main modern quilts of quil ting free quilt patterns making...
TRANSCRIPT
Making Modern Quilts: 4 Free Modern Quilt Patterns 1
©F+W Media
Making Modern Quilts 4 Free Quilt PatternsofQuilting
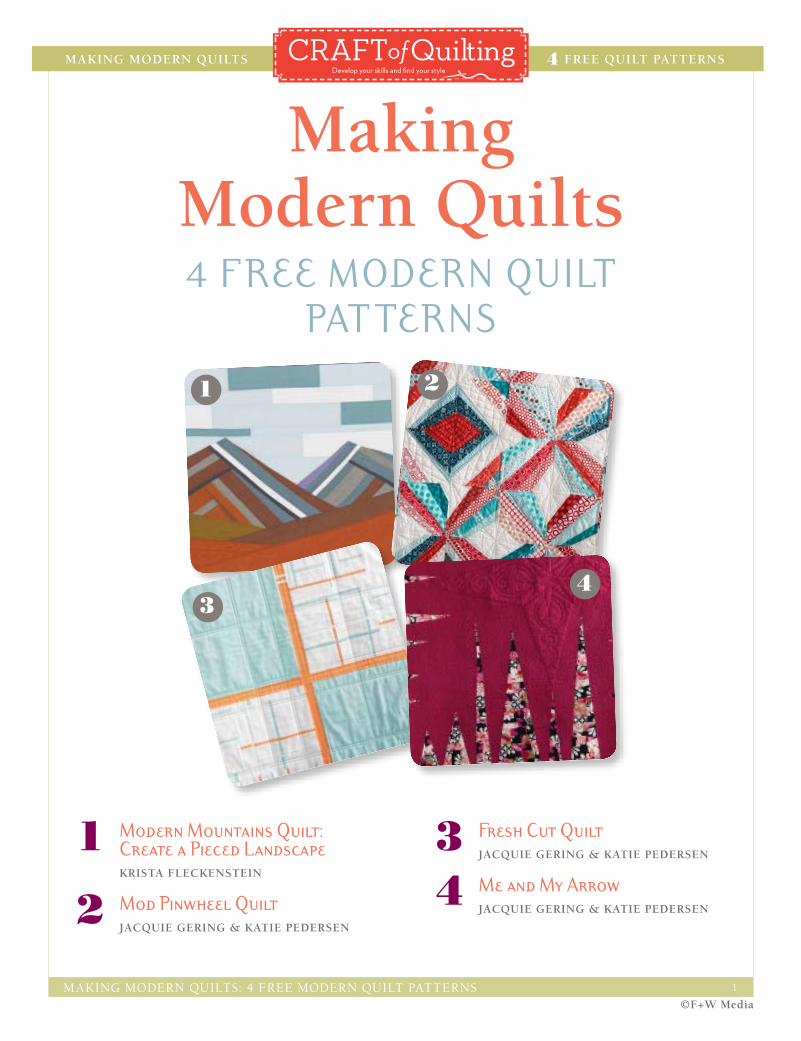
Making Modern Quilts4 Free Modern Quilt
Pat terns
1 Modern Mountains Quilt: Create a Pieced landscape
Krista FlecKenstein
2 Mod Pinwheel Quilt JacQuie GerinG & Katie Pedersen
3 Fresh Cut Quilt JacQuie GerinG & Katie Pedersen
4 Me and My arrow JacQuie GerinG & Katie Pedersen
1 2
34

Making Modern Quilts: 4 Free Modern Quilt Patterns 2
©F+W Media
Making Modern Quilts 4 Free Quilt PatternsofQuilting
Modern Mountains quiltCreate a PieCed landsCaPe
idesigned this quilt for my husband, Rob, who loves to hike and ski on
the trails of the Chugach Mountains near our home in Alaska. This quilt
showcases the simple beauty of those mountains. The shot cottons (woven
fabrics that have two different colors in the warp and weft) that I used echo the
subtle color differences that exist in nature.
Cut the fabriCssky
1/2 yard of light blue solid (ice), cut
into:
• 31/2" × 81/2" (S1)
• 31/2" × 121/2" (S3)
• 31/2" × 171/2" (S8)
• 31/2" × 181/2" (S12)
• 21/2" × 141/2" (S4)
• 21/2" × 51/2" (S6)
• 11/2" × 211/2" (S11)
• 41/2" × 321/2" (S14)
1⁄8 yard of medium blue solid (duck
egg), cut into:
• 31/2" × 121/2" (S2)
• 31/2" × 91/2" (S9)
• 11/2" × 111/2" (S10)
1⁄8 yard of white solid, cut into:
• 21/2" × 131/2" (S5)
• 31/2" × 61/2" (S7)
• 31/2" × 141/2" (S13)
Mountains and hills
note: As you cut, sort the pieces into
piles by letter to keep things organized.

Making Modern Quilts: 4 Free Modern Quilt Patterns 3
©F+W Media
Making Modern Quilts 4 Free Quilt PatternsofQuilting1/4 yard of burnt orange solid (ginger),
cut into:
• (2) 31/2" × 7" (A1 and A3)
• 11/2" × 13" (E)
• 6" × 17" (H3)
• 10" × 36" (H4)
1⁄8 yard of gray solid (sandstone), cut
into:
• 11/2" × 12" (C2)
• 11/2" × 7" (A2)
• 11/2" × 13" (B3)
• (2) 21/2" × 10" (E2 and E5)
• 11/2" × 10" (F3)
1⁄8 yard of cornflower blue solid
(driftwood), cut into:
• 2" × 13" (B5)
• 2" × 20" (D3)
• 2" × 10" (E1)
• 11/2" × 10" (E3)
• 21/2" × 10" (F2)
• 2" × 10" (F4)
1/4 yard of brown solid (nut), cut into:
• 2" × 13" (B1)
• 21/2" × 13" (B4)
• 2" × 12" (C1)
• 21/2" × 12" (C3)
• 21/4" × 20" (D4)
• 2" × 10" (E4)
• 3" × 30" (H2)
1⁄8 yard of dark blue solid (steel), cut
into:
• 1" × 12" (C4)
• 1" × 20" (D1)
• 1" × 10" (F1)
1⁄8 yard of white solid, cut into:
• 11/4" × 20" (D2)
• 11/2" × 12" (G3)
Purple (lavender) solid:
• 21/4" × 12" (G1)
Green/gold solid (chartreuse):
• 4" × 141/2" (H1)
Grass
1/4 yard of green solid (pea soup), cut
into:
• 2" × 4" (J1)
• 2" × 18" (J3)
• 5" × 21" (J4)
• 5" × 5" (J6)
1/4 yard of lime solid (sprout), cut into:
• 2" × 11" (J2)
• 5" × 7" (J5)
direCtions1. Piece the sky according to the
layout in Figure 1.
2. Trace the mountain templates
(A–G) onto template plastic. Label
and cut out.
3. Piece the mountain sections
according to Figures 2–8.
4. Referring to the same figures
(2–8) for placement, trace the
templates onto the pieced units
and cut them out.
5. Assemble Mountain 1 pieces in
order, A–D. [Figures 9 & 20]
6. Assemble Mountain 2 in order, E–G.
[Figures 10 & 20]
7. On each mountain, fold the top
edge 1/4" to the back and press.
[Figure 11]
8. Pin Mountain 2 onto the pieced
sky, matching up the right and
bottom edges of both pieces.
[Figure 12] Topstitch.
9. Pin Mountain 1 onto the pieced
sky, matching u p the left and
bottom edges [Figure 13] of both
pieces. It will overlap Mountain 2.
Topstitch.
10. Sew the chartreuse strip (H1)
along the bottom edge of
Mountain 1. Press. [Figure 14]
11. Stitch the nut strip (H2) along the
bottom edge of Mountain 2. Press.
[Figure 15]
12. Trim the excess fabric from the
bottom strips and sides. [Figure 16]
13. Sew the ginger strip (H3) along
the lower left edge. [Figure 17]
Press and trim. [Figure 18]
14. Sew the second ginger strip (H4)
across the entire bottom of the quilt
top, following the edge of the nut
strip (H2). Press. Trim the sides.
15. On the left side of the quilt top,
make a mark 11/2" below where the
2 ginger strips meet. Using your
ruler and rotary cutter, trim the
excess ginger fabric so that it is
M A T E R I A L S
Finished size: 31" × 33" (79 × 84 cm)
•Fabric for quilt front (see “Cutting the Fabrics” for yardages and sizes)
•Modern Mountain templates
•Template plastic
•Backing fabric, 1 yard
•Batting, 36" × 36"

Making Modern Quilts: 4 Free Modern Quilt Patterns 4
©F+W Media
Making Modern Quilts 4 Free Quilt PatternsofQuilting
S1 S2 S3
S7 S8 S9
S12 S13
S14
S4 S5 S6
S10 S11
Figure 1
A1 A2 A3
Figure 2
B1 B2 B3 B4 B5
Figure 3 Figure 4
C1 C2 C3 C4
E1 E2 E3 E4 E5
Figure 6
F1 F2 F3 F4
Figure 7
G1 G2 G3
Figure 8Figure 5
D1D2 D3 D4
Figure 9Figure 10
Figure 11

Making Modern Quilts: 4 Free Modern Quilt Patterns 5
©F+W Media
Making Modern Quilts 4 Free Quilt PatternsofQuiltingparallel to the top of the sky. You
will now have a square quilt top.
16. Piece the grass [Figure 19] and
then attach this strip to the bottom
of the quilt top. (Figure 20)
17. Layer the backing fabric, batting,
and quilt top. Baste. Quilt as
desired, referring to the finished
quilt for design ideas.
18. Square up the quilt, trim as
needed, and bind.
spottedstone.blogspot.com
Figure 15
Figure 18
Figure 16
Figure 17
Figure 12
Figure 13
Figure 14
Figure 20
Figure 19
J1 J2 J3
J4 J5 J6

Making Modern Quilts: 4 Free Modern Quilt Patterns 6
©F+W Media
Making Modern Quilts 4 Free Quilt PatternsofQuilting
mod Pinwheel quiltby Jacquie GerinG & Katie Pedersen
Making Modern Quilts: 4 Free Modern Quilt Patterns 7
©F+W Media
Making Modern Quilts 4 Free Quilt PatternsofQuilting
Cut the fabriCFrom blue fabrics, cut 26 strips 3"
(7.5 cm) × width of fabric.
• Cross-cut 12 of the strips into 60
rectangles 8" × 3" (20.5 × 7.5 cm).
• Cross-cut 14 of the strips into 54
rectangles 10" × 3" (25.5 cm ×
7.5 cm).
• Set aside the remainder of the blue
prints.
From red fabrics, cut 26 strips 3"
(7.5 cm) × width of fabric.
• Cross-cut 12 of the strips into 60
rectangles 8" × 3" (20.5 × 7.5 cm).
• Cross-cut 14 of the strips into 54
rectangles 10" × 3" (25.5 cm ×
7.5 cm).
• Set aside the remainder of the red
prints.
From cream fabric, cut:
• 16 strips 6" (15 cm) × width of
fabric. Cross-cut the strips to make
108 squares 6" × 6" (15 × 15 cm),
then cut each square in half on the
diagonal to yield 216 triangles.
• 3 strips 21/2" (6.5 cm) × width of
fabric. Cross-cut these strips into
12 rectangles 10" × 21/2" (25.5 ×
6.5 cm).
• From binding fabric, cut 7 strips
21/4" (5.5 cm) × width of fabric.
• From paper, cut 120 foundation
squares, each 61/2" × 61/2" (16.5 ×
16.5 cm).
ConstruCt the QuiltAll seam allowances are 1/4" (6 mm)
unless otherwise indicated. Press
seams to the side for foundation
piecing. Press all other seams open
unless otherwise indicated.
1. Sort the blue rectangles by size and
value, making a stack of lights and
a stack of darks in each size. Do
the same for the red rectangles.
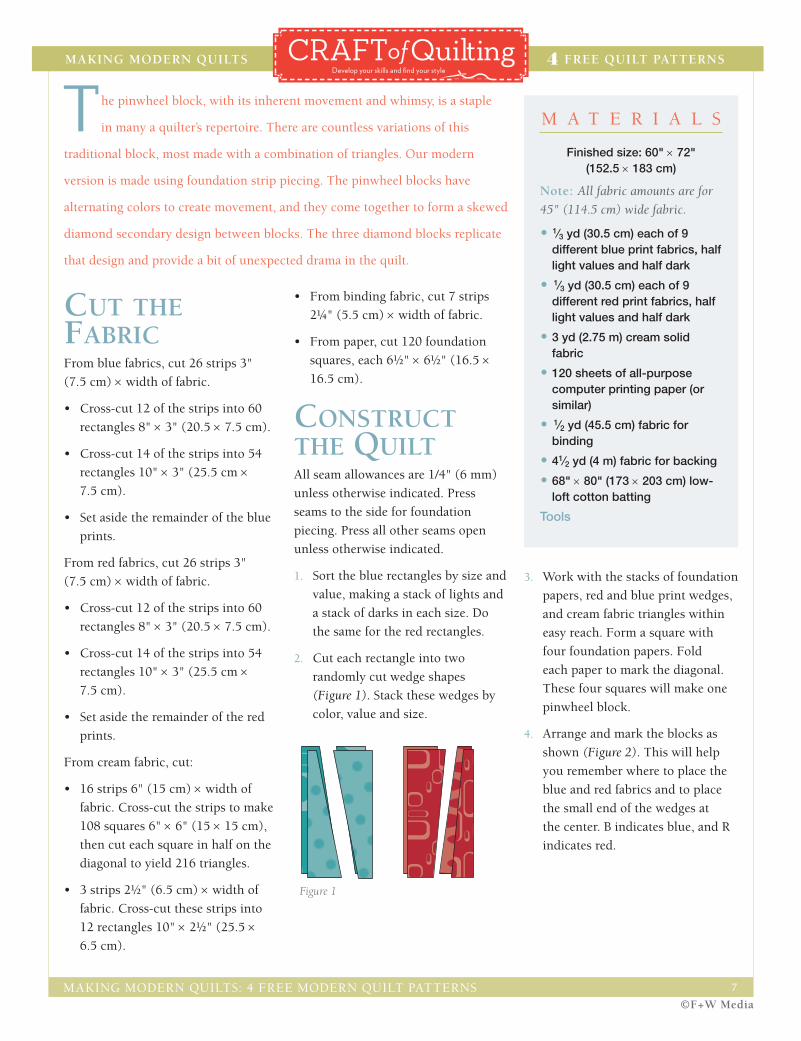
2. Cut each rectangle into two
randomly cut wedge shapes
(Figure 1). Stack these wedges by
color, value and size.
3. Work with the stacks of foundation
papers, red and blue print wedges,
and cream fabric triangles within
easy reach. Form a square with
four foundation papers. Fold
each paper to mark the diagonal.
These four squares will make one
pinwheel block.
4. Arrange and mark the blocks as
shown (Figure 2). This will help
you remember where to place the
blue and red fabrics and to place
the small end of the wedges at
the center. B indicates blue, and R
indicates red.
the pinwheel block, with its inherent movement and whimsy, is a staple
in many a quilter’s repertoire. There are countless variations of this
traditional block, most made with a combination of triangles. Our modern
version is made using foundation strip piecing. The pinwheel blocks have
alternating colors to create movement, and they come together to form a skewed
diamond secondary design between blocks. The three diamond blocks replicate
that design and provide a bit of unexpected drama in the quilt.
M A T E R I A L S
Finished size: 60" × 72" (152.5 × 183 cm)
note: All fabric amounts are for
45" (114.5 cm) wide fabric.
• 1⁄3 yd (30.5 cm) each of 9 different blue print fabrics, half light values and half dark
• 1⁄3 yd (30.5 cm) each of 9 different red print fabrics, half light values and half dark
•3 yd (2.75 m) cream solid fabric
•120 sheets of all-purpose computer printing paper (or similar)
• 1⁄2 yd (45.5 cm) fabric for binding
•41⁄2 yd (4 m) fabric for backing
•68" × 80" (173 × 203 cm) low-loft cotton batting
Tools
Figure 1
The pinwheel block, with its inherent movement and whimsy, is a staple in
many a quilter’s repertoire. There are countless variations of this traditional block,
most made with a combination of triangles. Our modern version is made using
foundation strip piecing. The pinwheel blocks have alternating colors to create
movement, and they come together to form a skewed diamond secondary design
between blocks. The three diamond blocks replicate that design and provide a bit
of unexpected drama in the quilt.
Finished size: 60" x 72" (152.5 x 183 cm)
Mod Pinwheel Quilt
PAGE 2 OF 3 © F+W MEDIA, INC. ALL RIGHTS RESERVED. F+W Media grants permission for any or all pages in this PDF to be copied for personal use.
Please respect the copyright by not forwarding or distributing this document.
M A T E R I A L S
All fabric amounts are for 45" (114.5 cm) wide fabric.
• 1⁄ 3 yd (30.5 cm) each of 9 different blue print fabrics, half light values and half dark
• 1⁄ 3 yd (30.5 cm) each of 9 different red print fabrics, half light values and half dark
• 3 yd (2.75 m) cream solid fabric
• 120 sheets of all-purpose computer printing paper (or similar)
• 1⁄ 2 yd (45.5 cm) fabric for binding
• 41⁄ 2 yd (4 m) fabric for backing
• 68" x 80" (173 x 203 cm) low-loft cotton batting
TOOLS
• Modern quilter’s toolbox (page XX)
• 61⁄ 2" (16.5 cm) squaring ruler
• Acid-free temporary glue stick
Cut the FabriCFrom blue fabrics, cut 26 strips 3" (7.5 cm) x width of fabric.
• Cross-cut 12 of the strips into 60 rectangles 8" x 3" (20.5 x 7.5 cm).
• Cross-cut 14 of the strips into 54 rectangles 10" x 3" (25.5 cm x 7.5 cm).
• Set aside the remainder of the blue prints.
From red fabrics, cut 26 strips 3" (7.5 cm) x width of fabric.
• Cross-cut 12 of the strips into 60 rectangles 8" x 3" (20.5 x 7.5 cm).
• Cross-cut 14 of the strips into 54 rectangles 10" x 3" (25.5 cm x 7.5 cm).
• Set aside the remainder of the red prints.
From cream fabric, cut:
• 16 strips 6" (15 cm) x width of fabric. Cross-cut the strips to make 108
figure 1
squares 6" x 6" (15 x 15 cm), then cut each square in half on the diagonal to yield 216 triangles.
• 3 strips 21⁄ 2" (6.5 cm) x width of fabric. Cross-cut these strips into 12 rectangles 10" x 21⁄ 2" (25.5 x 6.5 cm).
• From binding fabric, cut 7 strips 21⁄ 4" (5.5 cm) x width of fabric.
• From paper, cut 120 foundation squares, each 61⁄ 2" x 61⁄ 2" (16.5 x 16.5 cm).
ConstruCt the QuiltAll seam allowances are 1/4" (6 mm) unless
otherwise indicated. Press seams to the
side for foundation piecing. Press all other
seams open unless otherwise indicated.
1. Sort the blue rectangles by size and value, making a stack of lights and a stack of darks in each size. Do the same for the red rectangles.
2. Cut each rectangle into two randomly cut wedge shapes (fig. 1). Stack these wedges by color, value and size.
3. Work with the stacks of foundation papers, red and blue print wedges, and cream fabric triangles within easy reach. Form a square with four foundation papers. Fold each paper to mark the diagonal. These four squares will make one pinwheel block.

Mod Pinwheel Quilt
PAGE 3 OF 3 © F+W MEDIA, INC. ALL RIGHTS RESERVED. F+W Media grants permission for any or all pages in this PDF to be copied for personal use.
Please respect the copyright by not forwarding or distributing this document.
4. Arrange and mark the blocks as shown in fig. 2. This will help you remember where to place the blue and red fabrics and to place the small end of the wedges at the center. B indicates blue, and R indicates red.
5. Place a 10" (25.5 cm) red wedge with a light value right side up on a foundation square (fig. 3). Align one long edge of the wedge with the diagonal fold on the paper. Make sure the narrow end of the wedge is on the marked end of the paper and the strip is on the “red” side of the paper. If necessary, use a dab of glue stick to hold the wedge in place.
6. Place a 10" (25.5 cm) blue wedge with a light value on the red wedge, right sides together, aligned with the red edge on the diagonal (fig. 4). Shorten the stitch
length to 1.5 for paper piecing. Sew the edge along the diagonal with a 1/4" (6 mm) seam allowance.
7. Flip the blue wedge right side up and press without steam (fig 5).
8. Place an 8" (20.5 cm) blue wedge with a darker value on the light blue wedge, right sides together, aligned with the raw edge of the light blue wedge. Sew, flip and press.
9. To complete this side of the square, “audition” a cream triangle as shown in fig. 6. Lay a cream triangle over the dark blue wedge, overlapping 1/2" (1.3 mm). Be sure the triangle covers the rest of the foundation paper.
10. Place the triangle in sewing position on the dark blue wedge, with right sides together and raw edges matched (fig. 7).
11. Sew, flip, and press the cream triangle.
12. Repeat the process on the red side, adding first an 8" (20.5 cm) dark red wedge and then a cream triangle.
13. When all strips have been added to the square, turn the block wrong side up. Align the 61/2" (16.5 cm) squaring ruler with the foundation paper and trim around it, so the block is 61/2" square (fig. 8).
14. Make 108 of these foundation-pieced blocks. Place different values of the same color next to each other within the blocks. Begin some blocks with a dark red patch and others with a light red value.
R B
B R
B R
R B
R
B
R
B
R
B
figure 2 figure 3 figure 4 figure 5
figure 6 figure 7 figure 8
R
B
R
B
1615
1413
1211
109
87
65
43
21
12
45º
45º45º
45º
60º
456 3
Figure 7
Mod Pinwheel Quilt
PAGE 3 OF 3 © F+W MEDIA, INC. ALL RIGHTS RESERVED. F+W Media grants permission for any or all pages in this PDF to be copied for personal use.
Please respect the copyright by not forwarding or distributing this document.
4. Arrange and mark the blocks as shown in fig. 2. This will help you remember where to place the blue and red fabrics and to place the small end of the wedges at the center. B indicates blue, and R indicates red.
5. Place a 10" (25.5 cm) red wedge with a light value right side up on a foundation square (fig. 3). Align one long edge of the wedge with the diagonal fold on the paper. Make sure the narrow end of the wedge is on the marked end of the paper and the strip is on the “red” side of the paper. If necessary, use a dab of glue stick to hold the wedge in place.
6. Place a 10" (25.5 cm) blue wedge with a light value on the red wedge, right sides together, aligned with the red edge on the diagonal (fig. 4). Shorten the stitch
length to 1.5 for paper piecing. Sew the edge along the diagonal with a 1/4" (6 mm) seam allowance.
7. Flip the blue wedge right side up and press without steam (fig 5).
8. Place an 8" (20.5 cm) blue wedge with a darker value on the light blue wedge, right sides together, aligned with the raw edge of the light blue wedge. Sew, flip and press.
9. To complete this side of the square, “audition” a cream triangle as shown in fig. 6. Lay a cream triangle over the dark blue wedge, overlapping 1/2" (1.3 mm). Be sure the triangle covers the rest of the foundation paper.
10. Place the triangle in sewing position on the dark blue wedge, with right sides together and raw edges matched (fig. 7).
11. Sew, flip, and press the cream triangle.
12. Repeat the process on the red side, adding first an 8" (20.5 cm) dark red wedge and then a cream triangle.
13. When all strips have been added to the square, turn the block wrong side up. Align the 61/2" (16.5 cm) squaring ruler with the foundation paper and trim around it, so the block is 61/2" square (fig. 8).
14. Make 108 of these foundation-pieced blocks. Place different values of the same color next to each other within the blocks. Begin some blocks with a dark red patch and others with a light red value.
R B
B R
B R
R B
R
B
R
B
R
B
figure 2 figure 3 figure 4 figure 5
figure 6 figure 7 figure 8
R
B
R
B
1615
1413
1211
109
87
65
43
21
12
45º
45º45º
45º
60º
456 3
Figure 8
Figure 6
Mod Pinwheel Quilt
PAGE 3 OF 3 © F+W MEDIA, INC. ALL RIGHTS RESERVED. F+W Media grants permission for any or all pages in this PDF to be copied for personal use.
Please respect the copyright by not forwarding or distributing this document.
4. Arrange and mark the blocks as shown in fig. 2. This will help you remember where to place the blue and red fabrics and to place the small end of the wedges at the center. B indicates blue, and R indicates red.
5. Place a 10" (25.5 cm) red wedge with a light value right side up on a foundation square (fig. 3). Align one long edge of the wedge with the diagonal fold on the paper. Make sure the narrow end of the wedge is on the marked end of the paper and the strip is on the “red” side of the paper. If necessary, use a dab of glue stick to hold the wedge in place.
6. Place a 10" (25.5 cm) blue wedge with a light value on the red wedge, right sides together, aligned with the red edge on the diagonal (fig. 4). Shorten the stitch
length to 1.5 for paper piecing. Sew the edge along the diagonal with a 1/4" (6 mm) seam allowance.
7. Flip the blue wedge right side up and press without steam (fig 5).
8. Place an 8" (20.5 cm) blue wedge with a darker value on the light blue wedge, right sides together, aligned with the raw edge of the light blue wedge. Sew, flip and press.
9. To complete this side of the square, “audition” a cream triangle as shown in fig. 6. Lay a cream triangle over the dark blue wedge, overlapping 1/2" (1.3 mm). Be sure the triangle covers the rest of the foundation paper.
10. Place the triangle in sewing position on the dark blue wedge, with right sides together and raw edges matched (fig. 7).
11. Sew, flip, and press the cream triangle.
12. Repeat the process on the red side, adding first an 8" (20.5 cm) dark red wedge and then a cream triangle.
13. When all strips have been added to the square, turn the block wrong side up. Align the 61/2" (16.5 cm) squaring ruler with the foundation paper and trim around it, so the block is 61/2" square (fig. 8).
14. Make 108 of these foundation-pieced blocks. Place different values of the same color next to each other within the blocks. Begin some blocks with a dark red patch and others with a light red value.
R B
B R
B R
R B
R
B
R
B
R
B
figure 2 figure 3 figure 4 figure 5
figure 6 figure 7 figure 8
R
B
R
B16
1514
1312
1110
98
76
54
32
1
12
45º
45º45º
45º
60º
456 3
Making Modern Quilts: 4 Free Modern Quilt Patterns 8
©F+W Media
Making Modern Quilts 4 Free Quilt PatternsofQuilting
5. Place a 10" (25.5 cm) red wedge
with a light value right side up on
a foundation square (Figure 3).
Align one long edge of the wedge
with the diagonal fold on the
paper. Make sure the narrow end
of the wedge is on the marked
end of the paper and the strip is
on the “red” side of the paper. If
necessary, use a dab of glue stick to
hold the wedge in place.
6. Place a 10" (25.5 cm) blue wedge
with a light value on the red
wedge, right sides together, aligned
with the red edge on the diagonal
(Figure 4). Shorten the stitch
length to 1.5 for paper piecing.
Sew the edge along the diagonal
with a 1/4" (6 mm) seam allowance.
7. Flip the blue wedge right side up
and press without steam (Figure 5).
8. Place an 8" (20.5 cm) blue wedge
with a darker value on the light
blue wedge, right sides together,
aligned with the raw edge of the
light blue wedge. Sew, flip and
press.
9. To complete this side of the square,
“audition” a cream triangle as
shown (Figure 6). Lay a cream
triangle over the dark blue wedge,
overlapping 1/2" (1.3 mm). Be sure
the triangle covers the rest of the
foundation paper.
10. Place the triangle in sewing
position on the dark blue wedge,
with right sides together and raw
edges matched (Figure 7).
11. Sew, flip, and press the cream
triangle.
12. Repeat the process on the red
side, adding first an 8" (20.5 cm)
dark red wedge and then a cream
triangle.
13. When all strips have been added
to the square, turn the block
wrong side up. Align the 61/2"
(16.5 cm) squaring ruler with the
foundation paper and trim around
it, so the block is 61/2" square
(Figure 8).
Figure 2
Mod Pinwheel Quilt
PAGE 3 OF 3 © F+W MEDIA, INC. ALL RIGHTS RESERVED. F+W Media grants permission for any or all pages in this PDF to be copied for personal use.
Please respect the copyright by not forwarding or distributing this document.
4. Arrange and mark the blocks as shown in fig. 2. This will help you remember where to place the blue and red fabrics and to place the small end of the wedges at the center. B indicates blue, and R indicates red.
5. Place a 10" (25.5 cm) red wedge with a light value right side up on a foundation square (fig. 3). Align one long edge of the wedge with the diagonal fold on the paper. Make sure the narrow end of the wedge is on the marked end of the paper and the strip is on the “red” side of the paper. If necessary, use a dab of glue stick to hold the wedge in place.
6. Place a 10" (25.5 cm) blue wedge with a light value on the red wedge, right sides together, aligned with the red edge on the diagonal (fig. 4). Shorten the stitch
length to 1.5 for paper piecing. Sew the edge along the diagonal with a 1/4" (6 mm) seam allowance.
7. Flip the blue wedge right side up and press without steam (fig 5).
8. Place an 8" (20.5 cm) blue wedge with a darker value on the light blue wedge, right sides together, aligned with the raw edge of the light blue wedge. Sew, flip and press.
9. To complete this side of the square, “audition” a cream triangle as shown in fig. 6. Lay a cream triangle over the dark blue wedge, overlapping 1/2" (1.3 mm). Be sure the triangle covers the rest of the foundation paper.
10. Place the triangle in sewing position on the dark blue wedge, with right sides together and raw edges matched (fig. 7).
11. Sew, flip, and press the cream triangle.
12. Repeat the process on the red side, adding first an 8" (20.5 cm) dark red wedge and then a cream triangle.
13. When all strips have been added to the square, turn the block wrong side up. Align the 61/2" (16.5 cm) squaring ruler with the foundation paper and trim around it, so the block is 61/2" square (fig. 8).
14. Make 108 of these foundation-pieced blocks. Place different values of the same color next to each other within the blocks. Begin some blocks with a dark red patch and others with a light red value.
R B
B R
B R
R B
R
B
R
B
R
B
figure 2 figure 3 figure 4 figure 5
figure 6 figure 7 figure 8
R
B
R
B
1615
1413
1211
109
87
65
43
21
12
45º
45º45º
45º
60º
456 3
Figure 3
Mod Pinwheel Quilt
PAGE 3 OF 3 © F+W MEDIA, INC. ALL RIGHTS RESERVED. F+W Media grants permission for any or all pages in this PDF to be copied for personal use.
Please respect the copyright by not forwarding or distributing this document.
4. Arrange and mark the blocks as shown in fig. 2. This will help you remember where to place the blue and red fabrics and to place the small end of the wedges at the center. B indicates blue, and R indicates red.
5. Place a 10" (25.5 cm) red wedge with a light value right side up on a foundation square (fig. 3). Align one long edge of the wedge with the diagonal fold on the paper. Make sure the narrow end of the wedge is on the marked end of the paper and the strip is on the “red” side of the paper. If necessary, use a dab of glue stick to hold the wedge in place.
6. Place a 10" (25.5 cm) blue wedge with a light value on the red wedge, right sides together, aligned with the red edge on the diagonal (fig. 4). Shorten the stitch
length to 1.5 for paper piecing. Sew the edge along the diagonal with a 1/4" (6 mm) seam allowance.
7. Flip the blue wedge right side up and press without steam (fig 5).
8. Place an 8" (20.5 cm) blue wedge with a darker value on the light blue wedge, right sides together, aligned with the raw edge of the light blue wedge. Sew, flip and press.
9. To complete this side of the square, “audition” a cream triangle as shown in fig. 6. Lay a cream triangle over the dark blue wedge, overlapping 1/2" (1.3 mm). Be sure the triangle covers the rest of the foundation paper.
10. Place the triangle in sewing position on the dark blue wedge, with right sides together and raw edges matched (fig. 7).
11. Sew, flip, and press the cream triangle.
12. Repeat the process on the red side, adding first an 8" (20.5 cm) dark red wedge and then a cream triangle.
13. When all strips have been added to the square, turn the block wrong side up. Align the 61/2" (16.5 cm) squaring ruler with the foundation paper and trim around it, so the block is 61/2" square (fig. 8).
14. Make 108 of these foundation-pieced blocks. Place different values of the same color next to each other within the blocks. Begin some blocks with a dark red patch and others with a light red value.
R B
B R
B R
R B
R
B
R
B
R
B
figure 2 figure 3 figure 4 figure 5
figure 6 figure 7 figure 8
R
B
R
B
1615
1413
1211
109
87
65
43
21
12
45º
45º45º
45º
60º
456 3
Figure 4
Mod Pinwheel Quilt
PAGE 3 OF 3 © F+W MEDIA, INC. ALL RIGHTS RESERVED. F+W Media grants permission for any or all pages in this PDF to be copied for personal use.
Please respect the copyright by not forwarding or distributing this document.
4. Arrange and mark the blocks as shown in fig. 2. This will help you remember where to place the blue and red fabrics and to place the small end of the wedges at the center. B indicates blue, and R indicates red.
5. Place a 10" (25.5 cm) red wedge with a light value right side up on a foundation square (fig. 3). Align one long edge of the wedge with the diagonal fold on the paper. Make sure the narrow end of the wedge is on the marked end of the paper and the strip is on the “red” side of the paper. If necessary, use a dab of glue stick to hold the wedge in place.
6. Place a 10" (25.5 cm) blue wedge with a light value on the red wedge, right sides together, aligned with the red edge on the diagonal (fig. 4). Shorten the stitch
length to 1.5 for paper piecing. Sew the edge along the diagonal with a 1/4" (6 mm) seam allowance.
7. Flip the blue wedge right side up and press without steam (fig 5).
8. Place an 8" (20.5 cm) blue wedge with a darker value on the light blue wedge, right sides together, aligned with the raw edge of the light blue wedge. Sew, flip and press.
9. To complete this side of the square, “audition” a cream triangle as shown in fig. 6. Lay a cream triangle over the dark blue wedge, overlapping 1/2" (1.3 mm). Be sure the triangle covers the rest of the foundation paper.
10. Place the triangle in sewing position on the dark blue wedge, with right sides together and raw edges matched (fig. 7).
11. Sew, flip, and press the cream triangle.
12. Repeat the process on the red side, adding first an 8" (20.5 cm) dark red wedge and then a cream triangle.
13. When all strips have been added to the square, turn the block wrong side up. Align the 61/2" (16.5 cm) squaring ruler with the foundation paper and trim around it, so the block is 61/2" square (fig. 8).
14. Make 108 of these foundation-pieced blocks. Place different values of the same color next to each other within the blocks. Begin some blocks with a dark red patch and others with a light red value.
R B
B R
B R
R B
R
B
R
B
R
B
figure 2 figure 3 figure 4 figure 5
figure 6 figure 7 figure 8
R
B
R
B
1615
1413
1211
109
87
65
43
21
12
45º
45º45º
45º
60º
456 3
Figure 5
Mod Pinwheel Quilt
PAGE 3 OF 3 © F+W MEDIA, INC. ALL RIGHTS RESERVED. F+W Media grants permission for any or all pages in this PDF to be copied for personal use.
Please respect the copyright by not forwarding or distributing this document.
4. Arrange and mark the blocks as shown in fig. 2. This will help you remember where to place the blue and red fabrics and to place the small end of the wedges at the center. B indicates blue, and R indicates red.
5. Place a 10" (25.5 cm) red wedge with a light value right side up on a foundation square (fig. 3). Align one long edge of the wedge with the diagonal fold on the paper. Make sure the narrow end of the wedge is on the marked end of the paper and the strip is on the “red” side of the paper. If necessary, use a dab of glue stick to hold the wedge in place.
6. Place a 10" (25.5 cm) blue wedge with a light value on the red wedge, right sides together, aligned with the red edge on the diagonal (fig. 4). Shorten the stitch
length to 1.5 for paper piecing. Sew the edge along the diagonal with a 1/4" (6 mm) seam allowance.
7. Flip the blue wedge right side up and press without steam (fig 5).
8. Place an 8" (20.5 cm) blue wedge with a darker value on the light blue wedge, right sides together, aligned with the raw edge of the light blue wedge. Sew, flip and press.
9. To complete this side of the square, “audition” a cream triangle as shown in fig. 6. Lay a cream triangle over the dark blue wedge, overlapping 1/2" (1.3 mm). Be sure the triangle covers the rest of the foundation paper.
10. Place the triangle in sewing position on the dark blue wedge, with right sides together and raw edges matched (fig. 7).
11. Sew, flip, and press the cream triangle.
12. Repeat the process on the red side, adding first an 8" (20.5 cm) dark red wedge and then a cream triangle.
13. When all strips have been added to the square, turn the block wrong side up. Align the 61/2" (16.5 cm) squaring ruler with the foundation paper and trim around it, so the block is 61/2" square (fig. 8).
14. Make 108 of these foundation-pieced blocks. Place different values of the same color next to each other within the blocks. Begin some blocks with a dark red patch and others with a light red value.
R B
B R
B R
R B
R
B
R
B
R
B
figure 2 figure 3 figure 4 figure 5
figure 6 figure 7 figure 8
R
B
R
B
1615
1413
1211
109
87
65
43
21
12
45º
45º45º
45º
60º
456 3

Mod Pinwheel Quilt
PAGE 4 OF 3 © F+W MEDIA, INC. ALL RIGHTS RESERVED. F+W Media grants permission for any or all pages in this PDF to be copied for personal use.
Please respect the copyright by not forwarding or distributing this document.
figure 9 figure 9
figure 10
figure 11
figure 12
15. Carefully remove the foundation papers from the blocks by tearing the paper along the seamlines. Pinch the seam ends with your fingers as you tear to keep the stitches from coming loose. Return the machine to a standard stitch length.
16. Place four completed foundation blocks as shown in fig. 9 to form a pinwheel.
17. Flip block 2 onto block 1, right sides together. Sew along the right edge and press. Repeat with block 3 and 4. Flip the top section down onto the bottom section, right sides together. Pin matching raw edges and seams. Sew and press to complete the block.
18. The assembled pinwheel block measures 121/2" (31.5 cm) square. Make twenty-seven pinwheel blocks.
19. The quilt has three skewed diamond blocks. Each of these blocks is also constructed from four foundation-pieced squares, but with an alternate fabric placement (fig. 10).
20. Have twelve cream rectangles, twelve paper foundation squares, and the remaining blue and red fabrics at hand. Cut strips as needed from these fabrics.
21. Center a cream strip on the diagonal of one foundation square. Secure with the glue stick. Shorten the machine’s stitch length to 1.5 for paper piecing.
A
B
3
1
4
222. Sew strips to the cream rectangle’s side A: sew a blue strip, then a blue strip of contrasting value, and finish side A with a red triangle (fig. 11). Press after adding each strip.
23. Sew strips to side B using the color placement in fig. 11. Press after each added strip. Make twelve blocks in this style. Remove the foundation papers and return the machine to a standard stitch length.
24. Place four blocks in a group as shown in fig. 12. Assemble the blocks as in Step 16. The skewed diamond blocks measure 121/2" (31.5 cm) square; make three.
25. Arrange the thirty blocks on the design wall as indicated in the Mod Pinwheel construction diagram.
26. Sew the top five blocks together in order, from left to right, to make row 1. Place the completed row back on the design wall in the correct position. Repeat to assemble the other five rows.
27. Sew the rows together from top to bottom, aligning raw edges and matching seams. Press seams open.
28. Remove the selvedges from the backing fabric. Cut the fabric into two 80" (203 cm) panels. Sew the panels together along one long edge using a 1/2" (1.3 cm) seam and press seam open. Trim to
make an 80" x 68" (203 x 173 cm) quilt backing with the seam centered.
29. Make a quilt sandwich with the backing, batting, and quilt top, and baste.
30. Quilt as desired. Trim the backing and batting to match the quilt top.
31. Join the binding strips to make a continuous length. Bind the raw edges to finish the quilt.
3
1
4
2
Figure 9
Mod Pinwheel Quilt
PAGE 4 OF 3 © F+W MEDIA, INC. ALL RIGHTS RESERVED. F+W Media grants permission for any or all pages in this PDF to be copied for personal use.
Please respect the copyright by not forwarding or distributing this document.
figure 9 figure 9
figure 10
figure 11
figure 12
15. Carefully remove the foundation papers from the blocks by tearing the paper along the seamlines. Pinch the seam ends with your fingers as you tear to keep the stitches from coming loose. Return the machine to a standard stitch length.
16. Place four completed foundation blocks as shown in fig. 9 to form a pinwheel.
17. Flip block 2 onto block 1, right sides together. Sew along the right edge and press. Repeat with block 3 and 4. Flip the top section down onto the bottom section, right sides together. Pin matching raw edges and seams. Sew and press to complete the block.
18. The assembled pinwheel block measures 121/2" (31.5 cm) square. Make twenty-seven pinwheel blocks.
19. The quilt has three skewed diamond blocks. Each of these blocks is also constructed from four foundation-pieced squares, but with an alternate fabric placement (fig. 10).
20. Have twelve cream rectangles, twelve paper foundation squares, and the remaining blue and red fabrics at hand. Cut strips as needed from these fabrics.
21. Center a cream strip on the diagonal of one foundation square. Secure with the glue stick. Shorten the machine’s stitch length to 1.5 for paper piecing.
A
B
3
1
4
222. Sew strips to the cream rectangle’s side A: sew a blue strip, then a blue strip of contrasting value, and finish side A with a red triangle (fig. 11). Press after adding each strip.
23. Sew strips to side B using the color placement in fig. 11. Press after each added strip. Make twelve blocks in this style. Remove the foundation papers and return the machine to a standard stitch length.
24. Place four blocks in a group as shown in fig. 12. Assemble the blocks as in Step 16. The skewed diamond blocks measure 121/2" (31.5 cm) square; make three.
25. Arrange the thirty blocks on the design wall as indicated in the Mod Pinwheel construction diagram.
26. Sew the top five blocks together in order, from left to right, to make row 1. Place the completed row back on the design wall in the correct position. Repeat to assemble the other five rows.
27. Sew the rows together from top to bottom, aligning raw edges and matching seams. Press seams open.
28. Remove the selvedges from the backing fabric. Cut the fabric into two 80" (203 cm) panels. Sew the panels together along one long edge using a 1/2" (1.3 cm) seam and press seam open. Trim to
make an 80" x 68" (203 x 173 cm) quilt backing with the seam centered.
29. Make a quilt sandwich with the backing, batting, and quilt top, and baste.
30. Quilt as desired. Trim the backing and batting to match the quilt top.
31. Join the binding strips to make a continuous length. Bind the raw edges to finish the quilt.
3
1
4
2
Figure 10
Mod Pinwheel Quilt
PAGE 4 OF 3 © F+W MEDIA, INC. ALL RIGHTS RESERVED. F+W Media grants permission for any or all pages in this PDF to be copied for personal use.
Please respect the copyright by not forwarding or distributing this document.
figure 9 figure 9
figure 10
figure 11
figure 12
15. Carefully remove the foundation papers from the blocks by tearing the paper along the seamlines. Pinch the seam ends with your fingers as you tear to keep the stitches from coming loose. Return the machine to a standard stitch length.
16. Place four completed foundation blocks as shown in fig. 9 to form a pinwheel.
17. Flip block 2 onto block 1, right sides together. Sew along the right edge and press. Repeat with block 3 and 4. Flip the top section down onto the bottom section, right sides together. Pin matching raw edges and seams. Sew and press to complete the block.
18. The assembled pinwheel block measures 121/2" (31.5 cm) square. Make twenty-seven pinwheel blocks.
19. The quilt has three skewed diamond blocks. Each of these blocks is also constructed from four foundation-pieced squares, but with an alternate fabric placement (fig. 10).
20. Have twelve cream rectangles, twelve paper foundation squares, and the remaining blue and red fabrics at hand. Cut strips as needed from these fabrics.
21. Center a cream strip on the diagonal of one foundation square. Secure with the glue stick. Shorten the machine’s stitch length to 1.5 for paper piecing.
A
B
3
1
4
222. Sew strips to the cream rectangle’s side A: sew a blue strip, then a blue strip of contrasting value, and finish side A with a red triangle (fig. 11). Press after adding each strip.
23. Sew strips to side B using the color placement in fig. 11. Press after each added strip. Make twelve blocks in this style. Remove the foundation papers and return the machine to a standard stitch length.
24. Place four blocks in a group as shown in fig. 12. Assemble the blocks as in Step 16. The skewed diamond blocks measure 121/2" (31.5 cm) square; make three.
25. Arrange the thirty blocks on the design wall as indicated in the Mod Pinwheel construction diagram.
26. Sew the top five blocks together in order, from left to right, to make row 1. Place the completed row back on the design wall in the correct position. Repeat to assemble the other five rows.
27. Sew the rows together from top to bottom, aligning raw edges and matching seams. Press seams open.
28. Remove the selvedges from the backing fabric. Cut the fabric into two 80" (203 cm) panels. Sew the panels together along one long edge using a 1/2" (1.3 cm) seam and press seam open. Trim to
make an 80" x 68" (203 x 173 cm) quilt backing with the seam centered.
29. Make a quilt sandwich with the backing, batting, and quilt top, and baste.
30. Quilt as desired. Trim the backing and batting to match the quilt top.
31. Join the binding strips to make a continuous length. Bind the raw edges to finish the quilt.
3
1
4
2
Figure 11
Mod Pinwheel Quilt
PAGE 4 OF 3 © F+W MEDIA, INC. ALL RIGHTS RESERVED. F+W Media grants permission for any or all pages in this PDF to be copied for personal use.
Please respect the copyright by not forwarding or distributing this document.
figure 9 figure 9
figure 10
figure 11
figure 12
15. Carefully remove the foundation papers from the blocks by tearing the paper along the seamlines. Pinch the seam ends with your fingers as you tear to keep the stitches from coming loose. Return the machine to a standard stitch length.
16. Place four completed foundation blocks as shown in fig. 9 to form a pinwheel.
17. Flip block 2 onto block 1, right sides together. Sew along the right edge and press. Repeat with block 3 and 4. Flip the top section down onto the bottom section, right sides together. Pin matching raw edges and seams. Sew and press to complete the block.
18. The assembled pinwheel block measures 121/2" (31.5 cm) square. Make twenty-seven pinwheel blocks.
19. The quilt has three skewed diamond blocks. Each of these blocks is also constructed from four foundation-pieced squares, but with an alternate fabric placement (fig. 10).
20. Have twelve cream rectangles, twelve paper foundation squares, and the remaining blue and red fabrics at hand. Cut strips as needed from these fabrics.
21. Center a cream strip on the diagonal of one foundation square. Secure with the glue stick. Shorten the machine’s stitch length to 1.5 for paper piecing.
A
B
3
1
4
222. Sew strips to the cream rectangle’s side A: sew a blue strip, then a blue strip of contrasting value, and finish side A with a red triangle (fig. 11). Press after adding each strip.
23. Sew strips to side B using the color placement in fig. 11. Press after each added strip. Make twelve blocks in this style. Remove the foundation papers and return the machine to a standard stitch length.
24. Place four blocks in a group as shown in fig. 12. Assemble the blocks as in Step 16. The skewed diamond blocks measure 121/2" (31.5 cm) square; make three.
25. Arrange the thirty blocks on the design wall as indicated in the Mod Pinwheel construction diagram.
26. Sew the top five blocks together in order, from left to right, to make row 1. Place the completed row back on the design wall in the correct position. Repeat to assemble the other five rows.
27. Sew the rows together from top to bottom, aligning raw edges and matching seams. Press seams open.
28. Remove the selvedges from the backing fabric. Cut the fabric into two 80" (203 cm) panels. Sew the panels together along one long edge using a 1/2" (1.3 cm) seam and press seam open. Trim to
make an 80" x 68" (203 x 173 cm) quilt backing with the seam centered.
29. Make a quilt sandwich with the backing, batting, and quilt top, and baste.
30. Quilt as desired. Trim the backing and batting to match the quilt top.
31. Join the binding strips to make a continuous length. Bind the raw edges to finish the quilt.
3
1
4
2
Figure 12
Making Modern Quilts: 4 Free Modern Quilt Patterns 9
©F+W Media
Making Modern Quilts 4 Free Quilt PatternsofQuilting14. Make 108 of these foundation-
pieced blocks. Place different
values of the same color next to
each other within the blocks.
Begin some blocks with a dark red
patch and others with a light red
value.
15. Carefully remove the foundation
papers from the blocks by tearing
the paper along the seamlines.
Pinch the seam ends with your
fingers as you tear to keep the
stitches from coming loose.
Return the machine to a standard
stitch length.
16. Place four completed foundation
blocks as shown (Figure 9) to
form a pinwheel.
17. Flip block 2 onto block 1, right
sides together. Sew along the right
edge and press. Repeat with block
3 and 4. Flip the top section down
onto the bottom section, right
sides together. Pin matching raw
edges and seams. Sew and press to
complete the block.
18. The assembled pinwheel block
measures 121/2" (31.5 cm) square.
Make twenty-seven pinwheel
blocks.
19. The quilt has three skewed
diamond blocks. Each of these
blocks is also constructed from
four foundationpieced squares,
but with an alternate fabric
placement (Figure 10).
20. Have twelve cream rectangles,
twelve paper foundation squares,
and the remaining blue and red
fabrics at hand. Cut strips as
needed from these fabrics.
21. Center a cream strip on the
diagonal of one foundation
square. Secure with the glue
stick. Shorten the machine’s stitch
length to 1.5 for paper piecing.
22. Sew strips to the cream rectangle’s
side 2A: sew a blue strip, then a
blue strip of contrasting value,
and finish side A with a red
triangle (Figure 11). Press after
adding each strip.
23. Sew strips to side B using the
color placement in Figure 11.
Press after each added strip.
Make twelve blocks in this style.
Remove the foundation papers
and return the machine to a
standard stitch length.
24. Place four blocks in a group as
shown (Figure 12). Assemble the
blocks as in Step 16. The skewed
diamond blocks measure 121/2"
(31.5 cm) square; make three.
25. Arrange the thirty blocks on
the design wall as indicated in
the Mod Pinwheel construction
diagram.

Making Modern Quilts: 4 Free Modern Quilt Patterns 10
©F+W Media
Making Modern Quilts 4 Free Quilt PatternsofQuilting26. Sew the top five blocks together
in order, from left to right, to
make row 1. Place the completed
row back on the design wall in
the correct position. Repeat to
assemble the other five rows.
27. Sew the rows together from top
to bottom, aligning raw edges
and matching seams. Press seams
open.
28. Remove the selvedges from the
backing fabric. Cut the fabric into
two 80" (203 cm) panels. Sew
the panels together along one
long edge using a 1/2" (1.3 cm)
seam and press seam open. Trim
to make an 80" × 68" (203 ×
173 cm) quilt backing with the
seam centered.
29. Make a quilt sandwich with the
backing, batting, and quilt top,
and baste.
30. Quilt as desired. Trim the backing
and batting to match the quilt top.
31. Join the binding strips to make a
continuous length. Bind the raw
edges to finish the quilt.
tallgrassprairiestudio.blogspot.com
& sewkatiedid.wordpress.com
Our quilting emphasizes the primary design by creating whirling, quilted pinwheels within the secondary diamonds between blocks. Straight lines and patterns add additional interest and texture.

Making Modern Quilts: 4 Free Modern Quilt Patterns 11
©F+W Media
Making Modern Quilts 4 Free Quilt PatternsofQuilting
fresh cut quilt by Jacquie GerinG & Katie Pedersen

slivers of fresh color along with parallel, perpendicular, and floating horizontal and
vertical lines create the linear patterns in the Fresh Cut quilt. Three large blocks
made with our Slice and Insert technique alternate with solid blocks. We added
sashing—fabric strips that separate blocks—to enhance the clean lines of the quilt.
Light orange sparkles next to the contrasting aqua for a crisp, fresh feeling.
1110
98
76
54
32
1
1110987654321
1110987654321
11 10 9 8 7 6 5 4 3 2 1
1110
98
76
54
32
1
1110
98
76
54
32
111
109
87
65
43
21
1110
98
76
54
32
1
Fresh Cut Quilt
PAGE 2 OF 3 © F+W MEDIA, INC. ALL RIGHTS RESERVED. F+W Media grants permission for any or all pages in this PDF to be copied for personal use.
Please respect the copyright by not forwarding or distributing this document.
by Jacqui GerinG
M A T E R I A L S
All fabric amounts are for 45" (114.5 cm) wide fabric.
• 11/4 yd (114.5 cm) white fabric
• 11/4 yd (114.5 cm) aqua fabric
• 1/4 yd (30.5 cm) light orange fabric for sashing
• 15/8 yd (148.5 cm) fabric for backing
• 42" x 59" (106.5 x 150 cm) low-loft cotton batting
TOOLS
• Modern quilter’s toolbox (page XX)
• 81/2" (21.5 cm) squaring ruler
Finished size: 331/2" x 501/2" (85 x 128.5 cm)
Cut the fabriCFrom white fabric, cut:
• 12 squares 10" x 10" (25.5 x 25.5 cm)
• 3 strips 21/4" (5.5 cm) by width of fabric for binding
• 1 strip 3/4" (2 cm) x width of fabric for inserts
From aqua fabric, cut:
• 3 squares 161/4" x 161/2" (42 x 42 cm)
• 3 strips 21/4" (5.5 cm) x width of fabric for binding
• 1 strip 3/4" (2 cm) x width of fabric for inserts
From orange fabric, cut:
• 4 strips 11/2" (3.8 cm) x width of fabric for sashing
• 1 strip 3/4" (2 cm) x width of fabric for inserts
• Cut additional 3/4" (2 cm) strips from aqua, white, and orange fabrics as needed.
ConstruCt the QuiltNote: All seam allowances are 1/4" (6 mm). Press seams open unless otherwise indicated.
1. Slice one white square into two pieces, cutting parallel to the fabric edge and at least 2" (5 cm) from the edge.
figure 1
2. Choose a 3/4" (2 cm)-wide strip in any color and cut an 11" (29 cm) piece from it. Insert the colored strip into the white square, using the Slice and Insert technique described in Quilting Modern.
3. Continue slicing and inserting full and partial strips in various colors to create a geometric design in the block. Press the seam allowances away from the strips. Insert all the strips in the block parallel or perpendicular to each other—no odd angles. The majority of inserts in each square should be aqua. Use orange as an accent color.
Maintain parallel and perpendicular inserts by aligning a line on the ruler with a previous insert when making new slices. Be careful not to add inserts too close to the edges since the block will be trimmed to 81/2" (21.5 cm) square later.
Repeat the process with all twelve of the white 10" (25.5 cm) squares.
4. Use the squaring ruler to trim the twelve squares to 81/2" x 81/2" (21.5 x 21.5 cm). Align a horizontal or vertical line on the ruler with one of the inserts to keep the block correctly squared while trimming (fig. 1). If a square is too small, add background fabric to one or more edges to bring it to size.
5. Place the twelve squares on the design wall in three groups of four squares. When you’re satisfied with the layout, sew each set of four blocks together to create a square panel. Each panel should each measure 16 1/2" x 161/2" (42 x 42 cm).
6. Arrange the three assembled panels and the three aqua squares on the design wall as shown in the construction diagram on page XX.
7. From the orange sashing strips, cut four pieces 171/2" (44.5 cm) long for the horizontal sashing. Add white inserts across the sashing using the Slice and Insert technique, referring to the photograph for suggested
Figure 1
Making Modern Quilts: 4 Free Modern Quilt Patterns 12
©F+W Media
Making Modern Quilts 4 Free Quilt PatternsofQuilting
Cut the fabriCFrom white fabric, cut:
• 12 squares 10" × 10" (25.5 ×
25.5 cm)
• 3 strips 21/4" (5.5 cm) by width of
fabric for binding
• 1 strip 3/4" (2 cm) × width of fabric
for inserts
From aqua fabric, cut:
• 3 squares 161/4" × 161/2" (42 ×
42 cm)
• 3 strips 21/4" (5.5 cm) × width of
fabric for binding
• 1 strip 3/4" (2 cm) × width of fabric
for inserts
From orange fabric, cut:
• 4 strips 11/2" (3.8 cm) × width of
fabric for sashing
• 1 strip 3/4" (2 cm) × width of fabric
for inserts
• Cut additional 3/4" (2 cm) strips
from aqua, white, and orange
fabrics as needed.
ConstruCt the Quiltnote: All seam allowances are 1/4"
(6 mm).
Press seams open unless otherwise
indicated.
1. Slice one white square into two
pieces, cutting parallel to the fabric
edge and at least 2" (5 cm) from
the edge.
2. Choose a 3/4" (2 cm)-wide strip in
any color and cut an 11" (29 cm)
piece from it. Insert the colored
strip into the white square, using
the Slice and Insert technique
described starting on page 16.
3. Continue slicing and inserting full
and partial strips in various colors
to create a geometric design in the
block. Press the seam allowances
away from the strips. Insert all
the strips in the block parallel or
perpendicular to each other—no
odd angles. The majority of inserts
in each square should be aqua. Use
orange as an accent color.
Maintain parallel and perpendicu-
lar inserts by aligning a line on the
ruler with a previous insert when
making new slices. Be careful not
to add inserts too close to the edg-
es since the block will be trimmed
to 81/2" (21.5 cm) square later.
Repeat the process with all twelve
of the white 10" (25.5 cm) squares.
4. Use the squaring ruler to trim the
twelve squares to 81/2" × 81/2"
(21.5 × 21.5 cm). Align a horizontal
or vertical line on the ruler with
one of the inserts to keep the block
correctly squared while trimming
(Figure 1). If a square is too small,
add background fabric to one or
more edges to bring it to size.
5. Place the twelve squares on the
design wall in three groups of four
squares. When you’re satisfied with
the layout, sew each set of four
blocks together to create a square
panel. Each panel should each
measure 161/2" × 161/2" (42 × 42 cm).
slivers of fresh color along with parallel, perpendicular, and floating
horizontal and vertical lines create the linear patterns in the Fresh Cut
quilt. Three large blocks made with our Slice and Insert technique alternate with
solid blocks. We added sashing—fabric strips that separate blocks—to enhance
the clean lines of the quilt. Light orange sparkles next to the contrasting aqua
for a crisp, fresh feeling.
M A T E R I A L S
Finished size: 331⁄2" × 501⁄2" (85 × 128.5 cm)
note: All fabric amounts are for
45" (114.5 cm) wide fabric.
•11⁄4 yd (114.5 cm) white fabric
•11⁄4 yd (114.5 cm) aqua fabric
• 1⁄4 yd (30.5 cm) light orange fabric for sashing
•15⁄8 yd (148.5 cm) fabric for backing
•42" × 59" (106.5 × 150 cm) low-loft cotton batting
Tools
•Modern quilter’s toolbox (page 24)

1 2
3 4
1 2
3 4
X
Fresh Cut Quilt
PAGE 3 OF 3 © F+W MEDIA, INC. ALL RIGHTS RESERVED. F+W Media grants permission for any or all pages in this PDF to be copied for personal use.
Please respect the copyright by not forwarding or distributing this document.
by Jacqui GerinG
placements. Press seams away from the inserts and trim each of the four strips to 161/2" (42 cm). If you prefer solid sashing, simply cut four 161/2" (42 cm) orange strips and skip the inserts.
8. Add the sashing strips to the design wall in the correct positions. Sew the sashing strips to the aqua blocks, right sides together, aligning the raw edges, to make two vertical columns. Press the seams open.
9. Sew the two remaining sashing strips together along one short edge. Cut a 551/2" (141 cm) strip from the joined pieces to create the vertical sashing strip. The pieced strip will be a bit longer than you need; don’t trim it to size yet.
10. Add white inserts to the vertical sashing strip. Trim to 501/2" (128.3 cm).
11. Sew the vertical sashing strip to the center edge of one column, right sides together, matching raw edges, and press. Repeat to attach the second column of blocks to the other edge of the sashing strip.
12. Trim the selvedges from the backing fabric and press. Make a quilt sandwich from the backing, batting, and quilt top. Baste the layers together.
13. Quilt as desired. Trim the backing and batting to match the quilt top.
14. Generally binding is sewn on in one continuous piece, but for Fresh Cut we used two colors of binding fussy cut to bind the aqua edges with aqua binding and the white edges with white binding. To do so, start sewing
figure 2
figure 3
the aqua binding to the quilt at the X in fig. 3, leaving at least a 10" (25.5 cm) tail. Sew clockwise to the first arrow in the diagram, stop, and backstitch.
15. Extend the aqua binding along the edge of the quilt and mark the binding 1/4" (6 mm) past the sashing seam. Cut straight across the aqua binding at the mark. Unfold the aqua and white binding strips. Align the raw edges with right sides together and sew. Finger-press the seam open and re-fold the binding strips.
16. Pin the binding so the binding and sashing seams match. Continue sewing the binding (now white) until you reach the next stop point. Backstitch and repeat Step 15 as necessary around the quilt, alternating colors, to complete the binding.
Figure 2
1 2
3 4
1 2
3 4
X
Fresh Cut Quilt
PAGE 3 OF 3 © F+W MEDIA, INC. ALL RIGHTS RESERVED. F+W Media grants permission for any or all pages in this PDF to be copied for personal use.
Please respect the copyright by not forwarding or distributing this document.
by Jacqui GerinG
placements. Press seams away from the inserts and trim each of the four strips to 161/2" (42 cm). If you prefer solid sashing, simply cut four 161/2" (42 cm) orange strips and skip the inserts.
8. Add the sashing strips to the design wall in the correct positions. Sew the sashing strips to the aqua blocks, right sides together, aligning the raw edges, to make two vertical columns. Press the seams open.
9. Sew the two remaining sashing strips together along one short edge. Cut a 551/2" (141 cm) strip from the joined pieces to create the vertical sashing strip. The pieced strip will be a bit longer than you need; don’t trim it to size yet.
10. Add white inserts to the vertical sashing strip. Trim to 501/2" (128.3 cm).
11. Sew the vertical sashing strip to the center edge of one column, right sides together, matching raw edges, and press. Repeat to attach the second column of blocks to the other edge of the sashing strip.
12. Trim the selvedges from the backing fabric and press. Make a quilt sandwich from the backing, batting, and quilt top. Baste the layers together.
13. Quilt as desired. Trim the backing and batting to match the quilt top.
14. Generally binding is sewn on in one continuous piece, but for Fresh Cut we used two colors of binding fussy cut to bind the aqua edges with aqua binding and the white edges with white binding. To do so, start sewing
figure 2
figure 3
the aqua binding to the quilt at the X in fig. 3, leaving at least a 10" (25.5 cm) tail. Sew clockwise to the first arrow in the diagram, stop, and backstitch.
15. Extend the aqua binding along the edge of the quilt and mark the binding 1/4" (6 mm) past the sashing seam. Cut straight across the aqua binding at the mark. Unfold the aqua and white binding strips. Align the raw edges with right sides together and sew. Finger-press the seam open and re-fold the binding strips.
16. Pin the binding so the binding and sashing seams match. Continue sewing the binding (now white) until you reach the next stop point. Backstitch and repeat Step 15 as necessary around the quilt, alternating colors, to complete the binding.
Figure 3
1 2
3 4
1 2
3 4
X
Fresh Cut Quilt
PAGE 3 OF 3 © F+W MEDIA, INC. ALL RIGHTS RESERVED. F+W Media grants permission for any or all pages in this PDF to be copied for personal use.
Please respect the copyright by not forwarding or distributing this document.
by Jacqui GerinG
placements. Press seams away from the inserts and trim each of the four strips to 161/2" (42 cm). If you prefer solid sashing, simply cut four 161/2" (42 cm) orange strips and skip the inserts.
8. Add the sashing strips to the design wall in the correct positions. Sew the sashing strips to the aqua blocks, right sides together, aligning the raw edges, to make two vertical columns. Press the seams open.
9. Sew the two remaining sashing strips together along one short edge. Cut a 551/2" (141 cm) strip from the joined pieces to create the vertical sashing strip. The pieced strip will be a bit longer than you need; don’t trim it to size yet.
10. Add white inserts to the vertical sashing strip. Trim to 501/2" (128.3 cm).
11. Sew the vertical sashing strip to the center edge of one column, right sides together, matching raw edges, and press. Repeat to attach the second column of blocks to the other edge of the sashing strip.
12. Trim the selvedges from the backing fabric and press. Make a quilt sandwich from the backing, batting, and quilt top. Baste the layers together.
13. Quilt as desired. Trim the backing and batting to match the quilt top.
14. Generally binding is sewn on in one continuous piece, but for Fresh Cut we used two colors of binding fussy cut to bind the aqua edges with aqua binding and the white edges with white binding. To do so, start sewing
figure 2
figure 3
the aqua binding to the quilt at the X in fig. 3, leaving at least a 10" (25.5 cm) tail. Sew clockwise to the first arrow in the diagram, stop, and backstitch.
15. Extend the aqua binding along the edge of the quilt and mark the binding 1/4" (6 mm) past the sashing seam. Cut straight across the aqua binding at the mark. Unfold the aqua and white binding strips. Align the raw edges with right sides together and sew. Finger-press the seam open and re-fold the binding strips.
16. Pin the binding so the binding and sashing seams match. Continue sewing the binding (now white) until you reach the next stop point. Backstitch and repeat Step 15 as necessary around the quilt, alternating colors, to complete the binding.
Making Modern Quilts: 4 Free Modern Quilt Patterns 13
©F+W Media
Making Modern Quilts 4 Free Quilt PatternsofQuilting
6. Arrange the three assembled panels
and the three aqua squares on
the design wall as shown in the
construction diagram at right.
7. From the orange sashing strips,
cut four pieces 171/2" (44.5 cm)
long for the horizontal sashing.
Add white inserts across the
sashing using the Slice and
Insert technique, referring to
the photograph for suggested
placements. Press seams away from
the inserts and trim each of the
four strips to 161/2" (42 cm). If you
prefer solid sashing, simply cut
four 161/2" (42 cm) orange strips
and skip the inserts.
8. Add the sashing strips to the
design wall in the correct
positions. Sew the sashing strips
to the aqua blocks, right sides
together, aligning the raw edges,
to make two vertical columns.
Press the seams open.
9. Sew the two remaining sashing
strips together along one short
edge. Cut a 551/2" (141 cm) strip
from the joined pieces to create
the vertical sashing strip. The
pieced strip will be a bit longer
than you need; don’t trim it to size
yet.
10. Add white inserts to the vertical
sashing strip. Trim to 501/2"
(128.3 cm).
11. Sew the vertical sashing strip to
the center edge of one column,
right sides together, matching raw
edges, and press. Repeat to attach
the second column of blocks to
the other edge of the sashing strip.
12. Trim the selvedges from the
backing fabric and press. Make a
quilt sandwich from the backing,
batting, and quilt top. Baste the
layers together.
13. Quilt as desired. Trim the backing
and batting to match the quilt top.
14. Generally binding is sewn on in
one continuous piece, but for
Fresh Cut we used two colors of
binding fussy cut to bind the aqua
edges with aqua binding and the
white edges with white binding.
To do so, start sewing the aqua
binding to the quilt at the X in
Figure 3, leaving at least a 10"

Making Modern Quilts: 4 Free Modern Quilt Patterns 14
©F+W Media
Making Modern Quilts 4 Free Quilt PatternsofQuilting
(25.5 cm) tail. Sew clockwise to
the first arrow in the diagram,
stop, and backstitch.
15. Extend the aqua binding along
the edge of the quilt and mark
the binding 1/4" (6 mm) past
the sashing seam. Cut straight
across the aqua binding at the
mark. Unfold the aqua and white
binding strips. Align the raw edges
with right sides together and sew.
Fingerpress the seam open and
re-fold the binding strips.
16. Pin the binding so the binding and
sashing seams match. Continue
sewing the binding (now white)
until you reach the next stop
point. Backstitch and repeat Step
15 as necessary around the quilt,
alternating colors, to complete the
binding.
We quilted Fresh Cut across and down the quilt with pairs of straight lines 3⁄4" (2 cm) apart. A
few pairs of lines in the aqua blocks turn 90 degrees to cross other lines or run off the edge
of the quilt.
Making Modern Quilts: 4 Free Modern Quilt Patterns 15
©F+W Media
Making Modern Quilts 4 Free Quilt PatternsofQuilting
sliCe and insert teChniQueTo practice this technique and its
variations, assemble scraps of fabric,
your rotary cutter, cutting mat, and
acrylic quilter’s rulers, and your
sewing machine.
basiC sliCe and insert
Start with a piece of fabric slightly
larger than the desired finished block
size. Blocks are trimmed to size after
insertions. You can work with any
shape as the background, but we like
working with squares or rectangles.
The insert strips can be any width.
Consistent-width strips are easiest, but
you can use wedge-shaped strips.
1. Use a rotary cutter to slice the
background fabric where you want
the insert to appear. Measure the
cut from edge to edge and cut the
insert strip a little bit longer. Place
the insert strip on the cut edge of A
(Figure 1), right sides together and
raw edges matched, and sew.
2. Press the seam open unless the
strip is less than 1" (2.5 cm) wide
after insertion; in that case, press
the seam allowances away from
the strip.
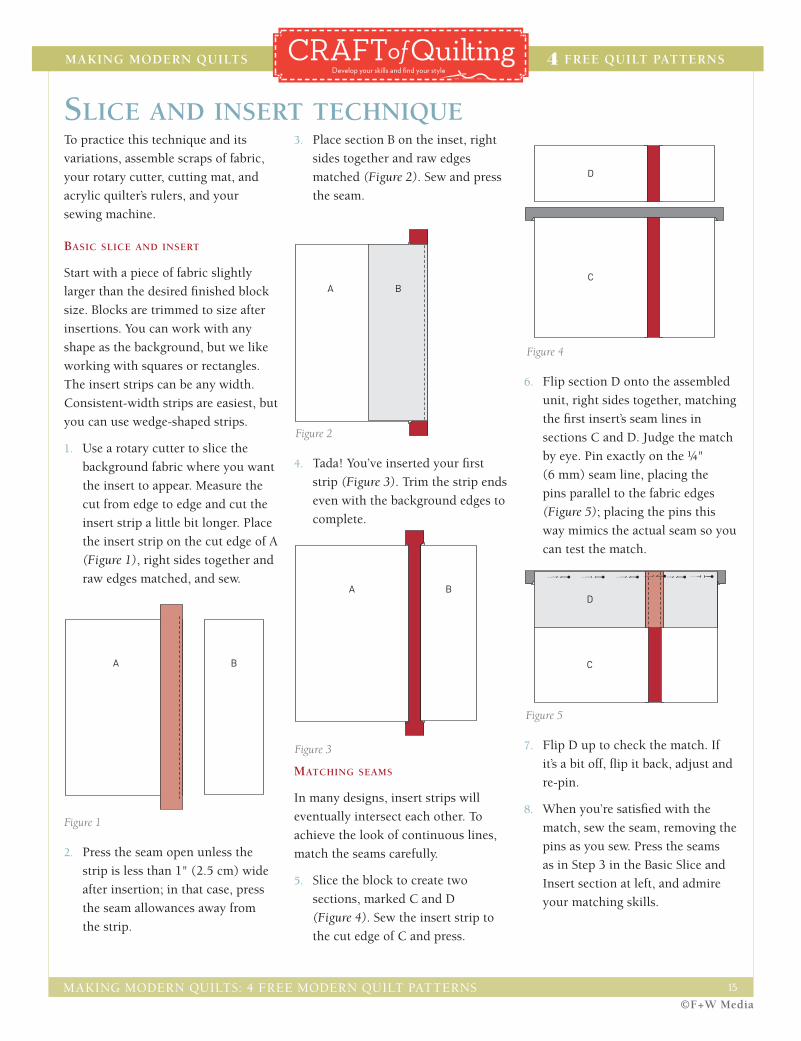
3. Place section B on the inset, right
sides together and raw edges
matched (Figure 2). Sew and press
the seam.
4. Tada! You’ve inserted your first
strip (Figure 3). Trim the strip ends
even with the background edges to
complete.
MatChinG seaMs
In many designs, insert strips will
eventually intersect each other. To
achieve the look of continuous lines,
match the seams carefully.
5. Slice the block to create two
sections, marked C and D
(Figure 4). Sew the insert strip to
the cut edge of C and press.
6. Flip section D onto the assembled
unit, right sides together, matching
the first insert’s seam lines in
sections C and D. Judge the match
by eye. Pin exactly on the 1/4"
(6 mm) seam line, placing the
pins parallel to the fabric edges
(Figure 5); placing the pins this
way mimics the actual seam so you
can test the match.
7. Flip D up to check the match. If
it’s a bit off, flip it back, adjust and
re-pin.
8. When you’re satisfied with the
match, sew the seam, removing the
pins as you sew. Press the seams
as in Step 3 in the Basic Slice and
Insert section at left, and admire
your matching skills.
Figure 3
A B
Figure 4
D
C
Figure 5
D
C
Figure 1
A B
Figure 2
A B

Making Modern Quilts: 4 Free Modern Quilt Patterns 16
©F+W Media
Making Modern Quilts 4 Free Quilt PatternsofQuilting9. When matching two or more
intersections, adjust the
intersections independently. You
may need to adjust one and not
the other. The fabric will give a
bit, but try not to stretch or pull.
Gentle easing will help yield a
good match.
Partial inserts
It’s easy to create an insert that isn’t
continuous from one edge of the block
to another, and it’s a great way to add
complexity and interest to your design.
10. Make a block with perpendicular
inserts. Slice the block vertically
where you want the insert to
end, as shown by the dotted
line (Figure 6). Slice section E
horizontally where the new insert
will appear (Figure 7).
Sew the insert into section E and
press the seams. Sew sections E and F
back together, carefully matching the
horizontal insert sections. Trim the
edges of section E to match section F
at top and bottom.
11. An alternative technique for
creating partial inserts is simply to
slice a square with inserts, rotate
one section 180 degrees, and
reattach (Figure 8).
floatinG inserts
Creating an insert that appears to
float in the background is as easy
as adding background fabric to
both ends of the insert strip, as
shown (Figure 9). If you want only
one end of the insert to blend into
the background, add background
fabric to only one end of the strip
(Figure 10).
To sew, decide the length of the
strip you’d like to float and cut
the strip 1/2" (1.3 cm) longer than
necessary to account for seam
allowances. Cut background
strips the same width as the insert
strip, estimating the lengths to
reach the background edges. Sew
the background strip(s) to one
or both ends of the contrasting
insert and press the seam. Slice
the background fabric and insert the
pieced strip.
Pointed inserts
with diaGonal joins
To create diagonal joins for the
appearance of pointed inserts, join
consistent-width background and
contrasting strips at an angle. Position
Figure 6
E F
Figure 7
E F
Figure 8
Figure 9
Figure 10
Making Modern Quilts: 4 Free Modern Quilt Patterns 17
©F+W Media
Making Modern Quilts 4 Free Quilt PatternsofQuilting
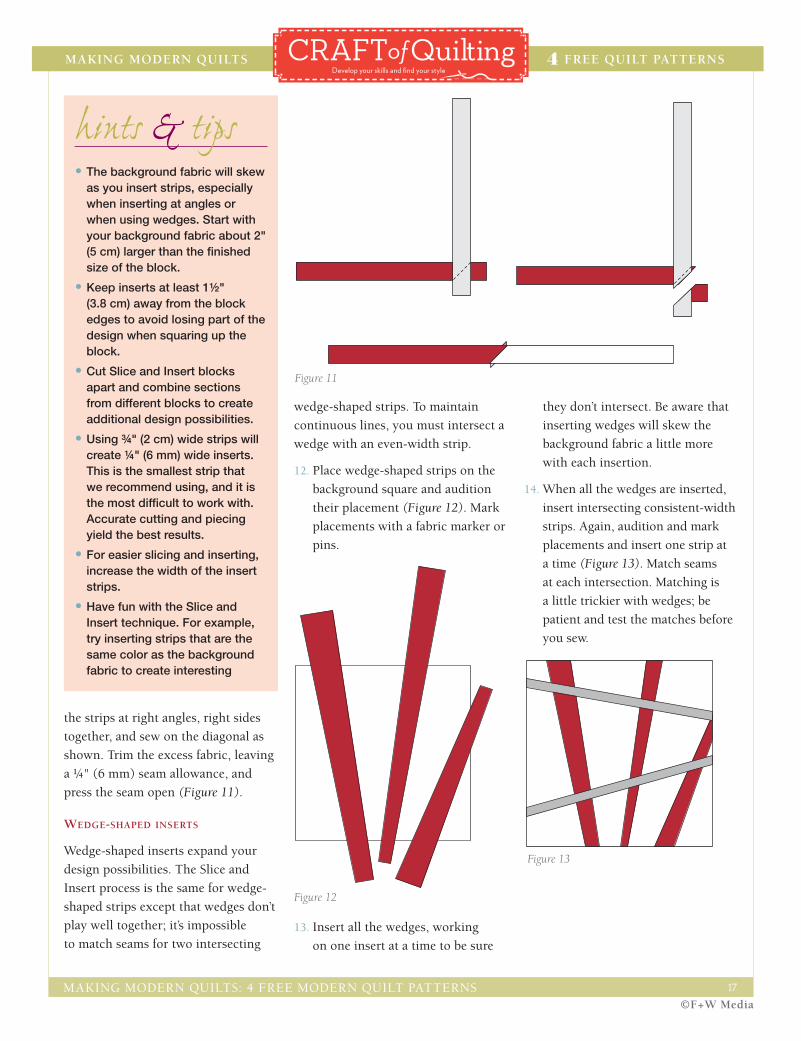
the strips at right angles, right sides
together, and sew on the diagonal as
shown. Trim the excess fabric, leaving
a 1/4" (6 mm) seam allowance, and
press the seam open (Figure 11).
wedGe-shaPed inserts
Wedge-shaped inserts expand your
design possibilities. The Slice and
Insert process is the same for wedge-
shaped strips except that wedges don’t
play well together; it’s impossible
to match seams for two intersecting
wedge-shaped strips. To maintain
continuous lines, you must intersect a
wedge with an even-width strip.
12. Place wedge-shaped strips on the
background square and audition
their placement (Figure 12). Mark
placements with a fabric marker or
pins.
13. Insert all the wedges, working
on one insert at a time to be sure
they don’t intersect. Be aware that
inserting wedges will skew the
background fabric a little more
with each insertion.
14. When all the wedges are inserted,
insert intersecting consistent-width
strips. Again, audition and mark
placements and insert one strip at
a time (Figure 13). Match seams
at each intersection. Matching is
a little trickier with wedges; be
patient and test the matches before
you sew.
Figure 13
Figure 12
hints & tips•The background fabric will skew
as you insert strips, especially when inserting at angles or when using wedges. Start with your background fabric about 2" (5 cm) larger than the finished size of the block.
•Keep inserts at least 1½" (3.8 cm) away from the block edges to avoid losing part of the design when squaring up the block.
•Cut Slice and Insert blocks apart and combine sections from different blocks to create additional design possibilities.
•Using ¾" (2 cm) wide strips will create ¼" (6 mm) wide inserts. This is the smallest strip that we recommend using, and it is the most difficult to work with. Accurate cutting and piecing yield the best results.
•For easier slicing and inserting, increase the width of the insert strips.
•Have fun with the Slice and Insert technique. For example, try inserting strips that are the same color as the background fabric to create interesting
Figure 11

Making Modern Quilts: 4 Free Modern Quilt Patterns 18
©F+W Media
Making Modern Quilts 4 Free Quilt PatternsofQuilting
by Jacquie GerinG & Katie Pedersen
me and My
arrow
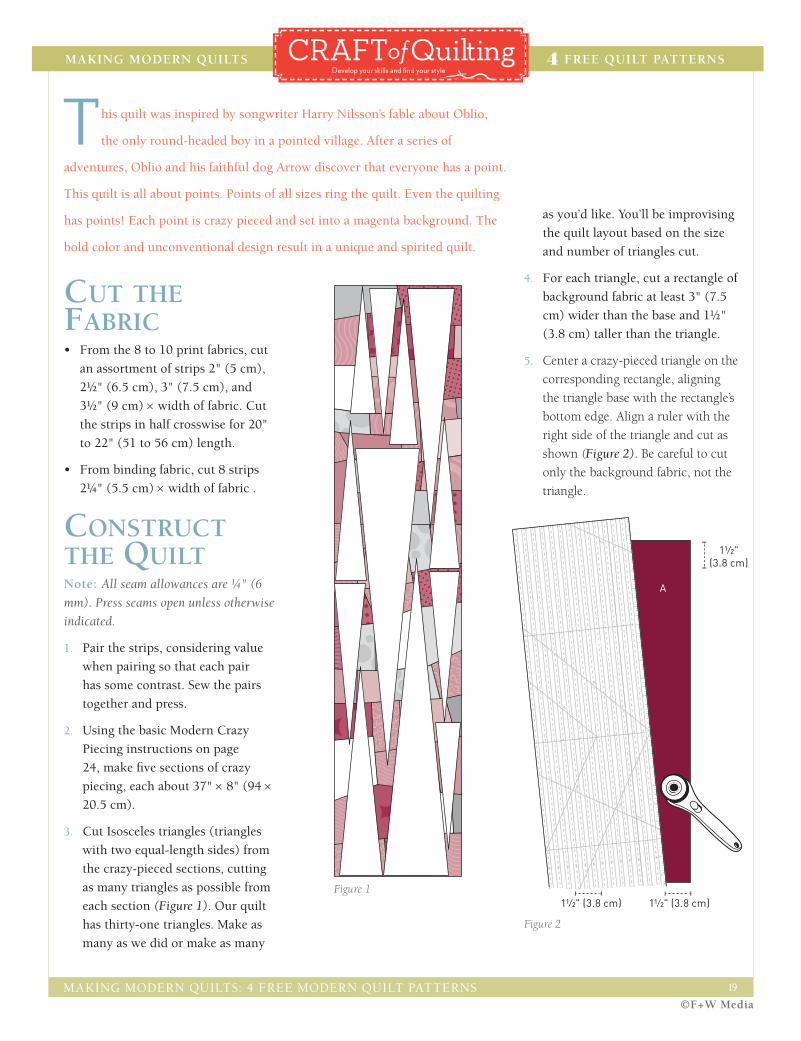
Figure 2
2120
1918
1716
1514
1312
1110
98
76
54
32
1
3/8
63/8
57/8
47/8
37/84
3/853/8
33/8
27/8
23/8
17/8
13/8
12
45º
45º
45º
45º
60º
60º
456
3
11⁄2"(3.8 cm)
A
B
11⁄2" (3.8 cm)11⁄2" (3.8 cm)
Making Modern Quilts: 4 Free Modern Quilt Patterns 19
©F+W Media
Making Modern Quilts 4 Free Quilt PatternsofQuilting
Cut the fabriC• From the 8 to 10 print fabrics, cut
an assortment of strips 2" (5 cm),
21/2" (6.5 cm), 3" (7.5 cm), and
31/2" (9 cm) × width of fabric. Cut
the strips in half crosswise for 20"
to 22" (51 to 56 cm) length.
• From binding fabric, cut 8 strips
21/4" (5.5 cm) × width of fabric .
ConstruCt the Quiltnote: All seam allowances are 1/4" (6
mm). Press seams open unless otherwise
indicated.
1. Pair the strips, considering value
when pairing so that each pair
has some contrast. Sew the pairs
together and press.
2. Using the basic Modern Crazy
Piecing instructions on page
24, make five sections of crazy
piecing, each about 37" × 8" (94 ×
20.5 cm).
3. Cut Isosceles triangles (triangles
with two equal-length sides) from
the crazy-pieced sections, cutting
as many triangles as possible from
each section (Figure 1). Our quilt
has thirty-one triangles. Make as
many as we did or make as many
as you’d like. You’ll be improvising
the quilt layout based on the size
and number of triangles cut.
4. For each triangle, cut a rectangle of
background fabric at least 3" (7.5
cm) wider than the base and 11/2"
(3.8 cm) taller than the triangle.
5. Center a crazy-pieced triangle on the
corresponding rectangle, aligning
the triangle base with the rectangle’s
bottom edge. Align a ruler with the
right side of the triangle and cut as
shown (Figure 2). Be careful to cut
only the background fabric, not the
triangle.
this quilt was inspired by songwriter Harry Nilsson’s fable about Oblio,
the only round-headed boy in a pointed village. After a series of
adventures, Oblio and his faithful dog Arrow discover that everyone has a point.
This quilt is all about points. Points of all sizes ring the quilt. Even the quilting
has points! Each point is crazy pieced and set into a magenta background. The
bold color and unconventional design result in a unique and spirited quilt.
Figure 1

Figure 3
A
Align the corners.
Figure 4
A
B
Figure 5
A
B
Figure 6
Making Modern Quilts: 4 Free Modern Quilt Patterns 20
©F+W Media
Making Modern Quilts 4 Free Quilt PatternsofQuilting6. Flip the triangle onto section A,
right sides together, aligning the raw
edges and bottom corners as shown
(Figure 3). Sew and press.
7. Rotate section B so the wider edge is
at the top (Figure 4).
8. Flip section B onto the triangle,
right sides together, aligning the raw
edges. Sew with the background
fabric on
top, using
the raw
edge of B
as a guide.
Trim section
A to match
B (Figure
5). Press.
9. Square the triangle block to the
largest possible size (Figure 6).
Repeat Steps 5 through 9 with each
crazy-pieced triangle.
10. Our version of this quilt has a
three-column structure made
up of nine panels. Arrange your
completed triangle blocks on the
design wall with that structure in
mind, placing the tallest triangles
in the top and bottom center
sections and the smaller triangles
along the sides, as shown in the
construction diagram on the next
page. Alter the quilt structure
as desired, or as necessary to
accommodate the triangle blocks
you’ve made.
M A T E R I A L S
Finished size: 63" × 73" (160 × 185 cm)
note: All fabric amounts are for
45" (114.5 cm) wide fabric
•23⁄4 yd (2.5 m) total of 8 to 10 print fabrics in pink, fuchsia, and black and white, in a mix of values
•41⁄2 yd (4.2 m) of solid magenta fabric for background
•4 yd (3.7 m) fabric for backing
• 5⁄8 yd (57 cm) fabric for binding
•71" × 81" (180 × 206 cm) low-loft cotton batting

Making Modern Quilts: 4 Free Modern Quilt Patterns 21
©F+W Media
Making Modern Quilts 4 Free Quilt PatternsofQuilting
30" (75 cm)
Pael measurements are prior to joining the panels.
19" (48.5 cm) 15" (38 cm)
11"(28 cm)
21"(53.5 cm)
16"(40.5 cm)
25"(63.5 cm)
12½"(31.5 cm)
49"(124.5 cm)
14"(35.5 cm)
36½"(92.5 cm)
37"(94 cm)
Me and My arrow ConstruCtion diaGraM
Measurements are prior to joining the panels.

Making Modern Quilts: 4 Free Modern Quilt Patterns 22
©F+W Media
Making Modern Quilts 4 Free Quilt PatternsofQuilting11. Make the two center panels
first. Sew the two center panels
together and measure the
resulting column length; this will
establish the length of the two
side columns.
12. For each side column, measure
the tallest triangle block to
establish the panel width. Extend
the other triangles in the column
to that measurement. Sew the
extended triangles together,
adding background fabric as
necessary between triangle blocks
so the column length equals the
center column.
13. Sew the side panels to the center
panel to complete the quilt top.
14. Trim selvedges from your backing
fabric and cut two 71" (180 cm)
lengths. Note: If your quilt’s
finished dimensions differ from
ours, recalculate the backing fabric
quantity and the length of the
pieces. Sew the panels together
along one long edge, using a 1/2"
(1.3 cm) seam allowance. Press the
seam open.
15. Make a quilt sandwich from the
backing, batting, and quilt top.
Baste the layers together.
16. Quilt as desired. Trim the backing
and batting to match the quilt top.
17. Join the binding strips to make
a continuous length. Attach the
binding to finish the quilt.
tallgrassprairiestudio.blogspot.com
& sewkatiedid.wordpress.com
Figure 7 shows how we
created the bottom center
panel of our quilt.
1. Determine the height
for the panel, then
extend each triangle
block to the desired
height. We added
background fabric to
extend the height to
37" (94 cm).
2. Sew the extended
triangles together. Our
panel is 30" (76 cm)
wide.Figure 7
Creating the center panels
We quilted the Me and My Arrow quilt with tiny pebbles in the background to add a subtle texture. The focal point of the quilting is the four-pointed star in the negative space at the center.

Making Modern Quilts: 4 Free Modern Quilt Patterns 23
©F+W Media
Making Modern Quilts 4 Free Quilt PatternsofQuilting
the Modern Quilter’s toolbox
basiC Crazy PieCinG teChniQue
1. Cut width-of-fabric strips from
the fat quarters. Strips can vary in
width from about 2" to 31/2." (5
to 9 cm). Divide the 22" (56 cm)
strips in half (if you cut folded
fabric, divide strips by cutting at
the fold). Strips may be cut straight
or at a variety of angles (Figure 1).
2. When using scraps, choose four-
sided scraps with at least one
straight edge. Scraps should be at
least 21/2" (6.5 cm) square because
seam allowances will make each
piece smaller.
3. Determine a finished size for the
crazy-pieced section before you
begin. Use the lines on the cutting
mat to measure the section as it
grows.
4. Pair the strips. Consider color and
value as you make the pairs so that
there is some contrast between the
strips in each pair. If using scraps,
pair them in the same way.
5. Sew each pair of strips with right
sides together, using a 1/4" (6 mm)
seam allowance. Press seams
open; this is important when crazy
piecing to reduce bulk so that
pieced sections will lie flat.
6. Cut each strip set into
sections as shown in
Figure 2. Vary the size
and angle of the cut
sections.
7. To build larger sections,
combine pairs to make
four-piece blocks or add
a scrap to make three-
piece blocks. Offset the
seams when joining pairs
(Figure 3). These are the
building blocks of crazy
piecing.
8. Continue building
the crazy piecing by
combining the 3- and
4-piece blocks. Join
pieces at angles to create
the “crazy” look. To do this, lay a
section on a four-piece block at the
desired angle, right sides together
(Figure 4).
9. Align a ruler with the edge of
the angled section and trim the
excess. Sew as indicated using a 1/4"
(6 mm) seam. Press seam open.
10. Notice in Figure 5 that identical
fabrics meet along the seam line.
Similar fabrics across the seam
line trick the eye and camouflage
where sections are joined;
camouflage joins when possible.
11. Continue making three-piece and
four-piece units and sewing these
together to create a large section
of crazy piecing. Remember to
press seams open. In no time
you’ll have a large crazy-pieced
unit that you can use whole or
cut into smaller pieces to place in
projects.
You’ll need the following tools for most modern quilting projects.
•Fabric
•Scissors
•Thread clippers or small scissors
•Rotary cutters
•Dressmaker’s shears
•Self-healing cutting mat
•Gridded acrylic quilter’s rulers
•Straight pins
•Measuring tape
•Sewing machine with free-motion capability and walking foot attachment
•Seam ripper
•Design wall
•Blue painter’s tape
•Quilter’s safety pins
1312
1110
9
8
7
6
5
4
3
2
1
1
245º
45º
45º
60º
4
5
6
3
Figure 2
Figure 4
Figure 3
Figure 5
Figure 1