low light & night photography - eos training academy · 25600 iso making it possible to...
TRANSCRIPT
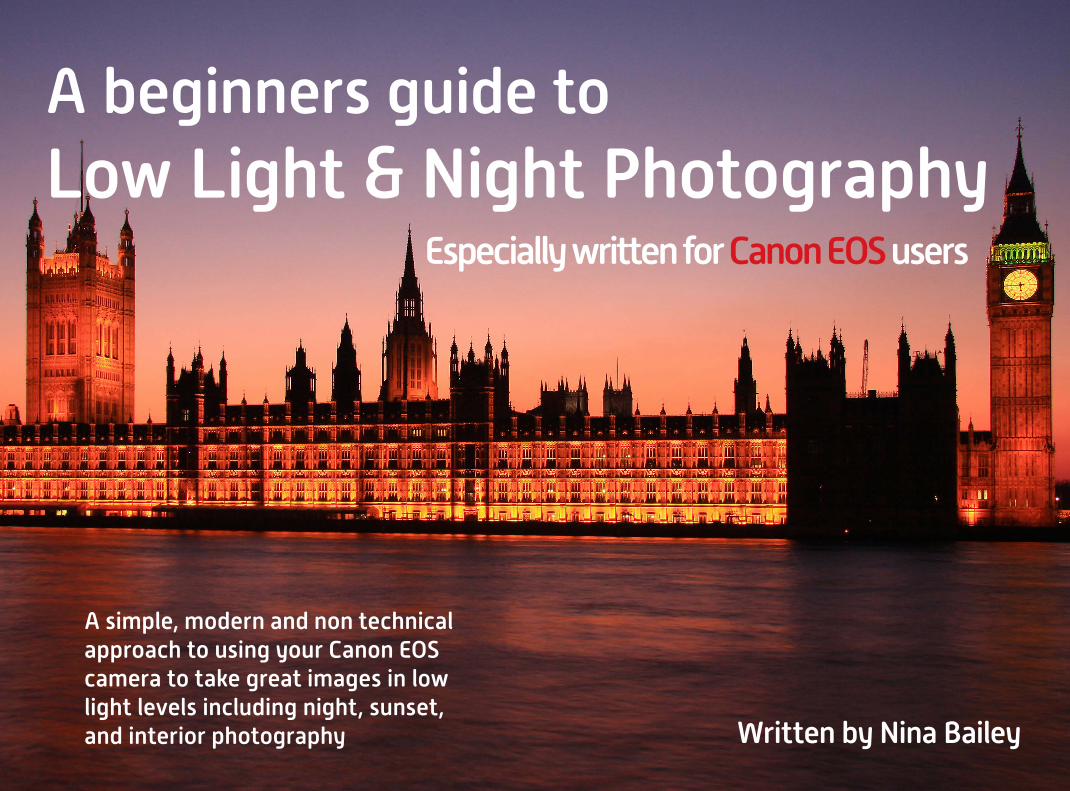
A beginners guide to Low Light & Night Photography
Written by Nina Bailey
Especially written for Canon EOS users
A simple, modern and non technical approach to using your Canon EOS camera to take great images in low light levels including night, sunset, and interior photography
Written, designed and images by
Nina Bailey
www.ninabailey.co.uk
Produced by Nina Bailey © 2016. All rights reserved. Unauthorised copying, reproduction, hiring, lending prohibited.
2
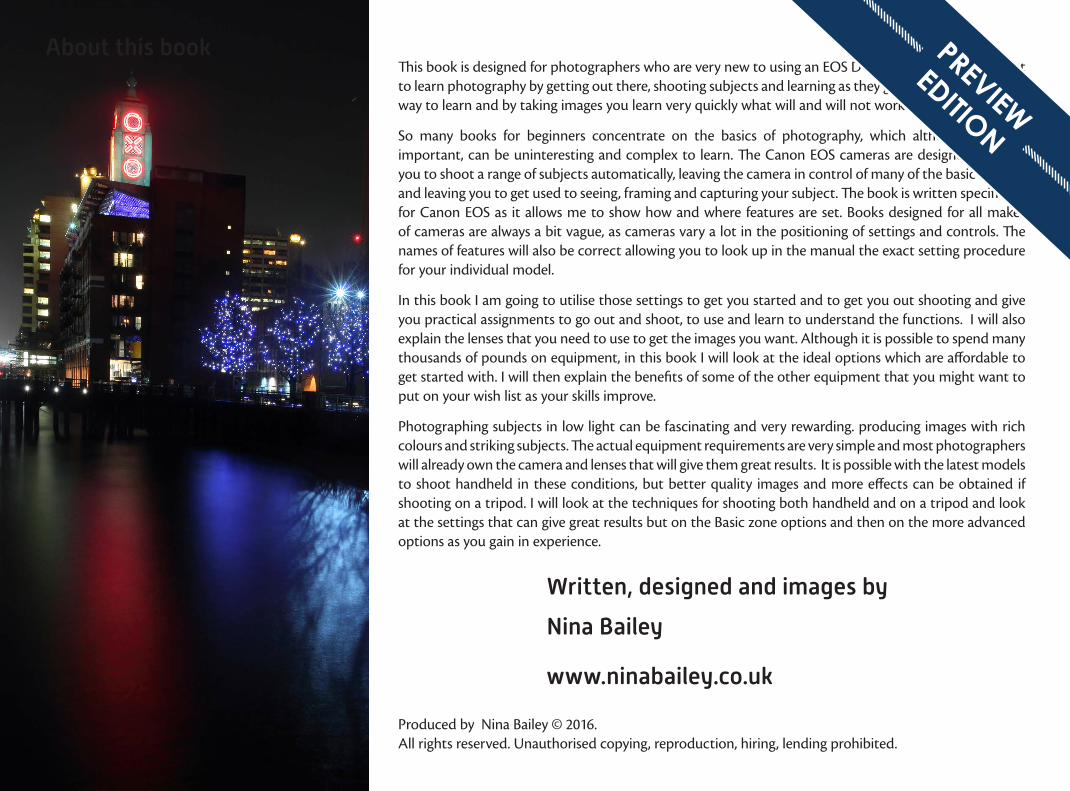
This book is designed for photographers who are very new to using an EOS D-SLR camera and who want to learn photography by getting out there, shooting subjects and learning as they go. It’s a more enjoyable way to learn and by taking images you learn very quickly what will and will not work.
So many books for beginners concentrate on the basics of photography, which although they are important, can be uninteresting and complex to learn. The Canon EOS cameras are designed to allow you to shoot a range of subjects automatically, leaving the camera in control of many of the basic settings and leaving you to get used to seeing, framing and capturing your subject. The book is written specifically for Canon EOS as it allows me to show how and where features are set. Books designed for all makes of cameras are always a bit vague, as cameras vary a lot in the positioning of settings and controls. The names of features will also be correct allowing you to look up in the manual the exact setting procedure for your individual model.
In this book I am going to utilise those settings to get you started and to get you out shooting and give you practical assignments to go out and shoot, to use and learn to understand the functions. I will also explain the lenses that you need to use to get the images you want. Although it is possible to spend many thousands of pounds on equipment, in this book I will look at the ideal options which are affordable to get started with. I will then explain the benefits of some of the other equipment that you might want to put on your wish list as your skills improve.
Photographing subjects in low light can be fascinating and very rewarding. producing images with rich colours and striking subjects. The actual equipment requirements are very simple and most photographers will already own the camera and lenses that will give them great results. It is possible with the latest models to shoot handheld in these conditions, but better quality images and more effects can be obtained if shooting on a tripod. I will look at the techniques for shooting both handheld and on a tripod and look at the settings that can give great results but on the Basic zone options and then on the more advanced options as you gain in experience.
About this book PREVIEW
EDITION

About the authorNina started her career in the retail sector of the photographic industry and then moved to Canon UK where she had a successful nine years looking after training, exhibitions and marketing both in the
UK and also within Europe. This gave Nina an unrivalled knowledge of not only the Canon EOS system but also how to develop and enhance the skills of photographers of all ability levels.
Nina started her own business in 1999, concentrating on training for amateur photographers. She is also at the forefront in developing the EOS Training Academy both online and within its practical day courses.
In 2014 Nina started producing her own range of ebooks to bring photography training to an ever wider audience.
In 2015 Nina became technical editor for EOS magazine and produces articles and images for each issue. Nina is a prolific professional photographer producing images not only for the EOS Training Academy but for a variety of outside organisations.
Nina started taking images when she was very young and is still a very keen photographer both professionally and personally. Nina loves travel, landscape and wildlife photography and still shoots commercially within the travel photography market. Nina also leads photographic trips from time to time.
3
PREVIEW
EDITION

4
Contents
About low light levels 6 About photographing in low light 7 Equipment requirements 8 Camera choice 9 Explanation of sensor size 10 Which is the best sensor size? 11 Lens jargon and terminology 12 About the aperture 15 Tripod selection 17 Equipment summary 19
Getting started 20 Getting started - Night images 21 Getting started - Sunsets and sunrise 22 Getting started - Interiors 23 Getting started - Performances 24 About modes 25 First steps - Flash off mode 26 CA - Creative Auto mode 27 First steps - Handheld night scene mode 29 First steps - Landscape mode 30 First steps - Night portrait mode 31 First steps - Candlelight mode 32 Scene/PIC mode overrides 33 Subjective terms used in photography 34 Shoot by ambient options 36 Shoot by lighting or scene type options 38 Previewing overrides using Live View 39 Assignment - Start shooting night images 40 Assignment - Start shooting sunsets/sunrise 41 Assignment - Start shooting interiors 42
Taking more control 43 Why take more control? 44 Problems that can occur 46
How to avoid camera shake 47 Taking more control - Program mode 48 Default settings on program mode 49 Viewfinder information 51 Understanding when to use program mode 52 Program Shift 53 About depth of field 54 Basic focusing set up - static subjects 57 Exposure compensation - correcting brightness 59 Getting program mode to work better 60 Assignment - Getting used to program mode 61 Moving on from program mode 62 Exposure settings - ISO and its usage 63 About the high ISO settings 65 Reducing the impact of noise in your images 66 Exposure settings - putting the settings together 70 Basic starting guidelines 72 Understanding when to use TV mode 73 How to use TV mode 74 How to see the settings an image was taken at 75 Assignment - Look at the EXIF data on your images 76 Understanding when to use AV mode 77 How to use AV mode 78 Assignment - Getting used to TV and AV modes 79 Mode summary 80
Other settings 81 About the other settings 82 ISO controls on the later EOS models 83 White balance system and overrides 84 About the K values 85 White balance - correcting colours 86 Artificial lighting types 87 White balance - New AWB options 88 White balance options to boost sunset colours 89 Custom white balance 90
PREVIEW
EDITION

5
Contents
Using live view to assess white balance 91 Picture style - reducing post production 92 Drive settings 94 Metering - measuring the light 95 Using the AE Lock 96 Assignment - Start experimenting 97 Framing 98 Framing for low light photography 99 Turning the camera around 100 Positioning the subject in the frame 101 Assignment - shooting variations 102
Lighting 103 About lighting 104 Lighting - what we see vs what we can capture 105
Special subjects 107 Special subjects 108 Special subjects - The moon 109 Special subjects - Northern lights 110 Special subjects - Fireworks 112 Special subjects - Light trails 113 Special subjects - Stage shows and concerts 114 Shooting low light summary 115 Other products and services 116
PREVIEW
EDITION
About Low Light Levels
PREVIEW
EDITION
77
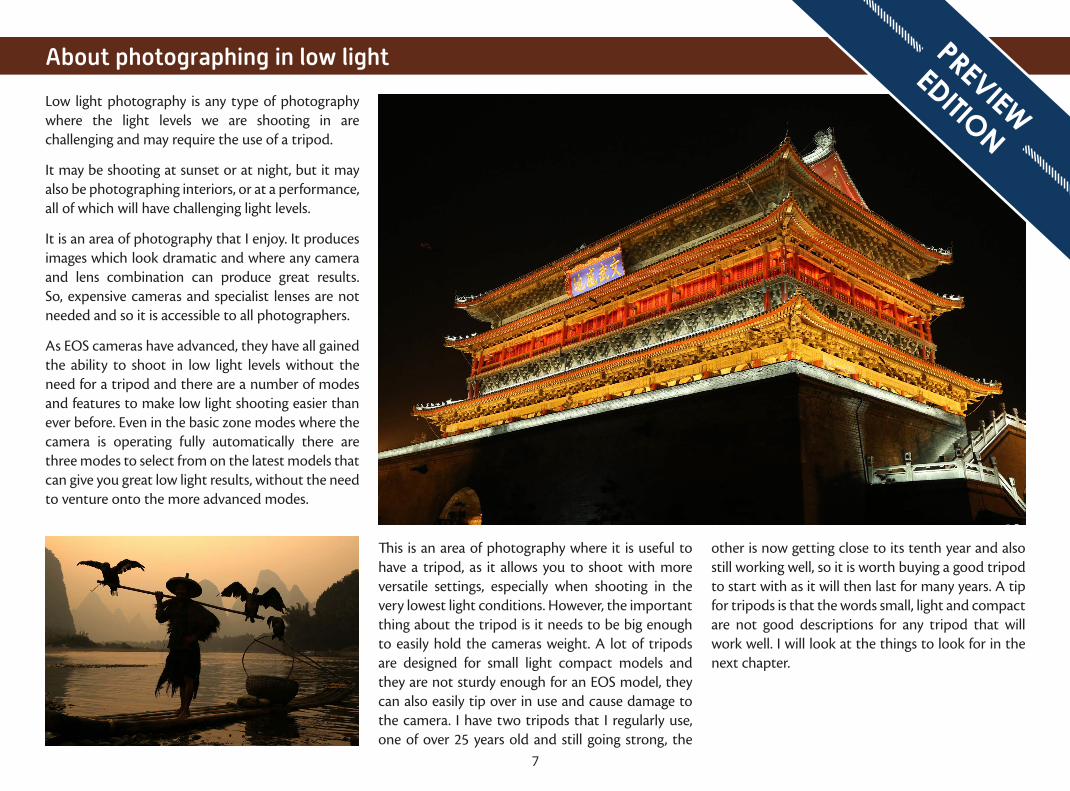
About photographing in low light
Low light photography is any type of photography where the light levels we are shooting in are challenging and may require the use of a tripod.
It may be shooting at sunset or at night, but it may also be photographing interiors, or at a performance, all of which will have challenging light levels.
It is an area of photography that I enjoy. It produces images which look dramatic and where any camera and lens combination can produce great results. So, expensive cameras and specialist lenses are not needed and so it is accessible to all photographers.
As EOS cameras have advanced, they have all gained the ability to shoot in low light levels without the need for a tripod and there are a number of modes and features to make low light shooting easier than ever before. Even in the basic zone modes where the camera is operating fully automatically there are three modes to select from on the latest models that can give you great low light results, without the need to venture onto the more advanced modes.
This is an area of photography where it is useful to have a tripod, as it allows you to shoot with more versatile settings, especially when shooting in the very lowest light conditions. However, the important thing about the tripod is it needs to be big enough to easily hold the cameras weight. A lot of tripods are designed for small light compact models and they are not sturdy enough for an EOS model, they can also easily tip over in use and cause damage to the camera. I have two tripods that I regularly use, one of over 25 years old and still going strong, the
other is now getting close to its tenth year and also still working well, so it is worth buying a good tripod to start with as it will then last for many years. A tip for tripods is that the words small, light and compact are not good descriptions for any tripod that will work well. I will look at the things to look for in the next chapter.
PREVIEW
EDITION
Equipment requirements
PREVIEW
EDITION

99
Camera choice
Any of the EOS models in the range will cope well for low light photography including the EOS M range.
The smaller lighter models that feature the APS-C or 1.6x crop sensor have the advantage that they are very small and light to carry and do not need quite such a robust tripod to secure them. The newer models in the range go up to 12800 ISO or even 25600 ISO making it possible to handhold them even in the lowest light levels.
There are some benefits to the full frame or 1.0x models. The key one being the much wider ISO range that they offer. Most go up to 102400 ISO and although a setting this high is seldom required, the mid range ISO settings such as 6400, 12800 and 25600 are a much more usable quality due to the larger sensors these models have working better in poor light levels.
They also can offer an advantage if shooting interiors as the lenses needed are not quite such a low focal length and this will produce less distortions within interior images that need to be taken with ultra wide lenses.
All of the EOS cameras allow enough configuration to allow an image like the one above to be taken. This was taken on a tripod so even the ISO range available on the camera did not matter.
PREVIEW
EDITION
1010
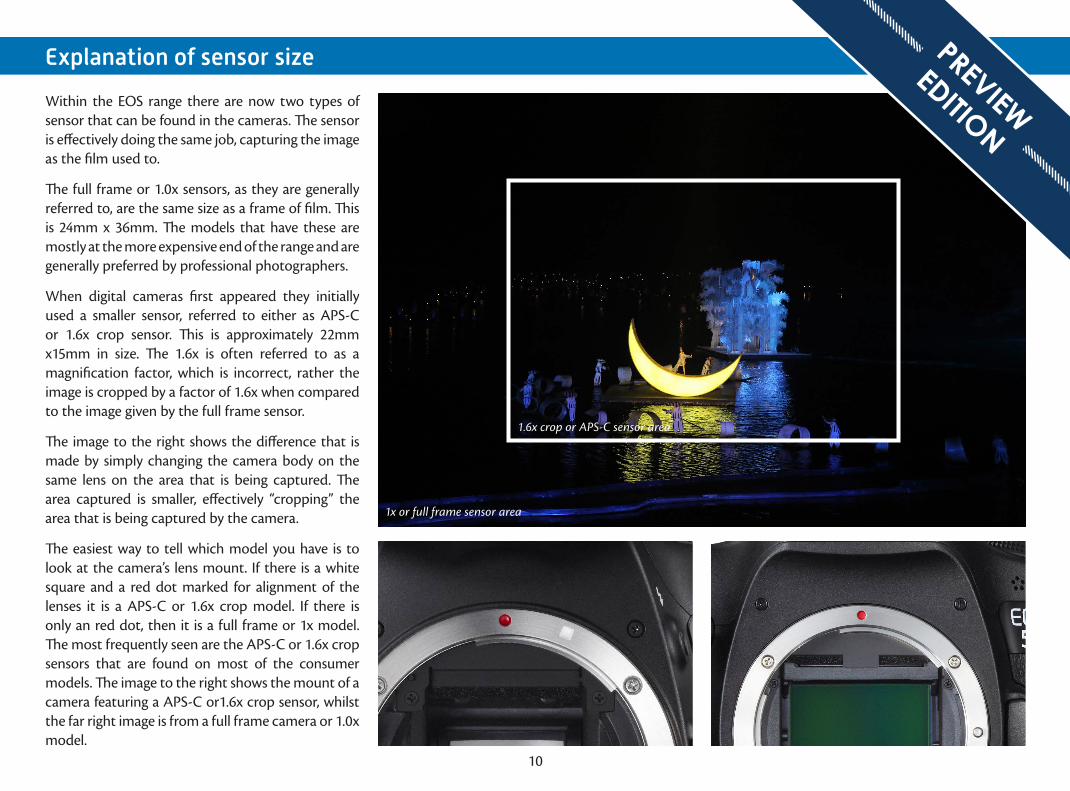
Explanation of sensor size
Within the EOS range there are now two types of sensor that can be found in the cameras. The sensor is effectively doing the same job, capturing the image as the film used to.
The full frame or 1.0x sensors, as they are generally referred to, are the same size as a frame of film. This is 24mm x 36mm. The models that have these are mostly at the more expensive end of the range and are generally preferred by professional photographers.
When digital cameras first appeared they initially used a smaller sensor, referred to either as APS-C or 1.6x crop sensor. This is approximately 22mm x15mm in size. The 1.6x is often referred to as a magnification factor, which is incorrect, rather the image is cropped by a factor of 1.6x when compared to the image given by the full frame sensor.
The image to the right shows the difference that is made by simply changing the camera body on the same lens on the area that is being captured. The area captured is smaller, effectively “cropping” the area that is being captured by the camera.
The easiest way to tell which model you have is to look at the camera’s lens mount. If there is a white square and a red dot marked for alignment of the lenses it is a APS-C or 1.6x crop model. If there is only an red dot, then it is a full frame or 1x model. The most frequently seen are the APS-C or 1.6x crop sensors that are found on most of the consumer models. The image to the right shows the mount of a camera featuring a APS-C or1.6x crop sensor, whilst the far right image is from a full frame camera or 1.0x model.
1.6x crop or APS-C sensor area
1x or full frame sensor area
PREVIEW
EDITION
1111
Which is the best sensor size?
The APS-C or 1.6x crop sensor models fill the frame much easier and so you do not need to use such long lenses, which keeps the cost of the outfit you need down and can make it easier to shoot stage shows and other subjects that need a telephoto lens.
Another benefit of the APS-C or 1.6x crop sensor models is that they are smaller and lighter and designed to take the more compact range of EF-S lenses. These all have impressive close focusing capabilities, especially the EF-S 18-55mm f3.5-5.6 IS STM kit lens which is supplied with many of the Canon EOS cameras. They do give the crop factor all through the lens range and so you will need lenses much wider than we used to use in the days of film. However, this is not the drawback that it used to be thanks to the ever growing range of Canon EF-S lenses.
You may well be wondering why people buy 1.0x or full frame cameras. I actually have both and choose the one that works best for the type of photography I am doing at the time. The APS-C or 1.6x sensors models are great for people to get going with, being easy to use and set up and smaller and lighter to carry, especially when used with the EF-S series of lenses which are designed exclusively for them.
People who have done photography for many years, tend to prefer the full frame or 1.0x models as the lenses give the same image area as they were used to with film. The full frame models having a larger sensor also have a better low light capability. However, when you start to look at the subjects tackled by these photographers you often find that
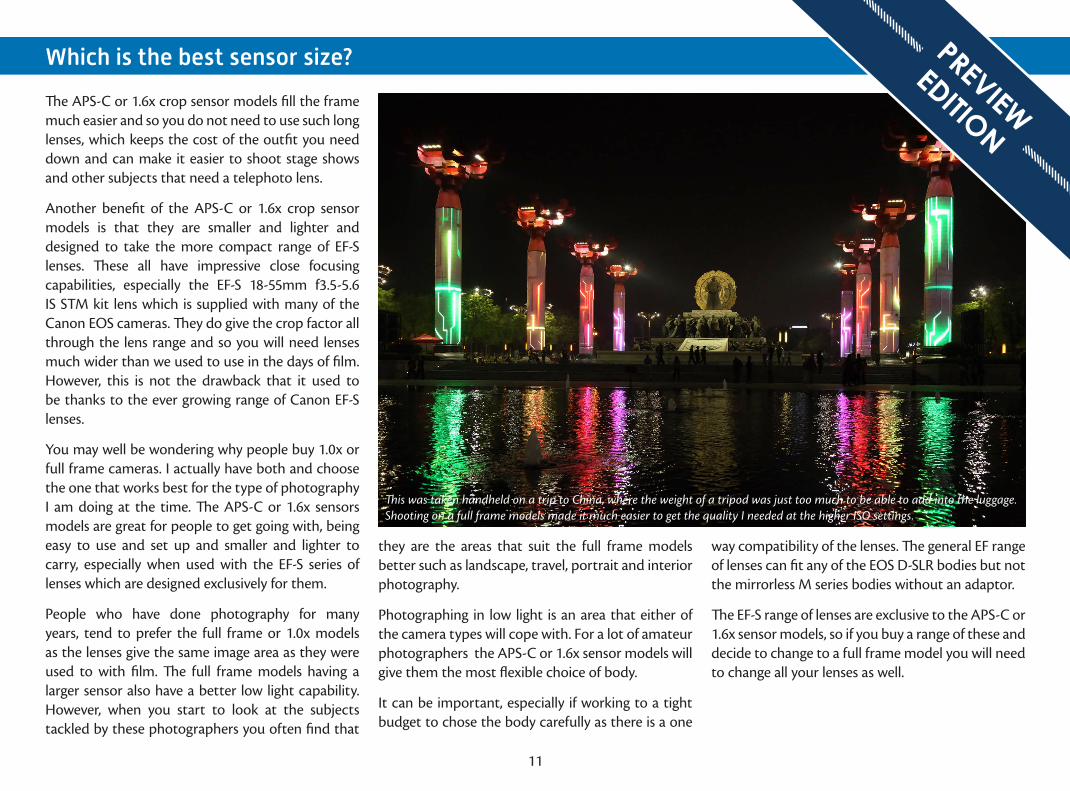
This was taken handheld on a trip to China, where the weight of a tripod was just too much to be able to add into the luggage. Shooting on a full frame models made it much easier to get the quality I needed at the higher ISO settings.
they are the areas that suit the full frame models better such as landscape, travel, portrait and interior photography.
Photographing in low light is an area that either of the camera types will cope with. For a lot of amateur photographers the APS-C or 1.6x sensor models will give them the most flexible choice of body.
It can be important, especially if working to a tight budget to chose the body carefully as there is a one
way compatibility of the lenses. The general EF range of lenses can fit any of the EOS D-SLR bodies but not the mirrorless M series bodies without an adaptor.
The EF-S range of lenses are exclusive to the APS-C or 1.6x sensor models, so if you buy a range of these and decide to change to a full frame model you will need to change all your lenses as well.
PREVIEW
EDITION
1212
Lens jargon and terminology
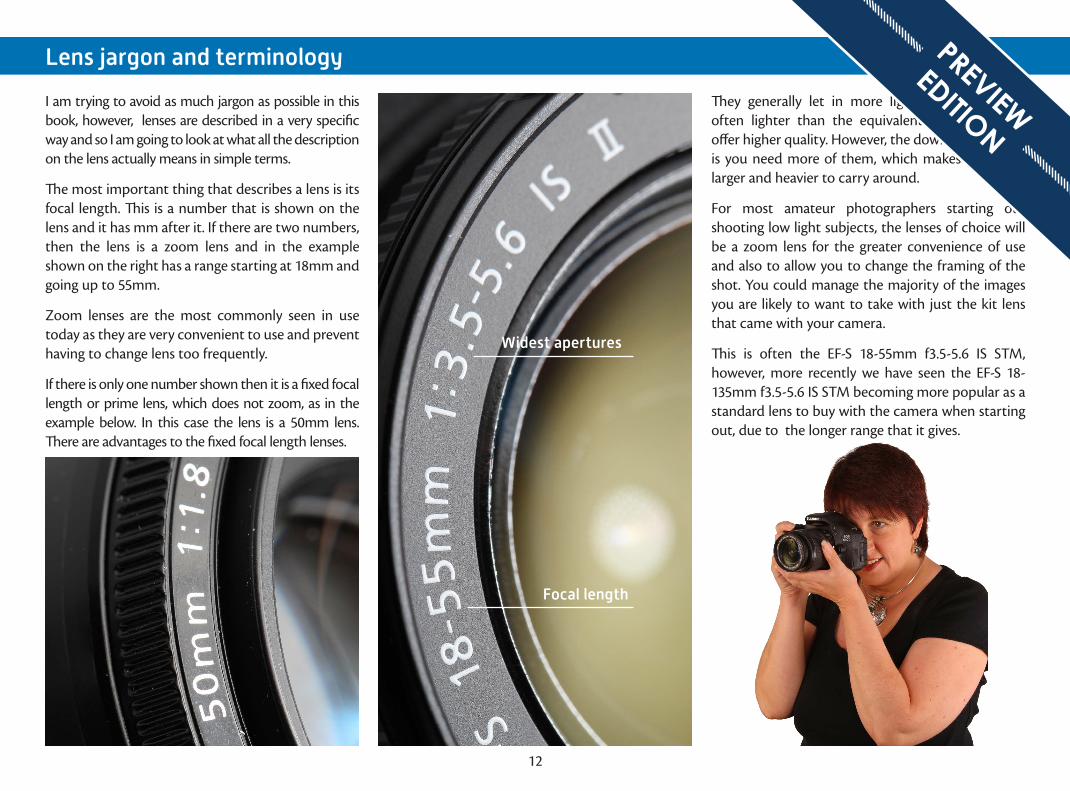
I am trying to avoid as much jargon as possible in this book, however, lenses are described in a very specific way and so I am going to look at what all the description on the lens actually means in simple terms.
The most important thing that describes a lens is its focal length. This is a number that is shown on the lens and it has mm after it. If there are two numbers, then the lens is a zoom lens and in the example shown on the right has a range starting at 18mm and going up to 55mm.
Zoom lenses are the most commonly seen in use today as they are very convenient to use and prevent having to change lens too frequently.
If there is only one number shown then it is a fixed focal length or prime lens, which does not zoom, as in the example below. In this case the lens is a 50mm lens. There are advantages to the fixed focal length lenses.
Focal length
Widest apertures
They generally let in more light, are smaller and often lighter than the equivalent zoom lens and offer higher quality. However, the down side of them is you need more of them, which makes the outfit larger and heavier to carry around.
For most amateur photographers starting out shooting low light subjects, the lenses of choice will be a zoom lens for the greater convenience of use and also to allow you to change the framing of the shot. You could manage the majority of the images you are likely to want to take with just the kit lens that came with your camera.
This is often the EF-S 18-55mm f3.5-5.6 IS STM, however, more recently we have seen the EF-S 18-135mm f3.5-5.6 IS STM becoming more popular as a standard lens to buy with the camera when starting out, due to the longer range that it gives.
PREVIEW
EDITION

1313
Lens jargon and terminology
The focal length of the lens tells us the type of lens that it is and the effect that it will have on the image. Lenses can be broken down into three basic groups
Wide angle: These get more into the picture than we naturally see with the eye but they also make things look further away and smaller. Wide angle lenses are used a lot for low light photography as they are easy to handhold and a lot of low light is shot in cities within confined spaces. Focal lengths from 35mm down to 10mm would be considered to be a wide angle focal length.
Standard: These are lenses that give the same width and appearance as we see naturally with the human eye. Lenses from 36mm up to 55mm are generally considered to be a standard focal length. These focal lengths can work well for low light and if using the fixed focal length versions they can offer wider apertures making handholding more realistic.
Telephoto: These are the lenses that are used for flower photography as they allow better blurring of the backgrounds. They capture a narrower area than we naturally see with the eye and make the subject appear to be a lot closer to us. Telephoto lenses are not used as much for low light with the exception of stage performances and often sunsets.
Telephoto lenses can be split into two groups. The normal telephoto lenses have focal lengths from 56mm and go up to 300mm. You then have the Ultra telephoto lenses, these range from 400mm up to 800mm in the current range.
10mm 14mm 17mm
20mm 28mm 35mm
50mm 70mm 100mm
135mm 135mm 200mm
The images above are taken from the same spot but with the lens focal length being changed between each shot. As the focal length gets higher you can see a smaller part being captured. The 50mm image shows the scene as it looked to the eye.
PREVIEW
EDITION
1414
Lens jargon and terminology
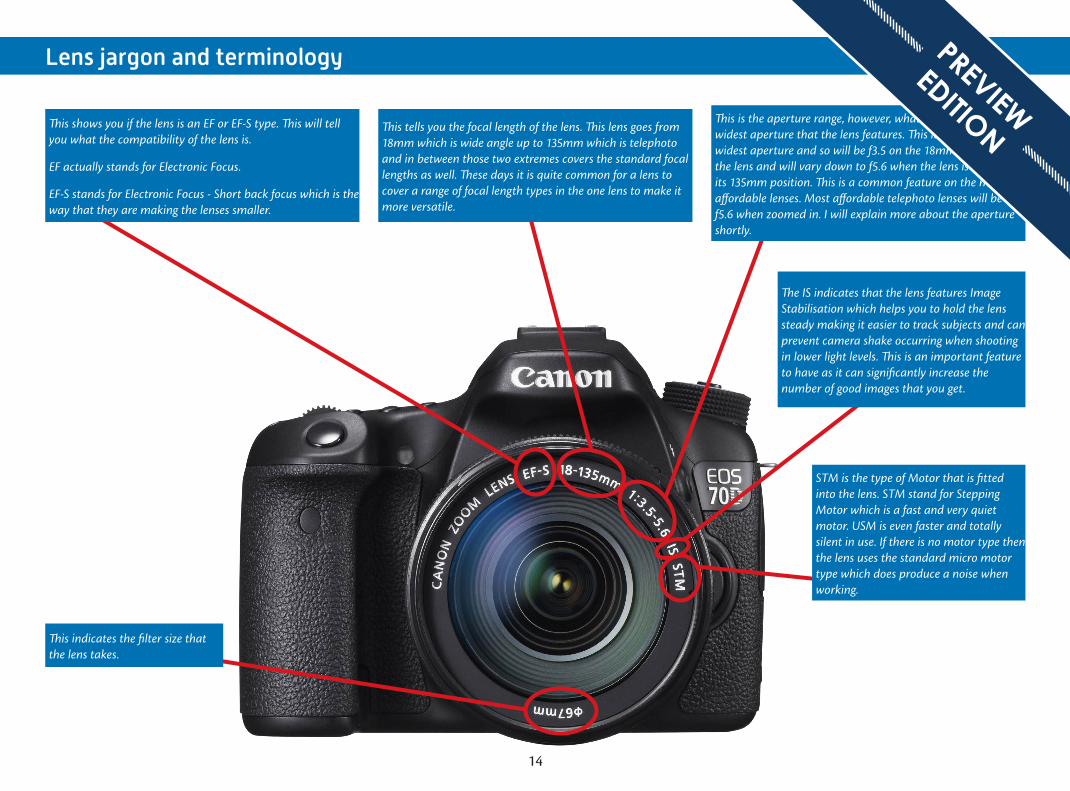
This shows you if the lens is an EF or EF-S type. This will tell you what the compatibility of the lens is.
EF actually stands for Electronic Focus.
EF-S stands for Electronic Focus - Short back focus which is the way that they are making the lenses smaller.
This tells you the focal length of the lens. This lens goes from 18mm which is wide angle up to 135mm which is telephoto and in between those two extremes covers the standard focal lengths as well. These days it is quite common for a lens to cover a range of focal length types in the one lens to make it more versatile.
This is the aperture range, however, what it tells you is the widest aperture that the lens features. This lens has a variable widest aperture and so will be f3.5 on the 18mm setting of the lens and will vary down to f5.6 when the lens is set to its 135mm position. This is a common feature on the more affordable lenses. Most affordable telephoto lenses will be f5.6 when zoomed in. I will explain more about the aperture shortly.
The IS indicates that the lens features Image Stabilisation which helps you to hold the lens steady making it easier to track subjects and can prevent camera shake occurring when shooting in lower light levels. This is an important feature to have as it can significantly increase the number of good images that you get.
STM is the type of Motor that is fitted into the lens. STM stand for Stepping Motor which is a fast and very quiet motor. USM is even faster and totally silent in use. If there is no motor type then the lens uses the standard micro motor type which does produce a noise when working.
This indicates the filter size that the lens takes.
PREVIEW
EDITION
1515
About the aperture
The aperture is the mechanism in the lens that controls how much light is being let into the camera. It is an important part of the exposure control on the camera. It is used in conjunction with the shutter speed and ISO settings that we will look at in the settings chapter. Although it is found in the lens, the camera is controlling the setting that is being used.
It also modifies the depth of field that the lens gives. This is how much is sharp from front to back within the image. Though this can change a lot more by changing the focal length of the lens than by actually changing the aperture setting.
In low light, having a reasonably wide aperture can be important if handholding as it lets more light in. When shooting on a tripod any aperture can be used as it does not matter how long the shutter stays open for.
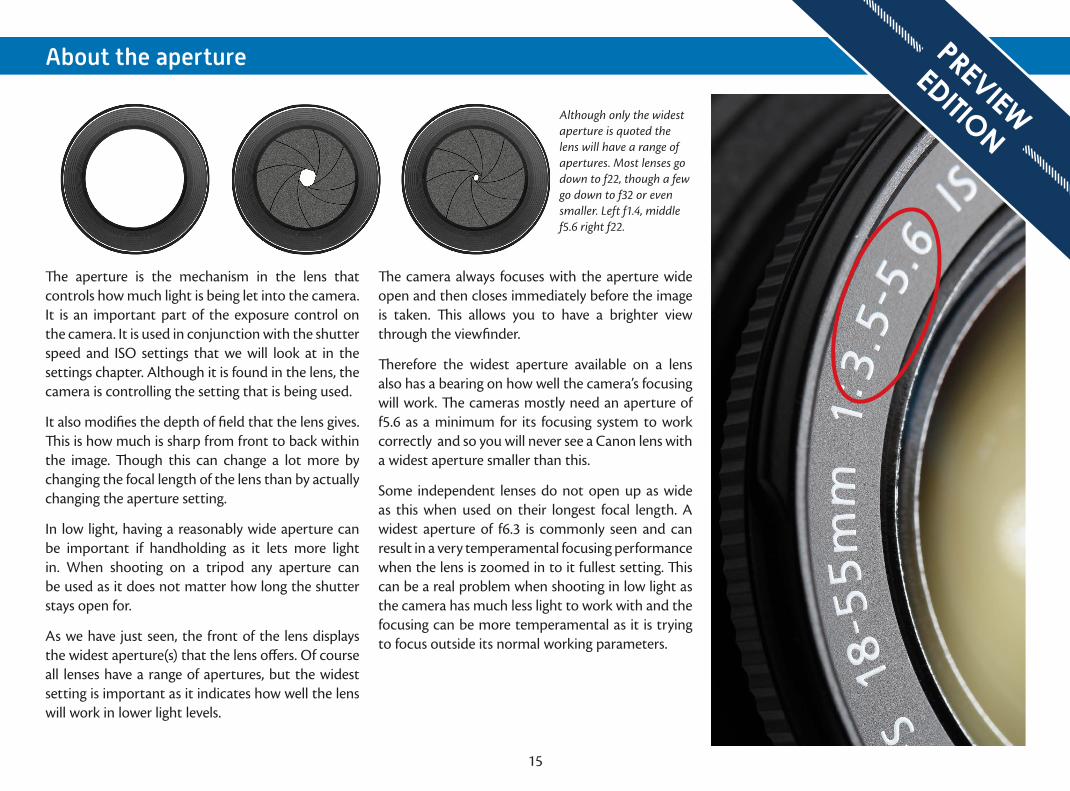
As we have just seen, the front of the lens displays the widest aperture(s) that the lens offers. Of course all lenses have a range of apertures, but the widest setting is important as it indicates how well the lens will work in lower light levels.
Although only the widest aperture is quoted the lens will have a range of apertures. Most lenses go down to f22, though a few go down to f32 or even smaller. Left f1.4, middle f5.6 right f22.
The camera always focuses with the aperture wide open and then closes immediately before the image is taken. This allows you to have a brighter view through the viewfinder.
Therefore the widest aperture available on a lens also has a bearing on how well the camera’s focusing will work. The cameras mostly need an aperture of f5.6 as a minimum for its focusing system to work correctly and so you will never see a Canon lens with a widest aperture smaller than this.
Some independent lenses do not open up as wide as this when used on their longest focal length. A widest aperture of f6.3 is commonly seen and can result in a very temperamental focusing performance when the lens is zoomed in to it fullest setting. This can be a real problem when shooting in low light as the camera has much less light to work with and the focusing can be more temperamental as it is trying to focus outside its normal working parameters.
PREVIEW
EDITION
1616
The lenses you need for low light photography
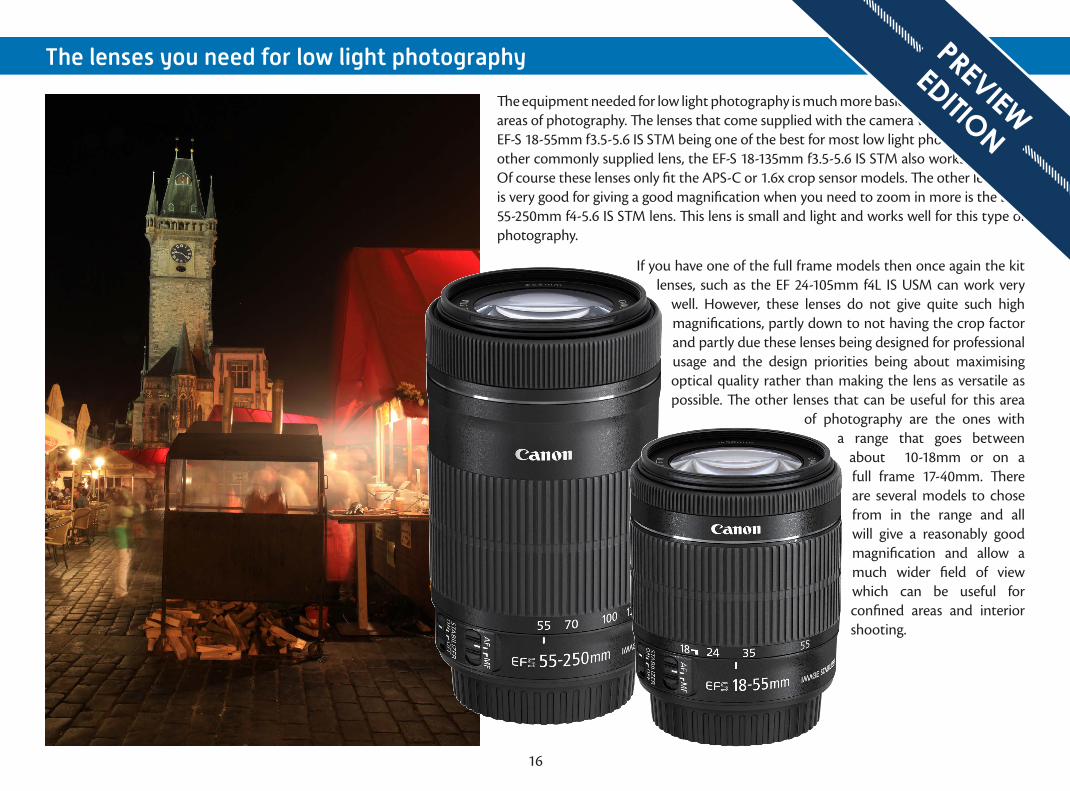
The equipment needed for low light photography is much more basic than for many other areas of photography. The lenses that come supplied with the camera will work well, the EF-S 18-55mm f3.5-5.6 IS STM being one of the best for most low light photography. The other commonly supplied lens, the EF-S 18-135mm f3.5-5.6 IS STM also works very well. Of course these lenses only fit the APS-C or 1.6x crop sensor models. The other lens that is very good for giving a good magnification when you need to zoom in more is the EF-S 55-250mm f4-5.6 IS STM lens. This lens is small and light and works well for this type of photography.
If you have one of the full frame models then once again the kit lenses, such as the EF 24-105mm f4L IS USM can work very
well. However, these lenses do not give quite such high magnifications, partly down to not having the crop factor and partly due these lenses being designed for professional usage and the design priorities being about maximising optical quality rather than making the lens as versatile as possible. The other lenses that can be useful for this area
of photography are the ones with a range that goes between
about 10-18mm or on a full frame 17-40mm. There are several models to chose from in the range and all will give a reasonably good magnification and allow a much wider field of view which can be useful for confined areas and interior shooting.
PREVIEW
EDITION
1717
Tripod selection
Although some low light photography can be performed handheld, it is possible to get higher quality results and more effects if shooting on a tripod.
A tripod needs to have the camera solidly, as you have to support the weight of the Camera. If the tripod is too flimsy or small it will not be keeping the camera steady enough for this type of photography.
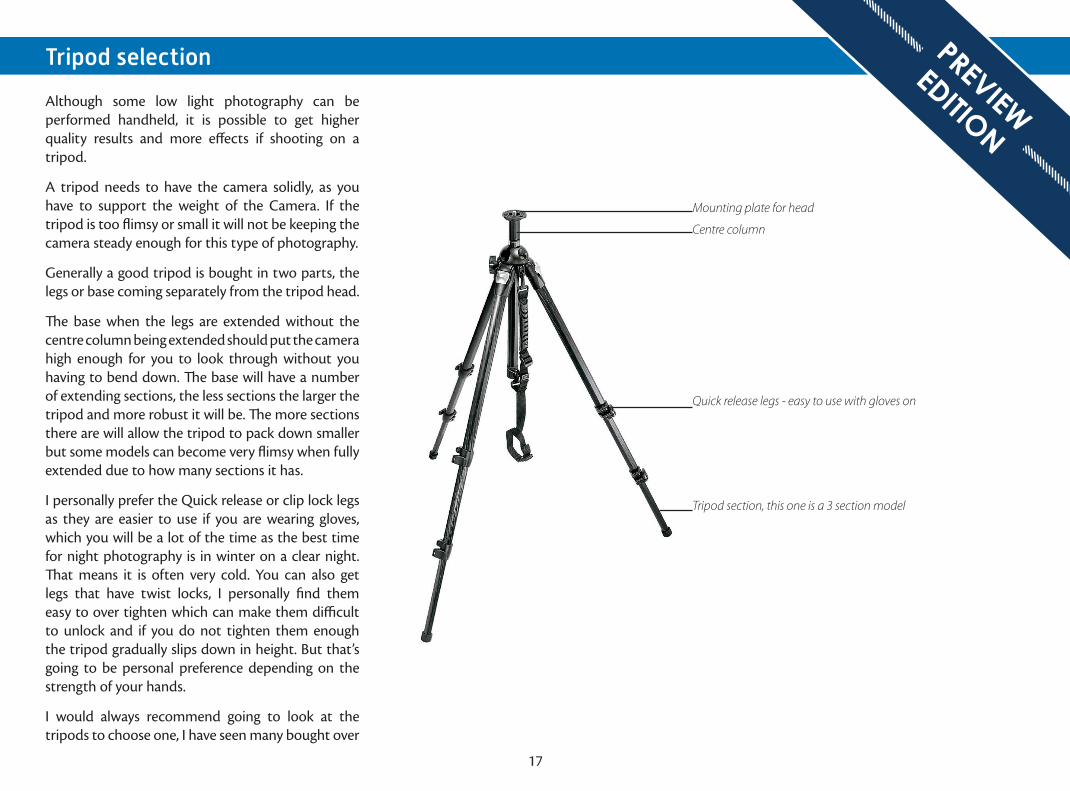
Generally a good tripod is bought in two parts, the legs or base coming separately from the tripod head.
The base when the legs are extended without the centre column being extended should put the camera high enough for you to look through without you having to bend down. The base will have a number of extending sections, the less sections the larger the tripod and more robust it will be. The more sections there are will allow the tripod to pack down smaller but some models can become very flimsy when fully extended due to how many sections it has.
I personally prefer the Quick release or clip lock legs as they are easier to use if you are wearing gloves, which you will be a lot of the time as the best time for night photography is in winter on a clear night. That means it is often very cold. You can also get legs that have twist locks, I personally find them easy to over tighten which can make them difficult to unlock and if you do not tighten them enough the tripod gradually slips down in height. But that’s going to be personal preference depending on the strength of your hands.
I would always recommend going to look at the tripods to choose one, I have seen many bought over
Mounting plate for head
Centre column
Quick release legs - easy to use with gloves on
Tripod section, this one is a 3 section model
PREVIEW
EDITION
1818
the internet, recommended as good value which are not sturdy enough for the camera they were bought for.
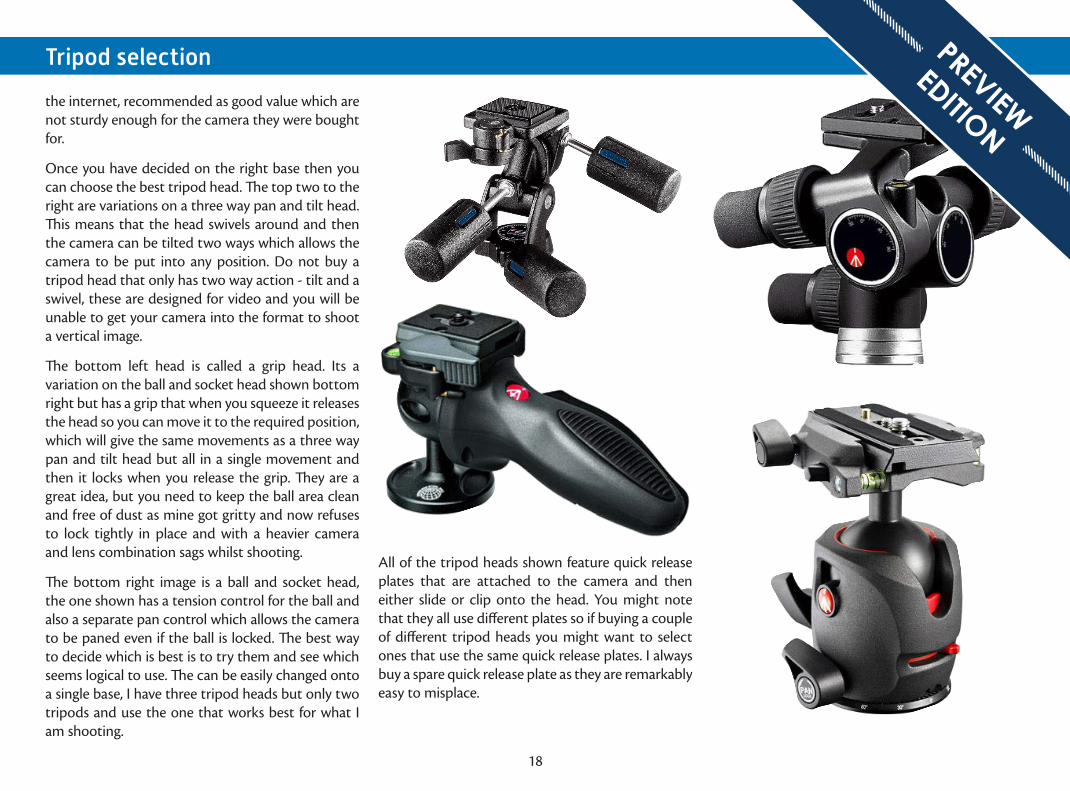
Once you have decided on the right base then you can choose the best tripod head. The top two to the right are variations on a three way pan and tilt head. This means that the head swivels around and then the camera can be tilted two ways which allows the camera to be put into any position. Do not buy a tripod head that only has two way action - tilt and a swivel, these are designed for video and you will be unable to get your camera into the format to shoot a vertical image.
The bottom left head is called a grip head. Its a variation on the ball and socket head shown bottom right but has a grip that when you squeeze it releases the head so you can move it to the required position, which will give the same movements as a three way pan and tilt head but all in a single movement and then it locks when you release the grip. They are a great idea, but you need to keep the ball area clean and free of dust as mine got gritty and now refuses to lock tightly in place and with a heavier camera and lens combination sags whilst shooting.
The bottom right image is a ball and socket head, the one shown has a tension control for the ball and also a separate pan control which allows the camera to be paned even if the ball is locked. The best way to decide which is best is to try them and see which seems logical to use. The can be easily changed onto a single base, I have three tripod heads but only two tripods and use the one that works best for what I am shooting.
All of the tripod heads shown feature quick release plates that are attached to the camera and then either slide or clip onto the head. You might note that they all use different plates so if buying a couple of different tripod heads you might want to select ones that use the same quick release plates. I always buy a spare quick release plate as they are remarkably easy to misplace.
Tripod selection PREVIEW
EDITION
1919
Equipment summary
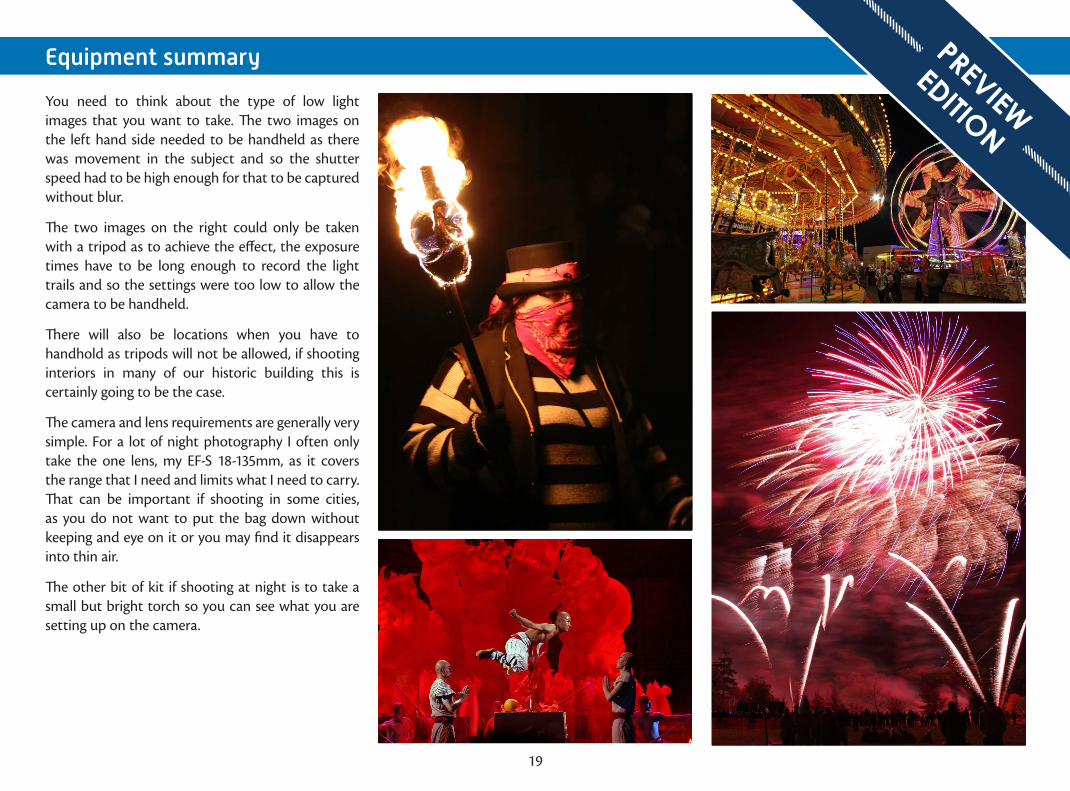
You need to think about the type of low light images that you want to take. The two images on the left hand side needed to be handheld as there was movement in the subject and so the shutter speed had to be high enough for that to be captured without blur.
The two images on the right could only be taken with a tripod as to achieve the effect, the exposure times have to be long enough to record the light trails and so the settings were too low to allow the camera to be handheld.
There will also be locations when you have to handhold as tripods will not be allowed, if shooting interiors in many of our historic building this is certainly going to be the case.
The camera and lens requirements are generally very simple. For a lot of night photography I often only take the one lens, my EF-S 18-135mm, as it covers the range that I need and limits what I need to carry. That can be important if shooting in some cities, as you do not want to put the bag down without keeping and eye on it or you may find it disappears into thin air.
The other bit of kit if shooting at night is to take a small but bright torch so you can see what you are setting up on the camera.
PREVIEW
EDITION
Getting started
PREVIEW
EDITION
visit: www.eos-magazine.com/ebooks
eBooks for your EOS photography
You’ve just read a free 20-page preview of this eBook, part of a comprehensive series of Canon EOS camera eBooks that I’ve produced, based on years of experience training Canon EOS photographers like you. Thanks for downloading it.
There’s much, much more – most of my eBooks are around 150 pages long, so you’ve had just a small taste of what you can learn about your camera. And it won’t cost you the earth – prices start from just £4.95.
So get the COMPLETE picture – buy the full version of this eBook and, in minutes, you’ll have the key to unlocking your EOS camera and your potential as a photographer.
10% offquote
FULL10
Nina
UNLOCK
THE FULL
VERSION