low cost hands-on experiments for physics teaching · low cost hands-on experiments for physics...
TRANSCRIPT

Lat. Am. J. Phys. Educ. Vol. 6, Suppl. I, August 2012 3 http://www.lajpe.org
Low cost hands-on experiments for Physics teaching
Michael Vollmer, Klaus Peter Möllmann University of Applied Sciences, Magdeburgerstr 50, 14770, Brandenburg, Germany.
E-mail: [email protected]
(Received 26 August 2011, accepted 3 December 2011)
Abstract Experiments are essential in any kind of phyiscs teaching. We will focus on one category, low cost hands-on
expriments, which have many advantages for physics teaching, in particular concerning motivation of students. After a
short discussion of criteria, advantages, critics and problems of such experiments, a number of selected hands-on
experiments are treated in more detail.
Keywords: Low cost experiments, hands-on experiments, student motivation, teacher training.
Resumen Los experimentos son esenciales en cualquier tipo de enseñanza de Física. Nos centraremos en una sola categoría,
experimentos manuales de bajo costos, que tienen muchas ventajas para la enseñanza de la física, en particular con
respecto a la motivación de los estudiantes. Después de una breve discusión de criterios, ventajas, críticos y los
problemas de los experimentos, un número de una selección de experimentos prácticos se tratan con más detalle.
Palabras clave: Experimentos de bajo costo, experimentos prácticos, motivación del estudiante, formación del
profesorado.
PACS: 01.40.-d, 01.40.J-, 01.50.My ISSN 1870-9095
I. INTRODUCTION
“Physics is a science based on experiences. It is based on
facts found experimentally”. This statement from RW Pohl,
a German physicist from the 20th
century, who was famous
for his lecture demonstrations, is one way of describing the
importance of experiments. Obviously many important
scientific developments also in theoretical physics do
depend on experiments. One example is the introduction of
the constant h, now known as Planck´s quantum constant in
order to be able to quantitatively describe the result of very
precise measurements of the blackbody radiation from
heated cavities. Nowadays experiments are not only
essential for the scientific discipline physics, but they are
also indispensable in any classroom where physics is
taught.
There are various possibilities to classify experiments
for teaching, here we will focus on the two extreme
categories. First there are cognition oriented experiments,
i.e., those supporting knowledge. These are mostly
performed with special apparatus under controlled but
variable conditions. Such experiments allow reproducible
tests of predictions of physical theories. At the introductory
level, think e.g. of a free fall experiment where a metal
sphere is falling through light barriers and time differences
are measured accurately with some counters or, e.g., of
measuring the index of refraction of air using the change of
interference fringes in a Mach Zehnder interferometer.
Obviously special equipment is needed and costs for
schools are high. In contrast, there are second low cost
hands-on experiments which are primarily of the category
motivation oriented. Usually such experiments can be
performed with all kind of apparatus which allows student
encounters with physics, technology, and/or natural
phenomena. Whereas the former type of experiment usually
only attracts a limited number of students, the latter offers
the possibility of reaching more students and raising
interest in the natural sciences in general. Of course there
are also a large number of experimental types in between
these two extremes. In this paper, we will focus, however,
mostly on the low-cost hands on experiments. In Sect. 2 we
will briefly define what is meant with this type of
experiment outlining also the typical criticism, their
advantages and also the problem areas. Sect. 3 will present
a number of selected hands-on experiments and give brief
explanations. Sect. 4 gives a summary and conclusions.
II. HANDS-ON EXPERIMENTS
One possibility to define low cost hands-on experiments is
by listing some typical criteria. These are:
Michael Vollmer, Klaus-Peter Möllmann
Lat. Am. J. Phys. Educ. Vol. 6, Suppl. I, August 2012 4 http://www.lajpe.org
• The equipment is in general available (e.g.
hardware stores, supermarkets etc.), it is easy to
get, and has a low cost (a few Dollars or Euros).
• The set up is simple, maybe rising tension.
• The presentation should not last long.
• Sometimes the experiments may be motivated by
potential technical applications.
• In any case, it should cause special affective
effects (surprise, doubt, enthusiasm,...).
The latter effect may lead to a rise in motivation for
physics. This is quite important, since students have many
other distractions. Physics must e.g. compete with other
time consuming events of the daily life like love affairs,
watching movies, discussing fashion, attending or
participating in sports events and many more.
The obvious advantages of hands-on experiments are
that one usually needs very little preparation and can
perform them nearly everywhere. Since very often objects
of everyday life are used, the apparatus does not lead to any
distraction (e.g. by cables or unknown apparatus like power
supplies, pulse counters, etc.). Also, regular experiments do
often have a quite complex set up, which cannot be
understood by students immediately. In such a case, the set
up may be seen as black box and there is often the chance
that students think, that any outcome of the experiment is
possible, in particular the one desired by the teacher. The
simpler the set up, the easier it is to convince students that
there are indeed no technical tricks involved in the outcome
of the experiment. Hands-on experiments can be used in all
phases of teaching, e.g., in the introduction of a new topic
as motivation, then later on while gathering more facts and
finally when deepening the understanding. Such
experiments are fun, they often stir up the desire in students
to repeat them and to present them to friends and family. If
they are performed successfully, this can enhance the self
esteem of the student. Finally, the surprise effect which
often goes along can lead to cognitive conflicts. This may
finally help to shift from the everyday way of perceiving
our surroundings to the physics way of observing.
It must however, also be admitted, that since often
equipment of everyday life is used in simple set ups, a
severe problem can arise: the phenomena to be observed are
usually not isolated as in typical science oriented laboratory
experiments. In the latter, all possible disturbances are
usually suppressed, filtered out, or corrected for, such as
friction or air resistance. In contrast, simple hands-on
experiments usually involve all kinds of such effects.
Hence, the analysis and detailed explanation of some of
these experiments can be quite complex and the most
simple experiment can have the most difficult theoretical
explanation. This is, however not a real drawback, since
such effects need also to be discussed in the other type of
experiments when motivating of how to suppress them or
how to correct for them.
It should be mentioned that there is also criticism from
physics professionals. A typical prejudice is that such
experiments are childs play, stopgaps, or gadgets. If there is
no money available it may be acceptable but they should be
replaced as soon as possible by real equipment for real
experiments. The negative assessment is probably due to
the perceived close relation to magic and conjuring tricks.
Also such experiments are often seen as playing which
seems to violate the principle of seriousness in science. But:
any play that creates knowledge cannot be dubious or
wrong. And conjuring and magic tricks have a very close
connection to perception and physics and a lot of physics
can be learned, in particular also when studying the physics
of modern toys. Therefore we are convinced that hands-on
experiments have a lot of justification for use in teaching,
also besides the advantage of being low cost.
The following experiments were tested multiple times at
many in-service teacher training seminars in Germany,
Switzerland, Austria, Mexico and Namibia.
III. EXAMPLES OF HANDS-ON EXPERI-
MENTS
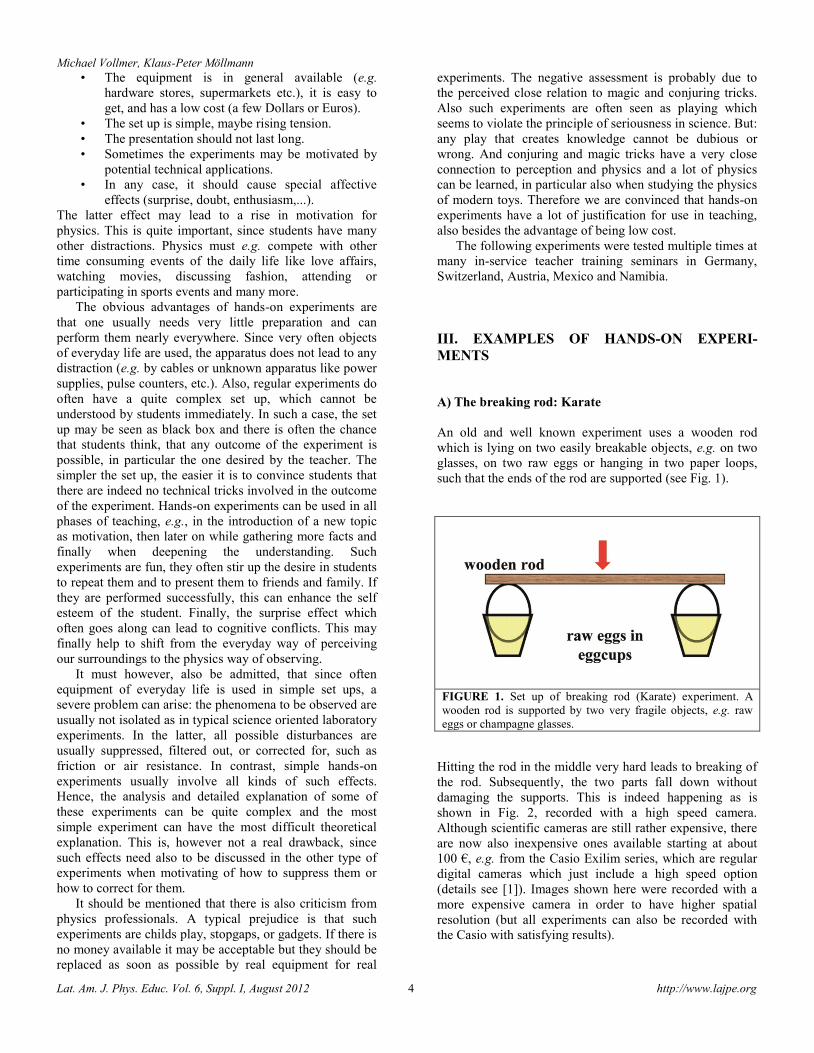
A) The breaking rod: Karate
An old and well known experiment uses a wooden rod
which is lying on two easily breakable objects, e.g. on two
glasses, on two raw eggs or hanging in two paper loops,
such that the ends of the rod are supported (see Fig. 1).
FIGURE 1. Set up of breaking rod (Karate) experiment. A
wooden rod is supported by two very fragile objects, e.g. raw
eggs or champagne glasses.
Hitting the rod in the middle very hard leads to breaking of
the rod. Subsequently, the two parts fall down without
damaging the supports. This is indeed happening as is
shown in Fig. 2, recorded with a high speed camera.
Although scientific cameras are still rather expensive, there
are now also inexpensive ones available starting at about
100 €, e.g. from the Casio Exilim series, which are regular
digital cameras which just include a high speed option
(details see [1]). Images shown here were recorded with a
more expensive camera in order to have higher spatial
resolution (but all experiments can also be recorded with
the Casio with satisfying results).
Low cost hands-on experiments for Physics teaching
Lat. Am. J. Phys. Educ. Vol. 6, Suppl. I, August 2012 5 http://www.lajpe.org
FIGURE 2. Three snapshots
of the breaking rod (times in
ms) recorded with a scientific
high speed camera at 1000
frames per second.
The motion induced upon hitting the rod can be
decomposed into a translation and a rotation. The
translation of each half rod is just due to momentum
transfer p=mv as a result of the applied force for contact
time t. Since v corresponds to the initial center of mass
velocity vCM, we find
mvCM = Ft. (1)
On the other hand, the force also created a torque M which
in contact time t leads to an angular momentum L. Since
L=J where J is the moment of inertia, we can relate the
angular frequency to center of mass velocity and from the
equation of motion of a rotating rod find the velocities of
the rod at each point. Initially, i.e. right after breaking, the
situation is depicted in Fig. 3: The half rod, here the one
supported on its left side, has vCM at its middle as well as 4
vCM at the right side, where the longer rod was hit. This
corresponds to the hand velocity. However, on the left side,
where the rod was initially supported, the velocity points
upwards, i.e. the rod is lifted away from the support and
thus has no chance to damage the support (more details, see
[2, 3]).
FIGURE 3. Initial velocities at center ands sides of one of the
half-rods (supported at left side) directly after breaking.
B) Strange superball movements
Superballs were invented several decades ago and are still a
popular toy due to their special properties upon reflection.
On the one hand, they have a very high coefficient of
restitution, i.e. they jump back much higher when falling to
the floor than other balls like tennis balls. In addition, they
also behave differently when hitting a boundary at an angle.
Whereas most balls tend to slide along the boundary,
superballs more or less stick to it which leads to a rolling on
the surface upon contact. As a consequence a ball colliding
with a wall will gain angular momentum, i.e. it rotates. If
such a ball with spin collides with another surface the ball
will behave similar to a billiard ball which hits a wall with
spin: it will be reflected sideways depending on spin
direction. This property leads to a peculiar behavior: when
such a ball is thrown at an angle towards the floor such that
it can hit a table from below (Fig. 4), it will change angular
momentum i.e. spin, twice and will be reflected back to
where it came from. The complete dynamics (e.g. [4, 5])
and related experiments have been treated elsewhere. In
FIGURE 4. Schematic trajectories and spin of superball, thrown
onto the floor and hitting a table from below.
particular, high speed videos of such experiments can be
found in the internet [3]. This behavior was well known for
quite a long time and inspired experiments with other
geometries. Fig. 5 depicts what happens when a superball is
thrown at an angle into a vertical cavity, realized e.g. by
two parallel oriented tables.
FIGURE 5. Schematic trajectories of a superball, thrown into a
vertical channel (left) and image of real trajectory superimposed
onto the snapshot at 10ms (numbers give time in ms).
+1 ms +3 ms
ms
+19 ms

Michael Vollmer, Klaus-Peter Möllmann
Lat. Am. J. Phys. Educ. Vol. 6, Suppl. I, August 2012 6 http://www.lajpe.org
Due to the spin acquired upon each reflection and, hence,
the reversal of direction after two reflections, the ball may
even exit the vertical channel again, i.e., if thrown hard
enough, its properties of retroreflection may even overcome
gravity. Again, a description with videos can be found in
the internet [3].
C) Measuring reaction times
Reaction times of humans are among the experiences that
every student can make of his own. A very simple and well
known experiment along these lines consists of holding a
ruler and ask a volunteer to make a gap between his thumb
and index finger with the ruler inside. The volunteer is
asked to react and close the gap between the fingers as soon
as the ruler is released (see Fig. 6).
FIGURE 6. Measuring total hand reaction times using the free
fall of a ruler (after [6]).
If there is no cheating (trying to close fingers without
release) the ruler falls a certain distance which is related to
the total reaction time, i.e., the real reaction time until the
brain has send information to the muscles and the following
time needed to close the gap.
Since the ruler will be in free fall, the falling distance
before the catch is related to the total reaction time by
g
st
2 . (2)
Table I gives results of reaction times versus distance for up
to 30cm of a typical ruler.
TABLE I. fall distance of a ruler as a function of time.
Distance in cm Time in s
5 0.10
10 0.14
15 0.17
20 0.20
25 0.23
30 0.25
This experiment can be done easily with many students at
the same time, but it is useful to also extend the method to
reaction times of feet, since those are needed every day
while driving a car when there is the sudden need for
braking. Obviously, a typical preconception is that the
reaction time should be longer than for the hand, because
the distance from brain to feet is longer than to the fingers.
Try it out by yourself by using a set up as shown in Fig. 7.
A volunteer is lying on his/her back on a table, the floor etc.
One leg should be at an angle of about 90° at the knee and
the foot should have a distance of a few cm towards a wall
or a plate etc. A ruler is placed between foot and wall and
the volunteer is asked to close the gap when the ruler is
released. Similar to the hand experiment, the falling
distance gives the total reaction time. This experiment is a
lot of fun and usually all students present in a classroom
want to do it.
FIGURE 7. Measuring total foot reaction times using the free
fall of a ruler.
D) The empty bottle and the cork
An example for a really surprising experiment uses a wine
bottle (with cork) and a piece of very thin and light cloth,
e.g., of silk. The bottle must be prepared the previous day.
The cork is removed, i.e., the bottle opened, usually by
means of a corkscrew. Whereas the empty bottle, which
should be dry inside, and the cork are needed, the wine is
not essential for the experiment.
The cork is pushed inside of the bottle (which may not
be easy due to the friction between cork and glass). Then
the problem is to remove the cork from the inside of the
bottle without destroying neither bottle nor cork. The only
equipment allowed is a silk cloth, e.g., a silk scarf.
FIGURE 8. Set up to remove a cork from an empty bottle using
a silk scarf (after [6]).
Low cost hands-on experiments for Physics teaching
Lat. Am. J. Phys. Educ. Vol. 6, Suppl. I, August 2012 7 http://www.lajpe.org
Fig. 8 depicts the set up for solving the problem. The silk
scarf is pushed into the bottle with part of it still being
outside (to be able to exert a force from outside). Then the
bottle is moved and rotated to place the cork onto the silk
such that tearing from the outside will lead to the silk
totally surrounding the cork, i.e., it no longer touches the
glass. Then one may tear and get the silk scarf outside of
the bottle, at the same time removing the cork.
The key point is friction and the coefficients of sliding
friction. On the one hand, due to friction between cork and
silk, it will stick to the silk while pulling. On the other
hand, the coefficient of friction between glass and silk is
smaller than the one between glass and cork, therefore
rather little force is needed to pull the cork within the silk
scarf.
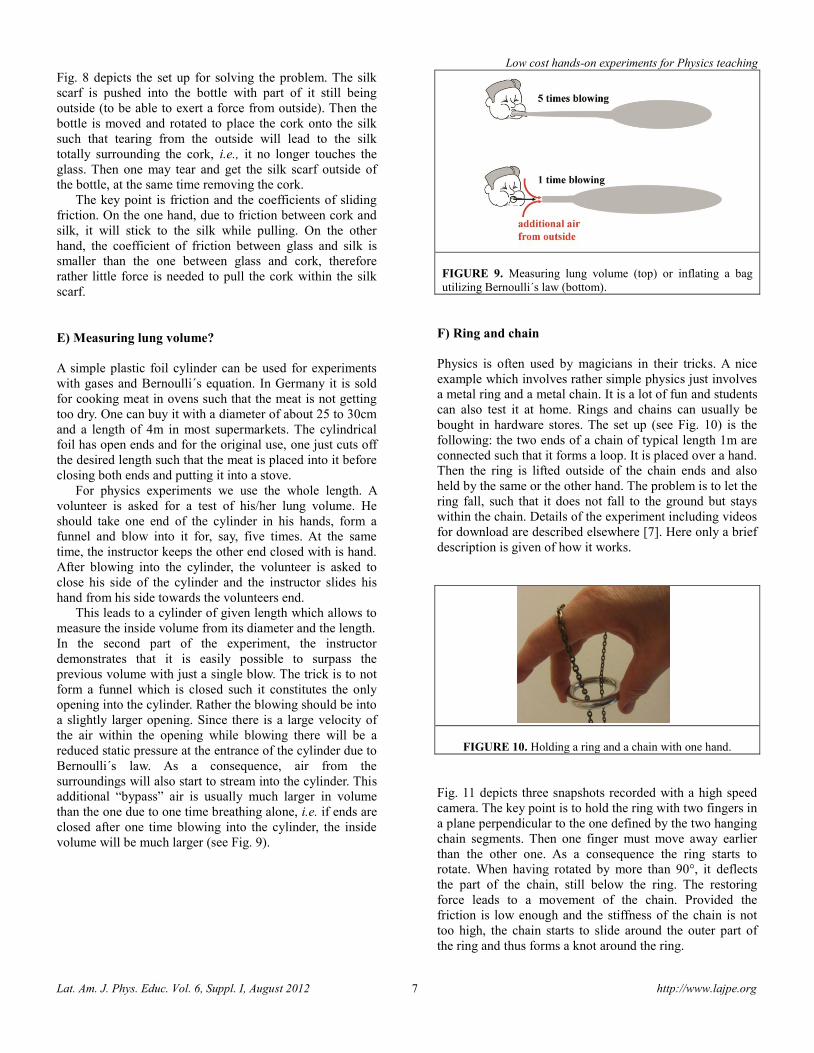
E) Measuring lung volume?
A simple plastic foil cylinder can be used for experiments
with gases and Bernoulli´s equation. In Germany it is sold
for cooking meat in ovens such that the meat is not getting
too dry. One can buy it with a diameter of about 25 to 30cm
and a length of 4m in most supermarkets. The cylindrical
foil has open ends and for the original use, one just cuts off
the desired length such that the meat is placed into it before
closing both ends and putting it into a stove.
For physics experiments we use the whole length. A
volunteer is asked for a test of his/her lung volume. He
should take one end of the cylinder in his hands, form a
funnel and blow into it for, say, five times. At the same
time, the instructor keeps the other end closed with is hand.
After blowing into the cylinder, the volunteer is asked to
close his side of the cylinder and the instructor slides his
hand from his side towards the volunteers end.
This leads to a cylinder of given length which allows to
measure the inside volume from its diameter and the length.
In the second part of the experiment, the instructor
demonstrates that it is easily possible to surpass the
previous volume with just a single blow. The trick is to not
form a funnel which is closed such it constitutes the only
opening into the cylinder. Rather the blowing should be into
a slightly larger opening. Since there is a large velocity of
the air within the opening while blowing there will be a
reduced static pressure at the entrance of the cylinder due to
Bernoulli´s law. As a consequence, air from the
surroundings will also start to stream into the cylinder. This
additional “bypass” air is usually much larger in volume
than the one due to one time breathing alone, i.e. if ends are
closed after one time blowing into the cylinder, the inside
volume will be much larger (see Fig. 9).
FIGURE 9. Measuring lung volume (top) or inflating a bag
utilizing Bernoulli´s law (bottom).
F) Ring and chain
Physics is often used by magicians in their tricks. A nice
example which involves rather simple physics just involves
a metal ring and a metal chain. It is a lot of fun and students
can also test it at home. Rings and chains can usually be
bought in hardware stores. The set up (see Fig. 10) is the
following: the two ends of a chain of typical length 1m are
connected such that it forms a loop. It is placed over a hand.
Then the ring is lifted outside of the chain ends and also
held by the same or the other hand. The problem is to let the
ring fall, such that it does not fall to the ground but stays
within the chain. Details of the experiment including videos
for download are described elsewhere [7]. Here only a brief
description is given of how it works.
FIGURE 10. Holding a ring and a chain with one hand.
Fig. 11 depicts three snapshots recorded with a high speed
camera. The key point is to hold the ring with two fingers in
a plane perpendicular to the one defined by the two hanging
chain segments. Then one finger must move away earlier
than the other one. As a consequence the ring starts to
rotate. When having rotated by more than 90°, it deflects
the part of the chain, still below the ring. The restoring
force leads to a movement of the chain. Provided the
friction is low enough and the stiffness of the chain is not
too high, the chain starts to slide around the outer part of
the ring and thus forms a knot around the ring.
Michael Vollmer, Klaus-Peter Möllmann
Lat. Am. J. Phys. Educ. Vol. 6, Suppl. I, August 2012 8 http://www.lajpe.org
FIGURE 11. Three snapshots,
recorded with a high speed
camera of the falling ring. The
chain forms a knot around the
ring (details, see [7]).
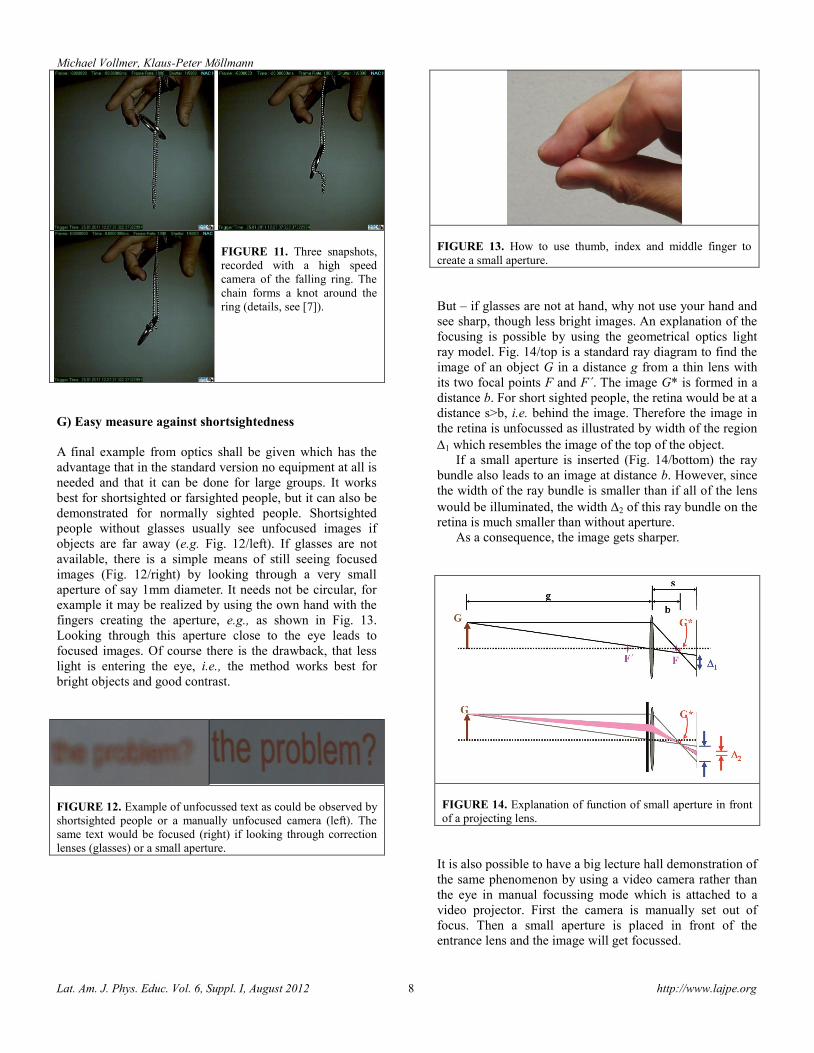
G) Easy measure against shortsightedness
A final example from optics shall be given which has the
advantage that in the standard version no equipment at all is
needed and that it can be done for large groups. It works
best for shortsighted or farsighted people, but it can also be
demonstrated for normally sighted people. Shortsighted
people without glasses usually see unfocused images if
objects are far away (e.g. Fig. 12/left). If glasses are not
available, there is a simple means of still seeing focused
images (Fig. 12/right) by looking through a very small
aperture of say 1mm diameter. It needs not be circular, for
example it may be realized by using the own hand with the
fingers creating the aperture, e.g., as shown in Fig. 13.
Looking through this aperture close to the eye leads to
focused images. Of course there is the drawback, that less
light is entering the eye, i.e., the method works best for
bright objects and good contrast.
FIGURE 12. Example of unfocussed text as could be observed by
shortsighted people or a manually unfocused camera (left). The
same text would be focused (right) if looking through correction
lenses (glasses) or a small aperture.
FIGURE 13. How to use thumb, index and middle finger to
create a small aperture.
But – if glasses are not at hand, why not use your hand and
see sharp, though less bright images. An explanation of the
focusing is possible by using the geometrical optics light
ray model. Fig. 14/top is a standard ray diagram to find the
image of an object G in a distance g from a thin lens with
its two focal points F and F´. The image G* is formed in a
distance b. For short sighted people, the retina would be at a
distance s>b, i.e. behind the image. Therefore the image in
the retina is unfocussed as illustrated by width of the region
1 which resembles the image of the top of the object.
If a small aperture is inserted (Fig. 14/bottom) the ray
bundle also leads to an image at distance b. However, since
the width of the ray bundle is smaller than if all of the lens
would be illuminated, the width 2 of this ray bundle on the
retina is much smaller than without aperture.
As a consequence, the image gets sharper.
FIGURE 14. Explanation of function of small aperture in front
of a projecting lens.
It is also possible to have a big lecture hall demonstration of
the same phenomenon by using a video camera rather than
the eye in manual focussing mode which is attached to a
video projector. First the camera is manually set out of
focus. Then a small aperture is placed in front of the
entrance lens and the image will get focussed.
Low cost hands-on experiments for Physics teaching
Lat. Am. J. Phys. Educ. Vol. 6, Suppl. I, August 2012 9 http://www.lajpe.org
IV. SUMMARY AND CONCLUSIONS
A number of well tested simple and low-cost hands-on
experiments have been described and explained. Some of
them were recorded with modern high speed cameras in
order to facilitate understanding of the underlying physics.
These few examples shall illustrate the usefulness of such
experiments in the teaching of physics. Of course we use
many more experiments of this type. Examples include
experiments from many different fields dealing, e.g., with
vacuum using household items [8], phenomena observed
when using electromagnetic fields within commercial
microwave ovens [9, 10], thermal phenomena of heat
transfer, which can be treated in predict-observe-explain
sequences such as e.g., the heating of cheese cubes in
conventional or microwave ovens [11], spectroscopy
experiments using overhead projectors [12] or even
interferometer set-ups for school or kitchen tables [13].
Experiments of various kinds and also simple hands-on
experiments can often be found in popular physics
education journals such as Physics Education (IOP), The
Physics Teacher (AAPT), or Lajpe (LAPEN) and – usually
with a larger degree of theory also in European Journal of
Physics (IOP) or American Journal of Physics (AAPT).
Finally there are compilations of hundreds of experiments
in books, published in various languages (see e.g. [6, 14]).
REFERENCES
[1] Vollmer, M. and Möllmann, K. P., High speed slow
motion: The technology of modern high speed cameras,
Phys. Ed. 46, 191-202 (2011).
[2] Mamola, K. C. and Pollock, J. T., The breaking
broomstick demonstration, The Physics Teacher 31, 230-
233 (1993).
[3] Vollmer, M. and Möllmann, K. P., Experiments with
high speed cameras, Phys. Ed. 46, 472-486 (2011).
[4] Garwin, R. L., Kinematics of an ultraelastic rough ball,
Am. J. Phys. 37, 88-92 (1969).
[5] Hefner, B. T., The kinematics of a superball bouncing
between two vertical surfaces, Am. J. Phys. 72, 875-883
(2004).
[6] Hilscher, H. et al., Physikalische Freihandexperimente,
2 Bände, (Aulis, Köln, 2004).
[7] Vollmer, M. and Möllmann, K. P., Ring falling into a
chain: no magic–just physics, The Physics Teacher 49, 337-
339 (2011).
[8] Vollmer, M., Vakuumphysik im Alltag: Physikalische
Freihand- und Low-cost-Experimente, PhyDid 1, 19-32
(2002), see www.phydid.de (in German).
[9] Vollmer, M., Möllmann, K. P., Karstädt, D., More
experiments with microwave ovens, Phys. Ed. 39, 346-351
(2004).
[10] Vollmer, M., Möllmann, K. P., Karstädt, D.,
Microwave oven experiments with metals and light sources,
Phys. Ed. 39, 500-508 (2004).
[11] Planinsic, G. and Vollmer, M., The surface to volume
ratio in thermal physics: from cheese cubes to animal
metabolism, Eur. J. Phys. 29, 369-384 (2008); see also 29/3,
661 (2008).
[12] Vollmer, M., Freihandexperimente zur Spektroskopie
im Unterricht und als Hausaufgabe, Praxis der
Naturwissenschaften–Physik in der Schule 4/52, 9-18
(2003) see also pages 2-8 in same issue (in German).
[13] Vollmer, M. and Möllmann, K. P., Michelson
interferometer for your kitchen table, The Phys. Teacher
46, 114-117 (2008).
[14] Edge, R., String and sticky tape experiments,
American Association of Physics Teachers, College Park,
MD (1987).