lightroom: creating and managing collections
DESCRIPTION
This document covers the creation and the managing of Collection in Lightroom. Collections are like virtual photo albums that you can use to store links to your best images, the ones you like to share with family, friends and clients.TRANSCRIPT
Lightroom’s Collections Panel and Toolset © Jim Cornish, 2014
Collections: Lightroom’s Virtual Photo Albums
Lightroom’s Collections Panel and Toolset © Jim Cornish, 2014
2
Table of ContentsCollections ………………….….………………….…………………………………... 3
The Collections Panel ……………………………………….………………. 4
Smart Collection Sets .…………………………..….……….….…………… 5
Creating a New Regular Collection …….………………………… 6
Setting the Target Collection ……………….….…….……………….. 7
Adding Images to a Target Collection ….….…………….……. 8
Adding Batch of Image and Creating a New
Collection at the Same time ……………………………………. 9
Using Drag-and-Drop to add Images to a Collection . 10
Adding Image to Collection in Develop Module…………… . 11
The Painter Tool ……………………………………………………………….. 12
Using the Painter Tool to Select Images for
The Target Collection.………………………………………………… 13
Collection Sets ………………….……………………………….………… 14
Creating a Collection Set ……………………….…………………… 15
Creating Regular Collections for Collection Set ….… 16
Deleting a Collection ……………………………………………………. 17
Moving Around Collections ………………………………………… 18
Renaming Collections ……………………………………………………. 19
Lightroom’s Collections Panel and Toolset © Jim Cornish, 2014
3
If you ever owned a film camera, changes areyou have shoe boxes filled with photographsstashed away in a closet. It is equally likely thatyou have your best pictures stored in photoalbums which you pull out from time to timewhen family and friends visit.
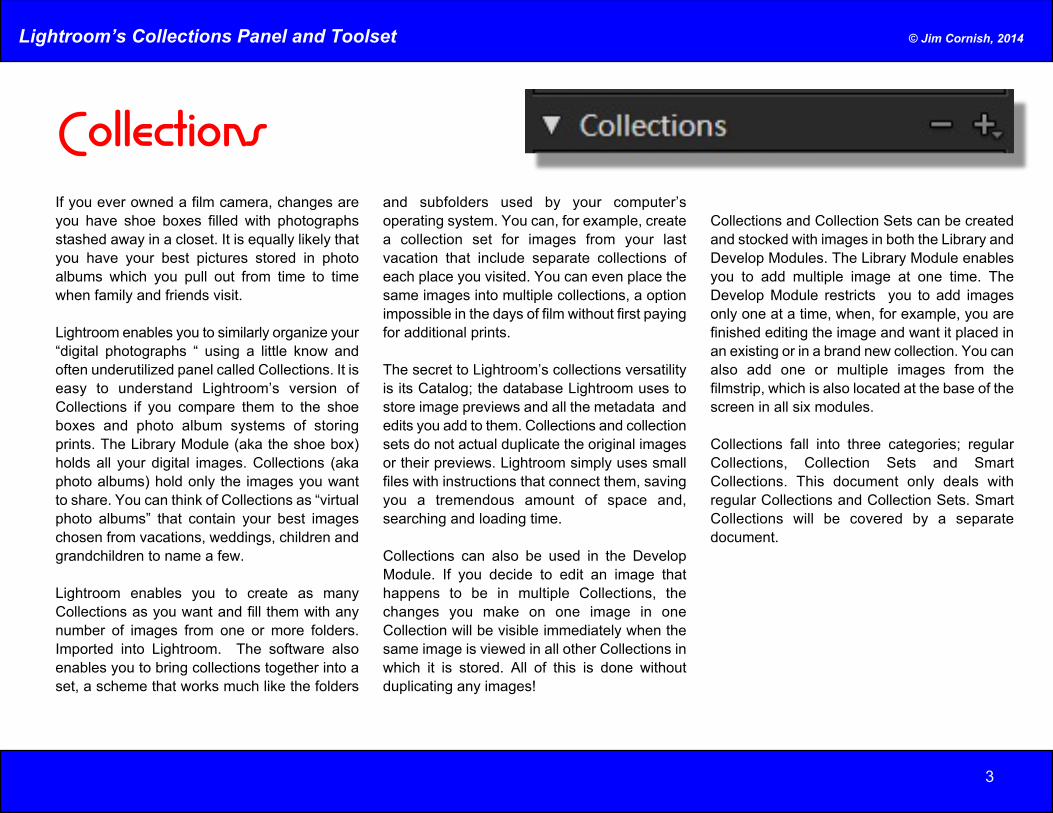
Lightroom enables you to similarly organize your“digital photographs “ using a little know andoften underutilized panel called Collections. It iseasy to understand Lightroom’s version ofCollections if you compare them to the shoeboxes and photo album systems of storingprints. The Library Module (aka the shoe box)holds all your digital images. Collections (akaphoto albums) hold only the images you wantto share. You can think of Collections as “virtualphoto albums” that contain your best imageschosen from vacations, weddings, children andgrandchildren to name a few.
Lightroom enables you to create as manyCollections as you want and fill them with anynumber of images from one or more folders.Imported into Lightroom. The software alsoenables you to bring collections together into aset, a scheme that works much like the folders
and subfolders used by your computer’soperating system. You can, for example, createa collection set for images from your lastvacation that include separate collections ofeach place you visited. You can even place thesame images into multiple collections, a optionimpossible in the days of film without first payingfor additional prints.
The secret to Lightroom’s collections versatilityis its Catalog; the database Lightroom uses tostore image previews and all the metadata andedits you add to them. Collections and collectionsets do not actual duplicate the original imagesor their previews. Lightroom simply uses smallfiles with instructions that connect them, savingyou a tremendous amount of space and,searching and loading time.
Collections can also be used in the DevelopModule. If you decide to edit an image thathappens to be in multiple Collections, thechanges you make on one image in oneCollection will be visible immediately when thesame image is viewed in all other Collections inwhich it is stored. All of this is done withoutduplicating any images!
Collections and Collection Sets can be createdand stocked with images in both the Library andDevelop Modules. The Library Module enablesyou to add multiple image at one time. TheDevelop Module restricts you to add imagesonly one at a time, when, for example, you arefinished editing the image and want it placed inan existing or in a brand new collection. You canalso add one or multiple images from thefilmstrip, which is also located at the base of thescreen in all six modules.
Collections fall into three categories; regularCollections, Collection Sets and SmartCollections. This document only deals withregular Collections and Collection Sets. SmartCollections will be covered by a separatedocument.

Lightroom’s Collections Panel and Toolset © Jim Cornish, 2014
4
The Collections Panel, as pictured in the screencapture to the right, is located in the left panel in all sixLightroom Modules. Your Collections list will, ofcourse, reflect your own system of naming andorganizing collections.
Regular collections and collection sets are organizedalphabetically in a tree structure that looks similar tothe directory structure of your computer’s filemanagement system. Keeping that in mind, you canthink of Collection sets as parent folders and regularcollections as subfolders. The images, when displayedin the center panel of the Library and DevelopModules, are like individual files. And as with foldersand subfolders, when collections and collections setsare added, moved and renamed, their position in thetree can change to maintain the alphabetical order.
The regular collections and collection sets in theCollections panel are revealed and concealed usinga disclosure triangle, also called a twirlie. Thesetwirlies act like toggle switches. If the twirlie is pointingto the right, the contents of the Collections panel areconcealed. To reveal the contents , click the twirlieonce. If the twirlie is pointing down, all the regularcollections and smart collections are revealed. If younest regular collections, (place one inside another),the parent collection will display a twirlie as well.
Twirlie(Disclosure triangle)
Collection SetShape
distinguishes it
Panel Tab
Collection
Delete
Add
Number of imagesin collection
Target collection asindicated by the +
Collection withcustomizable
options as
Collectioncurrentlydisplayed as
The Collections Panel
Lightroom’s Collections Panel and Toolset © Jim Cornish, 2014
5
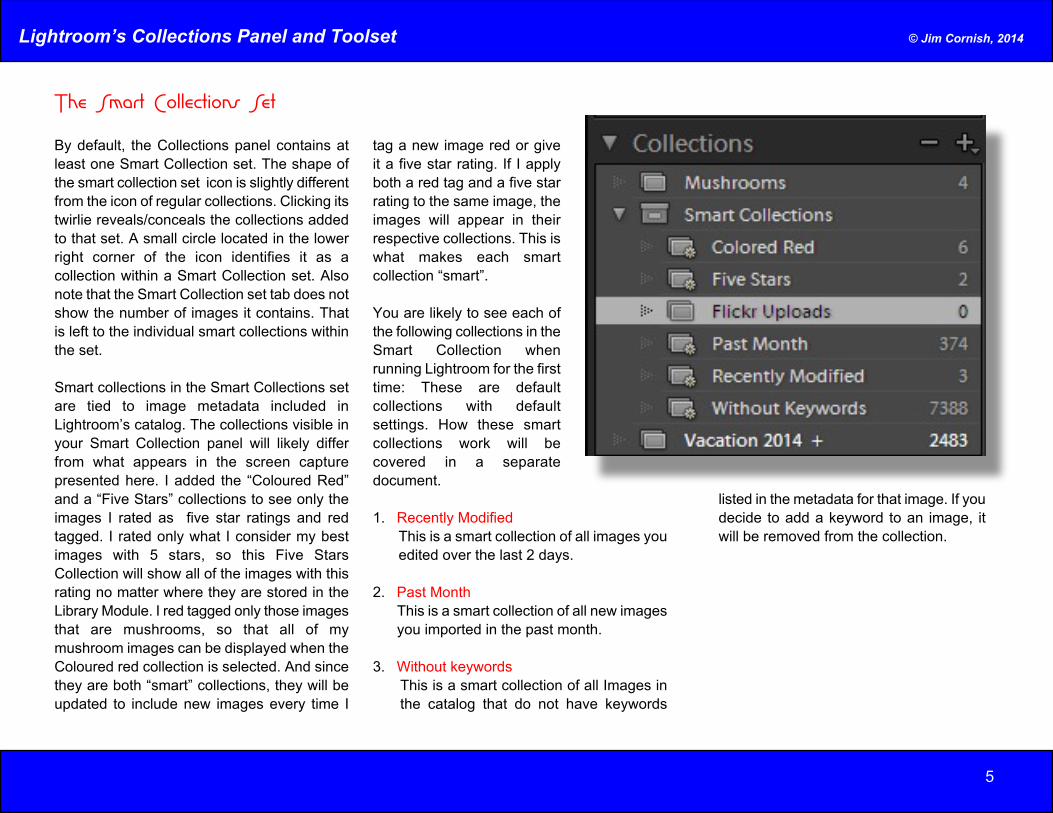
By default, the Collections panel contains atleast one Smart Collection set. The shape ofthe smart collection set icon is slightly differentfrom the icon of regular collections. Clicking itstwirlie reveals/conceals the collections addedto that set. A small circle located in the lowerright corner of the icon identifies it as acollection within a Smart Collection set. Alsonote that the Smart Collection set tab does notshow the number of images it contains. Thatis left to the individual smart collections withinthe set.
Smart collections in the Smart Collections setare tied to image metadata included inLightroom’s catalog. The collections visible inyour Smart Collection panel will likely differfrom what appears in the screen capturepresented here. I added the “Coloured Red”and a “Five Stars” collections to see only theimages I rated as five star ratings and redtagged. I rated only what I consider my bestimages with 5 stars, so this Five StarsCollection will show all of the images with thisrating no matter where they are stored in theLibrary Module. I red tagged only those imagesthat are mushrooms, so that all of mymushroom images can be displayed when theColoured red collection is selected. And sincethey are both “smart” collections, they will beupdated to include new images every time I
tag a new image red or giveit a five star rating. If I applyboth a red tag and a five starrating to the same image, theimages will appear in theirrespective collections. This iswhat makes each smartcollection “smart”.
You are likely to see each ofthe following collections in theSmart Collection whenrunning Lightroom for the firsttime: These are defaultcollections with defaultsettings. How these smartcollections work will becovered in a separatedocument.
1. Recently Modified This is a smart collection of all images you
edited over the last 2 days.
2. Past Month This is a smart collection of all new images
you imported in the past month.
3. Without keywords This is a smart collection of all Images in
the catalog that do not have keywords
listed in the metadata for that image. If youdecide to add a keyword to an image, itwill be removed from the collection.
The Smart Collections Set

Lightroom’s Collections Panel and Toolset © Jim Cornish, 2014
6
Creating A New Regular CollectionLightroom enables you to create any number ofregular collections. The name you give eachcollection should be one that immediatelyreminds you of the images the collectioncontains. The maximum length of a collectionname is 65 characters, so you have plenty ofcharacters to create great names. The letterscan be either upper or lower case or acombination of both and can include spaces andunderscores to separate words. You should,however, keep a collection name as short aspossible so the entire name is visible withouthaving to resize the panel’s width and losevaluable working space.
Lightroom gives you several options whencreating a regular collection. You can create theregular collection and then add one or moreimages later. You can also select a bunch ofimages you want in a new collection and thenhave Lightroom create that collection and addthe selected images automatically. Both optionswill be covered in this document.
To create a new, empty, regular collection,follow the steps below. Please note that the useof the word click refers to the left mouse button.Anytime the right mouse button must be used,the instruction will be written as right click.
1. Click the twirlie on the Collections tab todisplay all existing collections and collectionsets.
2. Click the + sign on the Collections tab. Acontextual menu, as pictured to the right,appears. It gives you three collectionsoptions.
3 Click the Create Collection option asdisplayed in a red rectangle in the screencapture to the right. A dialog box as picturedlower right will then appear.
4. Type a name for the collection in the Name:text box.
5. Leave the Location: Inside a CollectionSet box unchecked.
6. If present, click the checkmark on Includeselected photos to undo adding anyselected images to this new collection.
7. If present, click the checkmark on the Setas target collection to undo setting thenew collection as the target. The purposeof the target collection will be covered laterin this document.
8. Click the Create button to create the newcollection.
The new collection will now appear inalphabetical order in the collection panel. If youwant to create additional regular collections,repeat steps 2-5. Adding images to a regularcollection is covered on the next page of thisdocument.
Lightroom’s Collections Panel and Toolset © Jim Cornish, 2014
7
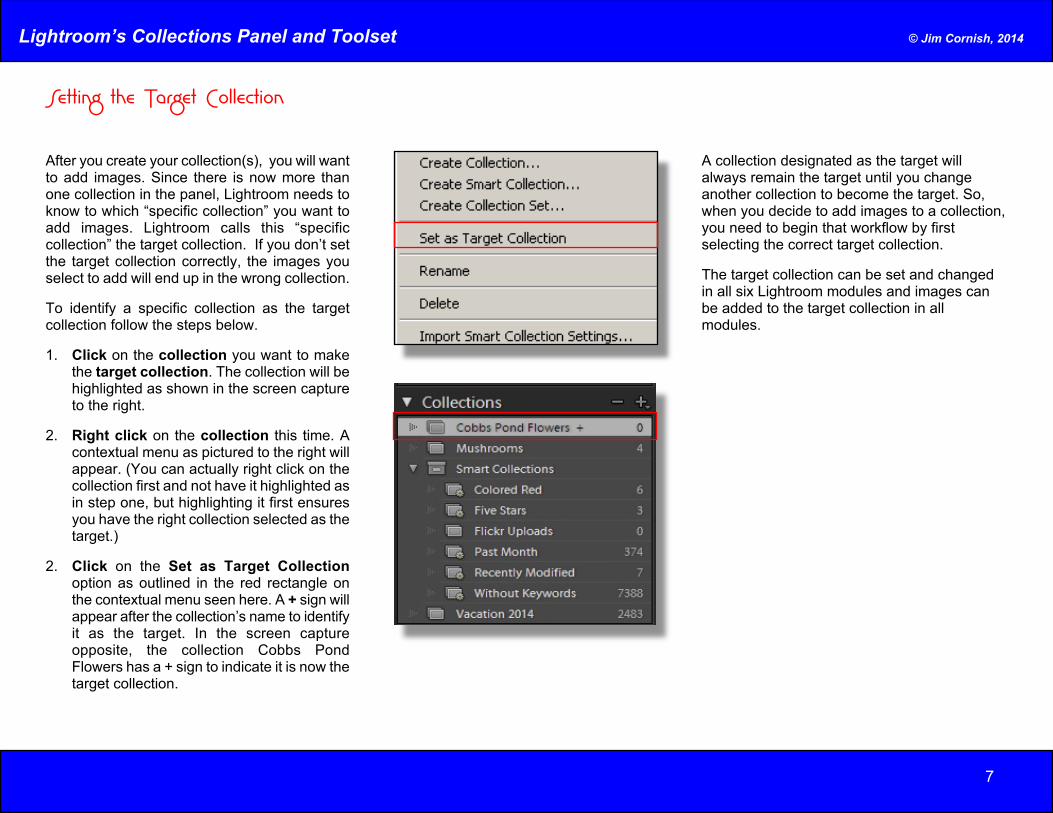
Setting the Target Collection
After you create your collection(s), you will wantto add images. Since there is now more thanone collection in the panel, Lightroom needs toknow to which “specific collection” you want toadd images. Lightroom calls this “specificcollection” the target collection. If you don’t setthe target collection correctly, the images youselect to add will end up in the wrong collection.
To identify a specific collection as the targetcollection follow the steps below.
1. Click on the collection you want to makethe target collection. The collection will behighlighted as shown in the screen captureto the right.
2. Right click on the collection this time. Acontextual menu as pictured to the right willappear. (You can actually right click on thecollection first and not have it highlighted asin step one, but highlighting it first ensuresyou have the right collection selected as thetarget.)
2. Click on the Set as Target Collectionoption as outlined in the red rectangle onthe contextual menu seen here. A + sign willappear after the collection’s name to identifyit as the target. In the screen captureopposite, the collection Cobbs PondFlowers has a + sign to indicate it is now thetarget collection.
A collection designated as the target willalways remain the target until you changeanother collection to become the target. So,when you decide to add images to a collection,you need to begin that workflow by firstselecting the correct target collection.
The target collection can be set and changedin all six Lightroom modules and images canbe added to the target collection in allmodules.
Lightroom’s Collections Panel and Toolset © Jim Cornish, 2014
8
Images can be added to a target collection one ata time or in batches. Adding images in batches canbe done in the grid view of the Library Module orfrom the filmstrip that appears along the bottom ofthe screen in all Lightroom Modules. Adding imagescan be done via a contextual menu option or viaclick-drag-and-drop. Both options will be covered.
Adding An Image via the Menu Option
It does not matter what Module you are in or if youchoose to use the filmstrip, adding a single imageis very straight forward.
1. Select the collection you want as the Targetcollection (see instructions on the previouspage).
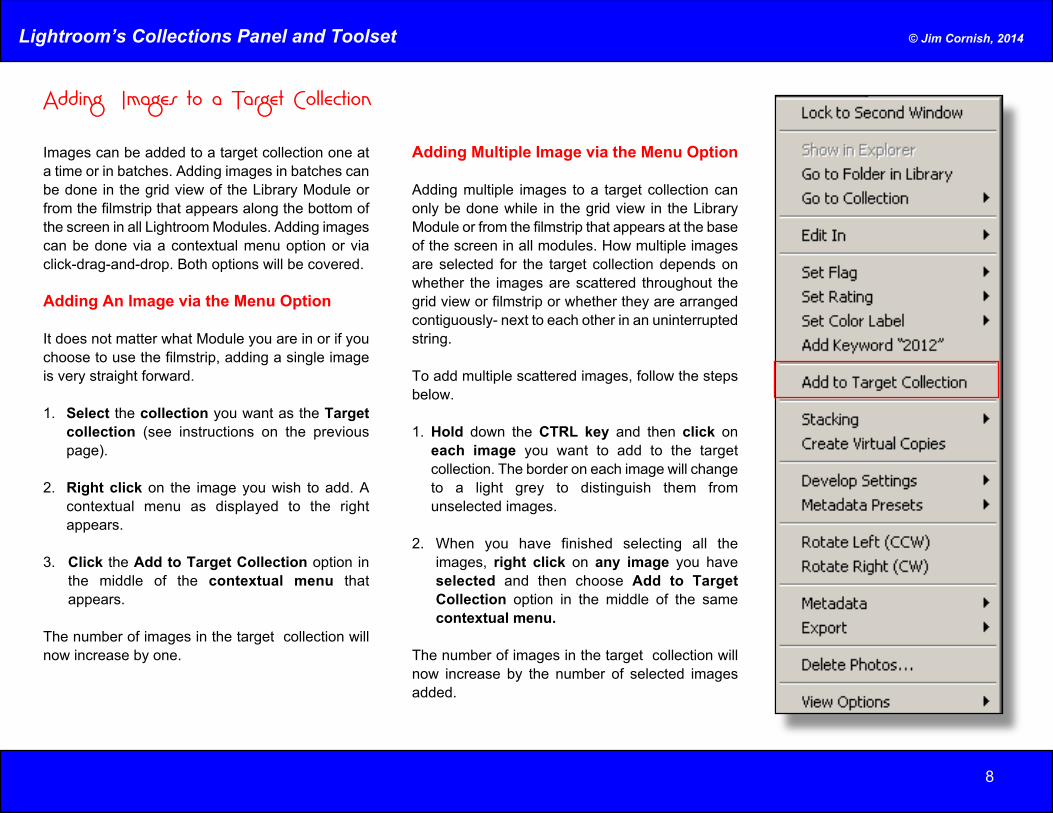
2. Right click on the image you wish to add. Acontextual menu as displayed to the rightappears.
3. Click the Add to Target Collection option inthe middle of the contextual menu thatappears.
The number of images in the target collection willnow increase by one.
Adding Multiple Image via the Menu Option
Adding multiple images to a target collection canonly be done while in the grid view in the LibraryModule or from the filmstrip that appears at the baseof the screen in all modules. How multiple imagesare selected for the target collection depends onwhether the images are scattered throughout thegrid view or filmstrip or whether they are arrangedcontiguously- next to each other in an uninterruptedstring.
To add multiple scattered images, follow the stepsbelow.
1. Hold down the CTRL key and then click oneach image you want to add to the targetcollection. The border on each image will changeto a light grey to distinguish them fromunselected images.
2. When you have finished selecting all theimages, right click on any image you haveselected and then choose Add to TargetCollection option in the middle of the samecontextual menu.
The number of images in the target collection willnow increase by the number of selected imagesadded.
Adding Images to a Target Collection

Lightroom’s Collections Panel and Toolset © Jim Cornish, 2014
9
As previously stated, you can select a bunch ofimages to add to a collection and then createthe collection and have those imagesautomatically added. This is a good option if youare using Collections for the first time and wantto add images to collections that don’t yet exist.Using this method does not require the use ofa target collection since the collection has yetto be created
To select a batch of images and create a newcollection at the same time, follow the stepsbelow.
1. CTRL click (hold the CTRL key done whileyou click on each image) to create a batchof images you wish to add to a newcollection.
2. When finished selecting the images, clickon the + sign on the Collections tab. ACreate Collection dialog box as pictured tothe right will appear.
3 Type a name for your collection in theText box..
4. Leave the box in the Location: Inside aCollection set section unchecked.
5. In the Options section, click on the boxes“Include selected photos” and “Set astarget collection” to check them. Havingthese boxes checked means Lightroom willcreate a new collection with the name youtyped, set it as the target collection andthen add the selected files automatically.
6. Click the create button to create the newcollection and add the images.
The new collection will now appear inalphabetical order in the collection panel. Theimages will be added and the number of imagesyou added will appear .
Images that are included in a collection have a“stacked symbol” located in the lower right handcorner of the image as displayed to the rightwhenever they are displayed in the Librarymodule and on the filmstrip. Other icons thatindicate the image has a keyword attached orthe image has been edited will also be displayed.
Adding A Batch of Selected Images
Lightroom’s Collections Panel and Toolset © Jim Cornish, 2014
10
Using Drag-and-drop to Add Images to a Collection
Drag-and-drop is a method many people use tomove files and folders around the directorystructure of their computer’s file managementsystem. This method works basically the sameway in Lightroom.
The instructions below can be used to dragimages from either the grid view in the LibraryModule or from the filmstrip visible at the baseof the screen on all modules.
1. Open the Folders panel and select thefolder containing the images you wish toadd to a collection.
2, While holding the CTRL down, click oneach image you wish to add to thecollection. When selected, the borderaround each image will turn a bright grey todistinguish selected images from non-selected images.
3. Once you have all the images selected,click on the twirlie to conceal the Folderspanel. Don’t worry, the images in thegrid/filmstrip will remain visible and selected.
4. Click on the twirlie to reveal theCollections panel if it is not already opened.
5, Scroll down until the collection you wishto drop the images into is visible in thelist.
6. Click and hold the mouse button on anyone of the images you have selected. Besure to do this on the image and not on theborder.
7. With the mouse button still held down,drag the mouse toward the collectionspanel. The mouse will change to a stack ofimages with the one you clicked on top.
8. Drag the stack to the Collections panel andhover over the Collection that you wantto drop the images into. The Collectionwill be highlighted. If the collection cannotreceive the images the stack will change tothe Ø symbol and back to a stack once youmove on.
9. When you have the correct collectionselected, release the mouse button. Theimages will now be added to the collection.
Note:
The selected images themselves are not movedas they would be in your computer’s operatingsystem. Instead, Lightroom simply updates theCatalog by adding a reference to their locationin a new or additional collection .
If you would like to add these same images toanother Collection, just repeat steps 3-5 as theimages will remain selected even after they aredropped.
If you wish to use the grid view of the LibraryModule to click-drag-and-drop images into acollection, follow the same steps
Lightroom’s Collections Panel and Toolset © Jim Cornish, 2014
11
The Develop module displays only one imageat a time; the image you are currently editing.Lightroom makes it possible for you to add thatimage to a Collection.
To add an image to a Collection while in theDevelop module, follow the steps below.
1. Click on the image you want to edit andbring it into the Develop module.
2. After or while editing the image, open theCollections panel.
3. Right click on the Collection you want asthe Target Collection. A contextual menuappears.
4. Click on “Set as Target Collection” . A +sign will now tag the collection as the target.
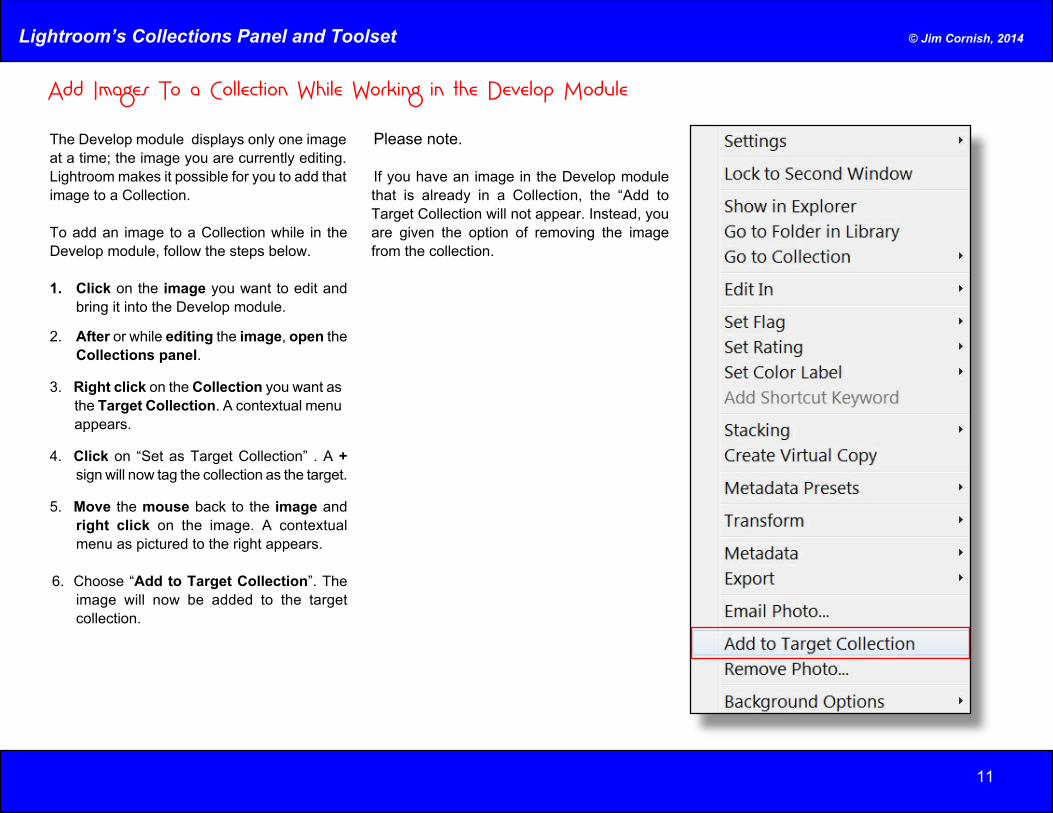
5. Move the mouse back to the image andright click on the image. A contextualmenu as pictured to the right appears.
6. Choose “Add to Target Collection”. Theimage will now be added to the targetcollection.
Please note.
If you have an image in the Develop modulethat is already in a Collection, the “Add toTarget Collection will not appear. Instead, youare given the option of removing the imagefrom the collection.
Add Images To a Collection While Working in the Develop Module
Lightroom’s Collections Panel and Toolset © Jim Cornish, 2014
12
The Painter is a new, little known yet veryversatile tool for managing and tagging imagesin the Library Module only.
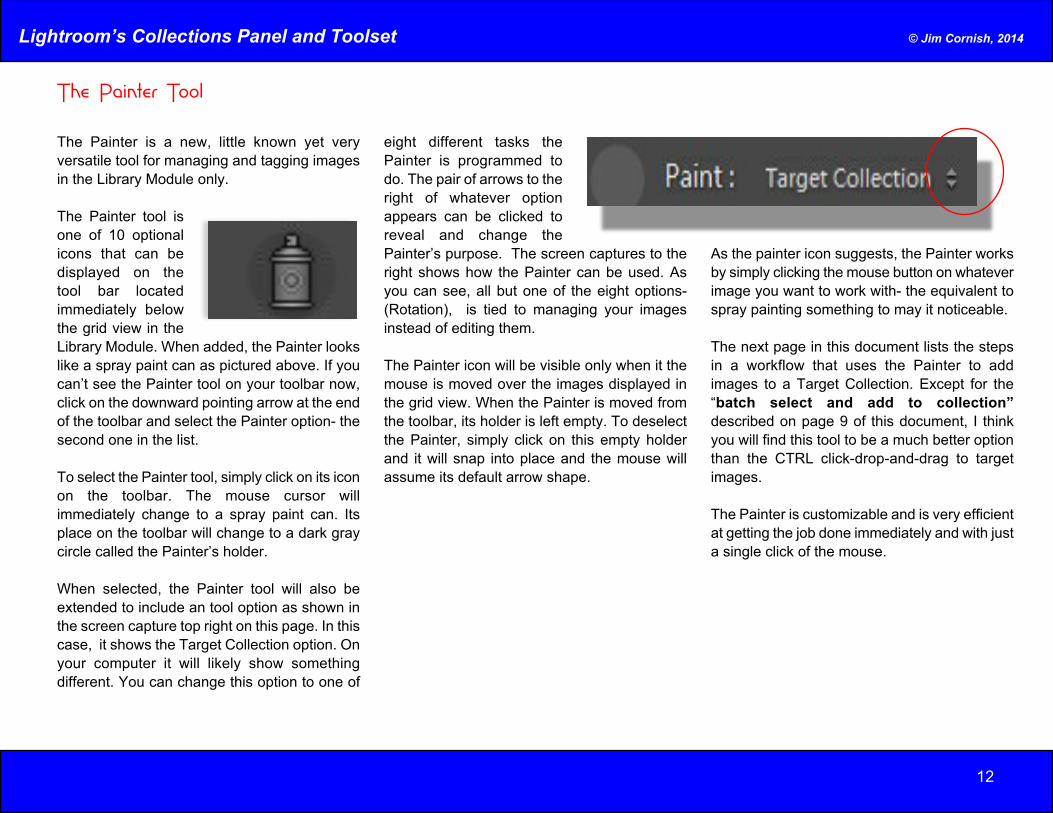
The Painter tool isone of 10 optionalicons that can bedisplayed on thetool bar locatedimmediately belowthe grid view in theLibrary Module. When added, the Painter lookslike a spray paint can as pictured above. If youcan’t see the Painter tool on your toolbar now,click on the downward pointing arrow at the endof the toolbar and select the Painter option- thesecond one in the list.
To select the Painter tool, simply click on its iconon the toolbar. The mouse cursor willimmediately change to a spray paint can. Itsplace on the toolbar will change to a dark graycircle called the Painter’s holder.
When selected, the Painter tool will also beextended to include an tool option as shown inthe screen capture top right on this page. In thiscase, it shows the Target Collection option. Onyour computer it will likely show somethingdifferent. You can change this option to one of
eight different tasks thePainter is programmed todo. The pair of arrows to theright of whatever optionappears can be clicked toreveal and change thePainter’s purpose. The screen captures to theright shows how the Painter can be used. Asyou can see, all but one of the eight options-(Rotation), is tied to managing your imagesinstead of editing them.
The Painter icon will be visible only when it themouse is moved over the images displayed inthe grid view. When the Painter is moved fromthe toolbar, its holder is left empty. To deselectthe Painter, simply click on this empty holderand it will snap into place and the mouse willassume its default arrow shape.
As the painter icon suggests, the Painter worksby simply clicking the mouse button on whateverimage you want to work with- the equivalent tospray painting something to may it noticeable.
The next page in this document lists the stepsin a workflow that uses the Painter to addimages to a Target Collection. Except for the“batch select and add to collection”described on page 9 of this document, I thinkyou will find this tool to be a much better optionthan the CTRL click-drop-and-drag to targetimages.
The Painter is customizable and is very efficientat getting the job done immediately and with justa single click of the mouse.
The Painter Tool
Lightroom’s Collections Panel and Toolset © Jim Cornish, 2014
13
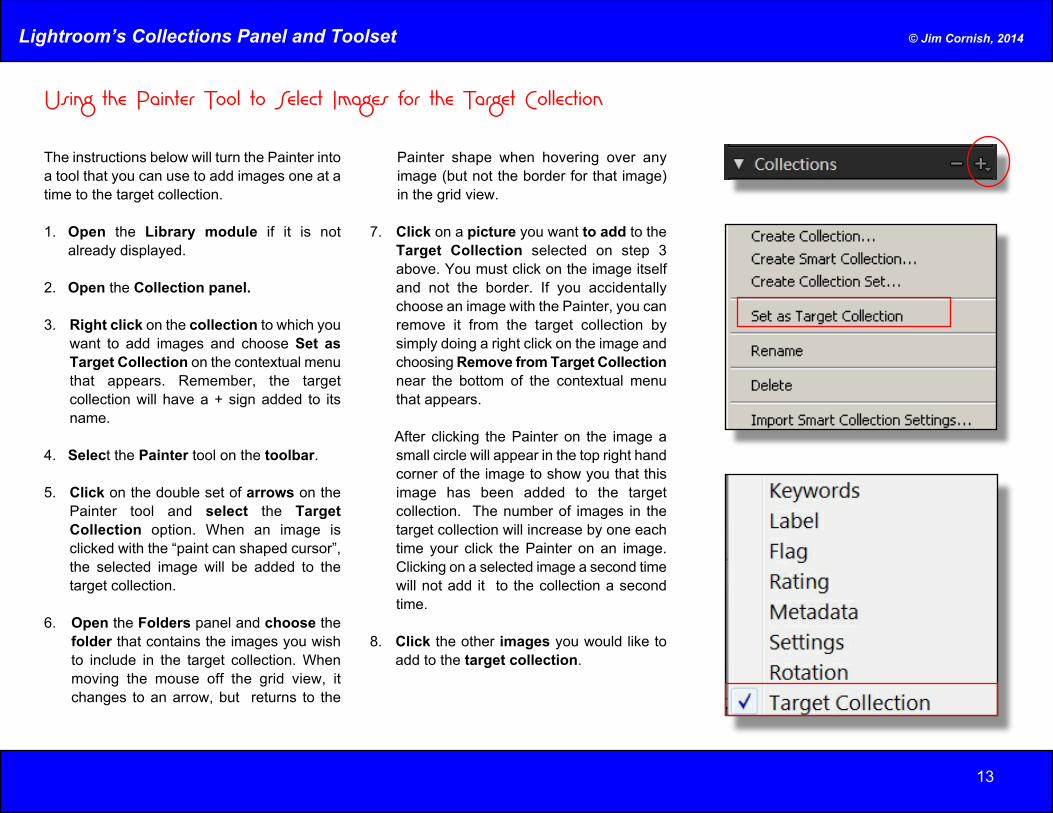
The instructions below will turn the Painter intoa tool that you can use to add images one at atime to the target collection.
1. Open the Library module if it is notalready displayed.
2. Open the Collection panel.
3. Right click on the collection to which youwant to add images and choose Set asTarget Collection on the contextual menuthat appears. Remember, the targetcollection will have a + sign added to itsname.
4. Select the Painter tool on the toolbar.
5. Click on the double set of arrows on thePainter tool and select the TargetCollection option. When an image isclicked with the “paint can shaped cursor”,the selected image will be added to thetarget collection.
6. Open the Folders panel and choose thefolder that contains the images you wishto include in the target collection. Whenmoving the mouse off the grid view, itchanges to an arrow, but returns to the
Painter shape when hovering over anyimage (but not the border for that image)in the grid view.
7. Click on a picture you want to add to theTarget Collection selected on step 3above. You must click on the image itselfand not the border. If you accidentallychoose an image with the Painter, you canremove it from the target collection bysimply doing a right click on the image andchoosing Remove from Target Collectionnear the bottom of the contextual menuthat appears.
After clicking the Painter on the image asmall circle will appear in the top right handcorner of the image to show you that thisimage has been added to the targetcollection. The number of images in thetarget collection will increase by one eachtime your click the Painter on an image.Clicking on a selected image a second timewill not add it to the collection a secondtime.
8. Click the other images you would like toadd to the target collection.
Using the Painter Tool to Select Images for the Target Collection
Lightroom’s Collections Panel and Toolset © Jim Cornish, 2014
14
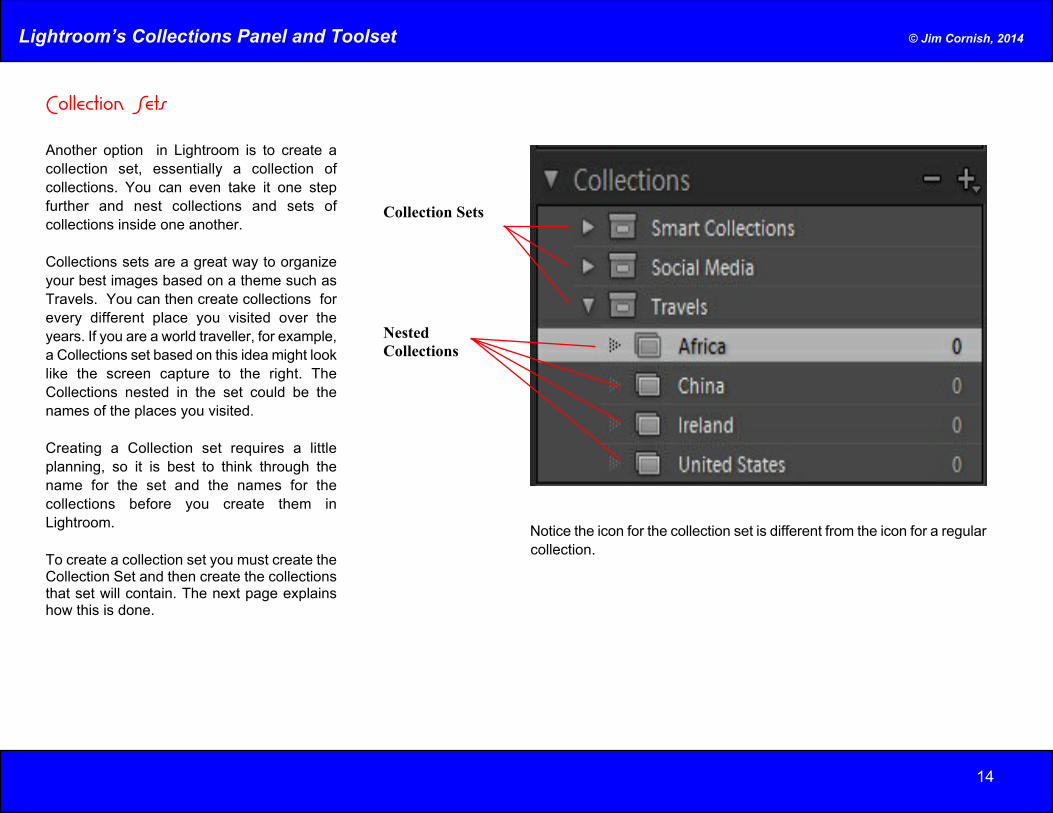
Another option in Lightroom is to create acollection set, essentially a collection ofcollections. You can even take it one stepfurther and nest collections and sets ofcollections inside one another.
Collections sets are a great way to organizeyour best images based on a theme such asTravels. You can then create collections forevery different place you visited over theyears. If you are a world traveller, for example,a Collections set based on this idea might looklike the screen capture to the right. TheCollections nested in the set could be thenames of the places you visited.
Creating a Collection set requires a littleplanning, so it is best to think through thename for the set and the names for thecollections before you create them inLightroom.
To create a collection set you must create theCollection Set and then create the collectionsthat set will contain. The next page explainshow this is done.
Collection Sets
Collection Sets
NestedCollections
Notice the icon for the collection set is different from the icon for a regularcollection.

Lightroom’s Collections Panel and Toolset © Jim Cornish, 2014
15
Creating an Collection Set
To create a Collection Set, follow the stepsbelow.
1. Open the Collections panel.
2. Click on the + sign on the collections paneltab. The now familiar contextual menu willappear.
3. Click on the Create Collection Set option.A dialog box will appear.
4. Type in the name for your collection in thetextbox. To follow through this handout,type Travels.
5. Click to uncheck the Inside a CollectionSet option.
6. Click the Create button to create thecollection set. It will now appear in theCollections panel. Notice the icon for thecollection set is different from the icon for aregular collection.
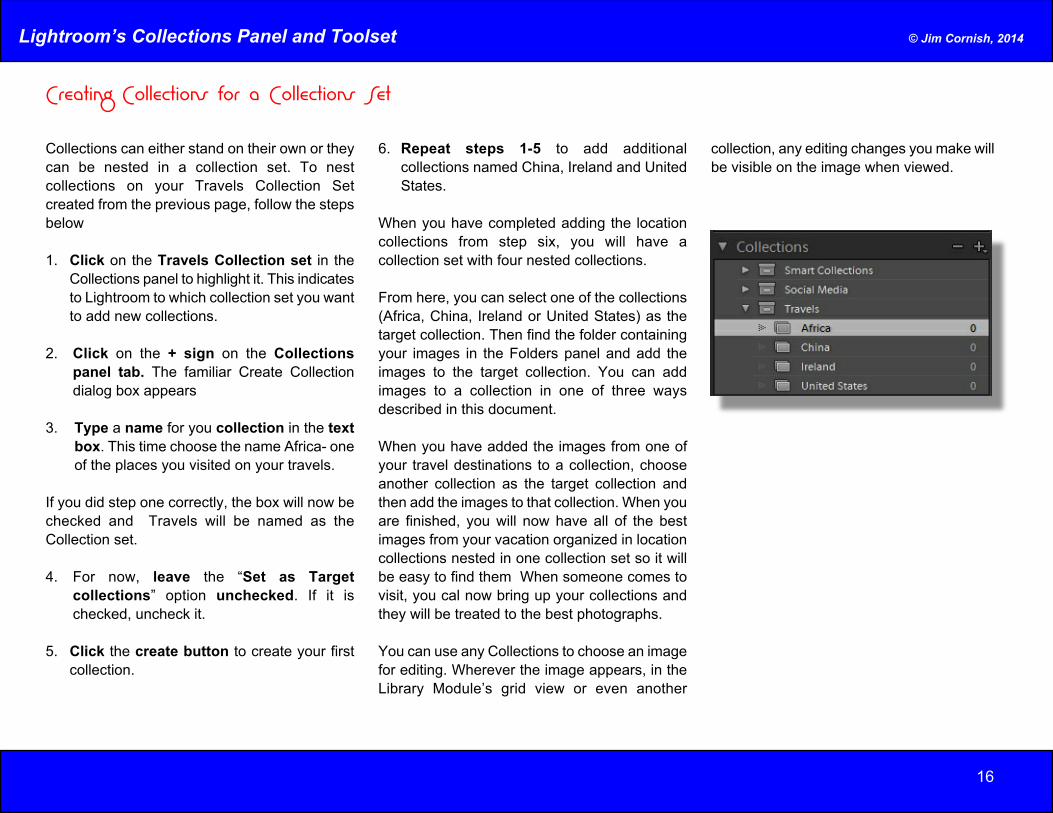
In the screen capture below, Travels is theCollection Set. Africa, China, Ireland and UnitedStates are all nested Collections in the Travelsset.
The next page contains the steps you mustfollow to add these travel destinations to theTravels collection set.
Lightroom’s Collections Panel and Toolset © Jim Cornish, 2014
16
Collections can either stand on their own or theycan be nested in a collection set. To nestcollections on your Travels Collection Setcreated from the previous page, follow the stepsbelow
1. Click on the Travels Collection set in theCollections panel to highlight it. This indicatesto Lightroom to which collection set you wantto add new collections.
2. Click on the + sign on the Collectionspanel tab. The familiar Create Collectiondialog box appears
3. Type a name for you collection in the textbox. This time choose the name Africa- oneof the places you visited on your travels.
If you did step one correctly, the box will now bechecked and Travels will be named as theCollection set.
4. For now, leave the “Set as Targetcollections” option unchecked. If it ischecked, uncheck it.
5. Click the create button to create your firstcollection.
6. Repeat steps 1-5 to add additionalcollections named China, Ireland and UnitedStates.
When you have completed adding the locationcollections from step six, you will have acollection set with four nested collections.
From here, you can select one of the collections(Africa, China, Ireland or United States) as thetarget collection. Then find the folder containingyour images in the Folders panel and add theimages to the target collection. You can addimages to a collection in one of three waysdescribed in this document.
When you have added the images from one ofyour travel destinations to a collection, chooseanother collection as the target collection andthen add the images to that collection. When youare finished, you will now have all of the bestimages from your vacation organized in locationcollections nested in one collection set so it willbe easy to find them When someone comes tovisit, you cal now bring up your collections andthey will be treated to the best photographs.
You can use any Collections to choose an imagefor editing. Wherever the image appears, in theLibrary Module’s grid view or even another
collection, any editing changes you make willbe visible on the image when viewed.
Creating Collections for a Collections Set
Lightroom’s Collections Panel and Toolset © Jim Cornish, 2014
17
Deleting a Collection
Sometimes you can use a Collection for asingular purpose. For example, as you edit yourimages you might like to put all the images youwant to show a certain friend or client in acollection so when the time comes, your don’thave to go through your images and select themagain. When you are finished working with thatclient, you might want to delete the collection toreduce the clutter in your Collections panel.
When you delete a collection, the images arenot deleted from your hard drive. Deleting acollection simply means you are deleting thecatalog references to the image that Lightroomuses to build that collection.
There are two ways of deleting a collection: 1.using a contextual menu and 2. using the - signon the Collection Panel tab.
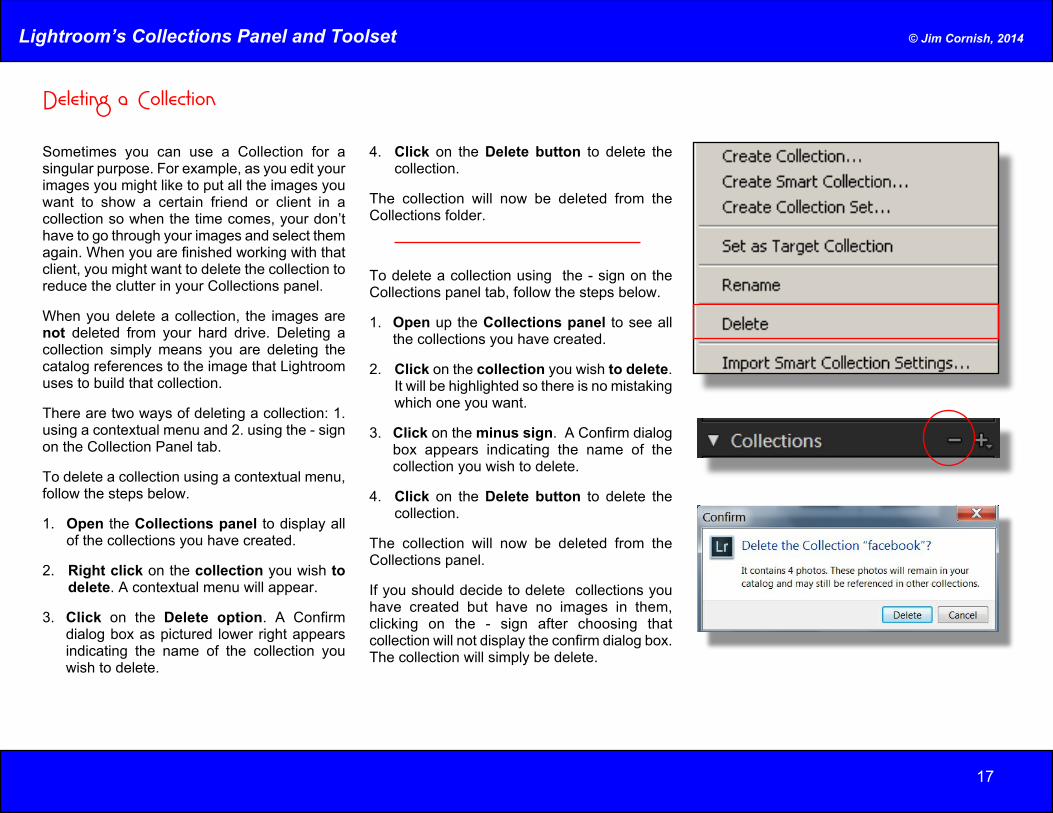
To delete a collection using a contextual menu,follow the steps below.
1. Open the Collections panel to display allof the collections you have created.
2. Right click on the collection you wish todelete. A contextual menu will appear.
3. Click on the Delete option. A Confirmdialog box as pictured lower right appearsindicating the name of the collection youwish to delete.
4. Click on the Delete button to delete thecollection.
The collection will now be deleted from theCollections folder.
To delete a collection using the - sign on theCollections panel tab, follow the steps below.
1. Open up the Collections panel to see allthe collections you have created.
2. Click on the collection you wish to delete.It will be highlighted so there is no mistakingwhich one you want.
3. Click on the minus sign. A Confirm dialogbox appears indicating the name of thecollection you wish to delete.
4. Click on the Delete button to delete thecollection.
The collection will now be deleted from theCollections panel.
If you should decide to delete collections youhave created but have no images in them,clicking on the - sign after choosing thatcollection will not display the confirm dialog box.The collection will simply be delete.

Lightroom’s Collections Panel and Toolset © Jim Cornish, 2014
18
Moving Around Collections
As you collections grow, there might come a timewhen you will want to move a collection from onecollection set and place it in another. Lightroomcan do this as easily as moving folders and filesusing click-drag-and-drop, the same method usedby your computer’s operating system. But, thereare rules.
Rules About Regular Collections
1. A regular collections cannot be moved tobecome nested in another regular collection.
2. A regular collection can be moved from oneCollection set to another Collection set.
3. A regular collection nested inside a Collectionset can be moved to stand on its own.
4. A regular collection nested in a Collection setcan be moved to another Collections set.
Rules About Collections Sets
1. A Collection set can be moved and nestedinside another Collection set.
2. A collections set nested inside anothercollection set can be moved to stand on itsown.
3. A collection set cannot be nested into aregular collection.
Moving a Collection and a Collections Set
To move a collection from one collection set toanother follow the steps below.
1. Click and hold the mouse on the collectionyou wish to move.
2. Drag the mouse to the collection set iconnameplate. As you move the mouse, a Ø willappear when you reach a spot where youcan’t move the selected collection. When youreach the collection set nameplate, the mousewill change to a symbol looking like a stack.
3. Release the mouse to drop the collectioninto its new set.
This click-drag-and-drop system works the sameway when moving regular collections andcollection sets around. You can practice thisbefore you add any images by simply creating afew empty collections and collection sets.
WARNING:Moving collections and collection sets withhundreds and even thousands of images cantake a bit of time, so be patient whileLightroom makes the necessary changes toits catalog.
.
Lightroom’s Collections Panel and Toolset © Jim Cornish, 2014
19
Renaming Collections
From time to time, you will want to rename acollection or a collection set. Lightroom allowyou to make this change and will update thecatalog so all the connections between therenamed set and its contents are not lost.
There are, however, some limitations.
1. Two regular collections cannot have thesame name. If you try this, a message willappear in the renaming dialog box indicatinga collection by the same name exists.
2. Two collection sets cannot have the samename.
3. Collections can only be renamed using thecontextual menu.
Two regular collections can have the samename but only if they are in separate collectionsets.
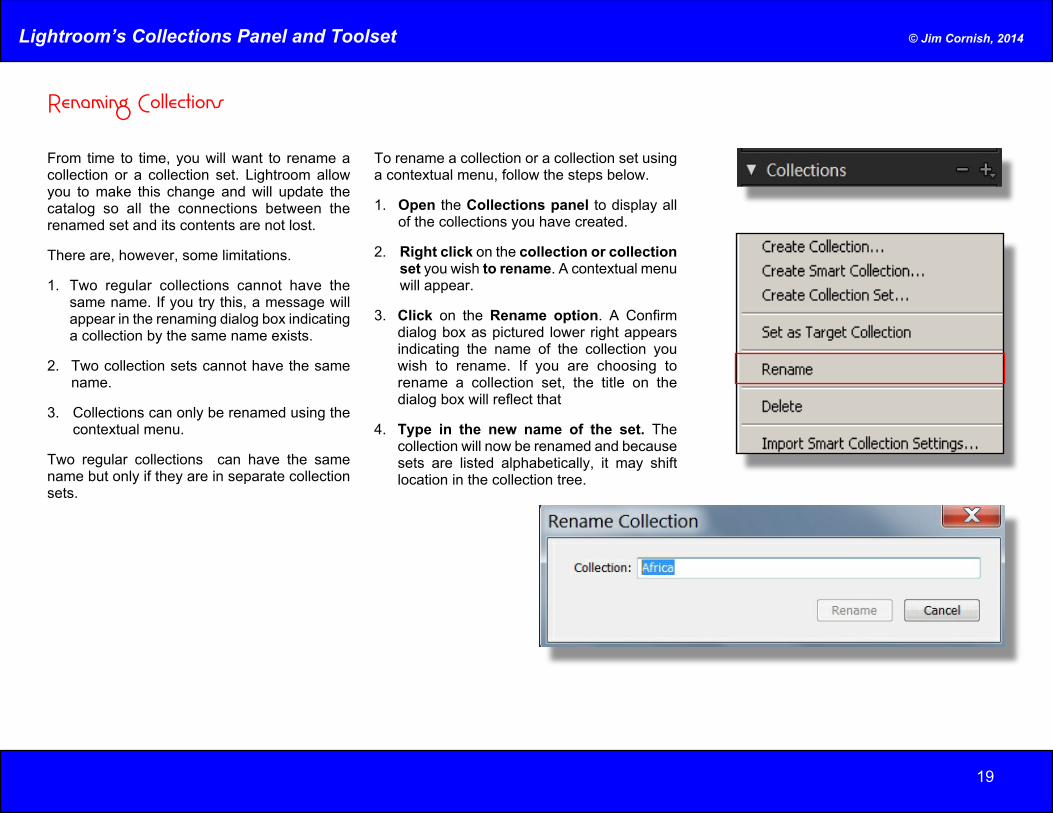
To rename a collection or a collection set usinga contextual menu, follow the steps below.
1. Open the Collections panel to display allof the collections you have created.
2. Right click on the collection or collectionset you wish to rename. A contextual menuwill appear.
3. Click on the Rename option. A Confirmdialog box as pictured lower right appearsindicating the name of the collection youwish to rename. If you are choosing torename a collection set, the title on thedialog box will reflect that
4. Type in the new name of the set. Thecollection will now be renamed and becausesets are listed alphabetically, it may shiftlocation in the collection tree.