lifting beam tutorial
DESCRIPTION
Lifting Beam Tutorial. Notes. 1. Save A Lot (possibly after each step in case you make any mistakes – THERE IS NO UNDO, and it gets complicated to correct mistakes sometimes with only a delete option) 2. Units are in inches and pounds 3. X, Y are horizontal. Z is vertical - PowerPoint PPT PresentationTRANSCRIPT
Lifting Beam Tutorial
Notes
1. Save A Lot (possibly after each step in case you make any mistakes – THERE IS NO UNDO, and it gets complicated to correct mistakes sometimes with only a delete option)
2. Units are in inches and pounds3. X, Y are horizontal. Z is vertical4. All tree instructions start under “Preprocessor > Modeling” unless otherwise
specified5. Tree instructions are only listed once (however, you will need to use the same
operation more than once) in bold and italic 6. I recommend keeping keypoint numbering on (plot controls > numbering…)7. When creating areas by lines or by keypoints, select the lines or keypoints in
order, don’t cross over, ANSYS won’t understand8. Hitting apply keeps a window open, so you can hit apply multiple times to create
multiple keypoints, but on the last one you should either hit apply then cancel or just okay. If you hit apply then okay, you will have 2 keypoints.
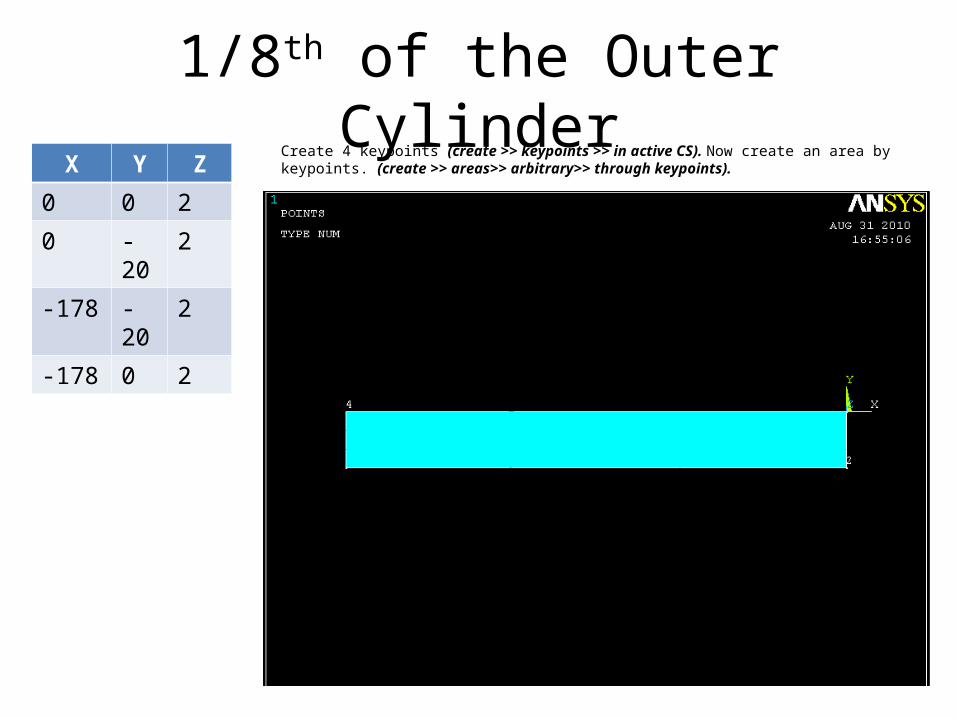
1/8th of the Outer CylinderX Y Z
0 0 2
0 -20 2
-178 -20 2
-178 0 2
Create 4 keypoints (create >> keypoints >> in active CS). Now create an area by keypoints. (create >> areas>> arbitrary>> through keypoints).
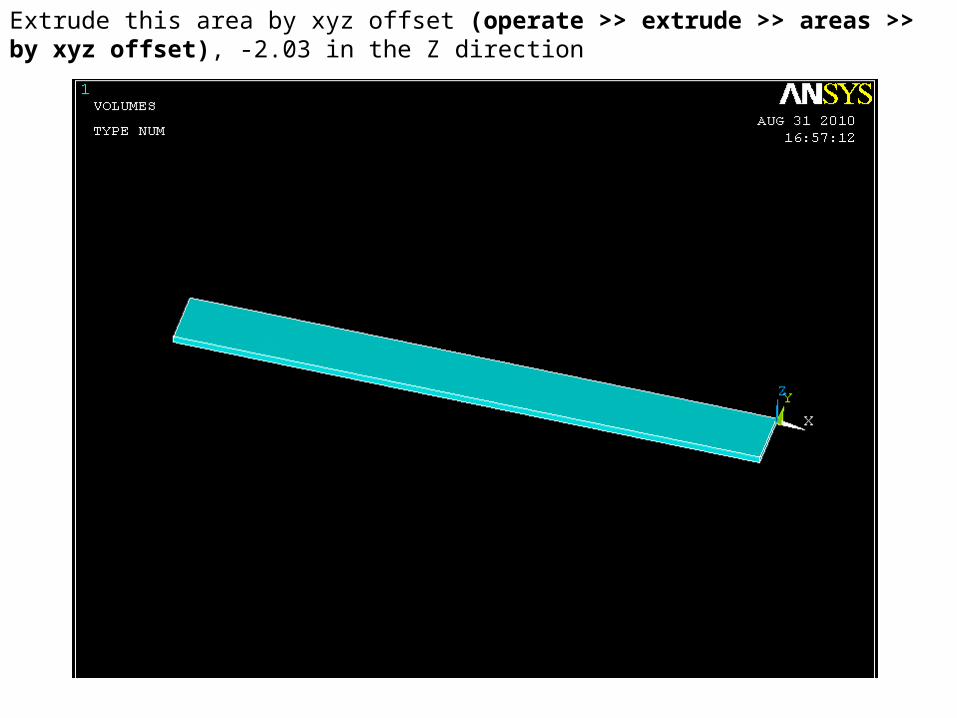
Extrude this area by xyz offset (operate >> extrude >> areas >> by xyz offset), -2.03 in the Z direction
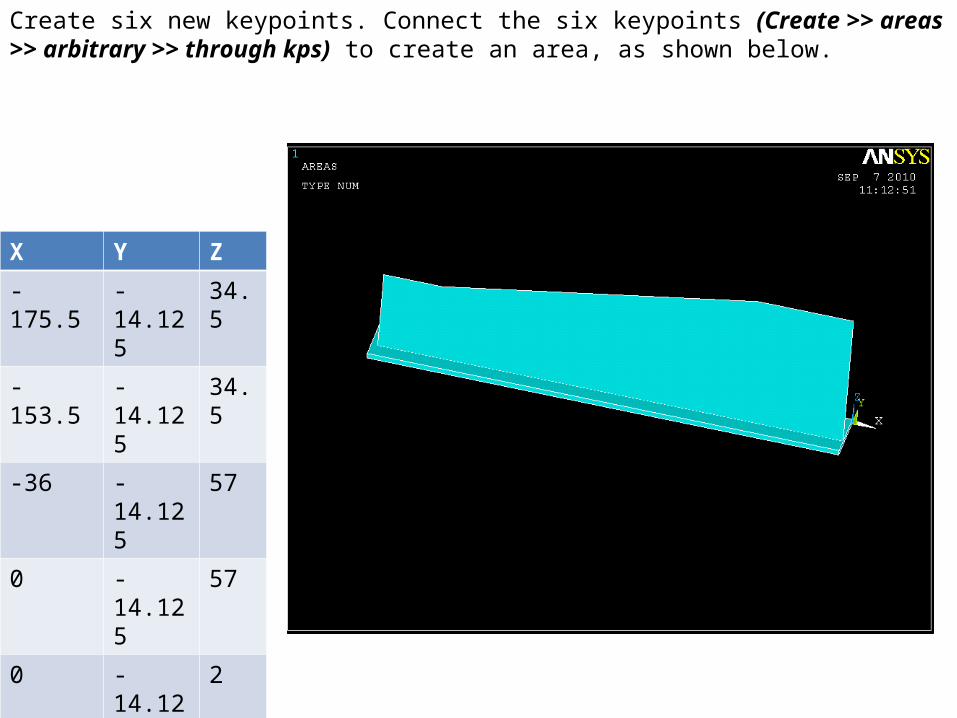
X Y Z
-175.5 -14.125 34.5
-153.5 -14.125 34.5
-36 -14.125 57
0 -14.125 57
0 -14.125 2
-175.5 -14.125 2
Create six new keypoints. Connect the six keypoints (Create >> areas >> arbitrary >> through kps) to create an area, as shown below.
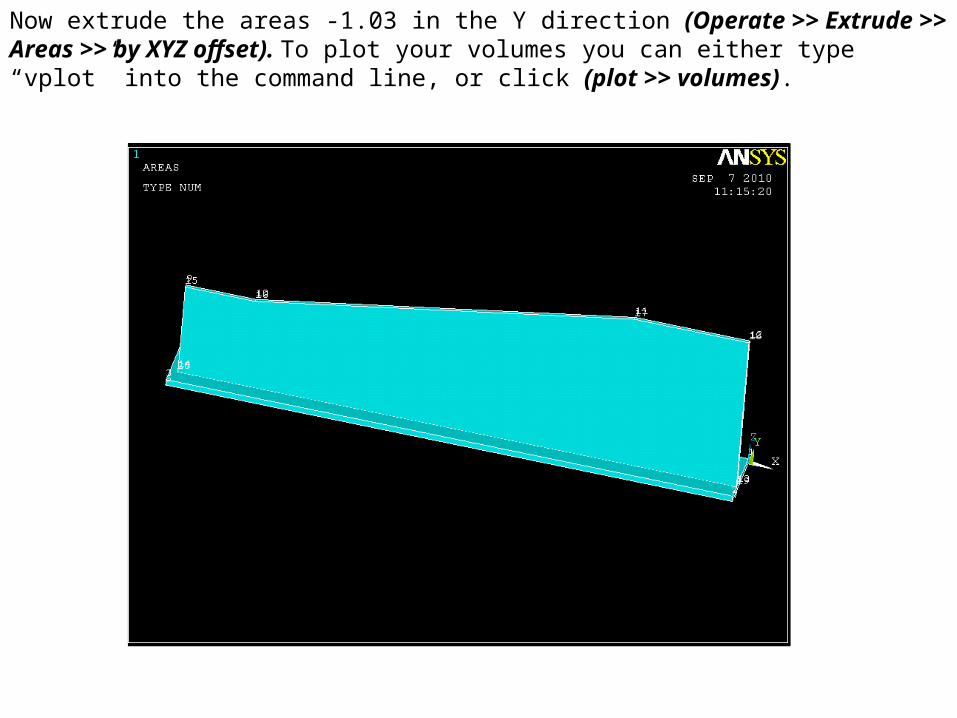
Now extrude the areas -1.03 in the Y direction (Operate >> Extrude >> Areas >> by XYZ offset). To plot your volumes you can either type “vplot” into the command line, or click (plot >> volumes).
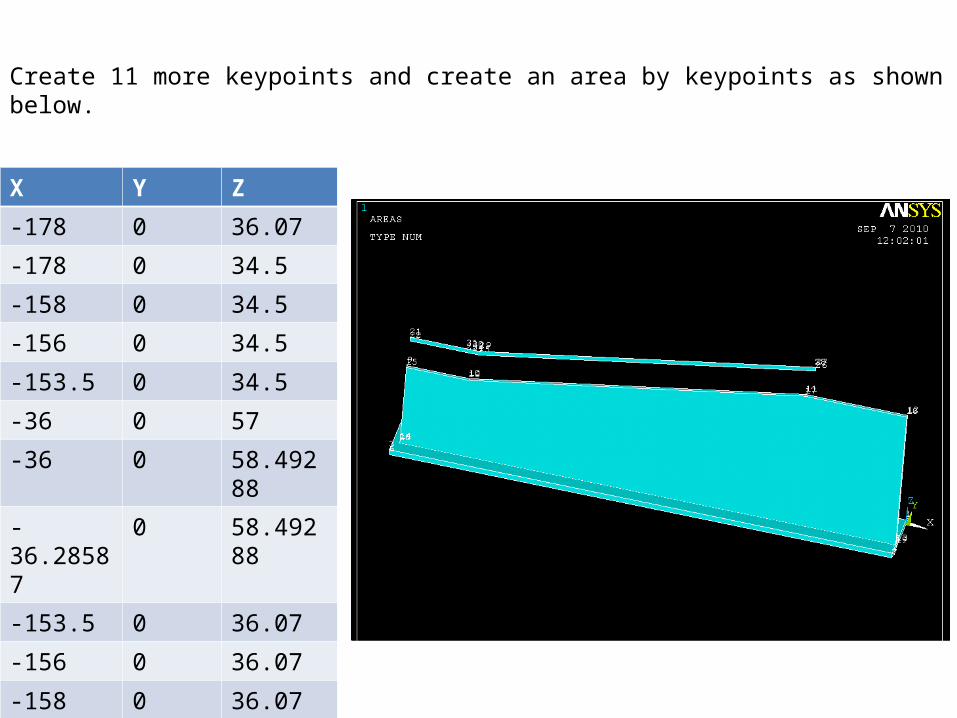
X Y Z
-178 0 36.07
-178 0 34.5
-158 0 34.5
-156 0 34.5
-153.5 0 34.5
-36 0 57
-36 0 58.49288
-36.28587 0 58.49288
-153.5 0 36.07
-156 0 36.07
-158 0 36.07
Create 11 more keypoints and create an area by keypoints as shown below.
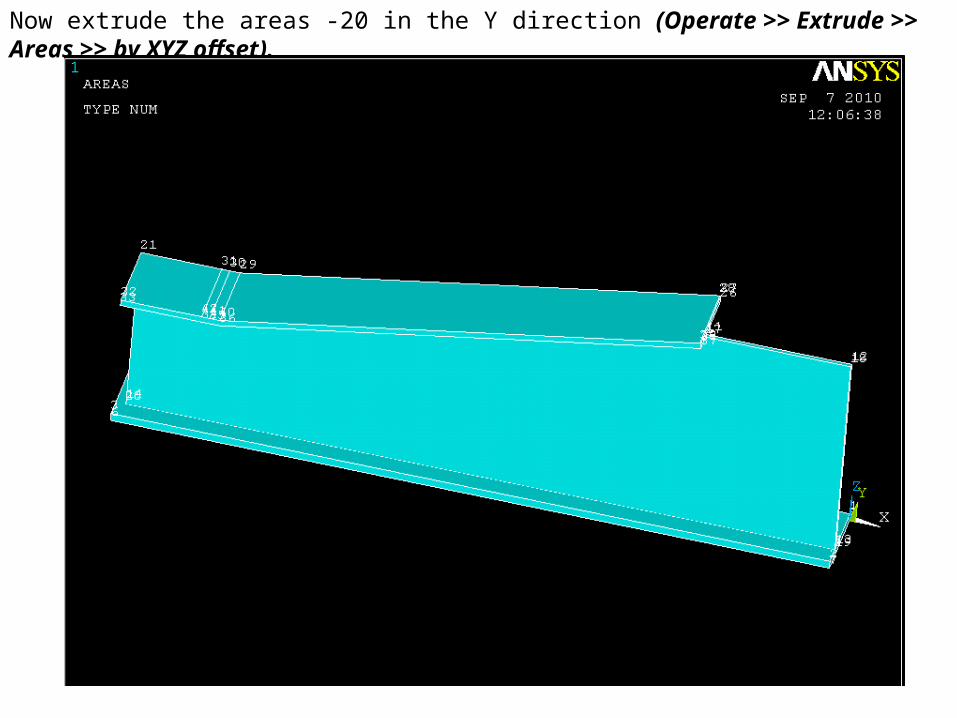
Now extrude the areas -20 in the Y direction (Operate >> Extrude >> Areas >> by XYZ offset).
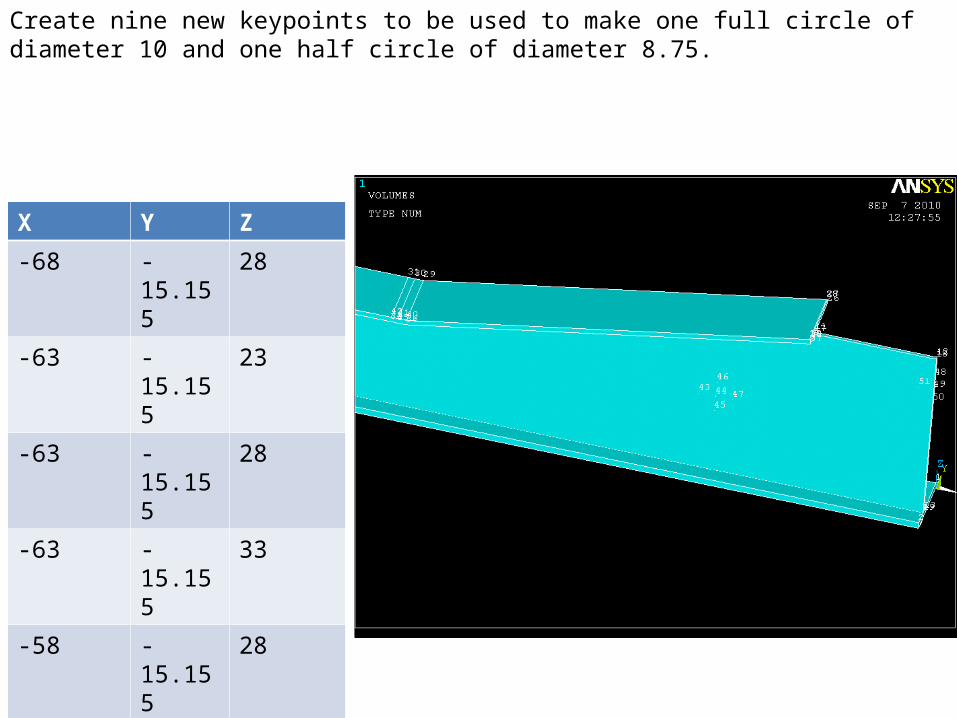
Create nine new keypoints to be used to make one full circle of diameter 10 and one half circle of diameter 8.75.
X Y Z
-68 -15.155 28
-63 -15.155 23
-63 -15.155 28
-63 -15.155 33
-58 -15.155 28
0 -15.155 50.375
0 -15.155 46
0 -15.155 41.625
-4.375 -15.155 46
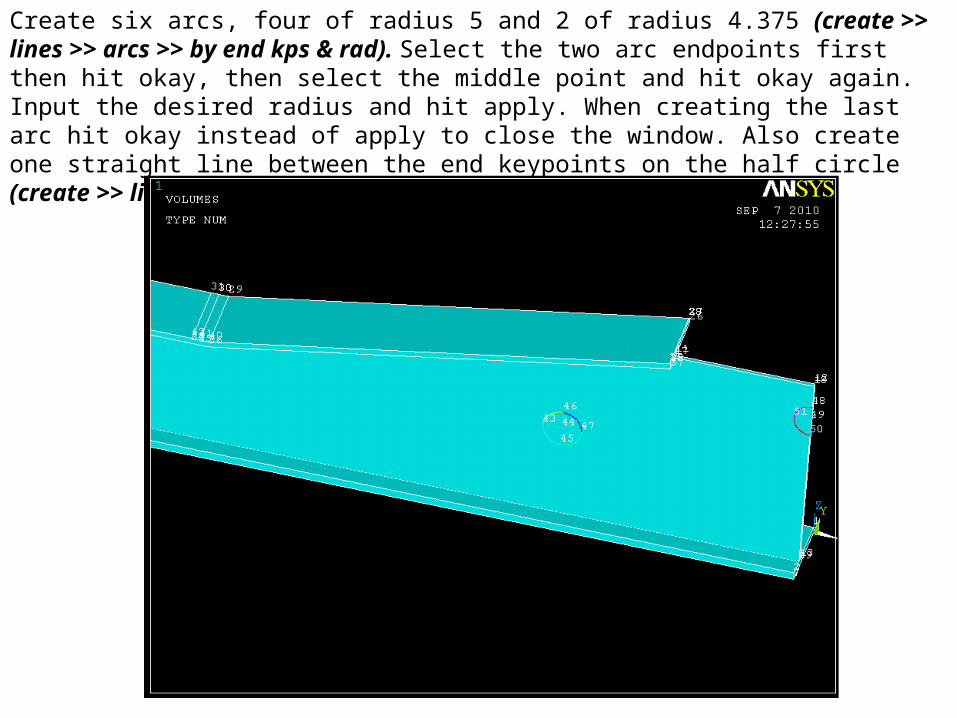
Create six arcs, four of radius 5 and 2 of radius 4.375 (create >> lines >> arcs >> by end kps & rad). Select the two arc endpoints first then hit okay, then select the middle point and hit okay again. Input the desired radius and hit apply. When creating the last arc hit okay instead of apply to close the window. Also create one straight line between the end keypoints on the half circle (create >> lines >> lines >> straight line).

Create 2 areas by lines as shown below (create >> areas >> arbitrary >> by lines).
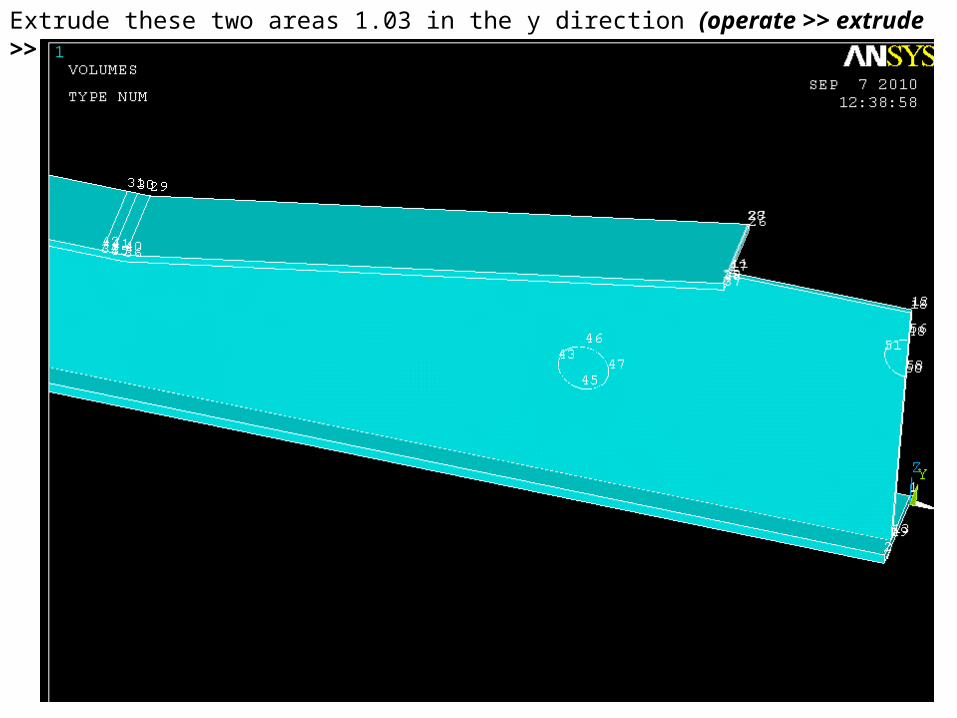
Extrude these two areas 1.03 in the y direction (operate >> extrude >> areas >> by xyz offset).
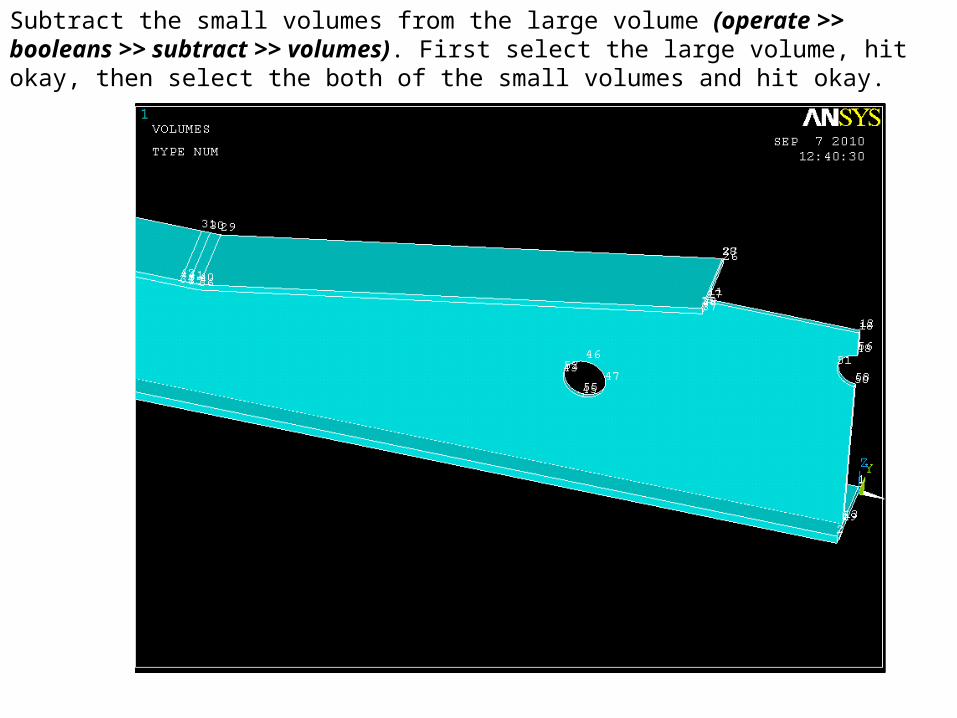
Subtract the small volumes from the large volume (operate >> booleans >> subtract >> volumes). First select the large volume, hit okay, then select the both of the small volumes and hit okay.
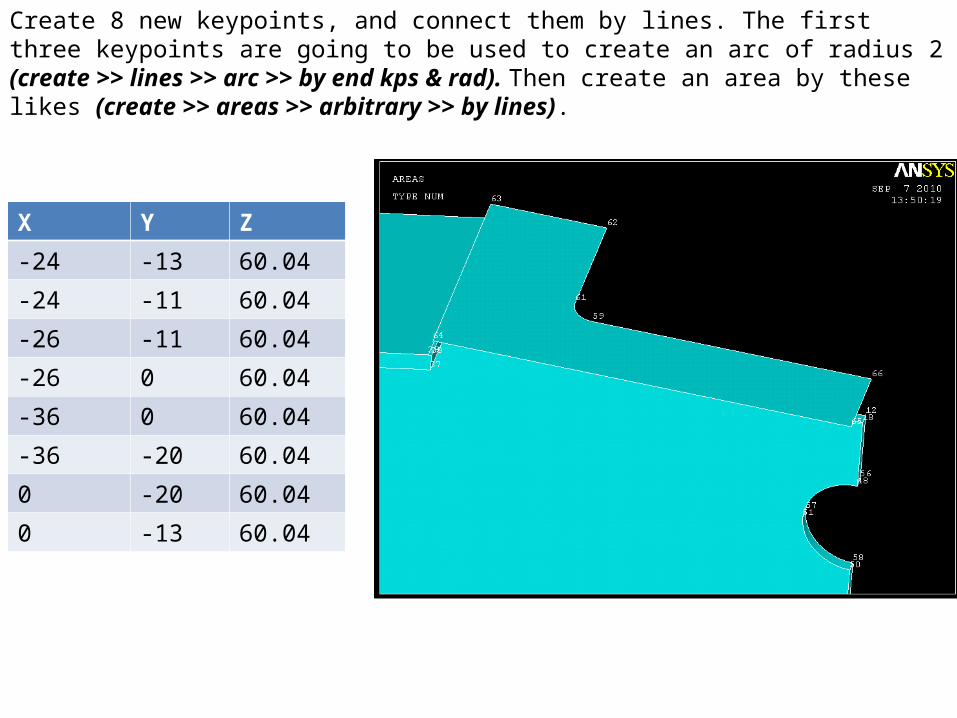
Create 8 new keypoints, and connect them by lines. The first three keypoints are going to be used to create an arc of radius 2 (create >> lines >> arc >> by end kps & rad). Then create an area by these likes (create >> areas >> arbitrary >> by lines).
X Y Z
-24 -13 60.04
-24 -11 60.04
-26 -11 60.04
-26 0 60.04
-36 0 60.04
-36 -20 60.04
0 -20 60.04
0 -13 60.04
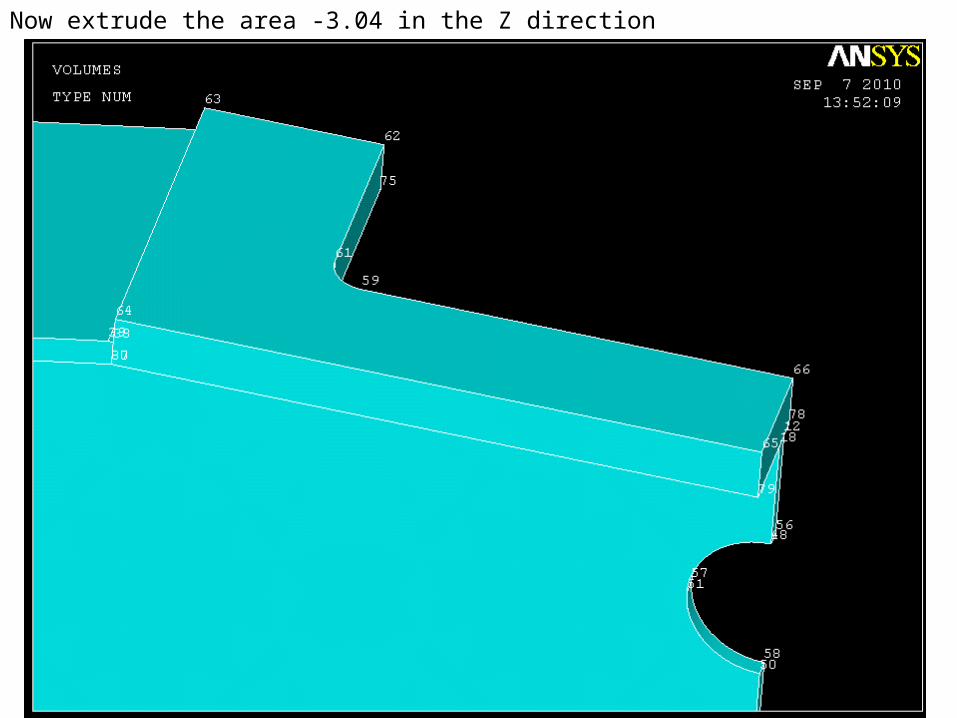
Now extrude the area -3.04 in the Z direction
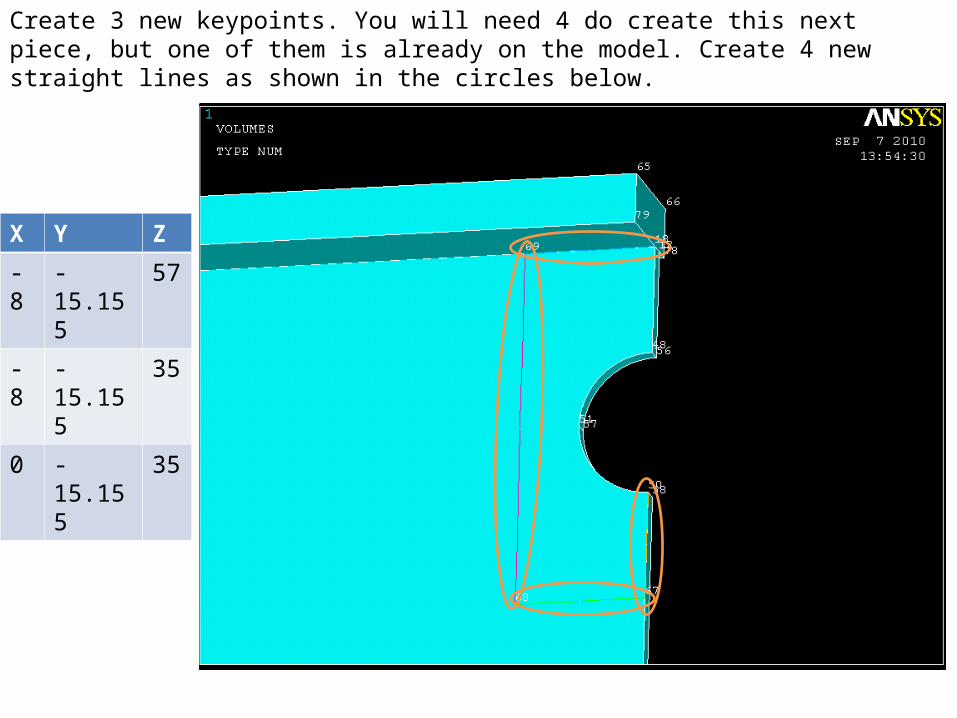
X Y Z
-8 -15.155 57
-8 -15.155 35
0 -15.155 35
Create 3 new keypoints. You will need 4 do create this next piece, but one of them is already on the model. Create 4 new straight lines as shown in the circles below.
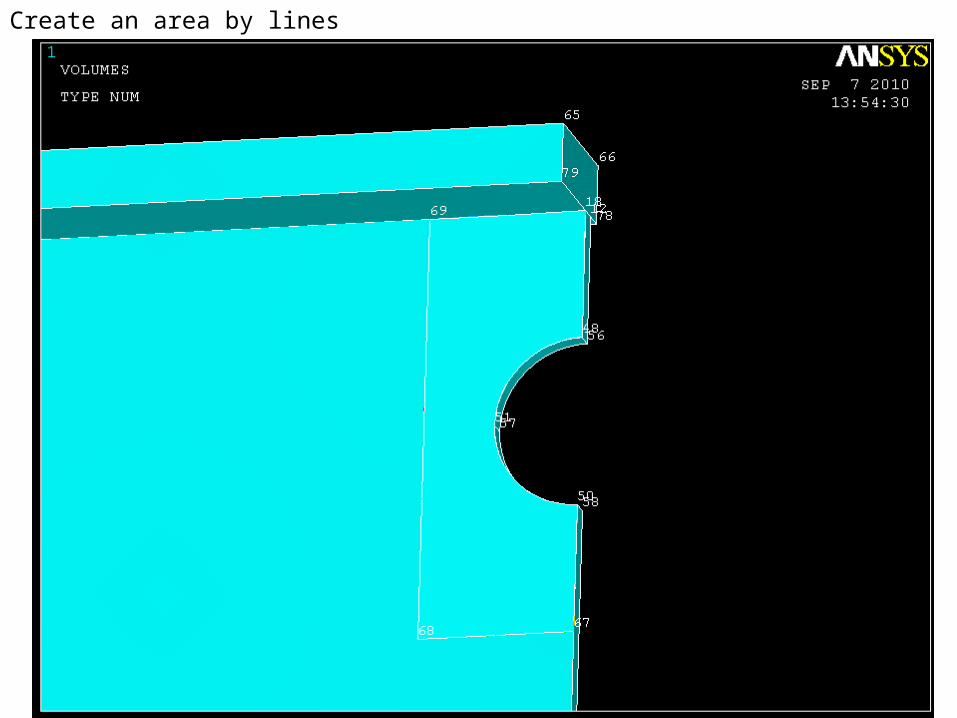
Create an area by lines
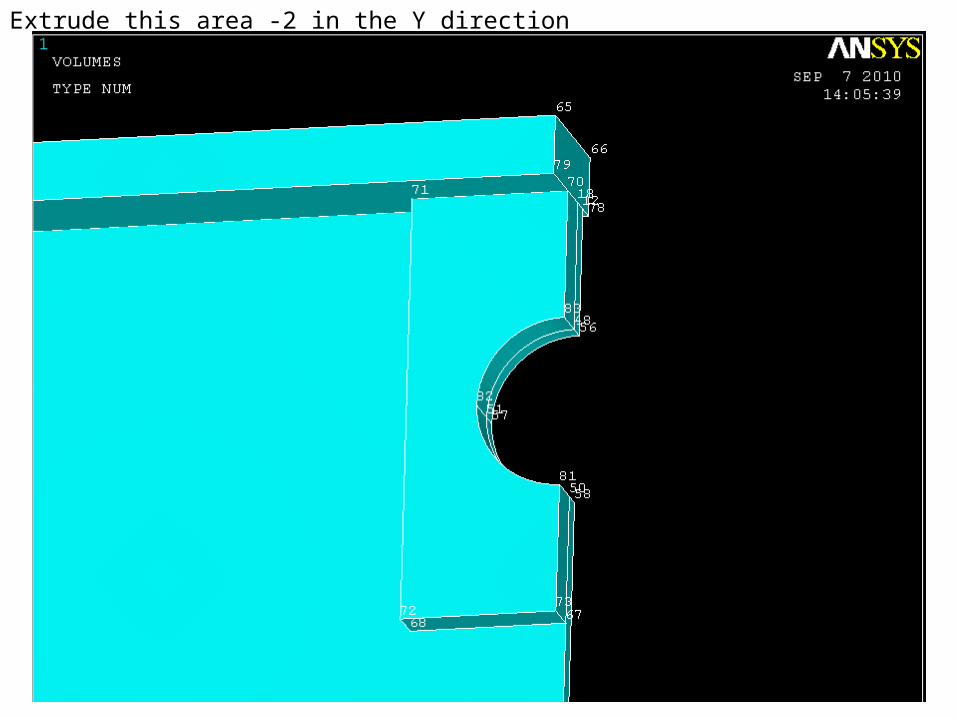
Extrude this area -2 in the Y direction
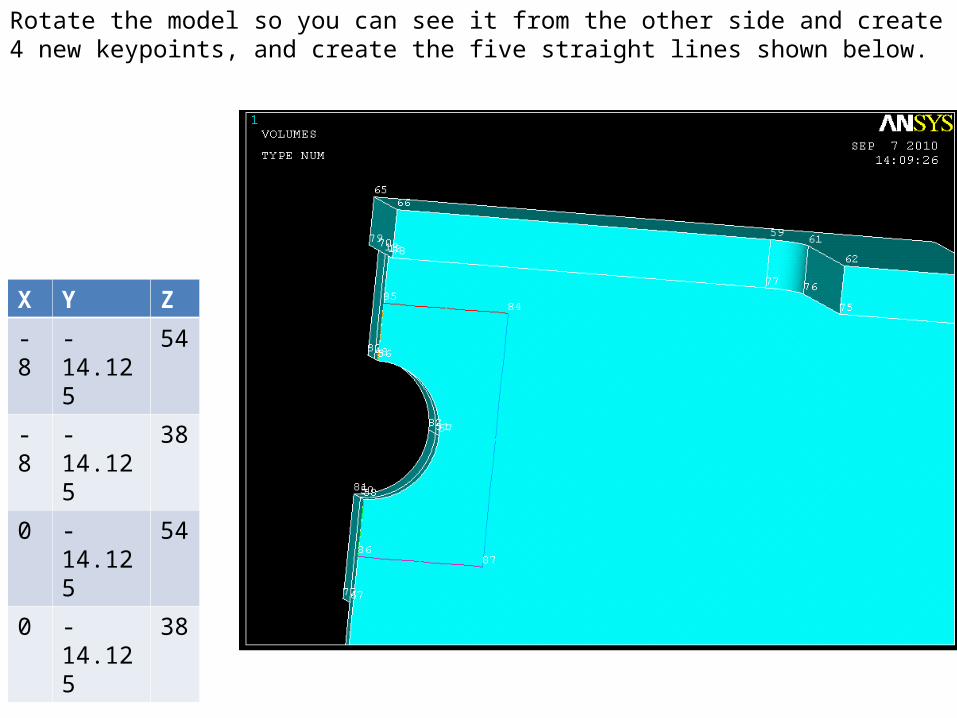
Rotate the model so you can see it from the other side and create 4 new keypoints, and create the five straight lines shown below.
X Y Z
-8 -14.125 54
-8 -14.125 38
0 -14.125 54
0 -14.125 38
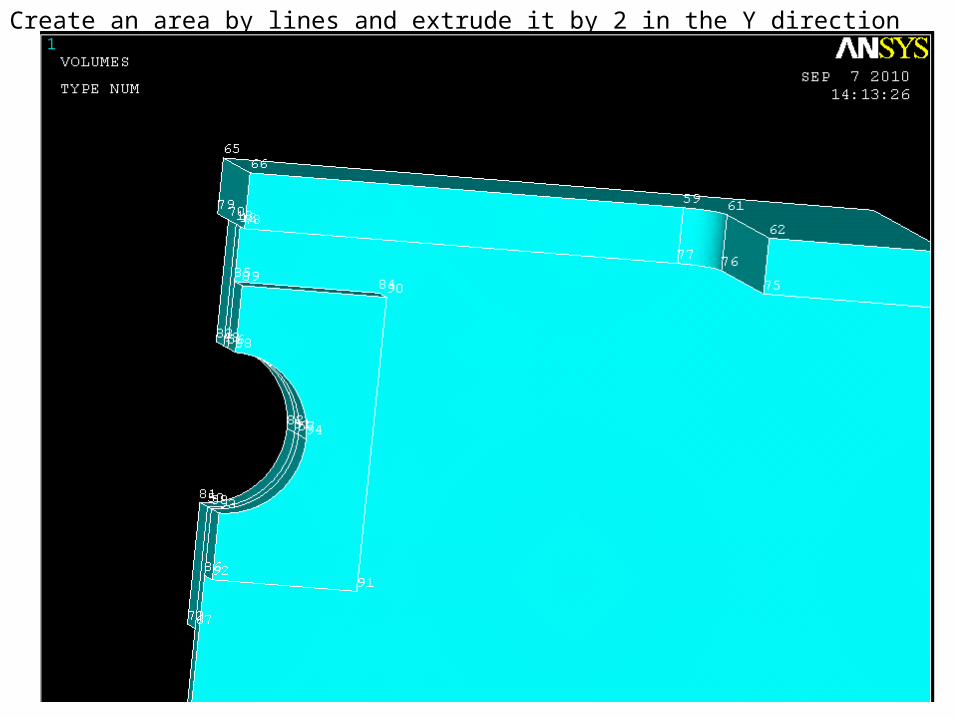
Create an area by lines and extrude it by 2 in the Y direction
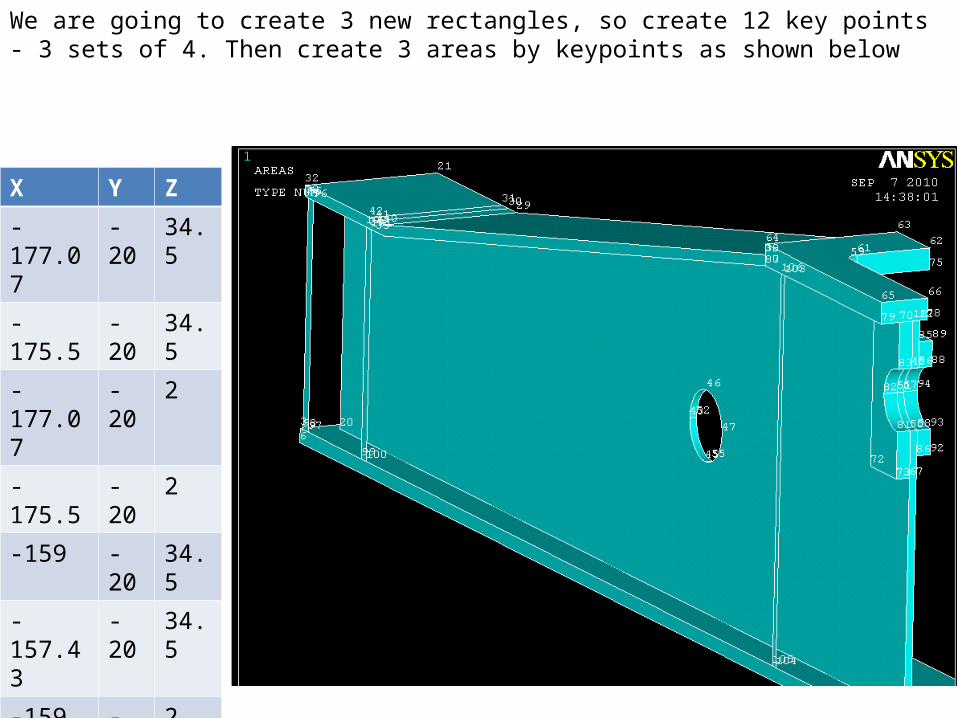
We are going to create 3 new rectangles, so create 12 key points - 3 sets of 4. Then create 3 areas by keypoints as shown below
X Y Z
-177.07 -20 34.5
-175.5 -20 34.5
-177.07 -20 2
-175.5 -20 2
-159 -20 34.5
-157.43 -20 34.5
-159 -20 2
-157.43 -20 2
-30 -20 57
-31.03 -20 57
-30 -20 2
-31.03 -20 2
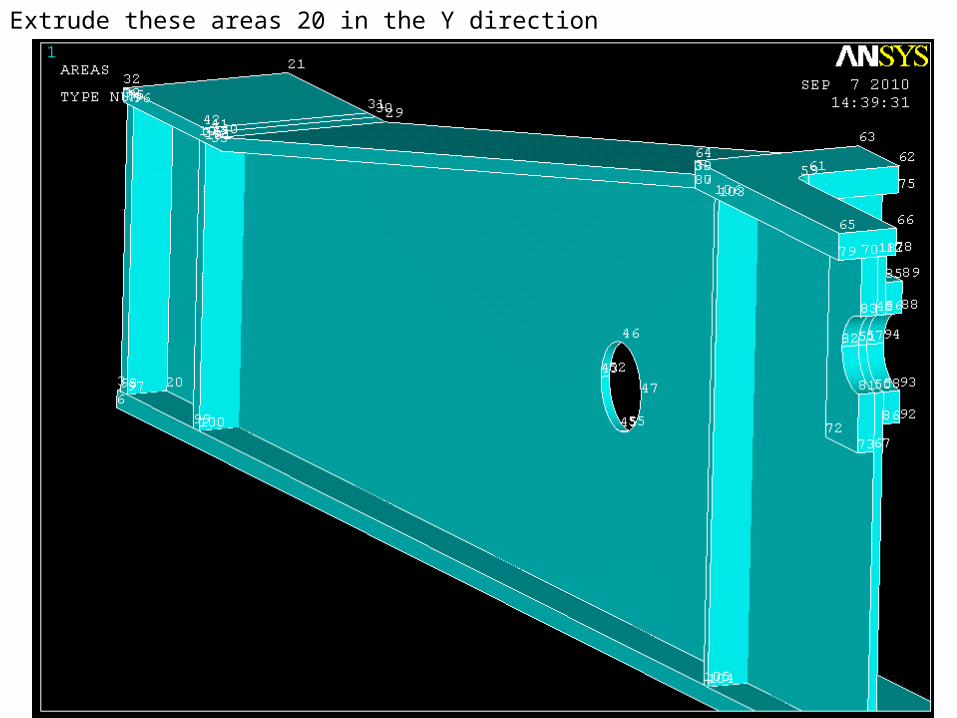
Extrude these areas 20 in the Y direction
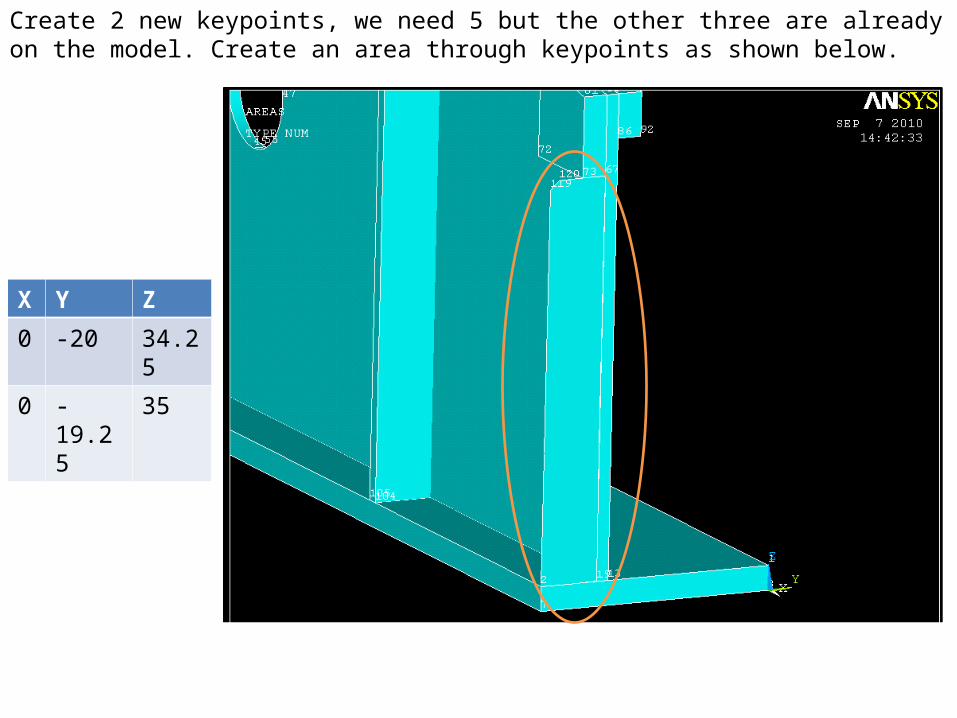
Create 2 new keypoints, we need 5 but the other three are already on the model. Create an area through keypoints as shown below.
X Y Z
0 -20 34.25
0 -19.25 35
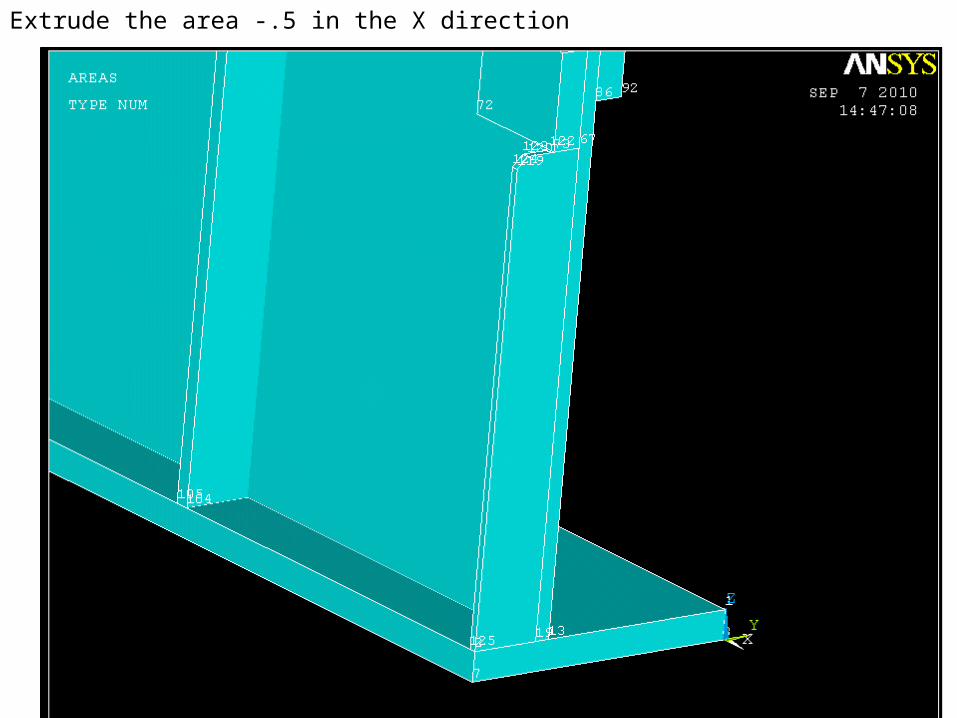
Extrude the area -.5 in the X direction

Add all of these volumes together to create one volume (operate >> booleans >> add >> volumes). Right now you can select the “pick all option”. Also at this point turn on volume numbering (plot controls >> numbering).
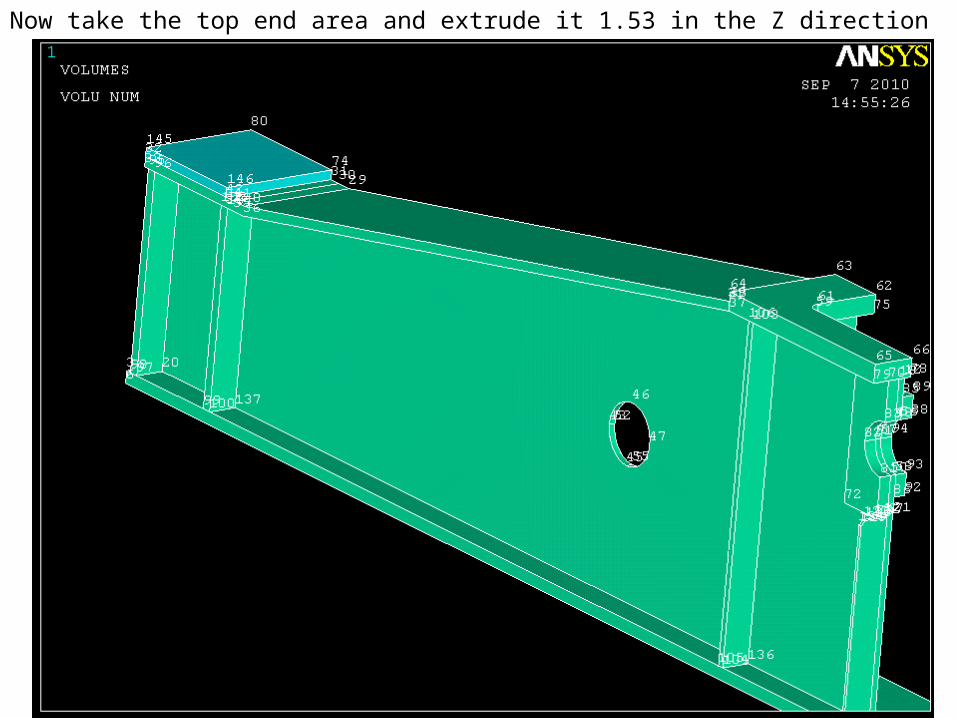
Now take the top end area and extrude it 1.53 in the Z direction
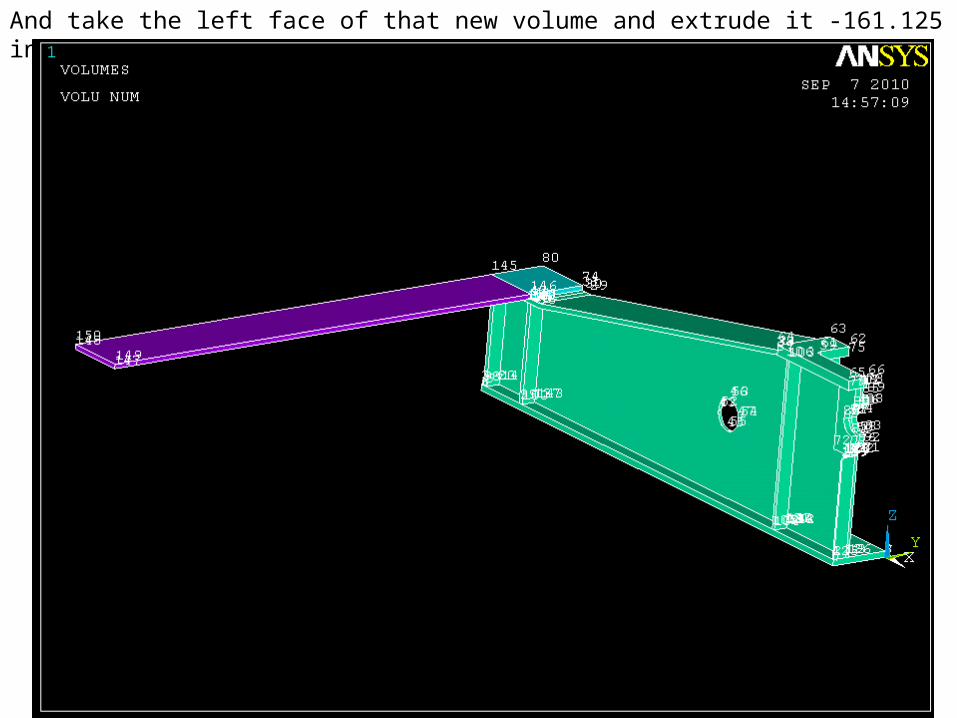
And take the left face of that new volume and extrude it -161.125 in the Y direction
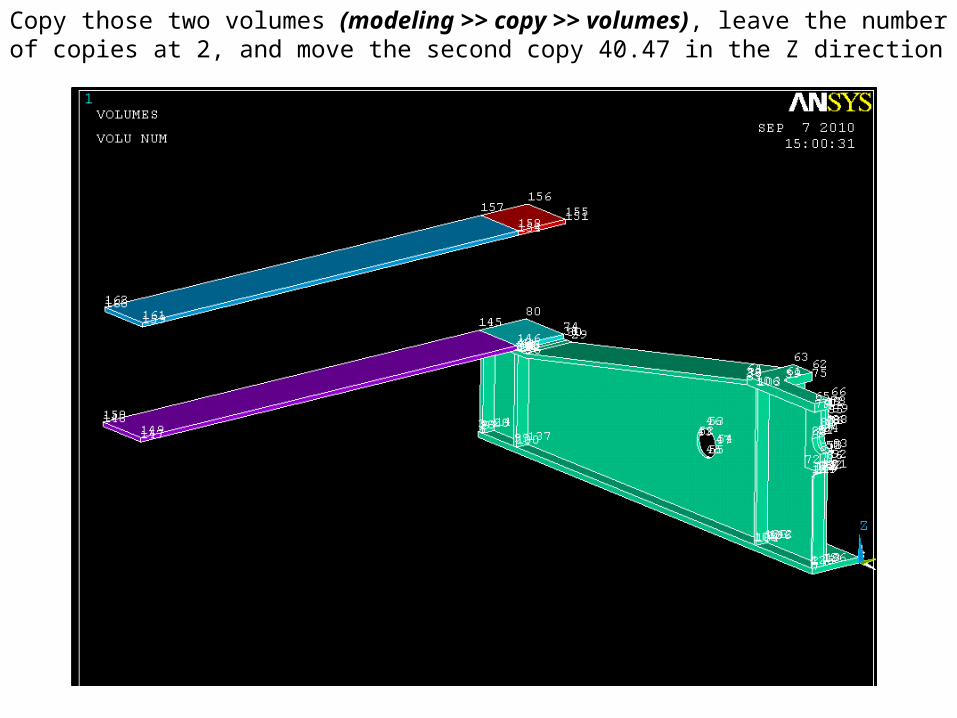
Copy those two volumes (modeling >> copy >> volumes), leave the number of copies at 2, and move the second copy 40.47 in the Z direction
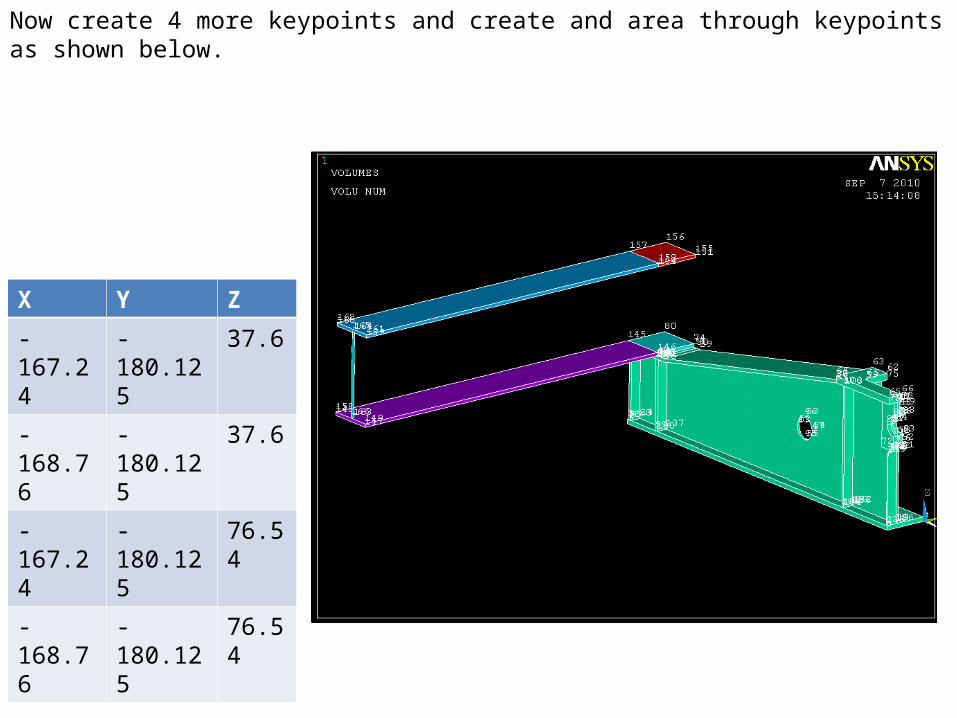
Now create 4 more keypoints and create and area through keypoints as shown below.
X Y Z
-167.24 -180.125 37.6
-168.76 -180.125 37.6
-167.24 -180.125 76.54
-168.76 -180.125 76.54
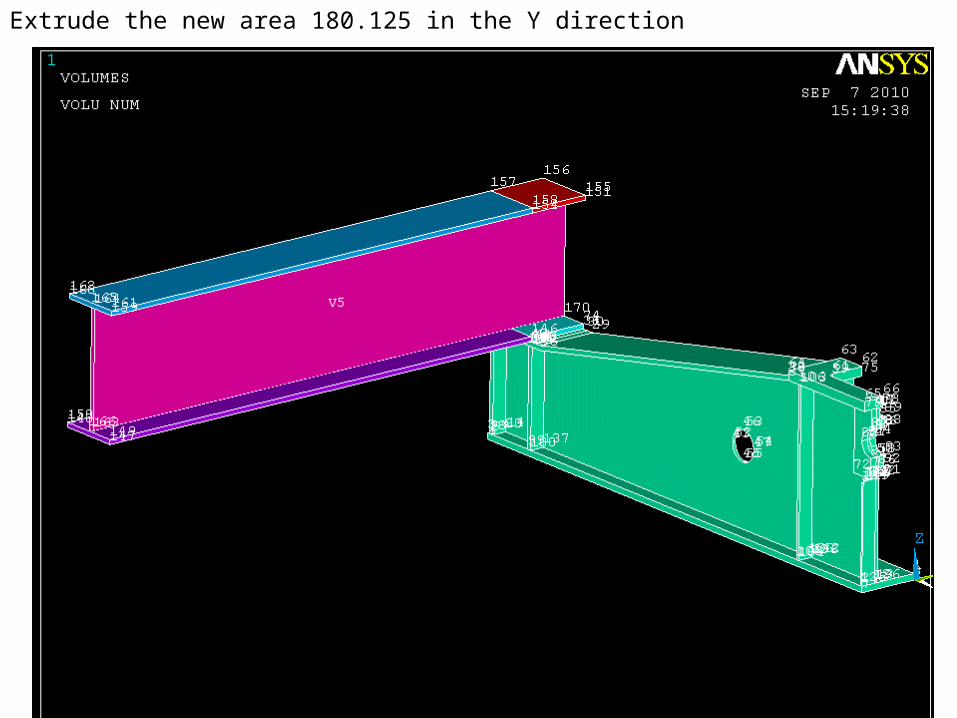
Extrude the new area 180.125 in the Y direction
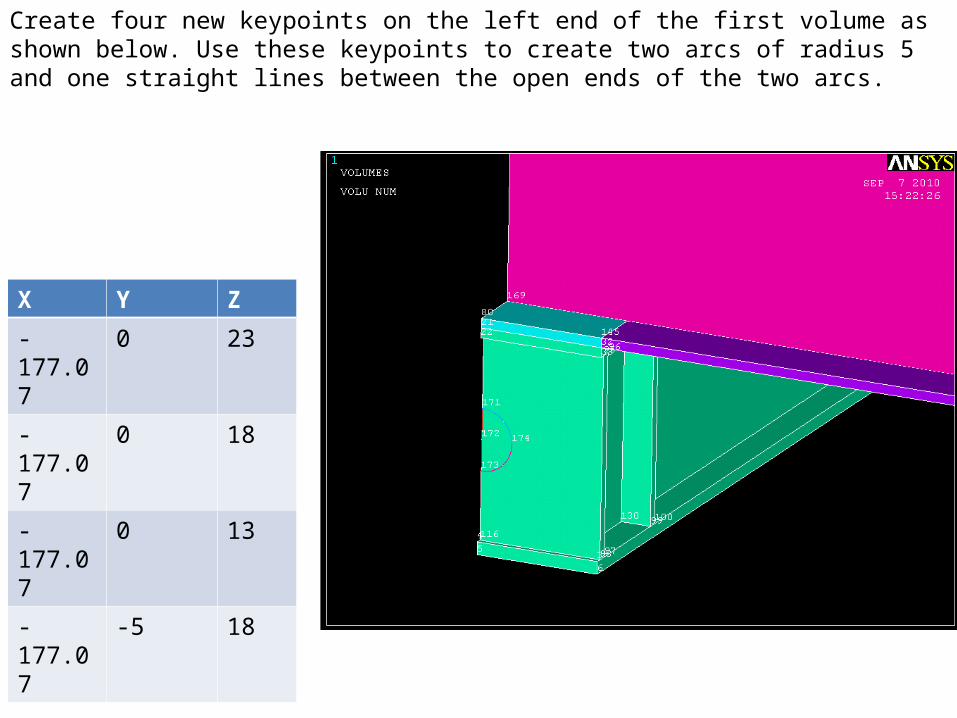
Create four new keypoints on the left end of the first volume as shown below. Use these keypoints to create two arcs of radius 5 and one straight lines between the open ends of the two arcs.
X Y Z
-177.07 0 23
-177.07 0 18
-177.07 0 13
-177.07 -5 18
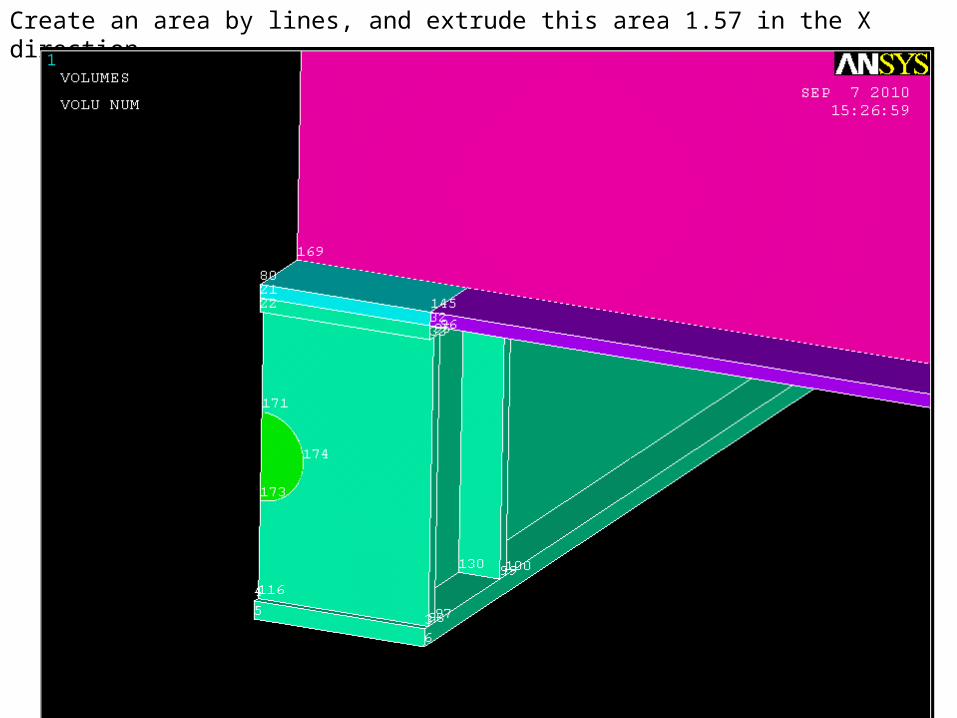
Create an area by lines, and extrude this area 1.57 in the X direction
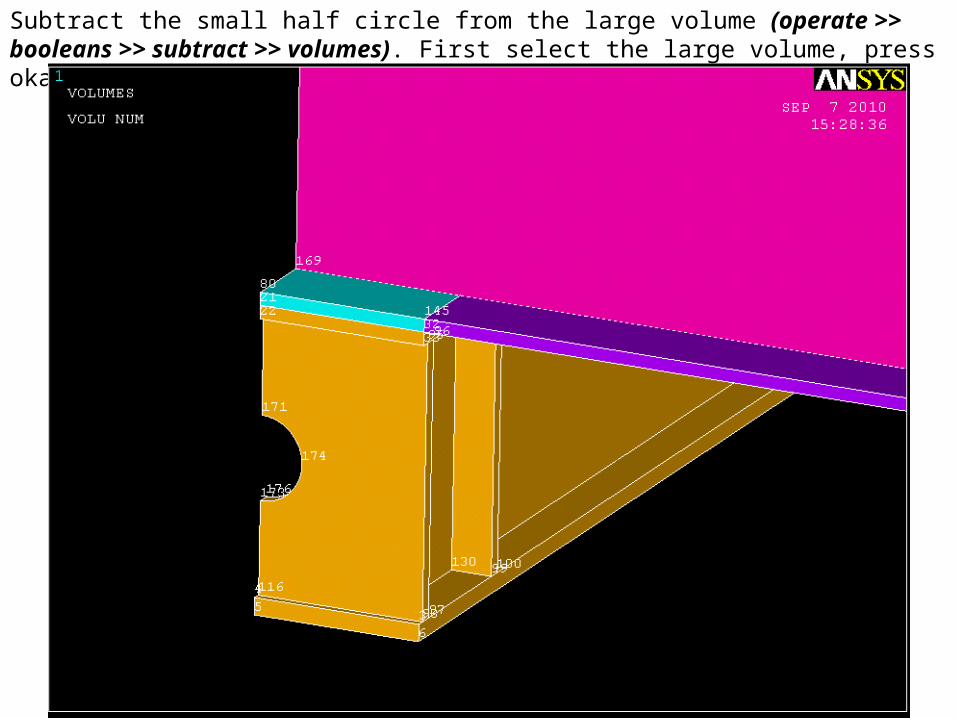
Subtract the small half circle from the large volume (operate >> booleans >> subtract >> volumes). First select the large volume, press okay, then select the small volume and press okay.
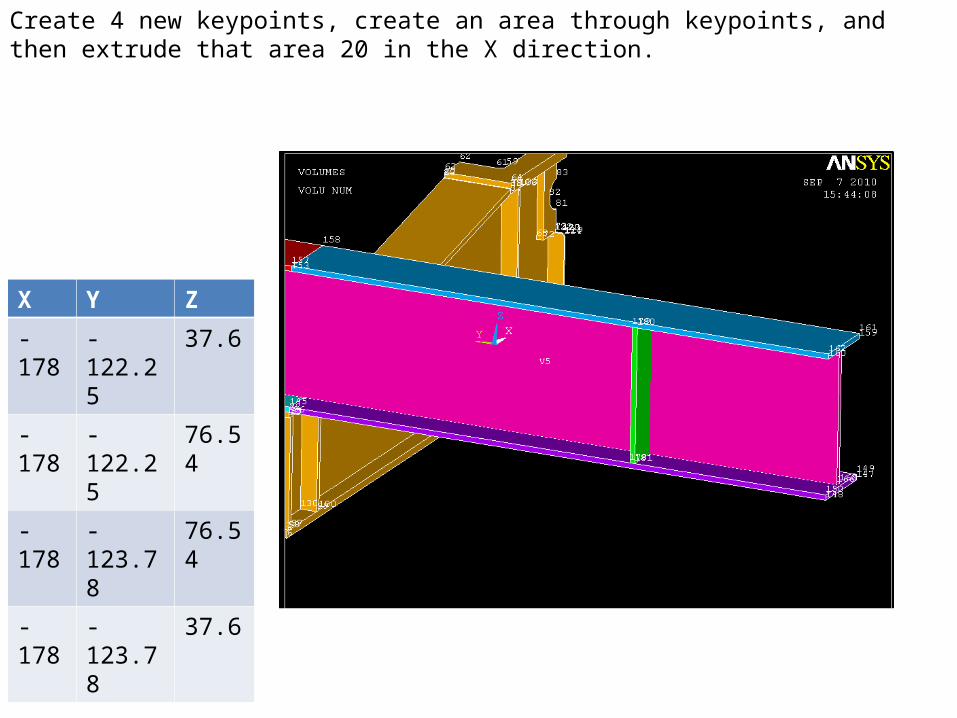
Create 4 new keypoints, create an area through keypoints, and then extrude that area 20 in the X direction.
X Y Z
-178 -122.25 37.6
-178 -122.25 76.54
-178 -123.78 76.54
-178 -123.78 37.6
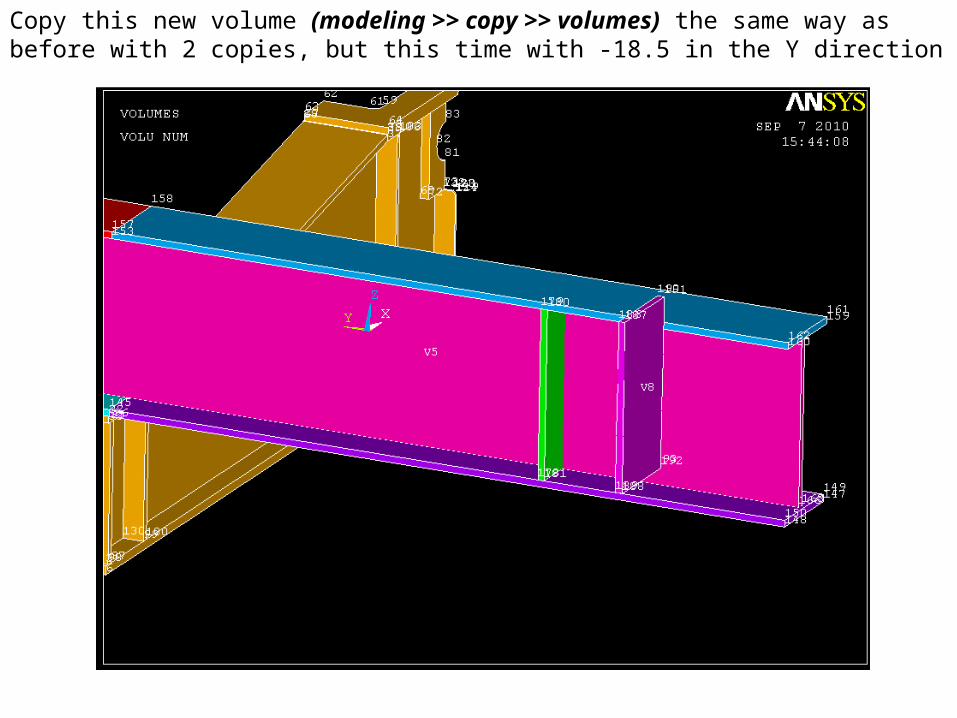
Copy this new volume (modeling >> copy >> volumes) the same way as before with 2 copies, but this time with -18.5 in the Y direction
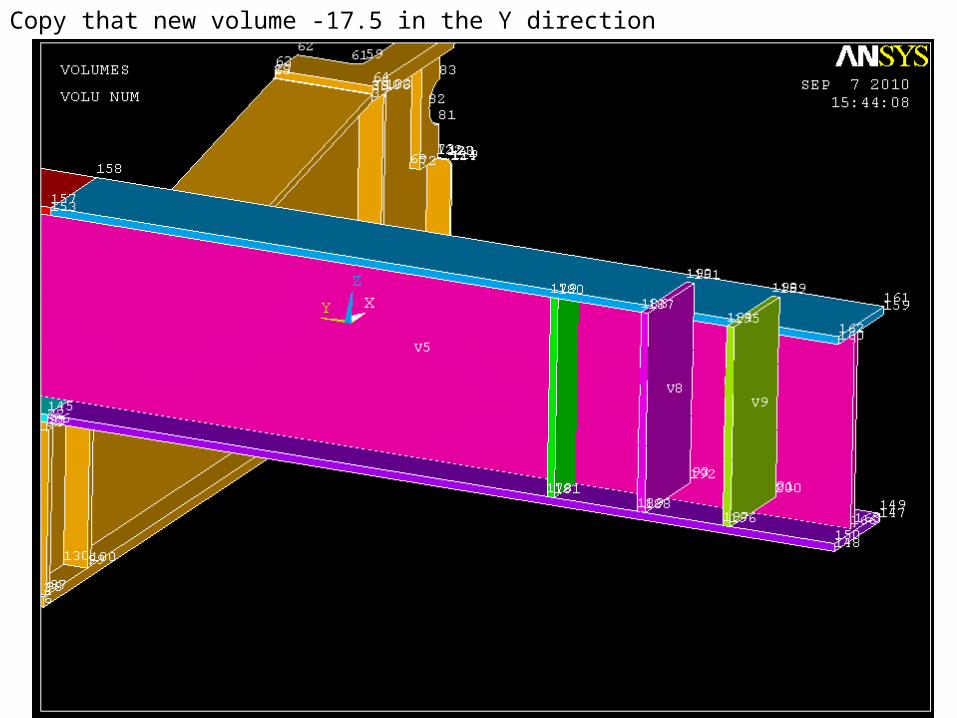
Copy that new volume -17.5 in the Y direction
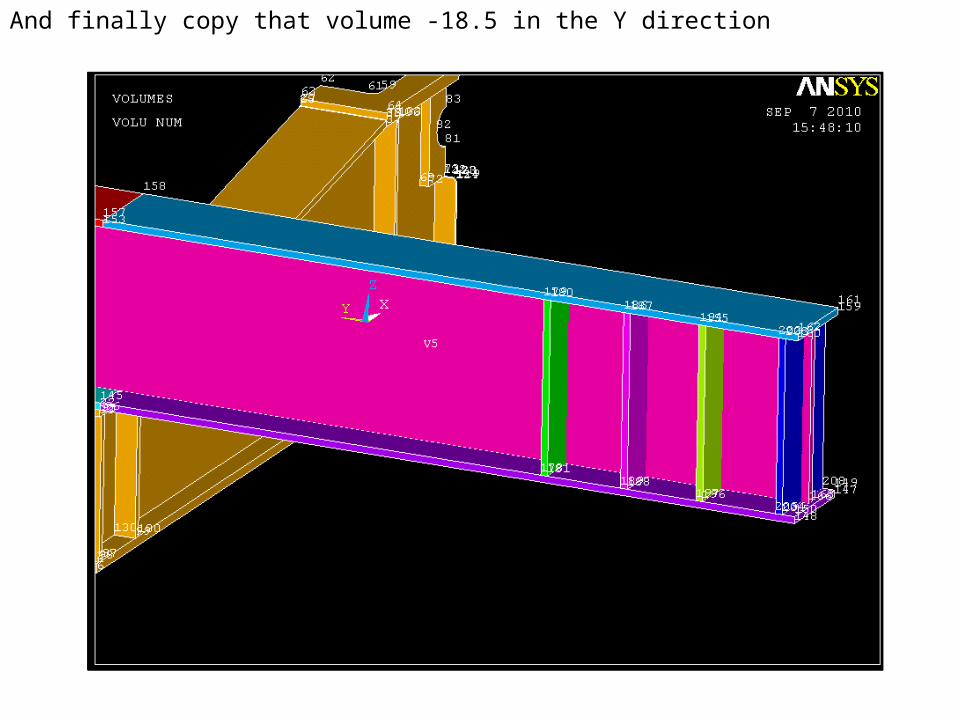
And finally copy that volume -18.5 in the Y direction
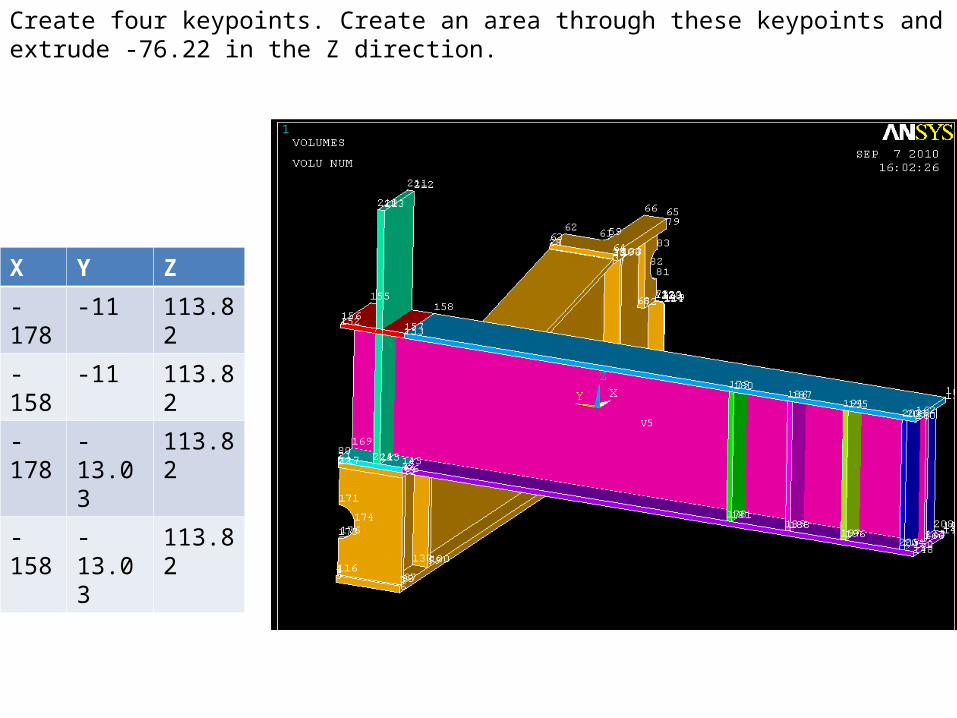
X Y Z
-178 -11 113.82
-158 -11 113.82
-178 -13.03 113.82
-158 -13.03 113.82
Create four keypoints. Create an area through these keypoints and extrude -76.22 in the Z direction.
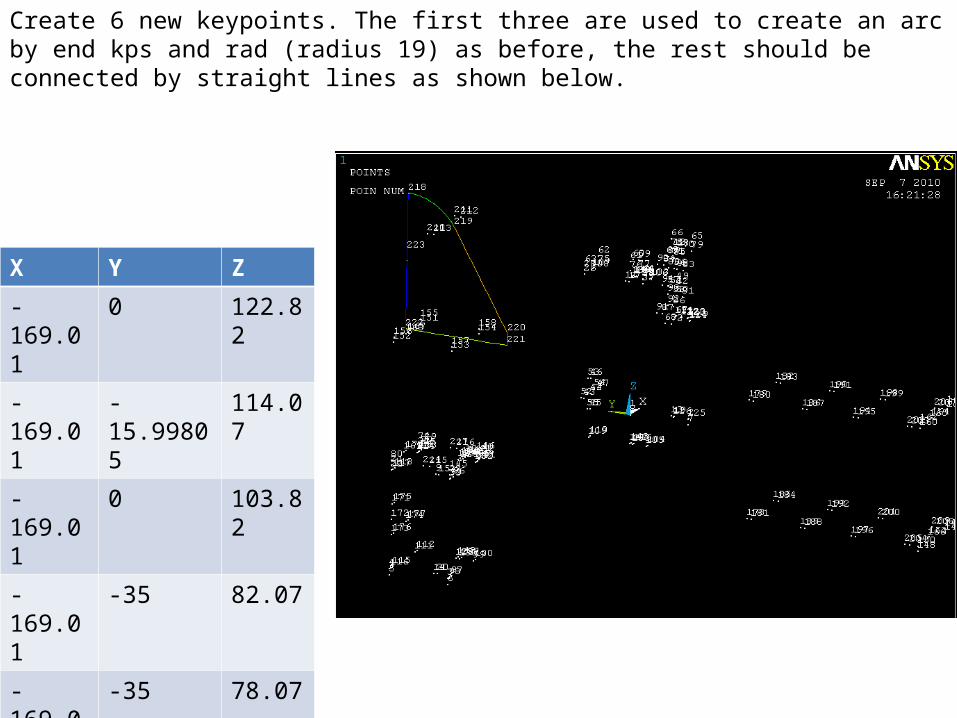
Create 6 new keypoints. The first three are used to create an arc by end kps and rad (radius 19) as before, the rest should be connected by straight lines as shown below.
X Y Z
-169.01 0 122.82
-169.01 -15.99805 114.07
-169.01 0 103.82
-169.01 -35 82.07
-169.01 -35 78.07
-169.01 0 78.07
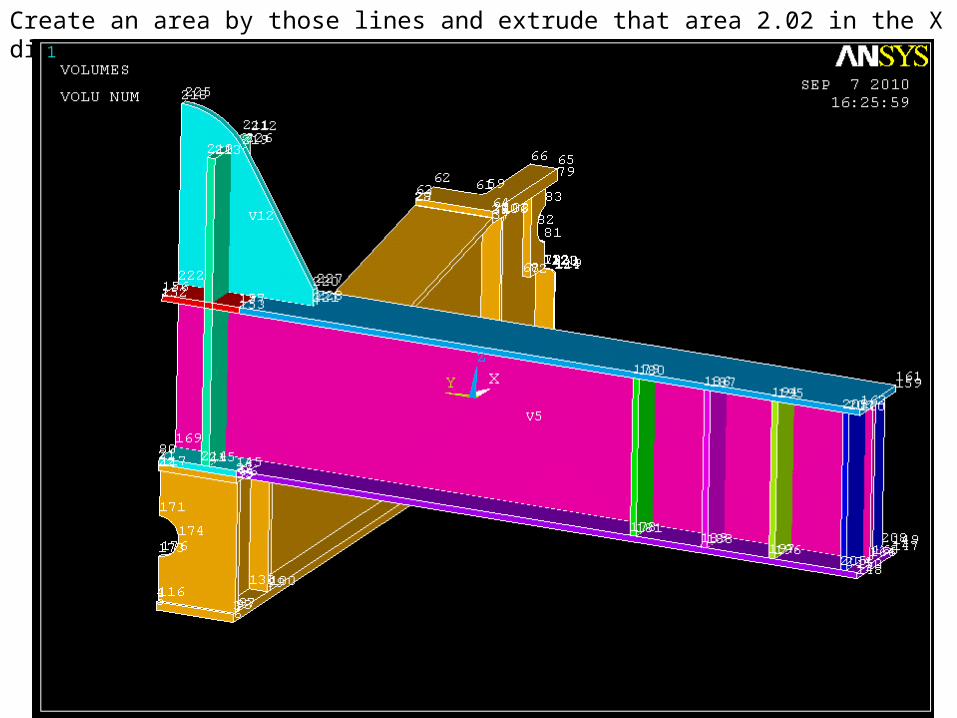
Create an area by those lines and extrude that area 2.02 in the X direction
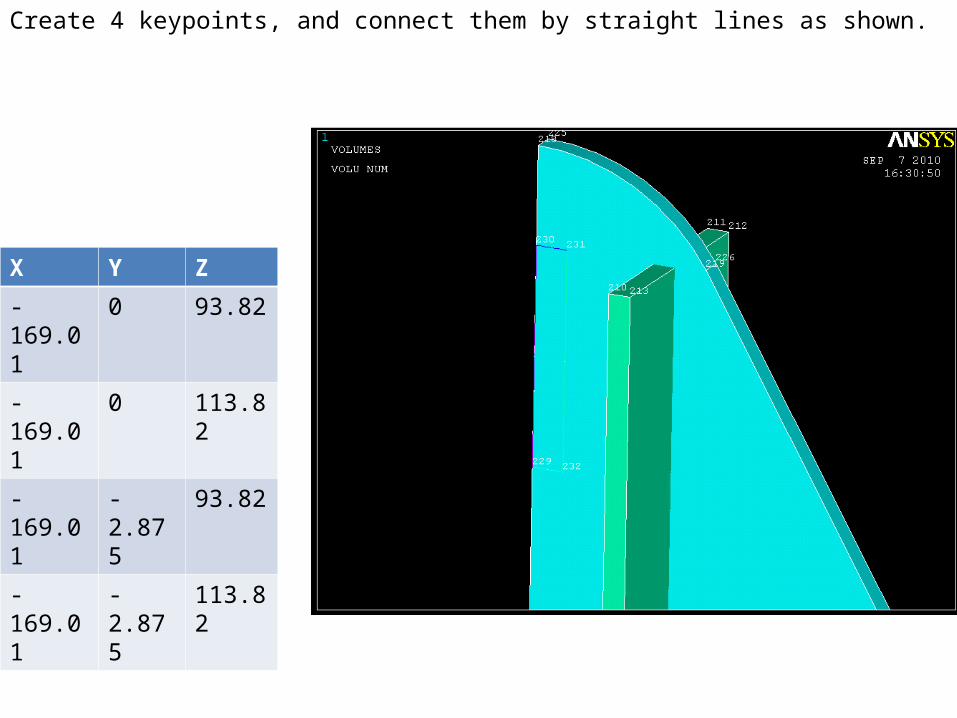
Create 4 keypoints, and connect them by straight lines as shown.
X Y Z
-169.01 0 93.82
-169.01 0 113.82
-169.01 -2.875 93.82
-169.01 -2.875 113.82
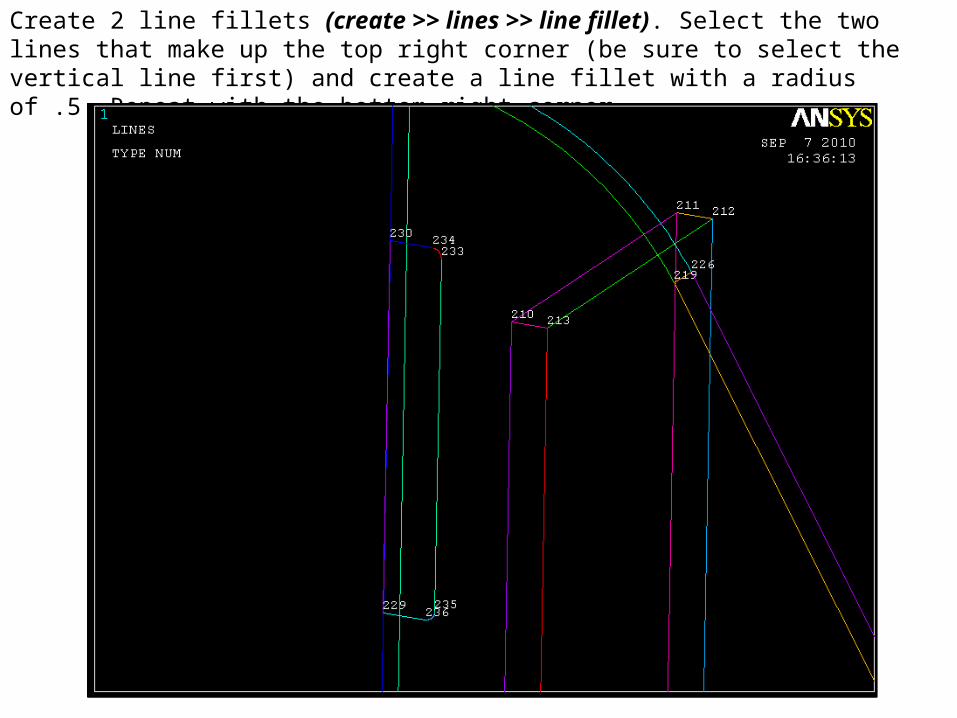
Create 2 line fillets (create >> lines >> line fillet). Select the two lines that make up the top right corner (be sure to select the vertical line first) and create a line fillet with a radius of .5. Repeat with the bottom right corner

Create an area by lines and extrude that area 2.02 in the X direction. Then subtract the smaller area from the larger area (select the large area first, hit okay, select the small area, hit okay).

Create 5 keypoints. Use these keypoints to make 4 arcs of radius 2.5. From these 4 arcs create an area, and extrude these areas -.1 in the Z direction.
X Y Z
-165.2656 -173.3281 78.07
-162.7656 -170.8281 78.07
-165.2656 -168.3281 78.07
-167.7656 -170.8281 78.07
-165.2656 -170.8281 78.07
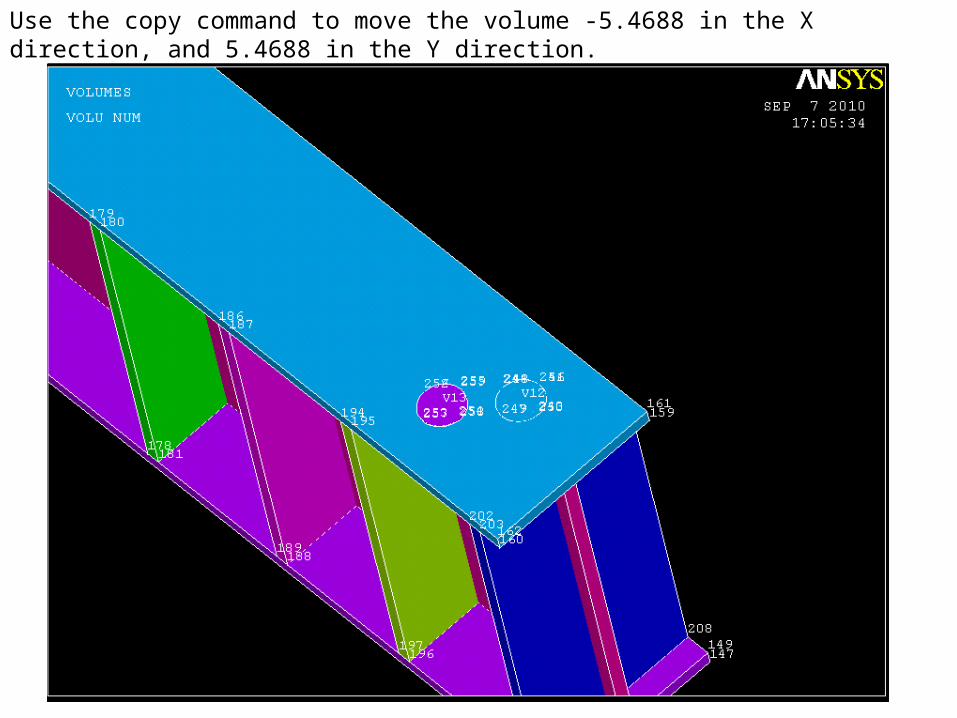
Use the copy command to move the volume -5.4688 in the X direction, and 5.4688 in the Y direction.
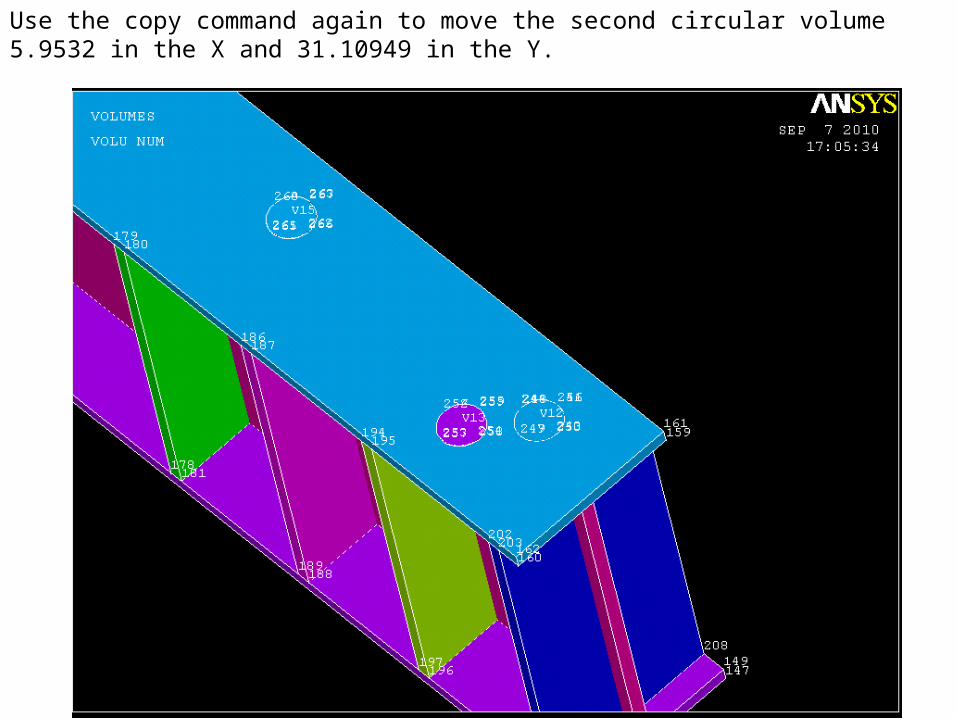
Use the copy command again to move the second circular volume 5.9532 in the X and 31.10949 in the Y.

Use the copy command again to move the third circular volume -6.4375 in the X and 4.3125

Add all of the volumes but the first volume together. There should be 15 volumes being added in this step.

Now mirror the 2 volumes over the XZ plane (modeling >> reflect >> volumes).

Now reflect all four volumes over the YZ plane. (turn off keypoint numbering by going to (plot controls >> numbering)
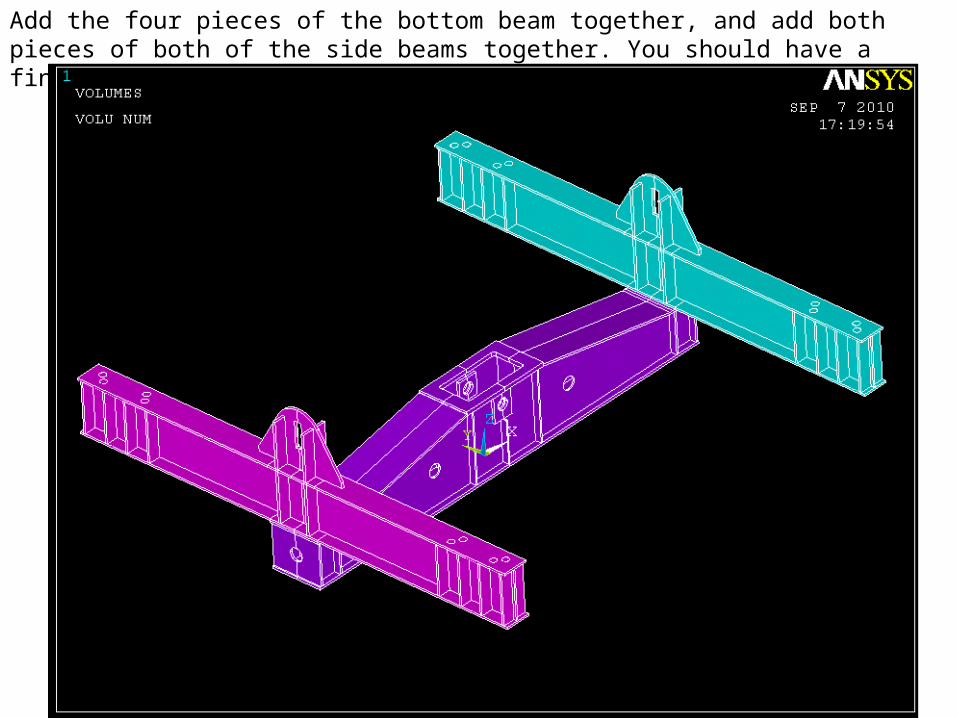
Add the four pieces of the bottom beam together, and add both pieces of both of the side beams together. You should have a final count of 3 volumes.
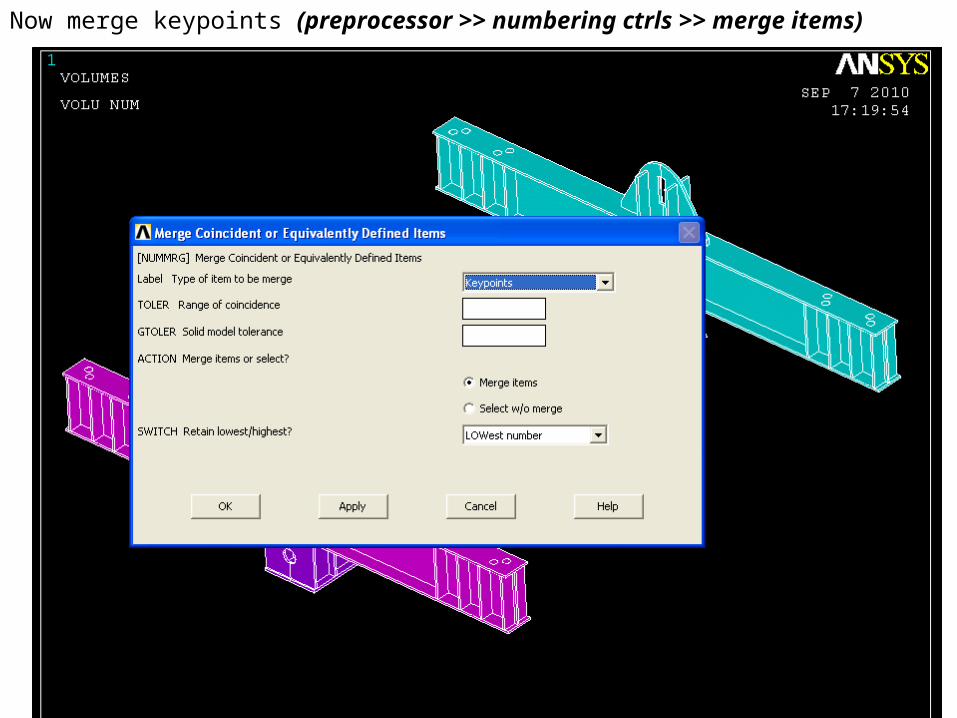
Now merge keypoints (preprocessor >> numbering ctrls >> merge items)

Now compress your keypoint, line, area, and volume numbers to create a cleaner model (preprocessor >> numbering ctrls >> compress items).
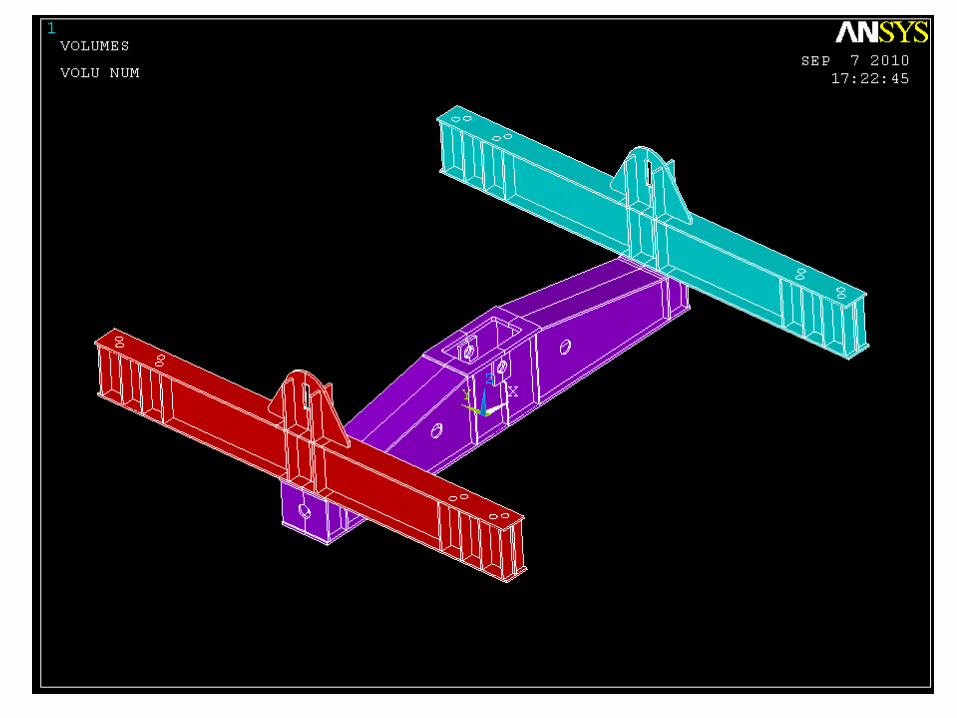

Fin.