leveraging a .net numerical library with microsoft excel · the rogue wave software name and logo,...
TRANSCRIPT

Leveraging a .NET Numerical Library with Microsoft Excel
Visual Studio Office Development and Other Tools
A White Paper by Visual Numerics, Inc.
June, 2010
Visual Numerics, Inc. 2500 Wilcrest Drive, Suite 200 Houston, TX 77042 USA www.vni.com

Leveraging a .NET Numerical Library with Microsoft Excel
Visual Studio Office Development and Other Tools By Visual Numerics, Inc. © 2010 Visual Numerics, Inc. All rights reserved Printed in the United States of America Publishing History: May 2007, June 2009, June 2010 Trademark Information
The Rogue Wave Software name and logo, the Visual Numerics name and logo, SourcePro, Stingray, HostAccess,
IMSL and PV-WAVE are registered trademarks of Rogue Wave Software, Inc. or its subsidiaries in the US and other
countries. JMSL, JWAVE, TS-WAVE, PyIMSL and Knowledge in Motion are trademarks of Rogue Wave Software,
Inc. or its subsidiaries. All other company, product or brand names are the property of their respective owners.
IMPORTANT NOTICE: The information contained in this document is subject to change without notice. Rogue Wave Software, Inc. and Visual Numerics, Inc. make no warranty of any kind with regard to this material, including, but not limited to, the implied warranties of merchantability and fitness for a particular purpose. Rogue Wave Software, Inc. and Visual Numerics, Inc, shall not be liable for errors contained herein or for incidental, consequential, or other indirect damages in connection with the furnishing, performance, or use of this material.
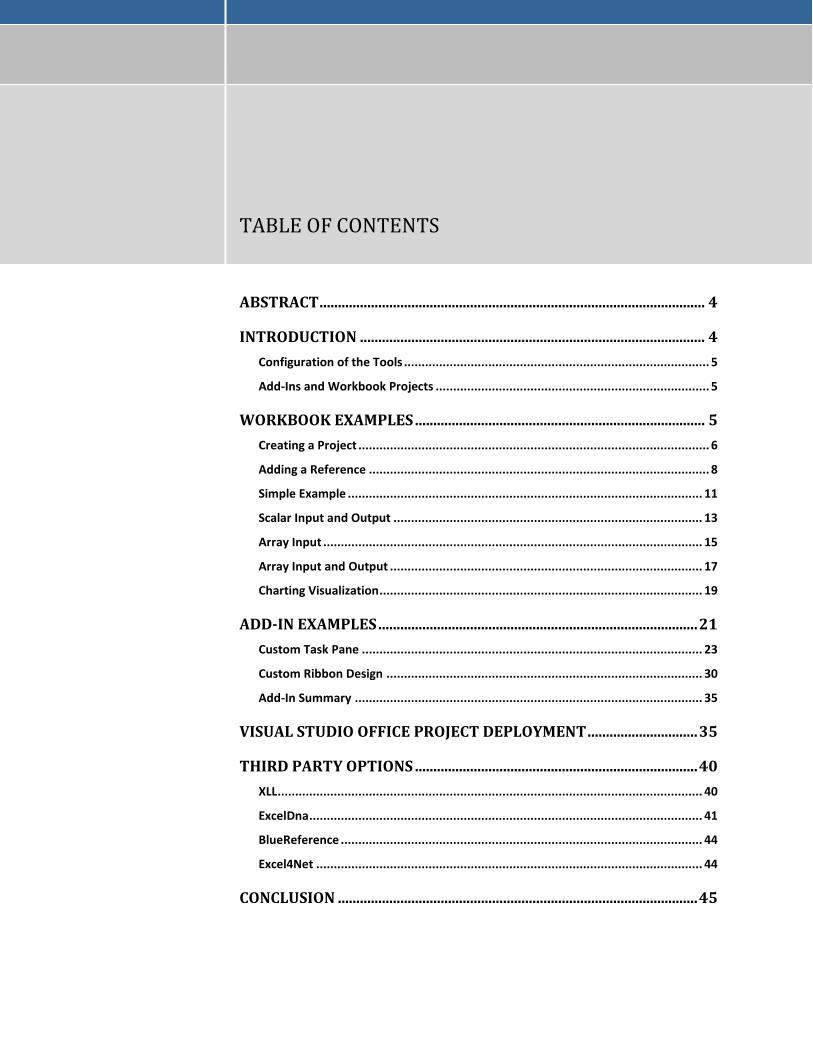
TABLE OF CONTENTS
ABSTRACT ......................................................................................................... 4
INTRODUCTION .............................................................................................. 4
Configuration of the Tools ....................................................................................... 5
Add-Ins and Workbook Projects .............................................................................. 5
WORKBOOK EXAMPLES ............................................................................... 5
Creating a Project .................................................................................................... 6
Adding a Reference ................................................................................................. 8
Simple Example ..................................................................................................... 11
Scalar Input and Output ........................................................................................ 13
Array Input ............................................................................................................ 15
Array Input and Output ......................................................................................... 17
Charting Visualization ............................................................................................ 19
ADD-IN EXAMPLES ....................................................................................... 21
Custom Task Pane ................................................................................................. 23
Custom Ribbon Design .......................................................................................... 30
Add-In Summary ................................................................................................... 35
VISUAL STUDIO OFFICE PROJECT DEPLOYMENT .............................. 35
THIRD PARTY OPTIONS ............................................................................. 40
XLL ......................................................................................................................... 40
ExcelDna ................................................................................................................ 41
BlueReference ....................................................................................................... 44
Excel4Net .............................................................................................................. 44
CONCLUSION .................................................................................................. 45

|4
Microsoft Excel is a very popular tool for anyone who analyzes data. The familiar interface and ability to easily view and edit data are key reasons for its success. However, some users need to integrate additional functionality into Excel for their numerical analysis needs. A popular library for this extension is the IMSL C# Numerical Library for .NET Applications, which adds a significant number of mathematical and statistical algorithms to the built-in Excel routines. There are many tools and options available for developers looking to extend Excel. The primary focus of this paper is on the Microsoft Office developer tools in Visual Studio that allow a developer the convenience of the well-known Visual Studio interface and use of their preferred .NET language to customize individual Excel workbooks or to create application-level add-ins. We also cover several open source and commercial tools that customize Excel, including tools that allow the use of XLL (Excel DLL) integration method along with .NET Framework languages.
This paper is intended for the developer interested in extending the functionality found in Microsoft Excel. Specialized mathematical and statistical libraries can extend analysis techniques well beyond any spreadsheet tool. However, spreadsheets are very popular because of their ease of use in organizing data and obtaining results quickly. The combination of an advanced numerical library and a spreadsheet with extensibility features lets a developer use a common interface for powerful numerical analysis. Microsoft first released the Visual Studio Tools for Office (VSTO) for the Office 2003 product family and the .NET Framework version 1.1. The concept allows .NET developers to create applications that combined the features of Microsoft Office and .NET using the Office Suite as a development platform. With Visual Studio 2008, Microsoft released the .NET Framework version 3.5 and a variety of updated tools. An updated version of VSTO, version 3.0, was designed to overcome many of the challenges users faced when using earlier versions. This document focuses on the next iteration of releases: the combination of Visual Studio 2010 and Excel 2010. The VSTO name is being phased out in favor of “Office Development in Visual Studio”. The general concepts are similar with the latest versions of these products covered in this document, but for those interested in the combinations of Visual Studio 2005 and Office 2003, or Visual Studio 2008 and Office 2007, earlier versions of this document are available from Visual Numerics upon request. There is extensive documentation available on MSDN1 with regard to Office Development in Visual Studio. Supplementing the Microsoft documentation, this document provides detailed examples using a .NET numerical library as part of an Excel customization project.
1 http://msdn.microsoft.com/en-us/library/d2tx7z6d.aspx

|5
The Visual Studio integration with Microsoft Office is powerful and flexible, but might not be the best answer to every challenge. A number of other tools exist commercially or as open source projects that can also be used to integrate third party .NET assemblies like the IMSL C# Numerical Library into the Microsoft Excel environment. Some of these options are discussed in the “Third Party Options” section of this document.
Configuration of the Tools
The core component for developing Excel applications in conjunction with the .NET Framework is Visual Studio 2010. When installing Visual Studio 2010, be sure to either do a complete install or check the box for Office Development components. On the Excel side, this example works with Excel 2010, a component of Office 2010. Earlier versions of Excel can also be used in a similar manner; however, earlier versions of Visual Studio are not substituted easily. Visual Studio also provides the option to install support for several different languages. The examples in this paper utilize the IMSL C# Numerical Library, which is a .NET assembly with language-independent metadata equally usable from Visual Basic, Managed C++ or F#. In earlier versions of VSTO, Visual Basic was easier to work with when writing Office applications because it simplifies the calling of the Office object model. However, with the later releases the C# language is a feasible option.
Add-Ins and Workbook Projects
There are three kinds of Office projects for Excel: Add-Ins, Templates and Workbooks. The Template model is very similar to a Workbook, but works for blank templates instead of specific workbooks. The conceptual difference is the add-in model is referred to as an “application-level project” while a workbook model is referred to as a “document-level project”. At the application level, custom Excel functions would be available to all workbooks, however at the document level, all customization is unique to one or more sheets contained in a single workbook. The end results may contain the same kinds of functionality discussed in this document, but the interface and development are variations on the theme. Further, the two models can be combined with unique task panes and ribbons for a specific workbook. For more information on document and application level projects, please refer to the comprehensive online documentation2.
Examples in this document are presented in order of increasing complexity, beginning with the workbook model. The programming language used is C#, but the procedure would be similar with Visual Basic or other .NET languages as discussed previously. A single project is used throughout, adding additional components and code behind methods as needed, but they are independent and the later examples do not rely on code from earlier examples.
2 http://msdn.microsoft.com/en-us/library/bb386107.aspx
|6
Creating a Project
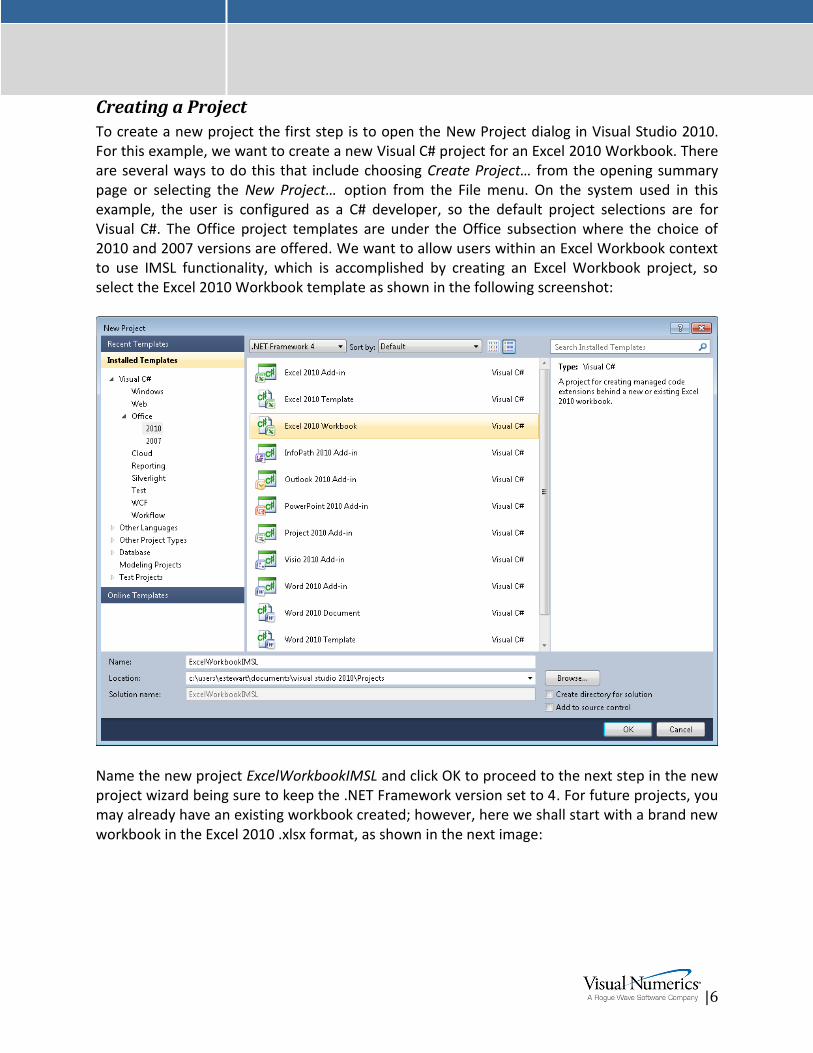
To create a new project the first step is to open the New Project dialog in Visual Studio 2010. For this example, we want to create a new Visual C# project for an Excel 2010 Workbook. There are several ways to do this that include choosing Create Project… from the opening summary page or selecting the New Project… option from the File menu. On the system used in this example, the user is configured as a C# developer, so the default project selections are for Visual C#. The Office project templates are under the Office subsection where the choice of 2010 and 2007 versions are offered. We want to allow users within an Excel Workbook context to use IMSL functionality, which is accomplished by creating an Excel Workbook project, so select the Excel 2010 Workbook template as shown in the following screenshot:
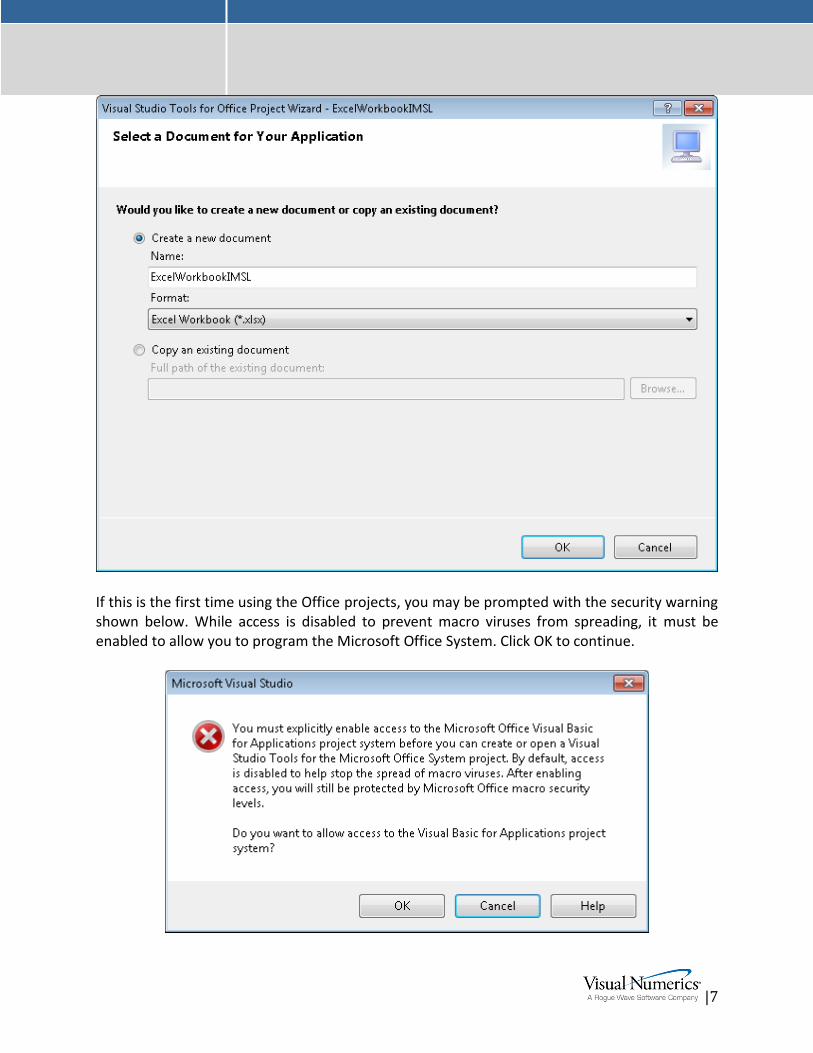
Name the new project ExcelWorkbookIMSL and click OK to proceed to the next step in the new project wizard being sure to keep the .NET Framework version set to 4. For future projects, you may already have an existing workbook created; however, here we shall start with a brand new workbook in the Excel 2010 .xlsx format, as shown in the next image:
|7
If this is the first time using the Office projects, you may be prompted with the security warning shown below. While access is disabled to prevent macro viruses from spreading, it must be enabled to allow you to program the Microsoft Office System. Click OK to continue.

|8
At this stage, you should see an empty Excel workbook, and it usually contains three blank worksheets. In the Solution Explorer, you will find “code behind” C# (.cs) files for each sheet and for the workbook as a whole. All these empty source files created from the templates now exist in the solution, but are blank, except for empty Startup and Shutdown methods and Designer-generated code. Here are images of the blank workbook and source code files:
Adding a Reference
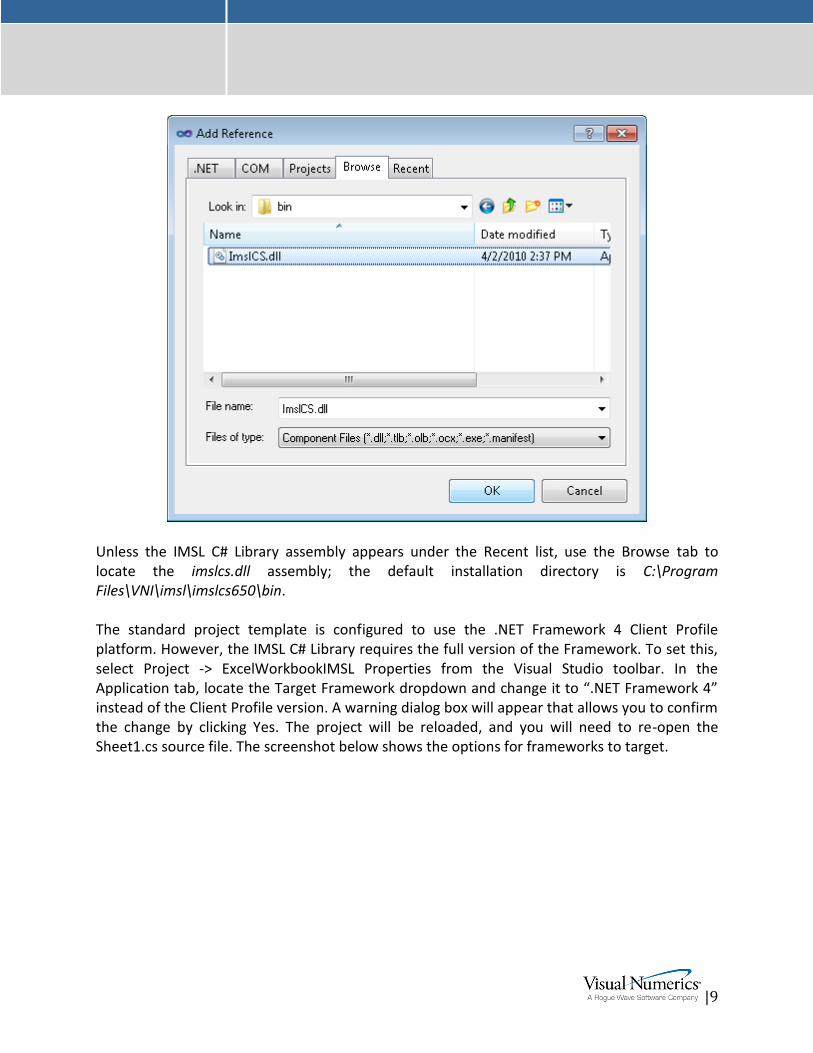
Once the new project is created, we need to add a reference to the numerical library assembly. In this case, we are using the IMSL C# Numerical Library. Like most Visual Studio projects, the Solution Explorer contains a References heading that can be right-clicked to add a reference to other projects or assemblies. Alternatively, you can select Add Reference… under the Project menu item. Using either method, the Add Reference dialog appears as shown below.
|9
Unless the IMSL C# Library assembly appears under the Recent list, use the Browse tab to locate the imslcs.dll assembly; the default installation directory is C:\Program Files\VNI\imsl\imslcs650\bin. The standard project template is configured to use the .NET Framework 4 Client Profile platform. However, the IMSL C# Library requires the full version of the Framework. To set this, select Project -> ExcelWorkbookIMSL Properties from the Visual Studio toolbar. In the Application tab, locate the Target Framework dropdown and change it to “.NET Framework 4” instead of the Client Profile version. A warning dialog box will appear that allows you to confirm the change by clicking Yes. The project will be reloaded, and you will need to re-open the Sheet1.cs source file. The screenshot below shows the options for frameworks to target.

|10
Once the reference is added to the project and the Target Framework is properly configured, we can confirm the library is available by opening one of the source files (for example, right-click on Sheet1.cs in the Solution Explorer and select View Code) and adding a using line to the source. Code completion, as shown in the next image, should be active if the IMSL Library has been successfully added as a reference.

|11
This confirmation with using is valuable but is not used in the examples. All examples use the full class names including the namespace to create inclusive code snippets. As an external .NET reference, a copy of the imslcs.dll assembly should be found in the bin\Debug or bin\Release directory with the spreadsheet object. If imslcs.dll has been added to the Global Assembly Cache, a local copy may not exist in the project but a copy is required when deploying the application to other computers. For more information on deployment, see the Deployment section of this document. With the newly created blank project and the IMSL C# Numerical Library available, we are ready to start building examples.
Simple Example
One of the simplest things we could do with the IMSL C# Numerical Library is to minimize the interaction with the spreadsheet objects and hard code variables. To begin, we need to provide a source for the user to initiate the action. There is a variety of ways to allow a user to interact with the worksheet, but basic button controls are used in these examples to avoid additional complexity. To view the spreadsheet and open the Visual Studio Toolbox, select the ExcelWorkbookIMSL.xls tab. If the Toolbox is not visible, drag it from the left edge (usually) or press Ctrl-W then X to open the window. Select the Button control and drag in the spreadsheet to create it. Upon creation, it is called “button1” and has that name as its text property. To be more descriptive, with the button selected, scroll down in its Properties view on the lower right and change the name via the Text property field to “Erf(0.2)”. This name will make more sense as we proceed. See the following image for the current status in Visual Studio 2010:

|12
Next, Visual Studio can generate some code to allow us to fill in the blanks and take some action when the user clicks the button. Double-click the button in this design view and the view changes to the code behind Sheet1.cs with a blank button1_Click method. This is the method executed when a user clicks the button at runtime. For this example, we return the value of the error function evaluated at 0.2. Fill in this method so that it reads as follows: private void button1_Click(object sender, EventArgs e)
{
double result = Imsl.Math.Sfun.Erf(0.2);
this.Application.ActiveCell.Value2 = result;
} In detail, this code creates a double named result and then calls the static method Erf in the
Sfun class of the Imsl.Math namespace. The output is then stored in the active cell. To test this code, the Start Without Debugging command automatically builds the solution and starts Excel. You can do this by pressing Ctrl+F5 or by selecting the Start Without Debugging option under the Debug item on the menu bar. You should then see Excel with your new button. Click the button to see the result filled in the active cell. Screenshots follow:
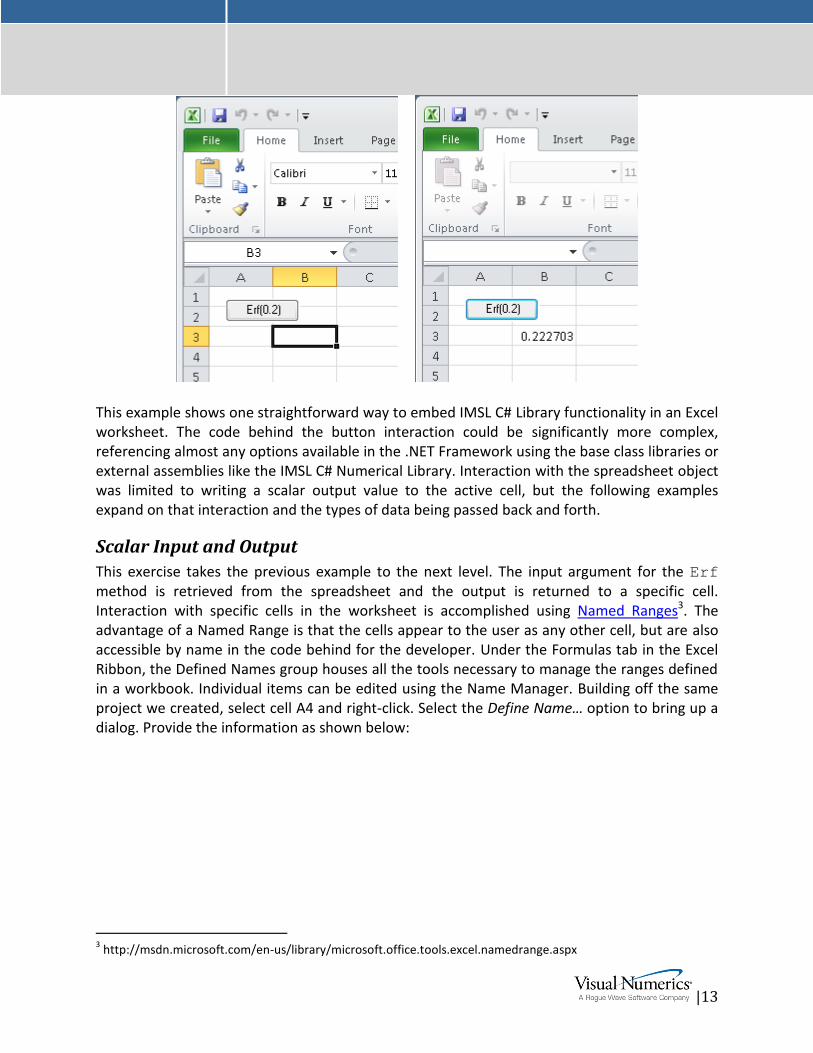
|13
This example shows one straightforward way to embed IMSL C# Library functionality in an Excel worksheet. The code behind the button interaction could be significantly more complex, referencing almost any options available in the .NET Framework using the base class libraries or external assemblies like the IMSL C# Numerical Library. Interaction with the spreadsheet object was limited to writing a scalar output value to the active cell, but the following examples expand on that interaction and the types of data being passed back and forth.
Scalar Input and Output
This exercise takes the previous example to the next level. The input argument for the Erf method is retrieved from the spreadsheet and the output is returned to a specific cell. Interaction with specific cells in the worksheet is accomplished using Named Ranges3. The advantage of a Named Range is that the cells appear to the user as any other cell, but are also accessible by name in the code behind for the developer. Under the Formulas tab in the Excel Ribbon, the Defined Names group houses all the tools necessary to manage the ranges defined in a workbook. Individual items can be edited using the Name Manager. Building off the same project we created, select cell A4 and right-click. Select the Define Name… option to bring up a dialog. Provide the information as shown below:
3 http://msdn.microsoft.com/en-us/library/microsoft.office.tools.excel.namedrange.aspx
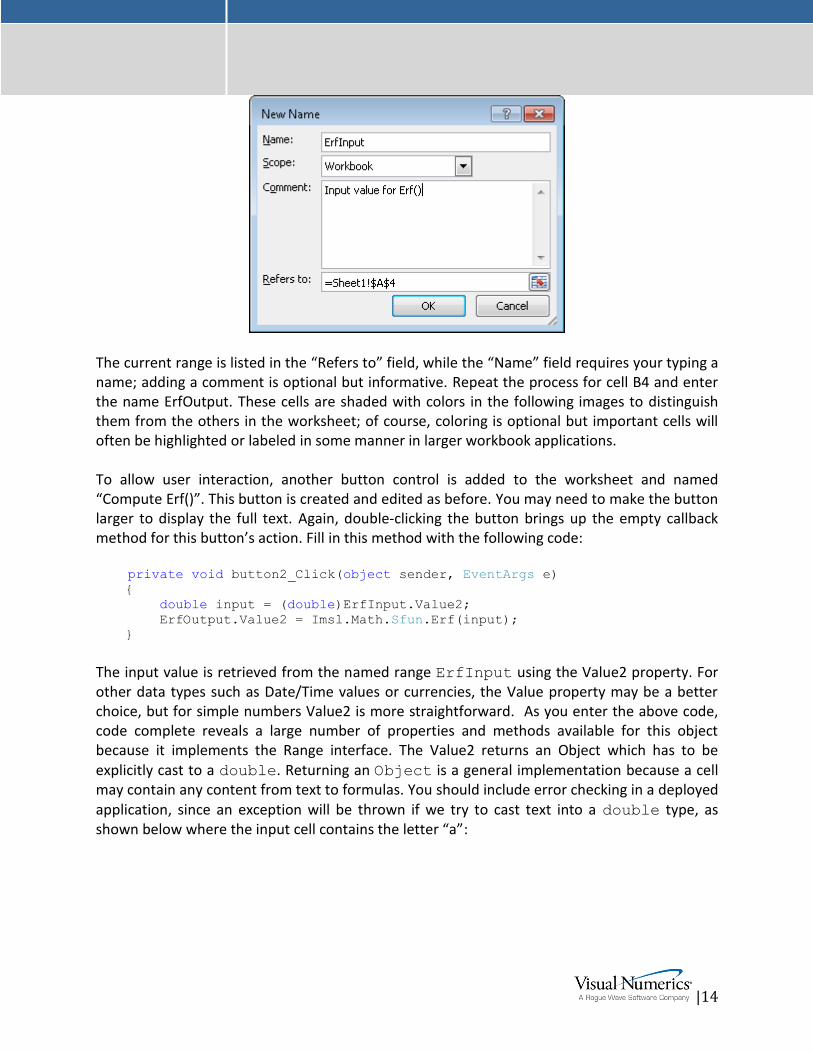
|14
The current range is listed in the “Refers to” field, while the “Name” field requires your typing a name; adding a comment is optional but informative. Repeat the process for cell B4 and enter the name ErfOutput. These cells are shaded with colors in the following images to distinguish them from the others in the worksheet; of course, coloring is optional but important cells will often be highlighted or labeled in some manner in larger workbook applications. To allow user interaction, another button control is added to the worksheet and named “Compute Erf()”. This button is created and edited as before. You may need to make the button larger to display the full text. Again, double-clicking the button brings up the empty callback method for this button’s action. Fill in this method with the following code: private void button2_Click(object sender, EventArgs e)
{
double input = (double)ErfInput.Value2;
ErfOutput.Value2 = Imsl.Math.Sfun.Erf(input);
} The input value is retrieved from the named range ErfInput using the Value2 property. For other data types such as Date/Time values or currencies, the Value property may be a better choice, but for simple numbers Value2 is more straightforward. As you enter the above code, code complete reveals a large number of properties and methods available for this object because it implements the Range interface. The Value2 returns an Object which has to be explicitly cast to a double. Returning an Object is a general implementation because a cell may contain any content from text to formulas. You should include error checking in a deployed application, since an exception will be thrown if we try to cast text into a double type, as shown below where the input cell contains the letter “a”:

|15
While the exception is descriptive enough, a cleaner approach would be to catch this conversion error in the code and then report the problem appropriately in a MessageBox, for example. Moving on, assuming the input variable is now a valid number, the Erf method is called and
the result returned by setting the Value2 property for the ErfOutput named range. A successful run is shown below:
With this example, we allow the user to enter a value in cell A4 and evaluate the value of the error function, returning the result in cell B4 with a click of a button. A single value is used as input to a static method for this example. The next example expands to accepting an array of values as input into an IMSL C# Library class.
Array Input
This example increases with complexity by accepting an array as input. Further, the array may be any length as the size is retrieved in a Named Range while the values are located below that cell. The IMSL Library function used is the SignTest class. The previous example used a static method in the Sfun class, but SignTest requires a constructor and a follow-up method call.

|16
The code behind structure supports this more complex object case and is not limited to static method calls, allowing use of multiple classes or reference libraries in combination. Continuing to work with the ExcelWorkbookIMSL.xls spreadsheet, follow the same instructions above for creating a named range to name cell A8 “SignTestCount” and cell B8 “SignTestOutput”. The cells in column A below A8 are used as input. For flexibility, enter the formula “=COUNT(A9:A1000)” into cell A8 to allow use of nearly one thousand values. In this example, we are only using a handful of values, but a general formula could be used. The cells A9 through A27 are filled in with values from the SignTest example in the IMSL C# Numerical Library documentation, as shown in the screenshot. Another button control is added, named “Sign Test”, and its callback method contains the following code: private void button3_Click(object sender, EventArgs e)
{
int count = (int)(double)SignTestCount.Value2;
Excel.Range dataRange = this.Range[
this.Cells[SignTestCount.Row + 1, SignTestCount.Column],
this.Cells[SignTestCount.Row + count, SignTestCount.Column]];
Object[,] array = (Object[,])dataRange.Value2;
double[] data = new double[count];
for (int i = 0; i < data.Length; i++)
{
data[i] = (double)array[1 + i, 1];
}
Imsl.Stat.SignTest st = new Imsl.Stat.SignTest(data);
double result = st.Compute();
SignTestOutput.Value2 = result;
} This is the most complex code shown so far. The basic parts are very similar to the previous examples with additional code that retrieves an array from a range of cells. First, the number of cells, count, is collected from the named range SignTestCount.Value2, and this variable
is used to declare the size of the data array. Note that we first cast the Object to a double then to an int to avoid an issue casting an Object directly to an integer. We then define a new Excel.Range object and use the Cells property to define its endpoints relative to the SignTestCount cell, expecting the input values to be listed directly below this cell. To retrieve the contents of this range properly, the array variable is declared as a two-dimensional
Object array and its Value2 property is queried. With this call, we are able to parse the array of Objects as double values and fill the data array (note that the array variable is a 1-based array rather than the traditional 0-based form most C# developers are used to). The array of Objects cannot be passed directly to the SignTest object since the constructor
expects a one-dimensional array of double values. Once we loop through the array to fill data, the SignTest object is instantiated, and its Compute method is called. The result is returned to the SignTestOutput named range. The result of running this example is shown below (for formatting reasons, the columns are split in half):

|17
Array Input and Output
For this example, we demonstrate matrix multiplication, which is not typically performed in a spreadsheet, yet is used regularly in many areas of numerical analysis. From the IMSL C# Library, the overloaded Matrix.Multiply static method accepts one-dimensional and two-dimensional arrays of double values and returns an appropriately sized double array containing the product of the matrix-matrix, vector-matrix or matrix-vector combination. Named ranges are used again to define the input variables, but their sizes are queried at runtime instead of requiring a counting cell as in the SignTest example previously. Defining a range of cells as a named range is done the same as single cells: highlight the area and right-click, and then select Define Name… from the list. Since the output range depends on the sizes of the input matrices, we use another single cell Named Range for the top left corner of the output matrix. Finally, for clarity, the entire output matrix is shaded. The code in the button’s callback method is as follows: private void button4_Click(object sender, EventArgs e)
{
Object[,] oMatrixA = (Object[,])MatrixA.Value2;
Object[,] oMatrixB = (Object[,])MatrixB.Value2;
int rowA = oMatrixA.GetLength(0);
int colA = oMatrixA.GetLength(1);
int rowB = oMatrixB.GetLength(0);
int colB = oMatrixB.GetLength(1);
double[,] dMatrixA = new double[rowA, colA];
double[,] dMatrixB = new double[rowB, colB];
for (int i = 0; i < rowA; i++)
{
for (int j = 0; j < colA; j++)
{

|18
dMatrixA[i, j] = (double)oMatrixA[i + 1, j + 1];
}
}
for (int i = 0; i < rowB; i++)
{
for (int j = 0; j < colB; j++)
{
dMatrixB[i, j] = (double)oMatrixB[i + 1, j + 1];
}
}
double[,] result = Imsl.Math.Matrix.Multiply(dMatrixA, dMatrixB);
Excel.Range resultRange = this.Range[MatrixOutput.Cells[1, 1],
MatrixOutput.Cells[1 + rowA - 1, 1 + colB - 1]];
resultRange.Value2 = result;
resultRange.Interior.Color = MatrixOutput.Interior.Color;
}
There are many differences in this code segment compared to the previous examples revealing the myriad of ways one can interact with the cells on an Excel spreadsheet at this level. To begin, the values of the MatrixA and MatrixB named ranges are retrieved with calls to their Value2 property and stored in Object[,] arrays. The dMatrixA and dMatrixB arrays are
declared as two dimensional double arrays with sizes determined from their counterparts. Note again, the offset of +1 that arises to account for the differences in handling array indices. Once the loops fill the double arrays, the Matrix.Multiply method is called, storing the answer in result. We define a new named range, resultRange, with a size defined by the number of rows of A by the number of columns of B (per matrix multiplication rules). Output to the MatrixOutput Named Range cell in the sheet is accomplished by setting its Value2
property to the result. The MatrixOutput cell was shaded to start with, and the entire output matrix is shaded to match. Screenshots of an example are shown below. The input range MatrixA is shaded orange; MatrixB, yellow. Before clicking the button, the output cell I2 is shaded blue; after the calculation the full output matrix is shaded blue.
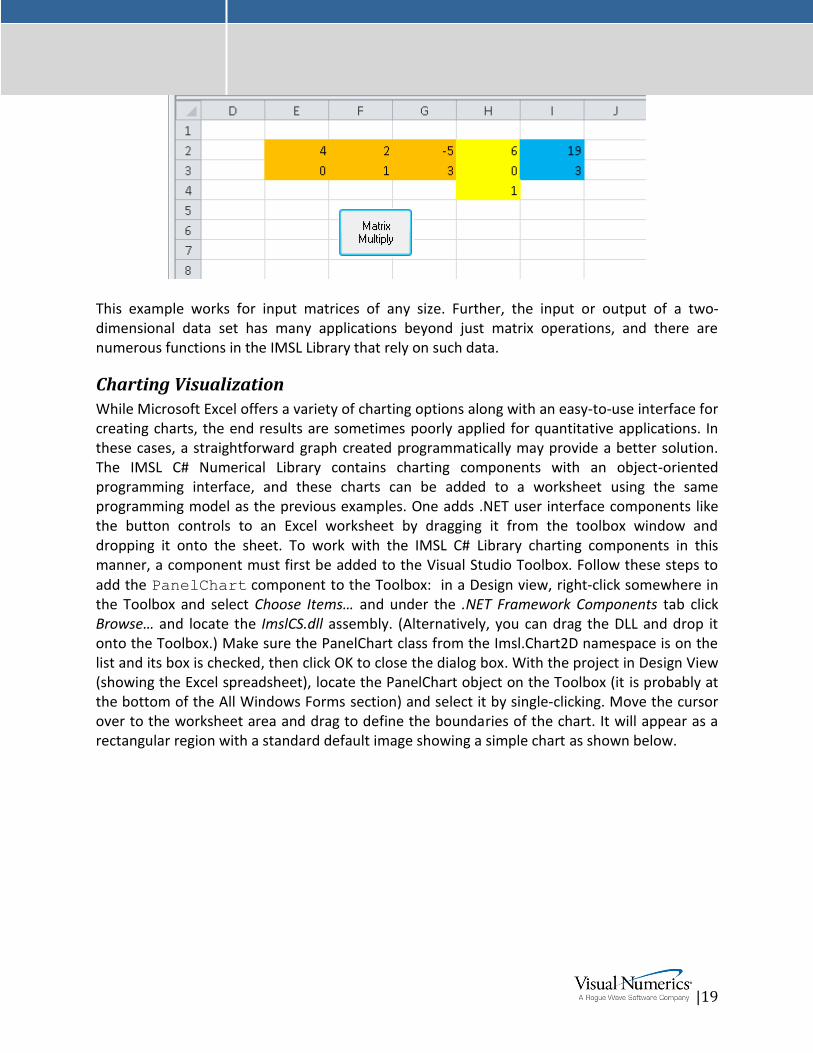
|19
This example works for input matrices of any size. Further, the input or output of a two-dimensional data set has many applications beyond just matrix operations, and there are numerous functions in the IMSL Library that rely on such data.
Charting Visualization
While Microsoft Excel offers a variety of charting options along with an easy-to-use interface for creating charts, the end results are sometimes poorly applied for quantitative applications. In these cases, a straightforward graph created programmatically may provide a better solution. The IMSL C# Numerical Library contains charting components with an object-oriented programming interface, and these charts can be added to a worksheet using the same programming model as the previous examples. One adds .NET user interface components like the button controls to an Excel worksheet by dragging it from the toolbox window and dropping it onto the sheet. To work with the IMSL C# Library charting components in this manner, a component must first be added to the Visual Studio Toolbox. Follow these steps to add the PanelChart component to the Toolbox: in a Design view, right-click somewhere in the Toolbox and select Choose Items… and under the .NET Framework Components tab click Browse… and locate the ImslCS.dll assembly. (Alternatively, you can drag the DLL and drop it onto the Toolbox.) Make sure the PanelChart class from the Imsl.Chart2D namespace is on the list and its box is checked, then click OK to close the dialog box. With the project in Design View (showing the Excel spreadsheet), locate the PanelChart object on the Toolbox (it is probably at the bottom of the All Windows Forms section) and select it by single-clicking. Move the cursor over to the worksheet area and drag to define the boundaries of the chart. It will appear as a rectangular region with a standard default image showing a simple chart as shown below.

|20
Programmatically, the properties of the created PanelChart object are accessed in the code behind the Excel spreadsheet in exactly the same way as in a traditional .NET Windows Forms desktop application. For this C# example, consider plotting a simple one-dimensional array like the one we used for the SignTest example. The following code segment plots the array data from the SignTest example as a colored line; this snippet can be added at the end of the button3_Click method shown above: // code snippet to work with a PanelChart object
Imsl.Chart2D.Chart chart = imsl_Chart2D_PanelChart1.Chart;
Imsl.Chart2D.AxisXY axis = new Imsl.Chart2D.AxisXY(chart);
Imsl.Chart2D.Data line = new Imsl.Chart2D.Data(axis, data);
line.LineColor = System.Drawing.Color.BlueViolet;
imsl_Chart2D_PanelChart1.Refresh(); The first few lines of the code define the objects in the chart hierarchy: a Chart holds Axis objects, which hold Data objects. The chart reference is obtained from the embedded PanelChart object’s Chart property. The axis and data objects are then defined and the data variable from the SignTest example appears here. The LineColor property is set, and

|21
then the Refresh method is called to redraw the PanelChart in the spreadsheet. A screenshot of the end result is shown below:
This is a simple example, but any of the charting features of the IMSL C# Numerical Libraries would be similarly accessible. These features include bar, pie, high-low-close, contour, heatmap, dendrogram, statistical process control charts, and others.
- This section covers creating an Excel Add-In that references the IMSL C# Numerical Library. Creating the project and adding a reference to the IMSL C# Library assembly follows the same steps as the Workbook Examples above. For completeness, below are screenshots of the project creation dialog and an empty Add-In project:

|22
Note that since Add-Ins are application-wide customizations, a specific Excel workbook instance is not required as part of the project. As before, the template is largely blank except for some code generated by Visual Studio. Do not forget to change the target framework to .NET Framework 4 instead of the Client Profile.

|23
As an application-wide customization, your Add-In is not accessed from elements added to a workbook, but instead through the Excel application interfaces itself. There are two common methods: creating a custom task pane4 or creating a new ribbon5 element.
Custom Task Pane
With custom task panes, developers can add in their own features using a view familiar to the typical Excel user. Since the custom panes are built using Windows Forms controls, their construction is familiar to most .NET developers as well. You can consider a custom task pane as a miniature Windows Forms application hosted within Excel. All of the Controls and Events operate as one would expect in a traditional desktop application. A Task Pane is a panel usually docked on the side of the default view in Excel, but it can be a floating window within the spreadsheet as well. This example shows how to use the custom task pane concept to build a solver for polynomial equations. Begin with a blank Add-In project and add a reference to the IMSL C# Library as described above (right-click on References in the Solution Explorer, select Add Reference…, and browse to the ImslCS.dll assembly). The first step is to add a new User Control to the project. From the Project item on the menu bar, select Add New Item… and choose “User Control” from the next dialog as shown below (it can be found in the Windows Forms category):
4 http://msdn.microsoft.com/en-us/office/aa942864.aspx
5 http://msdn.microsoft.com/en-us/office/bb386089.aspx

|24
We will use the default “UserControl1” name for the class. This action adds another item to the Solution Explorer (the C# source code file for the new control) and switches the view in Visual Studio to a design view showing the blank control, as seen below:
In a few steps we will fill in this empty space with some Windows Forms controls, but first switch back to the source code view of ThisAddIn.cs. The next step is to add some code that will enable your new task pane when Excel is started. Add the following five lines of source code to instantiate the UserControl1 object and load it into the list of custom task panes: namespace ExcelAddIn1

|25
{
public partial class ThisAddIn
{
private UserControl1 userControl1;
private Microsoft.Office.Tools.CustomTaskPane imslCustomTaskPane;
private void ThisAddIn_Startup(object sender, System.EventArgs e)
{
userControl1 = new UserControl1();
imslCustomTaskPane = this.CustomTaskPanes.Add
(userControl1, "IMSL Task Pane");
imslCustomTaskPane.Visible = true;
} This is the entire source code required to create a blank task pane that does nothing. As a test, save and build the project and then press Ctrl+F5 to start without debugging. You should see Excel 2010 start with a new task pane visible and empty, except for the title:
This pane can hold a variety of Windows Forms controls and can be treated as a miniature .NET Windows Forms application that is hosted within Excel. The next steps are to switch to design view for the UserControl1 object and drag items from the Toolbox in Visual Studio to build an interface. Instead of tediously explaining each step, a screenshot is shown below. A GroupBox is used to hold all the elements for this example, which allows you to add additional tools in the same area. A few labels are used for description; text boxes and a NumericUpDown are used for input; and a RichTextBox is used for output with a button to run the solver. No code has been written yet, although the user interface code is being generated by Visual Studio. The following images show the design view (left) and runtime view in Excel (right):

|26
There is quite a bit of customization that can be done. For example, you probably want to fill in default values of “0” for the coefficients. And with a little more code, it is easy to disable the text boxes for coefficients that are not required given a smaller order for the polynomial. But the key part of missing functionality so far is solving for the roots and printing the results. For that step, double-click the Solve button in the designer and Visual Studio creates an empty button1_Click method. In this method, gather the user input from the text boxes, pass them to the ZeroPolynomial class in the IMSL C# Library, and then nicely format the output of the solution. This can be written using many different styles and the following is an example showing some customization and output formatting style: public partial class UserControl1 : UserControl
{
private TextBox[] textBoxArray;
private const int maxOrder = 6;
private const int minOrder = 2;
public UserControl1()
{
InitializeComponent();
textBoxArray = new TextBox[maxOrder];
textBoxArray[0] = textBox1;
textBoxArray[1] = textBox2;
textBoxArray[2] = textBox3;
textBoxArray[3] = textBox4;
textBoxArray[4] = textBox5;

|27
textBoxArray[5] = textBox6;
}
private void numericUpDown1_ValueChanged(object sender, EventArgs e)
{
int num = (int)numericUpDown1.Value;
for (int i = minOrder; i < maxOrder; i++)
{
if (i < num)
{
textBoxArray[i].Enabled = true;
}
else
{
textBoxArray[i].Enabled = false;
}
}
}
private void button1_Click(object sender, EventArgs e)
{
int num = (int)numericUpDown1.Value;
double[] coef = new double[num];
for (int i = 0; i < num; i++)
{
coef[i] = Double.Parse(textBoxArray[i].Text);
}
Imsl.Math.ZeroPolynomial zp = new Imsl.Math.ZeroPolynomial();
Imsl.Math.Complex[] root = zp.ComputeRoots(coef);
richTextBox1.Text = "";
for (int i = 0; i < root.Length; i++)
{
richTextBox1.AppendText(root[i].Real().ToString("0.0000") +
" " + root[i].Imag().ToString("0.0000") + "i\n");
}
}
Running this example and solving the equation for x is shown below. (Note in this image the pane has been undocked and is floating in an Excel spreadsheet.) The output values are generally complex numbers, though the second root for this problem is real.

|28
Designing custom task panes using Visual Studio Office Tools and Excel 2010 is similar to creating any .NET desktop application using Windows Forms. The flexibility allows a wide variety of applications, and integrating a .NET library such as the IMSL C# Numerical Library is as easy as adding a reference to the assembly. This basic example does not interact with the current Excel spreadsheet instance (for example, to retrieve coefficient values from a series of cells). Such interaction is possible with a combination of the custom task pane UserControl and the Workbook model. Specifically, UserControl objects can be created without necessarily showing them every time Excel opens. In a specific Workbook project, an existing UserControl can be referenced and displayed for a specific sheet with code along the lines of the following: public partial class Sheet1
{
UserControl1 uc = new UserControl1();
private void Sheet1_Startup(object sender, System.EventArgs e)
{
Globals.ThisWorkbook.ActionsPane.Controls.Add(uc);
}
} Combining custom task panes with workbook-level customizations can yield a very powerful solution using both Excel data and objects and .NET Framework tools.

|29
Note that once you create this Add-In, each time Excel starts it will be loaded. To manage the Add-Ins you create, click on the Office Button on the top left corner of the Excel application and choose Excel Options at the bottom. Next, click on Add-Ins on the left side and notice the “ExcelAddIn1” item listed under the Active Application Add-Ins list (see below).
Notice its type is listed as a “COM Add-in” providing some insight into how the integration with .NET works behind the scenes. To disable this Add-In, simply select “COM Add-Ins” in the Manage dropdown at the bottom of the dialog and click “Go…” which shows the itemized registered COM Add-Ins:

|30
Simply uncheck the box for your custom add-ins that you do not want to load each time Excel starts. Click OK and restart Excel to confirm that your custom task pane is no longer being loaded.
Custom Ribbon Design
Ribbons were introduced with the Office 2007 release. The concept is that similar individual tasks are formatted in groups which are then collected together on separate ribbons. For
example, in Excel 2010 to center the contents of a cell, you click the “Center” button located in the Alignment group on the Home ribbon. Adding a custom Ribbon object is another way to enhance the functionality of Excel, and the model is quite similar to the custom task pane. As above, you start with a new Excel 2010 Add-In project in Visual Studio 2010. Then select Add New Item… from the Project item on the menu bar. Here, select the “Ribbon (Visual Designer)” template. It is possible to design a ribbon using XML as well, but the designer should feel more familiar to developers accustomed to Windows Forms projects. Here are screenshots of selecting the template along with the resulting design view of a blank ribbon:

|31
Using the Visual Studio Toolbox, you can now simply drag items into the empty group. Note that individual components cannot be added to the ribbon, but must be grouped together in containers. This is not a significant limitation, however, as it offers the designer the option of grouping similar tasks. For this example, we will just add a single button that displays a Windows Forms application to evaluate some special functions that Microsoft Excel does not include. Note that the Ribbon, Tab, and Group can all be renamed as desired. The Tab name is the one above the ribbon on the menu bar. The screenshot below shows the new button and the tab’s new name of “IMSL”:
|32
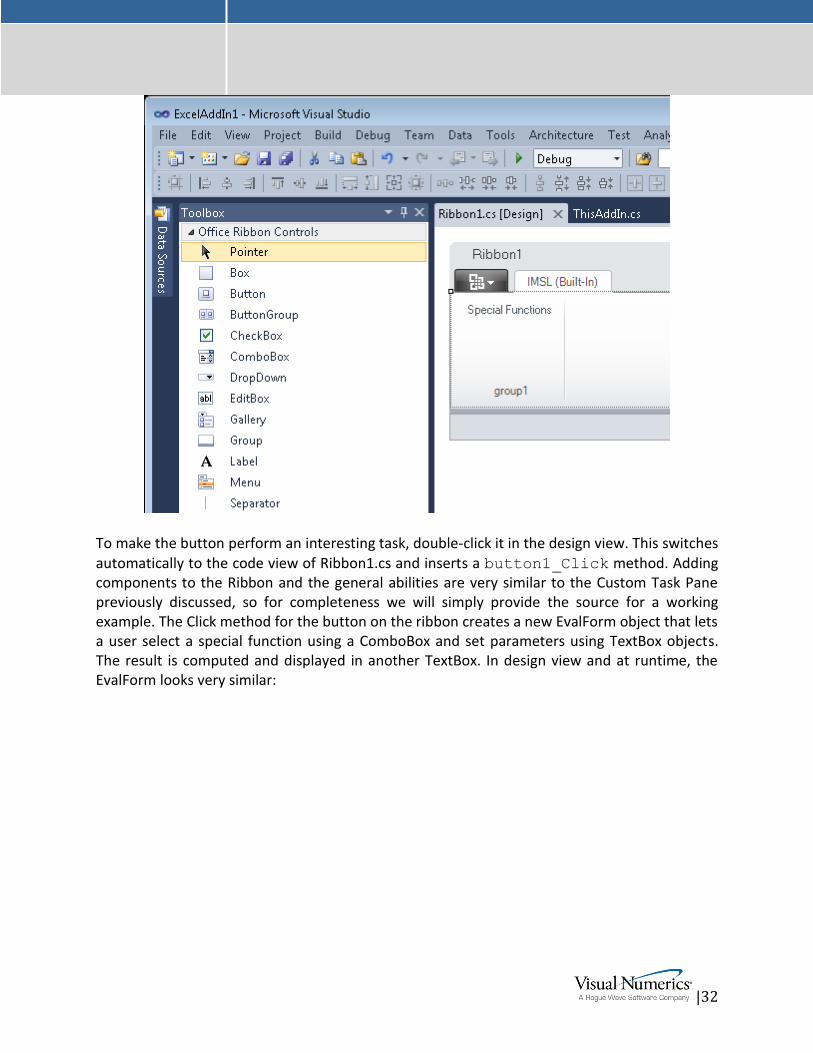
To make the button perform an interesting task, double-click it in the design view. This switches
automatically to the code view of Ribbon1.cs and inserts a button1_Click method. Adding components to the Ribbon and the general abilities are very similar to the Custom Task Pane previously discussed, so for completeness we will simply provide the source for a working example. The Click method for the button on the ribbon creates a new EvalForm object that lets a user select a special function using a ComboBox and set parameters using TextBox objects. The result is computed and displayed in another TextBox. In design view and at runtime, the EvalForm looks very similar:

|33
However, at runtime Excel now looks slightly different with an IMSL tab added at the top of the application. When this tab is selected, you will see the new group and the button:
Clicking on the Special Functions button shows the EvalForm window by adding a single line to its callback method: private void button1_Click(object sender, RibbonControlEventArgs e)
{
new EvalForm().Visible = true;
} The source code for the EvalForm.cs class is as follows: public partial class EvalForm : Form
{

|34
private Hashtable sfuns;
public EvalForm()
{
InitializeComponent();
sfuns = new Hashtable();
sfuns.Add("Beta", 2);
sfuns.Add("BetaIncomplete", 3);
sfuns.Add("ErfcInverse", 1);
sfuns.Add("ErfInverse", 1);
sfuns.Add("Gamma", 1);
sfuns.Add("LogBeta", 2);
sfuns.Add("Poch", 2);
IDictionaryEnumerator en = sfuns.GetEnumerator();
while (en.MoveNext()) {
comboBox1.Items.Add(en.Key);
}
comboBox1.Sorted = true;
comboBox1.SelectedIndex = 0;
}
private void comboBox1_SelectedIndexChanged(object sender,
EventArgs e)
{
if (comboBox1 == null) return;
string selKey = comboBox1.SelectedItem.ToString();
int n_params = (int)sfuns[selKey];
switch (n_params)
{
case 1:
textBox2.Enabled = false;
textBox3.Enabled = false;
break;
case 2:
textBox2.Enabled = true;
textBox3.Enabled = false;
break;
case 3:
textBox2.Enabled = true;
textBox3.Enabled = true;
break;
}
}
private void button1_Click(object sender, EventArgs e)
{
string selKey = comboBox1.SelectedItem.ToString();
int n_params = (int)sfuns[selKey];
Imsl.Math.PrintMatrix pm = new Imsl.Math.PrintMatrix();
Assembly imslcs = Assembly.GetAssembly(pm.GetType());
MethodInfo mi =
imslcs.GetType("Imsl.Math.Sfun").GetMethod(selKey);
object[] parms = new object[n_params];
parms[0] = Double.Parse(textBox1.Text);
if (n_params > 1)
{

|35
parms[1] = Double.Parse(textBox2.Text);
{
if (n_params > 2)
{
parms[2] = Double.Parse(textBox3.Text);
}
}
}
double result = (double)mi.Invoke(null, parms);
textBox4.Text = result.ToString();
}
} The functionality of the EvalForm class is somewhat straightforward. In short, the list of available functions with the number of required parameters is added to a Hashtable, which is used to populate the ComboBox. Depending on how many parameters are accepted, the ComboBox callback enables or disables the input TextBox items. In the callback for the “Calculate” button, the string value of the selected item is used as the actual method name to call in the Imsl.Math.Sfun class, so reflection is used. Not shown are using statements adding the System.Collections namespace (for the Hashtable) and the System.Reflection namespace
(for the reflection classes). The result is then displayed in textBox4.
Add-In Summary
Both the Custom Task Pane and Custom Ribbon models are excellent models that can be used to add functionality to Excel. With the custom add-ins enabled, each time Excel is started the tool becomes available to the user in any workbook opened. In the examples presented here, the interface is used to display standard Windows Forms applications, although there is virtually no limit to the amount of customization available. By combining the Workbook model with a custom Add-In, it is possible for the task pane or ribbon to communicate with cells in the active workbook directly adding significantly more power and flexibility to the solution. Combining task panes and ribbons in a Workbook project is as easy as selecting Add New Item… from the Project menu. This allows you to create a new group on the Add-Ins Ribbon or a new Task Pane that is available only to this specific workbook.
Deployment of Office Solutions was a challenge for many developers in the .NET Framework version 1.1, but has been progressively simplified with later updates. There is detailed documentation available online6 including the list of prerequisites, but we can summarize what is required to deploy the project created in this paper to a separate computer from the development machine. With Visual Studio 2008 and Excel 2007, deployment became significantly easier than for previous releases of VSTO. With the current platform, simply select Build from the Visual Studio
6 http://msdn.microsoft.com/en-us/library/bb386179.aspx

|36
2010 menu bar, and then select Publish <project>. The specific project name is shown on the list. The following screenshots guide you the default selections. First, you need to select a location to publish the application. This can be nearly any legal path including shared network resources and web sites. The default is simply “publish\” which creates a subdirectory under the working Visual Studio solution that contains the distributable files:
Next, the default installation path is required. For simplicity, select “CD-ROM or DVD-ROM”, but this can also be a web URL or network path.

|37
Finally, the wizard is ready to build the files. The full path to their location is displayed:

|38
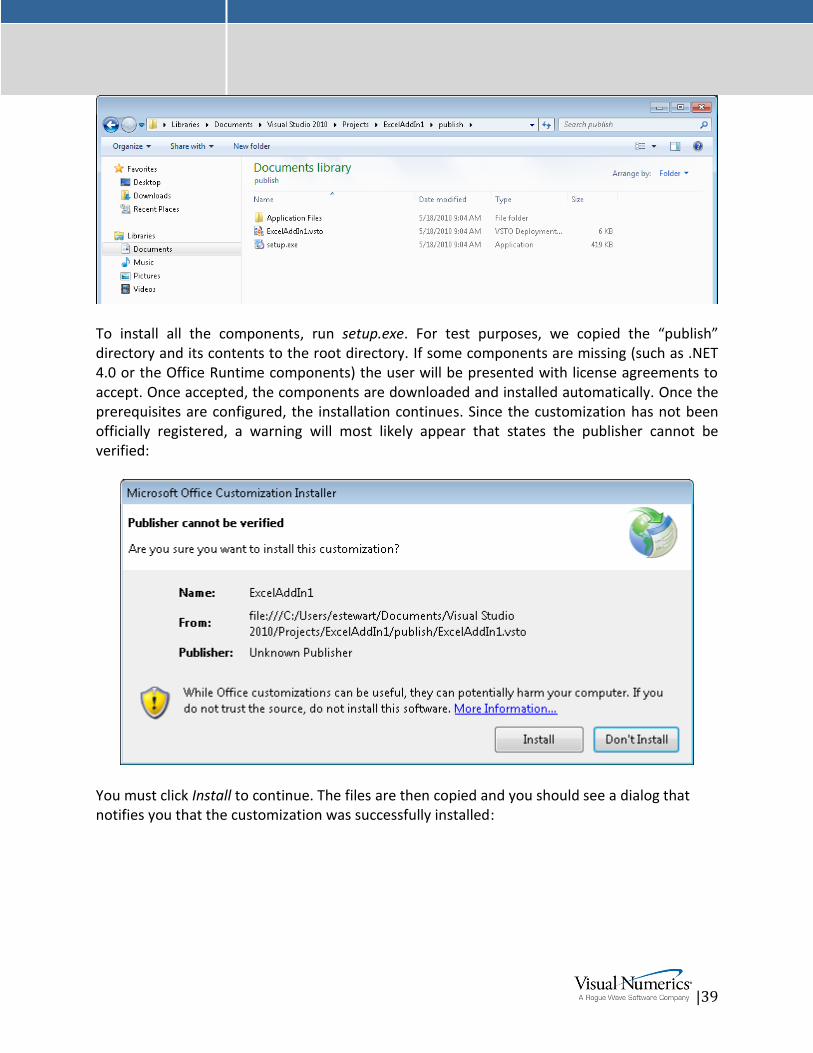
After a few seconds, you should see “Publish succeeded” in the status area at the bottom of the Visual Studio window. If you browse to the newly created directory, you should see files with names like setup.exe, ExcelWorkbookIMSL.vsto and ExcelWorkbookIMSL.xlsx along with a subdirectory that contains the application files. At this point, do not open the Excel workbook (.xlsx) file; instead, this entire directory hierarchy should be packaged for distribution on an end user’s computer. When you publish an Add-In project, there is not an xlsx workbook available for distribution since this type of project applies to the Excel application as a whole instead of a specific workbook. An example of the files in the target folder is shown below.
|39
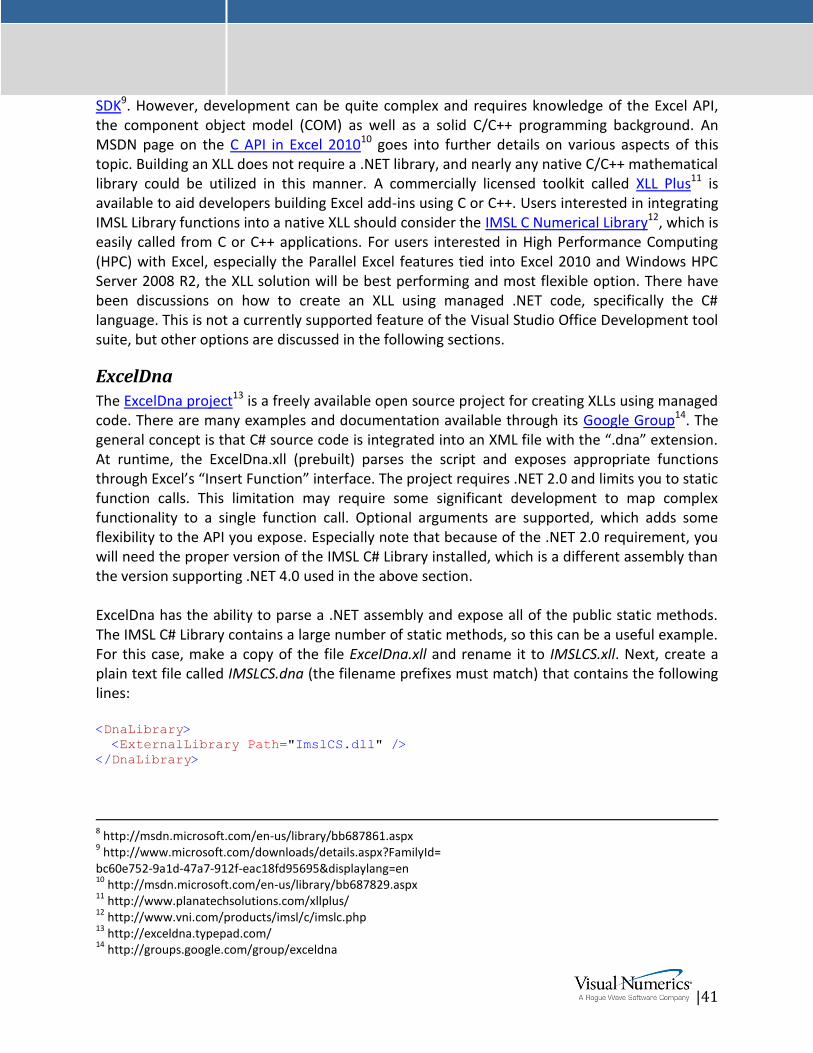
To install all the components, run setup.exe. For test purposes, we copied the “publish” directory and its contents to the root directory. If some components are missing (such as .NET 4.0 or the Office Runtime components) the user will be presented with license agreements to accept. Once accepted, the components are downloaded and installed automatically. Once the prerequisites are configured, the installation continues. Since the customization has not been officially registered, a warning will most likely appear that states the publisher cannot be verified:
You must click Install to continue. The files are then copied and you should see a dialog that notifies you that the customization was successfully installed:

|40
For a workbook project, the primary Excel workbook (ExcelWorkbookIMSL.xlsx here) is now fully functional. For add-in projects, each time Excel is started your new custom pane or ribbon will be available. To remove the installation, use the Add/Remove Applications feature of Microsoft Windows. The customized workbook or add-in will appear on the list:
While the combination of Visual Studio Office Development solutions of Add-Ins and Workbook projects meets many user requirements for integrating the IMSL C# Library with Microsoft Excel, there are other options one may wish to consider as well. Some of these require significantly less coding expertise while others are focused on solving different kinds of business problems. This section covers tools outside of the Microsoft Office Tools stack. Some of the following tools are open source and some are commercial, however any interested user should investigate each to its own merits. Visual Numerics makes no claims for validity or support for any of these third party tools.
XLL
An XLL is basically a DLL for Excel. Developing XLL files for Excel has traditionally been well documented7 (and here8) by Microsoft and has expanded to utilize a separate Excel 2010 XLL
7 http://msdn.microsoft.com/en-us/library/aa730920.aspx
|41
SDK9. However, development can be quite complex and requires knowledge of the Excel API, the component object model (COM) as well as a solid C/C++ programming background. An MSDN page on the C API in Excel 201010 goes into further details on various aspects of this topic. Building an XLL does not require a .NET library, and nearly any native C/C++ mathematical library could be utilized in this manner. A commercially licensed toolkit called XLL Plus11 is available to aid developers building Excel add-ins using C or C++. Users interested in integrating IMSL Library functions into a native XLL should consider the IMSL C Numerical Library12, which is easily called from C or C++ applications. For users interested in High Performance Computing (HPC) with Excel, especially the Parallel Excel features tied into Excel 2010 and Windows HPC Server 2008 R2, the XLL solution will be best performing and most flexible option. There have been discussions on how to create an XLL using managed .NET code, specifically the C# language. This is not a currently supported feature of the Visual Studio Office Development tool suite, but other options are discussed in the following sections.
ExcelDna
The ExcelDna project13 is a freely available open source project for creating XLLs using managed code. There are many examples and documentation available through its Google Group14. The general concept is that C# source code is integrated into an XML file with the “.dna” extension. At runtime, the ExcelDna.xll (prebuilt) parses the script and exposes appropriate functions through Excel’s “Insert Function” interface. The project requires .NET 2.0 and limits you to static function calls. This limitation may require some significant development to map complex functionality to a single function call. Optional arguments are supported, which adds some flexibility to the API you expose. Especially note that because of the .NET 2.0 requirement, you will need the proper version of the IMSL C# Library installed, which is a different assembly than the version supporting .NET 4.0 used in the above section. ExcelDna has the ability to parse a .NET assembly and expose all of the public static methods. The IMSL C# Library contains a large number of static methods, so this can be a useful example. For this case, make a copy of the file ExcelDna.xll and rename it to IMSLCS.xll. Next, create a plain text file called IMSLCS.dna (the filename prefixes must match) that contains the following lines: <DnaLibrary>
<ExternalLibrary Path="ImslCS.dll" />
</DnaLibrary>
8 http://msdn.microsoft.com/en-us/library/bb687861.aspx
9 http://www.microsoft.com/downloads/details.aspx?FamilyId=
bc60e752-9a1d-47a7-912f-eac18fd95695&displaylang=en 10
http://msdn.microsoft.com/en-us/library/bb687829.aspx 11
http://www.planatechsolutions.com/xllplus/ 12
http://www.vni.com/products/imsl/c/imslc.php 13
http://exceldna.typepad.com/ 14
http://groups.google.com/group/exceldna

|42
To ease deployment, copy these two files to the IMSL C# Library installation directory (typically C:\Program Files\VNI\imsl\imslcs650\bin). To enable this extension inside Excel, you can simply double-click the IMSLCS.xll file. You will be greeted by a security notice:
Alternatively, open the Excel Options window, select Manage Excel Add-Ins and browse to the XLL file. It then appears in the list of available Excel Add-Ins to manage:
It may not be immediately obvious, but after enabling the add-in, all of the static methods contained in the IMSL C# Library are available for use in any cell function. They will appear in the list of available functions as you type into an Excel cell; the IMSL Library functions will be distinguishable because they use their mixed-case standard names unlike the built-in Excel functions that appear in all capital letters. For example, in Cell A1, if you start to type “=ga” you should see the following:
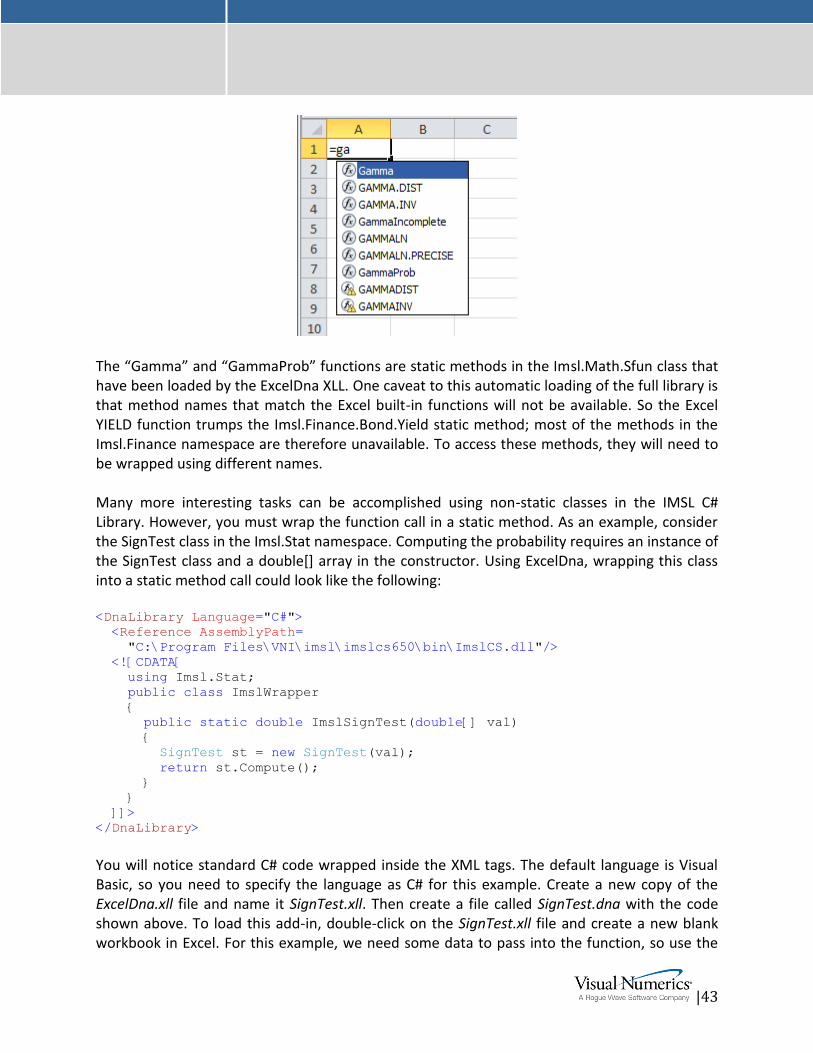
|43
The “Gamma” and “GammaProb” functions are static methods in the Imsl.Math.Sfun class that have been loaded by the ExcelDna XLL. One caveat to this automatic loading of the full library is that method names that match the Excel built-in functions will not be available. So the Excel YIELD function trumps the Imsl.Finance.Bond.Yield static method; most of the methods in the Imsl.Finance namespace are therefore unavailable. To access these methods, they will need to be wrapped using different names. Many more interesting tasks can be accomplished using non-static classes in the IMSL C# Library. However, you must wrap the function call in a static method. As an example, consider the SignTest class in the Imsl.Stat namespace. Computing the probability requires an instance of the SignTest class and a double[] array in the constructor. Using ExcelDna, wrapping this class into a static method call could look like the following: <DnaLibrary Language="C#">
<Reference AssemblyPath=
"C:\Program Files\VNI\imsl\imslcs650\bin\ImslCS.dll"/>
<![CDATA[
using Imsl.Stat;
public class ImslWrapper
{
public static double ImslSignTest(double[] val)
{
SignTest st = new SignTest(val);
return st.Compute();
}
}
]]>
</DnaLibrary> You will notice standard C# code wrapped inside the XML tags. The default language is Visual Basic, so you need to specify the language as C# for this example. Create a new copy of the ExcelDna.xll file and name it SignTest.xll. Then create a file called SignTest.dna with the code shown above. To load this add-in, double-click on the SignTest.xll file and create a new blank workbook in Excel. For this example, we need some data to pass into the function, so use the
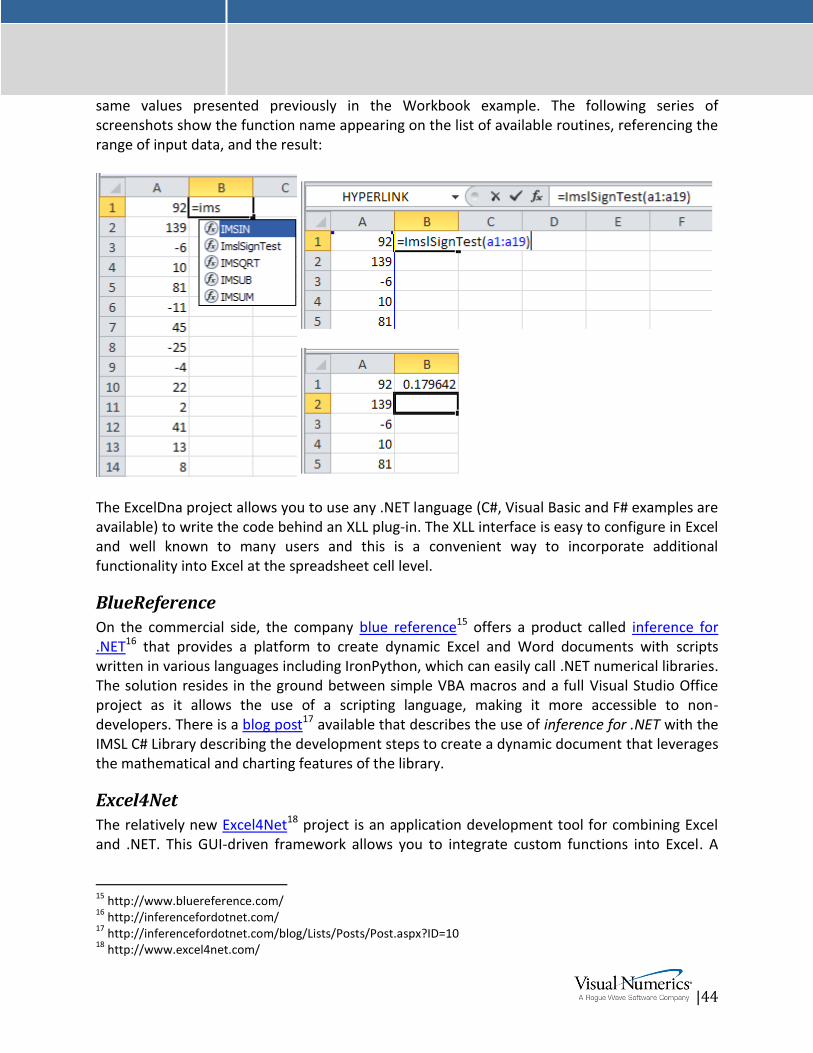
|44
same values presented previously in the Workbook example. The following series of screenshots show the function name appearing on the list of available routines, referencing the range of input data, and the result:
The ExcelDna project allows you to use any .NET language (C#, Visual Basic and F# examples are available) to write the code behind an XLL plug-in. The XLL interface is easy to configure in Excel and well known to many users and this is a convenient way to incorporate additional functionality into Excel at the spreadsheet cell level.
BlueReference
On the commercial side, the company blue reference15 offers a product called inference for .NET16 that provides a platform to create dynamic Excel and Word documents with scripts written in various languages including IronPython, which can easily call .NET numerical libraries. The solution resides in the ground between simple VBA macros and a full Visual Studio Office project as it allows the use of a scripting language, making it more accessible to non-developers. There is a blog post17 available that describes the use of inference for .NET with the IMSL C# Library describing the development steps to create a dynamic document that leverages the mathematical and charting features of the library.
Excel4Net
The relatively new Excel4Net18 project is an application development tool for combining Excel and .NET. This GUI-driven framework allows you to integrate custom functions into Excel. A
15
http://www.bluereference.com/ 16
http://inferencefordotnet.com/ 17
http://inferencefordotnet.com/blog/Lists/Posts/Post.aspx?ID=10 18
http://www.excel4net.com/

|45
custom Insert Function menu allows the user to map Excel table values to input arguments of public functions exposed in the .NET assembly. This is a free development kit, but may not yet support Excel 2010.
This document described and showed examples of how to develop and deploy an Excel-based application that calls the IMSL C# Numerical Library through the Office Development with Visual Studio interface. Interactions are as easy as adding code behind the spreadsheet using any .NET language and calling the IMSL C# Library assembly like any other assembly reference. In a workbook project, converting spreadsheet cell areas to arrays and copying the arrays back to cell areas is accomplished using Named Ranges. Charting components can be added as if they were any other Windows Forms component. Excel Add-Ins such as custom task panes and ribbons are another powerful integration option and can host Windows Forms applications inside the Excel environment. Finally, deployment is easily achieved using the publishing wizard to package your customized solutions for distribution to end users. For additional information, refer to the various hyperlinked sources in this document, many of which lead to the MSDN web pages. If the Visual Studio interfaces do not meet your needs, a growing set of third party tools provide other options for integration with Microsoft Excel. Additional Expert Consulting Services19 are also available for your IMSL-based applications from Visual Numerics, A Rogue Wave Software Company.
19
http://www.vni.com/products/consulting/index.php