lets play bassoon
TRANSCRIPT
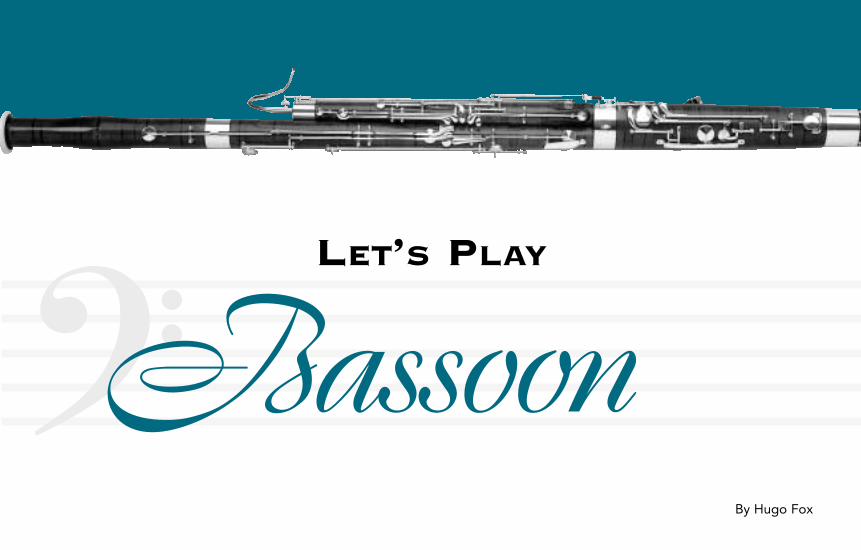
LET’S PLAY
By Hugo Fox
Bassoon
2
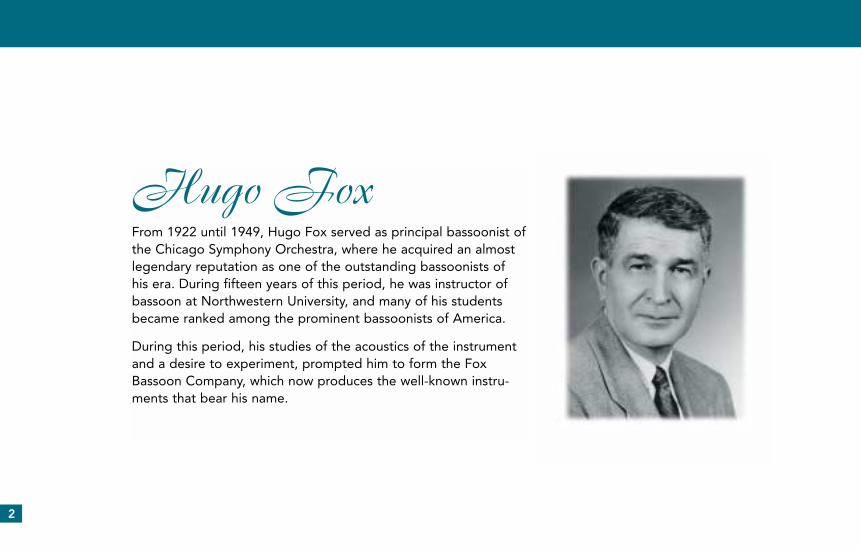
Hugo Fox From 1922 until 1949, Hugo Fox served as principal bassoonist ofthe Chicago Symphony Orchestra, where he acquired an almostlegendary reputation as one of the outstanding bassoonists of his era. During fifteen years of this period, he was instructor ofbassoon at Northwestern University, and many of his studentsbecame ranked among the prominent bassoonists of America.
During this period, his studies of the acoustics of the instrumentand a desire to experiment, prompted him to form the FoxBassoon Company, which now produces the well-known instru-ments that bear his name.
3
INTRODUCTION:This booklet has been prepared for the bandmaster orwoodwind instructor who teaches the instrument, whilenot being an accomplished bassoonist.
It is intended to serve as a handy reminder of some ofthe more important points to consider when starting astudent, maintaining the instrument, and finishing reedsor reed blanks.
The fingering chart is based on competent professionalpractices, and while not extensive in its treatment ofalternate fingerings, is sufficiently complete to be usedwith almost any properly constructed instrument.
4
INDEX
Introduction ....................................................................2-3
Starting the Student on Bassoon .................................... 5
Assembly of the Bassoon ...............................................6-7
Care of the Instrument ...................................................8-9
The Reed.....................................................................10-11
Fingering Charts .........................................................12-22
5
STARTING THE STUDENTON THE BASSOON
Either transfer the students from another instrument, orstart them directly on bassoon. If you have access to ashort-reach model bassoon, it is practical to start them inelementary..
Since the bassoon does not require a firm or tightembouchure, there is leeway in selecting suitable players.The teeth need not be straight, nor does the player needto have a normal bite. The lip tension is much less, forinstance, than that used in playing clarinet or oboe.
The reed should be taken into the mouth until the upperlip almost touches the first wire. The lips control the reedcompletely: the teeth play a minor role. The feeling of thelip should be one of grasping the reed all around, and thereed should be supported on the sides, as well as fromabove and below. The teeth should be apart when playing
bassoon, much like when playing trombone. The airstream must have a clear, unobstructed path through thereed, continuing through the instrument.
So that the reed will enter the mouth in a comfortable andnatural position, the body and instrument position shouldbe correct. The body should be erect, standing or sitting.The head should also be erect and facing forward. Theadjustment of the neck or seat strap should be such thatthe reed enters the mouth with the head in this position.
6
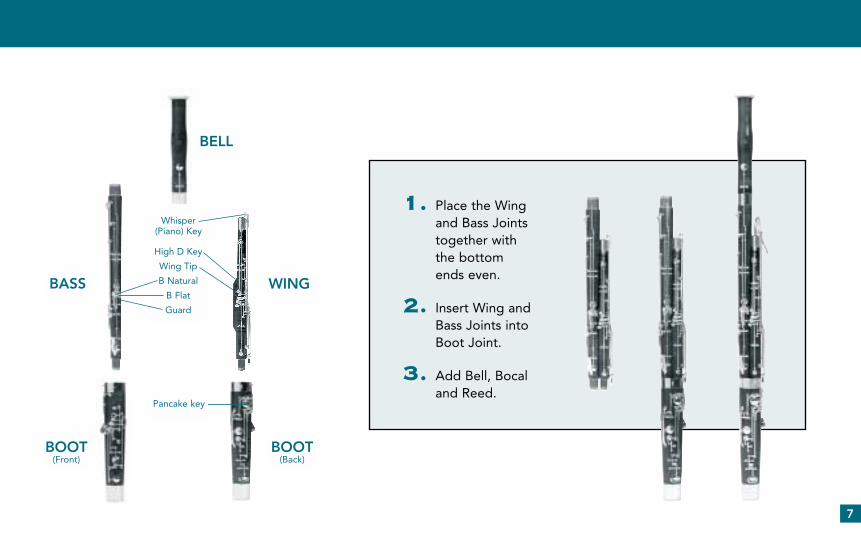
ASSEMBLY
■ To assemble the bassoon, place the wing and bass jointstogether with the bottom ends even (see illustration) andinsert them into the boot joint. Next, add the bell andthen the bocal or mouth pipe. Exercise care in insertingthe bocal so that the pad on the whisper (piano) key will not be injured or broken off.
■ An alternate assembly method is to first insert the wingjoint, and twist it to achieve a comfortable adjustment ofthe piano key mechanism. This adjustment should be measured with the bocal in the wing joint, and the mecha-nism should be such that the whisper (piano) key coversthe bocal button just prior to or simultaneously with the“pancake key” on the boot joint. On Fox and Renard bassoons, it is possible to install the wing joint so that thegroove running the length of the wing is concentric with thelarge socket in the boot. This will match a scribe line on thebottom of the whisper key side of the wing with a similarline on the boot, which can also be used for aligning it.After achieving this position, the bocal should be removedand the bass joint inserted in the boot joint. The playershould be extremely careful when using this method of
assembly, since carelessness can damage the keys or thetenons on the wing and bass joints.
■ If a body lock is used on the instrument, its closure shouldbe made after the bass and wing joints are in alignment. Ifthe key alignment is incorrect with the body lock in place,disengage the lock and have it adjusted by a repairman. Itis the opinion of the author that body locks, while of somevalue, are a constant hazard to the instrument, becausethey can easily be torn off the thin tenon wall of the bassjoint. An exception to this is with plastic bassoons, whichhave stronger sections than the wooden instruments. Ifwooden instruments have thread wound tenons, there isless of a need for the body lock, since the thread wrappingcan be adjusted to provide a firm fit between the joints.
■ Use of a hand rest is optional and is governed in mostcases by the length of the player’s hand. When playing witha neck strap, some form of hand support is necessary andthe hand rest becomes more important, in order to positionthe instrument. The size and shape of the hand rest shouldbe selected to provide maximum comfort to the player.
7
1. Place the Wingand Bass Jointstogether withthe bottomends even.
2. Insert Wing andBass Joints intoBoot Joint.
3. Add Bell, Bocaland Reed.
BELL
WINGBASS
BOOT(Front)
BOOT(Back)
High D Key
Wing Tip
B Natural
B Flat
Guard
Pancake key
Whisper (Piano) Key
8
CARE OF THE INSTRUMENT
GENERALTreat the instrument like a fine piece of furniture. Avoidexcessive heat and moisture, particularly sudden changes.Do not leave it in a cold automobile overnight, and thentry to play it immediately upon entering a building. Thecost of making a bassoon is mostly hand labor. It frequent-ly costs more to repair a damaged instrument than it doesto make a new one.
BOCALSBlow out, by blowing on the large end, after each use.Once a month flush with mixture of one tablespoon ofbaking soda in a large glass of warm water. Upon doingso, swab the bocal with a bocal brush and flush it out with warn water from a faucet. Check the hole in thebocal button to be sure it is open. This is best done byblowing through it.
OILING THE BORE After protecting the pads with wax paper or other suit-able material, or after removing the keys, the unlined portion of the bore should be swabbed with LIGHT mineral oil, using a pull-through swab. After allowing theoil to soak in for about an hour, remove the remaining oilwith another pull-through swab. This should be doneevery six months.
CLEANING THE BOREWood and pads can be severely damaged by moisture.Swab the bore after every concert, rehearsal and practice,in order to remove the moisture that has been depositedthere, as well as for sanitary reasons. This should be donewith a pull-through swab. A silk swab works best becauseit can be dropped down the “unlined” side of the bootand pulled out the “lined” side, pulling the moisture awayfrom the wood and out through the rubber lining.(Although plastic bassoons are impervious to moisture,they should still be swabbed to protect the pads and forsanitary reasons.)
9
CLEANING THE FINISHPLASTIC MODELS – Clean weekly with a damp cloth,being careful not to wet pads. Dry after cleaning. Soapand water may be used, if necessary.
WOODEN INSTRUMENTS – Clean weekly with a dampcloth, being careful not to wet the pads. Dry after clean-ing. Once every two months, polish with furniture polish.
KEYS Clean with a dry cloth after each use. If the keys are nick-el, they should be buffed by an experienced repairman,once a year. If the keys are silver, they should be polishedonce a month. If the keys tarnish very rapidly, it may bedue to the climate or the system of the player, and thisshould be discussed with the instrument manufacturer.
MECHANISMUse light key oil on long screws and heavy key oil onpivot screws. This should be done every two weeks.Weekly, check all screws to see that they are tight.
TENONSIf CORK WOUND, use a thin coat of cork grease onceevery two weeks, being sure to wipe off the old coatingbefore applying the new.
If THREAD WRAPPED, use a cake of canning wax. Warm it in your hand until it is soft, then rub a thin layeron the threads. This should be done once every month.DO NOT use cork grease on thread wound tenons,because it will eventually get imbedded with dirt.
10
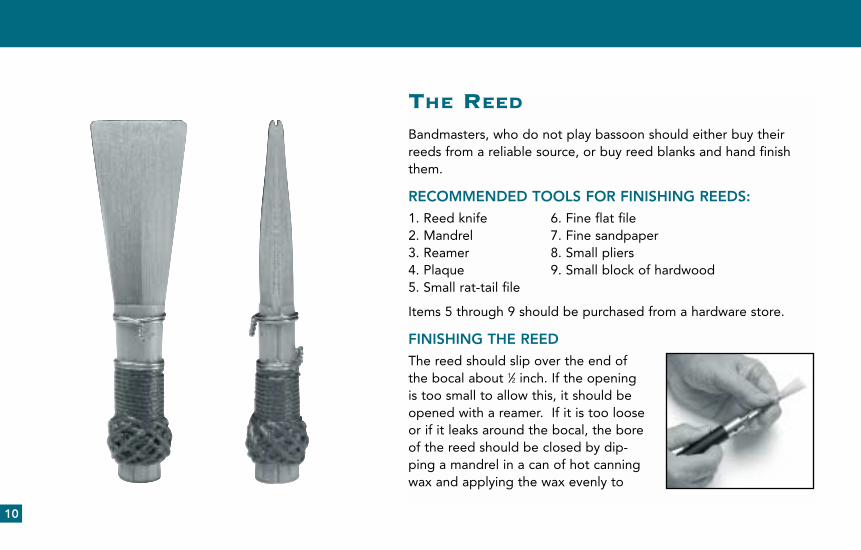
THE REED
Bandmasters, who do not play bassoon should either buy theirreeds from a reliable source, or buy reed blanks and hand finishthem.
RECOMMENDED TOOLS FOR FINISHING REEDS:1. Reed knife 6. Fine flat file2. Mandrel 7. Fine sandpaper3. Reamer 8. Small pliers4. Plaque 9. Small block of hardwood5. Small rat-tail file
Items 5 through 9 should be purchased from a hardware store.
FINISHING THE REEDThe reed should slip over the end ofthe bocal about 1⁄2 inch. If the openingis too small to allow this, it should beopened with a reamer. If it is too looseor if it leaks around the bocal, the boreof the reed should be closed by dip-ping a mandrel in a can of hot canningwax and applying the wax evenly to
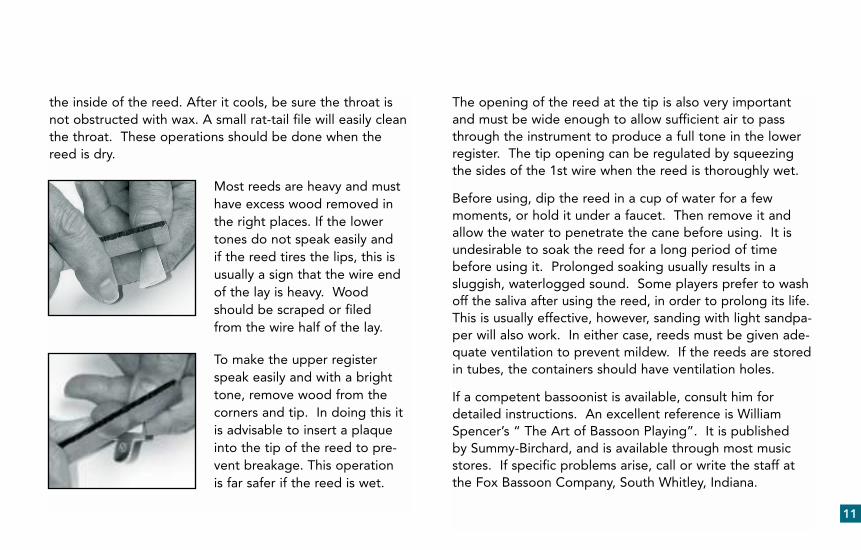
the inside of the reed. After it cools, be sure the throat isnot obstructed with wax. A small rat-tail file will easily cleanthe throat. These operations should be done when thereed is dry.
Most reeds are heavy and musthave excess wood removed inthe right places. If the lowertones do not speak easily and if the reed tires the lips, this isusually a sign that the wire endof the lay is heavy. Woodshould be scraped or filed from the wire half of the lay.
To make the upper registerspeak easily and with a brighttone, remove wood from thecorners and tip. In doing this itis advisable to insert a plaqueinto the tip of the reed to pre-vent breakage. This operation is far safer if the reed is wet.
The opening of the reed at the tip is also very importantand must be wide enough to allow sufficient air to passthrough the instrument to produce a full tone in the lowerregister. The tip opening can be regulated by squeezingthe sides of the 1st wire when the reed is thoroughly wet.
Before using, dip the reed in a cup of water for a fewmoments, or hold it under a faucet. Then remove it andallow the water to penetrate the cane before using. It isundesirable to soak the reed for a long period of timebefore using it. Prolonged soaking usually results in a sluggish, waterlogged sound. Some players prefer to washoff the saliva after using the reed, in order to prolong its life.This is usually effective, however, sanding with light sandpa-per will also work. In either case, reeds must be given ade-quate ventilation to prevent mildew. If the reeds are storedin tubes, the containers should have ventilation holes.
If a competent bassoonist is available, consult him fordetailed instructions. An excellent reference is WilliamSpencer’s “ The Art of Bassoon Playing”. It is published by Summy-Birchard, and is available through most musicstores. If specific problems arise, call or write the staff atthe Fox Bassoon Company, South Whitley, Indiana.
11
12
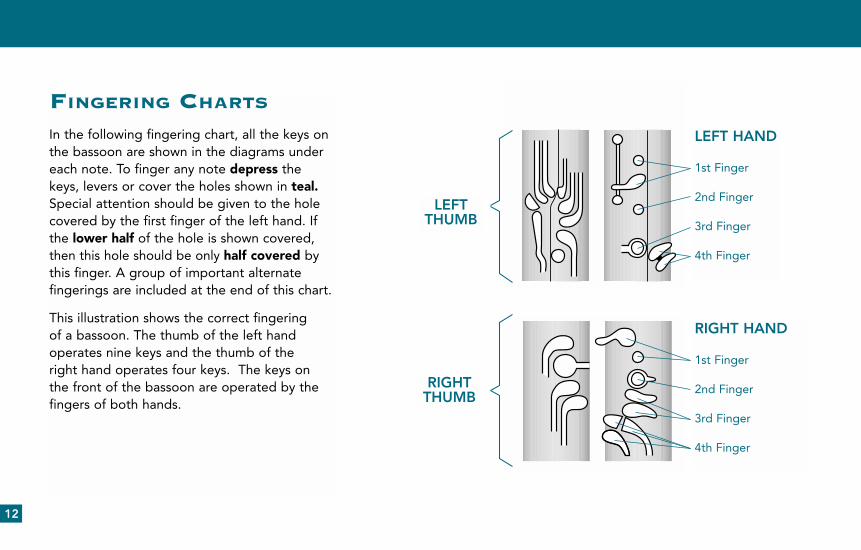
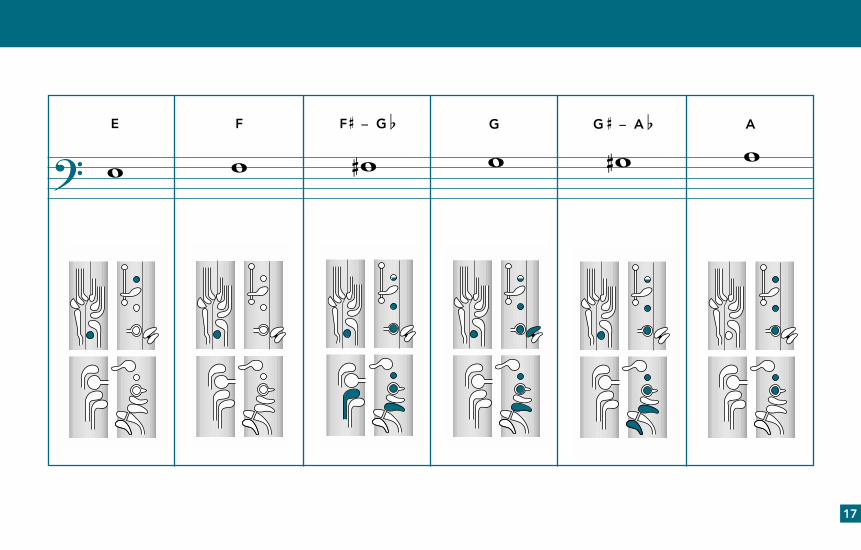
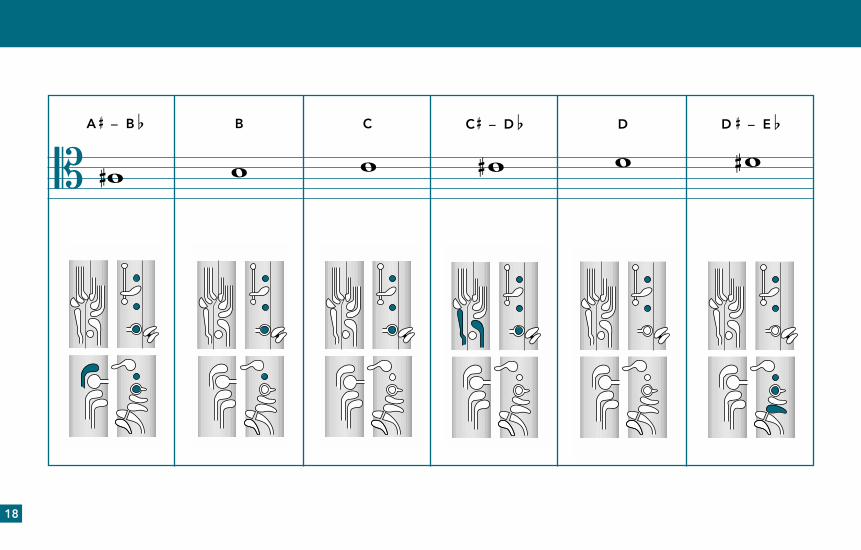
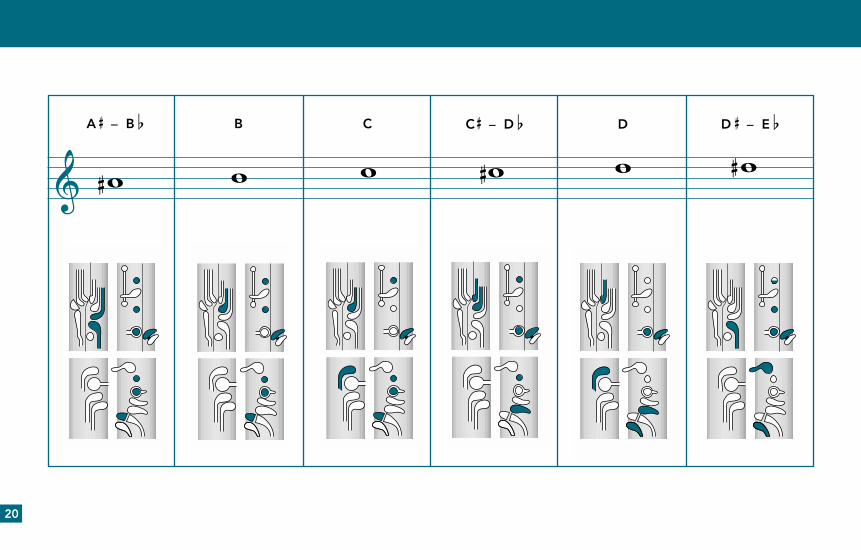
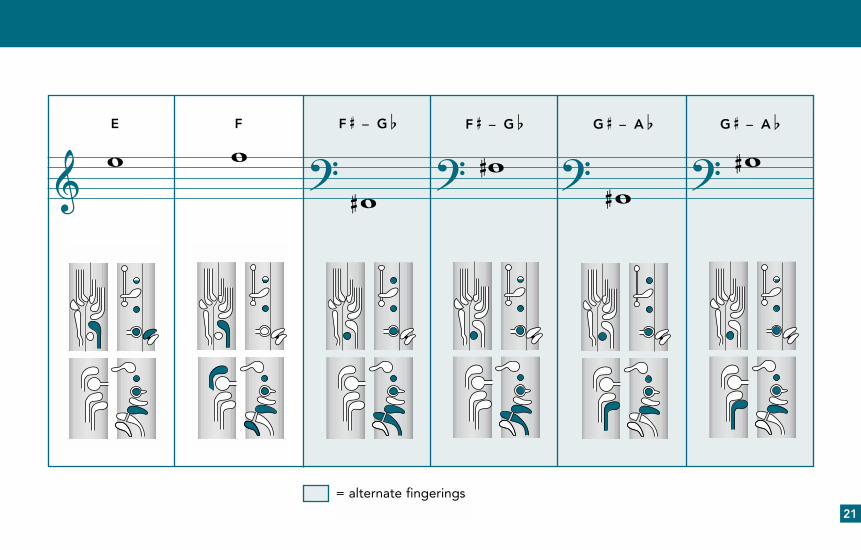
FINGERING CHARTS
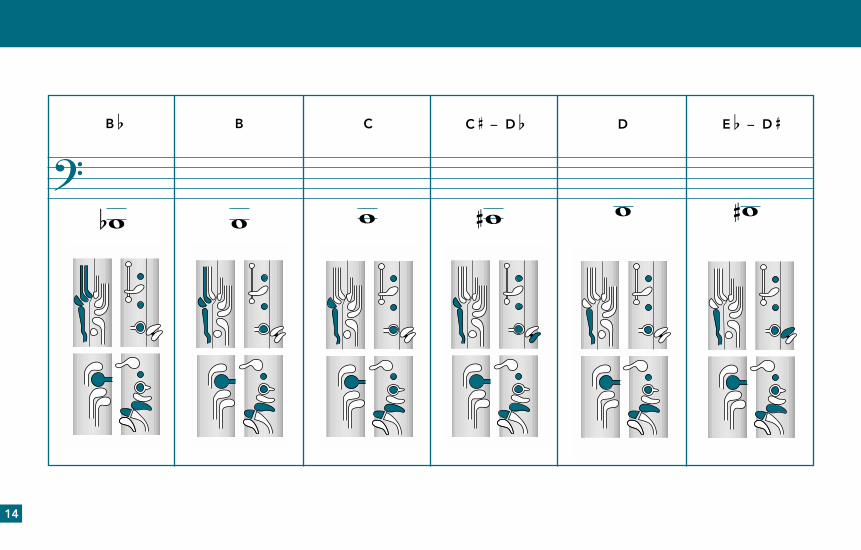
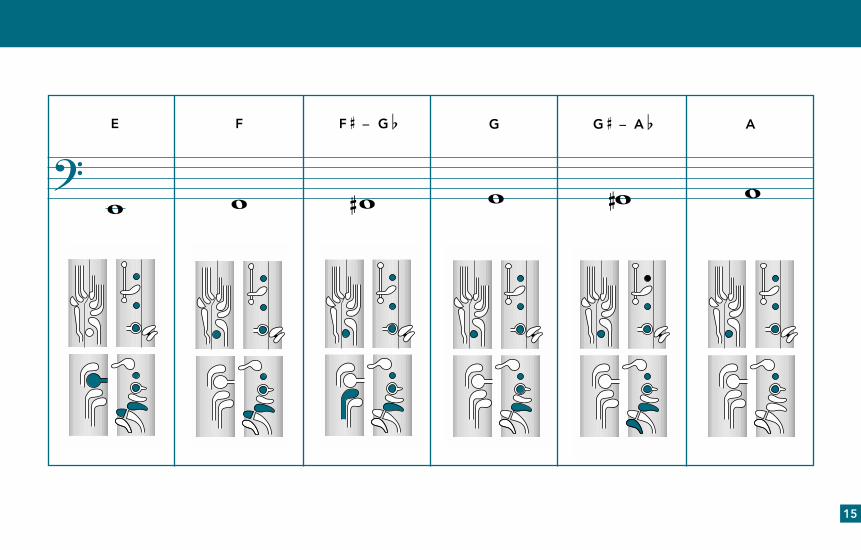
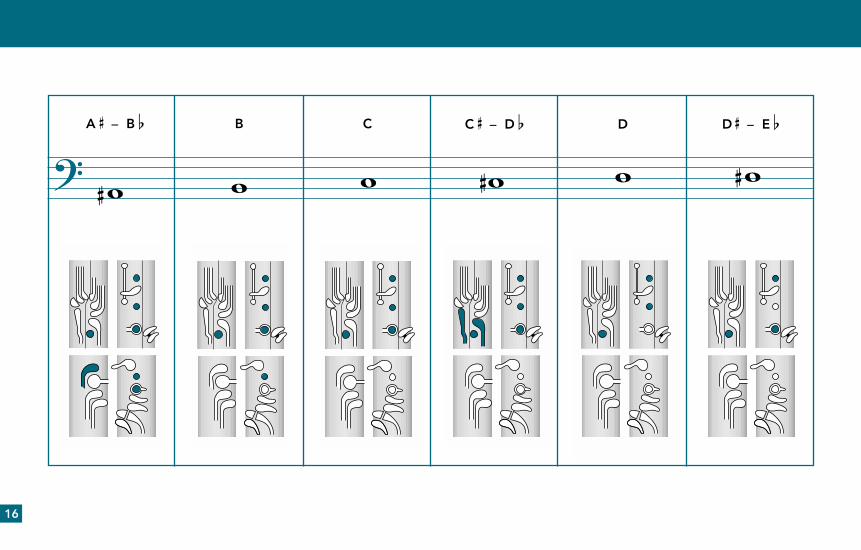
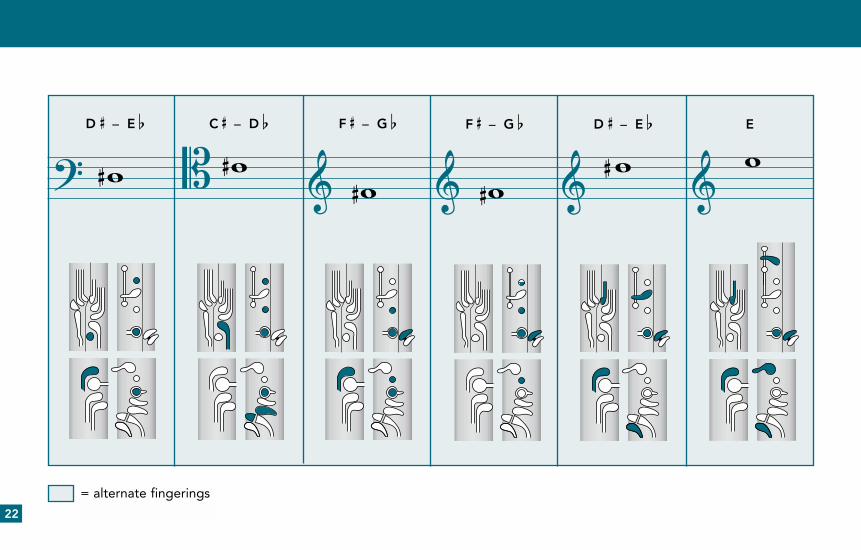
In the following fingering chart, all the keys onthe bassoon are shown in the diagrams undereach note. To finger any note depress thekeys, levers or cover the holes shown in teal.Special attention should be given to the holecovered by the first finger of the left hand. Ifthe lower half of the hole is shown covered,then this hole should be only half covered bythis finger. A group of important alternate fingerings are included at the end of this chart.
This illustration shows the correct fingering of a bassoon. The thumb of the left hand operates nine keys and the thumb of the right hand operates four keys. The keys onthe front of the bassoon are operated by thefingers of both hands.
LEFTTHUMB
RIGHTTHUMB
LEFT HAND
1st Finger
2nd Finger
3rd Finger
4th Finger
RIGHT HAND
1st Finger
2nd Finger
3rd Finger
4th Finger
13
The following fingering chart is the basis for tuning all FoxBassoons, and also applies to most Heckel Bassoons, aswell as many other makes. To permit the use of this chartwith the majority of instruments, a group of importantalternate fingerings has been included at the end of thestandard chart.
It should be realized that the lower register of the bassoonis relatively inflexible, and that an instrument manufacturedto be tuned to A-443 cannot easily be altered to play A-440, or vise versa, and still retain its tone quality. Thereader should be aware, however, that the pitch of mostnotes can be adjusted slightly by reaming or filling in tone holes, or by adjusting key height, and that many intonation problems can be corrected by using thesemethods. When a tuner is used to check the intonation of the instrument, all notes should be carefully checked,and compensation for temperature should be considered.A one degree Fahrenheit rise (above 72°F) produces apitch increase of about two cents, or 1⁄2 vibration per second at A-440.
Good bocals will improve the tone and intonation of most poor instruments. This is primarily due to their cross-sectional dimensions, and is only slightly affected by length.
14
� �� � � � � �� �B � B C D E � – D �C � – D �
15
� � � � � � �� �E F F � – G � G � – A � AG
16
� � � � � � �� � �A � – B � B C D D � – E �C � – D �
17
� � � � � � �� �E F F � – G � G � – A � AG
18
� � � � � � �� � �A � – B � B C D D � – E �C � – D �

19
�� � � � � �� �E F F � – G � G � – A � AG
�
20
� � � � � � �� � �A � – B � B C D D � – E �C � – D �
21
� � � � � � �� �� �E F F � – G � G � – A � G � – A �F � – G �
= alternate fingerings
� � � �
22
� � � � � �� ����D � – E � C � – D � F � – G � D � – E � EF � – G �
= alternate fingerings
� � � � � �

Fox Products Corporation
Phone: (219) 723-4888
Fax: (219) 723-6188
www.foxproducts.com
Shipping Address Only:
Fox Products Corporation
6110 South State Road 5
South Whitley, Indiana 46787
USA
Mailing Address Only:
Fox Products Corporation
P.O. Box 347
South Whitley, Indiana 46787
USA

No reproduction without permission of Fox Products Corporation Copyright 2000 Fox Products Corporation
FOX PRODUCTS CORPORATION