lab1 oracle linux 6 install
TRANSCRIPT
7/27/2019 Lab1 Oracle Linux 6 Install
http://slidepdf.com/reader/full/lab1-oracle-linux-6-install 1/59
Oracle Linux 6 Boot Camp
Oracle Linux 6 Lab Exercise
Safe Harbor Statement The following is intended to outline our general product direction. It is intended for
information purposes only, and may not be incorporated into any contract. It is not a
commitment to deliver any material, code, or functionality, and should not be relied
upon in making purchasing decisions.
The development, release, and timing of any features or functionality described for
Oracle’s products remains at the sole discretion of Oracle.
Oracle Training Materials – Usage Agreement Use of this Site (“Site”) or Materials constitutes agreement with the following termsand conditions:
1. Oracle Corporation (“Oracle”) is pleased to allow its business partner (“Partner”)
to download and copy the information, documents, and the online training courses
(collectively, “Materials") found on this Site. The use of the Materials is restricted to
the non-commercial, internal training of the Partner’s employees only. TheMaterials may not be used for training, promotion, or sales to customers or other
partners or third parties.
2. All the Materials are trademarks of Oracle and are proprietary information of
Oracle. Partner or other third party at no time has any right to resell, redistribute or
create derivative works from the Materials.
3. Oracle disclaims any warranties or representations as to the accuracy or
completeness of any Materials. Materials are provided "as is" without warranty of
any kind, either express or implied, including without limitation warranties of
merchantability, fitness for a particular purpose, and non-infringement.
4. Under no circumstances shall Oracle or the Oracle Authorized Delivery Partner be
liable for any loss, damage, liability or expense incurred or suffered which is claimed
to have resulted from use of this Site of Materials. As a condition of use of the
Materials, Partner agrees to indemnify Oracle from and against any and all actions,
claims, losses, damages, liabilities and expenses (including reasonable attorneys'
fees) arising out of Partner’s use of the Materials.
5. Reference materials including but not limited to those identified in the Boot Camp
manifest cannot be redistributed in any format without Oracle written consent.
7/27/2019 Lab1 Oracle Linux 6 Install
http://slidepdf.com/reader/full/lab1-oracle-linux-6-install 2/59
Oracle Linux 6 Installation - Lab 1
For Oracle employees and authorized partners only. Do
not distribute to third parties.
© 2013 Oracle Corporation
Page 2OL 6 - Lab 01
Installation of Oracle Linux 6.3V 1.0 January 2013
1 Introduction
In this lab, participants will download Oracle Linux 6.3 software from the Oracle
Software Delivery Cloud and then learn how to do a simple installation of Oracle
Linux 6.3 inside the VirtualBox application. After installing Oracle Linux 6.3,
participants will update the base install with latest packages and updates. This lab
will also include steps to install VirtualBox Guest Additions software on Oracle Linux
6.3.
Upon completion of this lab, participants will have learned how to obtain Oracle
Linux software, do a simple installation of Oracle Linux 6.3 and then update the
installed software with latest packages and patches.
2 Overview
There are four significant steps involved to complete this lab:
A. Create a Virtual Machine in VirtualBox Application
B. Install Oracle Linux 6.3 in the Virtual Machine
C. Update Oracle Linux 6.3 with latest patches and updates
D. Install VirtualBox Guest Additions Software
We will begin by downloading the Oracle Linux operating system software. Next we
will create a Virtual Machine and configure its settings. This Virtual Machine
running inside VirtualBox Application will be used to install Oracle Linux 6.3
operating system. We will do a simple installation of Oracle Linux 6.3 operating
system in this lab. After installing Oracle Linux 6.3, we will use the Oracle Public
Yum Server to update the image with latest packages and updates. Finally, we will
install VirtualBox Guest Additions Software.
7/27/2019 Lab1 Oracle Linux 6 Install
http://slidepdf.com/reader/full/lab1-oracle-linux-6-install 3/59
Oracle Linux 6 Installation - Lab 1
For Oracle employees and authorized partners only. Do
not distribute to third parties.
© 2013 Oracle Corporation
Page 3OL 6 - Lab 01
3 Pre-requisites
This lab requires the use of the following elements:
A current 64 bit laptop with at least 2GB RAM and 20GB free disk space
Operating system: A 64-bit version of Microsoft Windows, Mac OS X, Linuxor Solaris. Alternatively, a 32-bit host OS installed on a 64-bit CPU with VT-
x/AMD-V enabled in the BIOS.
Oracle VirtualBox Software (4.2.x with Extension Pack 4.2) installed
Oracle Linux 6u3 64 bit ISO image file or DVD media (Part # V33411-01)
The following assumptions have been made regarding the environment where this
lab is being performed:
1. Network connectivity to the Internet is required
2. Participants should have downloaded Oracle Linux 6.3 x64 bit ISO image
from the Oracle Software Delivery Cloud.
4 Pre-requisites
The Software Environment used to capture screen shots captured/shown in this lab
is shown below:
Windows 7 Host Operating System
VirtualBox Version 4.2.6
Installation of Oracle Linux 6.3 (64 bit version)
The product versions and screenshots shown in this document may slightly differ
depending on the product versions you use when you perform the lab.
4.1 Oracle VirtualBox Hypervisor Software basics
Your host system should already have Oracle VirtualBox hypervisor software
installed and ready to use. If not, the latest version can be provided by your
instructor or you can download it from Oracle.com using the link below.
Download VirtualBox
7/27/2019 Lab1 Oracle Linux 6 Install
http://slidepdf.com/reader/full/lab1-oracle-linux-6-install 4/59
Oracle Linux 6 Installation - Lab 1
For Oracle employees and authorized partners only. Do
not distribute to third parties.
© 2013 Oracle Corporation
Page 4OL 6 - Lab 01
VirtualBox Notes:
VirtualBox Installation Documentation
Installing VirtualBox Video
VirtualBox mouse capture can sometimes be awkward in the way it handles
mouse interaction between VirtualBox and your OS. Use the right controlkey on your keyboard to return mouse control back to your default
environment. You can change this in VirtualBox preferences. Once the Oracle
Linux OS installation is complete, we will install VirtualBox Guest Additions
software.
VirtualBox Guest Additions Software will make life much easier by providing
closer integration between host and guest and improving the interactive
performance of guest systems. The Guest Additions are designed to be
installed inside a virtual machine after the guest operating system has been
installed and this software helps improve mouse pointer integration between
the guest and host operating systems.
4.2 Download Oracle Linux 6.3 ISO image file
You will need the ISO image for Oracle Linux 6.3 x64 bit version to do this lab. You
should already have downloaded the ISO image if you completed the pre-requisites
of this training. If you have already downloaded the ISO image on your laptop/host
system, skip this section and proceed to Section 5.1. In case you need to download
the ISO image file, you can download the ISO image file and save it on the disk drive
of your laptop. You can use the location provided below to download the ISO file.
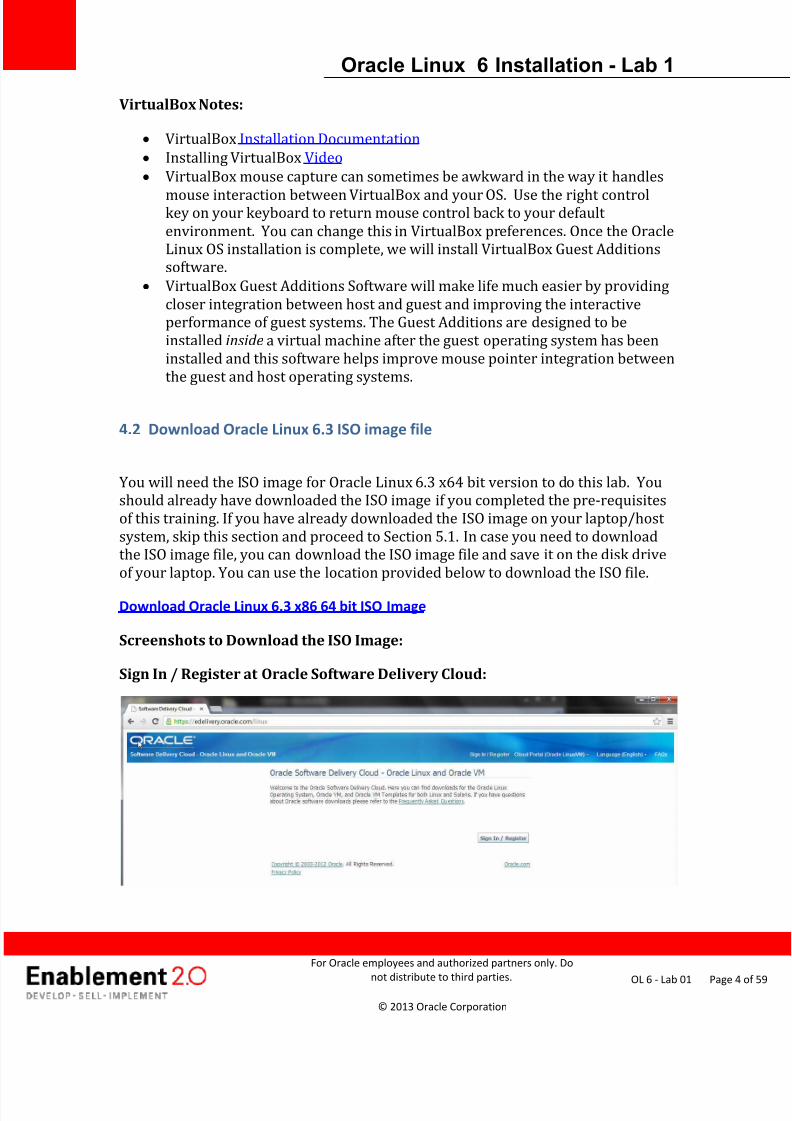
Download Oracle Linux 6.3 x86 64 bit ISO Image
Screenshots to Download the ISO Image:
Sign In / Register at Oracle Software Delivery Cloud:
7/27/2019 Lab1 Oracle Linux 6 Install
http://slidepdf.com/reader/full/lab1-oracle-linux-6-install 5/59
Oracle Linux 6 Installation - Lab 1
For Oracle employees and authorized partners only. Do
not distribute to third parties.
© 2013 Oracle Corporation
Page 5OL 6 - Lab 01
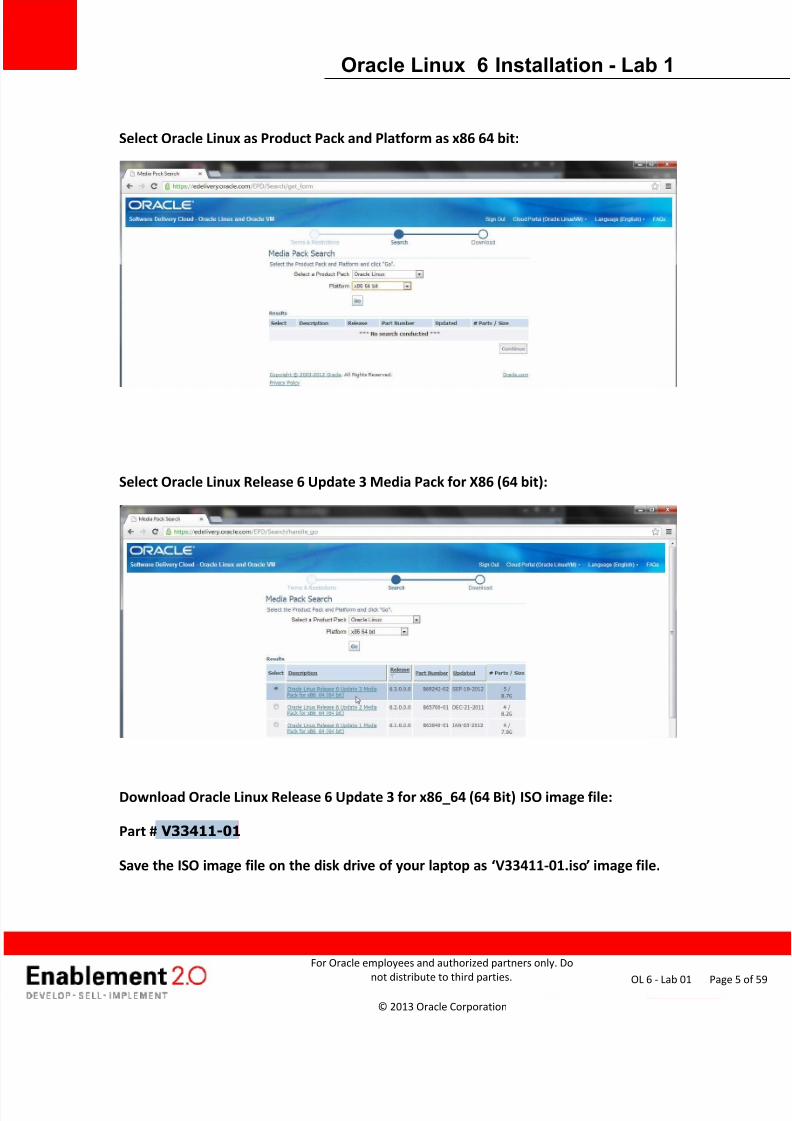
Select Oracle Linux as Product Pack and Platform as x86 64 bit:
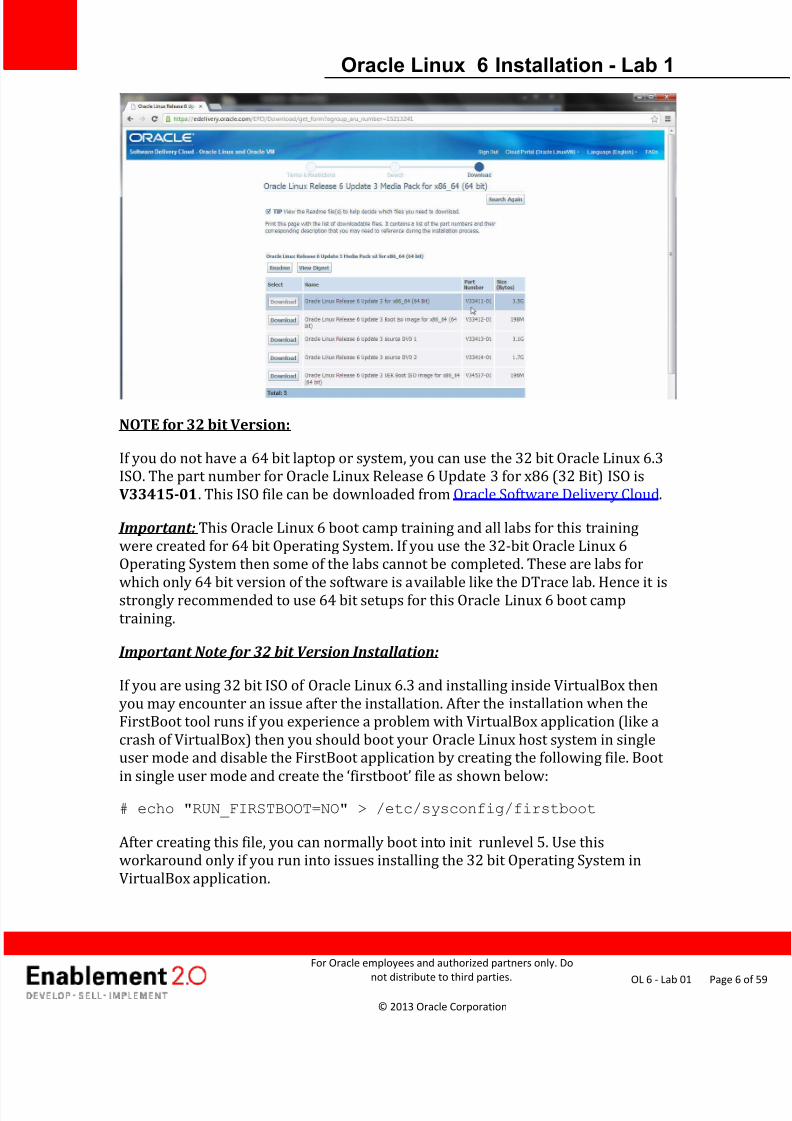
Select Oracle Linux Release 6 Update 3 Media Pack for X86 (64 bit):
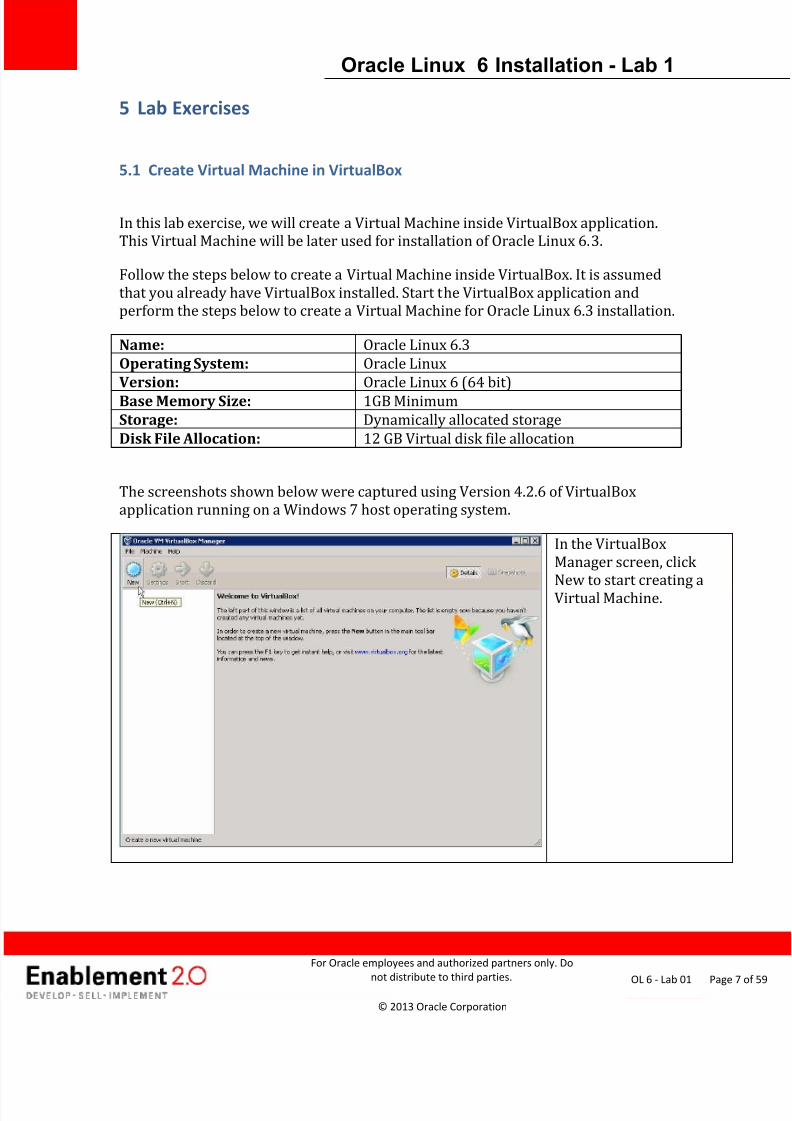
Download Oracle Linux Release 6 Update 3 for x86_64 (64 Bit) ISO image file:
Part # V33411-01Save the ISO image file on the disk drive of your laptop as ‘V33411-01.iso’ image file.
7/27/2019 Lab1 Oracle Linux 6 Install
http://slidepdf.com/reader/full/lab1-oracle-linux-6-install 6/59
Oracle Linux 6 Installation - Lab 1
For Oracle employees and authorized partners only. Do
not distribute to third parties.
© 2013 Oracle Corporation
Page 6OL 6 - Lab 01
NOTE for 32 bit Version:
If you do not have a 64 bit laptop or system, you can use the 32 bit Oracle Linux 6.3
ISO. The part number for Oracle Linux Release 6 Update 3 for x86 (32 Bit) ISO is
V33415-01. This ISO file can be downloaded from Oracle Software Delivery Cloud.
Important: This Oracle Linux 6 boot camp training and all labs for this training
were created for 64 bit Operating System. If you use the 32-bit Oracle Linux 6
Operating System then some of the labs cannot be completed. These are labs for
which only 64 bit version of the software is available like the DTrace lab. Hence it isstrongly recommended to use 64 bit setups for this Oracle Linux 6 boot camp
training.
Important Note for 32 bit Version Installation:
If you are using 32 bit ISO of Oracle Linux 6.3 and installing inside VirtualBox then
you may encounter an issue after the installation. After the installation when the
FirstBoot tool runs if you experience a problem with VirtualBox application (like a
crash of VirtualBox) then you should boot your Oracle Linux host system in single
user mode and disable the FirstBoot application by creating the following file. Boot
in single user mode and create the ‘firstboot’ file as shown below:
# echo "RUN_FIRSTBOOT=NO" > /etc/sysconfig/firstboot
After creating this file, you can normally boot into init runlevel 5. Use this
workaround only if you run into issues installing the 32 bit Operating System in
VirtualBox application.
7/27/2019 Lab1 Oracle Linux 6 Install
http://slidepdf.com/reader/full/lab1-oracle-linux-6-install 7/59
Oracle Linux 6 Installation - Lab 1
For Oracle employees and authorized partners only. Do
not distribute to third parties.
© 2013 Oracle Corporation
Page 7OL 6 - Lab 01
5 Lab Exercises
5.1 Create Virtual Machine in VirtualBox
In this lab exercise, we will create a Virtual Machine inside VirtualBox application.
This Virtual Machine will be later used for installation of Oracle Linux 6.3.
Follow the steps below to create a Virtual Machine inside VirtualBox. It is assumed
that you already have VirtualBox installed. Start the VirtualBox application and
perform the steps below to create a Virtual Machine for Oracle Linux 6.3 installation.
Name: Oracle Linux 6.3
Operating System: Oracle Linux
Version: Oracle Linux 6 (64 bit)
Base Memory Size: 1GB Minimum
Storage: Dynamically allocated storage
Disk File Allocation: 12 GB Virtual disk file allocation
The screenshots shown below were captured using Version 4.2.6 of VirtualBox
application running on a Windows 7 host operating system.
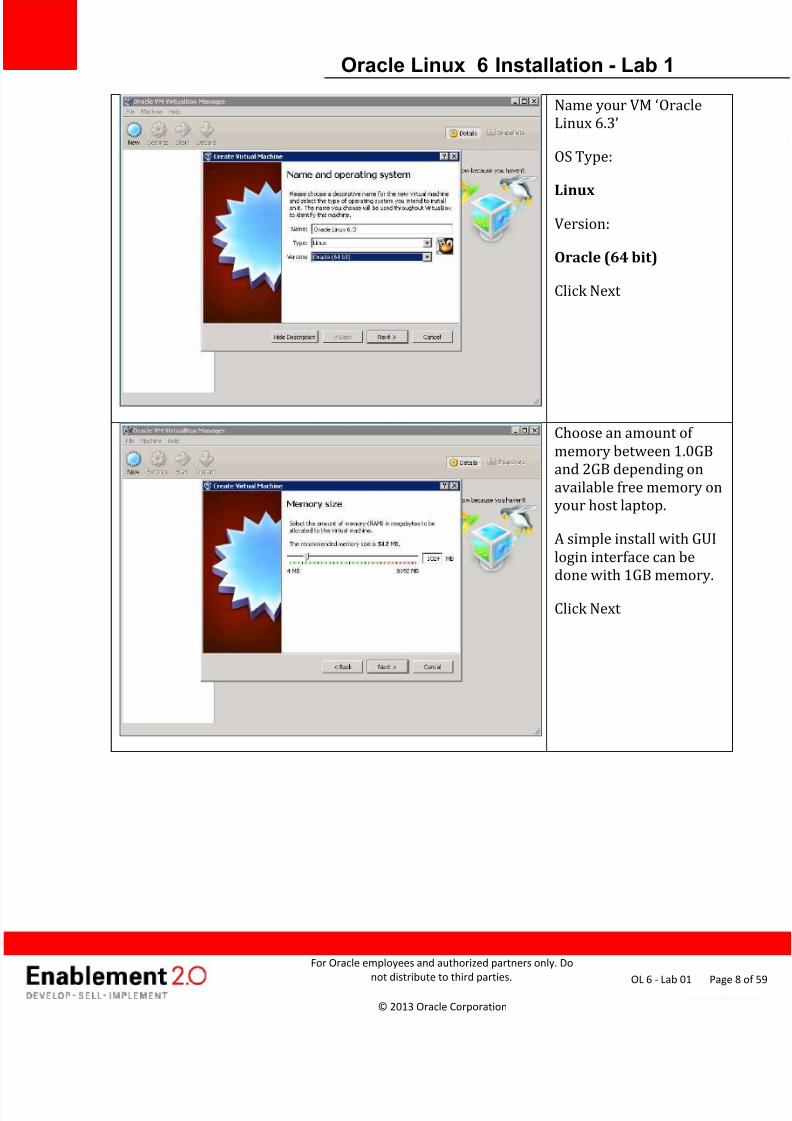
In the VirtualBox
Manager screen, click
New to start creating a
Virtual Machine.
7/27/2019 Lab1 Oracle Linux 6 Install
http://slidepdf.com/reader/full/lab1-oracle-linux-6-install 8/59
Oracle Linux 6 Installation - Lab 1
For Oracle employees and authorized partners only. Do
not distribute to third parties.
© 2013 Oracle Corporation
Page 8OL 6 - Lab 01
Name your VM ‘Oracle
Linux 6.3’
OS Type:
Linux
Version:
Oracle (64 bit)
Click Next
Choose an amount of
memory between 1.0GB
and 2GB depending on
available free memory on
your host laptop.
A simple install with GUI
login interface can be
done with 1GB memory.
Click Next
7/27/2019 Lab1 Oracle Linux 6 Install
http://slidepdf.com/reader/full/lab1-oracle-linux-6-install 9/59
Oracle Linux 6 Installation - Lab 1
For Oracle employees and authorized partners only. Do
not distribute to third parties.
© 2013 Oracle Corporation
Page 9OL 6 - Lab 01
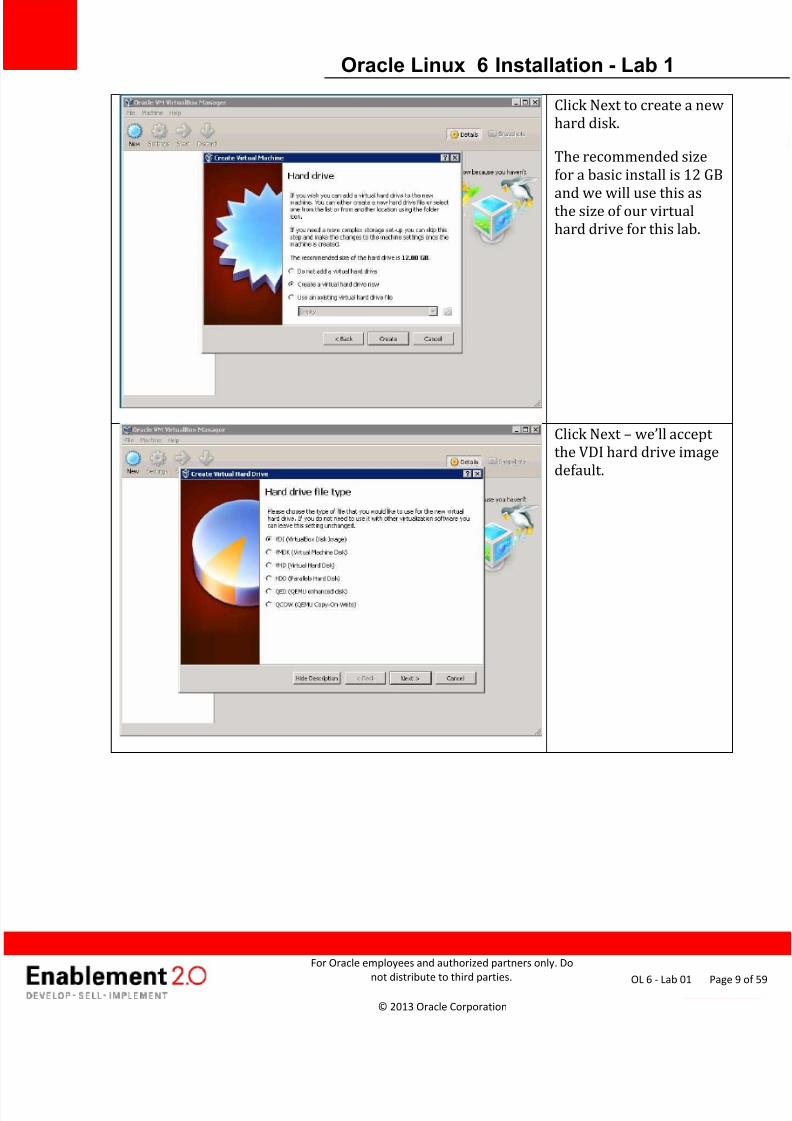
Click Next to create a new
hard disk.
The recommended size
for a basic install is 12 GB
and we will use this asthe size of our virtual
hard drive for this lab.
Click Next – we’ll accept the VDI hard drive image
default.
7/27/2019 Lab1 Oracle Linux 6 Install
http://slidepdf.com/reader/full/lab1-oracle-linux-6-install 10/59
Oracle Linux 6 Installation - Lab 1
For Oracle employees and authorized partners only. Do
not distribute to third parties.
© 2013 Oracle Corporation
Page 10OL 6 - Lab 01
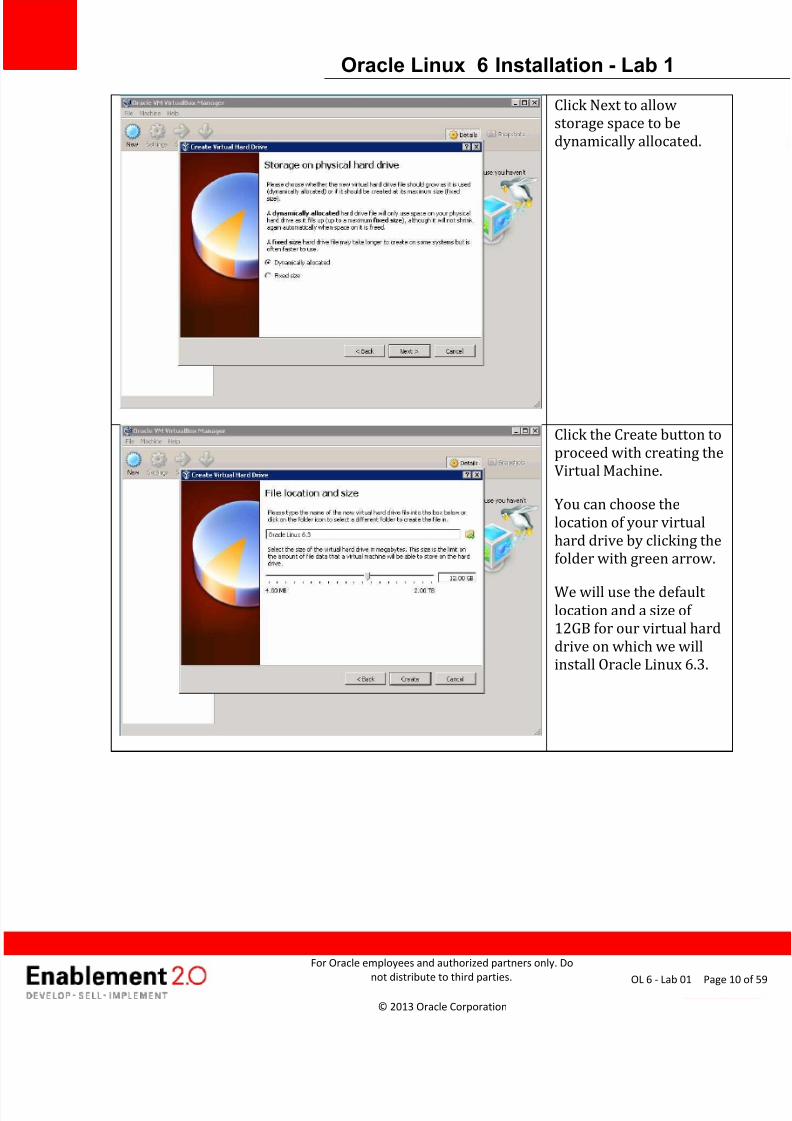
Click Next to allow
storage space to be
dynamically allocated.
Click the Create button to
proceed with creating the
Virtual Machine.
You can choose the
location of your virtual
hard drive by clicking the
folder with green arrow.
We will use the default location and a size of
12GB for our virtual hard
drive on which we will
install Oracle Linux 6.3.
7/27/2019 Lab1 Oracle Linux 6 Install
http://slidepdf.com/reader/full/lab1-oracle-linux-6-install 11/59
Oracle Linux 6 Installation - Lab 1
For Oracle employees and authorized partners only. Do
not distribute to third parties.
© 2013 Oracle Corporation
Page 11OL 6 - Lab 01
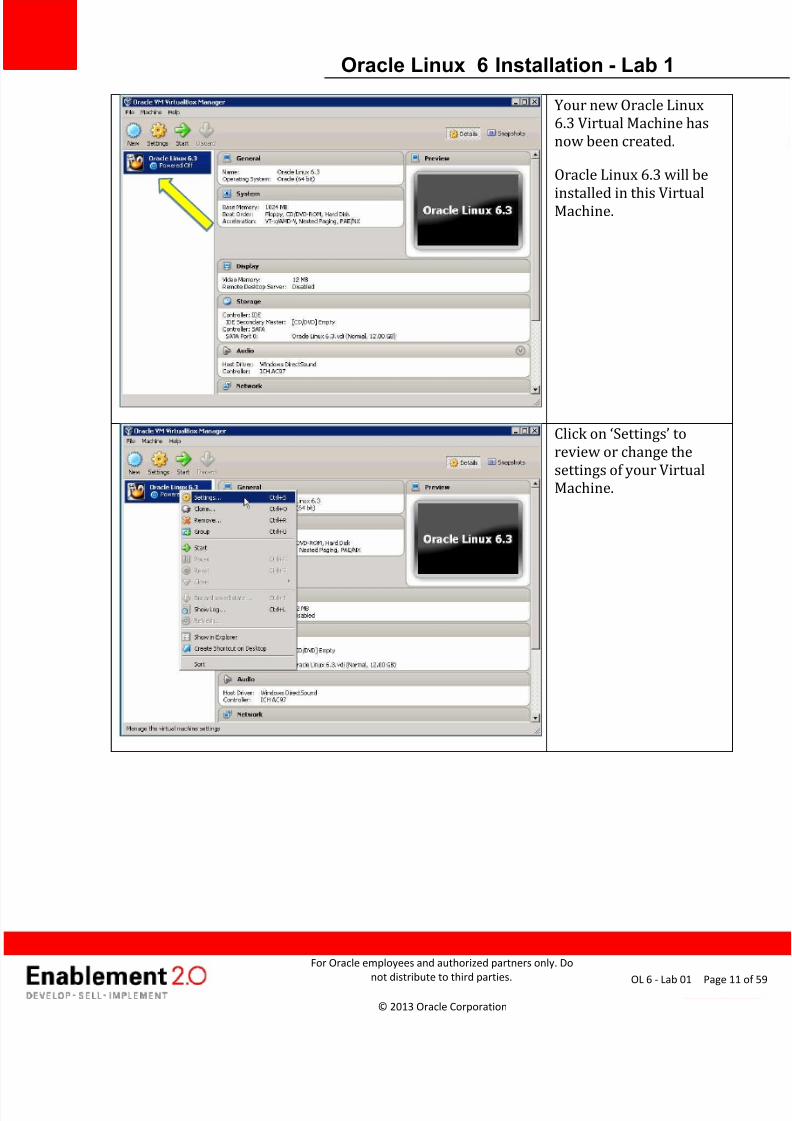
Your new Oracle Linux
6.3 Virtual Machine has
now been created.
Oracle Linux 6.3 will be
installed in this VirtualMachine.
Click on ‘Settings’ to
review or change the
settings of your Virtual
Machine.
7/27/2019 Lab1 Oracle Linux 6 Install
http://slidepdf.com/reader/full/lab1-oracle-linux-6-install 12/59
Oracle Linux 6 Installation - Lab 1
For Oracle employees and authorized partners only. Do
not distribute to third parties.
© 2013 Oracle Corporation
Page 12OL 6 - Lab 01
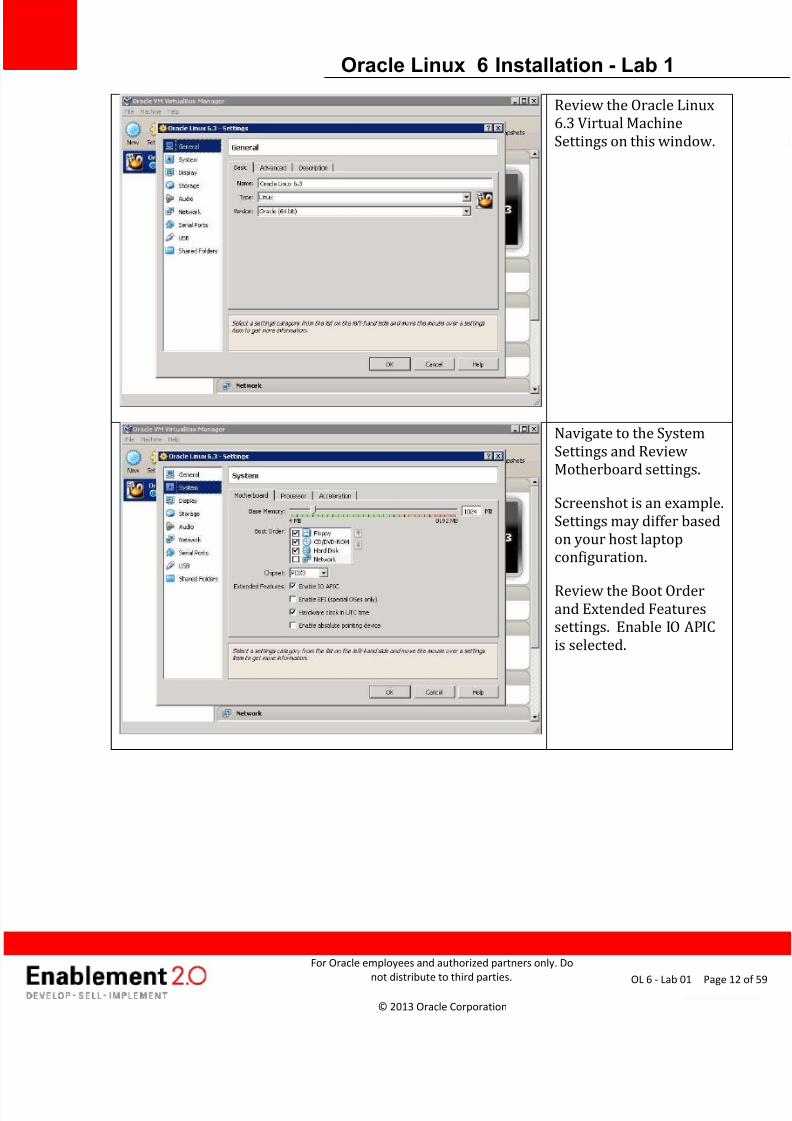
Review the Oracle Linux
6.3 Virtual Machine
Settings on this window.
Navigate to the System
Settings and Review
Motherboard settings.
Screenshot is an example.
Settings may differ based
on your host laptop
configuration.
Review the Boot Orderand Extended Features
settings. Enable IO APIC
is selected.
7/27/2019 Lab1 Oracle Linux 6 Install
http://slidepdf.com/reader/full/lab1-oracle-linux-6-install 13/59
Oracle Linux 6 Installation - Lab 1
For Oracle employees and authorized partners only. Do
not distribute to third parties.
© 2013 Oracle Corporation
Page 13OL 6 - Lab 01
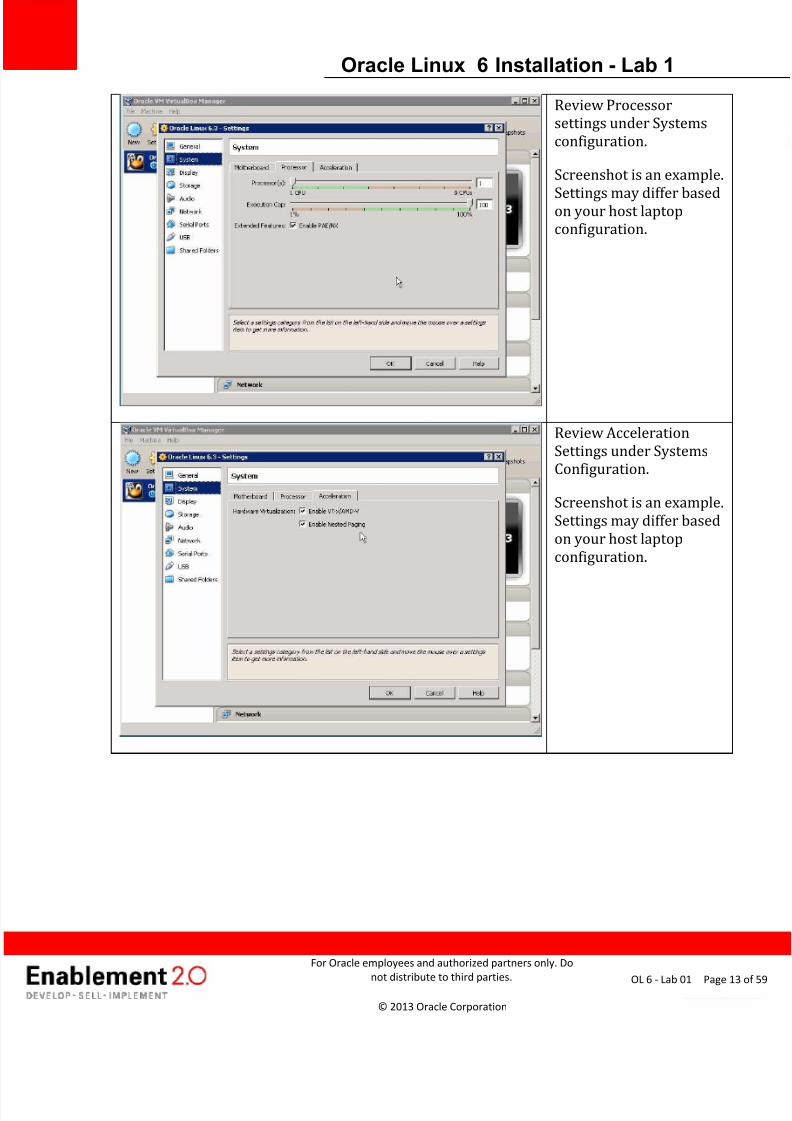
Review Processor
settings under Systems
configuration.
Screenshot is an example.
Settings may differ basedon your host laptop
configuration.
Review Acceleration
Settings under Systems
Configuration.
Screenshot is an example.
Settings may differ based
on your host laptop
configuration.
7/27/2019 Lab1 Oracle Linux 6 Install
http://slidepdf.com/reader/full/lab1-oracle-linux-6-install 14/59
Oracle Linux 6 Installation - Lab 1
For Oracle employees and authorized partners only. Do
not distribute to third parties.
© 2013 Oracle Corporation
Page 14OL 6 - Lab 01
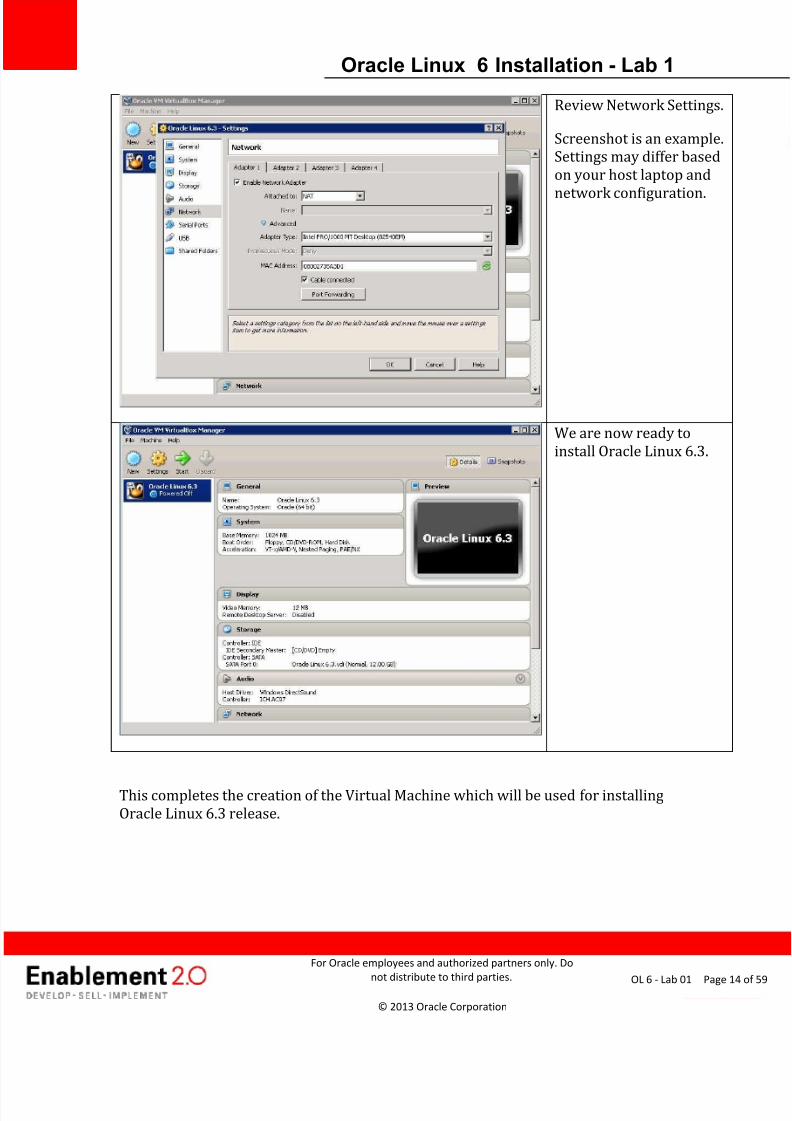
Review Network Settings.
Screenshot is an example.
Settings may differ based
on your host laptop and
network configuration.
We are now ready to
install Oracle Linux 6.3.
This completes the creation of the Virtual Machine which will be used for installing
Oracle Linux 6.3 release.
7/27/2019 Lab1 Oracle Linux 6 Install
http://slidepdf.com/reader/full/lab1-oracle-linux-6-install 15/59
Oracle Linux 6 Installation - Lab 1
For Oracle employees and authorized partners only. Do
not distribute to third parties.
© 2013 Oracle Corporation
Page 15OL 6 - Lab 01
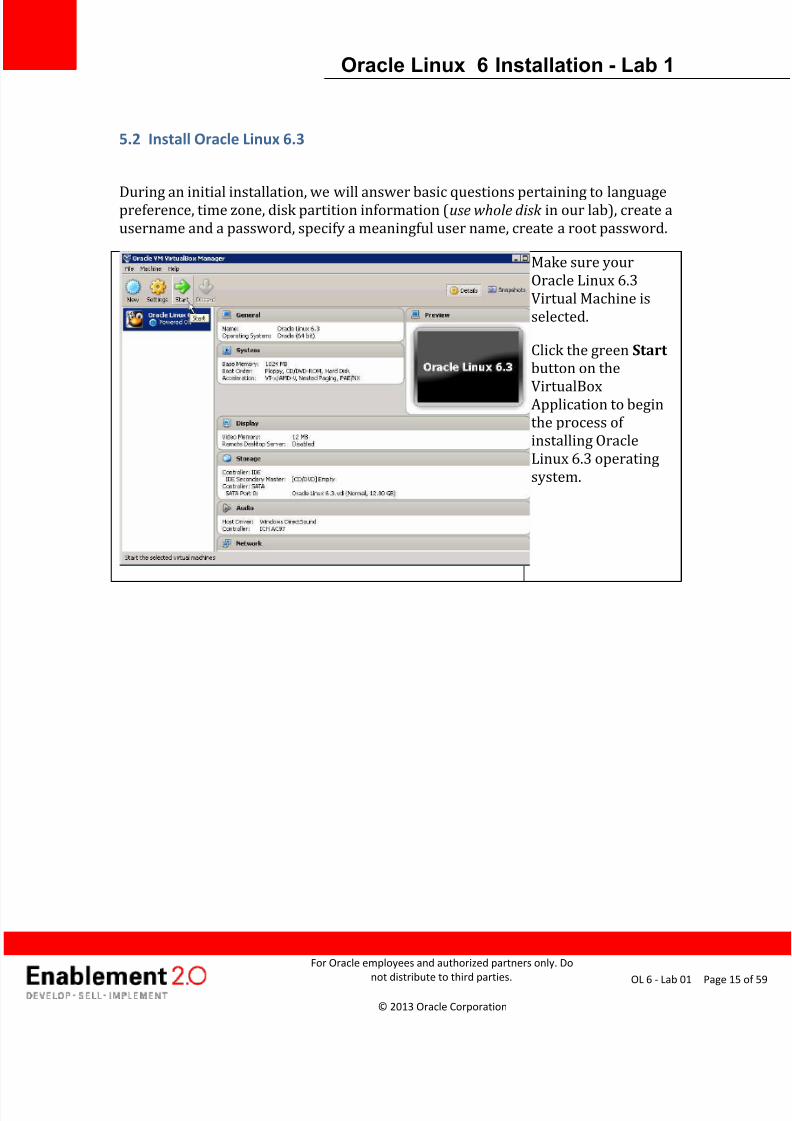
5.2 Install Oracle Linux 6.3
During an initial installation, we will answer basic questions pertaining to languagepreference, time zone, disk partition information (use whole disk in our lab), create a
username and a password, specify a meaningful user name, create a root password.
Make sure your
Oracle Linux 6.3
Virtual Machine is
selected.
Click the green Start
button on the
VirtualBoxApplication to begin
the process of
installing Oracle
Linux 6.3 operating
system.
7/27/2019 Lab1 Oracle Linux 6 Install
http://slidepdf.com/reader/full/lab1-oracle-linux-6-install 16/59
Oracle Linux 6 Installation - Lab 1
For Oracle employees and authorized partners only. Do
not distribute to third parties.
© 2013 Oracle Corporation
Page 16OL 6 - Lab 01
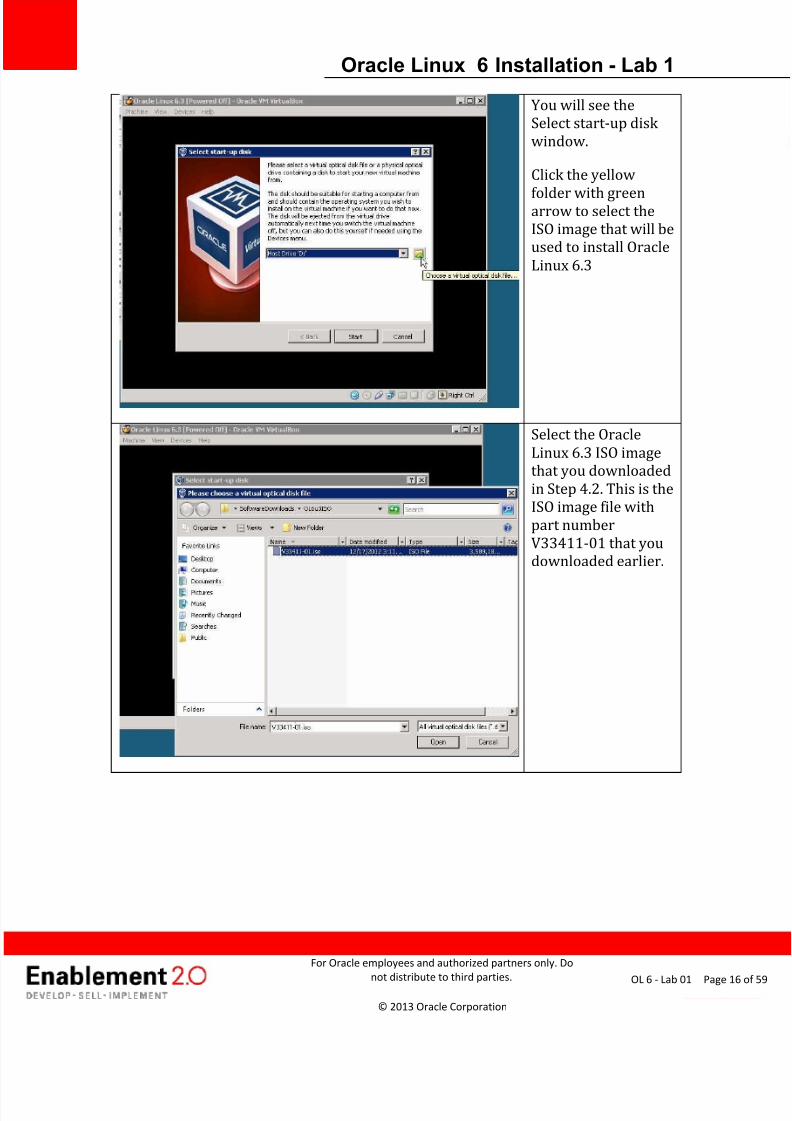
You will see the
Select start-up disk
window.
Click the yellow
folder with greenarrow to select the
ISO image that will be
used to install Oracle
Linux 6.3
Select the Oracle
Linux 6.3 ISO image
that you downloaded
in Step 4.2. This is the
ISO image file with
part number
V33411-01 that you
downloaded earlier.
7/27/2019 Lab1 Oracle Linux 6 Install
http://slidepdf.com/reader/full/lab1-oracle-linux-6-install 17/59
Oracle Linux 6 Installation - Lab 1
For Oracle employees and authorized partners only. Do
not distribute to third parties.
© 2013 Oracle Corporation
Page 17OL 6 - Lab 01
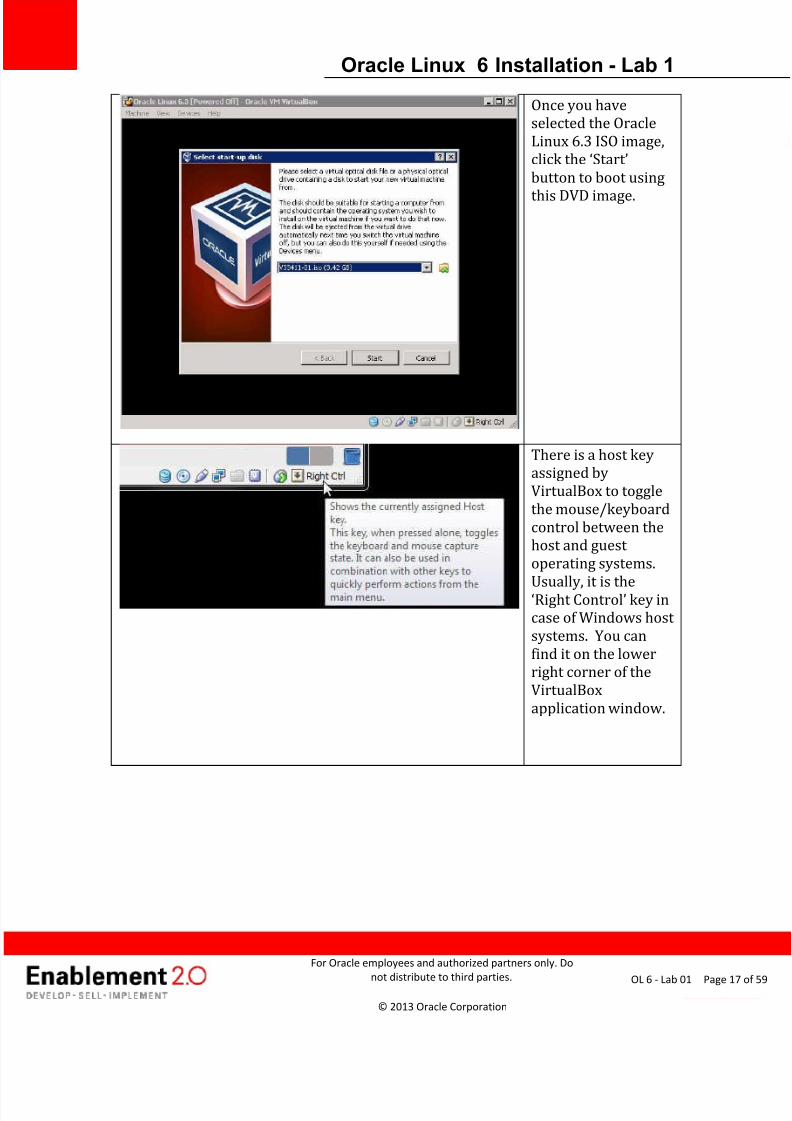
Once you have
selected the Oracle
Linux 6.3 ISO image,
click the ‘Start ’
button to boot using
this DVD image.
There is a host key
assigned by
VirtualBox to toggle
the mouse/keyboard
control between the
host and guest
operating systems.
Usually, it is the‘Right Control’ key incase of Windows host
systems. You can
find it on the lower
right corner of the
VirtualBox
application window.
7/27/2019 Lab1 Oracle Linux 6 Install
http://slidepdf.com/reader/full/lab1-oracle-linux-6-install 18/59
Oracle Linux 6 Installation - Lab 1
For Oracle employees and authorized partners only. Do
not distribute to third parties.
© 2013 Oracle Corporation
Page 18OL 6 - Lab 01
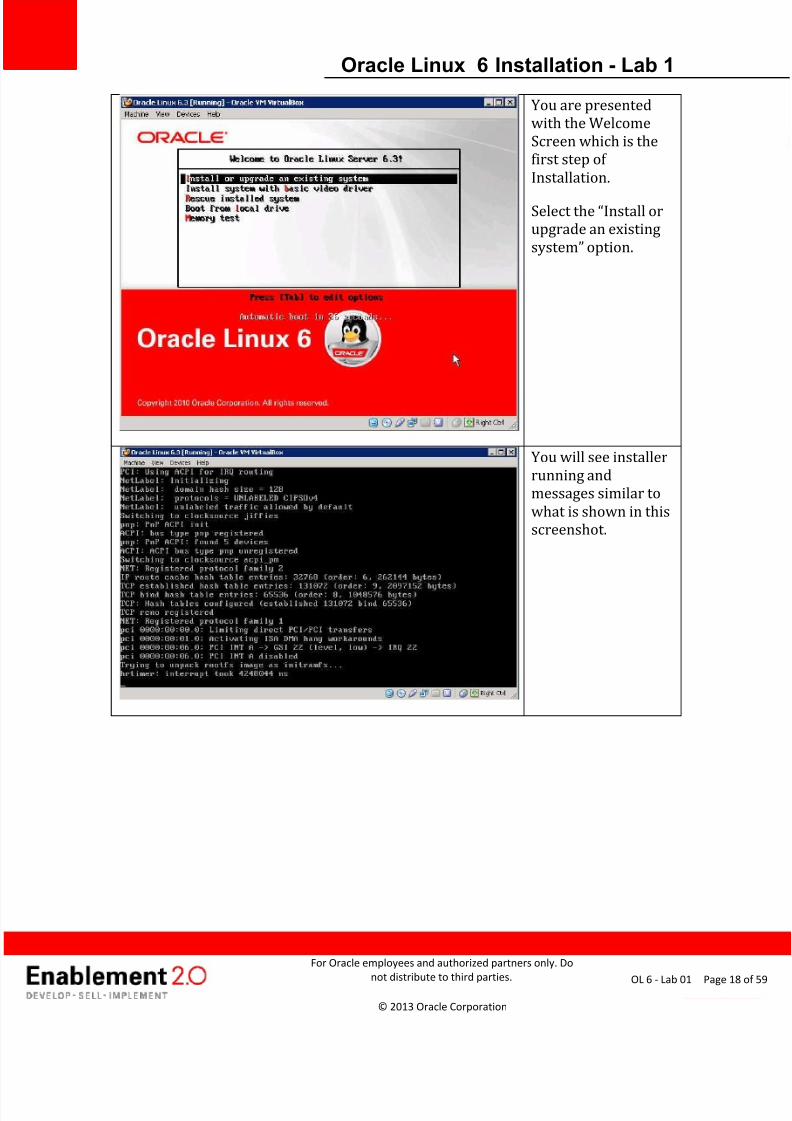
You are presented
with the Welcome
Screen which is the
first step of
Installation.
Select the “Install orupgrade an existing
system” option.
You will see installer
running and
messages similar to
what is shown in this
screenshot.
7/27/2019 Lab1 Oracle Linux 6 Install
http://slidepdf.com/reader/full/lab1-oracle-linux-6-install 19/59
Oracle Linux 6 Installation - Lab 1
For Oracle employees and authorized partners only. Do
not distribute to third parties.
© 2013 Oracle Corporation
Page 19OL 6 - Lab 01
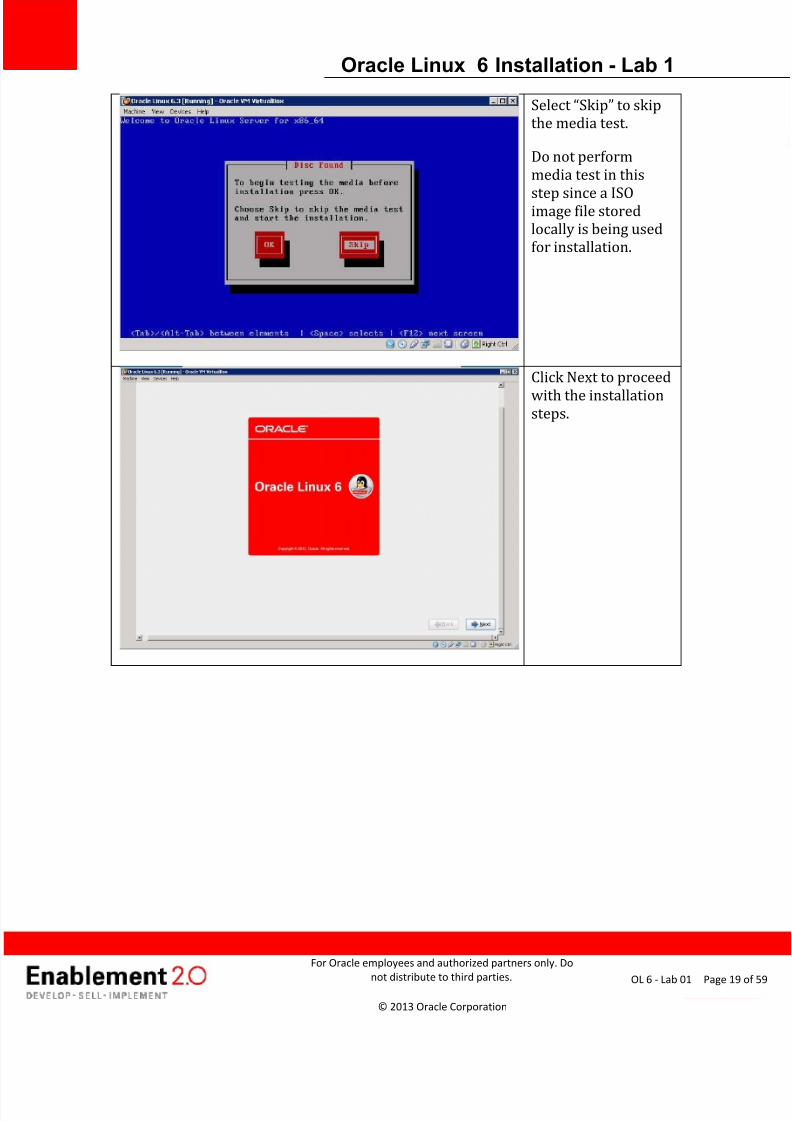
Select “Skip” to skipthe media test.
Do not perform
media test in this
step since a ISOimage file stored
locally is being used
for installation.
Click Next to proceed
with the installationsteps.
7/27/2019 Lab1 Oracle Linux 6 Install
http://slidepdf.com/reader/full/lab1-oracle-linux-6-install 20/59
Oracle Linux 6 Installation - Lab 1
For Oracle employees and authorized partners only. Do
not distribute to third parties.
© 2013 Oracle Corporation
Page 20OL 6 - Lab 01
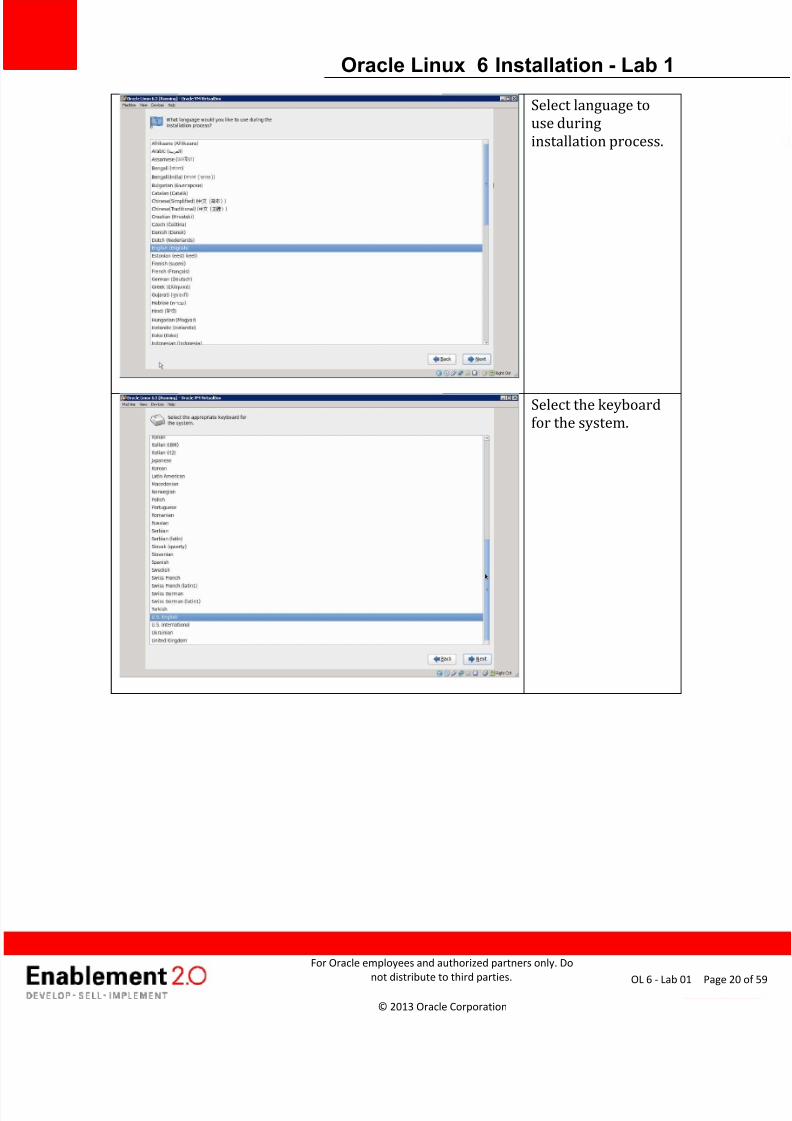
Select language to
use during
installation process.
Select the keyboard
for the system.
7/27/2019 Lab1 Oracle Linux 6 Install
http://slidepdf.com/reader/full/lab1-oracle-linux-6-install 21/59
Oracle Linux 6 Installation - Lab 1
For Oracle employees and authorized partners only. Do
not distribute to third parties.
© 2013 Oracle Corporation
Page 21OL 6 - Lab 01
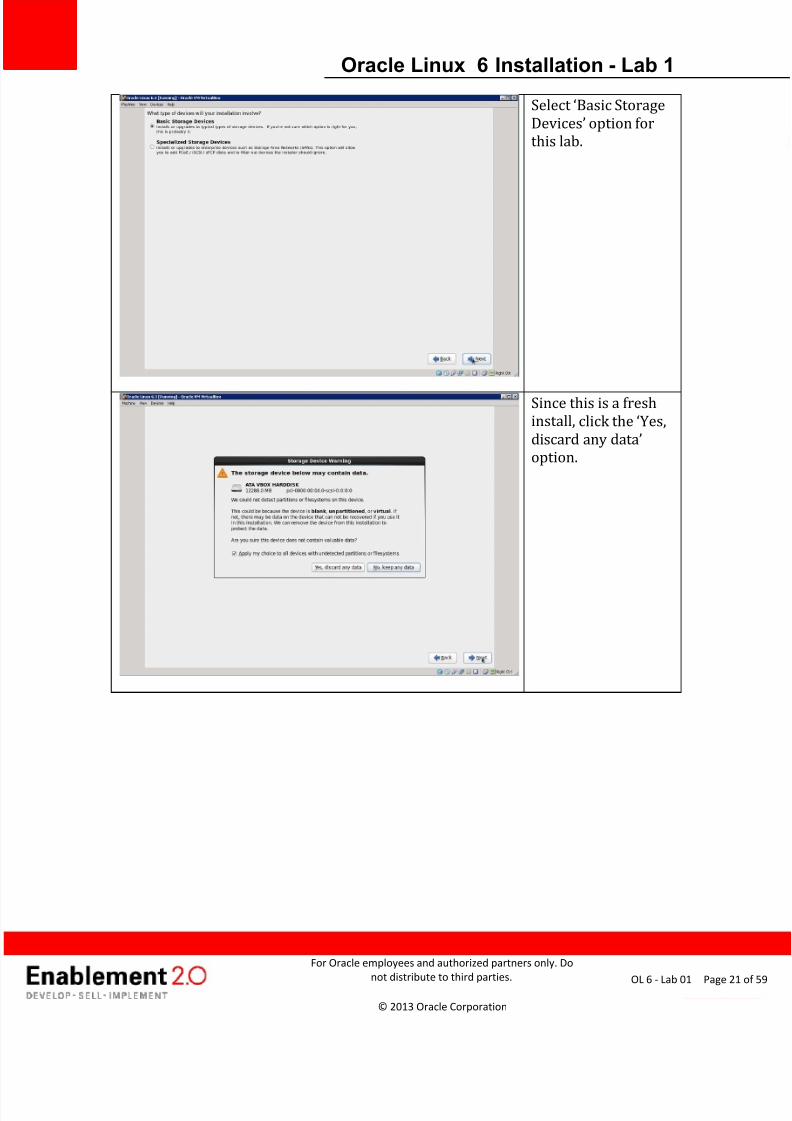
Select ‘Basic Storage
Devices’ option forthis lab.
Since this is a fresh
install, click the ‘Yes,
discard any data’option.
7/27/2019 Lab1 Oracle Linux 6 Install
http://slidepdf.com/reader/full/lab1-oracle-linux-6-install 22/59
Oracle Linux 6 Installation - Lab 1
For Oracle employees and authorized partners only. Do
not distribute to third parties.
© 2013 Oracle Corporation
Page 22OL 6 - Lab 01
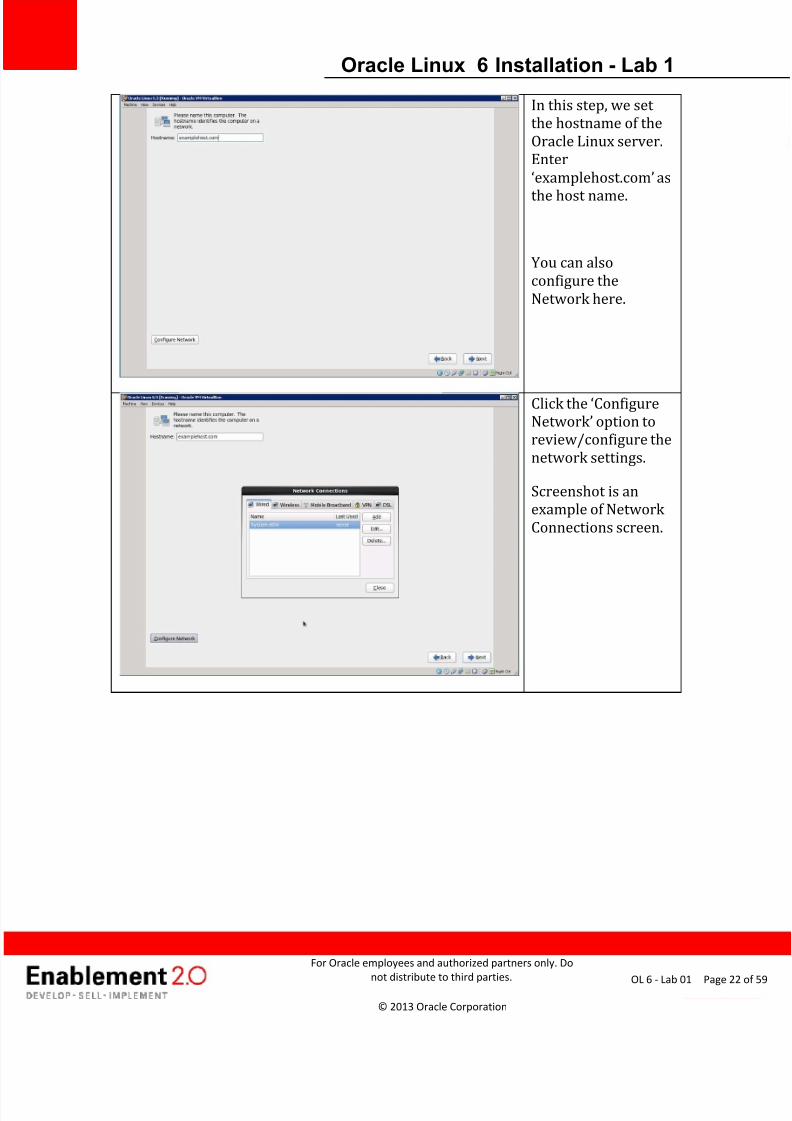
In this step, we set
the hostname of the
Oracle Linux server.
Enter
‘examplehost.com’ as
the host name.
You can also
configure the
Network here.
Click the ‘ConfigureNetwork’ option toreview/configure the
network settings.
Screenshot is an
example of Network
Connections screen.
7/27/2019 Lab1 Oracle Linux 6 Install
http://slidepdf.com/reader/full/lab1-oracle-linux-6-install 23/59
Oracle Linux 6 Installation - Lab 1
For Oracle employees and authorized partners only. Do
not distribute to third parties.
© 2013 Oracle Corporation
Page 23OL 6 - Lab 01
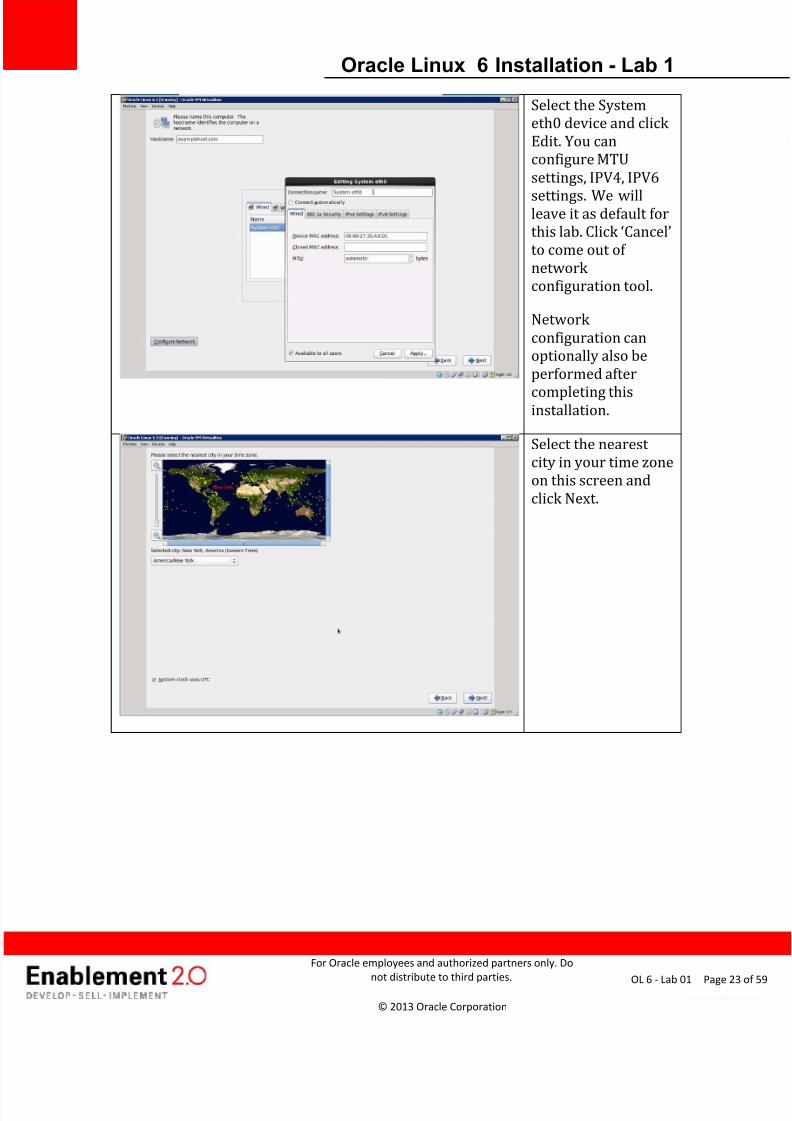
Select the System
eth0 device and click
Edit. You can
configure MTU
settings, IPV4, IPV6
settings. We willleave it as default for
this lab. Click ‘Cancel’
to come out of
network
configuration tool.
Network
configuration can
optionally also be
performed after
completing thisinstallation.
Select the nearest
city in your time zone
on this screen and
click Next.
7/27/2019 Lab1 Oracle Linux 6 Install
http://slidepdf.com/reader/full/lab1-oracle-linux-6-install 24/59
Oracle Linux 6 Installation - Lab 1
For Oracle employees and authorized partners only. Do
not distribute to third parties.
© 2013 Oracle Corporation
Page 24OL 6 - Lab 01
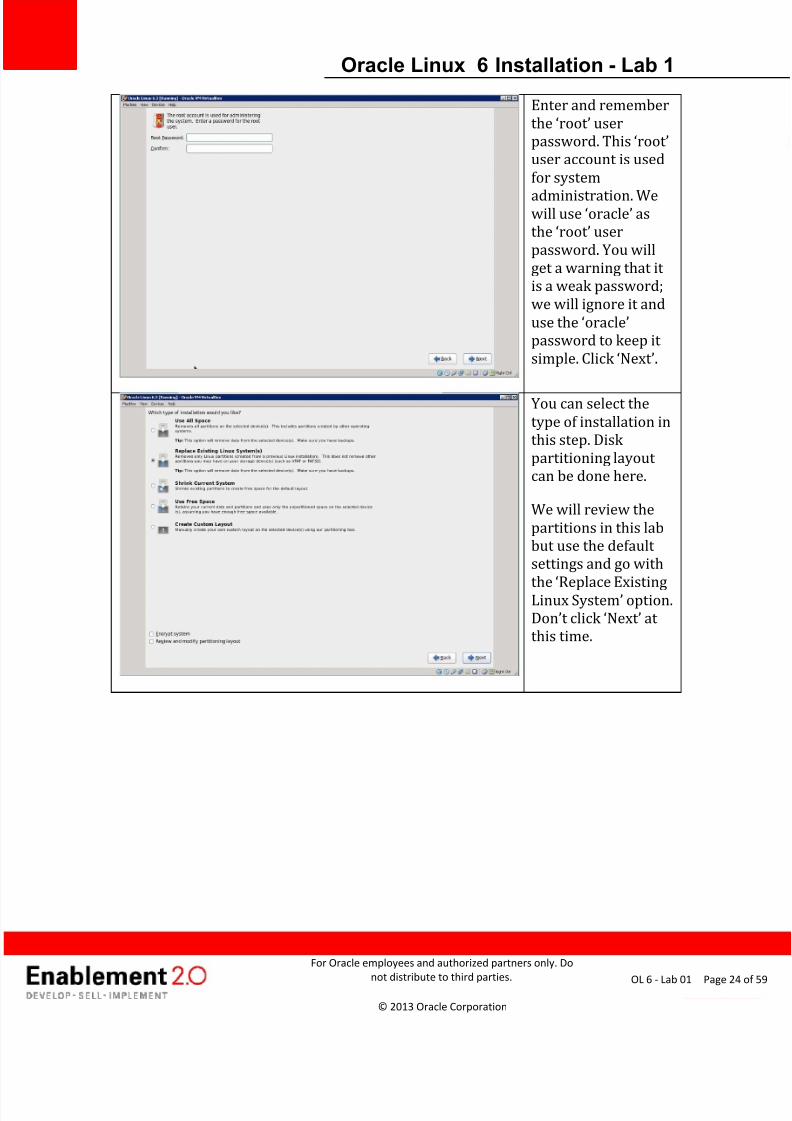
Enter and remember
the ‘root’ userpassword. This ‘root’user account is used
for system
administration. Wewill use ‘oracle’ asthe ‘root’ user
password. You will
get a warning that it
is a weak password;
we will ignore it and
use the ‘oracle’password to keep it
simple. Click ‘Next’.
You can select the
type of installation in
this step. Disk
partitioning layout
can be done here.
We will review the
partitions in this lab
but use the default
settings and go with
the ‘Replace ExistingLinux System’ option.Don’t click ‘Next’ at this time.
7/27/2019 Lab1 Oracle Linux 6 Install
http://slidepdf.com/reader/full/lab1-oracle-linux-6-install 25/59
Oracle Linux 6 Installation - Lab 1
For Oracle employees and authorized partners only. Do
not distribute to third parties.
© 2013 Oracle Corporation
Page 25OL 6 - Lab 01
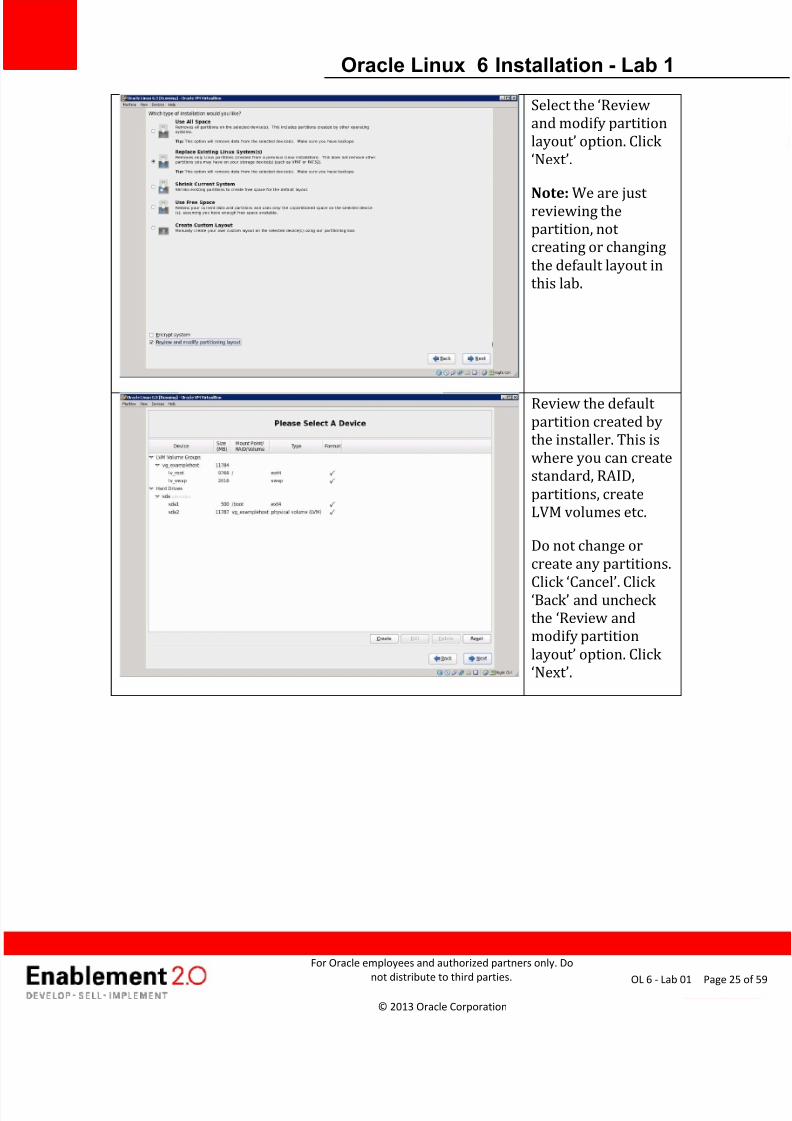
Select the ‘Reviewand modify partition
layout’ option. Click
‘Next’.
Note: We are just reviewing the
partition, not
creating or changing
the default layout in
this lab.
Review the default
partition created by
the installer. This is
where you can create
standard, RAID,
partitions, create
LVM volumes etc.
Do not change or
create any partitions.
Click ‘Cancel’. Click ‘Back’ and uncheck the ‘Review andmodify partition
layout’ option. Click ‘Next’.
7/27/2019 Lab1 Oracle Linux 6 Install
http://slidepdf.com/reader/full/lab1-oracle-linux-6-install 26/59
Oracle Linux 6 Installation - Lab 1
For Oracle employees and authorized partners only. Do
not distribute to third parties.
© 2013 Oracle Corporation
Page 26OL 6 - Lab 01
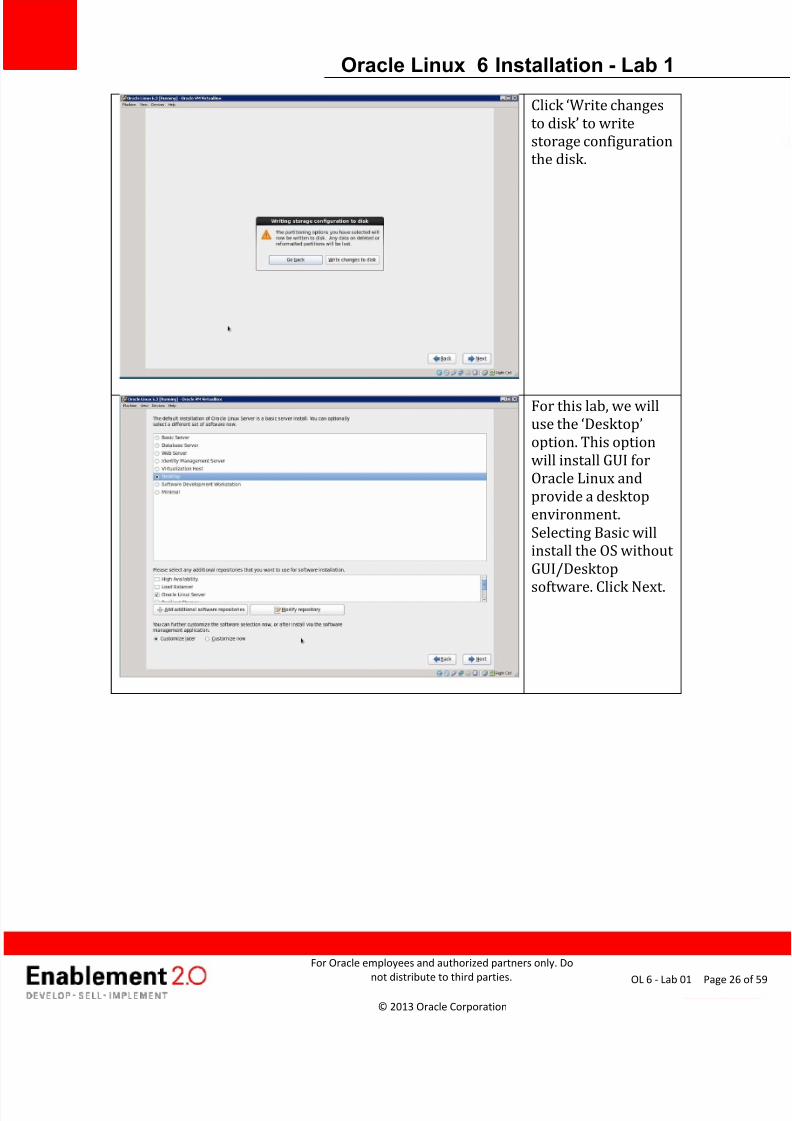
Click ‘Write changes
to disk’ to writestorage configuration
the disk.
For this lab, we will
use the ‘Desktop’
option. This option
will install GUI for
Oracle Linux and
provide a desktop
environment.
Selecting Basic will
install the OS without
GUI/Desktop
software. Click Next.
7/27/2019 Lab1 Oracle Linux 6 Install
http://slidepdf.com/reader/full/lab1-oracle-linux-6-install 27/59
Oracle Linux 6 Installation - Lab 1
For Oracle employees and authorized partners only. Do
not distribute to third parties.
© 2013 Oracle Corporation
Page 27OL 6 - Lab 01
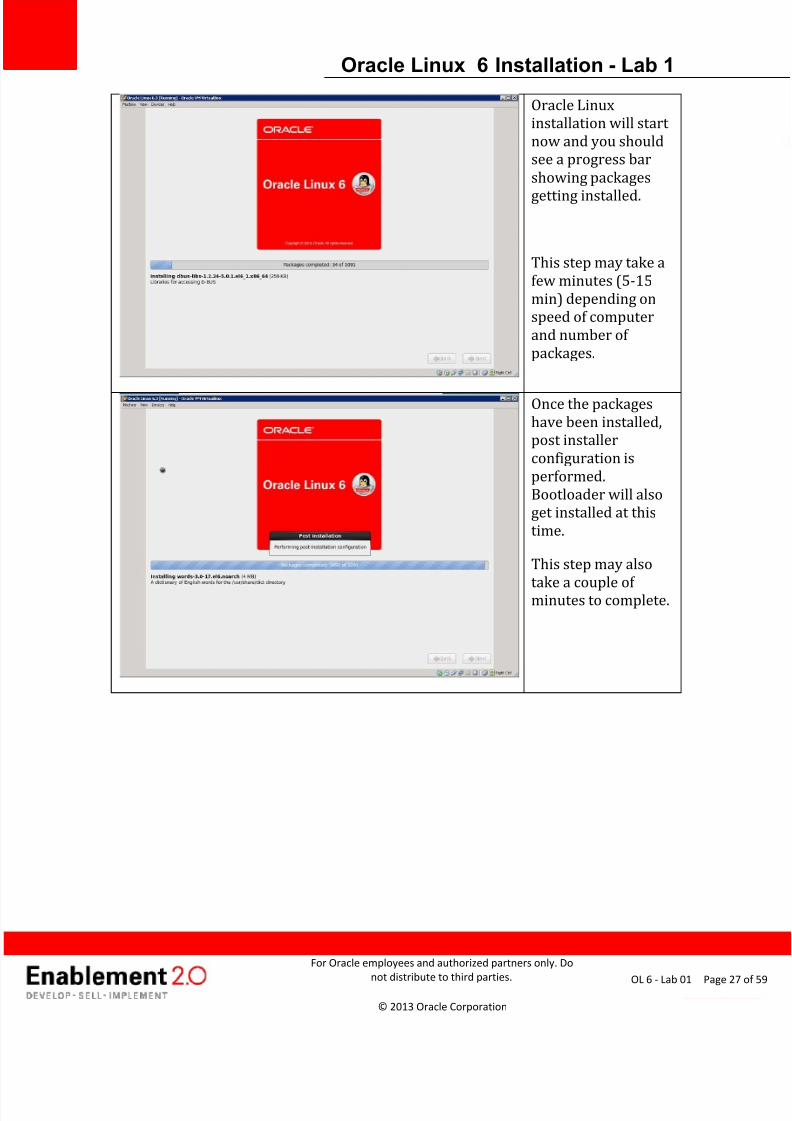
Oracle Linux
installation will start
now and you should
see a progress bar
showing packages
getting installed.
This step may take a
few minutes (5-15
min) depending on
speed of computer
and number of
packages.
Once the packages
have been installed,
post installer
configuration is
performed.
Bootloader will also
get installed at this
time.
This step may also
take a couple of minutes to complete.
7/27/2019 Lab1 Oracle Linux 6 Install
http://slidepdf.com/reader/full/lab1-oracle-linux-6-install 28/59
Oracle Linux 6 Installation - Lab 1
For Oracle employees and authorized partners only. Do
not distribute to third parties.
© 2013 Oracle Corporation
Page 28OL 6 - Lab 01
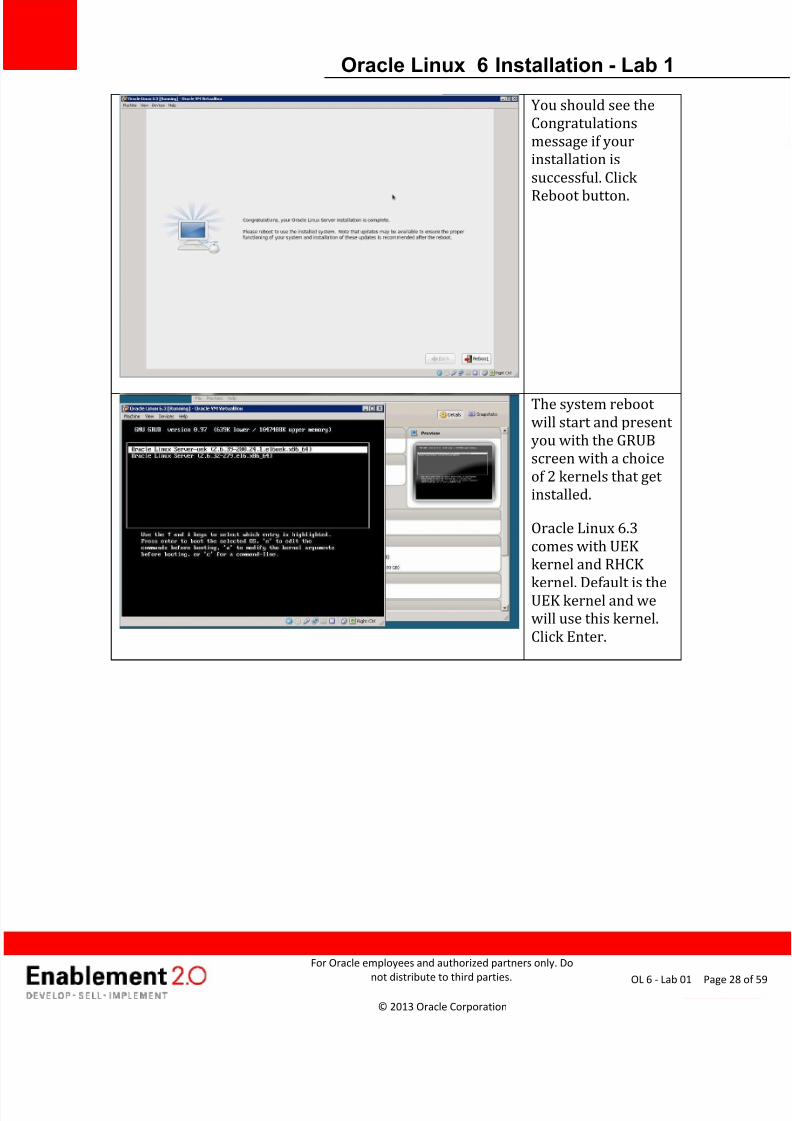
You should see the
Congratulations
message if your
installation is
successful. Click
Reboot button.
The system reboot
will start and present
you with the GRUB
screen with a choice
of 2 kernels that get
installed.
Oracle Linux 6.3
comes with UEK
kernel and RHCK
kernel. Default is theUEK kernel and we
will use this kernel.
Click Enter.
7/27/2019 Lab1 Oracle Linux 6 Install
http://slidepdf.com/reader/full/lab1-oracle-linux-6-install 29/59
Oracle Linux 6 Installation - Lab 1
For Oracle employees and authorized partners only. Do
not distribute to third parties.
© 2013 Oracle Corporation
Page 29OL 6 - Lab 01
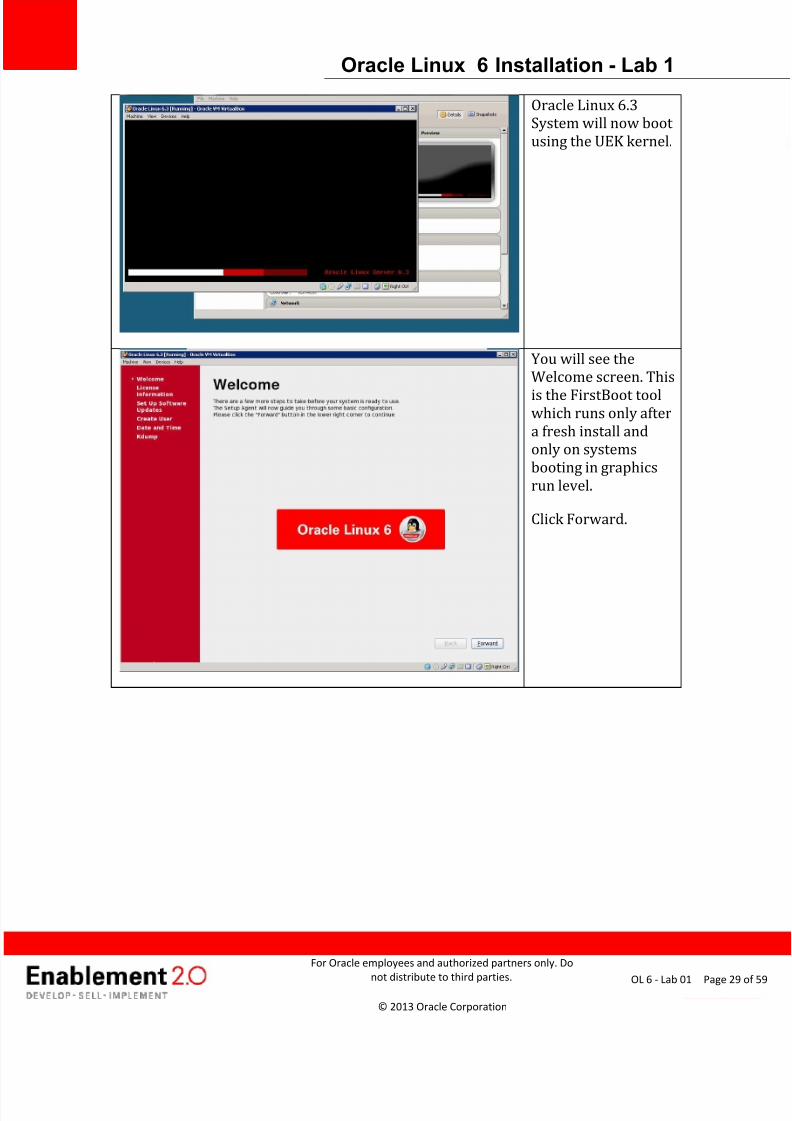
Oracle Linux 6.3
System will now boot
using the UEK kernel.
You will see the
Welcome screen. This
is the FirstBoot toolwhich runs only after
a fresh install and
only on systems
booting in graphics
run level.
Click Forward.

7/27/2019 Lab1 Oracle Linux 6 Install
http://slidepdf.com/reader/full/lab1-oracle-linux-6-install 30/59
Oracle Linux 6 Installation - Lab 1
For Oracle employees and authorized partners only. Do
not distribute to third parties.
© 2013 Oracle Corporation
Page 30OL 6 - Lab 01
Read and agree to
License agreement.
Click Forward.
Since our Network
connection is not
active, we cannot set
up Software Updates
at this time.
It is recommended to
setup Software
Updates. If not doneat this stage, you
should set this up
after installation.
7/27/2019 Lab1 Oracle Linux 6 Install
http://slidepdf.com/reader/full/lab1-oracle-linux-6-install 31/59
Oracle Linux 6 Installation - Lab 1
For Oracle employees and authorized partners only. Do
not distribute to third parties.
© 2013 Oracle Corporation
Page 31OL 6 - Lab 01
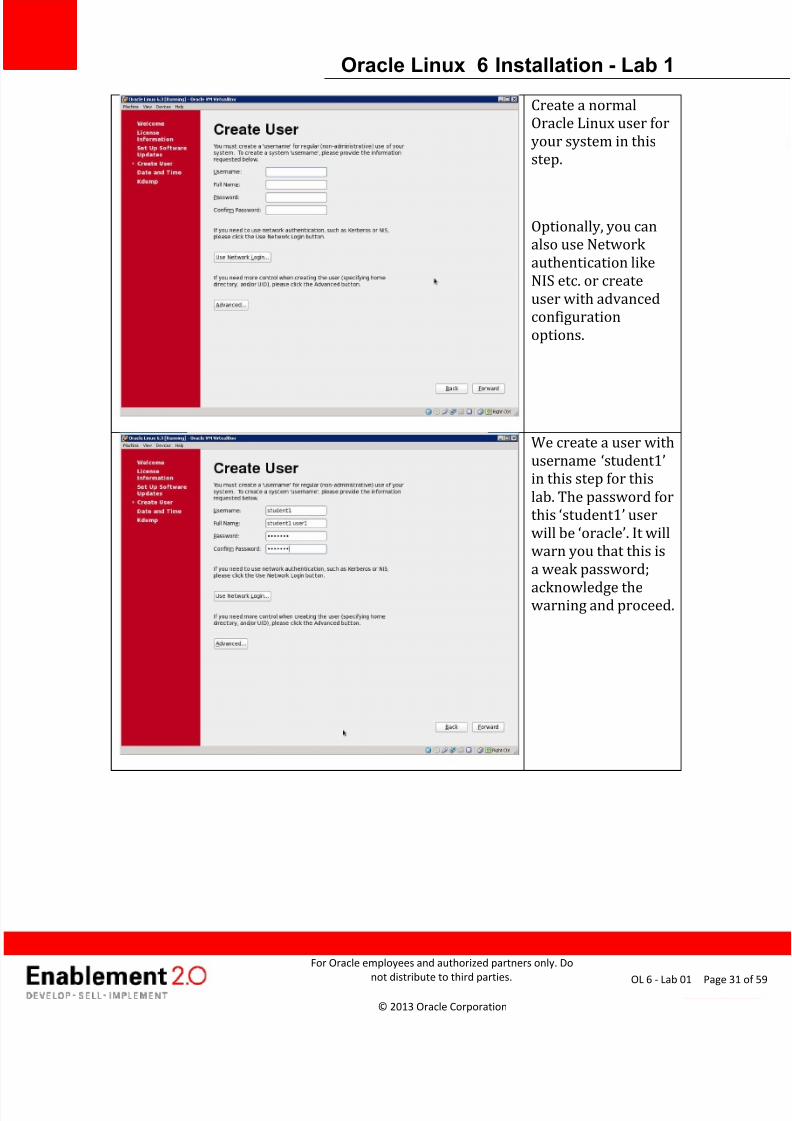
Create a normal
Oracle Linux user for
your system in this
step.
Optionally, you can
also use Network
authentication like
NIS etc. or create
user with advanced
configuration
options.
We create a user with
username ‘student1’in this step for this
lab. The password for
this ‘student1’ user
will be ‘oracle’. It willwarn you that this is
a weak password;
acknowledge thewarning and proceed.
7/27/2019 Lab1 Oracle Linux 6 Install
http://slidepdf.com/reader/full/lab1-oracle-linux-6-install 32/59
Oracle Linux 6 Installation - Lab 1
For Oracle employees and authorized partners only. Do
not distribute to third parties.
© 2013 Oracle Corporation
Page 32OL 6 - Lab 01
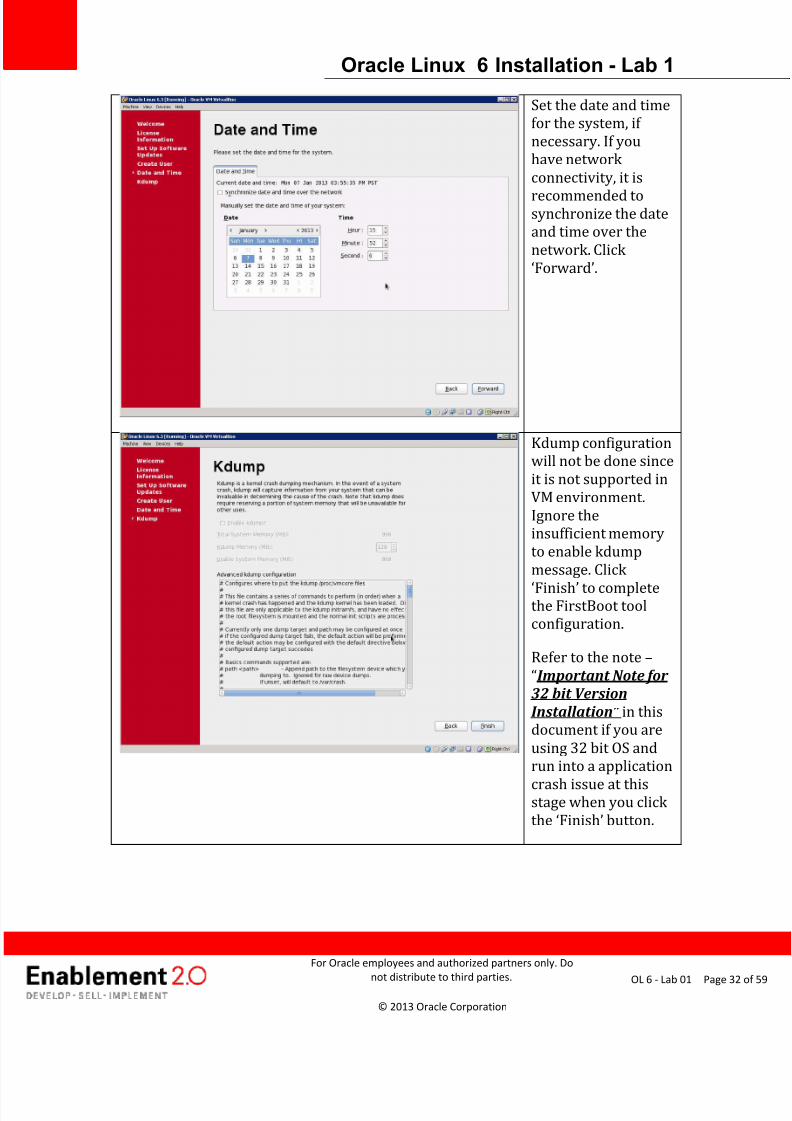
Set the date and time
for the system, if
necessary. If you
have network
connectivity, it is
recommended tosynchronize the date
and time over the
network. Click
‘Forward’.
Kdump configuration
will not be done since
it is not supported in
VM environment.
Ignore the
insufficient memory
to enable kdump
message. Click
‘Finish’ to completethe FirstBoot tool
configuration.
Refer to the note –
“Important Note for
32 bit Version
Installation” in this
document if you are
using 32 bit OS and
run into a application
crash issue at thisstage when you click
the ‘Finish’ button.
7/27/2019 Lab1 Oracle Linux 6 Install
http://slidepdf.com/reader/full/lab1-oracle-linux-6-install 33/59
Oracle Linux 6 Installation - Lab 1
For Oracle employees and authorized partners only. Do
not distribute to third parties.
© 2013 Oracle Corporation
Page 33OL 6 - Lab 01
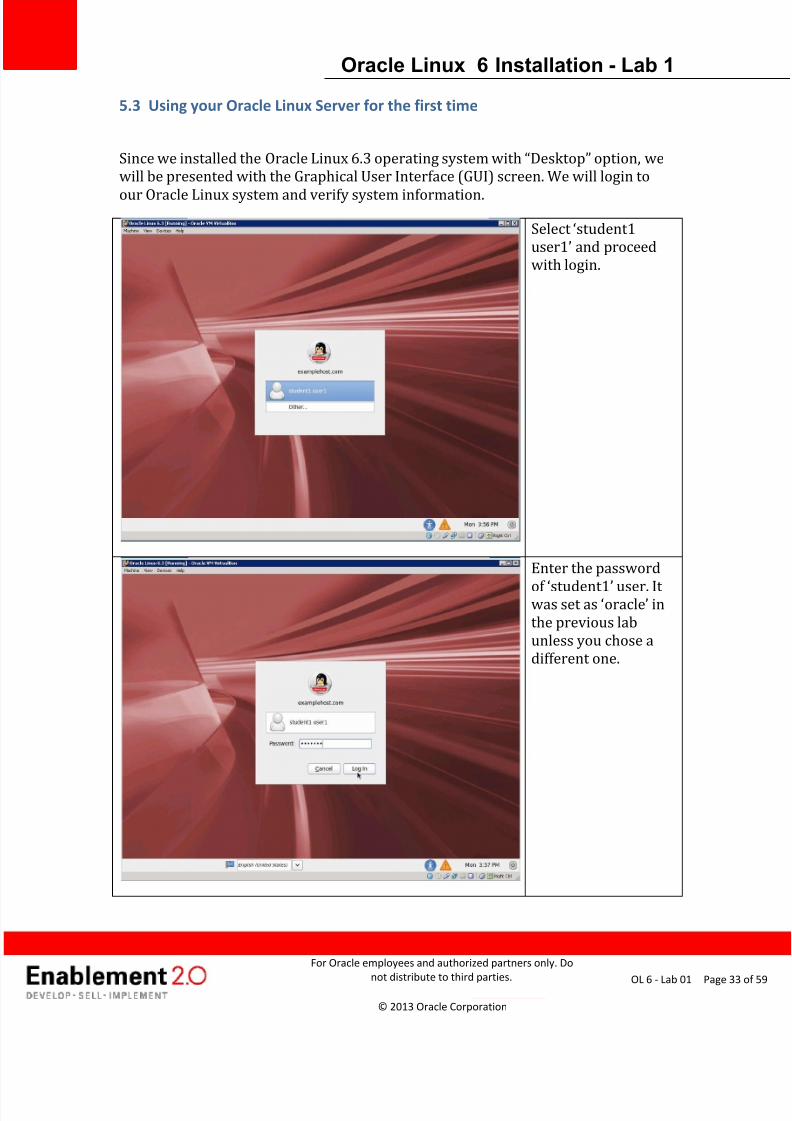
5.3 Using your Oracle Linux Server for the first time
Since we installed the Oracle Linux 6.3 operating system with “Desktop” option, wewill be presented with the Graphical User Interface (GUI) screen. We will login to
our Oracle Linux system and verify system information.
Select ‘student1user1’ and proceedwith login.
Enter the password
of ‘student1’ user. It was set as ‘oracle’ in
the previous lab
unless you chose a
different one.
7/27/2019 Lab1 Oracle Linux 6 Install
http://slidepdf.com/reader/full/lab1-oracle-linux-6-install 34/59
Oracle Linux 6 Installation - Lab 1
For Oracle employees and authorized partners only. Do
not distribute to third parties.
© 2013 Oracle Corporation
Page 34OL 6 - Lab 01
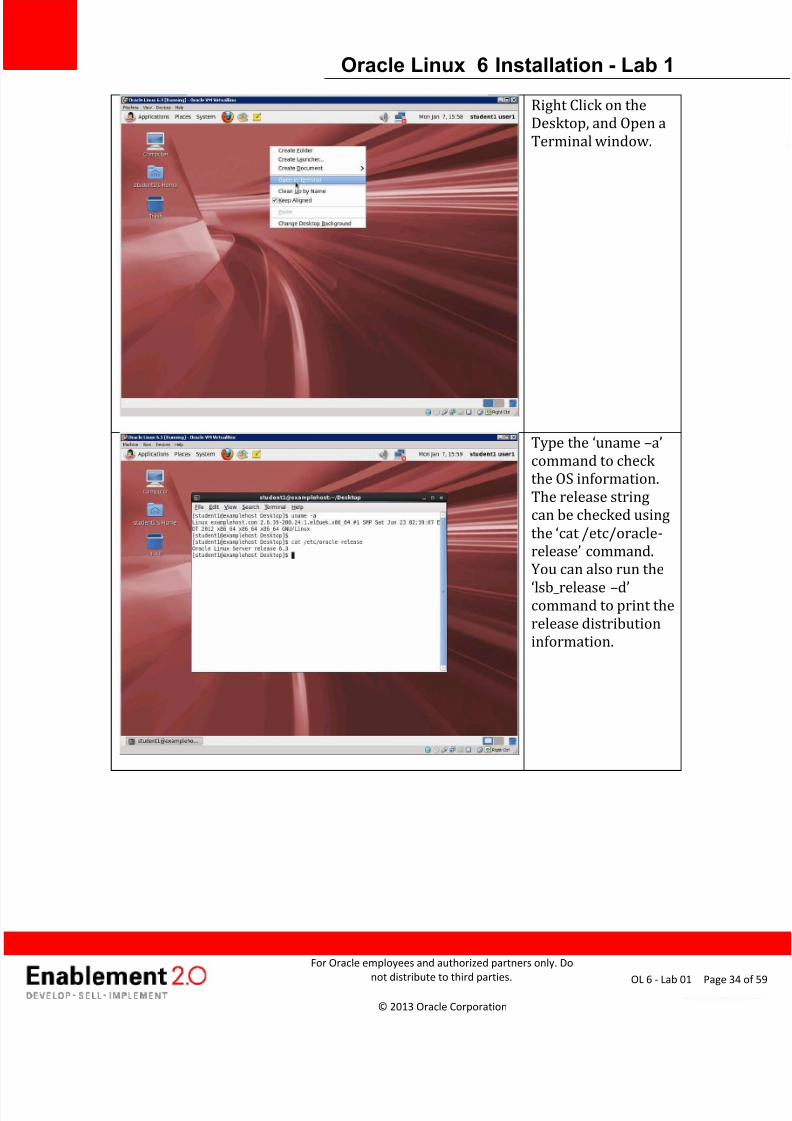
Right Click on the
Desktop, and Open a
Terminal window.
Type the ‘uname –a’
command to check
the OS information.
The release string
can be checked using
the ‘cat /etc/oracle-
release’ command. You can also run the
‘lsb_release –d’command to print the
release distribution
information.
7/27/2019 Lab1 Oracle Linux 6 Install
http://slidepdf.com/reader/full/lab1-oracle-linux-6-install 35/59
Oracle Linux 6 Installation - Lab 1
For Oracle employees and authorized partners only. Do
not distribute to third parties.
© 2013 Oracle Corporation
Page 35OL 6 - Lab 01
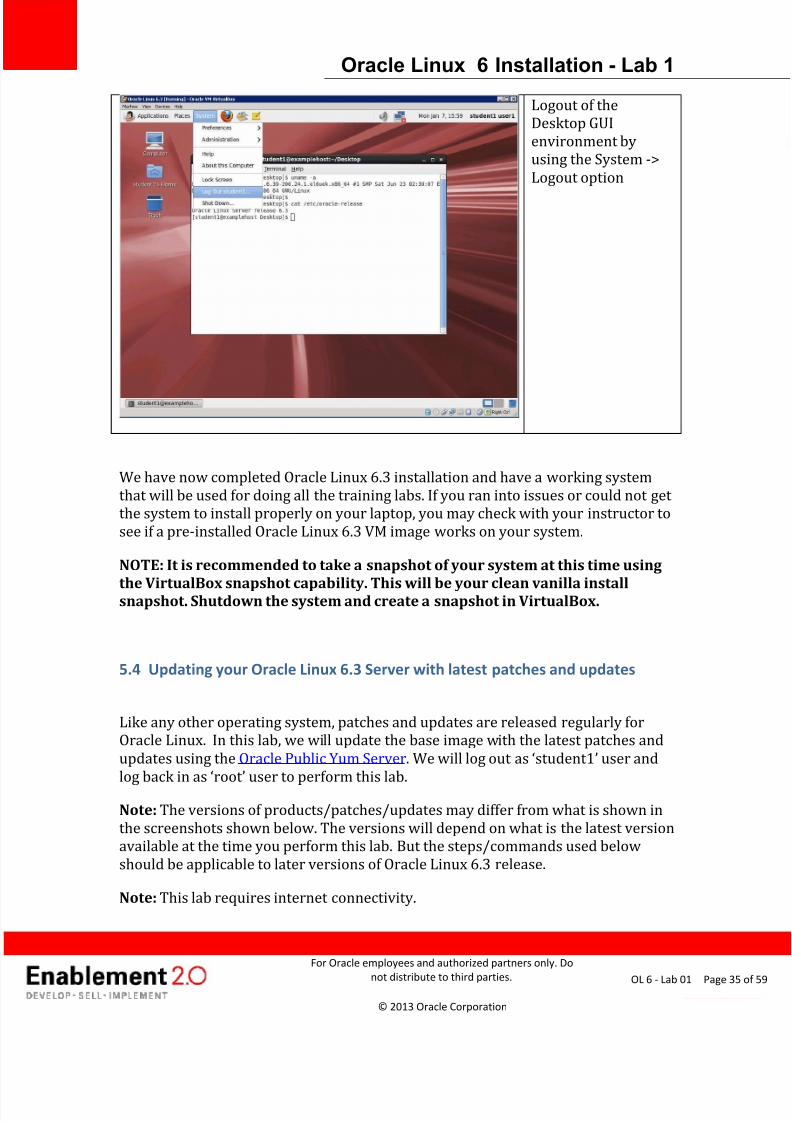
Logout of the
Desktop GUI
environment by
using the System ->
Logout option
We have now completed Oracle Linux 6.3 installation and have a working system
that will be used for doing all the training labs. If you ran into issues or could not get
the system to install properly on your laptop, you may check with your instructor to
see if a pre-installed Oracle Linux 6.3 VM image works on your system.
NOTE: It is recommended to take a snapshot of your system at this time using
the VirtualBox snapshot capability. This will be your clean vanilla installsnapshot. Shutdown the system and create a snapshot in VirtualBox.
5.4 Updating your Oracle Linux 6.3 Server with latest patches and updates
Like any other operating system, patches and updates are released regularly for
Oracle Linux. In this lab, we will update the base image with the latest patches and
updates using the Oracle Public Yum Server. We will log out as ‘student1’ user and
log back in as ‘root’ user to perform this lab.
Note: The versions of products/patches/updates may differ from what is shown in
the screenshots shown below. The versions will depend on what is the latest version
available at the time you perform this lab. But the steps/commands used below
should be applicable to later versions of Oracle Linux 6.3 release.
Note: This lab requires internet connectivity.

7/27/2019 Lab1 Oracle Linux 6 Install
http://slidepdf.com/reader/full/lab1-oracle-linux-6-install 36/59
Oracle Linux 6 Installation - Lab 1
For Oracle employees and authorized partners only. Do
not distribute to third parties.
© 2013 Oracle Corporation
Page 36OL 6 - Lab 01
When you first login as ‘root’ user, on a freshly installed Oracle Linux system, you
should expect to see a warning message similar to what is shown below. Read thismessage, acknowledge the warning and then click ‘Close’ to proceed.
7/27/2019 Lab1 Oracle Linux 6 Install
http://slidepdf.com/reader/full/lab1-oracle-linux-6-install 37/59
Oracle Linux 6 Installation - Lab 1
For Oracle employees and authorized partners only. Do
not distribute to third parties.
© 2013 Oracle Corporation
Page 37OL 6 - Lab 01
After logging in as ‘root ’ user, open a Terminal window and perform the following
steps:
[root@examplehost /]# cd /etc/yum.repos.d/[root@examplehost yum.repos.d]#
Check to see if there is a ‘/etc/yum.repos.d/public-yum-ol6.repo’ file already
present. If one is present, move it out of this directory if you wish to preserve the
original file or delete this file.
[root@examplehost yum.repos.d]# rm public-yum-ol6.reporm: remove regular file `public-yum-ol6.repo'? y[root@examplehost yum.repos.d]#
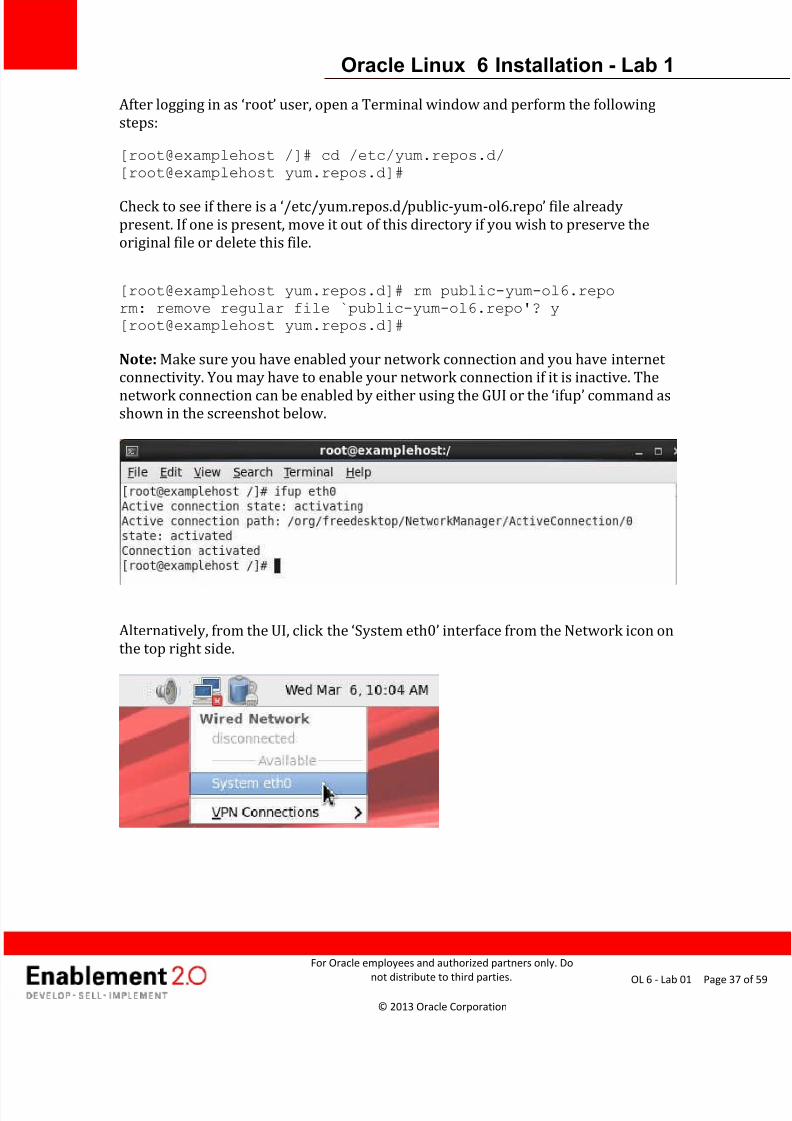
Note: Make sure you have enabled your network connection and you have internet
connectivity. You may have to enable your network connection if it is inactive. The
network connection can be enabled by either using the GUI or the ‘ifup’ command asshown in the screenshot below.
Alternat ively, from the UI, click the ‘System eth0’ interface from the Network icon onthe top right side.
7/27/2019 Lab1 Oracle Linux 6 Install
http://slidepdf.com/reader/full/lab1-oracle-linux-6-install 38/59
Oracle Linux 6 Installation - Lab 1
For Oracle employees and authorized partners only. Do
not distribute to third parties.
© 2013 Oracle Corporation
Page 38OL 6 - Lab 01
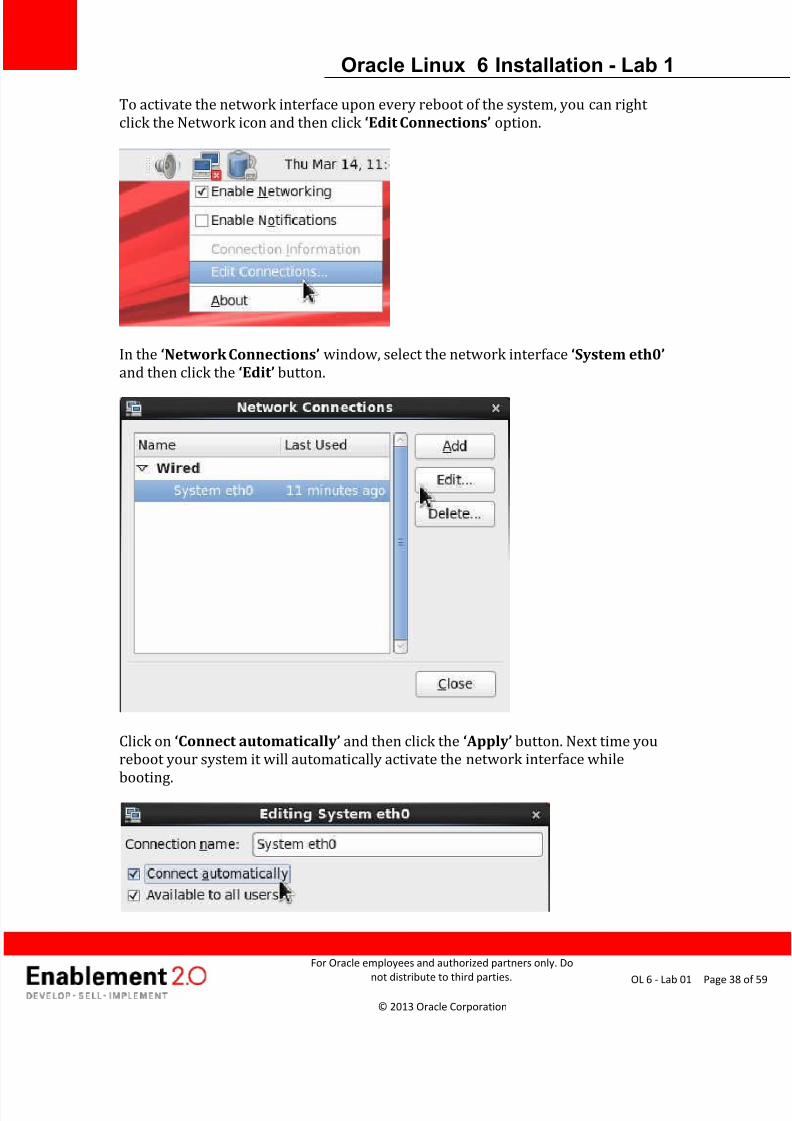
To activate the network interface upon every reboot of the system, you can right
click the Network icon and then click ‘Edit Connections’ option.
In the ‘Network Connections’ window, select the network interface ‘System eth0’
and then click the ‘Edit’ button.
Click on ‘Connect automatically’ and then click the ‘Apply’ button. Next time you
reboot your system it will automatically activate the network interface while
booting.
7/27/2019 Lab1 Oracle Linux 6 Install
http://slidepdf.com/reader/full/lab1-oracle-linux-6-install 39/59
Oracle Linux 6 Installation - Lab 1
For Oracle employees and authorized partners only. Do
not distribute to third parties.
© 2013 Oracle Corporation
Page 39OL 6 - Lab 01
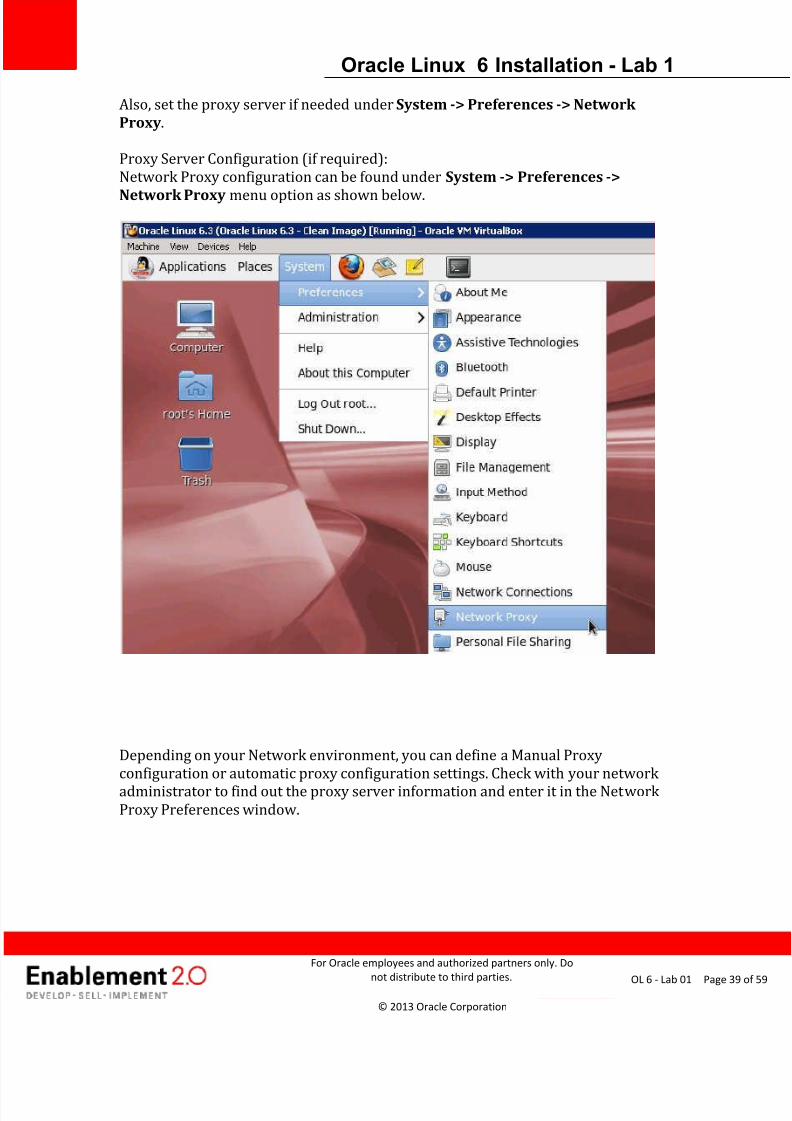
Also, set the proxy server if needed under System -> Preferences -> Network
Proxy.
Proxy Server Configuration (if required):
Network Proxy configuration can be found under System -> Preferences ->
Network Proxy menu option as shown below.
Depending on your Network environment, you can define a Manual Proxy
configuration or automatic proxy configuration settings. Check with your network
administrator to find out the proxy server information and enter it in the Network
Proxy Preferences window.
7/27/2019 Lab1 Oracle Linux 6 Install
http://slidepdf.com/reader/full/lab1-oracle-linux-6-install 40/59
Oracle Linux 6 Installation - Lab 1
For Oracle employees and authorized partners only. Do
not distribute to third parties.
© 2013 Oracle Corporation
Page 40OL 6 - Lab 01
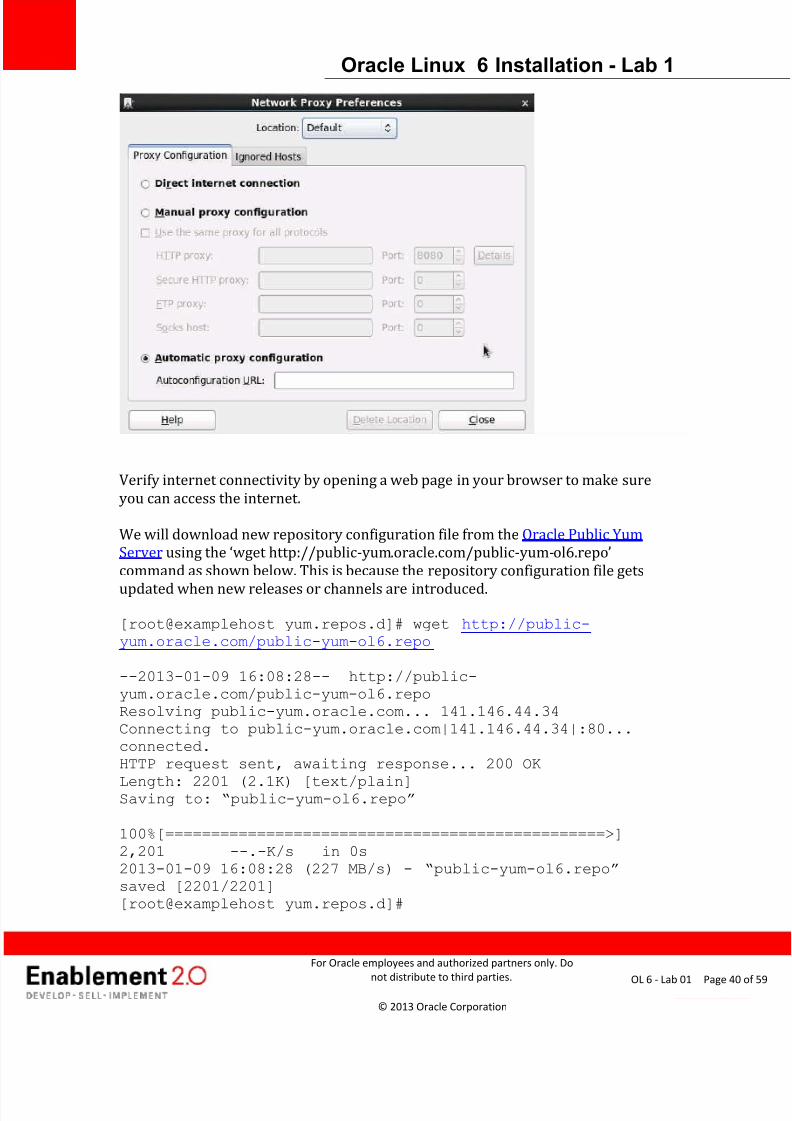
Verify internet connectivity by opening a web page in your browser to make sure
you can access the internet.
We will download new repository configuration file from the Oracle Public Yum
Server using the ‘wget http://public-yum.oracle.com/public-yum-ol6.repo’
command as shown below. This is because the repository configuration file gets
updated when new releases or channels are introduced.
[root@examplehost yum.repos.d]# wget http://public-yum.oracle.com/public-yum-ol6.repo
--2013-01-09 16:08:28-- http://public-yum.oracle.com/public-yum-ol6.repoResolving public-yum.oracle.com... 141.146.44.34Connecting to public-yum.oracle.com|141.146.44.34|:80...connected.HTTP request sent, awaiting response... 200 OK
Length: 2201 (2.1K) [text/plain]Saving to: “public-yum-ol6.repo”
100%[================================================>]2,201 --.-K/s in 0s2013-01-09 16:08:28 (227 MB/s) - “public-yum-ol6.repo”saved [2201/2201][root@examplehost yum.repos.d]#
7/27/2019 Lab1 Oracle Linux 6 Install
http://slidepdf.com/reader/full/lab1-oracle-linux-6-install 41/59
Oracle Linux 6 Installation - Lab 1
For Oracle employees and authorized partners only. Do
not distribute to third parties.
© 2013 Oracle Corporation
Page 41OL 6 - Lab 01
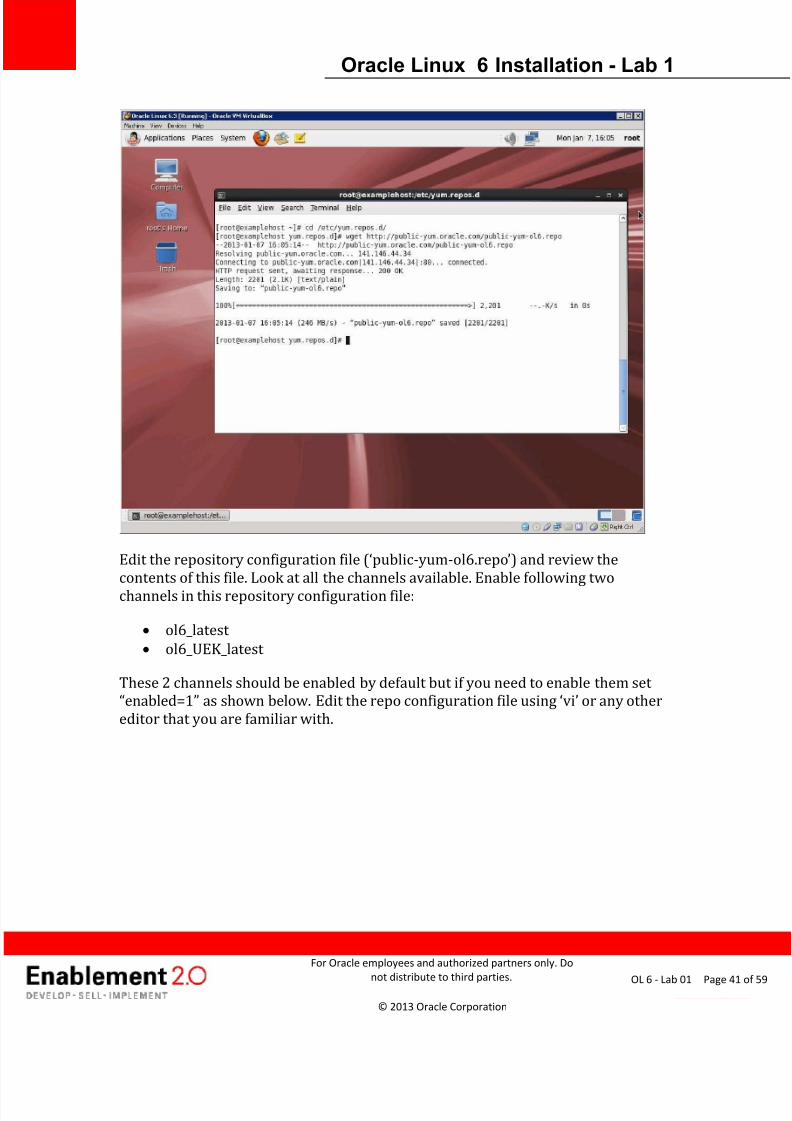
Edit the repository configuration file (‘public-yum-ol6.repo’) and review the
contents of this file. Look at all the channels available. Enable following two
channels in this repository configuration file:
ol6_latest
ol6_UEK_latest
These 2 channels should be enabled by default but if you need to enable them set
“enabled=1” as shown below. Edit the repo configuration file using ‘vi’ or any other
editor that you are familiar with.

7/27/2019 Lab1 Oracle Linux 6 Install
http://slidepdf.com/reader/full/lab1-oracle-linux-6-install 42/59
Oracle Linux 6 Installation - Lab 1
For Oracle employees and authorized partners only. Do
not distribute to third parties.
© 2013 Oracle Corporation
Page 42OL 6 - Lab 01
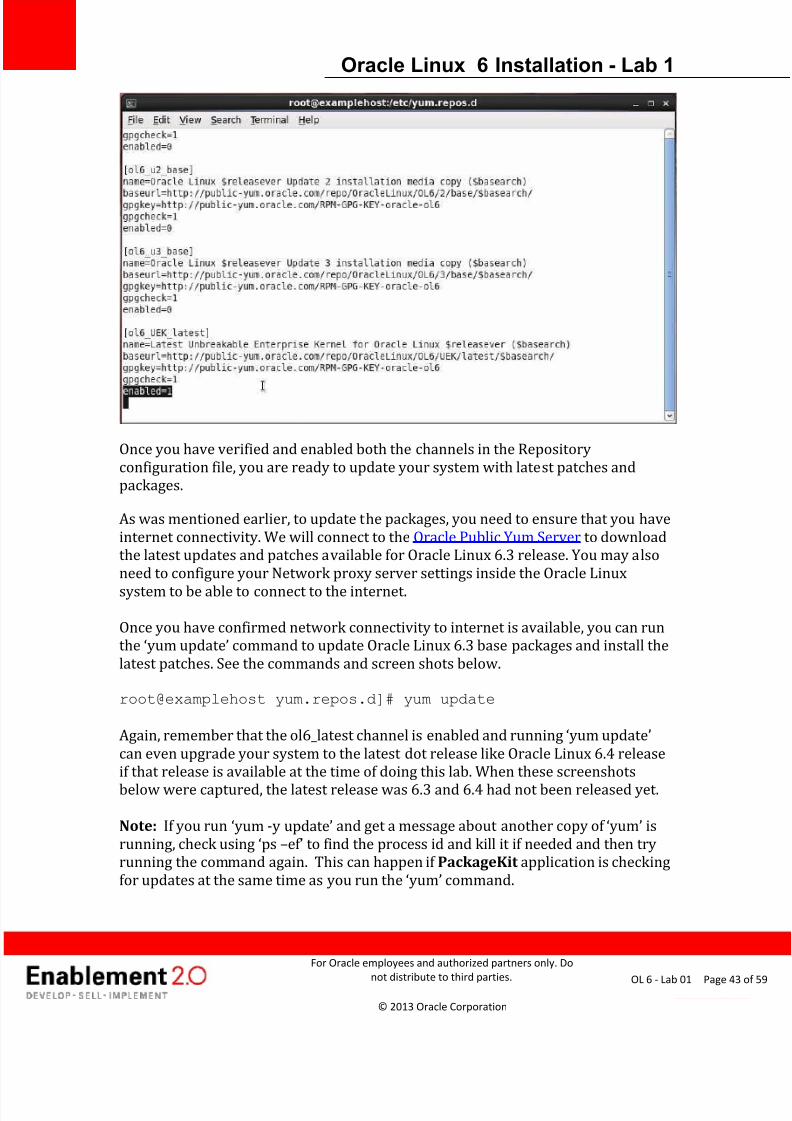
[root@examplehost yum.repos.d]# vi public-yum-ol6.repo
[ol6_latest]name=Oracle Linux $releasever Latest ($basearch)baseurl=http://public-
yum.oracle.com/repo/OracleLinux/OL6/latest/$basearch/gpgkey=http://public-yum.oracle.com/RPM-GPG-KEY-oracle-ol6gpgcheck=1enabled=1
[ol6_UEK_latest]name=Latest Unbreakable Enterprise Kernel for Oracle Linux$releasever ($basearch)baseurl=http://public-yum.oracle.com/repo/OracleLinux/OL6/UEK/latest/$basearch/gpgkey=http://public-yum.oracle.com/RPM-GPG-KEY-oracle-ol6gpgcheck=1enabled=1
Note: At the time of creation of this lab, Oracle Linux 6.3 was the latest release. If
you are doing this lab at a time when a newer release like Oracle Linux 6.4 is
available, the ol6_latest channel will pick up updates/patches available for the 6.4
release and upgrade your system to Oracle Linux 6.4.
7/27/2019 Lab1 Oracle Linux 6 Install
http://slidepdf.com/reader/full/lab1-oracle-linux-6-install 43/59
Oracle Linux 6 Installation - Lab 1
For Oracle employees and authorized partners only. Do
not distribute to third parties.
© 2013 Oracle Corporation
Page 43OL 6 - Lab 01
Once you have verified and enabled both the channels in the Repository
configuration file, you are ready to update your system with latest patches and
packages.
As was mentioned earlier, to update the packages, you need to ensure that you have
internet connectivity. We will connect to the Oracle Public Yum Server to download
the latest updates and patches available for Oracle Linux 6.3 release. You may also
need to configure your Network proxy server settings inside the Oracle Linux
system to be able to connect to the internet.
Once you have confirmed network connectivity to internet is available, you can run
the ‘yum update’ command to update Oracle Linux 6.3 base packages and install the
latest patches. See the commands and screen shots below.
root@examplehost yum.repos.d]# yum update
Again, remember that the ol6_latest channel is enabled and running ‘yum update’
can even upgrade your system to the latest dot release like Oracle Linux 6.4 release
if that release is available at the time of doing this lab. When these screenshots
below were captured, the latest release was 6.3 and 6.4 had not been released yet.
Note: If you run ‘yum -y update’ and get a message about another copy of ‘yum’ is
running, check using ‘ps –ef’ to find the process id and kill it if needed and then tryrunning the command again. This can happen if PackageKit application is checking
for updates at the same time as you run the ‘yum’ command.
7/27/2019 Lab1 Oracle Linux 6 Install
http://slidepdf.com/reader/full/lab1-oracle-linux-6-install 44/59
Oracle Linux 6 Installation - Lab 1
For Oracle employees and authorized partners only. Do
not distribute to third parties.
© 2013 Oracle Corporation
Page 44OL 6 - Lab 01
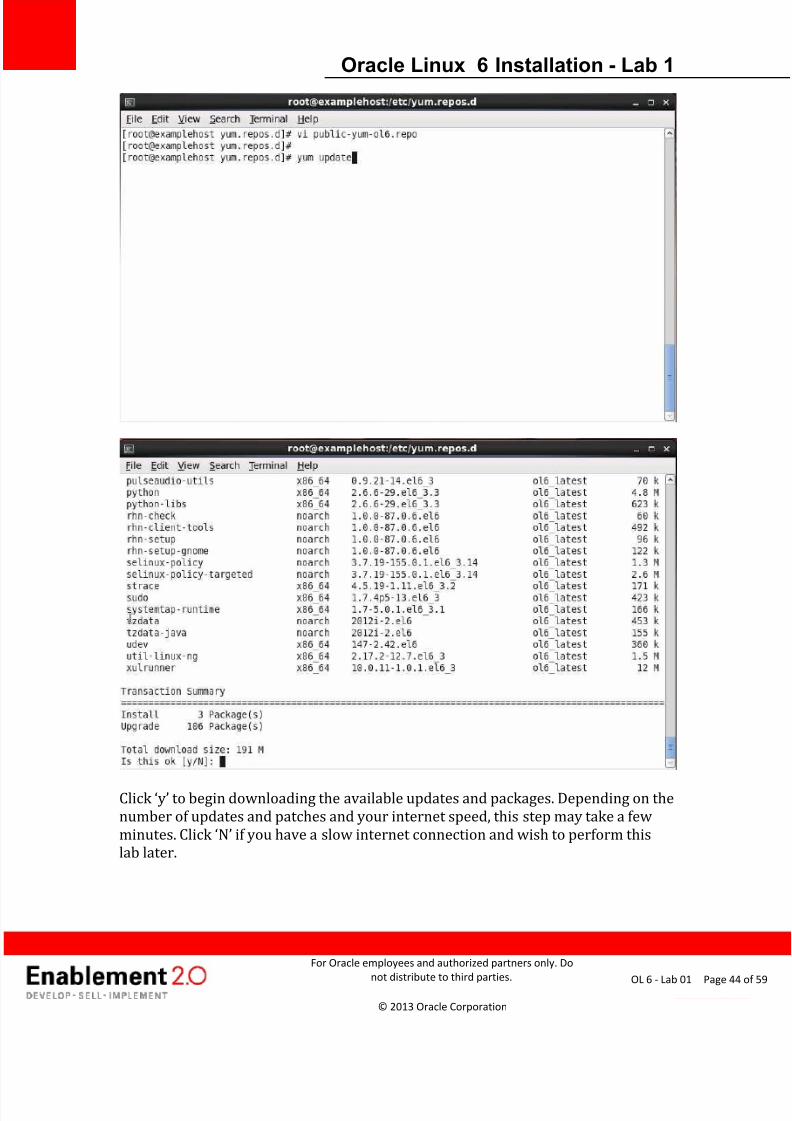
Click ‘y’ to begin downloading the available updates and packages. Depending on the
number of updates and patches and your internet speed, this step may take a few
minutes. Click ‘N’ if you have a slow internet connection and wish to perform this
lab later.
7/27/2019 Lab1 Oracle Linux 6 Install
http://slidepdf.com/reader/full/lab1-oracle-linux-6-install 45/59
Oracle Linux 6 Installation - Lab 1
For Oracle employees and authorized partners only. Do
not distribute to third parties.
© 2013 Oracle Corporation
Page 45OL 6 - Lab 01
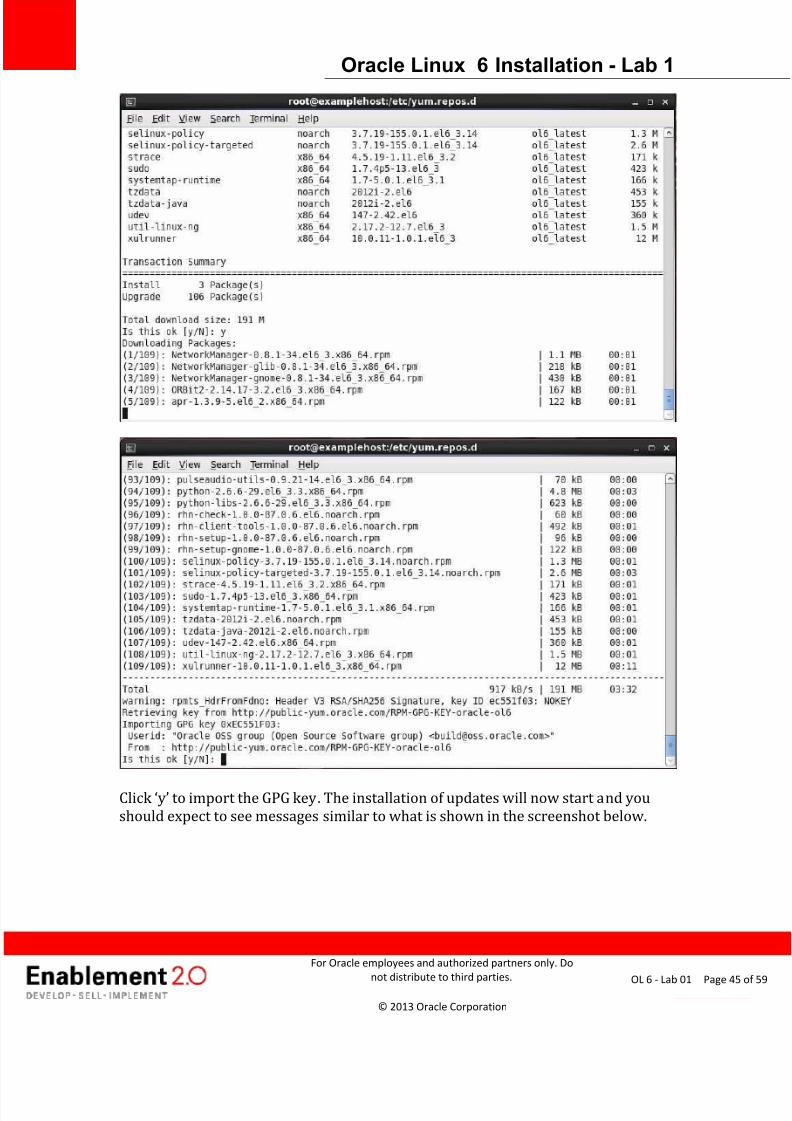
Click ‘y’ to import the GPG key. The installation of updates will now start and you
should expect to see messages similar to what is shown in the screenshot below.
7/27/2019 Lab1 Oracle Linux 6 Install
http://slidepdf.com/reader/full/lab1-oracle-linux-6-install 46/59
Oracle Linux 6 Installation - Lab 1
For Oracle employees and authorized partners only. Do
not distribute to third parties.
© 2013 Oracle Corporation
Page 46OL 6 - Lab 01
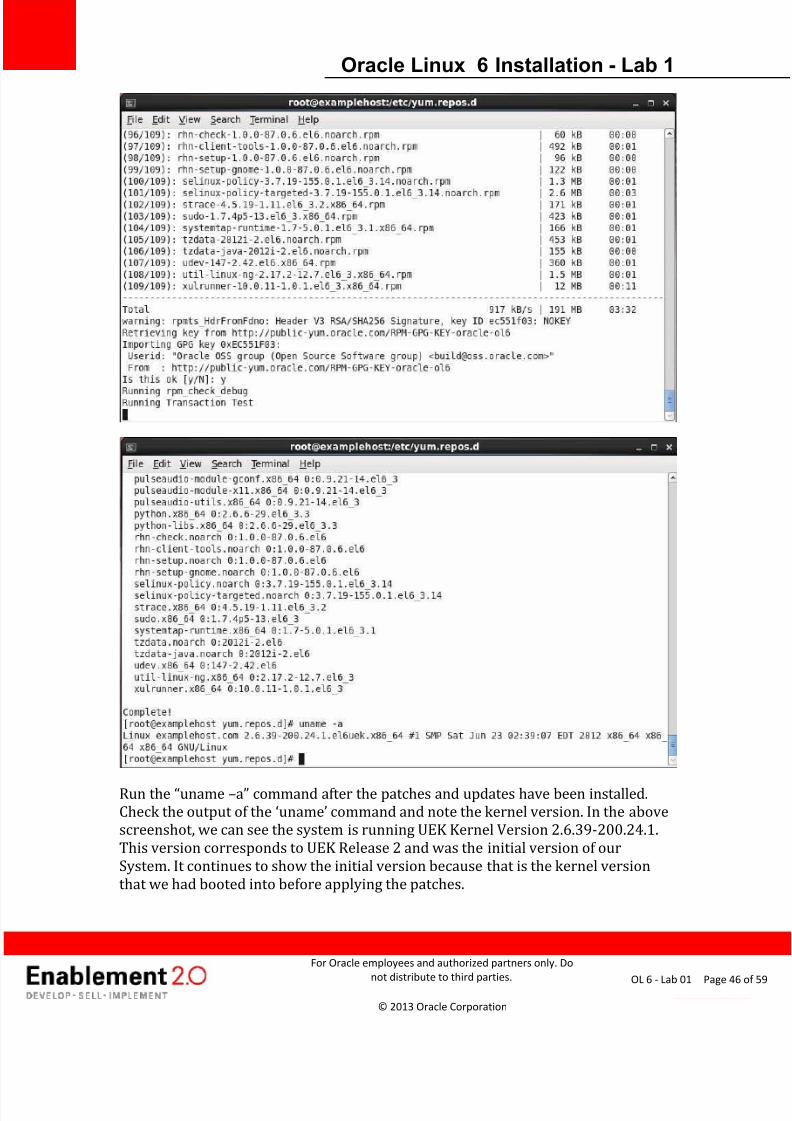
Run the “uname –a” command after the patches and updates have been installed.Check the output of the ‘uname’ command and note the kernel version. In the above
screenshot, we can see the system is running UEK Kernel Version 2.6.39-200.24.1.
This version corresponds to UEK Release 2 and was the initial version of our
System. It continues to show the initial version because that is the kernel version
that we had booted into before applying the patches.
7/27/2019 Lab1 Oracle Linux 6 Install
http://slidepdf.com/reader/full/lab1-oracle-linux-6-install 47/59
Oracle Linux 6 Installation - Lab 1
For Oracle employees and authorized partners only. Do
not distribute to third parties.
© 2013 Oracle Corporation
Page 47OL 6 - Lab 01
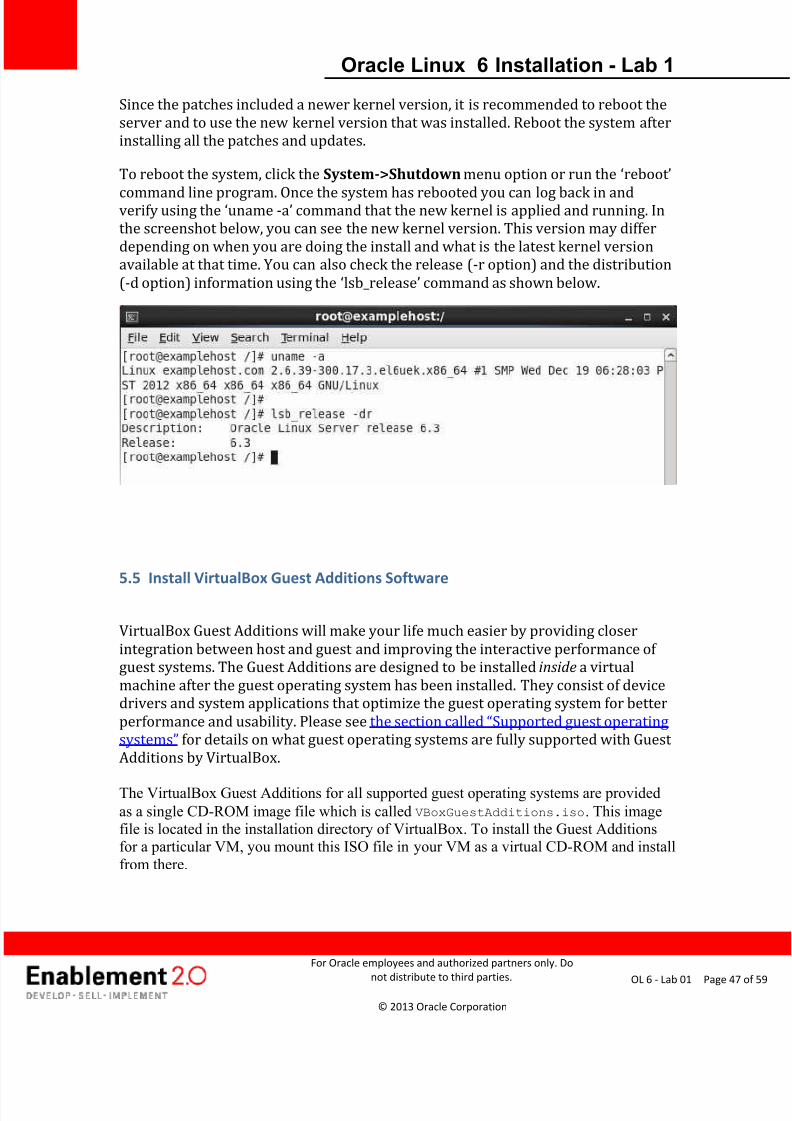
Since the patches included a newer kernel version, it is recommended to reboot the
server and to use the new kernel version that was installed. Reboot the system after
installing all the patches and updates.
To reboot the system, click the System->Shutdown menu option or run the ‘reboot ’
command line program. Once the system has rebooted you can log back in andverify using the ‘uname -a’ command that the new kernel is applied and running. In
the screenshot below, you can see the new kernel version. This version may differ
depending on when you are doing the install and what is the latest kernel version
available at that time. You can also check the release (-r option) and the distribution
(-d option) information using the ‘lsb_release’ command as shown below.
5.5 Install VirtualBox Guest Additions Software
VirtualBox Guest Additions will make your life much easier by providing closer
integration between host and guest and improving the interactive performance of
guest systems. The Guest Additions are designed to be installed inside a virtual
machine after the guest operating system has been installed. They consist of device
drivers and system applications that optimize the guest operating system for better
performance and usability. Please see the section called “Supported guest operatingsystems” for details on what guest operating systems are fully supported with Guest
Additions by VirtualBox.
The VirtualBox Guest Additions for all supported guest operating systems are provided
as a single CD-ROM image file which is called VBoxGuestAdditions.iso. This imagefile is located in the installation directory of VirtualBox. To install the Guest Additionsfor a particular VM, you mount this ISO file in your VM as a virtual CD-ROM and install
from there.
7/27/2019 Lab1 Oracle Linux 6 Install
http://slidepdf.com/reader/full/lab1-oracle-linux-6-install 48/59
Oracle Linux 6 Installation - Lab 1
For Oracle employees and authorized partners only. Do
not distribute to third parties.
© 2013 Oracle Corporation
Page 48OL 6 - Lab 01
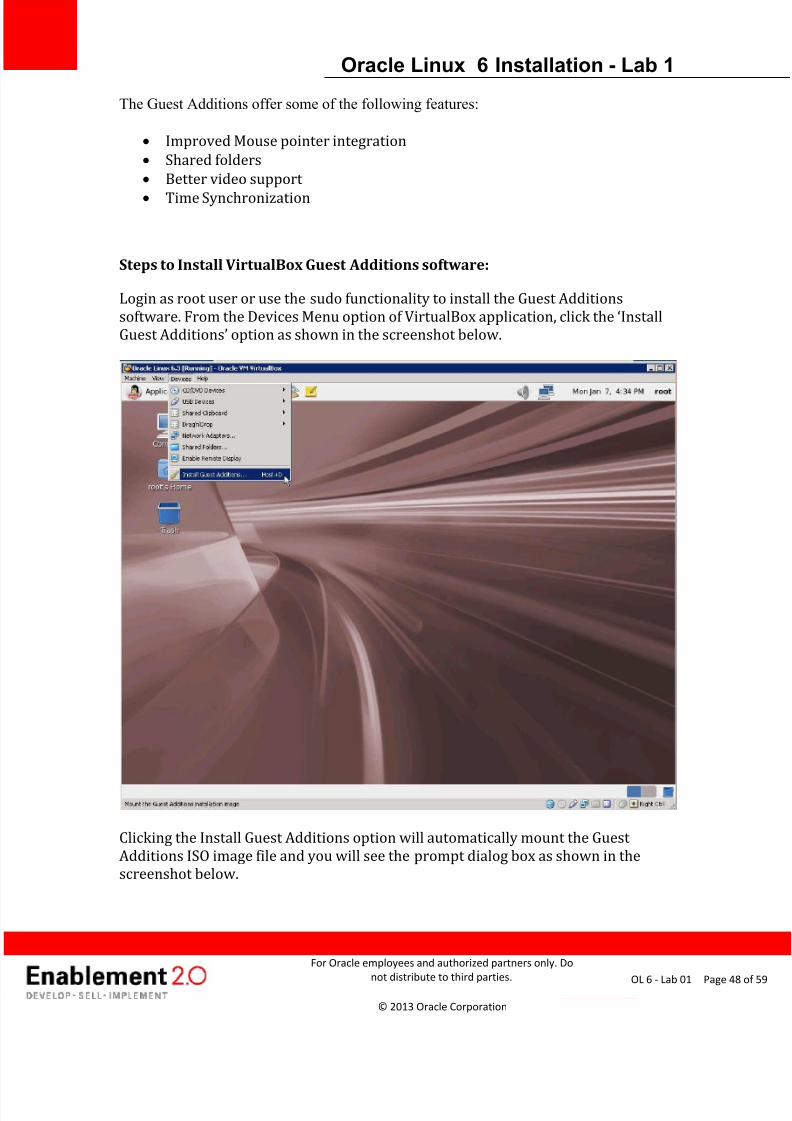
The Guest Additions offer some of the following features:
Improved Mouse pointer integration
Shared folders
Better video support
Time Synchronization
Steps to Install VirtualBox Guest Additions software:
Login as root user or use the sudo functionality to install the Guest Additions
software. From the Devices Menu option of VirtualBox application, click the ‘InstallGuest Additions’ option as shown in the screenshot below.
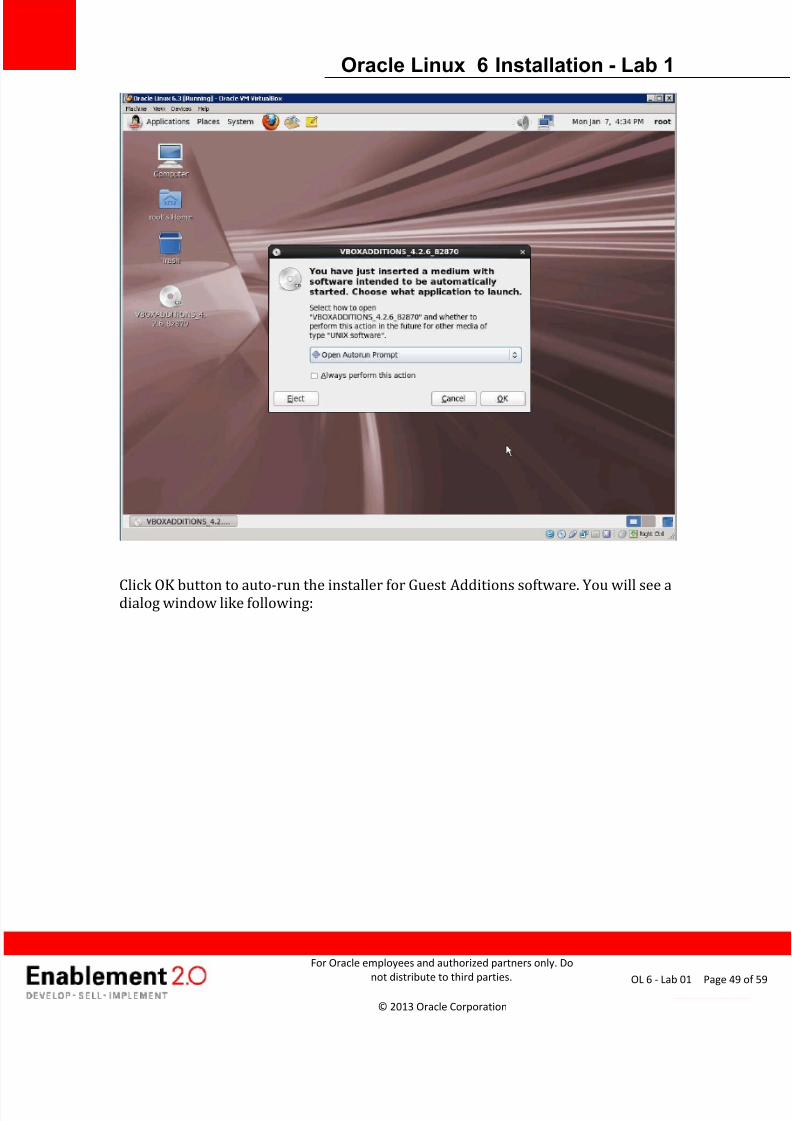
Clicking the Install Guest Additions option will automatically mount the Guest
Additions ISO image file and you will see the prompt dialog box as shown in the
screenshot below.
7/27/2019 Lab1 Oracle Linux 6 Install
http://slidepdf.com/reader/full/lab1-oracle-linux-6-install 49/59
Oracle Linux 6 Installation - Lab 1
For Oracle employees and authorized partners only. Do
not distribute to third parties.
© 2013 Oracle Corporation
Page 49OL 6 - Lab 01
Click OK button to auto-run the installer for Guest Additions software. You will see adialog window like following:

7/27/2019 Lab1 Oracle Linux 6 Install
http://slidepdf.com/reader/full/lab1-oracle-linux-6-install 50/59
Oracle Linux 6 Installation - Lab 1
For Oracle employees and authorized partners only. Do
not distribute to third parties.
© 2013 Oracle Corporation
Page 50OL 6 - Lab 01
Click ‘Run’ to begin running the install script for Guest Additions. You will see a
VirtualBox Guest Additions installation window with install messages. If you see afailure during install, it is most likely due to missing gcc utility or mismatch of kernel
headers/devel package. You may expect to see a screen shot similar to what is
shown below for such failures:
7/27/2019 Lab1 Oracle Linux 6 Install
http://slidepdf.com/reader/full/lab1-oracle-linux-6-install 51/59
Oracle Linux 6 Installation - Lab 1
For Oracle employees and authorized partners only. Do
not distribute to third parties.
© 2013 Oracle Corporation
Page 51OL 6 - Lab 01
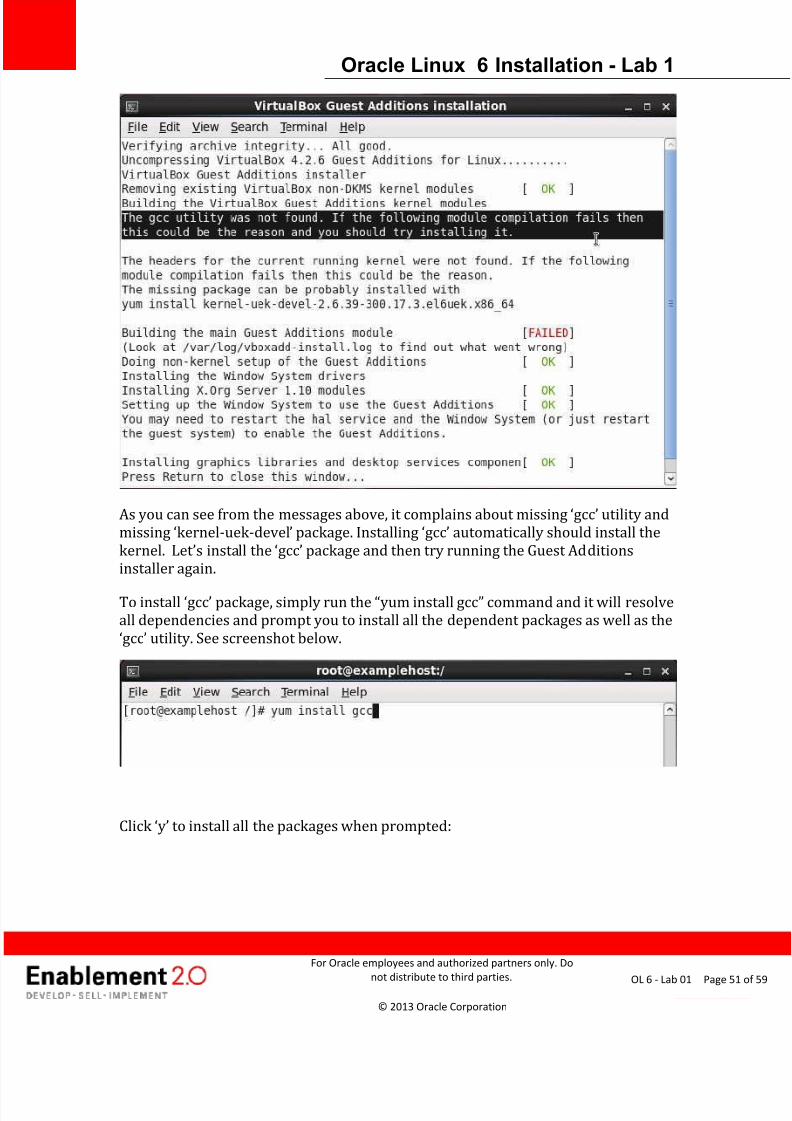
As you can see from the messages above, it complains about missing ‘gcc’ utility and
missing ‘kernel-uek-devel’ package. Installing ‘gcc’ automatically should install the
kernel. Let’s install the ‘gcc’ package and then try running the Guest Additions
installer again.
To install ‘gcc’ package, simply run the “yum install gcc” command and it will resolveall dependencies and prompt you to install all the dependent packages as well as the
‘gcc’ utility. See screenshot below.
Click ‘y’ to install all the packages when prompted:
7/27/2019 Lab1 Oracle Linux 6 Install
http://slidepdf.com/reader/full/lab1-oracle-linux-6-install 52/59
Oracle Linux 6 Installation - Lab 1
For Oracle employees and authorized partners only. Do
not distribute to third parties.
© 2013 Oracle Corporation
Page 52OL 6 - Lab 01
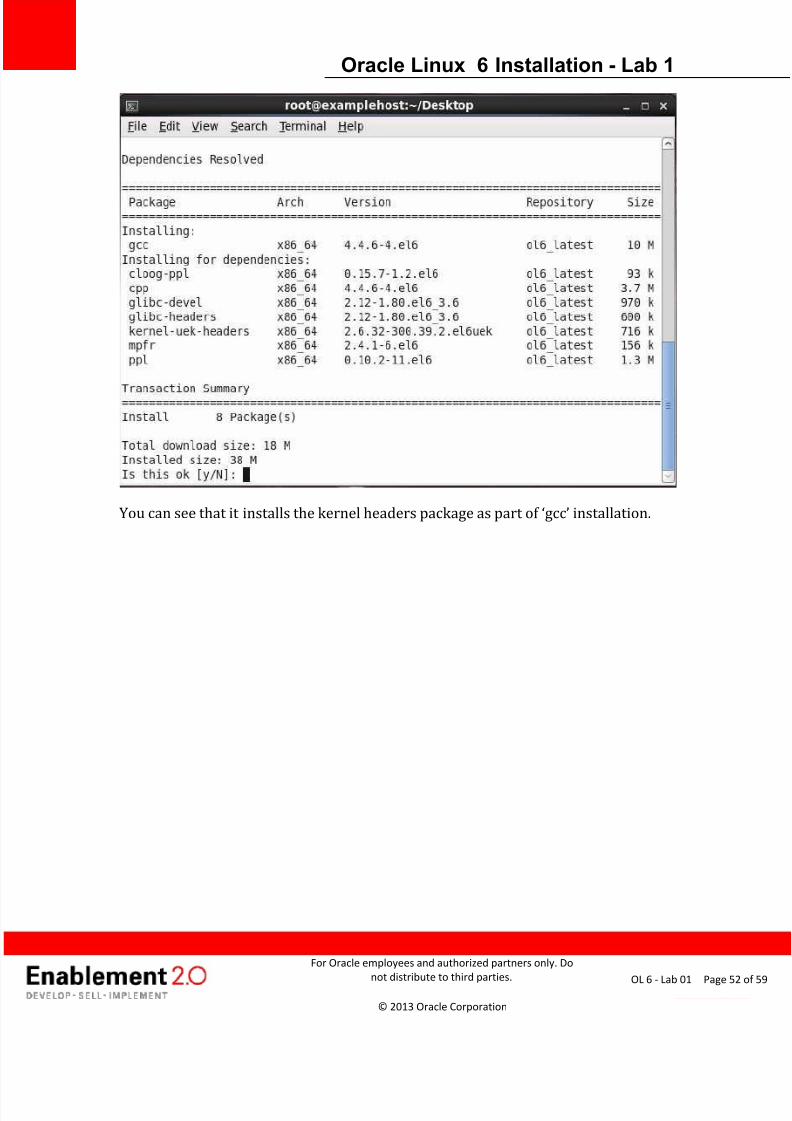
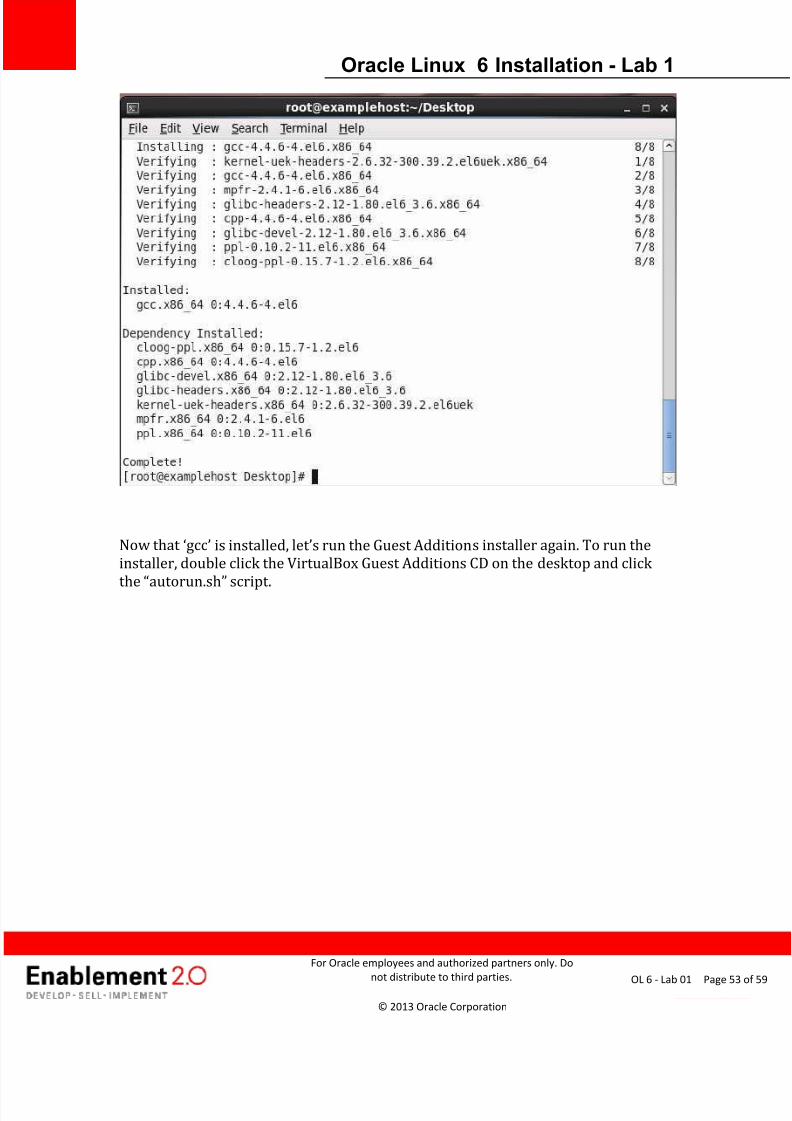
You can see that it installs the kernel headers package as part of ‘gcc’ installation.
7/27/2019 Lab1 Oracle Linux 6 Install
http://slidepdf.com/reader/full/lab1-oracle-linux-6-install 53/59
Oracle Linux 6 Installation - Lab 1
For Oracle employees and authorized partners only. Do
not distribute to third parties.
© 2013 Oracle Corporation
Page 53OL 6 - Lab 01
Now that ‘gcc’ is installed, let’s run the Guest Additions installer again. To run the
installer, double click the VirtualBox Guest Additions CD on the desktop and click
the “autorun.sh” script.
7/27/2019 Lab1 Oracle Linux 6 Install
http://slidepdf.com/reader/full/lab1-oracle-linux-6-install 54/59
Oracle Linux 6 Installation - Lab 1
For Oracle employees and authorized partners only. Do
not distribute to third parties.
© 2013 Oracle Corporation
Page 54OL 6 - Lab 01
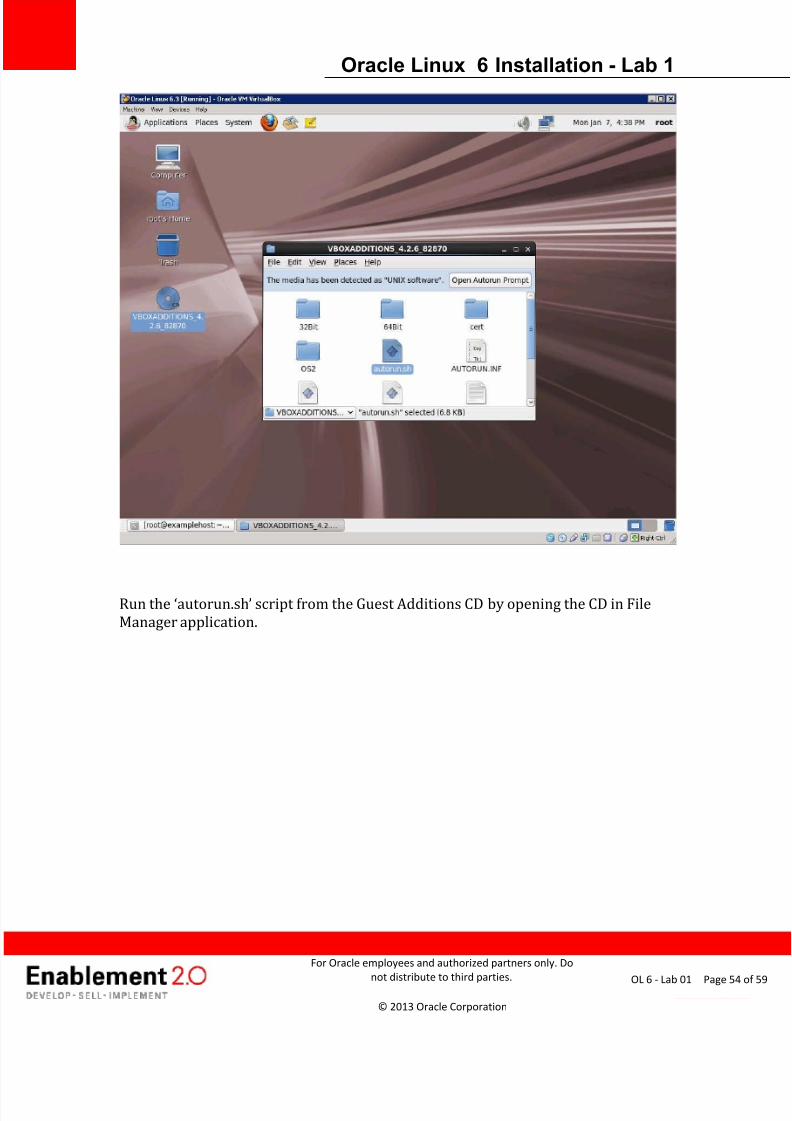
Run the ‘autorun.sh’ script from the Guest Additions CD by opening the CD in File
Manager application.
7/27/2019 Lab1 Oracle Linux 6 Install
http://slidepdf.com/reader/full/lab1-oracle-linux-6-install 55/59
Oracle Linux 6 Installation - Lab 1
For Oracle employees and authorized partners only. Do
not distribute to third parties.
© 2013 Oracle Corporation
Page 55OL 6 - Lab 01
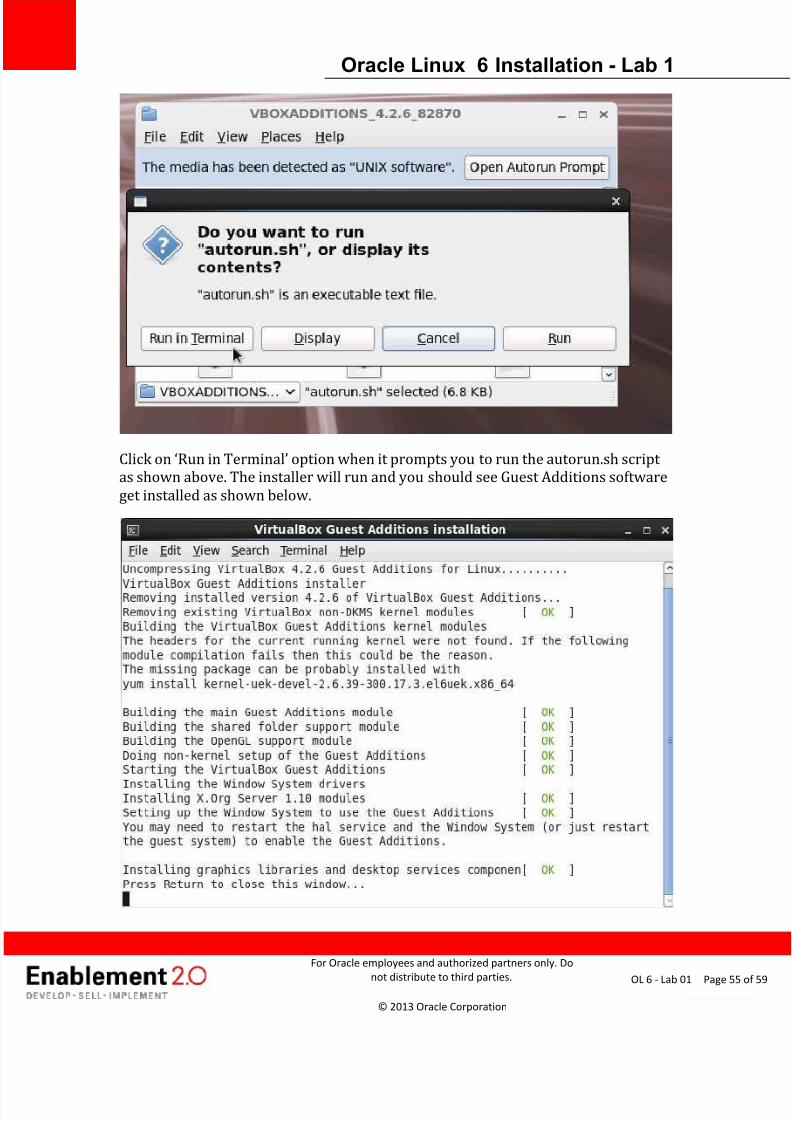
Click on ‘Run in Terminal’ option when it prompts you to run the autorun.sh script as shown above. The installer will run and you should see Guest Additions software
get installed as shown below.
7/27/2019 Lab1 Oracle Linux 6 Install
http://slidepdf.com/reader/full/lab1-oracle-linux-6-install 56/59
Oracle Linux 6 Installation - Lab 1
For Oracle employees and authorized partners only. Do
not distribute to third parties.
© 2013 Oracle Corporation
Page 56OL 6 - Lab 01
You can confirm and see that everything installed OK. Close this VirtualBox Guest
Addition install window. This completes the installation of Guest Additions software
and now you should see better mouse pointer integration between the host and
guest operating systems.
5.6 Snapshot the Virtual Machine
We have our Virtual Machine running Oracle Linux 6.3 with latest patches and also
the Guest Additions software installed. It is a good idea to capture a snapshot of this
Virtual Machine before proceeding with any other labs or any other exercises. We
will use the VirtualBox snapshot feature to create a snapshot of this image.
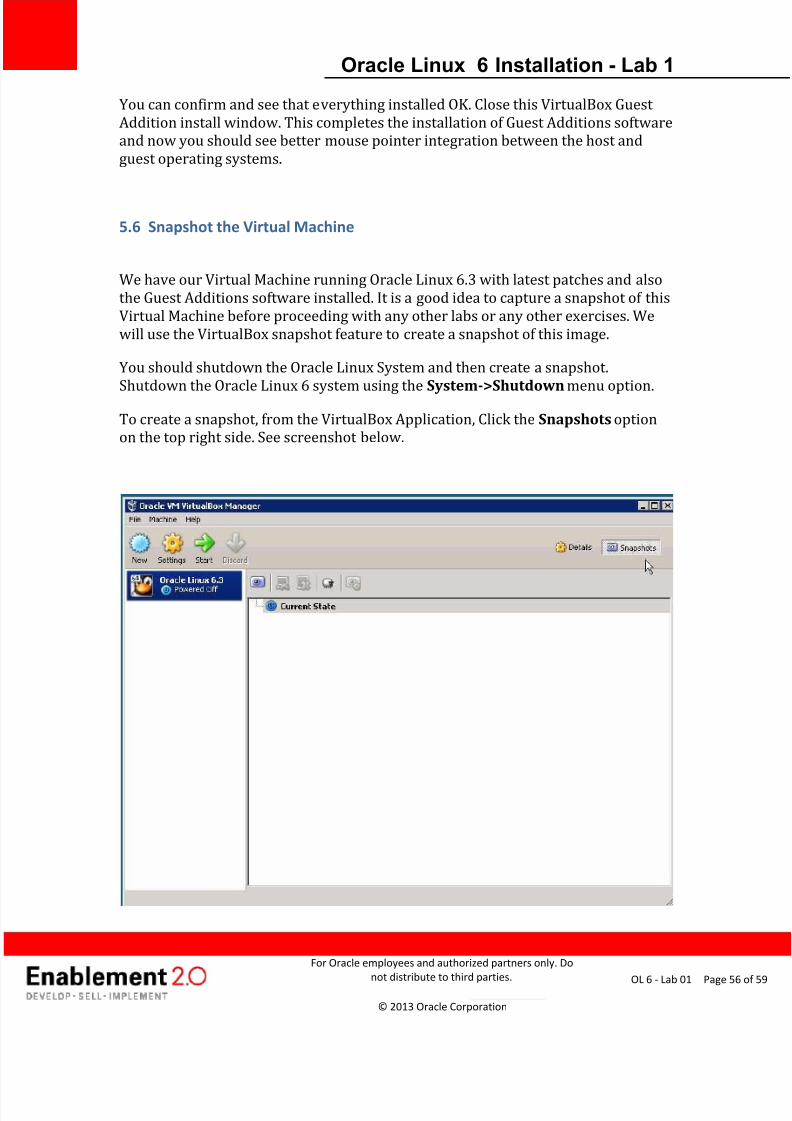
You should shutdown the Oracle Linux System and then create a snapshot.
Shutdown the Oracle Linux 6 system using the System->Shutdown menu option.
To create a snapshot, from the VirtualBox Application, Click the Snapshots option
on the top right side. See screenshot below.
7/27/2019 Lab1 Oracle Linux 6 Install
http://slidepdf.com/reader/full/lab1-oracle-linux-6-install 57/59
Oracle Linux 6 Installation - Lab 1
For Oracle employees and authorized partners only. Do
not distribute to third parties.
© 2013 Oracle Corporation
Page 57OL 6 - Lab 01
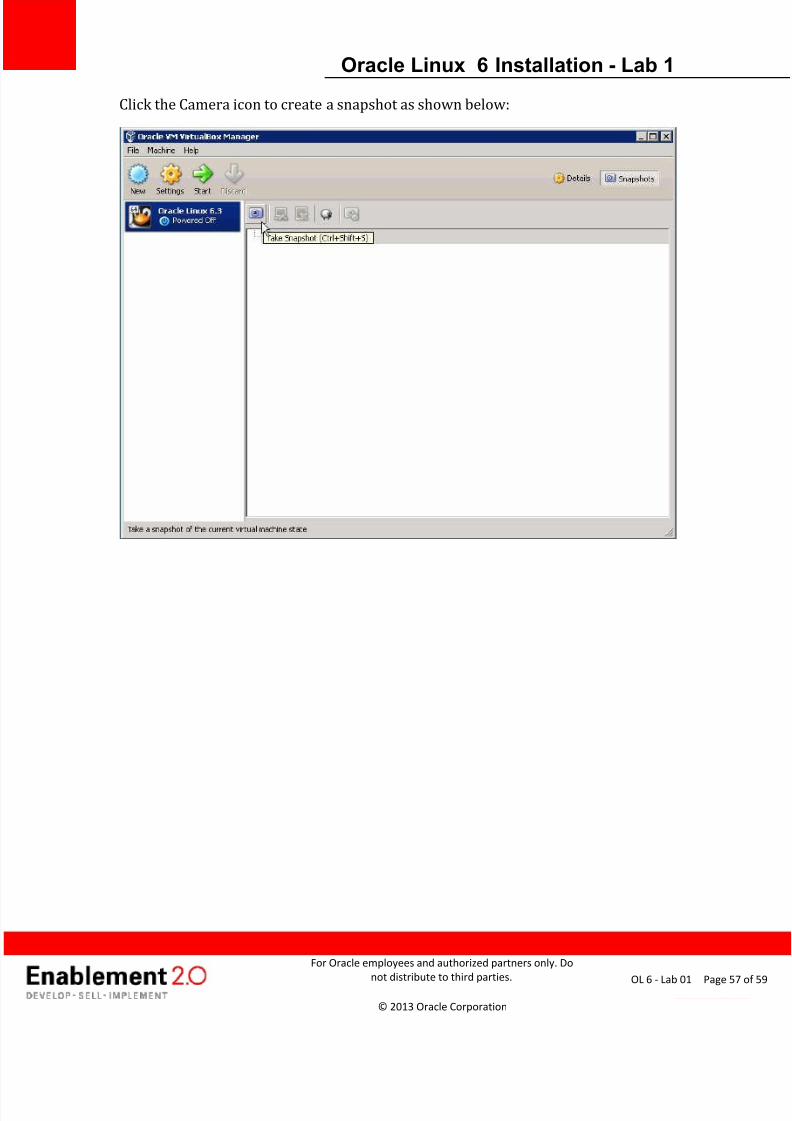
Click the Camera icon to create a snapshot as shown below:
7/27/2019 Lab1 Oracle Linux 6 Install
http://slidepdf.com/reader/full/lab1-oracle-linux-6-install 58/59
Oracle Linux 6 Installation - Lab 1
For Oracle employees and authorized partners only. Do
not distribute to third parties.
© 2013 Oracle Corporation
Page 58OL 6 - Lab 01
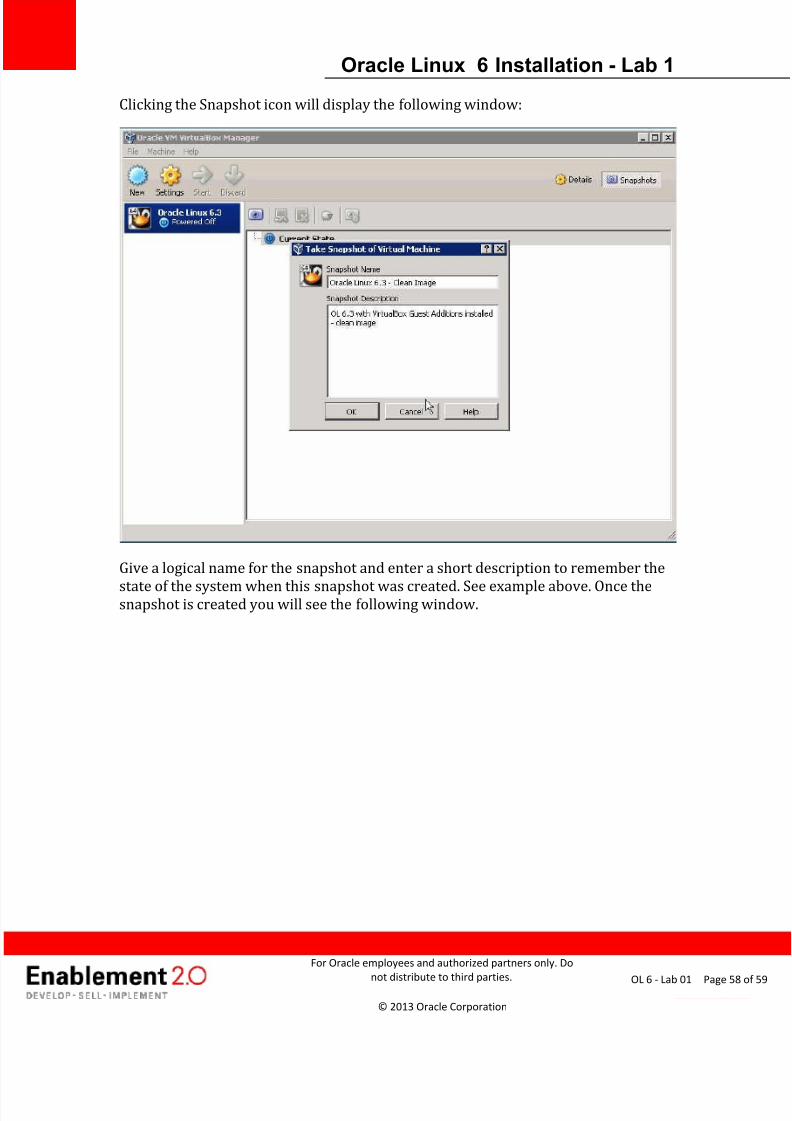
Clicking the Snapshot icon will display the following window:
Give a logical name for the snapshot and enter a short description to remember the
state of the system when this snapshot was created. See example above. Once thesnapshot is created you will see the following window.
7/27/2019 Lab1 Oracle Linux 6 Install
http://slidepdf.com/reader/full/lab1-oracle-linux-6-install 59/59
Oracle Linux 6 Installation - Lab 1
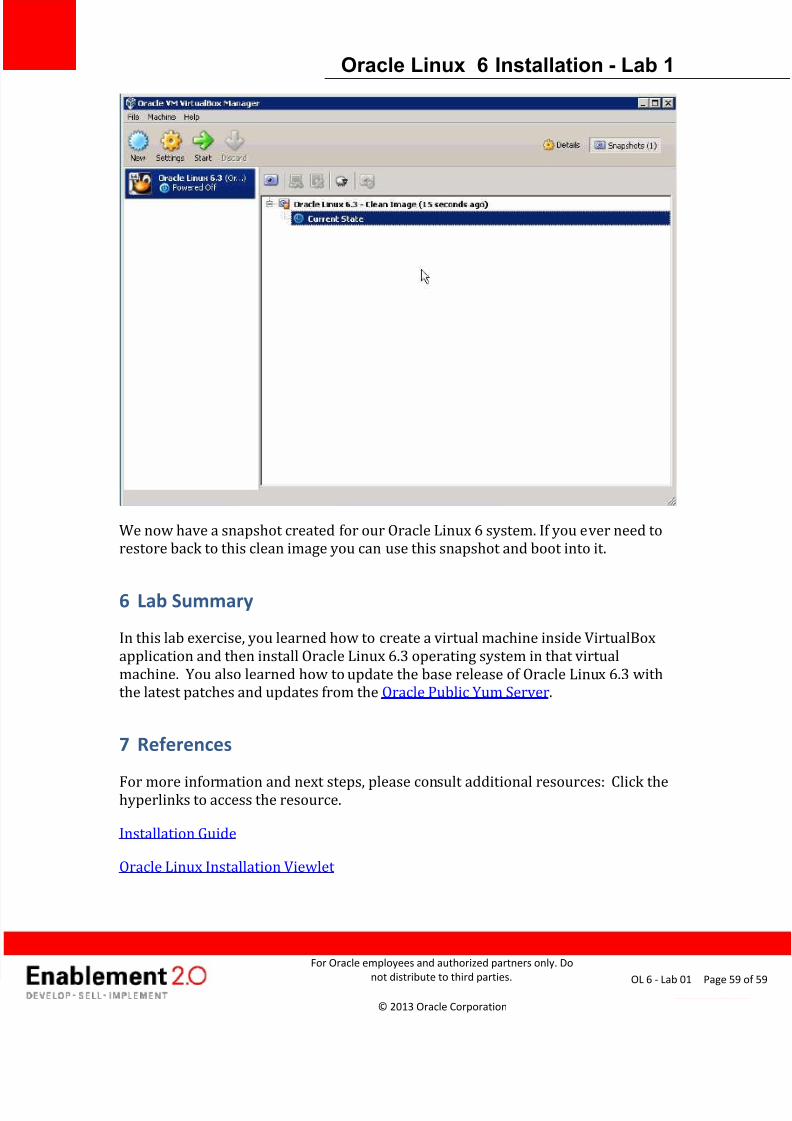
We now have a snapshot created for our Oracle Linux 6 system. If you ever need to
restore back to this clean image you can use this snapshot and boot into it.
6 Lab Summary
In this lab exercise, you learned how to create a virtual machine inside VirtualBox
application and then install Oracle Linux 6.3 operating system in that virtual
machine. You also learned how to update the base release of Oracle Linux 6.3 with
the latest patches and updates from the Oracle Public Yum Server.
7 References
For more information and next steps, please consult additional resources: Click thehyperlinks to access the resource.
Installation Guide