l2 / l3 switches simple network management protocol (snmp ... · pdf filesnmp configuration...
TRANSCRIPT
--
L2 / L3 Switches
Simple Network Management Protocol
(SNMP)
Configuration Guide
Revision 1.0

SNMP Configuration Guide
Supermicro L2/L3 Switches Configuration Guide 2

SNMP Configuration Guide
Supermicro L2/L3 Switches Configuration Guide 3
The information in this USER’S MANUAL has been carefully reviewed and is believed to be accurate. The vendor
assumes no responsibility for any inaccuracies that may be contained in this document, makes no commitment to
update or to keep current the information in this manual, or to notify any person organization of the updates.
Please Note: For the most up-to-date version of this manual, please see our web site at www.supermicro.com.
Super Micro Computer, Inc. (“Supermicro”) reserves the right to make changes to the product described in this
manual at any time and without notice. This product, including software, if any, and documentation may not, in
whole or in part, be copied, photocopied, reproduced, translated or reduced to any medium or machine without
prior written consent.
IN NO EVENT WILL SUPERMICRO BE LIABLE FOR DIRECT, INDIRECT, SPECIAL, INCIDENTAL, SPECULATIVE OR
CONSEQUENTIAL DAMAGES ARISING FROM THE USE OR INABILITY TO USETHIS PRODUCT OR DOCUMENTATION,
EVEN IF ADVISED OF THE POSSIBILITY OF SUCHDAMAGES. IN PARTICULAR, SUPERMICRO SHALL NOT HAVE
LIABILITY FOR ANY HARDWARE,SOFTWARE, OR DATA STORED OR USED WITH THE PRODUCT, INCLUDING THE
COSTS OFREPAIRING, REPLACING, INTEGRATING, INSTALLING OR RECOVERING SUCH HARDWARE,SOFTWARE, OR
DATA.
Any disputes arising between manufacturer and customer shall be governed by the laws of Santa Clara County in
the State of California, USA. The State of California, County of Santa Clara shall be the exclusive venue for the
resolution of any such disputes. Super Micro's total liability for all claims will not exceed the price paid for the
hardware product.
FCC Statement: This equipment has been tested and found to comply with the limits for a Class A digital device
pursuant to Part 15 of the FCC Rules. These limits are designed to provide reasonable protection against harmful
interference when the equipment is operated in a commercial environment. This equipment generates, uses, and
can radiate radio frequency energy and, if not installed and used in accordance with the manufacturer’s instruction
manual, may cause harmful interference with radio communications. Operation of this equipment in a residential
area is likely to cause harmful interference, in which case you will be required to correct the interference at your
own expense.
California Best Management Practices Regulations for Perchlorate Materials: This Perchlorate warning applies only
to products containing CR (Manganese Dioxide) Lithium coin cells. Perchlorate Material-special handling may
apply. See http://www.dtsc.ca.gov/hazardouswaste/perchlorate/ for further details.
Manual Revision 1.0
Release Date: August 15, 2013
Unless you request and receive written permission from Super Micro Computer, Inc., you may not copy any part of
this document.
Information in this document is subject to change without notice. Other products and companies referred to
herein are trademarks or registered trademarks of their respective companies or mark holders.
Copyright © 2013 by Super Micro Computer, Inc.
All rights reserved.
Printed in the United States of America
SNMP Configuration Guide
Supermicro L2/L3 Switches Configuration Guide 4
Contents 1 SNMP Configuration Guide ................................................................................................................... 5
1.1 SNMP Basics .................................................................................................................................. 5
1.2 SNMP Support ............................................................................................................................... 7
1.3 Interface Numbers ........................................................................................................................ 8
1.4 SNMP Defaults .............................................................................................................................. 9
1.5 Enable/Disable SNMP Agent ....................................................................................................... 10
1.6 Access control ............................................................................................................................. 10
1.6.1 Engine Identifier .................................................................................................................. 11
1.6.2 Community .......................................................................................................................... 12
1.6.3 User ..................................................................................................................................... 13
1.6.4 Group .................................................................................................................................. 15
1.6.5 View..................................................................................................................................... 17
1.6.6 Group Access ....................................................................................................................... 19
1.7 Trap ............................................................................................................................................. 21
1.7.1 Target Address .................................................................................................................... 21
1.7.2 Target Parameters .............................................................................................................. 22
1.7.3 SNMP Notify ........................................................................................................................ 24
1.7.4 Trap UDP Port ..................................................................................................................... 26
1.7.5 Authentication traps ........................................................................................................... 27
1.8 Sub-Agent .................................................................................................................................... 27
1.9 SNMP configuration example ..................................................................................................... 29
SNMP Configuration Guide
Supermicro L2/L3 Switches Configuration Guide 5
1 SNMP Configuration Guide
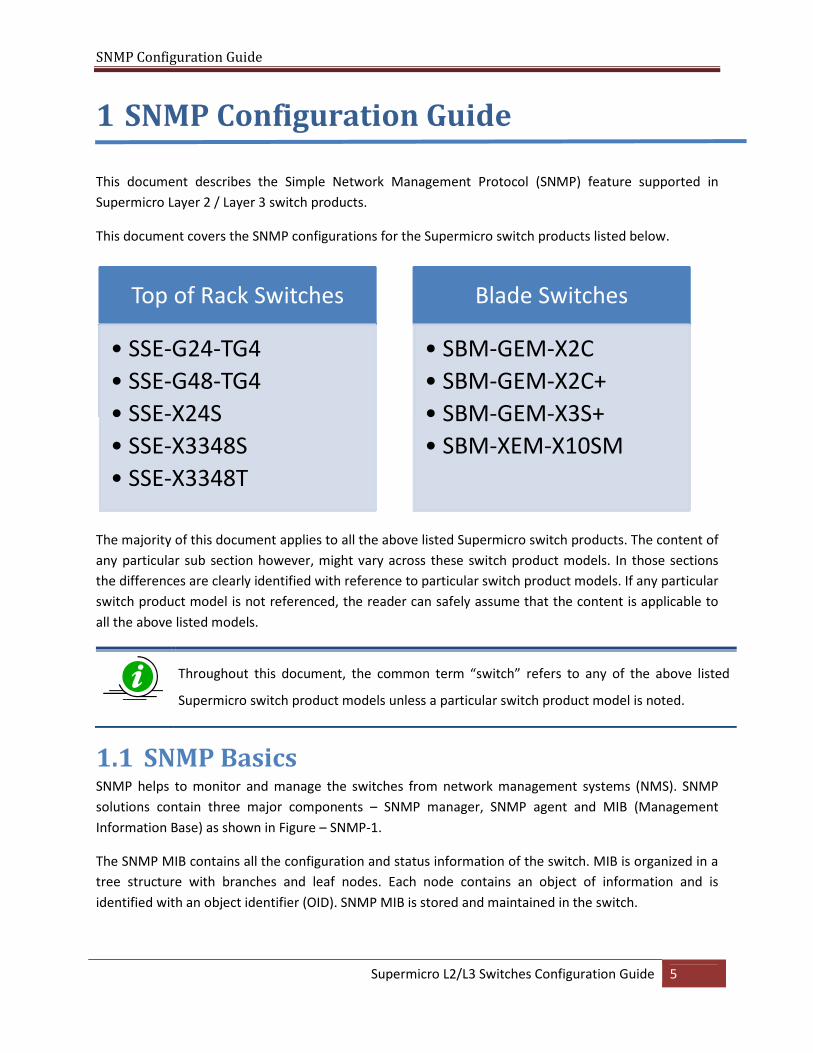
This document describes the Simple Network Management Protocol (SNMP) feature supported in
Supermicro Layer 2 / Layer 3 switch products.
This document covers the SNMP configurations for the Supermicro switch products listed below.
The majority of this document applies to all the above listed Supermicro switch products. The content of
any particular sub section however, might vary across these switch product models. In those sections
the differences are clearly identified with reference to particular switch product models. If any particular
switch product model is not referenced, the reader can safely assume that the content is applicable to
all the above listed models.
Throughout this document, the common term “switch” refers to any of the above listed
Supermicro switch product models unless a particular switch product model is noted.
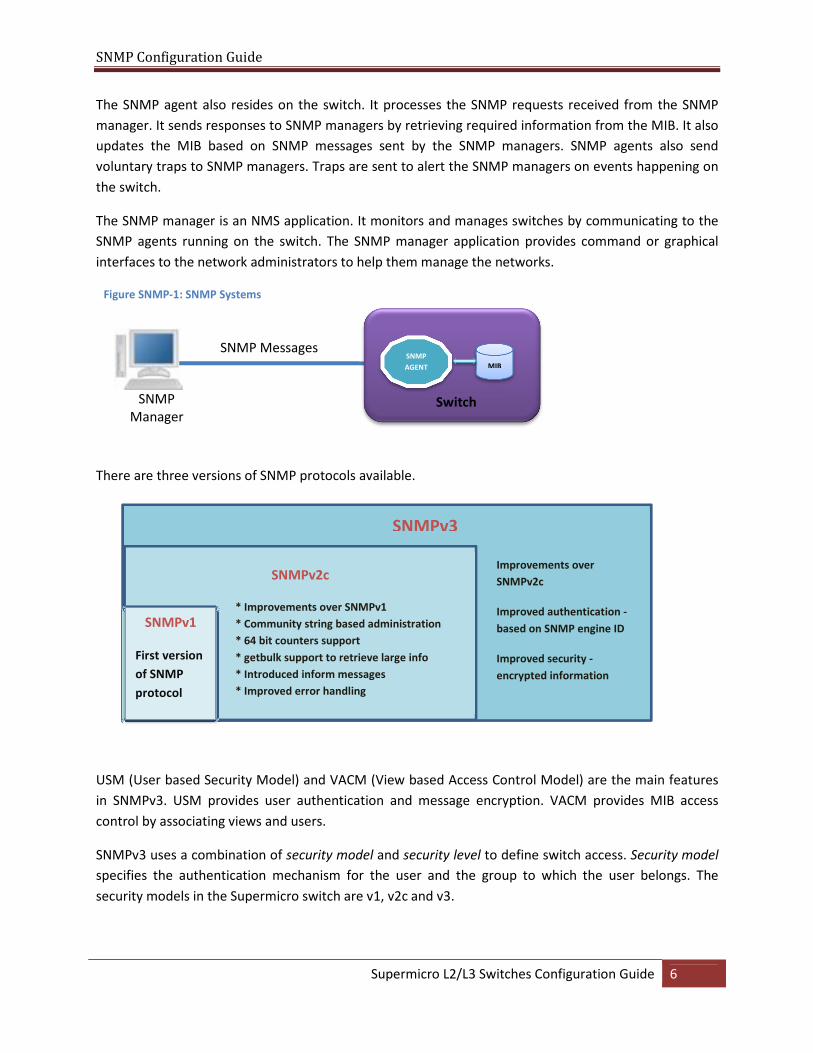
1.1 SNMP Basics SNMP helps to monitor and manage the switches from network management systems (NMS). SNMP
solutions contain three major components – SNMP manager, SNMP agent and MIB (Management
Information Base) as shown in Figure – SNMP-1.
The SNMP MIB contains all the configuration and status information of the switch. MIB is organized in a
tree structure with branches and leaf nodes. Each node contains an object of information and is
identified with an object identifier (OID). SNMP MIB is stored and maintained in the switch.
Top of Rack Switches
• SSE-G24-TG4
• SSE-G48-TG4
• SSE-X24S
• SSE-X3348S
• SSE-X3348T
Blade Switches
• SBM-GEM-X2C
• SBM-GEM-X2C+
• SBM-GEM-X3S+
• SBM-XEM-X10SM
SNMP Configuration Guide
Supermicro L2/L3 Switches Configuration Guide 6
The SNMP agent also resides on the switch. It processes the SNMP requests received from the SNMP
manager. It sends responses to SNMP managers by retrieving required information from the MIB. It also
updates the MIB based on SNMP messages sent by the SNMP managers. SNMP agents also send
voluntary traps to SNMP managers. Traps are sent to alert the SNMP managers on events happening on
the switch.
The SNMP manager is an NMS application. It monitors and manages switches by communicating to the
SNMP agents running on the switch. The SNMP manager application provides command or graphical
interfaces to the network administrators to help them manage the networks.
There are three versions of SNMP protocols available.
USM (User based Security Model) and VACM (View based Access Control Model) are the main features
in SNMPv3. USM provides user authentication and message encryption. VACM provides MIB access
control by associating views and users.
SNMPv3 uses a combination of security model and security level to define switch access. Security model
specifies the authentication mechanism for the user and the group to which the user belongs. The
security models in the Supermicro switch are v1, v2c and v3.
SNMP
Manager
MIB
SNMP
AGENT
Switch
SNMP Messages
Figure SNMP-1: SNMP Systems
SNMPv2c
SNMPv1
First version
of SNMP
protocol
* Improvements over SNMPv1
* Community string based administration
* 64 bit counters support
* getbulk support to retrieve large info
* Introduced inform messages
* Improved error handling
SNMPv3
Improvements over
SNMPv2c
Improved authentication -
based on SNMP engine ID
Improved security -
encrypted information
SNMP Configuration Guide
Supermicro L2/L3 Switches Configuration Guide 7
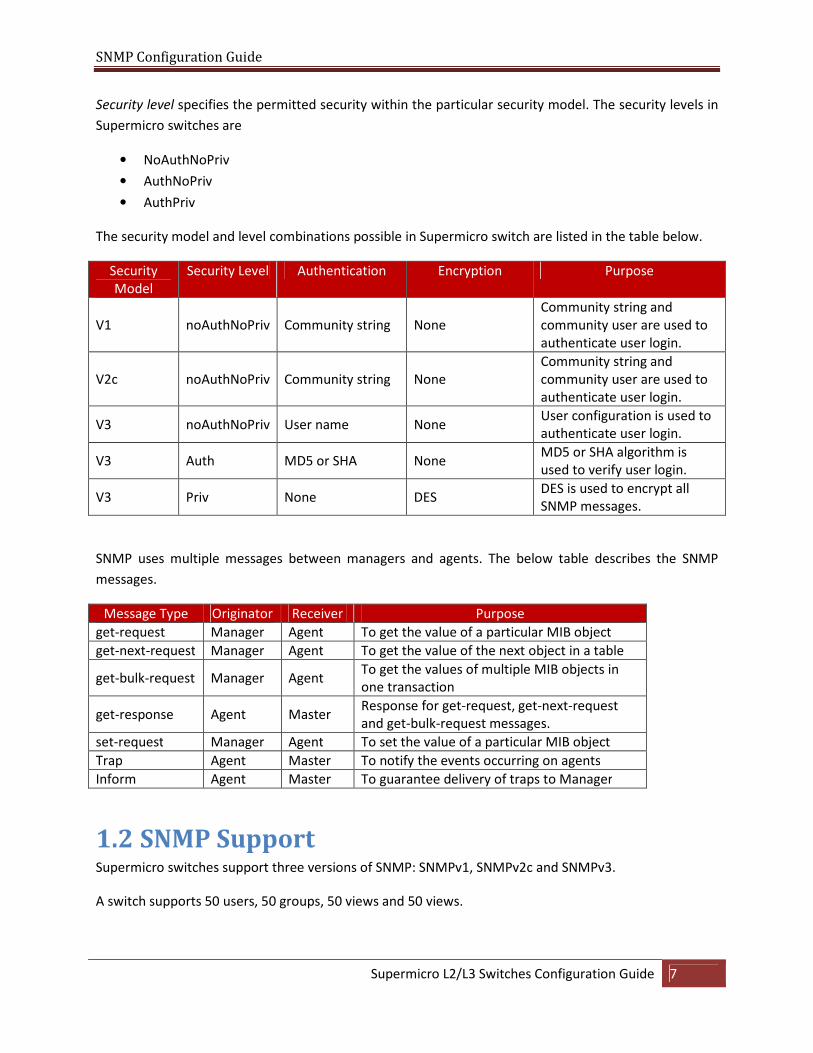
Security level specifies the permitted security within the particular security model. The security levels in
Supermicro switches are
• NoAuthNoPriv
• AuthNoPriv
• AuthPriv
The security model and level combinations possible in Supermicro switch are listed in the table below.
Security
Model
Security Level Authentication Encryption Purpose
V1 noAuthNoPriv Community string None
Community string and
community user are used to
authenticate user login.
V2c noAuthNoPriv Community string None
Community string and
community user are used to
authenticate user login.
V3 noAuthNoPriv User name None User configuration is used to
authenticate user login.
V3 Auth MD5 or SHA None MD5 or SHA algorithm is
used to verify user login.
V3 Priv None DES DES is used to encrypt all
SNMP messages.
SNMP uses multiple messages between managers and agents. The below table describes the SNMP
messages.
Message Type Originator Receiver Purpose
get-request Manager Agent To get the value of a particular MIB object
get-next-request Manager Agent To get the value of the next object in a table
get-bulk-request Manager Agent To get the values of multiple MIB objects in
one transaction
get-response Agent Master Response for get-request, get-next-request
and get-bulk-request messages.
set-request Manager Agent To set the value of a particular MIB object
Trap Agent Master To notify the events occurring on agents
Inform Agent Master To guarantee delivery of traps to Manager
1.2 SNMP Support Supermicro switches support three versions of SNMP: SNMPv1, SNMPv2c and SNMPv3.
A switch supports 50 users, 50 groups, 50 views and 50 views.
SNMP Configuration Guide
Supermicro L2/L3 Switches Configuration Guide 8
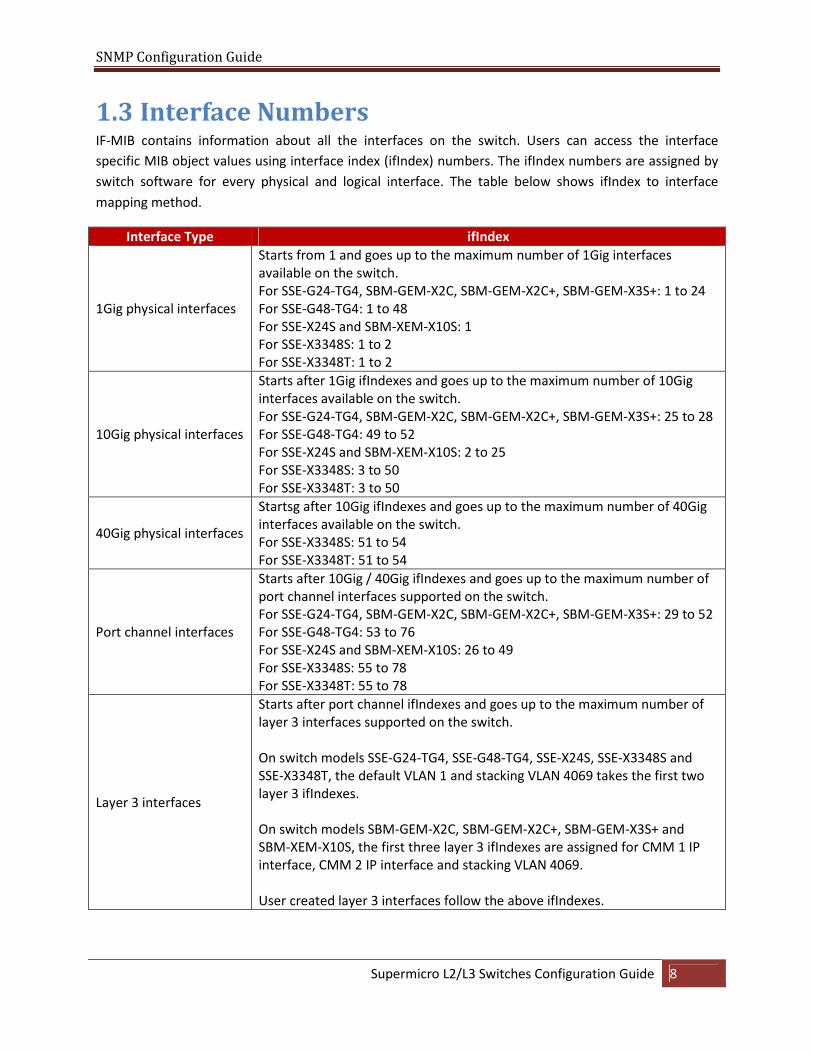
1.3 Interface Numbers IF-MIB contains information about all the interfaces on the switch. Users can access the interface
specific MIB object values using interface index (ifIndex) numbers. The ifIndex numbers are assigned by
switch software for every physical and logical interface. The table below shows ifIndex to interface
mapping method.
Interface Type ifIndex
1Gig physical interfaces
Starts from 1 and goes up to the maximum number of 1Gig interfaces
available on the switch.
For SSE-G24-TG4, SBM-GEM-X2C, SBM-GEM-X2C+, SBM-GEM-X3S+: 1 to 24
For SSE-G48-TG4: 1 to 48
For SSE-X24S and SBM-XEM-X10S: 1
For SSE-X3348S: 1 to 2
For SSE-X3348T: 1 to 2
10Gig physical interfaces
Starts after 1Gig ifIndexes and goes up to the maximum number of 10Gig
interfaces available on the switch.
For SSE-G24-TG4, SBM-GEM-X2C, SBM-GEM-X2C+, SBM-GEM-X3S+: 25 to 28
For SSE-G48-TG4: 49 to 52
For SSE-X24S and SBM-XEM-X10S: 2 to 25
For SSE-X3348S: 3 to 50
For SSE-X3348T: 3 to 50
40Gig physical interfaces
Startsg after 10Gig ifIndexes and goes up to the maximum number of 40Gig
interfaces available on the switch.
For SSE-X3348S: 51 to 54
For SSE-X3348T: 51 to 54
Port channel interfaces
Starts after 10Gig / 40Gig ifIndexes and goes up to the maximum number of
port channel interfaces supported on the switch.
For SSE-G24-TG4, SBM-GEM-X2C, SBM-GEM-X2C+, SBM-GEM-X3S+: 29 to 52
For SSE-G48-TG4: 53 to 76
For SSE-X24S and SBM-XEM-X10S: 26 to 49
For SSE-X3348S: 55 to 78
For SSE-X3348T: 55 to 78
Layer 3 interfaces
Starts after port channel ifIndexes and goes up to the maximum number of
layer 3 interfaces supported on the switch.
On switch models SSE-G24-TG4, SSE-G48-TG4, SSE-X24S, SSE-X3348S and
SSE-X3348T, the default VLAN 1 and stacking VLAN 4069 takes the first two
layer 3 ifIndexes.
On switch models SBM-GEM-X2C, SBM-GEM-X2C+, SBM-GEM-X3S+ and
SBM-XEM-X10S, the first three layer 3 ifIndexes are assigned for CMM 1 IP
interface, CMM 2 IP interface and stacking VLAN 4069.
User created layer 3 interfaces follow the above ifIndexes.
SNMP Configuration Guide
Supermicro L2/L3 Switches Configuration Guide 9
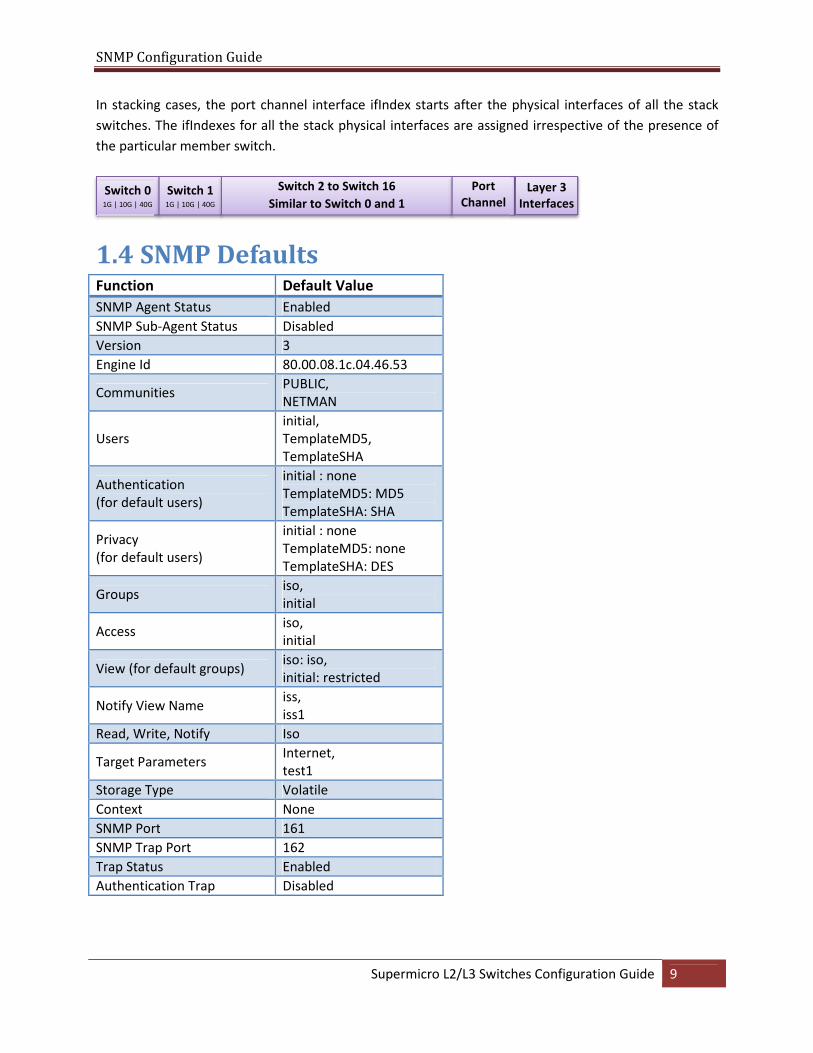
In stacking cases, the port channel interface ifIndex starts after the physical interfaces of all the stack
switches. The ifIndexes for all the stack physical interfaces are assigned irrespective of the presence of
the particular member switch.
1.4 SNMP Defaults Function Default Value
SNMP Agent Status Enabled
SNMP Sub-Agent Status Disabled
Version 3
Engine Id 80.00.08.1c.04.46.53
Communities PUBLIC,
NETMAN
Users
initial,
TemplateMD5,
TemplateSHA
Authentication
(for default users)
initial : none
TemplateMD5: MD5
TemplateSHA: SHA
Privacy
(for default users)
initial : none
TemplateMD5: none
TemplateSHA: DES
Groups iso,
initial
Access iso,
initial
View (for default groups) iso: iso,
initial: restricted
Notify View Name iss,
iss1
Read, Write, Notify Iso
Target Parameters Internet,
test1
Storage Type Volatile
Context None
SNMP Port 161
SNMP Trap Port 162
Trap Status Enabled
Authentication Trap Disabled
Switch 0 1G | 10G | 40G
Switch 1 1G | 10G | 40G
Switch 2 to Switch 16
Similar to Switch 0 and 1
Port
Channel
Layer 3
Interfaces
SNMP Configuration Guide
Supermicro L2/L3 Switches Configuration Guide 10
1.5 Enable/Disable the SNMP Agent The SNMP Agent is enabled by default in Supermicro switches.
Follow the steps below to disable the SNMP agent.
Step Command Description Step 1 configure terminal Enters the configuration mode
Step 2 disable snmpagent
Disables the SNMP agent
Step 3 end Exits the configuration mode.
Step 4 show snmp
Displays the SNMP information.
Step 5 write startup-config Optional step – saves this SNMP
configuration to be part of the startup
configuration.
The “enable snmp agent” command enables the SNMP agent.
To enable the SNMP agent, it must be in the disabled state. The SNMP subagent is disabled
by default. If needed, use the command “disable snmp subagent” to disable the SNMP
subagent feature.
The examples below show ways to disable/enable the SNMP agent function on Supermicro switches.
Disable the SNMP agent.
SMIS# configure terminal
SMIS(config)# disable snmpagent
SMIS(config)# end
Enable the SNMP agent.
SMIS# configure terminal
SMIS(config)# enable snmpagent
SMIS(config)# end
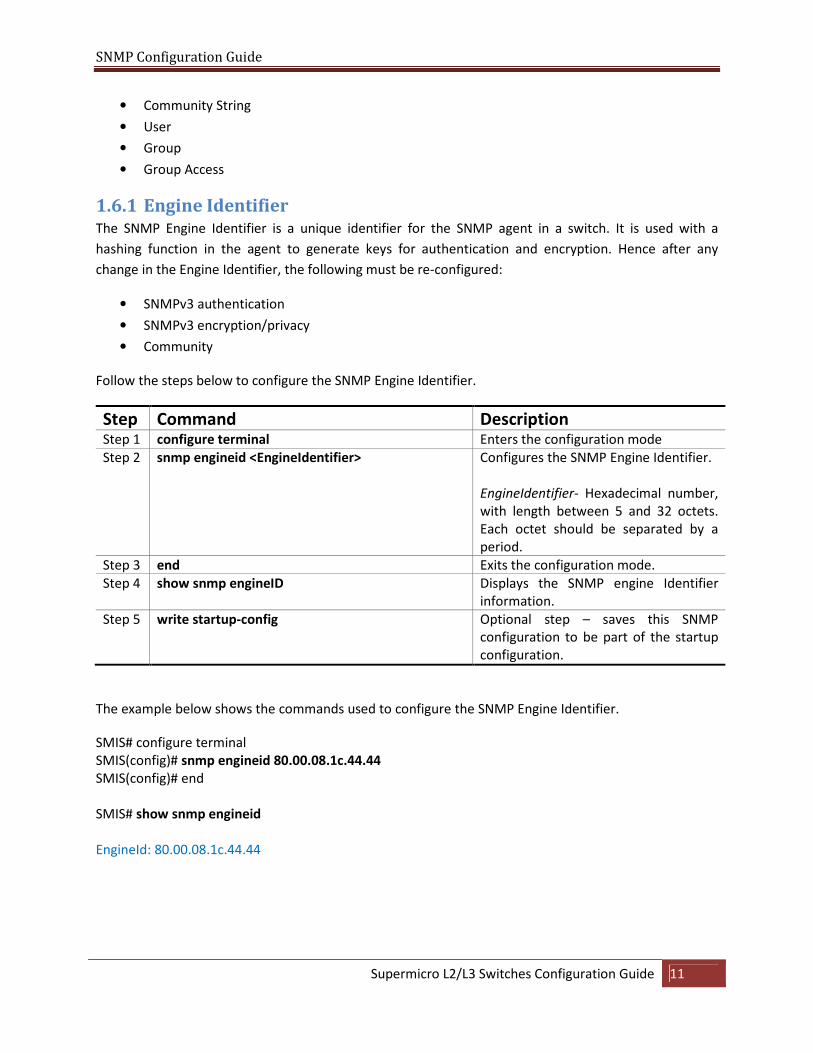
1.6 Access Control There are various parameters that control access to the SNMP Agent.
• Engine ID
SNMP Configuration Guide
Supermicro L2/L3 Switches Configuration Guide 11
• Community String
• User
• Group
• Group Access
1.6.1 Engine Identifier The SNMP Engine Identifier is a unique identifier for the SNMP agent in a switch. It is used with a
hashing function in the agent to generate keys for authentication and encryption. Hence after any
change in the Engine Identifier, the following must be re-configured:
• SNMPv3 authentication
• SNMPv3 encryption/privacy
• Community
Follow the steps below to configure the SNMP Engine Identifier.
Step Command Description Step 1 configure terminal Enters the configuration mode
Step 2 snmp engineid <EngineIdentifier> Configures the SNMP Engine Identifier.
EngineIdentifier- Hexadecimal number,
with length between 5 and 32 octets.
Each octet should be separated by a
period.
Step 3 end Exits the configuration mode.
Step 4 show snmp engineID
Displays the SNMP engine Identifier
information.
Step 5 write startup-config Optional step – saves this SNMP
configuration to be part of the startup
configuration.
The example below shows the commands used to configure the SNMP Engine Identifier.
SMIS# configure terminal
SMIS(config)# snmp engineid 80.00.08.1c.44.44
SMIS(config)# end
SMIS# show snmp engineid
EngineId: 80.00.08.1c.44.44
SNMP Configuration Guide
Supermicro L2/L3 Switches Configuration Guide 12
The “no snmp engineid” command resets the SNMP engineid to its default value of
80.00.08.1c.04.46.53.
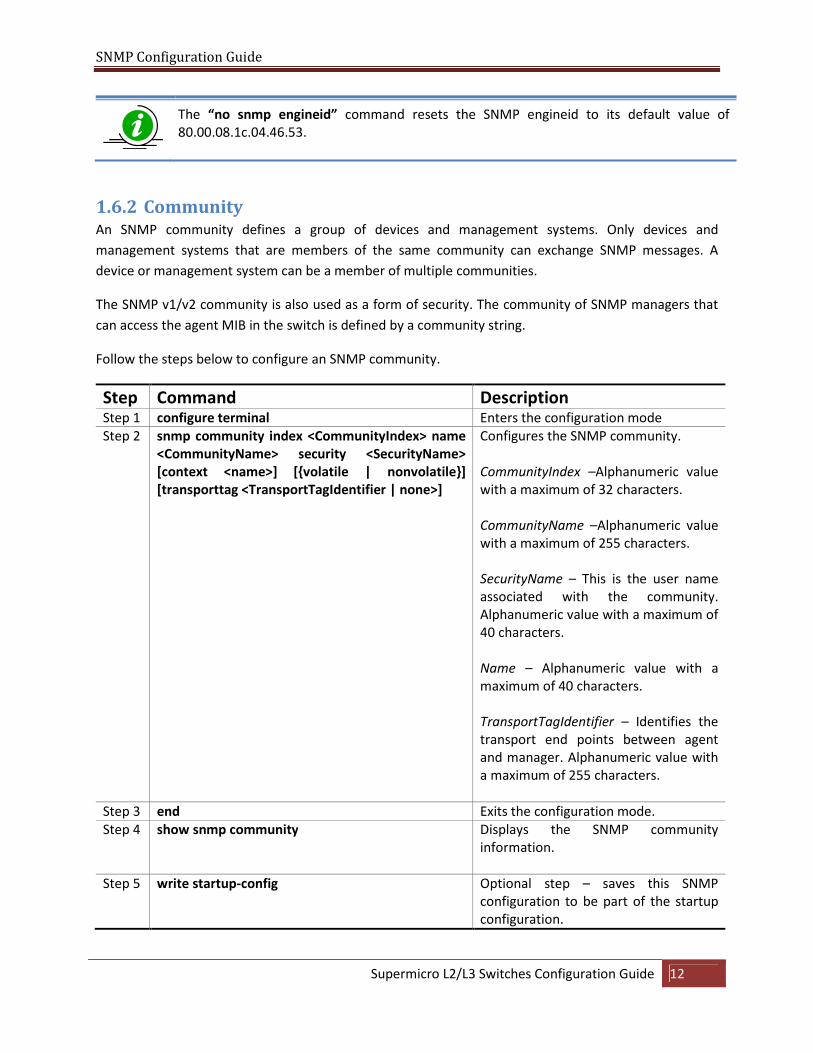
1.6.2 Community An SNMP community defines a group of devices and management systems. Only devices and
management systems that are members of the same community can exchange SNMP messages. A
device or management system can be a member of multiple communities.
The SNMP v1/v2 community is also used as a form of security. The community of SNMP managers that
can access the agent MIB in the switch is defined by a community string.
Follow the steps below to configure an SNMP community.
Step Command Description Step 1 configure terminal Enters the configuration mode
Step 2 snmp community index <CommunityIndex> name
<CommunityName> security <SecurityName>
[context <name>] [{volatile | nonvolatile}]
[transporttag <TransportTagIdentifier | none>]
Configures the SNMP community.
CommunityIndex –Alphanumeric value
with a maximum of 32 characters.
CommunityName –Alphanumeric value
with a maximum of 255 characters.
SecurityName – This is the user name
associated with the community.
Alphanumeric value with a maximum of
40 characters.
Name – Alphanumeric value with a
maximum of 40 characters.
TransportTagIdentifier – Identifies the
transport end points between agent
and manager. Alphanumeric value with
a maximum of 255 characters.
Step 3 end Exits the configuration mode.
Step 4 show snmp community
Displays the SNMP community
information.
Step 5 write startup-config Optional step – saves this SNMP
configuration to be part of the startup
configuration.

SNMP Configuration Guide
Supermicro L2/L3 Switches Configuration Guide 13
The “no snmp community index <CommunityIndex> ” command deletes the specified
community index.
The example below shows the commands used to configure the SNMP community.
SMIS(config)# snmp community index test1 name test1 security user1 nonvolatile
SMIS(config)# show snmp community
Community Index: NETMAN
Community Name: NETMAN
Security Name: none
Context Name:
Transport Tag:
Storage Type: Volatile
Row Status: Active
------------------------------
Community Index: PUBLIC
Community Name : PUBLIC
Security Name: none
Context Name :
Transport Tag:
Storage Type: Volatile
Row Status: Active
------------------------------
Community Index: test1
Community Name: test1
Security Name: user1
Context Name:
Transport Tag:
Storage Type: Non-volatile
Row Status: Active
------------------------------
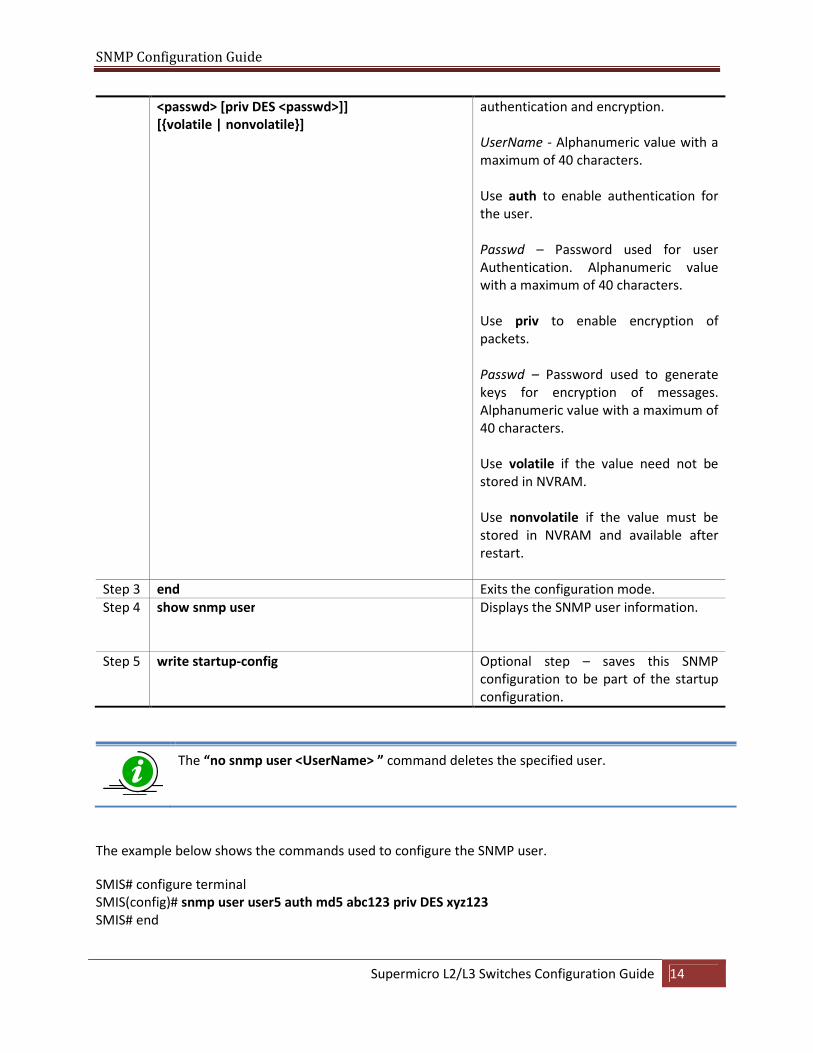
1.6.3 User SNMP user configuration is used only for SNMPv3. An SNMP user requests and receives information
about switch status and traps.
Follow the steps below to configure an SNMP user.
Step Command Description Step 1 configure terminal Enters the configuration mode
Step 2 snmp user <UserName> [auth {md5 | sha} Configures the SNMP user,
SNMP Configuration Guide
Supermicro L2/L3 Switches Configuration Guide 14
<passwd> [priv DES <passwd>]]
[{volatile | nonvolatile}]
authentication and encryption.
UserName - Alphanumeric value with a
maximum of 40 characters.
Use auth to enable authentication for
the user.
Passwd – Password used for user
Authentication. Alphanumeric value
with a maximum of 40 characters.
Use priv to enable encryption of
packets.
Passwd – Password used to generate
keys for encryption of messages.
Alphanumeric value with a maximum of
40 characters.
Use volatile if the value need not be
stored in NVRAM.
Use nonvolatile if the value must be
stored in NVRAM and available after
restart.
Step 3 end Exits the configuration mode.
Step 4 show snmp user
Displays the SNMP user information.
Step 5 write startup-config Optional step – saves this SNMP
configuration to be part of the startup
configuration.
The “no snmp user <UserName> ” command deletes the specified user.
The example below shows the commands used to configure the SNMP user.
SMIS# configure terminal
SMIS(config)# snmp user user5 auth md5 abc123 priv DES xyz123
SMIS# end
SNMP Configuration Guide
Supermicro L2/L3 Switches Configuration Guide 15
SMIS# show snmp user
Engine ID: 80.00.08.1c.04.46.53
User: user5
Authentication Protocol: MD5
Privacy Protocol: DES_CBC
Storage Type: Volatile
Row Status: Active
------------------------------
Engine ID: 80.00.08.1c.04.46.53
User: initial
Authentication Protocol: None
Privacy Protocol: None
Storage Type: Volatile
Row Status: Active
------------------------------
Engine ID: 80.00.08.1c.04.46.53
User: templateMD5
Authentication Protocol: MD5
Privacy Protocol: None
Storage Type: Volatile
Row Status: Active
------------------------------
Engine ID: 80.00.08.1c.04.46.53
User: templateSHA
Authentication Protocol: SHA
Privacy Protocol: DES_CBC
Storage Type: Volatile
Row Status: Active
------------------------------
1.6.4 Group A group identifies a set of users in SNMPv3.
Follow the steps below to configure an SNMP group.
Step Command Description Step 1 configure terminal Enters the configuration mode
Step 2 snmp group <GroupName> user <UserName>
security-model {v1 | v2c | v3 } [{volatile |
nonvolatile}]
Configures the SNMP group.
GroupName – Alphanumeric value with
a maximum of 40 characters.
Security-model – Use v1 or v2c or v3.
UserName - Alphanumeric value with a
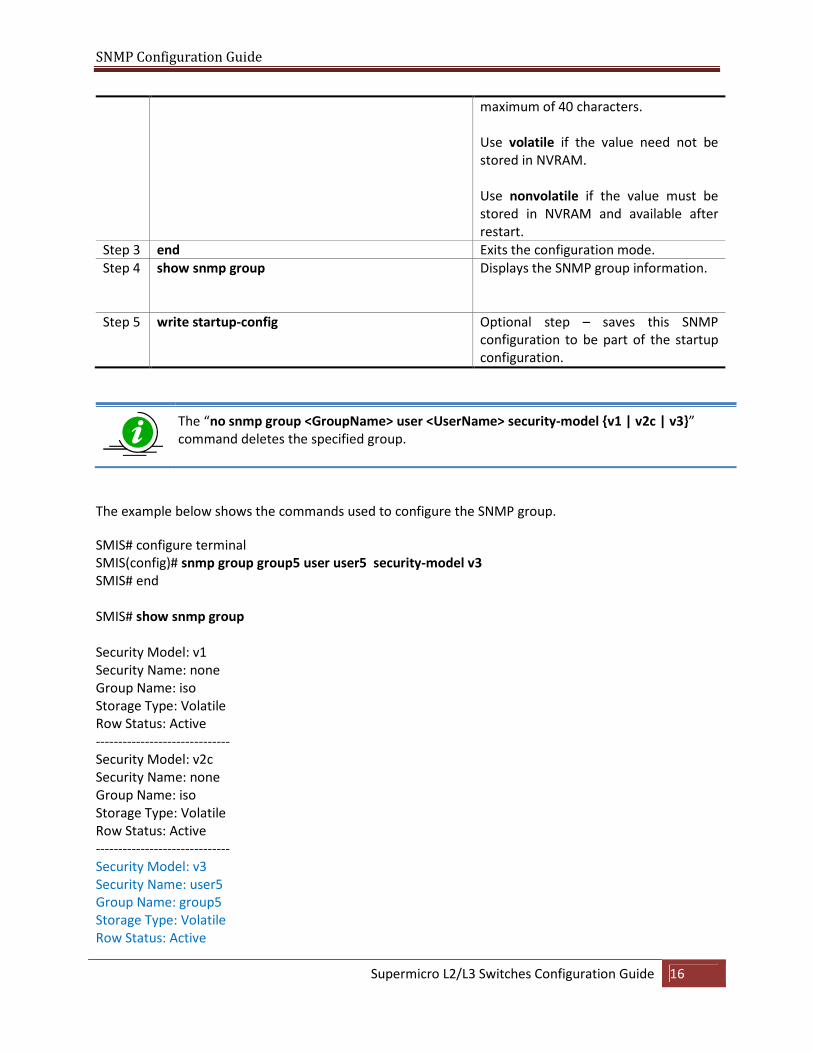
SNMP Configuration Guide
Supermicro L2/L3 Switches Configuration Guide 16
maximum of 40 characters.
Use volatile if the value need not be
stored in NVRAM.
Use nonvolatile if the value must be
stored in NVRAM and available after
restart.
Step 3 end Exits the configuration mode.
Step 4 show snmp group
Displays the SNMP group information.
Step 5 write startup-config Optional step – saves this SNMP
configuration to be part of the startup
configuration.
The “no snmp group <GroupName> user <UserName> security-model {v1 | v2c | v3}”
command deletes the specified group.
The example below shows the commands used to configure the SNMP group.
SMIS# configure terminal
SMIS(config)# snmp group group5 user user5 security-model v3
SMIS# end
SMIS# show snmp group
Security Model: v1
Security Name: none
Group Name: iso
Storage Type: Volatile
Row Status: Active
------------------------------
Security Model: v2c
Security Name: none
Group Name: iso
Storage Type: Volatile
Row Status: Active
------------------------------
Security Model: v3
Security Name: user5
Group Name: group5
Storage Type: Volatile
Row Status: Active
SNMP Configuration Guide
Supermicro L2/L3 Switches Configuration Guide 17
------------------------------
Security Model: v3
Security Name: initial
Group Name: initial
Storage Type: Non-volatile
Row Status: Active
------------------------------
Security Model: v3
Security Name: templateMD5
Group Name: initial
Storage Type: Non-volatile
Row Status: Active
------------------------------
Security Model: v3
Security Name: templateSHA
Group Name: initial
Storage Type: Non-volatile
Row Status: Active
------------------------------
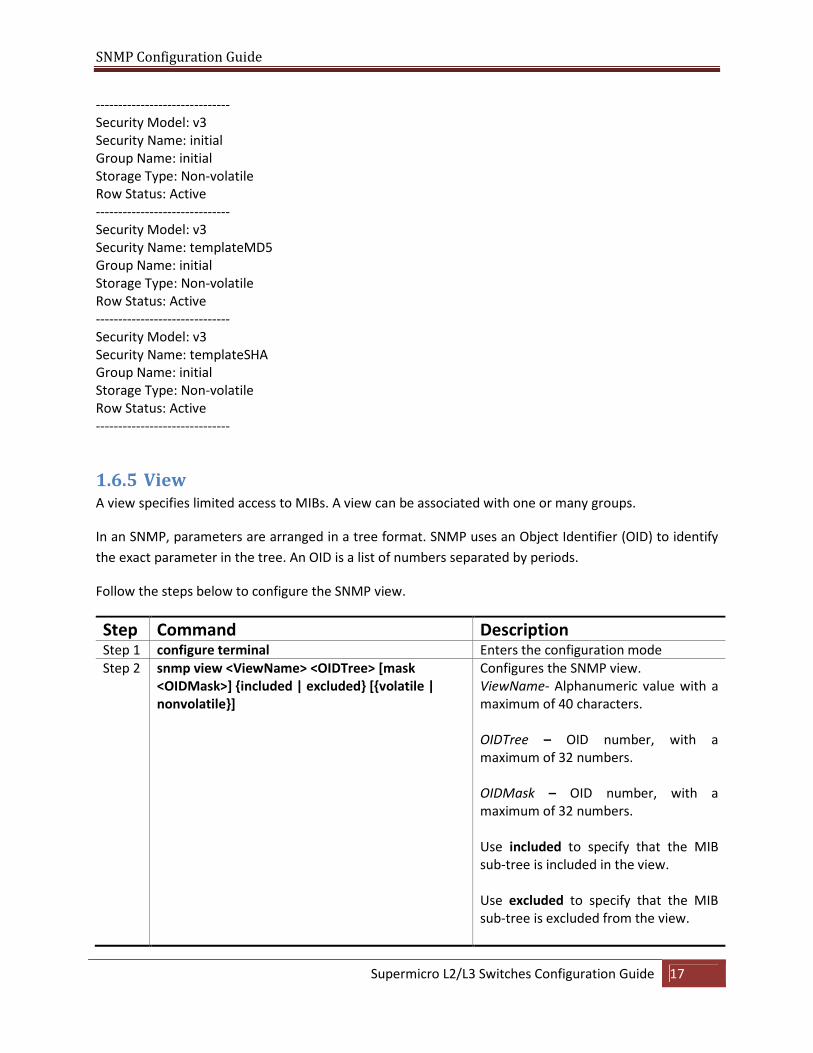
1.6.5 View A view specifies limited access to MIBs. A view can be associated with one or many groups.
In an SNMP, parameters are arranged in a tree format. SNMP uses an Object Identifier (OID) to identify
the exact parameter in the tree. An OID is a list of numbers separated by periods.
Follow the steps below to configure the SNMP view.
Step Command Description Step 1 configure terminal Enters the configuration mode
Step 2 snmp view <ViewName> <OIDTree> [mask
<OIDMask>] {included | excluded} [{volatile |
nonvolatile}]
Configures the SNMP view.
ViewName- Alphanumeric value with a
maximum of 40 characters.
OIDTree – OID number, with a
maximum of 32 numbers.
OIDMask – OID number, with a
maximum of 32 numbers.
Use included to specify that the MIB
sub-tree is included in the view.
Use excluded to specify that the MIB
sub-tree is excluded from the view.
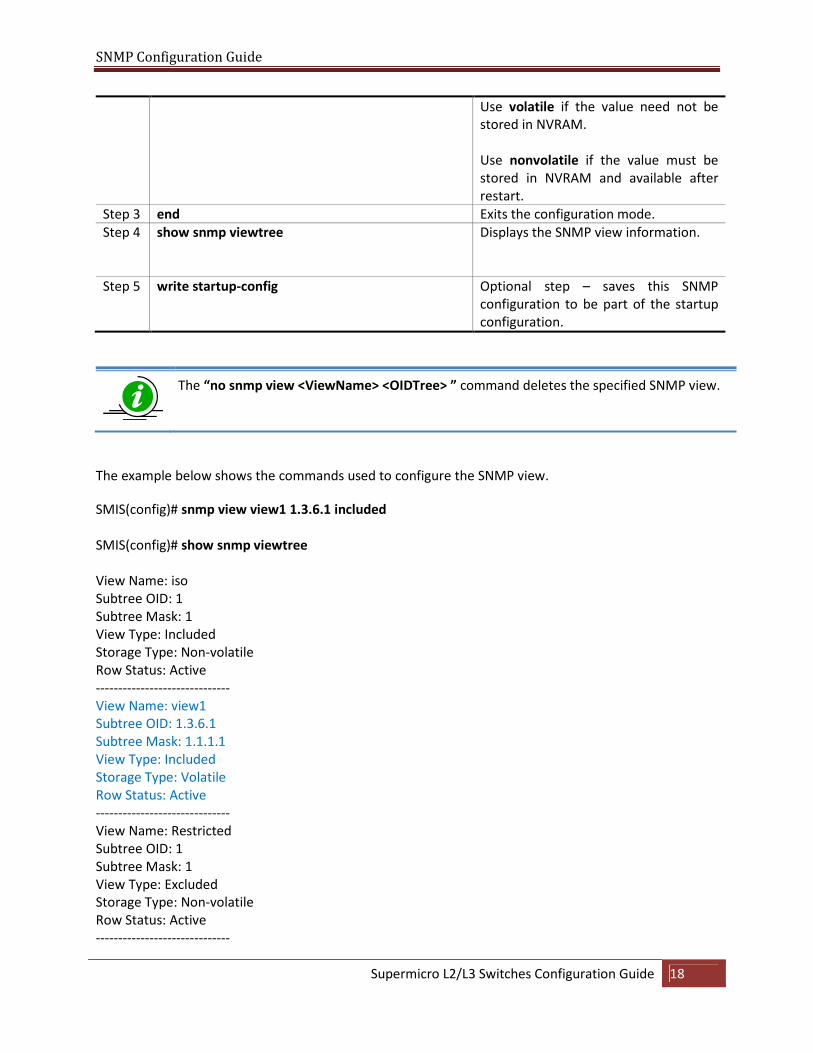
SNMP Configuration Guide
Supermicro L2/L3 Switches Configuration Guide 18
Use volatile if the value need not be
stored in NVRAM.
Use nonvolatile if the value must be
stored in NVRAM and available after
restart.
Step 3 end Exits the configuration mode.
Step 4 show snmp viewtree
Displays the SNMP view information.
Step 5 write startup-config Optional step – saves this SNMP
configuration to be part of the startup
configuration.
The “no snmp view <ViewName> <OIDTree> ” command deletes the specified SNMP view.
The example below shows the commands used to configure the SNMP view.
SMIS(config)# snmp view view1 1.3.6.1 included
SMIS(config)# show snmp viewtree
View Name: iso
Subtree OID: 1
Subtree Mask: 1
View Type: Included
Storage Type: Non-volatile
Row Status: Active
------------------------------
View Name: view1
Subtree OID: 1.3.6.1
Subtree Mask: 1.1.1.1
View Type: Included
Storage Type: Volatile
Row Status: Active
------------------------------
View Name: Restricted
Subtree OID: 1
Subtree Mask: 1
View Type: Excluded
Storage Type: Non-volatile
Row Status: Active
------------------------------
SNMP Configuration Guide
Supermicro L2/L3 Switches Configuration Guide 19
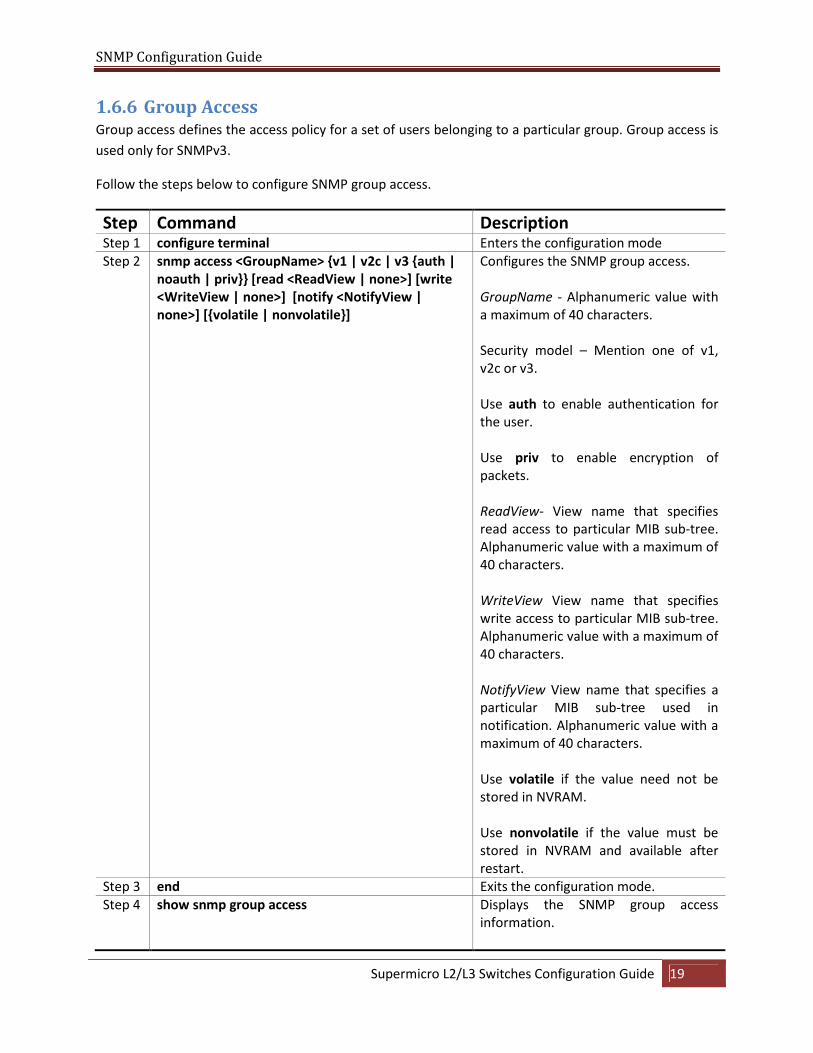
1.6.6 Group Access Group access defines the access policy for a set of users belonging to a particular group. Group access is
used only for SNMPv3.
Follow the steps below to configure SNMP group access.
Step Command Description Step 1 configure terminal Enters the configuration mode
Step 2 snmp access <GroupName> {v1 | v2c | v3 {auth |
noauth | priv}} [read <ReadView | none>] [write
<WriteView | none>] [notify <NotifyView |
none>] [{volatile | nonvolatile}]
Configures the SNMP group access.
GroupName - Alphanumeric value with
a maximum of 40 characters.
Security model – Mention one of v1,
v2c or v3.
Use auth to enable authentication for
the user.
Use priv to enable encryption of
packets.
ReadView- View name that specifies
read access to particular MIB sub-tree.
Alphanumeric value with a maximum of
40 characters.
WriteView View name that specifies
write access to particular MIB sub-tree.
Alphanumeric value with a maximum of
40 characters.
NotifyView View name that specifies a
particular MIB sub-tree used in
notification. Alphanumeric value with a
maximum of 40 characters.
Use volatile if the value need not be
stored in NVRAM.
Use nonvolatile if the value must be
stored in NVRAM and available after
restart.
Step 3 end Exits the configuration mode.
Step 4 show snmp group access
Displays the SNMP group access
information.
SNMP Configuration Guide
Supermicro L2/L3 Switches Configuration Guide 20
Step 5 write startup-config Optional step – saves this SNMP
configuration to be part of startup
configuration.
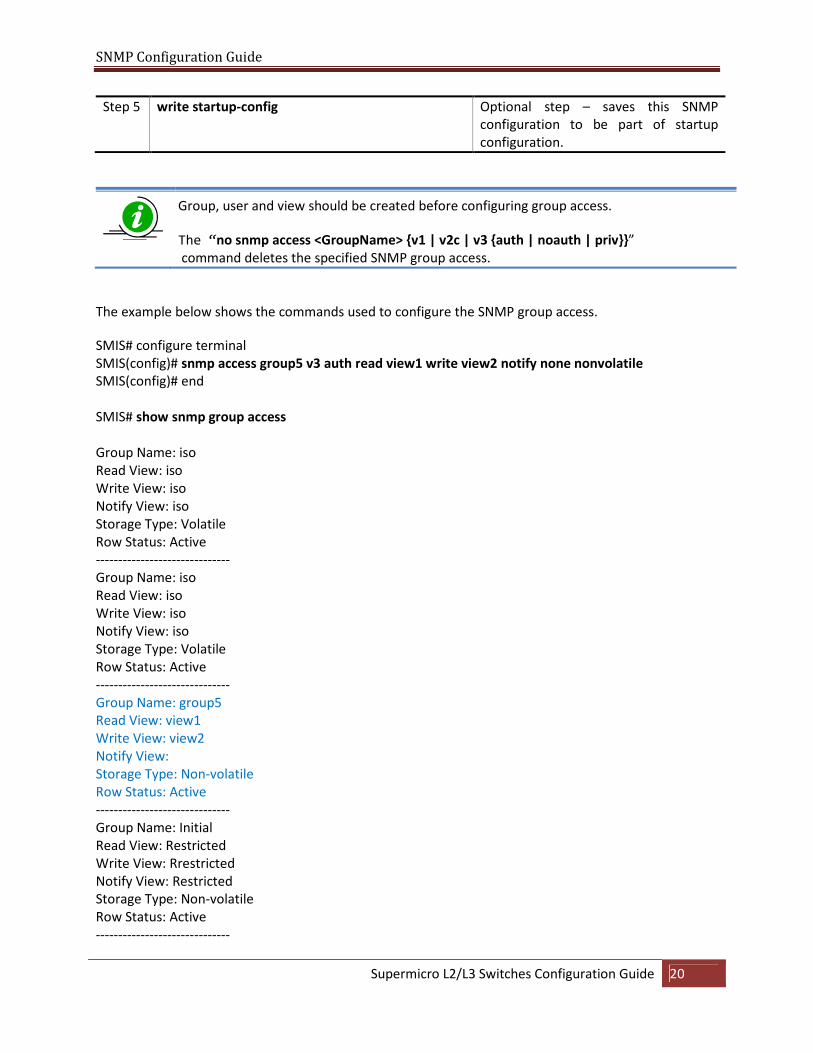
Group, user and view should be created before configuring group access.
The “no snmp access <GroupName> {v1 | v2c | v3 {auth | noauth | priv}}”
command deletes the specified SNMP group access.
The example below shows the commands used to configure the SNMP group access.
SMIS# configure terminal
SMIS(config)# snmp access group5 v3 auth read view1 write view2 notify none nonvolatile
SMIS(config)# end
SMIS# show snmp group access
Group Name: iso
Read View: iso
Write View: iso
Notify View: iso
Storage Type: Volatile
Row Status: Active
------------------------------
Group Name: iso
Read View: iso
Write View: iso
Notify View: iso
Storage Type: Volatile
Row Status: Active
------------------------------
Group Name: group5
Read View: view1
Write View: view2
Notify View:
Storage Type: Non-volatile
Row Status: Active
------------------------------
Group Name: Initial
Read View: Restricted
Write View: Rrestricted
Notify View: Restricted
Storage Type: Non-volatile
Row Status: Active
------------------------------
SNMP Configuration Guide
Supermicro L2/L3 Switches Configuration Guide 21
Group Name: Initial
Read View: iso
Write View: iso
Notify View: iso
Storage Type: Non-volatile
Row Status: Active
------------------------------
Group Name: initial
Read View: iso
Write View: iso
Notify View: iso
Storage Type: Non-volatile
Row Status: Active
------------------------------
1.7 Trap
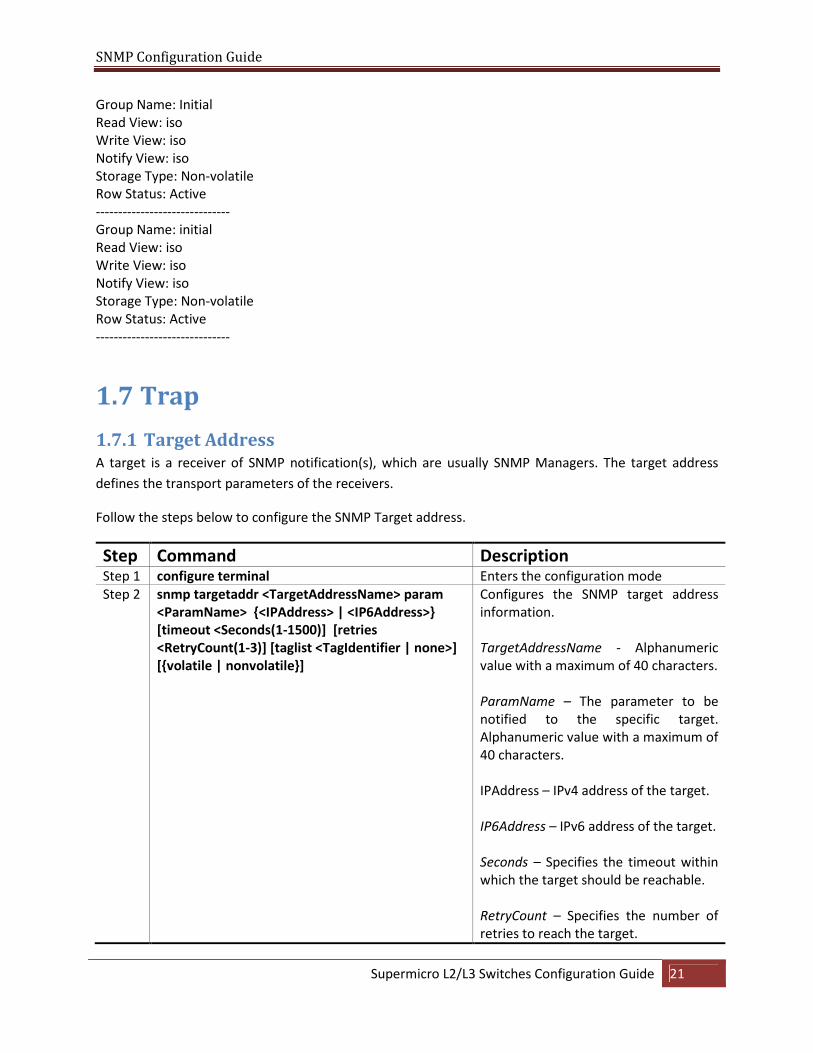
1.7.1 Target Address A target is a receiver of SNMP notification(s), which are usually SNMP Managers. The target address
defines the transport parameters of the receivers.
Follow the steps below to configure the SNMP Target address.
Step Command Description Step 1 configure terminal Enters the configuration mode
Step 2 snmp targetaddr <TargetAddressName> param
<ParamName> {<IPAddress> | <IP6Address>}
[timeout <Seconds(1-1500)] [retries
<RetryCount(1-3)] [taglist <TagIdentifier | none>]
[{volatile | nonvolatile}]
Configures the SNMP target address
information.
TargetAddressName - Alphanumeric
value with a maximum of 40 characters.
ParamName – The parameter to be
notified to the specific target.
Alphanumeric value with a maximum of
40 characters.
IPAddress – IPv4 address of the target.
IP6Address – IPv6 address of the target.
Seconds – Specifies the timeout within
which the target should be reachable.
RetryCount – Specifies the number of
retries to reach the target.
SNMP Configuration Guide
Supermicro L2/L3 Switches Configuration Guide 22
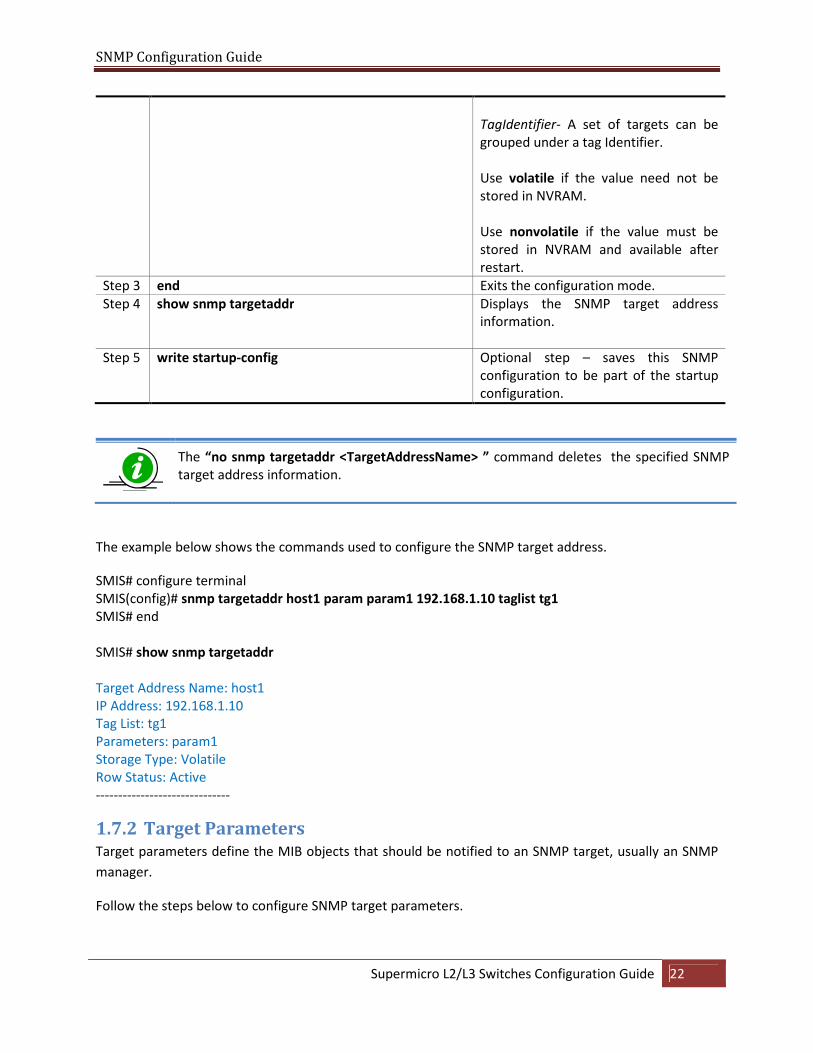
TagIdentifier- A set of targets can be
grouped under a tag Identifier.
Use volatile if the value need not be
stored in NVRAM.
Use nonvolatile if the value must be
stored in NVRAM and available after
restart.
Step 3 end Exits the configuration mode.
Step 4 show snmp targetaddr
Displays the SNMP target address
information.
Step 5 write startup-config Optional step – saves this SNMP
configuration to be part of the startup
configuration.
The “no snmp targetaddr <TargetAddressName> ” command deletes the specified SNMP
target address information.
The example below shows the commands used to configure the SNMP target address.
SMIS# configure terminal
SMIS(config)# snmp targetaddr host1 param param1 192.168.1.10 taglist tg1
SMIS# end
SMIS# show snmp targetaddr
Target Address Name: host1
IP Address: 192.168.1.10
Tag List: tg1
Parameters: param1
Storage Type: Volatile
Row Status: Active
------------------------------
1.7.2 Target Parameters Target parameters define the MIB objects that should be notified to an SNMP target, usually an SNMP
manager.
Follow the steps below to configure SNMP target parameters.
SNMP Configuration Guide
Supermicro L2/L3 Switches Configuration Guide 23
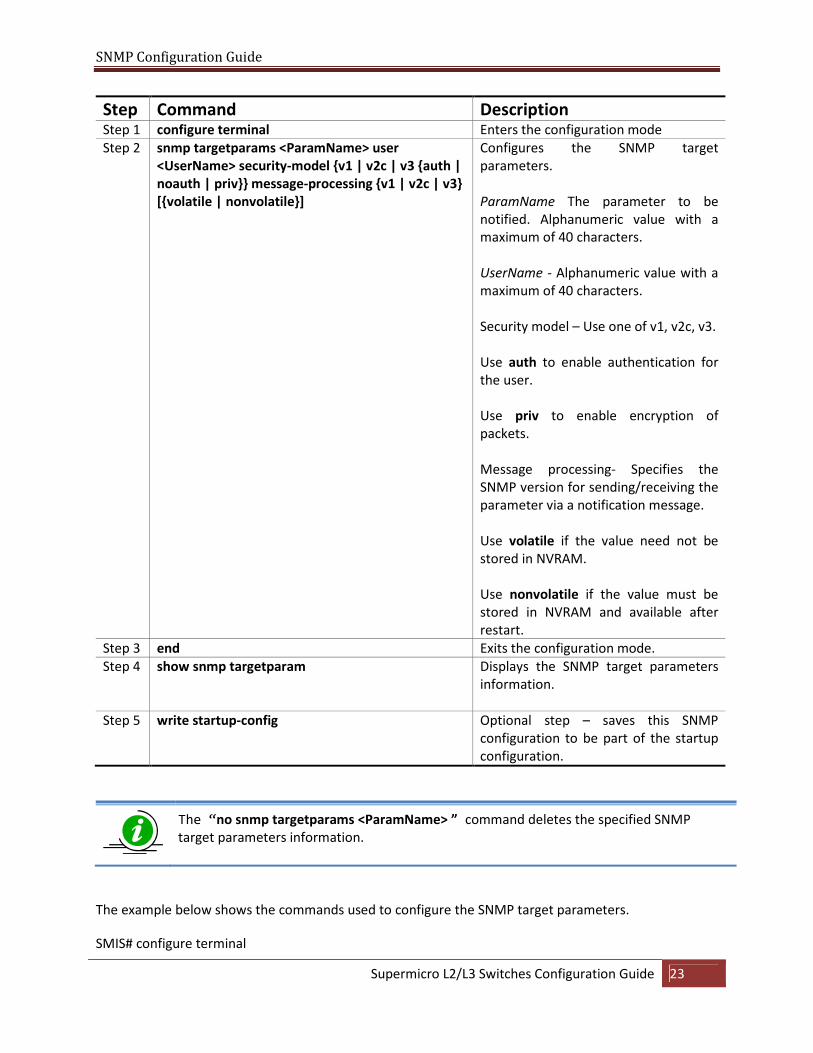
Step Command Description Step 1 configure terminal Enters the configuration mode
Step 2 snmp targetparams <ParamName> user
<UserName> security-model {v1 | v2c | v3 {auth |
noauth | priv}} message-processing {v1 | v2c | v3}
[{volatile | nonvolatile}]
Configures the SNMP target
parameters.
ParamName The parameter to be
notified. Alphanumeric value with a
maximum of 40 characters.
UserName - Alphanumeric value with a
maximum of 40 characters.
Security model – Use one of v1, v2c, v3.
Use auth to enable authentication for
the user.
Use priv to enable encryption of
packets.
Message processing- Specifies the
SNMP version for sending/receiving the
parameter via a notification message.
Use volatile if the value need not be
stored in NVRAM.
Use nonvolatile if the value must be
stored in NVRAM and available after
restart.
Step 3 end Exits the configuration mode.
Step 4 show snmp targetparam
Displays the SNMP target parameters
information.
Step 5 write startup-config Optional step – saves this SNMP
configuration to be part of the startup
configuration.
The “no snmp targetparams <ParamName> ” command deletes the specified SNMP
target parameters information.
The example below shows the commands used to configure the SNMP target parameters.
SMIS# configure terminal
SNMP Configuration Guide
Supermicro L2/L3 Switches Configuration Guide 24
SMIS(config)# snmp targetparams param4 user user4 security-model v2c message-processing v2c
SMIS# end
SMIS# show snmp targetparam
Target Parameter Name: Internet
Message Processing Model: v2c
Security Model: v2c
Security Name: None
Security Level: No Authenitcation, No Privacy
Storage Type: Volatile
Row Status: Active
------------------------------
Target Parameter Name: param4
Message Processing Model: v2c
Security Model: v2c
Security Name: user4
Security Level: No Authenitcation, No Privacy
Storage Type: Volatile
Row Status: Active
------------------------------
Target Parameter Name: test1
Message Processing Model: v2c
Security Model: v1
Security Name: None
Security Level: No Authenitcation, No Privacy
Storage Type: Volatile
Row Status: Active
------------------------------
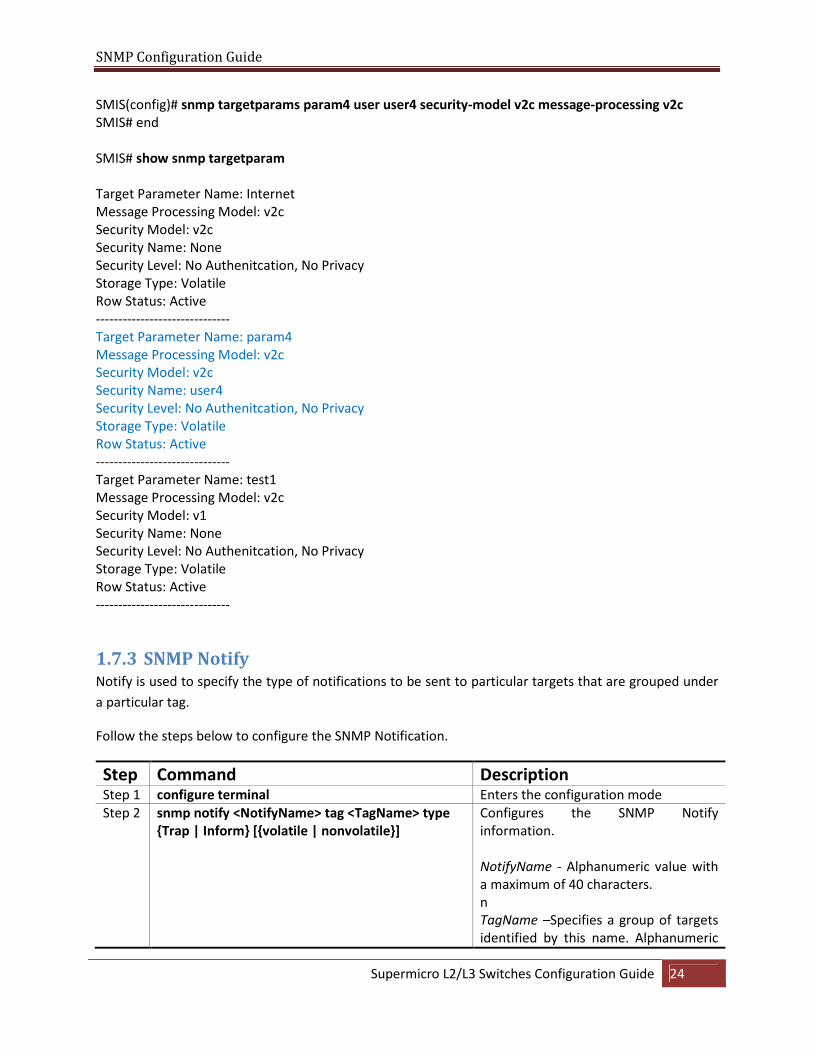
1.7.3 SNMP Notify Notify is used to specify the type of notifications to be sent to particular targets that are grouped under
a particular tag.
Follow the steps below to configure the SNMP Notification.
Step Command Description Step 1 configure terminal Enters the configuration mode
Step 2 snmp notify <NotifyName> tag <TagName> type
{Trap | Inform} [{volatile | nonvolatile}]
Configures the SNMP Notify
information.
NotifyName - Alphanumeric value with
a maximum of 40 characters.
n
TagName –Specifies a group of targets
identified by this name. Alphanumeric
SNMP Configuration Guide
Supermicro L2/L3 Switches Configuration Guide 25
value with a maximum of 255
characters.
Type – Notification can be Trap or
Inform.
Use volatile if the value need not be
stored in NVRAM.
Use nonvolatile if the value must be
stored in NVRAM and available after
restart.
Step 3 end Exits the configuration mode.
Step 4 show snmp notify
show snmp inform statistics
Displays the SNMP notification
information and Inform statistics.
Step 5 write startup-config Optional step – saves this SNMP
configuration to be part of the startup
configuration.
The “no snmp notify <NotifyName>” command deletes the specified SNMP notification.
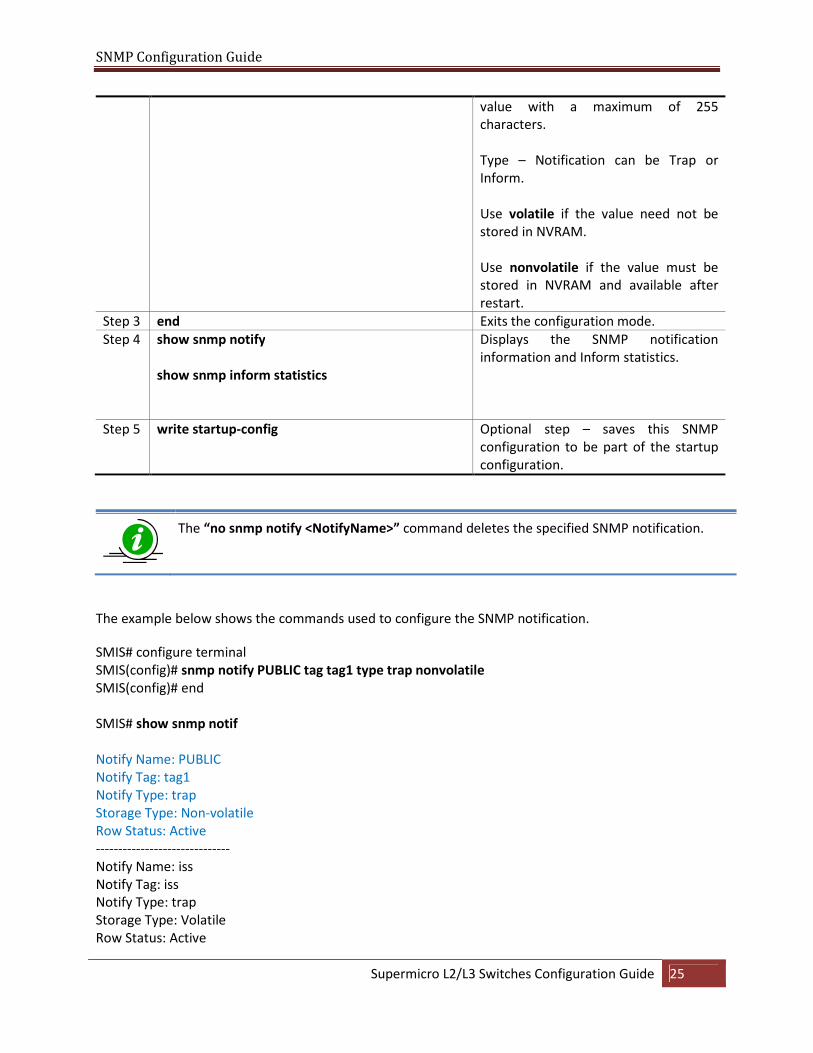
The example below shows the commands used to configure the SNMP notification.
SMIS# configure terminal
SMIS(config)# snmp notify PUBLIC tag tag1 type trap nonvolatile
SMIS(config)# end
SMIS# show snmp notif
Notify Name: PUBLIC
Notify Tag: tag1
Notify Type: trap
Storage Type: Non-volatile
Row Status: Active
------------------------------
Notify Name: iss
Notify Tag: iss
Notify Type: trap
Storage Type: Volatile
Row Status: Active
SNMP Configuration Guide
Supermicro L2/L3 Switches Configuration Guide 26
------------------------------
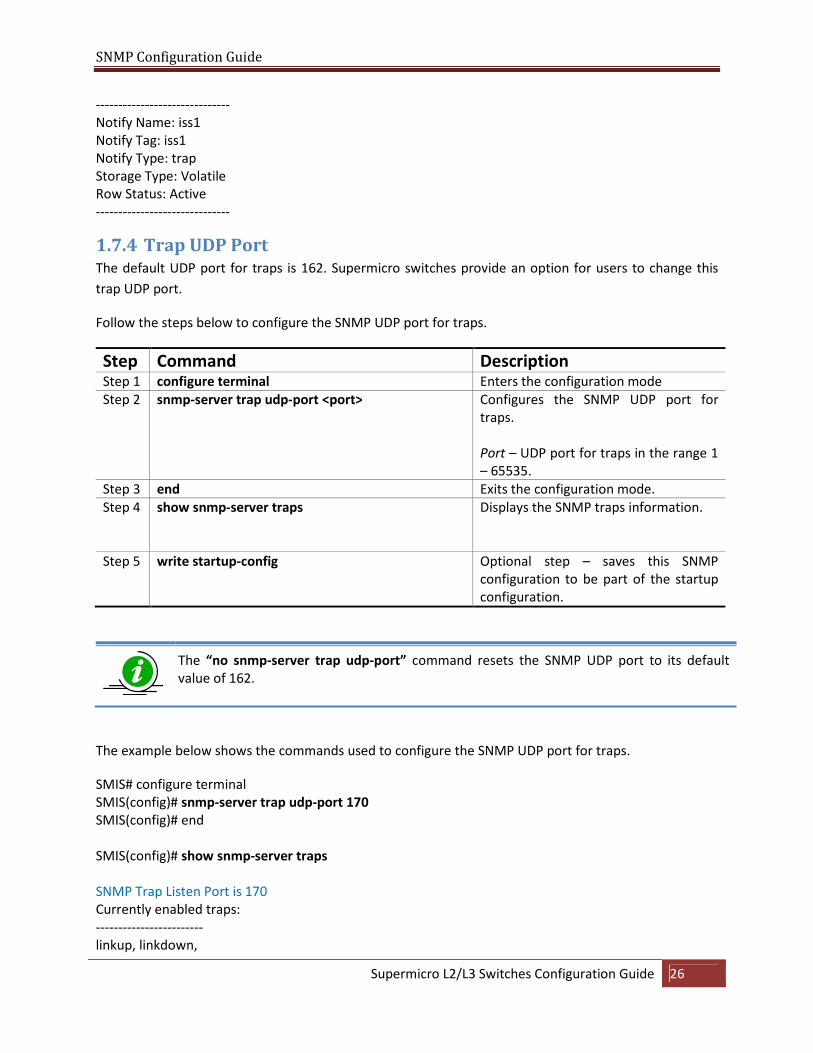
Notify Name: iss1
Notify Tag: iss1
Notify Type: trap
Storage Type: Volatile
Row Status: Active
------------------------------
1.7.4 Trap UDP Port The default UDP port for traps is 162. Supermicro switches provide an option for users to change this
trap UDP port.
Follow the steps below to configure the SNMP UDP port for traps.
Step Command Description Step 1 configure terminal Enters the configuration mode
Step 2 snmp-server trap udp-port <port> Configures the SNMP UDP port for
traps.
Port – UDP port for traps in the range 1
– 65535.
Step 3 end Exits the configuration mode.
Step 4 show snmp-server traps
Displays the SNMP traps information.
Step 5 write startup-config Optional step – saves this SNMP
configuration to be part of the startup
configuration.
The “no snmp-server trap udp-port” command resets the SNMP UDP port to its default
value of 162.
The example below shows the commands used to configure the SNMP UDP port for traps.
SMIS# configure terminal
SMIS(config)# snmp-server trap udp-port 170
SMIS(config)# end
SMIS(config)# show snmp-server traps
SNMP Trap Listen Port is 170
Currently enabled traps:
------------------------
linkup, linkdown,
SNMP Configuration Guide
Supermicro L2/L3 Switches Configuration Guide 27
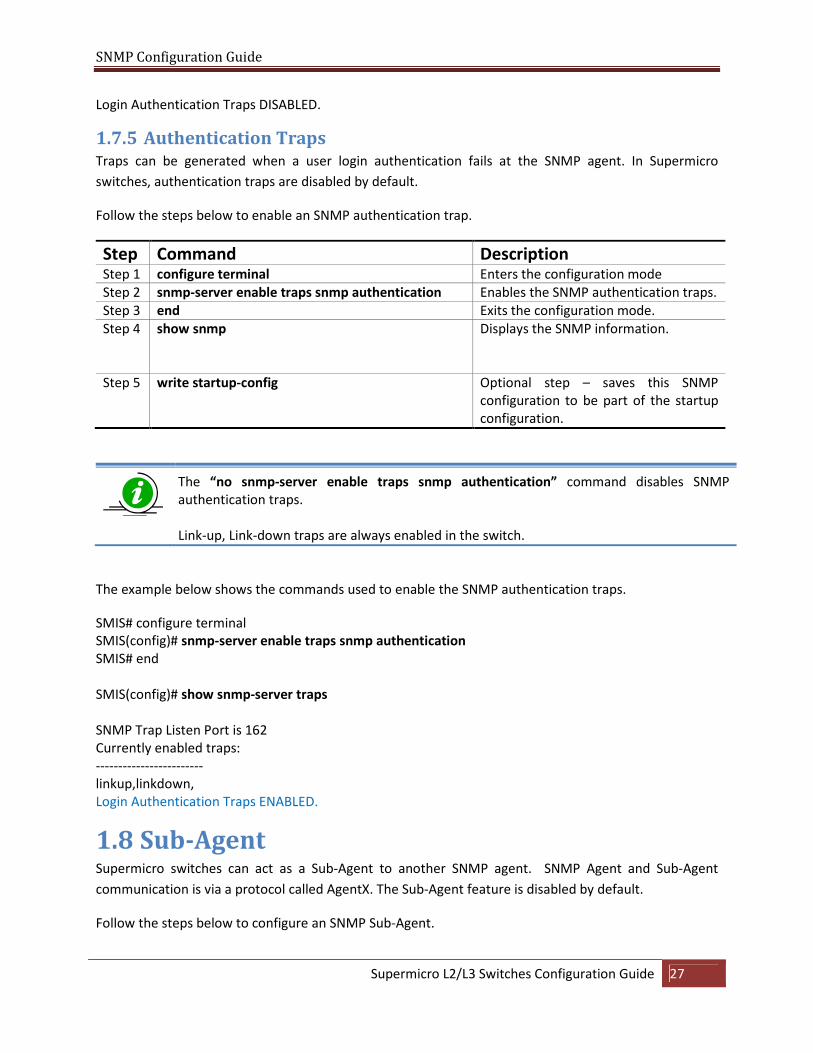
Login Authentication Traps DISABLED.
1.7.5 Authentication Traps Traps can be generated when a user login authentication fails at the SNMP agent. In Supermicro
switches, authentication traps are disabled by default.
Follow the steps below to enable an SNMP authentication trap.
Step Command Description Step 1 configure terminal Enters the configuration mode
Step 2 snmp-server enable traps snmp authentication Enables the SNMP authentication traps.
Step 3 end Exits the configuration mode.
Step 4 show snmp
Displays the SNMP information.
Step 5 write startup-config Optional step – saves this SNMP
configuration to be part of the startup
configuration.
The “no snmp-server enable traps snmp authentication” command disables SNMP
authentication traps.
Link-up, Link-down traps are always enabled in the switch.
The example below shows the commands used to enable the SNMP authentication traps.
SMIS# configure terminal
SMIS(config)# snmp-server enable traps snmp authentication
SMIS# end
SMIS(config)# show snmp-server traps
SNMP Trap Listen Port is 162
Currently enabled traps:
------------------------
linkup,linkdown,
Login Authentication Traps ENABLED.
1.8 Sub-Agent Supermicro switches can act as a Sub-Agent to another SNMP agent. SNMP Agent and Sub-Agent
communication is via a protocol called AgentX. The Sub-Agent feature is disabled by default.
Follow the steps below to configure an SNMP Sub-Agent.
SNMP Configuration Guide
Supermicro L2/L3 Switches Configuration Guide 28
Step Command Description Step 1 configure terminal Enters the configuration mode
Step 2 enable snmpsubagent {master { ip4
<ipv4_address> | ip6 <ipv6_address> } [port
<number>] }
Configures the switch as SNMP Sub-
Agent.
ipv4_address – IPv4 address of Sub-
Agent
ipv6_address – IPv6 address of Sub-
Agent
number – UDP port number for SNMP
message reception/transmission at
Sub-Agent, in the range of 1-65535.
Step 3 end Exits the configuration mode.
Step 4 show snmp agentx information
show snmp agentx statistics
Displays the SNMP Sub-Agent
information.
Step 5 write startup-config Optional step – saves this SNMP
configuration to be part of the startup
configuration.
An SNMP Agent must be disabled before enabling an SNMP Sub-Agent.
The “disable snmpsubagent ” command disables the SNMP Sub-Agent.
The example below shows the commands used to enable the SNMP Sub-Agent.
SMIS# configure terminal
SMIS(config)# disable snmpagent
SMIS(config)# enable snmpsubagent master ip4 192.168.1.80
SMIS(config)# end
SMIS# show snmp agentx information
Agentx Subagent is enabled
TransportDomain: TCP
Master IP Address: 192.168.1.80
Master PortNo: 705
SMIS(config)# show snmp agentx statistics
Tx Statistics
Transmitted Packets: 1
Open PDU: 1
Index Allocate PDU: 0
SNMP Configuration Guide
Supermicro L2/L3 Switches Configuration Guide 29
Index DeAllocate PDU: 0
Register PDU: 0
Add Agent Capabilities PDU: 0
Notify PDU: 0
Ping PDU: 0
Remove Agent Capabilities PDU: 0
UnRegister PDU: 0
Close PDU: 0
Response PDU: 0
Rx Statistics
Rx Packets: 0
Get PDU: 0
GetNext PDU: 0
GetBulk PDU: 0
TestSet PDU: 0
Commit PDU: 0
Cleanup PDU: 0
Undo PDU: 0
Dropped Packets: 0
Parse Drop Errors: 0
Open Fail Errors: 0
Close PDU: 0
Response PDU: 0
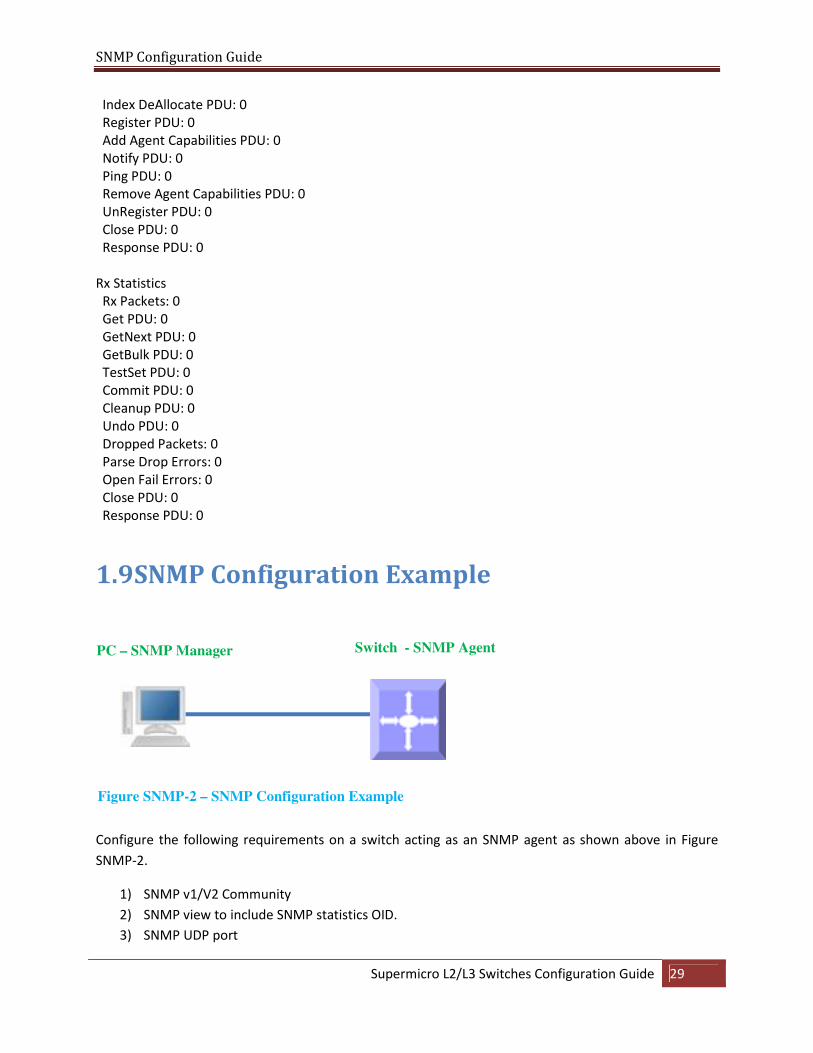
1.9 SNMP Configuration Example
Configure the following requirements on a switch acting as an SNMP agent as shown above in Figure
SNMP-2.
1) SNMP v1/V2 Community
2) SNMP view to include SNMP statistics OID.
3) SNMP UDP port
Switch - SNMP Agent PC – SNMP Manager
Figure SNMP-2 – SNMP Configuration Example
SNMP Configuration Guide
Supermicro L2/L3 Switches Configuration Guide 30
4) Enable authentication traps
5) SNMP Target address and parameters for notification
#configure SNMP community
SMIS# configure terminal
SMIS(config)# snmp community index testCom name testCom security none
SMIS(config)# end
#configure SNMP view
SMIS# configure terminal
SMIS(config)# snmp view view1 1.3.6.1.6.3.10.2.1 mask 1.1.1.1.1.1.1.1.1 included
SMIS(config)# end
#configure SNMP Trap port
SMIS# configure terminal
SMIS(config)# snmp-server trap udp-port 190
SMIS(config)# end
#Enable SNMP authentication trap
SMIS# configure terminal
SMIS(config)# snmp-server enable traps snmp authentication
SMIS(config)# end
#configure SNMP Target address information
SMIS# configure terminal
SMIS(config)# snmp targetaddr tgt1 param stat 192.168.1.50
SMIS(config)# end
#configure SNMP Target parameters information
SMIS# configure terminal
SMIS(config)# snmp targetparams stat user user1 security-model v1 message-processing v1
SMIS(config)# end
# Check the running-configuration for accuracy
SMIS# show running-config
Building configuration...
Switch ID Hardware Version Firmware Version
0 SBM-GEM-X3S+ (B4-01) 1.0.14-3
vlan 1
ports gi 0/1-24 untagged
ports ex 0/1-3 untagged
exit
snmp-server trap udp-port 190
snmp community index testCom name testCom security none volatile
snmp view view1 1.3.6.1.6.3.10.2.1 included volatile
SNMP Configuration Guide
Supermicro L2/L3 Switches Configuration Guide 31
snmp targetaddr tgt1 param stat 192.168.1.50 volatile
snmp targetparams stat user user1 security-model v1 message-processing v1 volatile
snmp-server enable traps snmp authentication
interface vlan 1
ip address 192.168.1.10 255.255.255.0
exit
#Display all configured values
SMIS# show snmp community
Community Index: NETMAN
Community Name: NETMAN
Security Name: none
Context Name:
Transport Tag:
Storage Type: Volatile
Row Status: Active
------------------------------
Community Index: PUBLIC
Community Name: PUBLIC
Security Name: none
Context Name:
Transport Tag:
Storage Type: Volatile
Row Status: Active
------------------------------
Community Index: testCom
Community Name: testCom
Security Name: none
Context Name:
Transport Tag:
Storage Type: Volatile
Row Status: Active
------------------------------
SMIS# show snmp viewtree
View Name: iso
Subtree OID: 1
Subtree Mask: 1
View Type: Included
Storage Type: Non-volatile
Row Status: Active
------------------------------
View Name: view1
Subtree OID: 1.3.6.1.6.3.10.2.1
SNMP Configuration Guide
Supermicro L2/L3 Switches Configuration Guide 32
Subtree Mask: 1.1.1.1.1.1.1.1.1
View Type: Included
Storage Type: Volatile
Row Status: Active
------------------------------
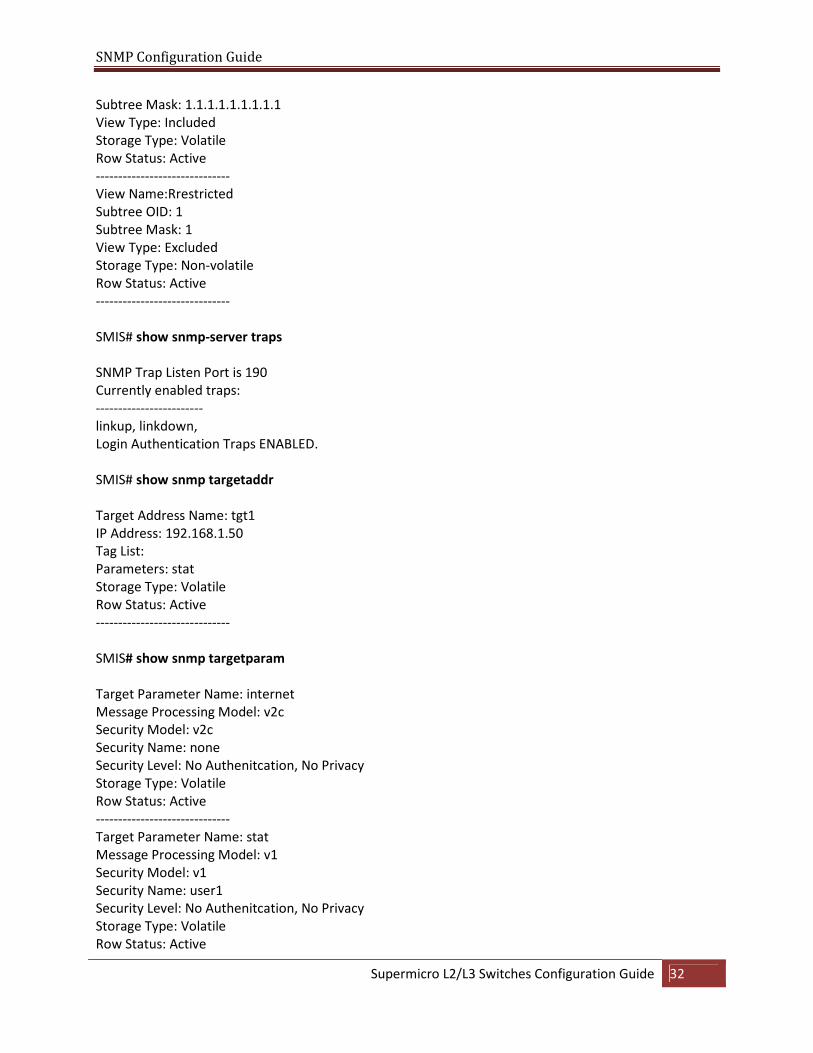
View Name:Rrestricted
Subtree OID: 1
Subtree Mask: 1
View Type: Excluded
Storage Type: Non-volatile
Row Status: Active
------------------------------
SMIS# show snmp-server traps
SNMP Trap Listen Port is 190
Currently enabled traps:
------------------------
linkup, linkdown,
Login Authentication Traps ENABLED.
SMIS# show snmp targetaddr
Target Address Name: tgt1
IP Address: 192.168.1.50
Tag List:
Parameters: stat
Storage Type: Volatile
Row Status: Active
------------------------------
SMIS# show snmp targetparam
Target Parameter Name: internet
Message Processing Model: v2c
Security Model: v2c
Security Name: none
Security Level: No Authenitcation, No Privacy
Storage Type: Volatile
Row Status: Active
------------------------------
Target Parameter Name: stat
Message Processing Model: v1
Security Model: v1
Security Name: user1
Security Level: No Authenitcation, No Privacy
Storage Type: Volatile
Row Status: Active
SNMP Configuration Guide
Supermicro L2/L3 Switches Configuration Guide 33
------------------------------
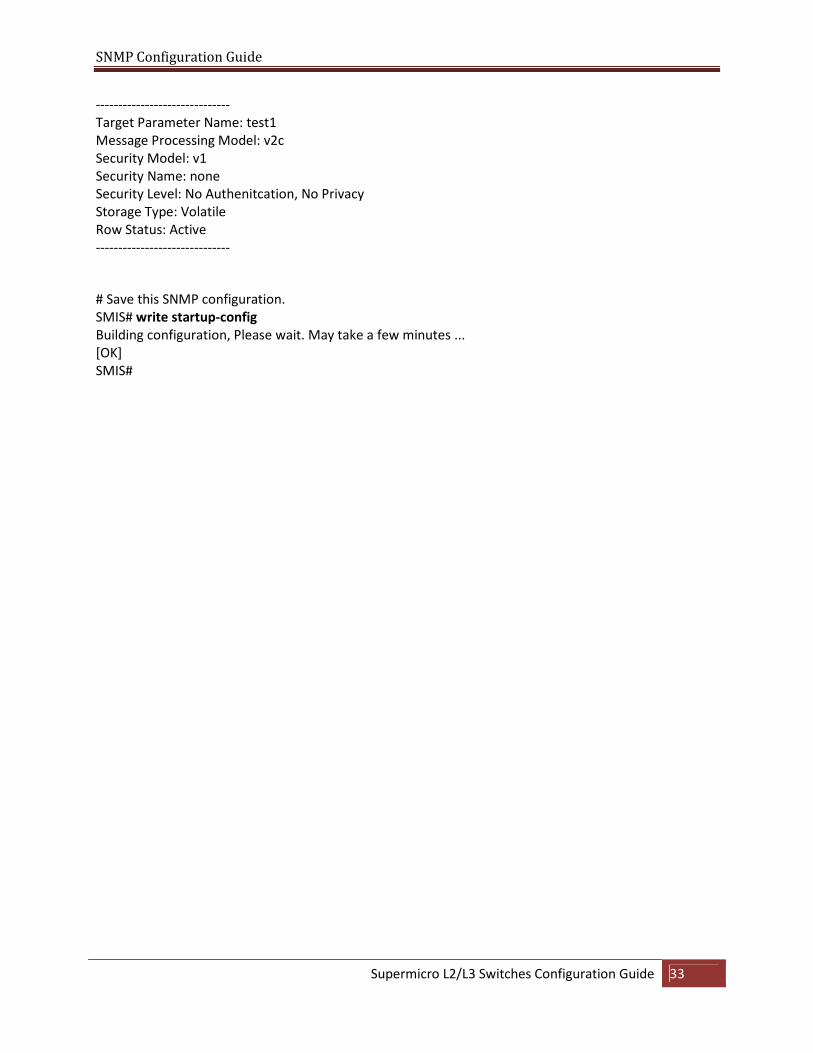
Target Parameter Name: test1
Message Processing Model: v2c
Security Model: v1
Security Name: none
Security Level: No Authenitcation, No Privacy
Storage Type: Volatile
Row Status: Active
------------------------------
# Save this SNMP configuration.
SMIS# write startup-config
Building configuration, Please wait. May take a few minutes ...
[OK]
SMIS#