kitchen renovation
TRANSCRIPT

KITCHEN DESIGN PROCESS
1
VIRTUDESIGNINSTITUTE

KITCHEN DESIGN CONSIDERATIONSThe kitchen is often the hub of the home.
Consequently, the kitchen designer needs to consider a wide range of factors, particular to each household for a successful design outcome.
A good kitchen design meets the needs of the clients lifestyle and is catered to the occupants of the home.
It must also be recognised that the kitchen is often more than a place for the preparation of meals - benches can double up as homework spaces, home offices and casual dining zones.
Kitchens can also adjoin or connect to open plan living and dining spaces, as well as outdoor entertaining areas.
Today, the kitchen has become the informal meeting point in the home, and, aesthetically, can represent a design feature of the home.
2

Types of KitchensA broad range of kitchen design
possibilities are available dependent upon the required function, aesthetics and budget.
FLAT PACK KITCHENS are an easy and cheap way to build a brand new standard kitchen. The buyer designs their own kitchen using standard modules to fit the space, selects from a choice of predetermined finishes, and can install the kitchen themselves.
This presents a much cheaper method of acquiring a new kitchen.
Examples of Flat pack kitchens are:
IKEA kitchens, SmartPak Kitchens & Bunning's Kitchens.
3

Types of Kitchens
• MID RANGE KITCHENS are custom designed, supplied and installed by the manufacturer.
• They are available in a range of styles to choose from including Traditional, Classic, Elegant or Contemporary.
• Examples of Mid market kitchens include:
Maxi Kitchens, Kitchen Connection as well as custom made kitchens manufactured by independent cabinetmakers.
4

Types of Kitchens• LUXURY KITCHENS are
custom made kitchens whose design is catered to the clients specific requirements incorporating innovative design features with quality high end materials.
• Luxury kitchens are usually manufactured by kitchen design companies specializing in Kitchen joinery. Leading Furniture manufacturer, Poliform also offers a luxury kitchen designs in their Varenna Range.
5

Kitchen Design Considerations• Kitchen design involves a number of components which
must be considered and specified. These include:The kitchen Units - Carcasses, doors and drawers- End panels- Hardware (handles, drawer runners,hinges)- Benchtops- Splash backs- Plinths & Kick railsAppliances- Oven- Cook top- Extractor/Range hood- Dishwasher- Refrigerator/Freezer- Microwave- Water filterSink (s) & Tap ware- Water FiltersLighting- Ceiling - Cabinetry/FeatureServices- Plumbing for waste & water pipes, traps and fittings- Electrical wiringStructural Requirements- Reinforcement of support elements – walls & floorsSurface Treatments- Plastering- Tiling- Painting
6
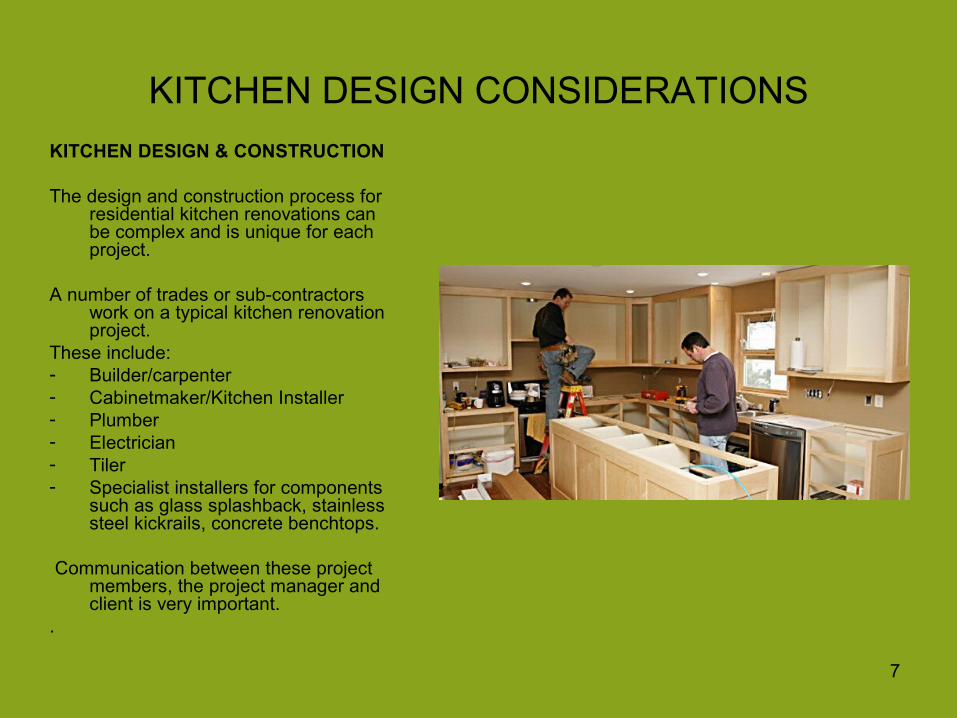
KITCHEN DESIGN CONSIDERATIONS
KITCHEN DESIGN & CONSTRUCTION
The design and construction process for residential kitchen renovations can be complex and is unique for each project.
A number of trades or sub-contractors work on a typical kitchen renovation project.
These include:- Builder/carpenter- Cabinetmaker/Kitchen Installer- Plumber- Electrician- Tiler - Specialist installers for components
such as glass splashback, stainless steel kickrails, concrete benchtops.
Communication between these project members, the project manager and client is very important.
.
7

KITCHEN DESIGN – COST CONSIDERATIONS
There are 7 basic areas of cost to be considered when designing a kitchen:
1. The new appliances that will be required;
2. The design complexity and overall size required;
3. The style and type of doors, benchtops and splashbacks;
4. The sub-trades required e.g. removal of the existing cabinets, plumbing, electrical and tiling) as well as the delivery and installation of the new kitchen;
5. The quantity of additional decorations, fixtures and fittings desired (lighting, bins, baskets, glass doors, etc);
6. Structural work required e.g. removing or adding walls, installing bulkheads.
7. The allocated budget.
8

ANALYSING YOUR CLIENT BRIEF• Upon completion of
Stage One of the Interiors work for your Clients apartment, you have been commissioned to undertake Stage Two - this involves formulating a Design for their new Kitchen.
• Before you can begin your kitchen designing you must determine the space you are working with, and understand the needs and desires of your client.
9

KITCHEN - DESIGN INTENTDesign considerations should include:
- Who will use the space? How will the space be used?
- How many people is the kitchen catering to?
- What are the dining and seating requirements?
- What needs to be stored/ accommodated within the space?
- What constraints must be considered within the space e.g. existing or reconfigured service locations – electrical and plumbing.
- What is the intended style or theme of the kitchen design?
- Does the client have preferred materials they would like to use in their kitchen design?
- What is the delegated budget for the kitchen renovation and which components are priorities?
10

Cabinetry Carcass Construction Materials• Reconstituted wood panels are used as
substrates for kitchen joinery components. Effectively, these are products made from wood particles bonded together to produce a flat sheet.
• Particleboard and MDF are the two preferred substrates for carcass or base cabinet construction.
• MDF- Medium Density Fibreboard, is denser and stronger than particleboard. There are 2 types of MDF. Standard MDF is manufactured for interior use only, such as furniture and general fit-out, while High Moisture Resistant (HMR) MDF is intended for use in areas of high humidity and occasional wetting such as bathrooms and laundries. MDF is made from almost powdered timber chips. All MDF boards adhere to Australian Standards, based on weight. For kitchen joinery 16mm thickness is recommended, preferably coated in white melamine* so that the insides of carcasses are precoated.
Particleboard is a panel product made from wood particles several millimetres in size. There are three types of particleboard. Standard particleboard is suitable for general purpose interior and used only where it will not be subjected to wetting or prolonged high humidity conditions. High moisture resistant (HMR) particleboard is suitable for areas of occasional wetting or high humidity. Particleboard is lighter than MDF yet retain a great deal of strength and stability. It is the cost effective wood panel choice for a wide range of applications. Standard particleboard could be used when covered with timber veneer, however the recommended grade for kitchen cabinetry, shelving and panels is 16mm High Moisture Resistant HMR particleboard.
* Melamine is a paper (mainly white) that is covered in glues and applied under heat and pressure to an MDF board to create a decorated internal surface for interior cabinet.
11

Benchtop Materials include:laminate, granite, polished concrete,
stainless steel & timber
12

Benchtop MaterialsGranite: is the most durable stone surface
and is chip and scratch resistant.
Corian: is a patented blend of high performance acrylic and natural minerals solid surface material that allows for seamless joins, non porosity, hygienic surfaces, stain resistance and thermo formability. It comes in 90 colours in matt, semi gloss and high gloss. Sinks can be incorporated within the benchtops to provide for a seamless finish. Corian comes with a 10 year DuPont warranty on product & installation.
Marble: Because of it is smooth and cool to the touch, marble is the traditional benchtop favourite for rolling dough. However, it lacks the durability of granite and requires sealants to be applied more frequently to prevent stains.
Tile: Decorative tiles may be used countertop surfaces. The main types are ceramic, porcelain, quarry, glass, natural stone and mosaic. Unglazed tiles must be sealed; glazed tiles are impervious to water. Grouting can discolour and must be sealed.
13

Benchtop MaterialsEngineered Stone: The superman of stone, quartz surfacing provides a nearly indestructible material, ideal for those who want a low maintenance, beautiful surfaces. Providing the look of natural stone with a resistance to coffee, lemon juice & red wine (if spills are cleared up efficiently). It requires low maintenance care, and its non porous nature protects against more than just stains. It is also extremely hygienic, making it a food safe choice.
Laminate: The most common kitchen countertop, laminate is synthetic material made up of several layers. Though economical, laminate doesn’t have the lasting power of stone; however, some manufacturers offer upgraded high wear surfaces with increased lifespan. A slightly more expensive alternative with no dark edges is solid-colour laminate, which is made of colour plastic throughout.
Hardwood: Solid timber benchtops can add character to a kitchen. Solid timber is reasonably durable, although scratches from knives and burn marks from hot pans will sho up. They may be unhygienic if meat or poultry is prepared on the surface. Solid timber benchtops can also require careful treatment and ongoing, at least annual maintenance or resealing.
Stainless Steel:Stainless steel kitchen benchtops are becoming more popular as they are durable, hygienic, and look good. They are also particularly easy to clean. Many sink bowls are able to be welded directly to the stainless steel benchtop, making the benchtop completely seamless. Stainless steel benchtops are also able to take the heat of hot pots and pans, and they will not warp or corrode over time.brushed and textured finishes that are capable of disguising these.
.
14

Benchtop Materials• Benchtop selection if often based more on aesthetics than function and can be used to create a
focal point of the kitchen design, based strongly on personal choice. However, functionality and durability are essential to the long term appeal of the kitchen for those using it.
• The recommended width (depth) for kitchen benchtops is at least 600mm to 900mm (any deeper and it may become too far to reach). When there is just one person preparing food, the minimum length (side space) should be 600mm, however 900mm is more ideal. Where two people are preparing side by side it is suggested that a length of 1200mm to 1500mm should be sufficient. (Diagrams illustrating these recommended dimensions are included in this handout).
• The approximate cost for an average Bench varies depending on the benchtop material chosen. The figures below may give an indication of approximate comparative pricing (as @ Dec, 2008).
- Laminates - $1500-$2500- Ceramics or Slate - $3500-$4500- Solid Timber $2000-$4500- Stainless Steel $6000+
Plastics:- Corian – plain $3500+- Corian – darker colours $6000+
Engineered Stones:- Silestone $5000+- Quantum Quartz $4000+- Smartstone $5000+- Caesarstone $5000+
Granite - $5500-$8000+Note: the comparative differences in pricing scale continues to be relevant today.
15

Joinery Materials include:laminates, veneers, 2pac & solid timber
16

Kitchen joinery- Doors & Drawers
17

Cabinets & Doors – Door Surface Treatments & Edging
1. Low Pressure Laminates - These laminates are supplied on pre-finished decorated boards and used mostly for low budget options. These sheets are cut and glued to the based particleboard. Door edgings will be in the same, matching or contrasted colours – edging can be 2mm to 3mm thick, the thicker size is recommended to prevent chipping.
2. High Pressure Laminates – These laminates are used in medium size budgets. They are often imported from European suppliers, are resin impregnated papers 3-5 layers thick with a final layer of decorative paper on top. These are glued to the particleboard. There is a wide range of plain colours and patterns, wood grains, stones, hand drawn graphics etc. available in either gloss, matt or textured finish. This type of surface is harder wearing than the low pressure laminates and is easy to maintain. Post forming (bending the laminate around the edge) is possible.
3. Vinyl-Vacuum Wrapped doors These door types are used in medium budget applications. They are supplied by firms such as Duratech and are cut, routed, profiled, sanded, then glued and covered with a vinyl film that is pressed to the door under vacuum. The back of the door is usually pre-laminated.
ABS is a rigid plastic edging designed to create a durable edge protection for decorated and composite wood panels.
It is colourfast under normal internal applications, has high dimensional stability and maintains a very high impact strength. It is suitable for use as a matching or contrasting edge finish for furniture, desktops, cupboard doors and drawers, shop fittings, and display panels where a high impact resistant and aesthetically appealing edge is required.
A large range of colour options are available to coordinate with the rest of the kitchen panels and laminates.
ABS does not contain fillers and is approximately 30% lighter than PVC. It is easier to handle
due to its lighter weight and less costly to ship.
ABS is a non toxic product. It is not carcinogenic. It is totally recyclable and reusable. It is one of the most common recycled plastics used. It is safe to burn and to dispose of. Due to its ability to be safely incinerated, it has become the plastic of choice for edging.
18

Cabinets & Doors – Door Surface Treatments
4. Powder Coating is used for hard wearing, lower cost options. Powder coating is an electrostatic spray application process, and this introduces unique characteristics. The finish in powder coated MDF board is similar to powder coated metal and produces an even, scratch resistant, maintainable finish in Texture, matt or satin.
Currently there are only a few Powder Coating Colours popular to kitchen cabinets – users can specify their own colour shades, but the extra cost for application less than 100sqm is quite high. Trimatrix Powder coated panels have the following advantages:
- Powder coating has long been recognised as an environmentally friendly coating. With little to no volatile organic compounds, it contains no solvents and no water.
- Powder coating over vinyl is advantageous due it its ability to coat both sides with the same colour and finish. This is particularly useful for frame doors. (Polyurethane or vinyl doors and panels are normally only coated on one end.
- Powder coating offers very good stain and heat resistance and ha a higher UV tolerance.- Powdercoating offers the same design and colour freedom as polyurethane but at a relatively
lower cost and lower environmental impact. - It offers comparable properties to high pressure laminates with greater design flexibility where
shapes are desired.
19

Cabinets & Doors – Door Surface Treatments
6. Polyurethane Painted doors (2 pak) are a high budget choice. Any type of board material can be used in this process, but as the doors are often profiled extensively it is preferable to use 18mm HMR boards non-laminated to ensure painting on both sides. A primer undercoat is followed by an oil-based or acrylic top coat that is sprayed on, sanded then sprayed again 3-5 times into a hard durable coat.
There is no sign of joins or edgings, creating a beautiful smooth product. The colour range is unlimited and gloos or semi gloss is advisable in a kitchen, although matt and high gloss are also possible. Cleaning is easy. It can be advisable to use 1 or 2mm pencil round edging rather than straight edges to prevent chipping of the paint over time. Note, painted surfaces can be relatively easily repaired by colour matching and scratch repainting, or sanding down and full repainting.
Polyurethane finished doors and matching sides provide a high quality and easily maintainable result for the medium to high budget kitchens.
The cost of textured finish polyurethane doors is similar to vinyl finishes, egg shell matt and high gloss finishes are a bit more expensive as end panels and other matching boards are also required to create a matching whole, and this can add $2000-$3000 to the cost of the kitchen.
7. Timber Veneer is a medium to high budget choice. On a particleboard base a natural timber veneer can be applied to both sides, that is sealed with a clear coating for durability or with a stain or lacquer. The colour range is limited to the availability of the timber species. Edges are square and in the same material or a matching strip can be used so a tiny join may be seen. Veneer is usually only applied to flat panel doors with square edges. If the profiles or grooves are applied then the board material may show and so a liming or staining should be used before applying the final clear finish. Acids or oil stains must be removed immediately. Cleaning is with a damp cloth.
8. Solid timber is generally high budget. Any timber species can be used. Solid doors are often built up of strips of timber and panels, inserted into a frame, clear coated with a a lacquer or polyurethane finish. Popular Australian hardwood species are Blackwood, Tasmanian oak, Sydney blue gum. Imported species include Cedar, European beech and maple. Note timber bench tops are not recommend in regions were large fluctuations in temperature and humidity could cause problems. Consider also that the timber used depends on current availability, and it is unlikely that all doors will have exactly the same colour and texture. Timber doors may also be subject to movements as they are affected by climate changes. Softer timbers are more susceptible to denting damage, and even the hardwood doors can be permanently affected this way. Cleaning is with a damp cloth, durability depends on the surface coating. Lacquer 2 pak is recommended, but natural timbers can also be oiled.
20

Cabinetry Doors & DrawersGeneral Considerations:- Materials used must meet industry standards, for example the carcass should be constructed of High Moisture
Resistant Particleboard (HMR) that is melamine backed and at least 16mm in thickness for cabinet carcass, 18mm for doors (up to 25mm for intricately carved doors).
- Drawers should include high quality drawer systems and hinges that are easy to adjust and require not special maintenance.
- Construction quality should incorporate thicker shelves to span wider cabinets and to support more weight without sagging. All shelving should be adjustable with at least 16mm thickness.
- Joinery edges should include glued plastic edgings that are at least 1mm ABS (impact resistant) thickness to withstand accidental damage.
Door Construction Types:1. Slab or flat door styles feature no raised or recessed profile. Solid wood slab doors are usually constructed of
several pieces of solid stock wood joined with adhesive, then cut to size. Laminated slab styles are made of a substrate material (without a routed shape), then covered with the a choice of laminate. Slab doors styles may have detailed or plain edge profiles.
2. Recessed Panel – creates a picture framed effect, often with either mitre or mortise and tenon joints. One more flat panels is secured within the frame. Panels may be grooved or otherwise decorated. When 18-25mm HMR particle board is used then the cut doors are profiled and recessed panels are formed using an automated router.
Flat door style Recessed Panel door style21

Cabinetry Doors & Drawers1. Raised Panel – Frames are constructed with panels secured in placed as for
recessed panel doors. The raised panel is usually constructed of several pieces of solid stock lumber joined with adhesive, cut dimensionally and then routed or shaped with the desire edge profile.
2. Routed Panel – Moisture Resistant Medium Density fibreboard (MRMD) or other material is shaped to create the appearance of a raised or recessed panel which is then painted or covered with the manufacturers choice of laminate. In its simpler form these could be made of 16mm HMR particle board, then vinyl coated. Alternatively 18-25mm particleboard can be used depending on the rebating or profiling requirements.
Raised Panel door style Routed Panel Door style22

Hinge systems
Most kitchen cabinets have overlay doors, meaning the doors overlap the door opening. A full overlay doors, covers the front of the cabinet completely. Because the doors are slightly bigger than their openings, overlay doors don’t require any fitting.
Overlay doors are usually hung with cup hinges, which are hidden when the door is closed. Cup hinges allow the door to be adjusted in several directions, making alignment easy for manufacturer and buyer alike. Better quality cup hinges have more adjusting points, and some allow the door to be popped off the cabinet without using tools.
Less common are inset doors which are housed in the door opening. When closed, inset doors are flush with the face of the cabinet, making the cabinet look more like a piece of furniture.
23

24
25

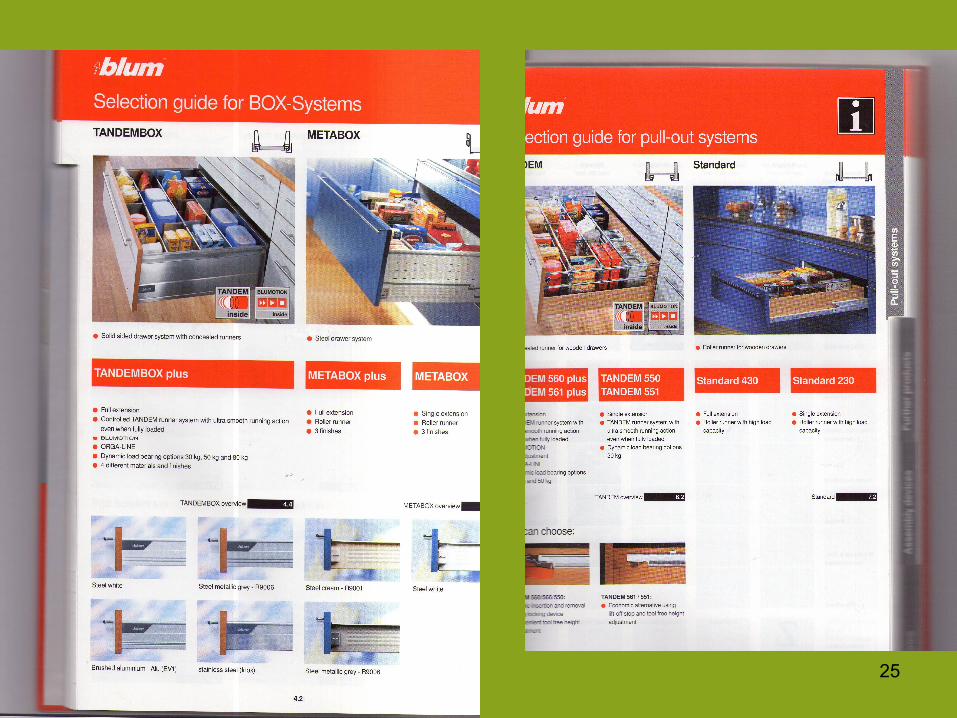
Soft closing Mechanisms for Cabinet doors & Drawers
The latest technology from Blum and Hettich has been the introduction of soft closing doors and self closing drawers. Up to now the drawer runners have been made so that the last 50mm of a drawer is pulled in by its own weight. Either that or a smart push will cause the “bang” against the carcass which can lead to the eventual dislodge of the drawer front or the hinge plate. So the ingenious design of the shock absorber soft closer was introduced for doors. They can be fitted by either drilling a hole in the edge of the cabinet or the easier option is to guy the hinge clip holder. The shock absorber can be adjusted to suit the weight of the door. This means that the soft closers can be retro fitted on any door with Blum or Hettic hinges. Both these manufacturers have introduced their own soft closing mechanisms. A soft closer costs around $6 each.
Soft closers can also be used on the self closing drawers but the shock absorber tube needs to be drilled into the carcass edge for each drawer. This is a little more tricky than fitting the hinge attachment but not impossible with the appropriate installation.
The Blumotion mechanism which is self closing and soft closing spring system is now incorporated into the Blum Tandembox drawer. It cannot be used for any other drawer system as Blum has incorporate it into the drawer side. This mechanism costs about 2-3 times the normal Metabox drawer range. A white drawer costs about $120 per Tandembox drawer, so if you have 10 drawers the additional cost will be about $1200 above the cost of the kitchen.
26

27

Door Joinery Design Detail – Example
28

Door Joinery Details - Example
29

DOOR JOINERY DETAILS
Unless otherwise specified, it is recommended that gaps between drawer fronts and adjacent edges of cabinetry shall be a maximum of
3mm.
30

Splashback materials include:Glass, tile & stainless steel
31

Splashback MaterialsSplashbacks may be finished using a number of materials including: - Glass- Tiles- Laminate- Natural or reconstituted stone- Stainless Steel- Acrylic panels- Paint finishesDepending on the quality of the wall finish, these materials may be required to be fixed to
a substrate material, prior to fixing onto the wall.Glass: The selection of glass for splashbacks shall be in accordance with AG/601 &
AS1288. It is highly recommended that glass splashbacks be made from toughened glass.
Laminate: Laminated splashbacks should be manufactured from moisture resistant board substrate and covered with a high pressure laminate finish.
Solid Surface: Some benchtop materials such as solid surfaces may require specialised or licensed installers to maintain the materials warranty.
Paint: The use of paints and lacquers in conjunction with splashbacks should be in accordance with the paint/lacquer manufacturers recommendations.
Splashback materials may be regulated because of their material makeup or because of their location. The regulations will be for the purpose of fire or injury prevention.
More information on Splashbacks & their installation requirements is on Blackboard. 32

33

KITCHEN DESIGN – WHERE TO BEGIN?
A number of key factors need to be explored and determined in designing the layout of the new kitchen. These include:
Determining the most appropriate kitchen layout for the space and the users with consideration given to work and traffic flow;
Planning Kitchen work zones to ensure efficient use of space; Catering design to address specific storage requirements; Considering ergonomics & spatial requirements of the space; Identifying service requirements and constraints; Ensuring that Restriction zone regulations and standards are
adhered to.
34

Communicating your Kitchen Design –Working Drawings for your Kitchen
35

36

37

Elevation and section drawing example
Note: Internal details have been represented using dashed linework to indicate carcass construction and shelving.
Door opening technique is also represented using a dashed line. In this instance, cupboard doors are side hinged.
Elevation & Section drawings are usually represented at 1:20 0r 1:50.
38

39

Kitchen Detail Drawings
Detail drawing scaled at 1:1 depicting Door handle design. Laminate finish on
Cupboard door & powder coated finish on handles
Note: For your reference, more detail drawing examples are included in your Bathroom Renovation Handbook: Fixtures, Fittings & Joinery
40

Kitchen Detail Drawings
41

Kitchen Standard dimensions
42

Example of Standard Kitchen
Dimensions
43

KITCHEN APPLIANCES- Technical Data Sheets & Diagrams• Kitchen design and construction must be catered to the
appliances specified. In effect, the kitchen is built around the appliances, and in some instances where integration is desired, the design must actually enclose the appliances.
• It is critically important to refer closely to the technical data provided by the manufacturer to ensure that joinery will appropriately accommodate appliances selected.
• Technical data sheets should provide relevant information for dimensions of all appliances AND for installation information with particular attention to required clearances between joinery & appliance.
44

RANGEHOODS
Range hood
Types
45

OVENS & COOKTOPS
46

DISHWASHERS
47

FRIDGE/FREEZER
48

WASHING MACHINE/DRYER
49

INTEGRATED APPLIANCES
50

KITCHEN SINKS
51

Regulatory requirements for electrical installations
52

TAPWARE
53

WATER FILTERS
54
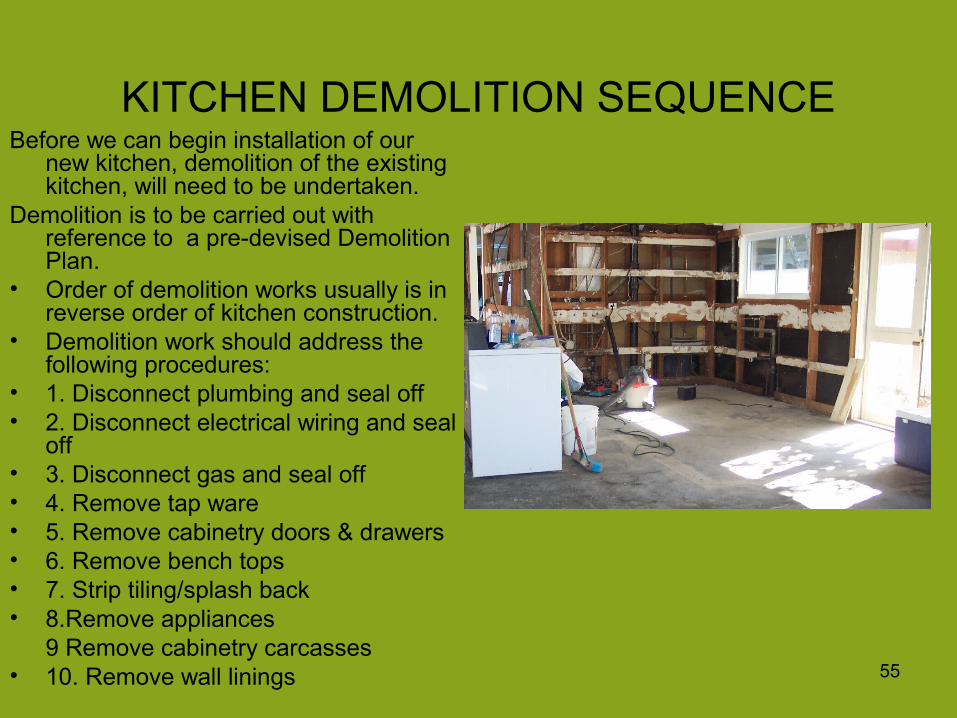
KITCHEN DEMOLITION SEQUENCE Before we can begin installation of our
new kitchen, demolition of the existing kitchen, will need to be undertaken.
Demolition is to be carried out with reference to a pre-devised Demolition Plan.
• Order of demolition works usually is in reverse order of kitchen construction.
• Demolition work should address the following procedures:
• 1. Disconnect plumbing and seal off• 2. Disconnect electrical wiring and seal
off • 3. Disconnect gas and seal off• 4. Remove tap ware• 5. Remove cabinetry doors & drawers• 6. Remove bench tops• 7. Strip tiling/splash back • 8.Remove appliances
9 Remove cabinetry carcasses• 10. Remove wall linings 55

KITCHEN RENOVATION SEQUENCE• Prior to installation of the new kitchen, coordination of relevant subcontractors/trades will be
required for preparatory work. This work will include:• Construction of any new walls to accommodate your new kitchen design• Make good any walls/floors,ceilings which have been affected by the demolition- Electrician to reposition lighting and GPO’s where required- Electrician to rough in electrics for all appliances- Plumber to relocate or install gas or plumbing- Plumber to rough-in plumbing for sink and dishwasher- Carpenter/builder to reinforce timber framework and install battens/noggins for additional support
for kitchen units.- Plasterer to reline/plaster walls and ceilings where required.- Once structural and services work has been undertaken:- The cabinetmaker can install carcasses on plinths or adjustable legs.- Bench tops can be measured, cut off site and installed- Drawers and Cupboard doors can be installed- Kickboards can be installed- Splash back or tiling can be installed- Appliances can be installed and connected by electrician/plumber- Sink and Tap ware can be installed and connected by plumber- Paintwork to be completed where required
Construction of Kitchen must comply with the BCA and Australian Standard Requirements.
56

Timber Framework must be reinforced to fix and
support joinery securely.
57

When a kitchen is installed all wall and floor components must be set level and plumb. If the floor isn’t level, and a plinth support is being used, there are two
ways to achieve a level base cabinet - Shimming or scribing.Shimming involves inserting slip shims under the cabinet unit until it is level and
at the required height. The shims can be concealed behind the kickrail.Scribing involves shaping the joinery and/or plinth to comply to the variation in
floor. The same technique is used for uneven wall surfaces.
58

When using adjustable legs, scribing or shimming is not requires as the leg heights can be individually modified up or down to allow for uneven floor
surfaces. The kickrail clips onto the legs and the clips are also adjustable.Using adjustable legs also allows easy access for services, upkeep and repairs.
59

When the kitchen plan includes an island bench, the joinery must be secured to the floor. One method is to screw blocks to the floor and mount the cabinets to
the blocks.
60

Joinery Construction• Ensure you include references in your construction sequence to the
following:1. Carcass construction: address materials including shelving & plinth;
shelving installation/attachment method, carcass/joinery attachment to walls; island bench attachment to floor (where applicable)
2. Door Type & Materials3. Drawer Materials4. Edging Materials (doors & drawers)5. Benchtop Materials – type and profile6. Hinge system7. Drawer runner system8. Hardware (handles) including location on doors/drawers9. Splashback material and installation method10. Other?.
61

62