kids crafts for easter how to decorate easter eggs easter egg hunt projects and more easter...
TRANSCRIPT

Kids' Crafts for Easter: How to Decorate Easter Eggs, Easter Egg Hunt Projects,
and more Easter Activities for Kids
Copyright 2014 by Prime Publishing LLC All rights reserved. No part of this book may be reproduced or transmitted in any form or by any means, electronic or mechanical, including photocopying, recording, or by any information storage or retrieval
system, without written permission from the publisher, except in the case of brief quotations embodied in critical articles and reviews.
Trademarks are property of their respective holders. When used, trademarks are for the benefit of the trademark owner only.
Published by Prime Publishing LLC, 3400 Dundee Road, Northbrook, IL 60062 – www.primecp.com
Free Kids’ Craft Projects
Free Craft Projects Free Paper Crafts
Free Crochet Projects Free Knitting Projects Free Jewelry Making Projects
Free Sewing Projects Free Quilt Projects DIY Wedding Crafts
Free Christmas Crafts Free Holiday Craft Projects Free Crochet Afghan Patterns
Letter from the Editor
Hello Hoppy Families, Easter is one of the most exciting times of the year because of the meaning of the holiday, the family time, and the rising temperatures and shining sun. The adorable little bunnies and chickies don’t hurt the glee surrounding the holiday either. Celebrate Easter to the max this year by decking out your family’s nest with pastel projects, feathery fun, and clucking crafts. Take this joyful opportunity to craft with your kiddos and make memories that will last forever. While kids might outgrow their pants, move on to college, and have kids of their own, you’ll always have the craft projects that they made “way back when.” Everyone will be smiling as you craft flying friends from egg cartons and beautiful baskets fit for a princess. Show your kids how much they mean to you by crafting as a family and then displaying those treasured memories throughout your home each Easter. The children will have a blast gluing, cutting, painting, and coloring their way to Easter euphoria. Encourage this creativity and expression by showing them these awesome crafts that they can make. Enjoy these great kids’ arts and crafts projects that’ll help you celebrate Easter in the most decorative way. You can find more craft projects, recipes, and activity ideas at www.AllFreeKidsCrafts.com.
Our eBooks, like all our kids’ craft projects, are absolutely FREE to members of our kids’ crafts community. Please feel free to share with family and friends and ask them to sign up at our website for our free e-mail newsletter. Happy crafting!
Jaclyn, Editor of AllFreeKidsCrafts www.AllFreeKidsCrafts.com
Kids’ Crafts for Easter: How to Decorate Easter Eggs, Easter Egg Hunt Projects, and more Easter Activities for Kids
Egg Carton Bunnies and Chickies .................. 5 Darling Cheap Chicks ..................................... 7 Yarn Wrapped Easter Egg .............................. 9 Pipe Cleaner Easter Bunny .......................... 11 Tulle Tutu Easter Basket .............................. 14 Dollar Store Easter Bunny Boxes ................. 17 Bunny and Carrot Easter Eggs ..................... 19 Chickie Easter Wreath ................................. 22 Watercolor-ful Doily Butterfly ..................... 26 Easter Egg Door Adornments ...................... 29 Tie-Dye Easter Egg Garland ......................... 33 Fun Foam Easter Baskets ............................ 36

Egg Carton Bunnies and Chickies By: Rebecca from Simple as That A pack of precious Egg Carton Bunnies and Chickies make adorable kids' Easter crafts and decorations. They’re nearly costless, but will bring endless amounts of joy to surround this special holiday. Recycled kids crafts like this are a simple and cute way to celebrate Easter with the little ones!
Materials:
Egg carton
Pair of scissors
Fine point black Sharpie
Adhesive or glue gun
Construction/scrapbook paper
Small white pom pom, button, or bead Instructions: 1.) Cut the sections of an egg carton apart to use for the body. 2.) Cut out of construction/scrapbook paper all the parts you'll need for the bunny and chick using the pieces pictured as a guide.
2.) Start putting your bunny and chick together by gluing the paper pieces to the egg carton section. For the bunny, fold over a thin portion at the base of each ear forming a thin tab. Put adhesive on the bottom of the tab and glue to egg carton.
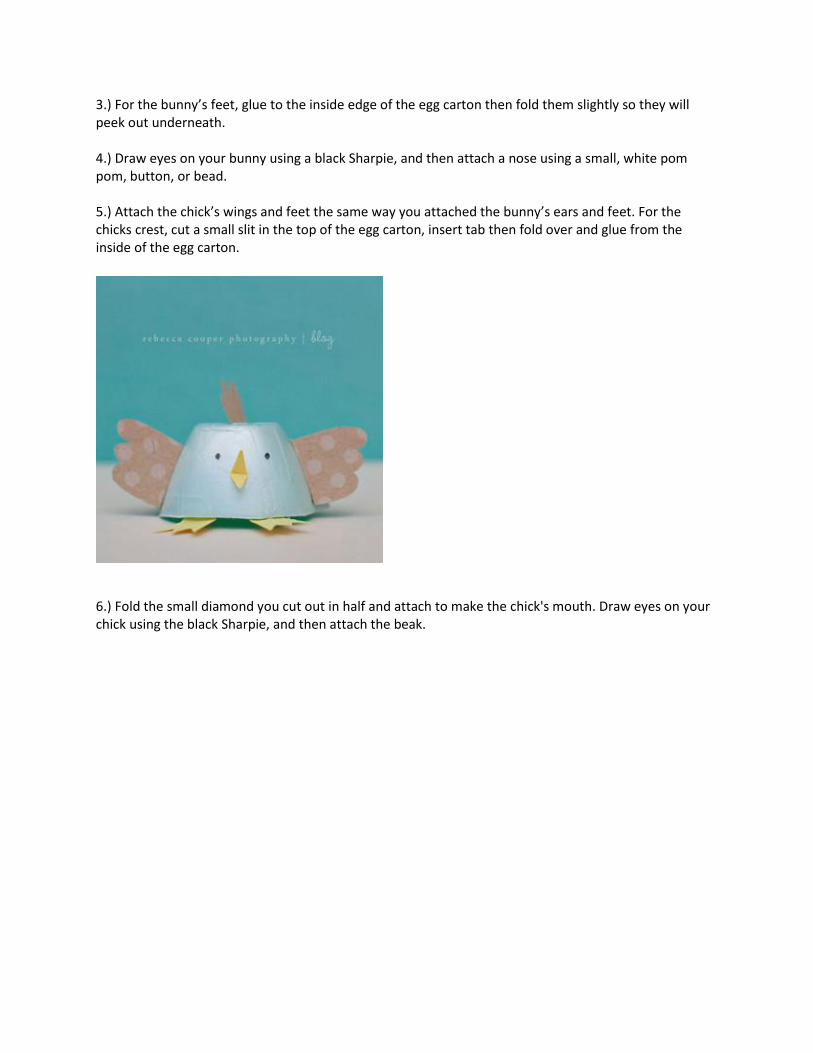
3.) For the bunny’s feet, glue to the inside edge of the egg carton then fold them slightly so they will peek out underneath. 4.) Draw eyes on your bunny using a black Sharpie, and then attach a nose using a small, white pom pom, button, or bead. 5.) Attach the chick’s wings and feet the same way you attached the bunny’s ears and feet. For the chicks crest, cut a small slit in the top of the egg carton, insert tab then fold over and glue from the inside of the egg carton.
6.) Fold the small diamond you cut out in half and attach to make the chick's mouth. Draw eyes on your chick using the black Sharpie, and then attach the beak.
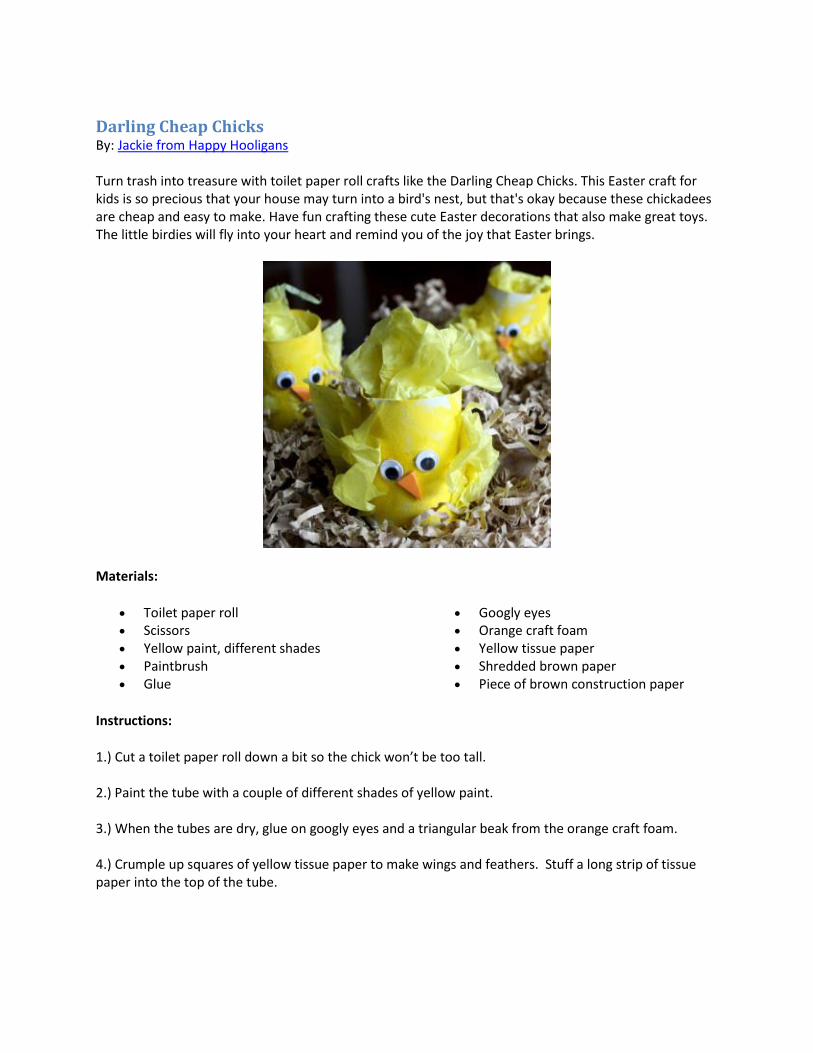
Darling Cheap Chicks By: Jackie from Happy Hooligans Turn trash into treasure with toilet paper roll crafts like the Darling Cheap Chicks. This Easter craft for kids is so precious that your house may turn into a bird's nest, but that's okay because these chickadees are cheap and easy to make. Have fun crafting these cute Easter decorations that also make great toys. The little birdies will fly into your heart and remind you of the joy that Easter brings.
Materials:
Toilet paper roll Scissors Yellow paint, different shades Paintbrush Glue
Googly eyes Orange craft foam Yellow tissue paper Shredded brown paper Piece of brown construction paper
Instructions:
1.) Cut a toilet paper roll down a bit so the chick won’t be too tall. 2.) Paint the tube with a couple of different shades of yellow paint. 3.) When the tubes are dry, glue on googly eyes and a triangular beak from the orange craft foam. 4.) Crumple up squares of yellow tissue paper to make wings and feathers. Stuff a long strip of tissue paper into the top of the tube.
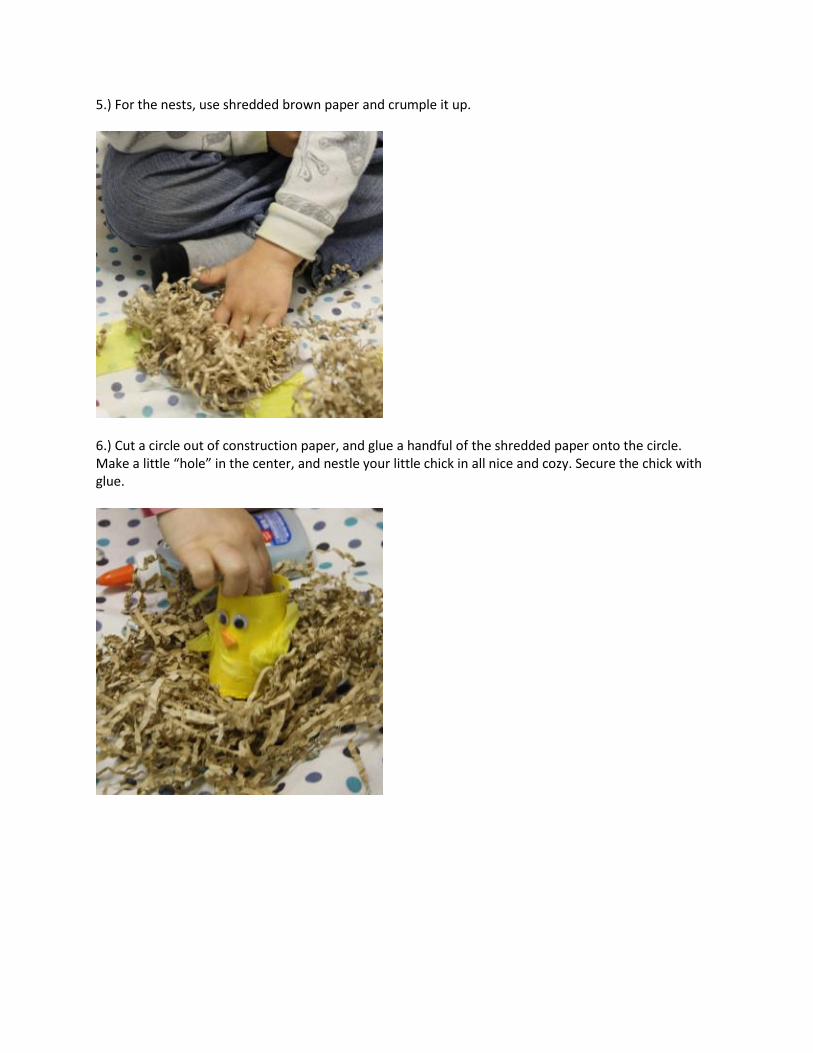
5.) For the nests, use shredded brown paper and crumple it up.
6.) Cut a circle out of construction paper, and glue a handful of the shredded paper onto the circle. Make a little “hole” in the center, and nestle your little chick in all nice and cozy. Secure the chick with glue.
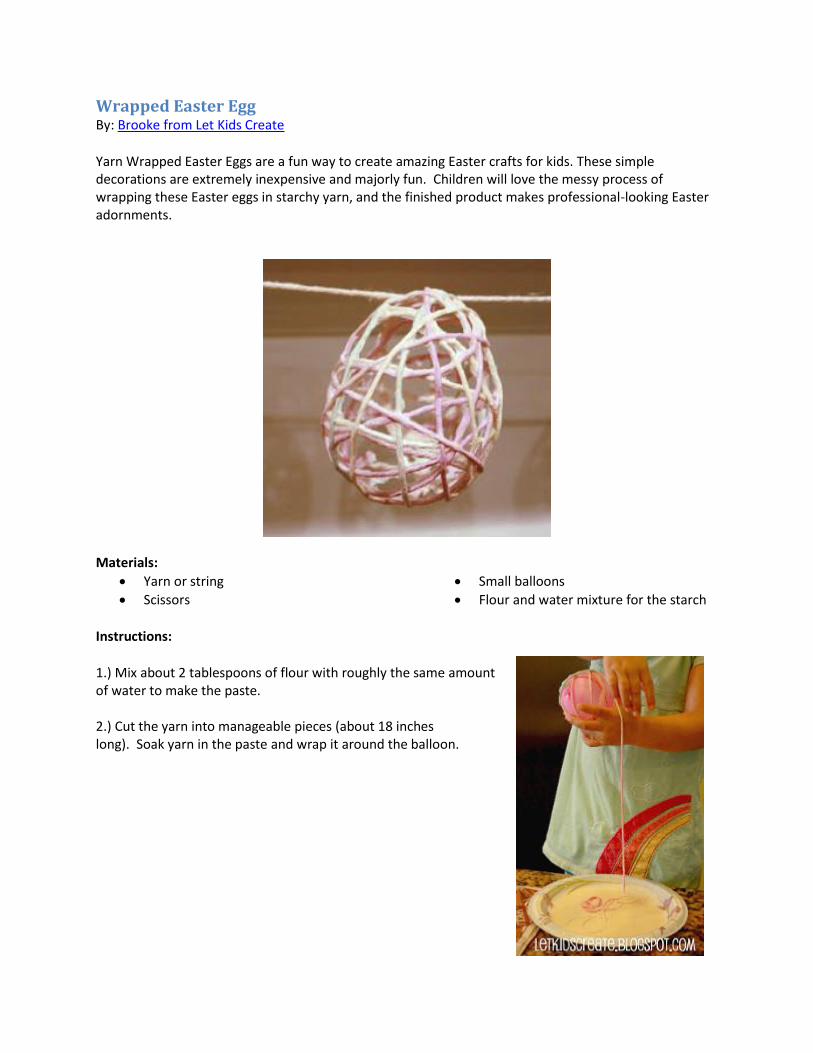
Wrapped Easter Egg By: Brooke from Let Kids Create
Yarn Wrapped Easter Eggs are a fun way to create amazing Easter crafts for kids. These simple decorations are extremely inexpensive and majorly fun. Children will love the messy process of wrapping these Easter eggs in starchy yarn, and the finished product makes professional-looking Easter adornments.
Materials:
Yarn or string
Scissors
Small balloons
Flour and water mixture for the starch
Instructions:
1.) Mix about 2 tablespoons of flour with roughly the same amount of water to make the paste. 2.) Cut the yarn into manageable pieces (about 18 inches long). Soak yarn in the paste and wrap it around the balloon.
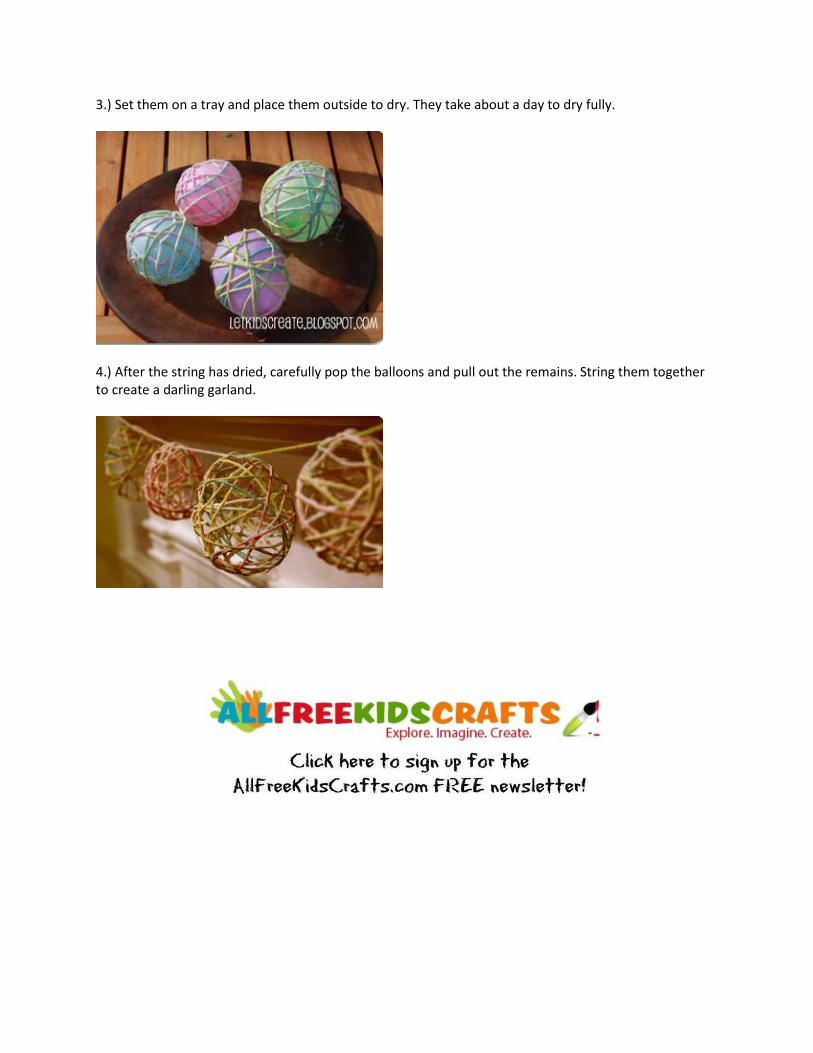
3.) Set them on a tray and place them outside to dry. They take about a day to dry fully.
4.) After the string has dried, carefully pop the balloons and pull out the remains. String them together to create a darling garland.
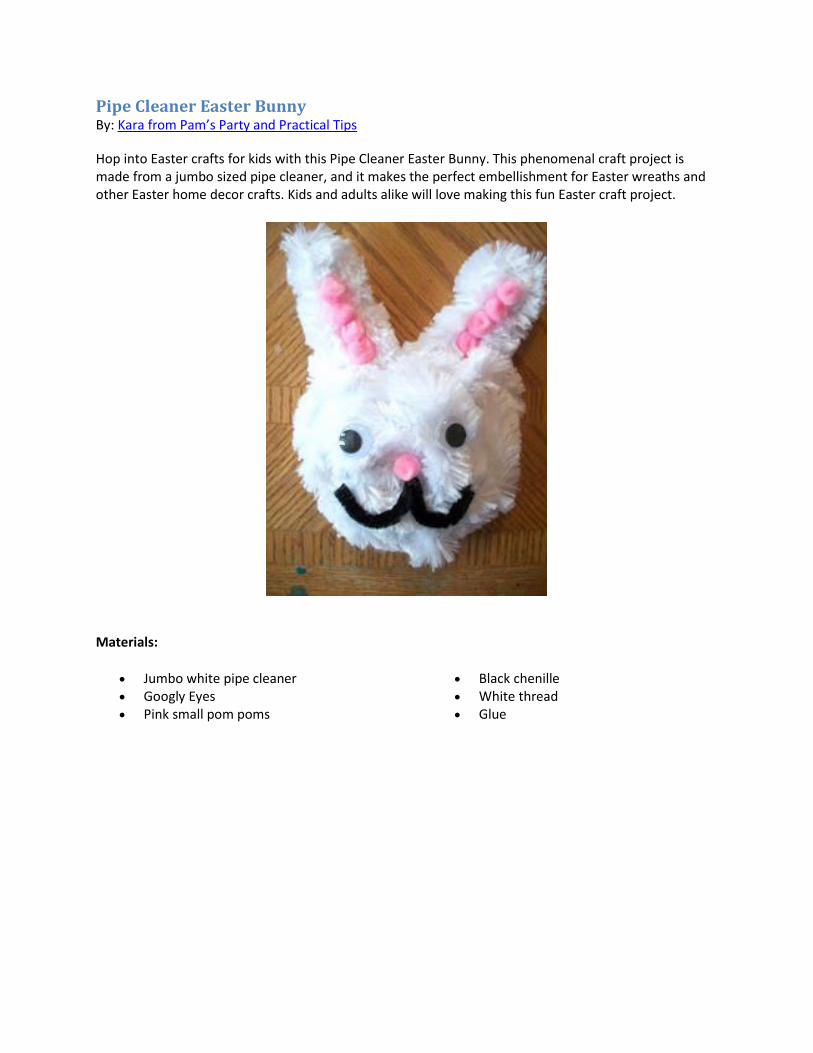
Pipe Cleaner Easter Bunny By: Kara from Pam’s Party and Practical Tips
Hop into Easter crafts for kids with this Pipe Cleaner Easter Bunny. This phenomenal craft project is made from a jumbo sized pipe cleaner, and it makes the perfect embellishment for Easter wreaths and other Easter home decor crafts. Kids and adults alike will love making this fun Easter craft project.
Materials:
Jumbo white pipe cleaner Googly Eyes Pink small pom poms
Black chenille White thread Glue
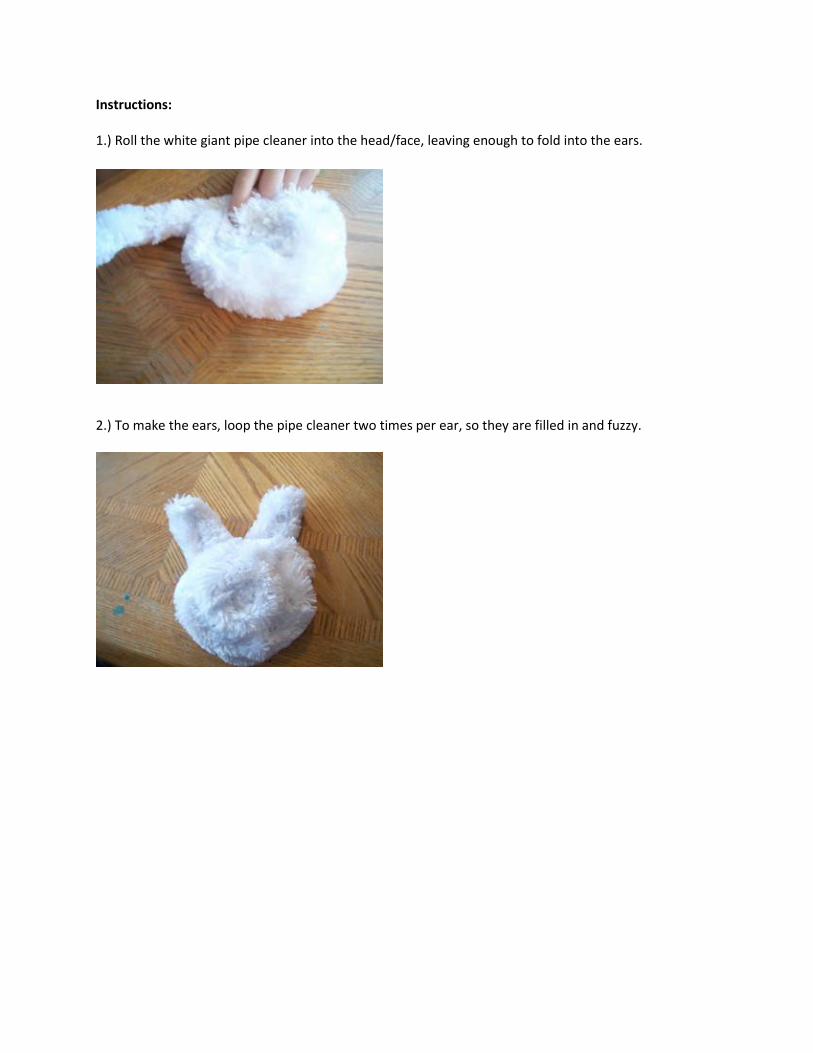
Instructions: 1.) Roll the white giant pipe cleaner into the head/face, leaving enough to fold into the ears.
2.) To make the ears, loop the pipe cleaner two times per ear, so they are filled in and fuzzy.
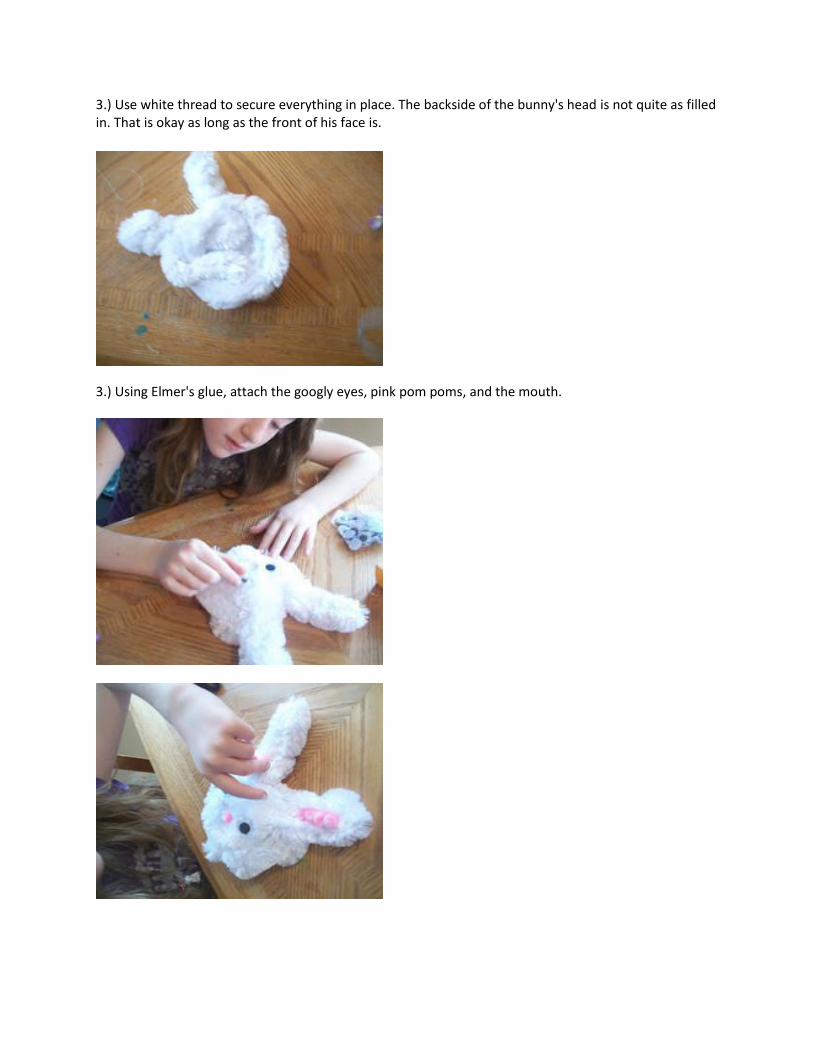
3.) Use white thread to secure everything in place. The backside of the bunny's head is not quite as filled in. That is okay as long as the front of his face is.
3.) Using Elmer's glue, attach the googly eyes, pink pom poms, and the mouth.
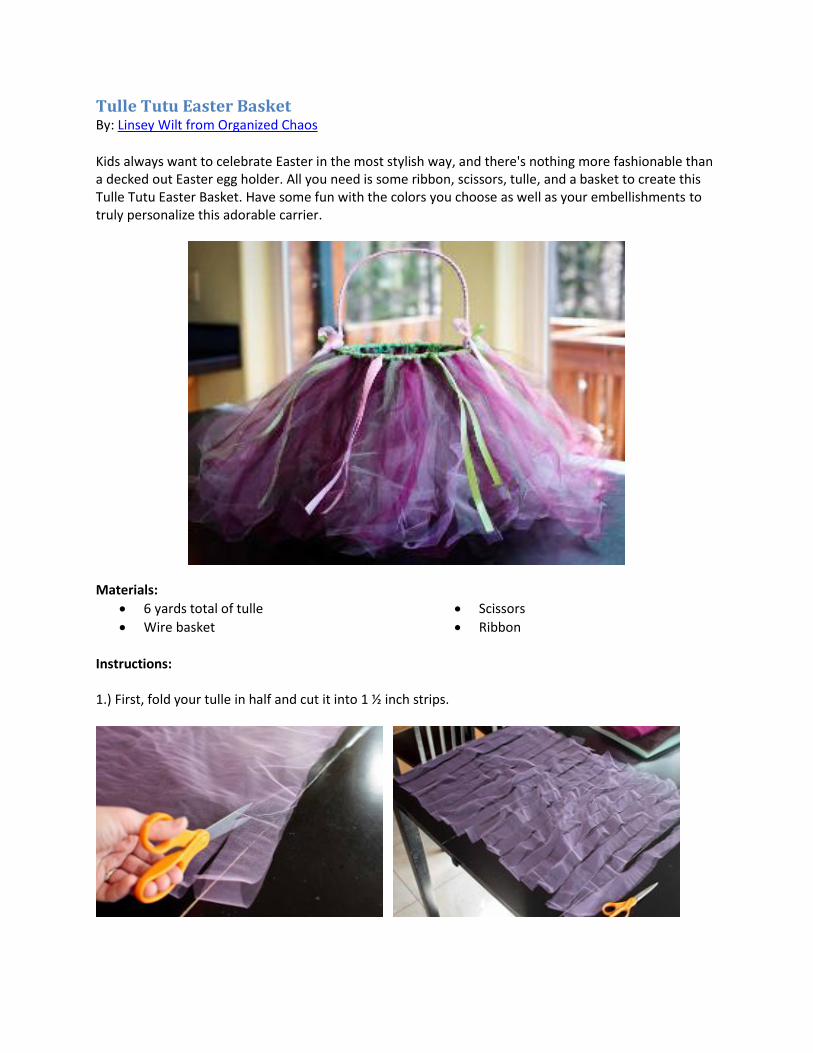
Tulle Tutu Easter Basket By: Linsey Wilt from Organized Chaos
Kids always want to celebrate Easter in the most stylish way, and there's nothing more fashionable than a decked out Easter egg holder. All you need is some ribbon, scissors, tulle, and a basket to create this Tulle Tutu Easter Basket. Have some fun with the colors you choose as well as your embellishments to truly personalize this adorable carrier.
Materials:
6 yards total of tulle
Wire basket
Scissors
Ribbon
Instructions: 1.) First, fold your tulle in half and cut it into 1 ½ inch strips.

2.) Then, go down the line and cut along the folded end, so you end up with two separate strips. Do this for every color.
3.) You are now ready to start knotting. Take two of your strips and fold them in half.
4.) Make a loop with both of the strips at once.
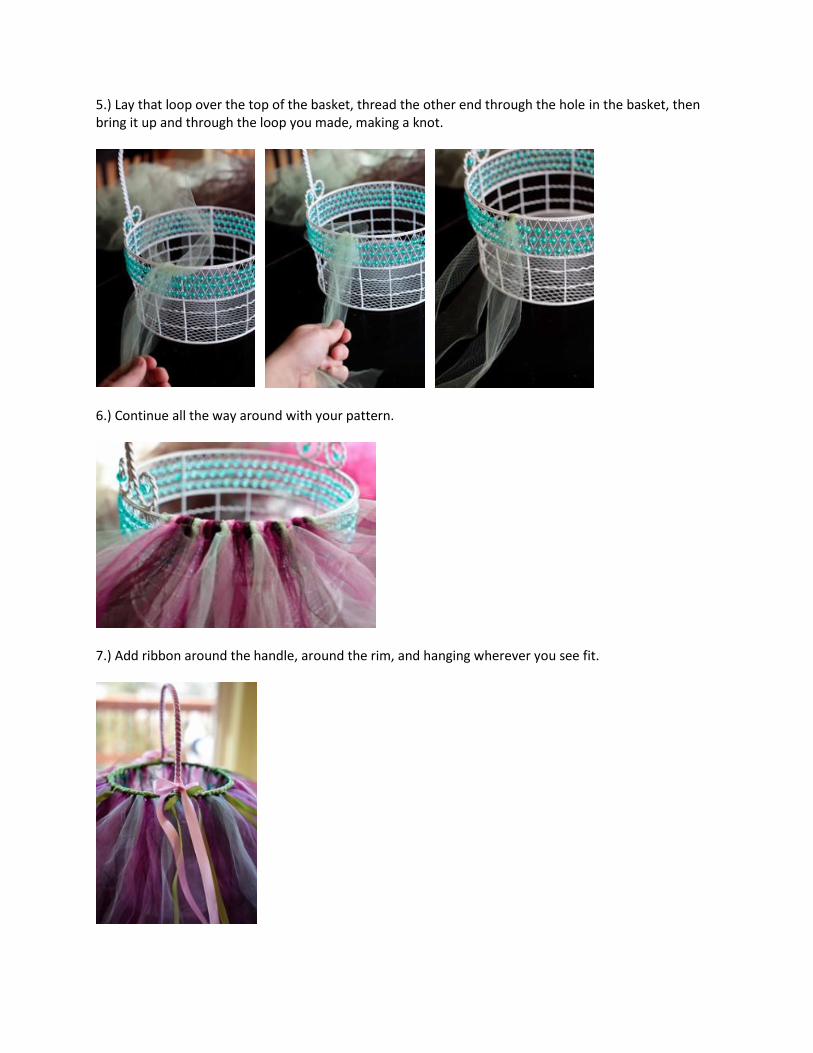
5.) Lay that loop over the top of the basket, thread the other end through the hole in the basket, then bring it up and through the loop you made, making a knot.
6.) Continue all the way around with your pattern.
7.) Add ribbon around the handle, around the rim, and hanging wherever you see fit.
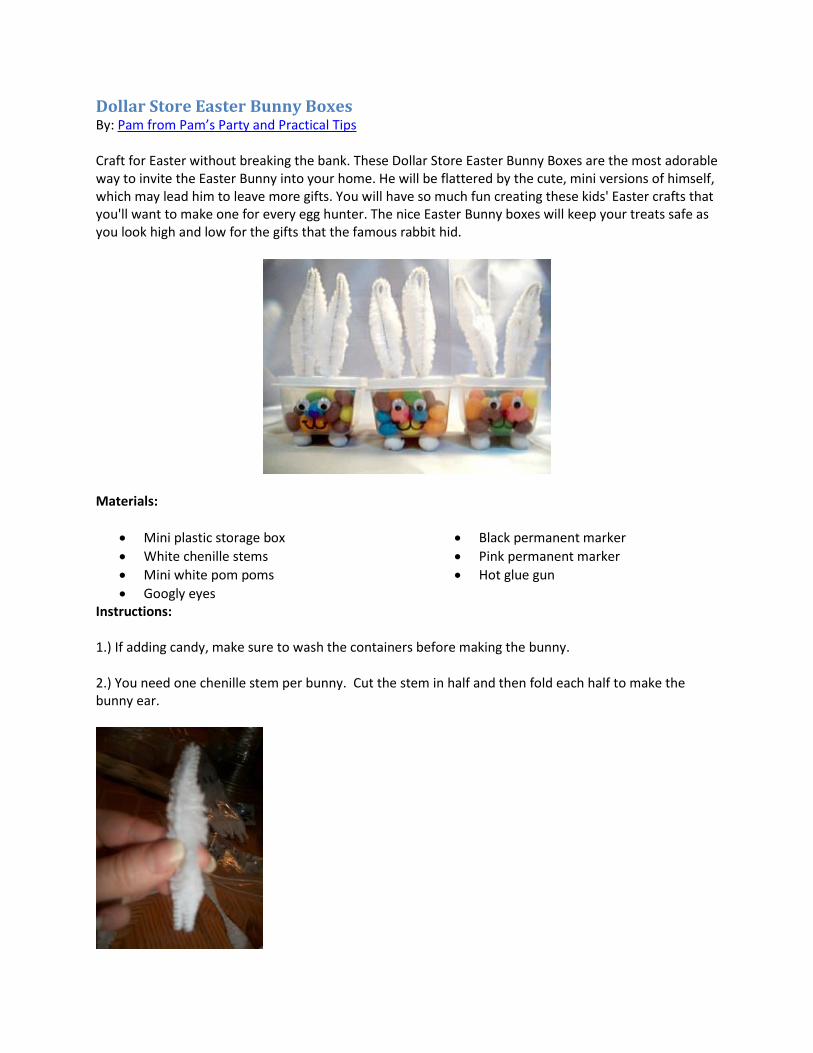
Dollar Store Easter Bunny Boxes By: Pam from Pam’s Party and Practical Tips Craft for Easter without breaking the bank. These Dollar Store Easter Bunny Boxes are the most adorable way to invite the Easter Bunny into your home. He will be flattered by the cute, mini versions of himself, which may lead him to leave more gifts. You will have so much fun creating these kids' Easter crafts that you'll want to make one for every egg hunter. The nice Easter Bunny boxes will keep your treats safe as you look high and low for the gifts that the famous rabbit hid.
Materials:
Mini plastic storage box
White chenille stems
Mini white pom poms
Googly eyes
Black permanent marker
Pink permanent marker
Hot glue gun
Instructions: 1.) If adding candy, make sure to wash the containers before making the bunny. 2.) You need one chenille stem per bunny. Cut the stem in half and then fold each half to make the bunny ear.
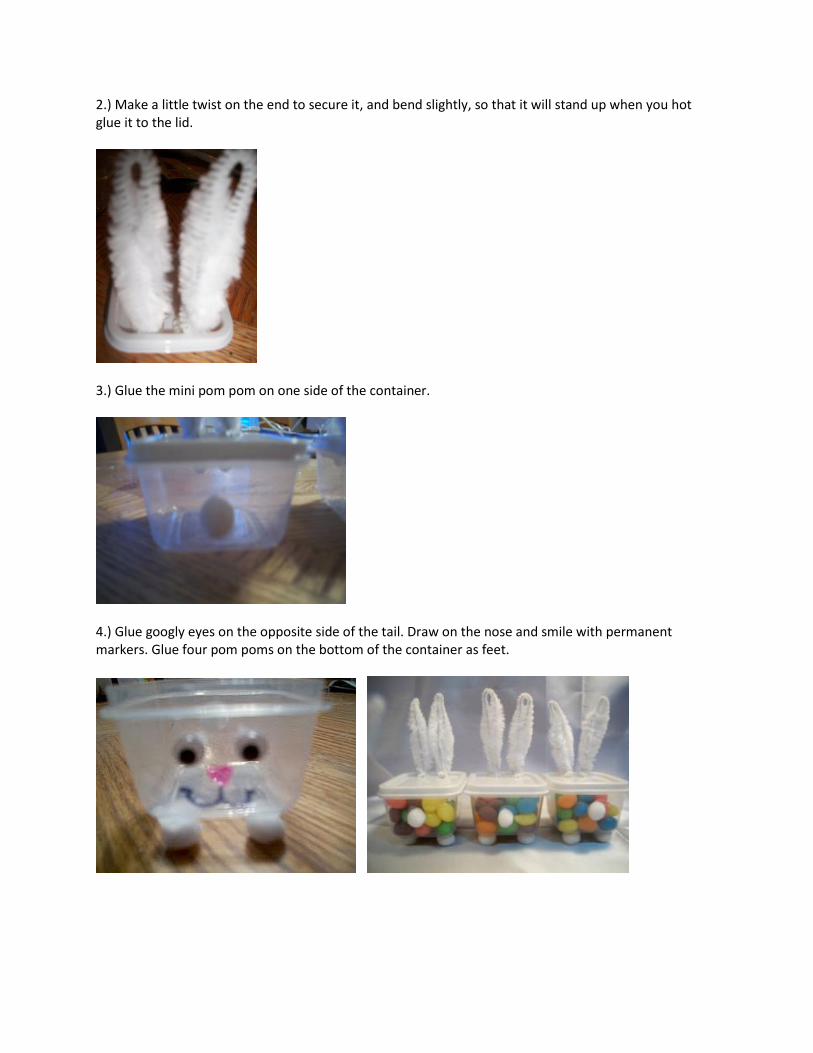
2.) Make a little twist on the end to secure it, and bend slightly, so that it will stand up when you hot glue it to the lid.
3.) Glue the mini pom pom on one side of the container.
4.) Glue googly eyes on the opposite side of the tail. Draw on the nose and smile with permanent markers. Glue four pom poms on the bottom of the container as feet.
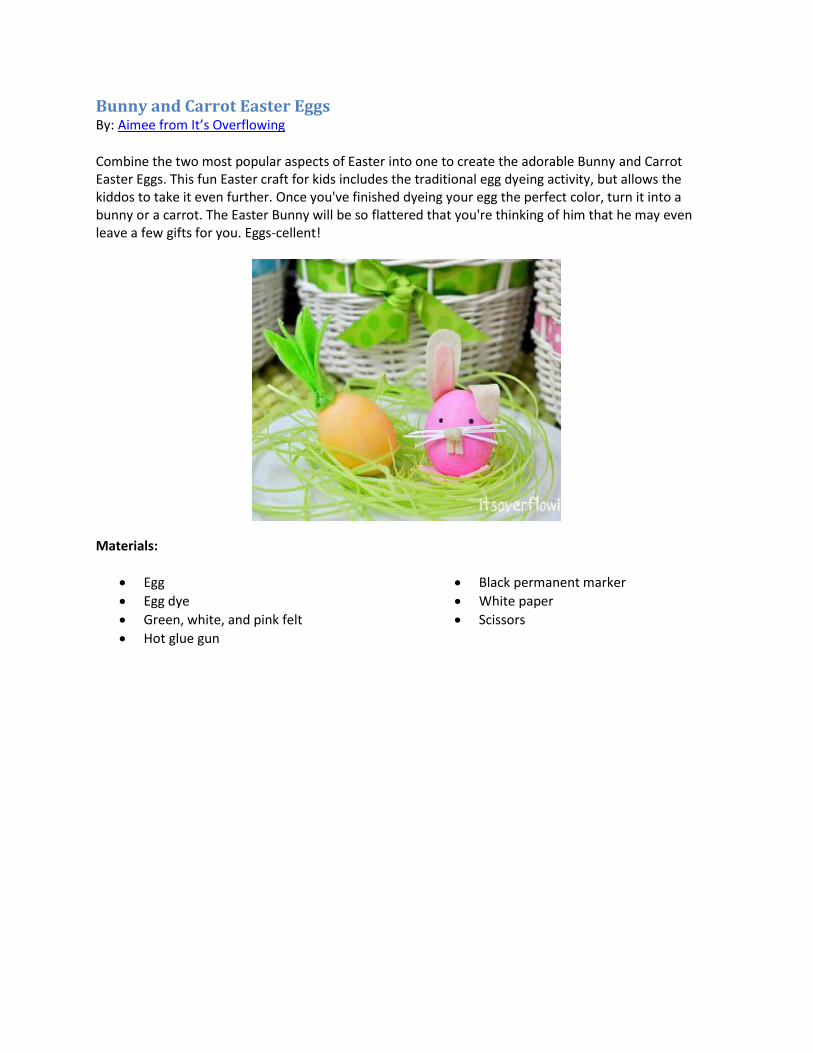
Bunny and Carrot Easter Eggs By: Aimee from It’s Overflowing
Combine the two most popular aspects of Easter into one to create the adorable Bunny and Carrot Easter Eggs. This fun Easter craft for kids includes the traditional egg dyeing activity, but allows the kiddos to take it even further. Once you've finished dyeing your egg the perfect color, turn it into a bunny or a carrot. The Easter Bunny will be so flattered that you're thinking of him that he may even leave a few gifts for you. Eggs-cellent!
Materials:
Egg
Egg dye
Green, white, and pink felt
Hot glue gun
Black permanent marker
White paper
Scissors
Instructions:
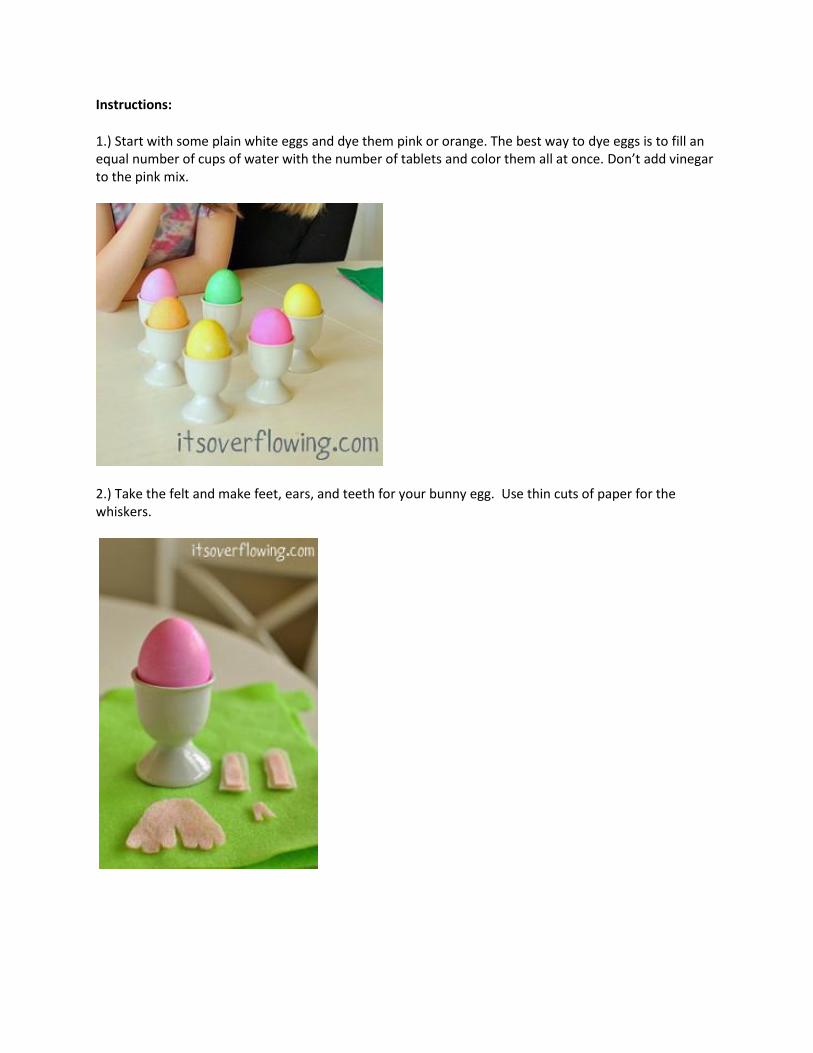
1.) Start with some plain white eggs and dye them pink or orange. The best way to dye eggs is to fill an equal number of cups of water with the number of tablets and color them all at once. Don’t add vinegar to the pink mix.
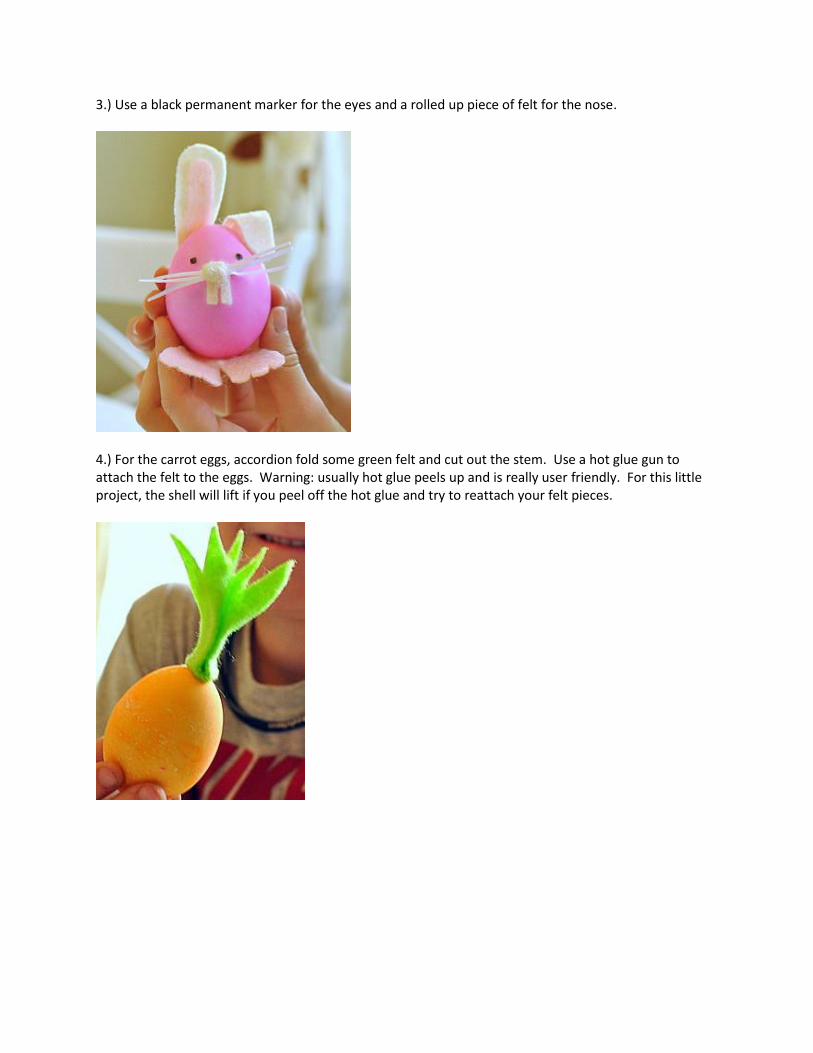
2.) Take the felt and make feet, ears, and teeth for your bunny egg. Use thin cuts of paper for the whiskers.
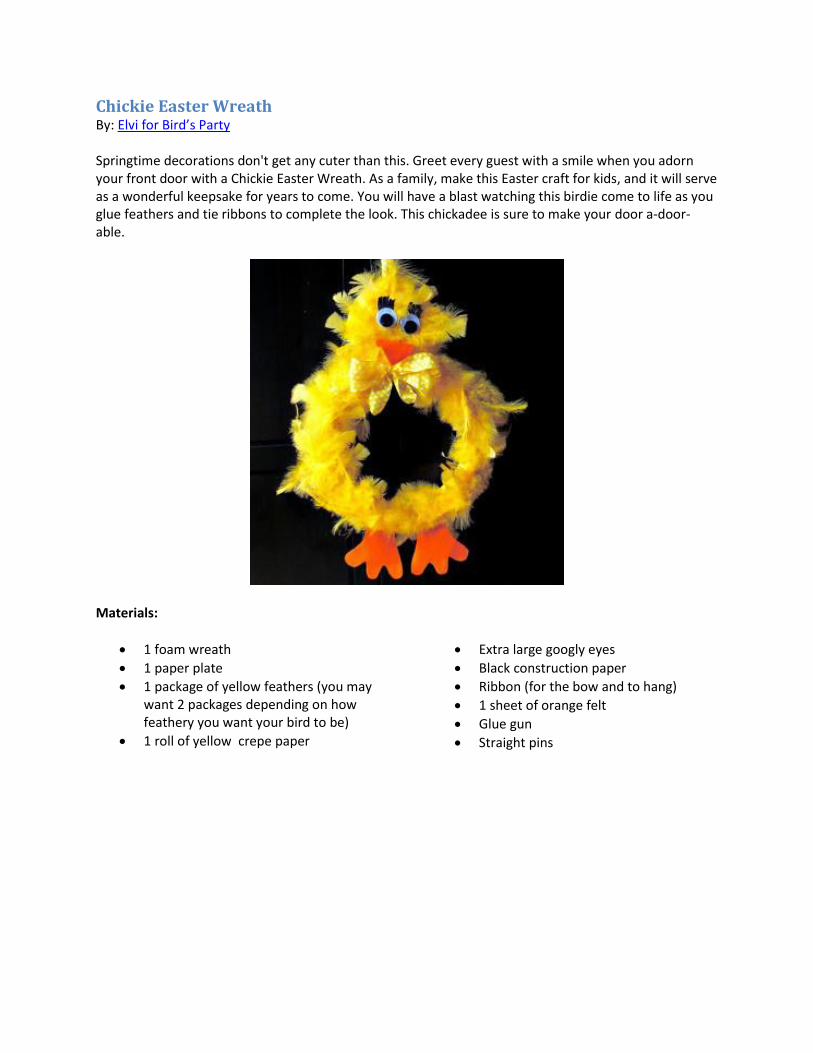
3.) Use a black permanent marker for the eyes and a rolled up piece of felt for the nose.
4.) For the carrot eggs, accordion fold some green felt and cut out the stem. Use a hot glue gun to attach the felt to the eggs. Warning: usually hot glue peels up and is really user friendly. For this little project, the shell will lift if you peel off the hot glue and try to reattach your felt pieces.
Chickie Easter Wreath By: Elvi for Bird’s Party Springtime decorations don't get any cuter than this. Greet every guest with a smile when you adorn your front door with a Chickie Easter Wreath. As a family, make this Easter craft for kids, and it will serve as a wonderful keepsake for years to come. You will have a blast watching this birdie come to life as you glue feathers and tie ribbons to complete the look. This chickadee is sure to make your door a-door-able.
Materials:
1 foam wreath
1 paper plate
1 package of yellow feathers (you may want 2 packages depending on how feathery you want your bird to be)
1 roll of yellow crepe paper
Extra large googly eyes
Black construction paper
Ribbon (for the bow and to hang)
1 sheet of orange felt
Glue gun
Straight pins
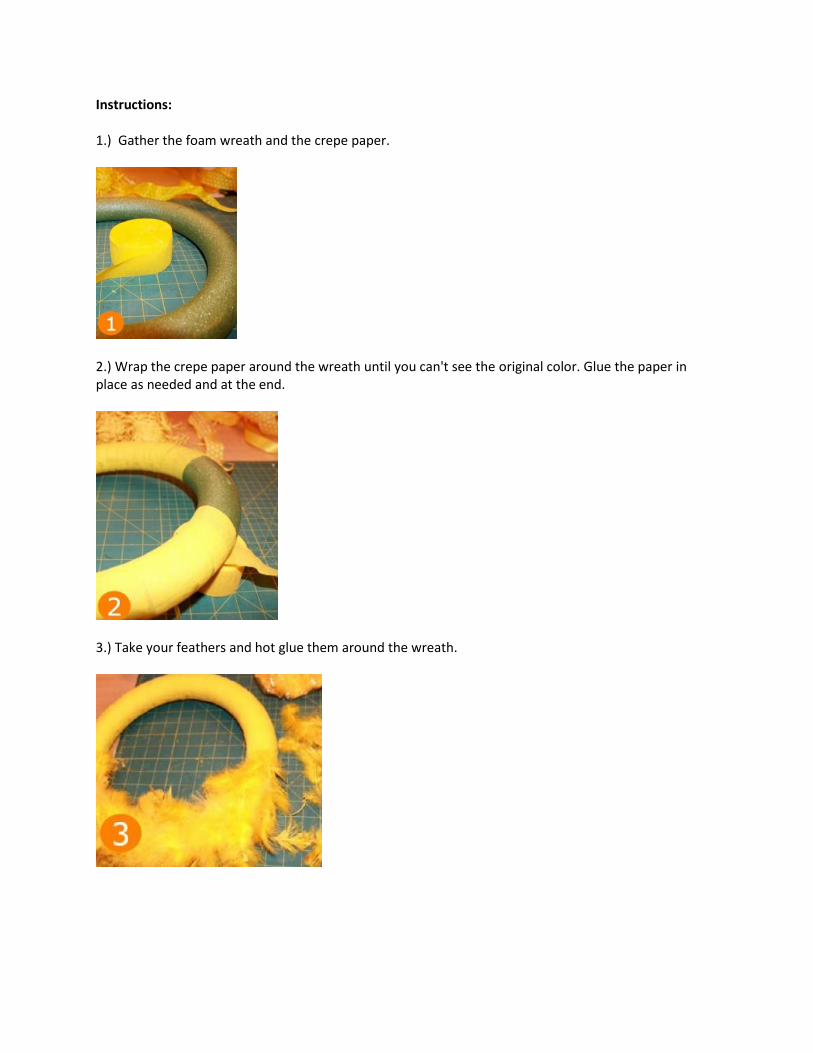
Instructions: 1.) Gather the foam wreath and the crepe paper.
2.) Wrap the crepe paper around the wreath until you can't see the original color. Glue the paper in place as needed and at the end.
3.) Take your feathers and hot glue them around the wreath.
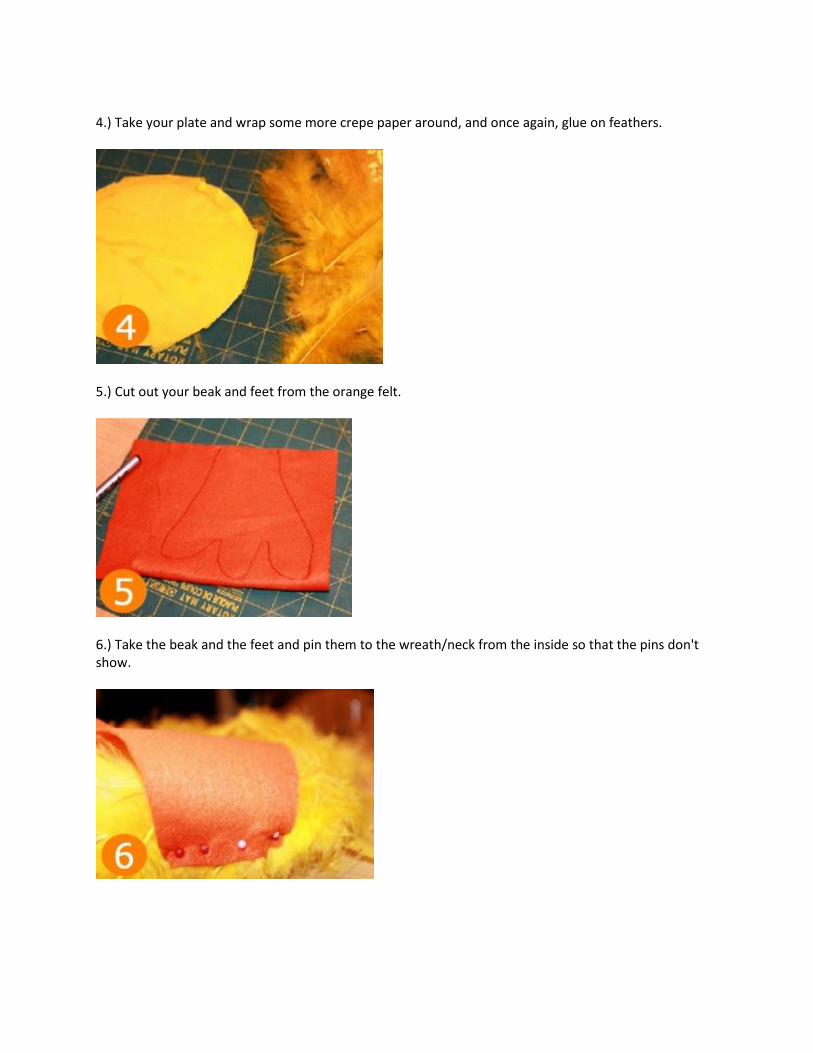
4.) Take your plate and wrap some more crepe paper around, and once again, glue on feathers.
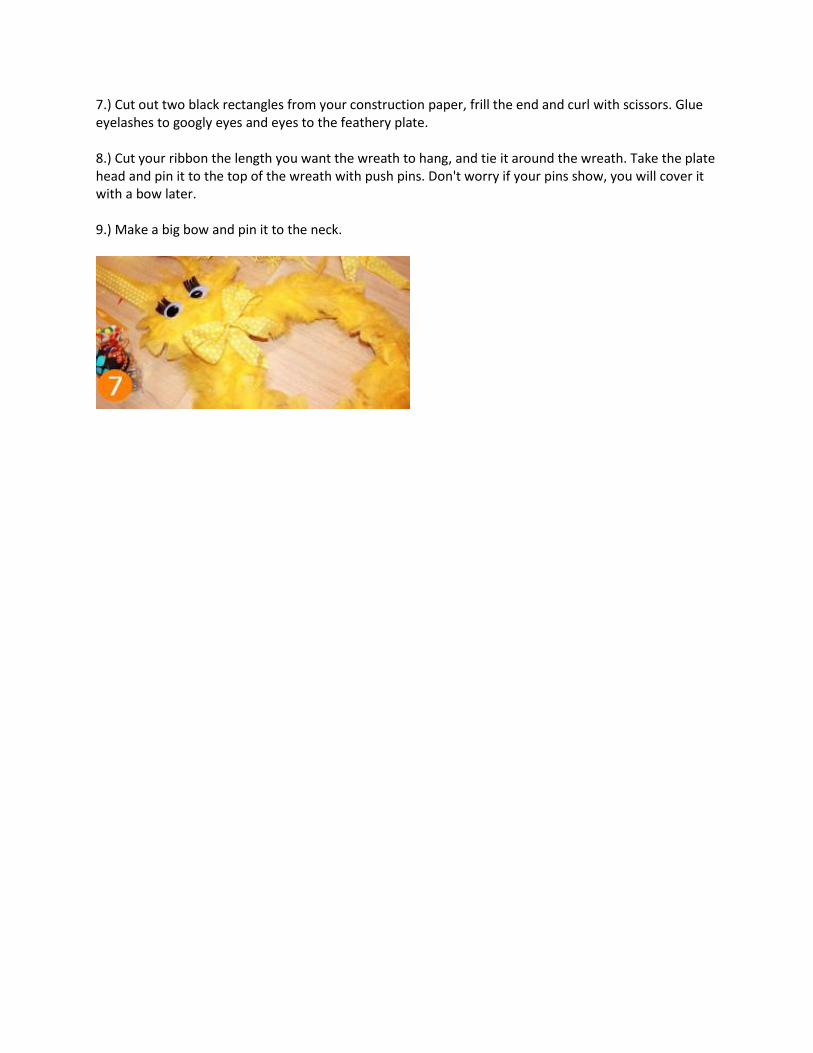
5.) Cut out your beak and feet from the orange felt.
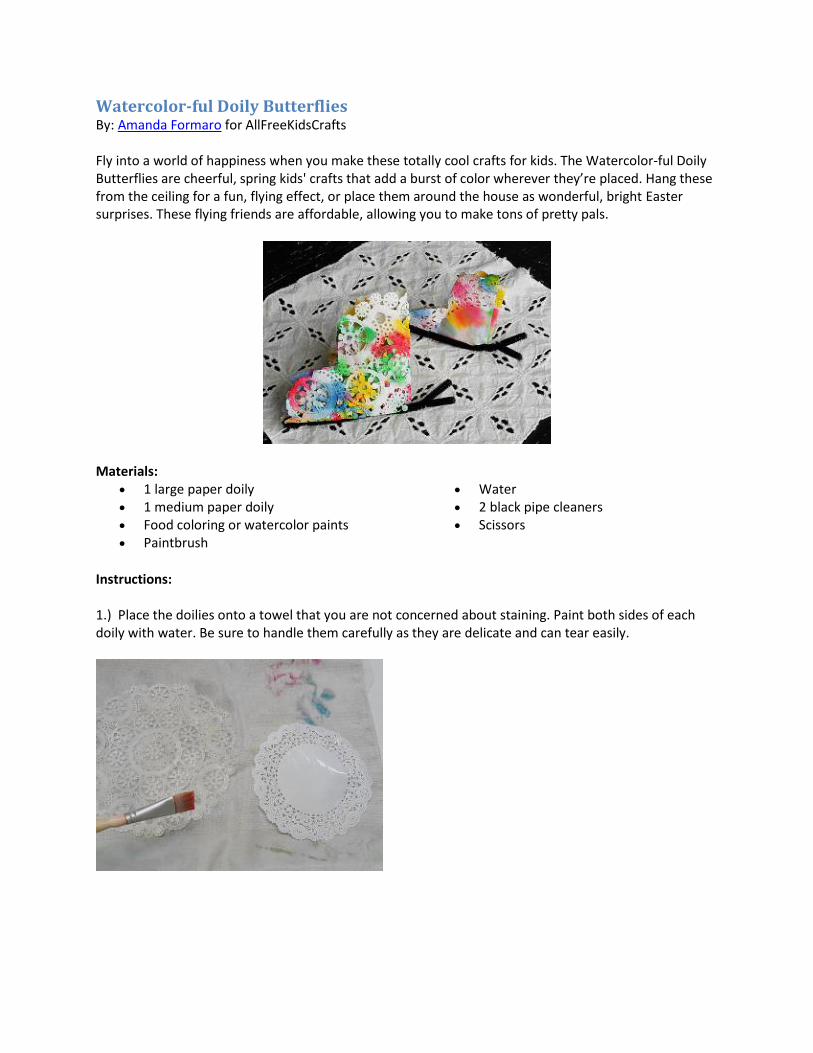
6.) Take the beak and the feet and pin them to the wreath/neck from the inside so that the pins don't show.
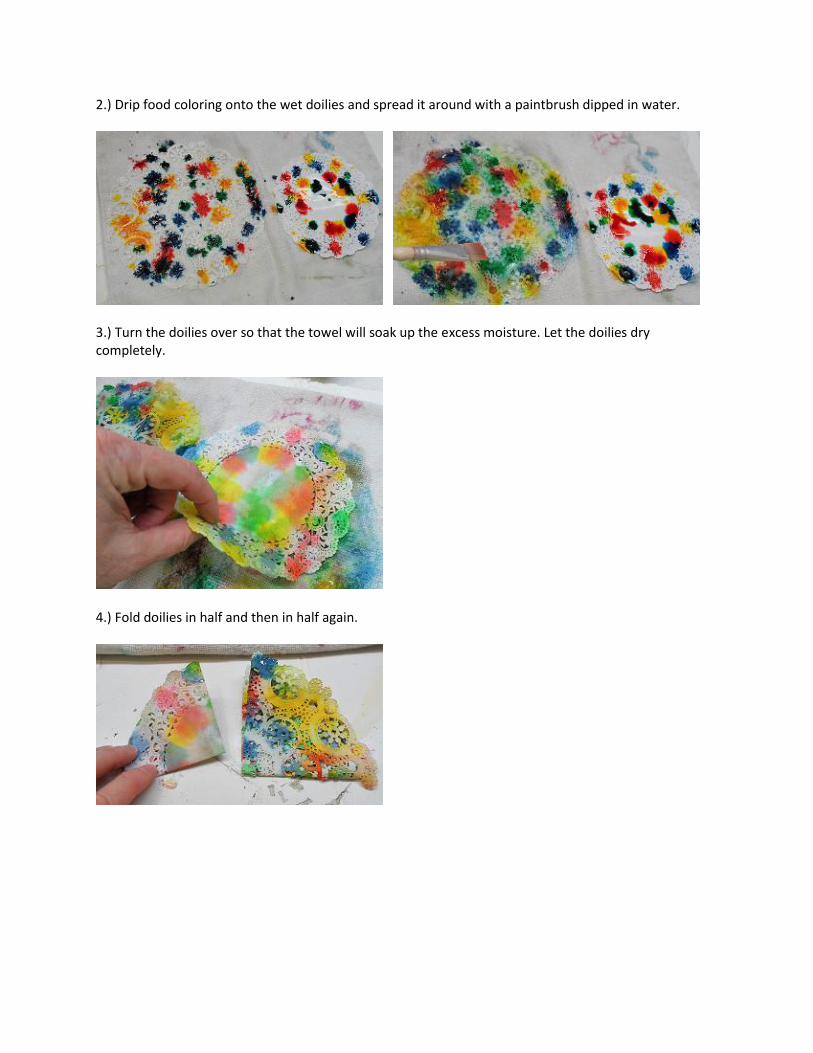
7.) Cut out two black rectangles from your construction paper, frill the end and curl with scissors. Glue eyelashes to googly eyes and eyes to the feathery plate. 8.) Cut your ribbon the length you want the wreath to hang, and tie it around the wreath. Take the plate head and pin it to the top of the wreath with push pins. Don't worry if your pins show, you will cover it with a bow later. 9.) Make a big bow and pin it to the neck.
Watercolor-ful Doily Butterflies By: Amanda Formaro for AllFreeKidsCrafts Fly into a world of happiness when you make these totally cool crafts for kids. The Watercolor-ful Doily Butterflies are cheerful, spring kids' crafts that add a burst of color wherever they’re placed. Hang these from the ceiling for a fun, flying effect, or place them around the house as wonderful, bright Easter surprises. These flying friends are affordable, allowing you to make tons of pretty pals.
Materials:
1 large paper doily 1 medium paper doily Food coloring or watercolor paints Paintbrush
Water 2 black pipe cleaners Scissors
Instructions: 1.) Place the doilies onto a towel that you are not concerned about staining. Paint both sides of each doily with water. Be sure to handle them carefully as they are delicate and can tear easily.
2.) Drip food coloring onto the wet doilies and spread it around with a paintbrush dipped in water.
3.) Turn the doilies over so that the towel will soak up the excess moisture. Let the doilies dry completely.
4.) Fold doilies in half and then in half again.
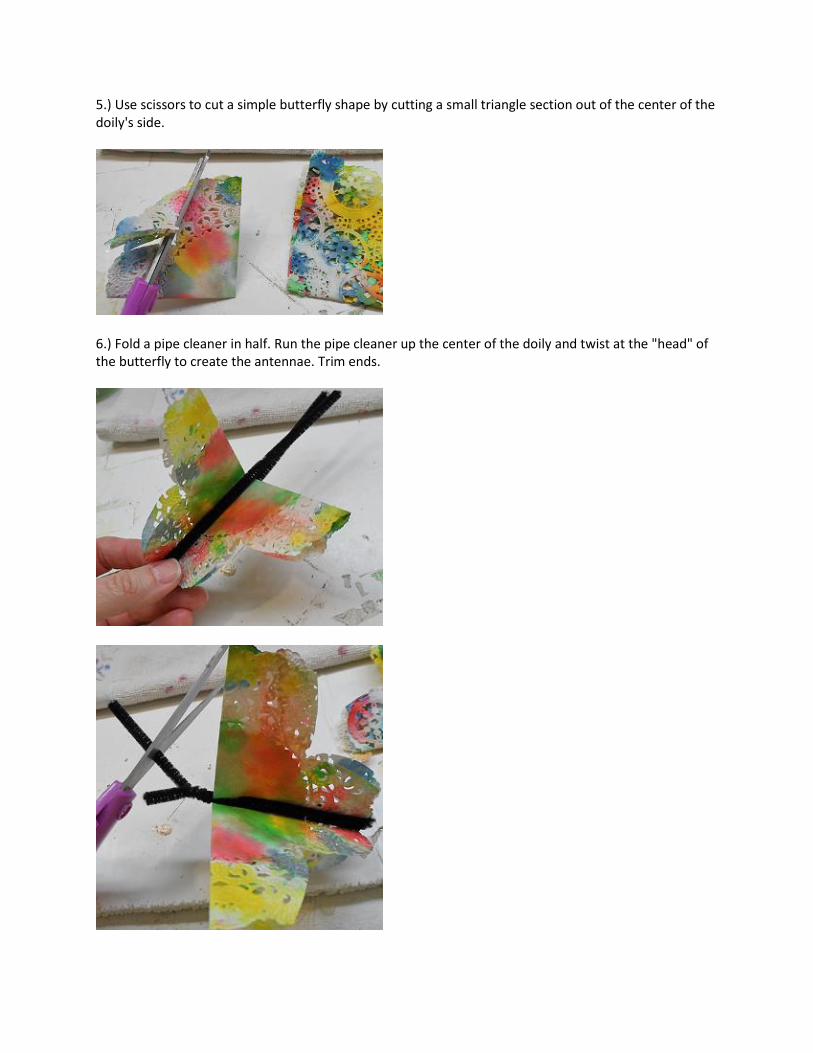
5.) Use scissors to cut a simple butterfly shape by cutting a small triangle section out of the center of the doily's side.
6.) Fold a pipe cleaner in half. Run the pipe cleaner up the center of the doily and twist at the "head" of the butterfly to create the antennae. Trim ends.
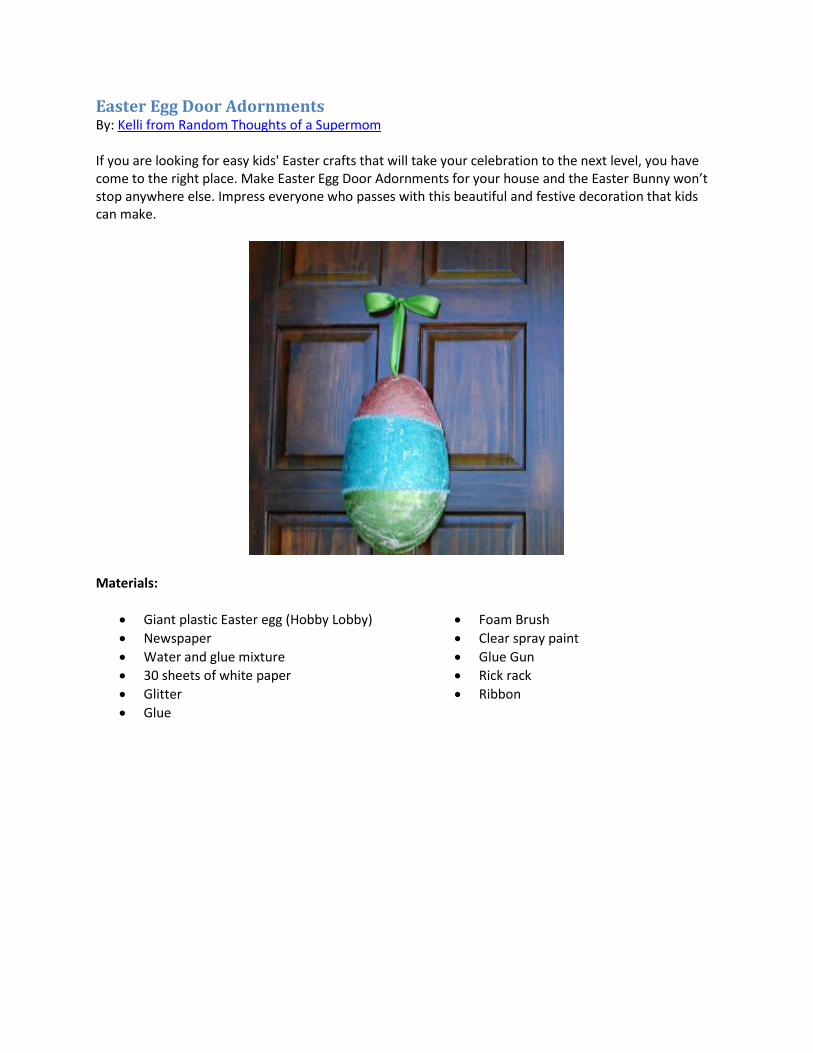
Easter Egg Door Adornments By: Kelli from Random Thoughts of a Supermom If you are looking for easy kids' Easter crafts that will take your celebration to the next level, you have come to the right place. Make Easter Egg Door Adornments for your house and the Easter Bunny won’t stop anywhere else. Impress everyone who passes with this beautiful and festive decoration that kids can make.
Materials:
Giant plastic Easter egg (Hobby Lobby)
Newspaper
Water and glue mixture
30 sheets of white paper
Glitter
Glue
Foam Brush
Clear spray paint
Glue Gun
Rick rack
Ribbon
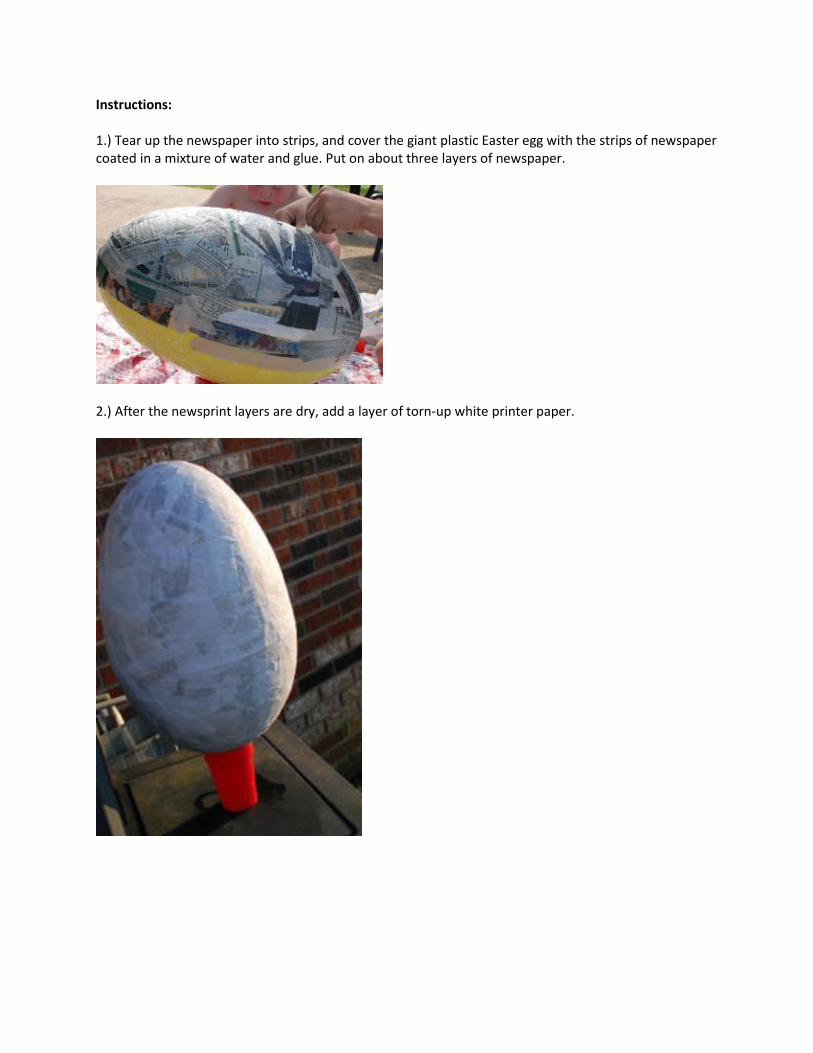
Instructions: 1.) Tear up the newspaper into strips, and cover the giant plastic Easter egg with the strips of newspaper coated in a mixture of water and glue. Put on about three layers of newspaper.
2.) After the newsprint layers are dry, add a layer of torn-up white printer paper.
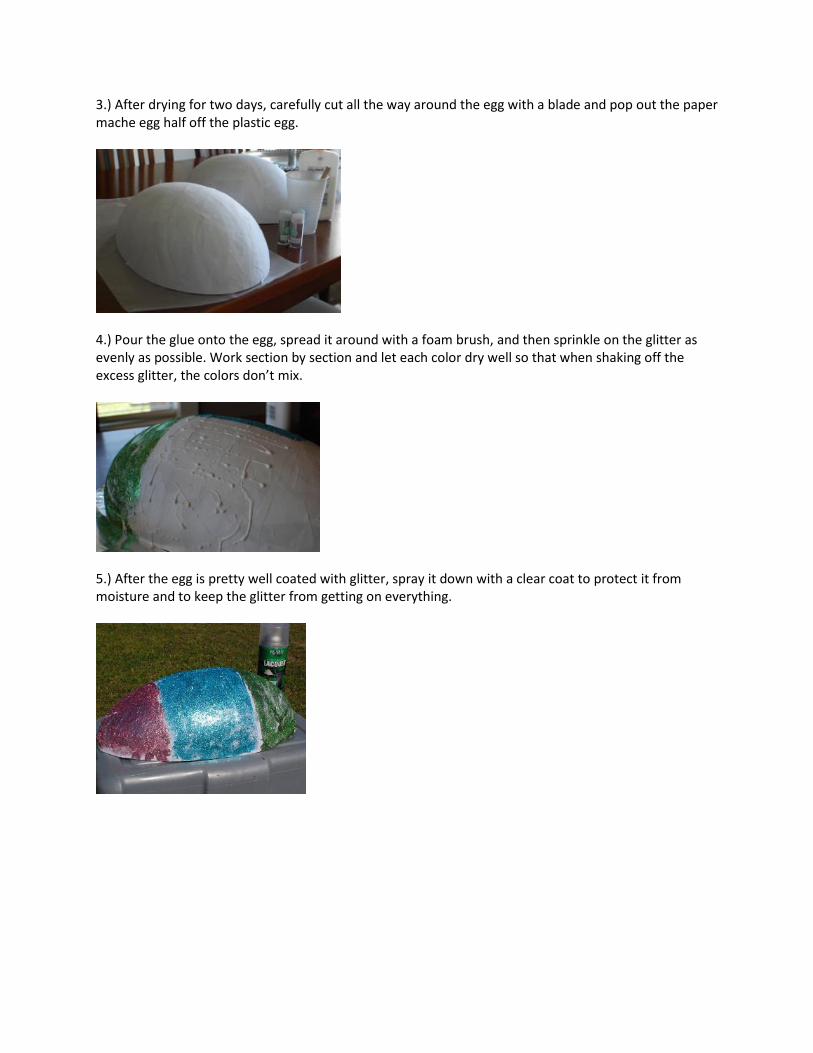
3.) After drying for two days, carefully cut all the way around the egg with a blade and pop out the paper mache egg half off the plastic egg.
4.) Pour the glue onto the egg, spread it around with a foam brush, and then sprinkle on the glitter as evenly as possible. Work section by section and let each color dry well so that when shaking off the excess glitter, the colors don’t mix.
5.) After the egg is pretty well coated with glitter, spray it down with a clear coat to protect it from moisture and to keep the glitter from getting on everything.
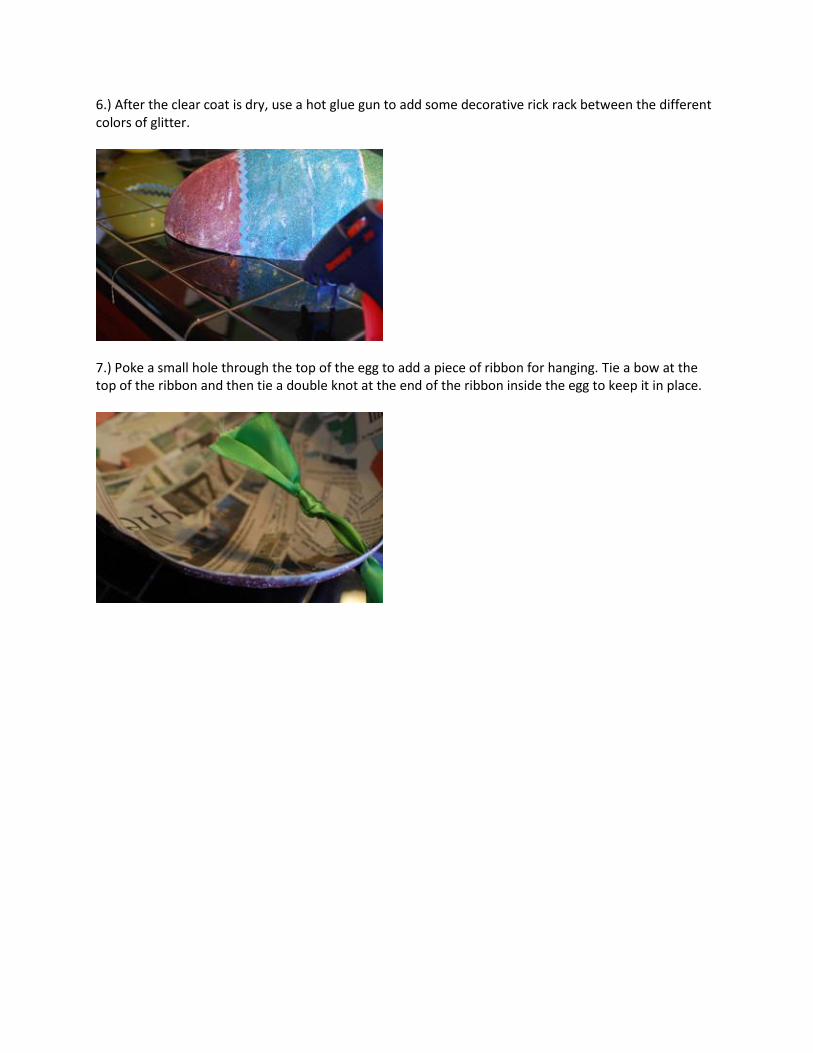
6.) After the clear coat is dry, use a hot glue gun to add some decorative rick rack between the different colors of glitter.
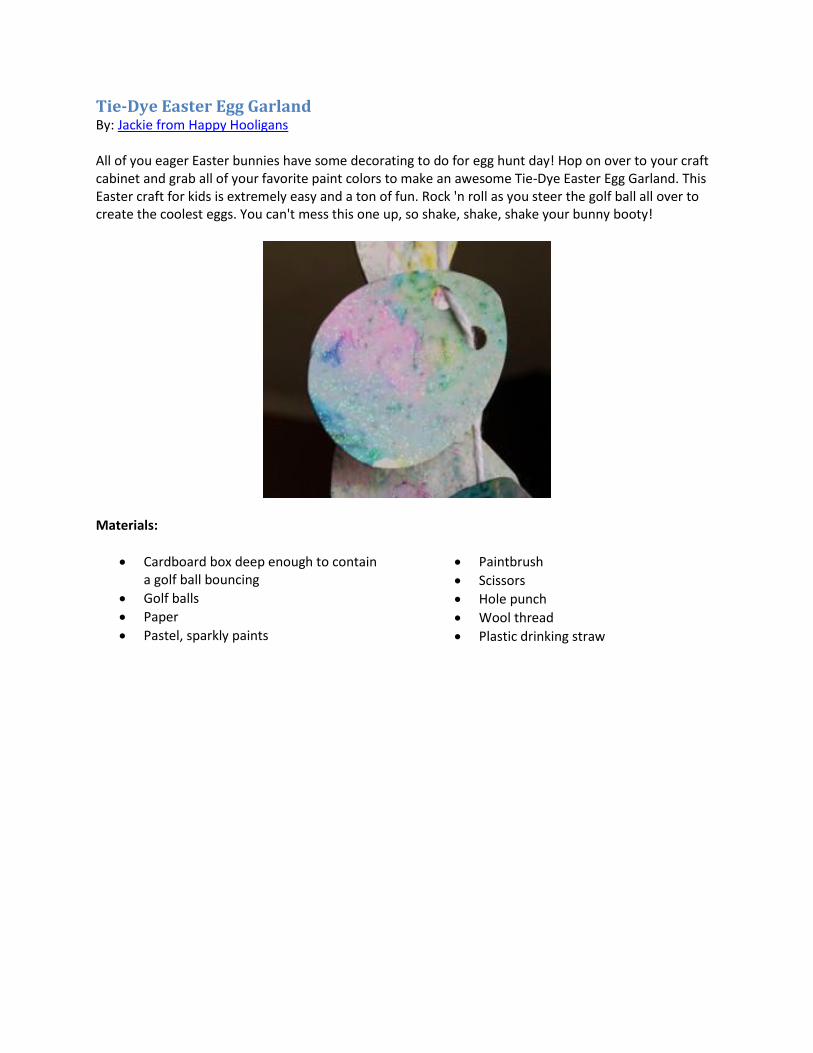
7.) Poke a small hole through the top of the egg to add a piece of ribbon for hanging. Tie a bow at the top of the ribbon and then tie a double knot at the end of the ribbon inside the egg to keep it in place.
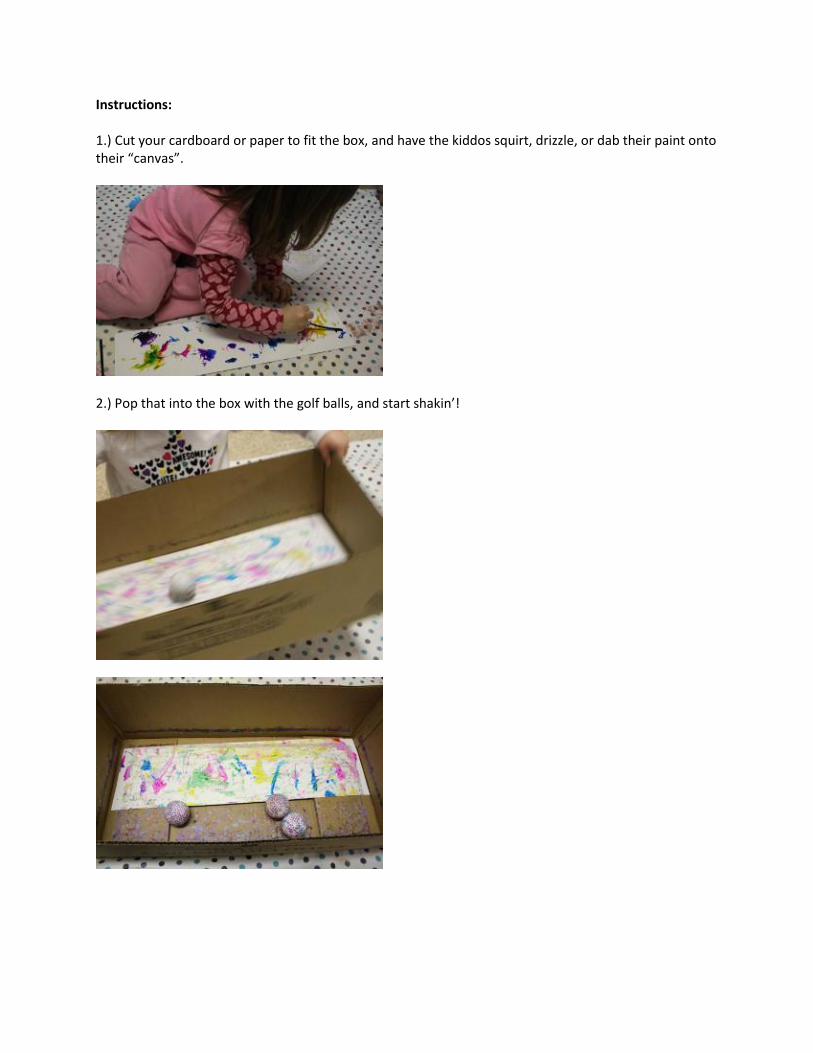
Tie-Dye Easter Egg Garland By: Jackie from Happy Hooligans All of you eager Easter bunnies have some decorating to do for egg hunt day! Hop on over to your craft cabinet and grab all of your favorite paint colors to make an awesome Tie-Dye Easter Egg Garland. This Easter craft for kids is extremely easy and a ton of fun. Rock 'n roll as you steer the golf ball all over to create the coolest eggs. You can't mess this one up, so shake, shake, shake your bunny booty!
Materials:
Cardboard box deep enough to contain a golf ball bouncing
Golf balls
Paper
Pastel, sparkly paints
Paintbrush
Scissors
Hole punch
Wool thread
Plastic drinking straw
Instructions: 1.) Cut your cardboard or paper to fit the box, and have the kiddos squirt, drizzle, or dab their paint onto their “canvas”.
2.) Pop that into the box with the golf balls, and start shakin’!
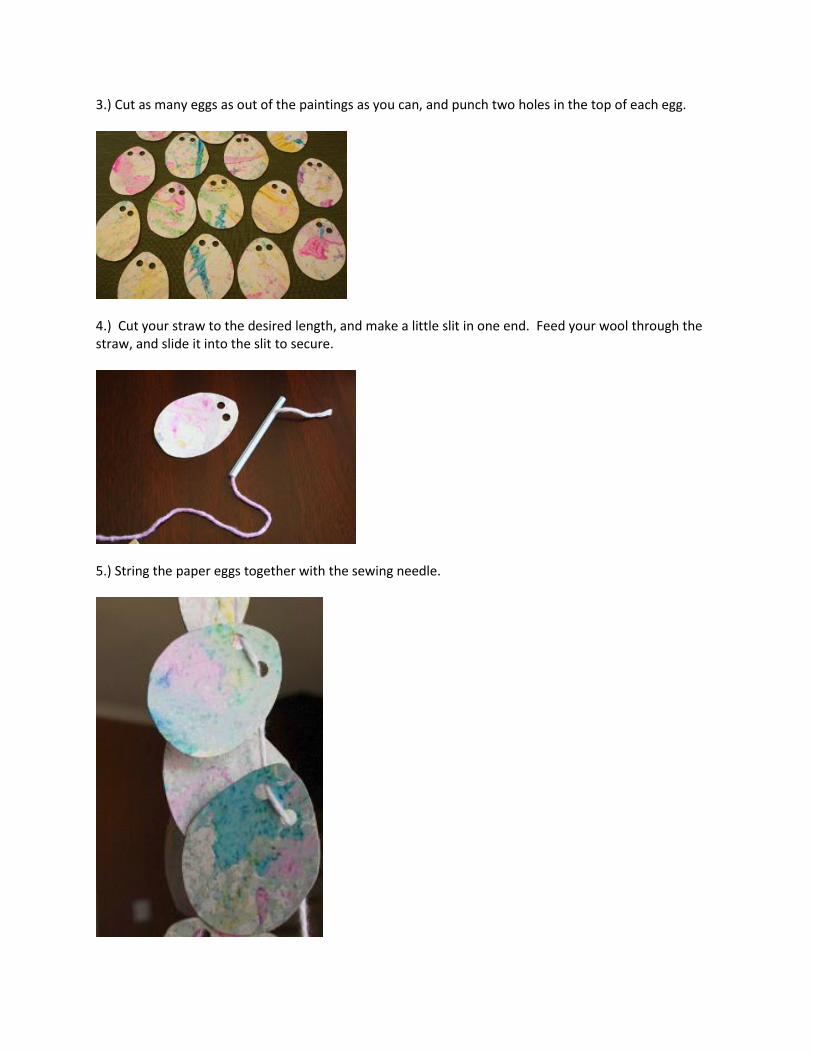
3.) Cut as many eggs as out of the paintings as you can, and punch two holes in the top of each egg.
4.) Cut your straw to the desired length, and make a little slit in one end. Feed your wool through the straw, and slide it into the slit to secure.
5.) String the paper eggs together with the sewing needle.
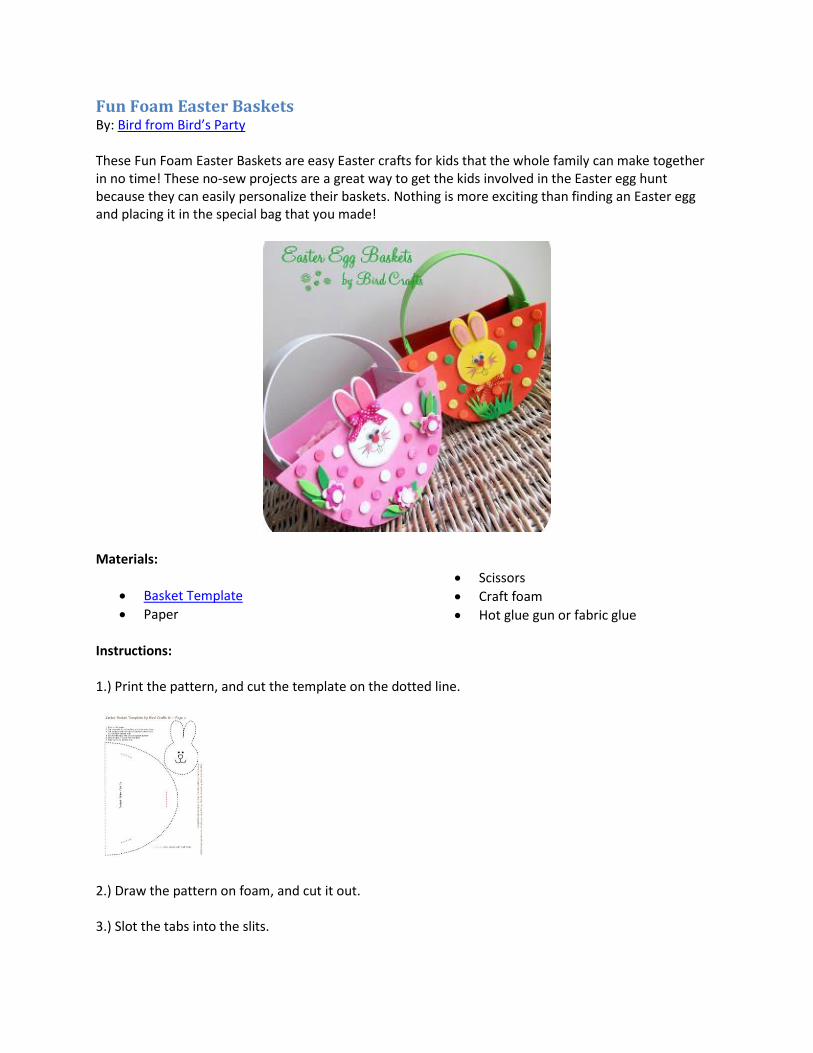
Fun Foam Easter Baskets By: Bird from Bird’s Party These Fun Foam Easter Baskets are easy Easter crafts for kids that the whole family can make together in no time! These no-sew projects are a great way to get the kids involved in the Easter egg hunt because they can easily personalize their baskets. Nothing is more exciting than finding an Easter egg and placing it in the special bag that you made!
Materials:
Basket Template
Paper
Scissors
Craft foam
Hot glue gun or fabric glue
Instructions: 1.) Print the pattern, and cut the template on the dotted line.
2.) Draw the pattern on foam, and cut it out. 3.) Slot the tabs into the slits.
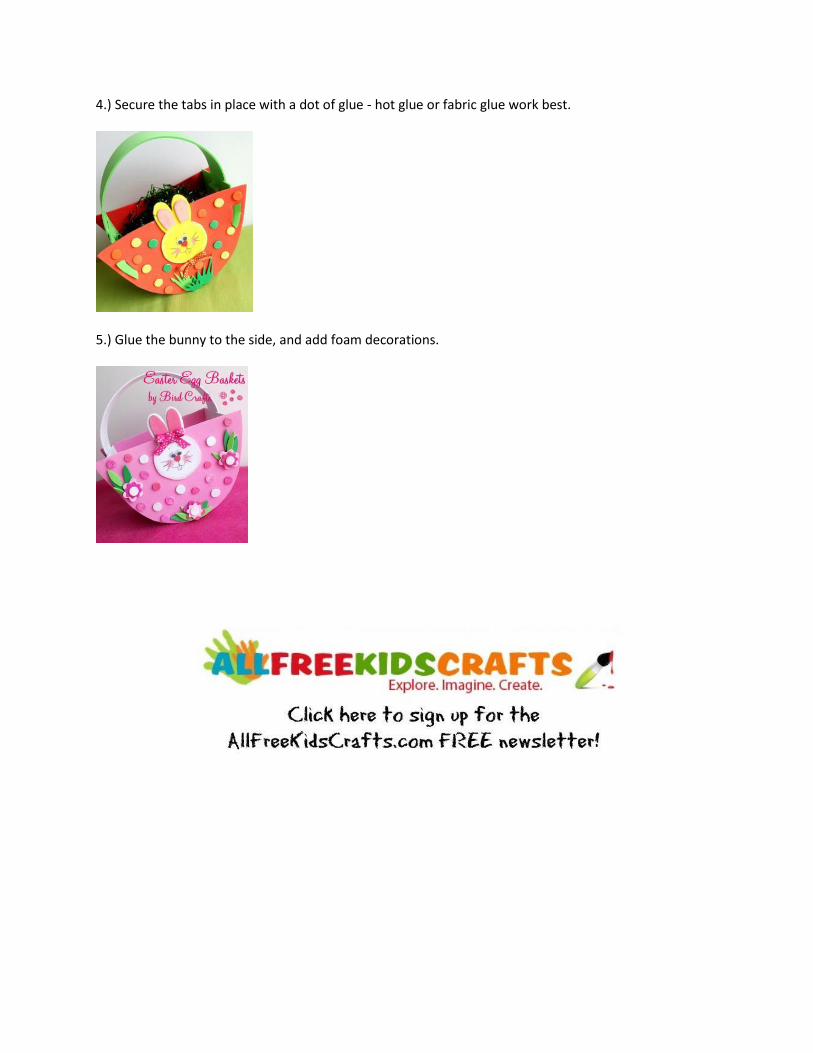
4.) Secure the tabs in place with a dot of glue - hot glue or fabric glue work best.
5.) Glue the bunny to the side, and add foam decorations.
Kids’ Crafts for Easter: How to Decorate Easter Eggs, Easter Egg Hunt Projects, and more Easter Activities for Kids
Thanks to everyone included in this eBook:
Bird from Bird’s Party
Elvi from LoLoVie
Pam Maxwell from Pam’s Party and Practical Tips
Kara Maxwell from Pam’s Party and Practical Tips
Jackie from Happy Hooligans
Linsey Wilt from Organized Chaos
Amanda Formaro from Crafts by Amanda
Kelli Wilson from Random Thoughts of a Supermom
Brooke from Let Kids Create
Rebecca from Simple as That
Aimee from It’s Overflowing
Featured in this eBook:
Egg Carton Bunnies and Chickies
Tulle Tutu Easter Basket
Bunny and Carrot Easter Eggs
Sign up for our free kids’ crafts newsletter and receive more collections, free craft projects, activity ideas, and more right in your inbox every week!