irrigation gravity fed drip irrigation kit - showme.co.za · gravity fed drip irrigation kit...
TRANSCRIPT
Gravity Fed Drip Irrigation KitDK100-G, DK250-G, DK500-G
I r r igat ionRivulis
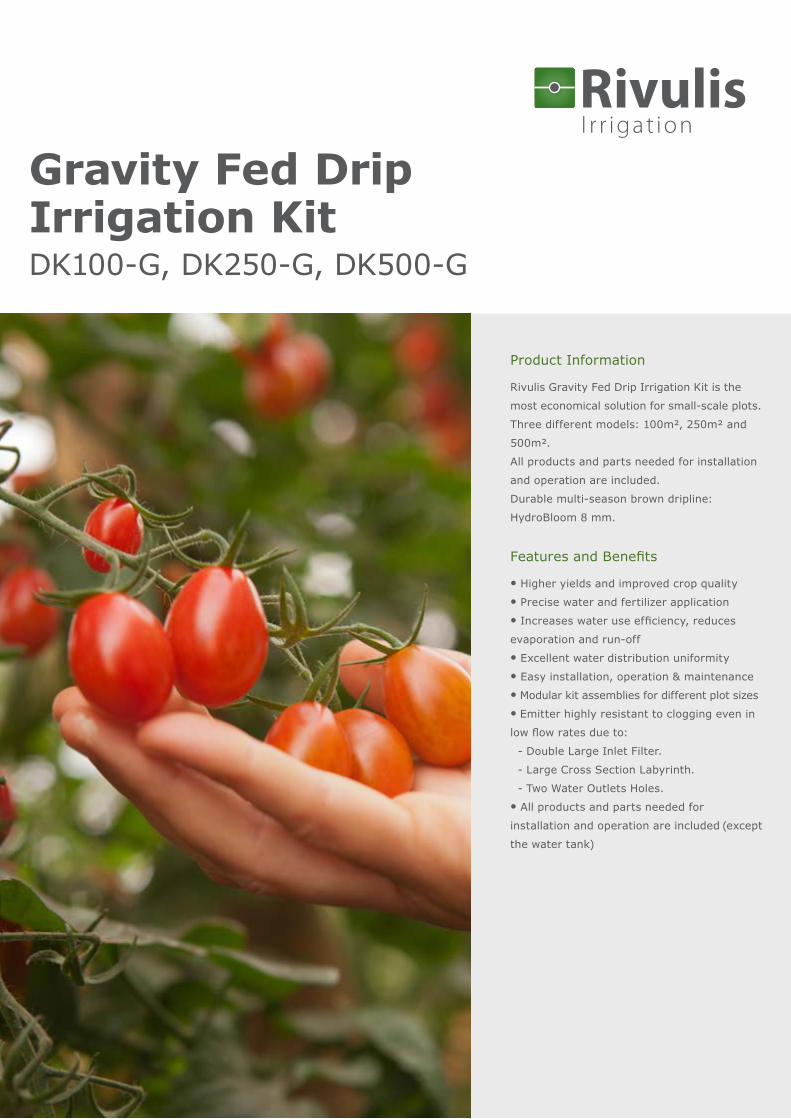
Product Information
Rivulis Gravity Fed Drip Irrigation Kit is the
most economical solution for small-scale plots.
Three different models: 100m², 250m² and
500m².
All products and parts needed for installation
and operation are included.
Durable multi-season brown dripline:
HydroBloom 8 mm.
Features and Benefits
● Higher yields and improved crop quality● Precise water and fertilizer application● Increases water use efficiency, reduces
evaporation and run-off● Excellent water distribution uniformity● Easy installation, operation & maintenance● Modular kit assemblies for different plot sizes● Emitter highly resistant to clogging even in
low flow rates due to:
- Double Large Inlet Filter.
- Large Cross Section Labyrinth.
- Two Water Outlets Holes.● All products and parts needed for
installation and operation are included (except
the water tank)
2
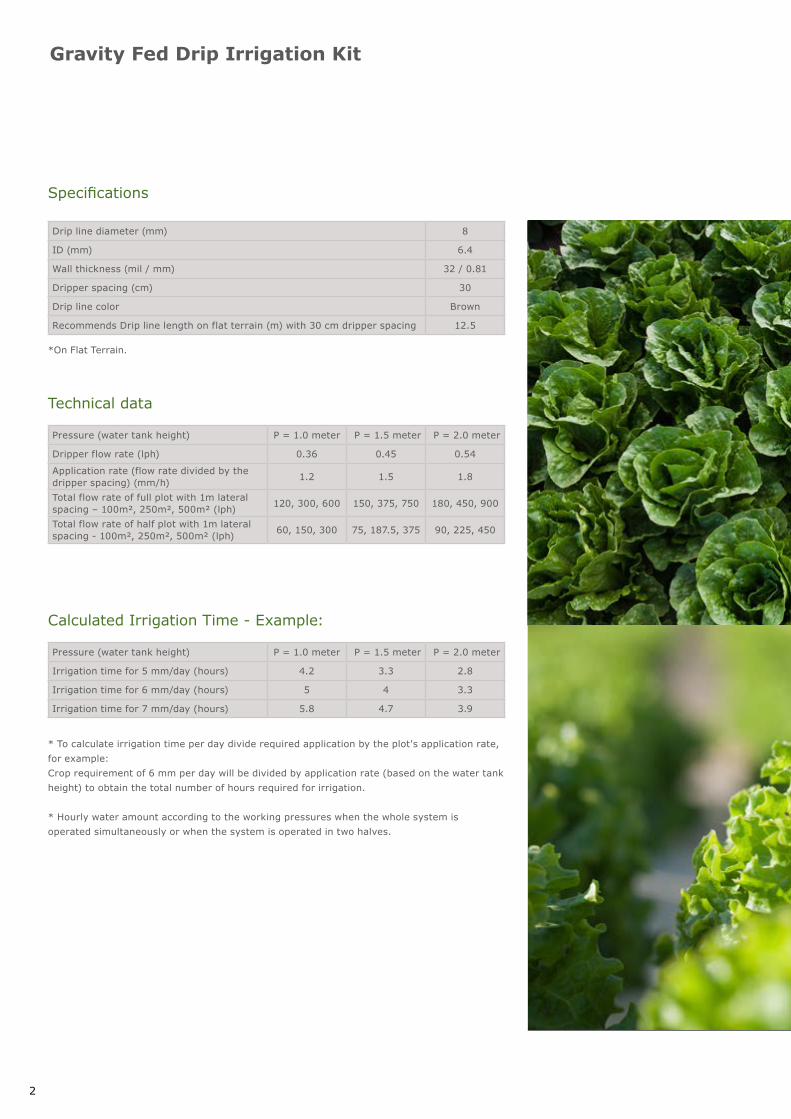
Specifications
Drip line diameter (mm) 8
ID (mm) 6.4
Wall thickness (mil / mm) 32 / 0.81
Dripper spacing (cm) 30
Drip line color Brown
Recommends Drip line length on flat terrain (m) with 30 cm dripper spacing 12.5
Pressure (water tank height) P = 1.0 meter P = 1.5 meter P = 2.0 meter
Dripper flow rate (lph) 0.36 0.45 0.54
Application rate (flow rate divided by the dripper spacing) (mm/h) 1.2 1.5 1.8
Total flow rate of full plot with 1m lateral spacing – 100m², 250m², 500m² (lph) 120, 300, 600 150, 375, 750 180, 450, 900
Total flow rate of half plot with 1m lateral spacing - 100m², 250m², 500m² (lph) 60, 150, 300 75, 187.5, 375 90, 225, 450
Pressure (water tank height) P = 1.0 meter P = 1.5 meter P = 2.0 meter
Irrigation time for 5 mm/day (hours) 4.2 3.3 2.8
Irrigation time for 6 mm/day (hours) 5 4 3.3
Irrigation time for 7 mm/day (hours) 5.8 4.7 3.9
Technical data
Calculated Irrigation Time - Example:
* To calculate irrigation time per day divide required application by the plot's application rate, for example: Crop requirement of 6 mm per day will be divided by application rate (based on the water tank height) to obtain the total number of hours required for irrigation.
* Hourly water amount according to the working pressures when the whole system is operated simultaneously or when the system is operated in two halves.
*On Flat Terrain.
Gravity Fed Drip Irrigation Kit
3
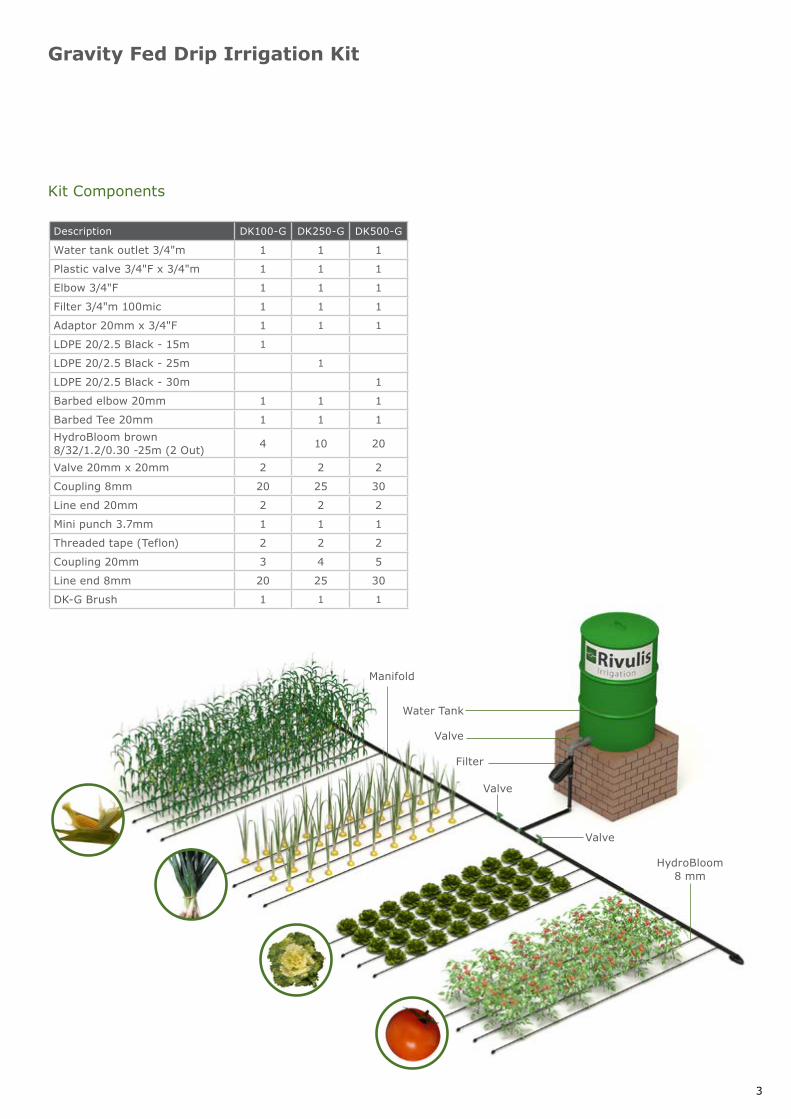
Water Tank
Manifold
HydroBloom 8 mm
Valve
Filter
Valve
Valve
Description DK100-G DK250-G DK500-G
Water tank outlet 3/4"m 1 1 1
Plastic valve 3/4"F x 3/4"m 1 1 1
Elbow 3/4"F 1 1 1
Filter 3/4"m 100mic 1 1 1
Adaptor 20mm x 3/4"F 1 1 1
LDPE 20/2.5 Black - 15m 1
LDPE 20/2.5 Black - 25m 1
LDPE 20/2.5 Black - 30m 1
Barbed elbow 20mm 1 1 1
Barbed Tee 20mm 1 1 1 HydroBloom brown 8/32/1.2/0.30 -25m (2 Out) 4 10 20
Valve 20mm x 20mm 2 2 2
Coupling 8mm 20 25 30
Line end 20mm 2 2 2
Mini punch 3.7mm 1 1 1
Threaded tape (Teflon) 2 2 2
Coupling 20mm 3 4 5
Line end 8mm 20 25 30
DK-G Brush 1 1 1
Gravity Fed Drip Irrigation Kit
Kit Components

Rivulis.comI r r igat ionRivulisThis literature has been compiled for worldwide circulation and the descriptions, photos, and information are for general purpose use only. Please consult with an irrigation specialist and technical specifications for proper use of products. Because some products are not available in all regions, please contact your local dealer for details. Rivulis Irrigation reserves the right to change specifications and the design of all products without notice. RIV_DS_DripKit_R6_EN_W15_0822
Logistic Information
Kit DK100-G DK250-G DK500-G
Item code 101049411 101049412 101049413
Model kit contains 1 box + 1 LDPE roll (loose) 1 box + 1 LDPE roll (loose) 2 boxes + 1 LDPE roll (loose)
Box packaging - H x L x W (mm) 270x385 x380 490X355 X355 490X355 X355
Average box weight (kg.) 3.1 6.2 6.2
Average LDPE roll weight (kg.) 1.1 1.8 2.2
Pallet size (meter) 1.2 x 1.1 1.2 x 1.1 1.2 x 1.1
Estimated number of kits per 20' container 370 280 140
Estimated number of kits per 40' container 740 560 280
Estimated number of kits per 40'HC container 815 620 310
Gravity Fed Drip Irrigation Kit
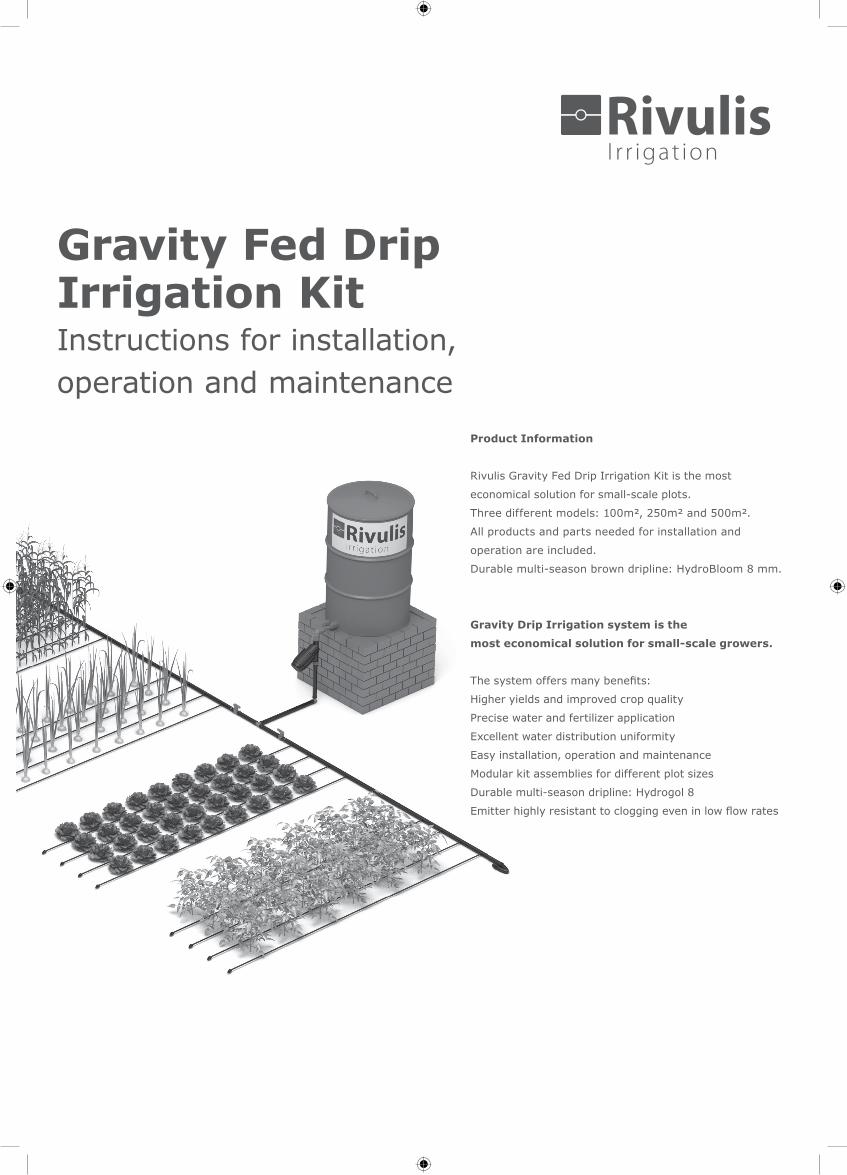
Gravity Fed Drip Irrigation KitInstructions for installation, operation and maintenance
I r r igat ionRivulis
Product Information
Rivulis Gravity Fed Drip Irrigation Kit is the most
economical solution for small-scale plots.
Three different models: 100m², 250m² and 500m².
All products and parts needed for installation and
operation are included.
Durable multi-season brown dripline: HydroBloom 8 mm.
Gravity Drip Irrigation system is the
most economical solution for small-scale growers.
The system offers many benefits:
Higher yields and improved crop quality
Precise water and fertilizer application
Excellent water distribution uniformity
Easy installation, operation and maintenance
Modular kit assemblies for different plot sizes
Durable multi-season dripline: Hydrogol 8
Emitter highly resistant to clogging even in low flow rates
2
Instructions for installation, operation and maintenance* For the whole parts list, please see the last page.
Gravity Fed Drip Irrigation Kit
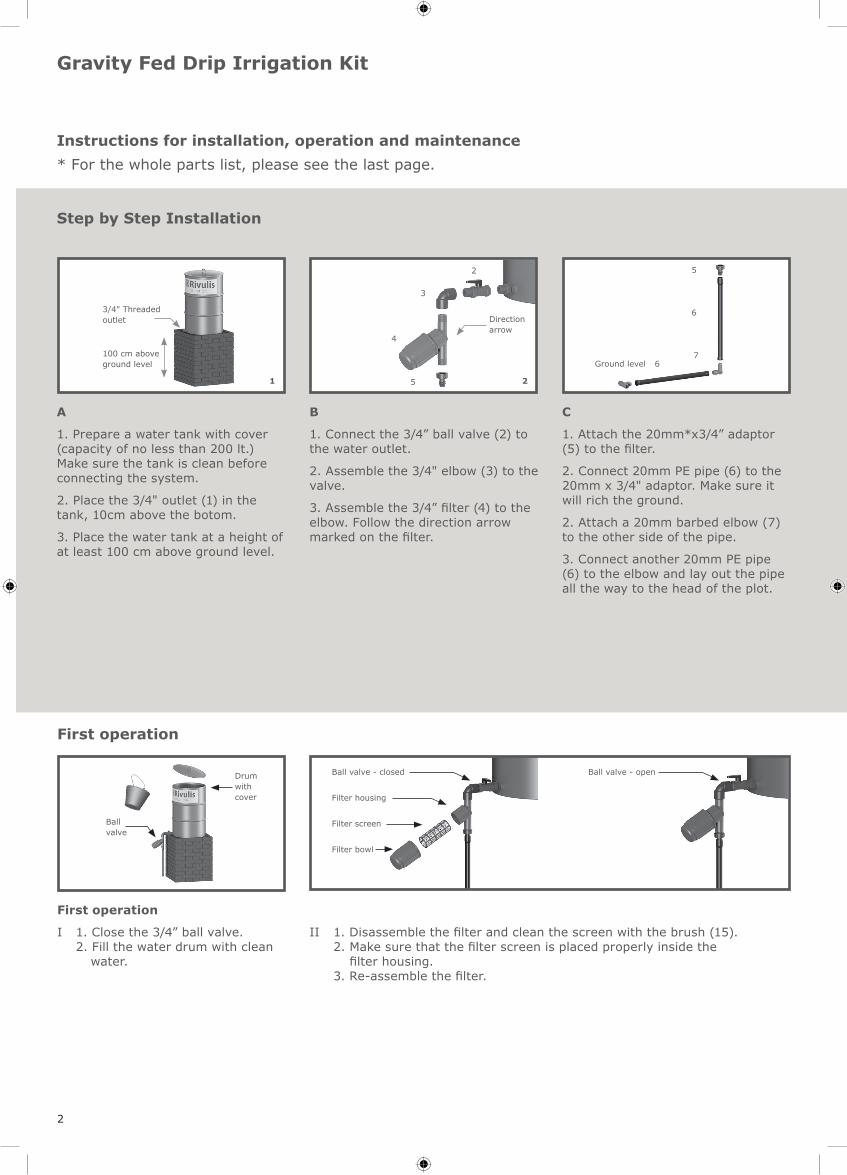
Step by Step Installation
A
1. Prepare a water tank with cover (capacity of no less than 200 lt.) Make sure the tank is clean before connecting the system.
2. Place the 3/4" outlet (1) in the tank, 10cm above the botom.
3. Place the water tank at a height of at least 100 cm above ground level.
B
1. Connect the 3/4” ball valve (2) to the water outlet.
2. Assemble the 3/4" elbow (3) to the valve.
3. Assemble the 3/4” filter (4) to the elbow. Follow the direction arrow marked on the filter.
C
1. Attach the 20mm*x3/4” adaptor (5) to the filter.
2. Connect 20mm PE pipe (6) to the 20mm x 3/4" adaptor. Make sure it will rich the ground.
2. Attach a 20mm barbed elbow (7) to the other side of the pipe.
3. Connect another 20mm PE pipe (6) to the elbow and lay out the pipe all the way to the head of the plot.
100 cm aboveground level
3/4" Threaded outlet Direction
arrow
2
3
4
5
5
6
76Ground level
1 2
First operation
Drum with cover
Ball valve
Ball valve - closed Ball valve - open
Filter housing
Filter screen
Filter bowl
First operation
I 1. Close the 3/4” ball valve. 2. Fill the water drum with clean water.
II 1. Disassemble the filter and clean the screen with the brush (15). 2. Make sure that the filter screen is placed properly inside the filter housing. 3. Re-assemble the filter.
3
Gravity Fed Drip Irrigation Kit
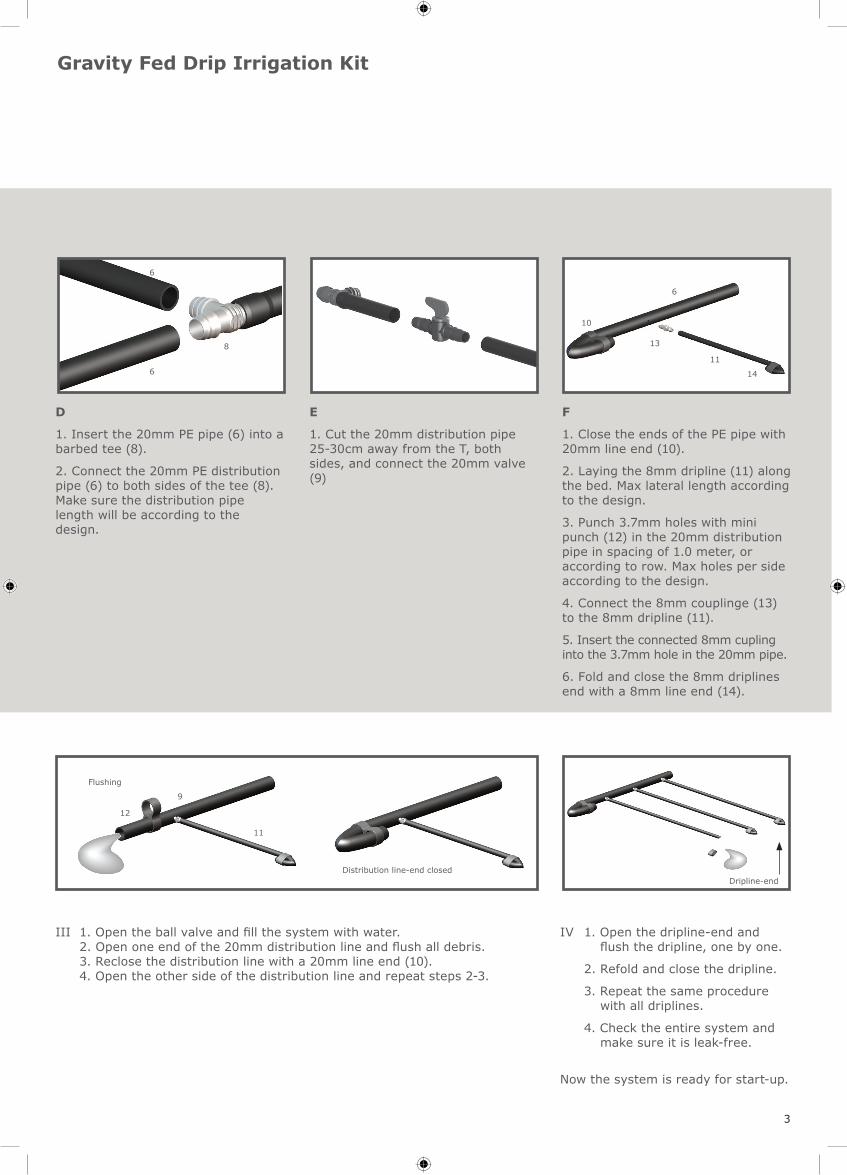
III 1. Open the ball valve and fill the system with water. 2. Open one end of the 20mm distribution line and flush all debris. 3. Reclose the distribution line with a 20mm line end (10). 4. Open the other side of the distribution line and repeat steps 2-3.
IV 1. Open the dripline-end and flush the dripline, one by one.
2. Refold and close the dripline.
3. Repeat the same procedure with all driplines.
4. Check the entire system and make sure it is leak-free.
Now the system is ready for start-up.
9
11
Dripline-endDistribution line-end closed
12
Flushing
D
1. Insert the 20mm PE pipe (6) into a barbed tee (8).
2. Connect the 20mm PE distribution pipe (6) to both sides of the tee (8). Make sure the distribution pipe length will be according to the design.
F
1. Close the ends of the PE pipe with 20mm line end (10).
2. Laying the 8mm dripline (11) along the bed. Max lateral length according to the design.
3. Punch 3.7mm holes with mini punch (12) in the 20mm distribution pipe in spacing of 1.0 meter, or according to row. Max holes per side according to the design.
4. Connect the 8mm couplinge (13) to the 8mm dripline (11).
5. Insert the connected 8mm cupling into the 3.7mm hole in the 20mm pipe.
6. Fold and close the 8mm driplines end with a 8mm line end (14).
6
6
8
10
6
13
14
11
E
1. Cut the 20mm distribution pipe 25-30cm away from the T, both sides, and connect the 20mm valve (9)
Gravity Fed Drip Irrigation Kit
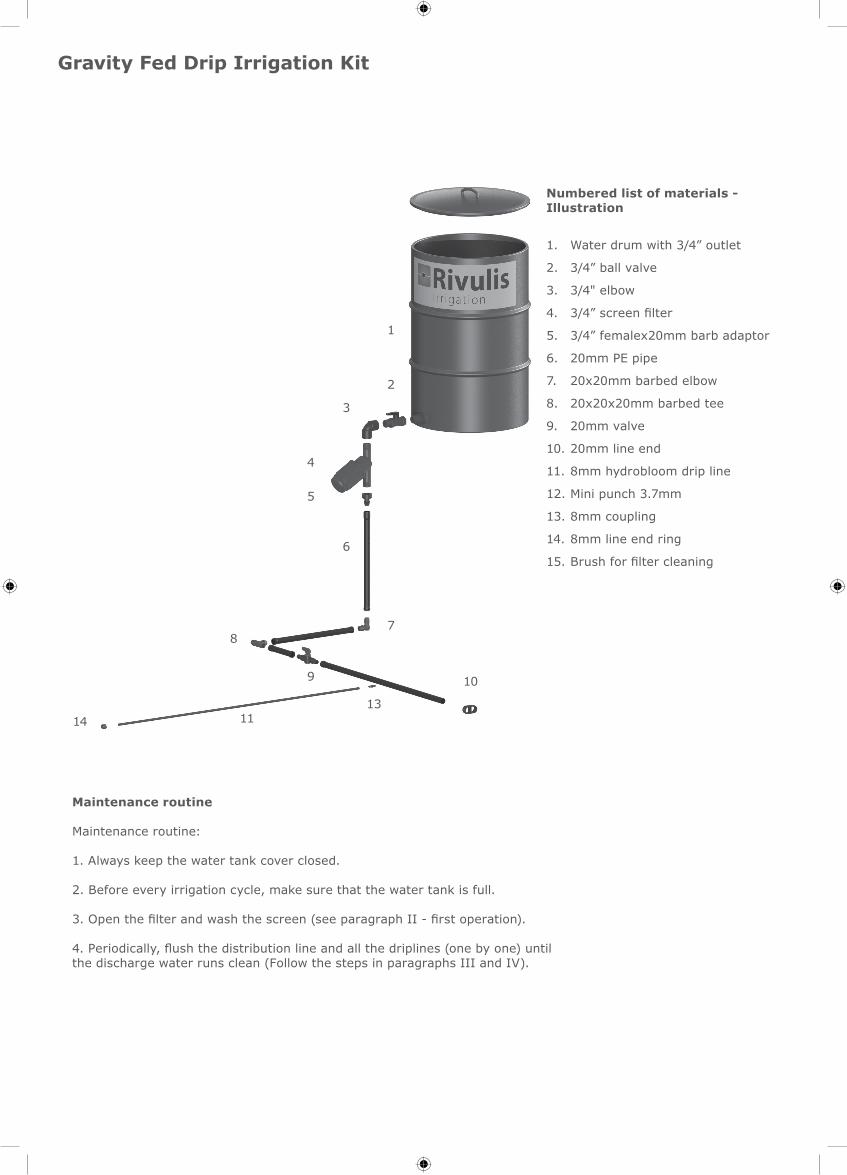
Maintenance routine
Maintenance routine: 1. Always keep the water tank cover closed. 2. Before every irrigation cycle, make sure that the water tank is full. 3. Open the filter and wash the screen (see paragraph II - first operation).
4. Periodically, flush the distribution line and all the driplines (one by one) until the discharge water runs clean (Follow the steps in paragraphs III and IV).
Numbered list of materials - Illustration
1. Water drum with 3/4” outlet
2. 3/4” ball valve
3. 3/4" elbow
4. 3/4” screen filter
5. 3/4” femalex20mm barb adaptor
6. 20mm PE pipe
7. 20x20mm barbed elbow
8. 20x20x20mm barbed tee
9. 20mm valve
10. 20mm line end
11. 8mm hydrobloom drip line
12. Mini punch 3.7mm
13. 8mm coupling
14. 8mm line end ring
15. Brush for filter cleaning
1
2
78
3
4
5
9
14
10
1311
6