introduction - isystem.com€¦ · special function registers view ... winidea project manager or...
TRANSCRIPT
Introduction..................................................................................................................1Debug Plug-In Functionality.......................................................................................1System Requirements.................................................................................................2
Supported platforms...................................................................................................3Installation....................................................................................................................4
iSystem Debugger and iSystem Debugger with winIDEA Open...............................4Eclipse 3.6 (Helios)....................................................................................................4Eclipse 3.7 (Indigo)....................................................................................................5Eclipse 4.2 and newer (Juno, Kepler, Luna, Mars, Neon).........................................6CodeWarrior...............................................................................................................7
Usage............................................................................................................................8Create a project in Eclipse / CDT..............................................................................8Write some code and compile it.................................................................................8Create a winIDEA workspace....................................................................................8
Using an existing winIDEA workspace (recommended)....................................................8Creating a debug configuration..................................................................................9Preferences Page....................................................................................................16Special Function Registers View.............................................................................17Real-time Expressions View....................................................................................18Disassembly view....................................................................................................19The Debug View and Stack Depth...........................................................................19Start debugging session without downloading the code.........................................19Launching without debugging..................................................................................19Making copies of project..........................................................................................19
IntroductionThis document describes the installation and use of iSYSTEM Debug Plug-In for Eclipse/CDT.
Debug Plug-In FunctionalityThe iSYSTEM Debug Plug-In (in further text plug-in) can communicate to iSystem development tools and execute debug commands. All standard debug functionalities available in CDT are also implemented in the plug-in. Additionally, SFR view and Real-time expressions view are also available. Comparing to winIDEA, the plug-in does not implement trace, execution coverage and profiler functionality. The plug-in therefore provides more than CDT debugger, but less than winIDEA. It currently still requires winIDEA to run in the background, but during the debugging, no switching to winIDEA is necessary.
System RequirementsBefore starting with the installation the system must contain the following:
1 winIDEA (not required if user chooses to install the iSystem Debugger for winIDEA Open plugin)To download the latest winIDEA, go to http://www.isystem.c om
1. Java 1.7 The plug-in will install, but will not be available if older version of Java is installed!
2. Eclipse 3.7.1 or laterTo download the latest Eclipse go to http://www.eclipse.org/downloads/. If we want to use Eclipse for C/C++ development only, there is already a package with CDT available (Eclipse IDE for C/C++ Developers). In this case we should skip CDT installation described in the next step.
3. CDT (C++ Development Toolkit) To obtain CDT go to http://www.eclipse.org/cdt/downloads.phpCDT should be installed as Eclipse plug-in.
Supported platforms
The plug-in supports all platforms supported by iSystem embedded development tools.
Installation
iSystem Debugger and iSystem Debugger with winIDEA Open
There are two flavors of iSystem Debugger plugin – a regular iSystem Debugger plugin and the plugin with winIDEA Open. Both plugins have the same functionality but the plugin with winIDEAOpen also downloads and installs winIDEA Open. Differences will be noted throughout this document. For regular plugin you must have winIDEA already installed on your system.
NOTE: iSystem Debug Plug-in for Eclipse older than Juno is based on an older CDT Debug architecture which is no longer being supported by the Eclipse/CDT comunity. So it is recommended to use Eclipse Juno or newer and the required plugin.
Eclipse 3.6 (Helios)
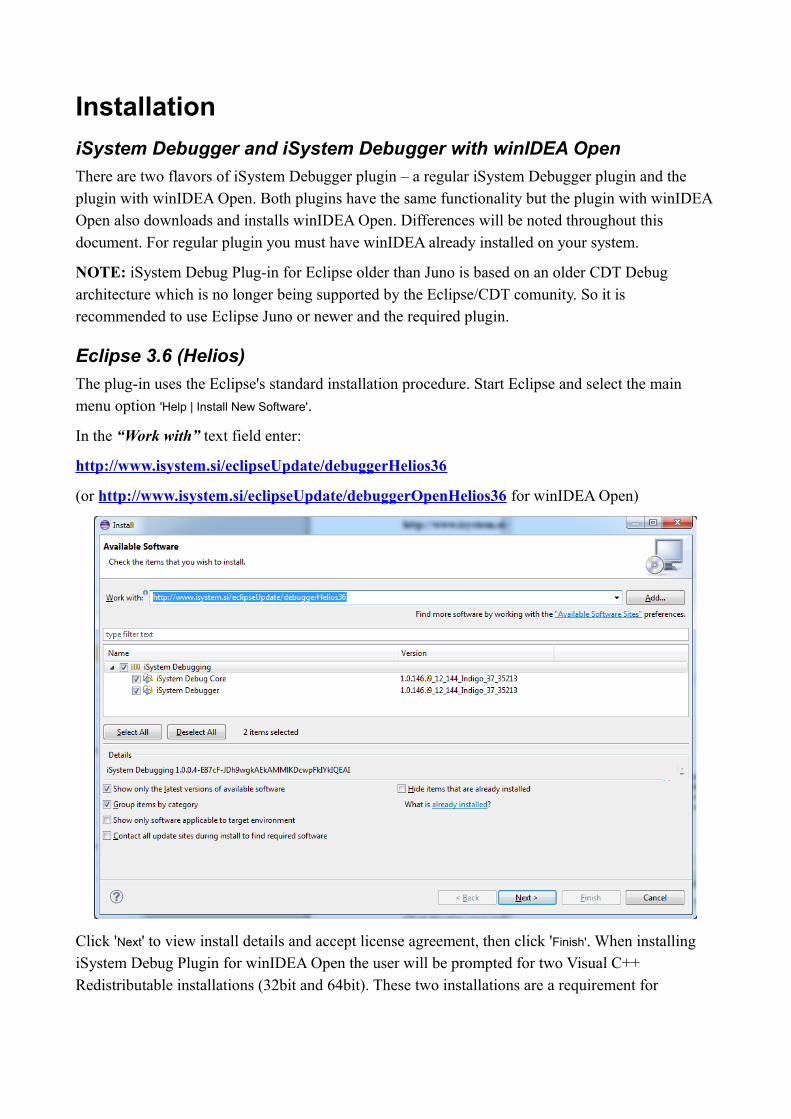
The plug-in uses the Eclipse's standard installation procedure. Start Eclipse and select the main menu option 'Help | Install New Software'.
In the “Work with” text field enter:
http://www.isystem.si/eclipseUpdate/debuggerHelios36
(or http://www.isystem.si/eclipseUpdate/debuggerOpenHelios36 for winIDEA Open)
Click 'Next' to view install details and accept license agreement, then click 'Finish'. When installing iSystem Debug Plugin for winIDEA Open the user will be prompted for two Visual C++ Redistributable installations (32bit and 64bit). These two installations are a requirement for
winIDEA Open to run. Next the plugin will attempt to download and unpack winIDEA Open from aremote location – this could take several minutes.
Wait until the installation is finished and confirm restart. The plug-in is installed.
Eclipse 3.7 (Indigo)
The installation procedure is the same as for Eclipse 3.6 (Helios) above.
Eclipse 4.2 and newer (Juno, Kepler, Luna, Mars, Neon)
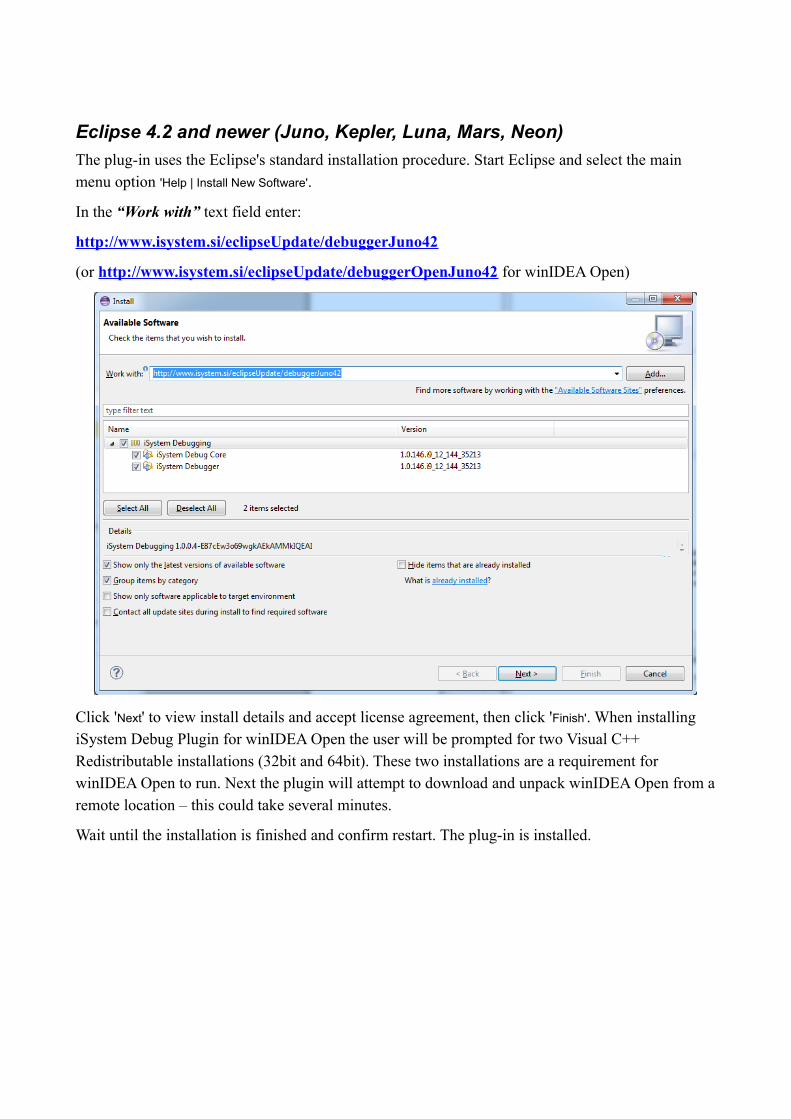
The plug-in uses the Eclipse's standard installation procedure. Start Eclipse and select the main menu option 'Help | Install New Software'.
In the “Work with” text field enter:
http://www.isystem.si/eclipseUpdate/debuggerJuno42
(or http://www.isystem.si/eclipseUpdate/debuggerOpenJuno42 for winIDEA Open)
Click 'Next' to view install details and accept license agreement, then click 'Finish'. When installing iSystem Debug Plugin for winIDEA Open the user will be prompted for two Visual C++ Redistributable installations (32bit and 64bit). These two installations are a requirement for winIDEA Open to run. Next the plugin will attempt to download and unpack winIDEA Open from aremote location – this could take several minutes.
Wait until the installation is finished and confirm restart. The plug-in is installed.
CodeWarrior
The installation procedure is the same as for standard Eclipse, but we have to be careful about the version of the plug-in which we install. To find the version of Eclipse which serves as a base of our CodeWarrior, select Help | About CodeWarrior Development Studio. A dialog opens, where we
should click the button Installation details. Select tab Features in the next dialog and check the version of Eclipse Platform feature. Depending on this version you install the iSystem's debug
plug-in for Eclipse 3.6 and 3.7 or 4.2 and 4.3 as described above. For example, CW 10.5 is based onEclipse 4.2.1.
UsageThe typical development procedure consists of the following steps:
Create a project in Eclipse / CDT
This step is described in the Eclipse/CDT help.
Write some code and compile it
See the Eclipse/CDT help for details. Make sure you know the name and location of the output file, which should be downloaded to the target.
Create a winIDEA workspace
There are two options: we can use an existing winIDEA workspace configured for our target, or create a new one from scratch.
Using an existing winIDEA workspace (recommended)
Minor modifications are necessary to migrate an existing winIDEA project to Eclipse.
Typically, files which are downloaded by the debugger contain the code and the debug information. Source files can be removed from winIDEA project manager, if the debug information contains source files’ absolute paths. If not, the user must either specify Eclipse project source files in the winIDEA project manager or specify the alternate project files search directories in winIDEA (Debug/Debug Options/Directories tab).
Creating a new winIDEA workspace
First we create a new workspace, then configure the emulator (Hardware | Hardware), and the targetoptions (Hardware | Emulation Options). Consult the winIDEA manual for details.
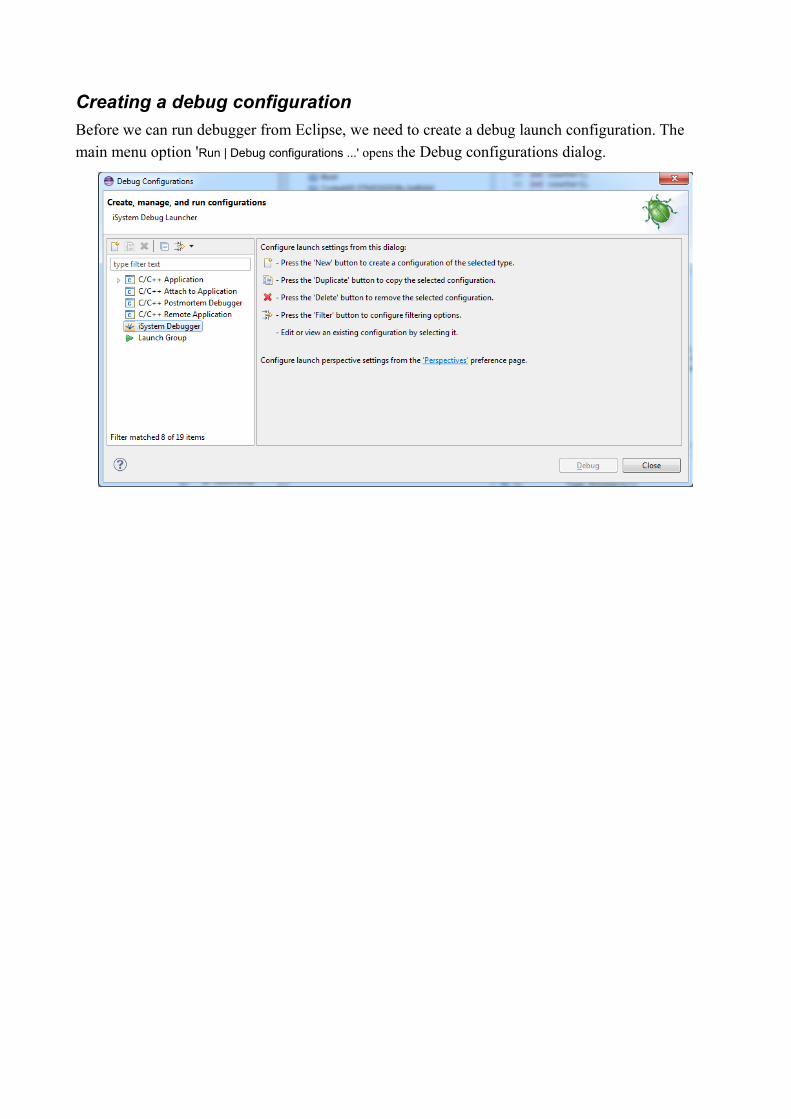
Creating a debug configuration
Before we can run debugger from Eclipse, we need to create a debug launch configuration. The main menu option 'Run | Debug configurations ...' opens the Debug configurations dialog.
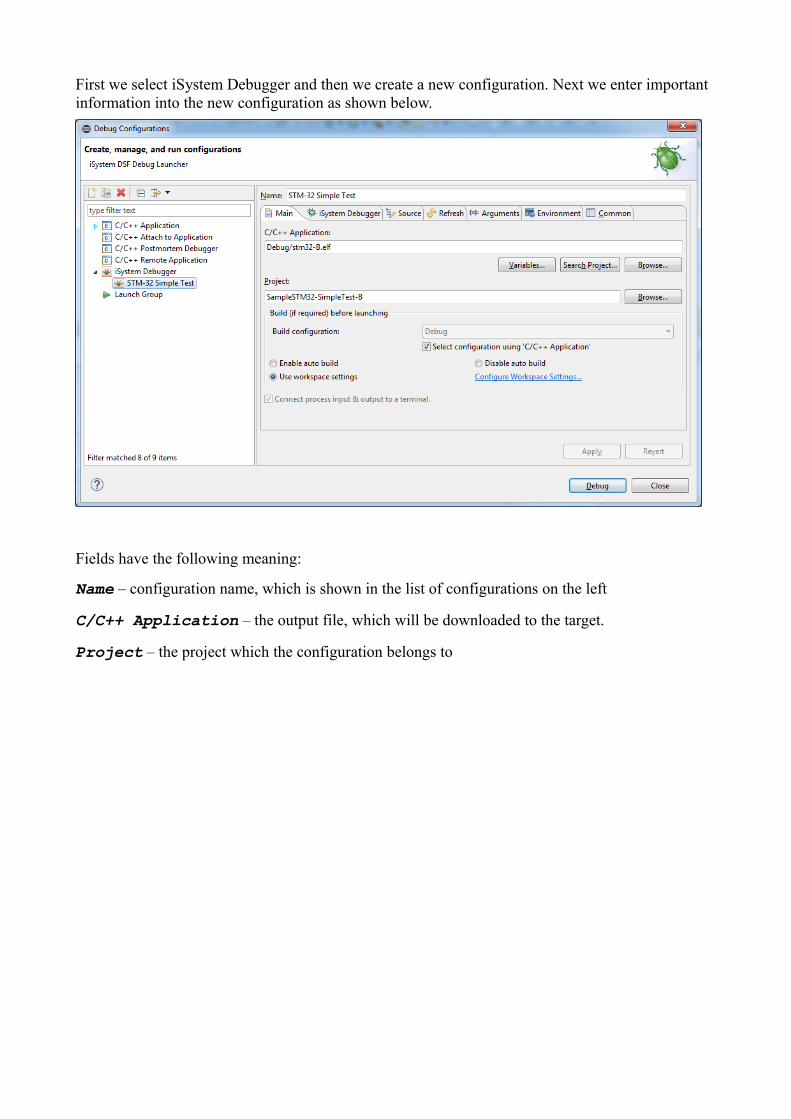
First we select iSystem Debugger and then we create a new configuration. Next we enter important information into the new configuration as shown below.
Fields have the following meaning:
Name – configuration name, which is shown in the list of configurations on the left
C/C++ Application – the output file, which will be downloaded to the target.
Project – the project which the configuration belongs to
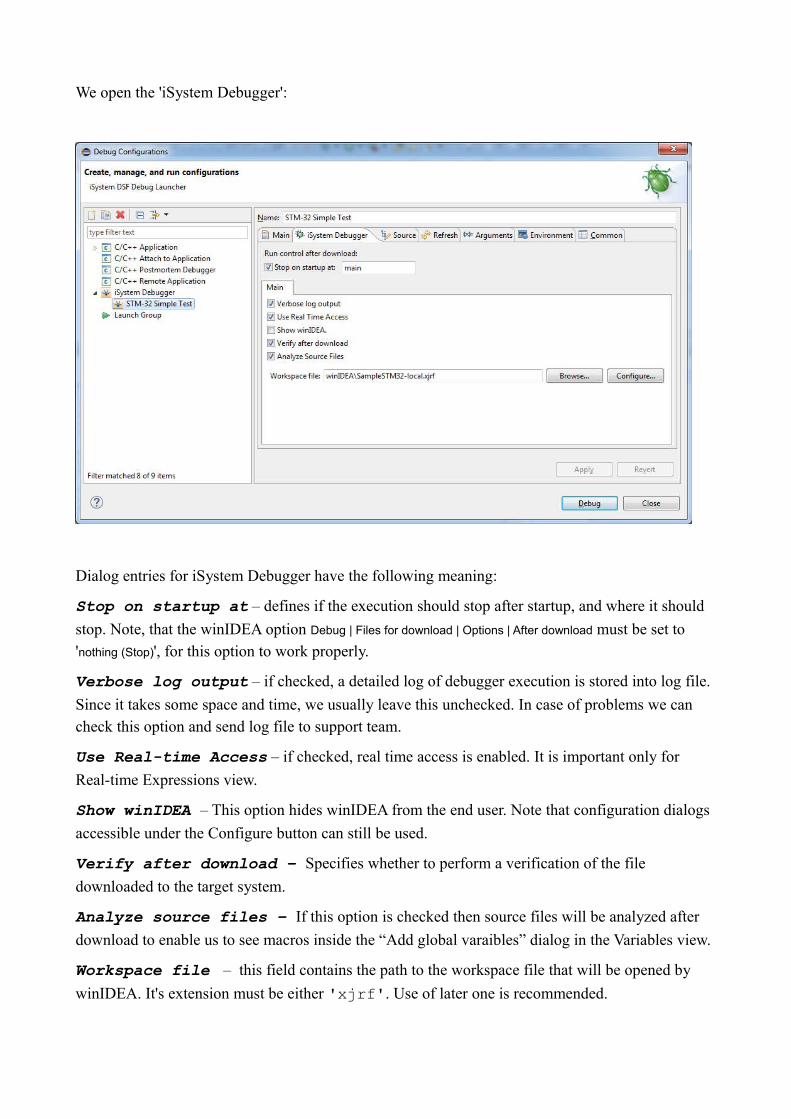
We open the 'iSystem Debugger':
Dialog entries for iSystem Debugger have the following meaning:
Stop on startup at – defines if the execution should stop after startup, and where it should
stop. Note, that the winIDEA option Debug | Files for download | Options | After download must be set to 'nothing (Stop)', for this option to work properly.
Verbose log output – if checked, a detailed log of debugger execution is stored into log file.
Since it takes some space and time, we usually leave this unchecked. In case of problems we can check this option and send log file to support team.
Use Real-time Access – if checked, real time access is enabled. It is important only for
Real-time Expressions view.
Show winIDEA – This option hides winIDEA from the end user. Note that configuration dialogs
accessible under the Configure button can still be used.
Verify after download – Specifies whether to perform a verification of the file
downloaded to the target system.
Analyze source files – If this option is checked then source files will be analyzed after
download to enable us to see macros inside the “Add global varaibles” dialog in the Variables view.
Workspace file – this field contains the path to the workspace file that will be opened by
winIDEA. It's extension must be either 'xjrf'. Use of later one is recommended.
Configure… - Advanced configuration option dialogs. This is explained in more detail in the
next section.
If there is no instance of winIDEA running yet, then a new instance will be opened when a debug session is started or if the Configuration button is clicked. winIDEA instance that was opened by theDebugger will also be closed when Eclipse is closed.
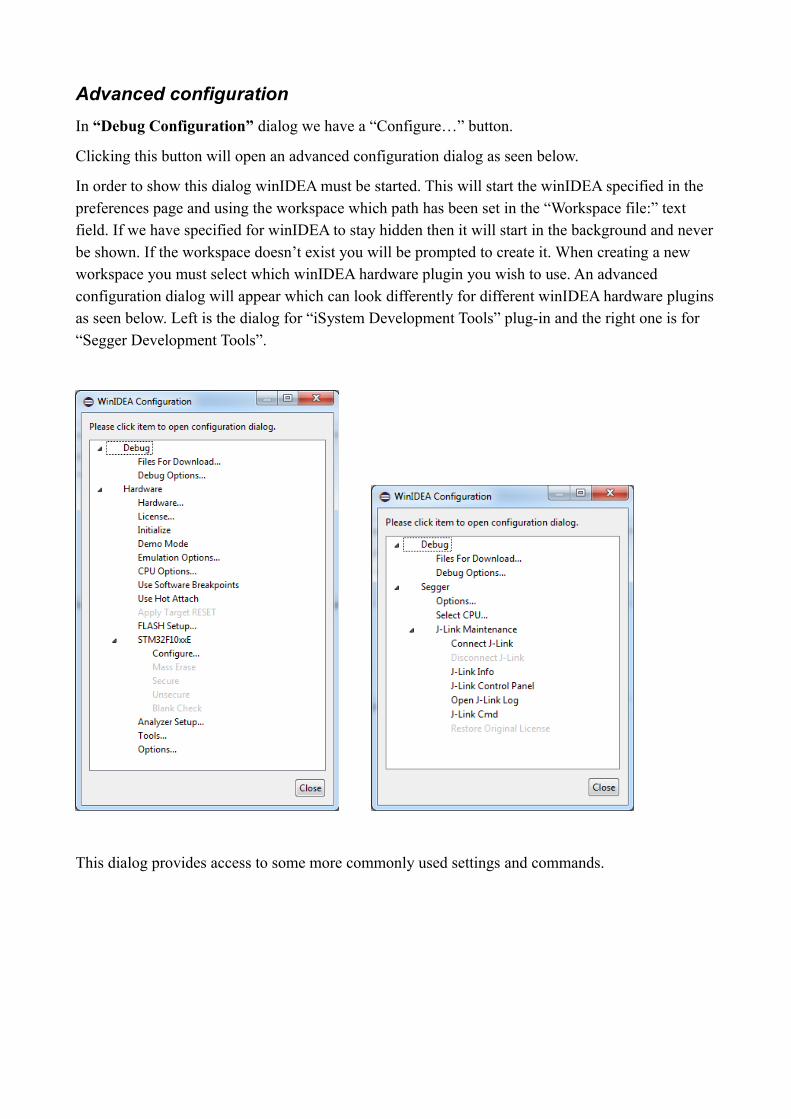
Advanced configuration
In “Debug Configuration” dialog we have a “Configure…” button.
Clicking this button will open an advanced configuration dialog as seen below.
In order to show this dialog winIDEA must be started. This will start the winIDEA specified in the preferences page and using the workspace which path has been set in the “Workspace file:” text field. If we have specified for winIDEA to stay hidden then it will start in the background and neverbe shown. If the workspace doesn’t exist you will be prompted to create it. When creating a new workspace you must select which winIDEA hardware plugin you wish to use. An advanced configuration dialog will appear which can look differently for different winIDEA hardware pluginsas seen below. Left is the dialog for “iSystem Development Tools” plug-in and the right one is for “Segger Development Tools”.
This dialog provides access to some more commonly used settings and commands.
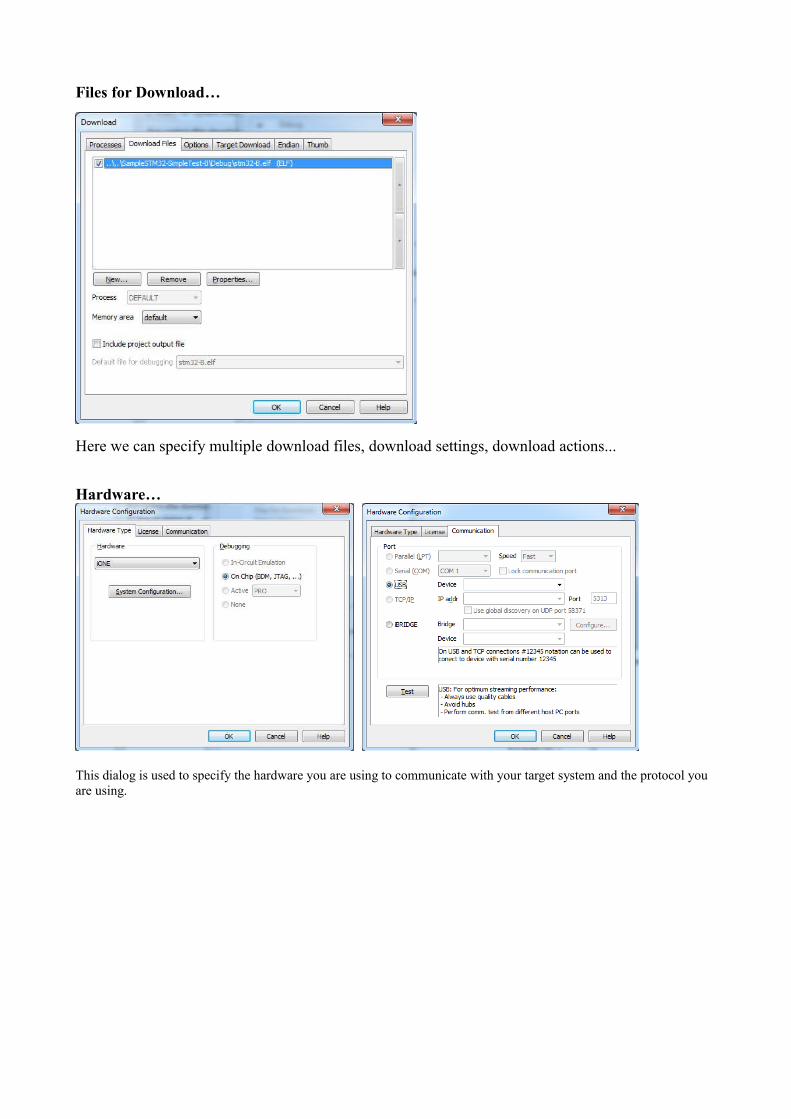
Files for Download…
Here we can specify multiple download files, download settings, download actions...
Hardware…
This dialog is used to specify the hardware you are using to communicate with your target system and the protocol you are using.
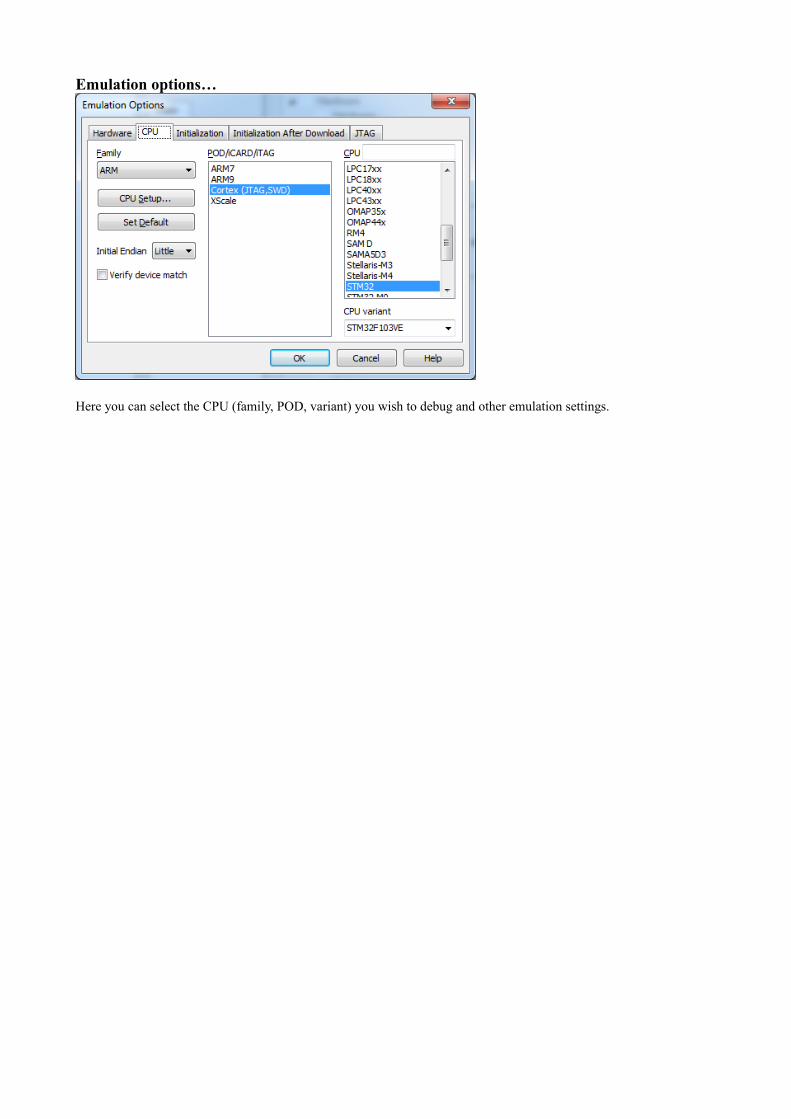
Emulation options…
Here you can select the CPU (family, POD, variant) you wish to debug and other emulation settings.
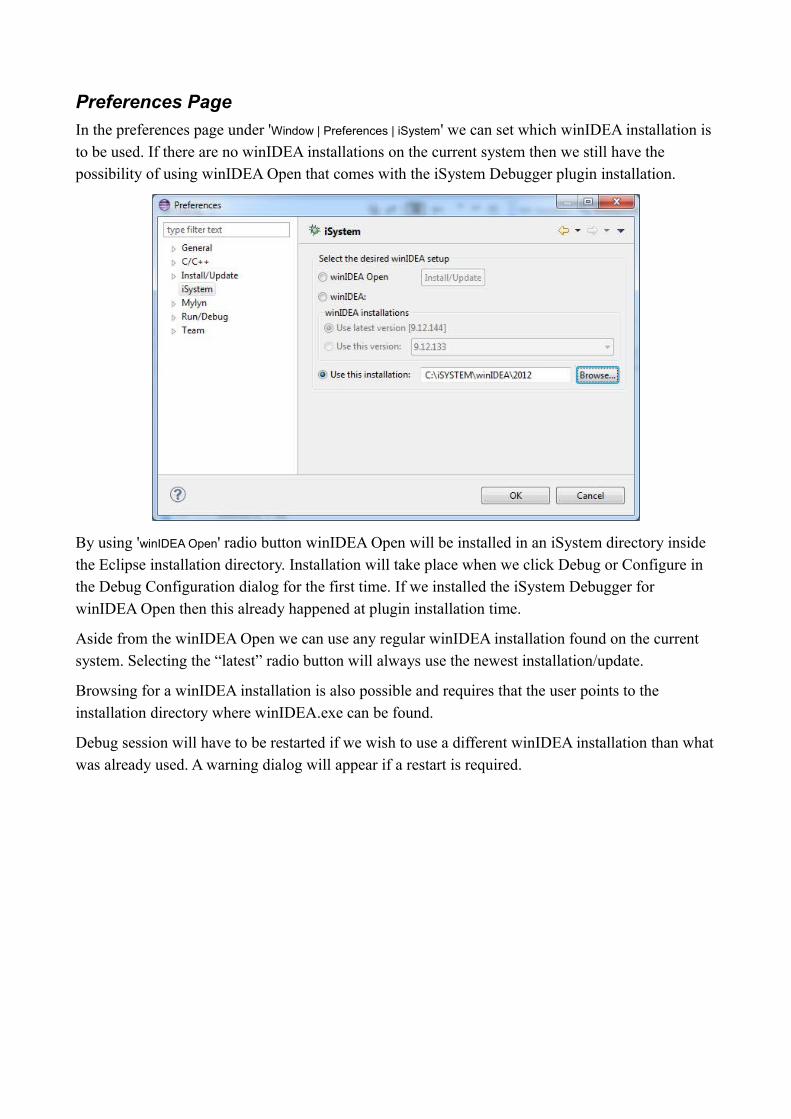
Preferences Page
In the preferences page under 'Window | Preferences | iSystem' we can set which winIDEA installation is to be used. If there are no winIDEA installations on the current system then we still have the possibility of using winIDEA Open that comes with the iSystem Debugger plugin installation.
By using 'winIDEA Open' radio button winIDEA Open will be installed in an iSystem directory inside the Eclipse installation directory. Installation will take place when we click Debug or Configure in the Debug Configuration dialog for the first time. If we installed the iSystem Debugger for winIDEA Open then this already happened at plugin installation time.
Aside from the winIDEA Open we can use any regular winIDEA installation found on the current system. Selecting the “latest” radio button will always use the newest installation/update.
Browsing for a winIDEA installation is also possible and requires that the user points to the installation directory where winIDEA.exe can be found.
Debug session will have to be restarted if we wish to use a different winIDEA installation than whatwas already used. A warning dialog will appear if a restart is required.
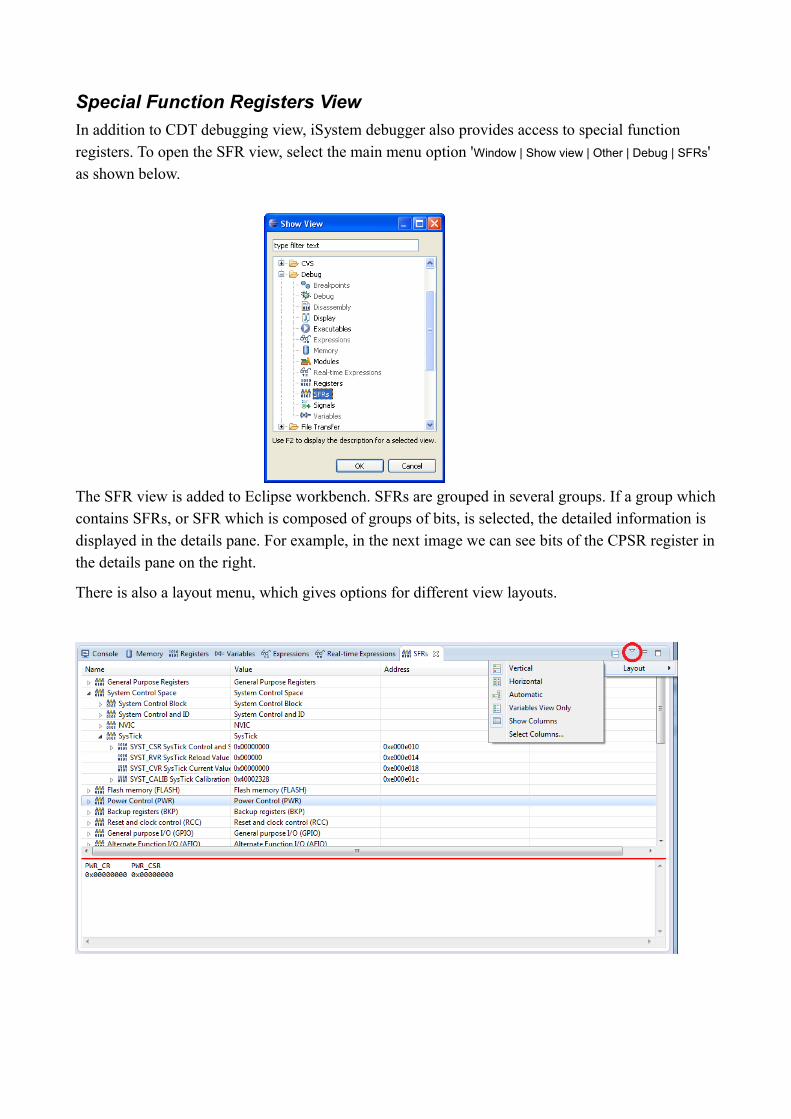
Special Function Registers View
In addition to CDT debugging view, iSystem debugger also provides access to special function registers. To open the SFR view, select the main menu option 'Window | Show view | Other | Debug | SFRs' as shown below.
The SFR view is added to Eclipse workbench. SFRs are grouped in several groups. If a group whichcontains SFRs, or SFR which is composed of groups of bits, is selected, the detailed information is displayed in the details pane. For example, in the next image we can see bits of the CPSR register inthe details pane on the right.
There is also a layout menu, which gives options for different view layouts.
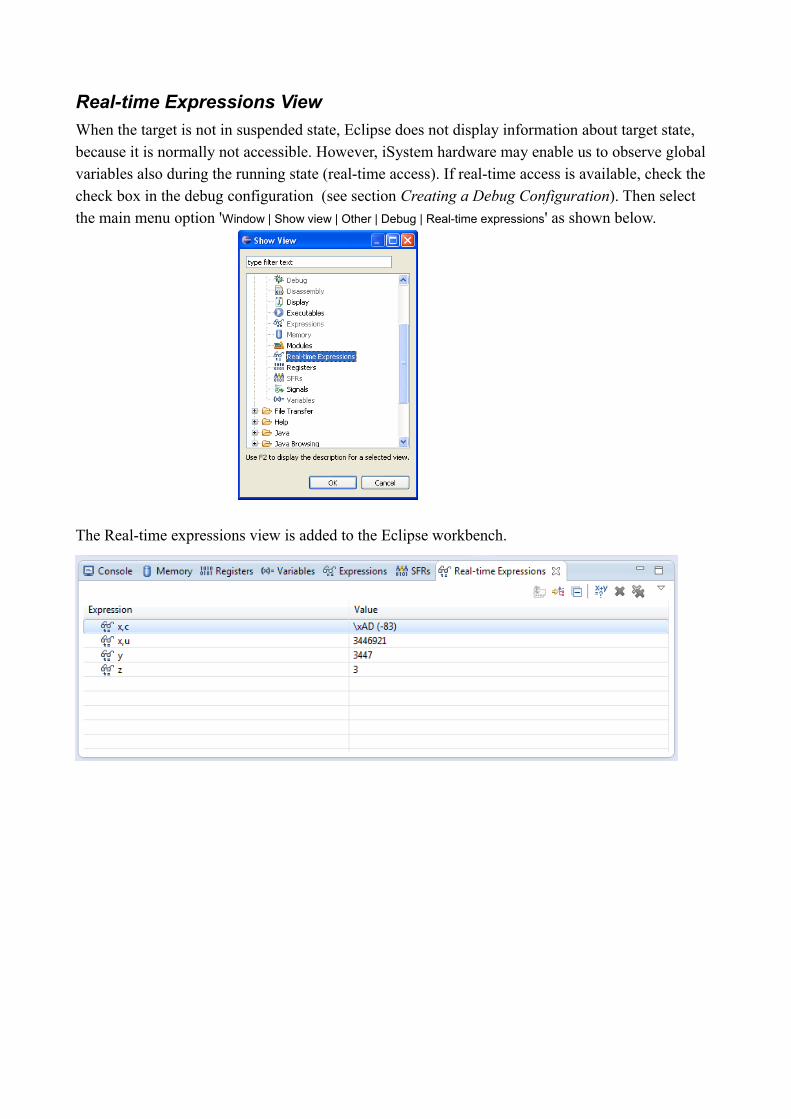
Real-time Expressions View
When the target is not in suspended state, Eclipse does not display information about target state, because it is normally not accessible. However, iSystem hardware may enable us to observe global variables also during the running state (real-time access). If real-time access is available, check the check box in the debug configuration (see section Creating a Debug Configuration). Then select the main menu option 'Window | Show view | Other | Debug | Real-time expressions' as shown below.
The Real-time expressions view is added to the Eclipse workbench.
Disassembly viewThe Disassembly view shows the loaded program as assembler instructions mixed with source code for comparison. This view is a standard CDT feature, but when the iSystem Debug Plugin is installed on the Infineon DAVE IDE alongside with the TASKING plugin, the disassembly view can’t be used as the TASKING plugin takes over the views signature and makes any changes impossible. When using the iSystem Debug Plugin with DAVE the user should uninstall the TASKING plugin if the Disassembly view doesn’t work (is empty).
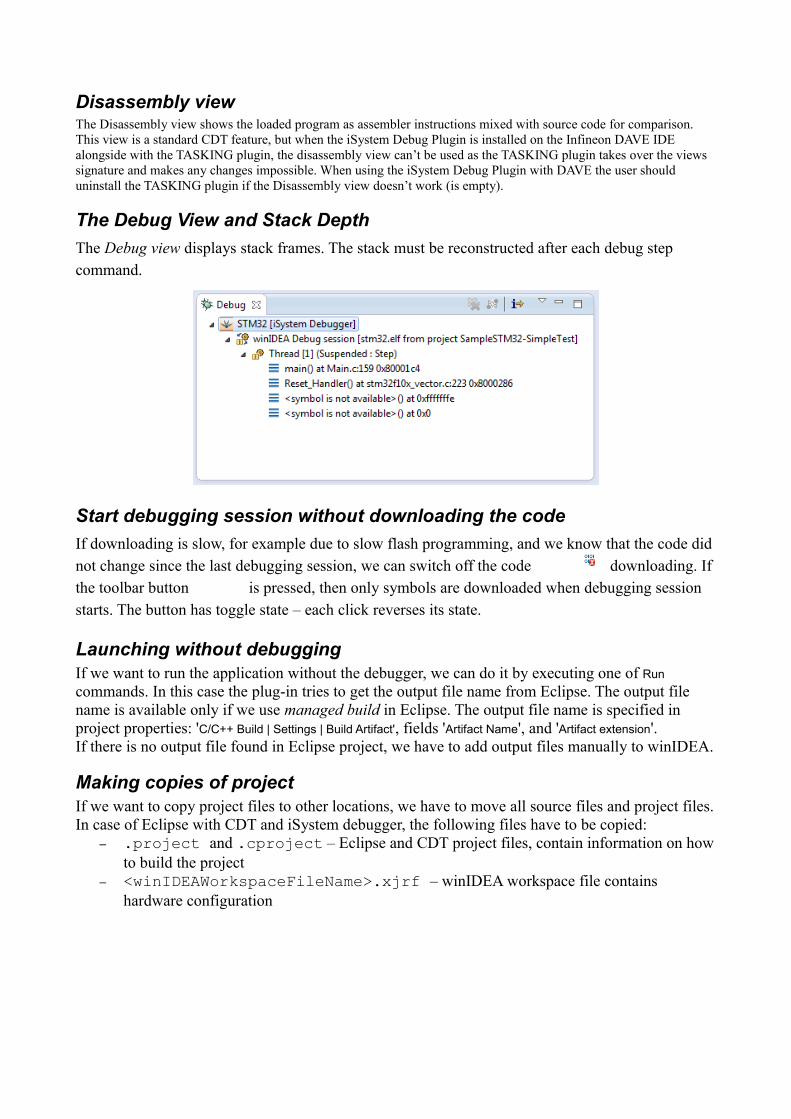
The Debug View and Stack Depth
The Debug view displays stack frames. The stack must be reconstructed after each debug step command.
Start debugging session without downloading the code
If downloading is slow, for example due to slow flash programming, and we know that the code did not change since the last debugging session, we can switch off the code downloading. If the toolbar button is pressed, then only symbols are downloaded when debugging session starts. The button has toggle state – each click reverses its state.
Launching without debuggingIf we want to run the application without the debugger, we can do it by executing one of Run commands. In this case the plug-in tries to get the output file name from Eclipse. The output file name is available only if we use managed build in Eclipse. The output file name is specified in project properties: 'C/C++ Build | Settings | Build Artifact', fields 'Artifact Name', and 'Artifact extension'.If there is no output file found in Eclipse project, we have to add output files manually to winIDEA.
Making copies of projectIf we want to copy project files to other locations, we have to move all source files and project files.In case of Eclipse with CDT and iSystem debugger, the following files have to be copied:
– .project and .cproject – Eclipse and CDT project files, contain information on howto build the project
– <winIDEAWorkspaceFileName>.xjrf – winIDEA workspace file contains hardware configuration

Disclaimer: iSYSTEM assumes no responsibility for any errors which may appear in this document,reserves the right to change devices or specifications detailed herein at any time without notice, anddoes not make any commitment to update the information herein.
iSYSTEM. All rights reserved.