interoperability in internet of things · introduction to internet of things. what is...
TRANSCRIPT
1
Interoperability in Internet of Things
Dr. Sudip MisraAssociate Professor
Department of Computer Science and EngineeringIIT KHARAGPUR
Email: [email protected]: http://www.cse.iitkgp.ac.in/~smisra/
Introduction to Internet of Things
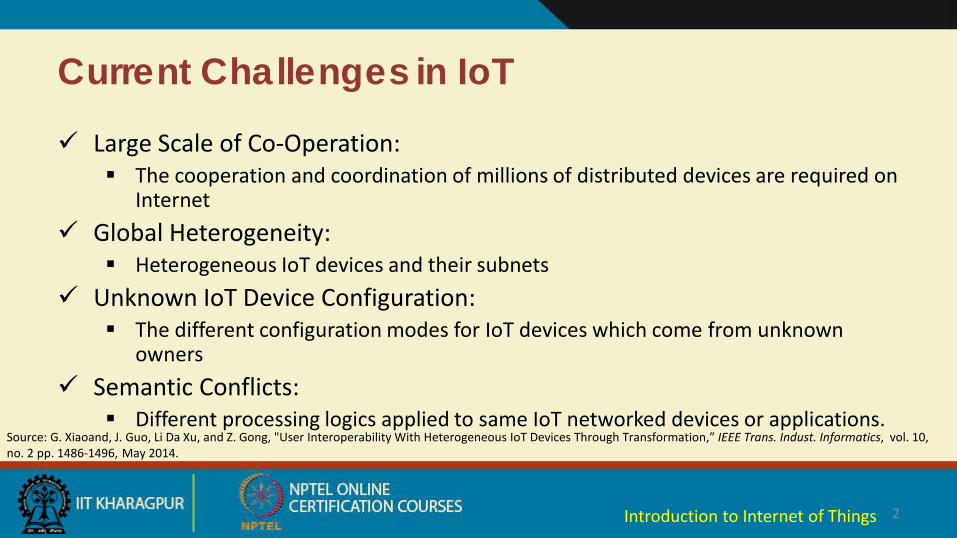
Current Challenges in IoT
Large Scale of Co-Operation: The cooperation and coordination of millions of distributed devices are required on
Internet Global Heterogeneity:
Heterogeneous IoT devices and their subnets Unknown IoT Device Configuration:
The different configuration modes for IoT devices which come from unknown owners
Semantic Conflicts: Different processing logics applied to same IoT networked devices or applications.
2
Source: G. Xiaoand, J. Guo, Li Da Xu, and Z. Gong, "User Interoperability With Heterogeneous IoT Devices Through Transformation,” IEEE Trans. Indust. Informatics, vol. 10, no. 2 pp. 1486-1496, May 2014.
Introduction to Internet of Things

What is Interoperability?
Interoperability is a characteristic of a product or system,whose interfaces are completely understood, to work withother products or systems, present or future, in eitherimplementation or access, without any restrictions. Communicate meaningfully Exchange data or services
3
Source: "Definition of Interoperability". dedicated website for a Definition of Interoperability at interoperability-definition.info. Copyright AFUL under CC BY-SA.
Introduction to Internet of Things
Why Interoperability is Important in Context of IoT?
To fulfill the IoT objectives Physical objects can interact with any other physical objects and can
share their information Any device can communicate with other devices anytime from
anywhere Machine to Machine communication(M2M), Device to Device
Communication (D2D), Device to Machine Communication (D2M) Seamless device integration with IoT network
4Introduction to Internet of Things
Why Interoperability is required?
Heterogeneity Different wireless communication protocols such as ZigBee (IEEE
802.15.4), Bluetooth (IEEE 802.15.1), GPRS, 6LowPAN, and Wi-Fi (IEEE 802.11)
Different wired communication protocols like Ethernet (IEEE 802.3) and Higher Layer LAN Protocols (IEEE 802.1)
Different programming languages used in computing systems and websites such as JavaScript, JAVA, C, C++, Visual Basic, PHP, and Python
Different hardware platforms such as Crossbow, NI, etc.
5Introduction to Internet of Things
Why Interoperability is required? (Contd.)
Different operating systems As an example for sensor node: TinyOS, SOS, Mantis OS, RETOS, and
mostly vendor specific OS As an example for personal computer: Windows, Mac, Unix, and Ubuntu
Different databases: DB2, MySQL, Oracle, PostgreSQL, SQLite, SQL Server, and Sybase
Different data representations Different control models Syntactic or semantic interpretations
6Introduction to Internet of Things
Different Types of Interoperability?
User Interoperability Interoperability problem between a user and a device
Device Interoperability Interoperability problem between two different devices
7Introduction to Internet of Things
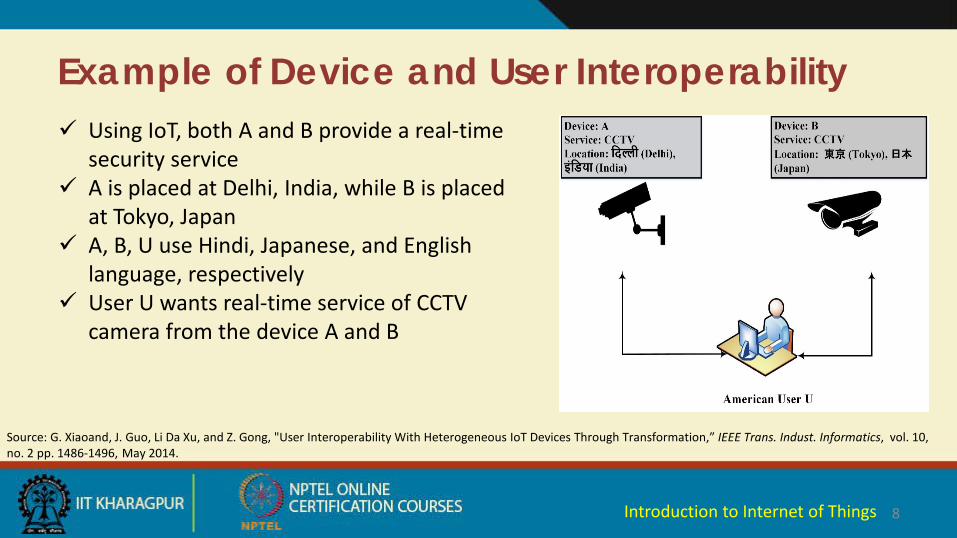
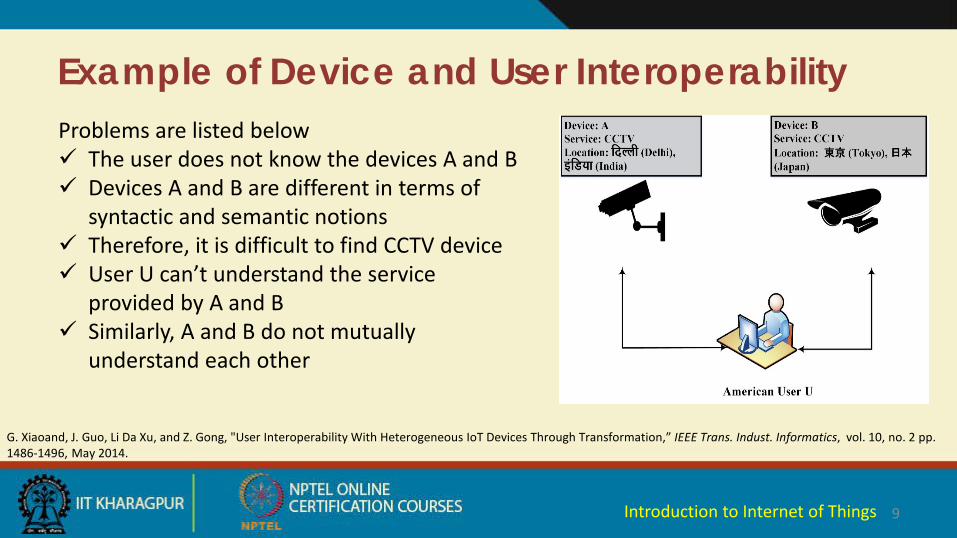
Example of Device and User Interoperability
8
Source: G. Xiaoand, J. Guo, Li Da Xu, and Z. Gong, "User Interoperability With Heterogeneous IoT Devices Through Transformation,” IEEE Trans. Indust. Informatics, vol. 10, no. 2 pp. 1486-1496, May 2014.
Using IoT, both A and B provide a real-time security service
A is placed at Delhi, India, while B is placed at Tokyo, Japan
A, B, U use Hindi, Japanese, and English language, respectively
User U wants real-time service of CCTV camera from the device A and B
Introduction to Internet of Things
Example of Device and User Interoperability
9
Problems are listed below The user does not know the devices A and B Devices A and B are different in terms of
syntactic and semantic notions Therefore, it is difficult to find CCTV device User U can’t understand the service
provided by A and B Similarly, A and B do not mutually
understand each other
G. Xiaoand, J. Guo, Li Da Xu, and Z. Gong, "User Interoperability With Heterogeneous IoT Devices Through Transformation,” IEEE Trans. Indust. Informatics, vol. 10, no. 2 pp. 1486-1496, May 2014.
Introduction to Internet of Things
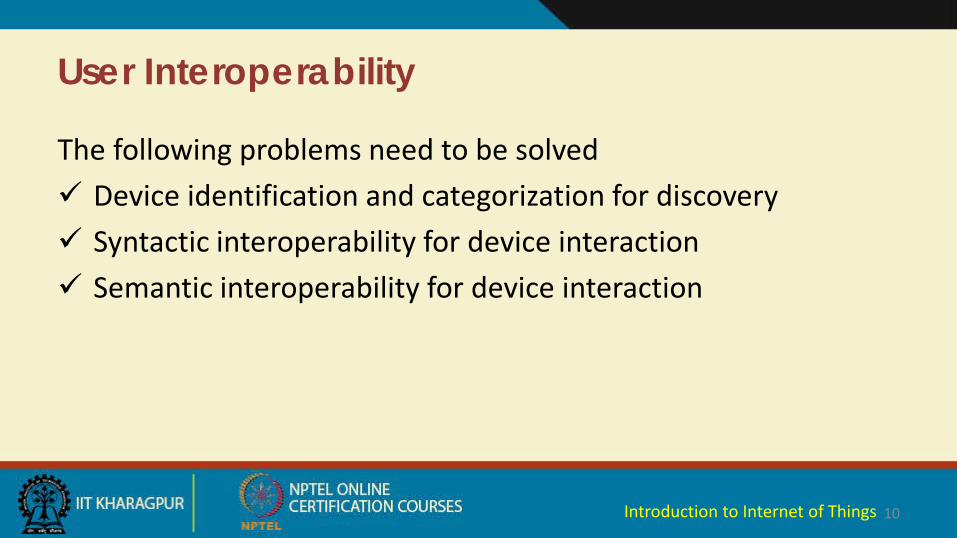
User Interoperability
The following problems need to be solved Device identification and categorization for discovery Syntactic interoperability for device interaction Semantic interoperability for device interaction
10Introduction to Internet of Things

Device identification and categorization for discoveryThere are different solutions for generating unique address Electronic Product Codes (EPC) Universal Product Code (UPC) Uniform Resource Identifier (URI) IP Addresses
IPv6
11
Source: G. Xiaoand, J. Guo, Li Da Xu, and Z. Gong, "User Interoperability With Heterogeneous IoT Devices Through Transformation,” IEEE Trans. Indust. Informatics, vol. 10, no. 2 pp. 1486-1496, May 2014.
Introduction to Internet of Things
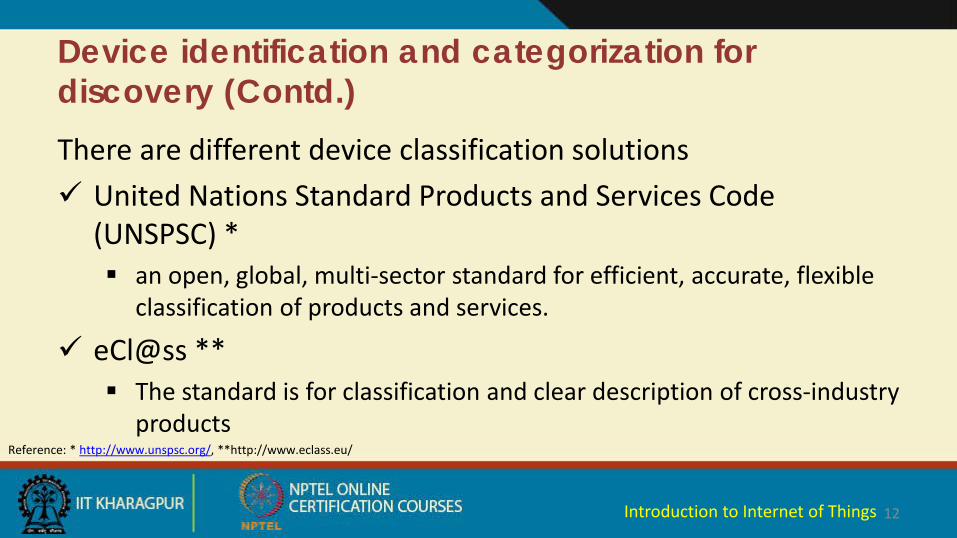
Device identification and categorization for discovery (Contd.)There are different device classification solutions United Nations Standard Products and Services Code
(UNSPSC) * an open, global, multi-sector standard for efficient, accurate, flexible
classification of products and services.
eCl@ss ** The standard is for classification and clear description of cross-industry
products
12
Reference: * http://www.unspsc.org/, **http://www.eclass.eu/
Introduction to Internet of Things

Syntactic Interoperability for Device Interaction
The interoperability between devices and device user in term of message formats
The message format from a device to a user is understandable for the user’s computer
On the other hand, the message format from the user to the device is executable by the device
13Introduction to Internet of Things
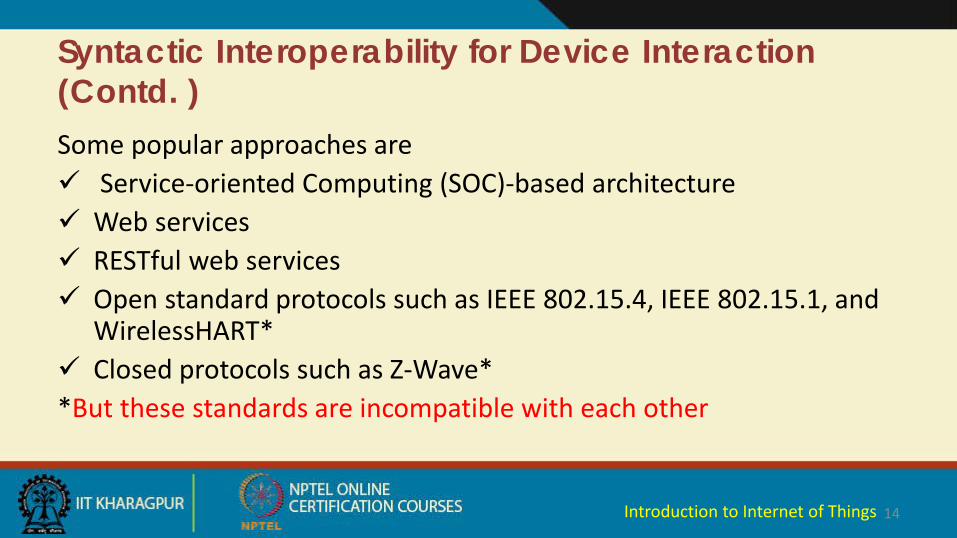
Syntactic Interoperability for Device Interaction (Contd. )Some popular approaches are Service-oriented Computing (SOC)-based architecture Web services RESTful web services Open standard protocols such as IEEE 802.15.4, IEEE 802.15.1, and
WirelessHART* Closed protocols such as Z-Wave**But these standards are incompatible with each other
14Introduction to Internet of Things
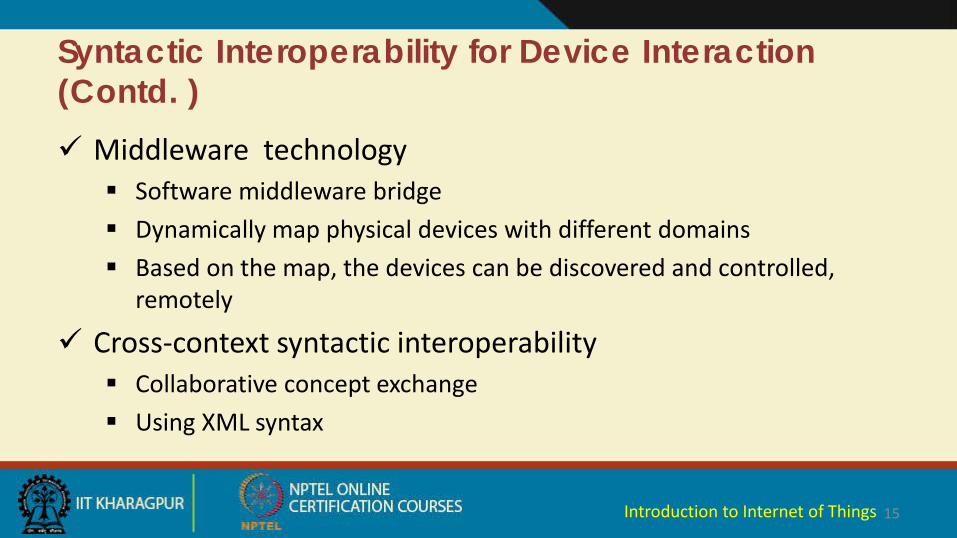
Syntactic Interoperability for Device Interaction (Contd. ) Middleware technology
Software middleware bridge Dynamically map physical devices with different domains Based on the map, the devices can be discovered and controlled,
remotely
Cross-context syntactic interoperability Collaborative concept exchange Using XML syntax
15Introduction to Internet of Things
Semantic Interoperability for Device Interaction
The interoperability between devices and device user in term of message’s meaning
The device can understand the meaning of user’s instruction that is sent from the user to the device.
Similarly, the user can understand the meaning of device’s response sent from the device
16Introduction to Internet of Things
Semantic Interoperability for Device Interaction (Contd. )Some popular approaches Ontology
Device ontology Physical domain ontology Estimation ontology
Ontology-based solution is limited to the defined domain /context
17
Source: G. Xiaoand, J. Guo, Li Da Xu, and Z. Gong, "User Interoperability With Heterogeneous IoT Devices Through Transformation,” IEEE Trans. Indust. Informatics, vol. 10, no. 2 pp. 1486-1496, May 2014.
Introduction to Internet of Things
Semantic Interoperability for Device Interaction (Contd. ) Collaborative conceptualization theory
Object is defined based on the collaborative concept, which is called cosign
The representation of a collaborative sign is defined as follows: cosign of a object = (A, B, C, D ), where A is a cosign internal identifier, B is
a natural language, C is the context of A, and D is a definition of the object As an example of CCTV, cosign = (1234, English, CCTV, “Camera Type:
Bullet, Communication: Network/IP, Horizontal Resolution: 2048 TVL”)
This solution approach is applicable for different domains/contexts
18Introduction to Internet of Things
Device Interoperability
Solution approach for device interoperability Universal Middleware Bridge (UMB)
Solves seamless interoperability problems caused by the heterogeneity of several kinds of home network middleware
UMB creates virtual maps among the physical devices of all middleware home networks, such as HAVI, Jini, LonWorks, and UPnP
Creates a compatibility among these middleware home networks
19
source: K.-D. Moon, Y.-H. Lee, C.-E. Lee, and Y.-S. Son, “Design of a universal middleware bridge for device interoperability in heterogeneous home network middleware,” IEEE Trans. Consum. Electron., vol. 51, no. 1, pp. 314–318, Feb. 2005.
Introduction to Internet of Things
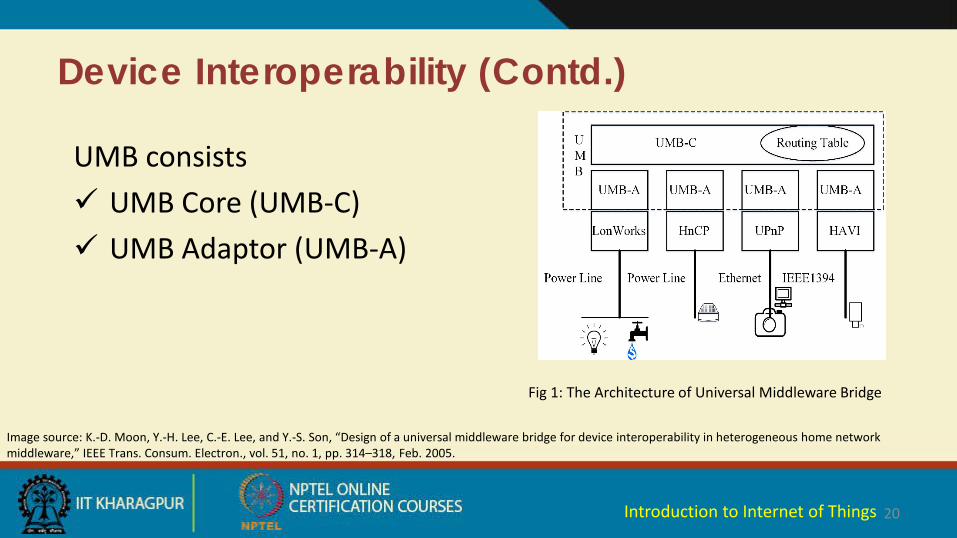
Device Interoperability (Contd.)
20
Image source: K.-D. Moon, Y.-H. Lee, C.-E. Lee, and Y.-S. Son, “Design of a universal middleware bridge for device interoperability in heterogeneous home network middleware,” IEEE Trans. Consum. Electron., vol. 51, no. 1, pp. 314–318, Feb. 2005.
Fig 1: The Architecture of Universal Middleware Bridge
UMB consists UMB Core (UMB-C) UMB Adaptor (UMB-A)
Introduction to Internet of Things
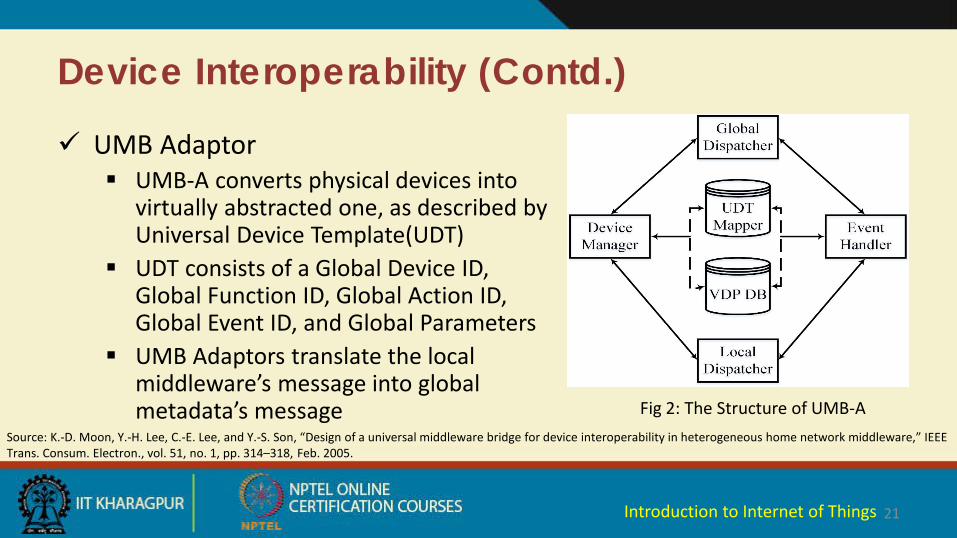
Device Interoperability (Contd.)
UMB Adaptor UMB-A converts physical devices into
virtually abstracted one, as described by Universal Device Template(UDT)
UDT consists of a Global Device ID, Global Function ID, Global Action ID, Global Event ID, and Global Parameters
UMB Adaptors translate the local middleware’s message into global metadata’s message
21
Source: K.-D. Moon, Y.-H. Lee, C.-E. Lee, and Y.-S. Son, “Design of a universal middleware bridge for device interoperability in heterogeneous home network middleware,” IEEE Trans. Consum. Electron., vol. 51, no. 1, pp. 314–318, Feb. 2005.
Fig 2: The Structure of UMB-A
Introduction to Internet of Things
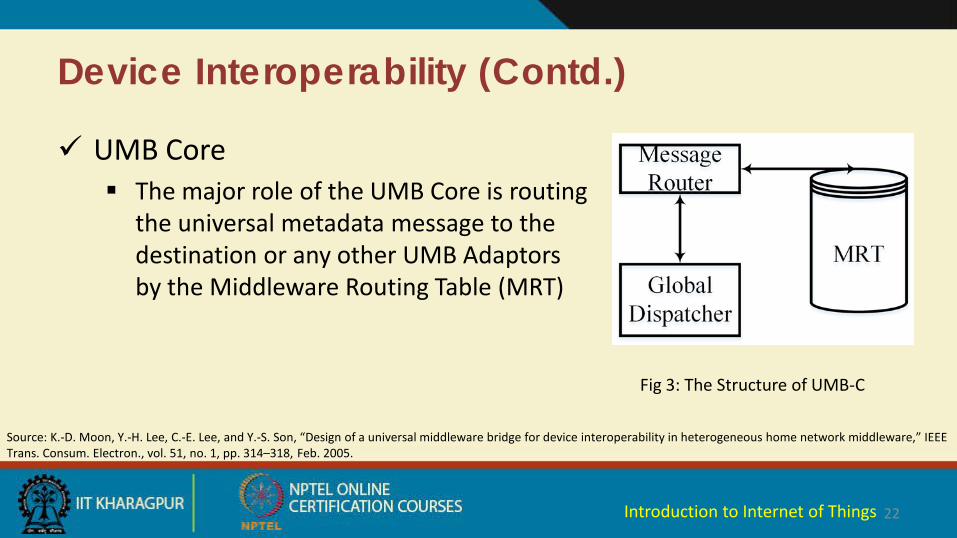
Device Interoperability (Contd.)
UMB Core The major role of the UMB Core is routing
the universal metadata message to the destination or any other UMB Adaptors by the Middleware Routing Table (MRT)
22
Source: K.-D. Moon, Y.-H. Lee, C.-E. Lee, and Y.-S. Son, “Design of a universal middleware bridge for device interoperability in heterogeneous home network middleware,” IEEE Trans. Consum. Electron., vol. 51, no. 1, pp. 314–318, Feb. 2005.
Fig 3: The Structure of UMB-C
Introduction to Internet of Things
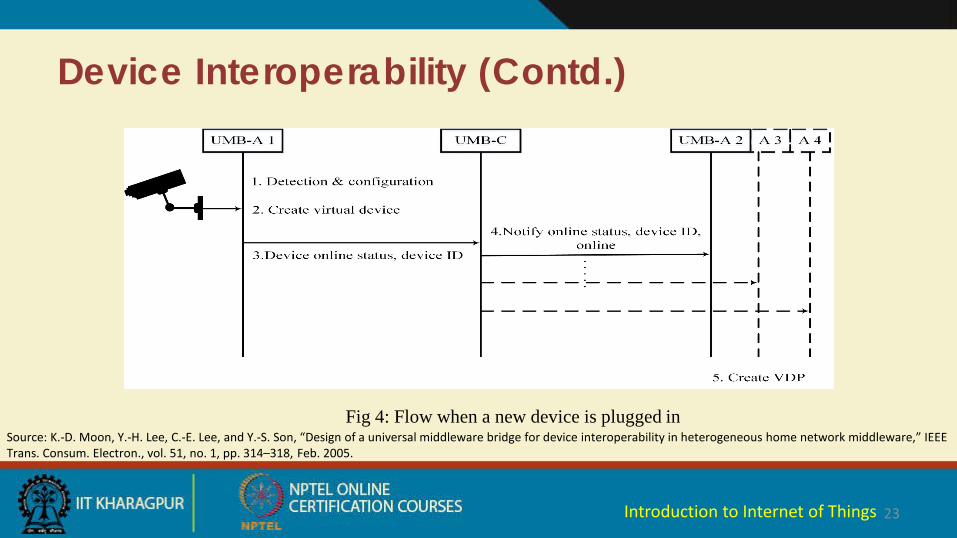
Device Interoperability (Contd.)
23
Source: K.-D. Moon, Y.-H. Lee, C.-E. Lee, and Y.-S. Son, “Design of a universal middleware bridge for device interoperability in heterogeneous home network middleware,” IEEE Trans. Consum. Electron., vol. 51, no. 1, pp. 314–318, Feb. 2005.
Fig 4: Flow when a new device is plugged in
Introduction to Internet of Things
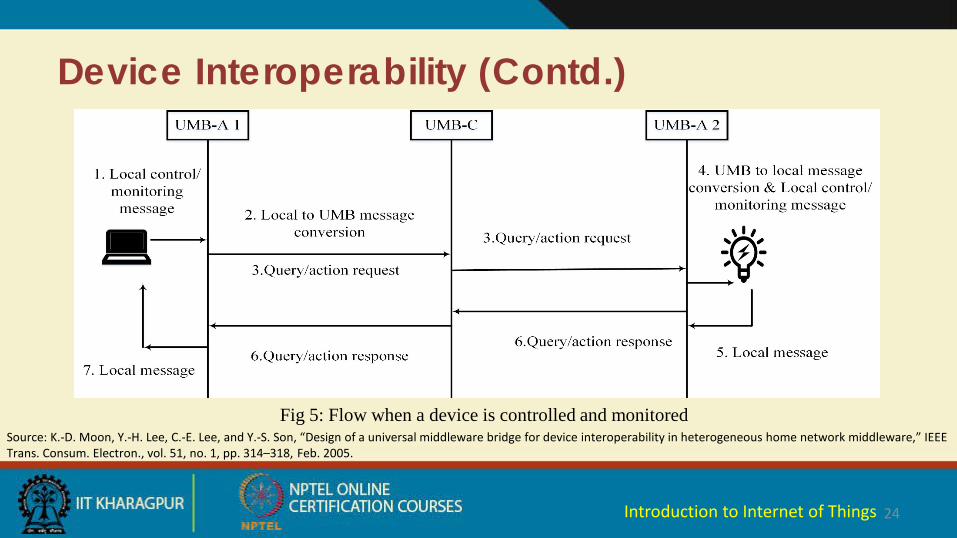
Device Interoperability (Contd.)
24
Source: K.-D. Moon, Y.-H. Lee, C.-E. Lee, and Y.-S. Son, “Design of a universal middleware bridge for device interoperability in heterogeneous home network middleware,” IEEE Trans. Consum. Electron., vol. 51, no. 1, pp. 314–318, Feb. 2005.
Fig 5: Flow when a device is controlled and monitored
Introduction to Internet of Things

25Introduction to Internet of Things
1
Dr. Sudip MisraAssociate Professor
Department of Computer Science and EngineeringIIT KHARAGPUR
Email: [email protected]: http://cse.iitkgp.ac.in/~smisra/
Introduction to Arduino Programming – Part I
Introduction to Internet of Things
Features of Arduino
Open source based electronic programmable board (micro controller)and software(IDE)
Accepts analog and digital signals as input and gives desired output
No extra hardware required to load a program into the controller board
2Introduction to Internet of Things
Types of Arduino Board
Arduino boards based on ATMEGA328 microcontroller
Arduino boards based on ATMEGA32u4 microcontroller
Arduino boards based on ATMEGA2560 microcontroller
Arduino boards based on AT91SAM3X8E microcontroller
3Introduction to Internet of Things
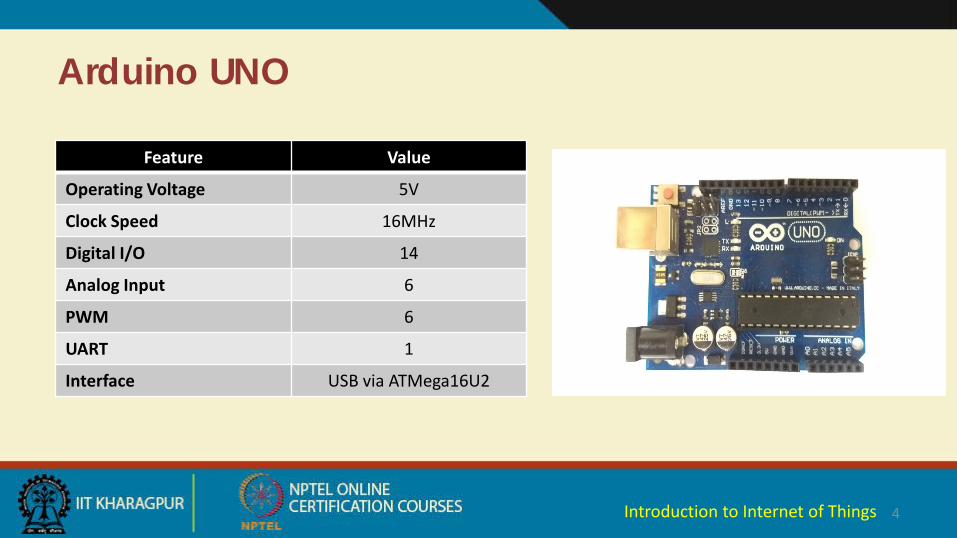
Arduino UNO
4
Feature Value
Operating Voltage 5V
Clock Speed 16MHz
Digital I/O 14
Analog Input 6
PWM 6
UART 1
Interface USB via ATMega16U2
Introduction to Internet of Things
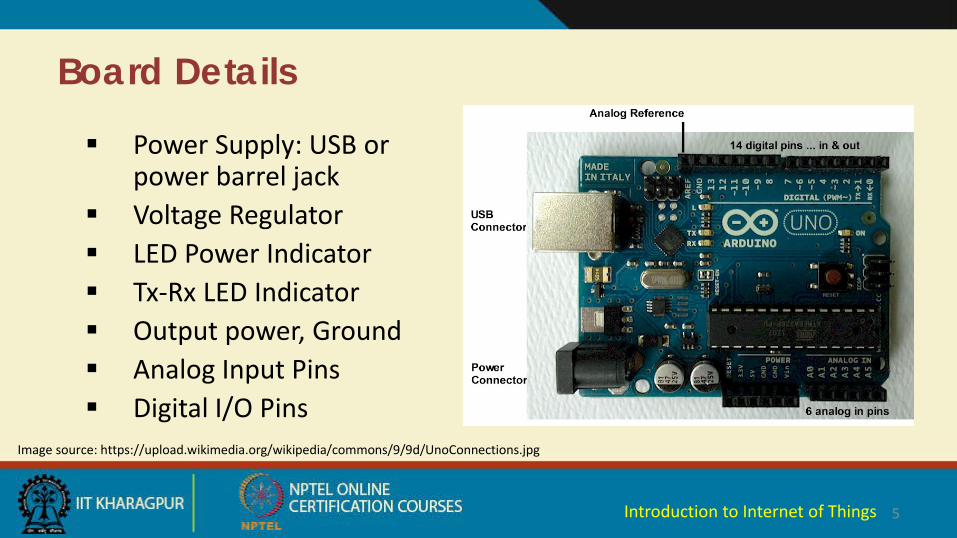
Board Details
Power Supply: USB or power barrel jack
Voltage Regulator LED Power Indicator Tx-Rx LED Indicator Output power, Ground Analog Input Pins Digital I/O Pins
5
Image source: https://upload.wikimedia.org/wikipedia/commons/9/9d/UnoConnections.jpg
Introduction to Internet of Things
Arduino IDE
Arduino IDE is an open source software that is used to program the Arduino controller board
Based on variations of the C and C++ programming language
It can be downloaded from Arduino’s official website and installed into PC
6Introduction to Internet of Things

Set Up
7
Power the board by connecting it to a PC via USB cable Launch the Arduino IDE Set the board type and the port for the board TOOLS -> BOARD -> select your board TOOLS -> PORT -> select your port
Introduction to Internet of Things
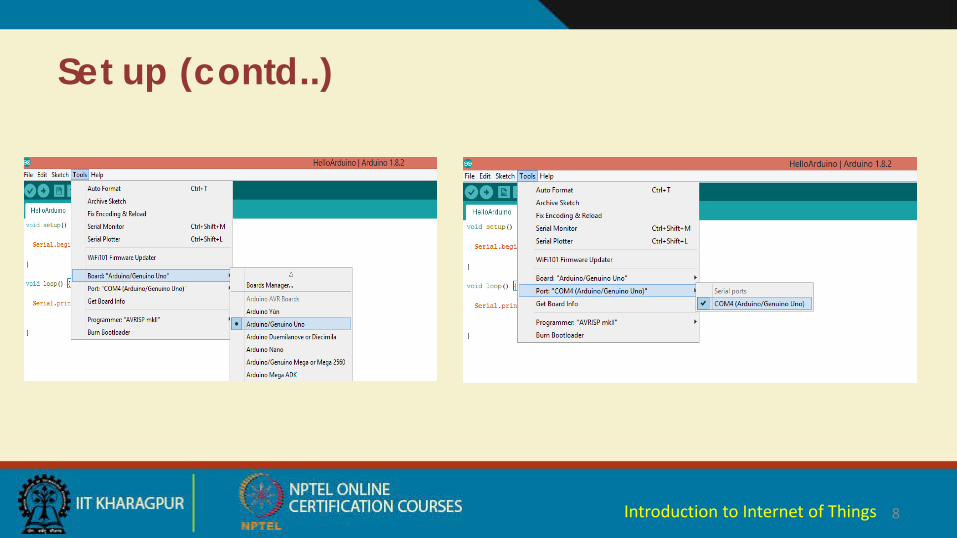
Set up (contd..)
8Introduction to Internet of Things
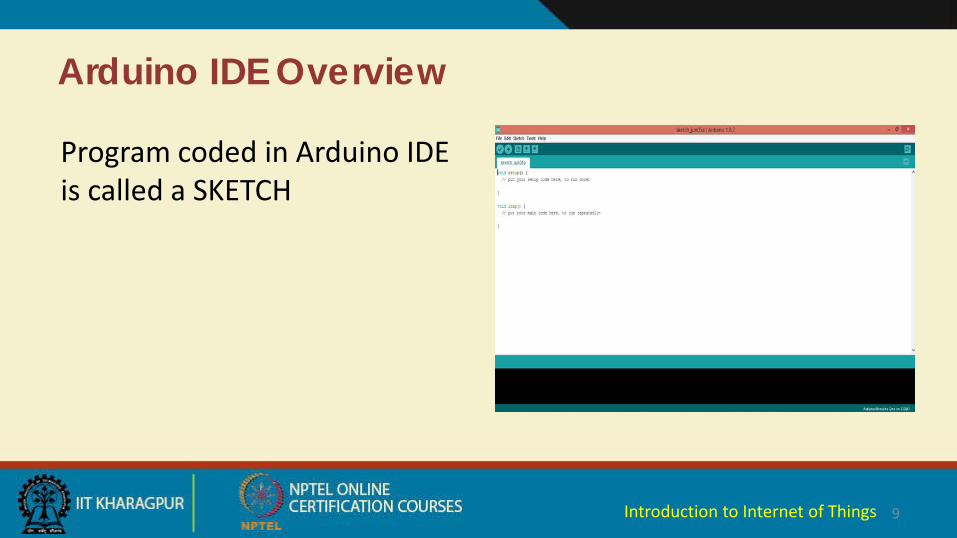
Arduino IDE Overview
9
Program coded in Arduino IDE is called a SKETCH
Introduction to Internet of Things

Arduino IDE Overview (contd..)
To create a new sketch File -> New
To open an existing sketch File -> open ->
There are some basic ready-to-use sketches available in the EXAMPLES section
File -> Examples -> select any program
10Introduction to Internet of Things
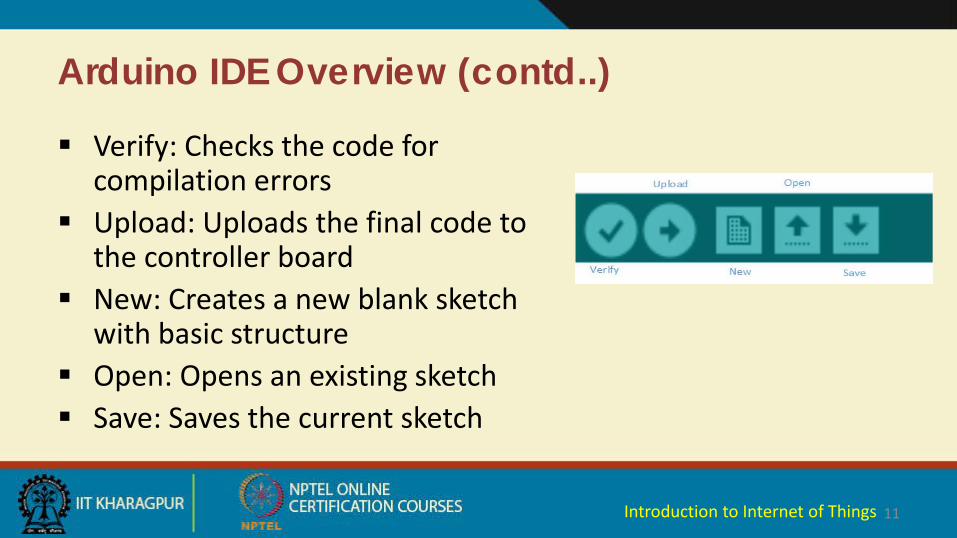
Arduino IDE Overview (contd..)
Verify: Checks the code for compilation errors
Upload: Uploads the final code to the controller board
New: Creates a new blank sketch with basic structure
Open: Opens an existing sketch Save: Saves the current sketch
11Introduction to Internet of Things
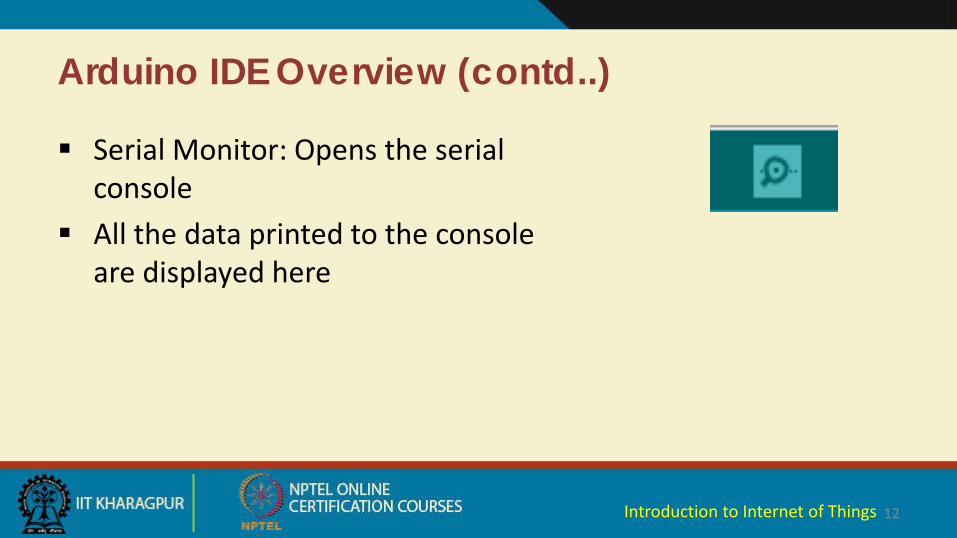
Arduino IDE Overview (contd..)
12
Serial Monitor: Opens the serial console
All the data printed to the console are displayed here
Introduction to Internet of Things

Sketch Structure
13
A sketch can be divided into two parts: Setup () Loop()
The function setup() is the point where the code starts, just like the main() function in C and C++
I/O Variables, pin modes are initialized in the Setup() function
Loop() function, as the name suggests, iterates the specified task in the program
Introduction to Internet of Things
Supported Datatype
14
Arduino supports the following data types-
Void LongInt CharBoolean Unsigned charByte Unsigned intWord Unsigned longFloat DoubleArray String-char arrayString-object Short
Introduction to Internet of Things
Arduino Function Libraries
15
Input/Output Functions: The arduino pins can be configured to act as input or output pins using the
pinMode() function
Void setup () { pinMode (pin , mode); }
Pin- pin number on the Arduino boardMode- INPUT/OUTPUT
Introduction to Internet of Things

Arduino Function Libraries (contd..)
16
digitalWrite() : Writes a HIGH or LOW value to a digital pin
analogRead() : Reads from the analog input pin i.e., voltage applied across the pin
Character functions such as isdigit(), isalpha(), isalnum(), isxdigit(), islower(), isupper(), isspace() return 1(true) or 0(false)
Delay() function is one of the most common time manipulation function used to provide a delay of specified time. It accepts integer value (time in miliseconds)
Introduction to Internet of Things
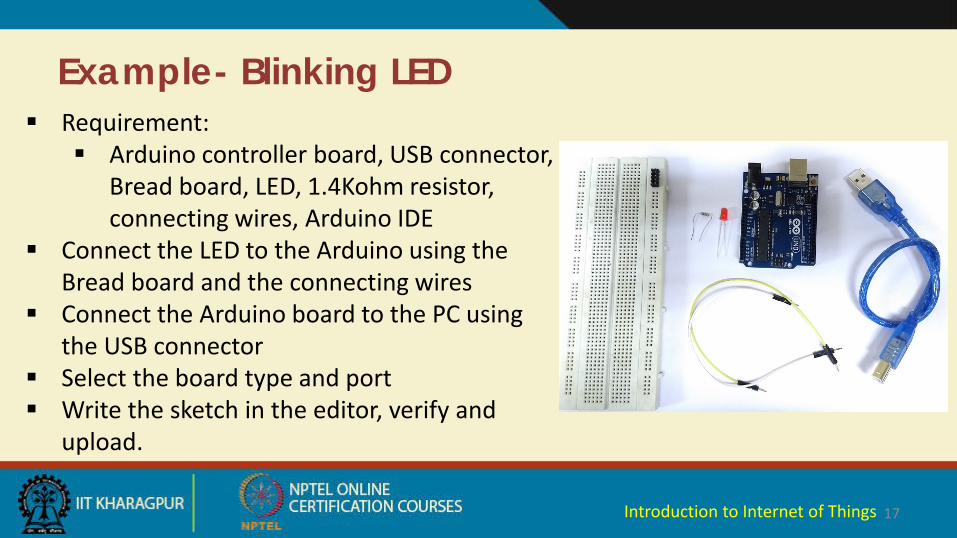
Example- Blinking LED
17
Requirement: Arduino controller board, USB connector,
Bread board, LED, 1.4Kohm resistor, connecting wires, Arduino IDE
Connect the LED to the Arduino using the Bread board and the connecting wires
Connect the Arduino board to the PC using the USB connector
Select the board type and port Write the sketch in the editor, verify and
upload.
Introduction to Internet of Things
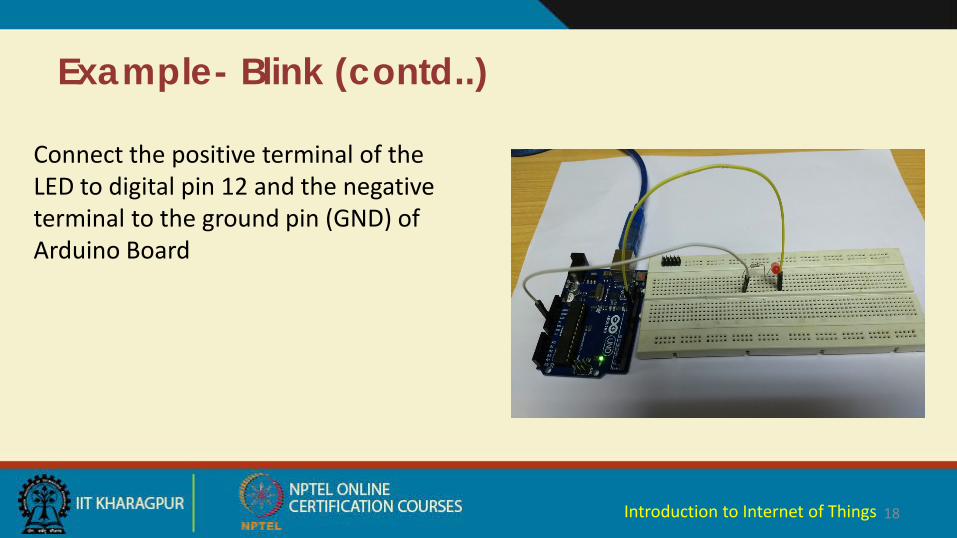
Example- Blink (contd..)
18
Connect the positive terminal of the LED to digital pin 12 and the negative terminal to the ground pin (GND) of Arduino Board
Introduction to Internet of Things
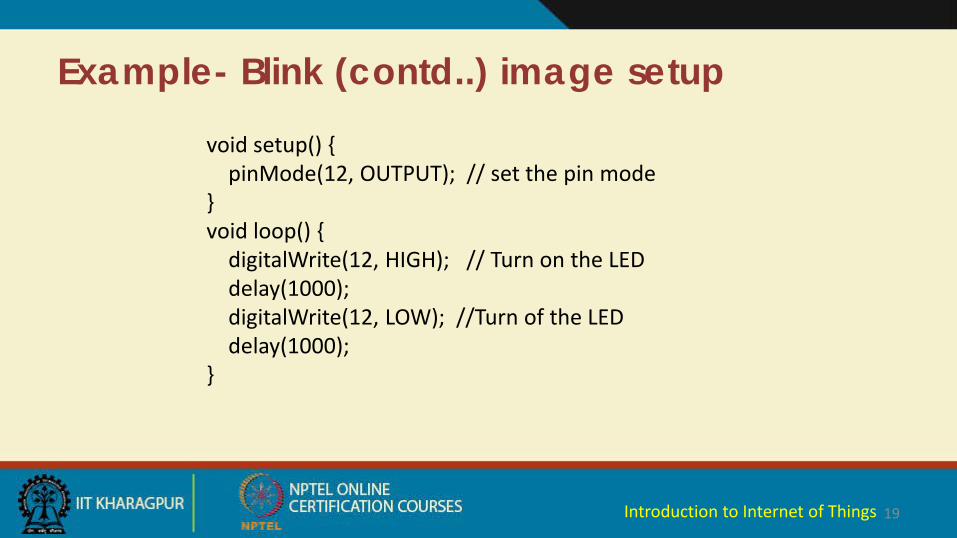
Example- Blink (contd..) image setup
19
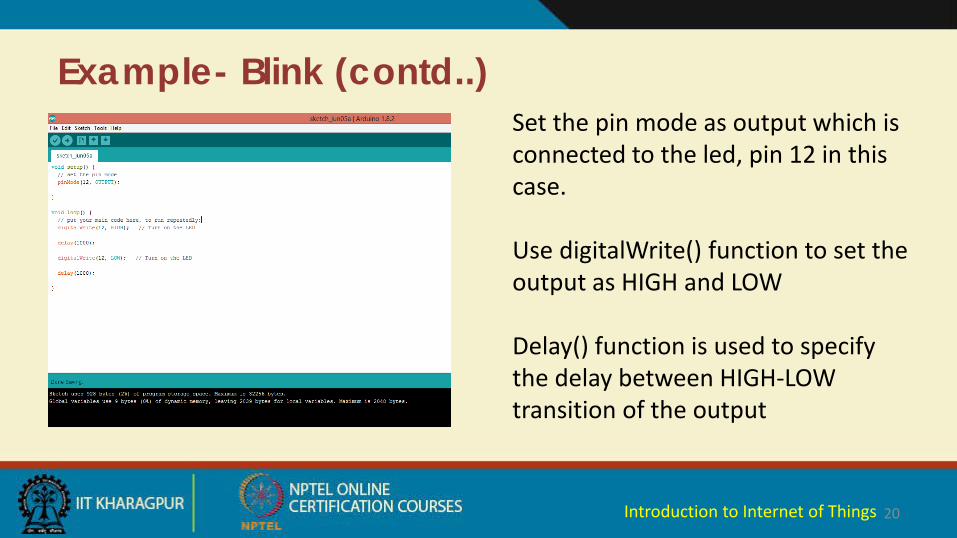
void setup() {pinMode(12, OUTPUT); // set the pin mode
}void loop() {
digitalWrite(12, HIGH); // Turn on the LEDdelay(1000);digitalWrite(12, LOW); //Turn of the LEDdelay(1000);
}
Introduction to Internet of Things
Example- Blink (contd..)
20
Set the pin mode as output which is connected to the led, pin 12 in this case.
Use digitalWrite() function to set the output as HIGH and LOW
Delay() function is used to specify the delay between HIGH-LOW transition of the output
Introduction to Internet of Things
Example- Blink (contd..) image setup
21
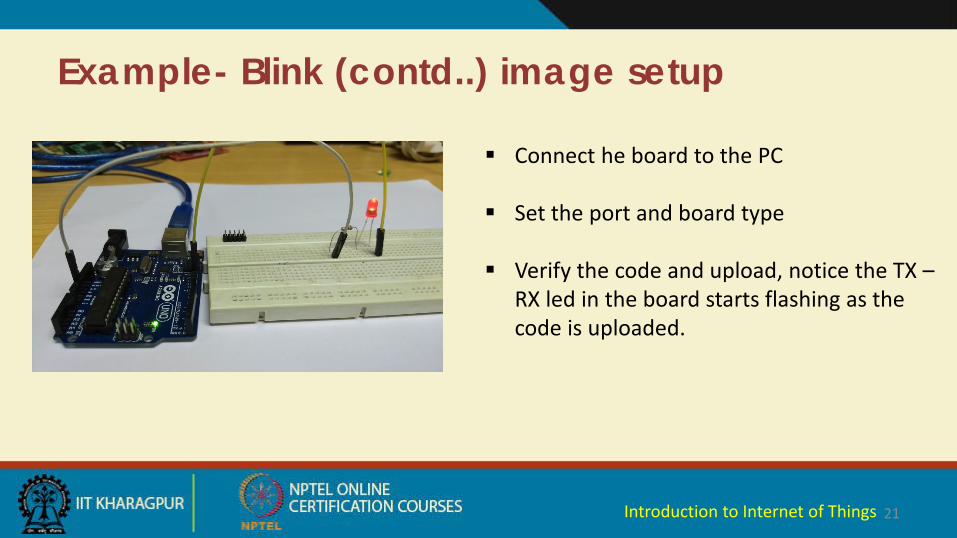
Connect he board to the PC
Set the port and board type
Verify the code and upload, notice the TX –RX led in the board starts flashing as the code is uploaded.
Introduction to Internet of Things

22Introduction to Internet of Things
1
Dr. Sudip MisraAssociate Professor
Department of Computer Science and EngineeringIIT KHARAGPUR
Email: [email protected]: http://cse.iitkgp.ac.in/~smisra/
Introduction to Arduino Programming – Part II
Introduction to Internet of Things
Content
Operators in Arduino Control Statement Loops Arrays String Math Library
2
Random Number Interrupts Example Program
Introduction to Internet of Things
Operators
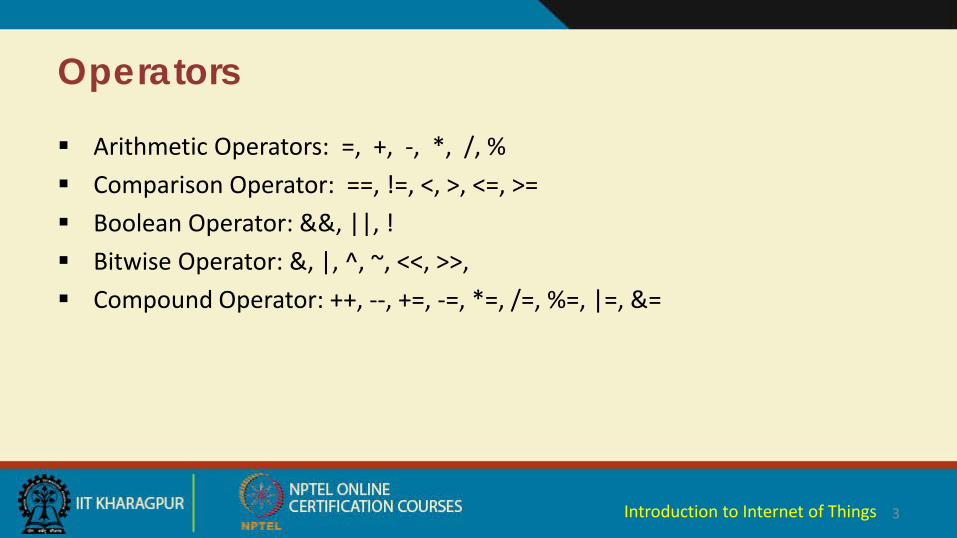
Arithmetic Operators: =, +, -, *, /, % Comparison Operator: ==, !=, <, >, <=, >= Boolean Operator: &&, ||, ! Bitwise Operator: &, |, ^, ~, <<, >>, Compound Operator: ++, --, +=, -=, *=, /=, %=, |=, &=
3Introduction to Internet of Things
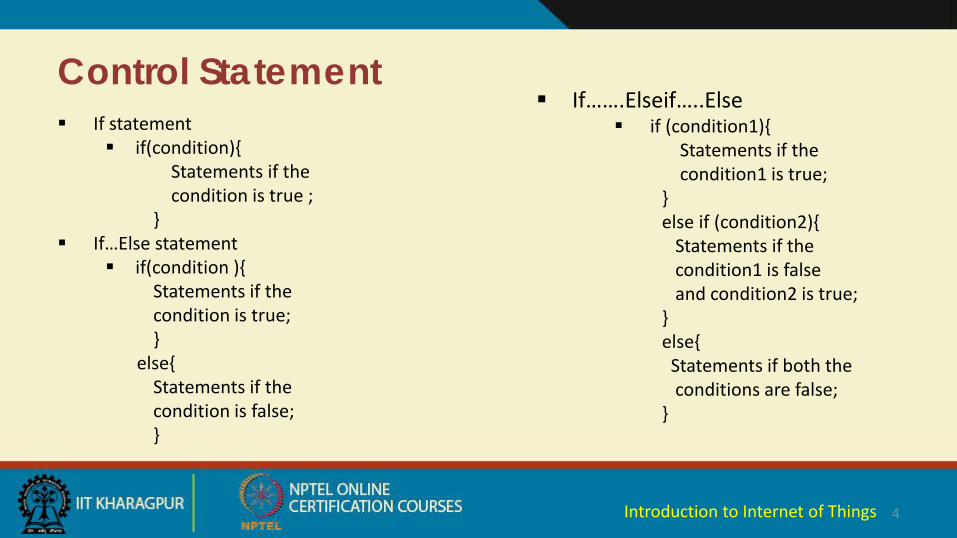
Control Statement If statement
if(condition){Statements if the condition is true ;
} If…Else statement
if(condition ){Statements if the condition is true;}
else{Statements if the condition is false;}
4
If…….Elseif…..Else if (condition1){
Statements if the condition1 is true;
}else if (condition2){
Statements if the condition1 is false and condition2 is true;
}else{Statements if both the conditions are false;
}
Introduction to Internet of Things
Control Statement (contd..)
5
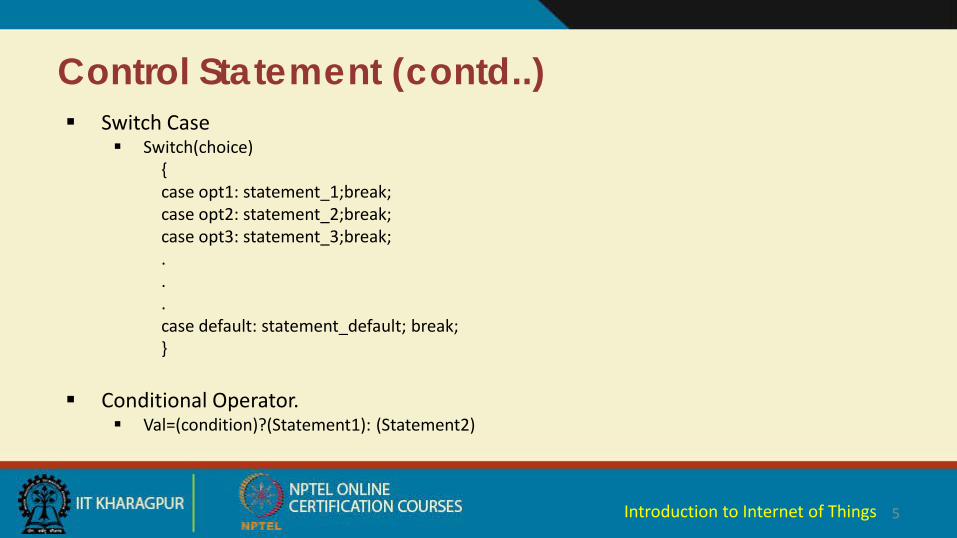
Switch Case Switch(choice)
{case opt1: statement_1;break;case opt2: statement_2;break;case opt3: statement_3;break;...case default: statement_default; break;}
Conditional Operator. Val=(condition)?(Statement1): (Statement2)
Introduction to Internet of Things
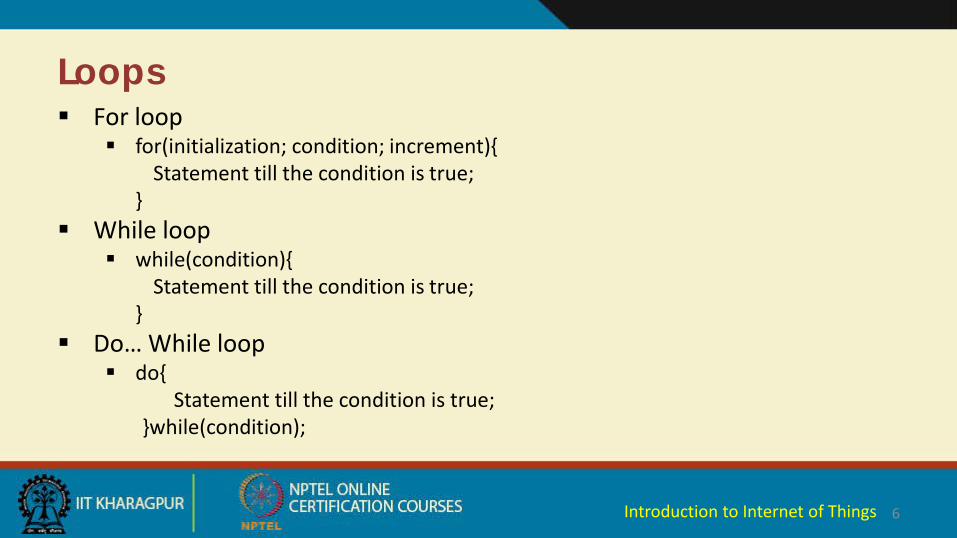
Loops For loop
for(initialization; condition; increment){Statement till the condition is true;
} While loop
while(condition){Statement till the condition is true;
} Do… While loop
do{Statement till the condition is true;
}while(condition);
6Introduction to Internet of Things
Loops (contd..)
7
Nested loop: Calling a loop inside another loop
Infinite loop: Condition of the loop is always true, the loop will never terminate
Introduction to Internet of Things
Arrays
Collection of elements having homogenous datatype that are stored in adjacent memory location.
The conventional starting index is 0. Declaration of array:
<Datatype> array_name[size];Ex: int arre[5];
8Introduction to Internet of Things
Arrays (contd..)
9
Alternative Declaration:int arre[]={0,1,2,3,4};int arre[5]={0,1,2};
Multi-dimentional array Declaration:<Datatype> array_name[n1] [n2][n3]….;Ex: int arre[row][col][height];
Introduction to Internet of Things
String
10
Array of characters with NULL as termination is termed as a String. Declaration using Array:
char str[]=“ABCD”; char str[4];
str[0]=‘A’; str[0]=‘B’; str[0]=‘C’; str[0]=0;
Declaration using String Object: String str=“ABC”;
Introduction to Internet of Things
String (contd..)
11
Functions of String Object: str.ToUpperCase(): change all the characters of str to upper case str.replace(str1,str2): is str1 is the sub string of str then it will be
replaced by str2 str.length(): returns the length of the string without considering null
Introduction to Internet of Things
Math Library To apply the math functions and mathematical constants, “MATH.h” header
files is needed to be included.
12
Functions: cos(double radian); sin(double radian); tan(double radian); fabs(double val); fmod(double val1, double val2);
Introduction to Internet of Things
Math Library (contd..)
13
Functions: exp(double val); log(double val); log10(double val); square(double val); pow(double base, double power);
Introduction to Internet of Things
Random Number
randomSeed(int v): reset the pseudo-random number generator with seed value v
random(maxi)=gives a random number within the range [0,maxi] random(mini,maxi)=gives a random number within the range
[mini,maxi]
14Introduction to Internet of Things
Interrupts
An external signal for which system blocks the current running process to process that signal
Types: Hardware interrupt Software interrupt
digitalPinToInterrupt(pin): Change actual digital pin to the specific interrupt number.
attachInterrupt(digitalPinToInterrupt(pin), ISR, mode); ISR: a interrupt service routine have to be defined
15Introduction to Internet of Things
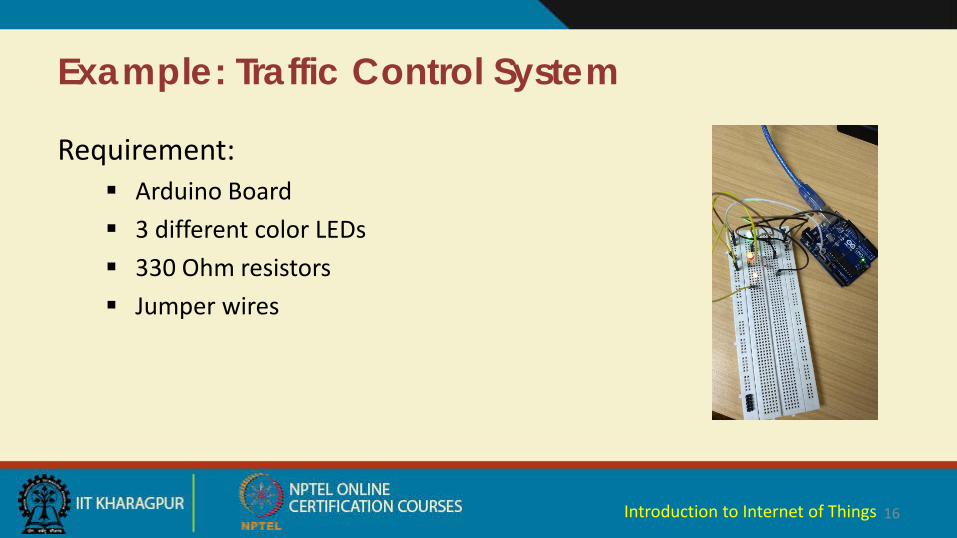
Example: Traffic Control System
Requirement: Arduino Board 3 different color LEDs 330 Ohm resistors Jumper wires
16Introduction to Internet of Things
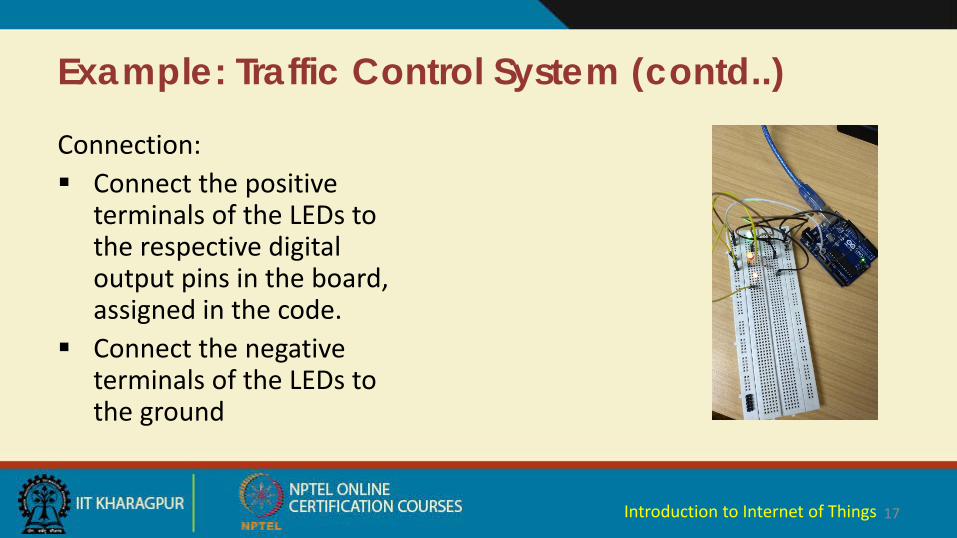
Example: Traffic Control System (contd..)
Connection: Connect the positive
terminals of the LEDs to the respective digital output pins in the board, assigned in the code.
Connect the negative terminals of the LEDs to the ground
17Introduction to Internet of Things

Example: Traffic Control System (contd..) Sketch
//LED pinsint r = 2; int g = 3;int y = 4;void setup(){
Serial.begin(9600);pinMode(r, OUTPUT); digitalWrite(r,LOW); pinMode(g, OUTPUT); digitalWrite(g,LOW); pinMode(y , OUTPUT); digitalWrite(y, LOW);
}
18Introduction to Internet of Things
Example: Traffic Control System (contd..)void traffic(){
digitalWrite(g, HIGH); Serial.println(“Green LED: ON, GO”);// delay of 5 secondsdelay(5000);digitalWrite(g, LOW); digitalWrite(y, HIGH);Serial.println(“Green LED: OFF ; Yellow LED: ON, WAIT”);delay(5000);
19Introduction to Internet of Things
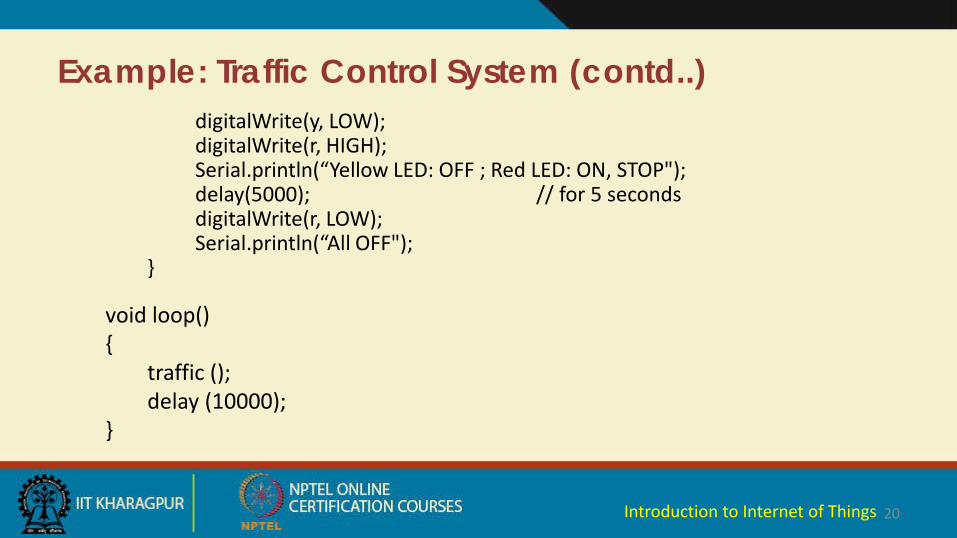
Example: Traffic Control System (contd..)digitalWrite(y, LOW);digitalWrite(r, HIGH);Serial.println(“Yellow LED: OFF ; Red LED: ON, STOP");delay(5000); // for 5 secondsdigitalWrite(r, LOW);Serial.println(“All OFF");
}
void loop(){
traffic ();delay (10000);
}
20Introduction to Internet of Things

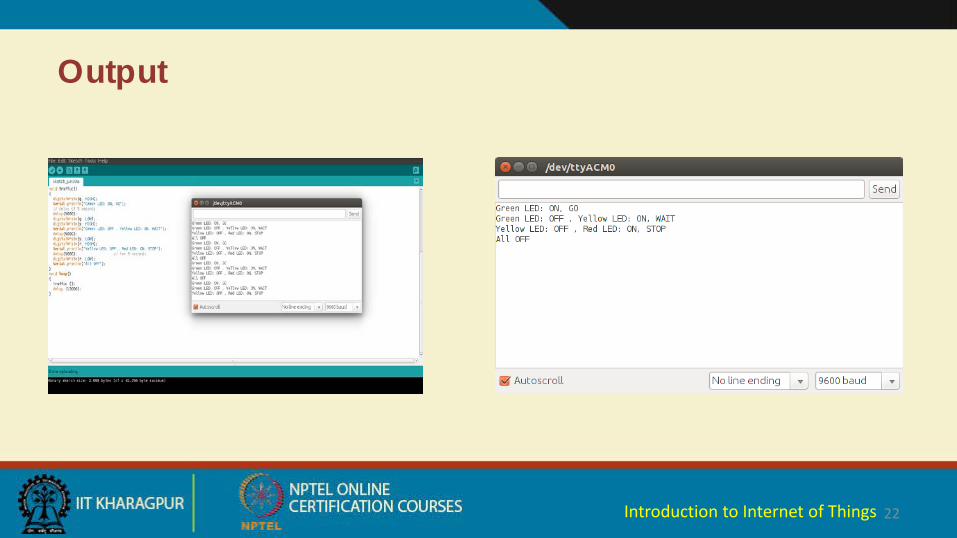
Example: Traffic Control System (contd..)Output: Initially, all the LEDs are turned
off The LEDs are turned on one at
a time with a delay of 5 seconds
The message is displayed accordingly
Figure showing all the LEDs turned on
21Introduction to Internet of Things
22
Output
Introduction to Internet of Things
23Introduction to Internet of Things
1
Dr. Sudip MisraAssociate Professor
Department of Computer Science and EngineeringIIT KHARAGPUR
Email: [email protected]: http://cse.iitkgp.ac.in/~smisra/
Integration of Sensors and Actuators with Arduino-Part I
Introduction to Internet of Things
Sensors
Electronic elements Converts physical quantity/ measurements into electrical
signals Can be analog or digital
2Introduction to Internet of Things
Types of Sensors
Some commonly used sensors: Temperature Humidity Compass Light Sound Accelerometer
3Introduction to Internet of Things
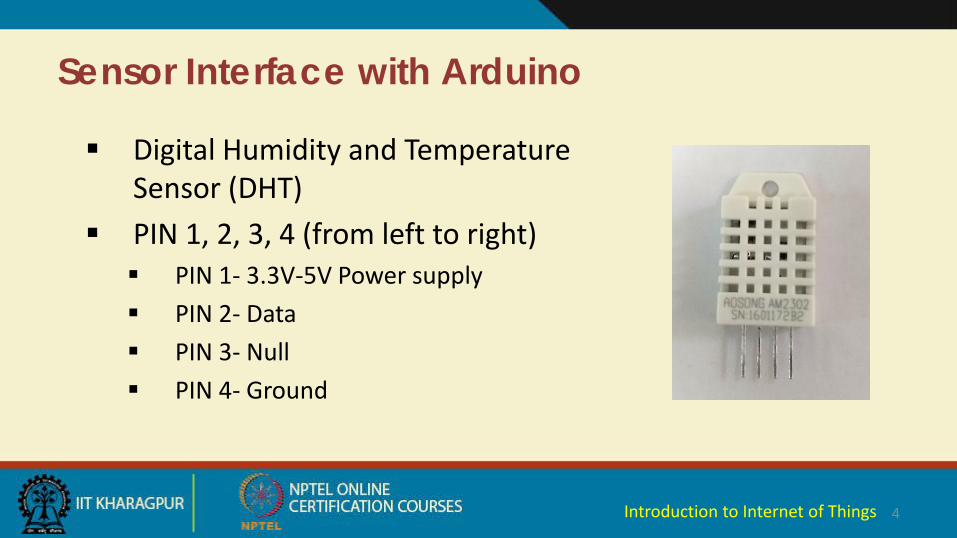
Sensor Interface with Arduino
4
Digital Humidity and Temperature Sensor (DHT)
PIN 1, 2, 3, 4 (from left to right) PIN 1- 3.3V-5V Power supply PIN 2- Data PIN 3- Null PIN 4- Ground
Introduction to Internet of Things
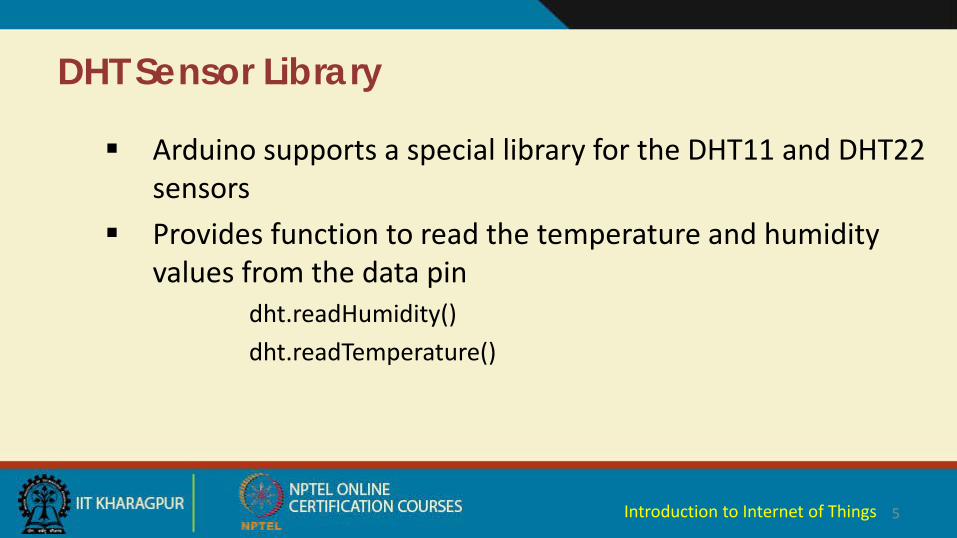
DHT Sensor Library
Arduino supports a special library for the DHT11 and DHT22 sensors
Provides function to read the temperature and humidity values from the data pin
dht.readHumidity()dht.readTemperature()
5Introduction to Internet of Things
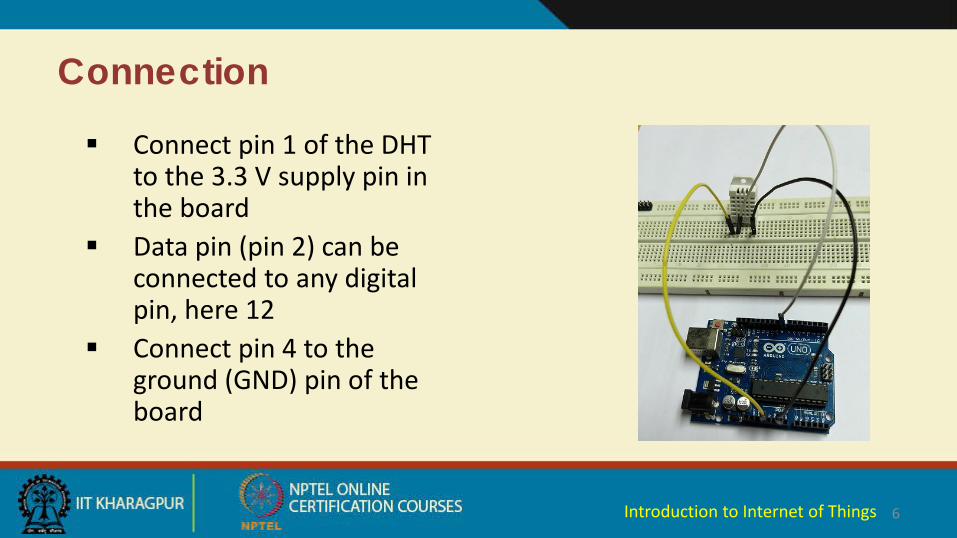
Connection
Connect pin 1 of the DHT to the 3.3 V supply pin in the board
Data pin (pin 2) can be connected to any digital pin, here 12
Connect pin 4 to the ground (GND) pin of the board
6Introduction to Internet of Things
Sketch: DHT_SENSOR
7
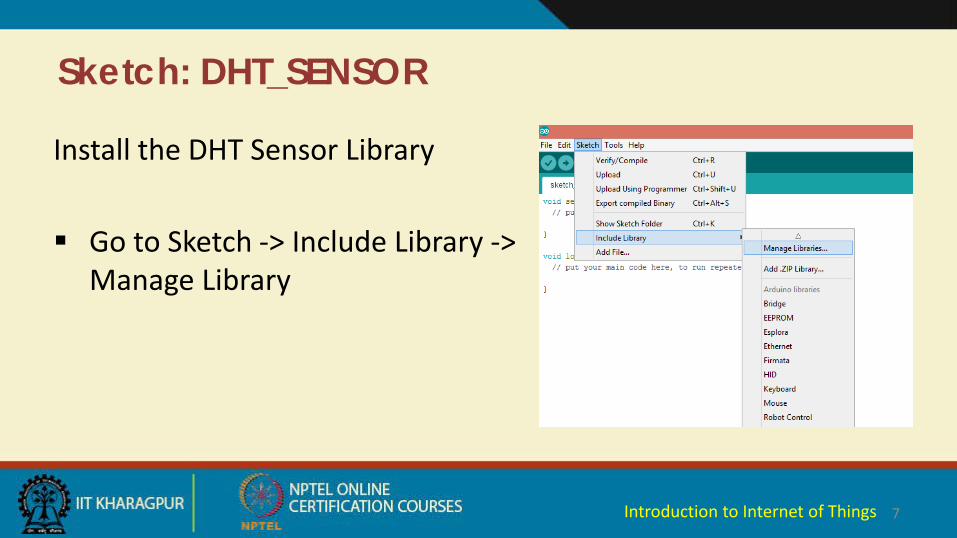
Install the DHT Sensor Library
Go to Sketch -> Include Library -> Manage Library
Introduction to Internet of Things
Sketch: DHT_SENSOR (contd..)
8
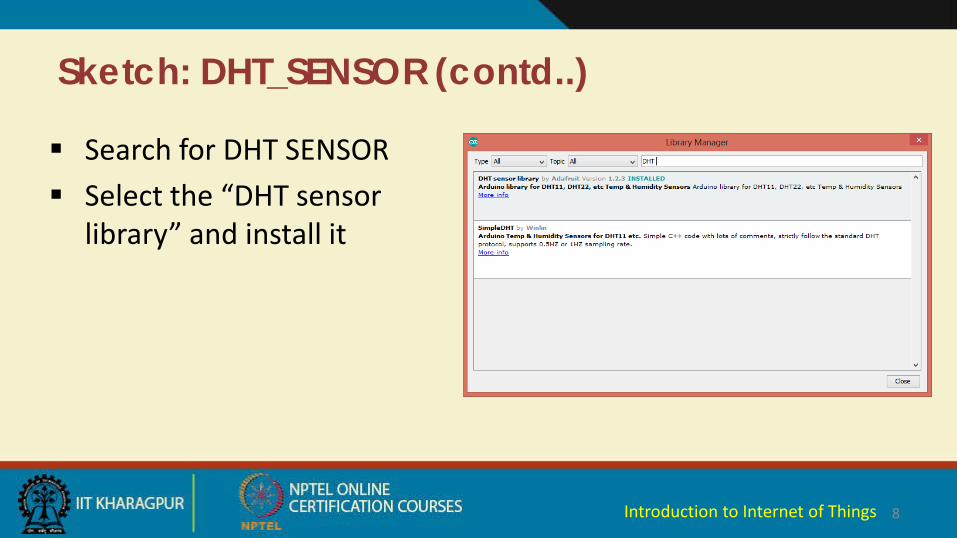
Search for DHT SENSOR Select the “DHT sensor
library” and install it
Introduction to Internet of Things
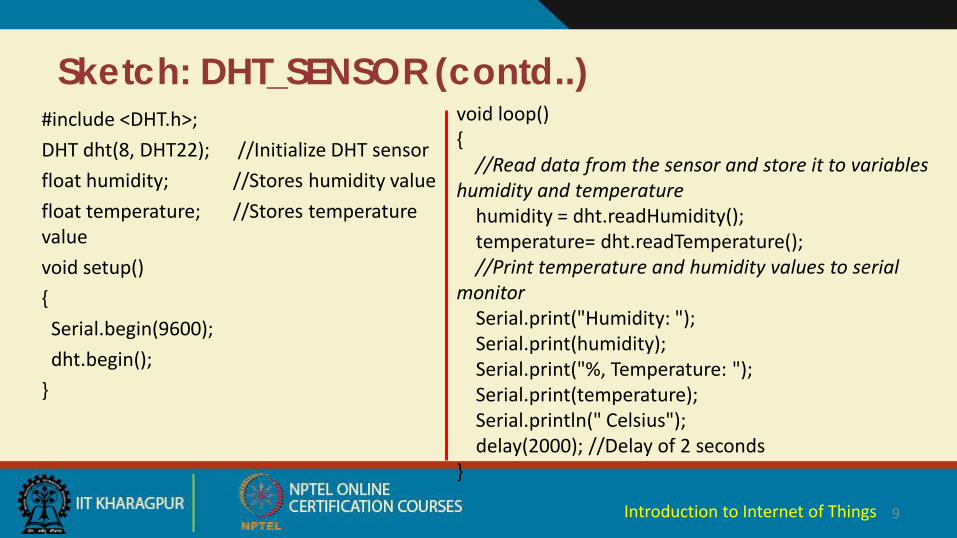
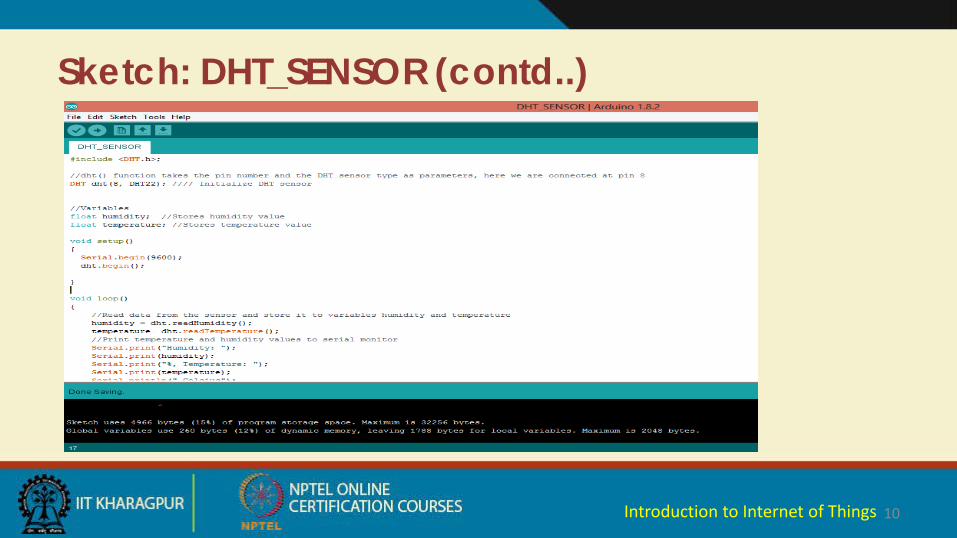
Sketch: DHT_SENSOR (contd..)#include <DHT.h>;DHT dht(8, DHT22); //Initialize DHT sensorfloat humidity; //Stores humidity valuefloat temperature; //Stores temperature valuevoid setup(){Serial.begin(9600);dht.begin();
}
9
void loop(){
//Read data from the sensor and store it to variables humidity and temperature
humidity = dht.readHumidity();temperature= dht.readTemperature();//Print temperature and humidity values to serial
monitorSerial.print("Humidity: ");Serial.print(humidity);Serial.print("%, Temperature: ");Serial.print(temperature);Serial.println(" Celsius");delay(2000); //Delay of 2 seconds
}
Introduction to Internet of Things
Sketch: DHT_SENSOR (contd..)
10Introduction to Internet of Things
Sketch: DHT_SENSOR (contd..)
11
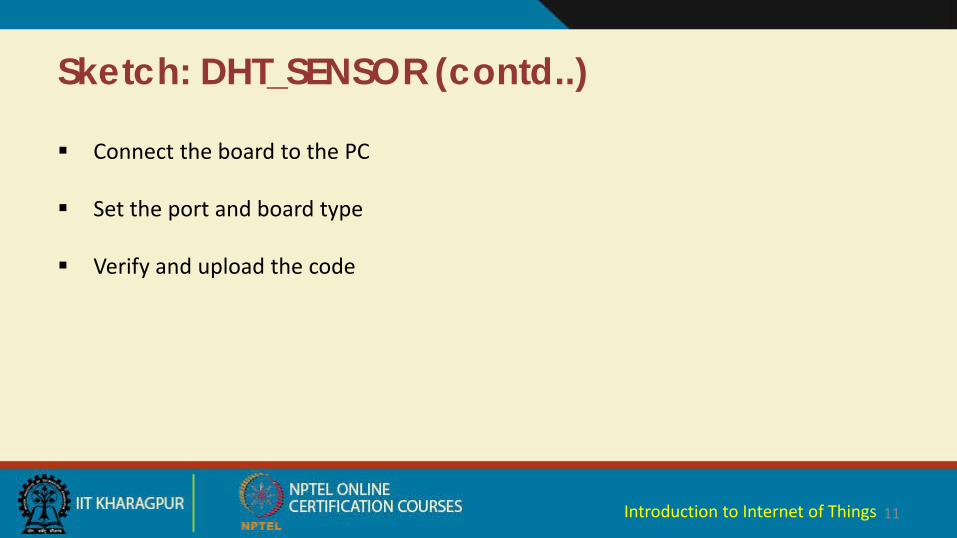
Connect the board to the PC
Set the port and board type
Verify and upload the code
Introduction to Internet of Things
Output
12
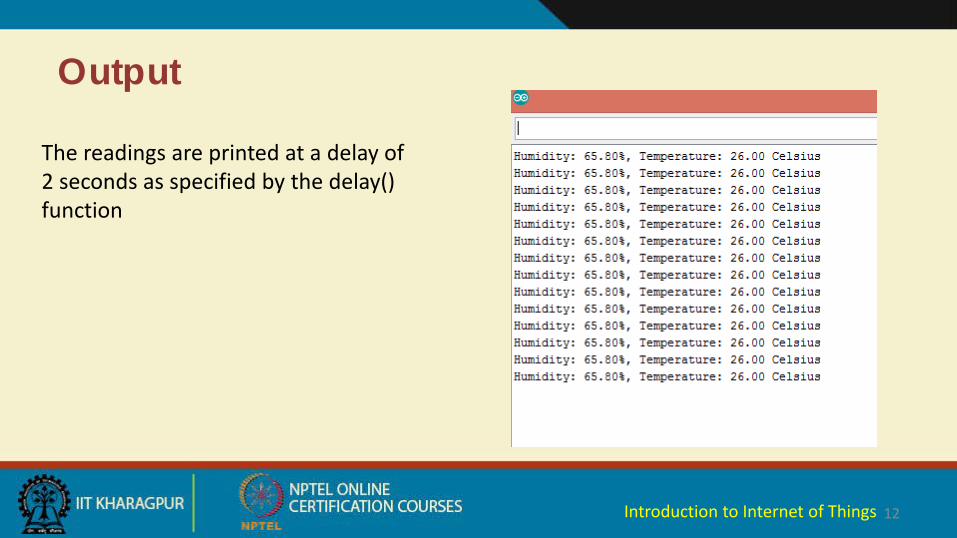
The readings are printed at a delay of 2 seconds as specified by the delay() function
Introduction to Internet of Things

13Introduction to Internet of Things

1
Dr. Sudip MisraAssociate Professor
Department of Computer Science and EngineeringIIT KHARAGPUR
Email: [email protected]: http://cse.iitkgp.ac.in/~smisra/
Integration of Sensors and Actuators with Arduino-Part II
Introduction to Internet of Things
Topics Covered
Introduction to ACTUATOR Servo Motor Servo motor interfaced with Arduino
Hardware interface Sketch
2Introduction to Internet of Things
Actuators
Mechanical/Electro-mechanical device Converts energy into motion Mainly used to provide controlled motion to other
components
3Introduction to Internet of Things
Basic Working Principle
4
Uses different combination of various mechanical structures like screws, ball bearings, gears to produce motion.
Introduction to Internet of Things
Types of Motor Actuators
Servo motor Stepper motor Hydraulic motor Solenoid Relay AC motor
5Introduction to Internet of Things
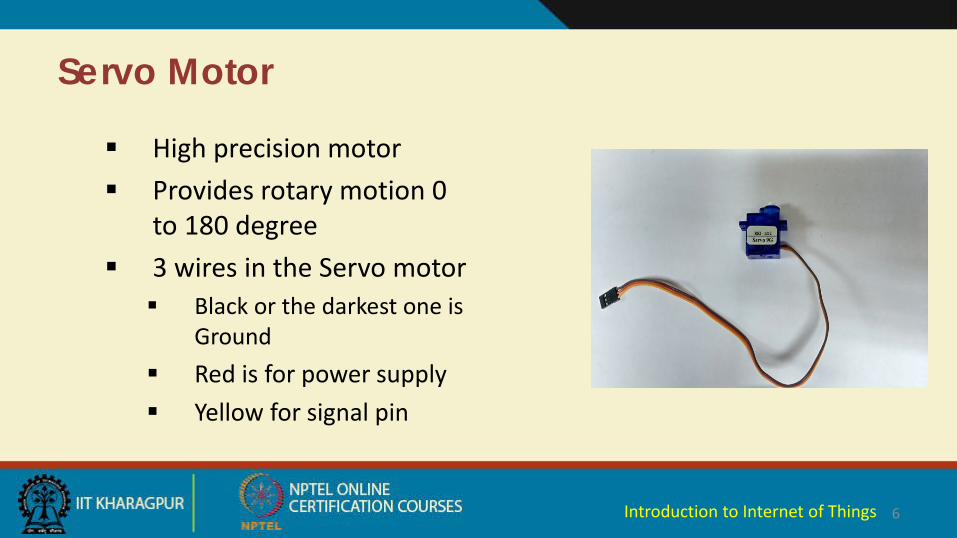
Servo Motor
High precision motor Provides rotary motion 0
to 180 degree 3 wires in the Servo motor Black or the darkest one is
Ground Red is for power supply Yellow for signal pin
6Introduction to Internet of Things
Servo Library on Arduino
Arduino provides different library- SERVO to operate the servo motor
Create an instance of servo to use it in the sketch
Servo myservo;
7Introduction to Internet of Things
Sketch: SERVO_ACTUATOR
8
#include <Servo.h> //Including the servo library for the program
int servoPin = 12;
Servo ServoDemo; // Creating a servo object
void setup() { // The servo pin must be attached to the servo
before it can be used
ServoDemo.attach(servoPin); }
void loop(){ //Servo moves to 0 degreesServoDemo.write(0); delay(1000);
// Servo moves to 90 degreesServoDemo.write(90); delay(1000);
// Servo moves to 180 degreesServoDemo.write(180); delay(1000);
}
Introduction to Internet of Things
Sketch: SERVO_ACTUATOR (contd..)
9
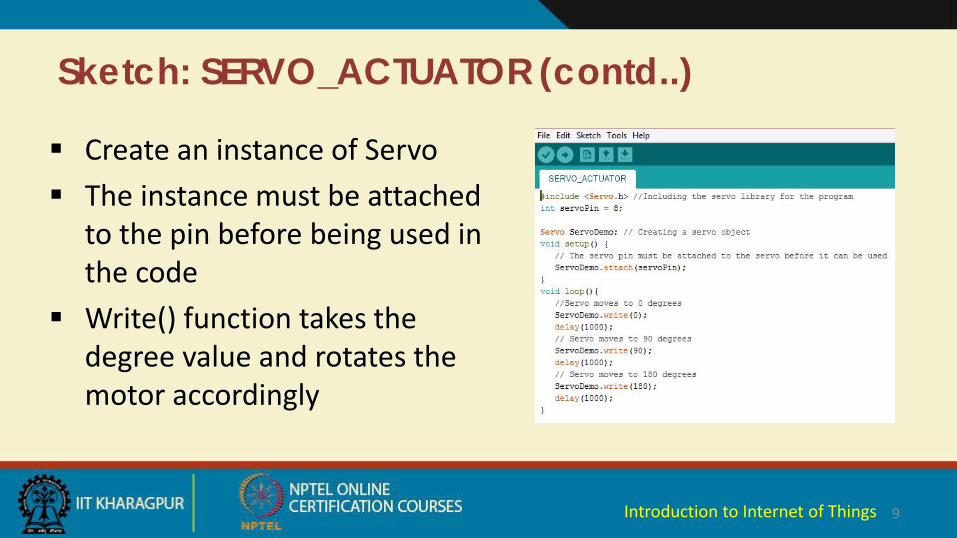
Create an instance of Servo The instance must be attached
to the pin before being used in the code
Write() function takes the degree value and rotates the motor accordingly
Introduction to Internet of Things
Connection
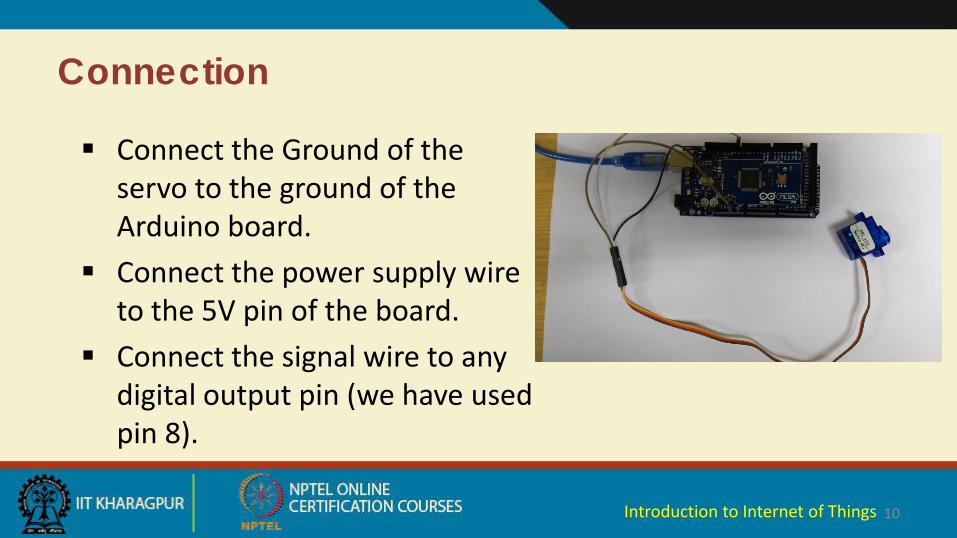
Connect the Ground of the servo to the ground of the Arduino board.
Connect the power supply wire to the 5V pin of the board.
Connect the signal wire to any digital output pin (we have used pin 8).
10Introduction to Internet of Things
Board Setup
11
Connect the board to the PC
Set the port and board type
Verify and upload the code
Introduction to Internet of Things
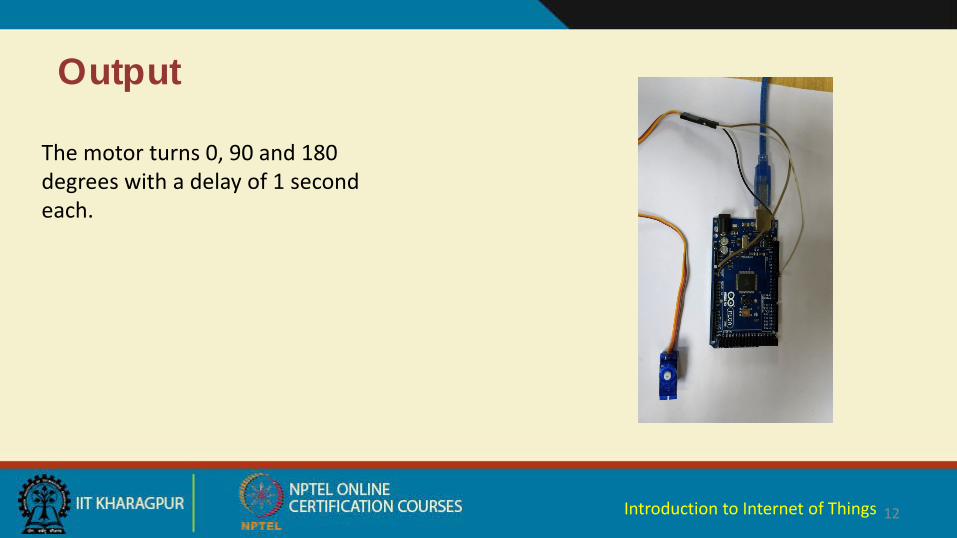
Output
12
The motor turns 0, 90 and 180 degrees with a delay of 1 second each.
Introduction to Internet of Things
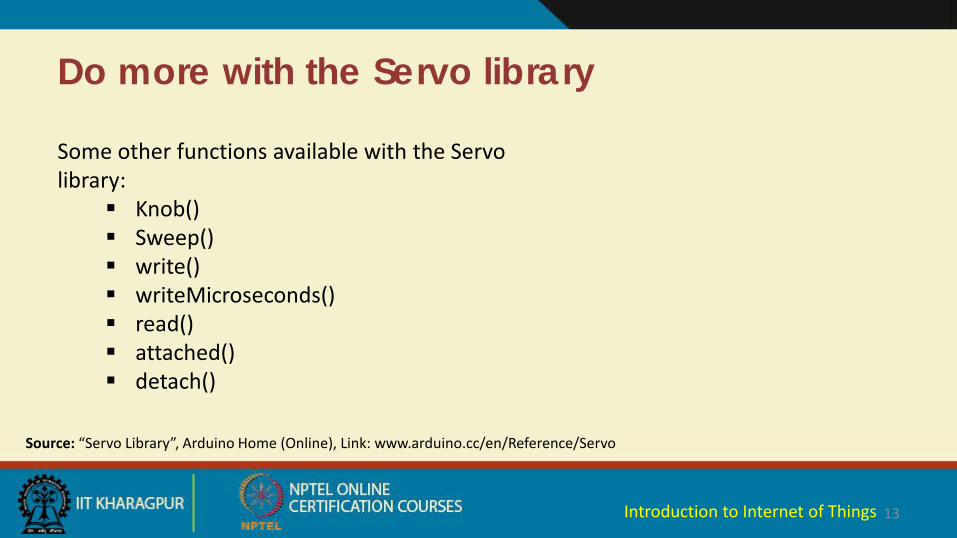
Do more with the Servo library
13
Some other functions available with the Servo library:
Knob() Sweep() write() writeMicroseconds() read() attached() detach()
Source: “Servo Library”, Arduino Home (Online), Link: www.arduino.cc/en/Reference/Servo
Introduction to Internet of Things

14Introduction to Internet of Things