intermediate groupwise 7 - collier county public … · intermediate groupwise 7.0 distributed by...
TRANSCRIPT

INTERMEDIATE GroupWise
7.0
Distributed by the Administrative Technology User Support Department under the Direction of Dr. Russell Clukey, Executive Director, Support Services.
Feel free to contact the AT User Support Help Desk any time at 377-0445 with questions.
P:/Training/GroupWise/Intermediate GroupWise 7.0 Page 1 of 33 06-02-07

CUSTOMIZE YOUR TOOLBARS: 1. Right click on a vacant area of the toolbar (not on an icon). 2. Click on Customize Toolbar. 3. Click on the Customize tab. 4. Click on the icon to be added. The description of the icon will be displayed
in the window. 5. Click Add button. 6. Click OK button.
You may need to click and hold on the blue band across the top of the Toolbar Properties window and drag it up so that the OK button is visible. While the Customize dialog box is open, remove icon(s) you don’t use by dragging the icon off the toolbar and then releasing the mouse.
TO CREATE A FOLDER:
1. Right click on Cabinet in the Folder list. 2. Click on New Folder.
3. Select the type of folder you are creating.
Personal Folder: Used for personal items and organization. Shared Folder: Used to specify others who will be able to view the items in
this folder.
P:/Training/GroupWise/Intermediate GroupWise 7.0 Page 2 of 33 06-02-07

4. Click Next. 5. Name the folder and give a description. 6. Click Up, Down, Left or Right to move the folder to the desired location. 7. Click Next. 8 Click Finish.
TO MOVE ITEMS TO A FOLDER:
1. Select the GroupWise item you want to move to a different folder. 2. Left click the mouse and drag the item to another folder.
a) To select multiple sequential items; click the first item, hold the SHIFT key and click the last item. Then drag them to the desired folder.
b) To select multiple non-sequential items; click the first item, hold the CTRL key and click each additional item. Then drag them to the desired folder.
3. Release the mouse button when the folder you want is highlighted and the items are moved.
REORDER FOLDER ITEMS:
1. Right click on Cabinet.
2. If the list is not in alphabetically order, Sort Subfolders will be available. Select Sort Subfolders and the list will reorder alphabetically.
P:/Training/GroupWise/Intermediate GroupWise 7.0 Page 3 of 33 06-02-07

WORKING WITHIN FOLDERS: There are times when you have a folder that contains multiple different folders that are linked to it. For example: If you have a folder titled FTE, and you want to have an ESE and ESOL FTE folder, you can link those folders to the FTE folder. The folders will hide when you close the FTE folder.
1. Click on the Folder you want to move. 2. Click Edit on the Menu bar. 3. Click Folders.
The Folders Window will display.
4. Click the Move buttons to place folder in the desired location. 5. Click OK.
TO USE THE WORK IN PROGRESS FOLDER:
1. Create the desired mail type. (Mail Message, Appointment, Phone Message, etc.)
2. Click on File located on the Menu bar. 3. Click on Save Draft.
P:/Training/GroupWise/Intermediate GroupWise 7.0 Page 4 of 33 06-02-07

4. The Folder window opens and Work in Progress should be highlighted. 5. Click OK. 6. Close message window.
If a message is opened and started then the “X” is clicked, a Cancel window message will appear. Choosing “Yes” will open the Folder window allowing the sender to save the message in Work in Progress, choosing “No” will delete the pending message and choosing “Cancel” will return you to the pending message.
TO ASSIGN A CATEGORY TO AN ITEM: You can assign items to a particular category as another way to help manage and organize items in your GroupWise account. Items that have been assigned categories are color-coded and displayed in the color of their respective categories.
1. Right click the item in your Mailbox, Calendar, Task or Note. 2. Select Categories. 3. Choose the category to which you wish to assign the item. The item then
displays in the color of that respective category.
P:/Training/GroupWise/Intermediate GroupWise 7.0 Page 5 of 33 06-02-07

GroupWise has the following default categories: Low Priority = Light Gray Urgent = Red Follow-up = Orange Personal = Royal Blue
CREATE A CUSTOM CATEGORY:
1. Right click the item in your Mailbox, Calendar, Task or Note. 2. Select Categories. 3. Select More to create a custom category.
The Edit Categories dialog box will display.
Type the name of the custom category in the text field.
4. Type the name of the custom category in the New Category dialog box. 5. Click Add. 6. Select the new category in the Categories list area and click Edit Color. 7. Click OK.
P:/Training/GroupWise/Intermediate GroupWise 7.0 Page 6 of 33 06-02-07

You may also change the names and colors of the default category from the Edit Categories dialog box.
The message chosen now displays in the category added and bright pink was the color selected.
TO CUSTOMIZE A SUBJECT LINE: Incoming items can often have subjects that do not adequately describe the item you are receiving. GroupWise allows you to customize the subject line of a received item so that you can accurately identify the topic of the message and find it quickly.
1. Open the message. 2. Click on the Personalize tab. 3. Type your subject in the My Subject: field. 4. Click Close.
This is the My Subject: line that you will use to type your own subject.
P:/Training/GroupWise/Intermediate GroupWise 7.0 Page 7 of 33 06-02-07

The subject in your Items List now reads the subject you typed in the My Subject: field. However, when the message is opened it displays the original subject title.
TO USE SEND OPTIONS:
1. Click New Mail icon on the Toolbar. 2. Prepare your message. 3. Select the Send Options tab.
The Mail To: properties window will display.
Send Options tab.
Setting a date that the message will be delivered. Good tool for follow up messaging!
Categorize message as Urgent, Personal, Low Priority or Follow-up.
High Priority displays red in both the recipient’s mailbox as well as your Sent Items Folder.
Requesting recipients to reply before deleting.
4. Make desired selections. 5. Click Send button to send message.
USING YOUR GROUPWISE ADDRESS BOOK: GroupWise Address Book is used to quickly select users, resources and groups from the list when addressing items to send. The Address Book is also ideal for looking up details like location, phone numbers or other pertinent information.
1. Click the Address Book icon on the Toolbar to open the address book.
P:/Training/GroupWise/Intermediate GroupWise 7.0 Page 8 of 33 06-02-07

The Address Book will display on your screen.
P:/Training/GroupWise/Intermediate GroupWise 7.0 Page 9 of 33 06-02-07
The Action icon on the context bar will allow you to send an item (Mail, Appointment, Task, Reminder note) directly from the Address Book.
You can create and use as many different address books as you wish.
Look For: field allows you to search for a name in the specified address book.
Inside drop down box allows you to limit your search to specific selection criteria.
Use the vertical slide bar to move up and down through the specified address book when searching for names.
If the Novell GroupWise Address Book list isn’t your default change the Name Completion Search Order.
2. Select File. 3. Select Name Completion Search Order. 4. Under Selected books highlight the Novell GroupWise Address Book. 5. Click UP under Book position. 6. Click OK.

TO CREATE MULTIPLE ADDRESS BOOKS FOR PERSONAL USE: You cannot make changes to the Novell GroupWise address book. You can create your own address books and copy names from the system address book. You can add, delete and modify contents of your personal address books.
1. Open the Address Book. 2. Click File. 3. Select New Book.
4. Type the name of the new book in the Create Address Book box. 5. Click OK.
6. You can click and drag names from the Novell GroupWise Address book to your new personal address book.
P:/Training/GroupWise/Intermediate GroupWise 7.0 Page 10 of 33 06-02-07

7. Double click on a user’s name to add details for that addressee. 8. Add information on the Contact tab:
9. Add information on the Office tab:
P:/Training/GroupWise/Intermediate GroupWise 7.0 Page 11 of 33 06-02-07
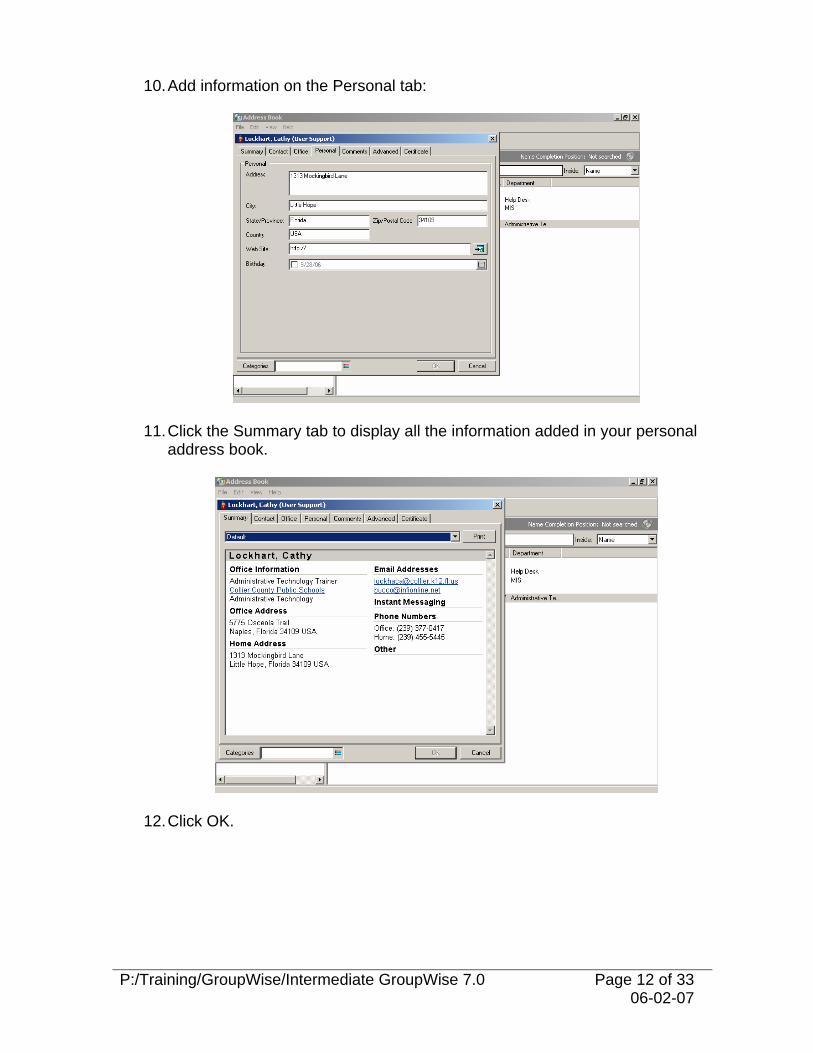
10. Add information on the Personal tab:
11. Click the Summary tab to display all the information added in your personal address book.
12. Click OK.
P:/Training/GroupWise/Intermediate GroupWise 7.0 Page 12 of 33 06-02-07

TO SPECIFY COLUMNS TO DISPLAY:
1. Open the Address Book that you would like to modify. 2. Right click in the column heading and select other column names you want
to display.
Right click anywhere along this bar.
3. If the column name you want is not displayed, select More Columns.
Choose Up or Down under Column position to reposition.
4. Click the column you wish to add from the Available Columns list. 5. Click Add. 6. Click OK.
P:/Training/GroupWise/Intermediate GroupWise 7.0 Page 13 of 33 06-02-07

TO SPECIFY HOW COLUMNS DISPLAY: 1. Click, drag and reposition a column heading to another position.
TO REMOVE A COLUMN: 1. Select the column heading and drag it off of the address book.
Any column headers in GroupWise can be modified in the same way.
TO CREATE PERSONAL GROUPS:
1. Open your Address Book icon on the toolbar. 2. Highlight a personal address book or Frequents Contacts. This is where
your group to be added. 3. Select New and click Group. 4. Type in a group name and add any comments to the comments field.
Name the Group in this Name field.
Under Members click the Add button.
5. Click on the Add button under Members. 6. Double clicking on the user name(s) or resource(s) will default to add into
the To: field. Highlight names and click to make CC or BC.
P:/Training/GroupWise/Intermediate GroupWise 7.0 Page 14 of 33 06-02-07

7. Click OK to close Select Group Members dialog box when all members are added.
8. Click OK again to close the New Group window. TO SHARE AN ADDRESS BOOK:
1. Open the Address Book. 2. Select the name of the address book you would like to share. 3. Click File. 4. Select Sharing.
P:/Training/GroupWise/Intermediate GroupWise 7.0 Page 15 of 33 06-02-07

5. Select Shared with. 6. In the Name field, specify the name of the user with whom you would like to
share the address book. 7. Click Add User. 8. Click on the user’s name and modify the access that each user will have. 9. Click OK to close dialog box, or click Apply to apply any changes that were
made.
The Properties window advises you that recipients have the option to accept or decline shared address books.
10. Click OK to send message to recipient(s).
P:/Training/GroupWise/Intermediate GroupWise 7.0 Page 16 of 33 06-02-07
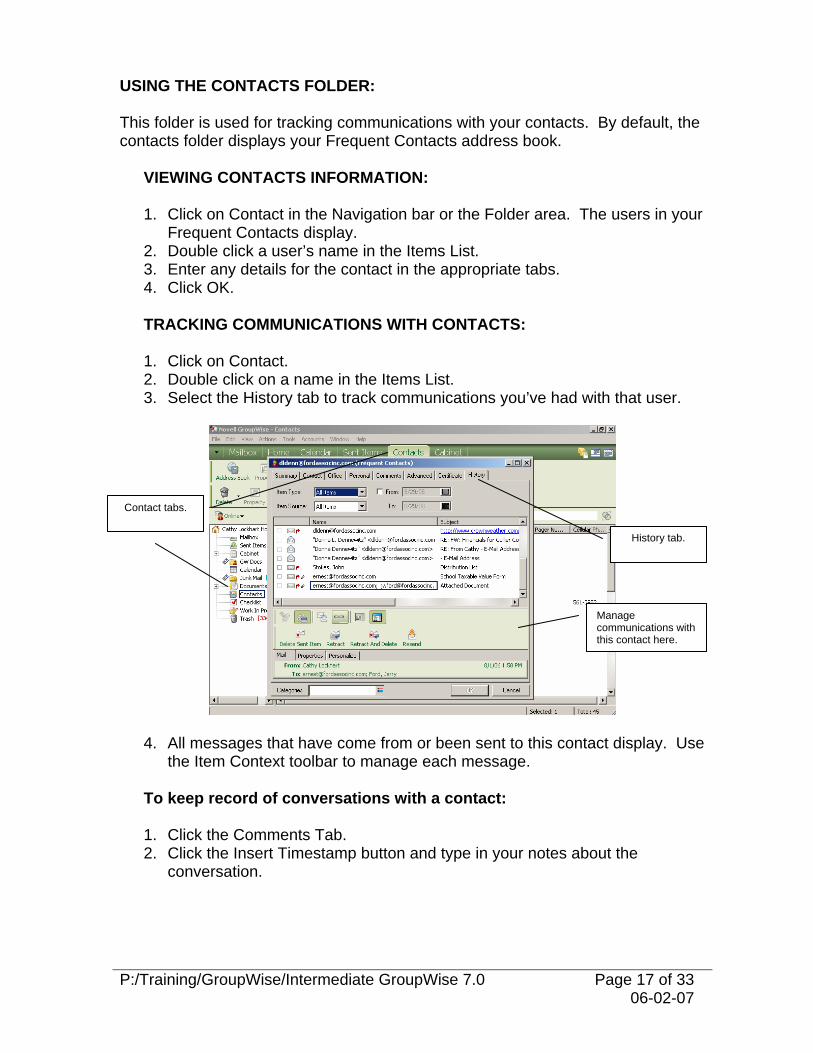
USING THE CONTACTS FOLDER: This folder is used for tracking communications with your contacts. By default, the contacts folder displays your Frequent Contacts address book.
VIEWING CONTACTS INFORMATION: 1. Click on Contact in the Navigation bar or the Folder area. The users in your
Frequent Contacts display. 2. Double click a user’s name in the Items List. 3. Enter any details for the contact in the appropriate tabs. 4. Click OK. TRACKING COMMUNICATIONS WITH CONTACTS: 1. Click on Contact. 2. Double click on a name in the Items List. 3. Select the History tab to track communications you’ve had with that user.
Contact tabs.
History tab.
Manage communications with this contact here.
4. All messages that have come from or been sent to this contact display. Use
the Item Context toolbar to manage each message.
To keep record of conversations with a contact:
1. Click the Comments Tab. 2. Click the Insert Timestamp button and type in your notes about the
conversation.
P:/Training/GroupWise/Intermediate GroupWise 7.0 Page 17 of 33 06-02-07

3. Add specific comments regarding communications with this contact. 4. Click OK to close window.
USING THE JUNK MAIL FOLDER: The JUNK MAIL folder allows individual users to block unwanted mail from coming into their mailbox.
For example: You receive an e-mail from an unknown address (outside Collier County Public Schools) that you believe to be a solicitation or SPAM. You have the capability of sending e-mail from that address or that domain to your JUNK MAIL folder.
TO MARK AN E-MAIL AS JUNK:
1. Click on the e-mail in your mailbox. 2. Drag the e-mail over to the Junk Mail folder.
P:/Training/GroupWise/Intermediate GroupWise 7.0 Page 18 of 33 06-02-07
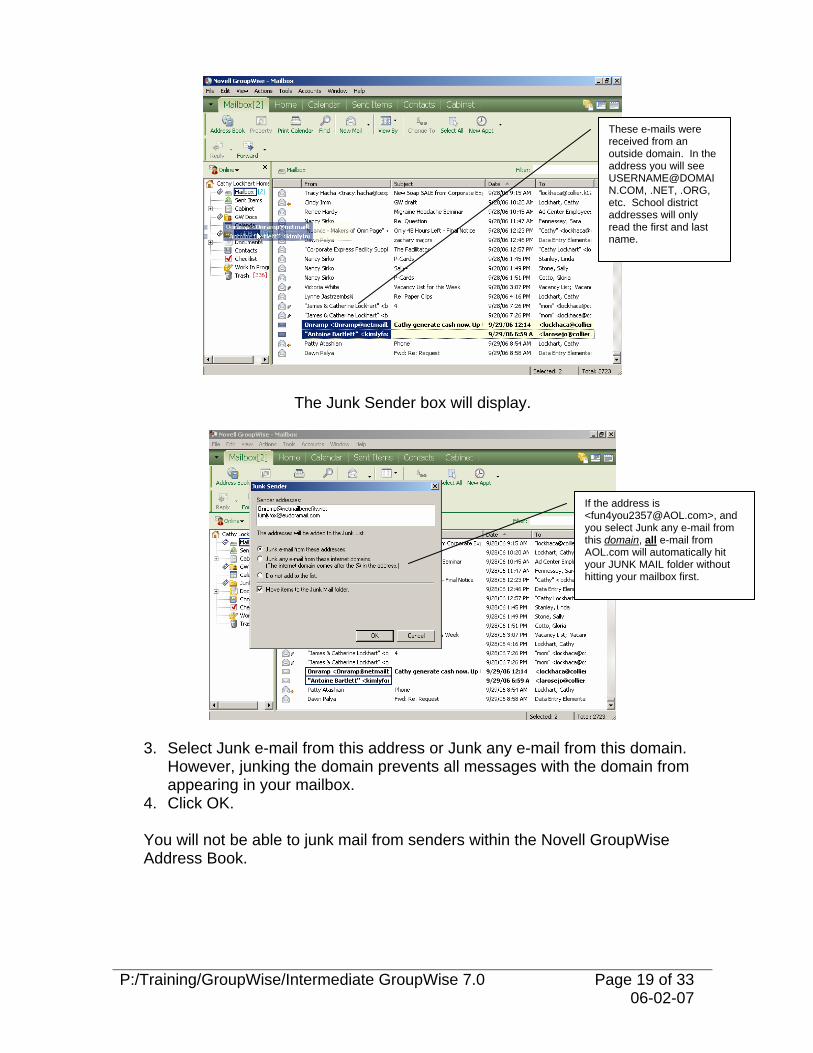
These e-mails were received from an outside domain. In the address you will see [email protected], .NET, .ORG, etc. School district addresses will only read the first and last name.
The Junk Sender box will display.
If the address is <[email protected]>, and you select Junk any e-mail from this domain, all e-mail from AOL.com will automatically hit your JUNK MAIL folder without hitting your mailbox first.
3. Select Junk e-mail from this address or Junk any e-mail from this domain.
However, junking the domain prevents all messages with the domain from appearing in your mailbox.
4. Click OK.
You will not be able to junk mail from senders within the Novell GroupWise Address Book.
P:/Training/GroupWise/Intermediate GroupWise 7.0 Page 19 of 33 06-02-07

TO BLOCK AN ADDRESS OR DOMAIN: 1. Right click on the message. 2. Choose Junk Mail. 3. Select Block Sender.
4. Select Block e-mail from this address or Block any e-mail from this domain. However, blocking the domain prevents all messages with the domain from appearing in your mailbox.
5. Click OK. The addresses and domains that have been dragged or moved as Junk will go to your Junk List by default. These messages will show in your Junk Mail folder. The addresses and domains that have been Blocked will display in the Block List. These messages go to the Trash folder.
TO MANAGE JUNKED OR BLOCKED MAIL LISTS:
1. Right click Junk Mail in the Folders area. 2. Select Junk Mail Handling.
P:/Training/GroupWise/Intermediate GroupWise 7.0 Page 20 of 33 06-02-07
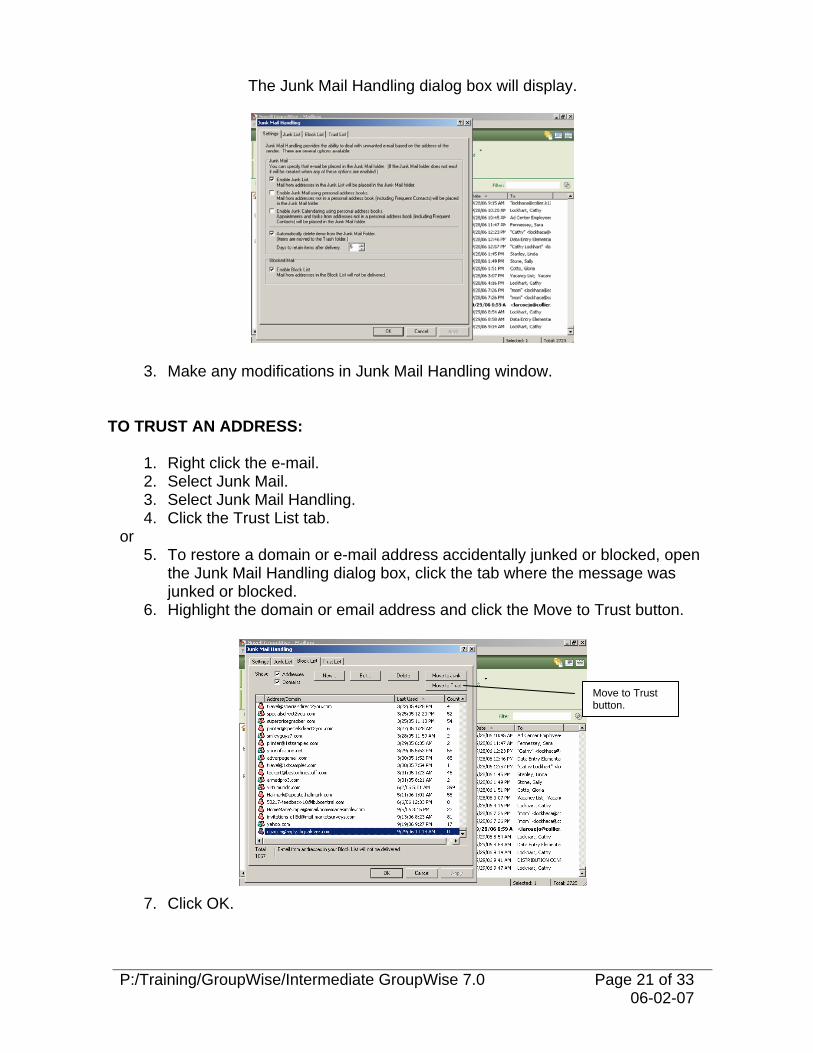
The Junk Mail Handling dialog box will display.
3. Make any modifications in Junk Mail Handling window.
TO TRUST AN ADDRESS:
1. Right click the e-mail. 2. Select Junk Mail. 3. Select Junk Mail Handling. 4. Click the Trust List tab.
or 5. To restore a domain or e-mail address accidentally junked or blocked, open
the Junk Mail Handling dialog box, click the tab where the message was junked or blocked.
6. Highlight the domain or email address and click the Move to Trust button.
Move to Trust button.
7. Click OK.
P:/Training/GroupWise/Intermediate GroupWise 7.0 Page 21 of 33 06-02-07
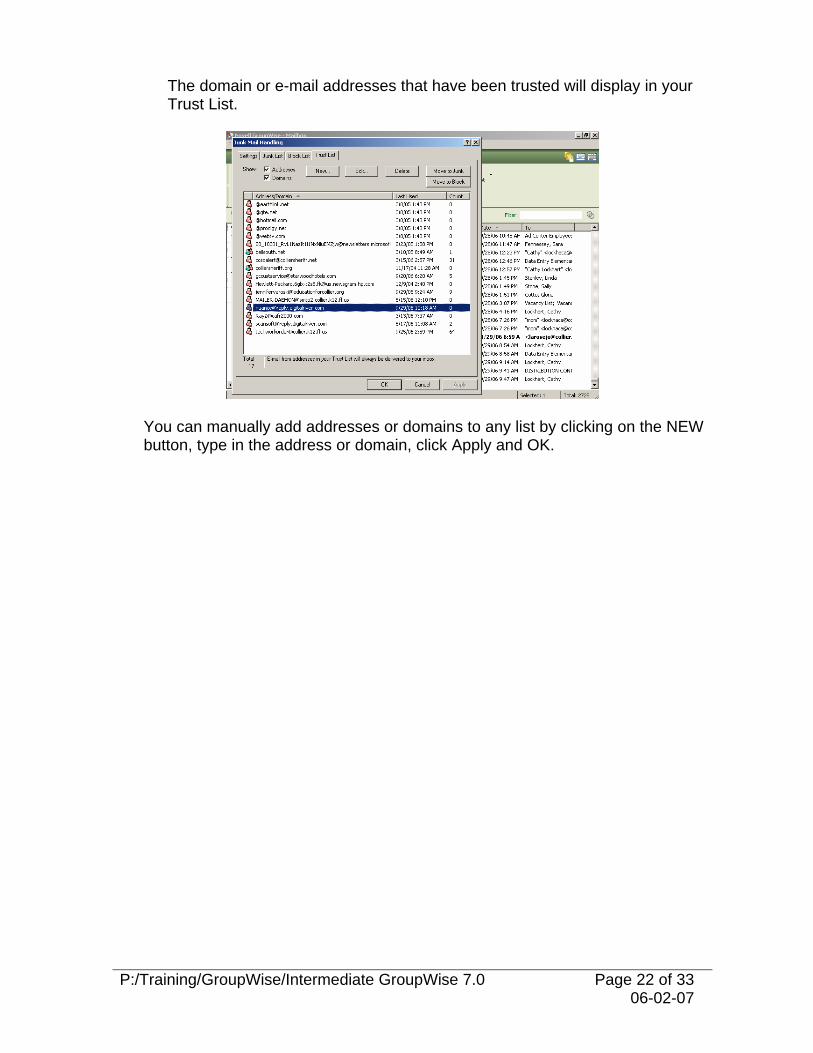
The domain or e-mail addresses that have been trusted will display in your Trust List.
You can manually add addresses or domains to any list by clicking on the NEW button, type in the address or domain, click Apply and OK.
P:/Training/GroupWise/Intermediate GroupWise 7.0 Page 22 of 33 06-02-07

TO SET UP PROXY ACCESS:
1. Click Tools on the Menu bar. 2. Click Options. 3. Double click Security. 4. Click Proxy Access tab.
5. Type users last name or click Address Book icon to go to the address book to select the person(s) you want to grant access.
6. Click Add User button. 7. Highlight the new user in the Access list area. 8. Place checkmarks next to the rights you want to grant to the user. 9. Click OK and close Options.
TO ACCESS SOMEONE’S MAILBOX WHO HAS GRANTED PROXY ACCESS:
1. Click Online in the Folders header bar. 2. Click on Proxy.
3. Type the granter’s name in the Name: area or click the Address Book icon
to select the user name. 4. Click OK.
P:/Training/GroupWise/Intermediate GroupWise 7.0 Page 23 of 33 06-02-07
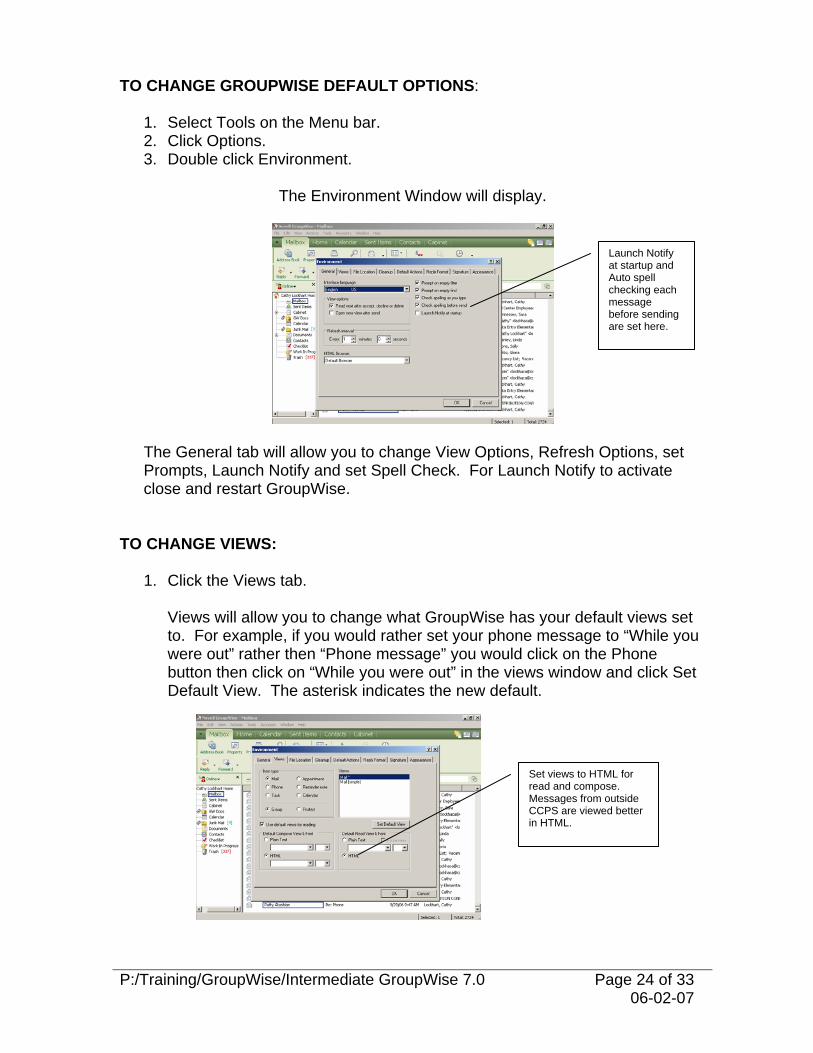
TO CHANGE GROUPWISE DEFAULT OPTIONS:
1. Select Tools on the Menu bar. 2. Click Options. 3. Double click Environment.
The Environment Window will display.
Launch Notify at startup and Auto spell checking each message before sending are set here.
The General tab will allow you to change View Options, Refresh Options, set Prompts, Launch Notify and set Spell Check. For Launch Notify to activate close and restart GroupWise.
TO CHANGE VIEWS:
1. Click the Views tab.
Views will allow you to change what GroupWise has your default views set to. For example, if you would rather set your phone message to “While you were out” rather then “Phone message” you would click on the Phone button then click on “While you were out” in the views window and click Set Default View. The asterisk indicates the new default.
Set views to HTML for read and compose. Messages from outside CCPS are viewed better in HTML.
P:/Training/GroupWise/Intermediate GroupWise 7.0 Page 24 of 33 06-02-07

TO CHANGE OTHER DEFAULT OPTIONS:
1. Select the Default Actions tab from the Environment window.
The Default Actions tab will allow you to change the default option on Sent Items, Web Browser, File Attachments, Start in folders, how Message Attachments open, Quick Viewer, offline messaging and viewing HTML.
TO CHANGE THE APPEARANCE OF YOUR GROUPWISE:
1. Select the Appearance tab to change the appearance of your GroupWise. 2. Click OK.
P:/Training/GroupWise/Intermediate GroupWise 7.0 Page 25 of 33 06-02-07

TO ARCHIVE ITEMS IN GROUPWISE: GroupWise default is set to Automatically Delete Items that are sent to you. You can view this in the Cleanup tab in Environments. Use Archive to save these items such as; mail, phone messages, appointments, reminder notes and/or tasks to a designated file location on your networks local H:/ drive (Archive is not available on Remote). Set the file location in the File Locations tab in Environments. Archiving items saves network space and keeps your Mailbox uncluttered. For example, if you have important items in your Mailbox that are not currently relevant to your work, you can archive them and retrieve them at a later date. You can also unarchive any item that was archived back into your personal Mailbox. When you archive an item you have sent, you are unable to track the status of the item. When you move an item to a Folder(s), it is not necessarily archived. Items in the folders are affected by how you set up the Cleanup options in the Environment Options. ARCHIVING IS A THREE STEP PROCESS:
STEP ONE: SPECIFY THE ARCHIVE PATH 1. Click Tools on the Menu bar. 2. Click Options. 3. Double click Environment. 4. Click File Location tab.
The Environment Window will display with File Location Options.
P:/Training/GroupWise/Intermediate GroupWise 7.0 Page 26 of 33 06-02-07

5. Click on the Folder button to the right of in Archive Directory. 6. Select your H:\ drive. 7. Click OK. STEP TWO: SET CLEAN-UP DAYS 1. From the Environment window, click the Cleanup tab.
The Environment window will display with Cleanup options.
This screen is used to set delete/archive days. For example: If you have Mail and Phone set to Auto-Archive after 14 days, GroupWise will automatically archive Mail and Phone messages if it is in your mailbox over 14 days.
It is recommended to set your archive/delete to no more then 14 days in order to prevent cluttering of the network and your mailbox.
2. Once days are set, click OK. 3. Close to exit out of Options.
P:/Training/GroupWise/Intermediate GroupWise 7.0 Page 27 of 33 06-02-07

STEP THREE: ARCHIVING THE MESSAGE 1. Right click on the item in your mailbox that you want to Archive. 2. Left click on Move to Archive.
TO VIEW ARCHIVED ITEMS: 1. Click the Online button above the Folders list. 2. Click Archive.
You can also customize your toolbar with icons to open Archive and move items to Archive if you use this feature frequently.
P:/Training/GroupWise/Intermediate GroupWise 7.0 Page 28 of 33 06-02-07

TO UNARCHIVE ITEMS: 1. Click the Archive button in the Folders header. 2. Click on Archive. 3. Right click the item you want to unarchive. 4. Click to uncheck the Move to Archive.
GroupWise is in Archive view.
Unarchived messages are returned to the folder from which they were archived. If the folder has been deleted, GroupWise will create a new folder.
TO CREATE RULES: Rules are created for an automatic reply/forward to be sent as a response to all messages received while you are out of the office.
1. Click Tools on the Menu bar. 2. Click Rules. 3. The Rules Window will display.
P:/Training/GroupWise/Intermediate GroupWise 7.0 Page 29 of 33 06-02-07

4. Click New to create new rule.
The New Rule Window will display.
5. Type a name for your rule in the Rule name box. 6. Click Received under When Event Is. 7. Click Add Action and select Reply. 8. Click OK. You may choose to click “Include Message received from sender”
if you want the sender to receive their message back with your auto reply. 9. Type in your Subject and reply in the Message fields. 10. Click OK. 11. Click the Save button and Close to exit the Rules dialog.
TO EDIT AN EXISTING RULE:
1. Click Tools on the Menu bar. 2. Click Rules. 3. Click on the Rule you want and click Edit. 4. Click Edit Action under These actions are and revise your reply to
messages. 5. Click OK. 6. Click the Save button and Close to exit the Rule dialog box.
TO DISABLE A RULE:
1. Click Tools on the Menu bar. 2. Click Rules. 3. Click on the Rule you want to Disable. 4. Click Disable and Close.
Enable is to run the rule. Disable is to shut off the rule.
P:/Training/GroupWise/Intermediate GroupWise 7.0 Page 30 of 33 06-02-07

SETTING A DEFINE CONDITIONS FOR RULES:
Going to a conference or on vacation and then forget to turn off the Rules when you return? Here’s how to Define Conditions and set dates for Rules to run.
1. Click Tools and select Rules. 2. Create a new rule or edit an existing rule. 3. Select Define Conditions.
Define Conditions button.
4. Select Delivered under Include Entries Where… from the drop down menu. 5. Click On or After Date in the second drop down list. The current date will
default. If you are setting a Rule ahead of time click the calendar icon to change the date.
6. Select the End pop-up list and click And. 7. A new menu line has appeared. Select Delivered in the first drop down list. 8. Click On or Before Date in the second drop down list. The current date will
default; click the calendar icon to select the ending date.
You have defined this Rule to run from October 23 to October 29.
8. Click OK. 9. Click Save. 10. Close the Rules dialog box.
P:/Training/GroupWise/Intermediate GroupWise 7.0 Page 31 of 33 06-02-07

OTHER FEATURES OF GROUPWISE:
1. Turn Tip of the Day on or off from Help on the Main Menu Bar. 2. Click the Show tips at startup to enable or disable tips.
3. Click Close.
P:/Training/GroupWise/Intermediate GroupWise 7.0 Page 32 of 33 06-02-07
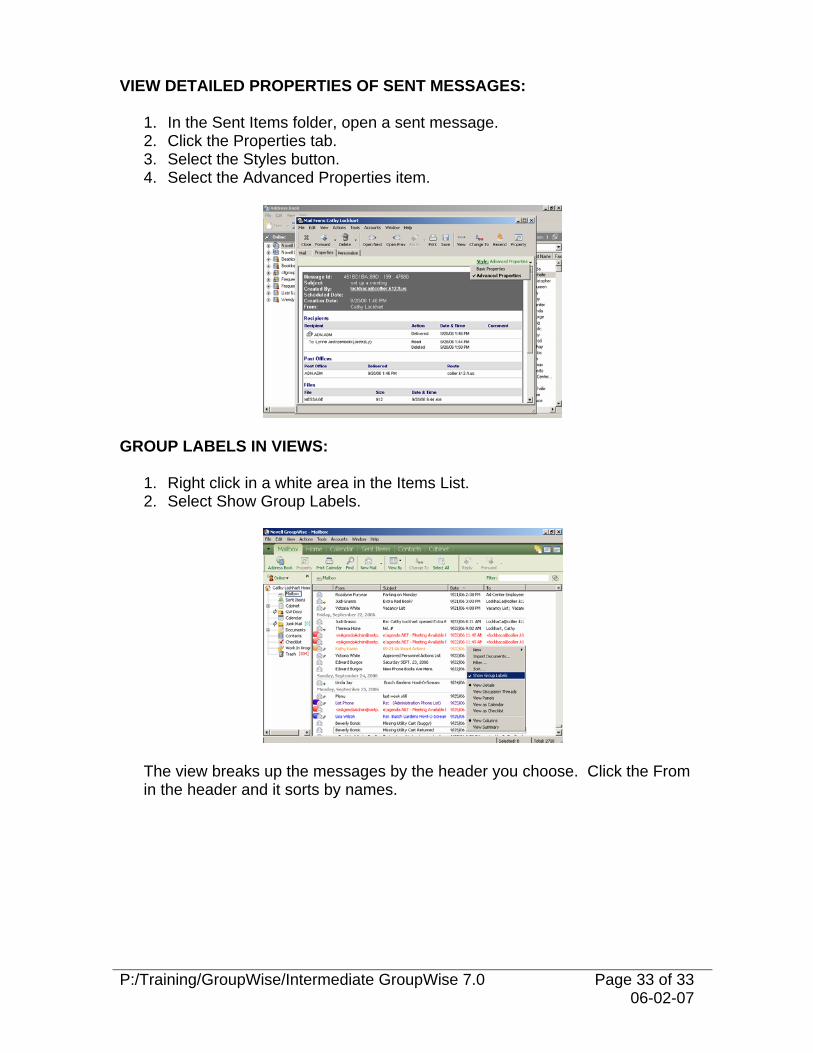
VIEW DETAILED PROPERTIES OF SENT MESSAGES:
1. In the Sent Items folder, open a sent message. 2. Click the Properties tab. 3. Select the Styles button. 4. Select the Advanced Properties item.
GROUP LABELS IN VIEWS:
1. Right click in a white area in the Items List. 2. Select Show Group Labels.
The view breaks up the messages by the header you choose. Click the From in the header and it sorts by names.
P:/Training/GroupWise/Intermediate GroupWise 7.0 Page 33 of 33 06-02-07