interaction sip proxy technical reference · interaction sip proxy™ technical reference 5...
TRANSCRIPT
Interaction SIP Proxy™
Technical Reference
Version 2018
Last updated February 6, 2018 (See Change Log for summary of changes.)
Abstract
This document provides an introduction to Interaction SIP Proxy, the procedure for installing or upgrading it, the configuration tasks that are needed for operation, and other technical
information.
2 Interaction SIP Proxy™ Technical Reference
Copyright and Trademark Information Interactive Intelligence, Interactive Intelligence Customer Interaction Center, Interaction Administrator, Interaction Attendant, Interaction Client, Interaction Designer, Interaction Tracker, Interaction Recorder, Interaction Mobile Office, Interaction Center Platform, Interaction Monitor, Interaction Optimizer, and the “Spirograph” logo design are registered trademarks of Genesys Telecommunications Laboratories, Inc. Customer Interaction Center, EIC, Interaction Fax Viewer, Interaction Server, ION, Interaction Voicemail Player, Interactive Update, Interaction Supervisor, Interaction Migrator, and Interaction Screen Recorder are trademarks of Genesys Telecommunications Laboratories, Inc. The foregoing products are ©1997-2017 Genesys Telecommunications Laboratories, Inc. All rights reserved. Interaction Dialer and Interaction Scripter are registered trademarks of Genesys Telecommunications Laboratories, Inc. The foregoing products are ©2000-2017 Genesys Telecommunications Laboratories, Inc. All rights reserved. Messaging Interaction Center and MIC are trademarks of Genesys Telecommunications Laboratories, Inc. The foregoing products are ©2001-2017 Genesys Telecommunications Laboratories, Inc. All rights reserved. Interaction Director is a registered trademark of Genesys Telecommunications Laboratories, Inc. e-FAQ Knowledge Manager and Interaction Marquee are trademarks of Genesys Telecommunications Laboratories, Inc. The foregoing products are ©2002-2017 Genesys Telecommunications Laboratories, Inc. All rights reserved. Interaction Conference is a trademark of Genesys Telecommunications Laboratories, Inc. The foregoing products are ©2004-2017 Genesys Telecommunications Laboratories, Inc. All rights reserved. Interaction SIP Proxy and Interaction EasyScripter are trademarks of Genesys Telecommunications Laboratories, Inc. The foregoing products are ©2005-2017 Genesys Telecommunications Laboratories, Inc. All rights reserved. Interaction Gateway is a registered trademark of Genesys Telecommunications Laboratories, Inc. Interaction Media Server is a trademark of Genesys Telecommunications Laboratories, Inc. The foregoing products are ©2006-2017 Genesys Telecommunications Laboratories, Inc. All rights reserved. Interaction Desktop is a trademark of Genesys Telecommunications Laboratories, Inc. The foregoing products are ©2007-2017 Genesys Telecommunications Laboratories, Inc. All rights reserved. Interaction Process Automation, Deliberately Innovative, Interaction Feedback, and Interaction SIP Station are registered trademarks of Genesys Telecommunications Laboratories, Inc. The foregoing products are ©2009-2017 Genesys Telecommunications Laboratories, Inc. All rights reserved. Interaction Analyzer is a registered trademark of Genesys Telecommunications Laboratories, Inc. Interaction Web Portal and IPA are trademarks of Genesys Telecommunications Laboratories, Inc. The foregoing products are ©2010-2017 Genesys Telecommunications Laboratories, Inc. All rights reserved. Spotability is a trademark of Genesys Telecommunications Laboratories, Inc. ©2011-2017. All rights reserved. Interaction Edge, CaaS Quick Spin, Interactive Intelligence Marketplace, Interaction SIP Bridge, and Interaction Mobilizer are registered trademarks of Genesys Telecommunications Laboratories, Inc. Interactive Intelligence Communications as a Service℠ and Interactive Intelligence CaaS℠ are trademarks or service marks of Genesys Telecommunications Laboratories, Inc. The foregoing products are ©2012-2017 Genesys Telecommunications Laboratories, Inc. All rights reserved. Interaction Speech Recognition and Interaction Quality Manager are registered trademarks of Genesys Telecommunications Laboratories, Inc. Bay Bridge Decisions and Interaction Script Builder are trademarks of Genesys Telecommunications Laboratories, Inc. The foregoing products are ©2013-2017 Genesys Telecommunications Laboratories, Inc. All rights reserved. Interaction Collector is a registered trademark of Genesys Telecommunications Laboratories, Inc. Interaction Decisions is a trademark of Genesys Telecommunications Laboratories, Inc. The foregoing products are ©2013-2017 Genesys Telecommunications Laboratories, Inc. All rights reserved. Interactive Intelligence Bridge Server and Interaction Connect are trademarks of Genesys Telecommunications Laboratories, Inc. The foregoing products are ©2014-2017 Genesys Telecommunications Laboratories, Inc. All rights reserved. The veryPDF product is ©2000-2017 veryPDF, Inc. All rights reserved. This product includes software licensed under the Common Development and Distribution License (6/24/2009). We hereby agree to indemnify the Initial Developer and every Contributor of the software licensed under the Common Development and Distribution License (6/24/2009) for any liability incurred by the Initial Developer or such Contributor as a result of any such terms we offer. The source code for the included software may be found at http://wpflocalization.codeplex.com. A database is incorporated in this software which is derived from a database licensed from Hexasoft Development Sdn. Bhd. ("HDSB"). All software and technologies used by HDSB are the properties of HDSB or its software suppliers and are protected by Malaysian and international copyright laws. No warranty is provided that the Databases are free of defects, or fit for a particular purpose. HDSB shall not be liable for any damages suffered by the Licensee or any third party resulting from use of the Databases. Other brand and/or product names referenced in this document are the trademarks or registered trademarks of their respective companies.
DISCLAIMER
GENESYS TELECOMMUNICATIONS LABORATORIES (GENESYS) HAS NO RESPONSIBILITY UNDER WARRANTY, INDEMNIFICATION OR OTHERWISE, FOR MODIFICATION OR CUSTOMIZATION OF ANY GENESYS SOFTWARE BY GENESYS, CUSTOMER OR ANY THIRD PARTY EVEN IF SUCH CUSTOMIZATION AND/OR MODIFICATION IS DONE USING GENESYS TOOLS, TRAINING OR METHODS DOCUMENTED BY GENESYS.
Genesys Telecommunications Laboratories, Inc. 2001 Junipero Serra Boulevard Daly City, CA 94014 Telephone/Fax (844) 274-5992 www.genesys.com
3 Interaction SIP Proxy™ Technical Reference
Table of Contents
Introduction to Interaction SIP Proxy ................................................................... 5 Interaction SIP Proxy network overview ................................................................................................ 5 Interaction SIP Proxy in action ............................................................................................................. 6 Interaction SIP Proxy routing ............................................................................................................... 6 Interaction SIP Proxy network protocols ............................................................................................... 7 Interaction SIP Proxy notifications ........................................................................................................ 7 Interaction SIP Proxy features ............................................................................................................. 7
Interaction SIP Proxy Installation......................................................................... 8 Interaction SIP Proxy hardware requirements........................................................................................ 8 Interaction SIP Proxy software requirements ......................................................................................... 8 Interaction SIP Proxy network configuration requirements ...................................................................... 8 Obtain Interaction SIP Proxy license and software ................................................................................. 8 Install Interaction SIP Proxy ................................................................................................................ 9
Migrate previous version of Interaction SIP Proxy to current version ................ 14 Ensure that the machine meets requirements....................................................................................... 14 Export the previous Interaction SIP Proxy configuration ........................................................................ 14 Stop the current Interaction SIP Proxy service...................................................................................... 15 Install and configure Microsoft Windows Server .................................................................................... 16 Install Interaction SIP Proxy ............................................................................................................... 16 Import previous Interaction SIP Proxy configuration into current version ................................................ 17 Verify connection to Customer Interaction Center server ....................................................................... 18 Configure trust settings for Interaction SIP Proxy in Interaction Administrator ......................................... 18
Configure initial settings for Interaction SIP Proxy ............................................ 21 Specify Network Interface Card for SIP requests ................................................................................... 21 Define Interaction SIP Proxy domain ................................................................................................... 22 Define Interaction SIP Proxy destinations............................................................................................. 23 Define Interaction SIP Proxy routes ..................................................................................................... 26 Configure Interaction SIP Proxy alerts ................................................................................................. 29
Interaction SIP Proxy email alerts .................................................................................................... 29 Interaction SIP Proxy SNMP alerts .................................................................................................... 29
Managed Interaction SIP Proxy ........................................................................................................... 30 Considerations for using a managed Interaction SIP Proxy server ....................................................... 30 Connect Interaction SIP Proxy to the Customer Interaction Center server ............................................ 31 Trust the Interaction SIP Proxy connection and assign a location......................................................... 33
Appendix A: Antivirus requirements and best practices for Customer Interaction Center and subsystem servers.......................................................... 35
Install only a supported antivirus product ............................................................................................ 35 Install only the virus protection security feature ................................................................................... 35 Configure real-time protection for only write operations ........................................................................ 36 Exclude continually accessed file types and directories .......................................................................... 36
Files and file types to exclude from real-time protection ..................................................................... 36 Directories and subdirectories to exclude from real-time protection ..................................................... 37
Update virus definitions daily .............................................................................................................. 37 Conduct a full scan of the file system on a regular basis ........................................................................ 37

4 Interaction SIP Proxy™ Technical Reference
Appendix B: OpenSSL Copyright ......................................................................... 38
Change Log .......................................................................................................... 40
5 Interaction SIP Proxy™ Technical Reference
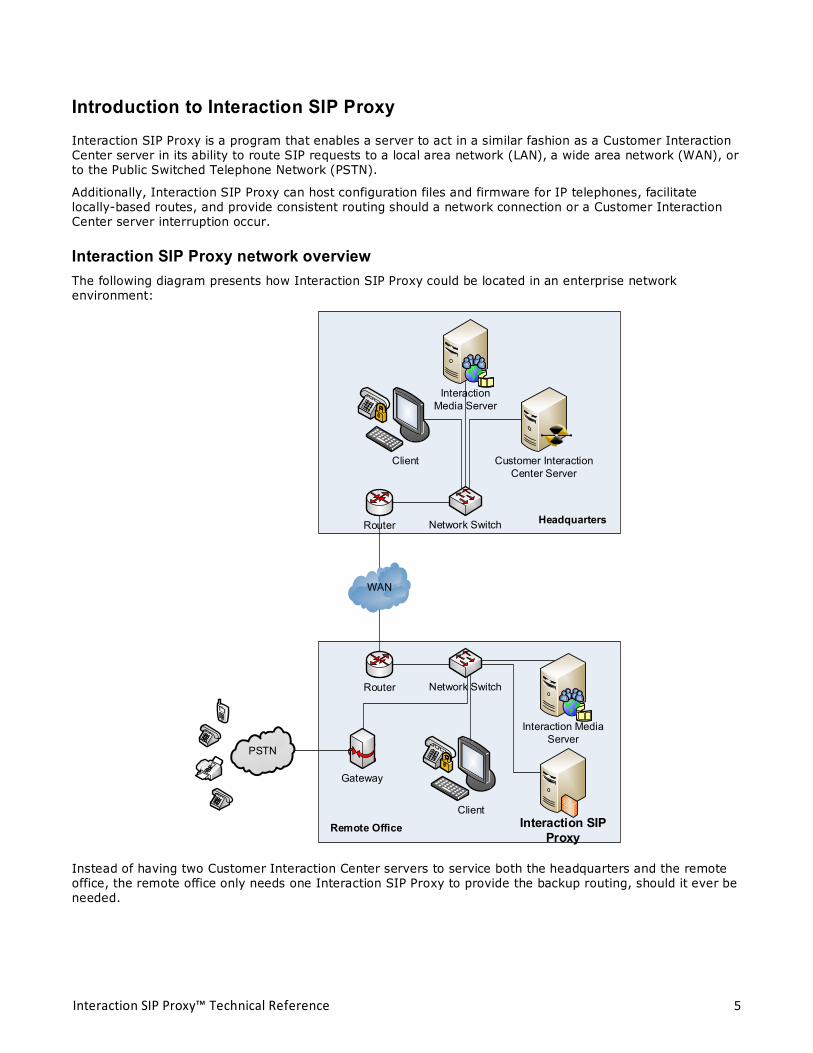
Introduction to Interaction SIP Proxy Interaction SIP Proxy is a program that enables a server to act in a similar fashion as a Customer Interaction Center server in its ability to route SIP requests to a local area network (LAN), a wide area network (WAN), or to the Public Switched Telephone Network (PSTN).
Additionally, Interaction SIP Proxy can host configuration files and firmware for IP telephones, facilitate locally-based routes, and provide consistent routing should a network connection or a Customer Interaction Center server interruption occur.
Interaction SIP Proxy network overview The following diagram presents how Interaction SIP Proxy could be located in an enterprise network environment:
Customer Interaction Center Server
Client
WAN
Router
Router
InteractionMedia Server
Network Switch
Interaction MediaServer
Client
Network Switch
Interaction SIPProxy
PSTN
Gateway
Headquarters
Remote Office
Instead of having two Customer Interaction Center servers to service both the headquarters and the remote office, the remote office only needs one Interaction SIP Proxy to provide the backup routing, should it ever be needed.
6 Interaction SIP Proxy™ Technical Reference
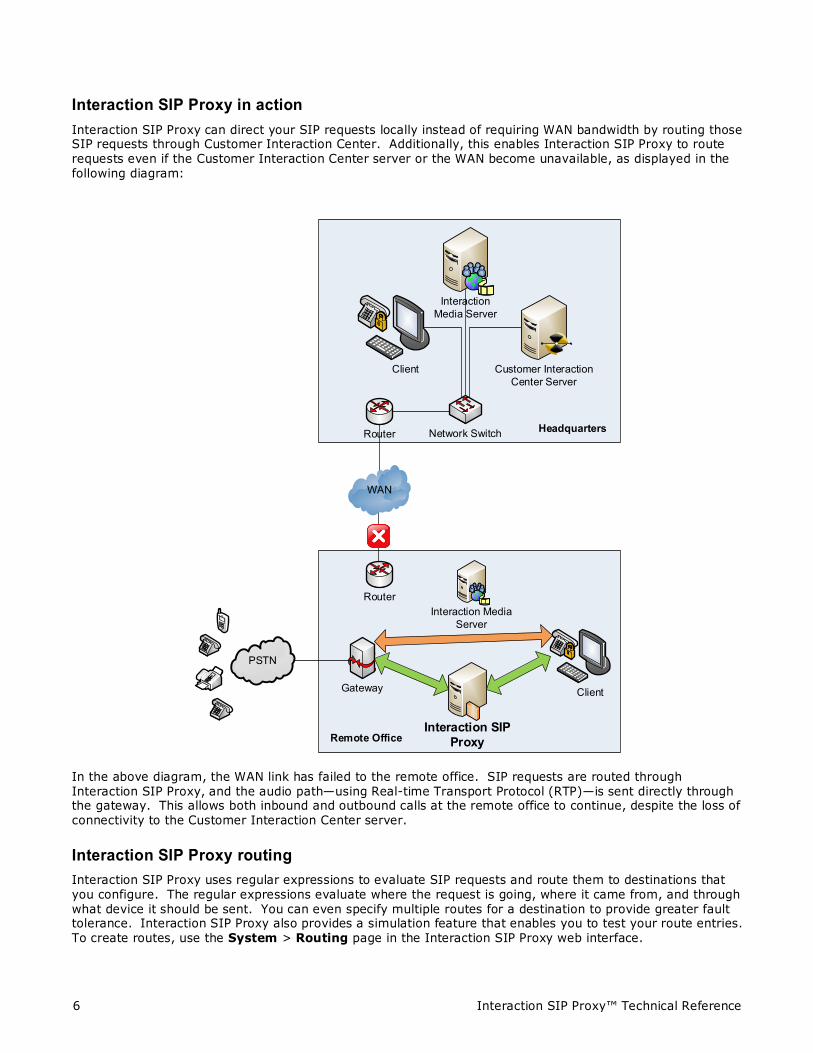
Interaction SIP Proxy in action Interaction SIP Proxy can direct your SIP requests locally instead of requiring WAN bandwidth by routing those SIP requests through Customer Interaction Center. Additionally, this enables Interaction SIP Proxy to route requests even if the Customer Interaction Center server or the WAN become unavailable, as displayed in the following diagram:
Customer Interaction Center Server
Client
WAN
Router
Router
InteractionMedia Server
Network Switch
Interaction MediaServer
Client
Interaction SIPProxy
PSTN
Gateway
Headquarters
Remote Office
In the above diagram, the WAN link has failed to the remote office. SIP requests are routed through Interaction SIP Proxy, and the audio path—using Real-time Transport Protocol (RTP)—is sent directly through the gateway. This allows both inbound and outbound calls at the remote office to continue, despite the loss of connectivity to the Customer Interaction Center server.
Interaction SIP Proxy routing Interaction SIP Proxy uses regular expressions to evaluate SIP requests and route them to destinations that you configure. The regular expressions evaluate where the request is going, where it came from, and through what device it should be sent. You can even specify multiple routes for a destination to provide greater fault tolerance. Interaction SIP Proxy also provides a simulation feature that enables you to test your route entries. To create routes, use the System > Routing page in the Interaction SIP Proxy web interface.
7 Interaction SIP Proxy™ Technical Reference
For more information on routes and entries, see Interaction SIP Proxy Help.
Interaction SIP Proxy network protocols Interaction SIP Proxy uses three network transport protocols for SIP requests:
• UDP – This protocol is lightweight and is the default protocol used by many SIP-enabled devices.
• TCP – This protocol provides reliability, which reduces the number of retries and lost packets on a saturated network.
• TLS – This protocol provides security, which makes it difficult for packets of a SIP request to be intercepted and decoded by outside parties.
Interaction SIP Proxy notifications Interaction SIP Proxy provides the following methods for notifying you about warnings and errors:
• Simple Network Management Protocol (SNMP) – Using SNMP, events—also known as traps—that occur in Interaction SIP Proxy are sent to an SNMP server that can receive events from many network devices or servers.
• Simple Mail Transport Protocol (SMTP) – You can configure Interaction SIP Proxy to send email messages to you or a distribution list for specific events that occur in the system, such as changes in Server Status, changes to Administrator credentials, and others. The only requirement is that you have an SMTP server in your organization to deliver the email message.
Interaction SIP Proxy features Interaction SIP Proxy has features that enable you to tailor Interaction SIP Proxy behavior to the way that you want it to perform. The following list covers some of these features:
• Distribution – Interaction SIP Proxy enables you to configure how it selects a destination from a pool of multiple destinations. The methods range from sequential to randomization of destinations. For more information about distribution methods, see Interaction SIP Proxy Help.
• Real-time server status – Through its web interface, Interaction SIP Proxy displays connections to all destinations servers, such as gateways and routers, and status information in real-time.
• Redirection – You can configure Interaction SIP Proxy to act as a redirect server for SIP INVITE requests so that the requesting SIP device is given an alternate set of URIs to contact.
• SIP device registration – Interaction SIP Proxy can serve as a registrar for SIP devices, thereby eliminating the need to have these devices register with the Customer Interaction Center server. For continuity in a fail-over scenario, you can configure the SIP devices to register to both Customer Interaction Center and Interaction SIP Proxy. For more information, see the information for the Registration Routing and Registration has priority controls in Interaction SIP Proxy Help.
• Administrative web interface – Interaction SIP Proxy uses a web interface for administrative tasks, such as entering SIP request route entries, simulating entry selection, configuring protocol usage and more. For more information about the web interface, see Interaction SIP Proxy Help.
8 Interaction SIP Proxy™ Technical Reference
Interaction SIP Proxy Installation This section contains the requirements and procedure to install Interaction SIP Proxy.
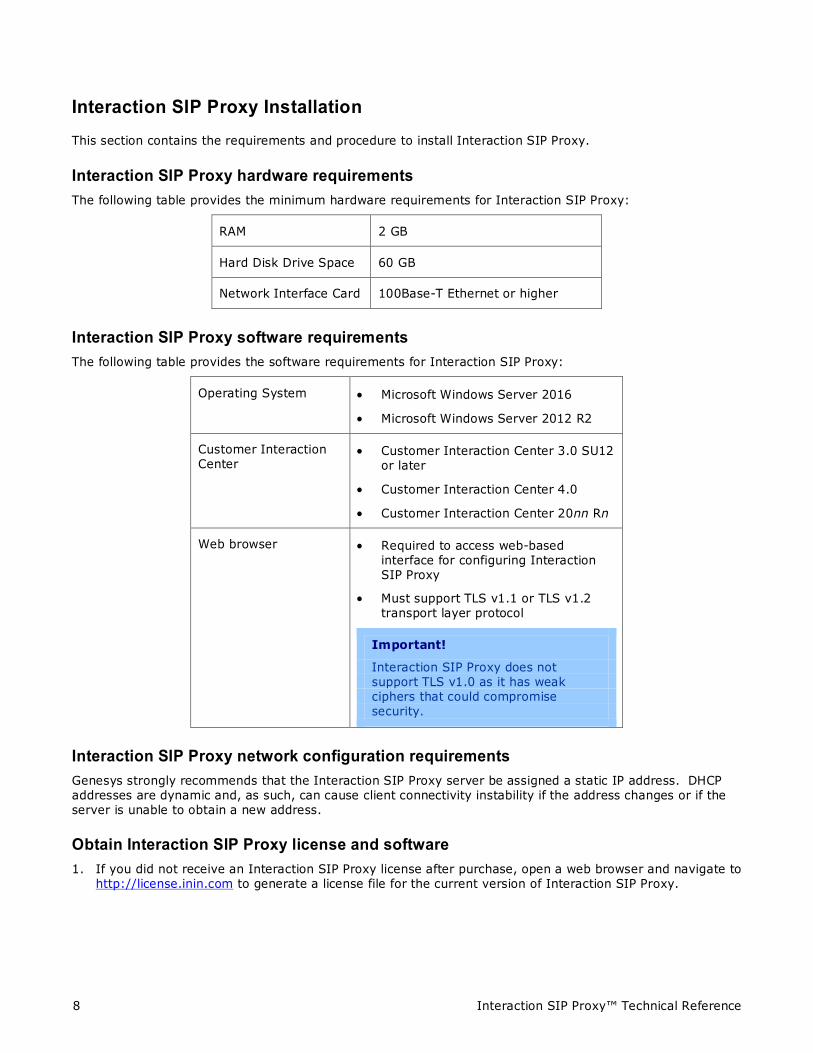
Interaction SIP Proxy hardware requirements The following table provides the minimum hardware requirements for Interaction SIP Proxy:
RAM 2 GB
Hard Disk Drive Space 60 GB
Network Interface Card 100Base-T Ethernet or higher
Interaction SIP Proxy software requirements The following table provides the software requirements for Interaction SIP Proxy:
Operating System • Microsoft Windows Server 2016
• Microsoft Windows Server 2012 R2
Customer Interaction Center
• Customer Interaction Center 3.0 SU12 or later
• Customer Interaction Center 4.0
• Customer Interaction Center 20nn Rn
Web browser • Required to access web-based interface for configuring Interaction SIP Proxy
• Must support TLS v1.1 or TLS v1.2 transport layer protocol
Important!
Interaction SIP Proxy does not support TLS v1.0 as it has weak ciphers that could compromise security.
Interaction SIP Proxy network configuration requirements Genesys strongly recommends that the Interaction SIP Proxy server be assigned a static IP address. DHCP addresses are dynamic and, as such, can cause client connectivity instability if the address changes or if the server is unable to obtain a new address.
Obtain Interaction SIP Proxy license and software 1. If you did not receive an Interaction SIP Proxy license after purchase, open a web browser and navigate to
http://license.inin.com to generate a license file for the current version of Interaction SIP Proxy.
9 Interaction SIP Proxy™ Technical Reference
Note:
You must have purchased the current version of Interaction SIP Proxy to be eligible to generate a license through the specified website. If you have problems obtaining the license, contact PureConnect technical support.
2. Download the CIC or Appliances .ISO file from the product information site at the following URL address:
https://my.inin.com/products/Pages/Downloads.aspx
Note:
The CIC .ISO file contains all CIC software. The Appliances .ISO file is much smaller and contains the following CIC software: • Interaction SIP Proxy • Interaction Media Server • Interaction Edge edition of Interaction SIP Proxy • Interaction Edge editions of Interaction Media Server The Interaction Edge editions of Interaction Media Server and Interaction SIP Proxy are available only on the Appliances .ISO file.
3. Copy the .ISO file to a non-Customer Customer Interaction Center file server with a high bandwidth connection to the machines on which you will install Interaction SIP Proxy.
4. Mount the .ISO file and share the contents to make them accessible to the machines on which you will install Interaction SIP Proxy.
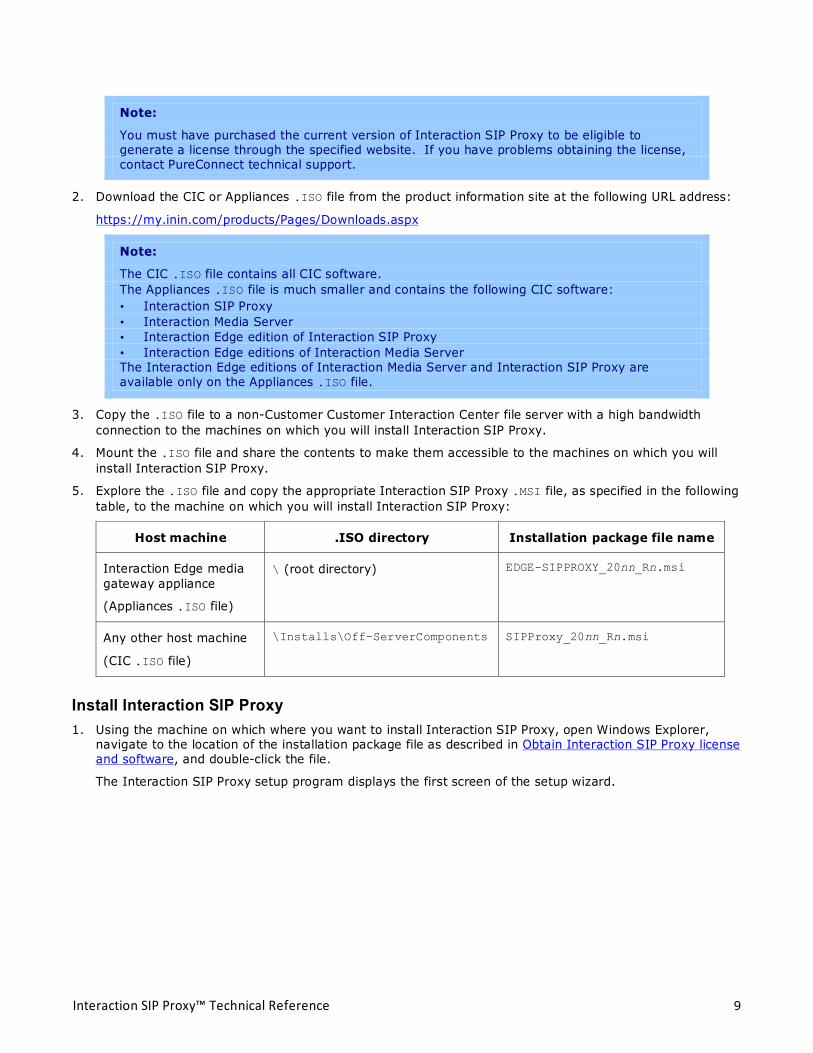
5. Explore the .ISO file and copy the appropriate Interaction SIP Proxy .MSI file, as specified in the following table, to the machine on which you will install Interaction SIP Proxy:
Host machine .ISO directory Installation package file name
Interaction Edge media gateway appliance
(Appliances .ISO file)
\ (root directory) EDGE-SIPPROXY_20nn_Rn.msi
Any other host machine
(CIC .ISO file)
\Installs\Off-ServerComponents SIPProxy_20nn_Rn.msi
Install Interaction SIP Proxy 1. Using the machine on which where you want to install Interaction SIP Proxy, open Windows Explorer,
navigate to the location of the installation package file as described in Obtain Interaction SIP Proxy license and software, and double-click the file.
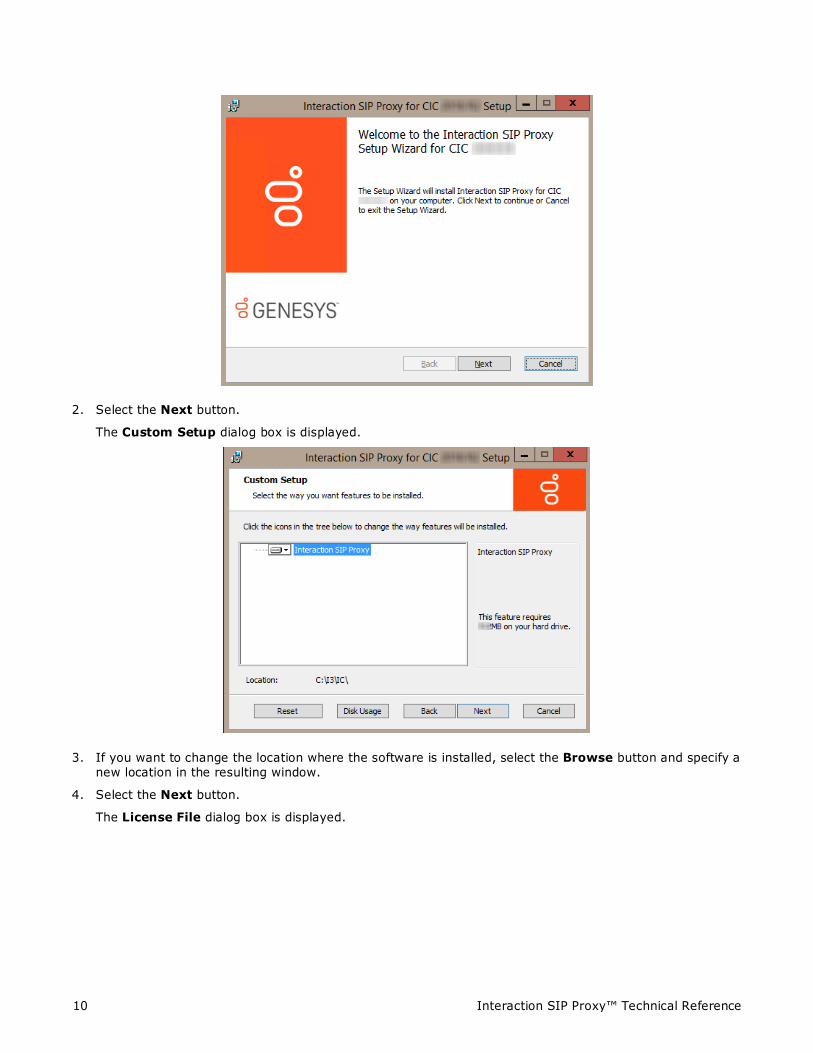
The Interaction SIP Proxy setup program displays the first screen of the setup wizard.
10 Interaction SIP Proxy™ Technical Reference
2. Select the Next button.
The Custom Setup dialog box is displayed.
3. If you want to change the location where the software is installed, select the Browse button and specify a new location in the resulting window.
4. Select the Next button.
The License File dialog box is displayed.
11 Interaction SIP Proxy™ Technical Reference
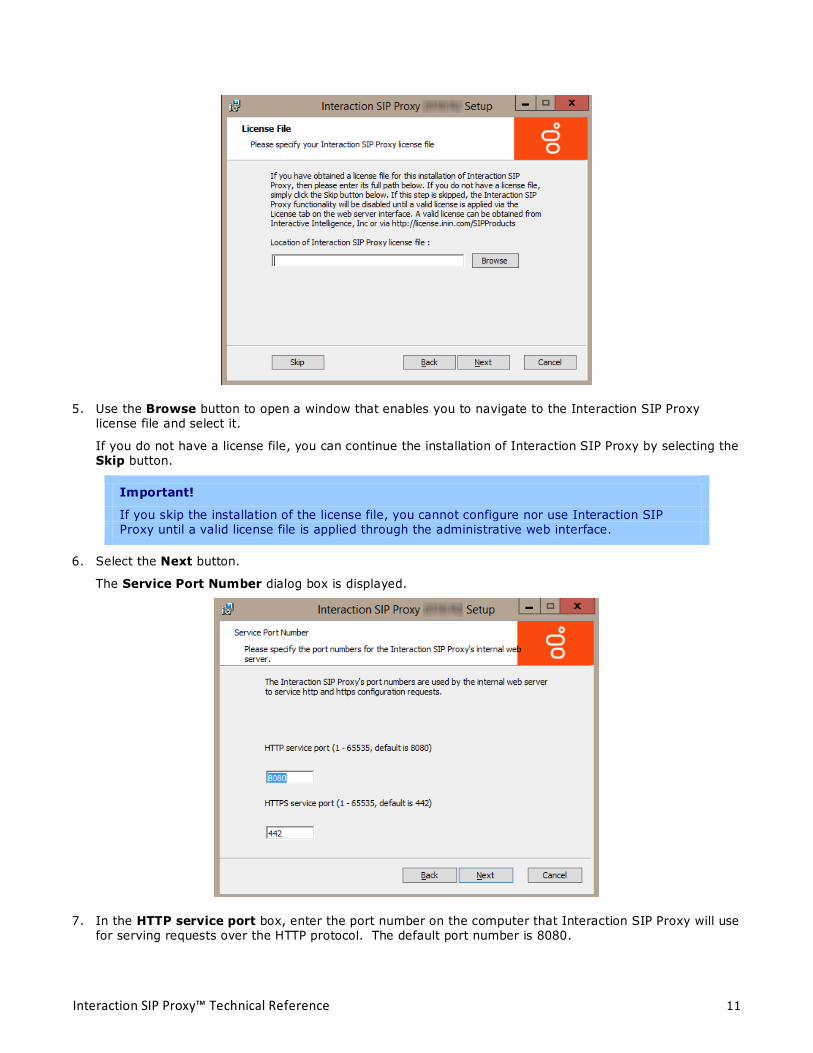
5. Use the Browse button to open a window that enables you to navigate to the Interaction SIP Proxy license file and select it.
If you do not have a license file, you can continue the installation of Interaction SIP Proxy by selecting the Skip button.
Important!
If you skip the installation of the license file, you cannot configure nor use Interaction SIP Proxy until a valid license file is applied through the administrative web interface.
6. Select the Next button.
The Service Port Number dialog box is displayed.
7. In the HTTP service port box, enter the port number on the computer that Interaction SIP Proxy will use for serving requests over the HTTP protocol. The default port number is 8080.
12 Interaction SIP Proxy™ Technical Reference
8. In the HTTPS service port box, enter the port number on the computer that Interaction SIP Proxy will use for serving requests over the HTTPS protocol. The default port number is 442.
Note:
The default port numbers are 8080 for HTTP and 442 for HTTPS.
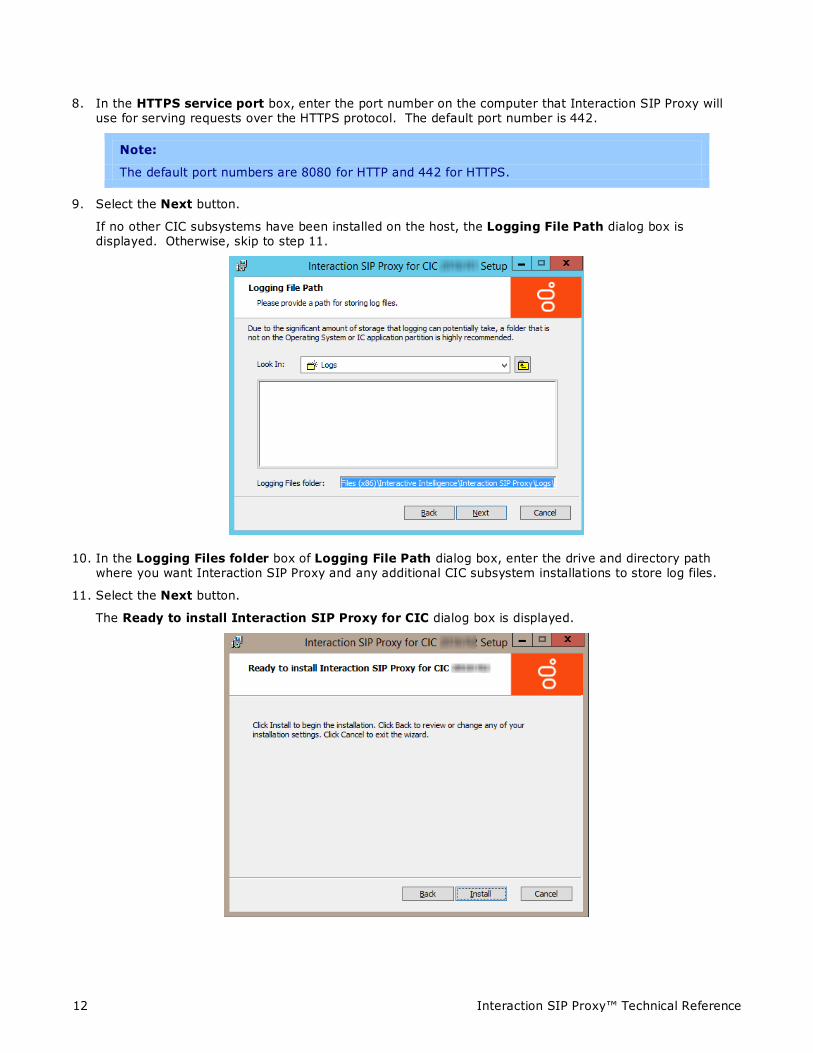
9. Select the Next button.
If no other CIC subsystems have been installed on the host, the Logging File Path dialog box is displayed. Otherwise, skip to step 11.
10. In the Logging Files folder box of Logging File Path dialog box, enter the drive and directory path where you want Interaction SIP Proxy and any additional CIC subsystem installations to store log files.
11. Select the Next button.
The Ready to install Interaction SIP Proxy for CIC dialog box is displayed.
13 Interaction SIP Proxy™ Technical Reference
12. If you need to change any of the previous settings that you entered, select the Back button until you reach the necessary dialog box. Otherwise, select the Install button to start the process of installing files on your server.
The server displays a dialog box that informs you of the progress of the installation. When the process is complete the final dialog box of the setup wizard is displayed.
13. Select the Finish button.
14 Interaction SIP Proxy™ Technical Reference
Migrate previous version of Interaction SIP Proxy to current version Migration of Interaction SIP Proxy from a previous version, other than Interaction SIP Proxy 4.0 R2, to the current version is a manual process. The migration tool for upgrading Customer Interaction Center version 3.0 and its subsystems to the current version does not support Interaction SIP Proxy.
Important!
You should upgrade Interaction SIP Proxy only during off-hours. Even if you are installing Interaction SIP Proxy on a new server, you still must redefine and re-enable connections to Customer Interaction Center servers.
The procedures in this section provide the necessary tasks to upgrade a previous version of Interaction SIP Proxy to the current version of Interaction SIP Proxy on a single machine, which can also require installation of a new operating system. You may need to omit some of these procedures or do additional procedures for other products depending on the circumstances of your environment:
• Installing Interaction SIP Proxy on a new server
• Installing Interaction SIP Proxy and Interaction Media Server on a new server
• Adding Interaction SIP Proxy to an existing Interaction Media Server installation
• Upgrading a previous version of Interaction SIP Proxy to the current version on a server that also hosts Interaction Media Server 3.0, 4.0, or the current version
Genesys recommends upgrading Interaction SIP Proxy after you upgrade previous versions of Customer Interaction Center and its subsystems, including Interaction Media Server, to the current version.
Important!
The administrative user name and password for a previous version of Interaction SIP Proxy is not included when you import the configuration data to the current version of Interaction SIP Proxy. The default administrative user name and password are admin and 1234. Also, the configuration data does not include any certificates used or created by the previous version of Interaction SIP Proxy. The current version of Interaction SIP Proxy creates new certificates when you reconnect it to Customer Interaction Center servers. If you used third-party Certificate Authorities (CAs) for line certificates with a previous version of Interaction SIP Proxy, you may need to request new certificates after you migrate to the current version of Interaction SIP Proxy and you do not use the host name or DNS domain. This situation does not apply to managed Interaction SIP Proxy servers as Customer Interaction Center generates a self-signed line certificate for Interaction SIP Proxy.
Ensure that the machine meets requirements Ensure that the machine on which you will install Interaction SIP Proxy meets the following requirements:
• Operating system requirements:
Microsoft Windows Server 2012 R2 http://technet.microsoft.com/en-us/library/dn303418.aspx
Microsoft Windows Server 2016
• Interaction SIP Proxy hardware requirements
• Interaction SIP Proxy software requirements
Export the previous Interaction SIP Proxy configuration 1. Using a web browser, log on to the web interface for the previous version of Interaction SIP Proxy server.
2. In the upper right corner of the page, select the System icon.
15 Interaction SIP Proxy™ Technical Reference
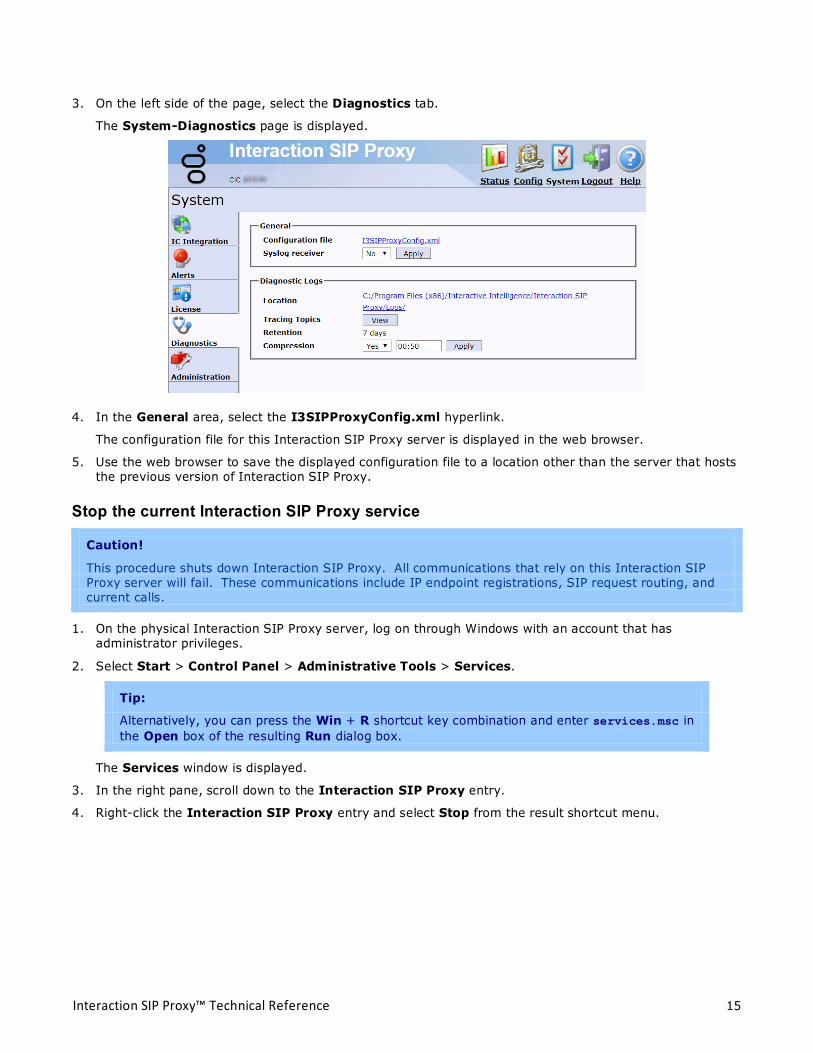
3. On the left side of the page, select the Diagnostics tab.
The System-Diagnostics page is displayed.
4. In the General area, select the I3SIPProxyConfig.xml hyperlink.
The configuration file for this Interaction SIP Proxy server is displayed in the web browser.
5. Use the web browser to save the displayed configuration file to a location other than the server that hosts the previous version of Interaction SIP Proxy.
Stop the current Interaction SIP Proxy service
Caution!
This procedure shuts down Interaction SIP Proxy. All communications that rely on this Interaction SIP Proxy server will fail. These communications include IP endpoint registrations, SIP request routing, and current calls.
1. On the physical Interaction SIP Proxy server, log on through Windows with an account that has administrator privileges.
2. Select Start > Control Panel > Administrative Tools > Services.
Tip:
Alternatively, you can press the Win + R shortcut key combination and enter services.msc in the Open box of the resulting Run dialog box.
The Services window is displayed.
3. In the right pane, scroll down to the Interaction SIP Proxy entry.
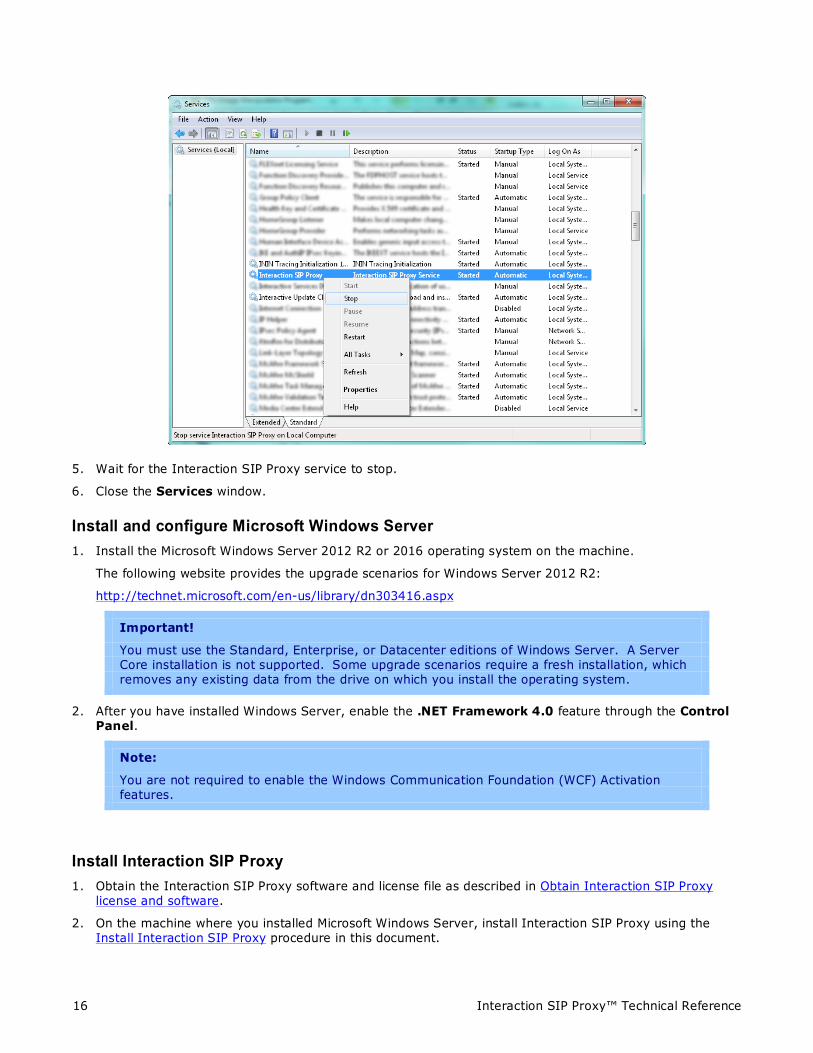
4. Right-click the Interaction SIP Proxy entry and select Stop from the result shortcut menu.
16 Interaction SIP Proxy™ Technical Reference
5. Wait for the Interaction SIP Proxy service to stop.
6. Close the Services window.
Install and configure Microsoft Windows Server 1. Install the Microsoft Windows Server 2012 R2 or 2016 operating system on the machine.
The following website provides the upgrade scenarios for Windows Server 2012 R2:
http://technet.microsoft.com/en-us/library/dn303416.aspx
Important!
You must use the Standard, Enterprise, or Datacenter editions of Windows Server. A Server Core installation is not supported. Some upgrade scenarios require a fresh installation, which removes any existing data from the drive on which you install the operating system.
2. After you have installed Windows Server, enable the .NET Framework 4.0 feature through the Control Panel.
Note:
You are not required to enable the Windows Communication Foundation (WCF) Activation features.
Install Interaction SIP Proxy 1. Obtain the Interaction SIP Proxy software and license file as described in Obtain Interaction SIP Proxy
license and software.
2. On the machine where you installed Microsoft Windows Server, install Interaction SIP Proxy using the Install Interaction SIP Proxy procedure in this document.
17 Interaction SIP Proxy™ Technical Reference
3. When prompted by the installation, supply the license file.
4. After you install Interaction SIP Proxy, apply any available patches, which are available through the following URL address:
https://my.inin.com/products/cic/Pages/Latest-Release.aspx
Import previous Interaction SIP Proxy configuration into current version
Important!
The administrative user name and password are not included in the Interaction SIP Proxy configuration file of the previous version. The default administrative user name and password for the current version are admin and 1234.
1. On the Interaction SIP Proxy server, log on to Windows with an account that has administrative privileges.
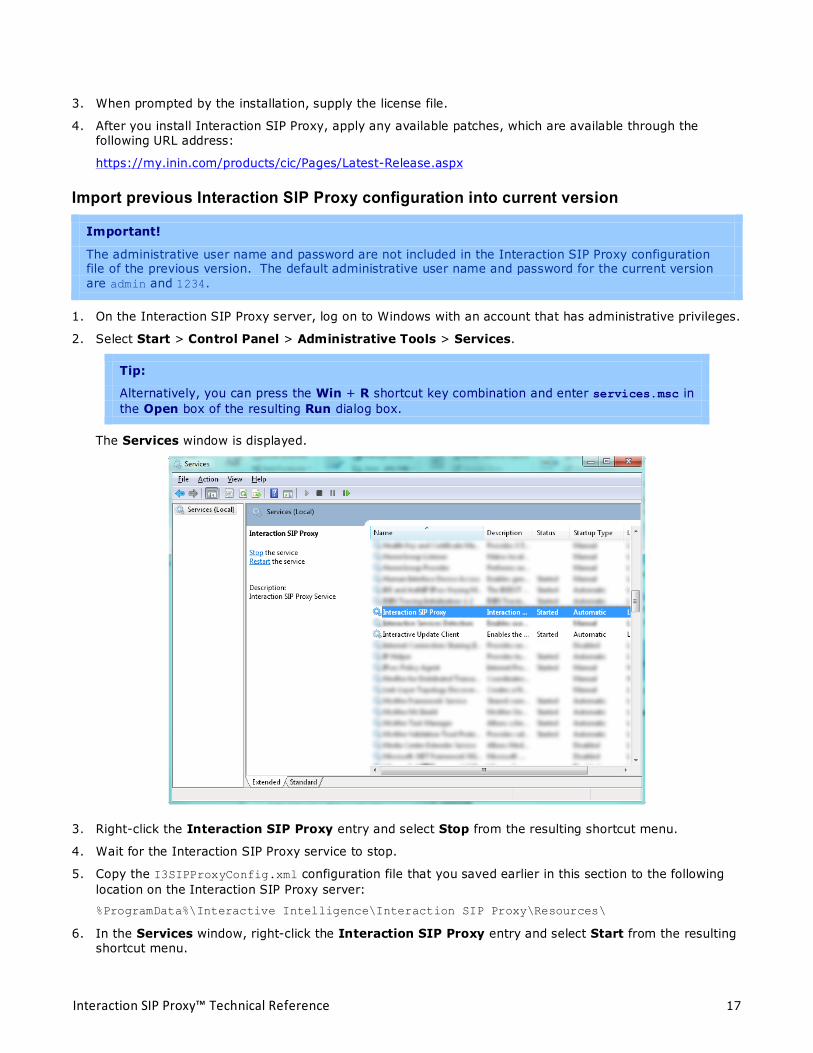
2. Select Start > Control Panel > Administrative Tools > Services.
Tip:
Alternatively, you can press the Win + R shortcut key combination and enter services.msc in the Open box of the resulting Run dialog box.
The Services window is displayed.
3. Right-click the Interaction SIP Proxy entry and select Stop from the resulting shortcut menu.
4. Wait for the Interaction SIP Proxy service to stop.
5. Copy the I3SIPProxyConfig.xml configuration file that you saved earlier in this section to the following location on the Interaction SIP Proxy server: %ProgramData%\Interactive Intelligence\Interaction SIP Proxy\Resources\
6. In the Services window, right-click the Interaction SIP Proxy entry and select Start from the resulting shortcut menu.
18 Interaction SIP Proxy™ Technical Reference
The current version of Interaction SIP Proxy now uses the configuration file that you saved from the previous version of Interaction SIP Proxy.
Verify connection to Customer Interaction Center server Do this procedure if you want to use Interaction SIP Proxy as a managed system through Interaction Administrator.
1. Using a web browser, log on to the web interface for the Interaction SIP Proxy server.
Important!
The web interface of Interaction SIP Proxy supports only versions 1.1 and 1.2 of the TLS protocol. Ensure that your web browser is configured to support one or both of those versions for the TLS protocol.
2. In the upper right corner of the page, select the System icon.
The System-IC Integration page is displayed.
3. If the Status box displays Disconnected, do the steps in Connect Interaction SIP Proxy to the Customer Interaction Center server.
If the Status box displays Pending Approval or Activated, continue to the next procedure.
Configure trust settings for Interaction SIP Proxy in Interaction Administrator 1. On a system where Interaction Administrator is installed, start Interaction Administrator.
2. If prompted, log on to Interaction Administrator with a Customer Interaction Center account that has administrative privileges.
The Interaction Administrator window is displayed.
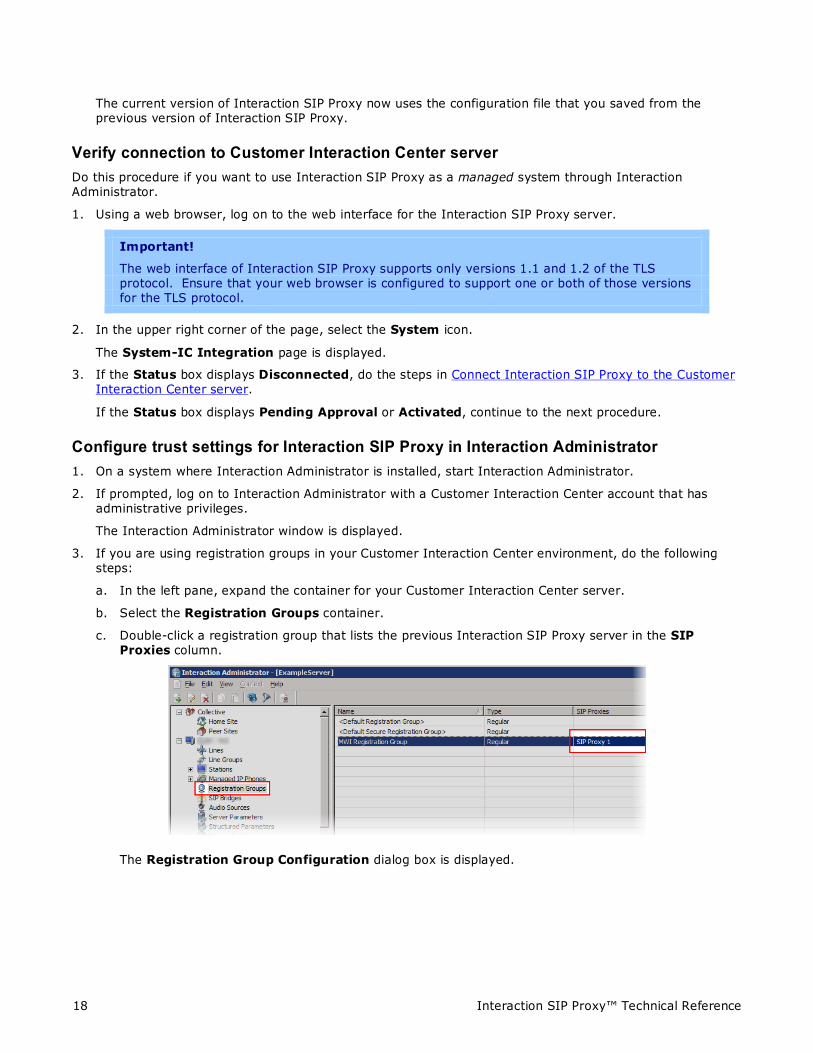
3. If you are using registration groups in your Customer Interaction Center environment, do the following steps:
a. In the left pane, expand the container for your Customer Interaction Center server.
b. Select the Registration Groups container.
c. Double-click a registration group that lists the previous Interaction SIP Proxy server in the SIP Proxies column.
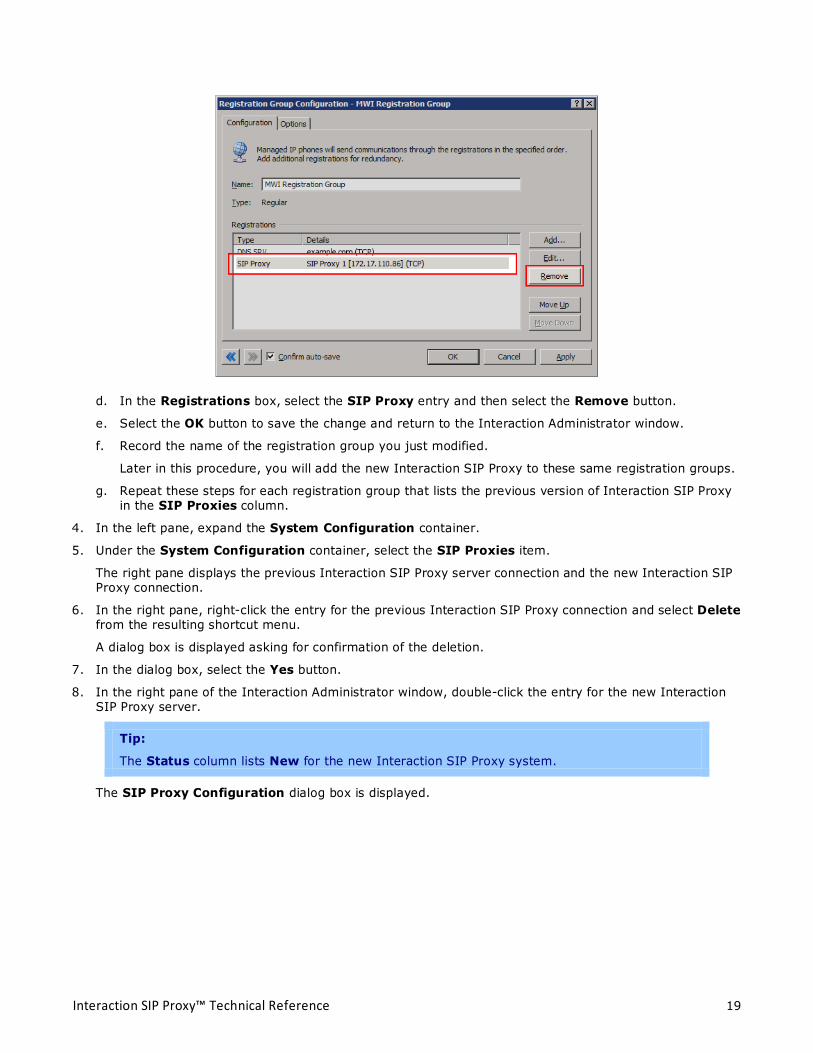
The Registration Group Configuration dialog box is displayed.
19 Interaction SIP Proxy™ Technical Reference
d. In the Registrations box, select the SIP Proxy entry and then select the Remove button.
e. Select the OK button to save the change and return to the Interaction Administrator window.
f. Record the name of the registration group you just modified.
Later in this procedure, you will add the new Interaction SIP Proxy to these same registration groups.
g. Repeat these steps for each registration group that lists the previous version of Interaction SIP Proxy in the SIP Proxies column.
4. In the left pane, expand the System Configuration container.
5. Under the System Configuration container, select the SIP Proxies item.
The right pane displays the previous Interaction SIP Proxy server connection and the new Interaction SIP Proxy connection.
6. In the right pane, right-click the entry for the previous Interaction SIP Proxy connection and select Delete from the resulting shortcut menu.
A dialog box is displayed asking for confirmation of the deletion.
7. In the dialog box, select the Yes button.
8. In the right pane of the Interaction Administrator window, double-click the entry for the new Interaction SIP Proxy server.
Tip:
The Status column lists New for the new Interaction SIP Proxy system.
The SIP Proxy Configuration dialog box is displayed.

20 Interaction SIP Proxy™ Technical Reference
9. Select the Trust this proxy button.
10. Select the OK button to save your changes and return to the Interaction Administrator window.
21 Interaction SIP Proxy™ Technical Reference
Configure initial settings for Interaction SIP Proxy This section contains the procedures for the initial configuration of Interaction SIP Proxy so that it can route SIP requests. It contains the following topics:
Specify Network Interface Card for SIP requests ................................................................................... 21 Define Interaction SIP Proxy domain ................................................................................................... 22 Define Interaction SIP Proxy destinations............................................................................................. 23 Define Interaction SIP Proxy routes ..................................................................................................... 26 Configure Interaction SIP Proxy alerts ................................................................................................. 29 Managed Interaction SIP Proxy ........................................................................................................... 30
Specify Network Interface Card for SIP requests For Interaction SIP Proxy to correctly send and receive SIP requests, you must specify which Network Interface Card (NIC) it must use. To specify the NIC to use for SIP requests, do the following steps:
1. Open a web browser and navigate to the URL of the Interaction SIP Proxy server.
If you are prompted about a certificate error, add an exception for this URL. This certificate is a self-signed certificate. Then, you are prompted for a user name and password.
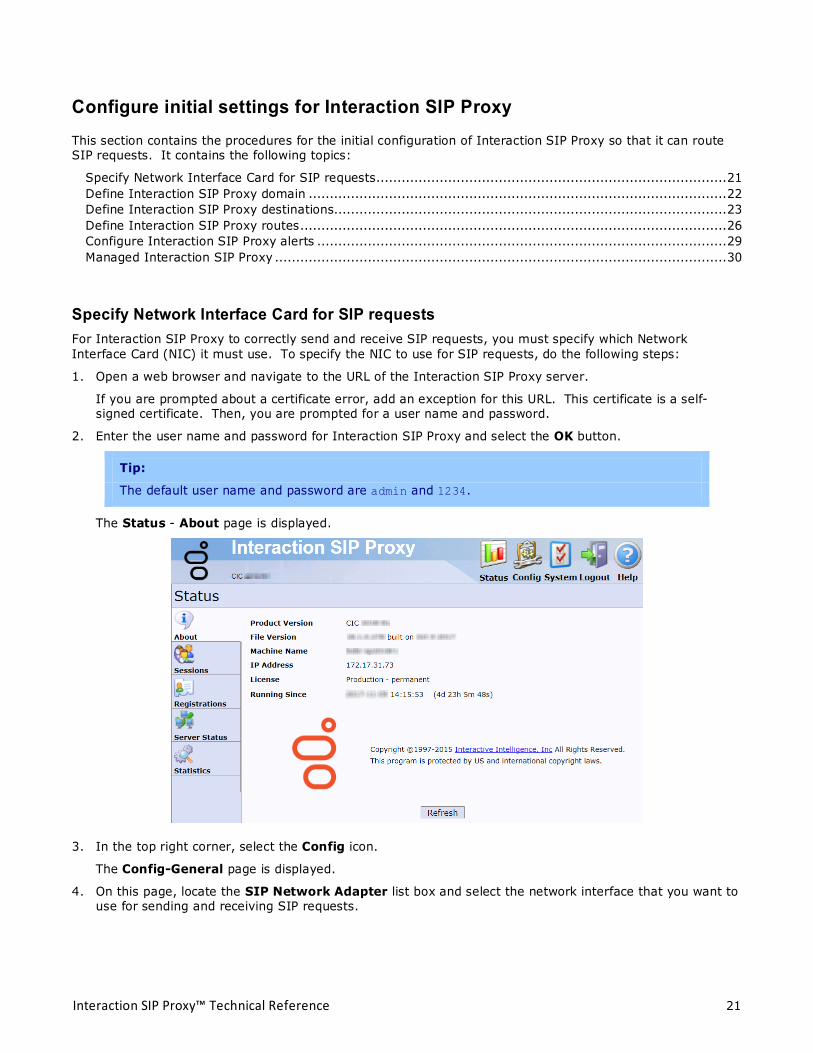
2. Enter the user name and password for Interaction SIP Proxy and select the OK button.
Tip:
The default user name and password are admin and 1234.
The Status - About page is displayed.
3. In the top right corner, select the Config icon.
The Config-General page is displayed.
4. On this page, locate the SIP Network Adapter list box and select the network interface that you want to use for sending and receiving SIP requests.
22 Interaction SIP Proxy™ Technical Reference
Note:
If you have only one network interface card in your system, only one address is displayed.
5. At the bottom of the page, select the Apply button.
The changes to the SIP Network Adapter box are saved.
Important!
This change requires a restart of the Interaction SIP Proxy service to take effect.
Define Interaction SIP Proxy domain The next task for configuring Interaction SIP Proxy is that of defining a domain. During installation, Interaction SIP Proxy automatically detects the domain in which it resides. However, if you want to specify a different domain, you must do the following steps:
1. Open a web browser and navigate to the URL of the Interaction SIP Proxy server.
If you are prompted about a certificate error, add an exception for this URL. Then, you are prompted for a user name and password.
2. Enter the user name and password for Interaction SIP Proxy and select the OK button.
Tip:
The default user name and password are admin and 1234.
The Status - About webpage is displayed.
3. In the top-right corner of the page, select the Config icon.
The Config-General page is displayed.
23 Interaction SIP Proxy™ Technical Reference
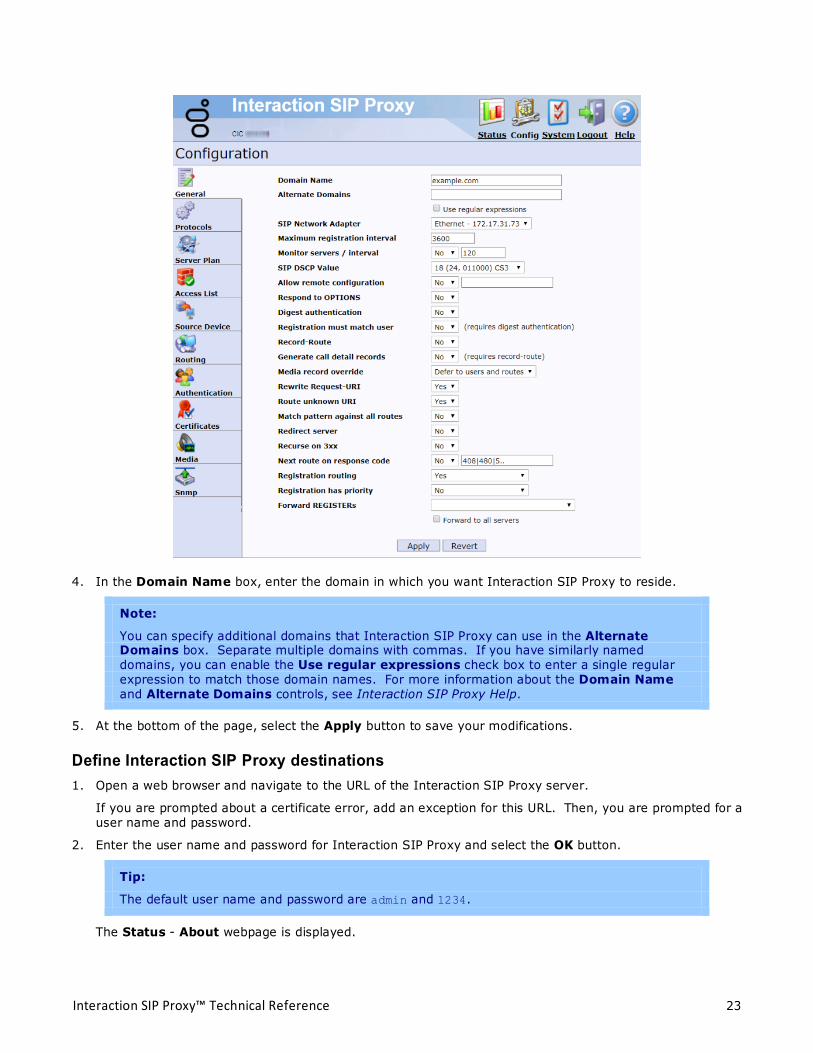
4. In the Domain Name box, enter the domain in which you want Interaction SIP Proxy to reside.
Note:
You can specify additional domains that Interaction SIP Proxy can use in the Alternate Domains box. Separate multiple domains with commas. If you have similarly named domains, you can enable the Use regular expressions check box to enter a single regular expression to match those domain names. For more information about the Domain Name and Alternate Domains controls, see Interaction SIP Proxy Help.
5. At the bottom of the page, select the Apply button to save your modifications.
Define Interaction SIP Proxy destinations 1. Open a web browser and navigate to the URL of the Interaction SIP Proxy server.
If you are prompted about a certificate error, add an exception for this URL. Then, you are prompted for a user name and password.
2. Enter the user name and password for Interaction SIP Proxy and select the OK button.
Tip:
The default user name and password are admin and 1234.
The Status - About webpage is displayed.
24 Interaction SIP Proxy™ Technical Reference
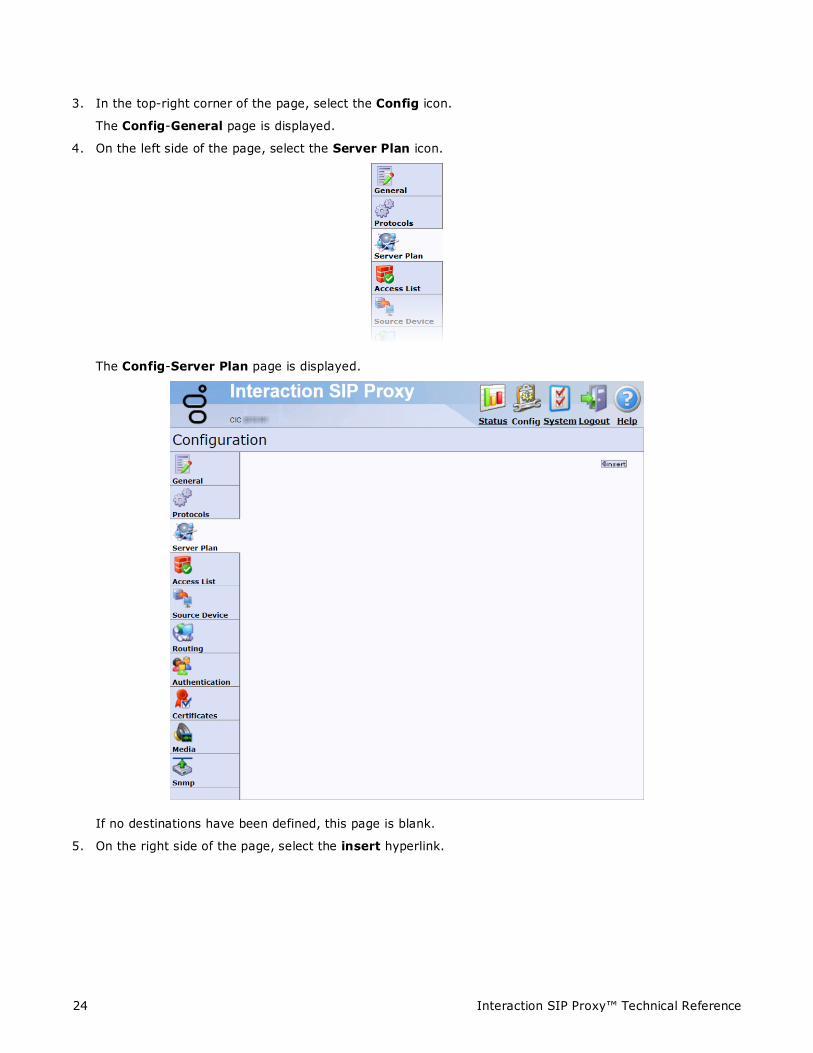
3. In the top-right corner of the page, select the Config icon.
The Config-General page is displayed.
4. On the left side of the page, select the Server Plan icon.
The Config-Server Plan page is displayed.
If no destinations have been defined, this page is blank.
5. On the right side of the page, select the insert hyperlink.
25 Interaction SIP Proxy™ Technical Reference
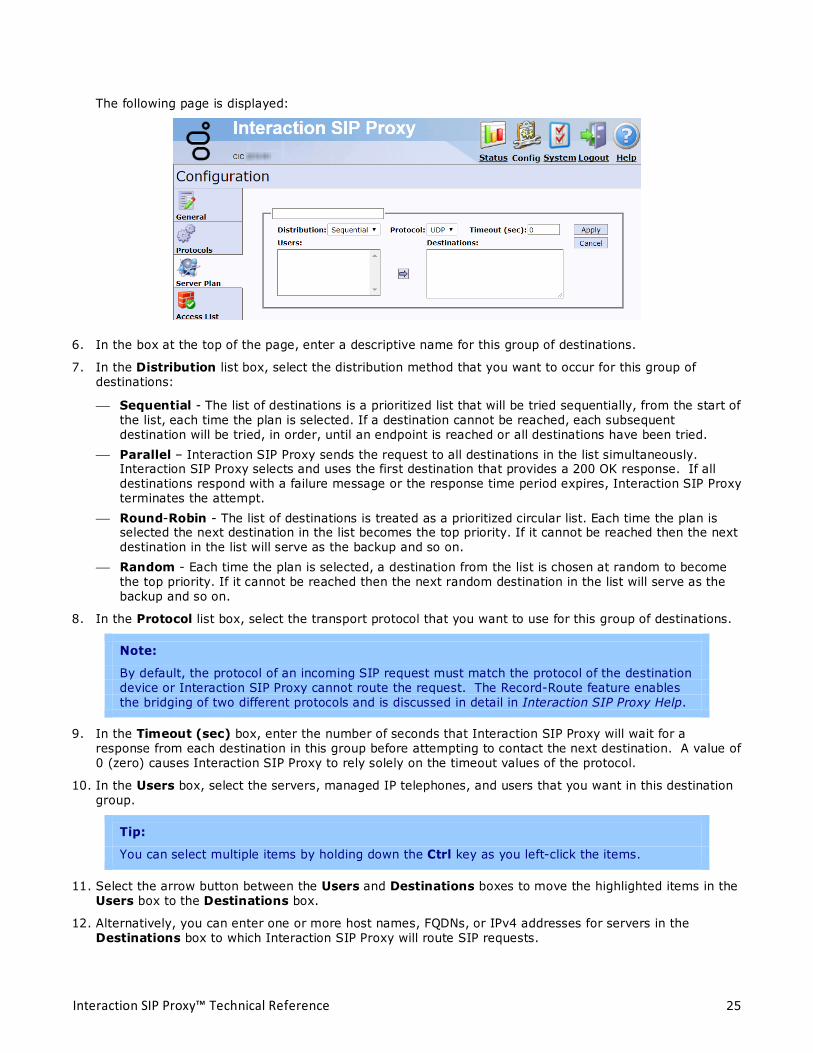
The following page is displayed:
6. In the box at the top of the page, enter a descriptive name for this group of destinations.
7. In the Distribution list box, select the distribution method that you want to occur for this group of destinations:
Sequential - The list of destinations is a prioritized list that will be tried sequentially, from the start of the list, each time the plan is selected. If a destination cannot be reached, each subsequent destination will be tried, in order, until an endpoint is reached or all destinations have been tried.
Parallel – Interaction SIP Proxy sends the request to all destinations in the list simultaneously. Interaction SIP Proxy selects and uses the first destination that provides a 200 OK response. If all destinations respond with a failure message or the response time period expires, Interaction SIP Proxy terminates the attempt.
Round-Robin - The list of destinations is treated as a prioritized circular list. Each time the plan is selected the next destination in the list becomes the top priority. If it cannot be reached then the next destination in the list will serve as the backup and so on.
Random - Each time the plan is selected, a destination from the list is chosen at random to become the top priority. If it cannot be reached then the next random destination in the list will serve as the backup and so on.
8. In the Protocol list box, select the transport protocol that you want to use for this group of destinations.
Note:
By default, the protocol of an incoming SIP request must match the protocol of the destination device or Interaction SIP Proxy cannot route the request. The Record-Route feature enables the bridging of two different protocols and is discussed in detail in Interaction SIP Proxy Help.
9. In the Timeout (sec) box, enter the number of seconds that Interaction SIP Proxy will wait for a response from each destination in this group before attempting to contact the next destination. A value of 0 (zero) causes Interaction SIP Proxy to rely solely on the timeout values of the protocol.
10. In the Users box, select the servers, managed IP telephones, and users that you want in this destination group.
Tip:
You can select multiple items by holding down the Ctrl key as you left-click the items.
11. Select the arrow button between the Users and Destinations boxes to move the highlighted items in the Users box to the Destinations box.
12. Alternatively, you can enter one or more host names, FQDNs, or IPv4 addresses for servers in the Destinations box to which Interaction SIP Proxy will route SIP requests.
26 Interaction SIP Proxy™ Technical Reference
13. Select the Apply button.
The group of destinations is saved and ready for use.
Define Interaction SIP Proxy routes To have Interaction SIP Proxy route SIP requests to destinations, you must define route entries. Each route entry specifies a regular expression to match addresses. In turn, if an address is matched, Interaction SIP Proxy routes the SIP request to the associated destination group or server plan.
Note:
You must define one or more destinations before you can specify routes. To specify destinations, see Define Interaction SIP Proxy destinations.
To specify a route, do the following steps:
1. Open a web browser and navigate to the URL of the Interaction SIP Proxy server.
If you are prompted about a certificate error, add an exception for this URL. Then, you are prompted for a user name and password.
2. Enter the user name and password for Interaction SIP Proxy and select the OK button.
Tip:
The default user name and password are admin and 1234.
The Status - About webpage is displayed.
3. In the top-right corner of the page, select the Config icon.
The Config-General page is displayed.
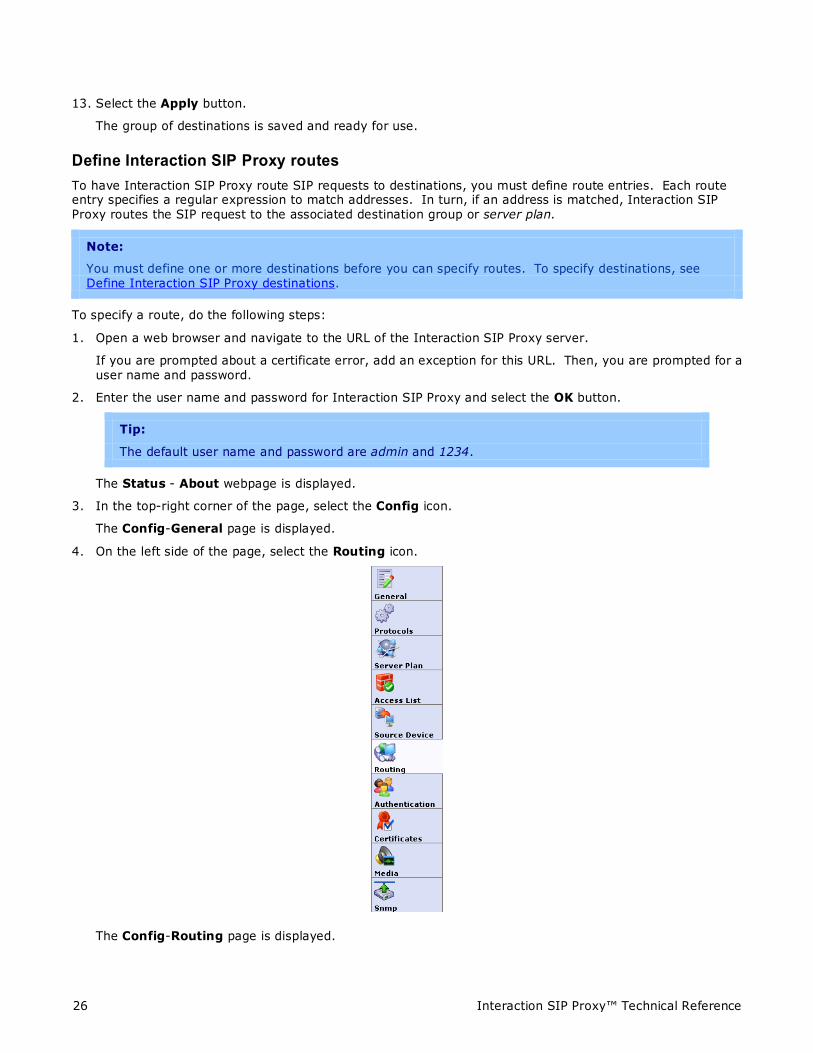
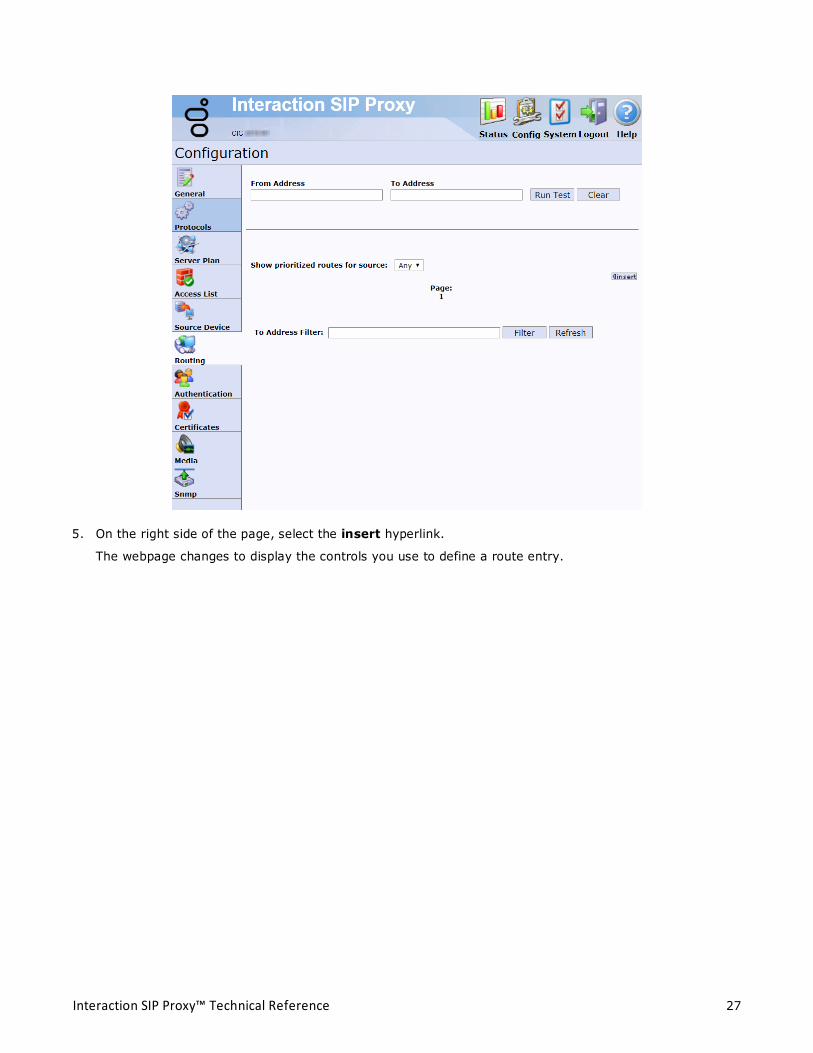
4. On the left side of the page, select the Routing icon.
The Config-Routing page is displayed.
27 Interaction SIP Proxy™ Technical Reference
5. On the right side of the page, select the insert hyperlink.
The webpage changes to display the controls you use to define a route entry.
28 Interaction SIP Proxy™ Technical Reference
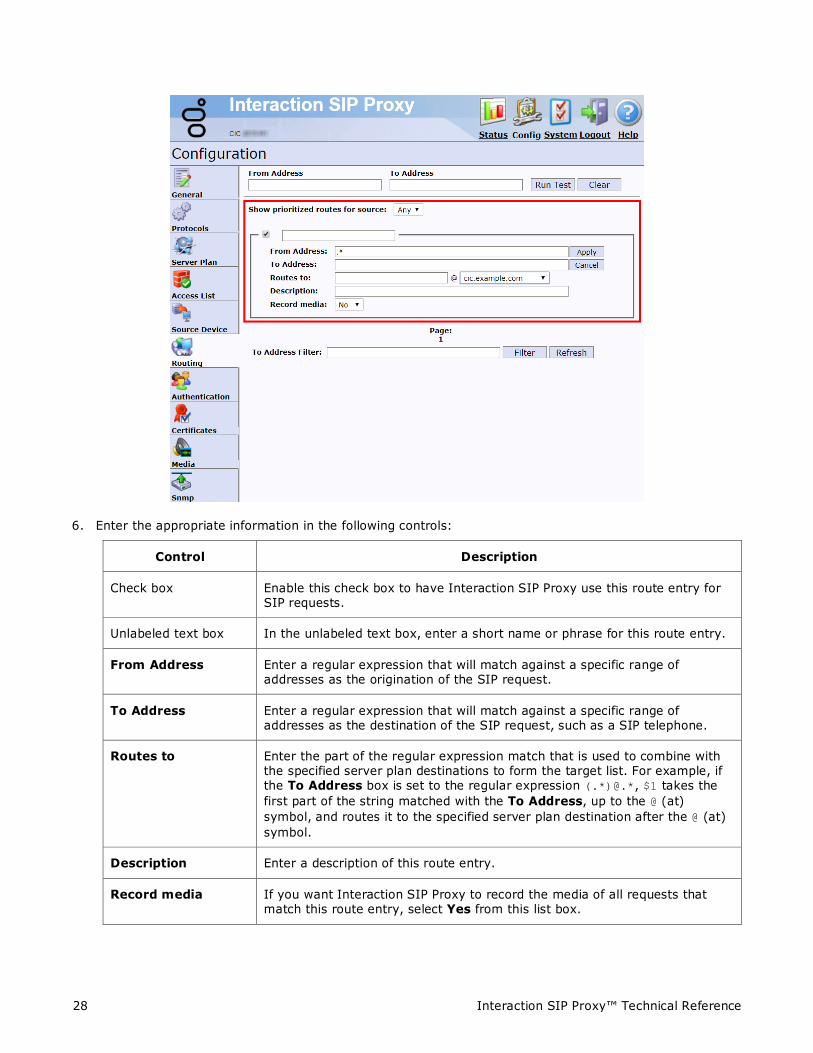
6. Enter the appropriate information in the following controls:
Control Description
Check box Enable this check box to have Interaction SIP Proxy use this route entry for SIP requests.
Unlabeled text box In the unlabeled text box, enter a short name or phrase for this route entry.
From Address Enter a regular expression that will match against a specific range of addresses as the origination of the SIP request.
To Address Enter a regular expression that will match against a specific range of addresses as the destination of the SIP request, such as a SIP telephone.
Routes to Enter the part of the regular expression match that is used to combine with the specified server plan destinations to form the target list. For example, if the To Address box is set to the regular expression (.*)@.*, $1 takes the first part of the string matched with the To Address, up to the @ (at) symbol, and routes it to the specified server plan destination after the @ (at) symbol.
Description Enter a description of this route entry.
Record media If you want Interaction SIP Proxy to record the media of all requests that match this route entry, select Yes from this list box.
29 Interaction SIP Proxy™ Technical Reference
Note:
If you are unfamiliar with regular expressions, there are many books, websites, and free programs that can assist you in developing your regular expressions. You can also refer to Interaction SIP Proxy Help for some specific examples of route regular expressions.
7. After you have entered your route entry information, select the Apply button on the right side of the page.
The route entry is stored to Interaction SIP Proxy.
Configure Interaction SIP Proxy alerts Interaction SIP Proxy can provide alerts regarding changes through either email or SNMP traps.
Interaction SIP Proxy email alerts You can configure email alerts that Interaction SIP Proxy sends to one or more email addresses for the following events:
• Server status change (UP or DOWN)
• Administrator account modifications
• Remotely-initiated configuration reload
• Excessive call duration
• Managed station addition or removal
The email alerts that Interaction SIP Proxy sends to recipients has the following format:
Subject: <Interaction SIP Proxy hostname>: Interaction SIP Proxy - <event>
Body: Server: <Interaction SIP Proxy hostname>
IP Address: <Interaction SIP Proxy IP address>
Version: <Interaction SIP Proxy version>
Date/Time: <Current date and time in GMT>
<Additional event information>
To configure Interaction SIP Proxy email alerts, do the following steps:
1. Log on to the Interaction SIP Proxy web interface.
2. In the top right corner, select the System icon.
3. On the left side of the resulting page, select the Alerts tab.
4. In the Email Alerts area, enter the appropriate information in the available controls. For more information on these controls and settings, see Interaction SIP Proxy Help.
5. When finished, select the Apply button.
Interaction SIP Proxy SNMP alerts You can configure Interaction SIP Proxy to send SNMP traps to an SNMP server. Traps are event notifications that Interaction SIP Proxy sends to a predefined group of hosts.
30 Interaction SIP Proxy™ Technical Reference
Important!
Interaction SIP Proxy includes the Interactive Intelligence SNMP server (ININ SNMP) by default. It automatically disables the Microsoft Windows SNMP Service. The ININ SNMP service support SNMPv1, v2c, and v3. For more information about the ININ SNMP service, see CIC and SNMP Technical Reference.
Caution!
The SNMPv2 protocol is not secure in a default configuration and you should not deploy it without taking appropriate precautions to ensure confidentiality of transmitted traffic. The Interaction SIP Proxy web interface enables you to configure only SNMPv2c settings. For secure SNMP communications, use the SNMPv3 security features in the Interactive Intelligence SNMP service (ININ SNMP), which can be configured through an included command line utility. For more information, see CIC and SNMP Technical Reference.
To configure Interaction SIP Proxy SNMP alerts, do the following steps:
1. Log on to the Interaction SIP Proxy web interface.
2. In the top right corner, select the Config icon.
3. On the left side of the resulting page, select the Snmp tab.
4. Enter the appropriate information in the available controls.
For more information on the SNMP controls and settings, see Interaction SIP Proxy Help.
For more information on the specific Management Information Base (MIB) files used in Interaction SIP Proxy, see CIC and SNMP Technical Reference.
5. When finished, select the Apply button.
Managed Interaction SIP Proxy This section contains the procedures necessary to configure Interaction SIP Proxy to connect with a Customer Interaction Center server; a configuration known as a managed proxy. This configuration enables managed IP telephones to register with Interaction SIP Proxy, as well as configuring it to recognize Direct Inward Dialing (DID) aliases for those managed IP telephones or the default workstations of users defined in Customer Interaction Center. You can configure many of these defaults through Interaction Administrator on the Customer Interaction Center server. A managed proxy also provides automatic generation of TLS certificates between Interaction SIP Proxy and the Customer Interaction Center server.
Considerations for using a managed Interaction SIP Proxy server
Important!
Before you create a managed proxy, ensure that you read and understand the requirements and restrictions in this section.
• SIP line configuration - For the proper routing of requests between Interaction SIP Proxy and Customer Interaction Center in a managed proxy configuration, you must first create a SIP line in the Lines container of Interaction Administration. You must allow the IP address of the Interaction SIP Proxy server to transmit on that line.
• Digest Authentication - Configuring Interaction SIP Proxy as a managed proxy automatically enables Digest Authentication. With Digest Authentication, SIP device registrations with a managed proxy are restricted to the following items:
Managed IP telephones that use a Customer Interaction Center registration group that also includes the managed proxy
31 Interaction SIP Proxy™ Technical Reference
Manually-configured Customer Interaction Center users with passwords
• Dual registration – To have SIP devices register to both Interaction SIP Proxy and a Customer Interaction Center server, you must use a managed proxy and have that managed proxy as a member of the registration group that services the SIP devices.
• DNS A-records – If a managed Interaction SIP Proxy is hosted on an Interaction Edge appliance, you must manually create a DNS A-record for the Interaction Edge short host name. When you create the registration group for the managed Interaction SIP Proxy through Interaction Administrator, it cannot automatically create the appropriate DNS A-record to resolve the short host name of the Interaction Edge appliance. This limitation results Interaction SIP Proxy being unable to retrieve the members of the registration group from the Customer Interaction Center server.
• Regional significant digits – A managed Interaction SIP Proxy is informed of managed IP phones that use registration groups that contain that managed Interaction SIP Proxy. This method enables managed IP phones in multiple locations to use a single, managed Interaction SIP Proxy server. However, be aware that the routes in Interaction SIP Proxy do not use different entries for managed IP phones in multiple locations. If managed IP phones in one location use a different set of regional significant digits than managed IP phones in another location, and all of those managed IP phones use the same managed Interaction SIP Proxy, SIP routing of the managed IP phones in the different locations will likely not be consistent. To avoid this problem, ensure that managed IP phones that use region significant digits use different registration groups with different managed Interaction SIP Proxy servers.
Connect Interaction SIP Proxy to the Customer Interaction Center server Creating a managed proxy requires a connection from Interaction SIP Proxy to a Customer Interaction Center server. To connect Interaction SIP Proxy to a Customer Interaction Center server, do the following steps:
1. Open a web browser and navigate to the URL of the Interaction SIP Proxy server.
If you are prompted about a certificate error, add an exception for this URL. You are then prompted for a user name and password.
2. Enter the user name and password for Interaction SIP Proxy and select the OK button.
Tip:
The default user name and password are admin and 1234.
The Status - About webpage is displayed.
3. In the top-right corner of the page, select the System icon.
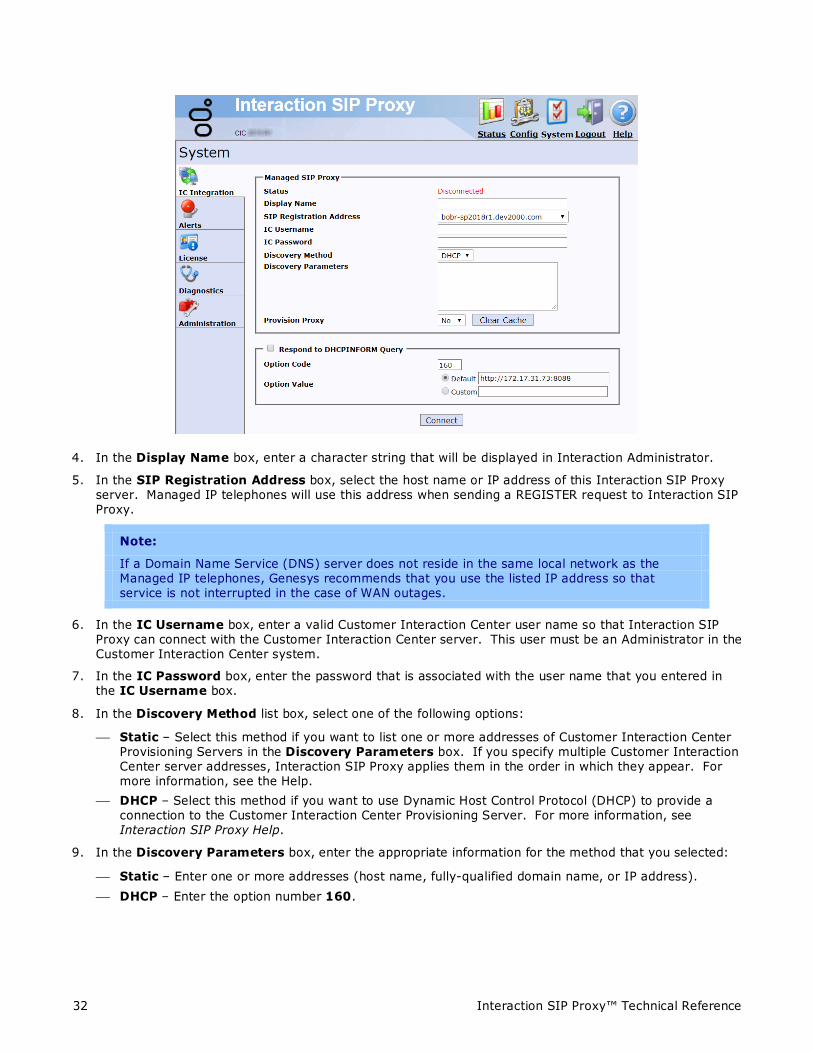
The System-IC Integration page is displayed.
32 Interaction SIP Proxy™ Technical Reference
4. In the Display Name box, enter a character string that will be displayed in Interaction Administrator.
5. In the SIP Registration Address box, select the host name or IP address of this Interaction SIP Proxy server. Managed IP telephones will use this address when sending a REGISTER request to Interaction SIP Proxy.
Note:
If a Domain Name Service (DNS) server does not reside in the same local network as the Managed IP telephones, Genesys recommends that you use the listed IP address so that service is not interrupted in the case of WAN outages.
6. In the IC Username box, enter a valid Customer Interaction Center user name so that Interaction SIP Proxy can connect with the Customer Interaction Center server. This user must be an Administrator in the Customer Interaction Center system.
7. In the IC Password box, enter the password that is associated with the user name that you entered in the IC Username box.
8. In the Discovery Method list box, select one of the following options:
Static – Select this method if you want to list one or more addresses of Customer Interaction Center Provisioning Servers in the Discovery Parameters box. If you specify multiple Customer Interaction Center server addresses, Interaction SIP Proxy applies them in the order in which they appear. For more information, see the Help.
DHCP – Select this method if you want to use Dynamic Host Control Protocol (DHCP) to provide a connection to the Customer Interaction Center Provisioning Server. For more information, see Interaction SIP Proxy Help.
9. In the Discovery Parameters box, enter the appropriate information for the method that you selected:
Static – Enter one or more addresses (host name, fully-qualified domain name, or IP address). DHCP – Enter the option number 160.
33 Interaction SIP Proxy™ Technical Reference
Note:
For information on the purpose and usage of the other controls on the IC Integration webpage, see Interaction SIP Proxy Help.
10. At the bottom of the page, select the Connect button.
Interaction SIP Proxy displays a dialog box listing the settings that it will use to connect to the specified Customer Interaction Center server.
11. Click OK.
Interaction SIP Proxy establishes a connection to the specified Customer Interaction Center server.
Trust the Interaction SIP Proxy connection and assign a location When you first configure Interaction SIP Proxy to connect to a Customer Interaction Center server, the web interface will display Pending Approval. This message indicates that you must configure Customer Interaction Center to trust the connection with Interaction SIP Proxy. Also, you should assign this Interaction SIP Proxy server to a predefined location so that it can service SIP devices in the same geographical region. To do these two tasks, do the following steps:
Important!
This procedure assumes that you have already created locations in your Customer Interaction Center server system. If you have not done so, see the following topic in Interaction Administrator Help: Interaction Administrator > IC Server > Regionalization > Create Location
1. From the Customer Interaction Center server console, open Interaction Administrator.
2. In the left pane, expand the System Configuration container.
3. In the left pane, select the SIP Proxies object.
A list of Interaction SIP Proxy servers that have been configured to connect to this Customer Interaction Center appears in the right pane.
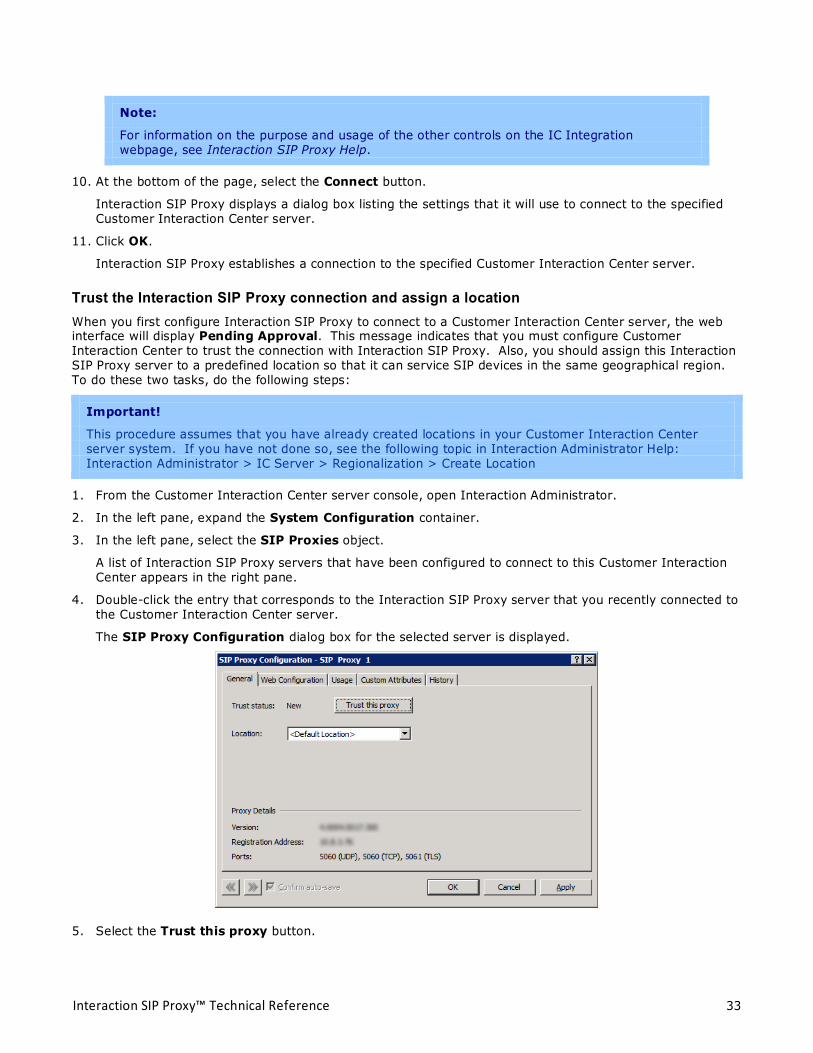
4. Double-click the entry that corresponds to the Interaction SIP Proxy server that you recently connected to the Customer Interaction Center server.
The SIP Proxy Configuration dialog box for the selected server is displayed.
5. Select the Trust this proxy button.
34 Interaction SIP Proxy™ Technical Reference
6. In the Location list box, select the predefined region to which you want to assign this Interaction SIP Proxy server.
7. Select the OK button.
The Interaction SIP Proxy web interface now displays Activated in regards to this Customer Interaction Center server.
Note:
If, after completing this procedure, you select the Untrust this proxy button, Customer Interaction Center will not allow future communication and will not enable trust with that Interaction SIP Proxy server. To allow Customer Interaction Center to communicate with that Interaction SIP Proxy server again, you must delete the server in the SIP Proxies container of Interaction Administrator, redefine the connection to the Customer Interaction Center server in the Interaction SIP Proxy web interface, and select the Trust this proxy button for that new server connection in Interaction Administrator.
35 Interaction SIP Proxy™ Technical Reference
Appendix A: Antivirus requirements and best practices for Customer Interaction Center and subsystem servers This section provides the best practices and additional information regarding antivirus software products for Customer Interaction Center and its subsystem servers. These subsystem servers include Interaction Media Server, Interaction Media Streaming Server, Interaction SIP Proxy, and others.
When you install and use an antivirus software product on servers for Customer Interaction Center or its subsystems, do the following tasks to ensure maximum performance and processing capacity:
Install only a supported antivirus product ............................................................................................ 35 Install only the virus protection security feature ................................................................................... 35 Configure real-time protection for only write operations ........................................................................ 36 Exclude continually accessed file types and directories .......................................................................... 36 Update virus definitions daily .............................................................................................................. 37 Conduct a full scan of the file system on a regular basis ........................................................................ 37
Genesys has created documentation for configuring the supported antivirus software products for use with Customer Interaction Center servers. You can find this documentation by selecting the Data and System Protection hyperlink on the following webpage:
http://testlab.inin.com
Install only a supported antivirus product Genesys selects and tests different antivirus software products from multiple vendors based on the popularity of the product in customer environments. Genesys tests each antivirus software product on several criteria, such as performance impact, compatibility, and processing capacity. Genesys then validates specific antivirus software products for use with Customer Interaction Center and its subsystem servers.
To view the supported antivirus software products, do the following steps:
1. Open a web browser and navigate to the following URL address:
http://testlab.inin.com
2. Select the Data and System Protection hyperlink.
The resulting webpage displays the supported antivirus products, the associated versions, and any impacts on performance and capacities for Customer Interaction Center and its subsystem servers.
Important!
Ensure that you know what antivirus software product and version that you will use on your Customer Interaction Center and its subsystem servers before you make purchasing decisions. Some antivirus software products reduce capacities and performance, which require additional servers or affect licensing decisions.
Install only the virus protection security feature Many software security products and suites include features in addition to virus protection. For performance and capacity considerations, Customer Interaction Center and its subsystem servers do not support any third-party security features other than virus protection. Many of these security features require the installation of drivers that can introduce decreases in performance and capacity, such as resets of network interface adapters.
The following list provides some of the unsupported security features that software security suite products can install:
• Firewall
• Malware protection
36 Interaction SIP Proxy™ Technical Reference
• Spyware protection
• Intrusion prevention
• Network monitoring
Important!
As security suite products typically install all security features by default, Genesys requires that you do not use standard or default installation options. Customize the installation to include only virus protection.
Configure real-time protection for only write operations Most antivirus software products provide a real-time protection feature, which scans for viruses when a program or process attempts a read, write, modify, or execute operation on a file. The terminology for this type of feature varies between antivirus software products, such as On-Access Scanning and Auto-Protect. So that you can configure the real-time protection feature of your antivirus software product, see the documentation for that product to determine its terminology for that feature.
Server software products execute and read files frequently. By default, most antivirus software products use the real-time protection feature to scan files on read, write, modify, and execute operations. Such a configuration can significantly reduce input and output performance of the storage media, create file lock contention, and cause a reduction in processing capacities of the host server.
Important!
Configure the real-time protection feature of your antivirus software product to scan for viruses for only write operations, such as when files are created or modified.
Exclude continually accessed file types and directories To process the interactions in your organization, Customer Interaction Center and its subsystem servers must write and modify files on a rapid, continual basis, such as recordings and log files. To ensure the maximum performance, configure your antivirus software product to exclude real-time protection of specific file types and directories, as presented in the following sections.
Files and file types to exclude from real-time protection Configure your antivirus software product to exclude the following files and file name extensions from any real-time scanning:
• .fbma • .rpt • .i3p • .i3c • .ivp • .dxs • .ihd • .i3pub • .db (for inin.db database files) • .ininlog (CIC log file format) • .ininlog.ininlog_idx (CIC log index file format)
37 Interaction SIP Proxy™ Technical Reference
Directories and subdirectories to exclude from real-time protection
Important!
When you exclude a directory from real-time protection, ensure that all of its subdirectories are also excluded.
Configure your antivirus software product to exclude the following directories and all subdirectories from any real-time scanning:
• %allusersprofile%\Interactive Intelligence\Interaction SIP Proxy\Recordings • %allusersprofile%\Interactive Intelligence\Interaction SIP Proxy\Resources\I3SIPProxyCache.xml
Important!
Your specific antivirus software product may require additional configuration. Consult the document for your specific antivirus software product on http://testlab.inin.com for any special instructions beyond these recommendations.
Update virus definitions daily Genesys strongly recommends that you configure your antivirus software product to download and implement new virus definitions on a daily basis. Schedule these updates to occur during off-peak hours. For more information about virus definitions, see the documentation for your antivirus software product.
Conduct a full scan of the file system on a regular basis Genesys strongly recommends that you configure your antivirus software product to scan all files of the host server storage media on a daily or weekly basis. Schedule this scan to occur during off-peak hours. Ensure that you select a time for starting the scan that allows it to finish before demand on host server resources increases.
38 Interaction SIP Proxy™ Technical Reference
Appendix B: OpenSSL Copyright NOTICE
This product includes software developed by the OpenSSL Project for use in the OpenSSL Toolkit (http://www.openssl.org/).
Copyright © 1998-2011 The OpenSSL Project. All rights reserved.
Redistribution and use in source and binary forms, with or without modification, are permitted provided that the following conditions are met:
1. Redistributions of source code must retain the above copyright notice, this list of conditions and the following disclaimer.
2. Redistributions in binary form must reproduce the above copyright notice, this list of conditions and the following disclaimer in the documentation and/or other materials provided with the distribution.
3. All advertising materials mentioning features or use of this software must display the following acknowledgment:
"This product includes software developed by the OpenSSL Project for use in the OpenSSL Toolkit. (http://www.openssl.org/)"
4. The names "OpenSSL Toolkit" and "OpenSSL Project" must not be used to endorse or promote products derived from this software without prior written permission. For written permission, please contact [email protected].
5. Products derived from this software may not be called "OpenSSL" nor may "OpenSSL" appear in their names without prior written permission of the OpenSSL Project.
6. Redistributions of any form whatsoever must retain the following acknowledgment:
"This product includes software developed by the OpenSSL Project for use in the OpenSSL Toolkit (http://www.openssl.org/)"
THIS SOFTWARE IS PROVIDED BY THE OpenSSL PROJECT “AS IS'' AND ANY EXPRESSED OR IMPLIED WARRANTIES, INCLUDING, BUT NOT LIMITED TO, THE IMPLIED WARRANTIES OF MERCHANTABILITY AND FITNESS FOR A PARTICULAR PURPOSE ARE DISCLAIMED. IN NO EVENT SHALL THE OpenSSL PROJECT OR ITS CONTRIBUTORS BE LIABLE FOR ANY DIRECT, INDIRECT, INCIDENTAL, SPECIAL, EXEMPLARY, OR CONSEQUENTIAL DAMAGES (INCLUDING, BUT NOT LIMITED TO, PROCUREMENT OF SUBSTITUTE GOODS OR SERVICES; LOSS OF USE, DATA, OR PROFITS; OR BUSINESS INTERRUPTION) HOWEVER CAUSED AND ON ANY THEORY OF LIABILITY, WHETHER IN CONTRACT, STRICT LIABILITY, OR TORT (INCLUDING NEGLIGENCE OR OTHERWISE) ARISING IN ANY WAY OUT OF THE USE OF THIS SOFTWARE, EVEN IF ADVISED OF THE POSSIBILITY OF SUCH DAMAGE.
This product includes cryptographic software written by Eric Young ([email protected]). This product includes software written by Tim Hudson ([email protected]).
Original SSLeay License
Copyright © 1995-1998 Eric Young ([email protected]). All rights reserved.
This package is an SSL implementation written by Eric Young ([email protected]). The implementation was written so as to conform with Netscape’s SSL. This library is free for commercial and non-commercial use as long as the following conditions are adhered to. The following conditions apply to all code found in this distribution, be it the RC4, RSA, lhash, DES, etc., code; not just the SSL code. The SSL documentation included with this distribution is covered by the same copyright terms except that the holder is Tim Hudson ([email protected]).
Copyright remains Eric Young's, and as such any Copyright notices in the code are not to be removed. If this package is used in a product, Eric Young should be given attribution as the author of the parts of the library used. This can be in the form of a textual message at program startup or in documentation (online or textual) provided with the package.
Redistribution and use in source and binary forms, with or without modification, are permitted provided that the following conditions are met:
1. Redistributions of source code must retain the copyright notice, this list of conditions and the following disclaimer.
2. Redistributions in binary form must reproduce the above copyright notice, this list of conditions and the following disclaimer in the documentation and/or other materials provided with the distribution.
3. All advertising materials mentioning features or use of this software must display the following acknowledgement:
"This product includes cryptographic software written by Eric Young ([email protected])."
39 Interaction SIP Proxy™ Technical Reference
The word 'cryptographic' can be left out if the routines from the library being used are not cryptographic related :-).
4. If you include any Windows specific code (or a derivative thereof) from the apps directory (application code) you must include an acknowledgement:
"This product includes software written by Tim Hudson ([email protected])."
THIS SOFTWARE IS PROVIDED BY ERIC YOUNG “AS IS'' AND ANY EXPRESS OR IMPLIED WARRANTIES, INCLUDING, BUT NOT LIMITED TO, THE IMPLIED WARRANTIES OF MERCHANTABILITY AND FITNESS FOR A PARTICULAR PURPOSE ARE DISCLAIMED. IN NO EVENT SHALL THE AUTHOR OR CONTRIBUTORS BE LIABLE FOR ANY DIRECT, INDIRECT, INCIDENTAL, SPECIAL, EXEMPLARY, OR CONSEQUENTIAL DAMAGES (INCLUDING, BUT NOT LIMITED TO, PROCUREMENT OF SUBSTITUTE GOODS OR SERVICES; LOSS OF USE, DATA, OR PROFITS; OR BUSINESS INTERRUPTION) HOWEVER CAUSED AND ON ANY THEORY OF LIABILITY, WHETHER IN CONTRACT, STRICT LIABILITY, OR TORT (INCLUDING NEGLIGENCE OR OTHERWISE) ARISING IN ANY WAY OUT OF THE USE OF THIS SOFTWARE, EVEN IF ADVISED OF THE POSSIBILITY OF SUCH DAMAGE.
The license and distribution terms for any publicly available version or derivative of this code cannot be changed. i.e., this code cannot simply be copied and put under another distribution license [including the GNU Public License].
40 Interaction SIP Proxy™ Technical Reference
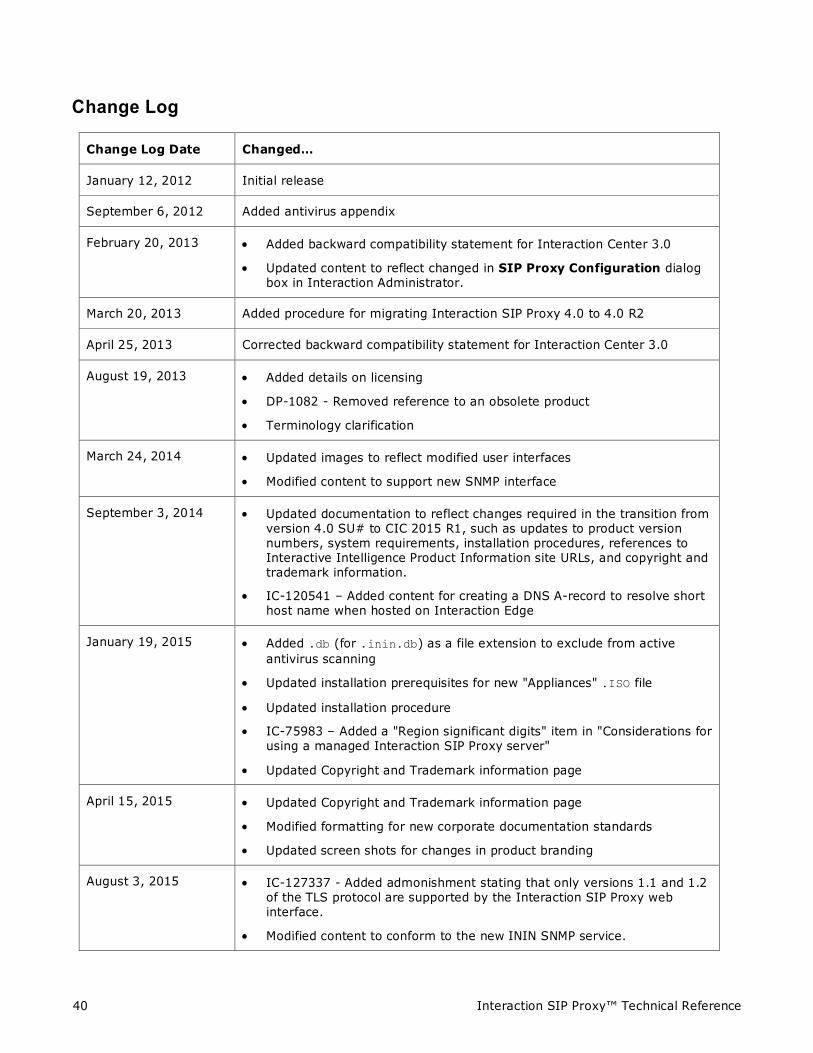
Change Log
Change Log Date Changed…
January 12, 2012 Initial release
September 6, 2012 Added antivirus appendix
February 20, 2013 • Added backward compatibility statement for Interaction Center 3.0
• Updated content to reflect changed in SIP Proxy Configuration dialog box in Interaction Administrator.
March 20, 2013 Added procedure for migrating Interaction SIP Proxy 4.0 to 4.0 R2
April 25, 2013 Corrected backward compatibility statement for Interaction Center 3.0
August 19, 2013 • Added details on licensing
• DP-1082 - Removed reference to an obsolete product
• Terminology clarification
March 24, 2014 • Updated images to reflect modified user interfaces
• Modified content to support new SNMP interface
September 3, 2014 • Updated documentation to reflect changes required in the transition from version 4.0 SU# to CIC 2015 R1, such as updates to product version numbers, system requirements, installation procedures, references to Interactive Intelligence Product Information site URLs, and copyright and trademark information.
• IC-120541 – Added content for creating a DNS A-record to resolve short host name when hosted on Interaction Edge
January 19, 2015 • Added .db (for .inin.db) as a file extension to exclude from active antivirus scanning
• Updated installation prerequisites for new "Appliances" .ISO file
• Updated installation procedure
• IC-75983 – Added a "Region significant digits" item in "Considerations for using a managed Interaction SIP Proxy server"
• Updated Copyright and Trademark information page
April 15, 2015 • Updated Copyright and Trademark information page
• Modified formatting for new corporate documentation standards
• Updated screen shots for changes in product branding
August 3, 2015 • IC-127337 - Added admonishment stating that only versions 1.1 and 1.2 of the TLS protocol are supported by the Interaction SIP Proxy web interface.
• Modified content to conform to the new ININ SNMP service.
41 Interaction SIP Proxy™ Technical Reference
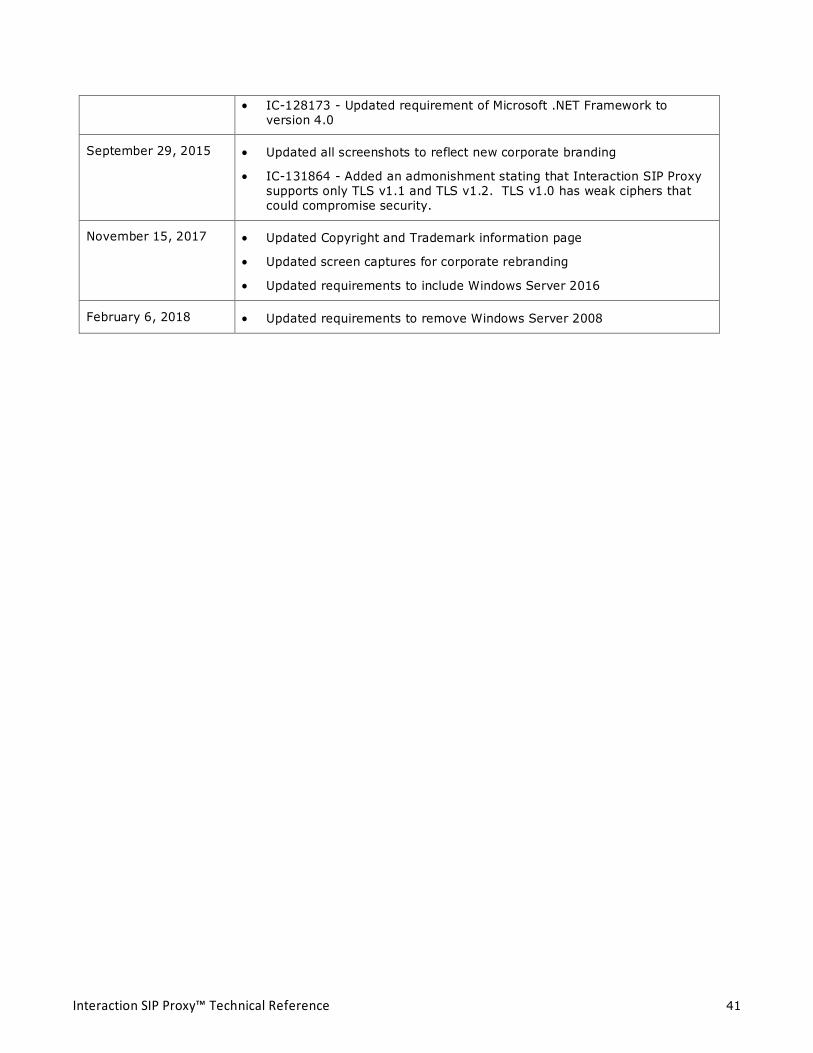
• IC-128173 - Updated requirement of Microsoft .NET Framework to version 4.0
September 29, 2015 • Updated all screenshots to reflect new corporate branding
• IC-131864 - Added an admonishment stating that Interaction SIP Proxy supports only TLS v1.1 and TLS v1.2. TLS v1.0 has weak ciphers that could compromise security.
November 15, 2017 • Updated Copyright and Trademark information page
• Updated screen captures for corporate rebranding
• Updated requirements to include Windows Server 2016
February 6, 2018 • Updated requirements to remove Windows Server 2008