intel-based mac computer • mac os x 10.6, 10.7, 10.8 or...
TRANSCRIPT
System RequirementsThese are the minimum system requirements needed to run Movavi Photo Editor:
• Intel-based Mac computer• Mac OS X 10.6, 10.7, 10.8 or 10.9• Display graphics minimum resolution of 1024x768; 32-bit color• 128 MB RAM• Minimum 150 MB of free hard disk space is needed for installation; 1 GB for proper operation• Administrative permissions are required for installation
While Movavi software may run on computers that do not meet these requirements, we cannot guarantee stableperformance. If you are having hardware incompatibility problems, feel free to contact our support team.

ActivationWhen you first install a copy of Movavi Software, it will be running in trial mode, where you cannot save the edited images.To be able to use the program to its fullest, you will need to activate it using an activation key that you can purchase from ourofficial website or any of our partners. Please see the following sections on some of the frequently asked questions about activation:
• How do I get an activation key?• How do I activate the program? I have a stable Internet connection.• Can I activate the program if I don't have Internet access?
If you have any other questions or you find that activation is not working correctly, please don't hesitate to contact oursupport team.
Getting an Activation Key1. To purchase an activation key, open the Help menu in Movavi Photo Editor and select Buy Now or just use the buttonbelow.
2. Choose a personal or business license and click the corresponding Buy Now button.If you intend to use Movavi Photo Editor commercially, that is, to obtain profit of any kind or in a government organization,you need to select a business license. 3. Fill in your billing information and enter a valid e-mail address. This e-mail will be used to deliver your activation key, somake sure you have entered it correctly and that you have access to it. 4. After you've completed your payment and your request has been processed, you will receive a confirmation e-mail withyour activation key, which you can use to activate Movavi Photo Editor. If you haven't received your activation key:
• Check the Spam folder of your mailbox• Contact support
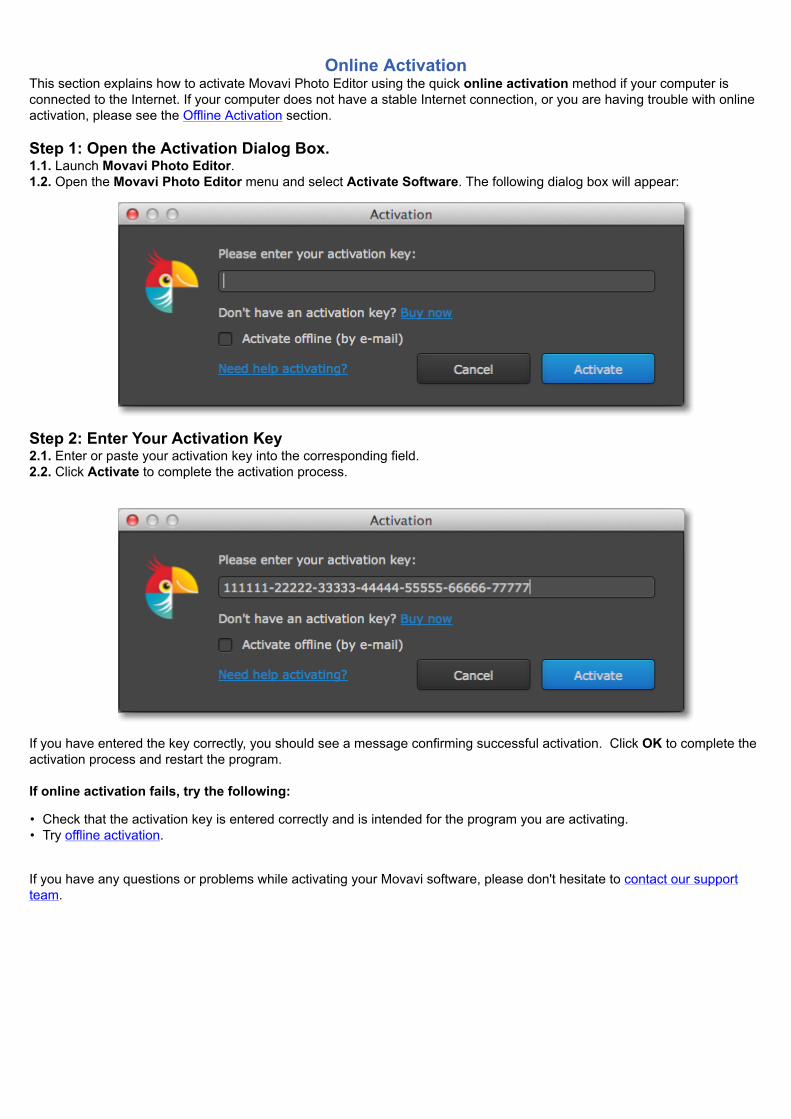
Online ActivationThis section explains how to activate Movavi Photo Editor using the quick online activation method if your computer isconnected to the Internet. If your computer does not have a stable Internet connection, or you are having trouble with onlineactivation, please see the Offline Activation section. Step 1: Open the Activation Dialog Box.1.1. Launch Movavi Photo Editor.1.2. Open the Movavi Photo Editor menu and select Activate Software. The following dialog box will appear:
Step 2: Enter Your Activation Key2.1. Enter or paste your activation key into the corresponding field.2.2. Click Activate to complete the activation process.
If you have entered the key correctly, you should see a message confirming successful activation. Click OK to complete theactivation process and restart the program.
If online activation fails, try the following:
• Check that the activation key is entered correctly and is intended for the program you are activating.• Try offline activation.
If you have any questions or problems while activating your Movavi software, please don't hesitate to contact our supportteam.
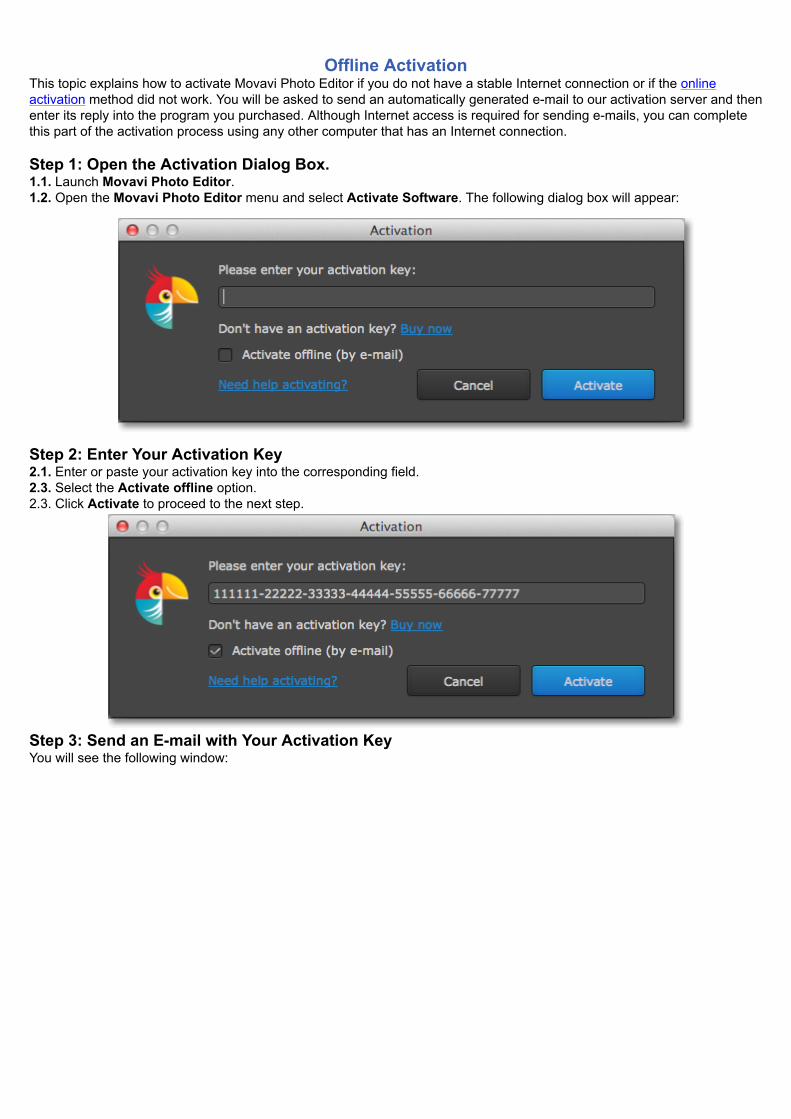
Offline ActivationThis topic explains how to activate Movavi Photo Editor if you do not have a stable Internet connection or if the onlineactivation method did not work. You will be asked to send an automatically generated e-mail to our activation server and thenenter its reply into the program you purchased. Although Internet access is required for sending e-mails, you can completethis part of the activation process using any other computer that has an Internet connection. Step 1: Open the Activation Dialog Box.1.1. Launch Movavi Photo Editor.1.2. Open the Movavi Photo Editor menu and select Activate Software. The following dialog box will appear:
Step 2: Enter Your Activation Key2.1. Enter or paste your activation key into the corresponding field.2.3. Select the Activate offline option.2.3. Click Activate to proceed to the next step.
Step 3: Send an E-mail with Your Activation KeyYou will see the following window:
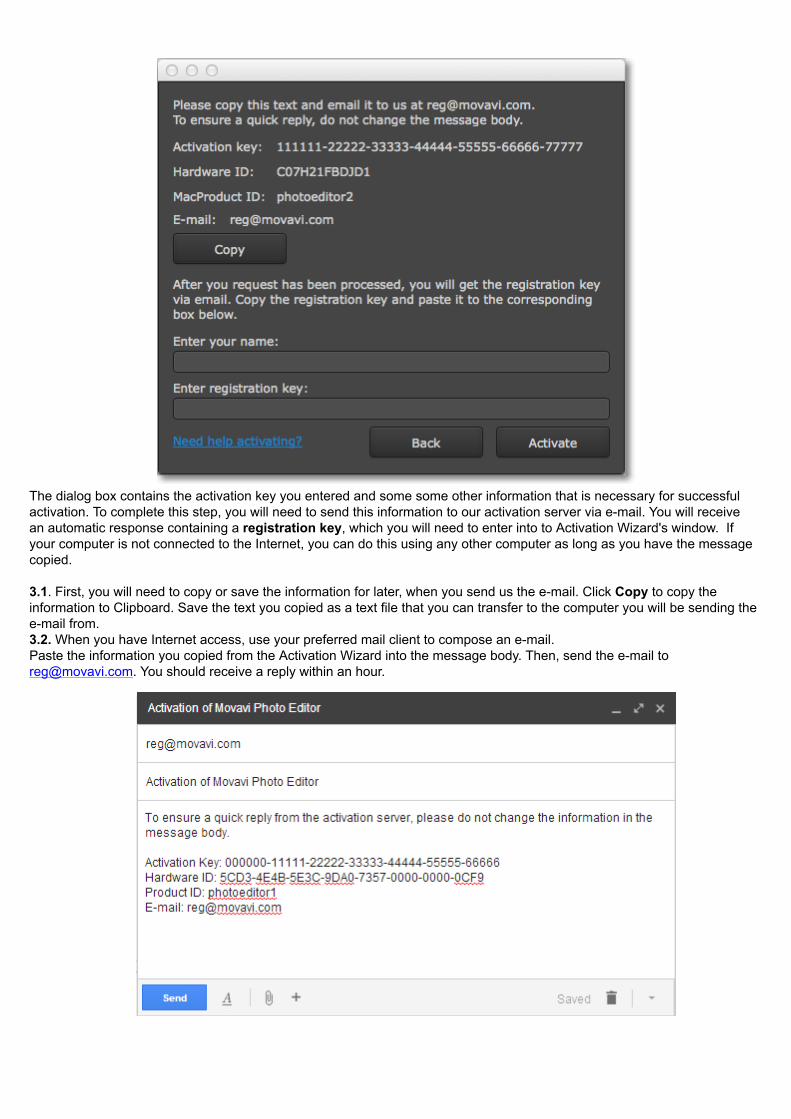
The dialog box contains the activation key you entered and some some other information that is necessary for successfulactivation. To complete this step, you will need to send this information to our activation server via e-mail. You will receivean automatic response containing a registration key, which you will need to enter into to Activation Wizard's window. Ifyour computer is not connected to the Internet, you can do this using any other computer as long as you have the messagecopied.
3.1. First, you will need to copy or save the information for later, when you send us the e-mail. Click Copy to copy theinformation to Clipboard. Save the text you copied as a text file that you can transfer to the computer you will be sending thee-mail from. 3.2. When you have Internet access, use your preferred mail client to compose an e-mail.Paste the information you copied from the Activation Wizard into the message body. Then, send the e-mail [email protected]. You should receive a reply within an hour.
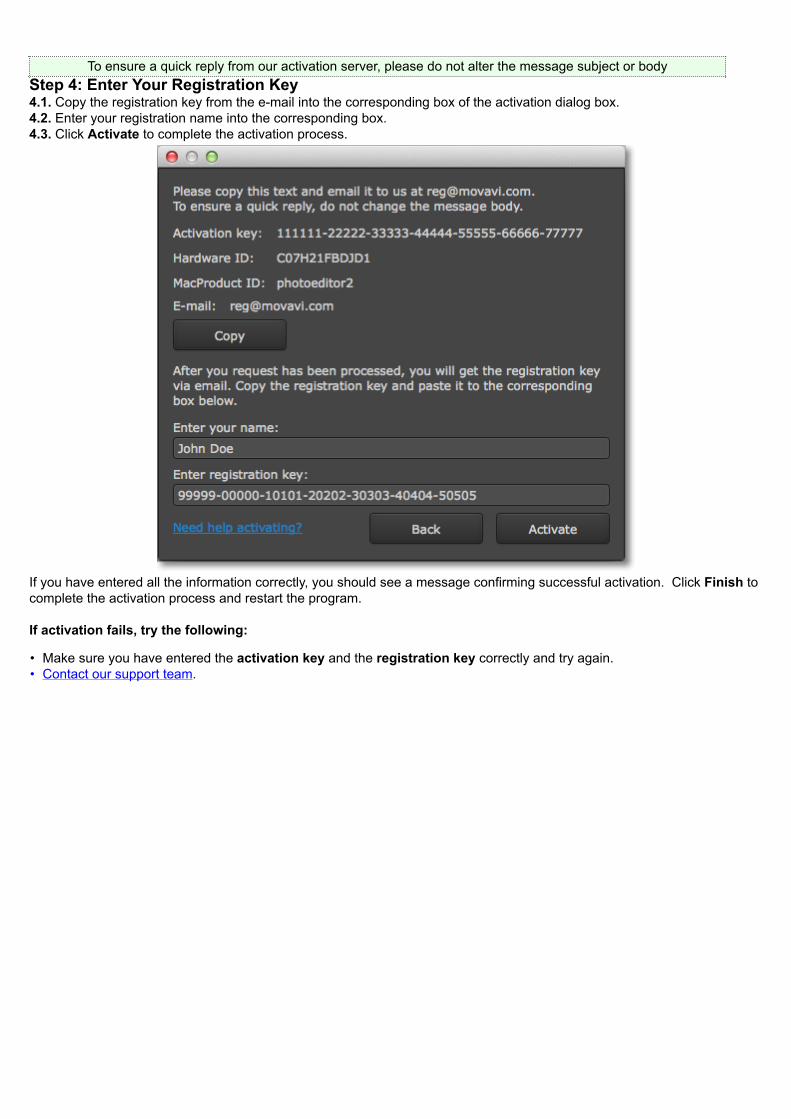
To ensure a quick reply from our activation server, please do not alter the message subject or bodyStep 4: Enter Your Registration Key4.1. Copy the registration key from the e-mail into the corresponding box of the activation dialog box.4.2. Enter your registration name into the corresponding box.4.3. Click Activate to complete the activation process.
If you have entered all the information correctly, you should see a message confirming successful activation. Click Finish tocomplete the activation process and restart the program. If activation fails, try the following:
• Make sure you have entered the activation key and the registration key correctly and try again.• Contact our support team.
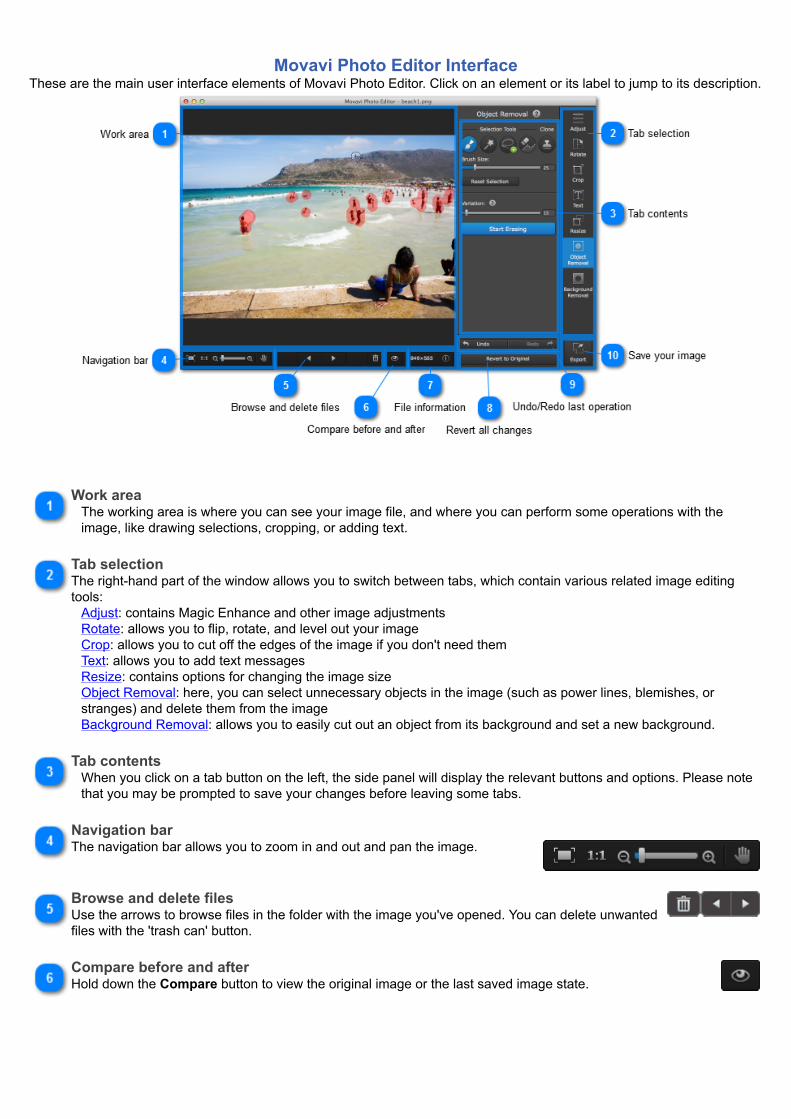
Movavi Photo Editor InterfaceThese are the main user interface elements of Movavi Photo Editor. Click on an element or its label to jump to its description.
Work areaThe working area is where you can see your image file, and where you can perform some operations with theimage, like drawing selections, cropping, or adding text.
Tab selectionThe right-hand part of the window allows you to switch between tabs, which contain various related image editingtools:
Adjust: contains Magic Enhance and other image adjustmentsRotate: allows you to flip, rotate, and level out your imageCrop: allows you to cut off the edges of the image if you don't need themText: allows you to add text messagesResize: contains options for changing the image sizeObject Removal: here, you can select unnecessary objects in the image (such as power lines, blemishes, orstranges) and delete them from the imageBackground Removal: allows you to easily cut out an object from its background and set a new background.
Tab contentsWhen you click on a tab button on the left, the side panel will display the relevant buttons and options. Please notethat you may be prompted to save your changes before leaving some tabs.
Navigation barThe navigation bar allows you to zoom in and out and pan the image.
Browse and delete filesUse the arrows to browse files in the folder with the image you've opened. You can delete unwantedfiles with the 'trash can' button.
Compare before and afterHold down the Compare button to view the original image or the last saved image state.
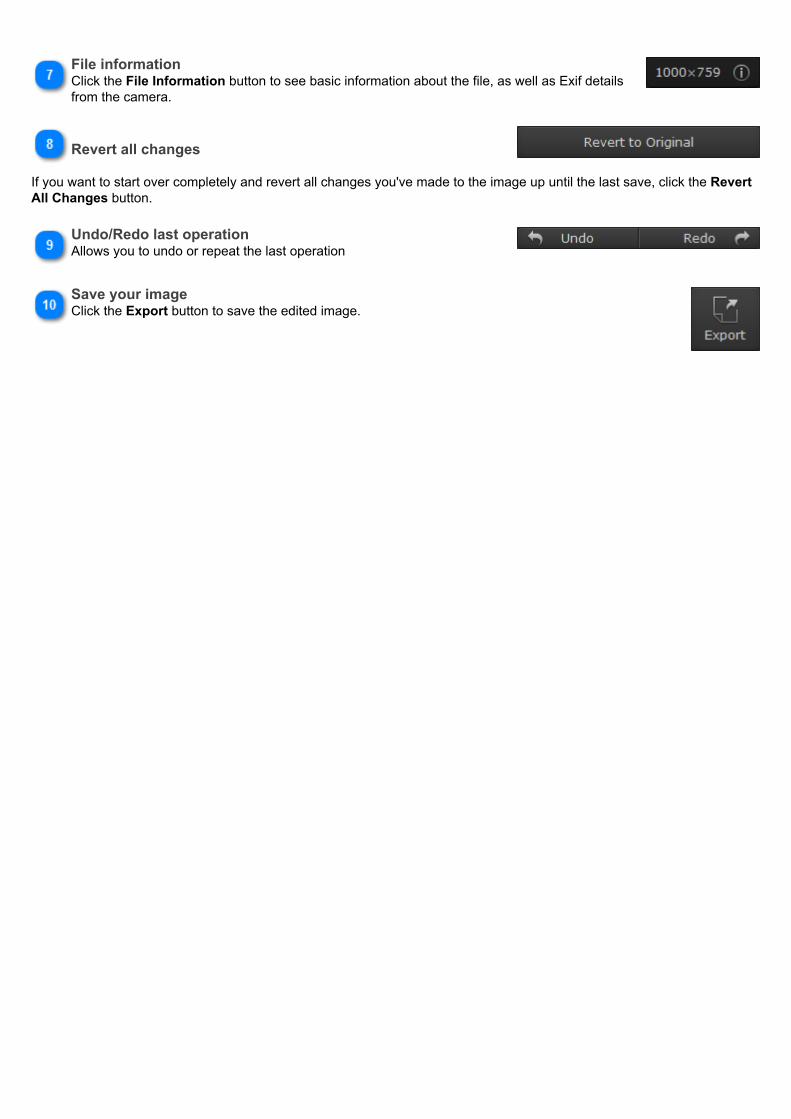
File informationClick the File Information button to see basic information about the file, as well as Exif detailsfrom the camera.
Revert all changes
If you want to start over completely and revert all changes you've made to the image up until the last save, click the RevertAll Changes button.
Undo/Redo last operationAllows you to undo or repeat the last operation
Save your imageClick the Export button to save the edited image.
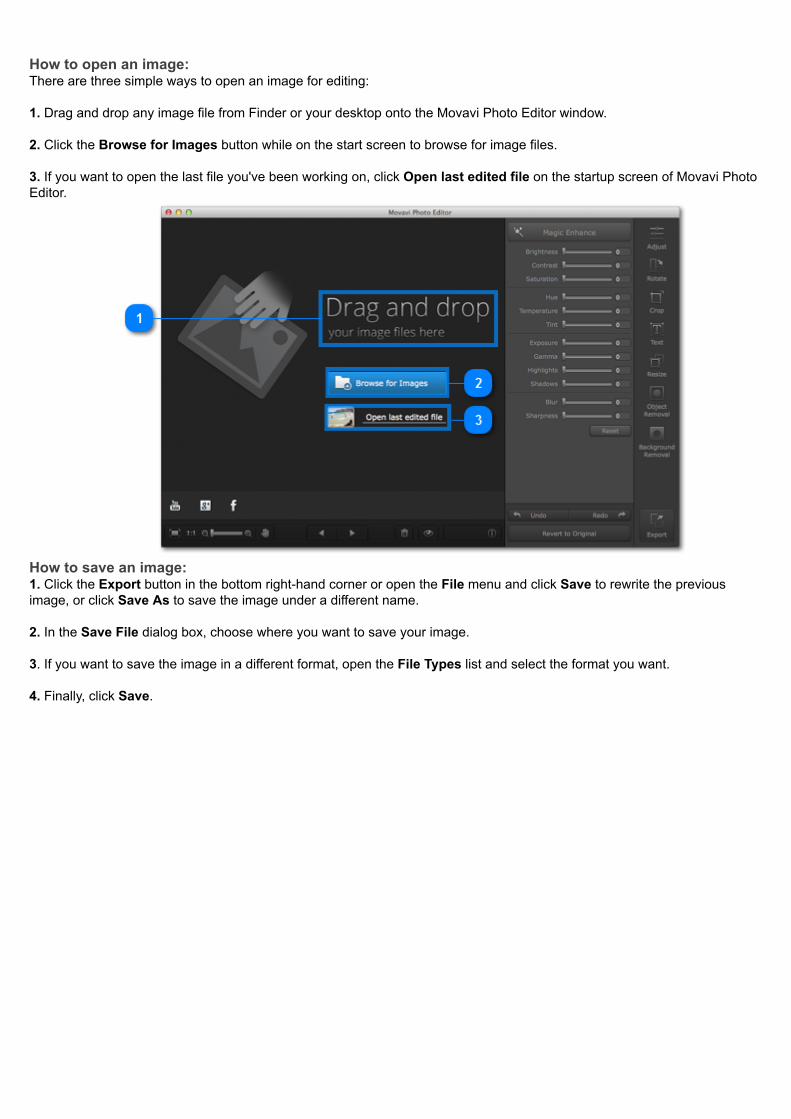
How to open an image:There are three simple ways to open an image for editing: 1. Drag and drop any image file from Finder or your desktop onto the Movavi Photo Editor window. 2. Click the Browse for Images button while on the start screen to browse for image files.
3. If you want to open the last file you've been working on, click Open last edited file on the startup screen of Movavi PhotoEditor.
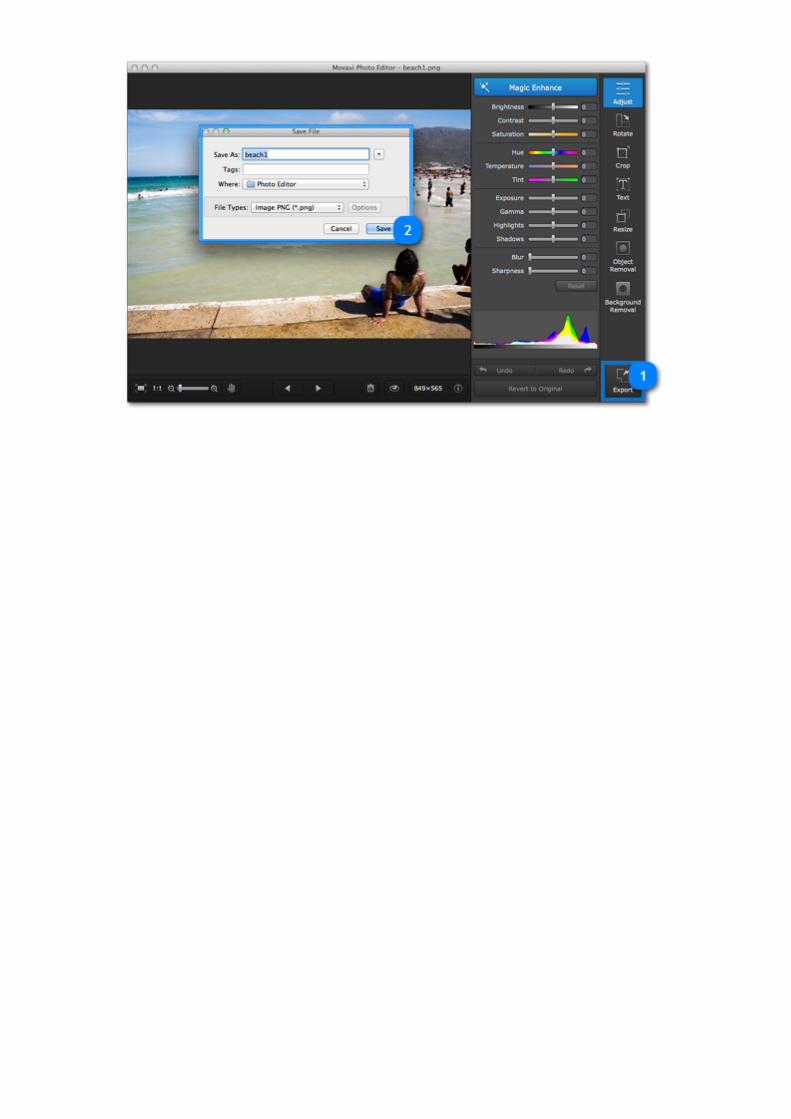
How to save an image:1. Click the Export button in the bottom right-hand corner or open the File menu and click Save to rewrite the previousimage, or click Save As to save the image under a different name. 2. In the Save File dialog box, choose where you want to save your image. 3. If you want to save the image in a different format, open the File Types list and select the format you want. 4. Finally, click Save.
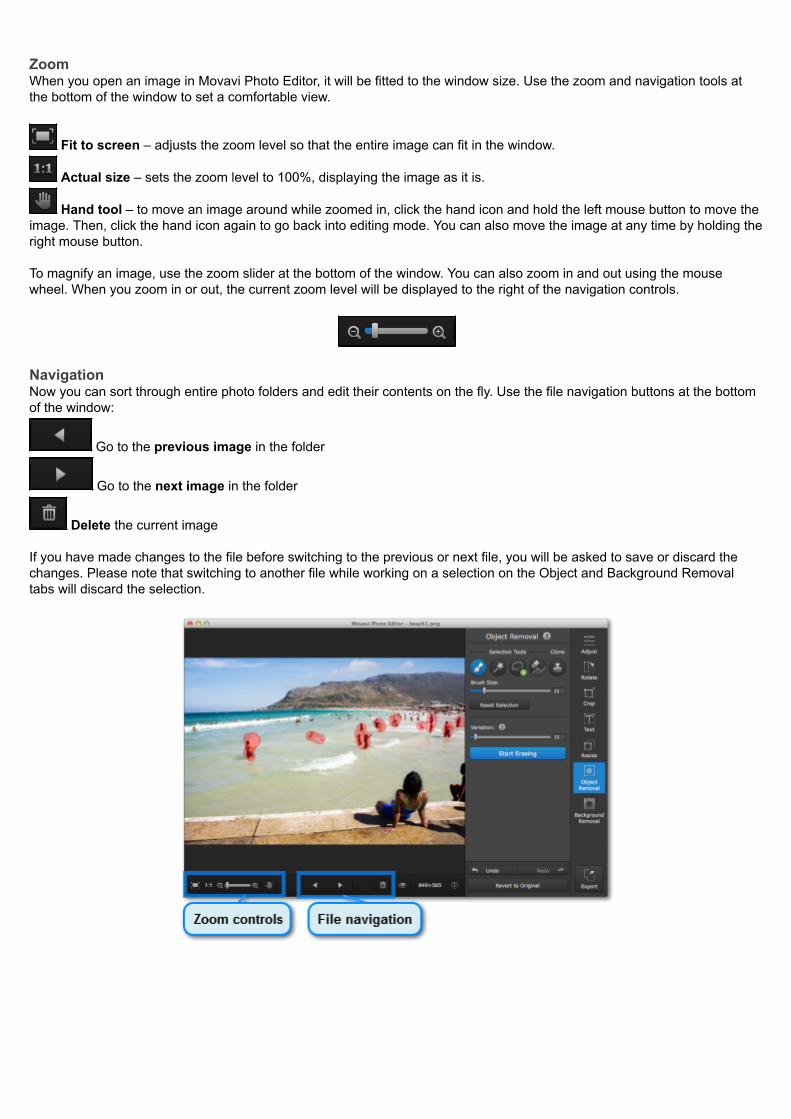
ZoomWhen you open an image in Movavi Photo Editor, it will be fitted to the window size. Use the zoom and navigation tools atthe bottom of the window to set a comfortable view.
Fit to screen – adjusts the zoom level so that the entire image can fit in the window.
Actual size – sets the zoom level to 100%, displaying the image as it is.
Hand tool – to move an image around while zoomed in, click the hand icon and hold the left mouse button to move theimage. Then, click the hand icon again to go back into editing mode. You can also move the image at any time by holding theright mouse button. To magnify an image, use the zoom slider at the bottom of the window. You can also zoom in and out using the mousewheel. When you zoom in or out, the current zoom level will be displayed to the right of the navigation controls.
NavigationNow you can sort through entire photo folders and edit their contents on the fly. Use the file navigation buttons at the bottomof the window:
Go to the previous image in the folder
Go to the next image in the folder
Delete the current image If you have made changes to the file before switching to the previous or next file, you will be asked to save or discard thechanges. Please note that switching to another file while working on a selection on the Object and Background Removaltabs will discard the selection.
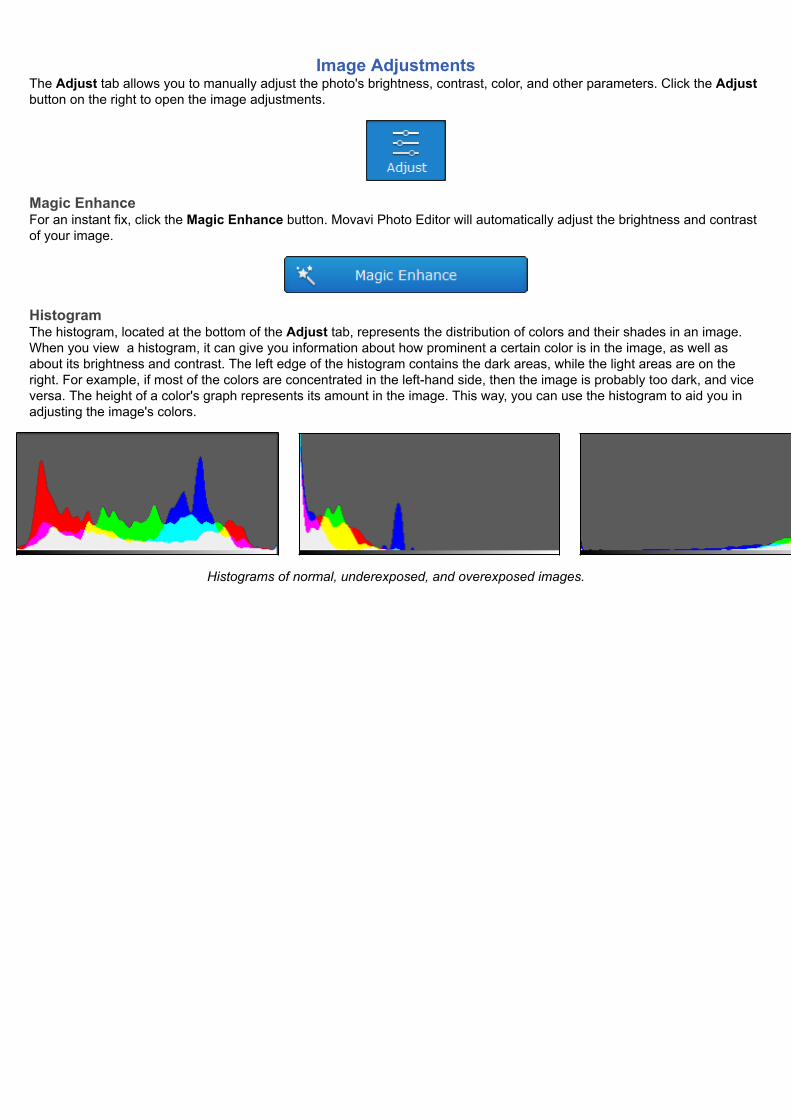
Image AdjustmentsThe Adjust tab allows you to manually adjust the photo's brightness, contrast, color, and other parameters. Click the Adjustbutton on the right to open the image adjustments.
Magic EnhanceFor an instant fix, click the Magic Enhance button. Movavi Photo Editor will automatically adjust the brightness and contrastof your image.
HistogramThe histogram, located at the bottom of the Adjust tab, represents the distribution of colors and their shades in an image.When you view a histogram, it can give you information about how prominent a certain color is in the image, as well asabout its brightness and contrast. The left edge of the histogram contains the dark areas, while the light areas are on theright. For example, if most of the colors are concentrated in the left-hand side, then the image is probably too dark, and viceversa. The height of a color's graph represents its amount in the image. This way, you can use the histogram to aid you inadjusting the image's colors.
Histograms of normal, underexposed, and overexposed images.
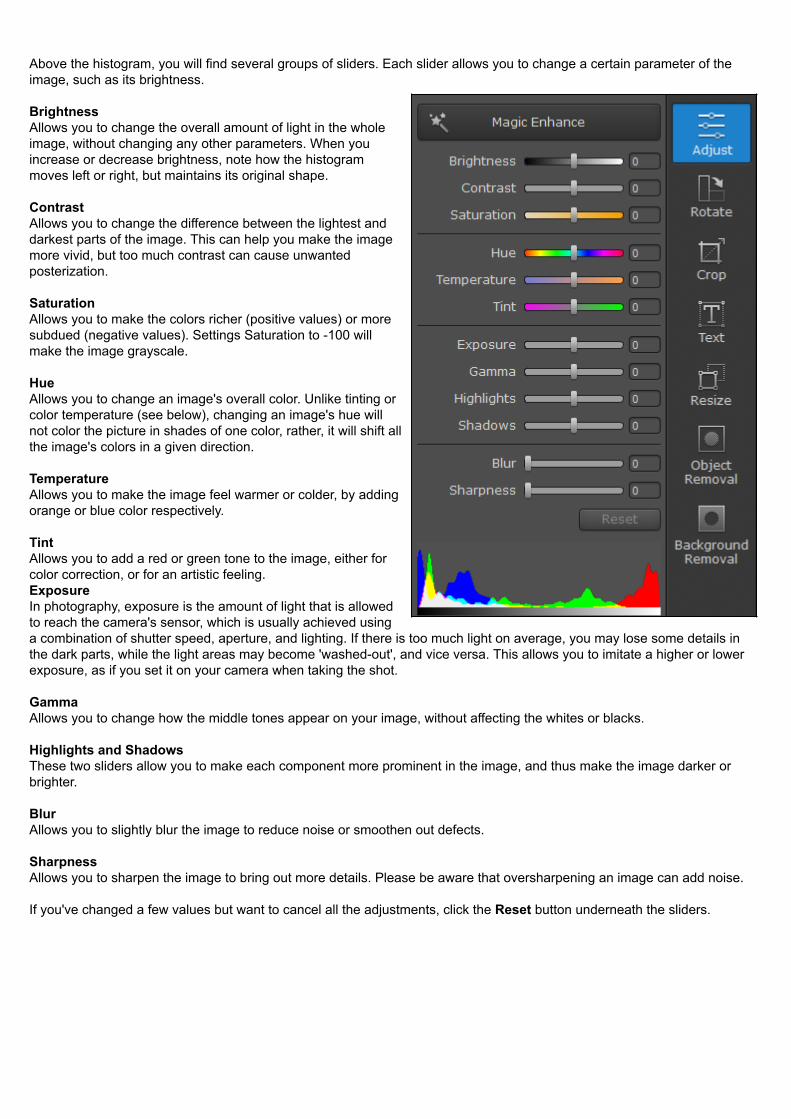
Above the histogram, you will find several groups of sliders. Each slider allows you to change a certain parameter of theimage, such as its brightness. BrightnessAllows you to change the overall amount of light in the wholeimage, without changing any other parameters. When youincrease or decrease brightness, note how the histogrammoves left or right, but maintains its original shape. ContrastAllows you to change the difference between the lightest anddarkest parts of the image. This can help you make the imagemore vivid, but too much contrast can cause unwantedposterization. SaturationAllows you to make the colors richer (positive values) or moresubdued (negative values). Settings Saturation to -100 willmake the image grayscale. HueAllows you to change an image's overall color. Unlike tinting orcolor temperature (see below), changing an image's hue willnot color the picture in shades of one color, rather, it will shift allthe image's colors in a given direction. TemperatureAllows you to make the image feel warmer or colder, by addingorange or blue color respectively. TintAllows you to add a red or green tone to the image, either forcolor correction, or for an artistic feeling.ExposureIn photography, exposure is the amount of light that is allowedto reach the camera's sensor, which is usually achieved usinga combination of shutter speed, aperture, and lighting. If there is too much light on average, you may lose some details inthe dark parts, while the light areas may become 'washed-out', and vice versa. This allows you to imitate a higher or lowerexposure, as if you set it on your camera when taking the shot. GammaAllows you to change how the middle tones appear on your image, without affecting the whites or blacks. Highlights and ShadowsThese two sliders allow you to make each component more prominent in the image, and thus make the image darker orbrighter. BlurAllows you to slightly blur the image to reduce noise or smoothen out defects. SharpnessAllows you to sharpen the image to bring out more details. Please be aware that oversharpening an image can add noise. If you've changed a few values but want to cancel all the adjustments, click the Reset button underneath the sliders.
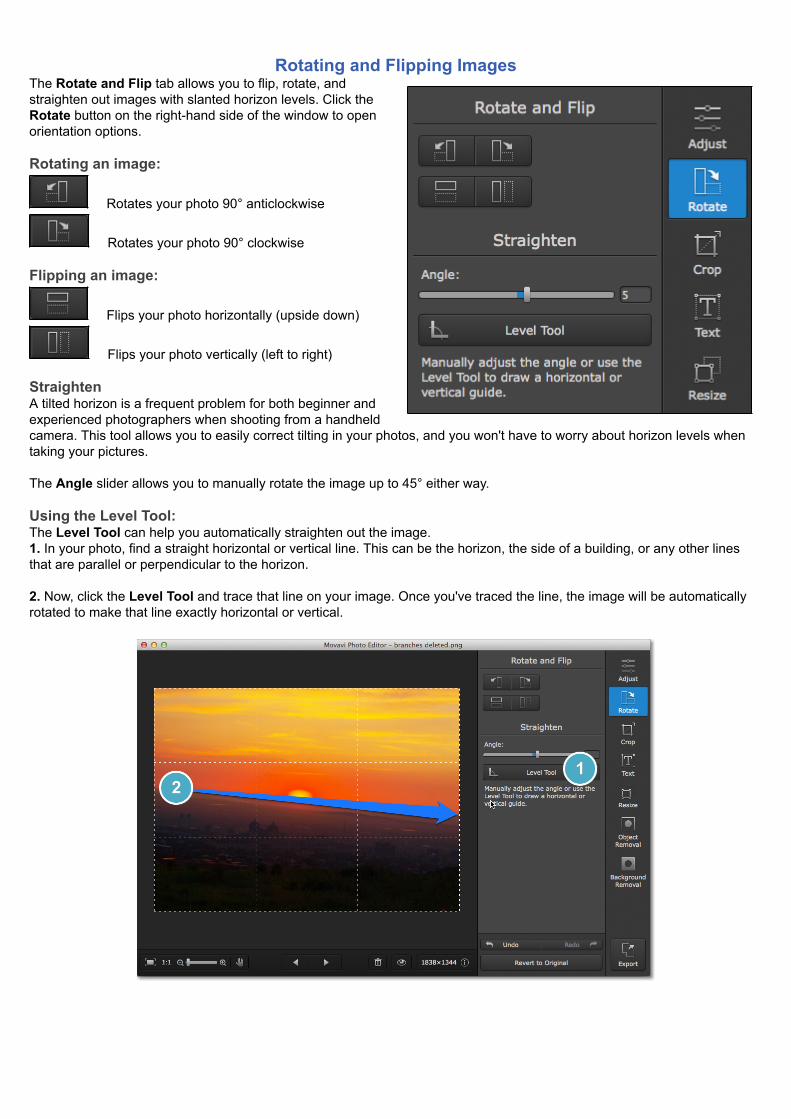
Rotating and Flipping ImagesThe Rotate and Flip tab allows you to flip, rotate, andstraighten out images with slanted horizon levels. Click theRotate button on the right-hand side of the window to openorientation options. Rotating an image:
Rotates your photo 90° anticlockwise
Rotates your photo 90° clockwise Flipping an image:
Flips your photo horizontally (upside down)
Flips your photo vertically (left to right) StraightenA tilted horizon is a frequent problem for both beginner andexperienced photographers when shooting from a handheldcamera. This tool allows you to easily correct tilting in your photos, and you won't have to worry about horizon levels whentaking your pictures. The Angle slider allows you to manually rotate the image up to 45° either way. Using the Level Tool:The Level Tool can help you automatically straighten out the image.1. In your photo, find a straight horizontal or vertical line. This can be the horizon, the side of a building, or any other linesthat are parallel or perpendicular to the horizon. 2. Now, click the Level Tool and trace that line on your image. Once you've traced the line, the image will be automaticallyrotated to make that line exactly horizontal or vertical.
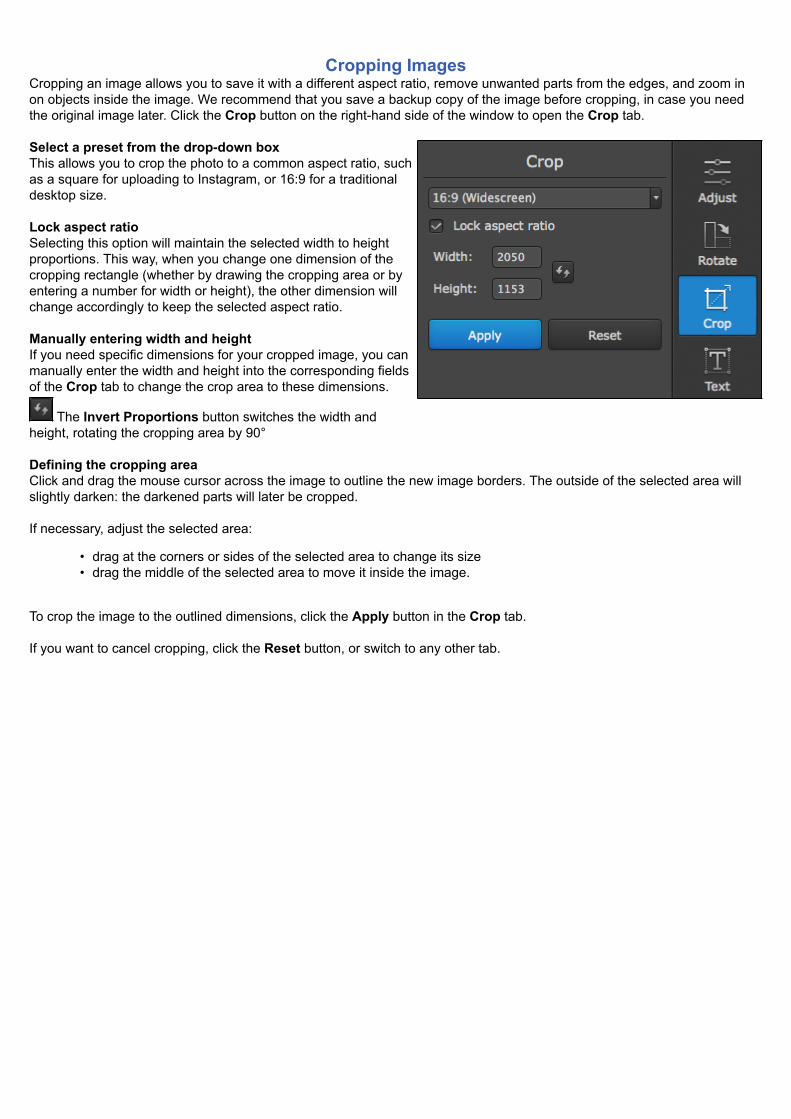
Cropping ImagesCropping an image allows you to save it with a different aspect ratio, remove unwanted parts from the edges, and zoom inon objects inside the image. We recommend that you save a backup copy of the image before cropping, in case you needthe original image later. Click the Crop button on the right-hand side of the window to open the Crop tab. Select a preset from the drop-down boxThis allows you to crop the photo to a common aspect ratio, suchas a square for uploading to Instagram, or 16:9 for a traditionaldesktop size. Lock aspect ratioSelecting this option will maintain the selected width to heightproportions. This way, when you change one dimension of thecropping rectangle (whether by drawing the cropping area or byentering a number for width or height), the other dimension willchange accordingly to keep the selected aspect ratio. Manually entering width and heightIf you need specific dimensions for your cropped image, you canmanually enter the width and height into the corresponding fieldsof the Crop tab to change the crop area to these dimensions.
The Invert Proportions button switches the width andheight, rotating the cropping area by 90° Defining the cropping areaClick and drag the mouse cursor across the image to outline the new image borders. The outside of the selected area willslightly darken: the darkened parts will later be cropped. If necessary, adjust the selected area:
• drag at the corners or sides of the selected area to change its size• drag the middle of the selected area to move it inside the image.
To crop the image to the outlined dimensions, click the Apply button in the Crop tab. If you want to cancel cropping, click the Reset button, or switch to any other tab.
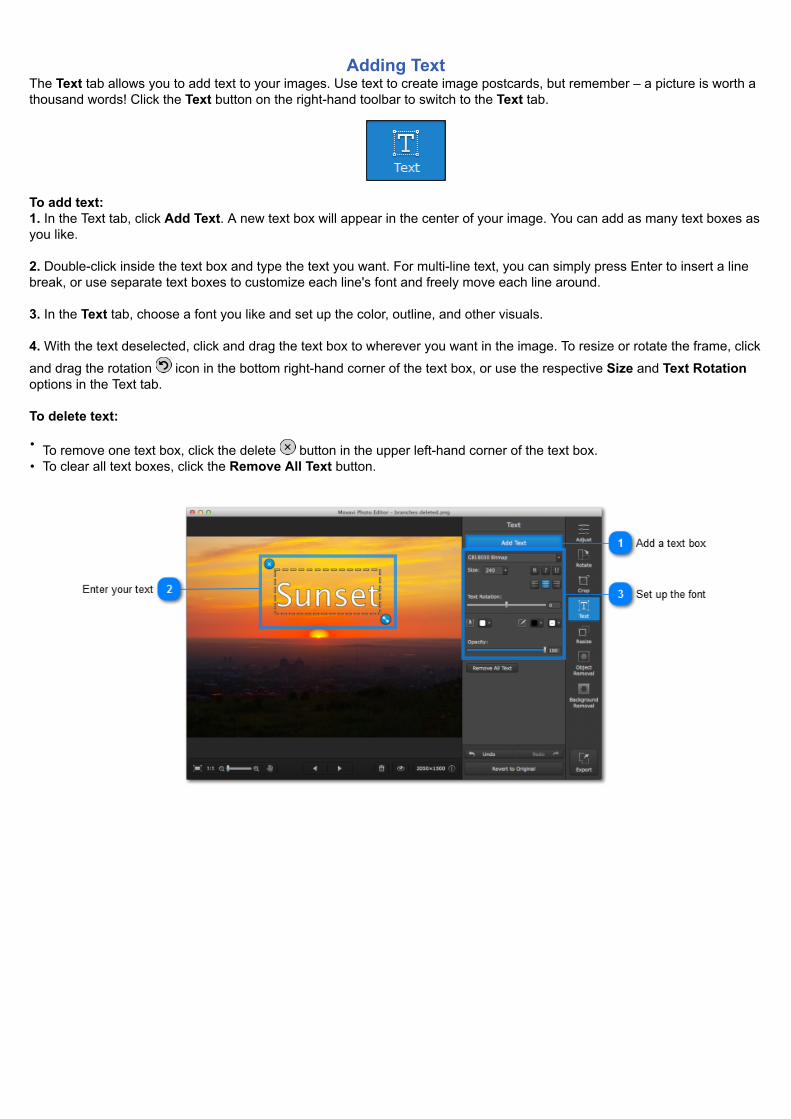
Adding TextThe Text tab allows you to add text to your images. Use text to create image postcards, but remember – a picture is worth athousand words! Click the Text button on the right-hand toolbar to switch to the Text tab.
To add text:1. In the Text tab, click Add Text. A new text box will appear in the center of your image. You can add as many text boxes asyou like. 2. Double-click inside the text box and type the text you want. For multi-line text, you can simply press Enter to insert a linebreak, or use separate text boxes to customize each line's font and freely move each line around. 3. In the Text tab, choose a font you like and set up the color, outline, and other visuals. 4. With the text deselected, click and drag the text box to wherever you want in the image. To resize or rotate the frame, click
and drag the rotation icon in the bottom right-hand corner of the text box, or use the respective Size and Text Rotationoptions in the Text tab. To delete text:
• To remove one text box, click the delete button in the upper left-hand corner of the text box.• To clear all text boxes, click the Remove All Text button.
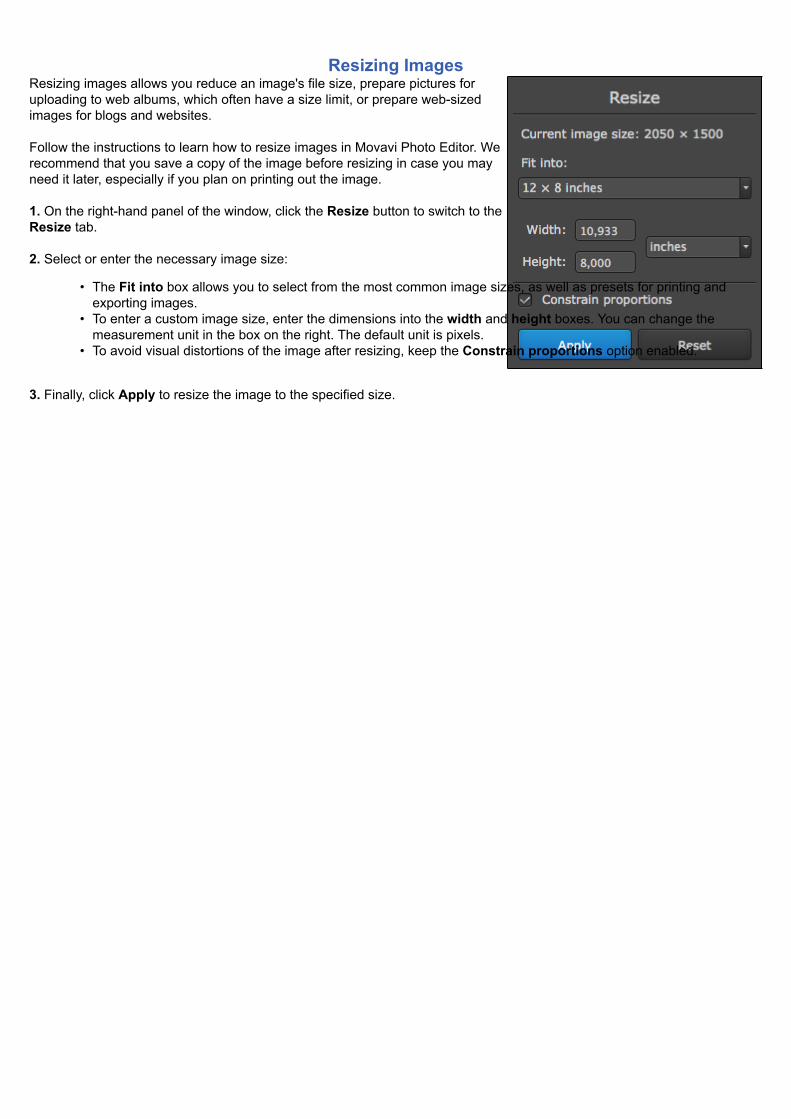
Resizing ImagesResizing images allows you reduce an image's file size, prepare pictures foruploading to web albums, which often have a size limit, or prepare web-sizedimages for blogs and websites. Follow the instructions to learn how to resize images in Movavi Photo Editor. Werecommend that you save a copy of the image before resizing in case you mayneed it later, especially if you plan on printing out the image. 1. On the right-hand panel of the window, click the Resize button to switch to theResize tab. 2. Select or enter the necessary image size:
• The Fit into box allows you to select from the most common image sizes, as well as presets for printing andexporting images.
• To enter a custom image size, enter the dimensions into the width and height boxes. You can change themeasurement unit in the box on the right. The default unit is pixels.
• To avoid visual distortions of the image after resizing, keep the Constrain proportions option enabled.
3. Finally, click Apply to resize the image to the specified size.
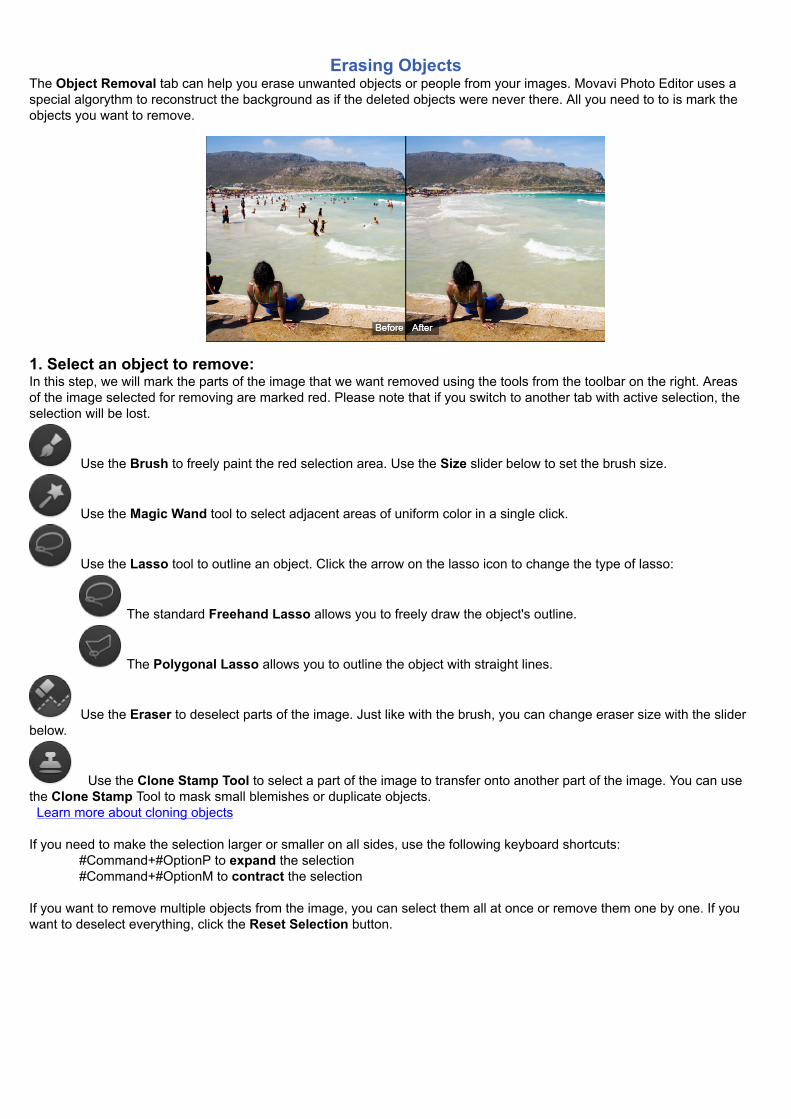
Erasing ObjectsThe Object Removal tab can help you erase unwanted objects or people from your images. Movavi Photo Editor uses aspecial algorythm to reconstruct the background as if the deleted objects were never there. All you need to to is mark theobjects you want to remove.
1. Select an object to remove:In this step, we will mark the parts of the image that we want removed using the tools from the toolbar on the right. Areasof the image selected for removing are marked red. Please note that if you switch to another tab with active selection, theselection will be lost.
Use the Brush to freely paint the red selection area. Use the Size slider below to set the brush size.
Use the Magic Wand tool to select adjacent areas of uniform color in a single click.
Use the Lasso tool to outline an object. Click the arrow on the lasso icon to change the type of lasso:
The standard Freehand Lasso allows you to freely draw the object's outline.
The Polygonal Lasso allows you to outline the object with straight lines.
Use the Eraser to deselect parts of the image. Just like with the brush, you can change eraser size with the sliderbelow.
Use the Clone Stamp Tool to select a part of the image to transfer onto another part of the image. You can usethe Clone Stamp Tool to mask small blemishes or duplicate objects. Learn more about cloning objects If you need to make the selection larger or smaller on all sides, use the following keyboard shortcuts:
⌘Command+⌘OptionP to expand the selection⌘Command+⌘OptionM to contract the selection
If you want to remove multiple objects from the image, you can select them all at once or remove them one by one. If youwant to deselect everything, click the Reset Selection button.
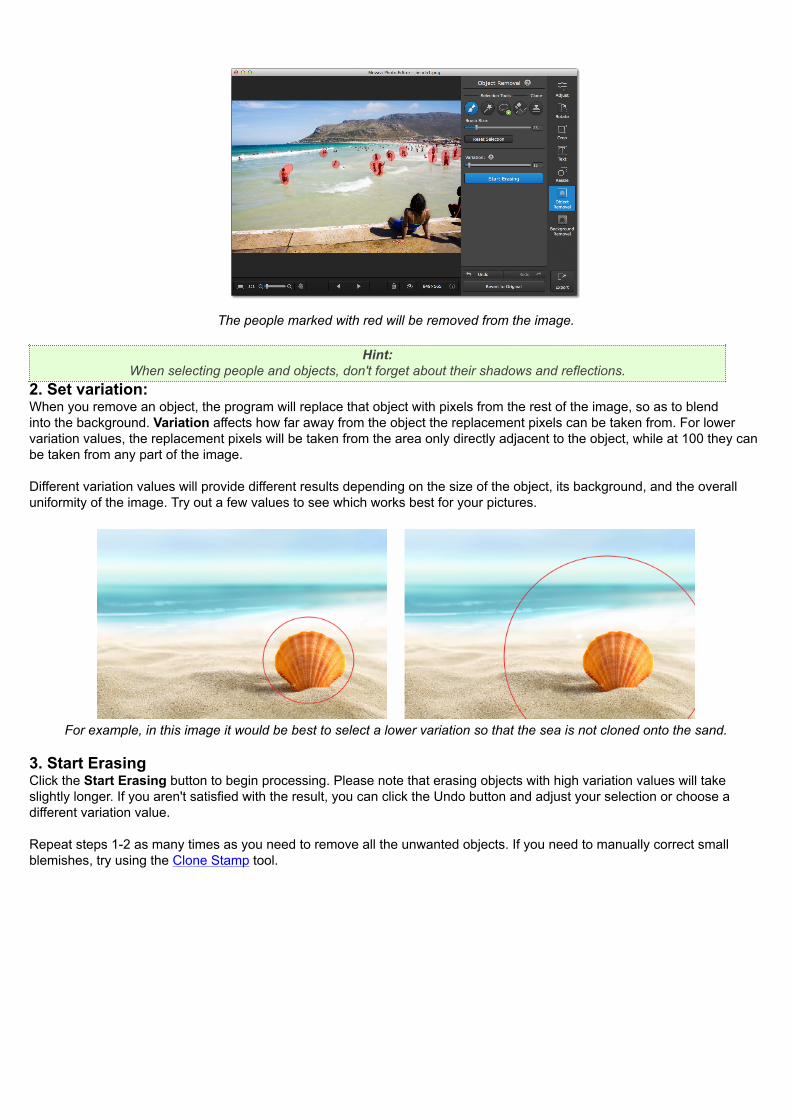
The people marked with red will be removed from the image.
Hint:When selecting people and objects, don't forget about their shadows and reflections.
2. Set variation:When you remove an object, the program will replace that object with pixels from the rest of the image, so as to blendinto the background. Variation affects how far away from the object the replacement pixels can be taken from. For lowervariation values, the replacement pixels will be taken from the area only directly adjacent to the object, while at 100 they canbe taken from any part of the image. Different variation values will provide different results depending on the size of the object, its background, and the overalluniformity of the image. Try out a few values to see which works best for your pictures.
For example, in this image it would be best to select a lower variation so that the sea is not cloned onto the sand.
3. Start ErasingClick the Start Erasing button to begin processing. Please note that erasing objects with high variation values will takeslightly longer. If you aren't satisfied with the result, you can click the Undo button and adjust your selection or choose adifferent variation value. Repeat steps 1-2 as many times as you need to remove all the unwanted objects. If you need to manually correct smallblemishes, try using the Clone Stamp tool.
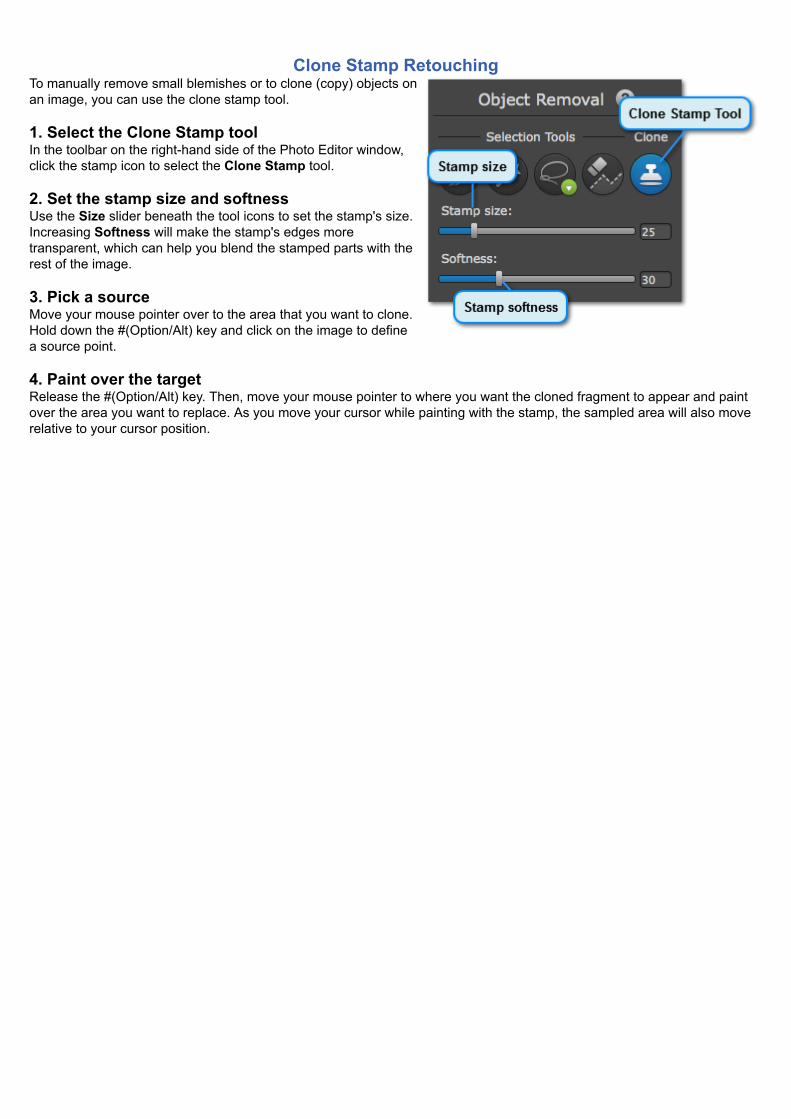
Clone Stamp RetouchingTo manually remove small blemishes or to clone (copy) objects onan image, you can use the clone stamp tool. 1. Select the Clone Stamp toolIn the toolbar on the right-hand side of the Photo Editor window,click the stamp icon to select the Clone Stamp tool.
2. Set the stamp size and softnessUse the Size slider beneath the tool icons to set the stamp's size.Increasing Softness will make the stamp's edges moretransparent, which can help you blend the stamped parts with therest of the image. 3. Pick a sourceMove your mouse pointer over to the area that you want to clone.Hold down the ⌘(Option/Alt) key and click on the image to definea source point. 4. Paint over the targetRelease the ⌘(Option/Alt) key. Then, move your mouse pointer to where you want the cloned fragment to appear and paintover the area you want to replace. As you move your cursor while painting with the stamp, the sampled area will also moverelative to your cursor position.
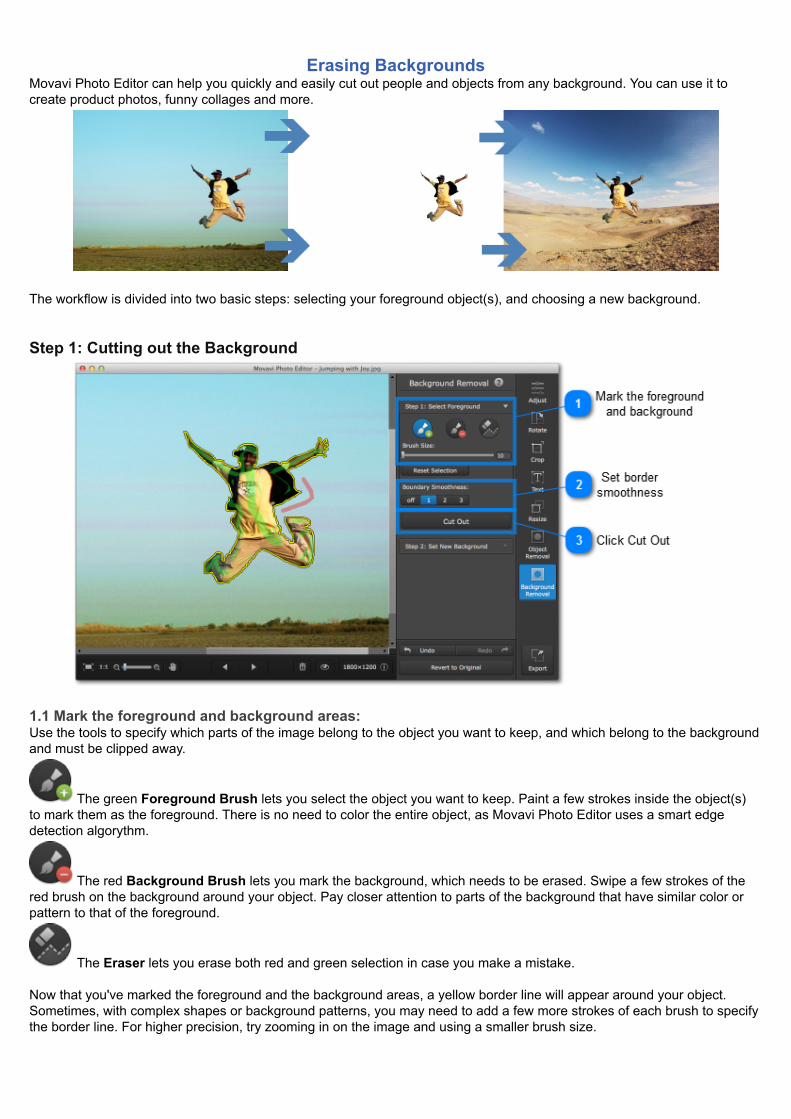
Erasing BackgroundsMovavi Photo Editor can help you quickly and easily cut out people and objects from any background. You can use it tocreate product photos, funny collages and more.
The workflow is divided into two basic steps: selecting your foreground object(s), and choosing a new background. Step 1: Cutting out the Background
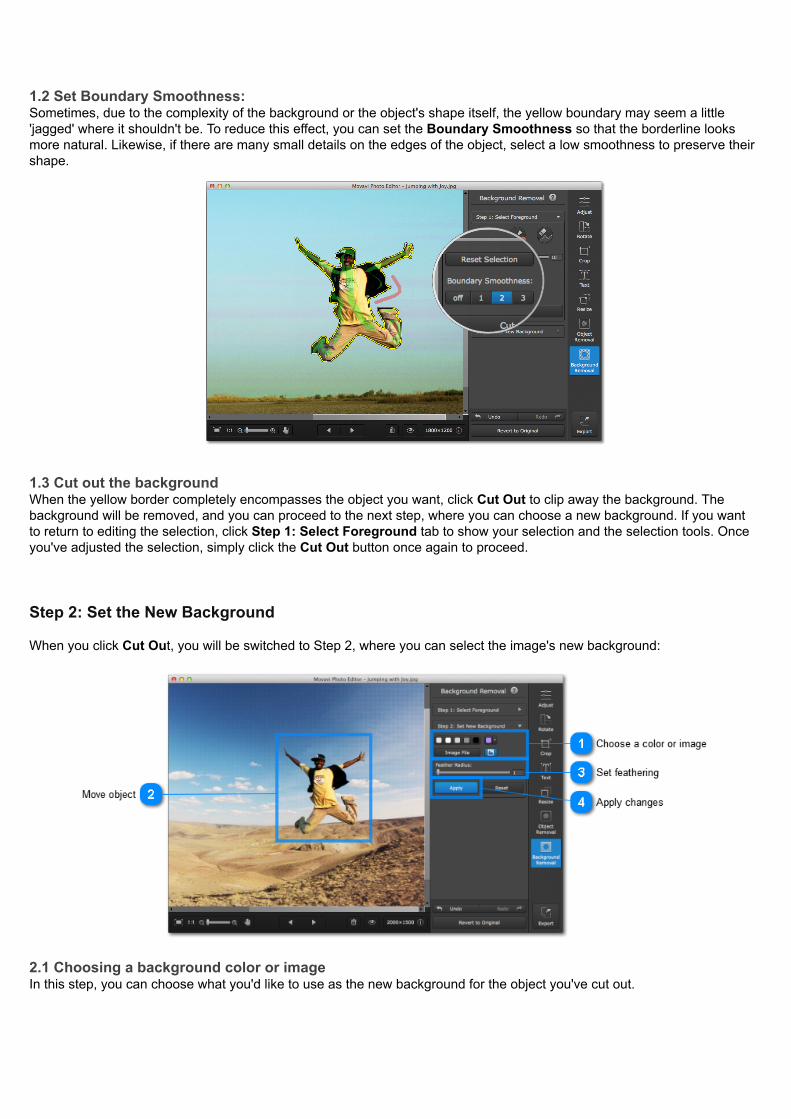
1.1 Mark the foreground and background areas:Use the tools to specify which parts of the image belong to the object you want to keep, and which belong to the backgroundand must be clipped away.
The green Foreground Brush lets you select the object you want to keep. Paint a few strokes inside the object(s)to mark them as the foreground. There is no need to color the entire object, as Movavi Photo Editor uses a smart edgedetection algorythm.
The red Background Brush lets you mark the background, which needs to be erased. Swipe a few strokes of thered brush on the background around your object. Pay closer attention to parts of the background that have similar color orpattern to that of the foreground.
The Eraser lets you erase both red and green selection in case you make a mistake. Now that you've marked the foreground and the background areas, a yellow border line will appear around your object.Sometimes, with complex shapes or background patterns, you may need to add a few more strokes of each brush to specifythe border line. For higher precision, try zooming in on the image and using a smaller brush size.
1.2 Set Boundary Smoothness:Sometimes, due to the complexity of the background or the object's shape itself, the yellow boundary may seem a little'jagged' where it shouldn't be. To reduce this effect, you can set the Boundary Smoothness so that the borderline looksmore natural. Likewise, if there are many small details on the edges of the object, select a low smoothness to preserve theirshape.
1.3 Cut out the backgroundWhen the yellow border completely encompasses the object you want, click Cut Out to clip away the background. Thebackground will be removed, and you can proceed to the next step, where you can choose a new background. If you wantto return to editing the selection, click Step 1: Select Foreground tab to show your selection and the selection tools. Onceyou've adjusted the selection, simply click the Cut Out button once again to proceed. Step 2: Set the New Background When you click Cut Out, you will be switched to Step 2, where you can select the image's new background:
2.1 Choosing a background color or imageIn this step, you can choose what you'd like to use as the new background for the object you've cut out.
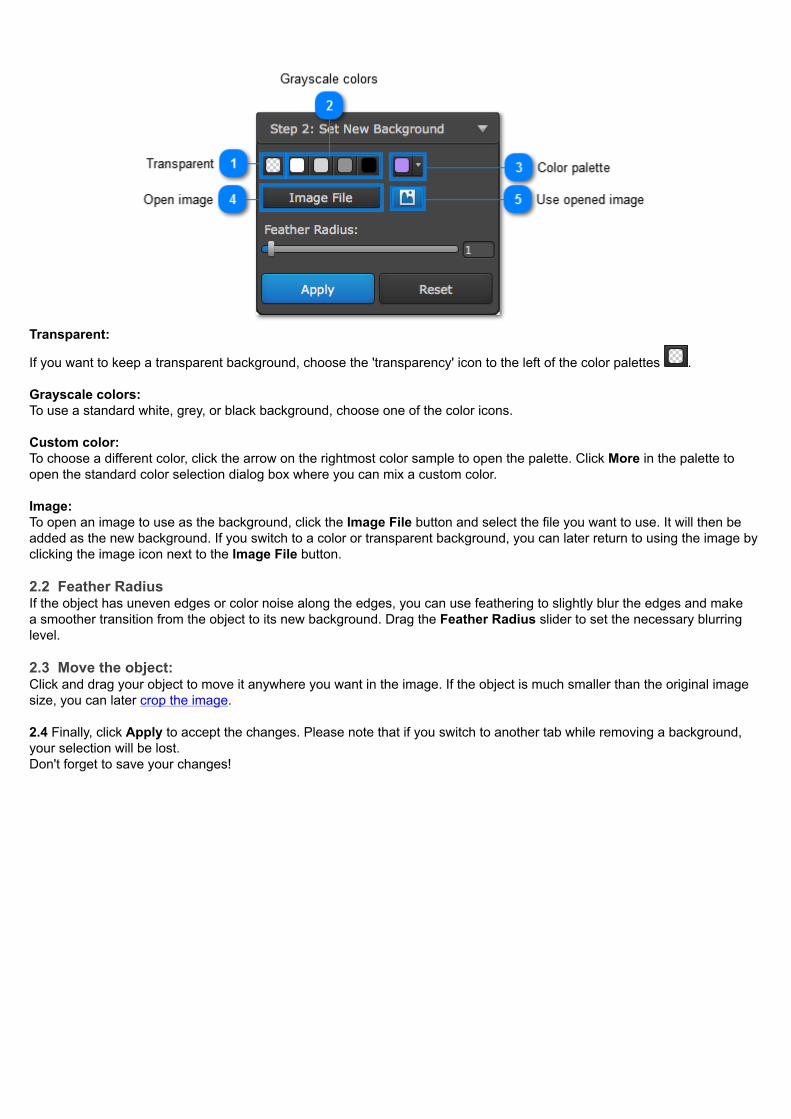
Transparent:
If you want to keep a transparent background, choose the 'transparency' icon to the left of the color palettes . Grayscale colors:To use a standard white, grey, or black background, choose one of the color icons. Custom color:To choose a different color, click the arrow on the rightmost color sample to open the palette. Click More in the palette toopen the standard color selection dialog box where you can mix a custom color.
Image:To open an image to use as the background, click the Image File button and select the file you want to use. It will then beadded as the new background. If you switch to a color or transparent background, you can later return to using the image byclicking the image icon next to the Image File button. 2.2 Feather RadiusIf the object has uneven edges or color noise along the edges, you can use feathering to slightly blur the edges and makea smoother transition from the object to its new background. Drag the Feather Radius slider to set the necessary blurringlevel. 2.3 Move the object:Click and drag your object to move it anywhere you want in the image. If the object is much smaller than the original imagesize, you can later crop the image. 2.4 Finally, click Apply to accept the changes. Please note that if you switch to another tab while removing a background,your selection will be lost.Don't forget to save your changes!
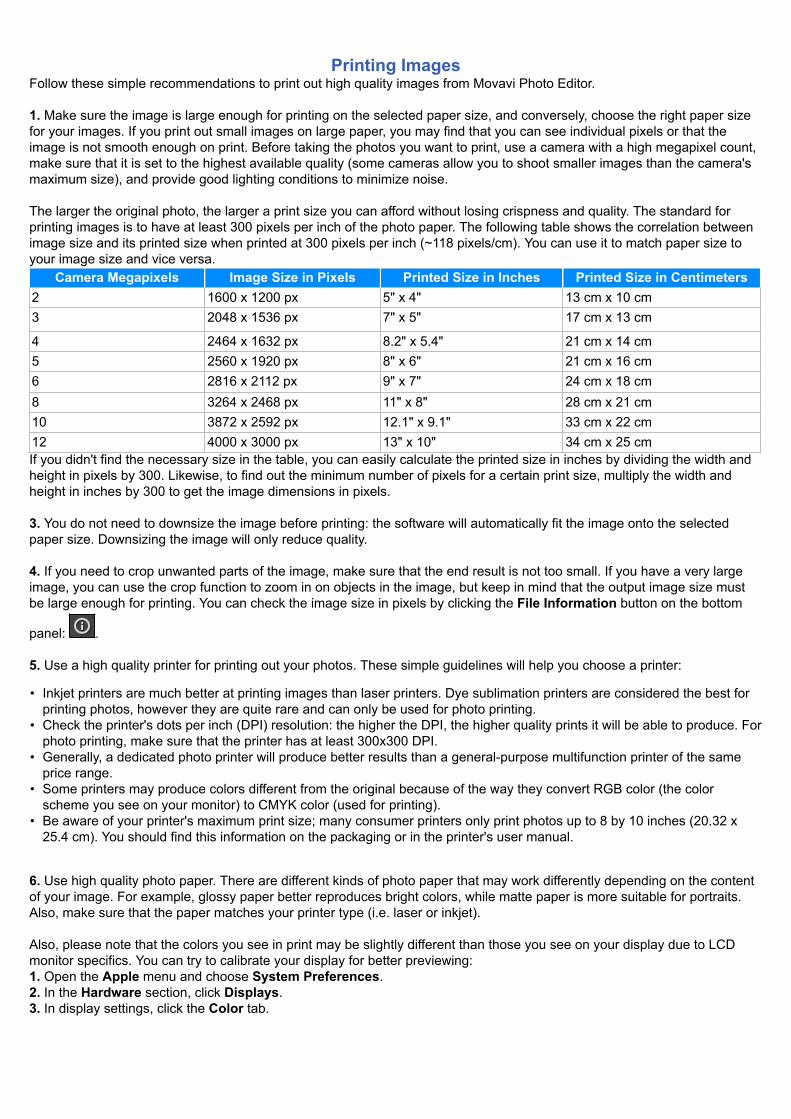
Printing ImagesFollow these simple recommendations to print out high quality images from Movavi Photo Editor. 1. Make sure the image is large enough for printing on the selected paper size, and conversely, choose the right paper sizefor your images. If you print out small images on large paper, you may find that you can see individual pixels or that theimage is not smooth enough on print. Before taking the photos you want to print, use a camera with a high megapixel count,make sure that it is set to the highest available quality (some cameras allow you to shoot smaller images than the camera'smaximum size), and provide good lighting conditions to minimize noise. The larger the original photo, the larger a print size you can afford without losing crispness and quality. The standard forprinting images is to have at least 300 pixels per inch of the photo paper. The following table shows the correlation betweenimage size and its printed size when printed at 300 pixels per inch (~118 pixels/cm). You can use it to match paper size toyour image size and vice versa.
Camera Megapixels Image Size in Pixels Printed Size in Inches Printed Size in Centimeters2 1600 x 1200 px 5" x 4" 13 cm x 10 cm3 2048 x 1536 px 7" x 5" 17 cm x 13 cm
4 2464 x 1632 px 8.2" x 5.4" 21 cm x 14 cm5 2560 x 1920 px 8" x 6" 21 cm x 16 cm6 2816 x 2112 px 9" x 7" 24 cm x 18 cm8 3264 x 2468 px 11" x 8" 28 cm x 21 cm10 3872 x 2592 px 12.1" x 9.1" 33 cm x 22 cm12 4000 x 3000 px 13" x 10" 34 cm x 25 cmIf you didn't find the necessary size in the table, you can easily calculate the printed size in inches by dividing the width andheight in pixels by 300. Likewise, to find out the minimum number of pixels for a certain print size, multiply the width andheight in inches by 300 to get the image dimensions in pixels. 3. You do not need to downsize the image before printing: the software will automatically fit the image onto the selectedpaper size. Downsizing the image will only reduce quality. 4. If you need to crop unwanted parts of the image, make sure that the end result is not too small. If you have a very largeimage, you can use the crop function to zoom in on objects in the image, but keep in mind that the output image size mustbe large enough for printing. You can check the image size in pixels by clicking the File Information button on the bottom
panel: . 5. Use a high quality printer for printing out your photos. These simple guidelines will help you choose a printer:
• Inkjet printers are much better at printing images than laser printers. Dye sublimation printers are considered the best forprinting photos, however they are quite rare and can only be used for photo printing.
• Check the printer's dots per inch (DPI) resolution: the higher the DPI, the higher quality prints it will be able to produce. Forphoto printing, make sure that the printer has at least 300x300 DPI.
• Generally, a dedicated photo printer will produce better results than a general-purpose multifunction printer of the sameprice range.
• Some printers may produce colors different from the original because of the way they convert RGB color (the colorscheme you see on your monitor) to CMYK color (used for printing).
• Be aware of your printer's maximum print size; many consumer printers only print photos up to 8 by 10 inches (20.32 x25.4 cm). You should find this information on the packaging or in the printer's user manual.
6. Use high quality photo paper. There are different kinds of photo paper that may work differently depending on the contentof your image. For example, glossy paper better reproduces bright colors, while matte paper is more suitable for portraits.Also, make sure that the paper matches your printer type (i.e. laser or inkjet). Also, please note that the colors you see in print may be slightly different than those you see on your display due to LCDmonitor specifics. You can try to calibrate your display for better previewing:1. Open the Apple menu and choose System Preferences.2. In the Hardware section, click Displays.3. In display settings, click the Color tab.

4. Click the Calibrate button to open the Display Calibration assistant and follow the onscreen instructions to calibrate yourdisplay. Finally, to print out an image from Movavi Photo Editor:
1. Open the File menu and choose Print.2. Choose the printer you want to use for printing the photo.3. Click Settings to open the settings for the selected printer. The settings will vary depending on your printer'ssoftware, but generally you can choose paper size, orientation and color options.4. Choose the number of copies that you want to print. If this is your first time printing a photo, you may want to firstprint only one sample copy to make sure you have set up everything right.5. Click Print to begin printing!
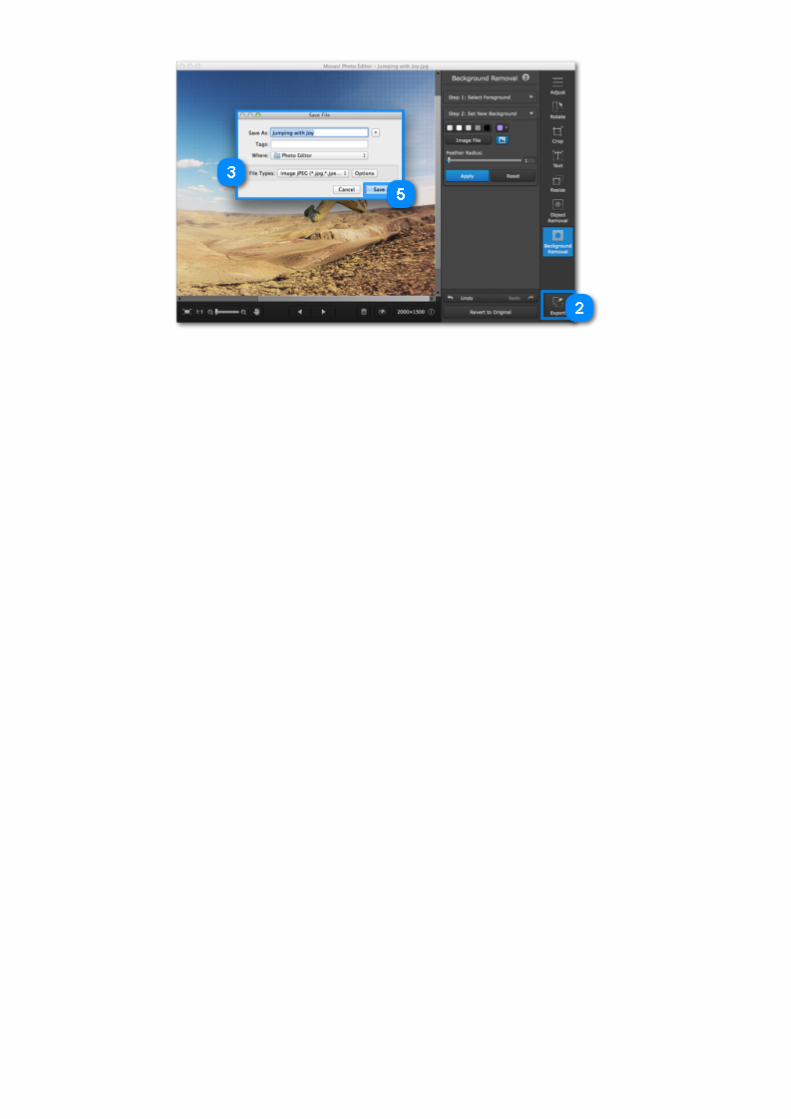
Changing Image FormatChanging an image's format allows you to use your images in a wider variety of situations, compress the images to a smallerfile size, and work with transparency. Many websites only allow a limited number of formats for uploading, so having a tool toeasily change image format becomes a must. 1. Open the image you want. 2. Click Export in the bottom right-hand corner of the window. The Save File dialog box will open.
3. To choose an image format, open the Save as type box and select the format you need.
• If the format lists multiple file extensions, such as *.jpg, *.jpeg and others for JPEG, you can type the necessary fileextension in the file name field.
• If your image contains transparent areas (for example, after removing a background), please note that not all formatssupport transparency. If you want to retain transparent areas after saving the image, choose one of the following formats:BMP, DPX, PNG, TGA.
Advanced:Some formats also allow you to set image quality and compression method. For these formats, click the Options button inthe Save File dialog box to open these options. JPEG QualityDrag the slider to the necessary quality level and click OK. Lower quality allows you to compress the image to a smaller filesize, but will probably not look as good. TIFF CompressionSelect the preferred compression method and click OK. Uncompressed: no compression method will be used. The image will be much larger in size than its compressed copies,but uncompressed images with large resolutions may be processed faster by some software.PackBits: offers less compression than LZW, but is the most widely supported compression method, especially on Applesoftware.LZW: compresses the image to about half size.ZIP: best for working with 16-bit images and average for 8-bit images. 4. Choose where to save the new file and give your file a name. 5. Click Save.If you make any edits after saving the file in a different format, you will be working with the new file.
File Size and Image QualityEven though image files rarely take up more disk space than videos or other media files, a large photo collection can quicklyfill up your hard drive if you save all photos at the maximum size and quality. In this section, you will learn how to manageimage file size. Image file size is defined by the following properties:
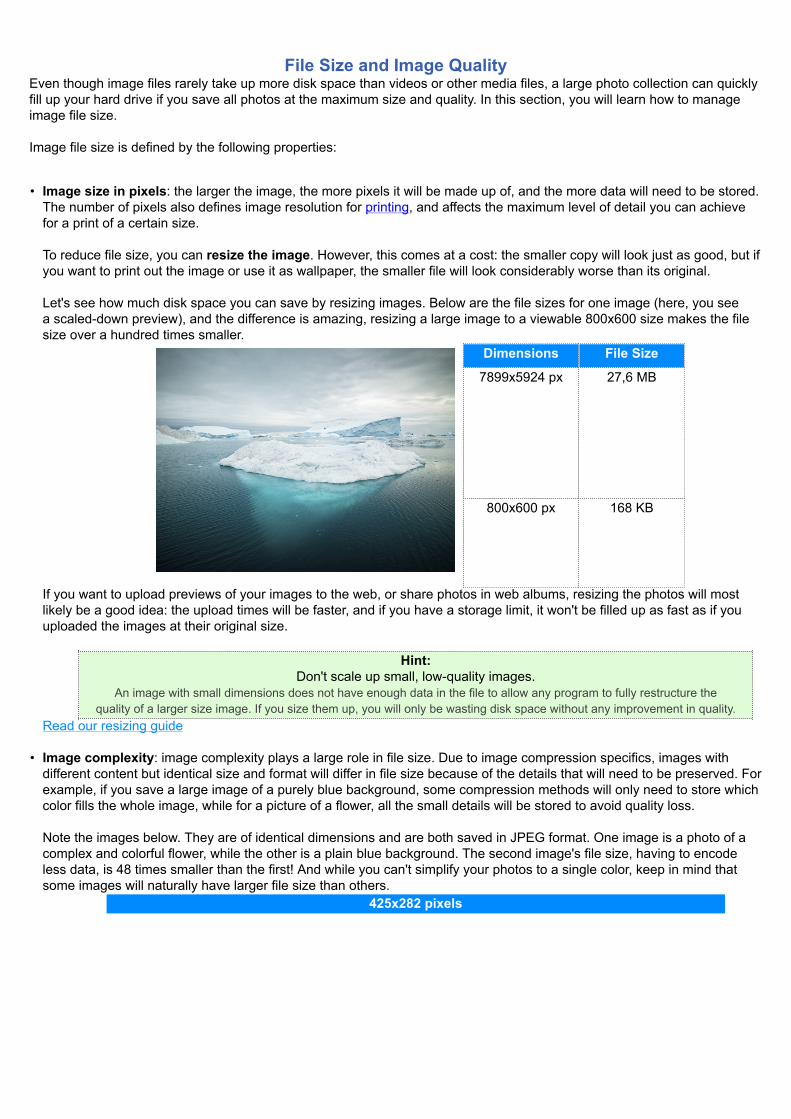
• Image size in pixels: the larger the image, the more pixels it will be made up of, and the more data will need to be stored.The number of pixels also defines image resolution for printing, and affects the maximum level of detail you can achievefor a print of a certain size. To reduce file size, you can resize the image. However, this comes at a cost: the smaller copy will look just as good, but ifyou want to print out the image or use it as wallpaper, the smaller file will look considerably worse than its original. Let's see how much disk space you can save by resizing images. Below are the file sizes for one image (here, you seea scaled-down preview), and the difference is amazing, resizing a large image to a viewable 800x600 size makes the filesize over a hundred times smaller.
Dimensions File Size
7899x5924 px 27,6 MB
800x600 px 168 KB
If you want to upload previews of your images to the web, or share photos in web albums, resizing the photos will mostlikely be a good idea: the upload times will be faster, and if you have a storage limit, it won't be filled up as fast as if youuploaded the images at their original size.
Hint:Don't scale up small, low-quality images.
An image with small dimensions does not have enough data in the file to allow any program to fully restructure thequality of a larger size image. If you size them up, you will only be wasting disk space without any improvement in quality.
Read our resizing guide
• Image complexity: image complexity plays a large role in file size. Due to image compression specifics, images withdifferent content but identical size and format will differ in file size because of the details that will need to be preserved. Forexample, if you save a large image of a purely blue background, some compression methods will only need to store whichcolor fills the whole image, while for a picture of a flower, all the small details will be stored to avoid quality loss. Note the images below. They are of identical dimensions and are both saved in JPEG format. One image is a photo of acomplex and colorful flower, while the other is a plain blue background. The second image's file size, having to encodeless data, is 48 times smaller than the first! And while you can't simplify your photos to a single color, keep in mind thatsome images will naturally have larger file size than others.
425x282 pixels
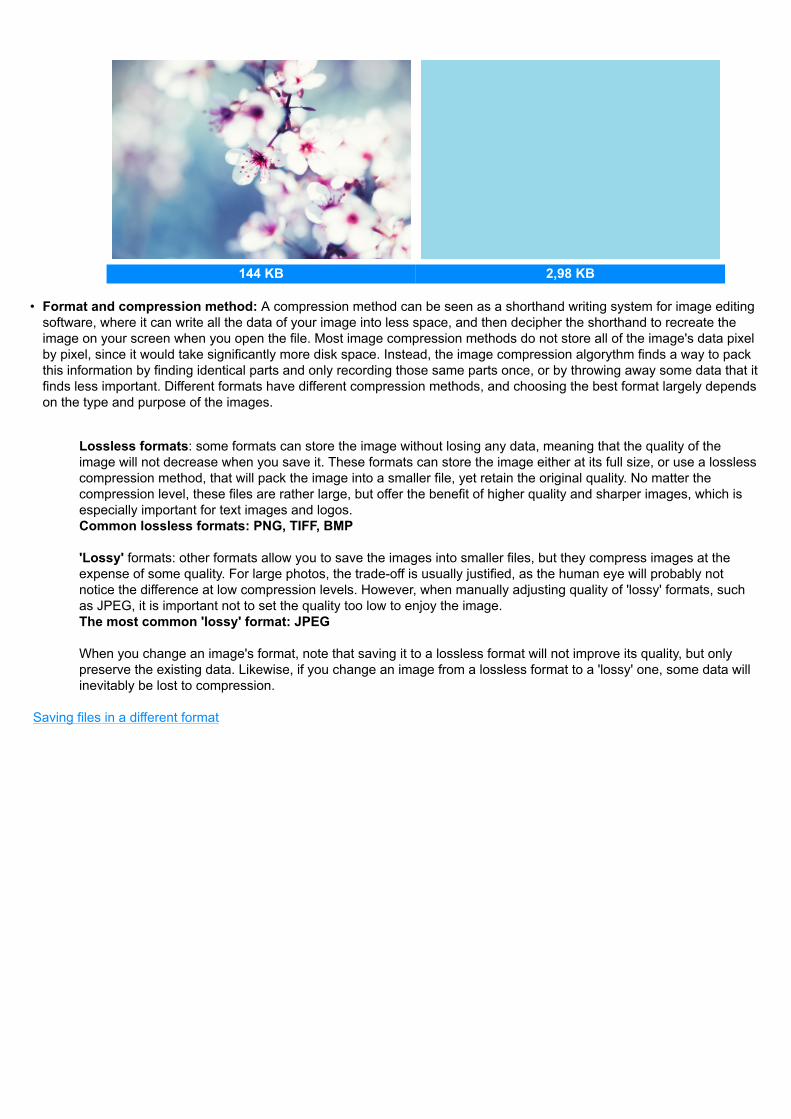
144 KB 2,98 KB
• Format and compression method: A compression method can be seen as a shorthand writing system for image editingsoftware, where it can write all the data of your image into less space, and then decipher the shorthand to recreate theimage on your screen when you open the file. Most image compression methods do not store all of the image's data pixelby pixel, since it would take significantly more disk space. Instead, the image compression algorythm finds a way to packthis information by finding identical parts and only recording those same parts once, or by throwing away some data that itfinds less important. Different formats have different compression methods, and choosing the best format largely dependson the type and purpose of the images.
Lossless formats: some formats can store the image without losing any data, meaning that the quality of theimage will not decrease when you save it. These formats can store the image either at its full size, or use a losslesscompression method, that will pack the image into a smaller file, yet retain the original quality. No matter thecompression level, these files are rather large, but offer the benefit of higher quality and sharper images, which isespecially important for text images and logos.Common lossless formats: PNG, TIFF, BMP 'Lossy' formats: other formats allow you to save the images into smaller files, but they compress images at theexpense of some quality. For large photos, the trade-off is usually justified, as the human eye will probably notnotice the difference at low compression levels. However, when manually adjusting quality of 'lossy' formats, suchas JPEG, it is important not to set the quality too low to enjoy the image.The most common 'lossy' format: JPEG
When you change an image's format, note that saving it to a lossless format will not improve its quality, but onlypreserve the existing data. Likewise, if you change an image from a lossless format to a 'lossy' one, some data willinevitably be lost to compression.
Saving files in a different format

Contacting SupportIf you have any questions or concerns regarding Movavi software, you are welcome to contact our support team. Pleasedescribe your problem in as much detail as possible; any screenshots or log files will allow us to help you faster. You can contact us using:E-mail: [email protected] – guaranteed response in 3 business daysLive Chat – available 12 A.M. — 6 P.M. GMT \ 4 P.M. — 10 A.M. PST Monday through Friday. Our support team specialists may ask you for additional information that is required to solve your problem: these may includeyour license key, log files, and files you were working with, but never personal information. We value your privacy!
Have you checked the FAQ section?Your question may have already been answered!