integrating mahara 1.8.1 with moodle 2.6.1 running under https filestep no. 3: create a new database...
TRANSCRIPT

Integrating Mahara 1.8.1 with Moodle 2.6.1 running under https
Server environment: Windows 2012 SP2 server on both machines Internet Information Services 9.5 PostgresSQL 9.3 PHP version 5.5.8
Installation of IIS and PHP on Mahara Server
Step No. 1: In the first step it is necessary to install the IIS feature in Windows 2012 Server. Do not forget to
add the CGI feature.
Step No. 2: The Visual Studio C++ 2012 x86 libraries needs to be installed!
Create an phpinfo file to check whether the PHP has been successfully installed.

Mahara installation:
Mahara is a PHP and MySQL application like Moodle. Mahara and Moodle share a very similar architecture, and are designed to be complementary in many respects.
Follow the instructions on the installing Mahara wiki page, http://wiki.mahara.org/System_Administrator%27s_Guide/Installing_Mahara.
Step No. 1: Copy the htdocs folder into the “wwwroot” and rename its name into “mahara”.
Step No. 2: Make an update of the www path in the IIS server.
Step No. 3: Create a new database and assign privileges on it for an account that will be used to establish a
connection between mahara database and mahara itself.
Step No. 4: Edit the Mahara configuration file by specifying connection details to the database. Additionally
the following lines must be added or uncommented in the configuration file:
$cfg->wwwroot ='your server name’;
$cfg->opensslcnf ='D:\php\v-5.5.8\extras\ssl\openssl.cnf'; path to the openssl.cnf in your php folder
The above path needs to be also added to the configuration file in Moodle.
$cfg->dataroot ='D:\maharadata'; folder to store the mahara data
$cfg->emailcontact ='moodle-support@your domain';
$cfg->passwordsaltmain ='randomly generated string';
$cfg->passwordsalt1 ='randomly generated string';
Step No. 5: If the following information will appear “No input file specified” then the doc_root in the php.ini
file needs to be updated.
Step No. 6: The session.entropy_length = 32 must be activated in the php.ini file
Step No. 7: Configure cron script.

Installation of SSL certificates
Step No. 1: Import the certificates into the Mahara and Moodle Server.
Step No. 2: Bind the website with installed certificate using port 433.
Step No. 3: Enable the https authentication in the Moodle administration page – “Use HTTPS for logins”
Step No. 4: Enable the https in the config.php file both on the Mahara and Moodle server.
Connecting Mahara with Moodle
The following steps based on the following tutorial:
http://www.packtpub.com/article/integrating-moodle-2-mahara-googledocs-for-business
Time for action - configuring the networking and SSO
To begin the process of configuring Moodle and Mahara to work together, we need to enable Moodle
Networking. You will need to make sure you have xmlrpc, curl, and openssl installed and configured in your
PHP build. Networking allows Moodle to share users and authentication with another system. In this case,
we are configuring Moodle to allow Moodle users to automatically login to Mahara when they login to
Moodle. This will create a more seamless experience for the users and enable them to move back and forth
between the systems.
The steps to configure the Mahara portfolio plugin are as follows:
1. From the Site administration menu, select Advanced features. Find the Networking option and
set it to On. Select Save changes.
2. The Networking option will then appear in the site admin menu. Select Networking, then Manage
Peers.
3. In the Add a new host form, copy the URL of your Mahara site into the hostname field and then
select Mahara as the server type.
4. Open a new window and login to your Mahara site as the site admin. Select the Site Admin tab.
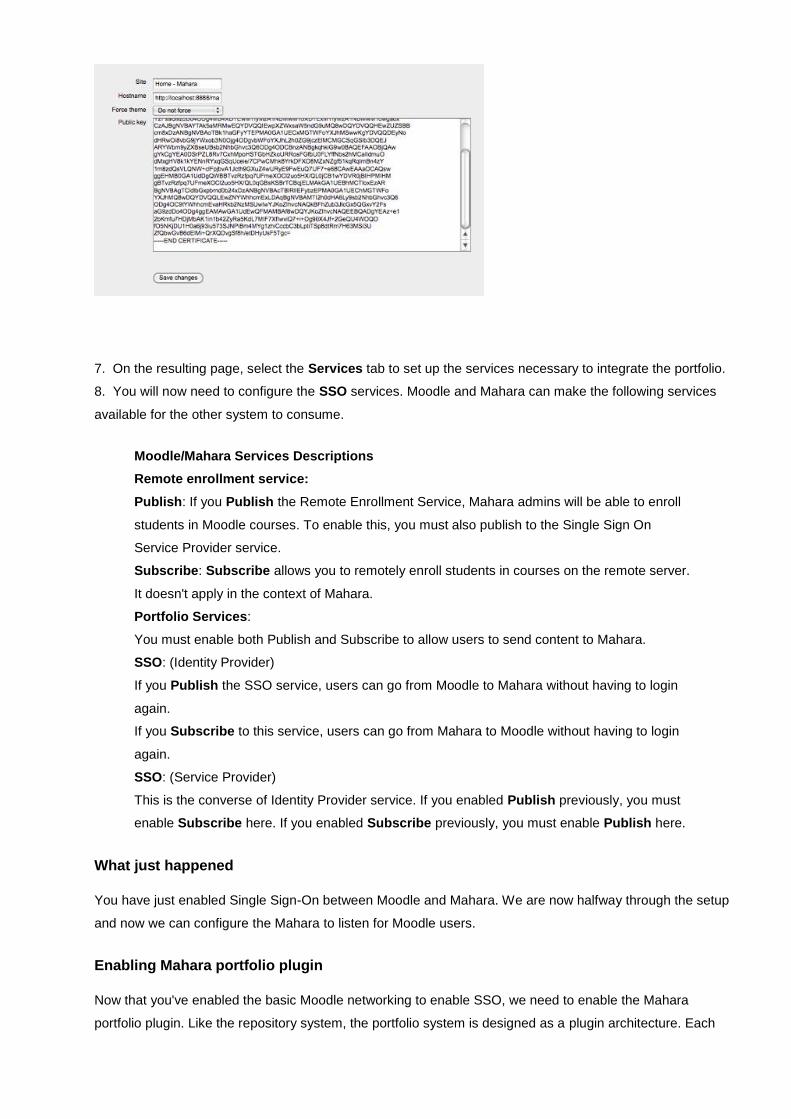
5. On your Mahara site, select Configure Site. Then select Networking.
6. Copy the public key from the BEGIN tag to the END CERTIFICATE and paste it into the Public Key
field in the Moodle networking form.
In case of connection problems try to generate new public key and add it manually into Moodle.
7. On the resulting page, select the Services tab to set up the services necessary to integrate the portfolio.
8. You will now need to configure the SSO services. Moodle and Mahara can make the following services
available for the other system to consume.
Moodle/Mahara Services Descriptions
Remote enrollment service:
Publish: If you Publish the Remote Enrollment Service, Mahara admins will be able to enroll
students in Moodle courses. To enable this, you must also publish to the Single Sign On
Service Provider service.
Subscribe: Subscribe allows you to remotely enroll students in courses on the remote server.
It doesn't apply in the context of Mahara.
Portfolio Services:
You must enable both Publish and Subscribe to allow users to send content to Mahara.
SSO: (Identity Provider)
If you Publish the SSO service, users can go from Moodle to Mahara without having to login
again.
If you Subscribe to this service, users can go from Mahara to Moodle without having to login
again.
SSO: (Service Provider)
This is the converse of Identity Provider service. If you enabled Publish previously, you must
enable Subscribe here. If you enabled Subscribe previously, you must enable Publish here.
What just happened
You have just enabled Single Sign-On between Moodle and Mahara. We are now halfway through the setup
and now we can configure the Mahara to listen for Moodle users.
Enabling Mahara portfolio plugin
Now that you've enabled the basic Moodle networking to enable SSO, we need to enable the Mahara
portfolio plugin. Like the repository system, the portfolio system is designed as a plugin architecture. Each

system capable of being a portfolio system will have its own plugin. You need to enable it to make it
available for users.
The Mahara plugin is a little different than many of the portfolio plugins. You cannot activate it until
you've finished the preceding networking configuration.
1. Login to Moodle as an administrator.
2. From the Site administration menu, select Advanced features. Then select the Enable
Portfolios checkbox.
3. Then select Plugins and Authentication from the Site administration menu. Select the Manage
Authentication page.
4. Click on the Enable button next to the the MNet Authentication plugin.
5. From the Site administration menu, select Plugins and then select Portfolios.
6. Select Manage Portfolios.
7. In the Manage portfolios page, set the Mahara plugin to Enabled and Visible.
8. You'll then be taken to the Configure portfolio plugin page.
9.
9. Begin the configuration by giving the instance of the portfolio a name. The name will be used to identify
the portfolio system to users.
10. In the MNet Host option, choose the Mahara networking peer you created in the previous step. 11. If
you have Mahara 1.3, you can enable Leap2a Portfolio support. Leap2a is a portfolio interoperation
protocol which allows systems to easily share portfolio data. If you are using Mahara 1.3, you should enable
this protocol.
12. Click on Save.
What just happened
You have now enabled the Mahara portfolio plugin on your Moodle site. Between the Networking
configuration and the plugin, you should now have your Moodle site fully configured. Next, we need to
configure Mahara to listen to Moodle.

Enabling Mahara to listen to Moodle
Once you've configured Moodle for Mahara networking, you must also enable Mahara to listen for Moodle
users. There are two steps to this process. First, we need to enable networking at the site level. Then, we
need to create an institution for the Moodle users in Mahara.
1. Login to Mahara as a site admin.
2. In the menu at the top of the page, click Site administration.
3. From the Admin home page, select the Configure Site tab. Then select the Networking sub-tab.
4. Set Enable networking to Yes.
5. Be very careful if you decide to enable Auto-register all hosts. This will allow anyone who has a
Moodle site and knows the URL of your Mahara instance to connect their Moodle to your Mahara.
6. Click on Save changes.
7. Now we need to create a new institution for your Moodle site. Institutions in Mahara are like sub-sites,
with their own collection of users and peer groups. To start the process, click on the Institutions tab.
8. From the Administer Institutions page, click the Add Institution button.
9. Set the institution name to the name of your Moodle website. Set the display name to a shorter but
understandable version of the name.
10. Leave the institution expiry date set at Not specified.
11. Uncheck the Registration allowed button. This will disable the manual registration for this institution
and force all user accounts to be created through Moodle.
12. Leave the Default Membership Period, Theme, and Maximum User Accounts blank.
13. Click on Submit. Mahara will take you to the editing screen for your new institution.
14. Now we have a base institution but we need to associate this institution with Moodle. We will use an
authentication plugin to enable Mahara to communicate with Moodle. From the Authentication plugin
menu, choose XMLRPC – Authenticate by SSO from an external application and click Add.
In case of connection problems try to generate new public key and add it manually into Mahara.

15. The Add an Authority window will pop up. The Authority we are adding is your Moodle server. The
Authority Name should be something to help you identify the server later. Use "Moodle" or something
similar.
16. Copy the base URL for your Moodle server into the WWW root field.
17. The Site name is a display field to help users identify from which site they have come to Mahara.
18. Set the Application menu to Moodle.
19. If your Moodle site is running on a different port than the standard port 80, enter the port here i.e. 433.
20. If you set a Parent authority, users will be able to log in using that login method as well as the Moodle
SSO. If you want users to directly log in to Mahara as well as come through Moodle, set this to Internal.
21. If you don't set the Parent Authority, and users have the URL for the Mahara login, then you will need
to add a login error message to the text area below the parent authority. Be sure to include the link to your
Moodle login with the error message.
22. The SSO direction sets the direction of the authentication. To enable Moodle users to login to Mahara,
leave this set to They SSO in.
23. Set the checkbox for Update user info on login. This will enable Moodle to update any user profile
information that may have changed between logins.
24. The We auto-create users enables Mahara to automatically create users who come from Moodle but
don't have accounts in Mahara. You will usually want to set this to Yes.
25. The We import content option will allow your users to export content from Moodle and save it in
Mahara. Check this box.
26. Click on Submit.
27. You will now be taken back to the Administer Institutions page. Click on Submit again.
What just happened
You have now configured Mahara to accept Moodle user logins. Once a user decides to save a forum post
or an assignment from Moodle to their portfolio, Mahara will accept their authentication from Moodle and
create a user account for them if they don't have one already.

Enable the Mahara-Portfolio Plugin in Moodle:
It is necessary to allow the usage of MNET for authenticated users. Edit the role parameters in the Site
administration section, Users, Permissions, Define. Change the Roam to a remote application via MNet to
Allow.
Export function between Moodle and Mahara:
It is necessary to install zip on the Mahara Server: You can install the zip/unzip executables (beware, not
Winzip, but the real zip/unzip for Win32) in any place you want. I'd place them in a directory without white
space in its name, e.g. C:\zip\zip.exe and C:\zip\unzip.exe. Then in your Mahara config.php file add the
following two lines (note the use of forward slashes instead of backward slashes):
$cfg->pathtounzip = 'C:/zip/unzip.exe';
$cfg->pathtozip = 'C:/zip/zip.exe';