installing a carver bimini top - coverquest.com · instructions for carver 2 bow bimini top these...
TRANSCRIPT

UniversalDeck Hinges
Eye Straps
No. 8, No. 10 Screws, and Finish Washers
Polypropylene Adjuster Straps
Polypropylene Hold-Down Straps
Center Metal Cross Bow Section
Short, Medium, and Long Metal Side Bow Sections
Installing A Carver Bimini TopCarver Bimini Tops are a classy way to protect yourself and your boat from the elements. They also add style and color to your boat. These instructions make assembly and installation easy. Please read them carefully before beginning.
Important: Make sure all parts are included in your Bimini Top package. For stainless steel tops and square tube pontoon tops, please refer to the supplemental instructions on page 5.
PArTS LiST:
item 2 Bow Tops 3 Bow Tops 4 Bow Tops
Quantities for:
No. 8 screws, 1/2” length 12____ 16____ 20____ 20____No. 10 screws, 1” length 12____ 12____ 12____ 13____Finish Washers 4____ 4____ 4____ 2____Long, metal side bow sections 2____ 2____ 2____ 2____Medium, metal side bow sections 0____ 2____ 2____ 2____Short, metal side bow sections 2____ 2____ 4____ 4____Center metal cross bow sections (equal length) 2____ 3____ 4____ 4____Black, 1” polypropylene hold-down straps 4____ 4____ 4____ 2____Black, 1” polypropylene adjuster straps 0____ 2____ 4____ 4____Bimini Top Canvas 1____ 1____ 1____ 1____Deck Hinges 2____ 2____ 2____ 2____Eye Straps 4____ 4____ 4____ 2____Optional Storage Boot 1____ 1____ 1____ 1____Brace Kit (pair) 0____ 0____ 0____ 1____
Minimum tools needed:Drill with 9/64” bit, a Phillips head and a flat head screwdriver, pencil.Also helpful: Tape measure or other measuring device.
How To Prolong The Life Of Your Bimini Top
• Avoid letting water or snow stand on the top.
• Always travel with top in the stored position.
• Allow Bimini Top to dry thoroughly before folding for storage.
Carver Industries, Inc. Limited WarrantyThe materials and workmanship in Carver products are guaranteed to be free of defects at time of manufacture. The length of the warranty is determined by the type of material ordered. Please visit our website, www.carvercovers.com, for more information on length of warranty for each of our bimini top fabrics.
Warranty coverage commences on the original date of purchase. The warranty does not cover normal wear, weather soiling, stains from environmental pollution and/or standing water, cuts from sharp objects, neglect, accident or misuse. The bimini top must be properly installed, utilized and maintained.
If a defect is detected within 12 months of date of purchase, Carver Industries will repair or replace (at its discretion) the product free of charge.
If a defect is detected after 12 months and up to 36 months from date of purchase for three-year warranties, and up to 60 months from date of purchase for five-year warranties, Carver will (at its discretion) repair the defect on a time and material cost basis or replace the product on a pro-rated basis.Carver Industries, Inc. and/or seller provide this warranty in lieu of all other warranties, expressed or implied. Carver Industries, Inc. and/or seller disclaim all liability for special, incidental or consequential damages.
Some states/provinces do not allow limitations on how long an implied warranty lasts, or the exclusion or limitation of special, incidental or consequential damages, so these limitations and exclusions may not apply to you. This warranty gives you specific legal rights. You may also have other rights which vary from state/province to state/province.
Call before returningproduct to receive a Return Merchandise Authorization Number (RMA#), then send warranty claims to: Phone: (864) 457-5820
Mailing AddressCarver industries, inc.Post Office Box 399Landrum, SC 29356
Shipping AddressCarver industries, inc.212 North Lyles Ave.Landrum, SC 29356
Please enclose a note describing the defect and be sure to include your full name and address inside the package.
Packaged By: ______________________________
4-Bow Square Tube Tops
1
Please take extra care when unpacking and assembling your bimini top. Should you need to return the bimini top, it MUST be in its original, new condition. The bimini top canvas must be clean and dry, and free of debris (including pet hair). Frame components must not be scratched.
!

INSTRUCTIONS FOR CARVER
2 BOW BIMINI TOPThese instructions show how to assemble the top, with its frame and straps, starting upside down and inverting to an upright position when attaching to your boat.
Step 1. Spread the Bimini Top canvas out on a flat, clean area with the bottom side up. Sewn-in label indicates the bottom, or inside, and the back of the top.
Step 2. identify the hook shaped, long bow side frame parts and one of the center bow frame parts. Assemble the side bow and center bow parts as shown, aligning the pre-drilled holes. Use the 1/2”, no. 8 screws to connect the bow parts securely.
Step 3. repeat this procedure for the short bow aligning the pre-drilled holes and securing them with 1/2”, no. 8 screws.
Caution: If screw heads become burred, cover heads with duct tape to avoid damage to canvas.
Step 4. With bows assembled, first pass long bow assembly through sleeve in back of top. (This is the sleeve on the end with the sewn-in tag.) Note the position of the jaw slides and the single pre-drilled holes on the bow frame. (Holes should be facing in.)
Step 5. Pass the short bow through sleeve in front of top. Note the position of the single pre-drilled hold-down strap holes on the bow frame. (Holes should be facing in.)
Step 6. Pass looped end of each hold-down strap over each end of the long and short bows. Use a no. 8, 1/2” screw to fasten strap to bow frame at each pre-drilled hole position as shown. Position strap over hole and insert screw, with finish washer, through center of strap and into pre-drilled hole.
Step 7. Connect short frame ends to jaw slides on each side of long bow frame. Jaw slides should allow short bows to pivot, but be tight enough to hold securely.
See page 7 of this instruction sheet for mounting the Bimini Top onto your boat.
1
2
4
5
6
7
2
Need more help? See video demonstrations of assembly and installation procedures on our website, www.carvercovers.com!

(Adjuster straps will be used to achieve desired crown on Bimini Top after installation on boat. See enlargement on page 6.)
1
2
5 4
6
7
8
INSTRUCTIONS FOR CARVER
3 BOW BIMINI TOPThese instructions show how to assemble the top, with its frame and straps, starting upside down and inverting to an upright position when attaching to your boat.
Step 1. Spread the Bimini Top canvas out on a flat, clean area with the bottom side up. Sewn-in label indicates the bottom, or inside, and the back of the top.
Step 2. identify the hook shaped, long, medium, and short bow side frame parts. Using the long bow side frame parts, and one of the center bow frame parts, assemble the side bow and center bow parts as shown, aligning the pre-drilled holes. Use the 1/2”, no. 8 screws to connect the bow parts securely.
Step 3. repeat this procedure for the medium and short bows, aligning the pre-drilled holes and securing them with 1/2”, no. 8 screws.
Caution: If screw heads become burred, cover heads with duct tape to avoid damage to canvas.
Step 4. With bows assembled, first pass medium bow assembly through sleeve in front of top. (This is the sleeve opposite the end with the sewn-in tag.) Note the position of the single pre-drilled holes on the bow frame. (Holes should be facing in.)
Step 5. Pass the short bow assembly through the small sleeve in the center of the top and the long bow assembly through the sleeve at the back of the top. Again note the position of the single pre-drilled holes on the long bow frame. (Holes should be facing in.)
Step 6. Pass the buckled end of the adjuster strap through opening in fabric and around long bow. Thread looped end through buckle. Pass the looped end of the strap over the end of the short bow and slide down into position directly across from opening in fabric where buckled end is attached. (See illustration.) Leave at maximum length. repeat this step for the second strap. See enlargement.
Step 7. Pass looped end of each hold down strap over each end of the long and medium bows. Use a no. 8, 1/2” screw to fasten strap to bow frame at each pre-drilled hole position as shown. Position strap over hole and insert screw, with finish washer, through center of strap and into pre-drilled hole.
Step 8. Connect short frame ends to jaw slides on each side of long bow frame. repeat for medium frame ends as shown jaw slides should allow short bows to pivot, but be tight enough to hold securely.
See page 7 of this instruction sheet for mounting the Bimini Top onto your boat.
3
Need more help? See video demonstrations of assembly and installation procedures on our website,
www.carvercovers.com!

(Adjuster straps will be used to achieve desired crown on Bimini Top after installation on boat. See enlargement on pg. 6.)
INSTRUCTIONS FOR CARVER
4 BOW BIMINI TOPThese instructions show how to assemble the top, with its frame and straps, starting upside down and inverting to an upright position when attaching to your boat.
Step 1. Spread the Bimini Top canvas out on a flat, clean area with the bottom side up. Sewn-in label indicates the bottom, or inside, and the back of the top.
Step 2. identify the hook shaped, long, medium, and short bow side frame parts. Using the long bow side frame part, and one of the center bow frame parts, assemble the side bow and center bow parts as shown aligning pre drilled holes. Use the 1/2”, no. 8 screws to connect the bow parts securely.
Step 3. repeat this procedure for the medium and short bows, aligning the pre-drilled holes and securing them with 1/2” , no. 8 screws.
Caution: If screw heads become burred, cover heads with duct tape to avoid damage to canvas.
Step 4. With bows assembled, first pass medium bow assembly through sleeve in front of top. (This is the sleeve opposite the end with the sewn-in tag). Note the position of the jaw slides and the single pre-drilled holes on the bow frame. (Holes should be facing in.)
Step 5. Pass the 2 short bow assemblies through the 2 small sleeves in the center of the top and the long bow assembly through the sleeve at the back of the top. Again note the position of the jaw slides and the single pre-drilled holes on the long bow frame. (Holes should be facing in.)
Step 6. Pass the buckled end of the adjuster strap through opening in fabric and around long bow. Thread looped end through buckle. Pass the looped end of the strap over the end of the short bow and slide down into position directly across from opening in fabric where buckled end is attached. (See illustration.) Leave at maximum length. repeat this step for all 4 straps. See enlargement.
Step 7. Pass looped end of each hold-down strap over each end of the long and medium bows. Use a no. 8, 1/2” screw to fasten strap to bow frame at each pre-drilled hole position as shown. Position strap over hole and insert screw, with finish washer through center of strap and into pre-drilled hole
Step 8. Connect medium frame ends to jaw slides closest to end of long bow frame. Then connect short frame ends to the second set of jaw slides on the long bow. Connect other short frame to the jaw slides on the medium frame bow. Jaw slides should allow short bows to pivot, but be tight enough to hold securely.
1
2
5
4
6
7
8
4
Need more help? See video demonstrations of assembly and installation procedures on our website,
www.carvercovers.com!

Square Tube Pontoon Bimini Top
Additional Instructions for Buggy-Style Pontoon Top with Tails:
1. To fit tails properly, pull the tails straight down and mark the snap locations onto the rails.
2. Drill 1/8” hole where each snap is marked on the rail. install supplied screw stud into hole. repeat for all snaps.
3. Snap tails to the rail.
(Note: the additional hardware (6 screw studs) are included in the fabric package.)
Follow Instructions for 4-Bow Top with these exceptions:
Step 7. The long bow has a jaw slide installed to mount the brace kit, instead of the pre-drilled hole for the hold-down strap. (See photo on label.)
Stainless Steel Frame Supplemental Instructions
The assembly of a stainless steel frame requires the use of rivets instead of screws. For your convenience, a Hand riveting Tool and all necessary rivets are included with your bimini top. Simple instructions for operating a Hand riveting Tool are located on the back of the rivet Tool package. For your safety, it is highly recommended that you wear safety goggles when operating your Hand Riveting Tool.
Following the steps provided for a 2, 3 or 4-Bow top, use a 3/16” rivet (provided) where a no. 8, 1/2” screw is specified. Align the pre-drilled holes, place thick end of rivet in hole and nail-end of rivet in rivet tool. Occasionally it may be necessary to tap the rivet in place. Set rivet by compressing handle of rivet tool three times. rivet will pop and be seated firmly in place. repeat process at all pre-drilled holes.
Should a rivet seat improperly, it can be drilled out using a 3/16” drill bit. Extra rivets are provided for your convenience.
5
Caring for your Bimini Top Canvas
To keep your canvas looking its best, regularly brush off any loose dirt with a soft brush and rinse with lukewarm water (100º F maximum). To clean, a solution of lukewarm water and mild natural soap such as ivory™ may be used. rinse thoroughly and allow to air dry. The use of detergents is not recommended as it may diminish the water repellent finish on certain fabrics. Never machine wash, dry clean or iron the canvas. To spot clean stubborn soil or stains, a solution of 1/4 cup mild natural soap and 1 cup of bleach per gallon of lukewarm water may be used. Mist the soiled area and clean vigorously with a sponge, soft brush or clean towel. rinse thoroughly and allow to air dry.
Always fold down and secure bimini top in the stored position when trailering your boat.

How to Adjust the Inside Eye Ends
• Inside Eye Ends will rotate
• Place a soft cloth over the eye end to avoid marring, and carefully turn the Eye End using a pair of pliers.
Universal Deck Hinge with 90-degree stop allows mounting in virtually any position.
Standard Mount with screw heads to the outside as shown. For alternate mounting positions, variations may apply.
Step 3. Pass the looped end of the strap over the short bow and slide down into position.
Enlargement - Step 63 Bow And 4 Bow
Adjuster Strap Illustration
Step 1. Pass the buckled end of the adjuster strap through opening in fabric and around long bow.
Step 2. Thread looped end through buckle.
Looped End
Buckled End
if you wish to shorten the height of your 46” top, you may do so by cutting the desired length from the ends of the long bow (see drawing).
Once the top has been shortened use a 3/16” drill bit to carefully drill the hole for the rivet. Be sure the eye end is set in the correct position before you drill for the rivet. Use a rivet gun to set the rivet in place. Then follow the remaining instructions listed in the instruction sheet.
Note: Be sure all set screws, fittings and pre-installed hardware are tight.
Use hacksaw to cut the desired length. You can remove up to 10” from this section.
Additional Hardware included2 - 3/16” rivets2 - 7/8” Outside Eye Ends
Additional Instructions for Adjusting Height of 46” Bimini Top.
6
Do not attempt to shorten the short or medium bows.

5
3
INSTALLING THE BIMINITOP ON THE BOATStep 1. The Bimini Top is now ready to be inverted and positioned on the boat. This is easier with two or more people, one to hold the top in place, while another marks the positions of the hinges to be attached to the gunnel of the boat.
Step 2. Measure the marked position of the hinges carefully to make sure they are exactly opposite each other. if not aligned properly, the top may become warped or damaged and unstable while in use, or look unbalanced.
Step 3. Use a drill with a 9/64” bit to drill the pilot holes for the deck hinges. if drilling into fiberglass hollow out the pilot hole to avoid cracking fiberglass when installing the screws. Secure the deck hinges with 1”, no. 10 sheet metal screws provided.
Step 4. Place top on boat, attaching the long bow ends to the hinges securely. raise top to desired upright position and adjust each hold-down strap. Straps should be adjusted to a length that attaches to the boat at approximately 45º to 60º angles to hold the top securely to boat.
Step 5. Mark the position of the eye straps on the gunnel of the boat, measuring to make sure they are exactly opposite each other on the sides of the boat. Use a drill with a 9/64” bit to drill the pilot holes for the eye straps. Be sure to hollow out the pilot holes with the drill bit if drilling into fiberglass. Secure the eye straps with 1”, no. 10 sheet metal screws provided.
Step 6. Attach the snap hook to the eye straps and adjust the hold down straps.
Please Note: The process of assembling the bimini frame may cause the width of the frame to expand or retract at the mounting points. if the frame appears too wide or too narrow when you are ready to mount the top on the boat, simply mount one side and, with minimal force, push or pull the opposite side to fit the mounting point on the gunwale.
lmportant note to Top Installer/User: Be sure all set screws, fittings and pre-installed hardware are tight.
Desired crown on Bimini Top can be achieved using adjuster straps after installation is complete.
CAUTION: Always fold down and secure bimini top in the stored position when trailering your boat.
Installing a Carver Brace Kit Carver Brace Kits are available in: • Aluminum tubing with Nylon Fittings - Fixed or Adjustable • Aluminum tubing with Stainless Steel Fittings - Fixed only • Stainless Steel tubing with Stainless Steel Fittings - Fixed only
All Brace Kit packages contain: 2 - Braces 2 - 90° Deck Hinges 2 - Hinged Jaw Slides w/ screw and bolt 4 - #10 x 1” stainless steel screws (for mounting the deck hinges) 2 - 3/16” rivets (required only when cutting down braces)
All fixed braces are 48” long. Adjustable braces “telescope” from 22” to 44 ”, the desired length being “set” by a joiner section.
The height of fixed aluminum braces may be adjusted by removing and replacing one eye end on each brace. To remove the eye ends, use a 3/16” drill bit to drill out the rivets. Carefully measure and cut down the tubing to the desired length using a hacksaw. To replace the eye ends, use a 3/16” drill bit to carefully drill the hole for the replacement rivets. Be sure each eye end is set in the correct position before drilling for the rivet. Use a rivet gun to set the rivets in place.
The height of stainless steel braces is best adjusted by moving the mounting location fore or aft on the gunnel (given the hardness of the metal, stainless steel is not easily cut with household tools).
The typical location to attach the braces to the main (long) bow is 2 inches beneath the rear hold down straps.
To attach the braces, the bimini top must be deployed (in its upright position). Carefully measure the exact location for the hinged jaw slide on each side of the main (long) bow and mark with a black marker. Be sure the measurement is identical on port and starboard side. Open the hinged jaw slides and fasten each around the main bow at the marked locations by tightening the screw securely. insert the braces into the jaw slides by inserting the eye ends and securing tightly with the bolts provided. Once the braces are attached to the main bow, determine the mounting locations for the deck hinges. The typical mounting point will create a 45° to 60° angle with the main (long) bow when the braces are mounted to the gunnel. To mount the deck hinges, refer to Steps 2 and 3 in the Bimini Top Installation Instructions above.
7

Storage Boot
Braces
You can judge a boat by its cover!
Bimini Top Storage BootLet in the sun. Our 2, 3, and 4 bow Bimini Tops fold together and out of the way in the protective storage boot. Available in material to match your top.
Bimini Top Braces Also availableDesigned to hold your top up and out of the way when top is folded and not in use. Each package includes two 7/8” tubes which can be cut to desired lengths, 2 hinged jaw slides, 2 deck hinges, and all screws necessary for mounting. One pair to a package.
Slide Track Kit for TopsEach aluminum slide track kit includes 2 slide tracks, 2 sliding deck hinges with combined slide locks, 2 side-mount sliding deck hinges with separate slide locks, 4 end caps and all necessary screws for mounting. One pair to each package.
Bimini Top Replacement Hold-Down StrapsConstructed of 1” black polypropylene webbing with heavy nickel-platted brass snap hook and stainless steel adjustable buckle. Available in two lengths. Packed in sets of four.
Carver industries produces quality Boat Covers, Personal Watercraft Covers and Bimini Tops. We take great pride in the craftsmanship and attention to detail that goes into all of our products.
For more info about additional products available from Carver Industries, call us at (864) 457-5820 or you can visit us on the web at: www.carvercovers.com
Accessories
Installing a Carver Slide Track KitCarver Slide Track Kits are available in 18” , 24”, 36”, 48” and 60” lengths to accommodate virtually any boat and bimini top.
All Slide Track Kit packages contain: 2 - Aluminum Slide Tracks 2 - Sliding Deck Hinges with combined Slide Locks 2 - Side-Mount Sliding Deck Hinges 2 - Slide Locks (for use with side-mount hinges) 4 - End Caps All necessary for screws for mounting. (All screws are #8 x 1” Stainless Steel).
Slide track should be installed on a level surface and may be mounted on top of the gunnel or on the inside of the gunnel (side-mounted).
Determine the location for the slide track. Carefully measure and mark the mounting locations making sure the measurements are identical on port and starboard side so that the tracks will be exactly opposite. Slide tracks are pre-drilled for easy installation.
Use a 1/8” drill bit to drill screw holes. if drilling into fiberglass, it is important to hollow out the drill hole with the drill bit to avoid cracking the fiberglass when screws are tightened. insert all screws and tighten securely.
Slide the appropriate hinges into the track (combination hinges for standard mount track or side-mount hinges and slide locks for side-mounted track). The locks should be positioned forward of the hinges and tightened to a fixed position. Attach the end caps using the screws provided. The main (long) bow may now be inserted into the track by attaching the eye ends to the deck hinges. Adjust the position of the bimini top by loosening the locks and sliding them into the desired position. Always retighten the slide locks after adjusting the position of the bimini top
8
Standard Mount Fittings
Side Mount Fittings
®
Need more help? See video demonstrations of assembly and installation procedures on our website, www.carvercovers.com!

Universal Tower Bimini Top Parts List
Quantity Quantity with Quantity with Item Per Top Single Brace Option Double Brace Option No. 8 screws, 1/2" length 16___ 16___ 16___ No 10 screws, 1" length 12___ 12___ 12___ Finish washers 4___ 2___ 0___ Long, metal side bow sections 2___ 2___ 2___ Medium, metal side bow sections 2___ 2___ 2___ Short, metal side bow sections 2___ 2___ 2___ Center metal cross bow sections 3___ 3___ 3___ Black polypropylene hold-down straps 4___ 2___ 0___ Bimini Top Canvas 1___ 1___ 1___ Bimini Top Storage Boot 1___ 1___ 1___ Tower Clamps 2___ 4___ 6___ Rubber Gaskets 2___ 4___ 6___ Thumb Screws 2___ 4___ 6___ ¼” Spacer (used with thumb screws) 2___ 4___ 6___ Allen Wrench 1___ 1___ 1___ Eye straps 4___ 2___ 0___ 24-inch aluminum braces 0___ 2___ 4___ Hinged jaw slides 0___ 2___ 4___ Packaged by: ___________________
Carver Industries, Inc. P.O. Box 399 Landrum, South Carolina 29356 (864) 457-5820 www.carvercovers.com
Proudly Made in the USA

Carver Industries, Inc. Limited Warranty The materials and workmanship in Carver products are guaranteed to be free of defects at time of manufacture. The length of the warranty is determined by the type of material ordered. Please visit our website, www.carvercovers.com, for more information on length of warranty for each of our bimini top fabrics. Warranty coverage commences on the original date of purchase. The warranty does not cover normal wear, weather soiling, stains from environmental pollution and/or standing water, cuts from sharp objects, neglect, accident or misuse. The bimini top must be properly installed, utilized and maintained. If a defect is detected within 12 months of date of purchase, Carver Industries will repair or replace (at its discretion) the product free of charge. If a defect is detected after 12 months and up to 36 months from date of purchase for three-year warranties, and up to 60 months from date of purchase for five-year warranties, Carver will (at its discretion) repair the defect on a time and material cost basis or replace the product on a pro-rated basis. Carver Industries, Inc. and/or seller provide this warranty in lieu of all other warranties, expressed or implied. Carver Industries, Inc. and/or seller disclaim all liability for special, incidental or consequential damages. Some states/provinces do not allow limitations on how long an implied warranty lasts, or the exclusion or limitation of special, incidental or consequential damages, so these limitations and exclusions may not apply to you. This warranty gives you specific legal rights. You may also have other rights which vary from state/province to state/province.
Call before returning product to receive a Return Merchandise Authorization Number (RMA#), then send warranty claims to: Phone: (864) 457-5820 Mailing Address Carver Industries, Inc. Post Office Box 399 Landrum, SC 29356 Shipping Address Carver Industries, Inc. 212 North Lyles Ave. Landrum, SC 29356 Please enclose a note describing the defect and be sure to include your full name and address inside the package.
Please take extra care when unpacking and assembling your bimini top. Should you need to return the bimini top, it MUST be in its original, new condition. The bimini top canvas must be clean and dry, and free of debris (including pet hair). Frame components must not be scratched.

2
Universal Tower Bimini Top Assembly Instructions
These instructions show how to assemble the top, with its frame and straps, starting upside down and inverting to an upright position when attaching to your boat. Step 1. Spread the Bimini Top metal out on a flat, clean surface. All bow’s are color coordinated with stickers. A-Bow- Red B-Bow- White C-Bow- Blue
Step 2. Identify the hook-shaped, long (A-bow), medium (B-bow), and short (C-bow) side frame parts. Using the 2- A-bow side frame parts, and the center (red sticker) for the A-bow, assemble the side bow and center bow parts as shown, aligning the pre-drilled holes. Matching the colored stickers, use the #8 x 1/2” screws to connect the bow parts securely.
Centers
C-Bow
A-Bow
B-Bow
Step 3. Repeat this procedure for the medium (B-bow) and short (C-bow) , aligning the pre-drilled holes and securing them with #8 x 1/2” screws. Caution: If screw heads become burred, cover heads with duct tape to avoid damage to canvas. Step 4. Pass looped end of each hold-down strap over each end of the long (A-bow) and medium (B-bow). Use a #8 x 1/2” screw to fasten strap to bow frame at each pre-drilled hole position as shown. Position strap over hole and insert screw, with finish washer, through center of strap and into pre-drilled hole. Be sure the adjuster buckle is facing out.
Step 5. With bows assembled, first pass long (A-bow) assembly through sleeve at the rear of the top. (This is the sleeve with the sewn-in tag.) Be sure jaw slides are facing down. Pass the short (C-bow) assembly through the small center sleeve. Step 6. Pass the medium (B-bow) assembly through the sleeve at the front of the top. Be sure screws for hold-down straps are facing down. Step 7. Connect short (C-bow) frame ends to jaw slides on each side of long (A-bow) frame. Repeat for medium (B-bow) frame ends as shown. Jaw slides should allow short (C-bows) to pivot, but be tight enough to hold securely.
A-Bow
Jaw Slides
B-Bow

Universal Tower Bimini Top
Installation Instructions
1. Place the folded bimini top in the storage boot. 2. Using the straps on the boot, secure the bimini to the top of the tower adjusting
the straps to the desired storage height (typically beneath the speakers, if applicable).
3. Prepare to install the tower clamps. Clamps are standard 2-3/8” inside diameter. A 3-foot length of black rubber gasket is provided for each clamp. If the diameter of your tower is smaller than 2-3/8”, wrap a sufficient amount of rubber gasket around the tower so that the clamp will fasten tightly around the tower leg. For 1-7/8” diameter towers, the entire 3-foot length of gasket will be used. For 2-3/8” tower diameter, a single wrap of gasket will help prevent the clamp from scratching the tower.
4. Using the Allen wrench provided, install the tower clamps on the rear tower legs
parallel to the bottom fittings on the bimini frame. The tower clamps should be positioned with the thumb screw facing the inside of the boat. Since no drilling is required, the tower clamps may easily be adjusted as needed.
5. Using the thumb screws and ¼” spacers provided, attach the bimini to the tower
clamps and disconnect the boot straps so that the bimini drops to the rear. Note: Each spacer should be positioned so that it rests against flat side of the tower clamp. This allows the eye end to rotate freely on the thumb screw.
6. Unzip the boot and deploy the bimini. Pivot the bimini upward to install the
adjustable hold-straps located at each corner of the bimini top. 7. Mark the position of the eye straps on the gunnel of the boat, measuring to
make sure they are exactly opposite each other on each side of the boat. The position of the eye straps should be such that 45 to 90 degree angles are formed with the front and rear bow (a wide letter “M” as shown) when the hold-down straps are secured. Be sure to leave room for strap adjustment!
8. Use a drill with a 9/64” bit to drill the pilot holes for the eye straps. When drilling
into fiberglass, be sure to hollow out the pilot holes slightly with the drill bit. Secure the eye straps with the No. 10 x 1” sheet metal screws provided. Attach the hold-down straps to the eye straps.
9. Adjust the bimini to the desired position by adjusting the front and rear hold-
down straps. Make sure the canvas is as taut as possible to prevent loose fabric from whipping in the wind.
10. If you ordered brace options with your tower bimini, the braces are easy to
adjust and install. All braces are 24” long, standard. To reduce the length of a brace, simply remove the eye end by loosening the set screw. Cut the brace to the desired length using a hacksaw and replace the eye end. Fasten the hinged jaw slide to the frame by tightening the set screw, and secure the eye end to the bolt on the jaw slide. Attach the opposite end of the brace to the tower with the tower clamp, spacer and thumb screw (refer to Step 5), thumb screws toward the inside of the boat.
Tower Bimini, Stored Position
Placement of the hold-down straps should form the letter “M”. Straps should form a 45 to 90 degree angle with each bow.
Optional braces are easy to adjust and install.
Carver Industries, Inc. P.O. Box 399 Landrum, SC 29356 (864) 457-5820 www.carvercovers.com

Carver Square Tube Bimini Top with Zippered Sleeves Assembly and Installation Instructions Carver Bimini Tops are a classy way to protect yourself and your boat from the elements. They also add style and color to your boat. These instructions make assembly and installation easy. Please read them carefully before beginning.
Caution! Please take extra care when unpacking and assem-bling your bimini top. Should you need to return the bimini top, it MUST be in its orignal, new condition. The bimini top canvas must be clean and dry, and free of debris (including pet hair). Frame components must not be scratched.
PARTS LIST:
No. 8 screws, 1/2” length
No. 10 screws, 1” length
Finish Washers
Long, metal side bow sections
Medium, metal side bow sections
Short, metal side bow sections
Center metal cross bow sections (equal length)
Black, 1” polypropylene hold-down straps
Bimini Top Canvas
Deck Hinges
Eye Straps
Optional Storage Boot
Brace Kit (pair)
20____
13____
2____
2____
2____
4____
4____
2____
1____
2____
2____
1____
1____
ITEM: QUANTITY:
Minimum tools needed: Drill with 9/64” bit, a Phillips head and a flat head screwdriver, pencil. Also helpful: Tape measure or other measuring device.
Universal Deck
Hinges
Short, Medium, Long Metal Side Bow Sections
Center Metal Cross Bow Section
Polypropylene Hold-Down
Straps
Stainless Steel Fasteners
Eye Straps
Packaged By:
_______________________________________________
Carver Industries, Inc. P.O. Box 399 Landrum, South Carolina 29356 (864) 457-5820
For your convenience, Assembly and Installation Videos are available on our website, www.carvercovers.com
Carver products are proudly Made in the USA

These instructions show how to assemble the top, with its frame and straps, starting upside down and inverting to an upright position when attaching to your boat. Step 1. Identify the hook shaped, long A-bow, medium B-bow, and short C-bow frame parts (as shown in figure 1). Assemble one A-Bow frame part and one of the centers by aligning the pre-drilled holes and fastening securely with the #8 x 1/2” screws provided (as shown in figures 2 & 3). Step 2. Repeat this procedure for the medium and short bows, aligning the pre-drilled holes and securing them with #8 x 1/2” screws. Caution: If screw heads become burred, cover heads with duct tape to avoid damage to canvas. Step 3. Attach hold-down strap to each medium B-Bow. Pass looped end of the hold-down strap over the end of the B-Bow (as shown in figure 4). Be sure adjuster buckle is facing out. Use a #8 x 1/2” screw and one finish washer to fasten the strap to the bow at the pre-drilled hole (as shown in figures 5A and 5B). This is easily accomplished by positioning the strap over the pre-drilled hole and placing the finish washer around the shank of the screw before attaching. Note: Each long A-bow has a pre-installed jaw slide (as shown in figure 6A and 6B) to mount the rear braces (rather than a hold-down strap). Step 4. Connect the ends of the medium B-bows to the jaw slides located at the ends of the long A-bows (as shown in figure 7). Step 5. Connect the ends of one short C-bow to the remaining jaw slides on the long A-bow. Connect the ends of the other short C-bow to the jaw slides on the medium B-bow (as shown in figure 7). The jaw slides should allow the short C-bows to pivot, yet be tight enough to hold securely. Step 6. Mount the brace kit by connecting the eye ends to the remaining jaw slides on the long A-bow (as shown in figure 7). Note: The braces are pre-fitted with deck hinges on the opposite ends for mounting to the rails on the boat. Step 7. Spread the Bimini Top canvas out on a clean, flat surface with the bottom side up. The sewn-in label is located on the bottom (or inside) REAR of the canvas (as shown in figure 8). Unzip the sleeve zippers. Step 8. Take the assembled frame and lay it on top of the canvas with the long A-bow to the rear (at the sewn-in label). Fasten the zippers on the sleeves over the short C-bows of the frame (as shown in figure 9). You are now ready to flip the bimini top right-side up and mount to the boat (see reverse).
Additional Instructions for Buggy-Style Pontoon Top with Tails: 1. To fit tails properly, pull the tails straight down and mark the snap locations on the rails using a black marker. 2. Drill 1/8” hole where each snap location is marked on the rail Install the supplied screw studs into each hole. Repeat for all snaps. 3. Snap tails to the rails. (Note: the additional hardware (6 screw studs) is included in the canvas package.)
A-Bow
B-Bow C-Bow
Centers
A-Bow B-Bow
C-Bows
Jaw Slides
Brace Kit
1
2 3
4 5A
6A
8
7
5B
6B
Sewn-in tag is on the bottom side REAR of the canvas.
9
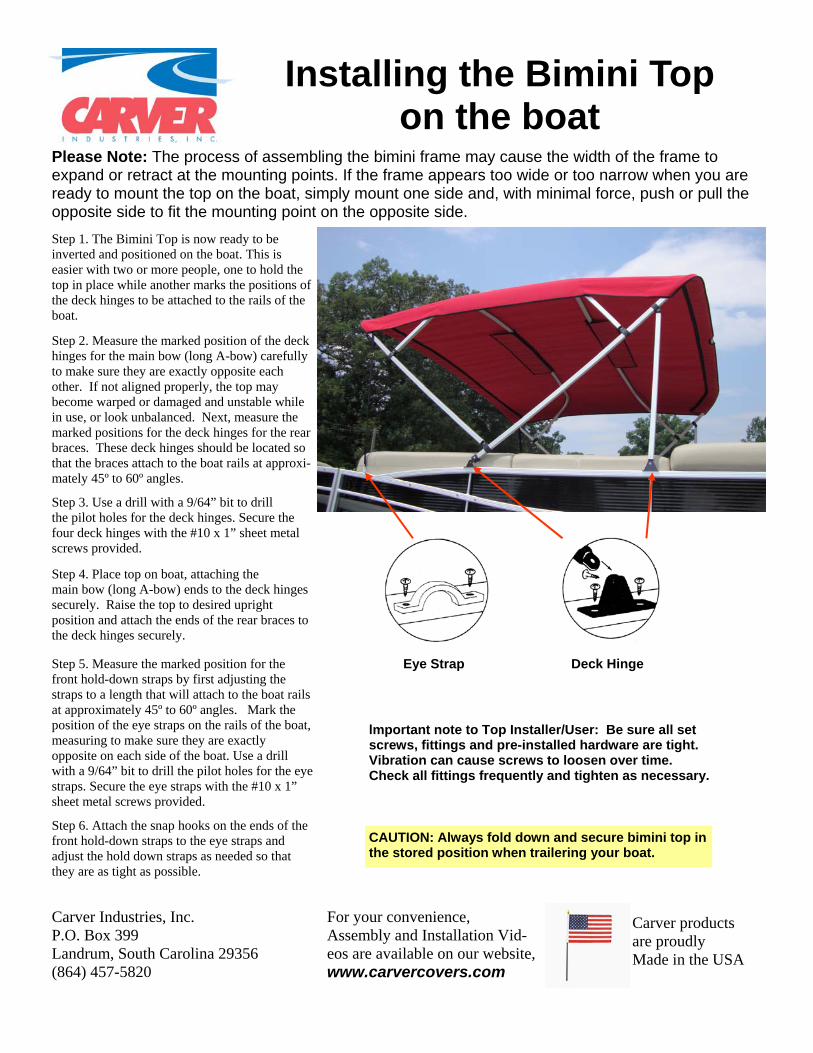
Step 1. The Bimini Top is now ready to be inverted and positioned on the boat. This is easier with two or more people, one to hold the top in place while another marks the positions of the deck hinges to be attached to the rails of the boat.
Installing the Bimini Top on the boat
Step 2. Measure the marked position of the deck hinges for the main bow (long A-bow) carefully to make sure they are exactly opposite each other. If not aligned properly, the top may become warped or damaged and unstable while in use, or look unbalanced. Next, measure the marked positions for the deck hinges for the rear braces. These deck hinges should be located so that the braces attach to the boat rails at approxi-mately 45º to 60º angles.
Step 3. Use a drill with a 9/64” bit to drill the pilot holes for the deck hinges. Secure the four deck hinges with the #10 x 1” sheet metal screws provided.
Step 4. Place top on boat, attaching the main bow (long A-bow) ends to the deck hinges securely. Raise the top to desired upright position and attach the ends of the rear braces to the deck hinges securely.
Step 5. Measure the marked position for the front hold-down straps by first adjusting the straps to a length that will attach to the boat rails at approximately 45º to 60º angles. Mark the position of the eye straps on the rails of the boat, measuring to make sure they are exactly opposite on each side of the boat. Use a drill with a 9/64” bit to drill the pilot holes for the eye straps. Secure the eye straps with the #10 x 1” sheet metal screws provided.
Please Note: The process of assembling the bimini frame may cause the width of the frame to expand or retract at the mounting points. If the frame appears too wide or too narrow when you are ready to mount the top on the boat, simply mount one side and, with minimal force, push or pull the opposite side to fit the mounting point on the opposite side.
lmportant note to Top Installer/User: Be sure all set screws, fittings and pre-installed hardware are tight. Vibration can cause screws to loosen over time. Check all fittings frequently and tighten as necessary.
CAUTION: Always fold down and secure bimini top in the stored position when trailering your boat.
Step 6. Attach the snap hooks on the ends of the front hold-down straps to the eye straps and adjust the hold down straps as needed so that they are as tight as possible.
Eye Strap Deck Hinge
Carver Industries, Inc. P.O. Box 399 Landrum, South Carolina 29356 (864) 457-5820
For your convenience, Assembly and Installation Vid-eos are available on our website, www.carvercovers.com
Carver products are proudly Made in the USA

Carver Industries, Inc. Limited Warranty The materials and workmanship in Carver products are guaranteed to be free of defects at time of manufacture. The length of the warranty is determined by the type of material ordered. Please visit our website, www.carvercovers.com, for more information on length of warranty for each of our bimini top fabrics. Warranty coverage commences on the original date of purchase. The warranty does not cover normal wear, weather soiling, stains from environmental pollution and/or standing water, cuts from sharp objects, neglect, accident or misuse. The bimini top must be properly installed, utilized and maintained. If a defect is detected within 12 months of date of purchase, Carver Industries will repair or replace (at its discretion) the product free of charge. If a defect is detected after 12 months and up to 36 months from date of purchase for three-year warranties, and up to 60 months from date of purchase for five-year warranties, Carver will (at its discretion) repair the defect on a time and material cost basis or replace the product on a pro-rated basis. Carver Industries, Inc. and/or seller provide this warranty in lieu of all other warranties, expressed or implied. Carver Industries, Inc. and/or seller disclaim all liability for special, incidental or consequential damages. Some states/provinces do not allow limitations on how long an implied warranty lasts, or the exclusion or limitation of special, incidental or consequential damages, so these limitations and exclusions may not apply to you. This warranty gives you specific legal rights. You may also have other rights which vary from state/province to state/province.
Call before returning product to receive a Return Merchandise Authorization Number (RMA#), then send warranty claims to: Phone: (864) 457-5820 Mailing Address Carver Industries, Inc. Post Office Box 399 Landrum, SC 29356 Shipping Address Carver Industries, Inc. 212 North Lyles Ave. Landrum, SC 29356 Please enclose a note describing the defect and be sure to include your full name and address inside the package.
Please take extra care when unpacking and assembling your bimini top. Should you need to return the bimini top, it MUST be in its original, new condition. The bimini top canvas must be clean and dry, and free of debris (including pet hair). Frame components must not be scratched.