installation instructions (mcs) - brick-it - use only brick it!!!! mortar mix it is specifically...
TRANSCRIPT
TOOLS REQUIRED: Hammer, Metal Snips, Brick Nip-per Caulking Gun, Drill, Mortar Bag, Joint, Tool, andMortar Mixer
SAFETY INFORMATION: Always work in a well venti-lated area with safety glasses, gloves and protectivemask. Always remember that metals have sharp edgesand alt product labels should be read before using.
*FASTENERS: Always use non-corrosive ribbed fas-teners with sufficient penetration to firmly secure grid towall. Look for studs where applicable.
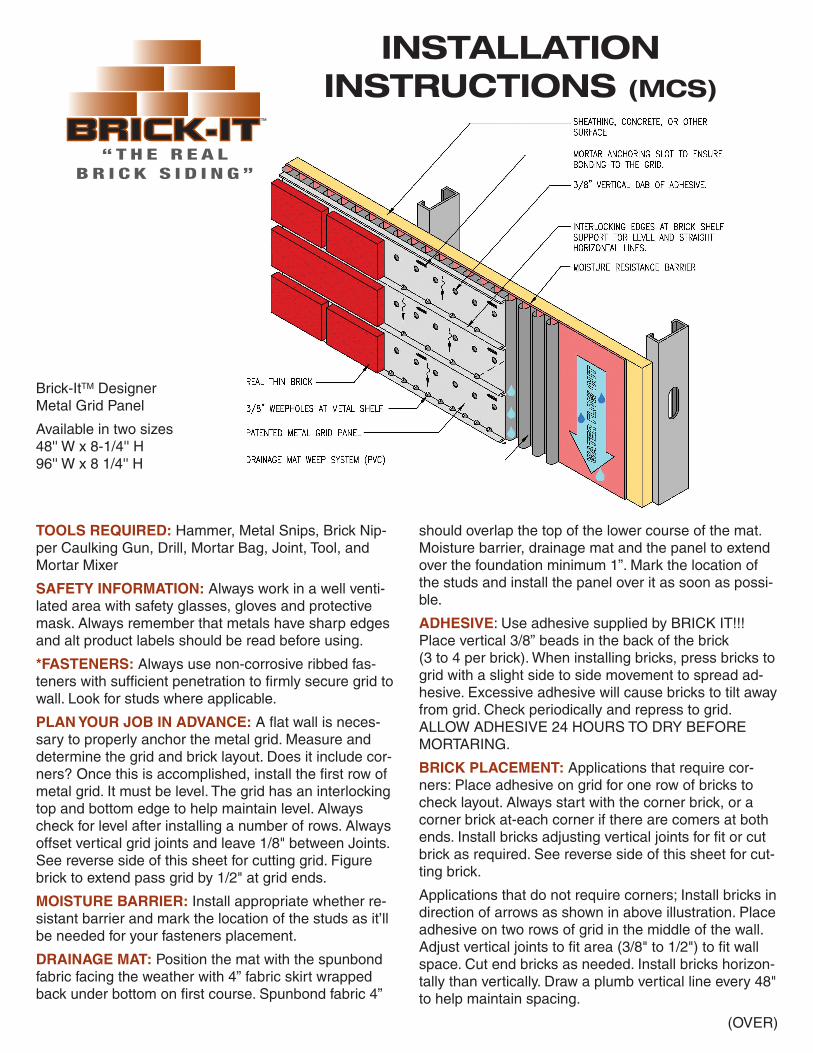
PLAN YOUR JOB IN ADVANCE: A flat wall is neces-sary to properly anchor the metal grid. Measure anddetermine the grid and brick layout. Does it include cor-ners? Once this is accomplished, install the first row ofmetal grid. It must be level. The grid has an interlockingtop and bottom edge to help maintain level. Alwayscheck for level after installing a number of rows. Alwaysoffset vertical grid joints and leave 1/8" between Joints.See reverse side of this sheet for cutting grid. Figurebrick to extend pass grid by 1/2" at grid ends.
MOISTURE BARRIER: Install appropriate whether re-sistant barrier and mark the location of the studs as it’llbe needed for your fasteners placement.
DRAINAGE MAT: Position the mat with the spunbondfabric facing the weather with 4” fabric skirt wrappedback under bottom on first course. Spunbond fabric 4”
should overlap the top of the lower course of the mat.Moisture barrier, drainage mat and the panel to extendover the foundation minimum 1”. Mark the location ofthe studs and install the panel over it as soon as possi-ble.
ADHESIVE: Use adhesive supplied by BRICK IT!!!Place vertical 3/8” beads in the back of the brick (3 to 4 per brick). When installing bricks, press bricks togrid with a slight side to side movement to spread ad-hesive. Excessive adhesive will cause bricks to tilt awayfrom grid. Check periodically and repress to grid. ALLOW ADHESIVE 24 HOURS TO DRY BEFOREMORTARING.
BRICK PLACEMENT: Applications that require cor-ners: Place adhesive on grid for one row of bricks tocheck layout. Always start with the corner brick, or acorner brick at-each corner if there are comers at bothends. Install bricks adjusting vertical joints for fit or cutbrick as required. See reverse side of this sheet for cut-ting brick.
Applications that do not require corners; Install bricks indirection of arrows as shown in above illustration. Placeadhesive on two rows of grid in the middle of the wall.Adjust vertical joints to fit area (3/8" to 1/2") to fit wallspace. Cut end bricks as needed. Install bricks horizon-tally than vertically. Draw a plumb vertical line every 48"to help maintain spacing.
INSTALLATION INSTRUCTIONS (MCS)
“ T H E R E A L B R I C K S I D I N G ”
(OVER)
Brick-ItTM Designer Metal Grid Panel
Available in two sizes48'' W x 8-1/4'' H96'' W x 8 1/4'' H

MORTARING - USE ONLY BRICK IT!!!! MORTAR MIXIt is specifically formulated for use with BRICK IT!!!products. Place mortar mix into a 5 gal. bucket and addcold water slowly until mortar is thoroughly mixed. Usea mortar mixer with 1/2" drill - stow speed, (approx 450-550 RPM) Mortar is properly mixed when it flows out ofmortar bag. Try a small sample area.
Apply mortar into Joints. Horizontal first, than vertical.Over fill joints with sufficient mortar to avoid leaving anyvoids. When mortar attains a firm consistency (checkevery 3 to 5 minutes) joints are ready for tooling.
Use the joint tool supplied with the mortar kit to strikejoints. Strike the vertical joints first than horizontaljoints. The joint tool is to insure that the depth of themortar joint does not exceed 1/8th of an inch below theface of the brick. Press the tool against the joint at a 45degree angle and strike joint. This will fill and seal themortar to the edges of the brick. Joints will have a con-cave finish. Fill any voids.
CUTTING METAL GRIDCIRCULAR SAW - HACKSAW: Cut back side of metalgrid with a very fine tooth blade. Remove any burring.
METAL SNIPS: Draw a straight vertical line on front ofgrid. Cut the flour (4) brick resting ledges and slightlybend metal. Now you can cut along drawn line.
NOTE: Grid can be folded around corners. Cut restingledges and fold.
CUTTING BRICKBricks can be cut with brick nippers or a brick cuttingsaw.
CLEANING BRICKAfter job is completed, it may be necessary to clean thebrick. Sure-ktean 600 is recommended. Refer to themanufactures instructions and precautionary steps be-fore using.
IMPORTANT: Do not begin cleaning until mortar jointsare properly cured. Allow a minimum of 24 to 72 hours.Always soak bricks and mortar Joints before applyingcleaner. Thoroughly flush wall and area after cleaning.
SEALER: Apply only after mortar joints are thoroughlycured. Allow a minimum of 2 weeks. Exterior applica-tions should always be sealed. Interior applications isrecommended.
IMPORTANT ITEMS FOR EVERY INSTALLATION1. Always anchor grid to substrate securely with ade-quate fasteners. Concrete and masonry walls requirefasteners and adhesive on rear of metal grid.
2. Always use a waterproof covering to protect woodsubstrates before installing gird.
3. Always stagger grid vertical joints. Leave minimum1/8” space between joints and 1/2” at ends.
4. Always allow at feast 24 hours for adhesive to drybefore mortaring joints.
5. Always use CLEAN COLD water to mix mortar. Flush hoses especially during warm weather.
6. Always slightly dampen bricks before mortaring. Especially during hot weather. Best time - evening before mortaring.
DO NOT MORTAR JOINTS WHEN DAY & NIGHTTIME TEMPERATURES ARE BELOW 40 DEGREES.
ALL INSTRUCTIONS MUST BE FOLLOWED TO INSURE A PROPER INSTALLATION.
“ T H E R E A L B R I C K S I D I N G ”
“THE INDUSTRY SOURCE FOR REAL THIN BRICK AND INSTALLATION SYSTEMS”
ph. 631.244.3993 fx. 631.244.6029
35 Carlough Road, Unit #3 Bohemia, New York 11716www.brickit.com