installation instructions condensing gas boiler - … instructions condensing gas boiler logamax...
TRANSCRIPT

Installation instructions Condensing gas boiler
Logamax plusGB162-80 kW/100 kW
7 74
6 80
0 10
3 (0
9/20
09) U
S/C
A
For the registered installer
Please read these instructions carefully before starting the operation
CAUTION!Before putting the boiler into operation read this manual carefully.
WARNING!Improper installation, adjustment, alteration, service or maintenance can cause injury, loss of life or property damage. Refer to this manual. For assistance or addi-tional information consult a qualified installer, service agency or the gas supplier.
CAUTION!The operating manual is part of the documentation that is delivered to the installa-tion's operator. Go through the information in this manual with the owner/operator and make sure that he or she is familiar with all the necessary operating instruc-tions.
NOTICE!In the Commonwealth of Massachusetts this boiler must be installed by a licensed Plumber or Gas Fitter.
Notice:• This manual is available in the English and French language.• This manual must be retained for future reference.
– Do not store or use gasoline or other flammable vapors and liquids in the vicinity of this or any other appliance.
– What to do if you smell gas• Do not try to light any boiler.• Do not touch any electrical switch; do not use any phone in your
building.• Immediately call your gas supplier from a neighbor’s phone.
Follow the gas supplier’s instructions.• If you cannot reach your gas supplier, call the fire department.– Installation and service must be performed by a qualified installer,
service agency or the gas supplier.
Warning: If the information in these instructions is not followed exactly, a fire or explosion may result causing property damage, personal injury or loss of life.
Product description
Logamax plus GB162-80 kW/100 kW - Subject to modifications resulting from technical improvements!2
Product description
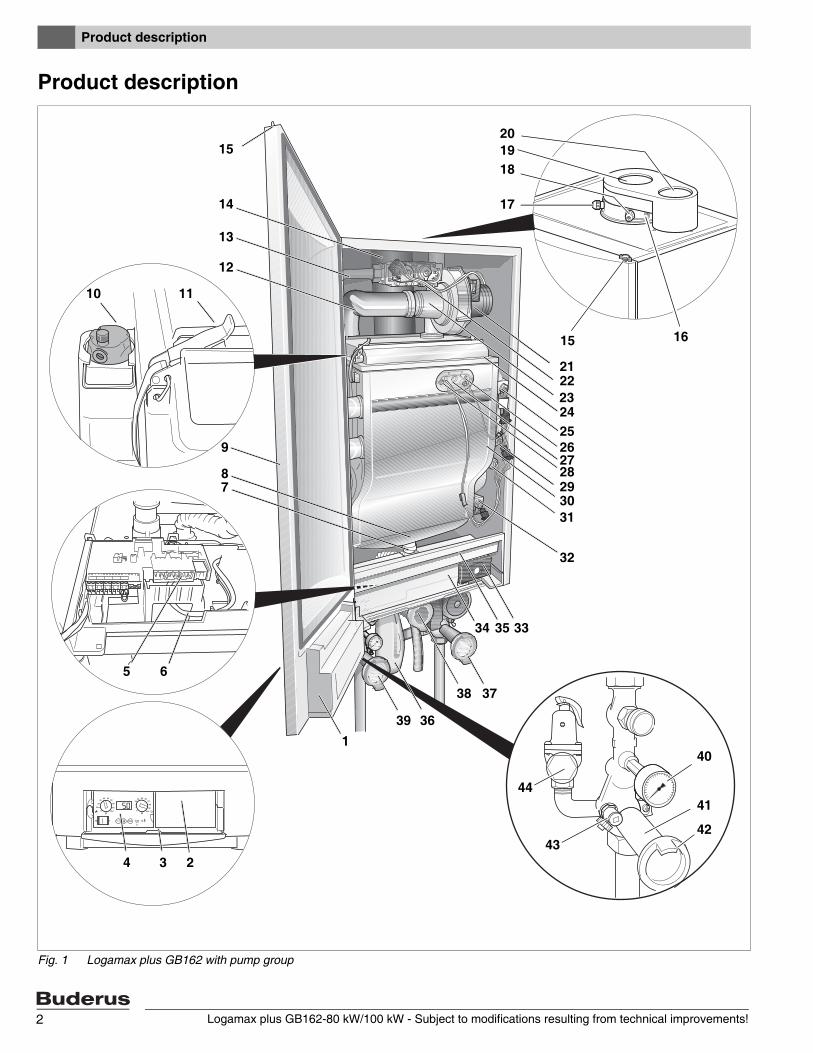
Fig. 1 Logamax plus GB162 with pump group
10
18
7
1
33
32
21
28
15
30
5
34 2
827269
11
12
13
15
14
2322
1920
2524
29
6
34
3738
3639
17
31
40
43
41
42
35
44
16
Product description
Logamax plus GB162-80 kW/100 kW - Subject to modifications resulting from technical improvements!3
1: BC10 basic controller receptacle2: Installation option for room controller, e.g. RC353: Cover with user manual compartment4: BC10 basic controller, can be expanded e.g. by the RC35 room controller5: Connection box (low-voltage and 120 VAC connections)6: Fan harness and mains lead of the pump7: Condensate drain outlet8: Condensate collector9: Boiler front door10: Automatic air vent11: Retaining clips12: Air intake for the fan13: Gas pipe14: Flue gas pipe15: Door lock16: Flue gas sensor17: Flue measuring point18: Measuring point for air intake19: Flue gas connection20: Air intake connection21: Fan22: Gas valve23: Venturi24: Burner cover25: Flow temperature sensor26: Ionization electrode27: Sighting glass28: Glow ignitor29: Safety temperature sensor30: Heat exchanger31: Pressure sensor32: Return temperature sensor33: Universal Burner Automatic Version 3 (UBA 3)34: Draw with function module integration options35: Cover shield36: Condensate trap
Pump group (scope of delivery):
37: Isolating valve, blue (CH boiler return) with pump, drain cock, check valve and thermometer38: Manual gas shutoff valve, yellow (GAS)39: Isolating valve, red (CH boiler flow) with drain cock, pressure gauge and thermometer40: Pressure gauge41: Isolating valve42: Thermometer (optional accessory)43: Drain valve44: Safety valve 30 psi (2 bar) (or 50 psi [3.45 bar] = optional)
The pump group also includes an insulation cover (see also pump group installation instructions).
Low loss header (scope of delivery, single appliance only):
45: Low loss header (not illustrated)
Contents
Logamax plus GB162-80 kW/100 kW - Subject to modifications resulting from technical improvements!4
Contents
1 General information . . . . . . . . . . . . . . . . . . . . . . . .6
2 Safety and general instructions . . . . . . . . . . . . . .72.1 Designated use . . . . . . . . . . . . . . . . . . . . . . .72.2 Hazard definitions . . . . . . . . . . . . . . . . . . . . .72.3 The following instructions must be observed .72.4 Heating system water quality . . . . . . . . . . . . .82.5 Pump test. . . . . . . . . . . . . . . . . . . . . . . . . . . .82.6 Freeze protection . . . . . . . . . . . . . . . . . . . . . .82.7 Tools, materials and further equipment . . . . .82.8 Disposal . . . . . . . . . . . . . . . . . . . . . . . . . . . . .8
3 Regulations and guidelines . . . . . . . . . . . . . . . . .93.1 Massachusetts Installations Only: . . . . . . . . .9
4 Dimensions and connections . . . . . . . . . . . . . . .114.1 Without pump group. . . . . . . . . . . . . . . . . . .114.2 With pump group . . . . . . . . . . . . . . . . . . . . .12
5 Packaging and transportation . . . . . . . . . . . . . .135.1 Scope of delivery . . . . . . . . . . . . . . . . . . . . .135.2 Transporting the boiler . . . . . . . . . . . . . . . . .13
6 Installation . . . . . . . . . . . . . . . . . . . . . . . . . . . . . .156.1 Requirements for the installation room . . . .156.2 Installing the boiler . . . . . . . . . . . . . . . . . . . .156.3 Water and Gas connection . . . . . . . . . . . . .176.4 Connecting the condensate drain pipe . . . .216.5 Combustion Air and Ventilation Openings . .226.6 Flue gas adapter . . . . . . . . . . . . . . . . . . . . .246.7 Installation of the Exhaust and Air Intake
system . . . . . . . . . . . . . . . . . . . . . . . . . . . . .24
7 Electrical connections . . . . . . . . . . . . . . . . . . . . .307.1 External connection board connections . . . .307.2 Installing function modules (accessories) . .337.3 Electrical wiring diagram . . . . . . . . . . . . . . .37
8 Operation . . . . . . . . . . . . . . . . . . . . . . . . . . . . . . .398.1 BC10 basic controller. . . . . . . . . . . . . . . . . .398.2 BC10 operating instructions. . . . . . . . . . . . .41
9 Start-up procedure . . . . . . . . . . . . . . . . . . . . . . . 459.1 Check for gas leaks . . . . . . . . . . . . . . . . . . 469.2 Fill the heating system . . . . . . . . . . . . . . . . 479.3 Fill the condensate trap with water . . . . . . . 489.4 Bleed the gas supply valve. . . . . . . . . . . . . 499.5 Check the air/flue gas connection . . . . . . . 499.6 Checking the appliance configuration . . . . 509.7 Measure the gas inlet pressure
(working pressure) . . . . . . . . . . . . . . . . . . . 509.8 Check and adjust the gas/air ratio . . . . . . . 529.9 Carry out a leakage test in operating
conditions . . . . . . . . . . . . . . . . . . . . . . . . . . 549.10 Measure the flue gases CO emissions. . . . 559.11 Carry out a function test . . . . . . . . . . . . . . . 569.12 Measure the ionization current . . . . . . . . . . 569.13 Test the Ignition Safety shut off device . . . 579.14 Boiler settings. . . . . . . . . . . . . . . . . . . . . . . 589.15 Final activities. . . . . . . . . . . . . . . . . . . . . . . 60
10 Shutting down the system. . . . . . . . . . . . . . . . . 6110.1 Shut down the heating system using
the basic controller . . . . . . . . . . . . . . . . . . . 6110.2 Shutting down the heating system if there
is a risk of freezing (interruption of use) . . . 6110.3 Shutting down the heating system in
the event of an emergency. . . . . . . . . . . . . 61
11 Inspection . . . . . . . . . . . . . . . . . . . . . . . . . . . . . . 6211.1 Prepare the heating system for inspection . 6211.2 Carry out a visual check for general
signs of corrosion . . . . . . . . . . . . . . . . . . . . 6311.3 Gas valve leakage test . . . . . . . . . . . . . . . . 6311.4 Measure the ionization current . . . . . . . . . . 6311.5 Measure the gas inlet pressure
(working pressure) . . . . . . . . . . . . . . . . . . . 6411.6 Check and adjust the gas/air ratio . . . . . . . 6411.7 Carry out a leakage test in operating
conditions . . . . . . . . . . . . . . . . . . . . . . . . . . 6411.8 Measure the flue gases CO emissions. . . . 6411.9 Fill the heating system . . . . . . . . . . . . . . . . 6411.10 Check the air/flue gas connection . . . . . . . 64
12 Maintenance . . . . . . . . . . . . . . . . . . . . . . . . . . . . 6512.1 Prepare the heating system for
maintenance. . . . . . . . . . . . . . . . . . . . . . . . 6512.2 Remove the boiler door . . . . . . . . . . . . . . . 6512.3 Clean the heat exchanger, burner and
condensate trap . . . . . . . . . . . . . . . . . . . . . 6612.4 Check and adjust the gas/air ratio . . . . . . . 7112.5 Function check . . . . . . . . . . . . . . . . . . . . . . 71
Contents
Logamax plus GB162-80 kW/100 kW - Subject to modifications resulting from technical improvements! 5
13 Display information . . . . . . . . . . . . . . . . . . . . . . 7213.1 Removing the control panel . . . . . . . . . . . . 7213.2 Replacing the control panel . . . . . . . . . . . . 7313.3 BC10 Display readings . . . . . . . . . . . . . . . . 7313.4 BC10 Display settings. . . . . . . . . . . . . . . . . 7313.5 BC10 Display codes . . . . . . . . . . . . . . . . . . 74
14 Technical specifications . . . . . . . . . . . . . . . . . . 8114.1 Technical specifications of GB162-boilers
at sea level (0-4,000 ft) . . . . . . . . . . . . . . . . 8114.2 Technical specifications of GB162-boilers
at high altitude (4,000-10,000 ft). . . . . . . . . 82
15 Reports . . . . . . . . . . . . . . . . . . . . . . . . . . . . . . . . 8515.1 Start-up report. . . . . . . . . . . . . . . . . . . . . . . 8515.2 Inspection report . . . . . . . . . . . . . . . . . . . . . 8615.3 Service report . . . . . . . . . . . . . . . . . . . . . . . 87
16 Spare parts . . . . . . . . . . . . . . . . . . . . . . . . . . . . . 88
17 Index. . . . . . . . . . . . . . . . . . . . . . . . . . . . . . . . . . . 91

General information1
Logamax plus GB162-80 kW/100 kW - Subject to modifications resulting from technical improvements!6
1 General informationAbout these instructions
These Installation Instructions contain important information for the safe and professional installation, start-up and main-tenance of the boiler with boiler input rating of 80 kW and 100 kW.
These Installation Instructions are intended for professional installers, who have the necessary training and experience for working on heating and gas systems.
Cascade installation
Special cascade units (accessories) have been developed to enable this boiler to be installed in a cascade system. Every cascade unit includes an installation frame, horizontal headers, connection pipes for the boiler, main gas pipe and a vertical low loss header.
Cascade units are available for installing the boilers inline or back-to-back. These cascade units make installing a cascade system easier and less labor intensive. Please contact Buderus for further information about cascade systems.
Updating of documentation
The following technical documentation is available for the Logamax plus GB162-80 kW/100 kW:
– Installation instructions– User’s manual– Service manual.
Please contact us if you have any suggestions for improve-ment or corrections.
Subject to technical modifications
Slight changes may be made without prior notice to the illus-trations, process steps and technical data as a result of our policy of continuous improvement.
GB162 Natural Gas Propane Gas80 kW 290,000 btu/hr 270,000 btu/hr
100 kW 333,000 btu/hr 315,000 btu/hr
Table 1 max. input rate
Safety and general instructions 2
Logamax plus GB162-80 kW/100 kW - Subject to modifications resulting from technical improvements! 7
2 Safety and general instructionsPlease observe these instructions in the interest of your own safety.
2.1 Designated useThe boiler was designed for heating water for a central heating system and generating domestic hot water.
The boiler is suitable for connection to fully pumped, sealed water systems ONLY.
The boiler can be installed either as a single system or as part of a multiple system (cascade system) with a maximum of 8 boilers connected together.
2.2 Hazard definitionsThe following defined terms are used throughout the docu-mentation to bring attention to the presence of hazards of various risk levels. Notices give important information concerning the operation of the product.
2.3 The following instructions must be observed
– The boiler must only be used for its designated purpose, observing the Installation Instructions.
– Only use the boiler in the combinations and with the accessories and spares listed.
– Maintenance and repairs must only be carried out by trained professionals.
– You are only permitted to operate the condensing gas boiler with the combustion air/flue gas system that has been specifically designed and approved for this type of boiler.
– Please note that local approval of the flue system and the condensate connection to the public sewer system may be required.
– If boiler installation is provided as replacement heater, DO NOT connect new boiler venting to an existing vent system, if it is shared with other appliances.
You must also observe:
– The local building regulations stipulating the installation rules at the time of installation.
– The local building regulations concerning the air intake and outlet systems and the chimney connection.
– The regulations for the power supply connection.– The technical rules laid down by the gas utility company
concerning the connection of the gas burner fitting to the local gas main.
– The instructions and standards concerning the safety equipment for the water/space heating system.
– The Installation Instructions for building heating systems.
– The boiler must be located in an area where leakage of the tank or connections will not result in damage to the area adjacent to the boiler or to lower floors of the structure. When such locations cannot be avoided, it is recommended that a suitable drain pan, adequately drained, be installed under the boiler. The pan must not restrict combustion air flow.
– The boiler must be installed such that the gas ignition system components are protected from water (dripping, spraying, rain etc.) during boiler operation and service.
– The boiler must not be installed on carpeting.– Do not restrict or seal any air intake or outlet openings.– If you find any defects, you must inform the owner of the
system of the defect and the associated hazard in writing.
DANGERIndicates the presence of hazards that will cause severe personal injury, death or substantial property damage.
WARNINGIndicates the presence of hazards that can cause severe personal injury, death or substantial property damage.
CAUTIONIndicates presence of hazards that will or cause minor personal injury or property damage.
CAUTIONRisk of electric shock.
Indicates presence of hazards due to electric shock.
NOTICEIndicates special instructions on installation, operation or maintenance that are important but not related to personal injury or property damage.
Safety and general instructions2
Logamax plus GB162-80 kW/100 kW - Subject to modifications resulting from technical improvements!8
2.4 Heating system requirements– Installing a dirt trap like a y-strainer and a desludging
device is required. This must be installed in the heating system in the immediate vicinity of the boiler, in an easily accessible position between the boiler and the lowest point in the return of the system.
– Clean the dirt trap at every annual service.– Never use salt bedding type exchangers (ion
exchangers) to soften the water.
– The low loss header and boiler connection set must be installed (supplied with the boiler).
– When using oxygen-permeable pipes (plastic), e.g. for floor heating systems, you must separate the system using secondary heat exchangers.
2.5 Heating system water qualityThe quality of the system water is very important. Poor water quality can damage heating systems due to scale formation and corrosion. For further details, please see the accompanying "Water quality requirements for Logamax plus GB162-80 kW/100 kW" manual.
2.6 Pump testIf the boiler has not been operational for approx. 4 weeks, the pump will automatically run for 10 seconds every 24 hours. This pump test is first carried out 24 hours after the main power has been connected to the boiler.
2.7 Freeze protectionThe boiler has integrated freeze protection that switches the boiler ON at a space heating (CH) water temperature of 45 °F (7 °C) and switches it OFF at a CH flow tempera-ture of 59 °F (15 °C).
This feature does not protect the central heating system from freezing. If there is a risk of radiators or pipe sections freezing up, we recommend setting the pump run-over time to 24 hours. See paragraph 13.4 on page 73.
2.8 Tools, materials and further equipmentFor the installation and maintenance of the boiler you will need the standard tools for space heating, gas and water fitting. In addition, a handtruck with a fastening belt is useful.
2.9 Disposal– Dispose of the boiler packaging in an environmentally
sound manner.– Dispose of components of the heating system (e. g.
boiler or control device), that must be replaced in an environmentally responsible manner.
DANGERif flammable gas explodes. Beware if you smell gas: there may be an explosion hazard!
Warning: If the information in these instructions is not followed exactly, a fire or explosion may result causing property damage, personal injury or death.
Do not store or use gasoline or other flam-mable vapors and liquids in the vicinity of this or any other boiler.
What to do if you smell gas
Do not try to light any boiler.
Do not touch any electrical switch; do not use any phone in your building.
Immediately call your gas supplier from a neighbor’s phone. Follow the gas supplier’s instructions.
If you cannot reach your gas supplier, call the fire department.
Installation and service must be performed by a qualified installer, service agency or the gas supplier.
WARNINGDanger of fatal accident from explosive fumes.
Only carry out work on gas pipes and fittings if you are properly registered.
WARNINGDangerous flue gas can escape if the air supply is insufficient.
Make sure that air vents are not reduced in size or obstructed.
The boiler may only be operated after the defect has been remedied.
Warn the user of the system of the defect verbally and in writing.
CAUTIONRisk of system damage due to unsuitable heating system water.
If oxygen-permeable pipes are used, e.g. for underfloor heating systems, the systems must be separated from one another by plate heat exchangers. Unsuitable heating system water promotes sludge and corrosion forma-tion. This can result in heat exchanger malfunction and damage.
Regulations and guidelines 3
Logamax plus GB162-80 kW/100 kW - Subject to modifications resulting from technical improvements! 9
3 Regulations and guidelinesThe installation must conform to the requirements of the authority having jurisdiction or, in the absence of such requirements, to the latest edition of the National Fuel Gas Code, ANSI Z223.1./NFPA 54. In Canada, installation must be in accordance with the requirements of CAN/CSA B149.1, Natural Gas and Propane Installation Code.
Where required by the authority having jurisdiction, the installation must conform to the Standard for Controls and Safety Devices for Automatically Fired Boilers, ANSI/ASME CSD-1.
Install CO detectors per local regulations. Boiler requires yearly maintenance, see chapter 12 "Maintenance", page 65.
Operating Limits of the boiler:
Max. boiler temperature: 230 °F (110 °C)Max. operating pressure: 30 psi (2.6 bar)– with optional pressure relief valve 50 psi (3.45 bar)
The hot water distribution system must comply with all applicable codes and regulations. When replacing an existing boiler, it is important to check the condition of the entire hot water distribution system to ensure safe opera-tion.
3.1 Massachusetts Installations Only:(a) For all side wall side horizontally vented gas fueled equipment installed in every dwelling, building or structure used in whole or in part for residential purposes, including those owned or operated by the Commonwealth and where the side wall exhaust vent termination is less than seven (7) feet above finished grade in the area of the venting, including but not limited to decks and porches, the following requirements shall be satisfied:
1. INSTALLATION OF CARBON MONOXIDE DETECTORS. At the time of installation of the side wall horizontal vented gas fueled equipment, the installing plumber or gasfitter shall observe that a hard wired carbon monoxide detector with an alarm and battery back-up is installed on the floor level where the gas equipment is to be installed. In addition, the installing plumber or gasfitter shall observe that a battery operated or hard wired carbon monoxide detector with an alarm is installed on each additional level of the dwelling, buiding or structure served by the side wall horizontal vented gas fueled equipment. It shall be the responsibility of the property owner to secure the services of qualified licensed professionals for the installation of hard wired carbon monoxide detectors.
a. In the event that the side wall horizontally vented gas fueled equipment is installed in a crawl space or an attic, the hard wired carbon monoxide detector with alarm and battery back-up may be installed on the next adjacent floor level.
b. In the event that the requirements of this subdivision can not be met at the time of completion of installation, the owner shall have a period of thirty (30) days to comply with the above requirements; provided, however, that during said thirty (30) day period, a battery operated carbon monoxide detector with an alarm shall be installed.
2. APPROVED CARBON MONOXIDE DETECTORS. Each carbon monoxide detector as required in accordance with the above provisions shall comply with NPA 720 and be ANSI/UL 2034 listed and IAS certified.
3. SIGNAGE. A metal or plastic identification plate shall be permanently mounted to the exterior of the building at a minimum height of eight (8) feet above grade directly in line with the exhaust vent terminal for the horizontally vented gas fueled heating appliance or equipment. The sign shall read, in print size no less than one-half (½) inch in size, “GAS VENT DIRECTLY BELOW. KEEP CLEAR OF ALL OBSTRUCTIONS”.
4. INSPECTION. The state or local gas inspector of the side wall horizontally vented gas fueled equipment shall not approve the installation unless, upon inspections, the inspector observes carbon monoxide detectors and signage installed in accordance with the provisions of 248 CRM 5.08(2)(a)1 through 4.
(b) EXEMPTIONS: The following equipment is exempt from 248 CRM 5.08(2)(a)1 through 4:
1. The equipment listed in Chapter 10 entitled “Equipment Not Required To Be Vented” in the most currect edition of NFPA 54 as adopted by the board: and
2. Product Approved side wall horizontally vented gas fueled equipment installed in a room or structure separate from the dwelling, building or structure used in whole or in part for residential puposes.
Regulations and guidelines3
Logamax plus GB162-80 kW/100 kW - Subject to modifications resulting from technical improvements!10
(c) MANUFACTURERS REQUIREMENTS - GAS EQUIP-MENT VENTING SYSTEM REQUIRED.When the manufacturer of Product Approved side wall horizontally mounted gas equipment provides a venting system design or venting system components with the equipment, the instructions provided by the manufacturer for the installation of the equipment and venting shall include:
1. Detailed instructions for the installation of the venting system or the venting system components: and
2. A complete parts list for the venting system design or venting system.
(d) MANUFACTURERS REQUIREMENTS - GAS EQUIP-MENT VENTING SYSTEM NOT PROVIDED.When the manufacturer of Product Approved side wall horizontally vented gas fueled equipment does not provide the parts for the venting of flue gases, but identifies “special venting systems”, the following requirements shall be satisfied by the manufacturer:
1. The referenced “special venting systems” shall be included with the appliance or equipment installation instructions: and
2. The “special venting systems” shall be Product Approved by the Board, and the instructions for that system shall include a parts list and detailed installation instructions.
(e) A copy of all instructions for all Product Approved side wall horizontally vented gas fueled equipment, all venting instructions, all parts lists for venting instructions, and/or venting design instructions shall remain with the appliance or equipment at the completion of the installation.

Dimensions and connections 4
Logamax plus GB162-80 kW/100 kW - Subject to modifications resulting from technical improvements! 11
4 Dimensions and connections
4.1 Without pump group
Fig. 2 Dimensions and connections without pump group
C
D FE
G
4.1” (103.5 mm)
38.5
8” (
980
mm
)5.
3” (
135
mm
)
1.4” (35 mm)5.4” (138 mm)6.4” (162 mm)
1.54” (39 mm)5.1” (130 mm)
5.5” (140 mm)
5.1” (130 mm)
A B
0 020.5” (520 mm)
39.5
” (10
03 m
m)
40,5
5” (
1030
mm
)51
.6” (
1310
mm
)
16” (406 mm)
GD/F
E
A/B
6” (152 mm)
18.3” (465 mm) 0.25” (6 mm)16.5" (420 mm)
1.2”
(30
mm
)
24.8” (630 mm)
20.5" (520 mm)
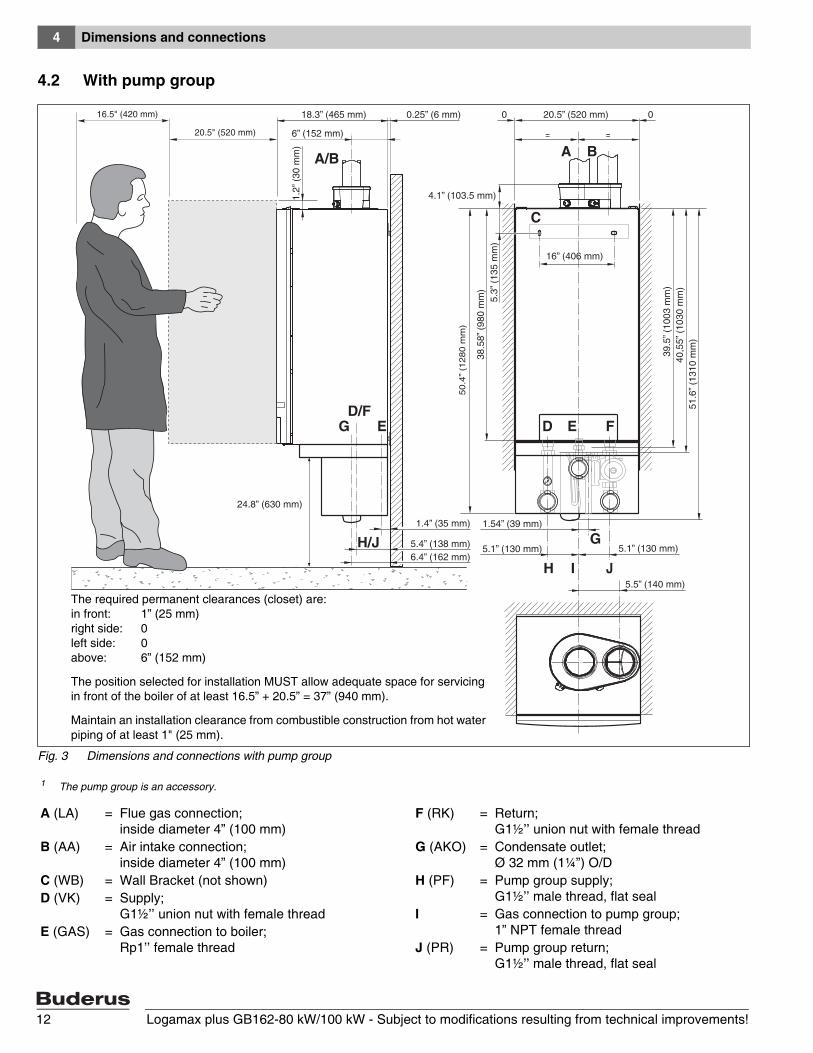
The required permanent clearances (closet) are:in front: 1” (25 mm)right side: 0left side: 0above: 6” (152 mm)
The position selected for installation MUST allow adequate space for servicing in front of the boiler of at least 16.5” + 20.5” = 37” (940 mm).
Maintain an installation clearance from combustible construction from hot water piping of at least 1" (25 mm).
A (LA) = Flue gas connection; inside diameter 4” (100 mm)
B (AA) = Air intake connection; inside diameter 4” (100 mm)
C (WB) = Wall Bracket (not shown)D (VK) = Supply;
G1½’’ union nut with female thread
E (GAS) = Gas connection to boiler; Rp1’’ female thread
F (RK) = Return; G1½’’ union nut with female thread
G (AKO) = Condensate outlet; Ø 32 mm (1¼”) O/D
Dimensions and connections4
Logamax plus GB162-80 kW/100 kW - Subject to modifications resulting from technical improvements!12
4.2 With pump group
Fig. 3 Dimensions and connections with pump group
G
C
D FE
4.1” (103.5 mm)
38.5
8” (
980
mm
)5.
3” (
135
mm
)
1.4” (35 mm)
5.4” (138 mm)6.4” (162 mm)
1.54” (39 mm)
5.1” (130 mm)
5.5” (140 mm)
5.1” (130 mm)
A B
0 020.5” (520 mm)
39.5
” (10
03 m
m)
40,5
5” (
1030
mm
)51
.6” (
1310
mm
)
16” (406 mm)
GD/F
E
A/B
6” (152 mm)
18.3” (465 mm) 0.25” (6 mm)
H/J G
H I J
1.2”
(30
mm
)
50.4
” (1
280 m
m)
24.8” (630 mm)
16.5" (420 mm)
20.5" (520 mm)
The required permanent clearances (closet) are:in front: 1” (25 mm)right side: 0left side: 0above: 6” (152 mm)
The position selected for installation MUST allow adequate space for servicing in front of the boiler of at least 16.5” + 20.5” = 37” (940 mm).
Maintain an installation clearance from combustible construction from hot water piping of at least 1" (25 mm).
1 The pump group is an accessory.
A (LA) = Flue gas connection; inside diameter 4” (100 mm)
B (AA) = Air intake connection; inside diameter 4” (100 mm)
C (WB) = Wall Bracket (not shown)D (VK) = Supply;
G1½’’ union nut with female threadE (GAS) = Gas connection to boiler;
Rp1’’ female thread
F (RK) = Return; G1½’’ union nut with female thread
G (AKO) = Condensate outlet; Ø 32 mm (1¼”) O/D
H (PF) = Pump group supply; G1½’’ male thread, flat seal
I = Gas connection to pump group; 1” NPT female thread
J (PR) = Pump group return; G1½’’ male thread, flat seal
Packaging and transportation 5
Logamax plus GB162-80 kW/100 kW - Subject to modifications resulting from technical improvements! 13
5 Packaging and transportation
5.1 Scope of deliveryThe boiler is delivered factory-assembled.
When receiving the delivery, check if the packaging is intact.
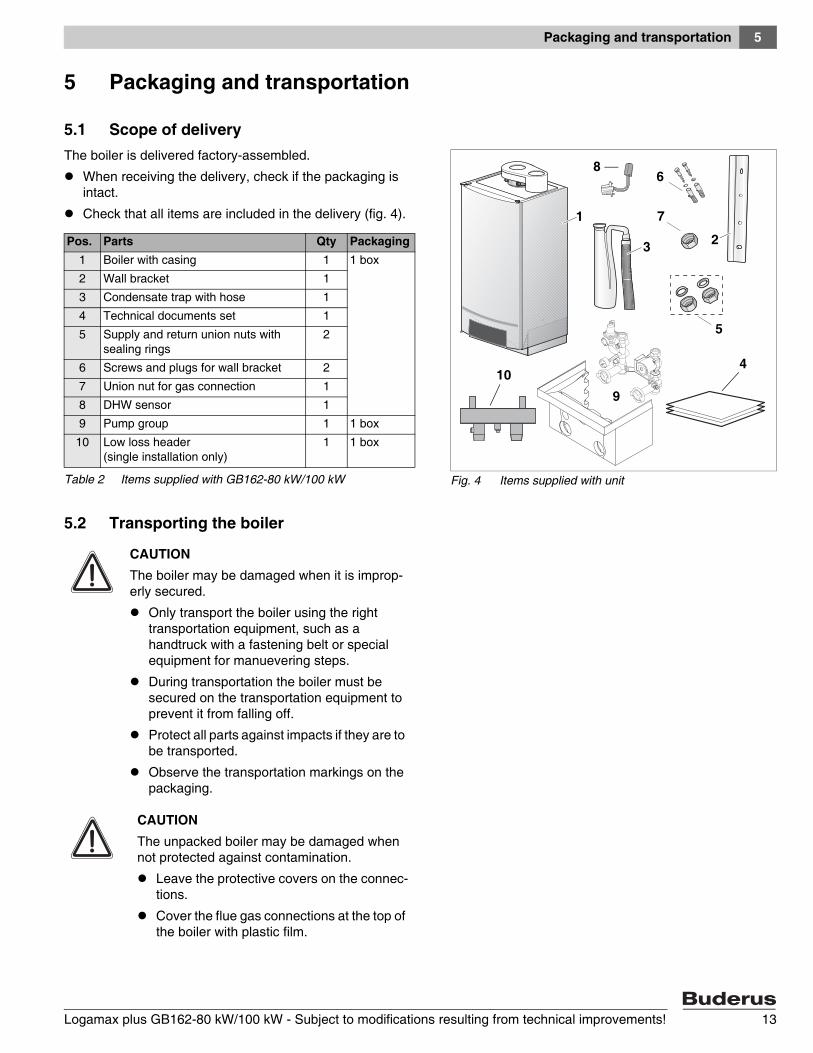
Check that all items are included in the delivery (fig. 4).
5.2 Transporting the boiler
Fig. 4 Items supplied with unit
0
1 2
3
4
1
2
4
8
3
6
7
5
910
Pos. Parts Qty Packaging1 Boiler with casing 1 1 box
2 Wall bracket 1
3 Condensate trap with hose 1
4 Technical documents set 1
5 Supply and return union nuts with sealing rings
2
6 Screws and plugs for wall bracket 2
7 Union nut for gas connection 1
8 DHW sensor 1
9 Pump group 1 1 box
10 Low loss header (single installation only)
1 1 box
Table 2 Items supplied with GB162-80 kW/100 kW
CAUTIONThe boiler may be damaged when it is improp-erly secured.
Only transport the boiler using the right transportation equipment, such as a handtruck with a fastening belt or special equipment for manuevering steps.
During transportation the boiler must be secured on the transportation equipment to prevent it from falling off.
Protect all parts against impacts if they are to be transported.
Observe the transportation markings on the packaging.
CAUTIONThe unpacked boiler may be damaged when not protected against contamination.
Leave the protective covers on the connec-tions.
Cover the flue gas connections at the top of the boiler with plastic film.
Packaging and transportation5
Logamax plus GB162-80 kW/100 kW - Subject to modifications resulting from technical improvements!14
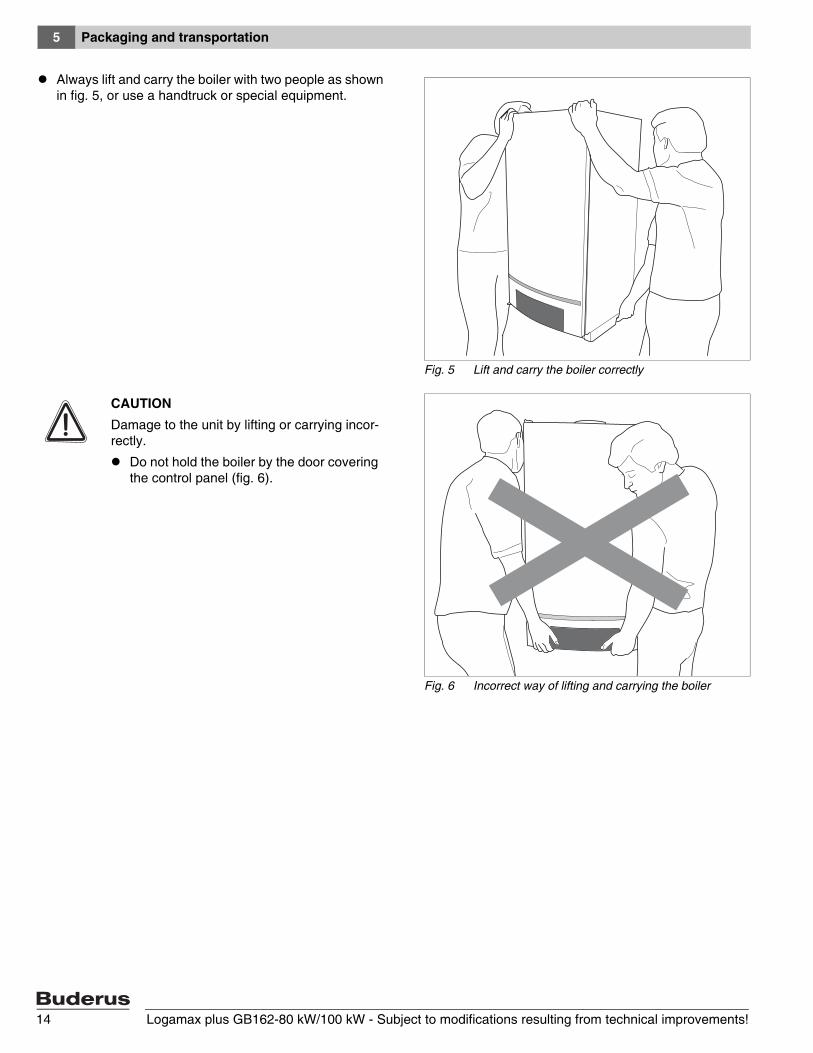
Always lift and carry the boiler with two people as shown in fig. 5, or use a handtruck or special equipment.
Fig. 5 Lift and carry the boiler correctly
Fig. 6 Incorrect way of lifting and carrying the boiler
CAUTIONDamage to the unit by lifting or carrying incor-rectly.
Do not hold the boiler by the door covering the control panel (fig. 6).
Installation 6
Logamax plus GB162-80 kW/100 kW - Subject to modifications resulting from technical improvements! 15
6 Installation
6.1 Requirements for the installation room
6.2 Installing the boilerObserve the installation distances of the combustion air/flue gas system.
Before starting installation check that the carrying capacity of the wall is sufficient for the boiler weight.
Remove the packaging and dispose of it in an environ-mentally manner.
Measure the installation height (see chapter 4 "Dimen-sions and connections", page 11).
DANGERInstall the heating system in a frost-free room.
If the boiler is operated dependent on room air, the installation room must have the required air vents. DO NOT obstruct these vents. The air vents must always be free.
When installed in a room with thin walls or a thin floor, resonating noise may occur. Install noise reducing parts if required.
Do not store any flammable materials or liquids in the immediate vicinity of the boiler.
Never use any chlorinated detergents or halogenated hydrocarbons (e. g. in spray cans, solvents and detergents, paints, adhesives).
Do not allow too much dust to collect on the boiler.
NOTICETo protect the connection orifice you must not remove the styrofoam bottom panel.
Do not lift the boiler by the door covering the control panel, see paragraph 5.2, page 13.
Protect the boiler and the combustion air/flue gas orifice against pollution during installation.
Installation6
Logamax plus GB162-80 kW/100 kW - Subject to modifications resulting from technical improvements!16
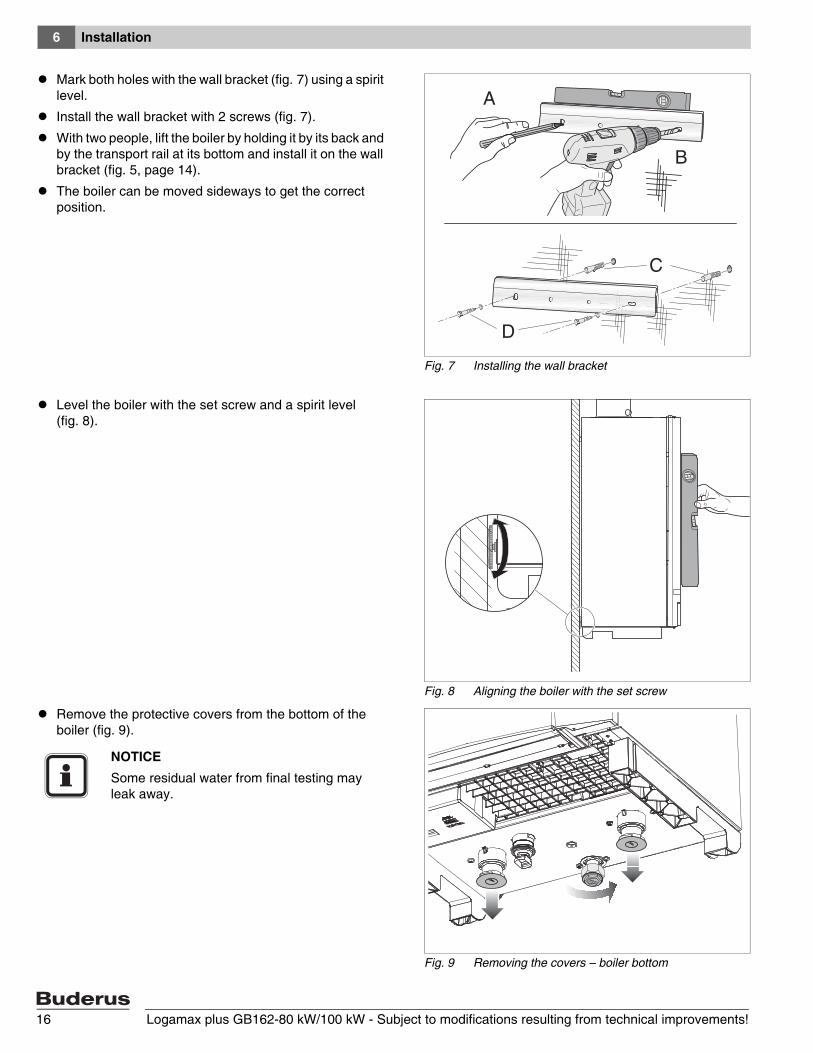
Mark both holes with the wall bracket (fig. 7) using a spirit level.
Install the wall bracket with 2 screws (fig. 7).
With two people, lift the boiler by holding it by its back and by the transport rail at its bottom and install it on the wall bracket (fig. 5, page 14).
The boiler can be moved sideways to get the correct position.
Level the boiler with the set screw and a spirit level (fig. 8).
Remove the protective covers from the bottom of the boiler (fig. 9).
Fig. 7 Installing the wall bracket
A
D
C
B
Fig. 8 Aligning the boiler with the set screw
Fig. 9 Removing the covers – boiler bottom
NOTICESome residual water from final testing may leak away.
Installation 6
Logamax plus GB162-80 kW/100 kW - Subject to modifications resulting from technical improvements! 17
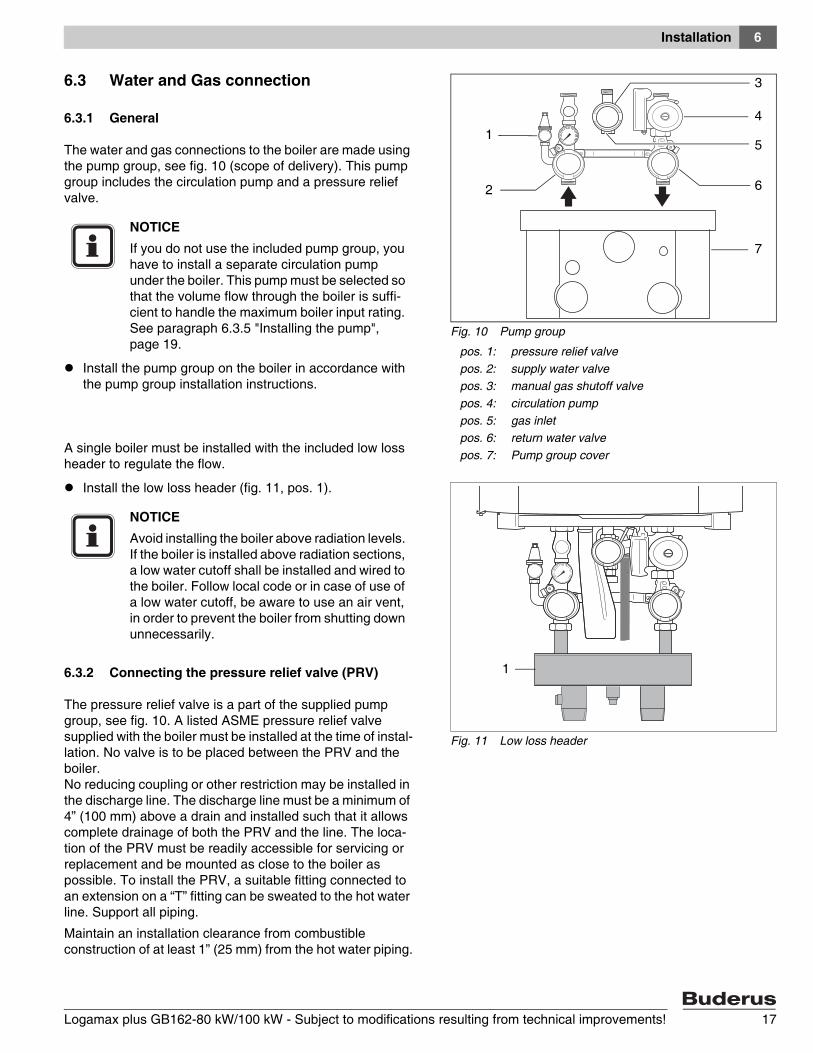
6.3 Water and Gas connection
6.3.1 General
The water and gas connections to the boiler are made using the pump group, see fig. 10 (scope of delivery). This pump group includes the circulation pump and a pressure relief valve.
Install the pump group on the boiler in accordance with the pump group installation instructions.
A single boiler must be installed with the included low loss header to regulate the flow.
Install the low loss header (fig. 11, pos. 1).
6.3.2 Connecting the pressure relief valve (PRV)
The pressure relief valve is a part of the supplied pump group, see fig. 10. A listed ASME pressure relief valve supplied with the boiler must be installed at the time of instal-lation. No valve is to be placed between the PRV and the boiler. No reducing coupling or other restriction may be installed in the discharge line. The discharge line must be a minimum of 4” (100 mm) above a drain and installed such that it allows complete drainage of both the PRV and the line. The loca-tion of the PRV must be readily accessible for servicing or replacement and be mounted as close to the boiler as possible. To install the PRV, a suitable fitting connected to an extension on a “T” fitting can be sweated to the hot water line. Support all piping.
Maintain an installation clearance from combustible construction of at least 1” (25 mm) from the hot water piping.
Fig. 10 Pump group
pos. 1: pressure relief valvepos. 2: supply water valvepos. 3: manual gas shutoff valvepos. 4: circulation pumppos. 5: gas inletpos. 6: return water valvepos. 7: Pump group cover
1
2
3
4
5
6
7
NOTICEIf you do not use the included pump group, you have to install a separate circulation pump under the boiler. This pump must be selected so that the volume flow through the boiler is suffi-cient to handle the maximum boiler input rating. See paragraph 6.3.5 "Installing the pump", page 19.
Fig. 11 Low loss header
1
NOTICEAvoid installing the boiler above radiation levels. If the boiler is installed above radiation sections, a low water cutoff shall be installed and wired to the boiler. Follow local code or in case of use of a low water cutoff, be aware to use an air vent, in order to prevent the boiler from shutting down unnecessarily.
Installation6
Logamax plus GB162-80 kW/100 kW - Subject to modifications resulting from technical improvements!18
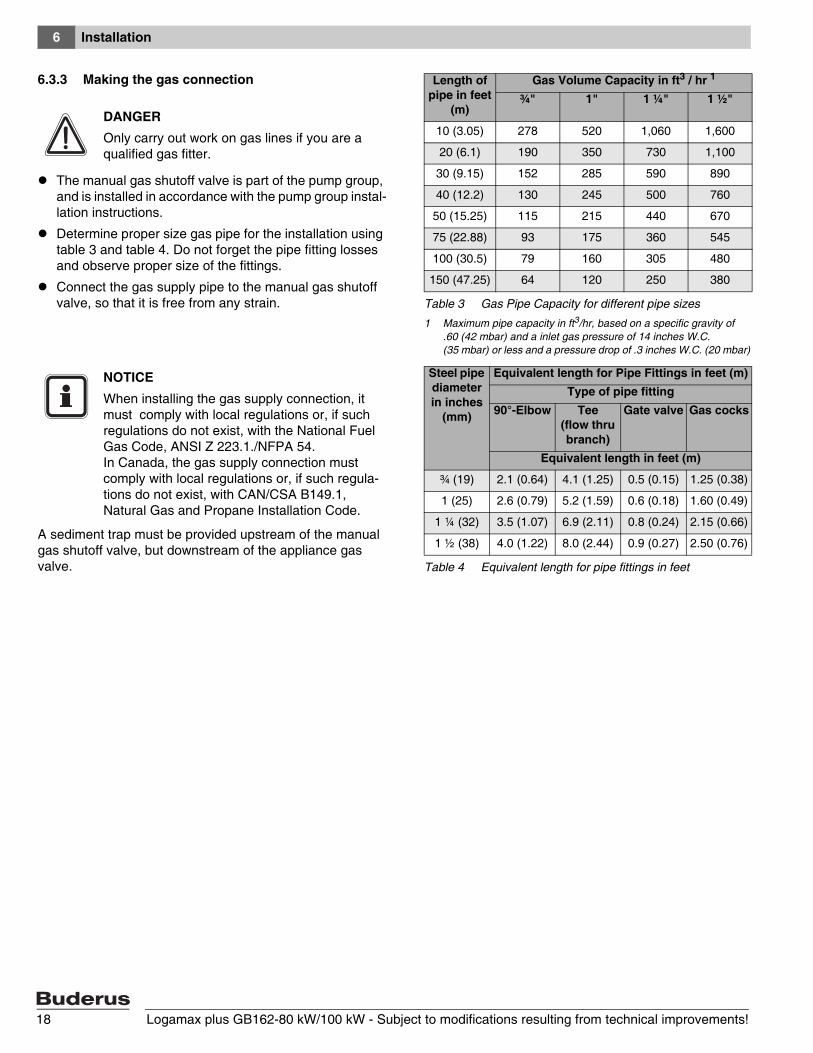
6.3.3 Making the gas connection
The manual gas shutoff valve is part of the pump group, and is installed in accordance with the pump group instal-lation instructions.
Determine proper size gas pipe for the installation using table 3 and table 4. Do not forget the pipe fitting losses and observe proper size of the fittings.
Connect the gas supply pipe to the manual gas shutoff valve, so that it is free from any strain.
A sediment trap must be provided upstream of the manual gas shutoff valve, but downstream of the appliance gas valve.
Length of pipe in feet
(m)
Gas Volume Capacity in ft3 / hr 1
¾" 1" 1 ¼" 1 ½"
10 (3.05) 278 520 1,060 1,600
20 (6.1) 190 350 730 1,100
30 (9.15) 152 285 590 890
40 (12.2) 130 245 500 760
50 (15.25) 115 215 440 670
75 (22.88) 93 175 360 545
100 (30.5) 79 160 305 480
150 (47.25) 64 120 250 380
Table 3 Gas Pipe Capacity for different pipe sizes
1 Maximum pipe capacity in ft3/hr, based on a specific gravity of .60 (42 mbar) and a inlet gas pressure of 14 inches W.C. (35 mbar) or less and a pressure drop of .3 inches W.C. (20 mbar)
DANGEROnly carry out work on gas lines if you are a qualified gas fitter.
Steel pipe diameter in inches
(mm)
Equivalent length for Pipe Fittings in feet (m)Type of pipe fitting
90°-Elbow Tee (flow thru branch)
Gate valve Gas cocks
Equivalent length in feet (m)
¾ (19) 2.1 (0.64) 4.1 (1.25) 0.5 (0.15) 1.25 (0.38)
1 (25) 2.6 (0.79) 5.2 (1.59) 0.6 (0.18) 1.60 (0.49)
1 ¼ (32) 3.5 (1.07) 6.9 (2.11) 0.8 (0.24) 2.15 (0.66)
1 ½ (38) 4.0 (1.22) 8.0 (2.44) 0.9 (0.27) 2.50 (0.76)
Table 4 Equivalent length for pipe fittings in feet
NOTICEWhen installing the gas supply connection, it must comply with local regulations or, if such regulations do not exist, with the National Fuel Gas Code, ANSI Z 223.1./NFPA 54.In Canada, the gas supply connection must comply with local regulations or, if such regula-tions do not exist, with CAN/CSA B149.1, Natural Gas and Propane Installation Code.
Installation 6
Logamax plus GB162-80 kW/100 kW - Subject to modifications resulting from technical improvements! 19
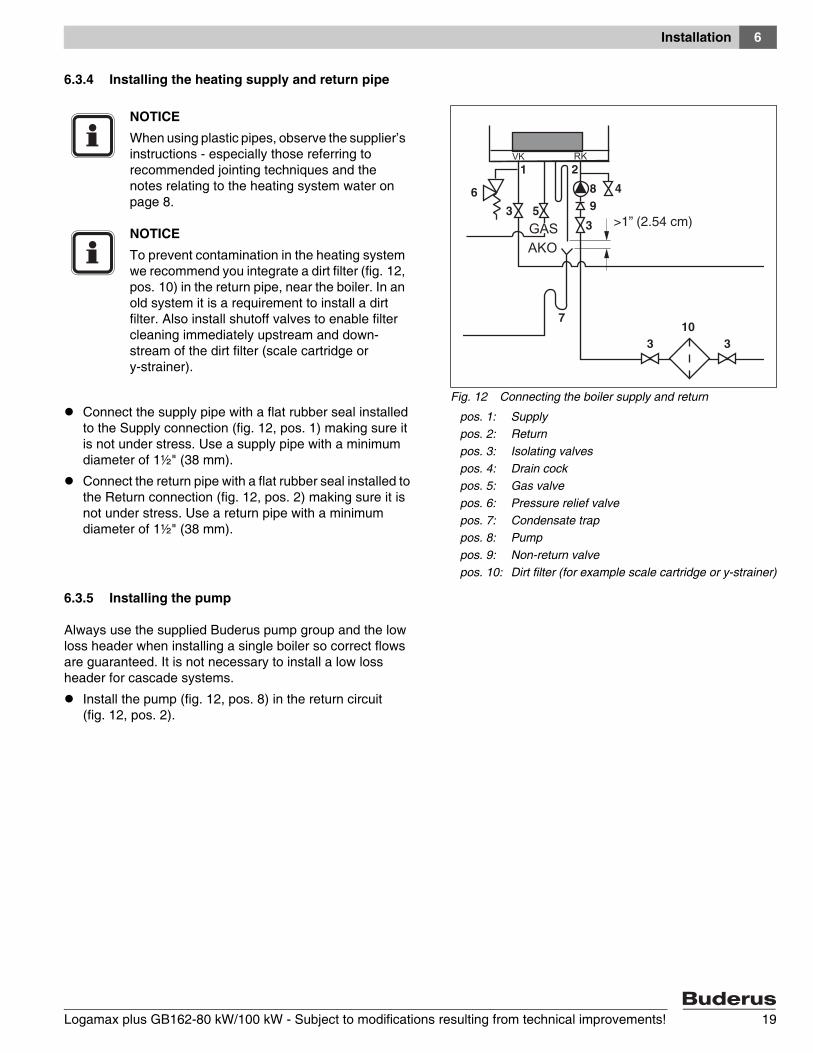
6.3.4 Installing the heating supply and return pipe
Connect the supply pipe with a flat rubber seal installed to the Supply connection (fig. 12, pos. 1) making sure it is not under stress. Use a supply pipe with a minimum diameter of 1½" (38 mm).
Connect the return pipe with a flat rubber seal installed to the Return connection (fig. 12, pos. 2) making sure it is not under stress. Use a return pipe with a minimum diameter of 1½" (38 mm).
6.3.5 Installing the pump
Always use the supplied Buderus pump group and the low loss header when installing a single boiler so correct flows are guaranteed. It is not necessary to install a low loss header for cascade systems.
Install the pump (fig. 12, pos. 8) in the return circuit (fig. 12, pos. 2).
Fig. 12 Connecting the boiler supply and return
pos. 1: Supplypos. 2: Returnpos. 3: Isolating valvespos. 4: Drain cockpos. 5: Gas valvepos. 6: Pressure relief valvepos. 7: Condensate trappos. 8: Pumppos. 9: Non-return valvepos. 10: Dirt filter (for example scale cartridge or y-strainer)
1 2
3 5
6
3
489
710
3 3
>1” (2.54 cm)
NOTICEWhen using plastic pipes, observe the supplier’s instructions - especially those referring to recommended jointing techniques and the notes relating to the heating system water on page 8.
NOTICETo prevent contamination in the heating system we recommend you integrate a dirt filter (fig. 12, pos. 10) in the return pipe, near the boiler. In an old system it is a requirement to install a dirt filter. Also install shutoff valves to enable filter cleaning immediately upstream and down-stream of the dirt filter (scale cartridge or y-strainer).
Installation6
Logamax plus GB162-80 kW/100 kW - Subject to modifications resulting from technical improvements!20
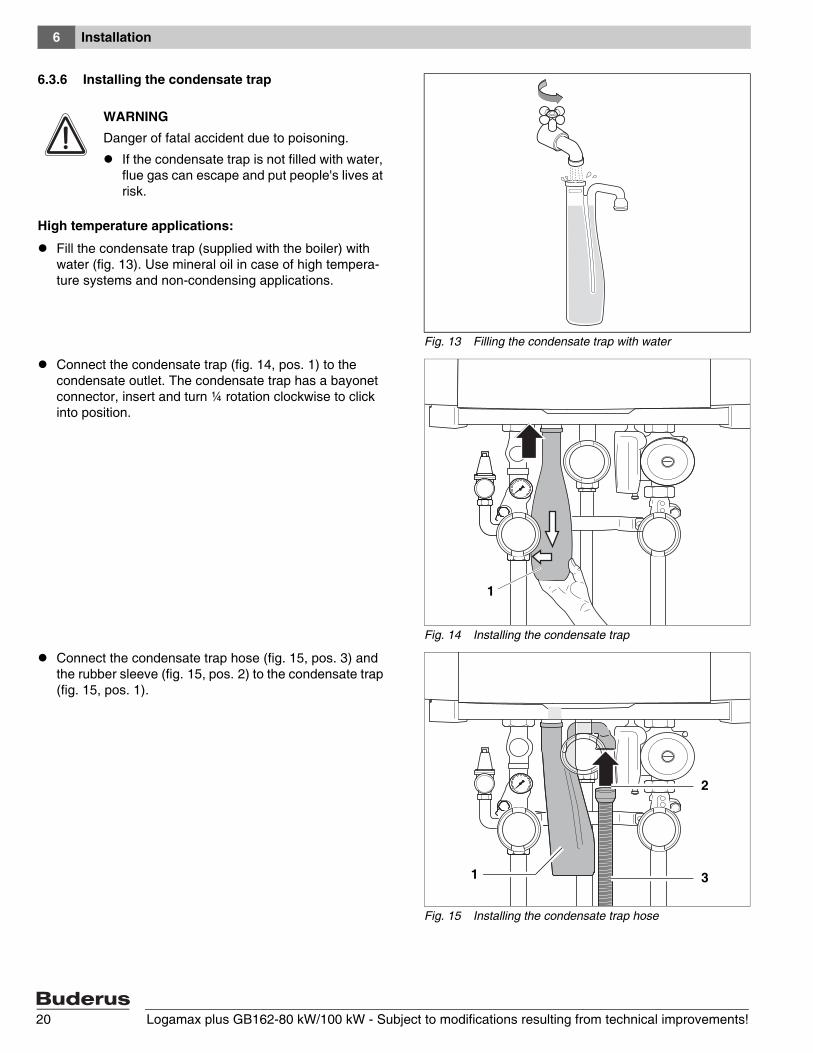
6.3.6 Installing the condensate trap
High temperature applications:
Fill the condensate trap (supplied with the boiler) with water (fig. 13). Use mineral oil in case of high tempera-ture systems and non-condensing applications.
Connect the condensate trap (fig. 14, pos. 1) to the condensate outlet. The condensate trap has a bayonet connector, insert and turn ¼ rotation clockwise to click into position.
Connect the condensate trap hose (fig. 15, pos. 3) and the rubber sleeve (fig. 15, pos. 2) to the condensate trap (fig. 15, pos. 1).
Fig. 13 Filling the condensate trap with water
WARNINGDanger of fatal accident due to poisoning.
If the condensate trap is not filled with water, flue gas can escape and put people's lives at risk.
Fig. 14 Installing the condensate trap
1
Fig. 15 Installing the condensate trap hose
1
2
3

Installation 6
Logamax plus GB162-80 kW/100 kW - Subject to modifications resulting from technical improvements! 21
6.4 Connecting the condensate drain pipe
Install the condensate drain pipe taking the following into account:
– An air gap of at least 1” (2.54 cm) must be maintained between the boiler condensate trap hose and the condensate pipework, see fig. 16 and fig. 17.
– If the condensate outlet of the boiler is lower than the drain, a condensate pump must be used.
– The condensate produced by the boiler has a pH value between 3 and 4.
Install a neutralization unit if required by the local code.
6.4.1 Connecting the expansion vessel in a single-boiler system
Connect the expansion tank to the boiler return. If a check valve is available: connect the expansion vessel to the CH-side of the check valve in the return circuit (fig. 18, pos. 1).
Fig. 16 Connecting the condensate trap
1
>1” (2.54 cm)
NOTICEThe condensate must be drained from the boiler in accordance with local, state or federal rules and regulations.
NOTICEUse materials approved by the authority having jurisdiction. In the absence of such authority, PVC and CPVC pipe must comply with ASTM D1785, F441 or D2665. Cement and primer must comply with ASTM D2564 or F493. For Canada, use ULC certified PVC or CPVC pipe, fittings and cement.
Fig. 17 Condensate drainage pipe
> 1” (2.54 cm)1
Fig. 18 Connecting the expansion vessel in a single-boiler system
1
>1” (2.54 cm)
CAUTIONDamage to the installation due to faulty pressure relief valve.
The expansion vessel must be of sufficient capacity.

Installation6
Logamax plus GB162-80 kW/100 kW - Subject to modifications resulting from technical improvements!22
6.5 Combustion Air and Ventilation Openings
Provisions for combustion and ventilation air must be made in accordance with section 5.3, Air for Combustion and Ventilation, of the National Flue Gas Code, ANSI Z223.1/NFPA 54, or Sections 7.2, 7.3 or 7.4 of CAN/CGA B149, Installation Codes, or applicable provi-sions of the local building codes.
CAUTIONBOILER DAMAGE AND OPERATIONAL FAILURES !Due to insufficient or improper openings for combustion air and/or ventilation of the boiler room.
Provisions for combustion air and ventilation are always required, regardless whether the combustion air is taken from the outside (sealed combustion) or inside (room air for combustion).
Insufficient ventilation of the boiler room can lead to high air temperatures. This can result in boiler damage.
– Make sure that intake and exhaust openings are sufficiently sized and no reduction or closure of openings takes place.
– When the problem is not resolved, do not operate the boiler.
– Please note these restrictions and its dangers to the operator of the boiler.
WARNINGBOILER DAMAGE !Due to contaminated air.
– Boiler must be clear and free from combustible materials, gasoline and other flammable vapors and liquids, and corrosive liquids and vapors.Never use chlorine and hydrocarbon containing chemicals (such as spray chemicals, solution and cleaning agents, paints, glues etc) in the vicinity of the boiler.
– Do not store and use these chemicals in the boiler room.
– Avoid excessive dust formation and build-up.
NOTICEWhen one expects contaminated combustion air (near swimming pools, chemical cleaning operations and hair salons), sealed combustion operation is recommended.
Installation 6
Logamax plus GB162-80 kW/100 kW - Subject to modifications resulting from technical improvements! 23
All Air from Inside the Building (room air)
The closet shall be provided with two permanent openings communicating directly with an additional room(s). The total input of all gas utilization equipment installed in the combined space shall be considered in making this determi-nation. Each opening shall have a minimum free area of 1 square inch per 1,000 Btu per hour of total input rating of all gas utilization equipment in the confined space, but no less than 100 square inches. One opening shall commence within 12 inches (305 mm) of the top, and one opening shall commence within 12 inches (305 mm) of the bottom of the enclosure. The minimum dimension of air openings shall be not less than 4 inches (101.6 mm).
All Air from Outdoor (sealed combustion)
The closet shall be provided with two permanent openings, one commencing within 12 inches (305 mm) from the top, and one commencing within 12 inches (305 mm) from the bottom of the enclosure. The openings shall communicate directly, or by ducts, with the outdoors or spaces (crawl or attic) that freely communicate with the outdoors. The minimum dimension of air openings shall be no less than 4 inches (101.6 mm).
1. Where directly communicating with the outdoors, each opening shall have a minimum free area of 1 square inch per 4,000 Btu/hr of total input rating of all equipment in the enclosure.
2. Where communicating with the outdoors through vertical ducts, each opening shall have a minimum free area of 1 square inch per 4,000 Btu/hr of total input rating of all equipment in the enclosure.
3. Where communicating with the outdoors through horizontal ducts, each opening shall have a minimum free area of 1 square inch per 2,000 Btu/hr of total input rating of all equipment in the enclosure.
4. Where ducts are used, they shall be of the same cross-sectional area as the free area of the opening to which they connect.
DANGERFire danger due to flammable materials or liquids.
– Do not store flammable materials and liquids in the immediate vicinity of the boiler.
Installation6
Logamax plus GB162-80 kW/100 kW - Subject to modifications resulting from technical improvements!24
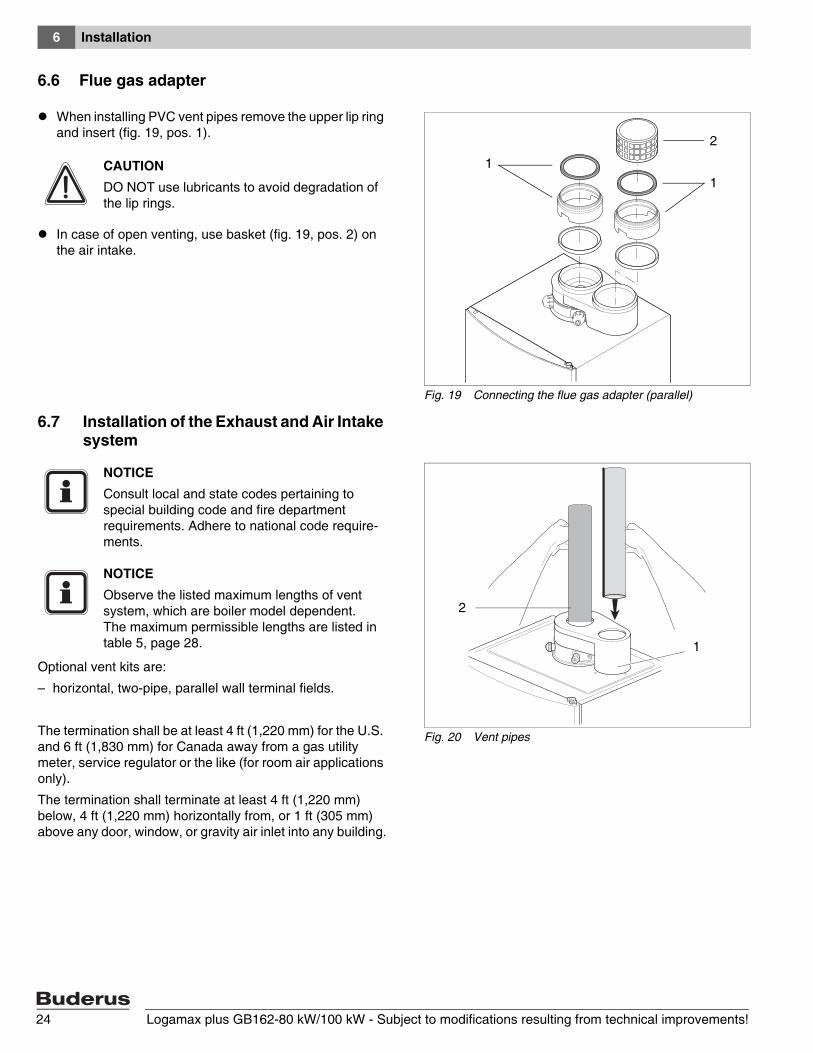
6.6 Flue gas adapter
When installing PVC vent pipes remove the upper lip ring and insert (fig. 19, pos. 1).
In case of open venting, use basket (fig. 19, pos. 2) on the air intake.
6.7 Installation of the Exhaust and Air Intake system
Optional vent kits are:
– horizontal, two-pipe, parallel wall terminal fields.
The termination shall be at least 4 ft (1,220 mm) for the U.S. and 6 ft (1,830 mm) for Canada away from a gas utility meter, service regulator or the like (for room air applications only).
The termination shall terminate at least 4 ft (1,220 mm) below, 4 ft (1,220 mm) horizontally from, or 1 ft (305 mm) above any door, window, or gravity air inlet into any building.
Fig. 19 Connecting the flue gas adapter (parallel)
2
11CAUTION
DO NOT use lubricants to avoid degradation of the lip rings.
Fig. 20 Vent pipes
1
2
NOTICEConsult local and state codes pertaining to special building code and fire department requirements. Adhere to national code require-ments.
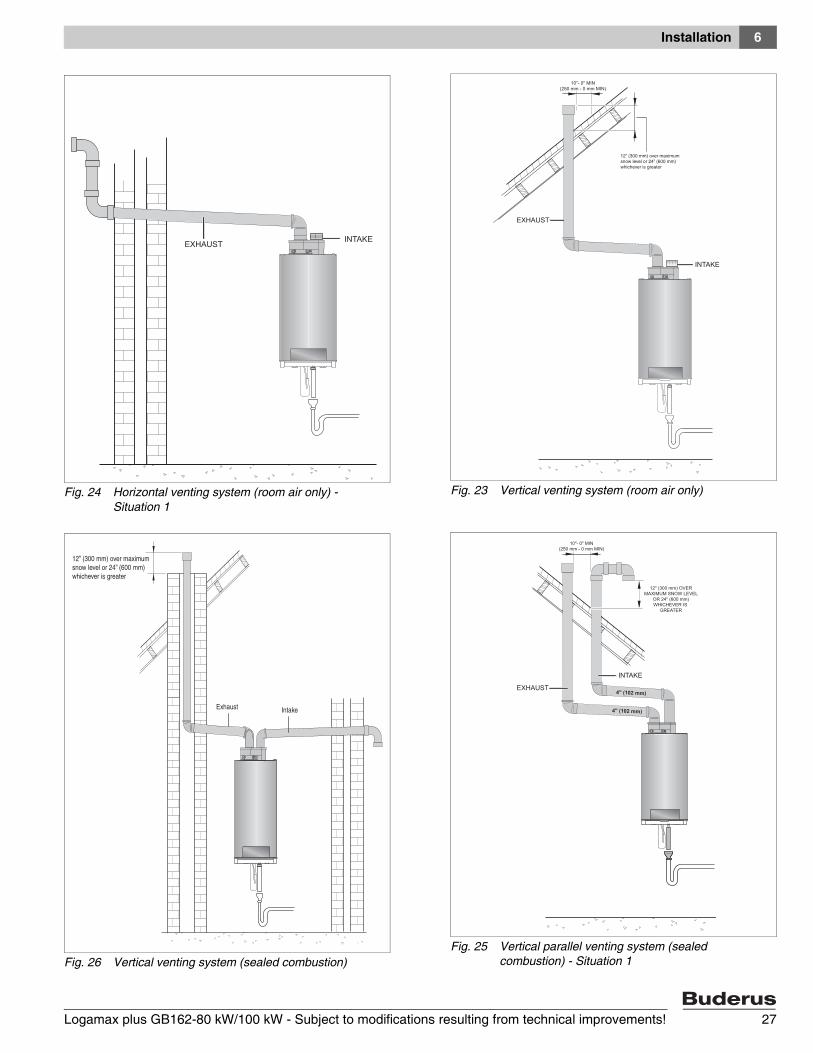
NOTICEObserve the listed maximum lengths of vent system, which are boiler model dependent. The maximum permissible lengths are listed in table 5, page 28.
Installation 6
Logamax plus GB162-80 kW/100 kW - Subject to modifications resulting from technical improvements! 25
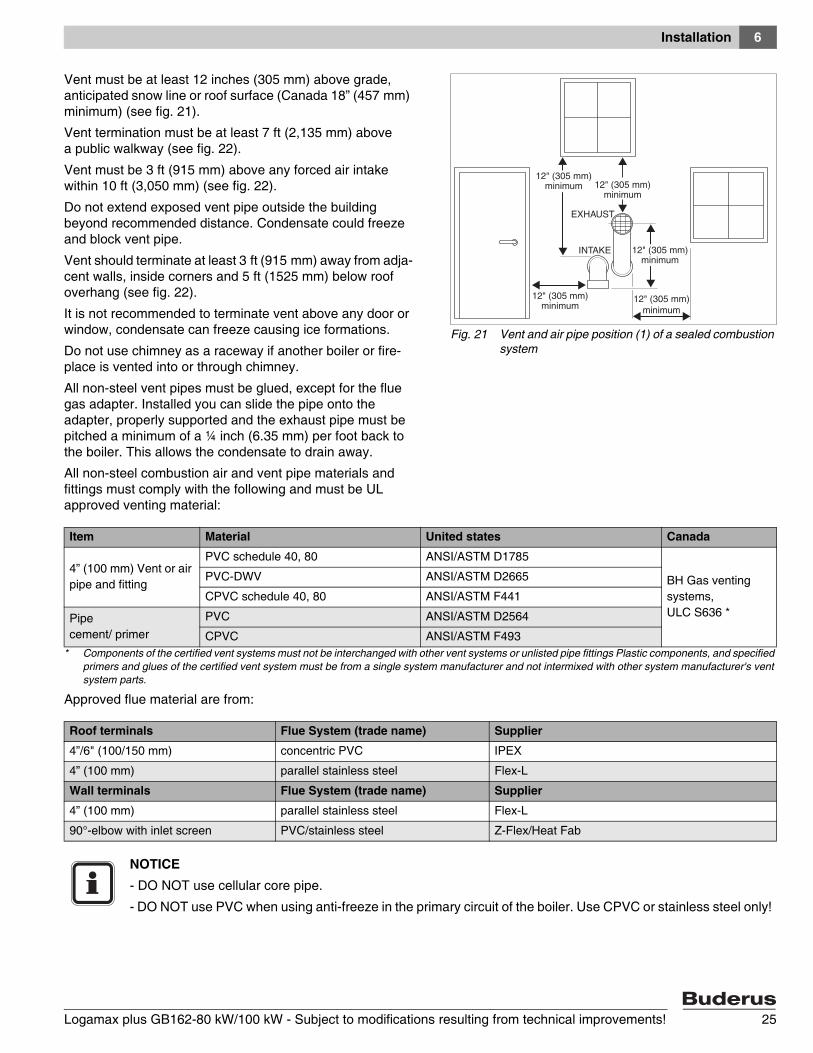
Vent must be at least 12 inches (305 mm) above grade, anticipated snow line or roof surface (Canada 18” (457 mm) minimum) (see fig. 21).
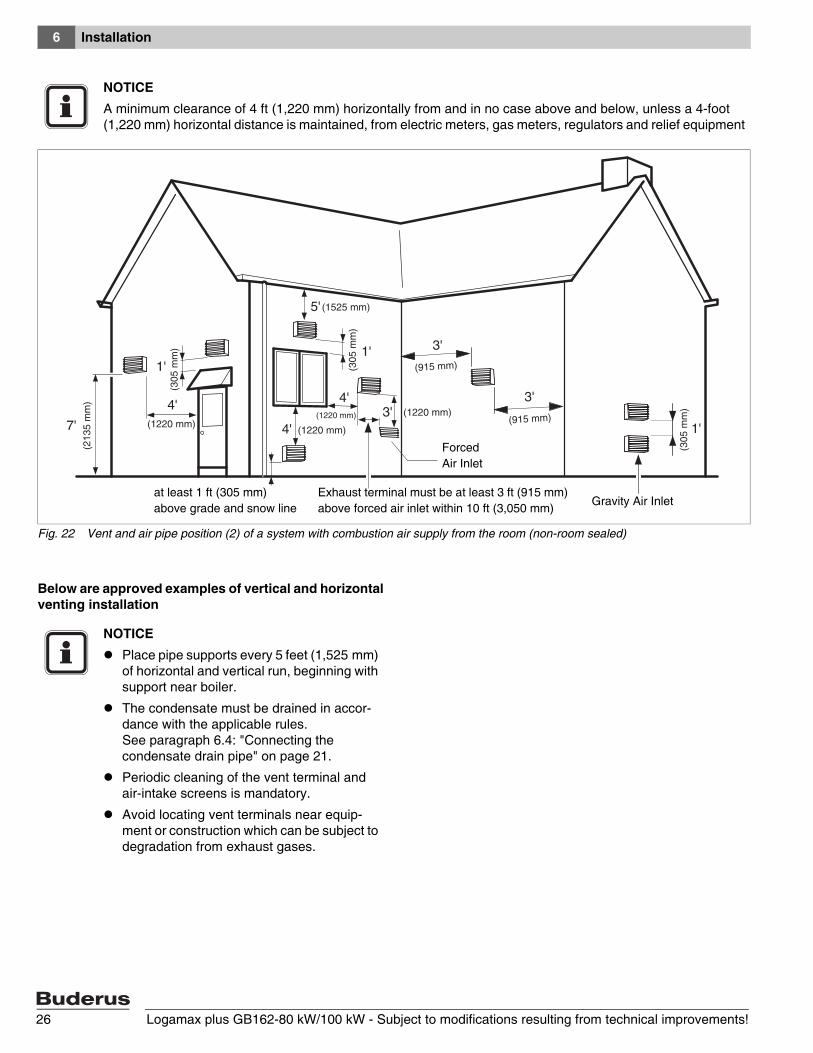
Vent termination must be at least 7 ft (2,135 mm) above a public walkway (see fig. 22).
Vent must be 3 ft (915 mm) above any forced air intake within 10 ft (3,050 mm) (see fig. 22).
Do not extend exposed vent pipe outside the building beyond recommended distance. Condensate could freeze and block vent pipe.
Vent should terminate at least 3 ft (915 mm) away from adja-cent walls, inside corners and 5 ft (1525 mm) below roof overhang (see fig. 22).
It is not recommended to terminate vent above any door or window, condensate can freeze causing ice formations.
Do not use chimney as a raceway if another boiler or fire-place is vented into or through chimney.
All non-steel vent pipes must be glued, except for the flue gas adapter. Installed you can slide the pipe onto the adapter, properly supported and the exhaust pipe must be pitched a minimum of a ¼ inch (6.35 mm) per foot back to the boiler. This allows the condensate to drain away.
All non-steel combustion air and vent pipe materials and fittings must comply with the following and must be UL approved venting material:
* Components of the certified vent systems must not be interchanged with other vent systems or unlisted pipe fittings Plastic components, and specified primers and glues of the certified vent system must be from a single system manufacturer and not intermixed with other system manufacturer's vent system parts.
Approved flue material are from:
Fig. 21 Vent and air pipe position (1) of a sealed combustion system
12" (305 mm)minimum
12" (305 mm)minimum
12" (305 mm)minimum
INTAKE
EXHAUST
12" (305 mm)minimum
12" (305 mm)minimum
Item Material United states Canada
4” (100 mm) Vent or air pipe and fitting
PVC schedule 40, 80 ANSI/ASTM D1785
BH Gas venting systems, ULC S636 *
PVC-DWV ANSI/ASTM D2665
CPVC schedule 40, 80 ANSI/ASTM F441
Pipe cement/ primer
PVC ANSI/ASTM D2564
CPVC ANSI/ASTM F493
Roof terminals Flue System (trade name) Supplier
4”/6" (100/150 mm) concentric PVC IPEX
4” (100 mm) parallel stainless steel Flex-L
Wall terminals Flue System (trade name) Supplier
4” (100 mm) parallel stainless steel Flex-L
90°-elbow with inlet screen PVC/stainless steel Z-Flex/Heat Fab
NOTICE- DO NOT use cellular core pipe.
- DO NOT use PVC when using anti-freeze in the primary circuit of the boiler. Use CPVC or stainless steel only!
Installation6
Logamax plus GB162-80 kW/100 kW - Subject to modifications resulting from technical improvements!26
Below are approved examples of vertical and horizontal venting installation
NOTICEA minimum clearance of 4 ft (1,220 mm) horizontally from and in no case above and below, unless a 4-foot (1,220 mm) horizontal distance is maintained, from electric meters, gas meters, regulators and relief equipment
Fig. 22 Vent and air pipe position (2) of a system with combustion air supply from the room (non-room sealed)
1'
3'
3'
1'
4'
4'
7'
4'
1'
3'
5'
(213
5 m
m)
(305
mm
)
(1220 mm)
(1525 mm)
(1220 mm)
(915 mm)
(915 mm)
(305
mm
)
(305
mm
)
(1220 mm)
(1220 mm)
Gravity Air InletExhaust terminal must be at least 3 ft (915 mm) above forced air inlet within 10 ft (3,050 mm)
at least 1 ft (305 mm)above grade and snow line
Forced Air Inlet
NOTICEPlace pipe supports every 5 feet (1,525 mm) of horizontal and vertical run, beginning with support near boiler.
The condensate must be drained in accor-dance with the applicable rules. See paragraph 6.4: "Connecting the condensate drain pipe" on page 21.
Periodic cleaning of the vent terminal and air-intake screens is mandatory.
Avoid locating vent terminals near equip-ment or construction which can be subject to degradation from exhaust gases.
Installation 6
Logamax plus GB162-80 kW/100 kW - Subject to modifications resulting from technical improvements! 27
Fig. 23 Vertical venting system (room air only)
INTAKE
EXHAUST
10"- 0" MIN(250 mm - 0 mm MIN)
12” (300 mm) over maximumsnow level or 24” (600 mm)whichever is greater
Fig. 24 Horizontal venting system (room air only) - Situation 1
INTAKEEXHAUST
Fig. 25 Vertical parallel venting system (sealed combustion) - Situation 1
INTAKE
EXHAUST
10"- 0" MIN(250 mm - 0 mm MIN)
12" (300 mm) OVERMAXIMUM SNOW LEVEL
OR 24" (600 mm)WHICHEVER IS
GREATER
4" (102 mm)
4" (102 mm)
Fig. 26 Vertical venting system (sealed combustion)
Exhaust Intake
12” (300 mm) over maximumsnow level or 24” (600 mm)whichever is greater
Installation6
Logamax plus GB162-80 kW/100 kW - Subject to modifications resulting from technical improvements!28
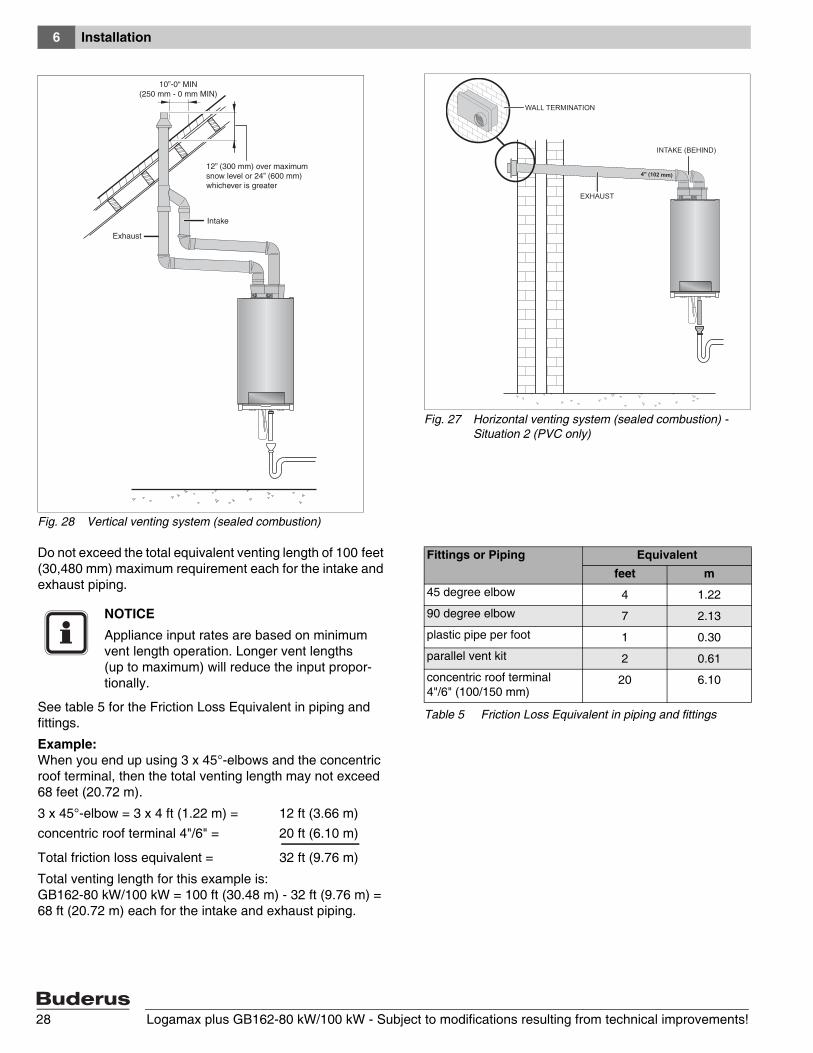
Do not exceed the total equivalent venting length of 100 feet (30,480 mm) maximum requirement each for the intake and exhaust piping.
See table 5 for the Friction Loss Equivalent in piping and fittings.
Example:When you end up using 3 x 45°-elbows and the concentric roof terminal, then the total venting length may not exceed 68 feet (20.72 m).
3 x 45°-elbow = 3 x 4 ft (1.22 m) = 12 ft (3.66 m)concentric roof terminal 4"/6" = 20 ft (6.10 m)
Total friction loss equivalent = 32 ft (9.76 m)
Total venting length for this example is:GB162-80 kW/100 kW = 100 ft (30.48 m) - 32 ft (9.76 m) = 68 ft (20.72 m) each for the intake and exhaust piping.
Fig. 27 Horizontal venting system (sealed combustion) - Situation 2 (PVC only)
INTAKE (BEHIND)
EXHAUST
4" (102 mm)
WALL TERMINATION
Fig. 28 Vertical venting system (sealed combustion)
12” (300 mm) over maximumsnow level or 24” (600 mm)whichever is greater
Exhaust
Intake
10”-0“ MIN(250 mm - 0 mm MIN)
Fittings or Piping Equivalentfeet m
45 degree elbow 4 1.22
90 degree elbow 7 2.13
plastic pipe per foot 1 0.30
parallel vent kit 2 0.61
concentric roof terminal4"/6" (100/150 mm)
20 6.10
Table 5 Friction Loss Equivalent in piping and fittings
NOTICEAppliance input rates are based on minimum vent length operation. Longer vent lengths (up to maximum) will reduce the input propor-tionally.
Installation 6
Logamax plus GB162-80 kW/100 kW - Subject to modifications resulting from technical improvements! 29
NOTICE– The minimum covering wall thickness is
1" (25 mm). The maximum covering wall thickness is 16" (406 mm).
– For direct venting properly reassemble and reseal the vent and air-intake systems.
CAUTIONVent connectors serving appliances vented by natural draft shall not be connected into any portion of mechanical draft systems operating under positive pressure.
At the time of removal of an existing boiler, the following steps shall be followed with each appliance remaining connected to the common venting system placed in operation, while the other appliances remaining connected to the common venting system are not in operation:
a) Seal any unused openings in the common venting system.
b) Visually inspect the venting system for proper size and horizontal pitch and determine there is no restriction, leakage, corrosion and other defi-ciencies which could cause unsafe condition.
c) Place in operation the appliance being inspected. Follow the lighting instructions. Adjust thermostat so appliance will operate continuously.
d) Test for spillage at the draft hood relief opening after 5 minutes of burner operation. Use the flame of a match or candle, or smoke from a cigarette, cigar or pipe.
e) Any improper operation of the common venting system should be corrected so the installation conforms with the National Fuel Gas Code, ANSI Z223.1/NFPA 54 and/or CAN/CSA B149.1, Natural Gas and Propane Installation Code.
When resizing any portion of the common venting system, the common venting system should be resized to appoach the minimum size as determined using the appropriate tables in Part 11 of the National Fuel Gas Code, ANSI Z223.1/NFPA 54 and/or CAN/CSA B149.1, Natural Gas and Propane Installation Code.
Electrical connections7
Logamax plus GB162-80 kW/100 kW - Subject to modifications resulting from technical improvements!30
7 Electrical connectionsDevices such as pumps, outdoor sensor and 3-way valve are all connected to the external connection board.
The electrical connections to the boiler must be made in accordance with all applicable local codes and the latest revision of the National Electrical Code, ANSI/NFPA-70.
If installed in Canada, electrical connections should conform with CSA C22.1 Code part 1.
7.1 External connection board connections
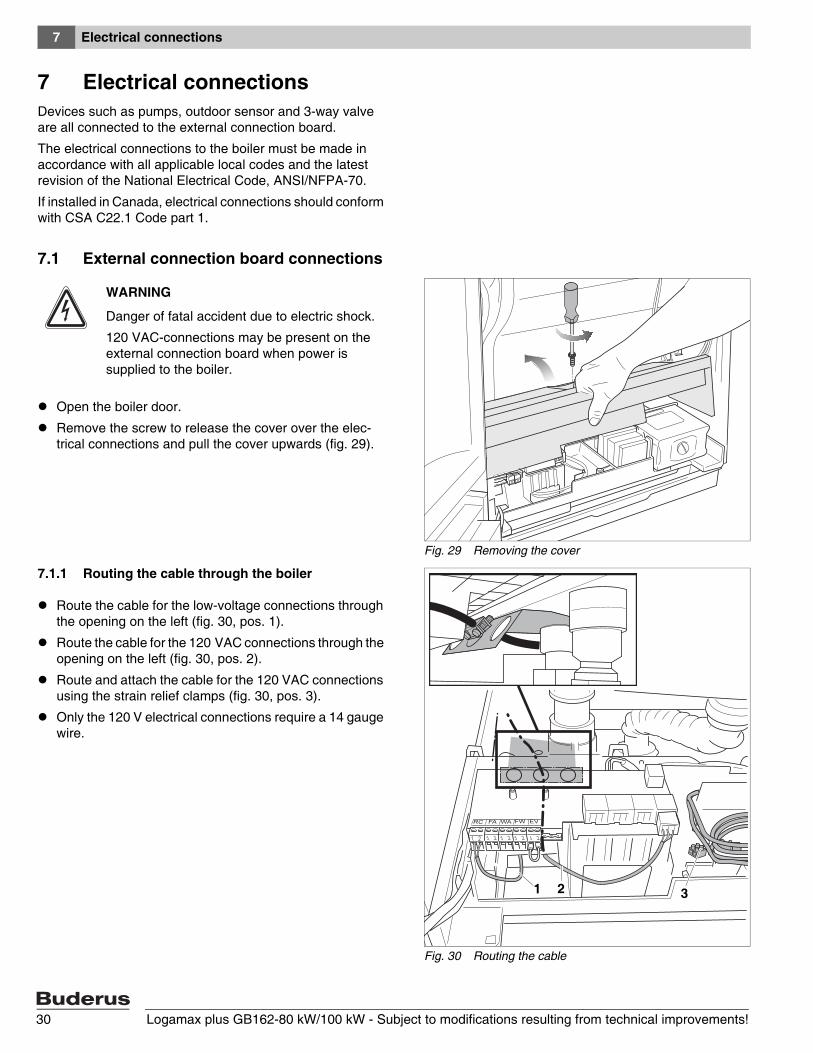
Open the boiler door.
Remove the screw to release the cover over the elec-trical connections and pull the cover upwards (fig. 29).
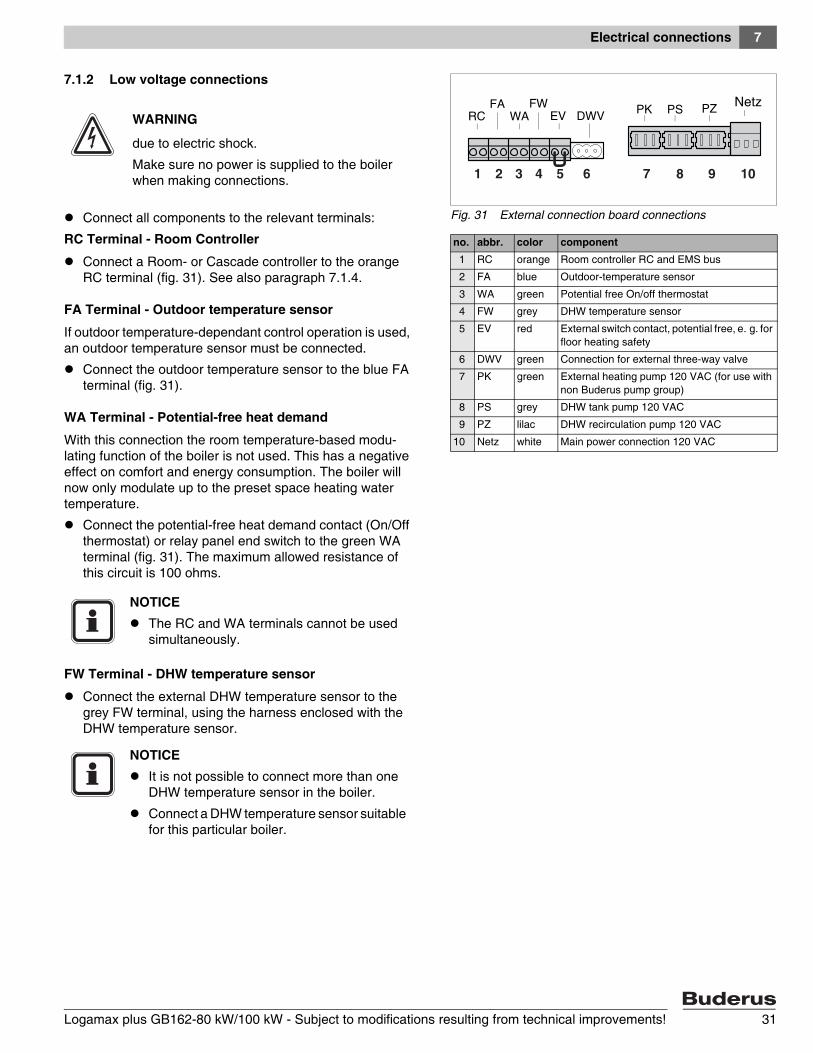
7.1.1 Routing the cable through the boiler
Route the cable for the low-voltage connections through the opening on the left (fig. 30, pos. 1).
Route the cable for the 120 VAC connections through the opening on the left (fig. 30, pos. 2).
Route and attach the cable for the 120 VAC connections using the strain relief clamps (fig. 30, pos. 3).
Only the 120 V electrical connections require a 14 gauge wire.
Fig. 29 Removing the cover
WARNING
Danger of fatal accident due to electric shock.
120 VAC-connections may be present on the external connection board when power is supplied to the boiler.
Fig. 30 Routing the cable
1 2 3
Electrical connections 7
Logamax plus GB162-80 kW/100 kW - Subject to modifications resulting from technical improvements! 31
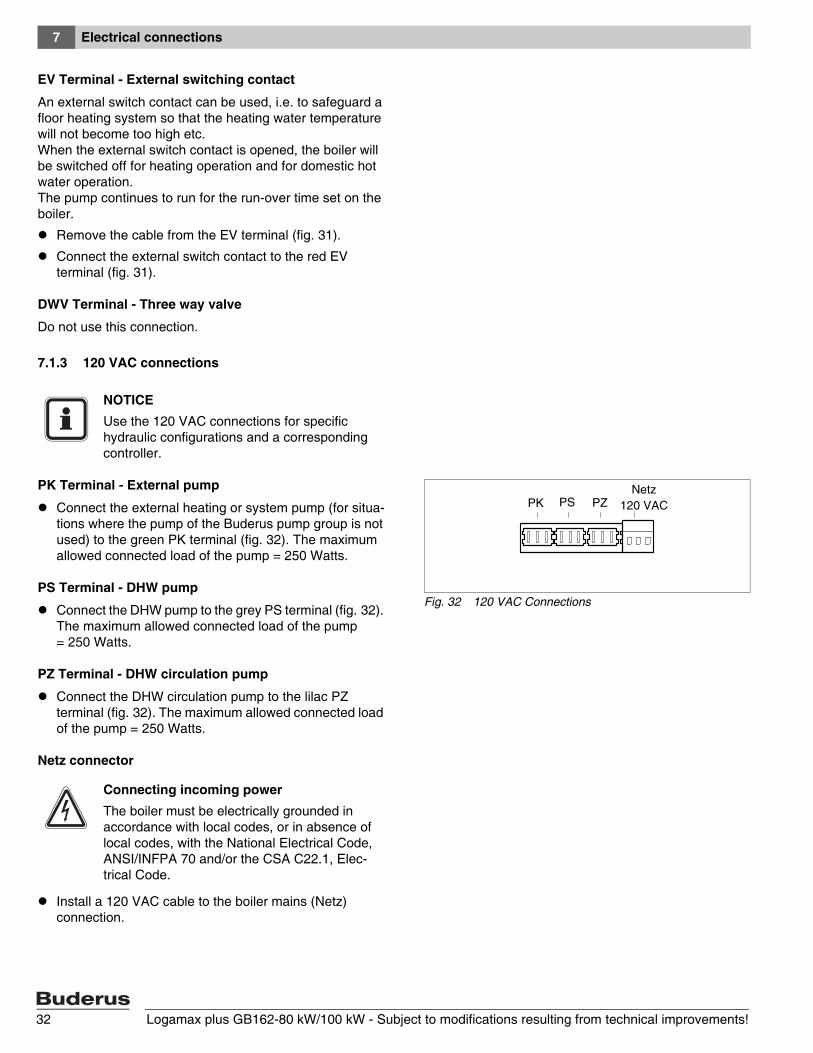
7.1.2 Low voltage connections
Connect all components to the relevant terminals:
RC Terminal - Room Controller
Connect a Room- or Cascade controller to the orange RC terminal (fig. 31). See also paragraph 7.1.4.
FA Terminal - Outdoor temperature sensor
If outdoor temperature-dependant control operation is used, an outdoor temperature sensor must be connected.
Connect the outdoor temperature sensor to the blue FA terminal (fig. 31).
WA Terminal - Potential-free heat demand
With this connection the room temperature-based modu-lating function of the boiler is not used. This has a negative effect on comfort and energy consumption. The boiler will now only modulate up to the preset space heating water temperature.
Connect the potential-free heat demand contact (On/Off thermostat) or relay panel end switch to the green WA terminal (fig. 31). The maximum allowed resistance of this circuit is 100 ohms.
FW Terminal - DHW temperature sensor
Connect the external DHW temperature sensor to the grey FW terminal, using the harness enclosed with the DHW temperature sensor.
Fig. 31 External connection board connections
1 2 3 4 5 6 7 8 9 10
RCFA
WAFW
EV DWVNetzPK PS PZ
WARNING
due to electric shock.
Make sure no power is supplied to the boiler when making connections.
no. abbr. color component1 RC orange Room controller RC and EMS bus
2 FA blue Outdoor-temperature sensor
3 WA green Potential free On/off thermostat
4 FW grey DHW temperature sensor
5 EV red External switch contact, potential free, e. g. for floor heating safety
6 DWV green Connection for external three-way valve
7 PK green External heating pump 120 VAC (for use with non Buderus pump group)
8 PS grey DHW tank pump 120 VAC
9 PZ lilac DHW recirculation pump 120 VAC
10 Netz white Main power connection 120 VAC
NOTICEThe RC and WA terminals cannot be used simultaneously.
NOTICEIt is not possible to connect more than one DHW temperature sensor in the boiler.
Connect a DHW temperature sensor suitable for this particular boiler.
Electrical connections7
Logamax plus GB162-80 kW/100 kW - Subject to modifications resulting from technical improvements!32
EV Terminal - External switching contact
An external switch contact can be used, i.e. to safeguard a floor heating system so that the heating water temperature will not become too high etc. When the external switch contact is opened, the boiler will be switched off for heating operation and for domestic hot water operation. The pump continues to run for the run-over time set on the boiler.
Remove the cable from the EV terminal (fig. 31).
Connect the external switch contact to the red EV terminal (fig. 31).
DWV Terminal - Three way valve
Do not use this connection.
7.1.3 120 VAC connections
PK Terminal - External pump
Connect the external heating or system pump (for situa-tions where the pump of the Buderus pump group is not used) to the green PK terminal (fig. 32). The maximum allowed connected load of the pump = 250 Watts.
PS Terminal - DHW pump
Connect the DHW pump to the grey PS terminal (fig. 32). The maximum allowed connected load of the pump = 250 Watts.
PZ Terminal - DHW circulation pump
Connect the DHW circulation pump to the lilac PZ terminal (fig. 32). The maximum allowed connected load of the pump = 250 Watts.
Netz connector
Install a 120 VAC cable to the boiler mains (Netz) connection.
NOTICEUse the 120 VAC connections for specific hydraulic configurations and a corresponding controller.
Fig. 32 120 VAC Connections
PK PS PZNetz
120 VAC
Connecting incoming powerThe boiler must be electrically grounded in accordance with local codes, or in absence of local codes, with the National Electrical Code, ANSI/INFPA 70 and/or the CSA C22.1, Elec-trical Code.
Electrical connections 7
Logamax plus GB162-80 kW/100 kW - Subject to modifications resulting from technical improvements! 33
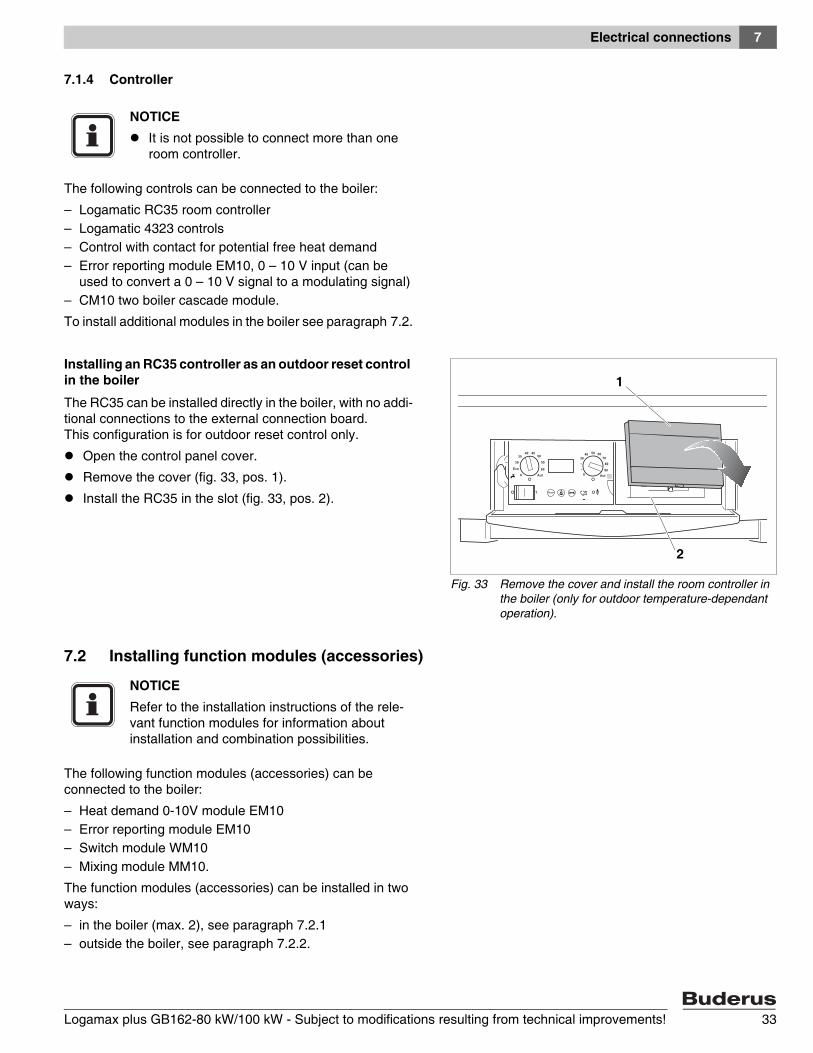
7.1.4 Controller
The following controls can be connected to the boiler:
– Logamatic RC35 room controller– Logamatic 4323 controls– Control with contact for potential free heat demand– Error reporting module EM10, 0 – 10 V input (can be
used to convert a 0 – 10 V signal to a modulating signal)– CM10 two boiler cascade module.
To install additional modules in the boiler see paragraph 7.2.
Installing an RC35 controller as an outdoor reset control in the boiler
The RC35 can be installed directly in the boiler, with no addi-tional connections to the external connection board. This configuration is for outdoor reset control only.
Open the control panel cover.
Remove the cover (fig. 33, pos. 1).
Install the RC35 in the slot (fig. 33, pos. 2).
7.2 Installing function modules (accessories)
The following function modules (accessories) can be connected to the boiler:
– Heat demand 0-10V module EM10– Error reporting module EM10– Switch module WM10– Mixing module MM10.
The function modules (accessories) can be installed in two ways:
– in the boiler (max. 2), see paragraph 7.2.1– outside the boiler, see paragraph 7.2.2.
NOTICEIt is not possible to connect more than one room controller.
Fig. 33 Remove the cover and install the room controller in the boiler (only for outdoor temperature-dependant operation).
1
2
NOTICERefer to the installation instructions of the rele-vant function modules for information about installation and combination possibilities.

Electrical connections7
Logamax plus GB162-80 kW/100 kW - Subject to modifications resulting from technical improvements!34
7.2.1 Installing function modules in the boiler
Loosen the screw (fig. 34, step 1).
Pull open the drawer (fig. 34, step 2).
Install the wall bracket in the relevant slots in the drawer (fig. 35).
Click the function module(s) into position in the wall bracket (fig. 36).
Remove the drawer.
Fig. 34 Opening the drawer
1
2
Fig. 35 Installing the wall bracket
Fig. 36 Clicking the function module into position
Electrical connections 7
Logamax plus GB162-80 kW/100 kW - Subject to modifications resulting from technical improvements! 35
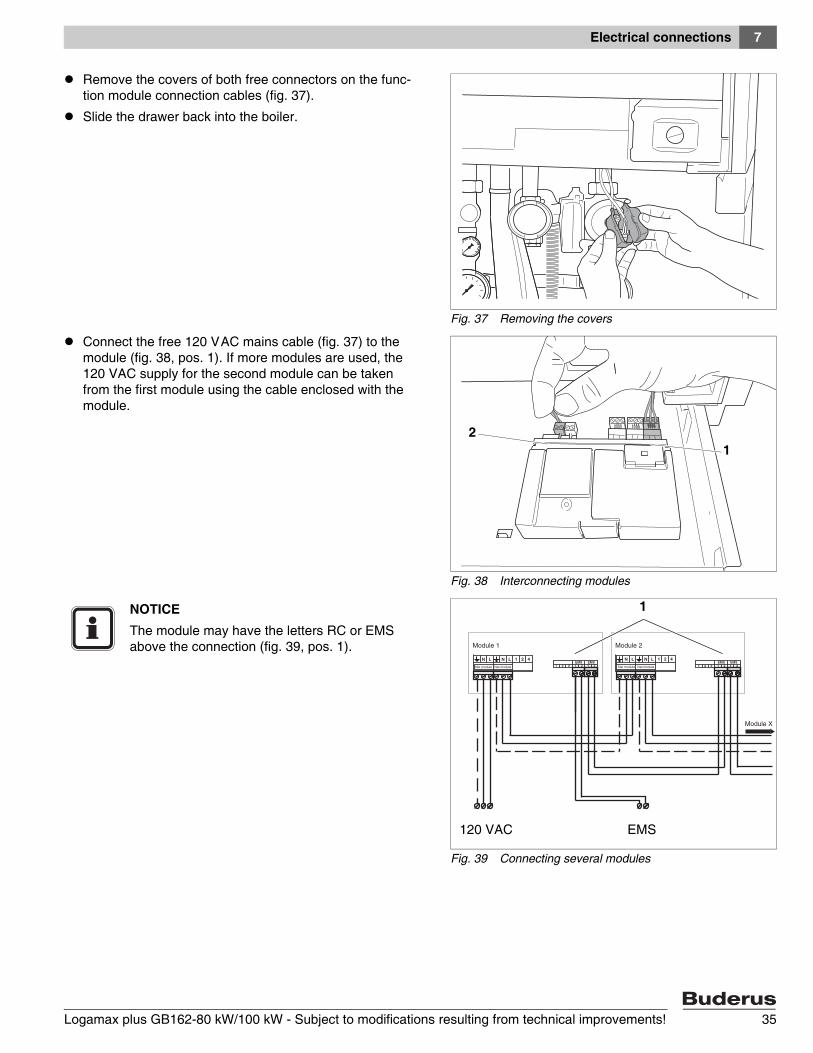
Remove the covers of both free connectors on the func-tion module connection cables (fig. 37).
Slide the drawer back into the boiler.
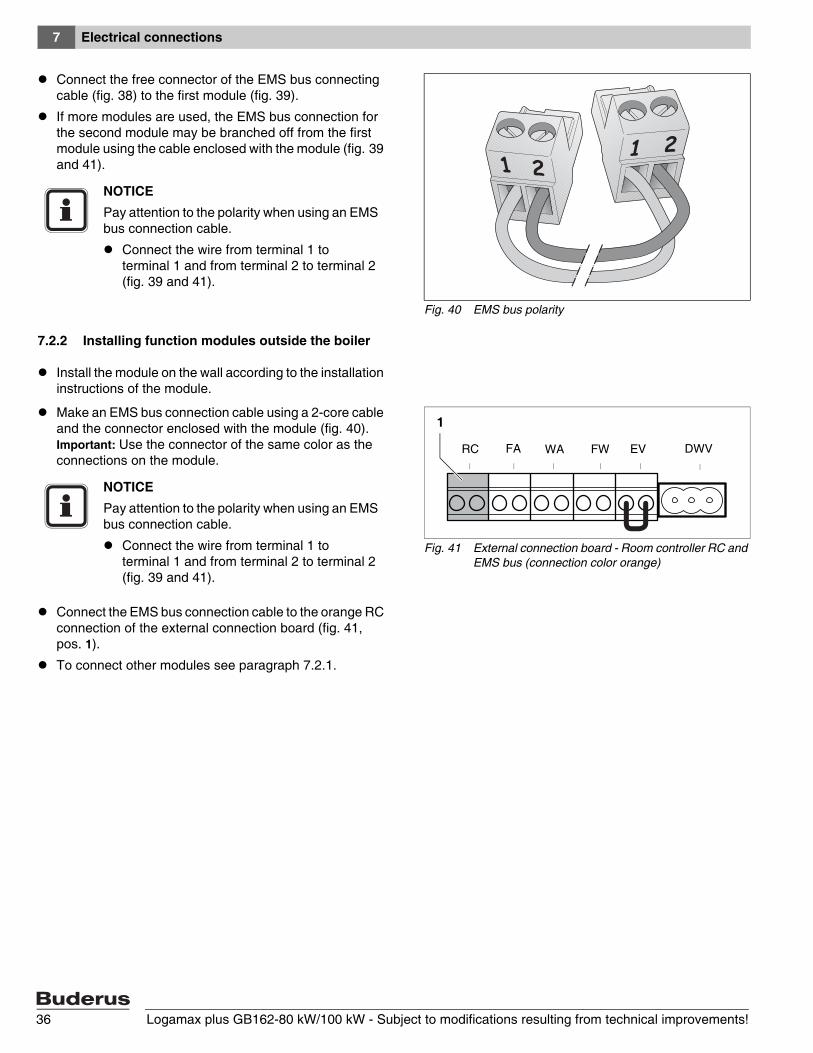
Connect the free 120 VAC mains cable (fig. 37) to the module (fig. 38, pos. 1). If more modules are used, the 120 VAC supply for the second module can be taken from the first module using the cable enclosed with the module.
Fig. 37 Removing the covers
Fig. 38 Interconnecting modules
12
Fig. 39 Connecting several modules
1
120 VAC EMS
NOTICEThe module may have the letters RC or EMS above the connection (fig. 39, pos. 1).
Electrical connections7
Logamax plus GB162-80 kW/100 kW - Subject to modifications resulting from technical improvements!36
Connect the free connector of the EMS bus connecting cable (fig. 38) to the first module (fig. 39).
If more modules are used, the EMS bus connection for the second module may be branched off from the first module using the cable enclosed with the module (fig. 39 and 41).
7.2.2 Installing function modules outside the boiler
Install the module on the wall according to the installation instructions of the module.
Make an EMS bus connection cable using a 2-core cable and the connector enclosed with the module (fig. 40). Important: Use the connector of the same color as the connections on the module.
Connect the EMS bus connection cable to the orange RC connection of the external connection board (fig. 41, pos. 1).
To connect other modules see paragraph 7.2.1.
Fig. 40 EMS bus polarity
NOTICEPay attention to the polarity when using an EMS bus connection cable.
Connect the wire from terminal 1 to terminal 1 and from terminal 2 to terminal 2 (fig. 39 and 41).
Fig. 41 External connection board - Room controller RC and EMS bus (connection color orange)
RC FA WA FW EV DWV
1
NOTICEPay attention to the polarity when using an EMS bus connection cable.
Connect the wire from terminal 1 to terminal 1 and from terminal 2 to terminal 2 (fig. 39 and 41).
Electrical connections 7
Logamax plus GB162-80 kW/100 kW - Subject to modifications resulting from technical improvements! 37
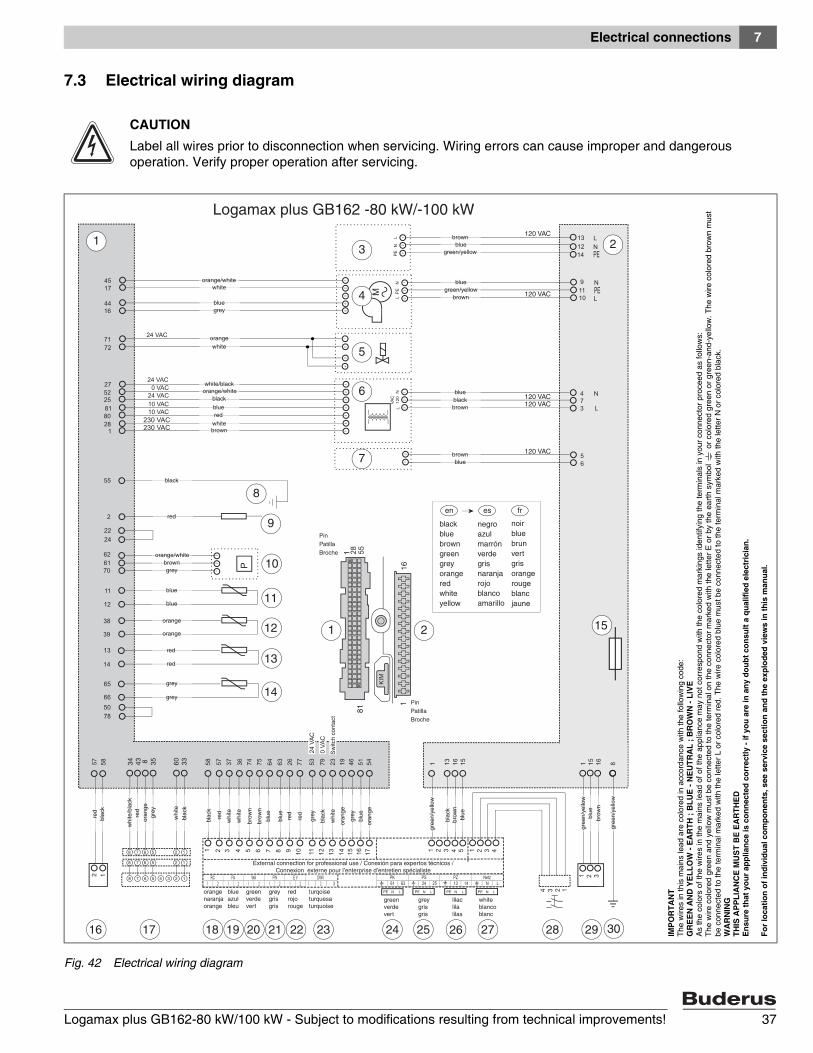
7.3 Electrical wiring diagram
Fig. 42 Electrical wiring diagram
CAUTIONLabel all wires prior to disconnection when servicing. Wiring errors can cause improper and dangerous operation. Verify proper operation after servicing.
81
1
1
16
120 VAC
1 2
4
3
5
9
13
16 17 18 19 20 21 22 23 24 25 26 27 28 29 30
7
1 2
6
12
11
10
8
15
orangenaranjaorange
blueazulbleu
greenverdevert
greygrisgris
redrojorouge
turqoiseturquesaturquoise
120 VAC120 VAC
120 VAC
External connection for professional use / Conexión para expertos técnicos / Connexion externe pour l’enterprise d’entretien spécialiste
greenverdevert
greygrisgris
lilaclilalilas
whiteblancoblanc
PinPatillaBroche
PinPatillaBroche
57
1465
665078
2224
black
browngrey
blue
blue
orange
orange
grey
grey
red rojo rouge
red
blac
k
red
whi
te
whi
te
brow
n
brow
n
blue
blue
grey
oran
ge
grey
blue
oran
ge
whi
te
blac
k
Sw
itch
cont
act
black
brown
orangegrey
white
blue
naranja orange
azul blue
gris gris
negro noir
brunmarrón
blanco blanc
en es fr
bluegreen/yellow
brown
120 VACbrown
blueblackbrown
brownblue
green verde vert
yellow amarillo jaune
gree
n/ye
llow
blac
kbr
own
gree
n/ye
llow
blue
brow
n
gree
n/ye
llow
Logamax plus GB162 -80 kW/-100 kW
123478 56
1278 56
1278 56
whi
te
grey
oran
ge
33603584334
white
bluegrey
orangewhite
white/black
black
bluered
whitebrown
green/yellowblue
orange/white
orange/white
red
orange/white
red
red
red
whi
te/b
lack
blac
k
red
red
blue
blac
k
IMP
OR
TAN
TTh
e w
ires
in th
is m
ains
lead
are
col
ored
in a
ccor
danc
e w
ith th
e fo
llow
ing
code
:G
RE
EN
AN
D Y
ELL
OW
- E
AR
TH ;
BLU
E -
NE
UTR
AL
; BR
OW
N -
LIV
EA
s th
e co
lors
of t
he w
ires
in th
e m
ains
lead
of o
f the
app
lianc
e m
ay n
ot c
orre
spon
d w
ith th
e co
lore
d m
arki
ngs
iden
tifyi
ng th
e te
rmin
als
in y
our c
onne
ctor
pro
ceed
as
follo
ws:
Th
e w
ire c
olor
ed g
reen
and
yel
low
mus
t be
conn
ecte
d to
the
term
inal
on
the
conn
ecto
r mar
ked
with
the
lette
r E o
r by
the
earth
sym
bol
or
colo
red
gree
n or
gre
en-a
nd-y
ello
w. T
he w
ire c
olor
ed b
row
n m
ust
be c
onne
cted
to th
e te
rmin
al m
arke
d w
ith th
e le
tter L
or c
olor
ed re
d. T
he w
ire c
olor
ed b
lue
mus
t be
conn
ecte
d to
the
term
inal
mar
ked
with
the
lette
r N o
r col
ored
bla
ck.
WA
RN
ING
THIS
AP
PLI
AN
CE
MU
ST
BE
EA
RTH
ED
Ens
ure
that
you
r ap
plia
nce
is c
onne
cted
cor
rect
ly -
if yo
u ar
e in
any
dou
bt c
onsu
lt a
qual
ified
ele
ctri
cian
.
For
loca
tion
of in
divi
dual
com
pone
nts,
see
ser
vice
sec
tion
and
the
expl
oded
vie
ws
in th
is m
anua
l.
Electrical connections7
Logamax plus GB162-80 kW/100 kW - Subject to modifications resulting from technical improvements!38
Legend of fig. 42
pos. 1: 81-pole connector (AC 0, 10, 24 and 230 V)pos. 2: 16-pole connector (AC 120 V)pos. 3: Connection for pump in connection kit (accessory)pos. 4: Fanpos. 5: Gas valvepos. 6: Transformerpos. 7: Glow ignitorpos. 8: Earthpos. 9: Ionizationpos. 10: Pressure sensorpos. 11: Return sensorpos. 12: Safety-temperature sensorpos. 13: Supply sensorpos. 14: Flue gas sensorpos. 15: Fuse (5 amp. FAST, sand filled)pos. 16: BUS function modulespos. 17: Connector for BC10 Basic Controllerpos. 18: Room controller RC and EMS buspos. 19: Outdoor temperature sensorpos. 20: On/off temperature controller (potential free)pos. 21: DHW sensorpos. 22: External switch contact (potential free, e.g. floor heating)pos. 23: External three-way valvepos. 24: Boiler pump (120 VAC, max. 100 W)pos. 25: DHW pump (pump 120 VAC, max. 100 W)pos. 26: DHW re-circulation pump (pump 120 VAC, max. 100 W)pos. 27: Main power connection 120 V 60 Hz, max. permissible 5 Apos. 28: Mains switchpos. 29: 120 VAC function modulepos. 30: Ground
Operation 8
Logamax plus GB162-80 kW/100 kW - Subject to modifications resulting from technical improvements! 39
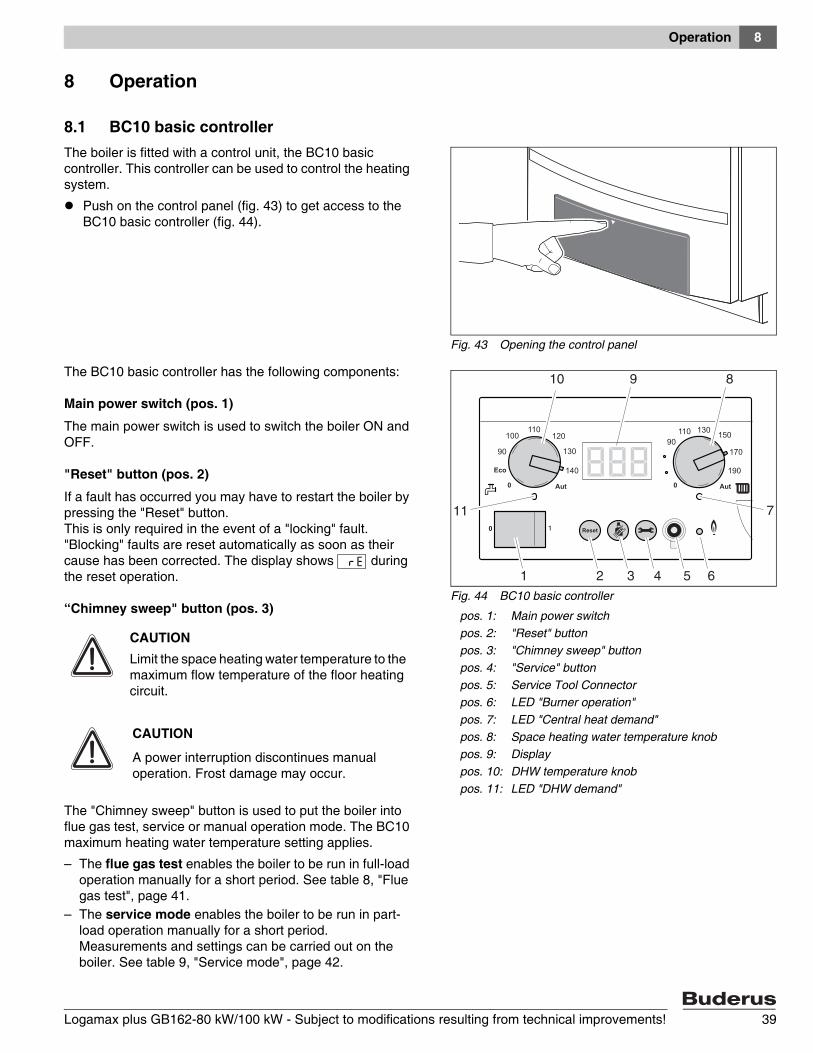
8 Operation
8.1 BC10 basic controllerThe boiler is fitted with a control unit, the BC10 basic controller. This controller can be used to control the heating system.
Push on the control panel (fig. 43) to get access to the BC10 basic controller (fig. 44).
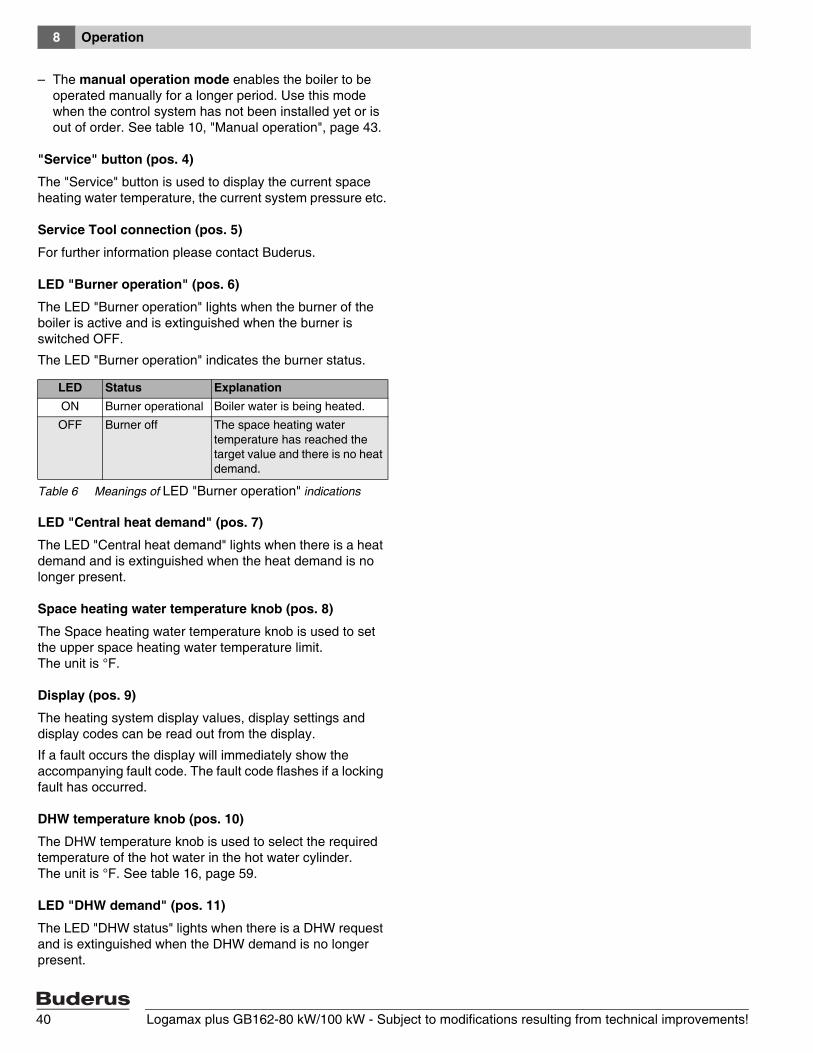
The BC10 basic controller has the following components:
Main power switch (pos. 1)
The main power switch is used to switch the boiler ON and OFF.
"Reset" button (pos. 2)
If a fault has occurred you may have to restart the boiler by pressing the "Reset" button.This is only required in the event of a "locking" fault. "Blocking" faults are reset automatically as soon as their cause has been corrected. The display shows [\/r/e| during the reset operation.
“Chimney sweep" button (pos. 3)
The "Chimney sweep" button is used to put the boiler into flue gas test, service or manual operation mode. The BC10 maximum heating water temperature setting applies.
– The flue gas test enables the boiler to be run in full-load operation manually for a short period. See table 8, "Flue gas test", page 41.
– The service mode enables the boiler to be run in part-load operation manually for a short period. Measurements and settings can be carried out on the boiler. See table 9, "Service mode", page 42.
Fig. 43 Opening the control panel
Fig. 44 BC10 basic controller
pos. 1: Main power switchpos. 2: "Reset" buttonpos. 3: "Chimney sweep" buttonpos. 4: "Service" buttonpos. 5: Service Tool Connectorpos. 6: LED "Burner operation"pos. 7: LED "Central heat demand" pos. 8: Space heating water temperature knobpos. 9: Displaypos. 10: DHW temperature knobpos. 11: LED "DHW demand"
8881
1 2 3 4 5 6
11
10 9 8
7
110
140
130
120
90
100130
170
15090
110
190
CAUTIONLimit the space heating water temperature to the maximum flow temperature of the floor heating circuit.
CAUTION
A power interruption discontinues manual operation. Frost damage may occur.
Operation8
Logamax plus GB162-80 kW/100 kW - Subject to modifications resulting from technical improvements!40
– The manual operation mode enables the boiler to be operated manually for a longer period. Use this mode when the control system has not been installed yet or is out of order. See table 10, "Manual operation", page 43.
"Service" button (pos. 4)
The "Service" button is used to display the current space heating water temperature, the current system pressure etc.
Service Tool connection (pos. 5)
For further information please contact Buderus.
LED "Burner operation" (pos. 6)
The LED "Burner operation" lights when the burner of the boiler is active and is extinguished when the burner is switched OFF.
The LED "Burner operation" indicates the burner status.
LED "Central heat demand" (pos. 7)
The LED "Central heat demand" lights when there is a heat demand and is extinguished when the heat demand is no longer present.
Space heating water temperature knob (pos. 8)
The Space heating water temperature knob is used to set the upper space heating water temperature limit. The unit is °F.
Display (pos. 9)
The heating system display values, display settings and display codes can be read out from the display.
If a fault occurs the display will immediately show the accompanying fault code. The fault code flashes if a locking fault has occurred.
DHW temperature knob (pos. 10)
The DHW temperature knob is used to select the required temperature of the hot water in the hot water cylinder. The unit is °F. See table 16, page 59.
LED "DHW demand" (pos. 11)
The LED "DHW status" lights when there is a DHW request and is extinguished when the DHW demand is no longer present.
LED Status ExplanationON Burner operational Boiler water is being heated.
OFF Burner off The space heating water temperature has reached the target value and there is no heat demand.
Table 6 Meanings of LED "Burner operation" indications
Operation 8
Logamax plus GB162-80 kW/100 kW - Subject to modifications resulting from technical improvements! 41
8.2 BC10 operating instructionsYou can navigate through the menu structure of the boiler on the BC10 using the "Reset" button, the "Chimney sweep" button, the "Service button" (fig. 44, pos. 2, 3 and 4) and the display (fig. 44, pos. 9).
The menu structure consists of 5 menus:
– Normal Operation menu, see table 7– Flue Gas Test menu, see table 8 – Service Mode menu, see table 9 – Manual Operation menu, see table 10– Settings menu, see table 11.
Normal Operation menu
Step 1 [\/7/5| Shows currently measured space heating water temperature in °F. Also see paragraph 13.3.
Step 2 Press the e button.
Step 3 [p/2/2| Shows currently measured system pressure in psi. Also see paragraph 13.3.
Step 4 Press the e button.
Step 5 [-/h/\| Current display code. In this case: Operating phase: Boiler in heating mode. Also see paragraph 13.5.
Step 6 After 5 seconds the display returns to step 1, or
Step 7 Press the e button.
Table 7 Normal operation
Flue Gas Test menu
Step 1 [1/2/0| Shows currently measured space heating water temperature in °F. Also see paragraph 13.3.
Step 2 To activate the flue gas test:Press and hold the d button for more than 2 but not longer than 5 seconds.
Step 3 [1/2/0| The non-flashing dot in the right-hand bottom corner of the display shows the flue gas test has been activated:
– the boiler is in heating mode at a capacity of 100 % for a maximum of 30 minutes. – Space heating water temperature is as set on the BC10 basic controller. – DHW mode is not possible.
Step 4 Press the e button.
Step 5 [p/2/2| Shows currently measured system pressure in psi. Also see paragraph 13.3.
Step 6 Press the e button.
Step 7 [-/a/\] Display code: Operating phase: The boiler is in flue gas test mode. Also see paragraph 13.5.
Step 8 Press the e button.
Step 9 [1/2/0| Shows currently measured space heating water temperature in °F. Also see paragraph 13.3.
Step 10 After 30 minutes or after a power interruption the flue gas test ends automatically.To end manually press and hold the d button for more than 2 seconds until the dot disappears.
Table 8 Flue gas test
Operation8
Logamax plus GB162-80 kW/100 kW - Subject to modifications resulting from technical improvements!42
Service Mode menu
Step 1 [1/2/0| Shows currently measured space heating water temperature in °F. Also see paragraph 13.3.
Step 2 To activate service mode 1st step:Press and hold the d button for more than 2 but not longer than 5 seconds.
Step 3 [1/2/0] The non-flashing dot is shown in the right-hand bottom corner of the display shows the boiler is now in Flue gas test mode.
Step 4 To activate service mode 2nd step:Simultaneously press and hold the d+ e buttons for more than 2 seconds.
Step 5 [l/?/?] Display shows the maximum capacity setting during heating mode in %. Also see paragraph 13.4.In this case: [l/?/?] = 100 %. Service mode has been activated.You can now adjust the boiler performance to partial load, i.e. to check the gas/air ratio or the ionization current.
Step 6 Press and hold the c button until the display shows:for boilers at sea level [l/2/5] with a 80-kW boiler or [l/2/0] with a 100-kW boilerfor boilers at high altitude [l/3/6] with a 80-kW boiler or [l/3/0] with a 100-kW boiler.
Step 7 For boilers at sea level (0-4000 ft):[l/2/5] Display setting: with a 80-kW boiler and [l/2/0] with a 100-kW boiler.For boilers at high altitude (4000-10,000 ft):[l/3/6] Display setting: with a 80-kW boiler and [l/3/0] with a 100-kW boiler.
Minimum capacity setting during heating mode in %. Also see paragraph 13.4.
– The boiler will reduce its performance to 25 % or 20 % (sea level) or 36 % or 30 % (high altitude) respectively within a couple of seconds.
– The space heating water temperature set on the BC10 basic controller (control panel) applies now. – Check the gas/air ratio or the ionization current and if necessary set the gas/air ratio according to
paragraph 9.8 or paragraph 9.12.
Step 8 Press the e button.
Step 9 [f/\/5] This parameter shows the pump run-over time in minutes that starts when the heating mode has ended.Also see paragraph 13.4.
Step 10 Press the e button.
Step 11 [c/\/1] This parameter indicates the DHW mode status setting. Also see paragraph 13.4.
Step 12 Press the e button.
Step 13 [1/2/0| Shows currently measured space heating water temperature in °F. Also see paragraph 13.3.
Step 14 Press the e button.
Step 15 [p/2/2] Shows currently measured system pressure in psi. Also see paragraph 13.3.
Step 16 Press the e button.
Step 17 [-/a/\] Display code: Operating phase: The boiler is in service mode. Also see paragraph 13.5.
Step 18 After 30 minutes or after a power interruption the flue gas test ends automatically. To end manually press and hold the d button for more than 2 seconds until the dot disappears.
Step 19 The boiler input rating drops to the preset capacity, see the "Settings" menu (table 10).
Table 9 Service mode

Operation 8
Logamax plus GB162-80 kW/100 kW - Subject to modifications resulting from technical improvements! 43
Manual Operation menu
Step 1 [1/2/0| Shows currently measured space heating water temperature in °F. Also see paragraph 13.3.
Step 2 To activate manual operation: Press and hold the d button for more than 5 seconds.
Step 3 [\/7/5} A flashing dot in the right-hand bottom corner of the display shows manual operation is active. This means that the boiler is permanently in heating mode:– Space heating water temperature is as set on the BC10 basic controller. – The LED "Heating system status" lights.– DHW mode is possible during manual operation.
Step 4 Press the e button.
Step 5 [p/2/2} Shows currently measured system pressure in psi. Also see paragraph 13.3.
Step 6 Press the e button.
Step 7 [-/h/\} Display code: Operating phase: Also see paragraph 13.5. The boiler is in manual operation mode.During manual operation the "Settings" menu (table 11 from step 2) can be used to temporarily change the target boiler performance.NOTE: If the boiler output has been changed temporarily, this must be set again after ending manual operation, according to the "Settings" menu (table 11).
Step 8 Press the e button.
Step 9 [1/2/0}Shows currently measured space heating water temperature in °F. Also see paragraph 13.3.
Step 10 After a power interruption manual operation ends automatically.To end manually press and hold the d button for more than 2 seconds until the dot disappears.
Table 10 Manual operation
Operation8
Logamax plus GB162-80 kW/100 kW - Subject to modifications resulting from technical improvements!44
Settings menu
Step 1 [1/2/0| Shows currently measured space heating water temperature in °F. Also see paragraph 13.3.
Step 2 To open the "Settings" menu: Press and hold the d + e buttons for more than 2 seconds.
Step 3 [l/?/?| This shows the "Settings" menu is open. You can adjust the setting of this parameter.
Step 4 [l/?/?| Target output. Adjust as follows, or go to step 5:Lower: Decrease the modulation rate with the c button. The minimum setting for boilers at sea level is[l/2/5| = 25 % with an 80 kW boiler and [l/2/0| = 20 % with a 100 kW boiler. The minimum setting for boilers at high altitude is [l/3/6| = 36 % with an 80 kW boiler and [l/3/0| = 30 % with a 100 kW boiler. Higher: Increase the modulation rate with the d button. The maximum setting is [l/?/?| = 100 %. This is equal to the factory setting.
Step 5 Press the e button.
Step 6 [f/\/5| Pump run-over time in minutes (starts when the heating mode has ended). Adjust as follows or or go to step 7:Lower: Decrease the time with the c button. The minimum setting is [f/\/0| = 0 minutes. The factory default setting is 5 minutes. CAUTION Do not set the post purge time to less than 5 minutes.Higher: Increase the time with the d button. The maximum setting is [f/6/0| = 60 minutes or [f/1/d| = 24 hours.
Step 7 Press the e button.
Step 8 [c/\/1| DHW mode status setting. Adjust as follows or go to step 9.DHW mode can be switched OFF or ON. This setting has priority over other DHW mode settings, such as those made on the room thermostat.Set the DHW mode with the c or d buttons. [c/\/1| means "ON", [c/\/0| means "OFF". NOTE: Setting [c/\/0| also switches OFF the hot water cylinder frost protection.
Step 9 After 5 seconds or after a power interruption the settings menu ends automatically. To end manually press the e button. Any adjustments that you have made have been confirmed.
Table 11 Settings
Start-up procedure 9
Logamax plus GB162-80 kW/100 kW - Subject to modifications resulting from technical improvements! 45
9 Start-up procedureThere are several steps involved in starting up the boiler. Complete the commissioning record log book after carrying out all activities described in this chapter (paragraph 15.1 “Start-up report“, page 85).
A.
B.
C.
D.
FOR YOUR SAFETY READ BEFORE OPERATINGWARNING: If you do not follow these instructionsexactly, a fire or explosion may result causingproperty damage, personal injury or loss of life.
This appliance does not have a pilot. It is equipped with an ignition devicewhich automatically lights the burner. Do not try to light the burner by hand,BEFORE OPERATING smell all around the appliance area for gas. Be sure tosmell next to the floor because some gas is heavier than air and will settle onthe floor.WHAT TO DO IF YOU SMELL GAS• Do not try to light any appliance.• Do not touch any electric switch; do not use any phone in your building.• Immediately call your gas supplier from a neighbor's phone. Follow the gas supplier's instruction.• If you cannot reach your gas supplier, call the fire department.
OPERATING INSTRUCTIONS
TO TURN OFF GAS TO APPLIANCE
Use only your hand to push in or turn the gas control knob. Never use tools.If the knob will not push in or turn by hand, don't try to repair it, call a qualifiedservice technician. Force or attempted repair may result in a fire or explosion.Do not use this appliance if any parts have been under water. Immediately call aqualified service technician to inspect the appliance and to replace any part ofthe control system and any gas control which has been under water.
1. STOP! read the safety information above on this label. 2. Turn off all electric power to the appliance. 3. Set the thermostat or other operating control to lowest setting. 4. This appliance is equipped with an ignition device which automatically lights the burner. Do not try to light the burner by hand. 5. Close main gas shut off valve. 6. Wait (5) minutes to clear out any gas. Then smell for gas. Including near the floor. If you smell gas, STOP! Follow "B" in the safety information above on this label. If you don't smell gas, go to the next step. 7. Open main shut off valve. 8. Set the thermostat or other operation control to desired setting. 9. Turn on all electric power to the appliance. 10. If the appliance will not operate, follow the instruction "To Turn Off Gas To Appliance" and call your service technician or gas supplier.
1. Turn off all electric power to the appliance if service is to be performed. 2. Set the thermostat or other operating control to lowest setting. 3. Close main gas shut off valve. 708.375A - 2172B

Start-up procedure9
Logamax plus GB162-80 kW/100 kW - Subject to modifications resulting from technical improvements!46
9.1 Check for gas leaksPrior to the initial start-up check that the gas flow pipework is gas-tight; this must be confirmed in the start-up report.
If 0.5 psi (34.45 mbar) or less, slowly open the gas valve by pushing on the gas valve and turning it ¼ rotation in a counter-clockwise direction (fig. 45). The gas valve is open when it is in the vertical position.
Shut off the heating system from the power supply.
Check the new conduit section up to and including its connection (i.e. direct sealing location) to the gas fitting for leaks, using a foaming product.The maximum test pressure allowed at the manual gas shutoff valve inlet is 0.5 mbar (0.2 inch W.C.).
WARNINGThe boiler and its manual gas shutoff valve must be isolated from the gas supply piping system during any pressure testing of that system, exceeding 0.5 psi (34.5 mbar). The maximum test pressure allowed at the manual gas shutoff valve inlet is 0.5 psi (34.5 mbar).
Cover endangered positions before leak testing.
Do not spray the leak testing agent onto cables, plugs or electrical connection lines. Do not allow it to drip onto them either.
DANGERLeaks may be caused to pipes and screw connections during commissioning and mainte-nance activities.
Carry out a proper leak test.
Only use approved leak detection agents for leak detection.
Fig. 45 Open the gas valve
pos. 1: pressure relief valvepos. 2: supply water valvepos. 3: pumppos. 4: manual gas shutoff valvepos. 5: return water valve
2
3
4
5
1
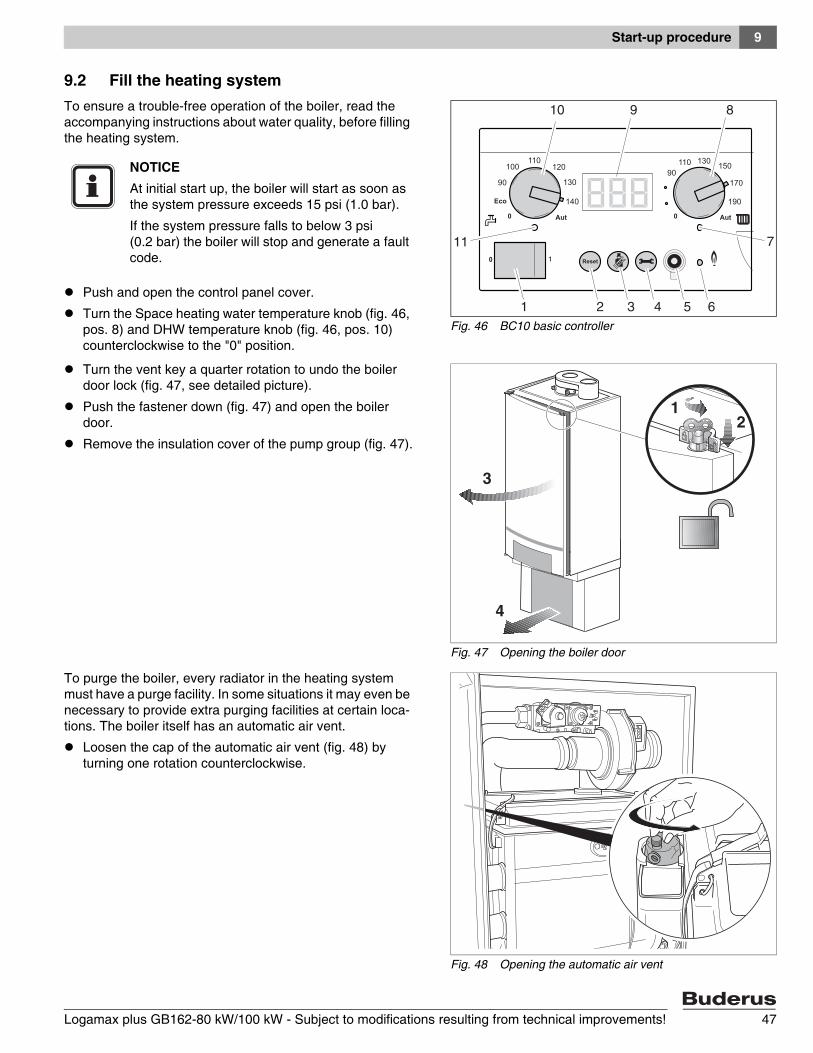
Start-up procedure 9
Logamax plus GB162-80 kW/100 kW - Subject to modifications resulting from technical improvements! 47
9.2 Fill the heating systemTo ensure a trouble-free operation of the boiler, read the accompanying instructions about water quality, before filling the heating system.
Push and open the control panel cover.
Turn the Space heating water temperature knob (fig. 46, pos. 8) and DHW temperature knob (fig. 46, pos. 10) counterclockwise to the "0" position.
Turn the vent key a quarter rotation to undo the boiler door lock (fig. 47, see detailed picture).
Push the fastener down (fig. 47) and open the boiler door.
Remove the insulation cover of the pump group (fig. 47).
To purge the boiler, every radiator in the heating system must have a purge facility. In some situations it may even be necessary to provide extra purging facilities at certain loca-tions. The boiler itself has an automatic air vent.
Loosen the cap of the automatic air vent (fig. 48) by turning one rotation counterclockwise.
Fig. 46 BC10 basic controller
8881
1 2 3 4 5 6
11
10 9 8
7
110
140
130
120
90
100130
170
15090
110
190
NOTICEAt initial start up, the boiler will start as soon as the system pressure exceeds 15 psi (1.0 bar).
If the system pressure falls to below 3 psi (0.2 bar) the boiler will stop and generate a fault code.
Fig. 47 Opening the boiler door
12
3
4
Fig. 48 Opening the automatic air vent
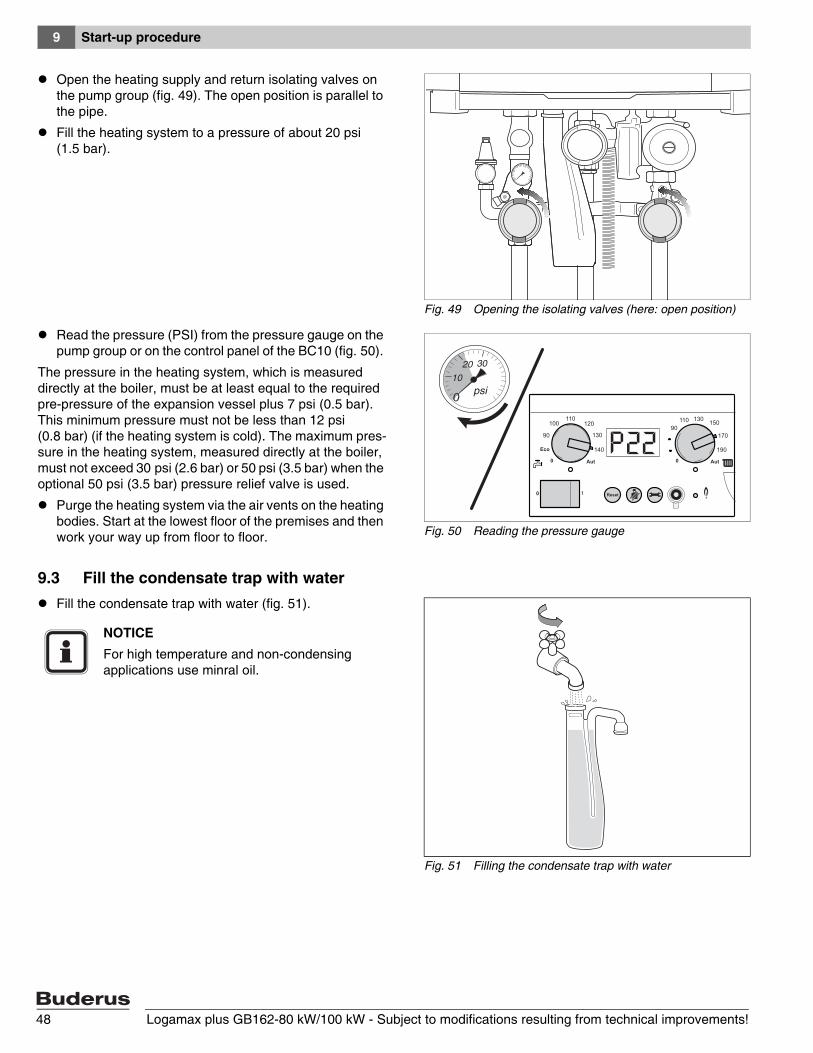
Start-up procedure9
Logamax plus GB162-80 kW/100 kW - Subject to modifications resulting from technical improvements!48
Open the heating supply and return isolating valves on the pump group (fig. 49). The open position is parallel to the pipe.
Fill the heating system to a pressure of about 20 psi (1.5 bar).
Read the pressure (PSI) from the pressure gauge on the pump group or on the control panel of the BC10 (fig. 50).
The pressure in the heating system, which is measured directly at the boiler, must be at least equal to the required pre-pressure of the expansion vessel plus 7 psi (0.5 bar). This minimum pressure must not be less than 12 psi (0.8 bar) (if the heating system is cold). The maximum pres-sure in the heating system, measured directly at the boiler, must not exceed 30 psi (2.6 bar) or 50 psi (3.5 bar) when the optional 50 psi (3.5 bar) pressure relief valve is used.
Purge the heating system via the air vents on the heating bodies. Start at the lowest floor of the premises and then work your way up from floor to floor.
9.3 Fill the condensate trap with waterFill the condensate trap with water (fig. 51).
Fig. 49 Opening the isolating valves (here: open position)
Fig. 50 Reading the pressure gauge
P221
110
140
130
120
90
100130
170
15090
110
190
psi10
20 30
Fig. 51 Filling the condensate trap with water
NOTICEFor high temperature and non-condensing applications use minral oil.

Start-up procedure 9
Logamax plus GB162-80 kW/100 kW - Subject to modifications resulting from technical improvements! 49
9.4 Bleed the gas supply valveClose the gas valve (fig. 52).
Open the screw plug on the testing nipple of the gas supply pressure and for purging (fig. 53, pos. 1) by 2 turns and install a hose.
Slowly open the gas valve by pushing on the gas valve and turning it counterclockwise through ¼ rotation (fig. 54). The gas valve is open when it is in the vertical position.
Purge the gas supply into a well ventilated area.
Close the gas shutoff valve when no more air is present (fig. 52).
Remove the hose and tighten the screw plug on the testing nipple again.
9.5 Check the air/flue gas connectionCheck the following points:
– Is the prescribed flue gas system used (see paragraph 6.7 "Installation of the Exhaust and Air Intake system", page 24)?
– Have the configuration instructions from the relevant flue gas system installation instructions been observed?
Fig. 52 Closing the gas valve
Fig. 53 Bleeding the gas flow pipe
1
Fig. 54 Opening the gas valve
NOTICETest the tightness of the measuring nipple(s) used.
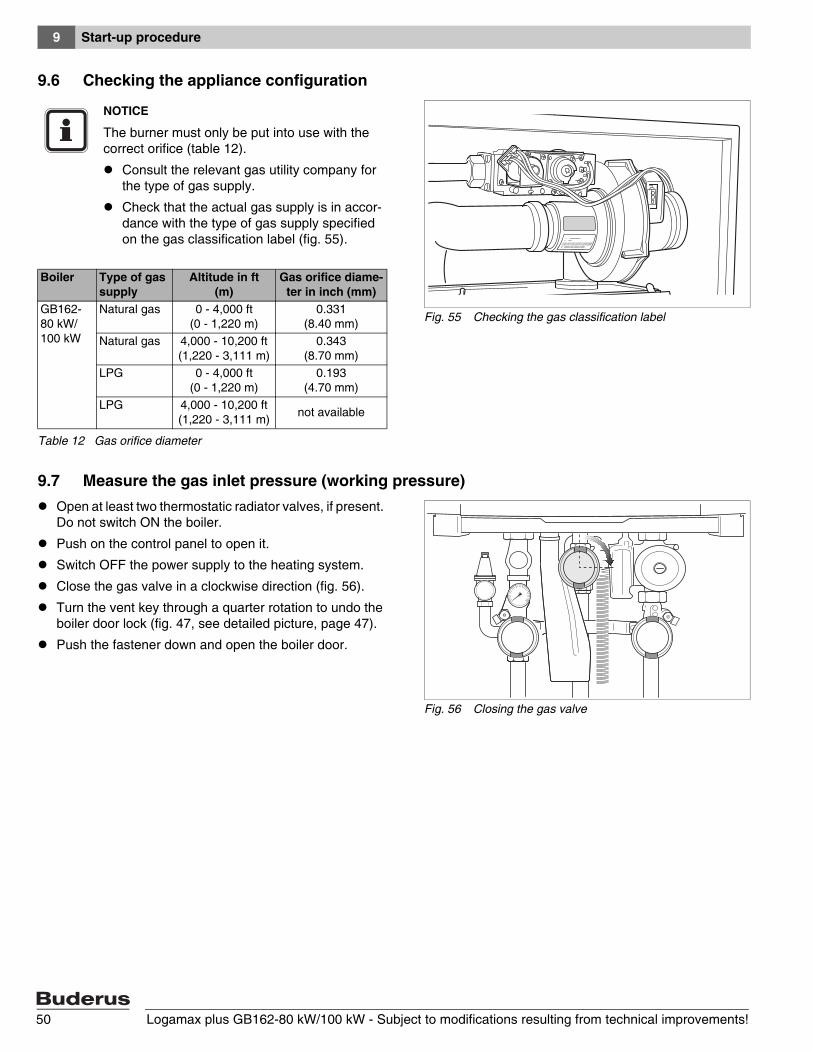
Start-up procedure9
Logamax plus GB162-80 kW/100 kW - Subject to modifications resulting from technical improvements!50
9.6 Checking the appliance configuration
9.7 Measure the gas inlet pressure (working pressure)Open at least two thermostatic radiator valves, if present. Do not switch ON the boiler.
Push on the control panel to open it.
Switch OFF the power supply to the heating system.
Close the gas valve in a clockwise direction (fig. 56).
Turn the vent key through a quarter rotation to undo the boiler door lock (fig. 47, see detailed picture, page 47).
Push the fastener down and open the boiler door.
Fig. 55 Checking the gas classification label
NOTICE
The burner must only be put into use with the correct orifice (table 12).
Consult the relevant gas utility company for the type of gas supply.
Check that the actual gas supply is in accor-dance with the type of gas supply specified on the gas classification label (fig. 55).
Boiler Type of gas supply
Altitude in ft(m)
Gas orifice diame-ter in inch (mm)
GB162-80 kW/100 kW
Natural gas 0 - 4,000 ft(0 - 1,220 m)
0.331(8.40 mm)
Natural gas 4,000 - 10,200 ft(1,220 - 3,111 m)
0.343(8.70 mm)
LPG 0 - 4,000 ft(0 - 1,220 m)
0.193(4.70 mm)
LPG 4,000 - 10,200 ft(1,220 - 3,111 m) not available
Table 12 Gas orifice diameter
Fig. 56 Closing the gas valve

Start-up procedure 9
Logamax plus GB162-80 kW/100 kW - Subject to modifications resulting from technical improvements! 51
Open the screw plug on the testing nipple for the gas inlet pressure by 2 turns (fig. 57, pos. 1).
Reset the digital pressure gauge to "0".
Connect the pressure gauge connection tube to the posi-tive port of the testing nipple (fig. 57, pos. 2).
Slowly open the gas valve by pushing on the gas valve and turning it ¼ rotation in an counterclockwise direction (fig. 54, page 49). The gas valve is open when it is in the vertical position.
Switch ON the heating system by pressing the main switch of the BC10 basic controller (fig. 58, pos. 1).
Press and hold the "Chimney sweep" button (fig. 58, pos. 3) (approx. two seconds), until the dot in the right-hand bottom corner of the display (fig. 58, pos. 9) appears. See also table 8, "Flue gas test", page 41.
After the LED "Burner operation" (fig. 58, pos. 6) has lit up wait for one minute until the boiler is burning at full load.
Measure the gas supply pressure and enter it in the start-up report, page 85. The gas supply pressure must be:
– for natural gas min. 7 inch W.C. (17.4 mbar), max. 10.5 inch W.C. (26.1 mbar), nominal supply pres-sure 8 inch W.C. (19.9 mbar).
– for LPG min. 8 inch W.C. (19.9 mbar), max. 13 inch W.C. (32.3 mbar), nominal supply pres-sure 11 inch W.C. (27.4 mbar).
Press the "Service" button (fig. 58, pos. 4) repeatedly until the temperature reading is shown in the display.
Press the "Chimney sweep" button (fig. 58, pos. 3) to clear the reading. Also see table 8, "Flue gas test", page 41
Fig. 57 Measuring the gas supply pressure
1
2
NOTICE
Throughout the measuring operation, keep the digital pressure gauge in the same position (horizontal or vertical) in which it was reset to "0".
Fig. 58 BC10 basic controller
pos. 1: Main switchpos. 2: "Reset" buttonpos. 3: "Chimney sweep" buttonpos. 4: "Service" buttonpos. 5: Connection possibility for the diagnosis connectorpos. 6: LED "Burner operation"pos. 7: LED "Central heat demand" pos. 8: Space heating water temperature knobpos. 9: Displaypos. 10: DHW temperature knobpos. 11: LED "DHW demand"
8881
1 2 3 4 5 6
11
10 9 8
7
110
140
130
120
90
100130
170
15090
110
190
WARNINGA leaking testing nipple causes explosive fumes.
Check the testing nipples used for leaks.
Only use approved detection products to locate leaks.
Start-up procedure9
Logamax plus GB162-80 kW/100 kW - Subject to modifications resulting from technical improvements!52
Close the gas valve.
Remove the gauge-connection tube and tighten the screw plug on the testing nipple again.
Open the gas valve again by pushing on the gas valve and turning it ¼ rotation in a counterclockwise direction.
9.8 Check and adjust the gas/air ratio
Open at least two thermostatic radiator valves, if present.Do not switch ON the boiler.
Push on the control panel to open it.
Switch OFF the heating system by pressing the main switch of the BC10 basic controller (fig. 59, pos. 1).
Close the gas valve (fig. 56).
Turn the vent key through a quarter rotation to undo the boiler door lock (fig. 47, see detailed picture).
Push the fastener down (fig. 47) and open the boiler door.
Open the screw plug on the testing nipple for the burner pressure by 2 turns (fig. 60, pos. 1).
Set the pressure gauge to "0".
Use a connection tube to connect the positive port of the pressure gauge to the testing nipple for burner pressure (fig. 60, pos. 2).
NOTICECheck the gas supply pipe or contact the rele-vant gas utility company if the required supply pressure is not available.
If the supply pressure is too high, a gas pres-sure regulator must be integrated upstream of the gas fitting. Contact the gas utility company.
Fig. 59 BC10 basic controller
8881
1 2 3 4 5 6
11
10 9 8
7
110
140
130
120
90
100130
170
15090
110
190
WARNING
Damage to the boiler by incorrect adjustment of the gas/air ratio.
Adjust gas/air ratio ONLY with part load!
Adjust gas/air ratio ONLY based on the gas/air pressure differential and never based on measured flue gas values such as CO/CO2/NOX!
Fig. 60 Checking the gas/air ratio
2
1
NOTICE
Throughout the measuring operation, keep the digital pressure gauge in the same position (horizontal or vertical) in which it was reset to "0".

Start-up procedure 9
Logamax plus GB162-80 kW/100 kW - Subject to modifications resulting from technical improvements! 53
Slowly open the gas valve by pushing on the gas valve and turning it ¼ rotation in an counterclockwise direction (fig. 54).
Switch ON the heating system by pressing the main switch of the BC10 basic controller (fig. 59, pos. 1).
Activate the Service mode in accordance with the "Service mode" menu (table 9, page 42).
Set the capacity to minimum (part load) according to the "Service mode" menu (table 9, page 42).
After the LED "Burner operation" (fig. 59, pos. 6) has lit wait for one minute until the boiler is burning at part load.
Read the differential pressure. The differential pressure (pGas – pAir) must be -0.02 inch W.C. (- 5 Pa) (±0.02 inch W.C. = ± 5 Pa) (read-out on pressure gauge: -0.04 – 0 inch W.C. = -10 – 0 Pa) (fig. 61).
Enter the result in the commissioning log book (see paragraph 15.1 "Start-up report", page 85).
If the gas/air ratio is incorrect, it must be adjusted on the set screw (fig. 62, pos. 1). The set screw is located behind the screw-on cover.
Press the "Chimney sweep" button (fig. 59, pos. 3) until the dot disappears from the display.
Switch OFF the heating system by pressing the main switch of the BC10 basic controller (fig. 59, pos. 1).
Close the gas valve (fig. 56).
Remove the measuring devices.
Tighten the screw in the burner pressure measuring nipple.
Slowly open the gas valve by pushing on the gas valve and turning it ¼ rotation in an counterclockwise direction (fig. 54).
Fig. 61 Air/gas difference at part load
-15 -10 -5 0 5 (Pa)
-0,15 -0,10 -0,05 0,00 0,05 (mbar)
-0,06 -0,04 -0,02 0,00 0,02 (inch W.C.)
wrong correct wrong
turn counterclockwise turn clockwise
Fig. 62 Adjusting the gas/air ratio
1

Start-up procedure9
Logamax plus GB162-80 kW/100 kW - Subject to modifications resulting from technical improvements!54
Switch ON the heating system by pressing the main switch of the BC10 basic controller (fig. 63, pos. 1).
Press and hold the "Chimney sweep" button (fig. 59, pos. 3) (approx. two seconds), until the dot in the right-hand bottom corner of the display (fig. 63, pos. 9) appears. See also table 8, "Flue gas test", page 41.
After the LED "Burner operation" (fig. 63, pos. 6) has lit wait for one minute until the boiler is burning at full load.
Press the "Chimney sweep" button (fig. 64, pos. 3) to clear the reading. See also table 8, "Flue gas test", page 41.
Check that the boiler performance is still at the required value. See table 11, "Settings", page 44.
9.9 Carry out a leakage test in operating conditions
Press and hold the "Chimney sweep" button (fig. 64, pos. 3) (approx. two seconds), until the dot in the right-hand bottom corner of the display (fig. 64, pos. 9) appears. See also table 8, "Flue gas test", page 41.
After the LED "Burner operation" (fig. 64, pos. 6) has lit up wait for one minute until the boiler is burning at full load.
Use a foaming product to check all sealing locations in the total gas circuit of the burner while the burner is active.
Fig. 63 BC10 basic controller
8881
1 2 3 4 5 6
11
10 9 8
7
110
140
130
120
90
100130
170
15090
110
190
WARNINGA leaking testing nipple causes explosive fumes.
Check the testing nipples used for gas tight-ness.
Only use approved detection products to locate leaks.
Fig. 64 BC10 basic controller
8881
1 2 3 4 5 6
11
10 9 8
7
110
140
130
120
90
100130
170
15090
110
190
WARNINGDAMAGE TO THE INSTALLATIONdue to short circuits.
Cover any hazardous locations prior to locating the leaks.
Do not spray the leak detection product on cable runs, plugs or electrical wiring. Do not let it drip onto them either.
WARNINGPipes and fittings may leak explosive fumes after commissioning activities have been carried out.
Only use approved detection products to locate leaks.
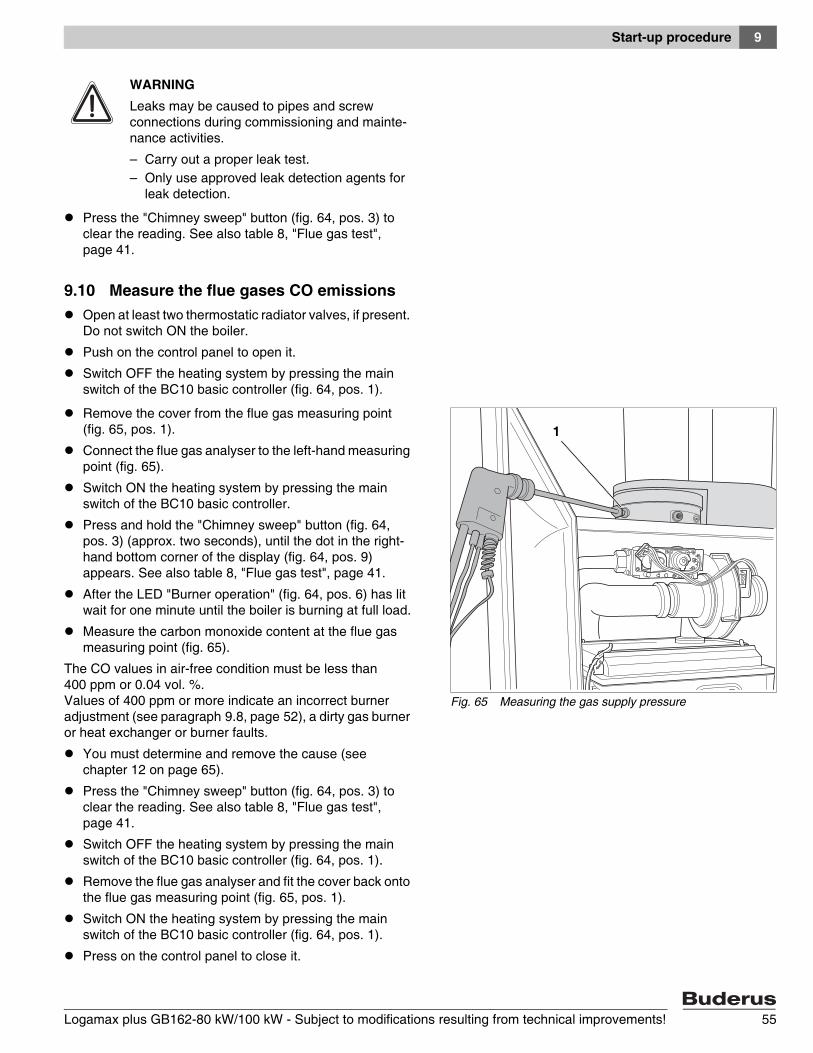
Start-up procedure 9
Logamax plus GB162-80 kW/100 kW - Subject to modifications resulting from technical improvements! 55
Press the "Chimney sweep" button (fig. 64, pos. 3) to clear the reading. See also table 8, "Flue gas test", page 41.
9.10 Measure the flue gases CO emissionsOpen at least two thermostatic radiator valves, if present. Do not switch ON the boiler.
Push on the control panel to open it.
Switch OFF the heating system by pressing the main switch of the BC10 basic controller (fig. 64, pos. 1).
Remove the cover from the flue gas measuring point (fig. 65, pos. 1).
Connect the flue gas analyser to the left-hand measuring point (fig. 65).
Switch ON the heating system by pressing the main switch of the BC10 basic controller.
Press and hold the "Chimney sweep" button (fig. 64, pos. 3) (approx. two seconds), until the dot in the right-hand bottom corner of the display (fig. 64, pos. 9) appears. See also table 8, "Flue gas test", page 41.
After the LED "Burner operation" (fig. 64, pos. 6) has lit wait for one minute until the boiler is burning at full load.
Measure the carbon monoxide content at the flue gas measuring point (fig. 65).
The CO values in air-free condition must be less than 400 ppm or 0.04 vol. %.Values of 400 ppm or more indicate an incorrect burner adjustment (see paragraph 9.8, page 52), a dirty gas burner or heat exchanger or burner faults.
You must determine and remove the cause (see chapter 12 on page 65).
Press the "Chimney sweep" button (fig. 64, pos. 3) to clear the reading. See also table 8, "Flue gas test", page 41.
Switch OFF the heating system by pressing the main switch of the BC10 basic controller (fig. 64, pos. 1).
Remove the flue gas analyser and fit the cover back onto the flue gas measuring point (fig. 65, pos. 1).
Switch ON the heating system by pressing the main switch of the BC10 basic controller (fig. 64, pos. 1).
Press on the control panel to close it.
WARNINGLeaks may be caused to pipes and screw connections during commissioning and mainte-nance activities.
– Carry out a proper leak test.– Only use approved leak detection agents for
leak detection.
Fig. 65 Measuring the gas supply pressure
1
Start-up procedure9
Logamax plus GB162-80 kW/100 kW - Subject to modifications resulting from technical improvements!56
9.11 Carry out a function testDuring initial start-up and annual inspection and/or needs-oriented servicing, make sure that all control, regulating and safety devices are in full working order and, if applicable, check them for correct adjustment.
The gas and water circuits must be tested for leaks (see paragraph 9.1, page 46 and paragraph 9.9, page 54).
9.12 Measure the ionization currentPress on the control panel to open it.
Open at least two thermostatic radiator valves, if present. Do not switch ON the boiler.
Switch OFF the heating system by pressing the main switch of the BC10 basic controller (fig. 66, pos. 1).
Turn the vent key through a quarter turn to undo the boiler door lock (fig. 47).
Push the fastener down (fig. 47) and open the boiler door.
Undo the plug and socket connection of the monitoring cable (fig. 67).
Fig. 66 BC10 basic controller
8881
1 2 3 4 5 6
11
10 9 8
7
110
140
130
120
90
100130
170
15090
110
190
Fig. 67 Removing the ionization electrode plug and socket connection
Start-up procedure 9
Logamax plus GB162-80 kW/100 kW - Subject to modifications resulting from technical improvements! 57
Connect the multimeter in series (fig. 68). Select the µA DC range on the multimeter. The multim-eter must have a resolution of at least 1 µA.
Switch ON the heating system by pressing the main switch of the BC10 basic controller (fig. 66, pos. 1).
Activate the Service mode in accordance with the "Service mode" menu (table 9, page 42).
Set the capacity to minimum (part load) according to the "Service mode" menu (table 9, page 42).
After the LED "Burner operation" (fig. 66, pos. 6) has lit wait for one minute until the boiler is burning at part load.
Measure the ionization current. The ionization current must be > 5 µA DC at part load operation.
Enter the result in the start-up report (see paragraph 15.1 "Start-up report", page 85).
If the result is not as it should be, check the gas/air ratio (paragraph 9.8, page 52) or check the ionization elec-trode (paragraph 12.3.4, page 68).
Press and hold the "Chimney sweep" button (fig. 66, pos. 3) (approx. two seconds), until the dot in the right-hand bottom corner of the display (fig. 66, pos. 9) appears. See also table 8, "Flue gas test", page 41.
Switch OFF the heating system by pressing the main switch of the BC10 basic controller (fig. 66, pos. 1).
Remove the multimeter and reconnect the monitoring cable.
Switch ON the heating system by pressing the main switch of the BC10 basic controller (fig. 66, pos. 1).
Check that the boiler performance is still at the required value. See the "Service mode" menu (table 9, page 42).
9.13 Test the Ignition Safety shut off deviceSwitch OFF the heating system by pressing the main switch of the BC10 basic controller (fig. 66, pos. 1).
Disconnect the plug and socket connection of the moni-toring cable.
Switch ON the heating system by pressing the main switch of the BC10 basic controller (fig. 66, pos. 1).
Press the "Chimney Sweep" d button and hold it (for approx. two seconds), until the display shows the decimal point.
Check if the boiler does one start-up attempt and three restart attampts.
After each start-up attempt the boiler will signal a start-up failure. A "6A" code can be seen in the display.
After the last start-up attempt, the boiler will lock out. The "6A" code is blinking in the display.
Connect the plug and socket connection of the moni-toring cable.
Fig. 68 Measuring the ionization current
Start-up procedure9
Logamax plus GB162-80 kW/100 kW - Subject to modifications resulting from technical improvements!58
Press the reset button.
Check if the boiler starts-up.
Press the "Chimney Sweep" button return to normal operating conditions.
9.14 Boiler settings
9.14.1 Set the heating capacity
Set the required heating capacity on the BC10 according to the "Settings" menu (table 11, page 44). See table 13 and table 14 when making these settings.
9.14.2 Set the space heating water temperature
Set the upper space heating water temperature limit for heating mode with the "space heating water tempera-ture" knob (fig. 69, pos. 8); see table 15. This limitation does not apply to DHW preparation.
Display indication
[%]
Rated heating capacity (±5%), based on natural gas (sea level)
GB162-80 kW GB162-100 kWkW btu/h kW btu/h
L20 – – 20.0 68,300
L30 24.3 78,300 29.9 97,900
L40 32.9 104,400 39.9 130,500
L50 41.5 130,500 49.8 163,200
L60 50.1 156,600 59.8 195,800
L70 58.7 182,700 69.7 228,400
L80 67.3 208,800 79.6 261,000
L90 75.9 234,900 89.6 293,700
L-- 84.5 261,000 99.5 326,300
Table 13 Heating capacity (as a percentage) at sea level (0 - 4,000 ft)
Display indication
[%]
Rated heating capacity (±5%), based on natural gas (high altitude)GB162-80 kW GB162-100 kW
kW btu/h kW btu/hL20 – – – –
L30 – – 29.9 97,900
L40 32.9 104,400 39.9 130,500
L50 41.5 130,500 49.8 163,200
L60 50.1 156,600 59.8 195,800
L70 58.7 182,700 69.7 228,400
L80 67.3 208,800 79.6 261,000
L90 75.9 234,900 89.6 293,700
L-- 84.5 261,000 99.5 326,300
Table 14 Heating capacity (as a percentage) at high altitude (4,000 - 10.000 ft)
Fig. 69 BC10 basic controller
8881
1 2 3 4 5 6
11
10 9 8
7
110
140
130
120
90
100130
170
15090
110
190
Knob position
Explanation
0 No supply to heating system (e.g. only DHW mode)
86 – 190 The temperature (in °F) set on the BC10 cannot be changed with a room controller. The supply temperature does not rise above this set temperature.
Aut The temperature is determined automatically on the basis of the heating curve. If no room controller is connected, the maximum heating temperature is 190 °F (88 °C).
Table 15 Setting of the "space heating water temperature"
Start-up procedure 9
Logamax plus GB162-80 kW/100 kW - Subject to modifications resulting from technical improvements! 59
9.14.3 Set the pump run-over time
Set the pump run-over time according to the "Settings" menu (table 11, page 44).
If the heating system is room temperature controlled, and not controlled parts of the heating system risk freeze damage (e.g. radiators in the garage), set the pump run-over time to 24 hours.
9.14.4 Switch DHW mode ON/OFF
Set the DHW mode according to the "Settings" menu (table 11, page 44).
When DHW-mode is switched OFF ([c/\/0|), the freeze protection for the hot water cylinder (if present) is switched OFF.
9.14.5 Set the DHW temperature
Set the DHW temperature knob (fig. 70, pos. 10) to the required temperature of the hot water in the hot water cylinder (see table 16).
Fig. 70 BC10 basic controller
8881
1 2 3 4 5 6
11
10 9 8
7
110
140
130
120
90
100130
170
15090
110
190
Knob position
Explanation
0 DHW mode is OFF (only heating mode)
ECO Economy mode. The DHW will only be reheated to 140 °F (60 °C), if the temperature has signifcantly fallen. This reduces the number of burner starts and saves energy. As a result the water may be a bit colder initially.
86 – 140 The temperature set on the BC10 is a temperature that cannot be changed using a RC thermostat.
Aut The temperature is set on the thermostat (e. g. RC35). If no thermostat is connected, the maximum DHW temperature is 140 °F (60 °C).
Table 16 Setting of the “DHW temperature”
Start-up procedure9
Logamax plus GB162-80 kW/100 kW - Subject to modifications resulting from technical improvements!60
9.15 Final activities
9.15.1 Close the boiler door and the control panel
Close the boiler door (fig. 71) and lock the fastener by turning the vent screw through ¼ rotation in a clockwise direction.
Push on the control panel to close it.
9.15.2 Hand over
Hand over all relevant documentation to the end user and explain his/her responsibilities under the relevant national and regional regulations.
Explain and demonstrate the start-up and shut down procedures.
Fig. 71 Closing the boiler door
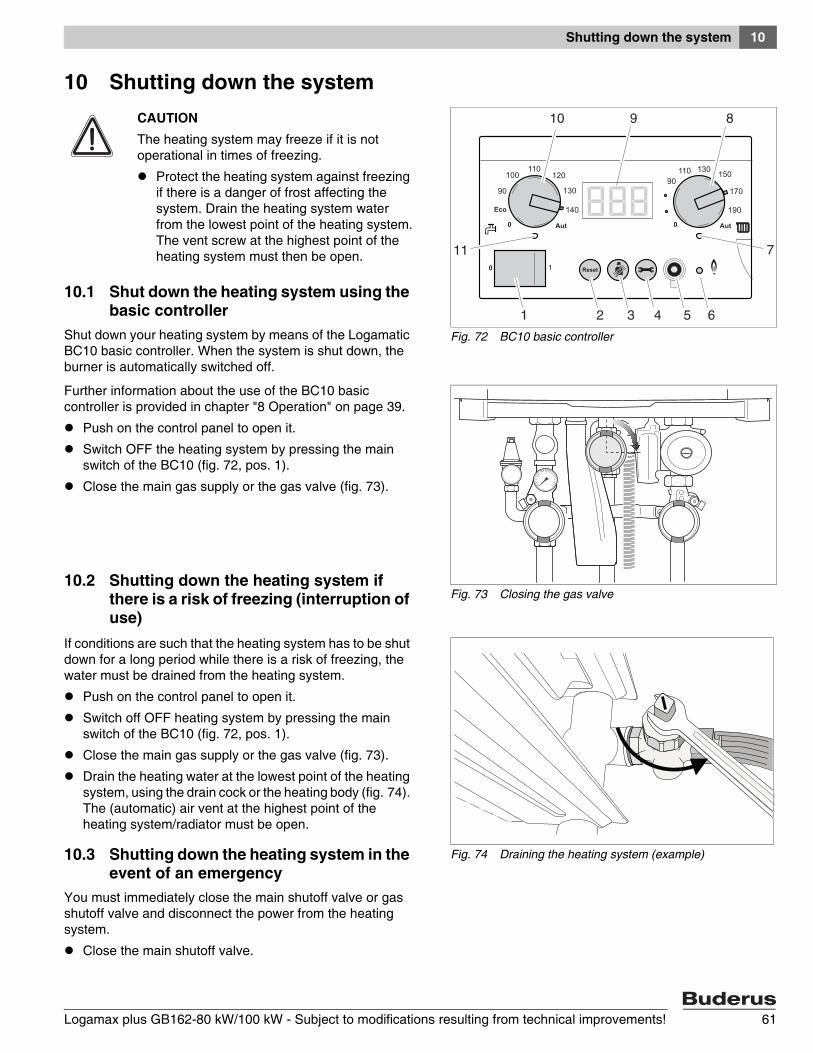
Shutting down the system 10
Logamax plus GB162-80 kW/100 kW - Subject to modifications resulting from technical improvements! 61
10 Shutting down the system
10.1 Shut down the heating system using the basic controller
Shut down your heating system by means of the Logamatic BC10 basic controller. When the system is shut down, the burner is automatically switched off.
Further information about the use of the BC10 basic controller is provided in chapter "8 Operation" on page 39.
Push on the control panel to open it.
Switch OFF the heating system by pressing the main switch of the BC10 (fig. 72, pos. 1).
Close the main gas supply or the gas valve (fig. 73).
10.2 Shutting down the heating system if there is a risk of freezing (interruption of use)
If conditions are such that the heating system has to be shut down for a long period while there is a risk of freezing, the water must be drained from the heating system.
Push on the control panel to open it.
Switch off OFF heating system by pressing the main switch of the BC10 (fig. 72, pos. 1).
Close the main gas supply or the gas valve (fig. 73).
Drain the heating water at the lowest point of the heating system, using the drain cock or the heating body (fig. 74). The (automatic) air vent at the highest point of the heating system/radiator must be open.
10.3 Shutting down the heating system in the event of an emergency
You must immediately close the main shutoff valve or gas shutoff valve and disconnect the power from the heating system.
Close the main shutoff valve.
Fig. 72 BC10 basic controller
8881
1 2 3 4 5 6
11
10 9 8
7
110
140
130
120
90
100130
170
15090
110
190
CAUTIONThe heating system may freeze if it is not operational in times of freezing.
Protect the heating system against freezing if there is a danger of frost affecting the system. Drain the heating system water from the lowest point of the heating system.The vent screw at the highest point of the heating system must then be open.
Fig. 73 Closing the gas valve
Fig. 74 Draining the heating system (example)

Inspection11
Logamax plus GB162-80 kW/100 kW - Subject to modifications resulting from technical improvements!62
11 InspectionOffer your customer an annual inspection and maintenance contract. The activities to be included in an annual inspec-tion and maintenance contract can be found in the inspec-tion and service reports (see pages 86 and 87).
Periodically examine the venting systems and cleaning of the screens in the vent terminal.
Also periodically inspect the low water cutoffs, including flushing of float types and clean the condensate collec-tions and disposal system.
11.1 Prepare the heating system for inspection
Switch OFF the heating system by pressing the main switch of the BC10.
Close the gas valve (fig. 75, pos. 1).
Close the isolating valves (fig. 75, pos. 2).
CAUTIONInsufficient or improper cleaning and mainte-nance can cause damage to the installation.
Inspect and clean the heating system once a year.
Carry out maintenance as required. Immedi-ately remedy faults. This will avoid further damage to the system!
WARNINGDo not use this boiler if any part has been under water. Immediately call a qualified service tech-nician to inspect the boiler and to replace any part of the control system and any gas control which has been under water.
CAUTIONRisk of electric shock.
Before opening the system:disconnect the heating system from the power supply using the heating system emergency OFF button or disconnect the relevant circuit breaker of the house from the power grid.
Secure the heating system against acci-dental restarting.
Fig. 75 Closing the valves (here: in closed position)
1
2
INSTRUCTION FOR THE INSTALLERIf gas pipes have to be disconnected from the gas burner fitting, the burner cover must only be opened by a specialized profes-sional.
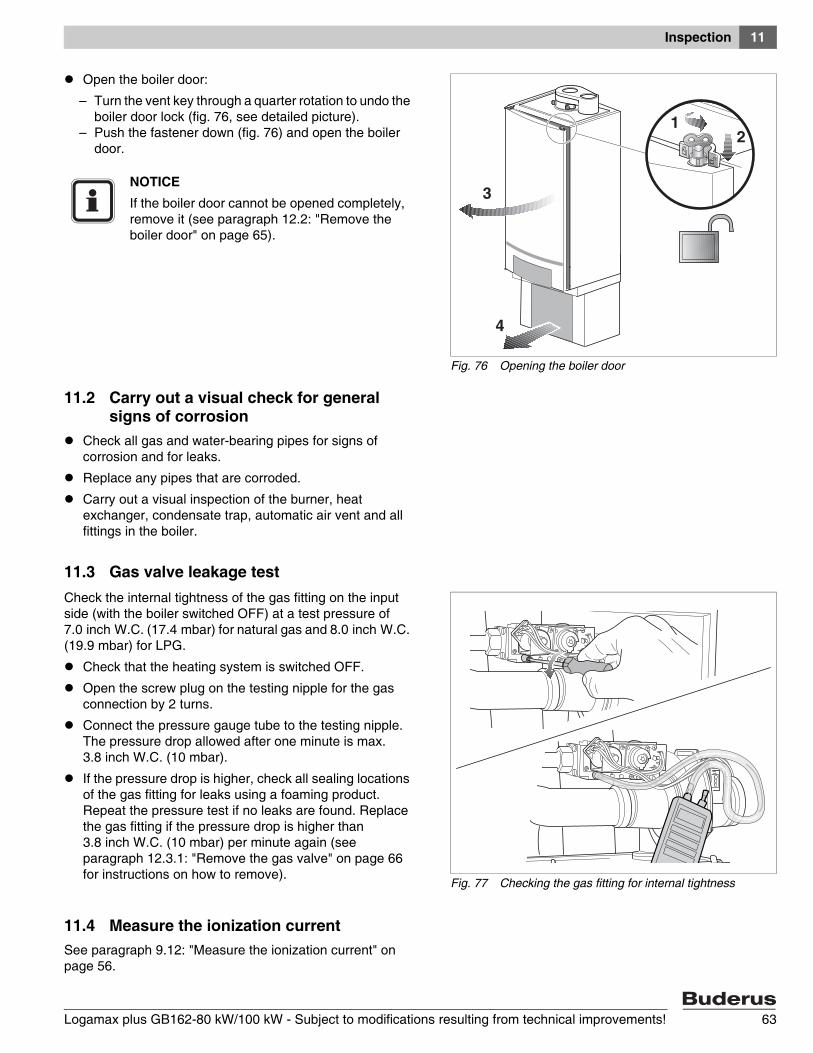
Inspection 11
Logamax plus GB162-80 kW/100 kW - Subject to modifications resulting from technical improvements! 63
Open the boiler door:
– Turn the vent key through a quarter rotation to undo the boiler door lock (fig. 76, see detailed picture).
– Push the fastener down (fig. 76) and open the boiler door.
11.2 Carry out a visual check for general signs of corrosion
Check all gas and water-bearing pipes for signs of corrosion and for leaks.
Replace any pipes that are corroded.
Carry out a visual inspection of the burner, heat exchanger, condensate trap, automatic air vent and all fittings in the boiler.
11.3 Gas valve leakage testCheck the internal tightness of the gas fitting on the input side (with the boiler switched OFF) at a test pressure of 7.0 inch W.C. (17.4 mbar) for natural gas and 8.0 inch W.C. (19.9 mbar) for LPG.
Check that the heating system is switched OFF.
Open the screw plug on the testing nipple for the gas connection by 2 turns.
Connect the pressure gauge tube to the testing nipple. The pressure drop allowed after one minute is max. 3.8 inch W.C. (10 mbar).
If the pressure drop is higher, check all sealing locations of the gas fitting for leaks using a foaming product. Repeat the pressure test if no leaks are found. Replace the gas fitting if the pressure drop is higher than 3.8 inch W.C. (10 mbar) per minute again (see paragraph 12.3.1: "Remove the gas valve" on page 66 for instructions on how to remove).
11.4 Measure the ionization currentSee paragraph 9.12: "Measure the ionization current" on page 56.
Fig. 76 Opening the boiler door
12
3
4
NOTICEIf the boiler door cannot be opened completely, remove it (see paragraph 12.2: "Remove the boiler door" on page 65).
Fig. 77 Checking the gas fitting for internal tightness
Inspection11
Logamax plus GB162-80 kW/100 kW - Subject to modifications resulting from technical improvements!64
11.5 Measure the gas inlet pressure (working pressure)See paragraph 9.7: "Measure the gas inlet pressure (working pressure)" on page 50.
11.6 Check and adjust the gas/air ratioSee paragraph 9.8: "Check and adjust the gas/air ratio" on page 52
11.7 Carry out a leakage test in operating conditionsSee paragraph 9.9: "Carry out a leakage test in operating conditions" on page 54.
11.8 Measure the flue gases CO emissionsSee paragraph 9.10: "Measure the flue gases CO emis-sions" on page 55.
11.9 Fill the heating systemTo ensure a trouble free operation of your boiler you must to check the pH-value every year and correct if necessary.See accompanying manual about water quality for more information.
See paragraph 9.2: "Fill the heating system" on page 47.
11.10 Check the air/flue gas connectionSee paragraph 9.5: "Check the air/flue gas connection" on page 49.
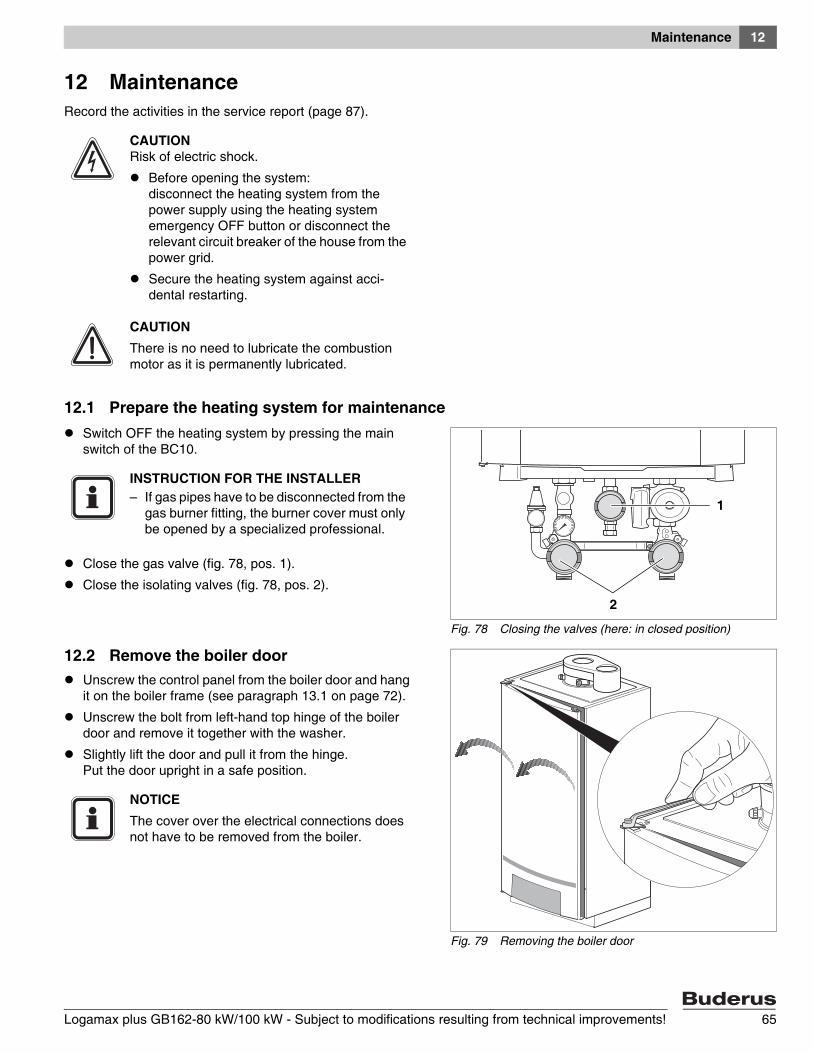
Maintenance 12
Logamax plus GB162-80 kW/100 kW - Subject to modifications resulting from technical improvements! 65
12 MaintenanceRecord the activities in the service report (page 87).
12.1 Prepare the heating system for maintenanceSwitch OFF the heating system by pressing the main switch of the BC10.
Close the gas valve (fig. 78, pos. 1).
Close the isolating valves (fig. 78, pos. 2).
12.2 Remove the boiler doorUnscrew the control panel from the boiler door and hang it on the boiler frame (see paragraph 13.1 on page 72).
Unscrew the bolt from left-hand top hinge of the boiler door and remove it together with the washer.
Slightly lift the door and pull it from the hinge. Put the door upright in a safe position.
CAUTIONRisk of electric shock.
Before opening the system:disconnect the heating system from the power supply using the heating system emergency OFF button or disconnect the relevant circuit breaker of the house from the power grid.
Secure the heating system against acci-dental restarting.
CAUTIONThere is no need to lubricate the combustion motor as it is permanently lubricated.
Fig. 78 Closing the valves (here: in closed position)
1
2
INSTRUCTION FOR THE INSTALLER– If gas pipes have to be disconnected from the
gas burner fitting, the burner cover must only be opened by a specialized professional.
Fig. 79 Removing the boiler door
NOTICEThe cover over the electrical connections does not have to be removed from the boiler.
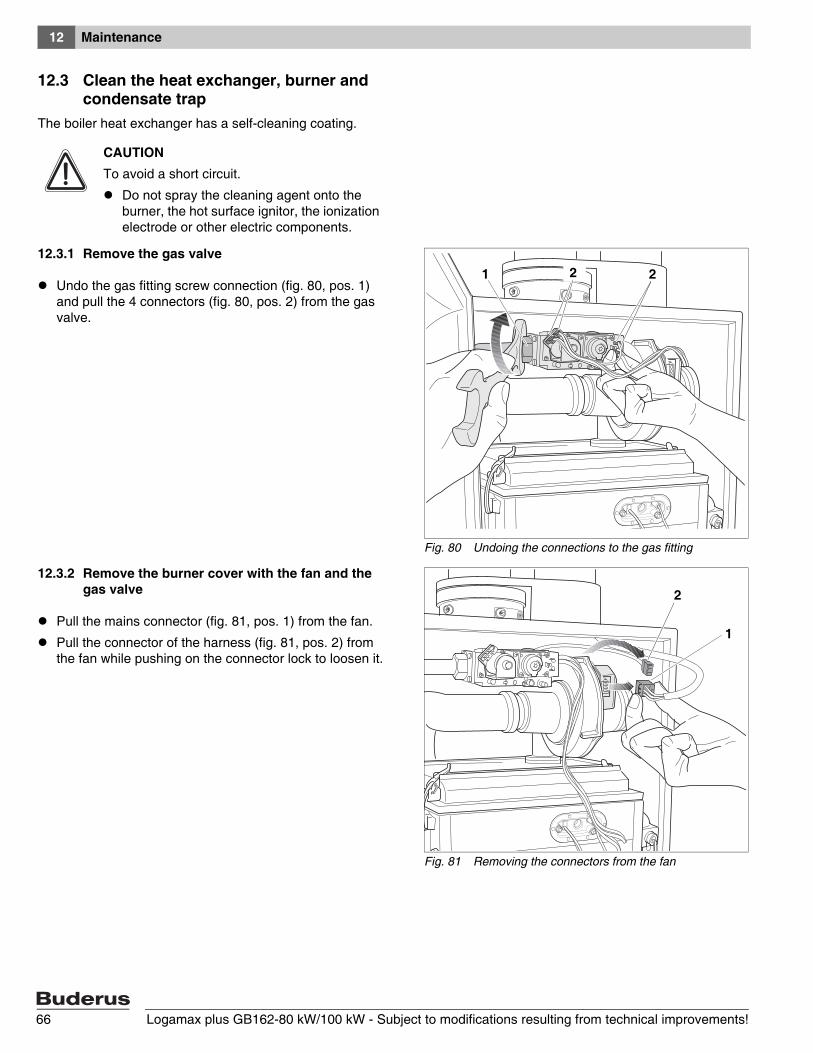
Maintenance12
Logamax plus GB162-80 kW/100 kW - Subject to modifications resulting from technical improvements!66
12.3 Clean the heat exchanger, burner and condensate trap
The boiler heat exchanger has a self-cleaning coating.
12.3.1 Remove the gas valve
Undo the gas fitting screw connection (fig. 80, pos. 1) and pull the 4 connectors (fig. 80, pos. 2) from the gas valve.
12.3.2 Remove the burner cover with the fan and the gas valve
Pull the mains connector (fig. 81, pos. 1) from the fan.
Pull the connector of the harness (fig. 81, pos. 2) from the fan while pushing on the connector lock to loosen it.
CAUTIONTo avoid a short circuit.
Do not spray the cleaning agent onto the burner, the hot surface ignitor, the ionization electrode or other electric components.
Fig. 80 Undoing the connections to the gas fitting
1 22
Fig. 81 Removing the connectors from the fan
1
2
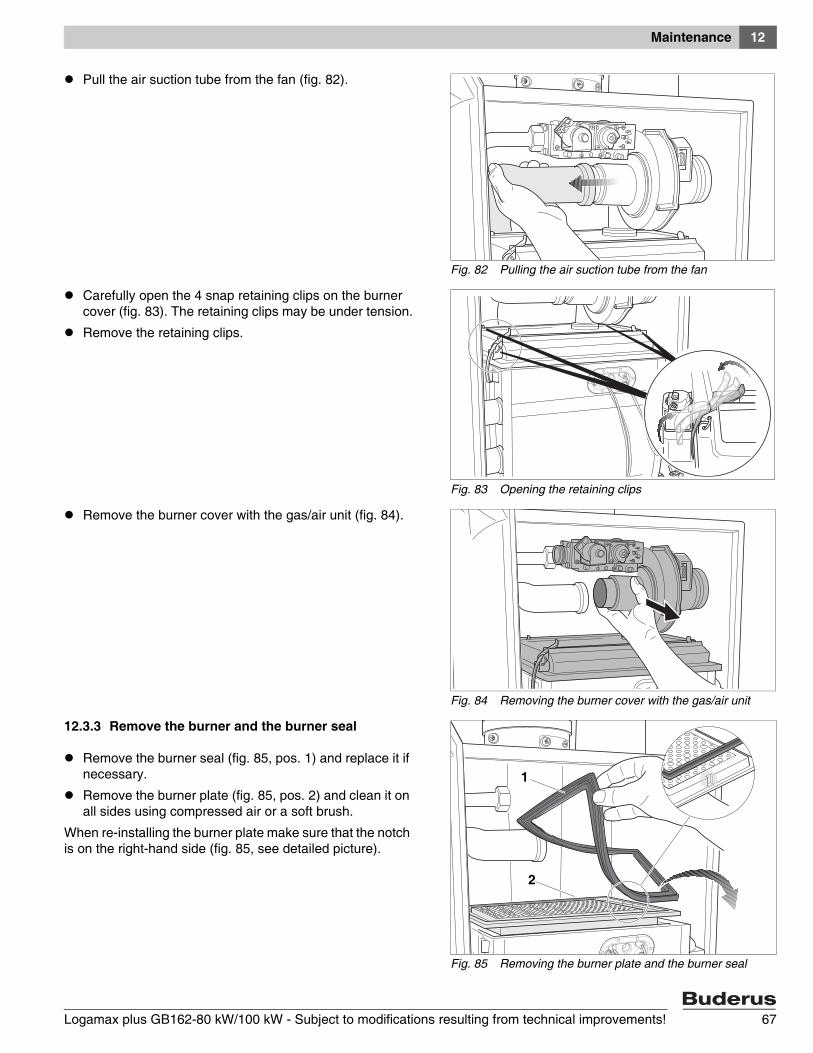
Maintenance 12
Logamax plus GB162-80 kW/100 kW - Subject to modifications resulting from technical improvements! 67
Pull the air suction tube from the fan (fig. 82).
Carefully open the 4 snap retaining clips on the burner cover (fig. 83). The retaining clips may be under tension.
Remove the retaining clips.
Remove the burner cover with the gas/air unit (fig. 84).
12.3.3 Remove the burner and the burner seal
Remove the burner seal (fig. 85, pos. 1) and replace it if necessary.
Remove the burner plate (fig. 85, pos. 2) and clean it on all sides using compressed air or a soft brush.
When re-installing the burner plate make sure that the notch is on the right-hand side (fig. 85, see detailed picture).
Fig. 82 Pulling the air suction tube from the fan
Fig. 83 Opening the retaining clips
Fig. 84 Removing the burner cover with the gas/air unit
Fig. 85 Removing the burner plate and the burner seal
2
1

Maintenance12
Logamax plus GB162-80 kW/100 kW - Subject to modifications resulting from technical improvements!68
12.3.4 Checking the glow ignitor and ionization electrode and their replacement, if required
Check the ionization electrode (fig. 87 and 86) and the glow ignitor for contamination, wear or damage.
Demand-dependent maintenance
Replace the ionization electrode and glow ignitor, if required (fig. 88).
Insert a new sight glas cover plate/gasket when replacing the ionization electrode and/or the glow ignitor.
Fig. 86 Checking the glow ignitor and ionization electrode
DAMAGE TO THE APPLIANCEby damage to the glow ignitor.
The glow ignitor is made from fragile ceramic material.
Do not damage the glow ignitor.
Fig. 87 Checking the ionization electrode
DAMAGE OF FATAL ACCIDENTfrom explosive fumes.
Only carry out work on gas components if you are properly registered.
DAMAGE TO THE APPLIANCEfrom leakage.
Ensure the two nuts securing the sight glas cover plate are tightened with equal torque.
After completing the above work, carry out a tightness test on the gas and flue gas side.
Fig. 88 Replacing the glow ignitor / ionization electrode
pos. 1: glow ignitorpos. 2: ionization electrodepos. 3: gasketpos. 4: sight glas cover platepos. 5: nut
1
4
5
2
5
3
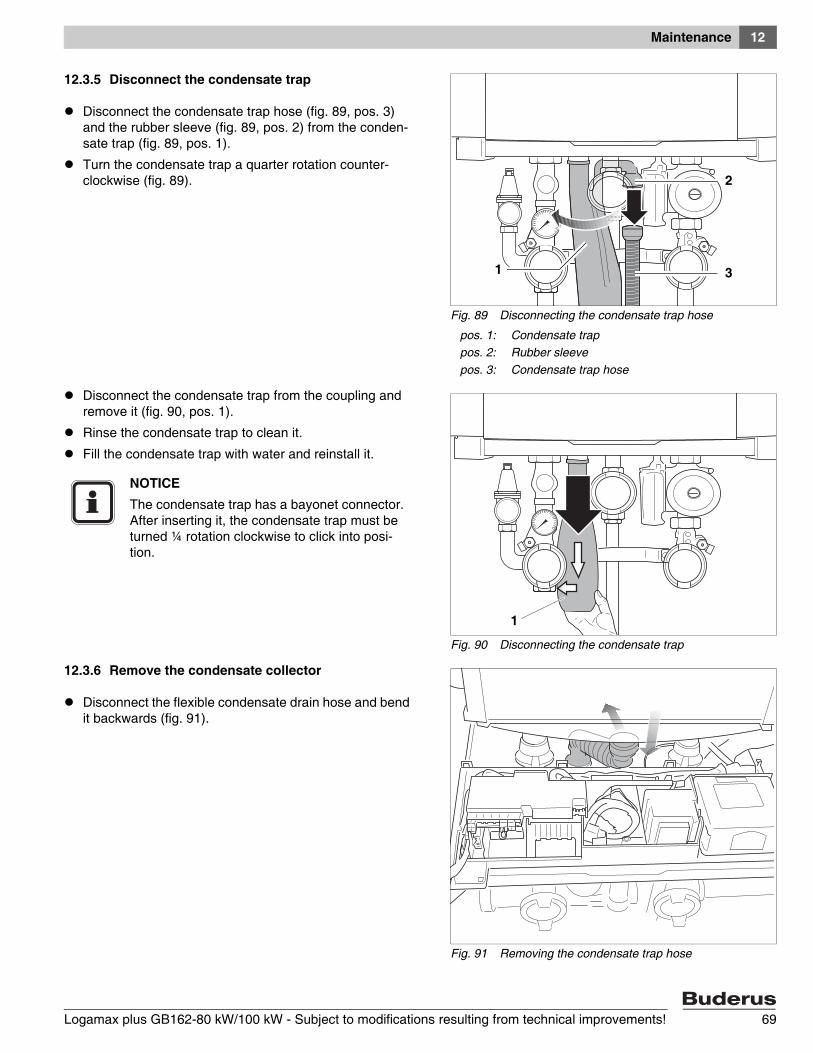
Maintenance 12
Logamax plus GB162-80 kW/100 kW - Subject to modifications resulting from technical improvements! 69
12.3.5 Disconnect the condensate trap
Disconnect the condensate trap hose (fig. 89, pos. 3) and the rubber sleeve (fig. 89, pos. 2) from the conden-sate trap (fig. 89, pos. 1).
Turn the condensate trap a quarter rotation counter-clockwise (fig. 89).
Disconnect the condensate trap from the coupling and remove it (fig. 90, pos. 1).
Rinse the condensate trap to clean it.
Fill the condensate trap with water and reinstall it.
12.3.6 Remove the condensate collector
Disconnect the flexible condensate drain hose and bend it backwards (fig. 91).
Fig. 89 Disconnecting the condensate trap hose
pos. 1: Condensate trappos. 2: Rubber sleevepos. 3: Condensate trap hose
1
2
3
Fig. 90 Disconnecting the condensate trap
1
NOTICEThe condensate trap has a bayonet connector. After inserting it, the condensate trap must be turned ¼ rotation clockwise to click into posi-tion.
Fig. 91 Removing the condensate trap hose
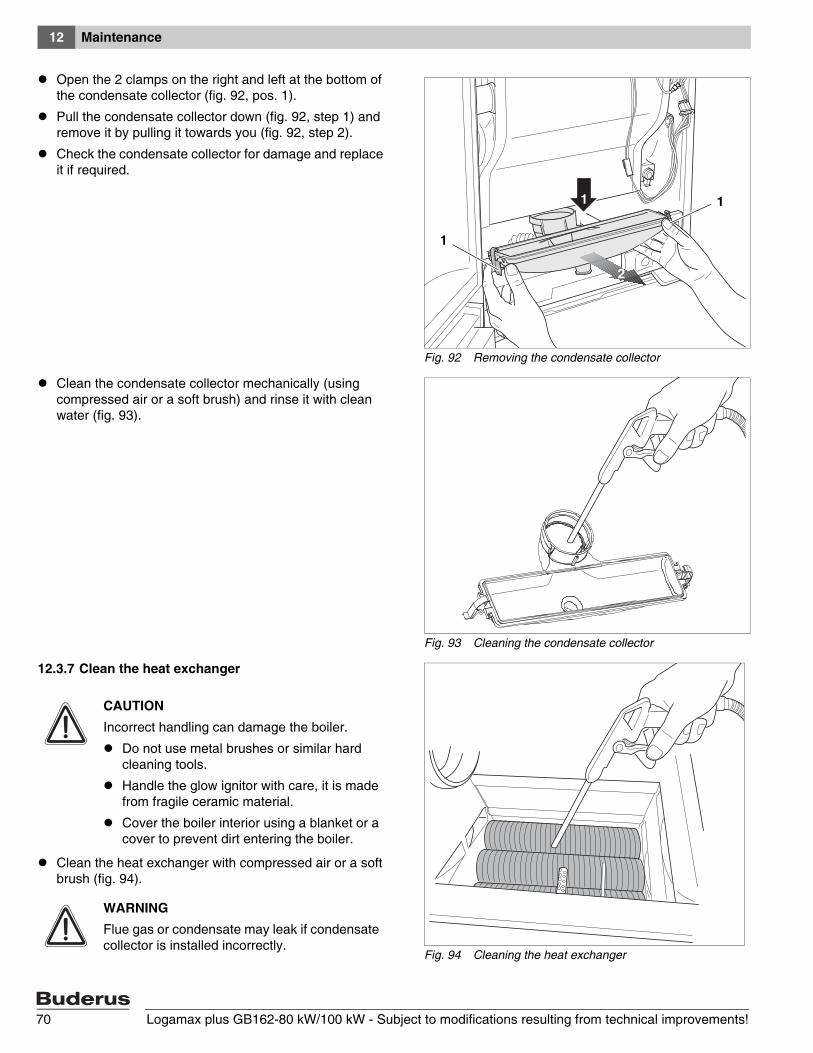
Maintenance12
Logamax plus GB162-80 kW/100 kW - Subject to modifications resulting from technical improvements!70
Open the 2 clamps on the right and left at the bottom of the condensate collector (fig. 92, pos. 1).
Pull the condensate collector down (fig. 92, step 1) and remove it by pulling it towards you (fig. 92, step 2).
Check the condensate collector for damage and replace it if required.
Clean the condensate collector mechanically (using compressed air or a soft brush) and rinse it with clean water (fig. 93).
12.3.7 Clean the heat exchanger
Clean the heat exchanger with compressed air or a soft brush (fig. 94).
Fig. 92 Removing the condensate collector
1
2
1
1
Fig. 93 Cleaning the condensate collector
Fig. 94 Cleaning the heat exchanger
CAUTIONIncorrect handling can damage the boiler.
Do not use metal brushes or similar hard cleaning tools.
Handle the glow ignitor with care, it is made from fragile ceramic material.
Cover the boiler interior using a blanket or a cover to prevent dirt entering the boiler.
WARNINGFlue gas or condensate may leak if condensate collector is installed incorrectly.
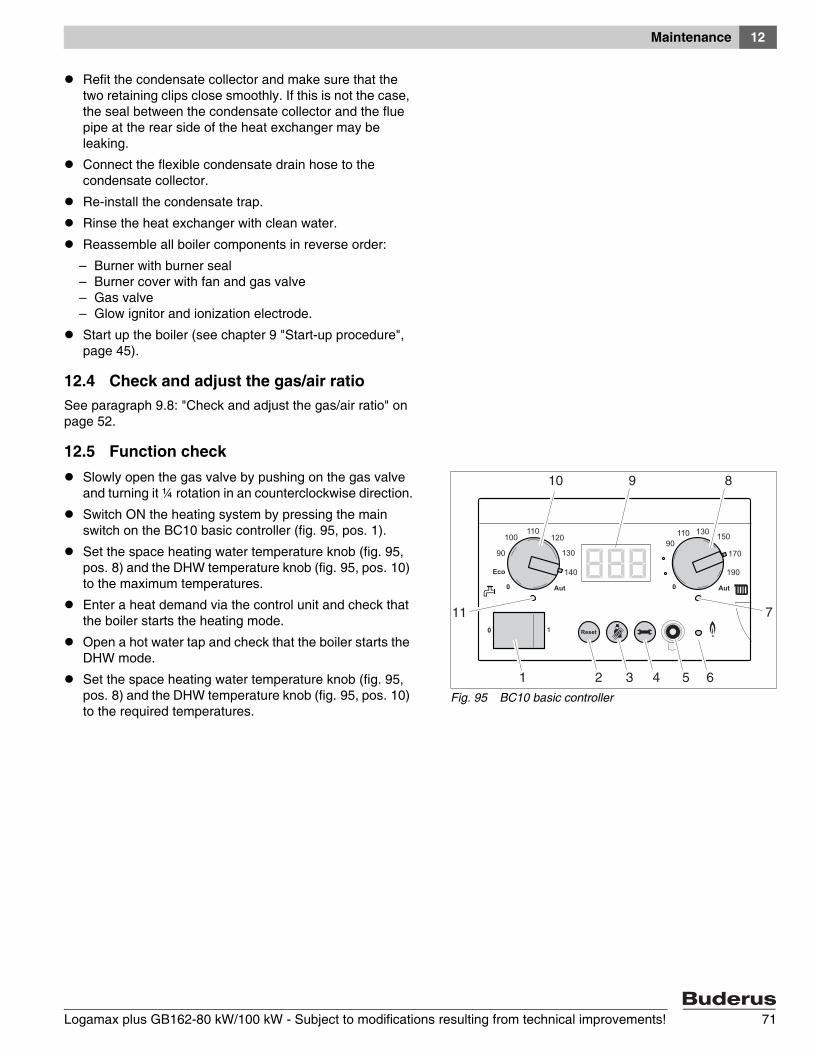
Maintenance 12
Logamax plus GB162-80 kW/100 kW - Subject to modifications resulting from technical improvements! 71
Refit the condensate collector and make sure that the two retaining clips close smoothly. If this is not the case, the seal between the condensate collector and the flue pipe at the rear side of the heat exchanger may be leaking.
Connect the flexible condensate drain hose to the condensate collector.
Re-install the condensate trap.
Rinse the heat exchanger with clean water.
Reassemble all boiler components in reverse order:
– Burner with burner seal– Burner cover with fan and gas valve– Gas valve– Glow ignitor and ionization electrode.
Start up the boiler (see chapter 9 "Start-up procedure", page 45).
12.4 Check and adjust the gas/air ratioSee paragraph 9.8: "Check and adjust the gas/air ratio" on page 52.
12.5 Function checkSlowly open the gas valve by pushing on the gas valve and turning it ¼ rotation in an counterclockwise direction.
Switch ON the heating system by pressing the main switch on the BC10 basic controller (fig. 95, pos. 1).
Set the space heating water temperature knob (fig. 95, pos. 8) and the DHW temperature knob (fig. 95, pos. 10) to the maximum temperatures.
Enter a heat demand via the control unit and check that the boiler starts the heating mode.
Open a hot water tap and check that the boiler starts the DHW mode.
Set the space heating water temperature knob (fig. 95, pos. 8) and the DHW temperature knob (fig. 95, pos. 10) to the required temperatures.
Fig. 95 BC10 basic controller
8881
1 2 3 4 5 6
11
10 9 8
7
110
140
130
120
90
100130
170
15090
110
190
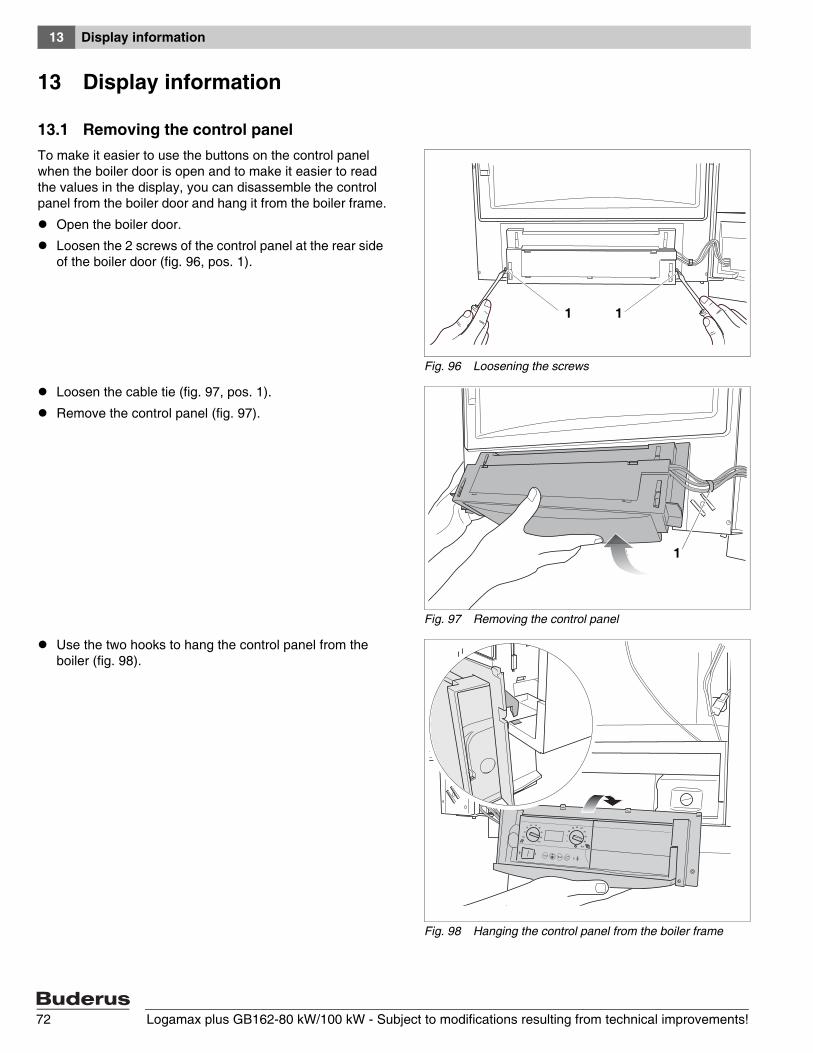
Display information13
Logamax plus GB162-80 kW/100 kW - Subject to modifications resulting from technical improvements!72
13 Display information
13.1 Removing the control panelTo make it easier to use the buttons on the control panel when the boiler door is open and to make it easier to read the values in the display, you can disassemble the control panel from the boiler door and hang it from the boiler frame.
Open the boiler door.
Loosen the 2 screws of the control panel at the rear side of the boiler door (fig. 96, pos. 1).
Loosen the cable tie (fig. 97, pos. 1).
Remove the control panel (fig. 97).
Use the two hooks to hang the control panel from the boiler (fig. 98).
Fig. 96 Loosening the screws
1 1
Fig. 97 Removing the control panel
1
Fig. 98 Hanging the control panel from the boiler frame
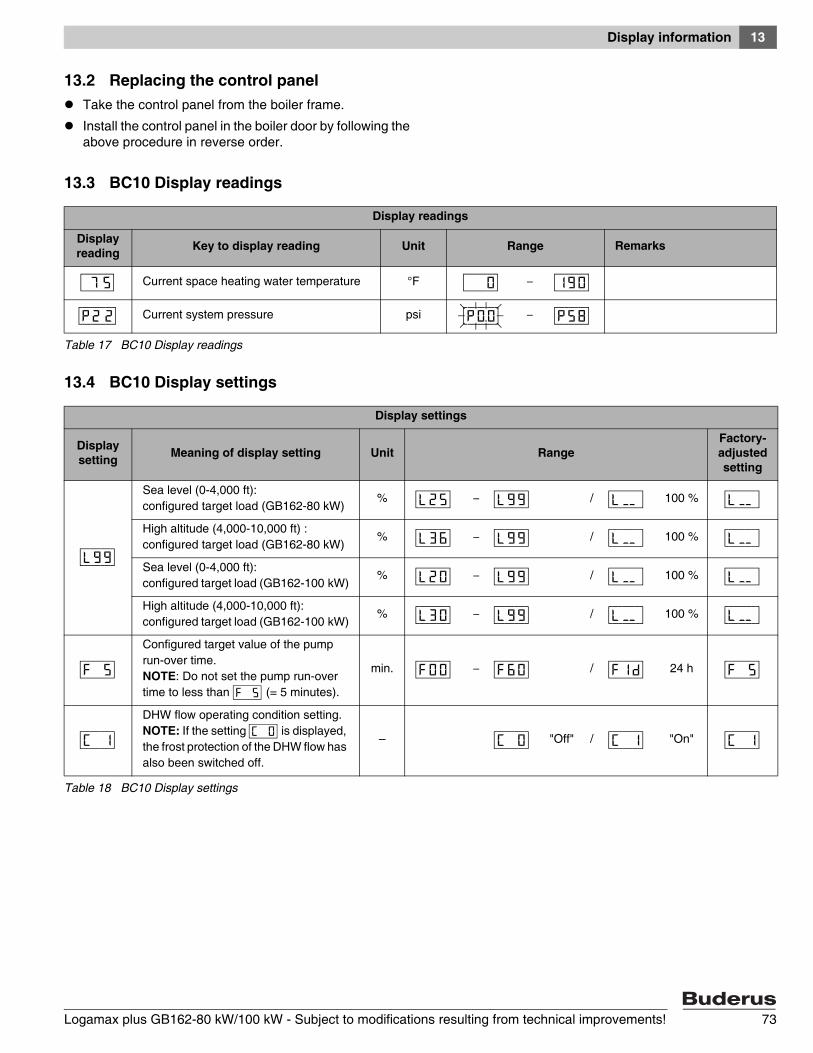
Display information 13
Logamax plus GB162-80 kW/100 kW - Subject to modifications resulting from technical improvements! 73
13.2 Replacing the control panelTake the control panel from the boiler frame.
Install the control panel in the boiler door by following the above procedure in reverse order.
13.3 BC10 Display readings
13.4 BC10 Display settings
Display readings
Display reading Key to display reading Unit Range Remarks
[\7\5| Current space heating water temperature °F [\/\/0| – [1/9/0|
[p/2\2| Current system pressure psi [p/0.0| – [p/5/8|Table 17 BC10 Display readings
Display settings
Display setting Meaning of display setting Unit Range
Factory-adjusted setting
[l/9/9|
Sea level (0-4,000 ft): configured target load (GB162-80 kW)
% [l/2/5| – [l/9/9| / [l/??/| 100 % [l/??/|High altitude (4,000-10,000 ft) : configured target load (GB162-80 kW)
% [l/3/6| – [l/9/9| / [l/??/| 100 % [l/??/|Sea level (0-4,000 ft): configured target load (GB162-100 kW)
% [l/2/0| – [l/9/9| / [l/??/| 100 % [l/??/|High altitude (4,000-10,000 ft): configured target load (GB162-100 kW)
% [l/3/0| – [l/9/9| / [l/??/| 100 % [l/??/|
[f/\/5|Configured target value of the pump run-over time. NOTE: Do not set the pump run-over time to less than [f/\/5| (= 5 minutes).
min. [f/0/0| – [f/6/0| / [f/1/d| 24 h [f/\/5|
[c/\/1|DHW flow operating condition setting.NOTE: If the setting [c/\/0| is displayed, the frost protection of the DHW flow has also been switched off.
– [c/\/0| "Off" / [c/\/1| "On" [c/\/1|
Table 18 BC10 Display settings
Display information13
Logamax plus GB162-80 kW/100 kW - Subject to modifications resulting from technical improvements!74
13.5 BC10 Display codes
The folllowing table contains all codes that can show on the BC10 display. To show the current display code and/or subcode, press the e-key repeatedly. There are 3 main code groups:
Operating codes - this code gives the status of the boiler. No action is necessary.
Locking faults - the boiler resumes normal operation when the fault has cleared.
Blocking faults - the boiler is locked and will only restart after a manual reset. The pump will operate continuously for frost protection.
If a blinking code is displayed together with other codes, all displayed codes will blink.
A locking code will always show on the first screen of the BC10.
Display codes
Main display code
Sub-display
codeKey to display code
Other effects
[\/-/\| Operating phase:Communication test while starting up. This display code flashes five times within 5 seconds while starting up to indicate that the communica-tion between the UBA 3 and the BC10 basic controller is being tested. If a new UBA 3 or a new KIM was fitted, this code will flash for max. 10 seconds.
[\/-/\| Blocking fault:If this code continues to flash on the display, there is a fault in the com-munication between the UBA 3 and the BC10 basic controller.
No heating operation and no DHW.
[-/a/\] [2/0/8|1)
Any display code with a dot in bottom right hand corner.Operating phase: The boiler is in flue gas test or service mode.
[-/h/\| [2/0/0|1)
Operating phase:The boiler is in heating mode.
[-/h/} [2/0/0|1)
Any display code with a blinking dot in bottom right hand corner.
Operating phase: The boiler is in manual operation mode.
The room temperature is too high.
[=/h/\| [2/0/1|1)
Operating phase:The boiler is in DHW mode.
[=/h/\| [2/0/1|1)
Operating phase:Pump run-over time via the external hot water cylinder 130 seconds at minimum speed. The LED "Burner operation" is off.
[0/a/\| [2/0/2|1)
Operating phase:The switch optimization program is activated. This program is activated if there has been a DHW request from an RC regulator more frequently than once every 10 minutes. This means that the boiler cannot be restarted until at least ten minutes have elapsed since initial burner start-up.
The room temperature is not possibly reached.
Table 19 BC10 Display codes1) Only visible on the Service Tool or a specific RC controller.
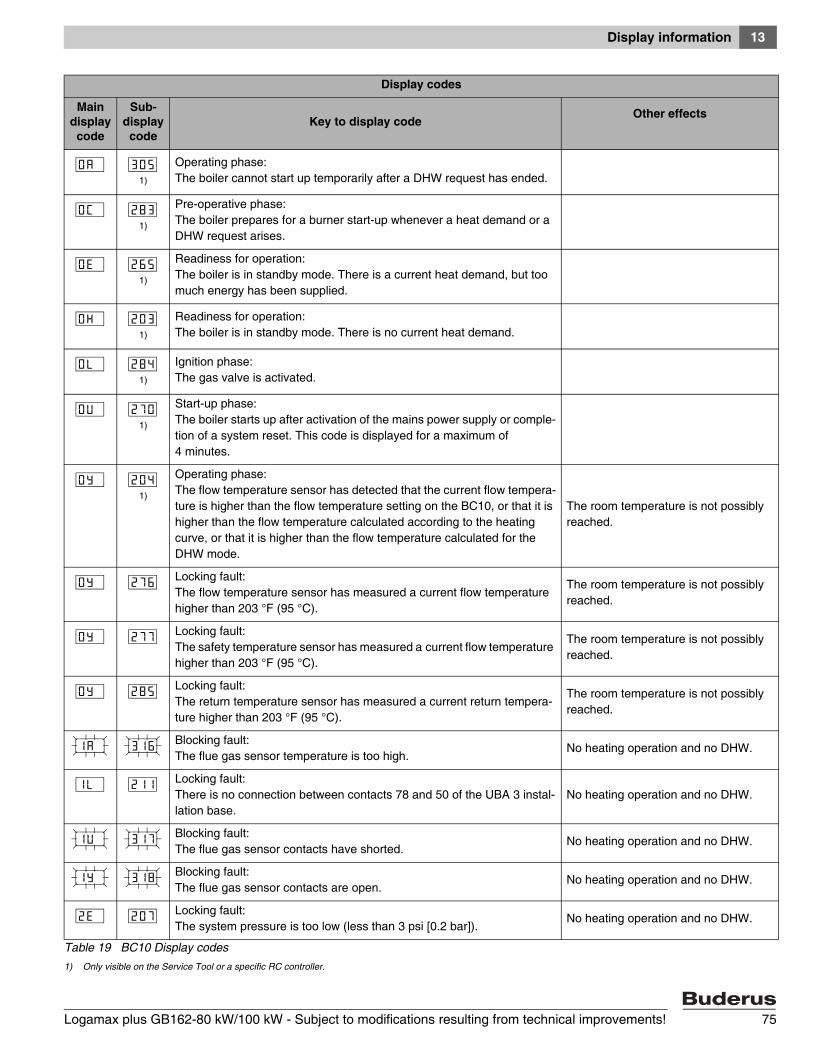
Display information 13
Logamax plus GB162-80 kW/100 kW - Subject to modifications resulting from technical improvements! 75
[0/a/\| [3/0/5|1)
Operating phase:The boiler cannot start up temporarily after a DHW request has ended.
[0/c/\| [2/8/3|1)
Pre-operative phase:The boiler prepares for a burner start-up whenever a heat demand or a DHW request arises.
[0/e/\| [2/6/5|1)
Readiness for operation:The boiler is in standby mode. There is a current heat demand, but too much energy has been supplied.
[0/h/\| [2/0/3|1)
Readiness for operation:The boiler is in standby mode. There is no current heat demand.
[0/l/\| [2/8/4|1)
Ignition phase:The gas valve is activated.
[0/u/\| [2/7/0|1)
Start-up phase:The boiler starts up after activation of the mains power supply or comple-tion of a system reset. This code is displayed for a maximum of 4 minutes.
[0/y/\| [2/0/4|1)
Operating phase:The flow temperature sensor has detected that the current flow tempera-ture is higher than the flow temperature setting on the BC10, or that it is higher than the flow temperature calculated according to the heating curve, or that it is higher than the flow temperature calculated for the DHW mode.
The room temperature is not possibly reached.
[0/y/\| [2/7/6| Locking fault:The flow temperature sensor has measured a current flow temperature higher than 203 °F (95 °C).
The room temperature is not possibly reached.
[0/y/\| [2/7/7| Locking fault:The safety temperature sensor has measured a current flow temperature higher than 203 °F (95 °C).
The room temperature is not possibly reached.
[0/y/\| [2/8/5| Locking fault:The return temperature sensor has measured a current return tempera-ture higher than 203 °F (95 °C).
The room temperature is not possibly reached.
[1/a/\| [3/1/6| Blocking fault:The flue gas sensor temperature is too high.
No heating operation and no DHW.
[1/l/\| [2/1/1| Locking fault:There is no connection between contacts 78 and 50 of the UBA 3 instal-lation base.
No heating operation and no DHW.
[1/u/\| [3/1/7| Blocking fault:The flue gas sensor contacts have shorted.
No heating operation and no DHW.
[1/y/\| [3/1/8| Blocking fault:The flue gas sensor contacts are open.
No heating operation and no DHW.
[2/e/\| [2/0/7| Locking fault:The system pressure is too low (less than 3 psi [0.2 bar]).
No heating operation and no DHW.
Display codes
Main display code
Sub-display code
Key to display codeOther effects
Table 19 BC10 Display codes1) Only visible on the Service Tool or a specific RC controller.
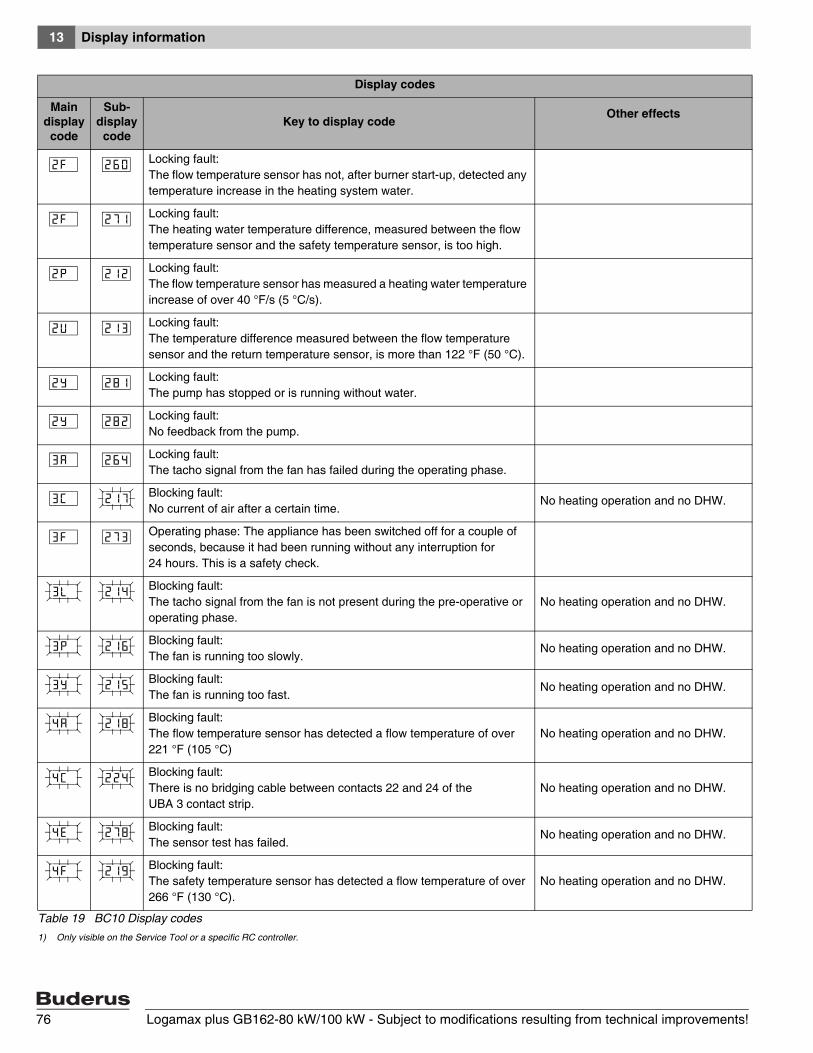
Display information13
Logamax plus GB162-80 kW/100 kW - Subject to modifications resulting from technical improvements!76
[2/f/\| [2/6/0| Locking fault:The flow temperature sensor has not, after burner start-up, detected any temperature increase in the heating system water.
[2/f/\| [2/7/1| Locking fault:The heating water temperature difference, measured between the flow temperature sensor and the safety temperature sensor, is too high.
[2/p/\| [2/1/2| Locking fault:The flow temperature sensor has measured a heating water temperature increase of over 40 °F/s (5 °C/s).
[2/u/\| [2/1/3| Locking fault:The temperature difference measured between the flow temperature sensor and the return temperature sensor, is more than 122 °F (50 °C).
[2/y/\| [2/8/1| Locking fault:The pump has stopped or is running without water.
[2/y/\| [2/8/2| Locking fault:No feedback from the pump.
[3/a/\| [2/6/4| Locking fault:The tacho signal from the fan has failed during the operating phase.
[3/c/\| [2/1/7| Blocking fault:No current of air after a certain time.
No heating operation and no DHW.
[3/f/\| [2/7/3| Operating phase: The appliance has been switched off for a couple of seconds, because it had been running without any interruption for 24 hours. This is a safety check.
[3/l/\| [2/1/4| Blocking fault:The tacho signal from the fan is not present during the pre-operative or operating phase.
No heating operation and no DHW.
[3/p/\| [2/1/6| Blocking fault:The fan is running too slowly.
No heating operation and no DHW.
[3/y/\| [2/1/5| Blocking fault:The fan is running too fast.
No heating operation and no DHW.
[4/a/\| [2/1/8| Blocking fault:The flow temperature sensor has detected a flow temperature of over 221 °F (105 °C)
No heating operation and no DHW.
[4/c/\| [2/2/4| Blocking fault:There is no bridging cable between contacts 22 and 24 of the UBA 3 contact strip.
No heating operation and no DHW.
[4/e/\| [2/7/8| Blocking fault:The sensor test has failed.
No heating operation and no DHW.
[4/f/\| [2/1/9| Blocking fault:The safety temperature sensor has detected a flow temperature of over 266 °F (130 °C).
No heating operation and no DHW.
Display codes
Main display code
Sub-display
codeKey to display code
Other effects
Table 19 BC10 Display codes1) Only visible on the Service Tool or a specific RC controller.

Display information 13
Logamax plus GB162-80 kW/100 kW - Subject to modifications resulting from technical improvements! 77
[4/l/\| [2/2/0| Blocking fault:The contacts for the safety temperature sensor have shorted or the safety temperature sensor has detected a flow temperature of over 266 °F (130 °C).
No heating operation and no DHW.
[4/p/\| [2/2/1| Blocking fault:The contacts for the safety temperature sensor have been interrupted.
No heating operation and no DHW.
[4/u/\| [2/2/2| Blocking fault:The contacts for the safety temperature sensor have shorted.
No heating operation and no DHW.
[4/y/\| [2/2/3| Blocking fault:The contacts for the safety temperature sensor have been interrupted.
No heating operation and no DHW.
[5/h/\| [2/6/8| Operating phase:Component test phase.
[6/a/\| [2/2/7| Locking fault:The system has detected an insufficient ionization current during the ignition phase.
[6/a/\| [2/2/7| Blocking fault:The system has detected an insufficient ionization current after four start-up attempts.
No heating operation and no DHW.
[6/c/\| [2/2/8| Blocking fault:The system has detected an ionization current before burner start-up.
No heating operation and no DHW.
[6/c/\| [3/0/6| Blocking fault:An ionization current has been measured after the burner shut down.
No heating operation and no DHW.
[6/l/\| [2/2/9| Blocking fault:The system has detected an insufficient ionization current during the operating phase.
[6/p/\| [2/6/9| Blocking fault:The glow ignitor was activated for more than 10 minutes.
No heating operation and no DHW.
[6/y/\| [2/0/3| Blocking fault:The ionization current is too high.
No heating operation and no DHW.
[7/c/\| [2/3/1| Blocking fault:The power supply was interrupted during a locking fault
[4/a/\| [4/c/\| [4/e/\| [4/f/\|
[4/l/\| [4/p/\| [4/u/\| [4/y/\|No heating operation and no DHW.
[7/l/\| [2/6/1| Blocking fault:The UBA 3 is defect.
No heating operation and no DHW.
[7/l/\| [2/8/0| Blocking fault:The UBA 3 is defect.
[8/y/\| [2/3/2|1)
Operating phase:The external switch contact is open.
No heating operation.
Display codes
Main display code
Sub-display code
Key to display codeOther effects
Table 19 BC10 Display codes1) Only visible on the Service Tool or a specific RC controller.
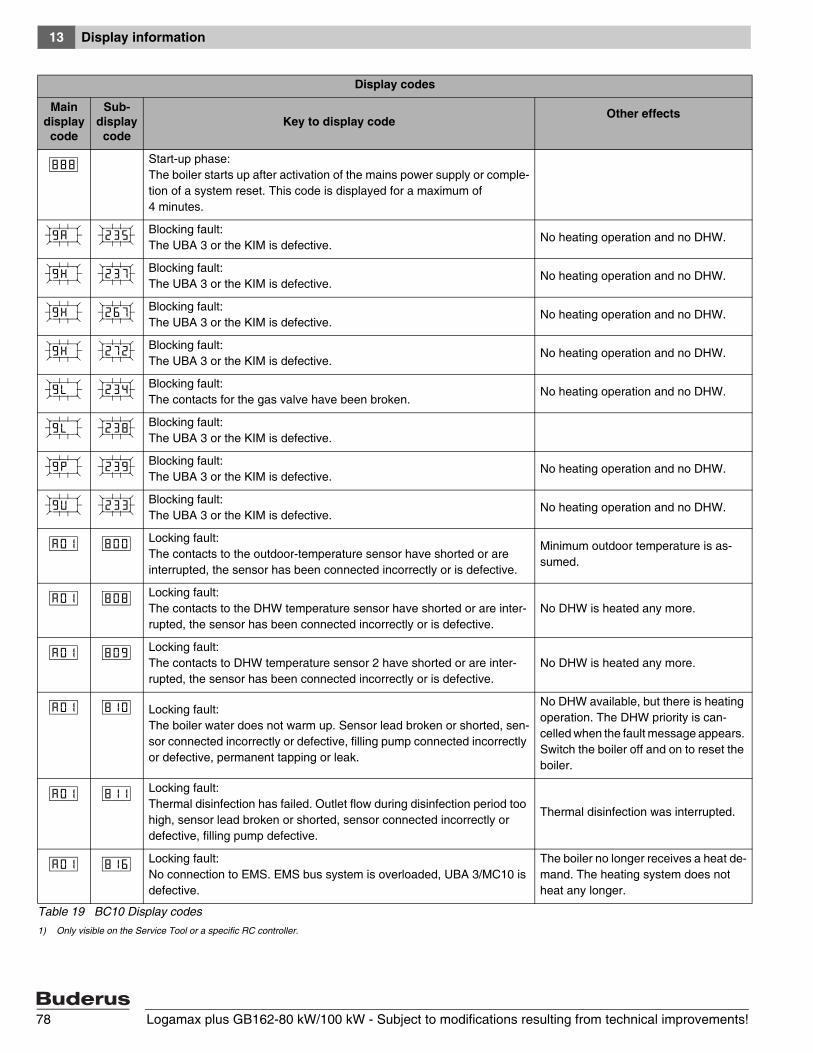
Display information13
Logamax plus GB162-80 kW/100 kW - Subject to modifications resulting from technical improvements!78
[8/8/8| Start-up phase:The boiler starts up after activation of the mains power supply or comple-tion of a system reset. This code is displayed for a maximum of 4 minutes.
[9/a/\| [2/3/5| Blocking fault:The UBA 3 or the KIM is defective.
No heating operation and no DHW.
[9/h/\| [2/3/7| Blocking fault:The UBA 3 or the KIM is defective.
No heating operation and no DHW.
[9/h/\| [2/6/7| Blocking fault:The UBA 3 or the KIM is defective.
No heating operation and no DHW.
[9/h/\| [2/7/2| Blocking fault:The UBA 3 or the KIM is defective.
No heating operation and no DHW.
[9/l/\| [2/3/4| Blocking fault:The contacts for the gas valve have been broken.
No heating operation and no DHW.
[9/l/\| [2/3/8| Blocking fault:The UBA 3 or the KIM is defective.
[9/p/\| [2/3/9| Blocking fault:The UBA 3 or the KIM is defective.
No heating operation and no DHW.
[9/u/\| [2/3/3| Blocking fault:The UBA 3 or the KIM is defective.
No heating operation and no DHW.
[a/0/1| [8/0/0| Locking fault:The contacts to the outdoor-temperature sensor have shorted or are interrupted, the sensor has been connected incorrectly or is defective.
Minimum outdoor temperature is as-sumed.
[a/0/1| [8/0/8| Locking fault:The contacts to the DHW temperature sensor have shorted or are inter-rupted, the sensor has been connected incorrectly or is defective.
No DHW is heated any more.
[a/0/1| [8/0/9| Locking fault:The contacts to DHW temperature sensor 2 have shorted or are inter-rupted, the sensor has been connected incorrectly or is defective.
No DHW is heated any more.
[a/0/1| [8/1/0| Locking fault:The boiler water does not warm up. Sensor lead broken or shorted, sen-sor connected incorrectly or defective, filling pump connected incorrectly or defective, permanent tapping or leak.
No DHW available, but there is heating operation. The DHW priority is can-celled when the fault message appears. Switch the boiler off and on to reset the boiler.
[a/0/1| [8/1/1| Locking fault:Thermal disinfection has failed. Outlet flow during disinfection period too high, sensor lead broken or shorted, sensor connected incorrectly or defective, filling pump defective.
Thermal disinfection was interrupted.
[a/0/1| [8/1/6| Locking fault:No connection to EMS. EMS bus system is overloaded, UBA 3/MC10 is defective.
The boiler no longer receives a heat de-mand. The heating system does not heat any longer.
Display codes
Main display code
Sub-display
codeKey to display code
Other effects
Table 19 BC10 Display codes1) Only visible on the Service Tool or a specific RC controller.
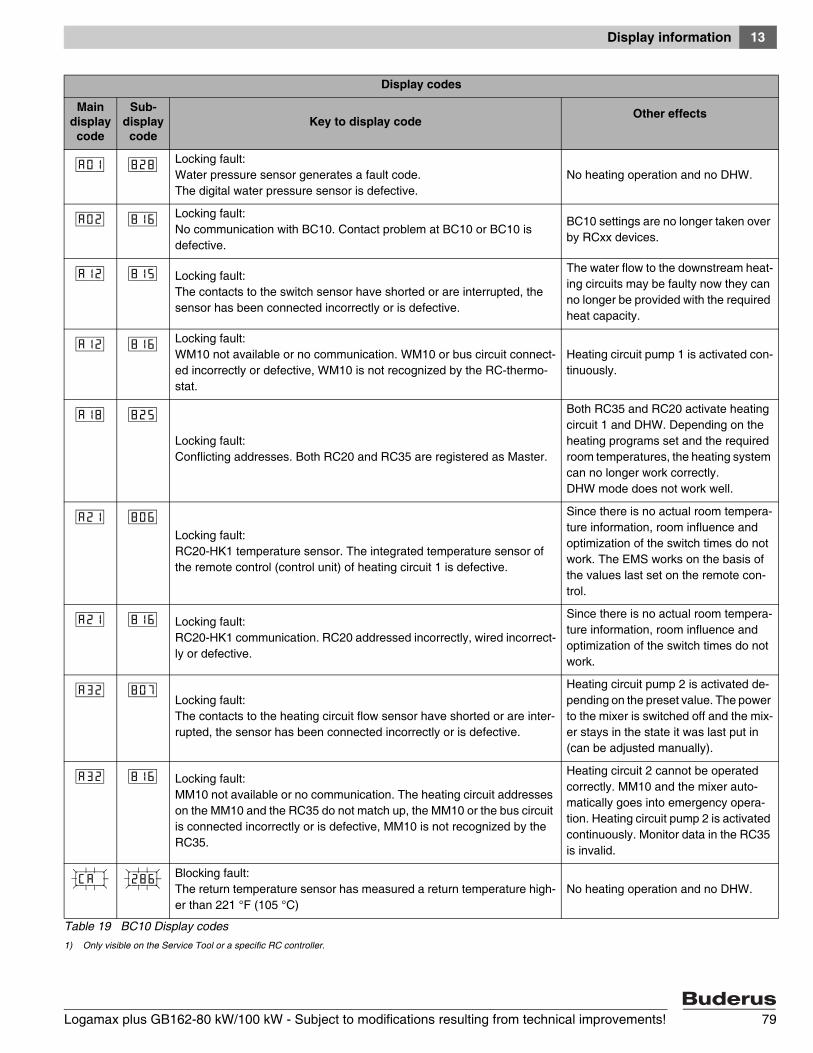
Display information 13
Logamax plus GB162-80 kW/100 kW - Subject to modifications resulting from technical improvements! 79
[a/0/1| [8/2/8| Locking fault:Water pressure sensor generates a fault code. The digital water pressure sensor is defective.
No heating operation and no DHW.
[a/0/2| [8/1/6| Locking fault:No communication with BC10. Contact problem at BC10 or BC10 is defective.
BC10 settings are no longer taken over by RCxx devices.
[a/1/2| [8/1/5| Locking fault:The contacts to the switch sensor have shorted or are interrupted, the sensor has been connected incorrectly or is defective.
The water flow to the downstream heat-ing circuits may be faulty now they can no longer be provided with the required heat capacity.
[a/1/2| [8/1/6| Locking fault:WM10 not available or no communication. WM10 or bus circuit connect-ed incorrectly or defective, WM10 is not recognized by the RC-thermo-stat.
Heating circuit pump 1 is activated con-tinuously.
[a/1/8| [8/2/5|
Locking fault:Conflicting addresses. Both RC20 and RC35 are registered as Master.
Both RC35 and RC20 activate heating circuit 1 and DHW. Depending on the heating programs set and the required room temperatures, the heating system can no longer work correctly. DHW mode does not work well.
[a/2/1| [8/0/6|Locking fault:RC20-HK1 temperature sensor. The integrated temperature sensor of the remote control (control unit) of heating circuit 1 is defective.
Since there is no actual room tempera-ture information, room influence and optimization of the switch times do not work. The EMS works on the basis of the values last set on the remote con-trol.
[a/2/1| [8/1/6| Locking fault:RC20-HK1 communication. RC20 addressed incorrectly, wired incorrect-ly or defective.
Since there is no actual room tempera-ture information, room influence and optimization of the switch times do not work.
[a/3/2| [8/0/7|Locking fault:The contacts to the heating circuit flow sensor have shorted or are inter-rupted, the sensor has been connected incorrectly or is defective.
Heating circuit pump 2 is activated de-pending on the preset value. The power to the mixer is switched off and the mix-er stays in the state it was last put in (can be adjusted manually).
[a/3/2| [8/1/6| Locking fault:MM10 not available or no communication. The heating circuit addresses on the MM10 and the RC35 do not match up, the MM10 or the bus circuit is connected incorrectly or is defective, MM10 is not recognized by the RC35.
Heating circuit 2 cannot be operated correctly. MM10 and the mixer auto-matically goes into emergency opera-tion. Heating circuit pump 2 is activated continuously. Monitor data in the RC35 is invalid.
[c/a/\| [2/8/6| Blocking fault:The return temperature sensor has measured a return temperature high-er than 221 °F (105 °C)
No heating operation and no DHW.
Display codes
Main display code
Sub-display code
Key to display codeOther effects
Table 19 BC10 Display codes1) Only visible on the Service Tool or a specific RC controller.
Display information13
Logamax plus GB162-80 kW/100 kW - Subject to modifications resulting from technical improvements!80
[c/0/\| [2/8/8| Blocking fault:The contacts for the pressure sensor have been interrupted or have shorted.
No heating operation and no DHW.
[c/0/\| [2/8/9| Blocking fault:The contacts for the pressure sensor have shorted.
No heating operation and no DHW.
[c/u/\| [2/4/0| Blocking fault:The contacts for the return temperature sensor have shorted.
No heating operation and no DHW.
[c/y/\| [2/4/1| Blocking fault:The contacts for the return temperature sensor have been interrupted.
No heating operation and no DHW.
[e/l/\| [2/9/0| Locking fault:The UBA 3 or the KIM is defective.
No heating operation and no DHW.
[e/\/\| [2/4/2|thru
[2/8/7|
Any display code starting with the letter E (except EL).
Blocking fault:The UBA 3 or the KIM is defective.
No heating operation and no DHW.
[h/\/7| Operating phase:The system pressure is too low (less than 12 psi [0.8 bar]).
Possibly no heating operation or no DHW available.
[h/\/7| Operating phase:The system pressure is too low (less than 12 psi [0.8 bar]).
Possibly no heating operation or no DHW available.
[p/-.-| Operating phase:The system pressure is too high (higher than 58 psi [4.0 bar]).
[\/r/e| Locking fault:Reset is carried out. This code appears after the "Reset" button on the display was pressed for 5 seconds.
Display codes
Main display code
Sub-display
codeKey to display code
Other effects
Table 19 BC10 Display codes1) Only visible on the Service Tool or a specific RC controller.
Technical specifications 14
Logamax plus GB162-80 kW/100 kW - Subject to modifications resulting from technical improvements! 81
14 Technical specifications
14.1 Technical specifications of GB162-boilers at sea level (0-4,000 ft)
General specifications unit GB162-80 (NG) GB162-80 (LP) GB162-100 (NG) GB162-100 (LP)Gas category Natural gas Propane Natural gas PropaneRated thermal load btu/h 72,000 - 290,000 62,000 - 270,000 72,000 - 333,000 62,000 - 315,000Rated heating capacity, heating curve 176/140 °F (80/60 °C)
btu/h64,100 - 255,200 55,200 - 237,600 64,100 - 293,000 55,200 - 277,200
Rated heating capacity, heating curve 122/86 °F (50/30 °C)
btu/h71,300 - 281,300 61,400 - 261,900 71,300 - 326,300 61,400 - 308,700
Boiler efficiency at max. capacity, heating curve 176/140 °F (80/60 °C)
%88 88
Boiler efficiency at max. capacity, heating curve 122/86 °F (50/30 °C)
%97 98
CSA Output btu/h 261,000 243,000 295,000 279,000De-ration altitudes 2,000 - 4,000 ft % / 1,000 ft 2.3 2.2 2.1 2.0AFUE at 80/180°F (27/82 °C) 93.8 93.9 n/a n/aBTS 2000 at 80/180°F (27/82 °C) part. load n/a n/a 96.1 96.1BTS 2000 at 80/180°F (27/82 °C) full load n/a n/a 90.8 90.8HeatingMaximum flow temperature °F (°C) 190 (88)Maximum working pressure (boiler) psi (bar) 50 (3.6)Minimum water circulation volume Gal/h (l/h) 0Flow temperature °F (°C) 86-190 (30-88), can be set on the BC10 basic controllerResistance at ΔT = 20 K psi (mbar) 3.26 (225) 4.57 (315)Heating circuit volume of heat exchanger Gal (L) 1.3 (5.0)Pipe connections boiler, without pump group.Gas connection in Rp1“Heating water connection in G1½’’ union nut with female thread enclosedCondensate connection in (mm) Ø 1¼” (32 mm)Flue gas valuesCondensate quantity at 104/86 °F (40/30 °C) Gal/h (L/h) 2.4 (9.0) 2.85 (10.8)pH value of condensate pH approx. 4.1Flue gas mass flow rate, full load g/s 35.3 44.9Flue gas temperature 176/140 °F (80/60 °C), full load
°F (°C) 153 (67) 149 (65) 169 (76) 165 (63)
Flue gas temperature 176/140 °F (80/60 °C), partial load
°F (°C) 142 (61) 136 (58) 142 (61) 136 (58)
Flue gas temperature 122/86 °F (50/30 °C), full load
°F (°C) 118 (48) 114 (46) 124 (51) 120 (49)
Flue gas temperature 122/86 °F (50/30 °C), partial load
°F (°C) 93 (34) 88 (31) 93 (34) 88 (31)
CO2 content at full load % 9.3 9.6 9.4 9.7Free fan feed pressure Inch w.c.
(Pa) 0.602 (150) 0.883 (220)Flue gas connectionØ flue gas system, room-air dependent in (mm) Ø 4” (100 mm)Ø flue gas system, room-air independent in (mm) Ø 4” (100 mm) / 4” (100 mm) parallel
Table 20 Technical specifications of GB162-boilers at sea level

Technical specifications14
Logamax plus GB162-80 kW/100 kW - Subject to modifications resulting from technical improvements!82
14.2 Technical specifications of GB162-boilers at high altitude (4,000-10,000 ft)
Electrical dataMains connection voltage VAC, Hz 120, 60Electrical protection rating IPX4DFuses Amp 5Electrical power consumption, full load (without a pump group)
W104 156
Electrical power consumption, partial load (without a pump group)
W29 29
Boiler dimensions and weightHeight × width × depth (with pump group) in (mm) 50.4x20.5x18.3 (1280×520×465)Weight (without a pump group) lb (kg) 154 (70)Other specificationsPump group pump UP 26-99
General specifications unit GB162-80 (NG) GB162-80 (LP) GB162-100 (NG) GB162-100 (LP)
Table 20 Technical specifications of GB162-boilers at sea level (continued)
General specifications unit GB162-80 (NG) GB162-100 (NG)Gas category Natural gas Natural gasRated thermal load btu/h 100,000 - 290,000 100,000 - 333,000Rated heating capacity, heating curve 176/140 °F (80/60 °C) btu/h 89,000 - 255,200 89,000 - 293,000Rated heating capacity, heating curve 122/86 °F (50/30 °C) btu/h 99,000 - 281,300 99,000 - 326,300Boiler efficiency at max. capacity, heating curve 176/140 °F (80/60 °C)
%88 88
Boiler efficiency at max. capacity, heating curve 122/86 °F (50/30 °C)
%97 98
CSA Output btu/h 261,000 295,000De-ration altitudes 4,000 - 6,000 ft % / 1,000 ft 2.3 2.1De-ration altitudes 6,000 - 8,000 ft % / 1,000 ft 2.5 2.2De-ration altitudes 8,000 - 10,000 ft % / 1,000 ft 2.5 2.3AFUE at 80/180°F (27/82 °C) 93.8 n/aBTS 2000 at 80/180°F (27/82 °C) part. load n/a 96.1BTS 2000 at 80/180°F (27/82 °C) full load n/a 90.8HeatingMaximum flow temperature °F (°C) 190 (88)Maximum working pressure (boiler) psi (bar) 50 (3.6)Minimum water circulation volume Gal/h (l/h) 0Flow temperature °F (°C) 86-190 (30-88), can be set on the BC10 basic controllerResistance at ΔT = 20 K psi (mbar) 3.26 (225) 4.57 (315)Heating circuit volume of heat exchanger Gal (L) 1.3 (5.0)Pipe connections boiler, without pump group.Gas connection in Rp1“Heating water connection in G1½’’ union nut with female thread enclosedCondensate connection in (mm) Ø 1¼” (32 mm)Flue gas valuesCondensate quantity at 104/86 °F (40/30 °C) Gal/h (L/h) 2.4 (9.0) 2.85 (10.8)pH value of condensate pH approx. 4.1Flue gas mass flow rate, full load g/s 35.3 44.9Flue gas temperature 176/140 °F (80/60 °C), full load °F (°C) 153 (67) 169 (76)Flue gas temperature 176/140 °F (80/60 °C), partial load °F (°C) 144 (62) 144 (62)Flue gas temperature 122/86 °F (50/30 °C), full load °F (°C) 118 (48) 124 (51)Flue gas temperature 122/86 °F (50/30 °C), partial load °F (°C) 96 (36) 96 (36)CO2 content at full load % 9.3 9.4
Table 21 Technical specifications of GB162-boilers at high altitude
Technical specifications 14
Logamax plus GB162-80 kW/100 kW - Subject to modifications resulting from technical improvements! 83
The gas orifice diameter is marked on the gas orifice (in mm).
Free fan feed pressure Inch w.c. (Pa) 0.602 (150) 0.883 (220)Flue gas connectionØ flue gas system, room-air dependent in (mm) Ø 4” (100 mm)Ø flue gas system, room-air independent in (mm) Ø 4” (100 mm) / 4” (100 mm) parallelElectrical dataMains connection voltage VAC, Hz 120, 60Electrical protection rating IPX4DFuses Amp 5Electrical power consumption, full load (without a pump group)
W104 156
Electrical power consumption, partial load (without a pump group)
W44 44
Boiler dimensions and weightHeight × width × depth (with pump group) in (mm) 50.4x20.5x18.3 (1280×520×465)Weight (without a pump group) lb (kg) 154 (70)Other specificationsPump group pump UP 26-99
General specifications unit GB162-80 (NG) GB162-100 (NG)
Table 21 Technical specifications of GB162-boilers at high altitude (continued)
Type of gas supply Factory pre-setting of the gas control valve
Natural gas Delivered factory-set: Natural Gas
LP-gas Suitable for propane after conversion (also see the instruction "Conversion to another type of gas supply").Information on gas type instruction plate:Set to gas category: Propane.
Table 22 Factory setting of the gas control valve
Thermal power gas boiler
Type of gas supply
Altitude in ft (m)
Gas orifice diameter
in mm (inch)Part number
GB162-80 kW/100 kW
Natural gas
0 - 4,000(0 - 1,220)
8.40(0.331)
7746900399
Natural gas
4,000 - 10,200(1,220 - 3,111)
8.70(0.343)
7746900399
LPG0 - 4,000
(0 - 1,220)4.70
(0.193)7746900499
LPG4,000 - 10,200(1,220 - 3,111)
not available –
Table 23 Gas orifice diameter
Technical specifications14
Logamax plus GB162-80 kW/100 kW - Subject to modifications resulting from technical improvements!84
Hydraulic resistance of the boiler
Fig. 99 Boiler resistance curve
7.25
6.53
5.80
5.08
4.35
3.63
2.90
2.18
1.45
0.73
2.2 4.4 6.6 8.8 11.0 13.2 15.4 17.6 19.8 22.0
500 1000 1500 2000 2500 3000 3500 4000 4500 5000
500
450
400
350
300
250
200
150
100
50
0
psi mbar
L/h
GPM
100 kW
80 kW
Volume flow
Pre
ssur
e dr
op

Reports 15
Logamax plus GB162-80 kW/100 kW - Subject to modifications resulting from technical improvements! 85
15 Reports
15.1 Start-up report
Enter your signature and the date after completing the start-up activities.
Start-up activities Page Measurement results Remarks
1. Check for gas leaks 46
2. Fill the heating system 47
– Pre-pressure expansion vessel (refer to the installation instructions for the expansion vessel) ____________ psi
– Heating system filling pressure ____________ psi
3. Fill the condensate trap with water 48
4. Write down the gas characteristics: Heat input ____________ btu/ft³Heat output ____________ btu/ft³
5. Bleed the gas supply valve 49
6. Check the air/flue gas connection 49
7. Checking the appliance configuration 50
8. Measure the gas inlet pressure (working pressure) 50 ____________ inch W.C.
9. Check and adjust the gas/air ratio 52 ____________ inch W.C.
10. Carry out a leakage test in operating conditions 54
11. Measure the flue gases CO emissions 55 ____________ ppm
12. Carry out a function test 56
- Measure the ionization current 56 ____________ μA
12. Measure the pH-value Fill in the record book
13. Boiler settings 58
14. Final activities 60- Close the boiler door and the control panel- Hand over
Confirming proper start-up
Company stamp/signature/date
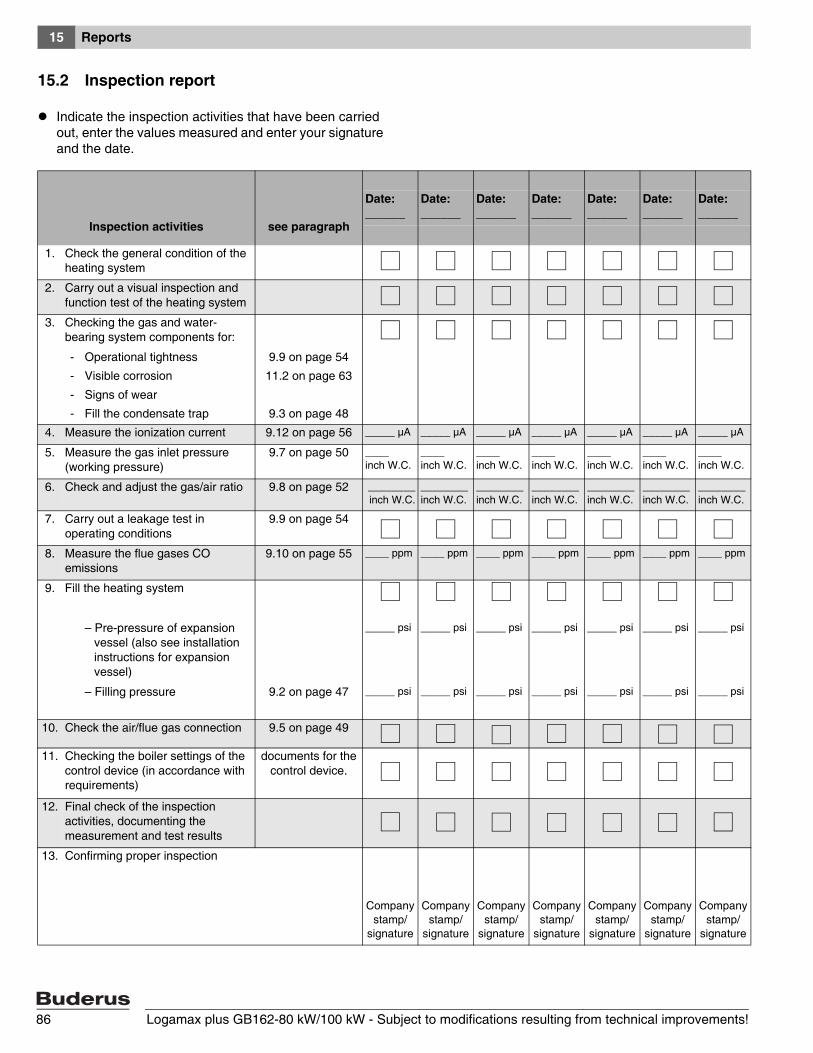
Reports15
Logamax plus GB162-80 kW/100 kW - Subject to modifications resulting from technical improvements!86
15.2 Inspection report
Indicate the inspection activities that have been carried out, enter the values measured and enter your signature and the date.
Inspection activities see paragraph
Date:______
Date:______
Date:______
Date:______
Date:______
Date:______
Date:______
1. Check the general condition of the heating system
2. Carry out a visual inspection and function test of the heating system
3. Checking the gas and water-bearing system components for:
- Operational tightness 9.9 on page 54
- Visible corrosion 11.2 on page 63
- Signs of wear
- Fill the condensate trap 9.3 on page 48
4. Measure the ionization current 9.12 on page 56 _____ µA _____ µA _____ µA _____ µA _____ µA _____ µA _____ µA
5. Measure the gas inlet pressure (working pressure)
9.7 on page 50 ____inch W.C.
____inch W.C.
____inch W.C.
____inch W.C.
____inch W.C.
____inch W.C.
____inch W.C.
6. Check and adjust the gas/air ratio 9.8 on page 52 ________inch W.C.
________ inch W.C.
________ inch W.C.
________ inch W.C.
________ inch W.C.
________ inch W.C.
________ inch W.C.
7. Carry out a leakage test in operating conditions
9.9 on page 54
8. Measure the flue gases CO emissions
9.10 on page 55 ____ ppm ____ ppm ____ ppm ____ ppm ____ ppm ____ ppm ____ ppm
9. Fill the heating system
– Pre-pressure of expansion vessel (also see installationinstructions for expansionvessel)
_____ psi _____ psi _____ psi _____ psi _____ psi _____ psi _____ psi
– Filling pressure 9.2 on page 47 _____ psi _____ psi _____ psi _____ psi _____ psi _____ psi _____ psi
10. Check the air/flue gas connection 9.5 on page 49
11. Checking the boiler settings of the control device (in accordance with requirements)
documents for the control device.
12. Final check of the inspection activities, documenting the measurement and test results
13. Confirming proper inspection
Company stamp/
signature
Company stamp/
signature
Company stamp/
signature
Company stamp/
signature
Company stamp/
signature
Company stamp/
signature
Company stamp/
signature
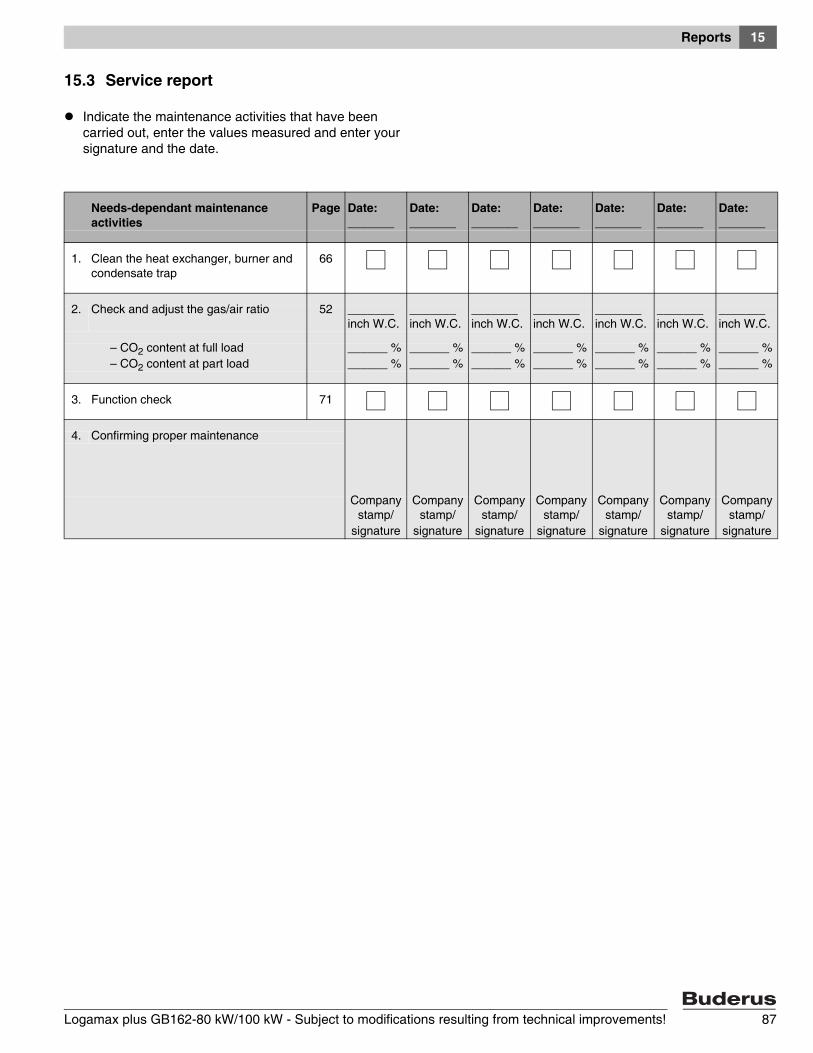
Reports 15
Logamax plus GB162-80 kW/100 kW - Subject to modifications resulting from technical improvements! 87
15.3 Service report
Indicate the maintenance activities that have been carried out, enter the values measured and enter your signature and the date.
Needs-dependant maintenance activities
Page Date: _______
Date: _______
Date: _______
Date: _______
Date: _______
Date: _______
Date: _______
1. Clean the heat exchanger, burner and condensate trap
66
2. Check and adjust the gas/air ratio 52 _______ inch W.C.
_______ inch W.C.
_______ inch W.C.
_______ inch W.C.
_______ inch W.C.
_______ inch W.C.
_______ inch W.C.
– CO2 content at full load– CO2 content at part load
______ %______ %
______ %______ %
______ %______ %
______ %______ %
______ %______ %
______ %______ %
______ %______ %
3. Function check 71
4. Confirming proper maintenance
Company stamp/
signature
Company stamp/
signature
Company stamp/
signature
Company stamp/
signature
Company stamp/
signature
Company stamp/
signature
Company stamp/
signature
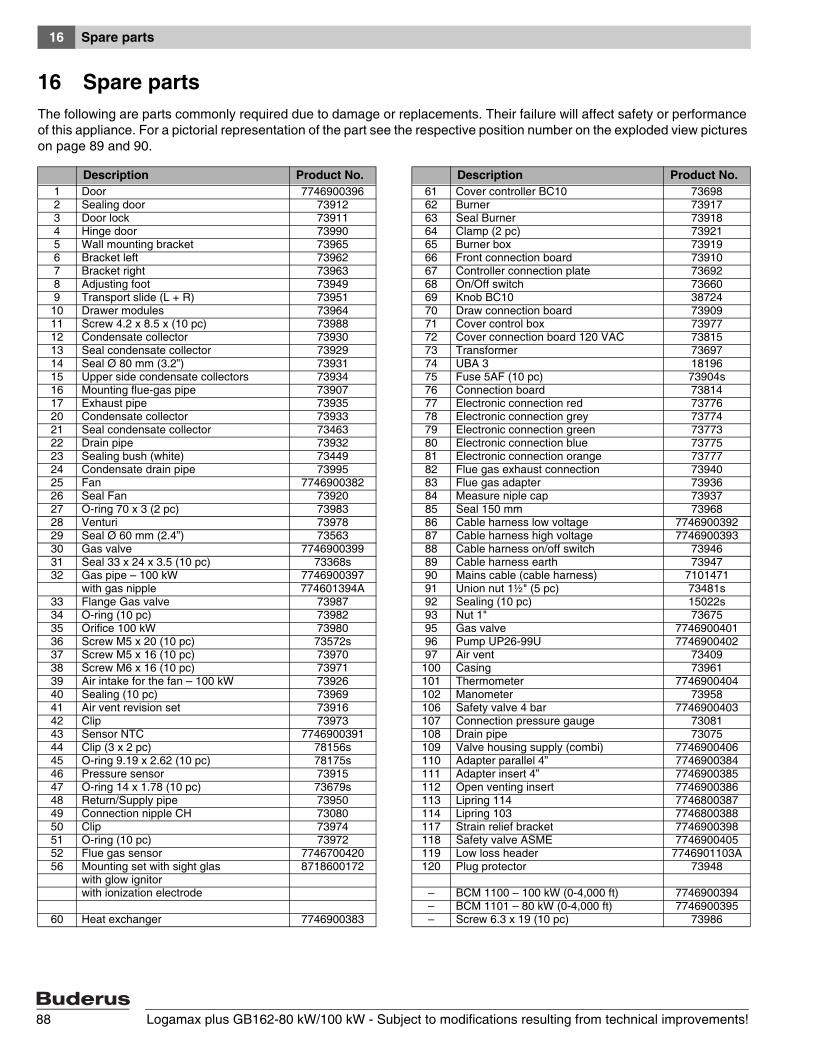
Spare parts16
Logamax plus GB162-80 kW/100 kW - Subject to modifications resulting from technical improvements!88
16 Spare partsThe following are parts commonly required due to damage or replacements. Their failure will affect safety or performance of this appliance. For a pictorial representation of the part see the respective position number on the exploded view pictures on page 89 and 90.
Description Product No. Description Product No.1 Door 7746900396 61 Cover controller BC10 736982 Sealing door 73912 62 Burner 739173 Door lock 73911 63 Seal Burner 739184 Hinge door 73990 64 Clamp (2 pc) 739215 Wall mounting bracket 73965 65 Burner box 739196 Bracket left 73962 66 Front connection board 739107 Bracket right 73963 67 Controller connection plate 736928 Adjusting foot 73949 68 On/Off switch 736609 Transport slide (L + R) 73951 69 Knob BC10 3872410 Drawer modules 73964 70 Draw connection board 7390911 Screw 4.2 x 8.5 x (10 pc) 73988 71 Cover control box 7397712 Condensate collector 73930 72 Cover connection board 120 VAC 7381513 Seal condensate collector 73929 73 Transformer 7369714 Seal Ø 80 mm (3.2”) 73931 74 UBA 3 1819615 Upper side condensate collectors 73934 75 Fuse 5AF (10 pc) 73904s16 Mounting flue-gas pipe 73907 76 Connection board 7381417 Exhaust pipe 73935 77 Electronic connection red 7377620 Condensate collector 73933 78 Electronic connection grey 7377421 Seal condensate collector 73463 79 Electronic connection green 7377322 Drain pipe 73932 80 Electronic connection blue 7377523 Sealing bush (white) 73449 81 Electronic connection orange 7377724 Condensate drain pipe 73995 82 Flue gas exhaust connection 7394025 Fan 7746900382 83 Flue gas adapter 7393626 Seal Fan 73920 84 Measure niple cap 7393727 O-ring 70 x 3 (2 pc) 73983 85 Seal 150 mm 7396828 Venturi 73978 86 Cable harness low voltage 774690039229 Seal Ø 60 mm (2.4”) 73563 87 Cable harness high voltage 774690039330 Gas valve 7746900399 88 Cable harness on/off switch 7394631 Seal 33 x 24 x 3.5 (10 pc) 73368s 89 Cable harness earth 7394732 Gas pipe – 100 kW 7746900397 90 Mains cable (cable harness) 7101471
with gas nipple 774601394A 91 Union nut 1½" (5 pc) 73481s33 Flange Gas valve 73987 92 Sealing (10 pc) 15022s34 O-ring (10 pc) 73982 93 Nut 1" 7367535 Orifice 100 kW 73980 95 Gas valve 774690040136 Screw M5 x 20 (10 pc) 73572s 96 Pump UP26-99U 774690040237 Screw M5 x 16 (10 pc) 73970 97 Air vent 7340938 Screw M6 x 16 (10 pc) 73971 100 Casing 7396139 Air intake for the fan – 100 kW 73926 101 Thermometer 774690040440 Sealing (10 pc) 73969 102 Manometer 7395841 Air vent revision set 73916 106 Safety valve 4 bar 774690040342 Clip 73973 107 Connection pressure gauge 7308143 Sensor NTC 7746900391 108 Drain pipe 7307544 Clip (3 x 2 pc) 78156s 109 Valve housing supply (combi) 774690040645 O-ring 9.19 x 2.62 (10 pc) 78175s 110 Adapter parallel 4” 774690038446 Pressure sensor 73915 111 Adapter insert 4” 774690038547 O-ring 14 x 1.78 (10 pc) 73679s 112 Open venting insert 774690038648 Return/Supply pipe 73950 113 Lipring 114 774680038749 Connection nipple CH 73080 114 Lipring 103 774680038850 Clip 73974 117 Strain relief bracket 774690039851 O-ring (10 pc) 73972 118 Safety valve ASME 774690040552 Flue gas sensor 7746700420 119 Low loss header 7746901103A56 Mounting set with sight glas 8718600172 120 Plug protector 73948
with glow ignitorwith ionization electrode – BCM 1100 – 100 kW (0-4,000 ft) 7746900394
– BCM 1101 – 80 kW (0-4,000 ft) 774690039560 Heat exchanger 7746900383 – Screw 6.3 x 19 (10 pc) 73986

Spare parts 16
Logamax plus GB162-80 kW/100 kW - Subject to modifications resulting from technical improvements! 89
Exploded view Logamax plus GB162-80 kW/100 kW
Fig. 100
5
484
43
5050
51
43
44 45
64
42
65
36
7
6
3734
27
29
36
40
38
16
13
44
44
47
44
45
45
46
43
71
6769
68
72
7681
80
73
74
66
7778
7975
26
2
52
14
14
32
11
84
40
31
9
10
2148
48
51
49
49
22
23
21
9
8
14
15
39
63
14
64
28
33
30
35
41
17
25
1
62
60
24
20
12
3
56
70
83
110
112
117
119
113
111
114
111
113
114
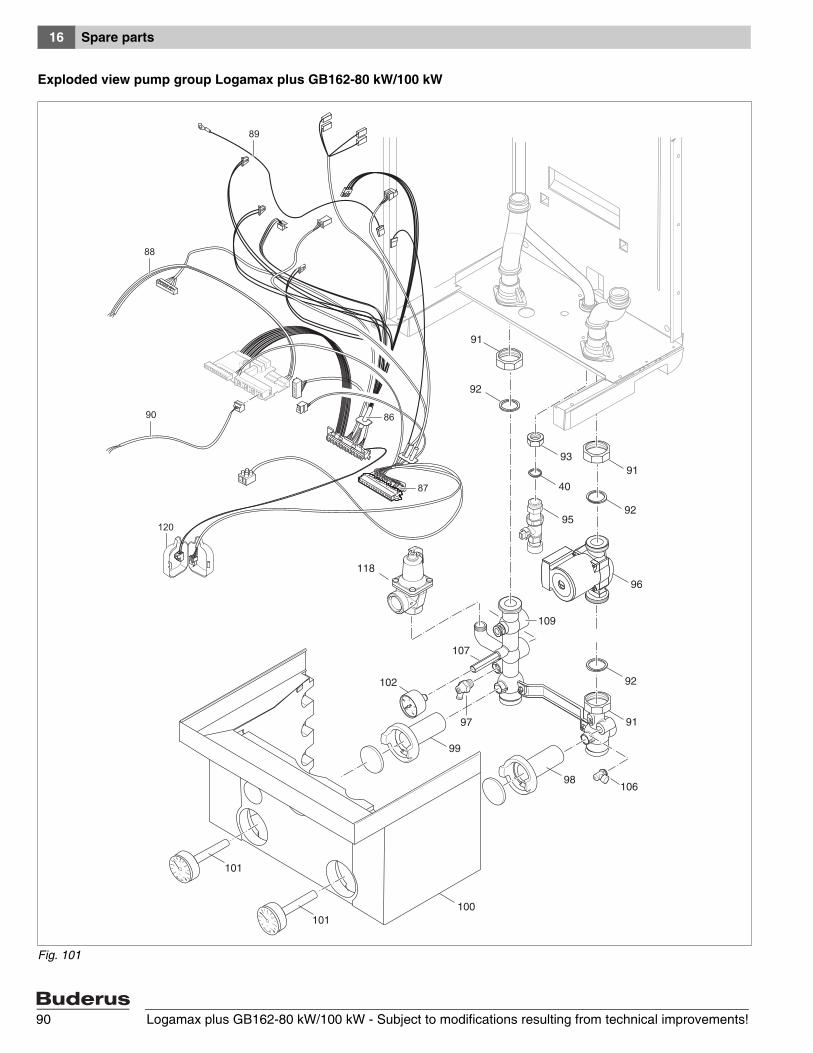
Spare parts16
Logamax plus GB162-80 kW/100 kW - Subject to modifications resulting from technical improvements!90
Exploded view pump group Logamax plus GB162-80 kW/100 kW
Fig. 101
0
1 2
3
4
12
91
92
92
92
96
106
100
102
101
101
99
97
9391
91
40
98
107
95
109
90
120
89
88
86
87
118
Index 17
Logamax plus GB162-80 kW/100 kW - Subject to modifications resulting from technical improvements! 91
17 IndexNumerics
115 VAC connection . . . . . . . . . . . . . . . . . . . . . . . . 32
AAppliance configuration . . . . . . . . . . . . . . . . . . . . . . 50
BBC10 basic controller . . . . . . . . . . . . . . . . . . . . . . . 39Burner . . . . . . . . . . . . . . . . . . . . . . . . . . . . . . . . . . . 66
CCarbon monoxide content . . . . . . . . . . . . . . . . . . . . 55CO values . . . . . . . . . . . . . . . . . . . . . . . . . . . . . . . . 55Condensate trap . . . . . . . . . . . . . . . . . . . . . . . . . . . 66Connections (gas, flue gas and water) . . . . . . .11, 12
DDHW circulation pump . . . . . . . . . . . . . . . . . . . . . . 32DHW pump . . . . . . . . . . . . . . . . . . . . . . . . . . . . . . . 32Diagnosis . . . . . . . . . . . . . . . . . . . . . . . . . . . . . . . . 72Dimensions . . . . . . . . . . . . . . . . . . . . . . . . . . . .11, 12Display . . . . . . . . . . . . . . . . . . . . . . . . . . . . . . .40, 72Display codes . . . . . . . . . . . . . . . . . . . . . . . . . . . . . 74Draining the heating water . . . . . . . . . . . . . . . . . . . 61
EEmergency . . . . . . . . . . . . . . . . . . . . . . . . . . . . . . . 61
FFault . . . . . . . . . . . . . . . . . . . . . . . . . . . . . . . . . . . . 72Flow temperature, maximum . . . . . . . . . . . . . .81, 82Flue gas connection . . . . . . . . . . . . . . . . . .49, 81, 83Flue gas test . . . . . . . . . . . . . . . . . . . . . . . . . . . . . . 41Front protection . . . . . . . . . . . . . . . . . . . . . . . . . . . . . 8Frost . . . . . . . . . . . . . . . . . . . . . . . . . . . . . . . . .15, 61Function modules . . . . . . . . . . . . . . . . . . . . . . . . . . 33Function testing . . . . . . . . . . . . . . . . . . . . . . . . . . . . 56
GGas flow pipe . . . . . . . . . . . . . . . . . . . . . . . . . . . . . 49Gas supply pressure . . . . . . . . . . . . . . . . . . . . . . . . 50Gas tightness . . . . . . . . . . . . . . . . . . . . . . . . . . . . . 46Gas/air ratio . . . . . . . . . . . . . . . . . . . . . . . . . . . . . . 52
HHeat exchanger . . . . . . . . . . . . . . . . . . . .3, 66, 81, 82Heating system water . . . . . . . . . . . . . . . . . . . . . . . 61
IInspection log book . . . . . . . . . . . . . . . . . . . . . . . . . 86Installation room . . . . . . . . . . . . . . . . . . . . . . . . . . . 15Internal leak test . . . . . . . . . . . . . . . . . . . . . . . . . . . 63Ionization current . . . . . . . . . . . . . . . . . . . . . . . . . . 56
LLeakage test . . . . . . . . . . . . . . . . . . . . . . . . . . . . . . 54
MMain connection . . . . . . . . . . . . . . . . . . . . . . . . . . .31Main switch . . . . . . . . . . . . . . . . . . . . . . . . . . . . . . .39Manual operation . . . . . . . . . . . . . . . . . . . . . . . . . . .43Menu structure . . . . . . . . . . . . . . . . . . . . . . . . . . . . .41
NNormal operation . . . . . . . . . . . . . . . . . . . . . . . . . . .41
PPump run-over time . . . . . . . . . . . . . . . . . . . . . . . . . .8Pump test . . . . . . . . . . . . . . . . . . . . . . . . . . . . . . . . .8
RResistance hydraulic . . . . . . . . . . . . . . . . . . . . . . . .83Room controller . . . . . . . . . . . . . . . . . . . . . . . . . . . .33
SSafety . . . . . . . . . . . . . . . . . . . . . . . . . . . . . . . . . . . .7Sensor connections . . . . . . . . . . . . . . . . . . . . . 32, 33Service mode . . . . . . . . . . . . . . . . . . . . . . . . . . . . . .42Service record log book . . . . . . . . . . . . . . . . . . . . . .87Service Tool . . . . . . . . . . . . . . . . . . . . . . . . . . . . . . .40Setting the heating capacity . . . . . . . . . . . . . . . . . .58Settings . . . . . . . . . . . . . . . . . . . . . . . . . . . . . . 44, 73Shutting down . . . . . . . . . . . . . . . . . . . . . . . . . . . . .61Signs of corrosion . . . . . . . . . . . . . . . . . . . . . . . . . .63Space heating water temperature, maximum . . . . .40
TTechnical specifications . . . . . . . . . . . . . . . . . . 81, 82Transportation . . . . . . . . . . . . . . . . . . . . . . . . . . . . .13
VVenturi . . . . . . . . . . . . . . . . . . . . . . . . . . . . . . . . . . .83
WWorking pressure . . . . . . . . . . . . . . . . . . . . . . 81, 82
Bosch Thermotechnology Corp.50 Wentworth AvenueLondonderry, NH 03053Tel.: 603-552-1100Fax: 603-584-1681www.buderus.netU.S.A.
Products manufactured by:Bosch Thermotechnik GmbHSophienstrasse 30-32D-35576 Wetzlarwww.buderus.com
Bosch Thermotechnology Corp. reserves the right to make changes without notice due to continuing engineering and technological advances.
7746
8001
0300
05