installation - diode led location 1 of 2 ig21-® chromapath® installation guide chromapath®...
TRANSCRIPT
DRY LOCATION
1 OF 2 IG020717-3.0
®
INSTALLATION GUIDECHROMAPATH®
CHROMAPATH® INSTALLATION GUIDE
ALUMINUM CHANNEL
Component Description Frosted & Clear Cover
PremiumDiffusion Cover
AluminumChannel
SLIM x x
SQUARE x x
45 DEG x x
DUO* x
Tape LightConnector
CLICKTIGHT® x x
CLICKTIGHT® PRO x x
Tape Light
AVENUE 24™ x x
BLAZE™ x x
DAZZLE® RGB x x
DAZZLE® RGBW** x
DAZZLE® RGBW 4D x x
DOUBLE BLAZE™ x x
FLUID VIEW® x x
K-RANGE® x x
ULTRA BLAZE™ x x
VALENT®** x
VALENT® HD x x
SAFETY & WARNINGS
TOOLS FOR INSTALL
INSTALLATION
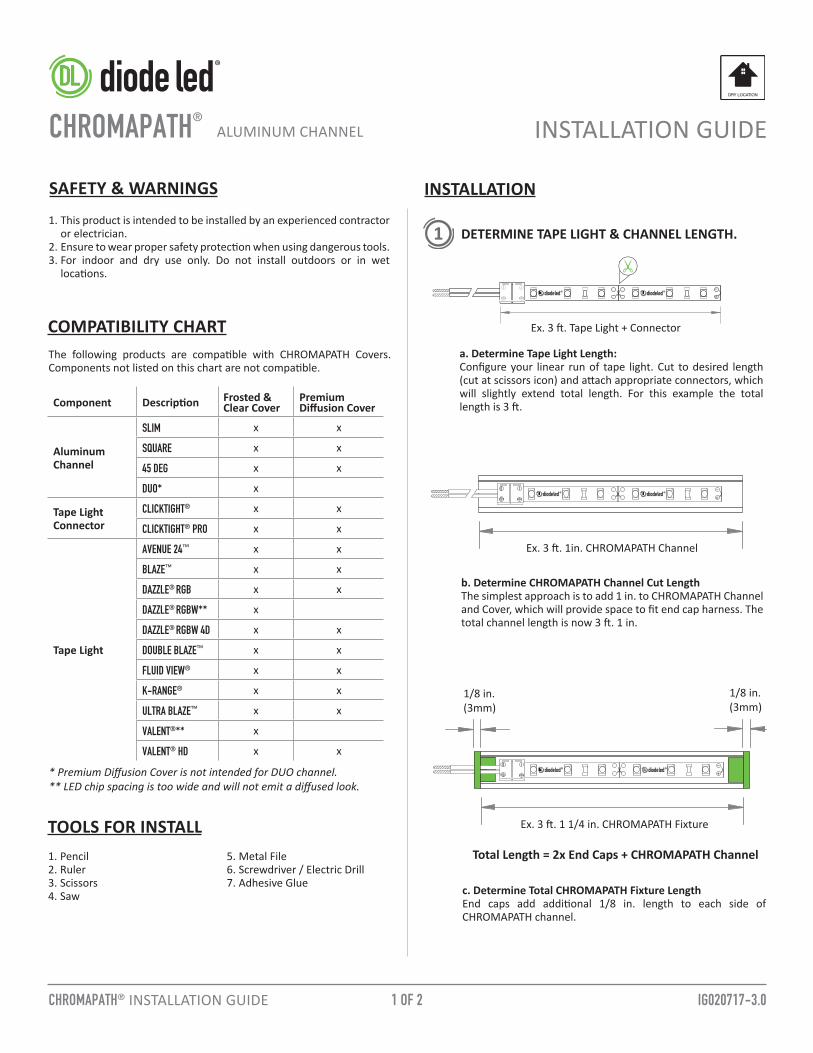
1 DETERMINE TAPE LIGHT & CHANNEL LENGTH.
®
+−
®+−
1/8 in. (3mm)
1/8 in. (3mm)
Ex. 3 ft. 1 1/4 in. CHROMAPATH Fixture
c. Determine Total CHROMAPATH Fixture LengthEnd caps add additional 1/8 in. length to each side of CHROMAPATH channel.
Total Length = 2x End Caps + CHROMAPATH Channel
1. This product is intended to be installed by an experienced contractor or electrician.
2. Ensure to wear proper safety protection when using dangerous tools.3. For indoor and dry use only. Do not install outdoors or in wet
locations.
1. Pencil2. Ruler3. Scissors4. Saw
5. Metal File6. Screwdriver / Electric Drill7. Adhesive Glue
* Premium Diffusion Cover is not intended for DUO channel.** LED chip spacing is too wide and will not emit a diffused look.
COMPATIBILITY CHARTThe following products are compatible with CHROMAPATH Covers. Components not listed on this chart are not compatible.
®+−
®+−
Ex. 3 ft. Tape Light + Connector
a. Determine Tape Light Length: Configure your linear run of tape light. Cut to desired length (cut at scissors icon) and attach appropriate connectors, which will slightly extend total length. For this example the total length is 3 ft.
®+−
®+−
b. Determine CHROMAPATH Channel Cut LengthThe simplest approach is to add 1 in. to CHROMAPATH Channel and Cover, which will provide space to fit end cap harness. The total channel length is now 3 ft. 1 in.
Ex. 3 ft. 1in. CHROMAPATH Channel

2 OF 2
® Toll Free: 877.817.6028 | Fax: 415.592.1596 | www.DiodeLED.com | [email protected]© 2017 Elemental LED, Inc. All rights reserved. Specifications are subject to change without notice.
IG020717-3.0CHROMAPATH® INSTALLATION GUIDE
INSTALLATION CONT. 5
ASSEMBLE CHROMAPATH FIXTURE.6
ADHERE TAPE LIGHT TO CHANNEL.4
DRAW GUIDE LINE & FASTEN MOUNTING CLIPS.
TEST CONNECTION.Prior to assembling fixture, connect tape light to Class 2 LED driver and turn on power. Ensure connection is secure and system is working properly. Turn off power again before mounting. See tape light installation guide for information on powering fixture.
®+−
Peel off 3M™ adhesive backing.
Adhere tape light to inside of channel, working one end to the other.
3
b. Mark holes. Use min one clip for every foot of channel. Fasten with applicable screws w/ screwdriver or drill.
MOUNTING VERTICALLY?See the CHROMAPATH Vertical Mounting Bracket Installation Guide at www.DiodeLED.com.
CUT CHANNEL & COVER.2ALUMINUM CHANNELSChannels can be cut to size with a bandsaw, rotary saw or handsaw fitted with an appropriate blade to cut metal objects. Once cut, finish edges with metal filer.
CHANNEL COVERSCovers can be cut to size with heavy duty scissors or saw.
NO TOOLS AVAILABLE?Contact Diode LED to learn about our custom fabrication services. Channels and Tape Light can be cut and fully assembled allowing for a quicker installation.
a. Fasten cover by firmly pressing one edge into channel, then the other (applies to Frosted, Clear & Premium Diffusion Covers).
b. Continue pressing in lens along channel until fully seated.
a. Draw guiding line with a ruler and pencil.
c. Attach end caps and adhere with adhesive glue if desired (Premium Diffusion example pictured above).
MOUNT CHROMAPATH FIXTURE.7
b. Firmly press channel into mounting clip.
c. Use flathead screwdriver to remove. Wrap tip with masking tape to prevent scratching channel surface.
Note: Mount SLIM Channels with 3M™ Mounting Tape.
a. Use End-to-end Interconnectors to seamlessly align multiple channels together. Does not fit DUO or SLIM.
Note: Mount SLIM Channels with SLIM clips or 3M™ Mounting Tape.