indesign scripting guide
TRANSCRIPT

Ado
be® In
Des
ign® CS
2
Scripting Guide

Adobe InDesign CS2 Scripting Guide
© 2005 Adobe Systems Incorporated. All rights reserved.
NOTICE: All information contained herein is the property of Adobe Systems Incorporated. No part of this publication (whether in hardcopy or electronic form) may be reproduced or transmitted, in any form or by any means, electronic, mechanical, photocopying, recording, or otherwise, without the prior written consent of Adobe Systems Incorporated. The software described in this document is furnished under license and may only be used or copied in accordance with the terms of such license.
This publication and the information herein is furnished AS IS, is subject to change without notice, and should not be construed as a commitment by Adobe Systems Incorporated. Adobe Systems Incorporated assumes no responsibility or liability for any errors or inaccuracies, makes no warranty of any kind (express, implied, or statutory) with respect to this publication, and expressly disclaims any and all warranties of merchantability, fitness for particular purposes, and noninfringement of third party rights.
Any references to company names in sample templates are for demonstration purposes only and are not intended to refer to any actual organization.
Adobe, the Adobe logo, Acrobat, Adobe PDF, Adobe Creative Suite, Illustrator, InDesign, InCopy, GoLive, and Photoshop are either registered trademarks or trademarks of Adobe Systems Incorporated in the United States and/or other countries.
Apple, Mac, Macintosh, and Mac OS are either registered trademarks or trademarks of Apple Computer, Inc., registered in the United States and other countries. Microsoft and Windows are either registered trademarks or trademarks of Microsoft Corporation in the United States and other countries. UNIX is a trademark in the United States and other countries, licensed exclusively through X/Open Company, Ltd.
All other trademarks are the property of their respective owners.
If this guide is distributed with software that includes an end user agreement, this guide, as well as the software described in it, is furnished under license and may be used or copied only in accordance with the terms of such license. Except as permitted by any such license, no part of this guide may be reproduced, stored in a retrieval system, or transmitted, in any form or by any means, electronic, mechanical, recording, or otherwise, without the prior written permission of Adobe Systems Incorporated. Please note that the content in this guide is protected under copyright law even if it is not distributed with software that includes an end user license agreement.
The content of this guide is furnished for informational use only, is subject to change without notice, and should not be construed as a commitment by Adobe Systems Incorporated. Adobe Systems Incorporated assumes no responsibility or liability for any errors or inaccuracies that may appear in the informational content contained in this guide.
Adobe Systems Incorporated, 345 Park Avenue, San Jose, California 95110, USA.
Adobe InDesign CS2 Scripting Guide Contents i
Contents
1 Introduction ................................................................. 1What is in this book ...................................................................................................... 1
Who should read this book ........................................................................................ 1
What you need to use scripting ............................................................................... 1JavaScript ..................................................................................................................................... 2Macintosh .................................................................................................................................... 2Windows ...................................................................................................................................... 2
How to use the scripts in this document .............................................................. 2Copying examples with long lines ..................................................................................... 3Running JavaScript files ......................................................................................................... 3
Where to find more information .............................................................................. 3InDesign online scripting resources .................................................................................. 4
2 Scripting Basics ........................................................... 5Introduction to scripting ............................................................................................ 5
What is scripting? ...................................................................................................................... 5Why use scripting? ................................................................................................................... 6What about macros? ................................................................................................................ 6
Making script files readable ....................................................................................... 7Commenting the script .......................................................................................................... 7Continuing long lines in AppleScript and VBScript ..................................................... 7Continuing long lines in JavaScript .................................................................................... 7
Objects and classes ...................................................................................................... 8Objects ......................................................................................................................................... 8Object references ..................................................................................................................... 8
Values and variables ..................................................................................................... 9Values ............................................................................................................................................ 9Variables .....................................................................................................................................10Variable names ........................................................................................................................ 11Assigning values to variables ............................................................................................. 11Array variables .........................................................................................................................12Converting values from one type to another ..............................................................12Finding the value type of a variable ................................................................................13
Operators ....................................................................................................................... 14
Methods ......................................................................................................................... 14
ii Contents Adobe InDesign CS2 Scripting Guide
Control structures ....................................................................................................... 15Conditional statements ........................................................................................................15Loops ...........................................................................................................................................16
Subroutines and handlers ........................................................................................ 17
3 Getting Started with InDesign Scripting ............... 19Measurements and positioning ............................................................................. 19
Coordinates ...............................................................................................................................19Measurement units ................................................................................................................20
The InDesign document object model ............................................................... 21Looking at the InDesign object model ...........................................................................21
Your first InDesign script ........................................................................................... 22
Adding features to “Hello World” .......................................................................... 25
Adding a user interface to "Hello World" ............................................................ 29Dialog box overview .............................................................................................................29
Adding the user interface ........................................................................................ 30Creating a more complex user interface ........................................................................33
Handling errors ............................................................................................................ 39
Using palettes to manage scripts ..........................................................................40Using the Scripts palette ......................................................................................................40Using the Script Label palette ............................................................................................41
Testing and troubleshooting ................................................................................... 42AppleScript debugging ........................................................................................................42VBScript debugging ..............................................................................................................42JavaScript debugging ...........................................................................................................42
4 Using ExtendScript Tools and Features ................. 43The ExtendScript Toolkit ...........................................................................................44
Configuring the Toolkit window .......................................................................................44Selecting a debugging target ...........................................................................................45Selecting scripts .....................................................................................................................46Tracking data ............................................................................................................................47The JavaScript console ........................................................................................................48The call stack ...........................................................................................................................48The Script Editor ......................................................................................................................49Debugging in the Toolkit .....................................................................................................50Profiling ......................................................................................................................................54
Dollar ($) Object .......................................................................................................... 55Dollar ($) object properties .................................................................................................55Dollar ($) object functions ...................................................................................................56
ExtendScript Reflection Interface .......................................................................... 58Reflection Object ...................................................................................................................58ReflectionInfo Object ...........................................................................................................59
Localizing ExtendScript Strings ..............................................................................60Variable values in localized strings ..................................................................................61Enabling automatic localization .......................................................................................61Locale names ...........................................................................................................................62Testing localization ................................................................................................................62Global localize function .......................................................................................................63
Adobe InDesign CS2 Scripting Guide Contents iii
User notification helper functions ......................................................................... 63Global alert function .............................................................................................................64Global confirm function .......................................................................................................64Global prompt function .......................................................................................................65
Specifying measurement values ...........................................................................66UnitValue object .....................................................................................................................66Converting pixel and percentage values .......................................................................67Computing with unit values ...............................................................................................68
Modular programming support ............................................................................ 69Preprocessor directives ........................................................................................................69Importing and exporting between scripts ...................................................................71
Operator overloading ............................................................................................... 72
Application and namespace specifiers ................................................................ 73Application specifiers ............................................................................................................73Namespace specifiers ...........................................................................................................74
Script locations and checking application installation ................................... 74
5 Working with Documents in AppleScript ............. 75Basic document management ............................................................................... 76
Creating a new document ...................................................................................................76Opening a document ............................................................................................................76Closing a document ...............................................................................................................77Saving a document ................................................................................................................77
Basic page layout ........................................................................................................ 78Defining page size and document length .....................................................................78Defining bleed and slug areas ...........................................................................................79Setting page margins and columns .................................................................................80
Changing the pasteboard's appearance ............................................................. 82
Using guides and grids .............................................................................................. 82Defining guides .......................................................................................................................82Setting grid preferences ......................................................................................................84Snapping to guides and grids ............................................................................................84
Changing measurement units and ruler ............................................................. 85
Defining and applying document presets ......................................................... 85Creating a preset by copying values ...............................................................................85Creating a preset using new values .................................................................................86Using a preset ..........................................................................................................................87
Setting up master spreads ....................................................................................... 87
Setting text-formatting defaults ............................................................................ 89Setting application text defaults ......................................................................................89Setting the active document's defaults .........................................................................91Using text defaults .................................................................................................................91
Adding XMP metadata .............................................................................................. 91
Creating a document template .............................................................................. 92
Printing a document ..................................................................................................96Printing using page ranges .................................................................................................96Setting print preferences .....................................................................................................96Using printer presets .............................................................................................................99Creating printer presets from printing preferences ...................................................99

iv Contents Adobe InDesign CS2 Scripting Guide
Exporting a document as PDF ..............................................................................104Using current PDF export options ................................................................................. 104Setting PDF export options ............................................................................................. 104Exporting a range of pages ............................................................................................. 106Exporting pages separately ............................................................................................. 106
Exporting pages as EPS ...........................................................................................107Exporting all pages ............................................................................................................. 108Exporting a range of pages ............................................................................................. 108Exporting with file naming .............................................................................................. 108
6 Working with Documents in JavaScript ...............111Basic document management ............................................................................. 112
Creating a new document .................................................................................................112Opening a document ..........................................................................................................112Closing a document .............................................................................................................112Saving a document ..............................................................................................................113
Basic page layout ...................................................................................................... 114Defining page size and document length ...................................................................114Defining bleed and slug areas .........................................................................................114Setting page margins and columns ...............................................................................115
Changing the pasteboard's appearance ........................................................... 117
Using guides and grids ............................................................................................ 117Defining guides ..................................................................................................................... 117Setting grid preferences ....................................................................................................119Snapping to guides and grids ..........................................................................................119
Changing measurement units and ruler ........................................................... 119
Defining and applying document presets .......................................................120Creating a preset by copying values .............................................................................120Creating a preset using new values ...............................................................................121Using a preset ........................................................................................................................122
Setting up master spreads .....................................................................................122
Setting text-formatting defaults ..........................................................................123Setting application text defaults ....................................................................................123Setting the active document's defaults .......................................................................126Using text defaults ...............................................................................................................126
Adding XMP metadata ............................................................................................126
Creating a document template ............................................................................ 127
Printing a document ................................................................................................130Printing using page ranges ...............................................................................................130Setting print preferences ...................................................................................................130Using printer presets ...........................................................................................................133Creating printer presets from printing preferences .................................................133
Exporting a document as PDF ..............................................................................138Using current PDF export options ..................................................................................138Setting PDF export options and exporting pages separately .............................139Exporting a range of pages ..............................................................................................141
Exporting pages as EPS ........................................................................................... 141Exporting all pages ..............................................................................................................141Exporting a range of pages ..............................................................................................141Controlling export options ...............................................................................................142
Adobe InDesign CS2 Scripting Guide Contents v
7 Working with Documents in VBScript .................143Basic document management .............................................................................144
Creating a new document ................................................................................................ 144Opening a document ......................................................................................................... 144Closing a document .............................................................................................................145Saving a document ..............................................................................................................145
Basic page layout ......................................................................................................146Defining page size and document length .................................................................. 146Defining bleed and slug areas ........................................................................................ 146Setting page margins and columns .............................................................................. 148
Changing the pasteboard's appearance ...........................................................149
Using guides and grids ............................................................................................150Defining guides .....................................................................................................................150Setting grid preferences ....................................................................................................152Snapping to guides and grids ..........................................................................................152
Changing measurement units and ruler ........................................................... 153
Defining and applying document presets .......................................................154Creating a preset by copying values ............................................................................ 154Creating a preset using new values ...............................................................................155Using a preset ........................................................................................................................155
Setting up master spreads ..................................................................................... 155
Setting text-formatting defaults .......................................................................... 157Setting application text defaults ....................................................................................157Setting the active document's defaults .......................................................................159Using text defaults .............................................................................................................. 160
Adding XMP metadata ............................................................................................160
Creating a document template ............................................................................160
Printing a document ................................................................................................165Printing using page ranges .............................................................................................. 165Setting print preferences .................................................................................................. 166Creating printer presets from printing preferences ................................................ 169
Exporting a document as PDF .............................................................................. 170Using current PDF export options ..................................................................................170Setting PDF export options ..............................................................................................171Exporting a range of pages ..............................................................................................172Exporting pages separately ..............................................................................................172
Exporting pages as EPS ........................................................................................... 173Exporting all pages ..............................................................................................................173Exporting a range of pages ..............................................................................................173Controlling other export options ...................................................................................174

vi Contents Adobe InDesign CS2 Scripting Guide
Adobe InDesign CS2 Scripting Guide Introduction 1
1 Introduction
If you’re reading this, you’ve discovered the most powerful feature in Adobe® InDesign® CS2. No other feature—no tool, palette, or dialog box that you see in the program’s user interface—can save you as much time, trouble, and money as scripting.
What is in this bookThis book contains the following:
Chapter 1, “Introduction”: Provides general information about this book, lists prerequisites for using InDesign, and provides tips for copying script examples from this book into a script editor.
Chapter 2, “Scripting Basics”: Gives a quick introduction to general scripting concepts, for those who have never done scripting or those who are not familiar with the scripting languages supported by InDesign.
Chapter 3, “Getting Started with InDesign Scripting”: Gives background information that is important for you to know when creating scripts for InDesign. Provides simple examples of common scripting operations.
Chapter 4, “Using ExtendScript Tools and Features for JavaScript”: Describes tools for JavaScript, including debugging, interapplication, and assorted others.
Chapter 5, “Working with Documents in AppleScript”: Provides AppleScript examples for many operations necessary to work with InDesign documents.
Chapter 6, “Working with Documents in JavaScript”: Provides JavaScript examples for many operations necessary to work with InDesign documents.
Chapter 7, “Working with Documents in VBScript”: Provides VBScript examples for many operations necessary to work with InDesign documents.
Who should read this bookThis book is for everyone from those who want to create simple scripts that can improve their own productivity, whether or not they have ever created a script before, to experts in scripting other applications who need a solid introduction to InDesign scripting.
What you need to use scriptingThe language that you use to write scripts depends on the scripting system of your platform: VBScript for Microsoft® Windows®, AppleScript for Mac OS® on the Apple® Macintosh®, or JavaScript for either platform.
2 Introduction Adobe InDesign CS2 Scripting Guide
Although the scripting systems differ, the ways that they work with InDesign are similar. Each example script in this manual is shown in all languages. Translating a script from one language to another is a fairly easy task.
JavaScript
InDesign supports JavaScript for cross-platform scripting in both Mac OS and Windows. InDesign’s JavaScript support is based on an Adobe implementation of JavaScript known as ExtendScript. The ExtendScript interpreter conforms to the current ECMA 262 standard for JavaScript. All language features of JavaScript 1.5 are supported, including try/catch/finally, equality operators, and the new instanceof and in operators. Adobe GoLive® and other Adobe products also use the ExtendScript JavaScript interpreter.
Macintosh
To use InDesign scripting on the Macintosh, you can use either JavaScript or AppleScript. To write AppleScripts, you must have AppleScript version 1.6 or higher and an AppleScript script editor. AppleScript comes with all Apple systems, or can be downloaded free from the Apple website. The Apple Script Editor is included with the Mac OS; third-party script editors, such as Script Debugger (from Late Night Software, http://www.latenightsw.com), are also available.
Windows
To use InDesign scripting in Windows, you can use either JavaScript or some version of Microsoft Visual Basic, such as VBScript. To create InDesign scripts using VBScript, you need only a text editor (such as Notepad).
Other versions of Visual Basic include Visual Basic 5 Control Creation Edition (CCE), Visual Basic 6, Visual Basic .NET, or an application that contains Visual Basic for Applications (VBA). Microsoft Office, Visio, AutoCAD, and other programs include VBA. Although InDesign supports VBA, it does not include VBA.
To use VBScript or VisualBasic for InDesign scripting in Windows, you must install InDesign from a user with Administrator privileges. After you’ve completed the installation, any user can run InDesign scripts, and any user with Power User or Adminstrator privileges can add scripts to the InDesign Scripts palette.
How to use the scripts in this documentTo use any script from this document:
1. Copy the script from this Adobe® PDF® document and paste it into your script editor, such as Notepad in Windows or TextEdit in Mac OS.
Important: Read the next section, “Copying Examples with Long Lines”.
2. Save the script as a plain text file in the Scripts folder inside the Presets folder in your InDesign folder (cre-ate the Scripts folder if it does not exist), using the appropriate file extension:
.as for AppleScript
.jsx for JavaScript
.vbs for VBScript
Note: You can also store the script file at another location and place an alias (Mac OS) or shortcut (Windows) to the file in the Scripts folder.
Adobe InDesign CS2 Scripting Guide Introduction 3
3. Display the Scripts palette by choosing Window > Automation > Scripts.
4. Run the script by double-clicking the script name in the Scripts palette.
Copying examples with long lines
Because of the layout of this document and the nature of the copy and paste process, some long lines of code might include unwanted line breaks when you paste them into your script editor. In some cases, these line breaks will cause the script to fail. To fix the script, you must remove the unnecessary line breaks.
Tip: In general, when you compile the script in AppleScript or full Visual Basic, your script editor tells you which lines you need to fix.
AppleScript example
When you paste the following line into a text editor, remove the line break following “properties”. If you don’t, the script generates an error. set myBaseNameField to make text editbox with properties {edit contents:myDocumentName, min width:160}
JavaScript example
When you paste the following line into a text editor, remove the line breaks following the commas—the line should end with the semicolon (“;”). In this example it works correctly with or without line breaks; however, the ExtendScript interpreter can interpret a line break as the end of a statement in some cases.guides.add(myDocument.layers.item("GuideLayer"), {orientation:HorizontalOrVertical.horizontal, location:marginPreferences.top, fitToPage:false});
VBScript example
When you paste the following line into a text editor, remove the line breaks preceding the equal sign (=). If you don't, the script generates an error.myInDesign.ActiveDocument.MasterSpreads.Item("B-Master").Pages.Item(1).AppliedMaster = myInDesign.ActiveDocument.MasterSpreads.Item("A-Master")
Running JavaScript files
Give InDesign JavaScript files the extension .jsx. You can run these files either from the ExtendScript Toolkit or from the Scripts palette, which guarantees that they are interpreted by the ExtendScript interpreter. You can also double-click them from your operating system to start the ExtendScript Toolkit and run the script.
Where to find more informationThe Adobe InDesign CS2 Scripting Reference provides details about the objects, properties, and methods available for scripting in InDesign.
We cannot fully document AppleScript, VBScript, or JavaScript, so you’ll probably also need documentation for any or all of those scripting languages.

4 Introduction Adobe InDesign CS2 Scripting Guide
InDesign online scripting resources
For more information on InDesign scripting, visit:
http://partners.adobe.com/public/developer/scripting/index.html
http://www.adobeforums.com, the InDesign Scripting User-to-User forum. In the forum, scripters can ask questions, post answers, and share their newest scripts. The forum contains hundreds of example scripts.
http://www.adobe.com/products/indesign/scripting.html
Adobe InDesign CS2 Scripting Guide Scripting Basics 5
2 Scripting Basics
If you’ve used InDesign, you’ve worked with frames and their contents, and you’ve learned to apply colors, formatting, and styles. You’ve set up publications, spreads, pages, and the design elements on those pages. If you’ve done all of this, you’ve gotten used to thinking of an InDesign publication as a collection of objects.
InDesign scripting uses the same approach. The core of InDesign scripting is the object model: a description of all the types of items—documents, spreads, pages, frames, and the contents of those frames—that can appear in an InDesign publication. Each type of object has its own special properties, and every object in an InDesign publication has its own identity.
Not every InDesign user will be familiar with programming terms, concepts, and techniques, so this chapter provides introductory information to help get you started with scripting. It covers the basic concepts of scripting, or programming, for both Windows and the Macintosh. For more detailed directions on using your scripting system with InDesign, see Chapter 3, “Getting Started with InDesign Scripting.” Experienced scripters might want to skip directly to that chapter.
Introduction to scriptingScripting isn’t only for software engineers—it’s for every InDesign user. You don’t need a degree in computer science or mathematics to write scripts that can automate a wide variety of common page-layout tasks in InDesign. If you can read this text, you can write InDesign scripts.
What is scripting?
A script is a series of commands that tells InDesign to perform a series of actions. These actions can be simple and affect only a single, selected object in the current publication; or complex and affect all of the objects in all of the InDesign publications on your hard drive. The actions might involve only InDesign, or they might involve other applications, such as word processors, spreadsheets, and database management programs. Virtually every task that you can perform by manipulating InDesign’s tools, menus, palettes, and dialog boxes can be performed by a script.
Scripting is a way to automate repetitive tasks, but it can also be a creative tool. In addition to performing routine production tasks, such as preparing a set of publications for remote printing, you can use scripts for creative tasks that would be too difficult or too time consuming to do yourself. For example, you could write a script to randomly change the font and color of the characters in a selection, or to gradually increase the size and baseline shift of characters from one end of a range of text to the other. Without scripting, you might not use these creative effects.
6 Scripting Basics Adobe InDesign CS2 Scripting Guide
On the Macintosh, scripting is often accomplished using AppleScript, a scripting system that sends messages to applications or to the operating system using AppleEvents. In Windows, VBScript programs use a similar system for interapplication communication, usually referred to as Windows Automation. JavaScripts, by contrast, run on either platform. The terminology differs among the scripting languages, but the idea is the same—to send information from one program (the scripting system) to another program (InDesign) to make the receiving application perform some task.
Not all applications can be controlled by scripts. For scripting to work, an application has to receive messages from another application, and has to be able to turn those messages into actions. In addition, the messages you send to an application have to be constructed in a particular way, or the application can’t understand what you want it to do.
This book is a kind of “language lesson”—it shows you how to talk to InDesign.
Why use scripting?
Graphic design is a field characterized by creativity, but most of the actual work of page layout is not creative. When you think about the work that you do, chances are good that you’ll find that you spend most of your time doing the same or similar production tasks, over and over again. In fact, you’ll probably notice that the time you spend placing and replacing images, correcting errors in text, and preparing files for printing at an image-setting service provider often reduces the time that you have available for doing creative work.
Wouldn’t it be wonderful to have an assistant—one who would do some or all of the boring, repetitive tasks for you? Then you’d have more time to concentrate on the creative aspects of your work.
With a small investment of time, InDesign scripting can be your page-layout assistant. You can start with short, simple scripts that save you a few seconds every day, and move on to scripts that work all night while you’re sleeping.
Think about your work—is there a repetitive task that’s annoying you? If so, you’ve identified a candidate for a script. Think analytically about the task. What are the steps involved in performing the task? What are the conditions in which you need to do the task? After you understand the process that you go through, you can turn it into a script.
What about macros?
A macro is a recording of a series of user-interface actions—menu choices, key presses, and mouse movements. When you run a macro, the macro performs all the recorded actions. You create macros using special utility programs. QuicKeys, from CE Software, is an example of a macro-creating program.
Many people are confused about the difference between a macro and a script. Macros and scripts are both ways of automating repetitive tasks, but they work very differently. The following points summarize the key differences.
Macros use a program’s user interface to do their work. As a macro runs, it displays and closes dialog boxes, pulls down menus, makes menu choices, and types text into documents or fields. Scripts do not use a program’s user interface to perform their tasks, and they execute much faster than the fastest macro.
Macros have very limited facilities for getting and responding to information from a program. Scripts can get information and then make decisions and calculations based on the information that they receive.
Note: In Microsoft Word, Excel, and some other Microsoft Office applications, macros are recordings of user actions written as scripts, which can be edited to add scripting features. These macros are not the type of macro we’re describing in the preceding text, and InDesign does not have the ability to record user actions as a script.
Adobe InDesign CS2 Scripting Guide Scripting Basics 7
Making script files readableComments within scripts and formatting of scripts make them easier to understand and to maintain.
Commenting the script
Comments let you add descriptive text to a script. The scripting system ignores comments as the script executes; this prevents comments from producing errors when you run your script. Comments are useful when you want to document the operation of a script (for yourself or for someone else).
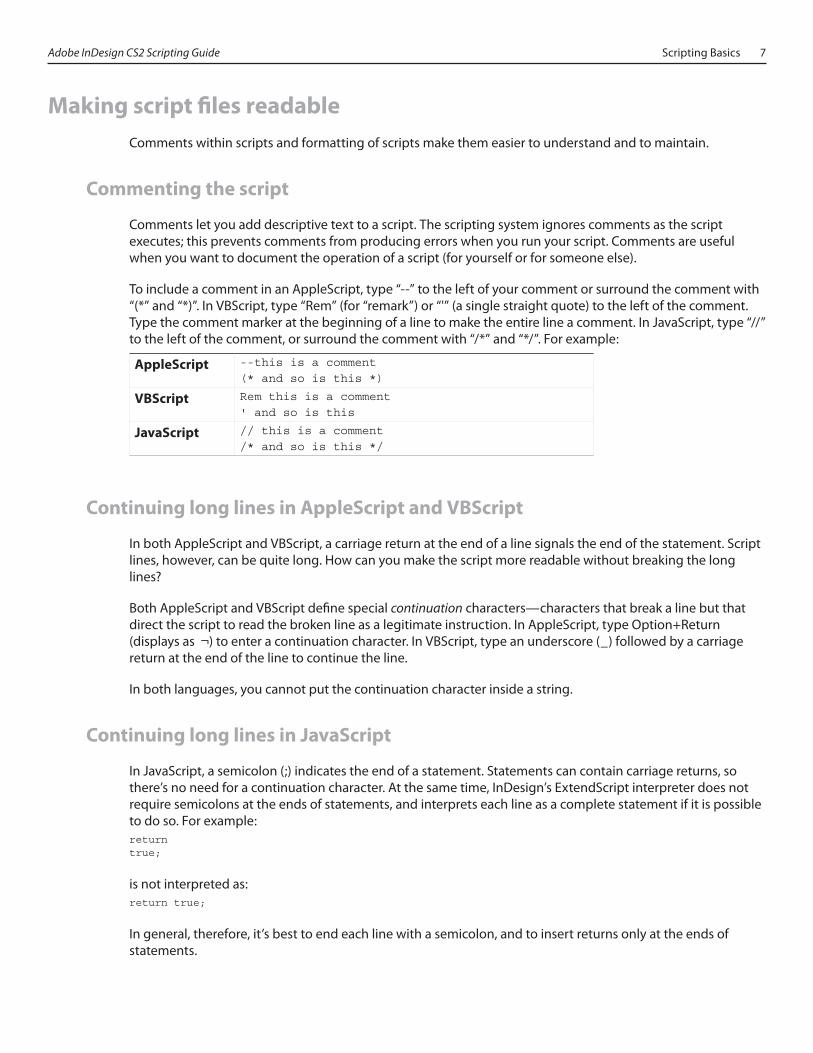
To include a comment in an AppleScript, type “--” to the left of your comment or surround the comment with “(*” and “*)”. In VBScript, type “Rem” (for “remark”) or “'” (a single straight quote) to the left of the comment. Type the comment marker at the beginning of a line to make the entire line a comment. In JavaScript, type “//” to the left of the comment, or surround the comment with “/*” and “*/”. For example:
AppleScript --this is a comment(* and so is this *)
VBScript Rem this is a comment' and so is this
JavaScript // this is a comment/* and so is this */
Continuing long lines in AppleScript and VBScript
In both AppleScript and VBScript, a carriage return at the end of a line signals the end of the statement. Script lines, however, can be quite long. How can you make the script more readable without breaking the long lines?
Both AppleScript and VBScript define special continuation characters—characters that break a line but that direct the script to read the broken line as a legitimate instruction. In AppleScript, type Option+Return (displays as ¬) to enter a continuation character. In VBScript, type an underscore (_) followed by a carriage return at the end of the line to continue the line.
In both languages, you cannot put the continuation character inside a string.
Continuing long lines in JavaScript
In JavaScript, a semicolon (;) indicates the end of a statement. Statements can contain carriage returns, so there’s no need for a continuation character. At the same time, InDesign’s ExtendScript interpreter does not require semicolons at the ends of statements, and interprets each line as a complete statement if it is possible to do so. For example:returntrue;
is not interpreted as:return true;
In general, therefore, it’s best to end each line with a semicolon, and to insert returns only at the ends of statements.
8 Scripting Basics Adobe InDesign CS2 Scripting Guide
Objects and classesThe terminology of object-oriented programming can be hard to understand, at first. This section defines commonly used terms and provides examples.
Objects
Objects belong to classes, and have properties that you manipulate using methods (Windows) or commands (Macintosh). What do these words mean in this context?
Here’s a way to think about objects and object properties. Imagine that you live in a technologically advanced (or magic) house that responds to your commands. The house is one object. The properties of your house object might include the number of rooms, the color of the exterior paint, and the date of its construction.
Imagine that the house can change some of its properties—if given the correct command. You might say, “House, paint yourself blue.” Because your house can respond to the method “paint,” you’ll soon have a house of a different color.
Next, your house contains many smaller objects. Each room, for example, might be an object, with each window, door, or appliance being other objects inside the room. You can talk to these objects directly, or you can talk to them through the house. You have to be very specific, though—you can’t tell your house to open a window without telling it which window to open. You can also give commands to the objects inside the rooms. “Tell the kitchen to open the north window,” you might say.
Each object in the house can respond to various methods according to its capabilities. Windows and doors, for example, can open or close—but the floor and ceiling cannot.
Some properties of objects can be changed; some cannot. The location of a piece of furniture can be changed; the construction date of the house cannot. Properties that can be changed are read/write; properties that cannot be changed are read only.
To apply this metaphor to InDesign—the application is the house, the spreads and pages are the rooms, and the frames on your pages are the windows and doors. You can tell InDesign pages to add frames, and you can tell frames to change their properties or content. You can then tell the frames to change color, import a graphic, or populate themselves with text.
Objects in your publication are arranged in a hierarchy—frames are on pages, which are inside a document, which is inside InDesign. When we speak of an object model, or a hierarchy, we’re talking about this structure.
Object references
When you send a command to an InDesign object, you must send the message to the correct object—the correct address. To do this, you identify objects by their position in the hierarchy. When you identify an object in this fashion, you’re creating an object reference. The different languages use different ways to create object references, but the idea is the same—to give the script directions for finding the object that you want to work with.
The following examples show how to refer to the first text frame of the first spread of the active document (note that these are not complete scripts).
Adobe InDesign CS2 Scripting Guide Scripting Basics 9
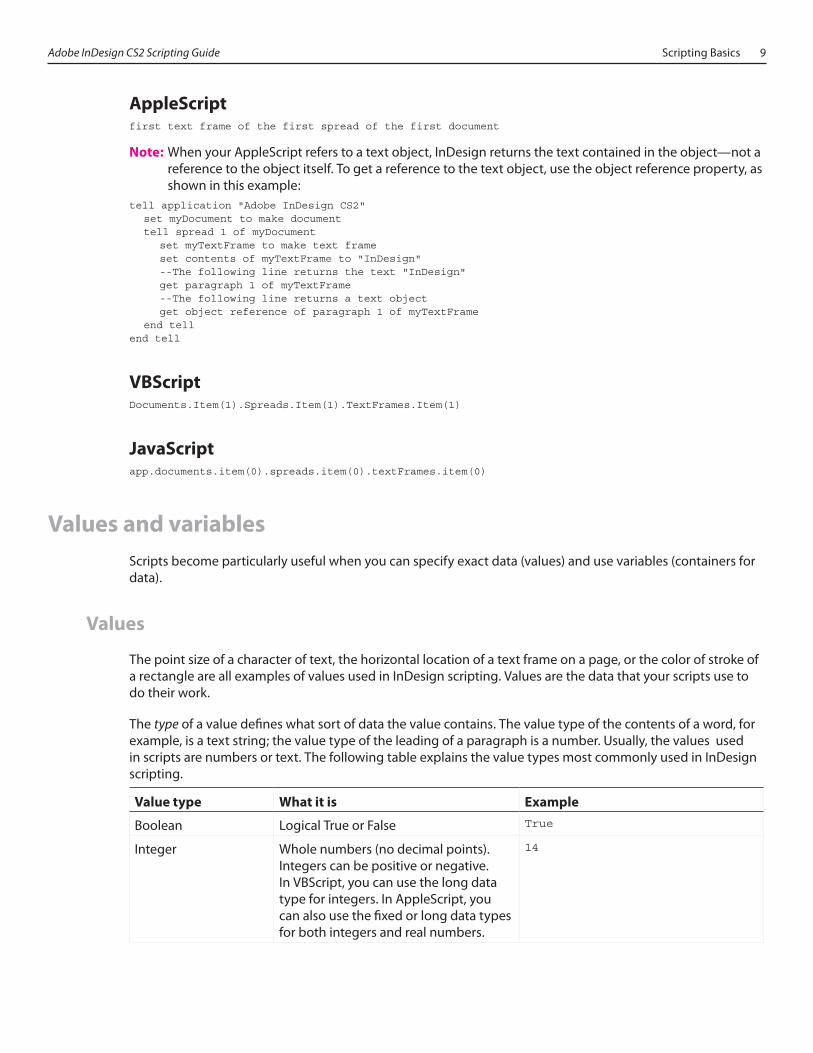
AppleScriptfirst text frame of the first spread of the first document
Note: When your AppleScript refers to a text object, InDesign returns the text contained in the object—not a reference to the object itself. To get a reference to the text object, use the object reference property, as shown in this example:
tell application "Adobe InDesign CS2" set myDocument to make document tell spread 1 of myDocument set myTextFrame to make text frame set contents of myTextFrame to "InDesign" --The following line returns the text "InDesign" get paragraph 1 of myTextFrame --The following line returns a text object get object reference of paragraph 1 of myTextFrame end tellend tell
VBScriptDocuments.Item(1).Spreads.Item(1).TextFrames.Item(1)
JavaScriptapp.documents.item(0).spreads.item(0).textFrames.item(0)
Values and variablesScripts become particularly useful when you can specify exact data (values) and use variables (containers for data).
Values
The point size of a character of text, the horizontal location of a text frame on a page, or the color of stroke of a rectangle are all examples of values used in InDesign scripting. Values are the data that your scripts use to do their work.
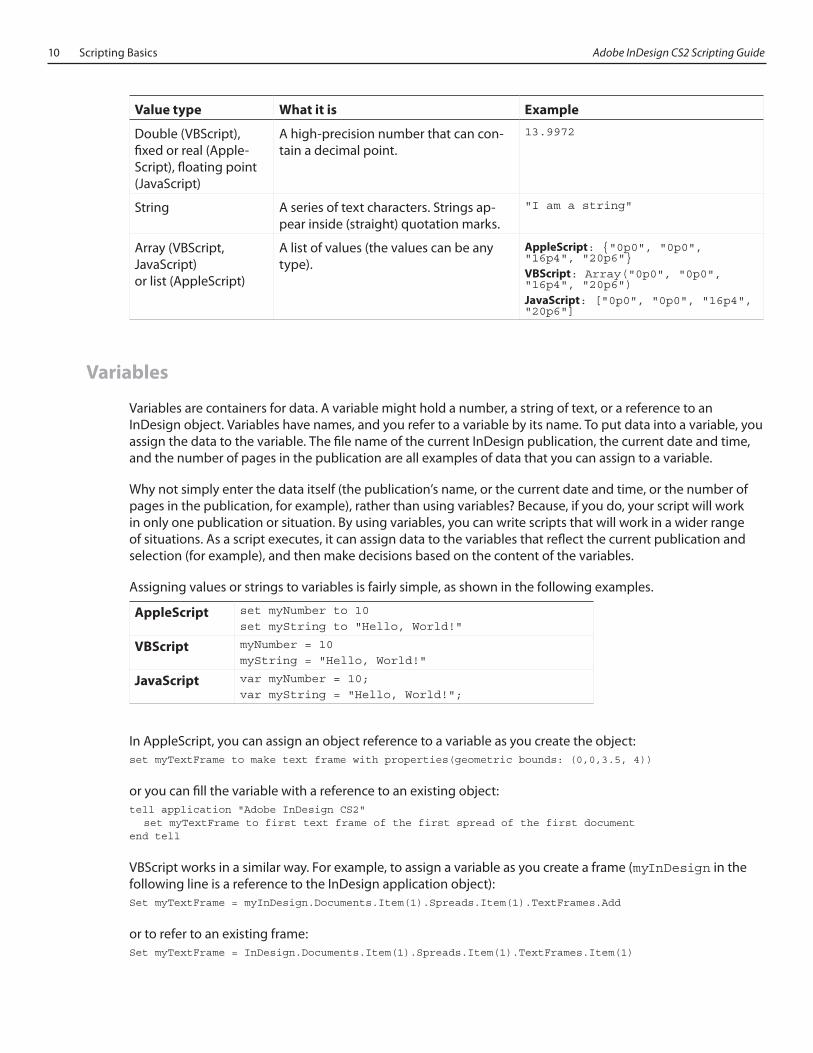
The type of a value defines what sort of data the value contains. The value type of the contents of a word, for example, is a text string; the value type of the leading of a paragraph is a number. Usually, the values used in scripts are numbers or text. The following table explains the value types most commonly used in InDesign scripting.
Value type What it is Example
Boolean Logical True or False True
Integer Whole numbers (no decimal points). Integers can be positive or negative. In VBScript, you can use the long data type for integers. In AppleScript, you can also use the fixed or long data types for both integers and real numbers.
14
10 Scripting Basics Adobe InDesign CS2 Scripting Guide
Value type What it is Example
Double (VBScript), fixed or real (Apple-Script), floating point (JavaScript)
A high-precision number that can con-tain a decimal point.
13.9972
String A series of text characters. Strings ap-pear inside (straight) quotation marks.
"I am a string"
Array (VBScript, JavaScript) or list (AppleScript)
A list of values (the values can be any type).
AppleScript: {"0p0", "0p0", "16p4", "20p6"}VBScript: Array("0p0", "0p0", "16p4", "20p6") JavaScript: ["0p0", "0p0", "16p4", "20p6"]
Variables
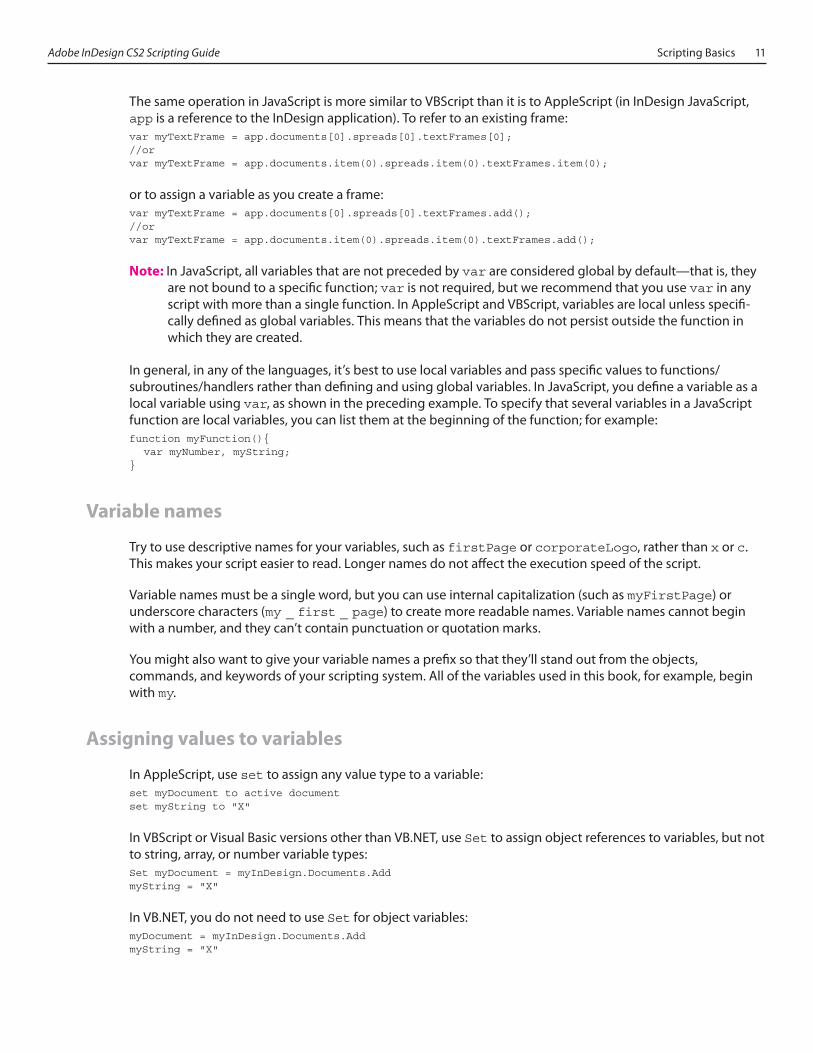
Variables are containers for data. A variable might hold a number, a string of text, or a reference to an InDesign object. Variables have names, and you refer to a variable by its name. To put data into a variable, you assign the data to the variable. The file name of the current InDesign publication, the current date and time, and the number of pages in the publication are all examples of data that you can assign to a variable.
Why not simply enter the data itself (the publication’s name, or the current date and time, or the number of pages in the publication, for example), rather than using variables? Because, if you do, your script will work in only one publication or situation. By using variables, you can write scripts that will work in a wider range of situations. As a script executes, it can assign data to the variables that reflect the current publication and selection (for example), and then make decisions based on the content of the variables.
Assigning values or strings to variables is fairly simple, as shown in the following examples.
AppleScript set myNumber to 10set myString to "Hello, World!"
VBScript myNumber = 10myString = "Hello, World!"
JavaScript var myNumber = 10;var myString = "Hello, World!";
In AppleScript, you can assign an object reference to a variable as you create the object:set myTextFrame to make text frame with properties(geometric bounds: (0,0,3.5, 4))
or you can fill the variable with a reference to an existing object:tell application "Adobe InDesign CS2" set myTextFrame to first text frame of the first spread of the first documentend tell
VBScript works in a similar way. For example, to assign a variable as you create a frame (myInDesign in the following line is a reference to the InDesign application object):Set myTextFrame = myInDesign.Documents.Item(1).Spreads.Item(1).TextFrames.Add
or to refer to an existing frame:Set myTextFrame = InDesign.Documents.Item(1).Spreads.Item(1).TextFrames.Item(1)
Adobe InDesign CS2 Scripting Guide Scripting Basics 11
The same operation in JavaScript is more similar to VBScript than it is to AppleScript (in InDesign JavaScript, app is a reference to the InDesign application). To refer to an existing frame:var myTextFrame = app.documents[0].spreads[0].textFrames[0];//orvar myTextFrame = app.documents.item(0).spreads.item(0).textFrames.item(0);
or to assign a variable as you create a frame:var myTextFrame = app.documents[0].spreads[0].textFrames.add();//orvar myTextFrame = app.documents.item(0).spreads.item(0).textFrames.add();
Note: In JavaScript, all variables that are not preceded by var are considered global by default—that is, they are not bound to a specific function; var is not required, but we recommend that you use var in any script with more than a single function. In AppleScript and VBScript, variables are local unless specifi-cally defined as global variables. This means that the variables do not persist outside the function in which they are created.
In general, in any of the languages, it’s best to use local variables and pass specific values to functions/subroutines/handlers rather than defining and using global variables. In JavaScript, you define a variable as a local variable using var, as shown in the preceding example. To specify that several variables in a JavaScript function are local variables, you can list them at the beginning of the function; for example:function myFunction(){ var myNumber, myString;}
Variable names
Try to use descriptive names for your variables, such as firstPage or corporateLogo, rather than x or c. This makes your script easier to read. Longer names do not affect the execution speed of the script.
Variable names must be a single word, but you can use internal capitalization (such as myFirstPage) or underscore characters (my _ first _ page) to create more readable names. Variable names cannot begin with a number, and they can’t contain punctuation or quotation marks.
You might also want to give your variable names a prefix so that they’ll stand out from the objects, commands, and keywords of your scripting system. All of the variables used in this book, for example, begin with my.
Assigning values to variables
In AppleScript, use set to assign any value type to a variable:set myDocument to active documentset myString to "X"
In VBScript or Visual Basic versions other than VB.NET, use Set to assign object references to variables, but not to string, array, or number variable types:Set myDocument = myInDesign.Documents.AddmyString = "X"
In VB.NET, you do not need to use Set for object variables:myDocument = myInDesign.Documents.AddmyString = "X"
12 Scripting Basics Adobe InDesign CS2 Scripting Guide
Like VB.NET, JavaScript does not require Set when you assign values to variables, regardless of the type of the variable:var myDocument = app.documents.add();var myString = "X";
Array variables
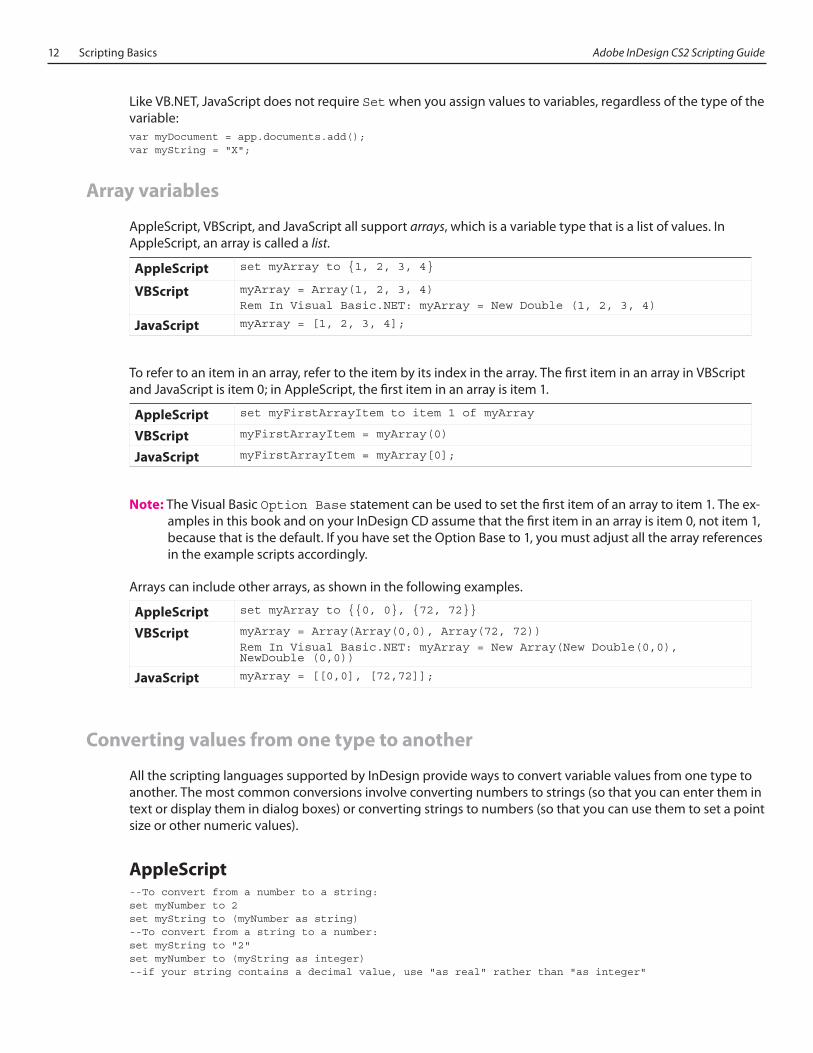
AppleScript, VBScript, and JavaScript all support arrays, which is a variable type that is a list of values. In AppleScript, an array is called a list.
AppleScript set myArray to {1, 2, 3, 4}
VBScript myArray = Array(1, 2, 3, 4)Rem In Visual Basic.NET: myArray = New Double (1, 2, 3, 4)
JavaScript myArray = [1, 2, 3, 4];
To refer to an item in an array, refer to the item by its index in the array. The first item in an array in VBScript and JavaScript is item 0; in AppleScript, the first item in an array is item 1.
AppleScript set myFirstArrayItem to item 1 of myArray
VBScript myFirstArrayItem = myArray(0)
JavaScript myFirstArrayItem = myArray[0];
Note: The Visual Basic Option Base statement can be used to set the first item of an array to item 1. The ex-amples in this book and on your InDesign CD assume that the first item in an array is item 0, not item 1, because that is the default. If you have set the Option Base to 1, you must adjust all the array references in the example scripts accordingly.
Arrays can include other arrays, as shown in the following examples.
AppleScript set myArray to {{0, 0}, {72, 72}}
VBScript myArray = Array(Array(0,0), Array(72, 72))Rem In Visual Basic.NET: myArray = New Array(New Double(0,0), NewDouble (0,0))
JavaScript myArray = [[0,0], [72,72]];
Converting values from one type to another
All the scripting languages supported by InDesign provide ways to convert variable values from one type to another. The most common conversions involve converting numbers to strings (so that you can enter them in text or display them in dialog boxes) or converting strings to numbers (so that you can use them to set a point size or other numeric values).
AppleScript--To convert from a number to a string:set myNumber to 2set myString to (myNumber as string)--To convert from a string to a number:set myString to "2"set myNumber to (myString as integer)--if your string contains a decimal value, use "as real" rather than "as integer"
Adobe InDesign CS2 Scripting Guide Scripting Basics 13
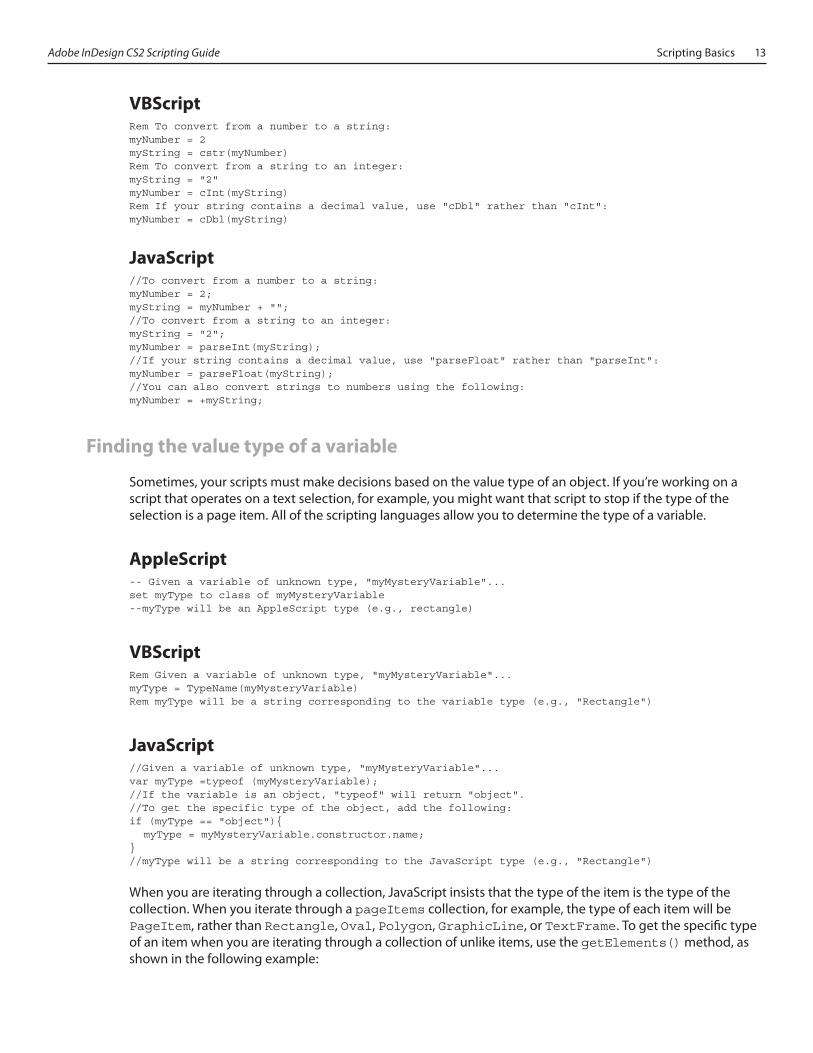
VBScriptRem To convert from a number to a string:myNumber = 2myString = cstr(myNumber)Rem To convert from a string to an integer:myString = "2"myNumber = cInt(myString)Rem If your string contains a decimal value, use "cDbl" rather than "cInt":myNumber = cDbl(myString)
JavaScript//To convert from a number to a string:myNumber = 2;myString = myNumber + "";//To convert from a string to an integer:myString = "2";myNumber = parseInt(myString);//If your string contains a decimal value, use "parseFloat" rather than "parseInt":myNumber = parseFloat(myString);//You can also convert strings to numbers using the following:myNumber = +myString;
Finding the value type of a variable
Sometimes, your scripts must make decisions based on the value type of an object. If you’re working on a script that operates on a text selection, for example, you might want that script to stop if the type of the selection is a page item. All of the scripting languages allow you to determine the type of a variable.
AppleScript-- Given a variable of unknown type, "myMysteryVariable"...set myType to class of myMysteryVariable--myType will be an AppleScript type (e.g., rectangle)
VBScriptRem Given a variable of unknown type, "myMysteryVariable"...myType = TypeName(myMysteryVariable)Rem myType will be a string corresponding to the variable type (e.g., "Rectangle")
JavaScript//Given a variable of unknown type, "myMysteryVariable"...var myType =typeof (myMysteryVariable);//If the variable is an object, "typeof" will return "object".//To get the specific type of the object, add the following:if (myType == "object"){ myType = myMysteryVariable.constructor.name;}//myType will be a string corresponding to the JavaScript type (e.g., "Rectangle")
When you are iterating through a collection, JavaScript insists that the type of the item is the type of the collection. When you iterate through a pageItems collection, for example, the type of each item will be PageItem, rather than Rectangle, Oval, Polygon, GraphicLine, or TextFrame. To get the specific type of an item when you are iterating through a collection of unlike items, use the getElements() method, as shown in the following example:
14 Scripting Basics Adobe InDesign CS2 Scripting Guide
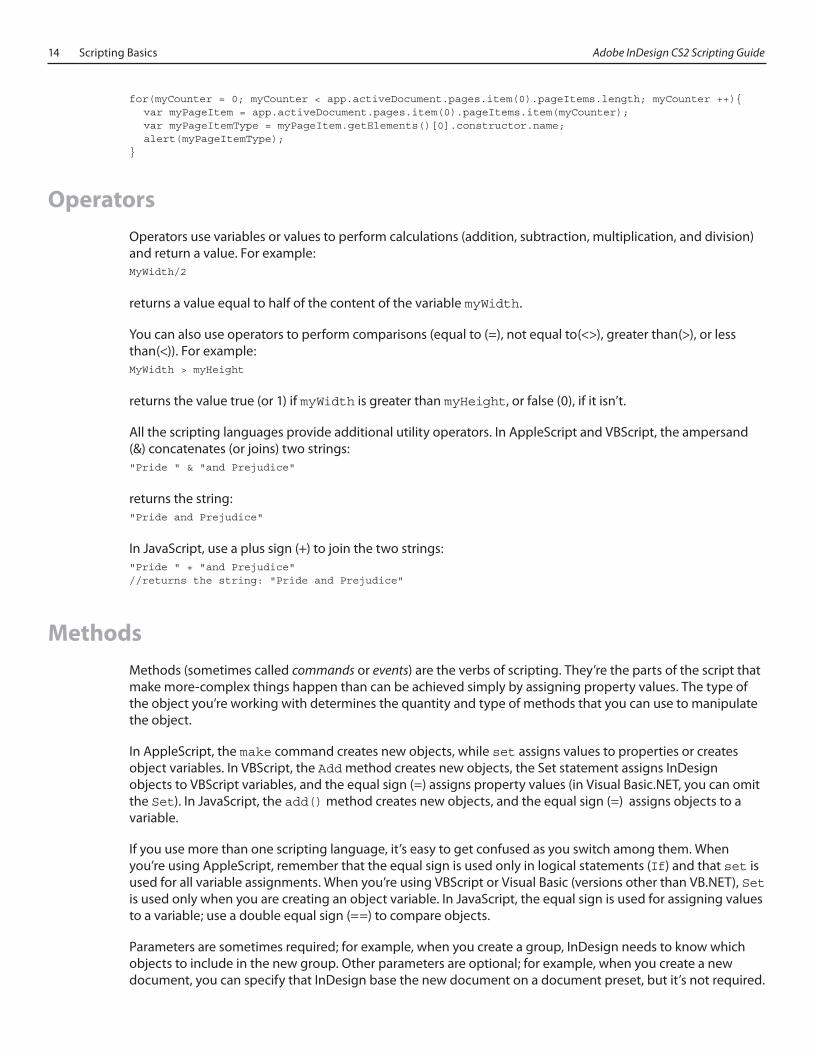
for(myCounter = 0; myCounter < app.activeDocument.pages.item(0).pageItems.length; myCounter ++){ var myPageItem = app.activeDocument.pages.item(0).pageItems.item(myCounter); var myPageItemType = myPageItem.getElements()[0].constructor.name; alert(myPageItemType);}
OperatorsOperators use variables or values to perform calculations (addition, subtraction, multiplication, and division) and return a value. For example:MyWidth/2
returns a value equal to half of the content of the variable myWidth.
You can also use operators to perform comparisons (equal to (=), not equal to(<>), greater than(>), or less than(<)). For example:MyWidth > myHeight
returns the value true (or 1) if myWidth is greater than myHeight, or false (0), if it isn’t.
All the scripting languages provide additional utility operators. In AppleScript and VBScript, the ampersand (&) concatenates (or joins) two strings:"Pride " & "and Prejudice"
returns the string:"Pride and Prejudice"
In JavaScript, use a plus sign (+) to join the two strings:"Pride " + "and Prejudice"//returns the string: "Pride and Prejudice"
MethodsMethods (sometimes called commands or events) are the verbs of scripting. They’re the parts of the script that make more-complex things happen than can be achieved simply by assigning property values. The type of the object you’re working with determines the quantity and type of methods that you can use to manipulate the object.
In AppleScript, the make command creates new objects, while set assigns values to properties or creates object variables. In VBScript, the Add method creates new objects, the Set statement assigns InDesign objects to VBScript variables, and the equal sign (=) assigns property values (in Visual Basic.NET, you can omit the Set). In JavaScript, the add() method creates new objects, and the equal sign (=) assigns objects to a variable.
If you use more than one scripting language, it’s easy to get confused as you switch among them. When you’re using AppleScript, remember that the equal sign is used only in logical statements (If) and that set is used for all variable assignments. When you’re using VBScript or Visual Basic (versions other than VB.NET), Set is used only when you are creating an object variable. In JavaScript, the equal sign is used for assigning values to a variable; use a double equal sign (==) to compare objects.
Parameters are sometimes required; for example, when you create a group, InDesign needs to know which objects to include in the new group. Other parameters are optional; for example, when you create a new document, you can specify that InDesign base the new document on a document preset, but it’s not required.
Adobe InDesign CS2 Scripting Guide Scripting Basics 15
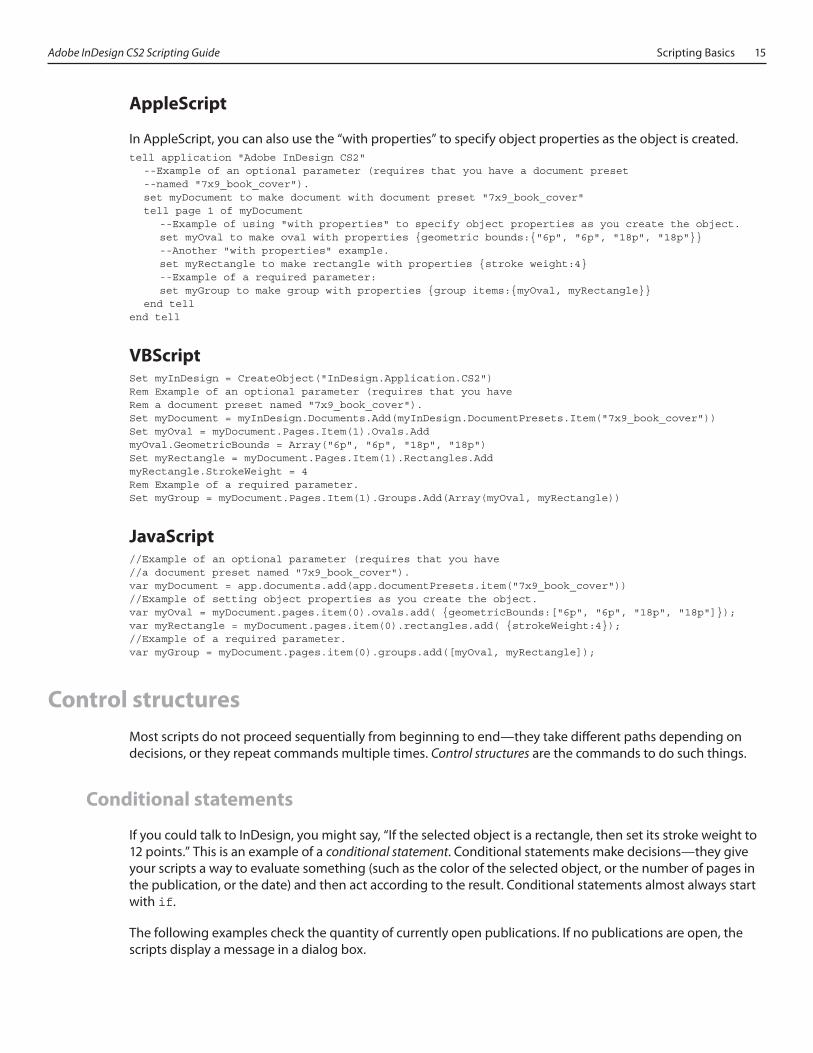
AppleScript
In AppleScript, you can also use the “with properties” to specify object properties as the object is created.tell application "Adobe InDesign CS2" --Example of an optional parameter (requires that you have a document preset --named "7x9_book_cover"). set myDocument to make document with document preset "7x9_book_cover" tell page 1 of myDocument --Example of using "with properties" to specify object properties as you create the object. set myOval to make oval with properties {geometric bounds:{"6p", "6p", "18p", "18p"}} --Another "with properties" example. set myRectangle to make rectangle with properties {stroke weight:4} --Example of a required parameter: set myGroup to make group with properties {group items:{myOval, myRectangle}} end tellend tell
VBScriptSet myInDesign = CreateObject("InDesign.Application.CS2")Rem Example of an optional parameter (requires that you have Rem a document preset named "7x9_book_cover").Set myDocument = myInDesign.Documents.Add(myInDesign.DocumentPresets.Item("7x9_book_cover"))Set myOval = myDocument.Pages.Item(1).Ovals.AddmyOval.GeometricBounds = Array("6p", "6p", "18p", "18p")Set myRectangle = myDocument.Pages.Item(1).Rectangles.AddmyRectangle.StrokeWeight = 4Rem Example of a required parameter.Set myGroup = myDocument.Pages.Item(1).Groups.Add(Array(myOval, myRectangle))
JavaScript//Example of an optional parameter (requires that you have //a document preset named "7x9_book_cover").var myDocument = app.documents.add(app.documentPresets.item("7x9_book_cover"))//Example of setting object properties as you create the object.var myOval = myDocument.pages.item(0).ovals.add( {geometricBounds:["6p", "6p", "18p", "18p"]});var myRectangle = myDocument.pages.item(0).rectangles.add( {strokeWeight:4});//Example of a required parameter.var myGroup = myDocument.pages.item(0).groups.add([myOval, myRectangle]);
Control structuresMost scripts do not proceed sequentially from beginning to end—they take different paths depending on decisions, or they repeat commands multiple times. Control structures are the commands to do such things.
Conditional statements
If you could talk to InDesign, you might say, “If the selected object is a rectangle, then set its stroke weight to 12 points.” This is an example of a conditional statement. Conditional statements make decisions—they give your scripts a way to evaluate something (such as the color of the selected object, or the number of pages in the publication, or the date) and then act according to the result. Conditional statements almost always start with if.
The following examples check the quantity of currently open publications. If no publications are open, the scripts display a message in a dialog box.
16 Scripting Basics Adobe InDesign CS2 Scripting Guide
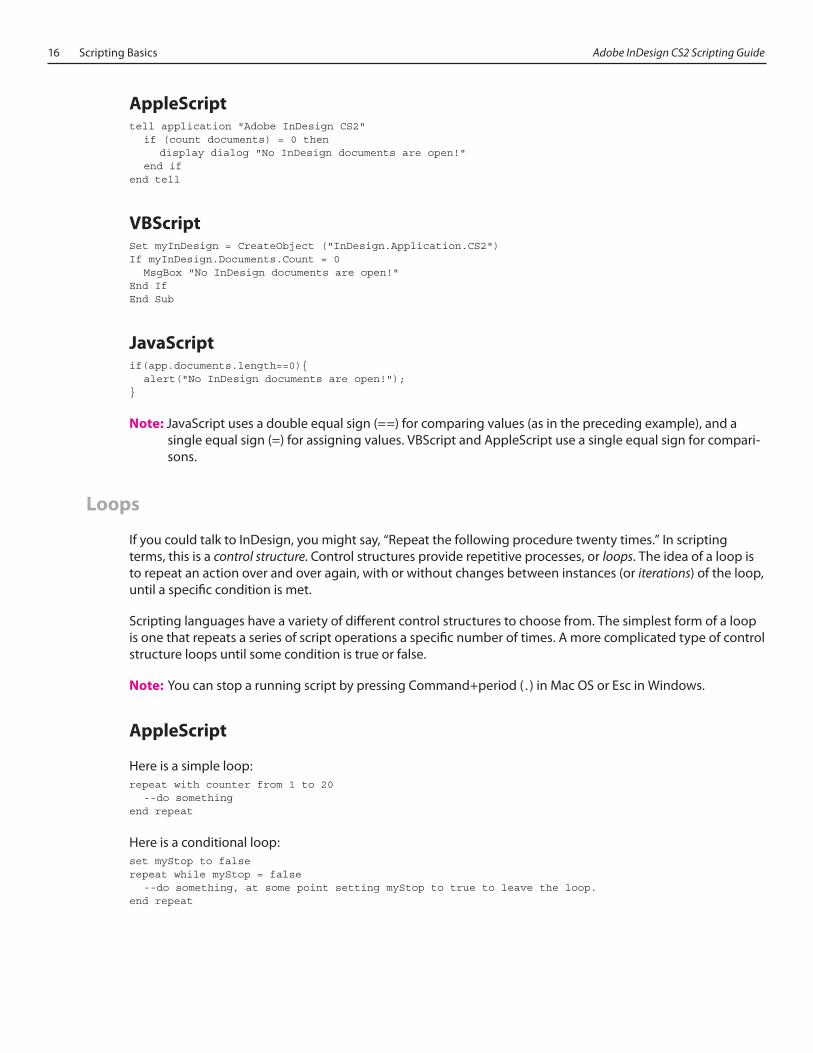
AppleScripttell application "Adobe InDesign CS2" if (count documents) = 0 then display dialog "No InDesign documents are open!" end ifend tell
VBScriptSet myInDesign = CreateObject ("InDesign.Application.CS2")If myInDesign.Documents.Count = 0 MsgBox "No InDesign documents are open!"End IfEnd Sub
JavaScriptif(app.documents.length==0){ alert("No InDesign documents are open!");}
Note: JavaScript uses a double equal sign (==) for comparing values (as in the preceding example), and a single equal sign (=) for assigning values. VBScript and AppleScript use a single equal sign for compari-sons.
Loops
If you could talk to InDesign, you might say, “Repeat the following procedure twenty times.” In scripting terms, this is a control structure. Control structures provide repetitive processes, or loops. The idea of a loop is to repeat an action over and over again, with or without changes between instances (or iterations) of the loop, until a specific condition is met.
Scripting languages have a variety of different control structures to choose from. The simplest form of a loop is one that repeats a series of script operations a specific number of times. A more complicated type of control structure loops until some condition is true or false.
Note: You can stop a running script by pressing Command+period (.) in Mac OS or Esc in Windows.
AppleScript
Here is a simple loop:repeat with counter from 1 to 20 --do somethingend repeat
Here is a conditional loop:set myStop to falserepeat while myStop = false --do something, at some point setting myStop to true to leave the loop.end repeat
Adobe InDesign CS2 Scripting Guide Scripting Basics 17
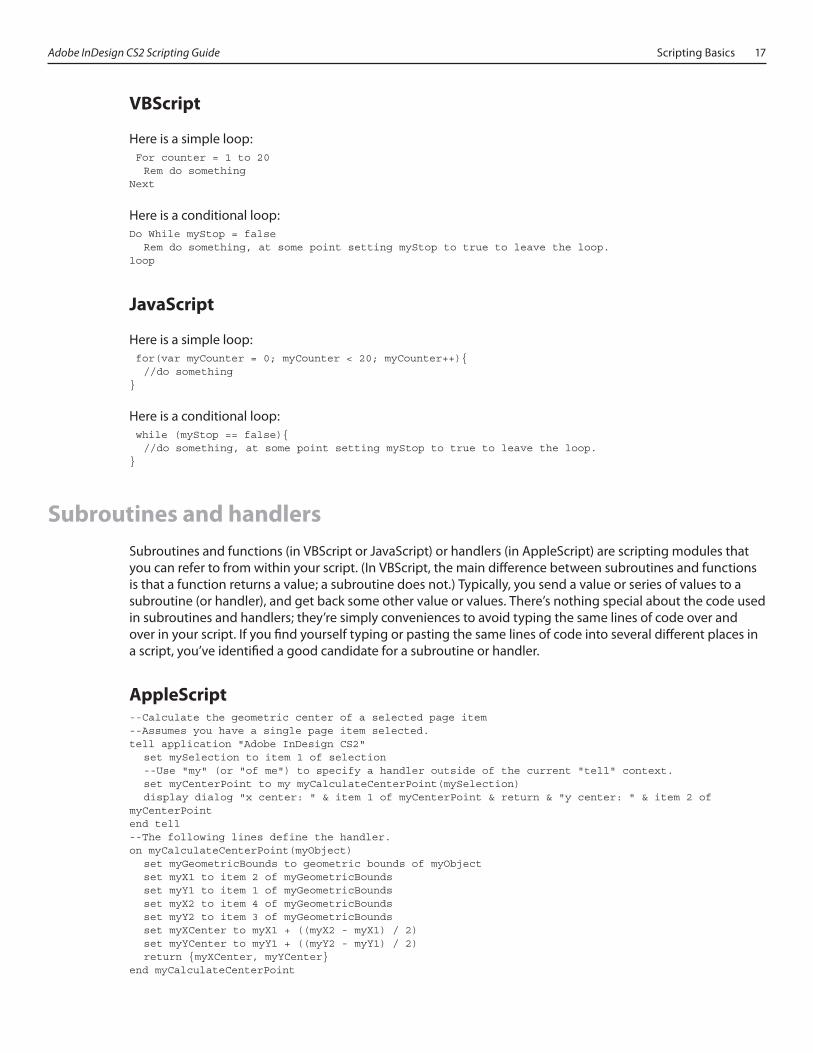
VBScript
Here is a simple loop: For counter = 1 to 20 Rem do somethingNext
Here is a conditional loop:Do While myStop = false Rem do something, at some point setting myStop to true to leave the loop.loop
JavaScript
Here is a simple loop: for(var myCounter = 0; myCounter < 20; myCounter++){ //do something}
Here is a conditional loop: while (myStop == false){ //do something, at some point setting myStop to true to leave the loop.}
Subroutines and handlersSubroutines and functions (in VBScript or JavaScript) or handlers (in AppleScript) are scripting modules that you can refer to from within your script. (In VBScript, the main difference between subroutines and functions is that a function returns a value; a subroutine does not.) Typically, you send a value or series of values to a subroutine (or handler), and get back some other value or values. There’s nothing special about the code used in subroutines and handlers; they’re simply conveniences to avoid typing the same lines of code over and over in your script. If you find yourself typing or pasting the same lines of code into several different places in a script, you’ve identified a good candidate for a subroutine or handler.
AppleScript--Calculate the geometric center of a selected page item--Assumes you have a single page item selected.tell application "Adobe InDesign CS2" set mySelection to item 1 of selection --Use "my" (or "of me") to specify a handler outside of the current "tell" context. set myCenterPoint to my myCalculateCenterPoint(mySelection) display dialog "x center: " & item 1 of myCenterPoint & return & "y center: " & item 2 of myCenterPointend tell--The following lines define the handler.on myCalculateCenterPoint(myObject) set myGeometricBounds to geometric bounds of myObject set myX1 to item 2 of myGeometricBounds set myY1 to item 1 of myGeometricBounds set myX2 to item 4 of myGeometricBounds set myY2 to item 3 of myGeometricBounds set myXCenter to myX1 + ((myX2 - myX1) / 2) set myYCenter to myY1 + ((myY2 - myY1) / 2) return {myXCenter, myYCenter}end myCalculateCenterPoint

18 Scripting Basics Adobe InDesign CS2 Scripting Guide
VBScriptRem Calculate the geometric center of a selected page itemRem Assumes you have a single page item selected.Set myInDesign = CreateObject("InDesign.Application.CS2")Set mySelection = myInDesign.Selection.Item(1)myCenterPoint = myCalculateCenterPoint(mySelection)MsgBox "x center: " & myCenterPoint(0) & vbCr & "y center: " & myCenterPoint(1)
Function myCalculateCenterPoint(myObject)myBounds = myObject.GeometricBoundsmyX1 = myBounds(1)myY1 = myBounds(0)myX2 = myBounds(3)myY2 = myBounds(2)myXCenter = myX1 + ((myX2 - myX1) / 2)myYCenter = myY1 + ((myY2 - myY1) / 2)myCalculateCenterPoint = Array(myXCenter, myYCenter)End Function
JavaScriptwith(app){ var mySelection = selection[0]; var myCenterPoint = myCalculateCenterPoint(mySelection); var myString = "x center: " + myCenterPoint[0] + "\n" + "y center: " + myCenterPoint[1]; alert(myString);}function myCalculateCenterPoint(myObject){ var myGeometricBounds = myObject.geometricBounds; var myX1 = myGeometricBounds[1]; var myY1 = myGeometricBounds[0]; var myX2 = myGeometricBounds[3]; var myY2 = myGeometricBounds[2]; var myXCenter = myX1 + ((myX2 - myX1)/2); var myYCenter = myY1 + ((myY2 - myY1)/2); return [myXCenter, myYCenter];}

Adobe InDesign CS2 Scripting Guide Getting Started with InDesign Scripting 19
3 Getting Started with InDesign Scripting
This chapter gives background information that is important for you to know when creating scripts for InDesign. It also provides simple examples of common InDesign scripting operations. Even if you’re experienced with AppleScript, VBScript, or JavaScript, you should read this chapter, as it covers a number of InDesign-specific matters.
Measurements and positioningAll items and objects in InDesign are positioned on the page according to measurements that you specify. It is useful to know how the InDesign coordinate system works and what measurement units it uses.
Coordinates
InDesign, like every other page layout and drawing program, uses simple two-dimensional geometry to record the position of objects on a page or a spread. The horizontal component of a coordinate pair (or point) is referred to as x, the vertical position is referred to as y. You can see these coordinates in the Transform palette when you select an object using the Selection tool. As in the InDesign user interface, coordinates are measured relative to the location of the zero point, which could be at the upper-left corner of the spread, or of the page, or at the binding edge of the spread.
There is one difference between the coordinates used in InDesign and the traditional geometric coordinate system—on InDesign’s vertical (or y) axis, coordinates below the zero point are positive numbers; coordinates above the zero point are negative numbers.
InDesign usually returns coordinates in x, y order, and expects you to provide them in that order.
Note: InDesign returns some coordinates in a different order, and expects you to supply them in that order. Geometric bounds and visible bounds are both arrays containing four coordinates—these coordinates define, in order, the top, left, bottom, and right edges of the object’s bounding box (or y1, x1, y2, x2).
To tell InDesign to move the current selection to a position two picas to the right and six picas below the zero point, for example, you’d use the following scripts.

20 Getting Started with InDesign Scripting Adobe InDesign CS2 Scripting Guide
AppleScripttell application "Adobe InDesign CS2" set mySelection to item 1 of selection move mySelection to {"2p", "6p"}end tell
VBScriptSet myInDesign = CreateObject("InDesign.Application.CS2")myInDesign.Selection.Item(1).Move Array("2p","6p")
JavaScriptwith(app){mySelection = selection[0];mySelection.move(["2p", "6p"]);}
Measurement units
When you send measurement values to InDesign, you can send either numbers (for example, 14.65) or measurement strings (for example, “1p7.1”). If you send numbers, InDesign uses the publication’s current units of measurement; if you send measurement strings, InDesign uses the units of measurement specified in the string.
InDesign returns coordinates and other measurement values using the publication’s current measurement units. In some cases, these units do not resemble the measurement values shown in the InDesign Transform palette. If the current measurement system is picas, for example, InDesign returns fractional values as decimals, rather than using the picas-and-points notation used by the Transform palette. “1p6,” for example, is returned as “1.5.” InDesign does this because your scripting system would have trouble trying to perform arithmetic operations using measurement strings—trying to add “0p3.5” to “13p4,” for example, would produce a script error; adding .2916 to 13.333 (the converted pica measurements) will not.
If your script depends on adding, subtracting, multiplying, or dividing specific measurement values, you might want to set the corresponding measurement units at the beginning of the script. At the end of the script, you can set the measurement units back to whatever they were before you ran the script. Or you can use measurement overrides, as many of the example scripts do. A measurement override is a string containing a special character, as shown in the following examples.
Character Meaning Example
p picas (optionally with additional points after the p) 1p6
pt points 18pt
mm millimeters 6.35mm
cm centimeters .635cm
c ciceros (optionally with additional didots after the c) 1.4c
i (or in) inches .25i
Adobe InDesign CS2 Scripting Guide Getting Started with InDesign Scripting 21
The InDesign document object modelThis section provides a rough outline of some of the key object types and hierarchy within InDesign:
Application: Preferences (of various sorts)
Application: Defaults (Colors, ParagraphStyles, and so on--application default objects apply all new documents)
Application: Documents (collection of open documents)
Document: Preferences (of various sorts)
Document: Defaults (Colors, ParagraphStyles, and so on--document default objects)
Document: Spreads/Pages
Spread/Page: PageItems (Rectangles, Ovals, Polygons, GraphicLines, TextFrames, etc.)
Document: Stories (The text in the document)
Story: Text objects (Paragraphs, Words, Characters, Lines, and so on--the text in the story)
A button is a page item (it’s a way to add an interactive button to an exported PDF).
Application: Dialogs (script dialog boxes) (includes most of the other user interface gadgets (radio button controls, dropdowns, checkbox controls, and so on) for building modal dialog boxes)
Looking at the InDesign object model
Although the objects and commands available in InDesign are all documented in the InDesign CS2 Scripting Reference, you can also view them from inside your scripting system if you are using AppleScript or VBScript. JavaScript does not provide a way to view the InDesign object model.
AppleScript
To view the InDesign AppleScript dictionary:
1. Start InDesign and the Apple Script Editor. If you can't find the Script Editor, see “System Requirements” in the Introduction.
2. In the Script Editor, choose File > Open Dictionary. The Script Editor displays a standard Open File dialog box.
3. Select the InDesign application and click OK. The Script Editor displays a list of InDesign’s objects and com-mands. You also can see the properties associated with each object.
JavaScript and VBScript
If you’re using JavaScript or VBScript to write your InDesign scripts, you can't view the InDesign object model as you can in AppleScript or VBScript. Instead, refer to the corresponding chapter of the Adobe InDesign Scripting Reference.
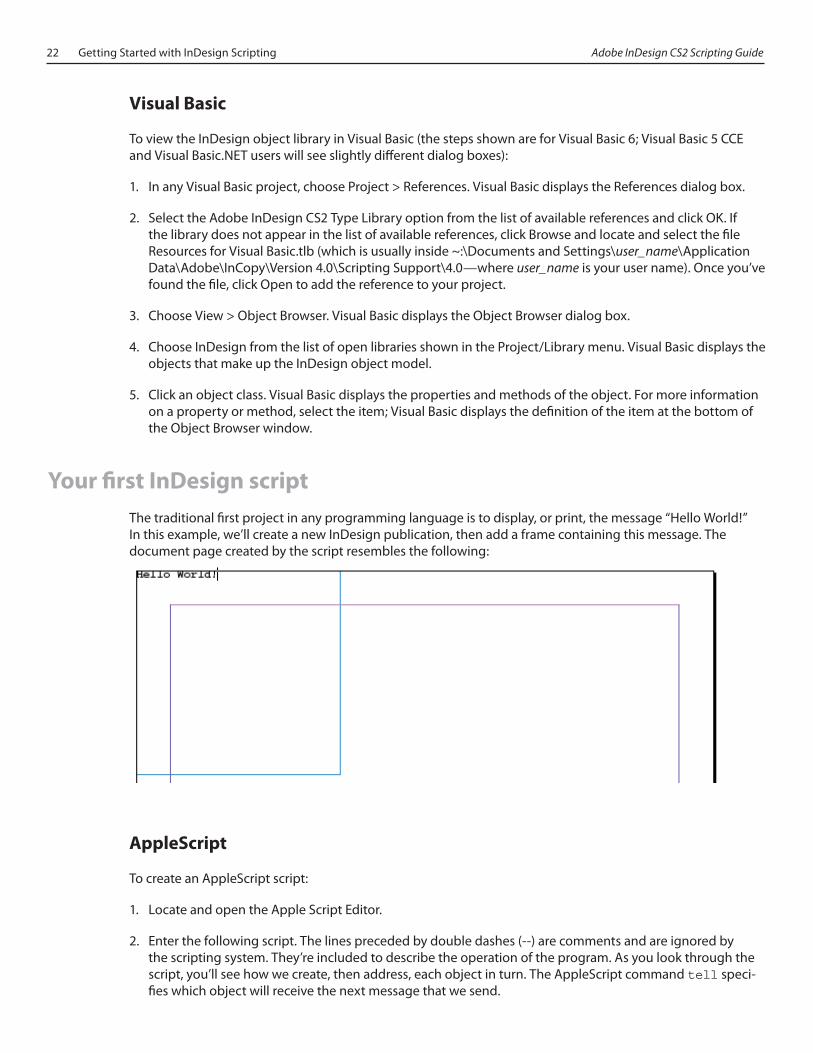
22 Getting Started with InDesign Scripting Adobe InDesign CS2 Scripting Guide
Visual Basic
To view the InDesign object library in Visual Basic (the steps shown are for Visual Basic 6; Visual Basic 5 CCE and Visual Basic.NET users will see slightly different dialog boxes):
1. In any Visual Basic project, choose Project > References. Visual Basic displays the References dialog box.
2. Select the Adobe InDesign CS2 Type Library option from the list of available references and click OK. If the library does not appear in the list of available references, click Browse and locate and select the file Resources for Visual Basic.tlb (which is usually inside ~:\Documents and Settings\user_name\Application Data\Adobe\InCopy\Version 4.0\Scripting Support\4.0—where user_name is your user name). Once you’ve found the file, click Open to add the reference to your project.
3. Choose View > Object Browser. Visual Basic displays the Object Browser dialog box.
4. Choose InDesign from the list of open libraries shown in the Project/Library menu. Visual Basic displays the objects that make up the InDesign object model.
5. Click an object class. Visual Basic displays the properties and methods of the object. For more information on a property or method, select the item; Visual Basic displays the definition of the item at the bottom of the Object Browser window.
Your first InDesign scriptThe traditional first project in any programming language is to display, or print, the message “Hello World!” In this example, we’ll create a new InDesign publication, then add a frame containing this message. The document page created by the script resembles the following:
AppleScript
To create an AppleScript script:
1. Locate and open the Apple Script Editor.
2. Enter the following script. The lines preceded by double dashes (--) are comments and are ignored by the scripting system. They’re included to describe the operation of the program. As you look through the script, you’ll see how we create, then address, each object in turn. The AppleScript command tell speci-fies which object will receive the next message that we send.
Adobe InDesign CS2 Scripting Guide Getting Started with InDesign Scripting 23
--Hello Worldtell application "Adobe InDesign CS2" --Create a new document and assign its --identity to the variable "myDocument" set myDocument to make document tell myDocument --Create a new text frame on the first page. tell page 1 set myTextFrame to make text frame --Change the size of the text frame. set geometric bounds of myTextFrame to {"0p0", "0p0", "18p0", "18p0"} --Enter text in the text frame. set contents of myTextFrame to "Hello World!" end tell end tellend tell
3. Save the script.
4. Run the script (click Run in the Script Editor). InDesign creates a new publication, adds a text frame, and enters text. During this process, the Script Editor might ask where your copy of InDesign is located. In this case, select the application from the list of displayed applications, and the Script Editor will remember where it is the next time you run the script.
VBScript
To create a VBasic script:
1. Start any text editor (Notepad, for example).
2. Enter the following code. The lines preceded by Rem are comments and are ignored by the scripting sys-tem. They’re included to describe the operation of the program. As you look through the script, you’ll see how we create, then address, each object in turn. You do not need to enter the comments.Rem Hello WorldSet myInDesign = CreateObject("InDesign.Application.CS2")Rem Create a new document.Set myDocument = myInDesign.Documents.AddRem Get a reference to the first page.Set myPage = myDocument.Pages.Item(1)Rem Create a text frame.Set myTextFrame = myDocument.TextFrames.AddRem Specify the size and shape of the text frame.myTextFrame.GeometricBounds = Array("0p0", "0p0", "18p0", "18p0")Rem Enter text in the text frame.myTextFrame.Contents = "Hello World!"
3. Save the file as text only to the Scripts folder in the Presets folder inside your InDesign application folder. Give the file the file extension .vbs.
4. Display the Scripts palette, if it’s not already visible. Double-click the script name in the palette to run the script.
Visual Basic
To create a Visual Basic script (the steps shown are for Visual Basic 6; Visual Basic 5 CCE and Visual Basic.NET users will see slightly different dialog boxes):
1. Start Visual Basic and create a new project. Add the InDesign CS Type Library reference to the project, as shown earlier.
24 Getting Started with InDesign Scripting Adobe InDesign CS2 Scripting Guide
2. Use the CommandButton tool to create a new button on the default form. Double-click the button to open the Code window.
3. Enter the following code (between the Private Sub and End Sub lines defining the code under the button). The lines preceded by Rem are comments and are ignored by the scripting system. They’re in-cluded to describe the operation of the program. As you look through the script, you’ll see how we create, then address, each object in turn. You do not need to enter the comments.Rem Hello WorldRem Declare variable types (optional if Option Explicit is off).Dim myInDesign As InDesign.ApplicationDim myDocument As InDesign.DocumentDim myPage As InDesign.PageDim myTextFrame As InDesign.TextFrameRem End of variable type declarations.Set myInDesign = CreateObject("InDesign.Application.CS2")Rem Create a new document.Set myDocument = myInDesign.Documents.AddRem Get a reference to the first page.Set myPage = myDocument.Pages.Item(1)Rem Create a text frame.Set myTextFrame = myDocument.TextFrames.AddRem Specify the size and shape of the text frame.myTextFrame.GeometricBounds = Array("0p0", "0p0", "18p0", "18p0")Rem Enter text in the text frame.myTextFrame.Contents = "Hello World!"
4. Save the form.
5. Start InDesign.
6. Return to Visual Basic and run the program.
7. Click the button you created earlier. InDesign creates a new publication, creates a new text frame, and then enters the text.
JavaScript
To create a JavaScript:
1. Using any text editor (including InDesign or the ExtendScript Tookit), enter the following text://Hello World!var myDocument = app.documents.add();with(myDocument){ var myPage = myDocument.pages.item(0); with(myPage){ //Create a new text frame and assign it to the variable "myTextFrame" var myTextFrame = textFrames.add(); //Specify the size and shape of the text frame. myTextFrame.geometricBounds = [ "0p0", "0p0", "18p0", "18p0"]; //Enter text in the text frame. myTextFrame.contents = "Hello World!" }}
2. Save the text as a plain text file with the file extension .jsx in the Scripts folder inside the Presets folder in your InDesign folder.
3. Test the script by double-clicking the script name in the InDesign Scripts palette.

Adobe InDesign CS2 Scripting Guide Getting Started with InDesign Scripting 25
Adding features to “Hello World”Next, let’s create a new script that makes changes to the “Hello World” publication that we created with our first script. Our second script demonstrates how to:
Get the active document.
Use a function (or handler in AppleScript).
Get the page dimensions and page margins of the active publication.
Resize a text frame.
Change the formatting of the text in the text frame.
After reformatting, the document page resembles the following:
AppleScript
To create the script:
1. Make sure that you have the Hello World document open; if you’ve closed the document without saving it, simply run the previous script again to make a new Hello World document.
2. Choose File > New in the Script Editor to create a new script.
3. Enter the following code:--Improved "Hello World"tell application "Adobe InDesign CS2" --Get a reference to a font. try --Enter the name of a font on your system, if necessary. set myFont to font "Helvetica" end try --Get the active document and assign the result to the variable "myDocument." set myDocument to active document tell myDocument --Use the handler "myGetBounds" to get the bounds of the --"live area" inside the margins of page 1. set myBounds to my myGetBounds(myDocument, page 1) tell text frame 1 of page 1 --Resize the text frame to match the page margins. set geometric bounds to myBounds tell paragraph 1 --Change the font, size, and paragraph alignment. try set applied font to myFont end try set point size to 72

26 Getting Started with InDesign Scripting Adobe InDesign CS2 Scripting Guide
set justification to center align end tell end tell end tellend tell--myGetBounds is a handler that returns the bounds of the "live area" of a page.on myGetBounds(myDocument, myPage) tell application "Adobe InDesign CS2" set myPageHeight to page height of document preferences of myDocument set myPageWidth to page width of document preferences of myDocument set myLeft to left of margin preferences of myPage set myTop to top of margin preferences of myPage set myRight to right of margin preferences of myPage set myBottom to bottom of margin preferences of myPage end tell set myRight to myLeft + (myPageWidth - (myRight + myLeft)) set myBottom to myTop + (myPageHeight - (myBottom + myTop)) return {myTop, myLeft, myBottom, myRight}end myGetBounds
4. Save the script.
5. Run the new script.
VBScript
To create the script:
1. Start any text editor (Notepad, for example).
2. Make sure that you have the Hello World document open; if you’ve closed the document without saving it, simply run the previous script again to make a new Hello World document.
3. Enter the following code. Rem Improved "Hello World"
Set myInDesign = CreateObject("InDesign.Application.CS2")Rem Enter the name of a font on your system, if necessary.Set myFont = myInDesign.Fonts.Item("Arial")Set myDocument = myInDesign.ActiveDocumentSet myPage = myDocument.Pages.Item(1)Rem Get page width and page height using the function "myGetBounds".myBounds = myGetBounds(myDocument, myPage)Set myTextFrame = myPage.TextFrames.Item(1)Rem Resize the text frame to match the publication margins.myTextFrame.GeometricBounds = myBoundsSet myParagraph = myTextFrame.Paragraphs.Item(1)Rem Change the font, size, and alignment.If TypeName(myFont) <> "Nothing" Then myParagraph.AppliedFont = myFontEnd IfmyParagraph.PointSize = 48myParagraph.Justification = idJustification.idLeftAlignFunction myGetBounds(myDocument, myPage)myPageHeight = myDocument.DocumentPreferences.PageHeightmyPageWidth = myDocument.DocumentPreferences.PageWidthmyTop = myPage.MarginPreferences.TopmyLeft = myPage.MarginPreferences.LeftmyRight = myPage.MarginPreferences.RightmyBottom = myPage.MarginPreferences.BottommyRight = myPageWidth - myRightmyBottom = myPageHeight - myBottommyGetBounds = Array(myTop, myLeft, myBottom, myRight)End Function
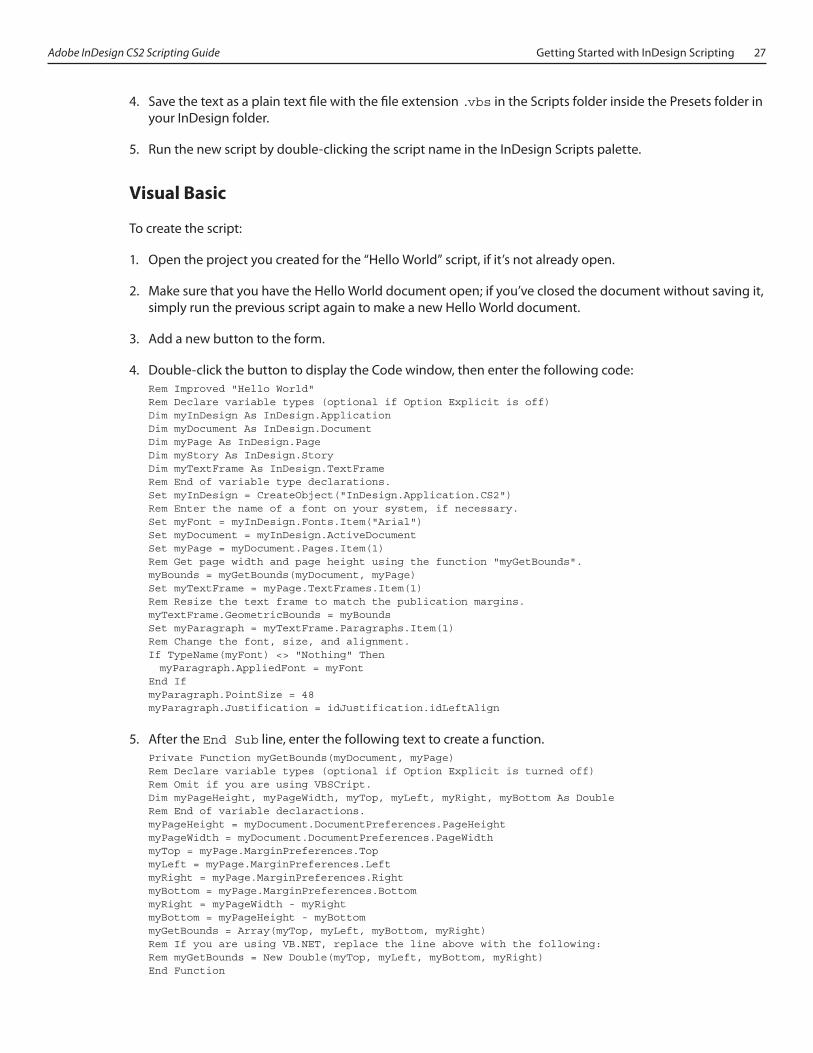
Adobe InDesign CS2 Scripting Guide Getting Started with InDesign Scripting 27
4. Save the text as a plain text file with the file extension .vbs in the Scripts folder inside the Presets folder in your InDesign folder.
5. Run the new script by double-clicking the script name in the InDesign Scripts palette.
Visual Basic
To create the script:
1. Open the project you created for the “Hello World” script, if it’s not already open.
2. Make sure that you have the Hello World document open; if you’ve closed the document without saving it, simply run the previous script again to make a new Hello World document.
3. Add a new button to the form.
4. Double-click the button to display the Code window, then enter the following code:Rem Improved "Hello World"Rem Declare variable types (optional if Option Explicit is off)Dim myInDesign As InDesign.ApplicationDim myDocument As InDesign.DocumentDim myPage As InDesign.PageDim myStory As InDesign.StoryDim myTextFrame As InDesign.TextFrameRem End of variable type declarations.Set myInDesign = CreateObject("InDesign.Application.CS2")Rem Enter the name of a font on your system, if necessary.Set myFont = myInDesign.Fonts.Item("Arial")Set myDocument = myInDesign.ActiveDocumentSet myPage = myDocument.Pages.Item(1)Rem Get page width and page height using the function "myGetBounds".myBounds = myGetBounds(myDocument, myPage)Set myTextFrame = myPage.TextFrames.Item(1)Rem Resize the text frame to match the publication margins.myTextFrame.GeometricBounds = myBoundsSet myParagraph = myTextFrame.Paragraphs.Item(1)Rem Change the font, size, and alignment.If TypeName(myFont) <> "Nothing" Then myParagraph.AppliedFont = myFontEnd IfmyParagraph.PointSize = 48myParagraph.Justification = idJustification.idLeftAlign
5. After the End Sub line, enter the following text to create a function.Private Function myGetBounds(myDocument, myPage)Rem Declare variable types (optional if Option Explicit is turned off)Rem Omit if you are using VBSCript.Dim myPageHeight, myPageWidth, myTop, myLeft, myRight, myBottom As DoubleRem End of variable declaractions.myPageHeight = myDocument.DocumentPreferences.PageHeightmyPageWidth = myDocument.DocumentPreferences.PageWidthmyTop = myPage.MarginPreferences.TopmyLeft = myPage.MarginPreferences.LeftmyRight = myPage.MarginPreferences.RightmyBottom = myPage.MarginPreferences.BottommyRight = myPageWidth - myRightmyBottom = myPageHeight - myBottommyGetBounds = Array(myTop, myLeft, myBottom, myRight)Rem If you are using VB.NET, replace the line above with the following:Rem myGetBounds = New Double(myTop, myLeft, myBottom, myRight)End Function
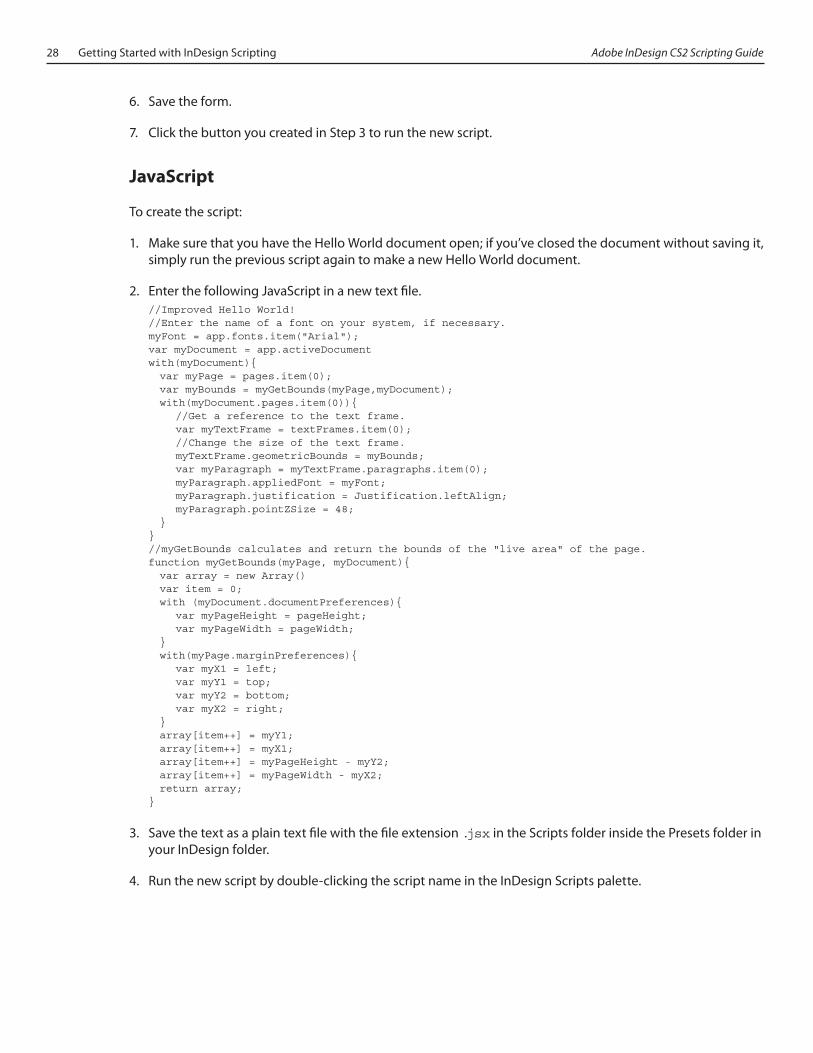
28 Getting Started with InDesign Scripting Adobe InDesign CS2 Scripting Guide
6. Save the form.
7. Click the button you created in Step 3 to run the new script.
JavaScript
To create the script:
1. Make sure that you have the Hello World document open; if you’ve closed the document without saving it, simply run the previous script again to make a new Hello World document.
2. Enter the following JavaScript in a new text file.//Improved Hello World!//Enter the name of a font on your system, if necessary.myFont = app.fonts.item("Arial");var myDocument = app.activeDocumentwith(myDocument){ var myPage = pages.item(0); var myBounds = myGetBounds(myPage,myDocument); with(myDocument.pages.item(0)){ //Get a reference to the text frame. var myTextFrame = textFrames.item(0); //Change the size of the text frame. myTextFrame.geometricBounds = myBounds; var myParagraph = myTextFrame.paragraphs.item(0); myParagraph.appliedFont = myFont; myParagraph.justification = Justification.leftAlign; myParagraph.pointZSize = 48; }}//myGetBounds calculates and return the bounds of the "live area" of the page.function myGetBounds(myPage, myDocument){ var array = new Array() var item = 0; with (myDocument.documentPreferences){ var myPageHeight = pageHeight; var myPageWidth = pageWidth; } with(myPage.marginPreferences){ var myX1 = left; var myY1 = top; var myY2 = bottom; var myX2 = right; } array[item++] = myY1; array[item++] = myX1; array[item++] = myPageHeight - myY2; array[item++] = myPageWidth - myX2; return array;}
3. Save the text as a plain text file with the file extension .jsx in the Scripts folder inside the Presets folder in your InDesign folder.
4. Run the new script by double-clicking the script name in the InDesign Scripts palette.
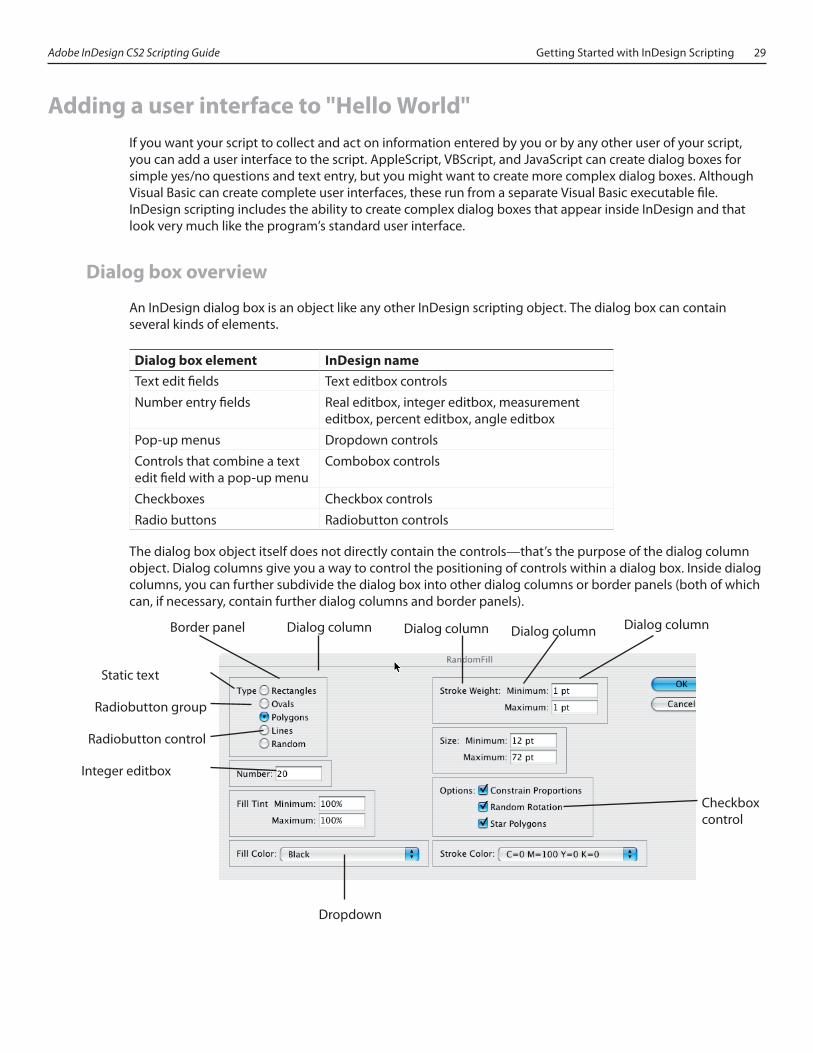
Adobe InDesign CS2 Scripting Guide Getting Started with InDesign Scripting 29
Adding a user interface to "Hello World"If you want your script to collect and act on information entered by you or by any other user of your script, you can add a user interface to the script. AppleScript, VBScript, and JavaScript can create dialog boxes for simple yes/no questions and text entry, but you might want to create more complex dialog boxes. Although Visual Basic can create complete user interfaces, these run from a separate Visual Basic executable file. InDesign scripting includes the ability to create complex dialog boxes that appear inside InDesign and that look very much like the program’s standard user interface.
Dialog box overview
An InDesign dialog box is an object like any other InDesign scripting object. The dialog box can contain several kinds of elements.
Dialog box element InDesign name
Text edit fields Text editbox controls
Number entry fields Real editbox, integer editbox, measurement editbox, percent editbox, angle editbox
Pop-up menus Dropdown controls
Controls that combine a text edit field with a pop-up menu
Combobox controls
Checkboxes Checkbox controls
Radio buttons Radiobutton controls
The dialog box object itself does not directly contain the controls—that’s the purpose of the dialog column object. Dialog columns give you a way to control the positioning of controls within a dialog box. Inside dialog columns, you can further subdivide the dialog box into other dialog columns or border panels (both of which can, if necessary, contain further dialog columns and border panels).
Dialog column
Static text
Border panel
Radiobutton group
Radiobutton control
Integer editbox
Dialog column Dialog columnDialog column
Checkbox control
Dropdown
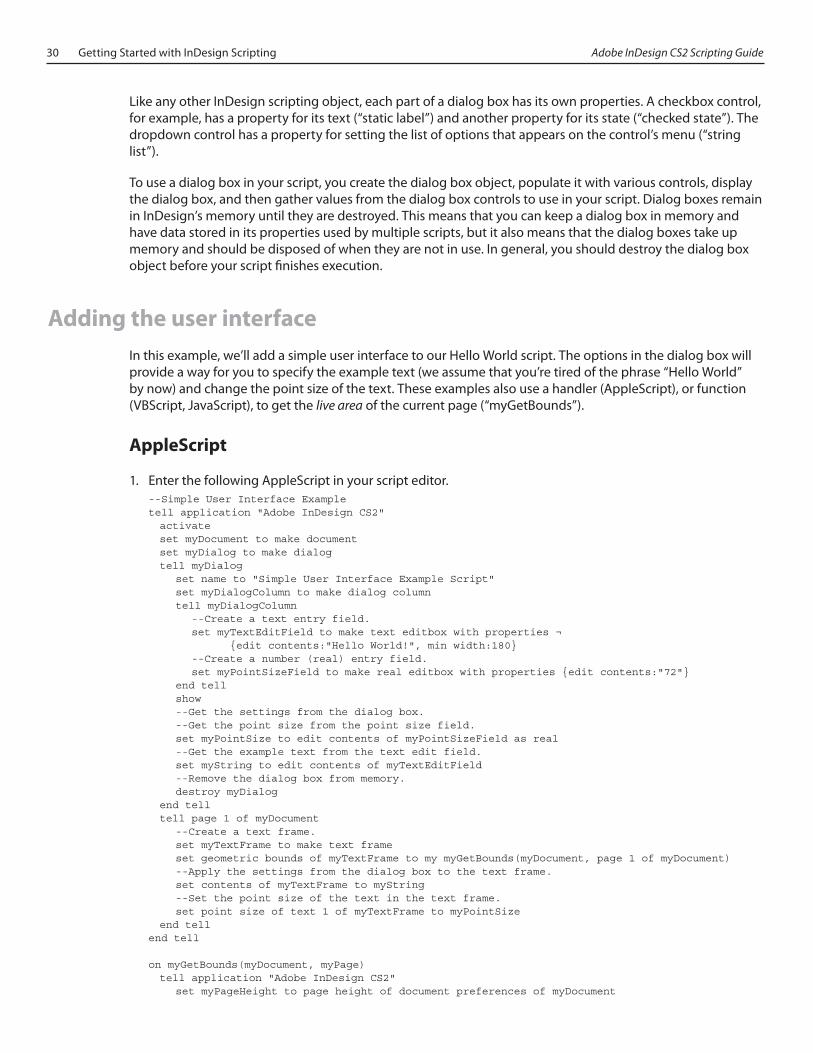
30 Getting Started with InDesign Scripting Adobe InDesign CS2 Scripting Guide
Like any other InDesign scripting object, each part of a dialog box has its own properties. A checkbox control, for example, has a property for its text (“static label”) and another property for its state (“checked state”). The dropdown control has a property for setting the list of options that appears on the control’s menu (“string list”).
To use a dialog box in your script, you create the dialog box object, populate it with various controls, display the dialog box, and then gather values from the dialog box controls to use in your script. Dialog boxes remain in InDesign’s memory until they are destroyed. This means that you can keep a dialog box in memory and have data stored in its properties used by multiple scripts, but it also means that the dialog boxes take up memory and should be disposed of when they are not in use. In general, you should destroy the dialog box object before your script finishes execution.
Adding the user interface In this example, we’ll add a simple user interface to our Hello World script. The options in the dialog box will provide a way for you to specify the example text (we assume that you’re tired of the phrase “Hello World” by now) and change the point size of the text. These examples also use a handler (AppleScript), or function (VBScript, JavaScript), to get the live area of the current page (“myGetBounds”).
AppleScript
1. Enter the following AppleScript in your script editor.--Simple User Interface Exampletell application "Adobe InDesign CS2" activate set myDocument to make document set myDialog to make dialog tell myDialog set name to "Simple User Interface Example Script" set myDialogColumn to make dialog column tell myDialogColumn --Create a text entry field. set myTextEditField to make text editbox with properties ¬ {edit contents:"Hello World!", min width:180} --Create a number (real) entry field. set myPointSizeField to make real editbox with properties {edit contents:"72"} end tell show --Get the settings from the dialog box. --Get the point size from the point size field. set myPointSize to edit contents of myPointSizeField as real --Get the example text from the text edit field. set myString to edit contents of myTextEditField --Remove the dialog box from memory. destroy myDialog end tell tell page 1 of myDocument --Create a text frame. set myTextFrame to make text frame set geometric bounds of myTextFrame to my myGetBounds(myDocument, page 1 of myDocument) --Apply the settings from the dialog box to the text frame. set contents of myTextFrame to myString --Set the point size of the text in the text frame. set point size of text 1 of myTextFrame to myPointSize end tellend tell on myGetBounds(myDocument, myPage) tell application "Adobe InDesign CS2" set myPageHeight to page height of document preferences of myDocument
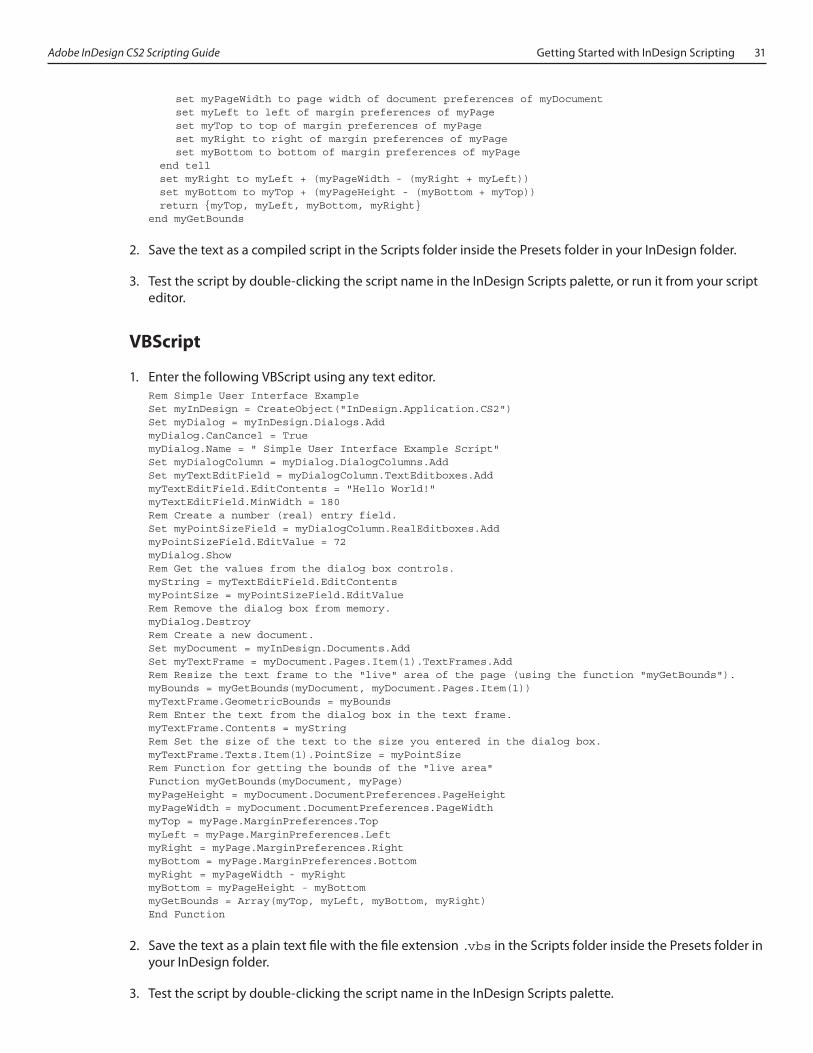
Adobe InDesign CS2 Scripting Guide Getting Started with InDesign Scripting 31
set myPageWidth to page width of document preferences of myDocument set myLeft to left of margin preferences of myPage set myTop to top of margin preferences of myPage set myRight to right of margin preferences of myPage set myBottom to bottom of margin preferences of myPage end tell set myRight to myLeft + (myPageWidth - (myRight + myLeft)) set myBottom to myTop + (myPageHeight - (myBottom + myTop)) return {myTop, myLeft, myBottom, myRight}end myGetBounds
2. Save the text as a compiled script in the Scripts folder inside the Presets folder in your InDesign folder.
3. Test the script by double-clicking the script name in the InDesign Scripts palette, or run it from your script editor.
VBScript
1. Enter the following VBScript using any text editor.Rem Simple User Interface ExampleSet myInDesign = CreateObject("InDesign.Application.CS2")Set myDialog = myInDesign.Dialogs.AddmyDialog.CanCancel = TruemyDialog.Name = " Simple User Interface Example Script"Set myDialogColumn = myDialog.DialogColumns.AddSet myTextEditField = myDialogColumn.TextEditboxes.AddmyTextEditField.EditContents = "Hello World!"myTextEditField.MinWidth = 180Rem Create a number (real) entry field.Set myPointSizeField = myDialogColumn.RealEditboxes.AddmyPointSizeField.EditValue = 72myDialog.ShowRem Get the values from the dialog box controls.myString = myTextEditField.EditContentsmyPointSize = myPointSizeField.EditValueRem Remove the dialog box from memory.myDialog.DestroyRem Create a new document.Set myDocument = myInDesign.Documents.AddSet myTextFrame = myDocument.Pages.Item(1).TextFrames.AddRem Resize the text frame to the "live" area of the page (using the function "myGetBounds").myBounds = myGetBounds(myDocument, myDocument.Pages.Item(1))myTextFrame.GeometricBounds = myBoundsRem Enter the text from the dialog box in the text frame.myTextFrame.Contents = myStringRem Set the size of the text to the size you entered in the dialog box.myTextFrame.Texts.Item(1).PointSize = myPointSizeRem Function for getting the bounds of the "live area"Function myGetBounds(myDocument, myPage)myPageHeight = myDocument.DocumentPreferences.PageHeightmyPageWidth = myDocument.DocumentPreferences.PageWidthmyTop = myPage.MarginPreferences.TopmyLeft = myPage.MarginPreferences.LeftmyRight = myPage.MarginPreferences.RightmyBottom = myPage.MarginPreferences.BottommyRight = myPageWidth - myRightmyBottom = myPageHeight - myBottommyGetBounds = Array(myTop, myLeft, myBottom, myRight)End Function
2. Save the text as a plain text file with the file extension .vbs in the Scripts folder inside the Presets folder in your InDesign folder.
3. Test the script by double-clicking the script name in the InDesign Scripts palette.
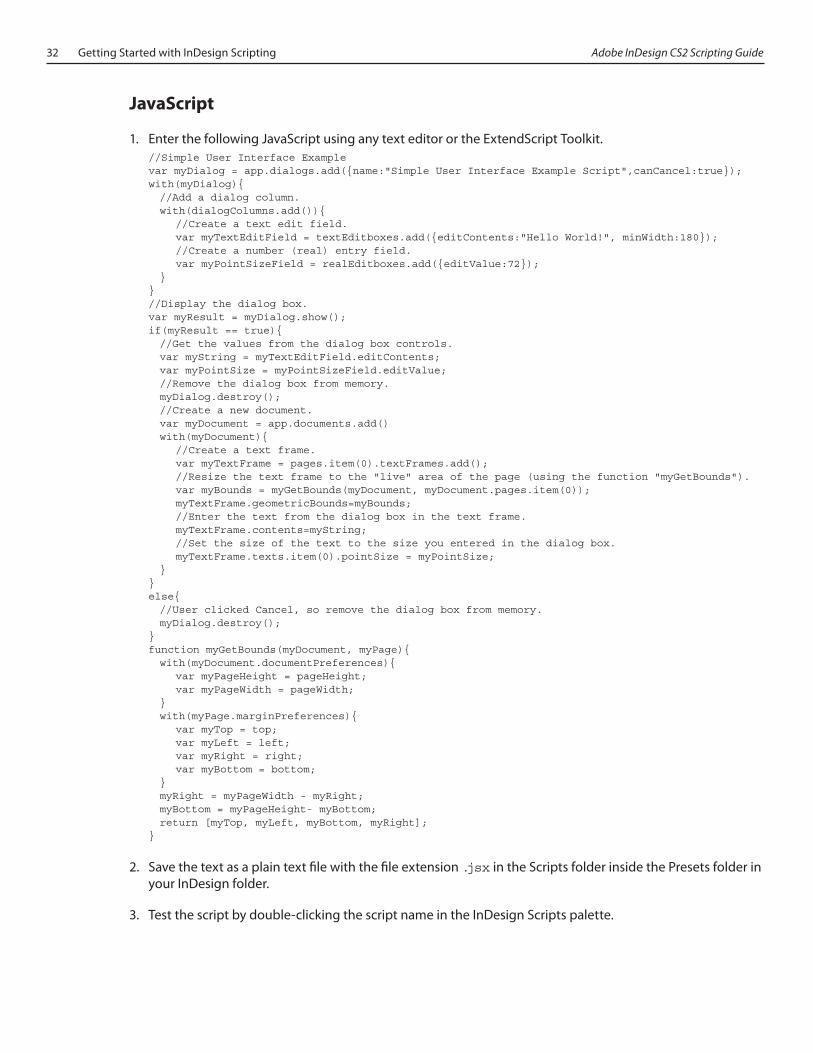
32 Getting Started with InDesign Scripting Adobe InDesign CS2 Scripting Guide
JavaScript
1. Enter the following JavaScript using any text editor or the ExtendScript Toolkit.//Simple User Interface Examplevar myDialog = app.dialogs.add({name:"Simple User Interface Example Script",canCancel:true});with(myDialog){ //Add a dialog column. with(dialogColumns.add()){ //Create a text edit field. var myTextEditField = textEditboxes.add({editContents:"Hello World!", minWidth:180}); //Create a number (real) entry field. var myPointSizeField = realEditboxes.add({editValue:72}); }}//Display the dialog box.var myResult = myDialog.show();if(myResult == true){ //Get the values from the dialog box controls. var myString = myTextEditField.editContents; var myPointSize = myPointSizeField.editValue; //Remove the dialog box from memory. myDialog.destroy(); //Create a new document. var myDocument = app.documents.add() with(myDocument){ //Create a text frame. var myTextFrame = pages.item(0).textFrames.add(); //Resize the text frame to the "live" area of the page (using the function "myGetBounds"). var myBounds = myGetBounds(myDocument, myDocument.pages.item(0)); myTextFrame.geometricBounds=myBounds; //Enter the text from the dialog box in the text frame. myTextFrame.contents=myString; //Set the size of the text to the size you entered in the dialog box. myTextFrame.texts.item(0).pointSize = myPointSize; }}else{ //User clicked Cancel, so remove the dialog box from memory. myDialog.destroy();}function myGetBounds(myDocument, myPage){ with(myDocument.documentPreferences){ var myPageHeight = pageHeight; var myPageWidth = pageWidth; } with(myPage.marginPreferences){ var myTop = top; var myLeft = left; var myRight = right; var myBottom = bottom; } myRight = myPageWidth - myRight; myBottom = myPageHeight- myBottom; return [myTop, myLeft, myBottom, myRight];}
2. Save the text as a plain text file with the file extension .jsx in the Scripts folder inside the Presets folder in your InDesign folder.
3. Test the script by double-clicking the script name in the InDesign Scripts palette.
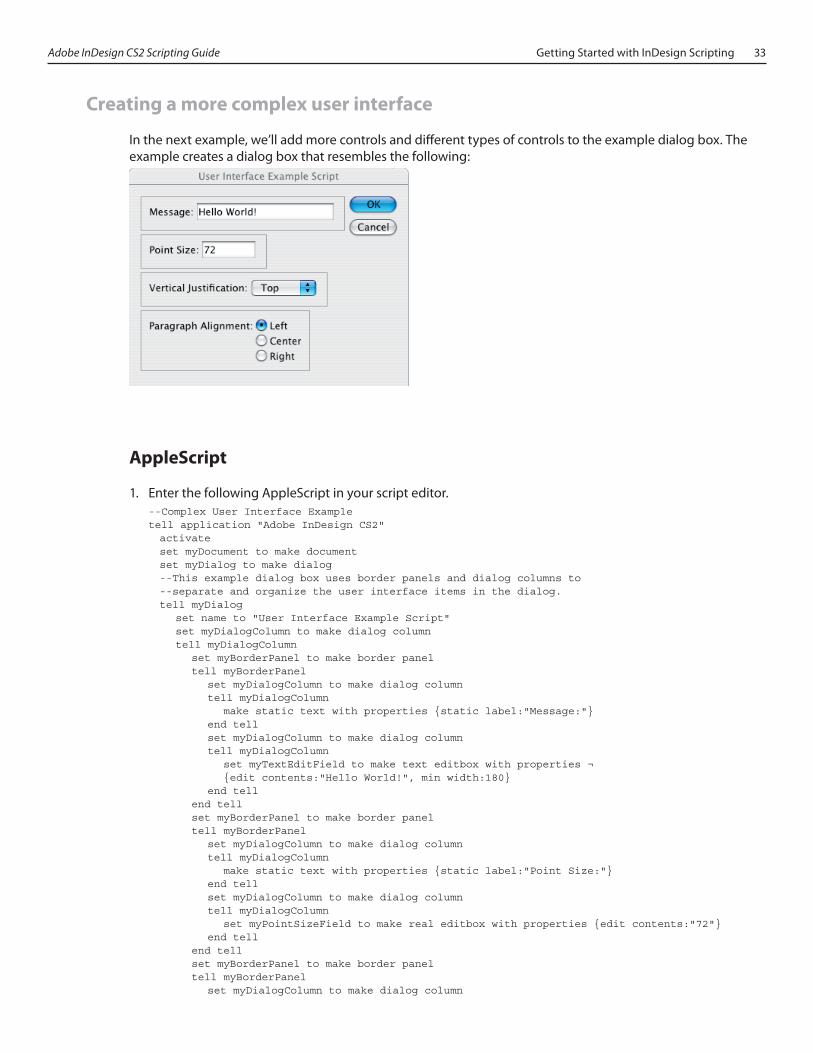
Adobe InDesign CS2 Scripting Guide Getting Started with InDesign Scripting 33
Creating a more complex user interface
In the next example, we’ll add more controls and different types of controls to the example dialog box. The example creates a dialog box that resembles the following:
AppleScript
1. Enter the following AppleScript in your script editor.--Complex User Interface Exampletell application "Adobe InDesign CS2" activate set myDocument to make document set myDialog to make dialog --This example dialog box uses border panels and dialog columns to --separate and organize the user interface items in the dialog. tell myDialog set name to "User Interface Example Script" set myDialogColumn to make dialog column tell myDialogColumn set myBorderPanel to make border panel tell myBorderPanel set myDialogColumn to make dialog column tell myDialogColumn make static text with properties {static label:"Message:"} end tell set myDialogColumn to make dialog column tell myDialogColumn set myTextEditField to make text editbox with properties ¬ {edit contents:"Hello World!", min width:180} end tell end tell set myBorderPanel to make border panel tell myBorderPanel set myDialogColumn to make dialog column tell myDialogColumn make static text with properties {static label:"Point Size:"} end tell set myDialogColumn to make dialog column tell myDialogColumn set myPointSizeField to make real editbox with properties {edit contents:"72"} end tell end tell set myBorderPanel to make border panel tell myBorderPanel set myDialogColumn to make dialog column
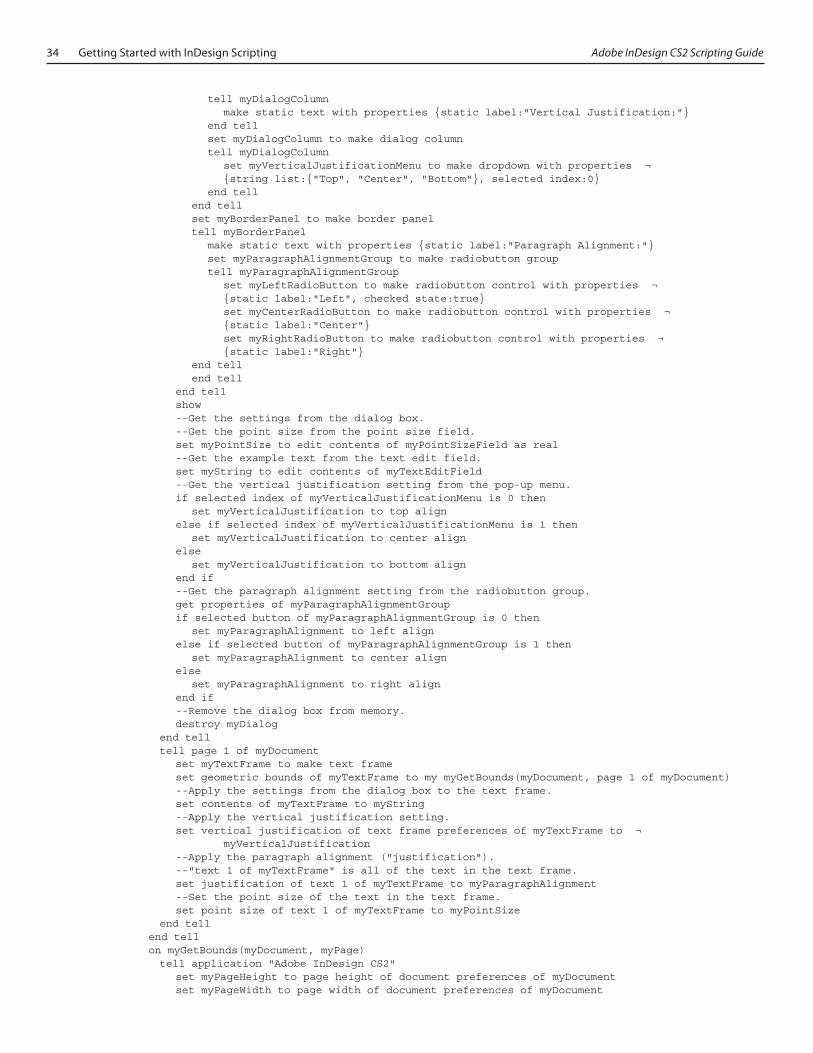
34 Getting Started with InDesign Scripting Adobe InDesign CS2 Scripting Guide
tell myDialogColumn make static text with properties {static label:"Vertical Justification:"} end tell set myDialogColumn to make dialog column tell myDialogColumn set myVerticalJustificationMenu to make dropdown with properties ¬ {string list:{"Top", "Center", "Bottom"}, selected index:0} end tell end tell set myBorderPanel to make border panel tell myBorderPanel make static text with properties {static label:"Paragraph Alignment:"} set myParagraphAlignmentGroup to make radiobutton group tell myParagraphAlignmentGroup set myLeftRadioButton to make radiobutton control with properties ¬ {static label:"Left", checked state:true} set myCenterRadioButton to make radiobutton control with properties ¬ {static label:"Center"} set myRightRadioButton to make radiobutton control with properties ¬ {static label:"Right"} end tell end tell end tell show --Get the settings from the dialog box. --Get the point size from the point size field. set myPointSize to edit contents of myPointSizeField as real --Get the example text from the text edit field. set myString to edit contents of myTextEditField --Get the vertical justification setting from the pop-up menu. if selected index of myVerticalJustificationMenu is 0 then set myVerticalJustification to top align else if selected index of myVerticalJustificationMenu is 1 then set myVerticalJustification to center align else set myVerticalJustification to bottom align end if --Get the paragraph alignment setting from the radiobutton group. get properties of myParagraphAlignmentGroup if selected button of myParagraphAlignmentGroup is 0 then set myParagraphAlignment to left align else if selected button of myParagraphAlignmentGroup is 1 then set myParagraphAlignment to center align else set myParagraphAlignment to right align end if --Remove the dialog box from memory. destroy myDialog end tell tell page 1 of myDocument set myTextFrame to make text frame set geometric bounds of myTextFrame to my myGetBounds(myDocument, page 1 of myDocument) --Apply the settings from the dialog box to the text frame. set contents of myTextFrame to myString --Apply the vertical justification setting. set vertical justification of text frame preferences of myTextFrame to ¬ myVerticalJustification --Apply the paragraph alignment ("justification"). --"text 1 of myTextFrame" is all of the text in the text frame. set justification of text 1 of myTextFrame to myParagraphAlignment --Set the point size of the text in the text frame. set point size of text 1 of myTextFrame to myPointSize end tellend tellon myGetBounds(myDocument, myPage) tell application "Adobe InDesign CS2" set myPageHeight to page height of document preferences of myDocument set myPageWidth to page width of document preferences of myDocument

Adobe InDesign CS2 Scripting Guide Getting Started with InDesign Scripting 35
set myLeft to left of margin preferences of myPage set myTop to top of margin preferences of myPage set myRight to right of margin preferences of myPage set myBottom to bottom of margin preferences of myPage end tell set myRight to myLeft + (myPageWidth - (myRight + myLeft)) set myBottom to myTop + (myPageHeight - (myBottom + myTop)) return {myTop, myLeft, myBottom, myRight}end myGetBounds
2. Save the text as a compiled script in the Scripts folder inside the Presets folder in your InDesign folder.
3. Test the script by double-clicking the script name in the InDesign Scripts palette, or run it from your script editor.
VBScript
1. Enter the following VBScript using any text editor.Rem Complex User Interface ExampleSet myInDesign = CreateObject("InDesign.Application.CS2")myInDesign.ActivateSet myDialog = myInDesign.Dialogs.AddmyDialog.CanCancel = TruemyDialog.Name = "User Interface Example Script"Rem Create a dialog column.Set myDialogColumn = myDialog.DialogColumns.AddRem Create a border panel.Set myBorderPanel = myDialogColumn.BorderPanels.AddRem Create a dialog column inside the border panel.Set myTempDialogColumn = myBorderPanel.DialogColumns.AddSet myStaticText = myTempDialogColumn.StaticTexts.AddmyStaticText.StaticLabel = "Message:"Rem Create another dialog column inside the border panel.Set myTempDialogColumn = myBorderPanel.DialogColumns.AddSet myTextEditField = myTempDialogColumn.TextEditboxes.AddmyTextEditField.EditContents = "Hello World!"myTextEditField.MinWidth = 180Rem Create another border panel.Set myBorderPanel = myDialogColumn.BorderPanels.AddRem Create a dialog column inside the border panel.Set myTempDialogColumn = myBorderPanel.DialogColumns.AddSet myStaticText = myTempDialogColumn.StaticTexts.AddmyStaticText.StaticLabel = "Point Size:"Rem Create another dialog column inside the border panel.Set myTempDialogColumn = myBorderPanel.DialogColumns.AddSet myPointSizeField = myTempDialogColumn.RealEditboxes.AddmyPointSizeField.EditValue = 72Rem Create another border panel.Set myBorderPanel = myDialogColumn.BorderPanels.AddRem Create a dialog column inside the border panel.Set myTempDialogColumn = myBorderPanel.DialogColumns.AddSet myStaticText = myTempDialogColumn.StaticTexts.AddmyStaticText.StaticLabel = "Vertical Justification:"Rem Create another dialog column inside the border panel.Set myTempDialogColumn = myBorderPanel.DialogColumns.AddSet myVerticalJustificationMenu = myTempDialogColumn.Dropdowns.AddmyVerticalJustificationMenu.StringList = Array("Top", "Center", "Bottom")myVerticalJustificationMenu.SelectedIndex = 0Rem Create another border panel.Set myBorderPanel = myDialogColumn.BorderPanels.AddRem Create a dialog column inside the border panel.Set myTempDialogColumn = myBorderPanel.DialogColumns.AddSet myStaticText = myTempDialogColumn.StaticTexts.AddmyStaticText.StaticLabel = "Paragraph Alignment:"Rem Create another dialog column inside the border panel.
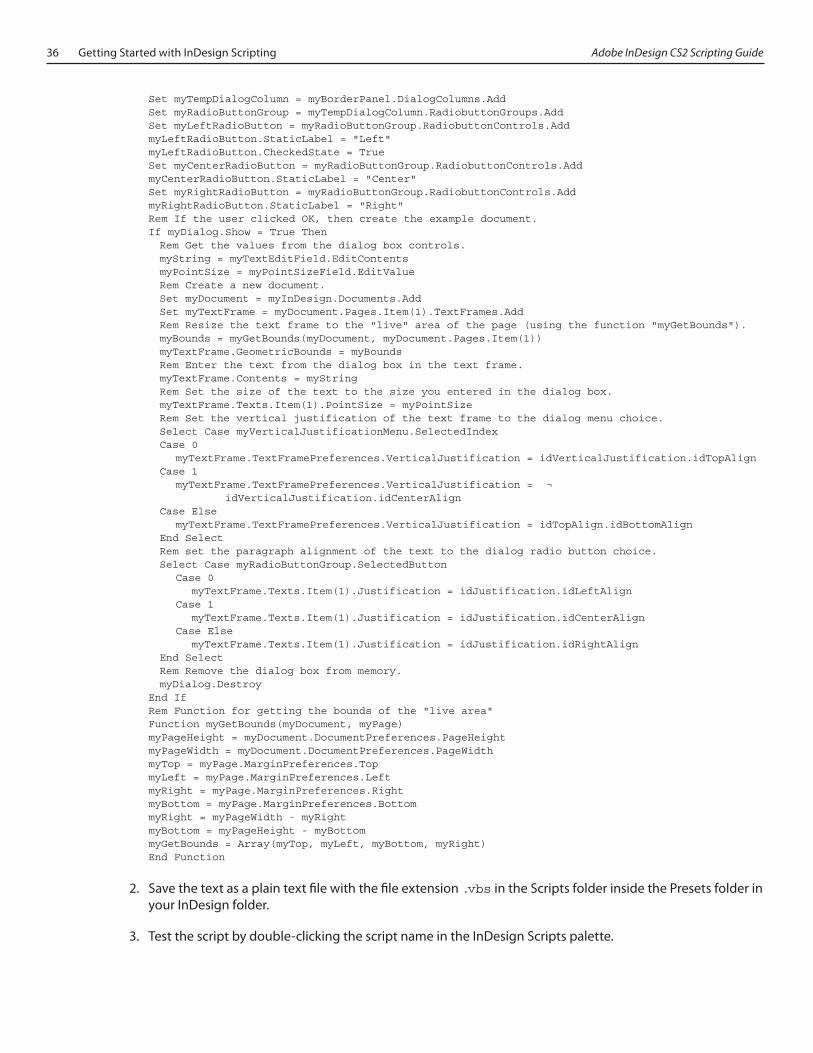
36 Getting Started with InDesign Scripting Adobe InDesign CS2 Scripting Guide
Set myTempDialogColumn = myBorderPanel.DialogColumns.AddSet myRadioButtonGroup = myTempDialogColumn.RadiobuttonGroups.AddSet myLeftRadioButton = myRadioButtonGroup.RadiobuttonControls.AddmyLeftRadioButton.StaticLabel = "Left"myLeftRadioButton.CheckedState = TrueSet myCenterRadioButton = myRadioButtonGroup.RadiobuttonControls.AddmyCenterRadioButton.StaticLabel = "Center"Set myRightRadioButton = myRadioButtonGroup.RadiobuttonControls.AddmyRightRadioButton.StaticLabel = "Right"Rem If the user clicked OK, then create the example document.If myDialog.Show = True Then Rem Get the values from the dialog box controls. myString = myTextEditField.EditContents myPointSize = myPointSizeField.EditValue Rem Create a new document. Set myDocument = myInDesign.Documents.Add Set myTextFrame = myDocument.Pages.Item(1).TextFrames.Add Rem Resize the text frame to the "live" area of the page (using the function "myGetBounds"). myBounds = myGetBounds(myDocument, myDocument.Pages.Item(1)) myTextFrame.GeometricBounds = myBounds Rem Enter the text from the dialog box in the text frame. myTextFrame.Contents = myString Rem Set the size of the text to the size you entered in the dialog box. myTextFrame.Texts.Item(1).PointSize = myPointSize Rem Set the vertical justification of the text frame to the dialog menu choice. Select Case myVerticalJustificationMenu.SelectedIndex Case 0 myTextFrame.TextFramePreferences.VerticalJustification = idVerticalJustification.idTopAlign Case 1 myTextFrame.TextFramePreferences.VerticalJustification = ¬ idVerticalJustification.idCenterAlign Case Else myTextFrame.TextFramePreferences.VerticalJustification = idTopAlign.idBottomAlign End Select Rem set the paragraph alignment of the text to the dialog radio button choice. Select Case myRadioButtonGroup.SelectedButton Case 0 myTextFrame.Texts.Item(1).Justification = idJustification.idLeftAlign Case 1 myTextFrame.Texts.Item(1).Justification = idJustification.idCenterAlign Case Else myTextFrame.Texts.Item(1).Justification = idJustification.idRightAlign End Select Rem Remove the dialog box from memory. myDialog.DestroyEnd IfRem Function for getting the bounds of the "live area"Function myGetBounds(myDocument, myPage)myPageHeight = myDocument.DocumentPreferences.PageHeightmyPageWidth = myDocument.DocumentPreferences.PageWidthmyTop = myPage.MarginPreferences.TopmyLeft = myPage.MarginPreferences.LeftmyRight = myPage.MarginPreferences.RightmyBottom = myPage.MarginPreferences.BottommyRight = myPageWidth - myRightmyBottom = myPageHeight - myBottommyGetBounds = Array(myTop, myLeft, myBottom, myRight)End Function
2. Save the text as a plain text file with the file extension .vbs in the Scripts folder inside the Presets folder in your InDesign folder.
3. Test the script by double-clicking the script name in the InDesign Scripts palette.
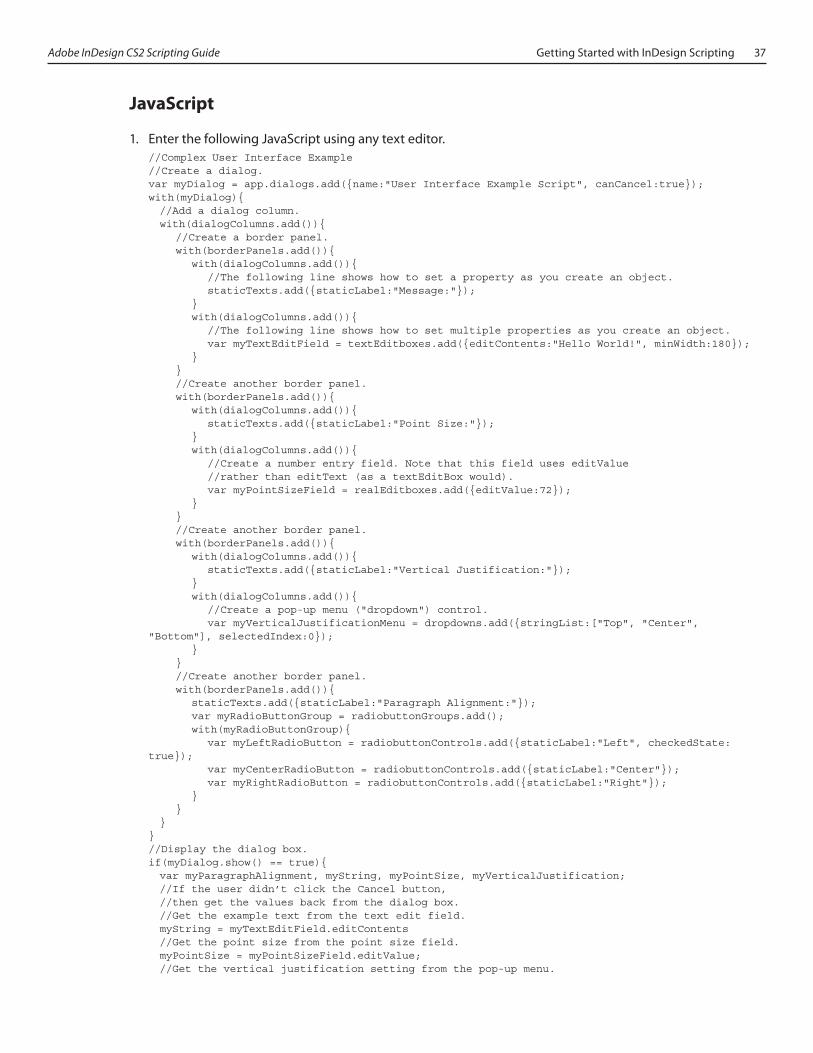
Adobe InDesign CS2 Scripting Guide Getting Started with InDesign Scripting 37
JavaScript
1. Enter the following JavaScript using any text editor.//Complex User Interface Example//Create a dialog.var myDialog = app.dialogs.add({name:"User Interface Example Script", canCancel:true});with(myDialog){ //Add a dialog column. with(dialogColumns.add()){ //Create a border panel. with(borderPanels.add()){ with(dialogColumns.add()){ //The following line shows how to set a property as you create an object. staticTexts.add({staticLabel:"Message:"}); } with(dialogColumns.add()){ //The following line shows how to set multiple properties as you create an object. var myTextEditField = textEditboxes.add({editContents:"Hello World!", minWidth:180}); } } //Create another border panel. with(borderPanels.add()){ with(dialogColumns.add()){ staticTexts.add({staticLabel:"Point Size:"}); } with(dialogColumns.add()){ //Create a number entry field. Note that this field uses editValue //rather than editText (as a textEditBox would). var myPointSizeField = realEditboxes.add({editValue:72}); } } //Create another border panel. with(borderPanels.add()){ with(dialogColumns.add()){ staticTexts.add({staticLabel:"Vertical Justification:"}); } with(dialogColumns.add()){ //Create a pop-up menu ("dropdown") control. var myVerticalJustificationMenu = dropdowns.add({stringList:["Top", "Center", "Bottom"], selectedIndex:0}); } } //Create another border panel. with(borderPanels.add()){ staticTexts.add({staticLabel:"Paragraph Alignment:"}); var myRadioButtonGroup = radiobuttonGroups.add(); with(myRadioButtonGroup){ var myLeftRadioButton = radiobuttonControls.add({staticLabel:"Left", checkedState:true}); var myCenterRadioButton = radiobuttonControls.add({staticLabel:"Center"}); var myRightRadioButton = radiobuttonControls.add({staticLabel:"Right"}); } } }}//Display the dialog box.if(myDialog.show() == true){ var myParagraphAlignment, myString, myPointSize, myVerticalJustification; //If the user didn’t click the Cancel button, //then get the values back from the dialog box. //Get the example text from the text edit field. myString = myTextEditField.editContents //Get the point size from the point size field. myPointSize = myPointSizeField.editValue; //Get the vertical justification setting from the pop-up menu.
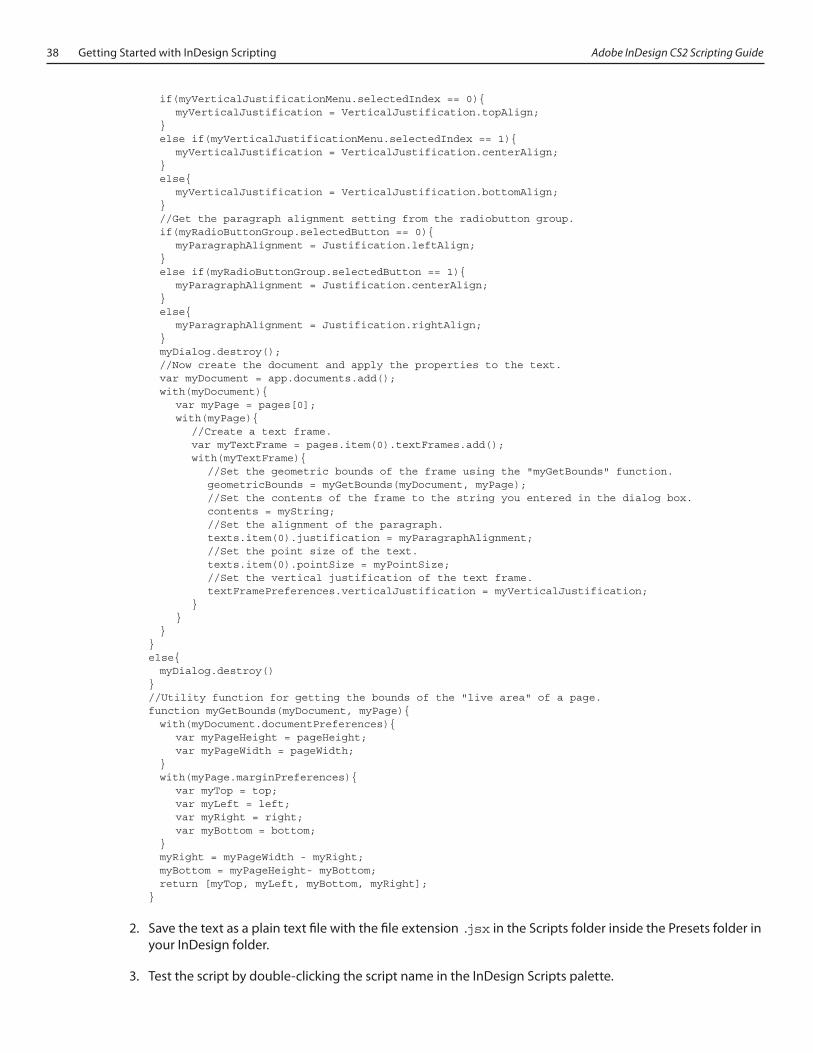
38 Getting Started with InDesign Scripting Adobe InDesign CS2 Scripting Guide
if(myVerticalJustificationMenu.selectedIndex == 0){ myVerticalJustification = VerticalJustification.topAlign; } else if(myVerticalJustificationMenu.selectedIndex == 1){ myVerticalJustification = VerticalJustification.centerAlign; } else{ myVerticalJustification = VerticalJustification.bottomAlign; } //Get the paragraph alignment setting from the radiobutton group. if(myRadioButtonGroup.selectedButton == 0){ myParagraphAlignment = Justification.leftAlign; } else if(myRadioButtonGroup.selectedButton == 1){ myParagraphAlignment = Justification.centerAlign; } else{ myParagraphAlignment = Justification.rightAlign; } myDialog.destroy(); //Now create the document and apply the properties to the text. var myDocument = app.documents.add(); with(myDocument){ var myPage = pages[0]; with(myPage){ //Create a text frame. var myTextFrame = pages.item(0).textFrames.add(); with(myTextFrame){ //Set the geometric bounds of the frame using the "myGetBounds" function. geometricBounds = myGetBounds(myDocument, myPage); //Set the contents of the frame to the string you entered in the dialog box. contents = myString; //Set the alignment of the paragraph. texts.item(0).justification = myParagraphAlignment; //Set the point size of the text. texts.item(0).pointSize = myPointSize; //Set the vertical justification of the text frame. textFramePreferences.verticalJustification = myVerticalJustification; } } }}else{ myDialog.destroy()}//Utility function for getting the bounds of the "live area" of a page.function myGetBounds(myDocument, myPage){ with(myDocument.documentPreferences){ var myPageHeight = pageHeight; var myPageWidth = pageWidth; } with(myPage.marginPreferences){ var myTop = top; var myLeft = left; var myRight = right; var myBottom = bottom; } myRight = myPageWidth - myRight; myBottom = myPageHeight- myBottom; return [myTop, myLeft, myBottom, myRight];}
2. Save the text as a plain text file with the file extension .jsx in the Scripts folder inside the Presets folder in your InDesign folder.
3. Test the script by double-clicking the script name in the InDesign Scripts palette.
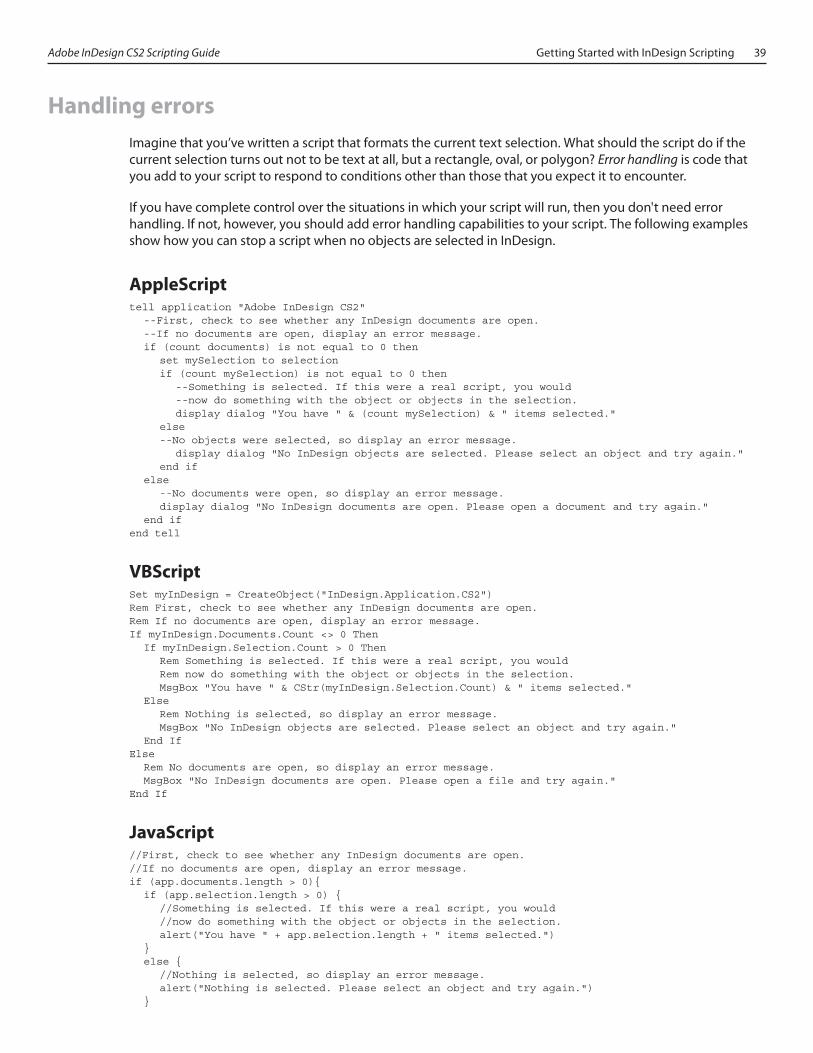
Adobe InDesign CS2 Scripting Guide Getting Started with InDesign Scripting 39
Handling errorsImagine that you’ve written a script that formats the current text selection. What should the script do if the current selection turns out not to be text at all, but a rectangle, oval, or polygon? Error handling is code that you add to your script to respond to conditions other than those that you expect it to encounter.
If you have complete control over the situations in which your script will run, then you don't need error handling. If not, however, you should add error handling capabilities to your script. The following examples show how you can stop a script when no objects are selected in InDesign.
AppleScripttell application "Adobe InDesign CS2" --First, check to see whether any InDesign documents are open. --If no documents are open, display an error message. if (count documents) is not equal to 0 then set mySelection to selection if (count mySelection) is not equal to 0 then --Something is selected. If this were a real script, you would --now do something with the object or objects in the selection. display dialog "You have " & (count mySelection) & " items selected." else --No objects were selected, so display an error message. display dialog "No InDesign objects are selected. Please select an object and try again." end if else --No documents were open, so display an error message. display dialog "No InDesign documents are open. Please open a document and try again." end ifend tell
VBScriptSet myInDesign = CreateObject("InDesign.Application.CS2")Rem First, check to see whether any InDesign documents are open.Rem If no documents are open, display an error message.If myInDesign.Documents.Count <> 0 Then If myInDesign.Selection.Count > 0 Then Rem Something is selected. If this were a real script, you would Rem now do something with the object or objects in the selection. MsgBox "You have " & CStr(myInDesign.Selection.Count) & " items selected." Else Rem Nothing is selected, so display an error message. MsgBox "No InDesign objects are selected. Please select an object and try again." End IfElse Rem No documents are open, so display an error message. MsgBox "No InDesign documents are open. Please open a file and try again."End If
JavaScript//First, check to see whether any InDesign documents are open.//If no documents are open, display an error message.if (app.documents.length > 0){ if (app.selection.length > 0) { //Something is selected. If this were a real script, you would //now do something with the object or objects in the selection. alert("You have " + app.selection.length + " items selected.") } else { //Nothing is selected, so display an error message. alert("Nothing is selected. Please select an object and try again.") }
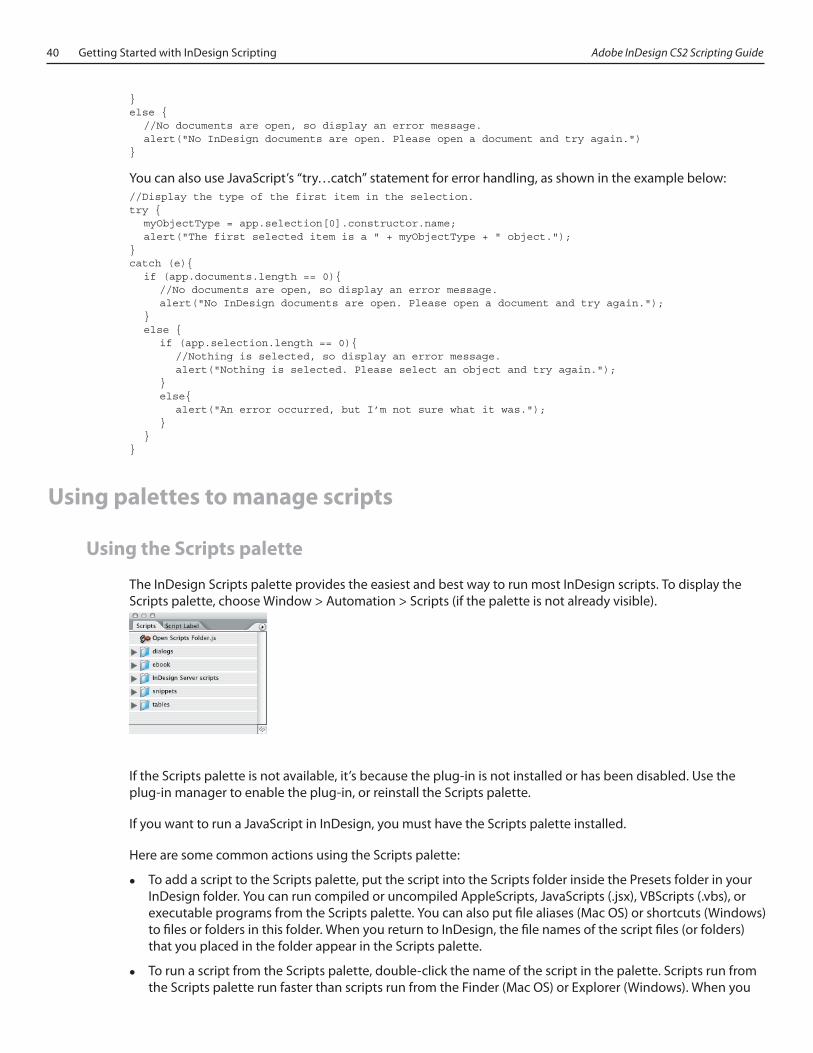
40 Getting Started with InDesign Scripting Adobe InDesign CS2 Scripting Guide
}else { //No documents are open, so display an error message. alert("No InDesign documents are open. Please open a document and try again.")}
You can also use JavaScript’s “try…catch” statement for error handling, as shown in the example below://Display the type of the first item in the selection.try { myObjectType = app.selection[0].constructor.name; alert("The first selected item is a " + myObjectType + " object."); } catch (e){ if (app.documents.length == 0){ //No documents are open, so display an error message. alert("No InDesign documents are open. Please open a document and try again."); } else { if (app.selection.length == 0){ //Nothing is selected, so display an error message. alert("Nothing is selected. Please select an object and try again."); } else{ alert("An error occurred, but I’m not sure what it was."); } }}
Using palettes to manage scripts
Using the Scripts palette
The InDesign Scripts palette provides the easiest and best way to run most InDesign scripts. To display the Scripts palette, choose Window > Automation > Scripts (if the palette is not already visible).
If the Scripts palette is not available, it’s because the plug-in is not installed or has been disabled. Use the plug-in manager to enable the plug-in, or reinstall the Scripts palette.
If you want to run a JavaScript in InDesign, you must have the Scripts palette installed.
Here are some common actions using the Scripts palette:
To add a script to the Scripts palette, put the script into the Scripts folder inside the Presets folder in your InDesign folder. You can run compiled or uncompiled AppleScripts, JavaScripts (.jsx), VBScripts (.vbs), or executable programs from the Scripts palette. You can also put file aliases (Mac OS) or shortcuts (Windows) to files or folders in this folder. When you return to InDesign, the file names of the script files (or folders) that you placed in the folder appear in the Scripts palette.
To run a script from the Scripts palette, double-click the name of the script in the palette. Scripts run from the Scripts palette run faster than scripts run from the Finder (Mac OS) or Explorer (Windows). When you
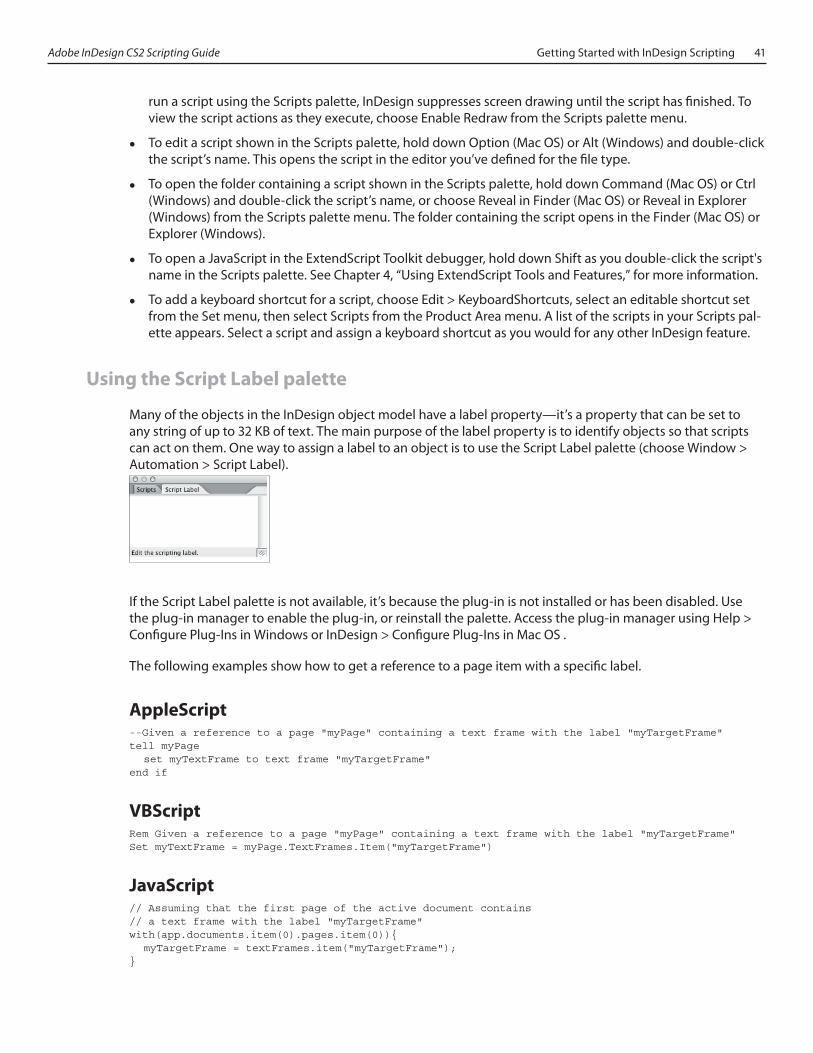
Adobe InDesign CS2 Scripting Guide Getting Started with InDesign Scripting 41
run a script using the Scripts palette, InDesign suppresses screen drawing until the script has finished. To view the script actions as they execute, choose Enable Redraw from the Scripts palette menu.
To edit a script shown in the Scripts palette, hold down Option (Mac OS) or Alt (Windows) and double-click the script’s name. This opens the script in the editor you’ve defined for the file type.
To open the folder containing a script shown in the Scripts palette, hold down Command (Mac OS) or Ctrl (Windows) and double-click the script’s name, or choose Reveal in Finder (Mac OS) or Reveal in Explorer (Windows) from the Scripts palette menu. The folder containing the script opens in the Finder (Mac OS) or Explorer (Windows).
To open a JavaScript in the ExtendScript Toolkit debugger, hold down Shift as you double-click the script's name in the Scripts palette. See Chapter 4, “Using ExtendScript Tools and Features,” for more information.
To add a keyboard shortcut for a script, choose Edit > KeyboardShortcuts, select an editable shortcut set from the Set menu, then select Scripts from the Product Area menu. A list of the scripts in your Scripts pal-ette appears. Select a script and assign a keyboard shortcut as you would for any other InDesign feature.
Using the Script Label palette
Many of the objects in the InDesign object model have a label property—it’s a property that can be set to any string of up to 32 KB of text. The main purpose of the label property is to identify objects so that scripts can act on them. One way to assign a label to an object is to use the Script Label palette (choose Window > Automation > Script Label).
If the Script Label palette is not available, it’s because the plug-in is not installed or has been disabled. Use the plug-in manager to enable the plug-in, or reinstall the palette. Access the plug-in manager using Help > Configure Plug-Ins in Windows or InDesign > Configure Plug-Ins in Mac OS .
The following examples show how to get a reference to a page item with a specific label.
AppleScript--Given a reference to a page "myPage" containing a text frame with the label "myTargetFrame"tell myPage set myTextFrame to text frame "myTargetFrame"end if
VBScriptRem Given a reference to a page "myPage" containing a text frame with the label "myTargetFrame"Set myTextFrame = myPage.TextFrames.Item("myTargetFrame")
JavaScript// Assuming that the first page of the active document contains// a text frame with the label "myTargetFrame"with(app.documents.item(0).pages.item(0)){ myTargetFrame = textFrames.item("myTargetFrame");}
42 Getting Started with InDesign Scripting Adobe InDesign CS2 Scripting Guide
Testing and troubleshootingScripting environments provide tools for monitoring the progress of your script as it runs. This makes it easier to find problems that your script might encounter or cause.
AppleScript debugging
The Apple Script Editor application doesn’t have extensive debugging tools, but it does have the AppleScript Event Log Window. To watch your script send commands to and receive information from InDesign:
1. Choose Controls > Open Event Log. The Script Editor displays the Event Log window.
2. Turn on the Show Events and Show Events Results options.
3. Run your script. As the script executes, you’ll see the commands sent to InDesign, and the InDesign responses. In addition, the Result window (choose Controls > Show Result) displays the value returned from the most recent script statement.
Third-party AppleScript editors, such as Script Debugger (from Late Night Software: www.latenightsw.com) offer more debugging features than the Apple Script Editor. If you will be writing more than a few simple scripts, we recommend that you acquire a script editor with better script debugging capabilities.
VBScript debugging
You can debug your VBScript using a Visual Basic debugger. In Visual Basic, you can stop your script at any point and step through the script one line at a time. You can also observe the values of variables defined in your script using the Watch and Locals windows—two valuable tool for debugging your scripts.
To view a variable in the Watch window:
1. Select the variable and choose Debug > Quick Watch. Visual Basic displays the Quick Watch dialog box.
2. Click Add. Visual Basic displays the Watch window.
3. To stop your script at a particular line (so that you can look at the Watch window), select the line and choose Debug > Toggle Breakpoint. When you run the script, Visual Basic stops at the breakpoint you set, and you can look at the values in your variables (if you’ve hidden the Watch window, you can display it again by choosing View > Watch Window).
4. Choose one of the following continuation options:
To execute the next line of your script, choose Debug > Step Into (or press F8 in Visual Basic 6 or F11 in Visual Basic.NET).
To continue normal execution of the script, choose Run > Start (or press F5) in Visual Basic 6 or Debug > Start (or press F5) in Visual Basic.NET.
JavaScript debugging
JavaScript debugging is described in Chapter 4, “Using ExtendScript Tools and Features.”
Adobe InDesign CS2 Scripting Guide Using ExtendScript Tools and Features 43
4 Using ExtendScript Tools and Features
ExtendScript is Adobe’s extended implementation of JavaScript, and is used by all Adobe Creative Suite 2 applications that provide a scripting interface. In addition to implementing the JavaScript language according to the W3C specification, ExtendScript provides certain additional features and utilities.
For help in developing, debugging, and testing scripts, ExtendScript provides:
The ExtendScript Toolkit , an interactive development and testing environment for ExtendScript.
A global debugging object, the Dollar ($) Object.
A reporting utility for ExtendScript elements, the ExtendScript Reflection Interface.
In addition, ExtendScript provides these tools and features:
A localization utility for providing user-interface string values in different languages. See the “Localiz-ing ExtendScript Strings” section.
Global functions for displaying short messages in dialog boxes; see the “User Notification Helper Func-tions” section.
An object type for specifying measurement values together with their units. See the “Specifying Mea-surement Values” section.
Tools for combining scripts, such as a #include directive, and import and export statements. See the “Modular Programming Support” section.
Support for extending or overriding math and logical operator behavior on a class-by-class basis. See the “Operator Overloading” section.
ExtendScript provides a common scripting environment for all Adobe Creative Suite 2 applications, and allows interapplication communication through scripts.
To identify specific Adobe Creative Suite 2 applications, scripts must use application and namespace specifiers as described in the “Application and namespace specifiers “ section.
Applications can run scripts automatically on startup. See the “Script Locations and Checking Application Installation” section.
For details about interapplication communication, see the Bridge JavaScript Reference, available with Adobe Creative Suite 2.
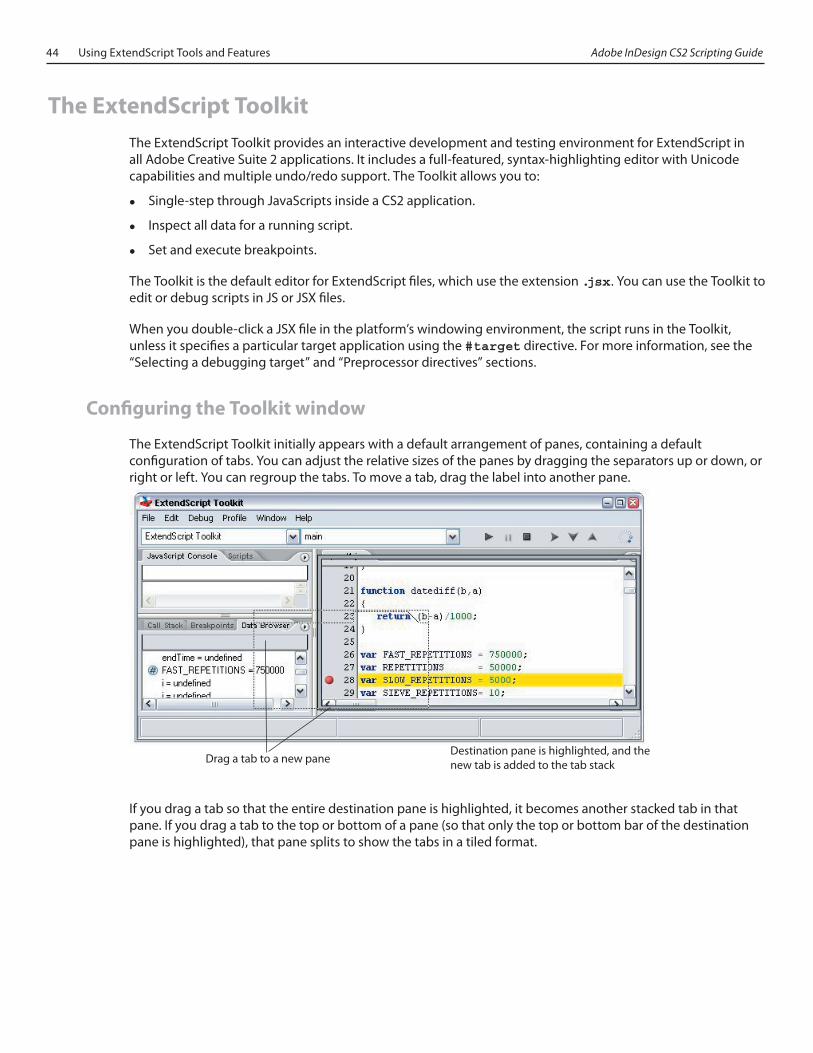
44 Using ExtendScript Tools and Features Adobe InDesign CS2 Scripting Guide
The ExtendScript ToolkitThe ExtendScript Toolkit provides an interactive development and testing environment for ExtendScript in all Adobe Creative Suite 2 applications. It includes a full-featured, syntax-highlighting editor with Unicode capabilities and multiple undo/redo support. The Toolkit allows you to:
Single-step through JavaScripts inside a CS2 application.
Inspect all data for a running script.
Set and execute breakpoints.
The Toolkit is the default editor for ExtendScript files, which use the extension .jsx. You can use the Toolkit to edit or debug scripts in JS or JSX files.
When you double-click a JSX file in the platform’s windowing environment, the script runs in the Toolkit, unless it specifies a particular target application using the #target directive. For more information, see the “Selecting a debugging target” and “Preprocessor directives” sections.
Configuring the Toolkit window
The ExtendScript Toolkit initially appears with a default arrangement of panes, containing a default configuration of tabs. You can adjust the relative sizes of the panes by dragging the separators up or down, or right or left. You can regroup the tabs. To move a tab, drag the label into another pane.
Drag a tab to a new paneDestination pane is highlighted, and the new tab is added to the tab stack
If you drag a tab so that the entire destination pane is highlighted, it becomes another stacked tab in that pane. If you drag a tab to the top or bottom of a pane (so that only the top or bottom bar of the destination pane is highlighted), that pane splits to show the tabs in a tiled format.
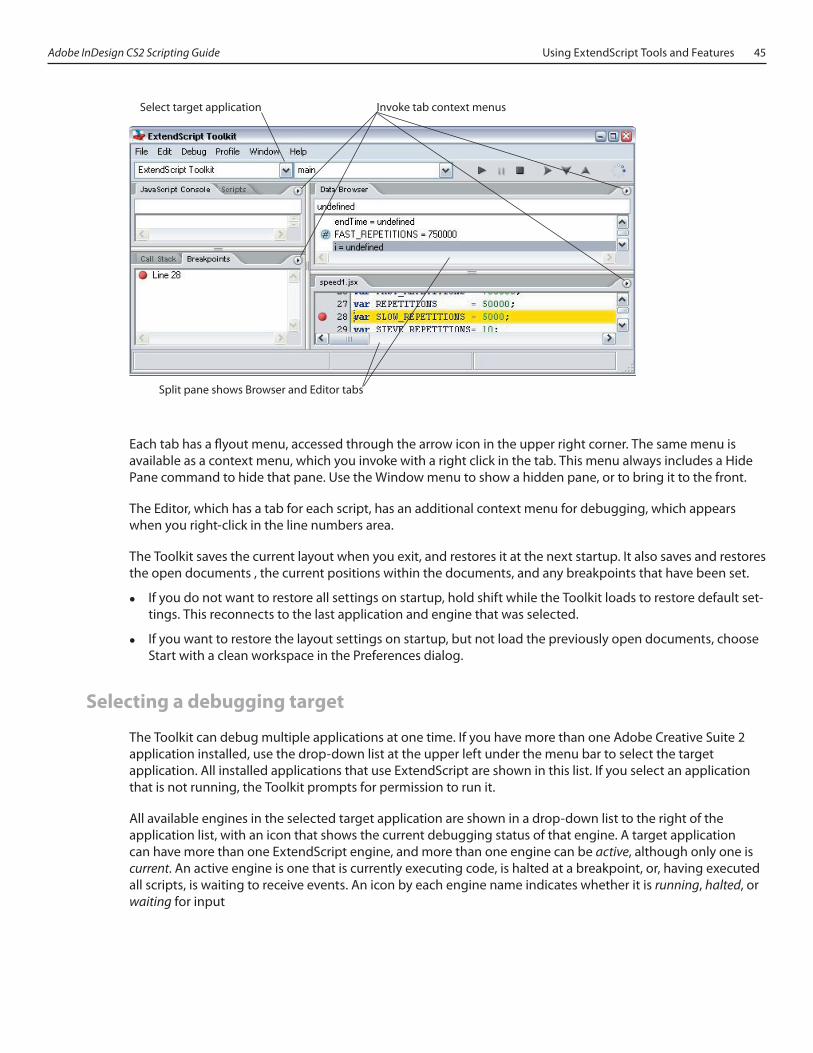
Adobe InDesign CS2 Scripting Guide Using ExtendScript Tools and Features 45
Select target application Invoke tab context menus
Split pane shows Browser and Editor tabs
Each tab has a flyout menu, accessed through the arrow icon in the upper right corner. The same menu is available as a context menu, which you invoke with a right click in the tab. This menu always includes a Hide Pane command to hide that pane. Use the Window menu to show a hidden pane, or to bring it to the front.
The Editor, which has a tab for each script, has an additional context menu for debugging, which appears when you right-click in the line numbers area.
The Toolkit saves the current layout when you exit, and restores it at the next startup. It also saves and restores the open documents , the current positions within the documents, and any breakpoints that have been set.
If you do not want to restore all settings on startup, hold shift while the Toolkit loads to restore default set-tings. This reconnects to the last application and engine that was selected.
If you want to restore the layout settings on startup, but not load the previously open documents, choose Start with a clean workspace in the Preferences dialog.
Selecting a debugging target
The Toolkit can debug multiple applications at one time. If you have more than one Adobe Creative Suite 2 application installed, use the drop-down list at the upper left under the menu bar to select the target application. All installed applications that use ExtendScript are shown in this list. If you select an application that is not running, the Toolkit prompts for permission to run it.
All available engines in the selected target application are shown in a drop-down list to the right of the application list, with an icon that shows the current debugging status of that engine. A target application can have more than one ExtendScript engine, and more than one engine can be active, although only one is current. An active engine is one that is currently executing code, is halted at a breakpoint, or, having executed all scripts, is waiting to receive events. An icon by each engine name indicates whether it is running, halted, or waiting for input
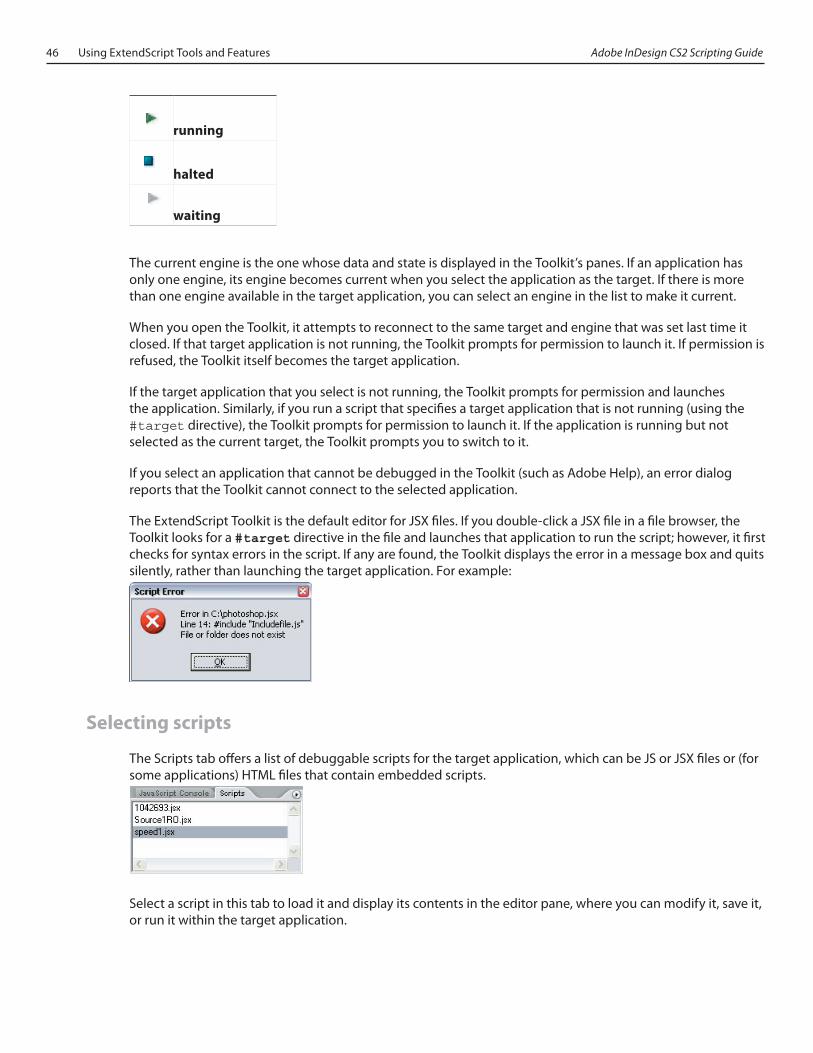
46 Using ExtendScript Tools and Features Adobe InDesign CS2 Scripting Guide
running
halted
waiting
The current engine is the one whose data and state is displayed in the Toolkit’s panes. If an application has only one engine, its engine becomes current when you select the application as the target. If there is more than one engine available in the target application, you can select an engine in the list to make it current.
When you open the Toolkit, it attempts to reconnect to the same target and engine that was set last time it closed. If that target application is not running, the Toolkit prompts for permission to launch it. If permission is refused, the Toolkit itself becomes the target application.
If the target application that you select is not running, the Toolkit prompts for permission and launches the application. Similarly, if you run a script that specifies a target application that is not running (using the #target directive), the Toolkit prompts for permission to launch it. If the application is running but not selected as the current target, the Toolkit prompts you to switch to it.
If you select an application that cannot be debugged in the Toolkit (such as Adobe Help), an error dialog reports that the Toolkit cannot connect to the selected application.
The ExtendScript Toolkit is the default editor for JSX files. If you double-click a JSX file in a file browser, the Toolkit looks for a #target directive in the file and launches that application to run the script; however, it first checks for syntax errors in the script. If any are found, the Toolkit displays the error in a message box and quits silently, rather than launching the target application. For example:
Selecting scripts
The Scripts tab offers a list of debuggable scripts for the target application, which can be JS or JSX files or (for some applications) HTML files that contain embedded scripts.
Select a script in this tab to load it and display its contents in the editor pane, where you can modify it, save it, or run it within the target application.
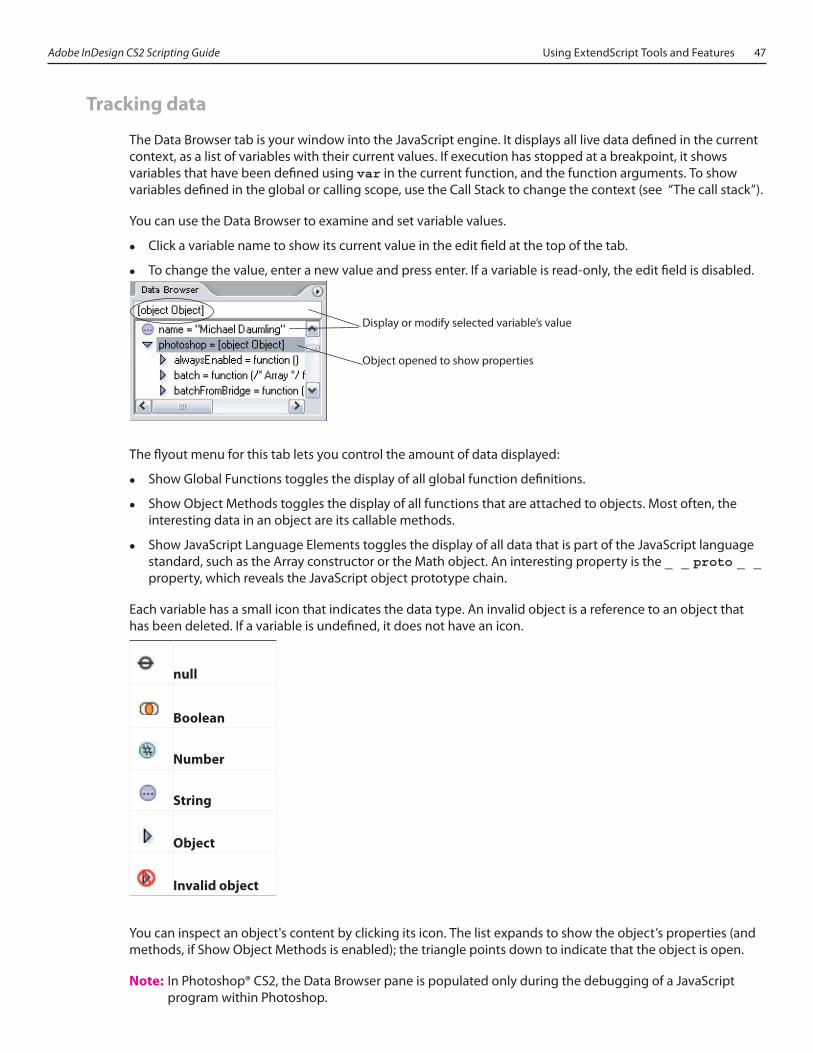
Adobe InDesign CS2 Scripting Guide Using ExtendScript Tools and Features 47
Tracking data
The Data Browser tab is your window into the JavaScript engine. It displays all live data defined in the current context, as a list of variables with their current values. If execution has stopped at a breakpoint, it shows variables that have been defined using var in the current function, and the function arguments. To show variables defined in the global or calling scope, use the Call Stack to change the context (see “The call stack”).
You can use the Data Browser to examine and set variable values.
Click a variable name to show its current value in the edit field at the top of the tab.
To change the value, enter a new value and press enter. If a variable is read-only, the edit field is disabled.
Display or modify selected variable’s value
Object opened to show properties
The flyout menu for this tab lets you control the amount of data displayed:
Show Global Functions toggles the display of all global function definitions.
Show Object Methods toggles the display of all functions that are attached to objects. Most often, the interesting data in an object are its callable methods.
Show JavaScript Language Elements toggles the display of all data that is part of the JavaScript language standard, such as the Array constructor or the Math object. An interesting property is the _ _ proto _ _ property, which reveals the JavaScript object prototype chain.
Each variable has a small icon that indicates the data type. An invalid object is a reference to an object that has been deleted. If a variable is undefined, it does not have an icon.
null
Boolean
Number
String
Object
Invalid object
You can inspect an object's content by clicking its icon. The list expands to show the object’s properties (and methods, if Show Object Methods is enabled); the triangle points down to indicate that the object is open.
Note: In Photoshop® CS2, the Data Browser pane is populated only during the debugging of a JavaScript program within Photoshop.
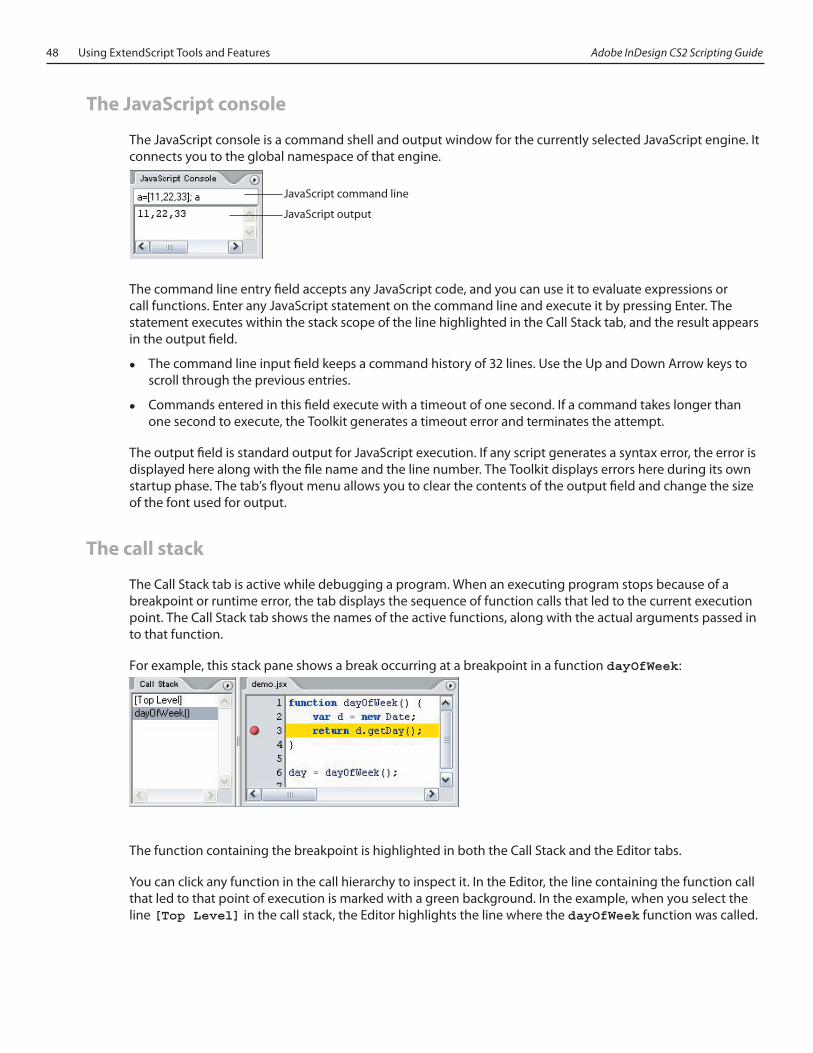
48 Using ExtendScript Tools and Features Adobe InDesign CS2 Scripting Guide
The JavaScript console
The JavaScript console is a command shell and output window for the currently selected JavaScript engine. It connects you to the global namespace of that engine.
JavaScript command line
JavaScript output
The command line entry field accepts any JavaScript code, and you can use it to evaluate expressions or call functions. Enter any JavaScript statement on the command line and execute it by pressing Enter. The statement executes within the stack scope of the line highlighted in the Call Stack tab, and the result appears in the output field.
The command line input field keeps a command history of 32 lines. Use the Up and Down Arrow keys to scroll through the previous entries.
Commands entered in this field execute with a timeout of one second. If a command takes longer than one second to execute, the Toolkit generates a timeout error and terminates the attempt.
The output field is standard output for JavaScript execution. If any script generates a syntax error, the error is displayed here along with the file name and the line number. The Toolkit displays errors here during its own startup phase. The tab’s flyout menu allows you to clear the contents of the output field and change the size of the font used for output.
The call stack
The Call Stack tab is active while debugging a program. When an executing program stops because of a breakpoint or runtime error, the tab displays the sequence of function calls that led to the current execution point. The Call Stack tab shows the names of the active functions, along with the actual arguments passed in to that function.
For example, this stack pane shows a break occurring at a breakpoint in a function dayOfWeek:
The function containing the breakpoint is highlighted in both the Call Stack and the Editor tabs.
You can click any function in the call hierarchy to inspect it. In the Editor, the line containing the function call that led to that point of execution is marked with a green background. In the example, when you select the line [Top Level] in the call stack, the Editor highlights the line where the dayOfWeek function was called.

Adobe InDesign CS2 Scripting Guide Using ExtendScript Tools and Features 49
Switching between the functions in the call hierarchy allows you to trace how the current function was called. The Console and Data Browser tabs coordinate with the Call Stack pane. When you select a function in the Call Stack:
The Console pane switches its scope to the execution context of that function , so you can inspect and modify its local variables. These would otherwise be inaccessible to the running JavaScript program from within a called function.
The Data Browser pane displays all data defined in the selected context.
The Script Editor
You can open any number of Script Editor tabs; each displays one Unicode source code document. The editor supports JavaScript syntax highlighting, JavaScript syntax checking, multiple undo and redo operations, and advanced search and replace functionality.
You can use the mouse or special keyboard shortcuts to move the insertion point or to select text in the editor.
Mouse navigation and selection
Click the left mouse button in the editor to move the position caret.
To select text with the mouse, click in unselected text, then drag over the text to be selected. If you drag above or below the currently displayed text, the text scrolls, continuing to select while scrolling. You can also double-click to select a word, or triple-click to select a line.
To initiate a drag-and-drop of selected text, click in the block of selected text, then drag to the destination. You can drag text from one editor pane to another. You can also drag text out of the Toolkit into another application that accepts dragged text, and drag text from another application into a Toolkit editor.
You can drop files from the Explorer or the Finder onto the Toolkit to open them in an editor.
Keyboard navigation and selection
Besides the usual keyboard input, the editor accepts these special movement keys. You can also select text by using a movement key while pressing Shift.
Enter Insert a Line Feed character
Backspace Delete character to the left
Delete Delete character to the right
Left arrow Move insertion point left one character
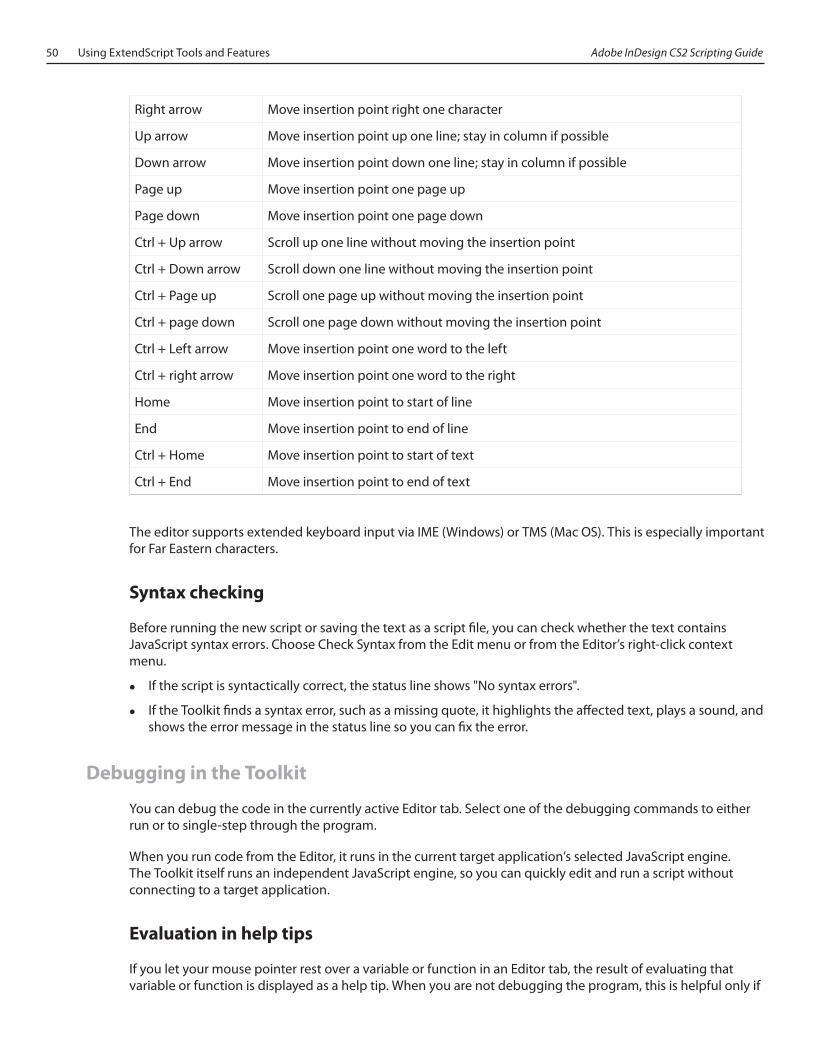
50 Using ExtendScript Tools and Features Adobe InDesign CS2 Scripting Guide
Right arrow Move insertion point right one character
Up arrow Move insertion point up one line; stay in column if possible
Down arrow Move insertion point down one line; stay in column if possible
Page up Move insertion point one page up
Page down Move insertion point one page down
Ctrl + Up arrow Scroll up one line without moving the insertion point
Ctrl + Down arrow Scroll down one line without moving the insertion point
Ctrl + Page up Scroll one page up without moving the insertion point
Ctrl + page down Scroll one page down without moving the insertion point
Ctrl + Left arrow Move insertion point one word to the left
Ctrl + right arrow Move insertion point one word to the right
Home Move insertion point to start of line
End Move insertion point to end of line
Ctrl + Home Move insertion point to start of text
Ctrl + End Move insertion point to end of text
The editor supports extended keyboard input via IME (Windows) or TMS (Mac OS). This is especially important for Far Eastern characters.
Syntax checking
Before running the new script or saving the text as a script file, you can check whether the text contains JavaScript syntax errors. Choose Check Syntax from the Edit menu or from the Editor’s right-click context menu.
If the script is syntactically correct, the status line shows "No syntax errors".
If the Toolkit finds a syntax error, such as a missing quote, it highlights the affected text, plays a sound, and shows the error message in the status line so you can fix the error.
Debugging in the Toolkit
You can debug the code in the currently active Editor tab. Select one of the debugging commands to either run or to single-step through the program.
When you run code from the Editor, it runs in the current target application’s selected JavaScript engine. The Toolkit itself runs an independent JavaScript engine, so you can quickly edit and run a script without connecting to a target application.
Evaluation in help tips
If you let your mouse pointer rest over a variable or function in an Editor tab, the result of evaluating that variable or function is displayed as a help tip. When you are not debugging the program, this is helpful only if
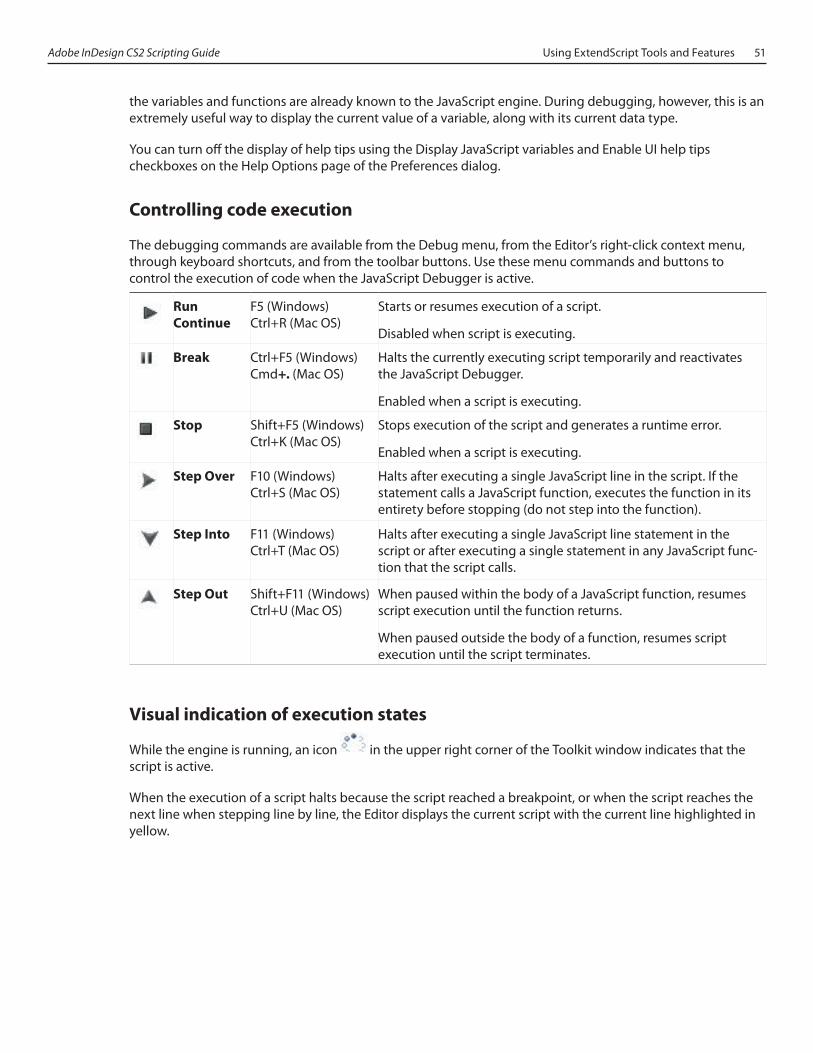
Adobe InDesign CS2 Scripting Guide Using ExtendScript Tools and Features 51
the variables and functions are already known to the JavaScript engine. During debugging, however, this is an extremely useful way to display the current value of a variable, along with its current data type.
You can turn off the display of help tips using the Display JavaScript variables and Enable UI help tips checkboxes on the Help Options page of the Preferences dialog.
Controlling code execution
The debugging commands are available from the Debug menu, from the Editor’s right-click context menu, through keyboard shortcuts, and from the toolbar buttons. Use these menu commands and buttons to control the execution of code when the JavaScript Debugger is active.
Run Continue
F5 (Windows) Ctrl+R (Mac OS)
Starts or resumes execution of a script.
Disabled when script is executing.
Break Ctrl+F5 (Windows) Cmd+. (Mac OS)
Halts the currently executing script temporarily and reactivates the JavaScript Debugger.
Enabled when a script is executing.
Stop Shift+F5 (Windows) Ctrl+K (Mac OS)
Stops execution of the script and generates a runtime error.
Enabled when a script is executing.
Step Over F10 (Windows) Ctrl+S (Mac OS)
Halts after executing a single JavaScript line in the script. If the statement calls a JavaScript function, executes the function in its entirety before stopping (do not step into the function).
Step Into F11 (Windows) Ctrl+T (Mac OS)
Halts after executing a single JavaScript line statement in the script or after executing a single statement in any JavaScript func-tion that the script calls.
Step Out Shift+F11 (Windows) Ctrl+U (Mac OS)
When paused within the body of a JavaScript function, resumes script execution until the function returns.
When paused outside the body of a function, resumes script execution until the script terminates.
Visual indication of execution states
While the engine is running, an icon in the upper right corner of the Toolkit window indicates that the script is active.
When the execution of a script halts because the script reached a breakpoint, or when the script reaches the next line when stepping line by line, the Editor displays the current script with the current line highlighted in yellow.
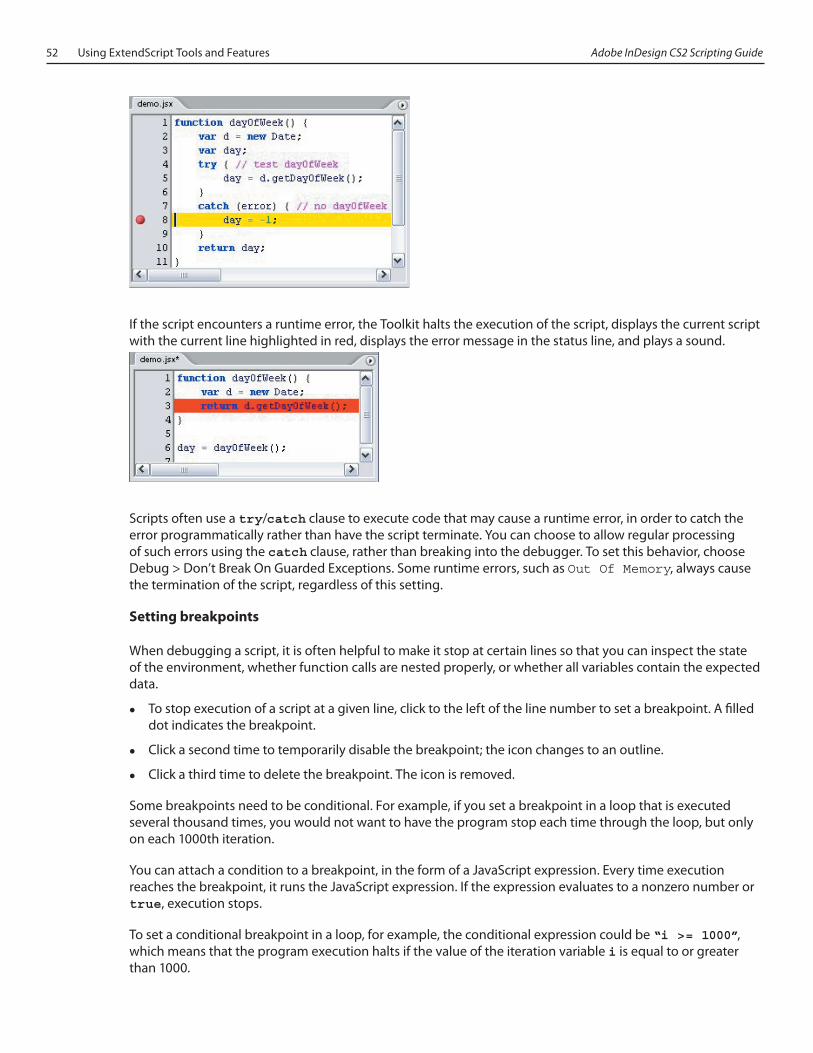
52 Using ExtendScript Tools and Features Adobe InDesign CS2 Scripting Guide
If the script encounters a runtime error, the Toolkit halts the execution of the script, displays the current script with the current line highlighted in red, displays the error message in the status line, and plays a sound.
Scripts often use a try/catch clause to execute code that may cause a runtime error, in order to catch the error programmatically rather than have the script terminate. You can choose to allow regular processing of such errors using the catch clause, rather than breaking into the debugger. To set this behavior, choose Debug > Don’t Break On Guarded Exceptions. Some runtime errors, such as Out Of Memory, always cause the termination of the script, regardless of this setting.
Setting breakpoints
When debugging a script, it is often helpful to make it stop at certain lines so that you can inspect the state of the environment, whether function calls are nested properly, or whether all variables contain the expected data.
To stop execution of a script at a given line, click to the left of the line number to set a breakpoint. A filled dot indicates the breakpoint.
Click a second time to temporarily disable the breakpoint; the icon changes to an outline.
Click a third time to delete the breakpoint. The icon is removed.
Some breakpoints need to be conditional. For example, if you set a breakpoint in a loop that is executed several thousand times, you would not want to have the program stop each time through the loop, but only on each 1000th iteration.
You can attach a condition to a breakpoint, in the form of a JavaScript expression. Every time execution reaches the breakpoint, it runs the JavaScript expression. If the expression evaluates to a nonzero number or true, execution stops.
To set a conditional breakpoint in a loop, for example, the conditional expression could be “i >= 1000”, which means that the program execution halts if the value of the iteration variable i is equal to or greater than 1000.
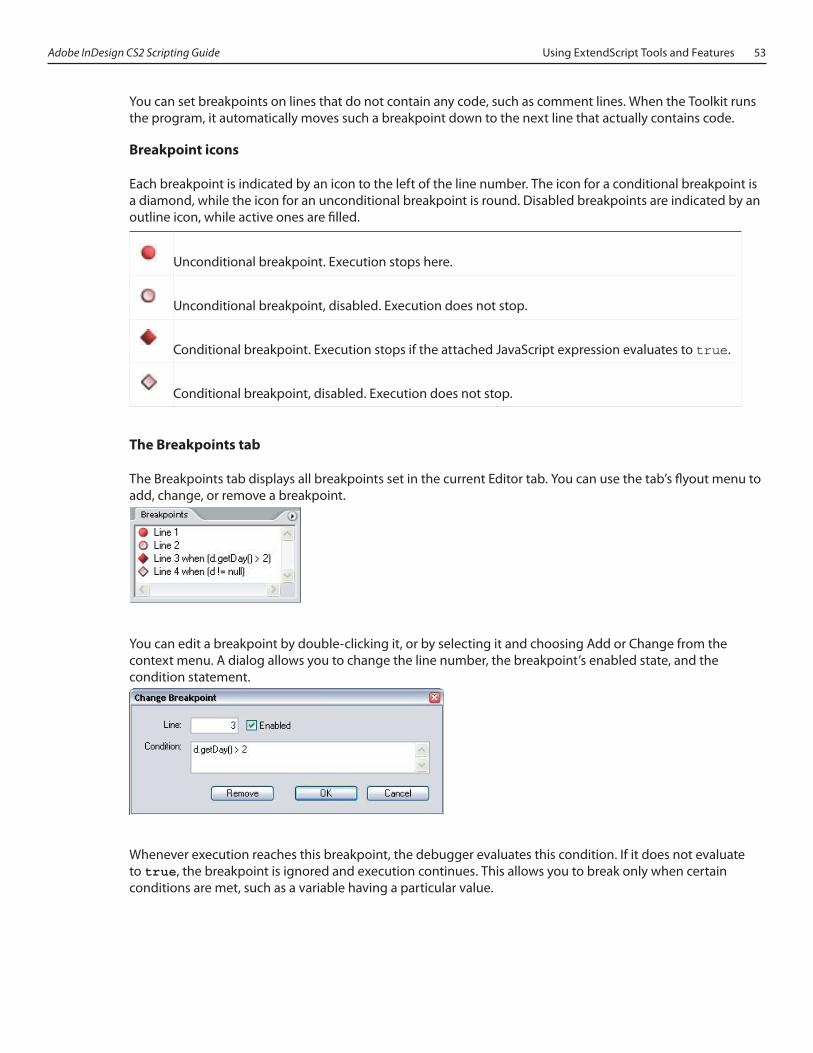
Adobe InDesign CS2 Scripting Guide Using ExtendScript Tools and Features 53
You can set breakpoints on lines that do not contain any code, such as comment lines. When the Toolkit runs the program, it automatically moves such a breakpoint down to the next line that actually contains code.
Breakpoint icons
Each breakpoint is indicated by an icon to the left of the line number. The icon for a conditional breakpoint is a diamond, while the icon for an unconditional breakpoint is round. Disabled breakpoints are indicated by an outline icon, while active ones are filled.
Unconditional breakpoint. Execution stops here.
Unconditional breakpoint, disabled. Execution does not stop.
Conditional breakpoint. Execution stops if the attached JavaScript expression evaluates to true.
Conditional breakpoint, disabled. Execution does not stop.
The Breakpoints tab
The Breakpoints tab displays all breakpoints set in the current Editor tab. You can use the tab’s flyout menu to add, change, or remove a breakpoint.
You can edit a breakpoint by double-clicking it, or by selecting it and choosing Add or Change from the context menu. A dialog allows you to change the line number, the breakpoint’s enabled state, and the condition statement.
Whenever execution reaches this breakpoint, the debugger evaluates this condition. If it does not evaluate to true, the breakpoint is ignored and execution continues. This allows you to break only when certain conditions are met, such as a variable having a particular value.
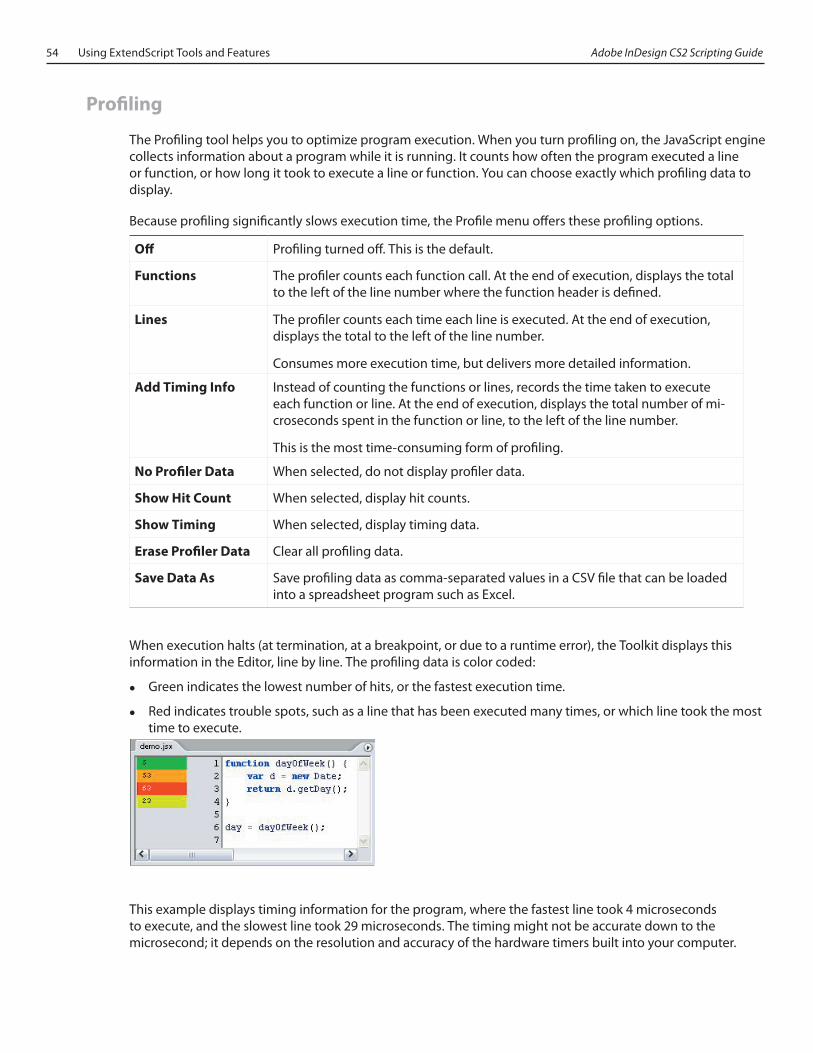
54 Using ExtendScript Tools and Features Adobe InDesign CS2 Scripting Guide
Profiling
The Profiling tool helps you to optimize program execution. When you turn profiling on, the JavaScript engine collects information about a program while it is running. It counts how often the program executed a line or function, or how long it took to execute a line or function. You can choose exactly which profiling data to display.
Because profiling significantly slows execution time, the Profile menu offers these profiling options.
Off Profiling turned off. This is the default.
Functions The profiler counts each function call. At the end of execution, displays the total to the left of the line number where the function header is defined.
Lines The profiler counts each time each line is executed. At the end of execution, displays the total to the left of the line number.
Consumes more execution time, but delivers more detailed information.
Add Timing Info Instead of counting the functions or lines, records the time taken to execute each function or line. At the end of execution, displays the total number of mi-croseconds spent in the function or line, to the left of the line number.
This is the most time-consuming form of profiling.
No Profiler Data When selected, do not display profiler data.
Show Hit Count When selected, display hit counts.
Show Timing When selected, display timing data.
Erase Profiler Data Clear all profiling data.
Save Data As Save profiling data as comma-separated values in a CSV file that can be loaded into a spreadsheet program such as Excel.
When execution halts (at termination, at a breakpoint, or due to a runtime error), the Toolkit displays this information in the Editor, line by line. The profiling data is color coded:
Green indicates the lowest number of hits, or the fastest execution time.
Red indicates trouble spots, such as a line that has been executed many times, or which line took the most time to execute.
This example displays timing information for the program, where the fastest line took 4 microseconds to execute, and the slowest line took 29 microseconds. The timing might not be accurate down to the microsecond; it depends on the resolution and accuracy of the hardware timers built into your computer.
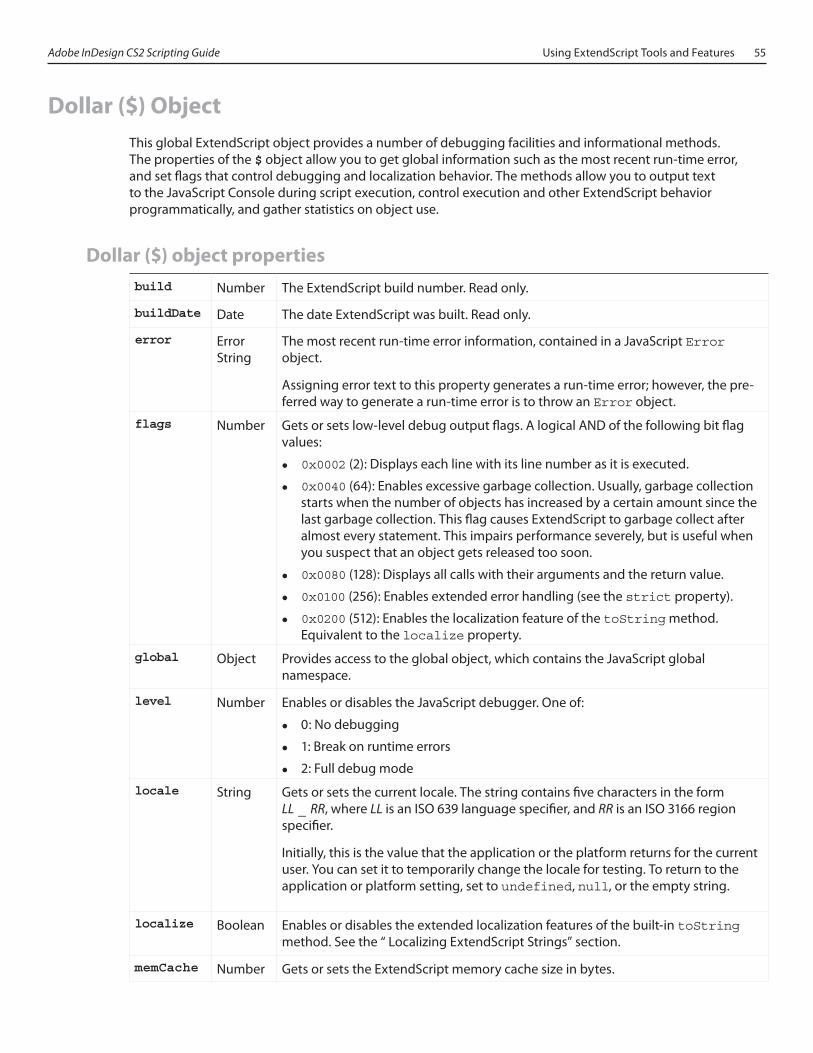
Adobe InDesign CS2 Scripting Guide Using ExtendScript Tools and Features 55
Dollar ($) Object This global ExtendScript object provides a number of debugging facilities and informational methods. The properties of the $ object allow you to get global information such as the most recent run-time error, and set flags that control debugging and localization behavior. The methods allow you to output text to the JavaScript Console during script execution, control execution and other ExtendScript behavior programmatically, and gather statistics on object use.
Dollar ($) object properties
build Number The ExtendScript build number. Read only.
buildDate Date The date ExtendScript was built. Read only.
error Error String
The most recent run-time error information, contained in a JavaScript Error object.
Assigning error text to this property generates a run-time error; however, the pre-ferred way to generate a run-time error is to throw an Error object.
flags Number Gets or sets low-level debug output flags. A logical AND of the following bit flag values:
0x0002 (2): Displays each line with its line number as it is executed.
0x0040 (64): Enables excessive garbage collection. Usually, garbage collection starts when the number of objects has increased by a certain amount since the last garbage collection. This flag causes ExtendScript to garbage collect after almost every statement. This impairs performance severely, but is useful when you suspect that an object gets released too soon.
0x0080 (128): Displays all calls with their arguments and the return value.
0x0100 (256): Enables extended error handling (see the strict property).
0x0200 (512): Enables the localization feature of the toString method. Equivalent to the localize property.
global Object Provides access to the global object, which contains the JavaScript global namespace.
level Number Enables or disables the JavaScript debugger. One of:
0: No debugging
1: Break on runtime errors
2: Full debug mode
locale String Gets or sets the current locale. The string contains five characters in the form LL _ RR, where LL is an ISO 639 language specifier, and RR is an ISO 3166 region specifier.
Initially, this is the value that the application or the platform returns for the current user. You can set it to temporarily change the locale for testing. To return to the application or platform setting, set to undefined, null, or the empty string.
localize Boolean Enables or disables the extended localization features of the built-in toString method. See the “ Localizing ExtendScript Strings” section.
memCache Number Gets or sets the ExtendScript memory cache size in bytes.
56 Using ExtendScript Tools and Features Adobe InDesign CS2 Scripting Guide
objects Number The total count of all JavaScript objects defined so far. Read only.
os String The current operating system version. Read only.
screens Array An array of objects containing information about the display screens attached to your computer. Each object has the properties left, top, right, and bottom, which contain the four corners of each screen in global coordinates. A property primary is true if that object describes the primary display.
strict Boolean When true, any attempt to write to a read-only property causes a runtime error. Some objects do not permit the creation of new properties when true.
version String The version number of the ExtendScript engine as a three-part number and de-scription; for example: “3.6.5 (debug)” Read only.
Dollar ($) object functions
about$.about ()
Displays the About box for the ExtendScript component, and returns the text of the About box as a string.
bp$.bp ([condition])
Executes a breakpoint at the current position. Returns undefined.
If no condition is needed, it is recommended that you use the JavaScript debugger statement in the script, rather than this method.
condition Optional. A string containing a JavaScript statement to be used as a condition. If the statement evaluates to true or nonzero when this point is reached, execution stops.
clearbp$.clearbp ([line])
Removes a breakpoint from the current script. Returns undefined.
line Optional. The line at which to clear the breakpoint. If 0 or not supplied, clears the breakpoint at the current line number.
gc$.gc ()
Initiates garbage collection. Returns undefined.
getenv$.getenv (envname)
Returns the value of the specified environment variable, or null if no such variable is defined.
envname The name of the environment variable.
list$.list ([classname])
Collects object information into a table and returns this table as a string. See the following “Object statistics” section.
classname Optional. The type of object about which to collect information. If not supplied, col-lects information about all objects currently defined.
setbp$.setbp ([line, condition])
Sets a breakpoint in the current script. Returns undefined.
If no arguments are needed, it is recommended that you use the JavaS-cript debugger statement in the script, rather than this method.
line Optional. The line at which to stop execution. If 0 or not supplied, sets the breakpoint at the current line number.
condition Optional. A string containing a JavaScript statement to be used for a conditional breakpoint. If the statement evaluates to true or nonzero when the line is reached, execution stops.
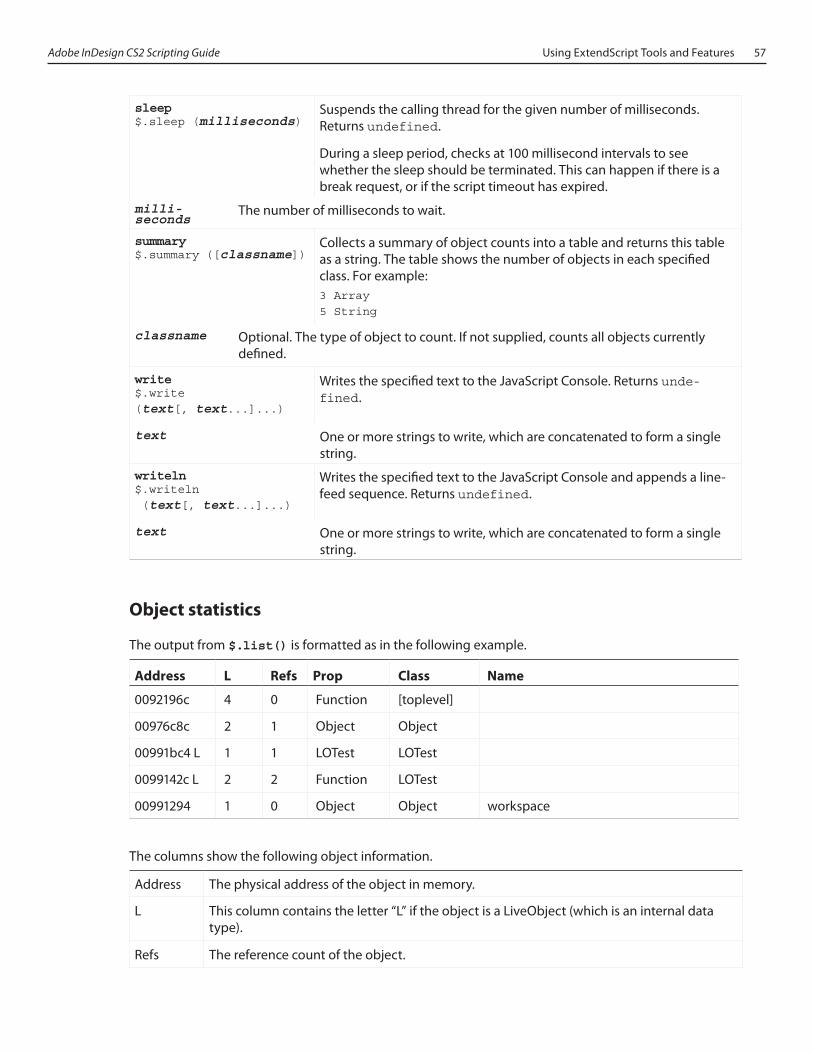
Adobe InDesign CS2 Scripting Guide Using ExtendScript Tools and Features 57
sleep$.sleep (milliseconds)
Suspends the calling thread for the given number of milliseconds. Returns undefined.
During a sleep period, checks at 100 millisecond intervals to see whether the sleep should be terminated. This can happen if there is a break request, or if the script timeout has expired.
milli-seconds
The number of milliseconds to wait.
summary$.summary ([classname])
Collects a summary of object counts into a table and returns this table as a string. The table shows the number of objects in each specified class. For example:3 Array5 String
classname Optional. The type of object to count. If not supplied, counts all objects currently defined.
write$.write (text[, text...]...)
Writes the specified text to the JavaScript Console. Returns unde-fined.
text One or more strings to write, which are concatenated to form a single string.
writeln$.writeln (text[, text...]...)
Writes the specified text to the JavaScript Console and appends a line-feed sequence. Returns undefined.
text One or more strings to write, which are concatenated to form a single string.
Object statistics
The output from $.list() is formatted as in the following example.
Address L Refs Prop Class Name
0092196c 4 0 Function [toplevel]
00976c8c 2 1 Object Object
00991bc4 L 1 1 LOTest LOTest
0099142c L 2 2 Function LOTest
00991294 1 0 Object Object workspace
The columns show the following object information.
Address The physical address of the object in memory.
L This column contains the letter “L” if the object is a LiveObject (which is an internal data type).
Refs The reference count of the object.
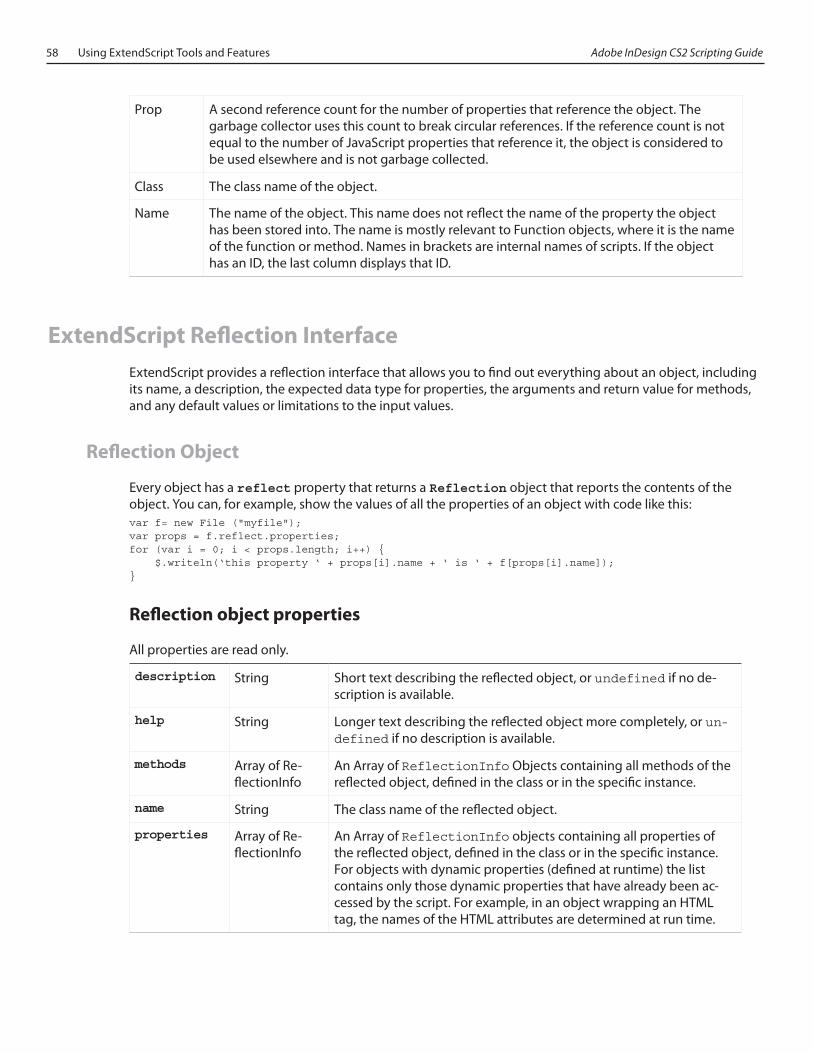
58 Using ExtendScript Tools and Features Adobe InDesign CS2 Scripting Guide
Prop A second reference count for the number of properties that reference the object. The garbage collector uses this count to break circular references. If the reference count is not equal to the number of JavaScript properties that reference it, the object is considered to be used elsewhere and is not garbage collected.
Class The class name of the object.
Name The name of the object. This name does not reflect the name of the property the object has been stored into. The name is mostly relevant to Function objects, where it is the name of the function or method. Names in brackets are internal names of scripts. If the object has an ID, the last column displays that ID.
ExtendScript Reflection InterfaceExtendScript provides a reflection interface that allows you to find out everything about an object, including its name, a description, the expected data type for properties, the arguments and return value for methods, and any default values or limitations to the input values.
Reflection Object
Every object has a reflect property that returns a Reflection object that reports the contents of the object. You can, for example, show the values of all the properties of an object with code like this:var f= new File ("myfile");var props = f.reflect.properties;for (var i = 0; i < props.length; i++) { $.writeln(‘this property ‘ + props[i].name + ‘ is ‘ + f[props[i].name]);}
Reflection object properties
All properties are read only.
description String Short text describing the reflected object, or undefined if no de-scription is available.
help String Longer text describing the reflected object more completely, or un-defined if no description is available.
methods Array of Re-flectionInfo
An Array of ReflectionInfo Objects containing all methods of the reflected object, defined in the class or in the specific instance.
name String The class name of the reflected object.
properties Array of Re-flectionInfo
An Array of ReflectionInfo objects containing all properties of the reflected object, defined in the class or in the specific instance. For objects with dynamic properties (defined at runtime) the list contains only those dynamic properties that have already been ac-cessed by the script. For example, in an object wrapping an HTML tag, the names of the HTML attributes are determined at run time.
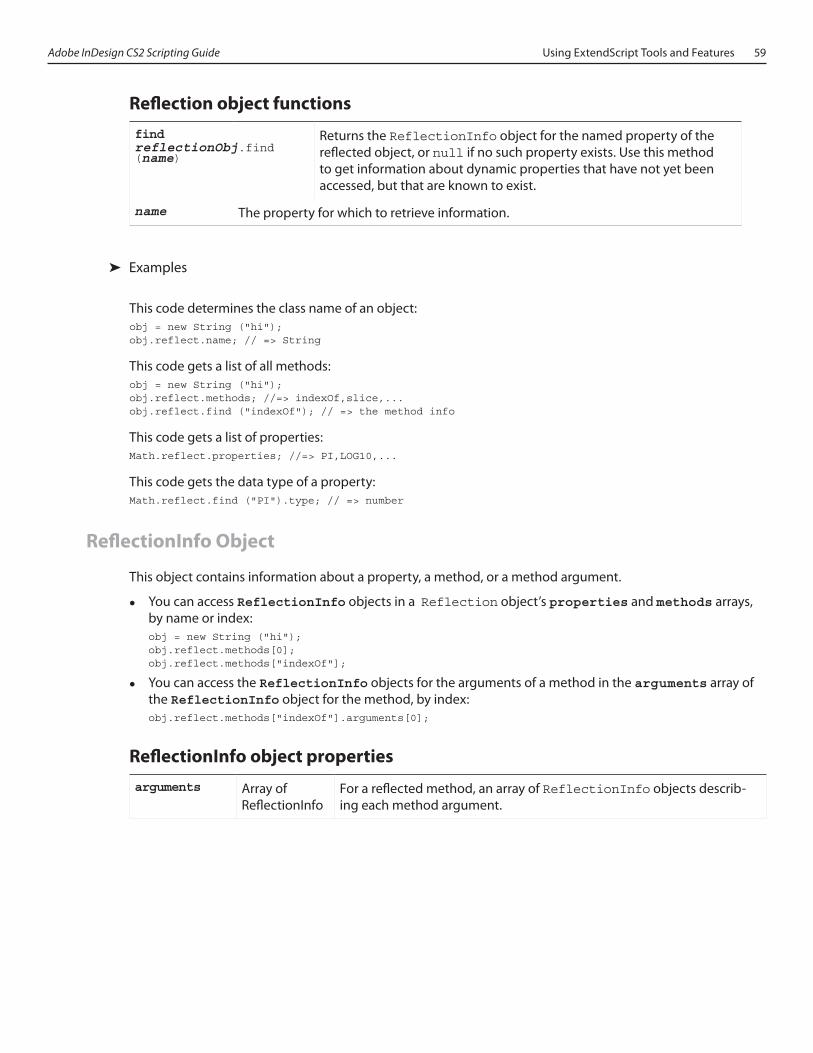
Adobe InDesign CS2 Scripting Guide Using ExtendScript Tools and Features 59
Reflection object functions
findreflectionObj.find (name)
Returns the ReflectionInfo object for the named property of the reflected object, or null if no such property exists. Use this method to get information about dynamic properties that have not yet been accessed, but that are known to exist.
name The property for which to retrieve information.
➤ Examples
This code determines the class name of an object:obj = new String ("hi");obj.reflect.name; // => String
This code gets a list of all methods:obj = new String ("hi");obj.reflect.methods; //=> indexOf,slice,...obj.reflect.find ("indexOf"); // => the method info
This code gets a list of properties:Math.reflect.properties; //=> PI,LOG10,...
This code gets the data type of a property:Math.reflect.find ("PI").type; // => number
ReflectionInfo Object
This object contains information about a property, a method, or a method argument.
You can access ReflectionInfo objects in a Reflection object’s properties and methods arrays, by name or index:obj = new String ("hi");obj.reflect.methods[0];obj.reflect.methods["indexOf"];
You can access the ReflectionInfo objects for the arguments of a method in the arguments array of the ReflectionInfo object for the method, by index:obj.reflect.methods["indexOf"].arguments[0];
ReflectionInfo object properties
arguments Array of ReflectionInfo
For a reflected method, an array of ReflectionInfo objects describ-ing each method argument.
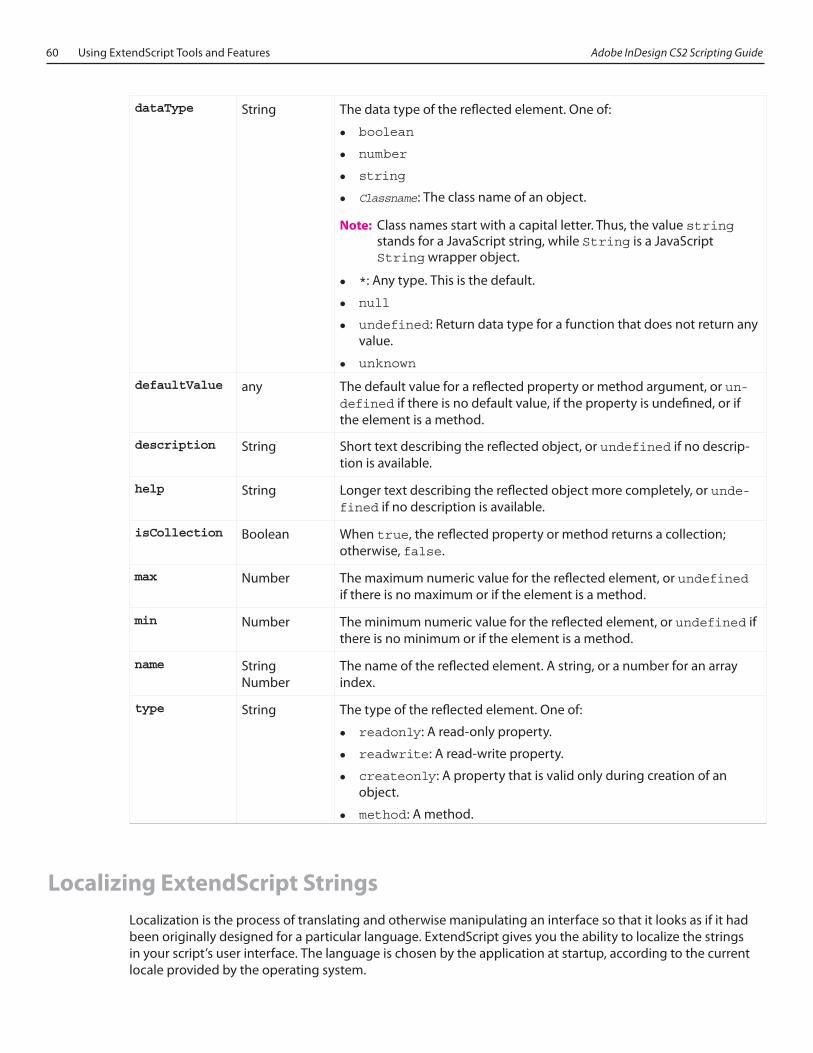
60 Using ExtendScript Tools and Features Adobe InDesign CS2 Scripting Guide
dataType String The data type of the reflected element. One of:
boolean
number
string
Classname: The class name of an object.
Note: Class names start with a capital letter. Thus, the value string stands for a JavaScript string, while String is a JavaScript String wrapper object.
*: Any type. This is the default.
null
undefined: Return data type for a function that does not return any value.
unknown
defaultValue any The default value for a reflected property or method argument, or un-defined if there is no default value, if the property is undefined, or if the element is a method.
description String Short text describing the reflected object, or undefined if no descrip-tion is available.
help String Longer text describing the reflected object more completely, or unde-fined if no description is available.
isCollection Boolean When true, the reflected property or method returns a collection; otherwise, false.
max Number The maximum numeric value for the reflected element, or undefined if there is no maximum or if the element is a method.
min Number The minimum numeric value for the reflected element, or undefined if there is no minimum or if the element is a method.
name String Number
The name of the reflected element. A string, or a number for an array index.
type String The type of the reflected element. One of:
readonly: A read-only property.
readwrite: A read-write property.
createonly: A property that is valid only during creation of an object.
method: A method.
Localizing ExtendScript StringsLocalization is the process of translating and otherwise manipulating an interface so that it looks as if it had been originally designed for a particular language. ExtendScript gives you the ability to localize the strings in your script’s user interface. The language is chosen by the application at startup, according to the current locale provided by the operating system.
Adobe InDesign CS2 Scripting Guide Using ExtendScript Tools and Features 61
For portions of your user interface that are displayed on the screen, you may want to localize the displayed text. You can localize any string explicitly using the Global localize function, which takes as its argument a localization object containing the localized versions of a string.
A localization object is a JavaScript object literal whose property names are locale names, and whose property values are the localized text strings. The locale name is a standard language code with an optional region identifier. For details of the syntax, see the “Locale names” section.
In this example, a msg object contains localized text strings for two locales. This object supplies the text for an alert dialog. msg = { en: "Hello, world", de: "Hallo Welt" }; alert (msg);
ExtendScript matches the current locale and platform to one of the object’s properties and uses the associated string. On a German system, for example, the property de: “Hallo Welt” is converted to the string “Hallo Welt”.
Variable values in localized strings
Some localization strings need to contain additional data whose position and order may change according to the language used.
You can include variables in the string values of the localization object, in the form %n. The variables are replaced in the returned string with the results of JavaScript expressions, supplied as additional arguments to the localize function. The variable %1 corresponds to the first additional argument, %2 to the second, and so on.
Because the replacement occurs after the localized string is chosen, the variable values are inserted in the correct position. For example:today = { en: "Today is %1/%2.", de: "Heute ist der %2.%1." };d = new Date();alert (localize (today, d.getMonth()+1, d.getDate()));
Enabling automatic localization
ExtendScript offers an automatic localization feature. When it is enabled, you can specify a localization object directly as the value of any property that takes a localizable string, without using the localize function. For example:msg = { en: "Yes", de: "Ja", fr: "Oui" }; alert (msg);
To use automatic translation of localization objects, you must enable localization in your script with this statement:$.localize = true;
The localize function always performs its translation, regardless of the setting of the $.localize variable. For example:msg = { en: "Yes", de: "Ja", fr: "Oui" }; //Only works if the $.localize=truealert (msg); //Always works, regardless of $.localize valuealert ( localize (msg));
If you need to include variables in the localized strings, use the localize function.
62 Using ExtendScript Tools and Features Adobe InDesign CS2 Scripting Guide
Locale names
A locale name is an identifier string in that contains an ISO 639 language specifier, and optionally an ISO 3166 region specifier, separated from the language specifier by an underscore.
The ISO 639 standard defines a set of two-letter language abbreviations, such as en for English and de for German.
The ISO 3166 standard defines a region code, another two-letter identifier, which you can optionally ap-pend to the language identifier with an underscore. For example, en _ US identifies U.S. English, while en _ GB identifies British English.
This object defines one message for British English, another for all other flavors of English, and another for all flavors of German:message = { en_GB: "Please select a colour." en: "Please select a colour." de: "Bitte wählen Sie eine Farbe."};
If you need to specify different messages for different platforms, you can append another underline character and the name of the platform, one of Win, Mac , or Unix. For example, this objects defines one message in British English to be displayed in Mac OS, one for all other flavors of English in Mac OS, and one for all other flavors of English on all other platforms:pressMsg = { en_GB_Mac: "Press Cmd-S to select a colour.", en_Mac: "Press Cmd-S to select a color.", en: "Press Ctrl-S to select a color."};
All of these identifiers are case sensitive. For example, EN _ US is not valid.
➤ How locale names are resolved
1. ExtendScript gets the hosting application’s locale; for example, en _ US.
2. It appends the platform identifier; for example, en _ US _ Win.
3. It looks for a matching property, and if found, returns the value string.
4. If not found, it removes the platform identifier (for example, en _ US) and retries.
5. If not found, it removes the region identifier (for example, en) and retries.
6. If not found, it tries the identifier en (that is, the default language is English).
7. If not found, it returns the entire localizer object.
Testing localization
ExtendScript stores the current locale in the variable $.locale. This variable is updated whenever the locale of the hosting application changes.
To test your localized strings, you can temporarily reset the locale. To restore the original behavior, set the variable to null, false, 0, or the empty string. An example:$.locale = "ru"; // try your Russian messages$.locale = null; // restore to the locale of the app
Adobe InDesign CS2 Scripting Guide Using ExtendScript Tools and Features 63
Global localize function
The globally available localize function can be used to provide localized strings anywhere a displayed text value is specified.
localize localize (localization_obj[, args])localize (ZString)
Returns the localized string for the current locale.
localization_obj A JavaScript object literal whose property names are locale names, and whose property values are the localized text strings. The locale name is an identifier as specified in the ISO 3166 standard, a set of two-letter language abbrevia-tions, such as “en” for English and “de” for German.
For example:btnText = { en: "Yes", de: "Ja", fr: "Oui" }; b1 = w.add ("button", undefined, localize (btnText));
The string value of each property can contain variables in the form %1, %2, and so on, corresponding to additional arguments. The variable is replaced with the result of evaluating the corresponding argument in the returned string.
args Optional. Additional JavaScript expressions matching variables in the string values supplied in the localization object. The first argument corresponds to the variable %1, the second to %2, and so on.
Each expression is evaluated and the result inserted in the variable’s position in the returned string.
➤ Example
today = { en: "Today is %1/%2", de: "Heute ist der %2.%1." };d = new Date();alert (localize (today, d.getMonth()+1, d.getDate()));
ZString Internal use only. A ZString is an internal Adobe format for localized strings, which you might see in Adobe scripts. It is a string that begins with $$$ and contains a path to the localized string in an installed ZString dictionary. For example:w = new Window ("dialog", localize ("$$$/UI/title1=Sample"));
User notification helper functionsExtendScript provides a set of globally available functions that allow you to display short messages to the user in platform-standard dialog boxes. There are three types of message dialogs:
Alert: Displays a dialog containing a short message and an OK button.
Confirm : Displays a dialog containing a short message and two buttons, Yes and No, allowing the user to accept or reject an action.
Prompt: Displays a dialog containing a short message, a text entry field, and OK and Cancel buttons, allow-ing the user to supply a value to the script.
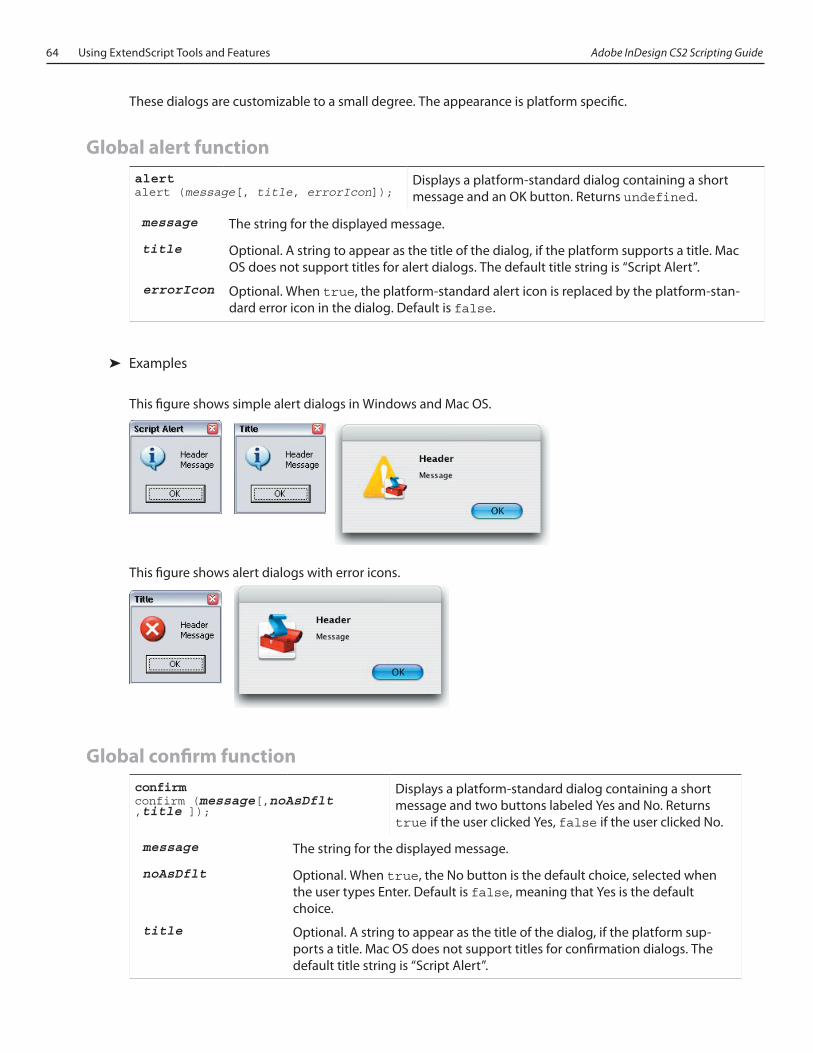
64 Using ExtendScript Tools and Features Adobe InDesign CS2 Scripting Guide
These dialogs are customizable to a small degree. The appearance is platform specific.
Global alert function
alert alert (message[, title, errorIcon]);
Displays a platform-standard dialog containing a short message and an OK button. Returns undefined.
message The string for the displayed message.
title Optional. A string to appear as the title of the dialog, if the platform supports a title. Mac OS does not support titles for alert dialogs. The default title string is “Script Alert”.
errorIcon Optional. When true, the platform-standard alert icon is replaced by the platform-stan-dard error icon in the dialog. Default is false.
➤ Examples
This figure shows simple alert dialogs in Windows and Mac OS.
This figure shows alert dialogs with error icons.
Global confirm function
confirm confirm (message[,noAsDflt ,title ]);
Displays a platform-standard dialog containing a short message and two buttons labeled Yes and No. Returns true if the user clicked Yes, false if the user clicked No.
message The string for the displayed message.
noAsDflt Optional. When true, the No button is the default choice, selected when the user types Enter. Default is false, meaning that Yes is the default choice.
title Optional. A string to appear as the title of the dialog, if the platform sup-ports a title. Mac OS does not support titles for confirmation dialogs. The default title string is “Script Alert”.
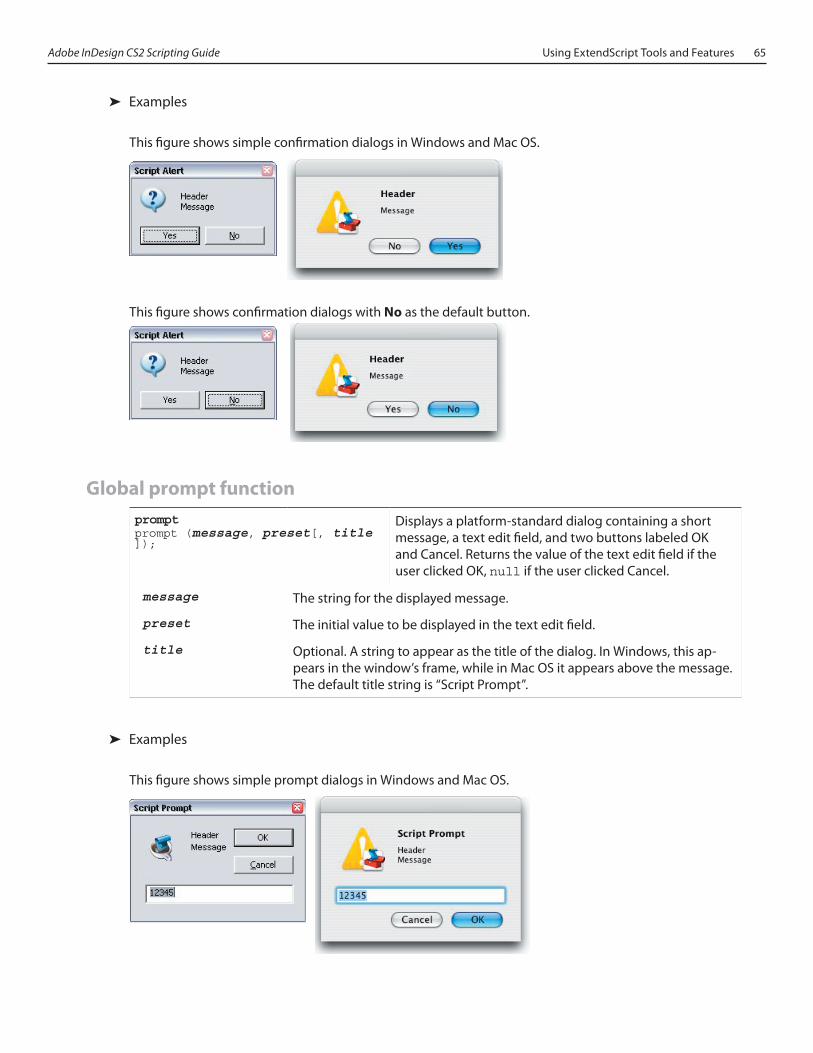
Adobe InDesign CS2 Scripting Guide Using ExtendScript Tools and Features 65
➤ Examples
This figure shows simple confirmation dialogs in Windows and Mac OS.
This figure shows confirmation dialogs with No as the default button.
Global prompt function
prompt prompt (message, preset[, title ]);
Displays a platform-standard dialog containing a short message, a text edit field, and two buttons labeled OK and Cancel. Returns the value of the text edit field if the user clicked OK, null if the user clicked Cancel.
message The string for the displayed message.
preset The initial value to be displayed in the text edit field.
title Optional. A string to appear as the title of the dialog. In Windows, this ap-pears in the window’s frame, while in Mac OS it appears above the message. The default title string is “Script Prompt”.
➤ Examples
This figure shows simple prompt dialogs in Windows and Mac OS.
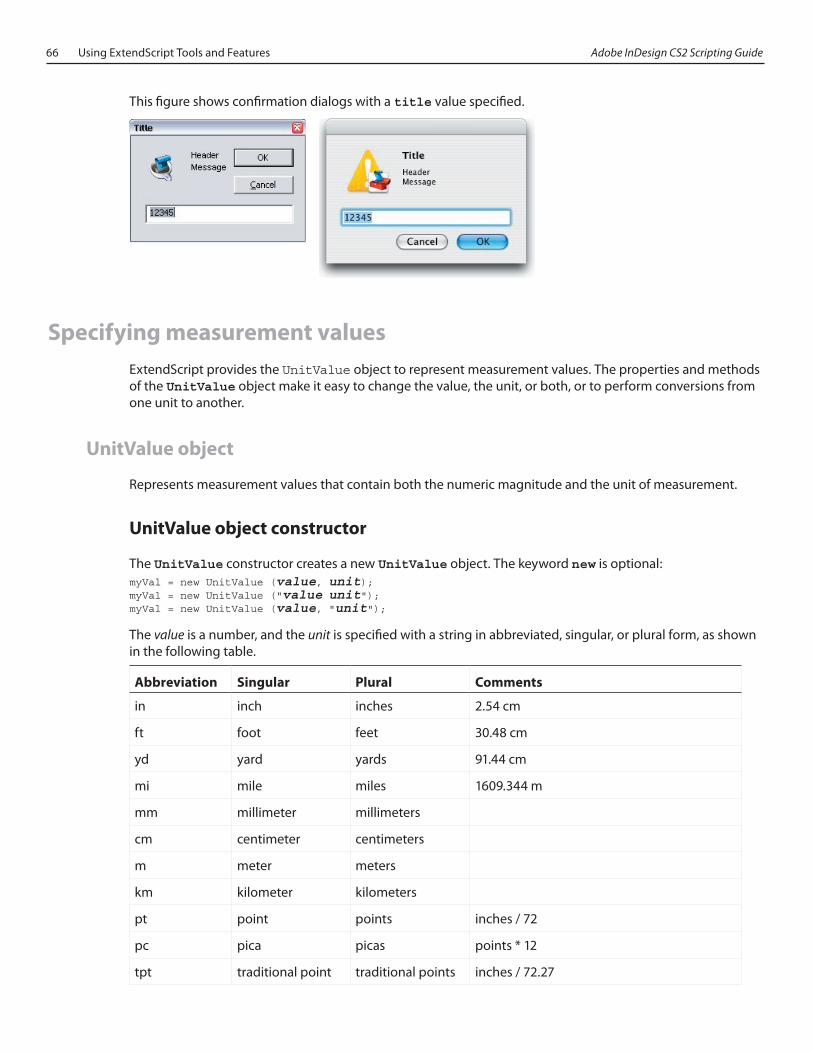
66 Using ExtendScript Tools and Features Adobe InDesign CS2 Scripting Guide
This figure shows confirmation dialogs with a title value specified.
Specifying measurement values ExtendScript provides the UnitValue object to represent measurement values. The properties and methods of the UnitValue object make it easy to change the value, the unit, or both, or to perform conversions from one unit to another.
UnitValue object
Represents measurement values that contain both the numeric magnitude and the unit of measurement.
UnitValue object constructor
The UnitValue constructor creates a new UnitValue object. The keyword new is optional:myVal = new UnitValue (value, unit);myVal = new UnitValue ("value unit");myVal = new UnitValue (value, "unit");
The value is a number, and the unit is specified with a string in abbreviated, singular, or plural form, as shown in the following table.
Abbreviation Singular Plural Comments
in inch inches 2.54 cm
ft foot feet 30.48 cm
yd yard yards 91.44 cm
mi mile miles 1609.344 m
mm millimeter millimeters
cm centimeter centimeters
m meter meters
km kilometer kilometers
pt point points inches / 72
pc pica picas points * 12
tpt traditional point traditional points inches / 72.27
Adobe InDesign CS2 Scripting Guide Using ExtendScript Tools and Features 67
tpc traditional pica traditional picas 12 tpt
ci cicero ciceros 12.7872 pt
px pixel pixels baseless (see below)
% percent percent baseless (see below)
If an unknown unit type is supplied, the type is set to “?”, and the UnitValue object prints as “UnitValue 0.00000”.
For example, all of the following formats are equivalent:myVal = new UnitValue (12, "cm");myVal = new UnitValue ("12 cm");myVal = UnitValue ("12 centimeters");
UnitValue object properties
baseUnit UnitValue A UnitValue Object that defines the size of one pixel, or a total size to use as a base for percentage values. This is used as the base conversion unit for pixels and percentages; see the “Converting pixel and percentage values” section .
Default is 0.013889 inches (1/72 in), which is the base conversion unit for pixels at 72 dpi. Set to null to restore the default.
type String The unit type in abbreviated form; for example, “cm” or “in”.
value Number The numeric measurement value.
UnitValue object functions
asunitValueObj.as (unit)
Returns the numeric value of this object in the given unit.
If the unit is unknown or cannot be computed, generates a run-time error.
unit The unit type in abbreviated form; for example, “cm” or “in”.
convertunitValueObj.convert (unit)
Converts this object to the given unit, resetting the type and value accordingly. Returns true if the conversion is successful. If the unit is unknown or the object cannot be converted, generates a run-time error and returns false.
unit The unit type in abbreviated form; for example, “cm” or “in”.
Converting pixel and percentage values
Converting measurements among different units requires a common base unit. For example, for length, the meter is the base unit. All length units can be converted into meters, which makes it possible to convert any length unit into any other length unit.
Pixels and percentages do not have a standard common base unit. Pixel measurements are relative to display resolution , and percentages are relative to an absolute total size.
68 Using ExtendScript Tools and Features Adobe InDesign CS2 Scripting Guide
To convert pixels into length units, you must know the size of a single pixel. The size of a pixel depends on the display resolution. A common resolution measurement is 72 dpi, which means that there are 72 pixels to the inch. The conversion base for pixels at 72 dpi is 0.013889 inches (1/72 inch).
Percentage values are relative to a total measurement. For example, 10% of 100 inches is 10 inches, while 10% of 1 meter is 0.1 meters. The conversion base of a percentage is the unit value corresponding to 100%.
The default baseUnit of a unitValue object is 0.013889 inches, the base for pixels at 72 dpi. If the unitValue is for pixels at any other dpi, or for a percentage value, you must set the baseUnit value accordingly. The baseUnit value is itself a unitValue object, containing both a magnitude and a unit.
For a system using a different dpi, you can change the baseUnit value in the UnitValue class, thus changing the default for all new unitValue objects. For example, to double the resolution of pixels:
UnitValue.baseUnit = UnitValue (1/144, "in"); //144 dpi
To restore the default, assign null to the class property:UnitValue.baseUnit = null; //restore default
You can override the default value for any particular unitValue object by setting the property in that object. For example, to create a unitValue object for pixels with 96 dpi:pixels = UnitValue (10, "px");myPixBase = UnitValue (1/96, "in");pixels.baseUnit = myPixBase;
For percentage measurements, set the baseUnit property to the measurement value for 100%. For example, to create a unitValue object for 40 % of 10 feet:myPctVal = UnitValue (40, "%");myBase = UnitValue (10, "ft")myPctVal.baseUnit = myBase;
Use the as method to get to a percentage value as a unit value:myFootVal = myPctVal.as ("ft"); // => 4myInchVal = myPctVal.as ("in"); // => 36
You can convert a unitValue from an absolute measurement to pixels or percents in the same way:myMeterVal = UnitValue (10, "m"); // 10 metersmyBase = UnitValue (1, "km"); myMeterVal.baseUnit = myBase; //as a percentage of 1 kilometerpctOfKm = myMeterVal.as (‘%’); // => 1myVal = UnitValue ("1 in"); // Define measurement in inches// convert to pixels using default basemyVal.convert ("px"); // => value=72 type=px
Computing with unit values
UnitValue objects can be used in computational JavaScript expressions. The way the value is used depends on the type of operator.
Unary operators (~, !, +, -)
~unitValue The numeric value is converted to a 32-bit integer with inverted bits.
!unitValue Result is true if the numeric value is nonzero, false if it is not.
+unitValue Result is the numeric value.
-unitValue Result is the negated numeric value.
Binary operators (+, -, *, /, %)
Adobe InDesign CS2 Scripting Guide Using ExtendScript Tools and Features 69
If one operand is unitValue object and the other is a number, the operation is applied to the number and the numeric value of the object. The expression returns a new unitValue object with the result as its value. For example:val = new UnitValue ("10 cm");res = val * 20;// res is a UnitValue (200, "cm");
If both operands are unitValue objects, JavaScript converts the right operand to the same unit as the left operand and applies the operation to the resulting values. The expression returns a new unitValue object with the unit of the left operand, and the result value. For example:a = new UnitValue ("1 m");b = new UnitValue ("10 cm");a + b; // res is a UnitValue (1.1, "m");b + a; // res is a UnitValue (110, "cm");
Comparisons (=, ==, <, >, <=, >=)
If one operand is a unitValue object and the other is a number, JavaScript compares the number with the unitValue’s numeric value.
If both operands are unitValue objects, JavaScript converts both objects to the same unit, and compares the converted numeric values.
For example:a = new UnitValue ("98 cm");b = new UnitValue ("1 m");a < b; // => truea < 1; // => falsea == 98; // => true
Modular programming supportExtendScript provides support for a modular approach to scripting by allowing you to include one script in another as a resource, and allowing a script to export definitions that can be imported and used in another script.
Preprocessor directives
ExtendScript provides preprocessor directives for including external scripts, naming scripts, specifying an ExtendScript engine, and setting certain flags. You can specify these in two ways:
With a C-style statement starting with the # character:#include "file.jsxinc"
In a comment whose text starts with the @ character:// @include "file.jsxinc"
When a directive takes one or more arguments, and an argument contains any nonalphanumeric characters, the argument must be enclosed in single or double quotes. This is generally the case with paths and file names, for example, which contain dots and slashes.
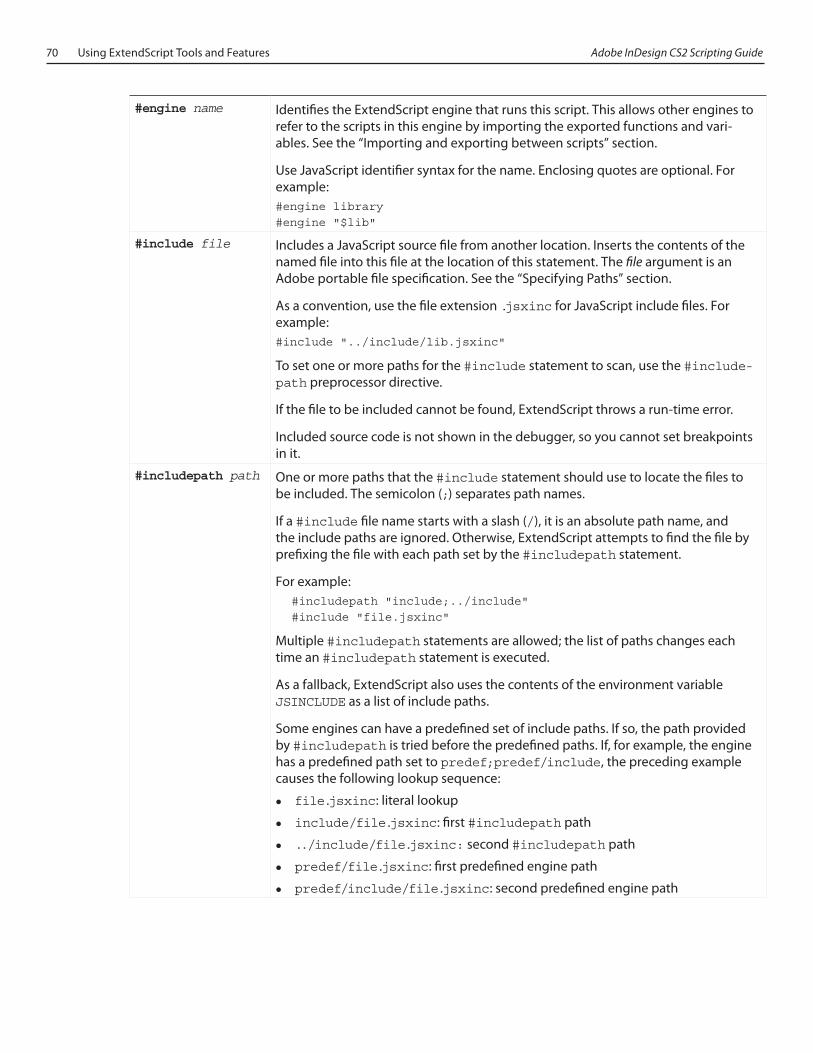
70 Using ExtendScript Tools and Features Adobe InDesign CS2 Scripting Guide
#engine name Identifies the ExtendScript engine that runs this script. This allows other engines to refer to the scripts in this engine by importing the exported functions and vari-ables. See the “Importing and exporting between scripts” section.
Use JavaScript identifier syntax for the name. Enclosing quotes are optional. For example:#engine library#engine "$lib"
#include file Includes a JavaScript source file from another location. Inserts the contents of the named file into this file at the location of this statement. The file argument is an Adobe portable file specification. See the “Specifying Paths” section.
As a convention, use the file extension .jsxinc for JavaScript include files. For example:#include "../include/lib.jsxinc"
To set one or more paths for the #include statement to scan, use the #include-path preprocessor directive.
If the file to be included cannot be found, ExtendScript throws a run-time error.
Included source code is not shown in the debugger, so you cannot set breakpoints in it.
#includepath path One or more paths that the #include statement should use to locate the files to be included. The semicolon (;) separates path names.
If a #include file name starts with a slash (/), it is an absolute path name, and the include paths are ignored. Otherwise, ExtendScript attempts to find the file by prefixing the file with each path set by the #includepath statement.
For example: #includepath "include;../include" #include "file.jsxinc"
Multiple #includepath statements are allowed; the list of paths changes each time an #includepath statement is executed.
As a fallback, ExtendScript also uses the contents of the environment variable JSINCLUDE as a list of include paths.
Some engines can have a predefined set of include paths. If so, the path provided by #includepath is tried before the predefined paths. If, for example, the engine has a predefined path set to predef;predef/include, the preceding example causes the following lookup sequence:
file.jsxinc: literal lookup
include/file.jsxinc: first #includepath path
../include/file.jsxinc: second #includepath path
predef/file.jsxinc: first predefined engine path
predef/include/file.jsxinc: second predefined engine path
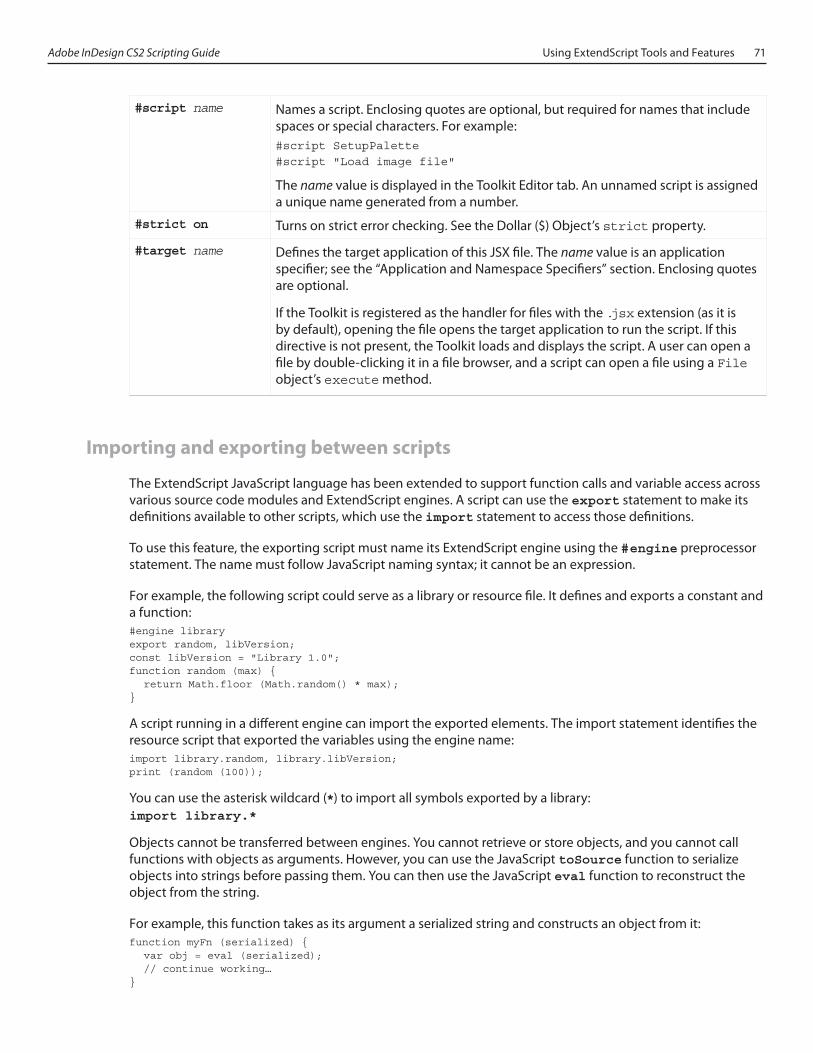
Adobe InDesign CS2 Scripting Guide Using ExtendScript Tools and Features 71
#script name Names a script. Enclosing quotes are optional, but required for names that include spaces or special characters. For example:#script SetupPalette#script "Load image file"
The name value is displayed in the Toolkit Editor tab. An unnamed script is assigned a unique name generated from a number.
#strict on Turns on strict error checking. See the Dollar ($) Object’s strict property.
#target name Defines the target application of this JSX file. The name value is an application specifier; see the “Application and Namespace Specifiers” section. Enclosing quotes are optional.
If the Toolkit is registered as the handler for files with the .jsx extension (as it is by default), opening the file opens the target application to run the script. If this directive is not present, the Toolkit loads and displays the script. A user can open a file by double-clicking it in a file browser, and a script can open a file using a File object’s execute method.
Importing and exporting between scripts
The ExtendScript JavaScript language has been extended to support function calls and variable access across various source code modules and ExtendScript engines. A script can use the export statement to make its definitions available to other scripts, which use the import statement to access those definitions.
To use this feature, the exporting script must name its ExtendScript engine using the #engine preprocessor statement. The name must follow JavaScript naming syntax; it cannot be an expression.
For example, the following script could serve as a library or resource file. It defines and exports a constant and a function:#engine libraryexport random, libVersion;const libVersion = "Library 1.0";function random (max) { return Math.floor (Math.random() * max);}
A script running in a different engine can import the exported elements. The import statement identifies the resource script that exported the variables using the engine name:import library.random, library.libVersion;print (random (100));
You can use the asterisk wildcard (*) to import all symbols exported by a library:import library.*
Objects cannot be transferred between engines. You cannot retrieve or store objects, and you cannot call functions with objects as arguments. However, you can use the JavaScript toSource function to serialize objects into strings before passing them. You can then use the JavaScript eval function to reconstruct the object from the string.
For example, this function takes as its argument a serialized string and constructs an object from it:function myFn (serialized) { var obj = eval (serialized); // continue working…}
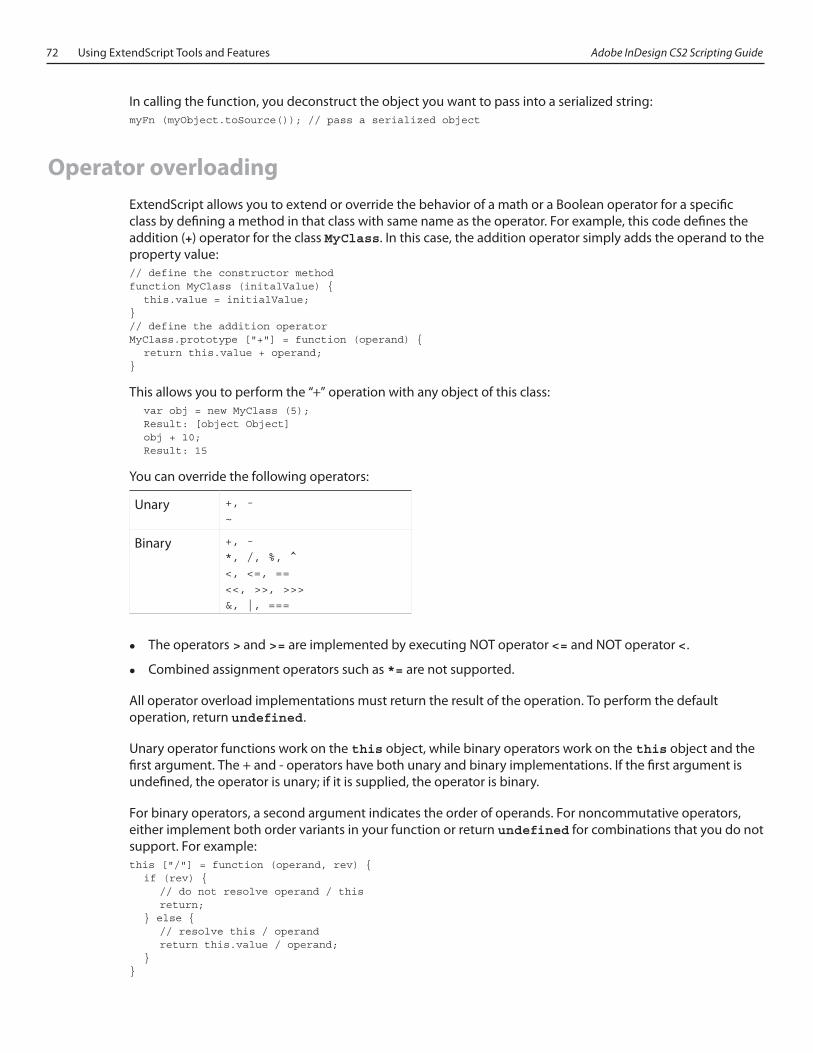
72 Using ExtendScript Tools and Features Adobe InDesign CS2 Scripting Guide
In calling the function, you deconstruct the object you want to pass into a serialized string:myFn (myObject.toSource()); // pass a serialized object
Operator overloading ExtendScript allows you to extend or override the behavior of a math or a Boolean operator for a specific class by defining a method in that class with same name as the operator. For example, this code defines the addition (+) operator for the class MyClass. In this case, the addition operator simply adds the operand to the property value:// define the constructor methodfunction MyClass (initalValue) { this.value = initialValue;}// define the addition operatorMyClass.prototype ["+"] = function (operand) { return this.value + operand;}
This allows you to perform the “+” operation with any object of this class: var obj = new MyClass (5); Result: [object Object] obj + 10; Result: 15
You can override the following operators:
Unary +, -~
Binary +, -*, /, %, ^<, <=, ==<<, >>, >>>&, |, ===
The operators > and >= are implemented by executing NOT operator <= and NOT operator <.
Combined assignment operators such as *= are not supported.
All operator overload implementations must return the result of the operation. To perform the default operation, return undefined.
Unary operator functions work on the this object, while binary operators work on the this object and the first argument. The + and - operators have both unary and binary implementations. If the first argument is undefined, the operator is unary; if it is supplied, the operator is binary.
For binary operators, a second argument indicates the order of operands. For noncommutative operators, either implement both order variants in your function or return undefined for combinations that you do not support. For example:this ["/"] = function (operand, rev) { if (rev) { // do not resolve operand / this return; } else { // resolve this / operand return this.value / operand; }}
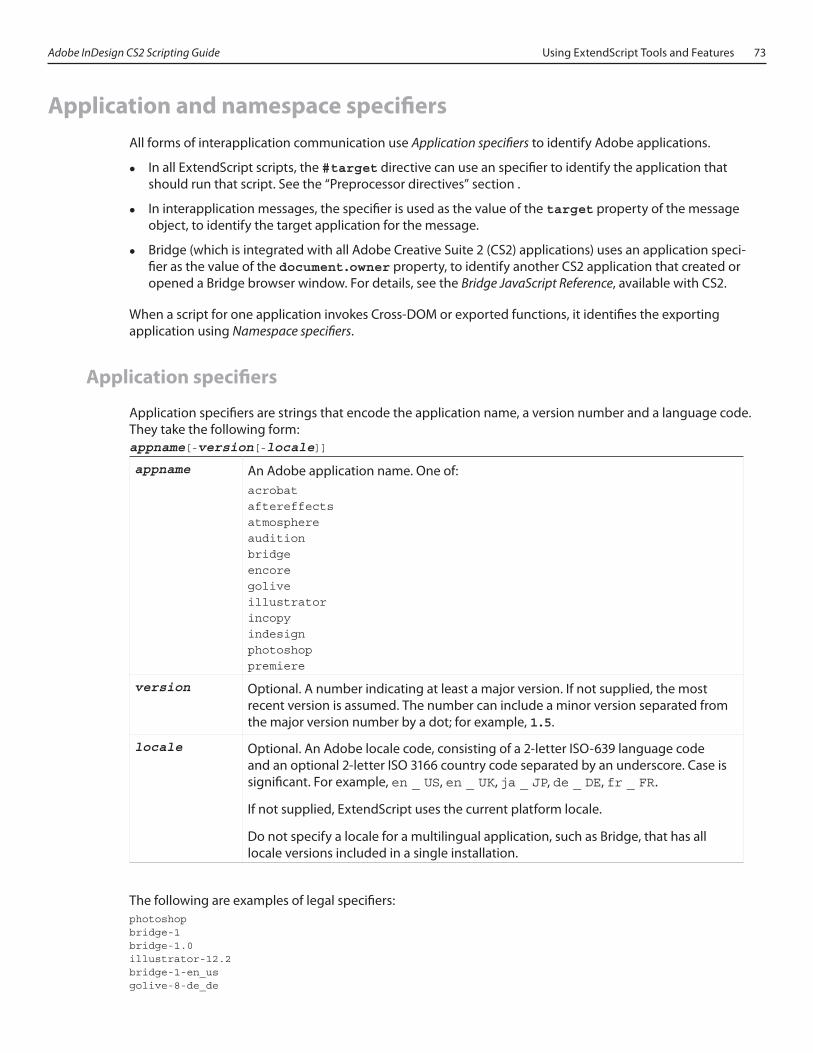
Adobe InDesign CS2 Scripting Guide Using ExtendScript Tools and Features 73
Application and namespace specifiersAll forms of interapplication communication use Application specifiers to identify Adobe applications.
In all ExtendScript scripts, the #target directive can use an specifier to identify the application that should run that script. See the “Preprocessor directives” section .
In interapplication messages, the specifier is used as the value of the target property of the message object, to identify the target application for the message.
Bridge (which is integrated with all Adobe Creative Suite 2 (CS2) applications) uses an application speci-fier as the value of the document.owner property, to identify another CS2 application that created or opened a Bridge browser window. For details, see the Bridge JavaScript Reference, available with CS2.
When a script for one application invokes Cross-DOM or exported functions, it identifies the exporting application using Namespace specifiers.
Application specifiers
Application specifiers are strings that encode the application name, a version number and a language code. They take the following form:appname[-version[-locale]]
appname An Adobe application name. One of:acrobataftereffectsatmosphereauditionbridgeencoregoliveillustratorincopyindesignphotoshoppremiere
version Optional. A number indicating at least a major version. If not supplied, the most recent version is assumed. The number can include a minor version separated from the major version number by a dot; for example, 1.5.
locale Optional. An Adobe locale code, consisting of a 2-letter ISO-639 language code and an optional 2-letter ISO 3166 country code separated by an underscore. Case is significant. For example, en _ US, en _ UK, ja _ JP, de _ DE, fr _ FR.
If not supplied, ExtendScript uses the current platform locale.
Do not specify a locale for a multilingual application, such as Bridge, that has all locale versions included in a single installation.
The following are examples of legal specifiers:photoshopbridge-1bridge-1.0illustrator-12.2bridge-1-en_usgolive-8-de_de
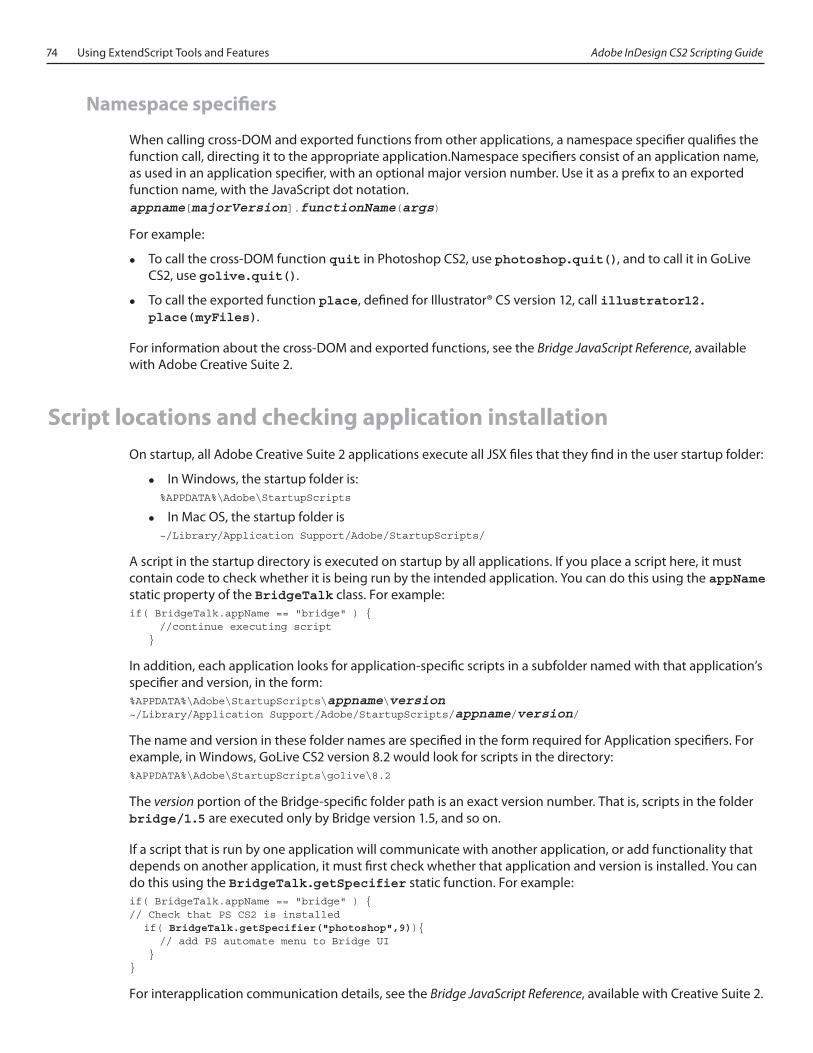
74 Using ExtendScript Tools and Features Adobe InDesign CS2 Scripting Guide
Namespace specifiers
When calling cross-DOM and exported functions from other applications, a namespace specifier qualifies the function call, directing it to the appropriate application.Namespace specifiers consist of an application name, as used in an application specifier, with an optional major version number. Use it as a prefix to an exported function name, with the JavaScript dot notation. appname[majorVersion].functionName(args)
For example:
To call the cross-DOM function quit in Photoshop CS2, use photoshop.quit(), and to call it in GoLive CS2, use golive.quit().
To call the exported function place, defined for Illustrator® CS version 12, call illustrator12.place(myFiles).
For information about the cross-DOM and exported functions, see the Bridge JavaScript Reference, available with Adobe Creative Suite 2.
Script locations and checking application installationOn startup, all Adobe Creative Suite 2 applications execute all JSX files that they find in the user startup folder:
In Windows, the startup folder is: %APPDATA%\Adobe\StartupScripts
In Mac OS, the startup folder is ~/Library/Application Support/Adobe/StartupScripts/
A script in the startup directory is executed on startup by all applications. If you place a script here, it must contain code to check whether it is being run by the intended application. You can do this using the appName static property of the BridgeTalk class. For example:if( BridgeTalk.appName == "bridge" ) { //continue executing script }
In addition, each application looks for application-specific scripts in a subfolder named with that application’s specifier and version, in the form:%APPDATA%\Adobe\StartupScripts\appname\version~/Library/Application Support/Adobe/StartupScripts/appname/version/
The name and version in these folder names are specified in the form required for Application specifiers. For example, in Windows, GoLive CS2 version 8.2 would look for scripts in the directory:%APPDATA%\Adobe\StartupScripts\golive\8.2
The version portion of the Bridge-specific folder path is an exact version number. That is, scripts in the folder bridge/1.5 are executed only by Bridge version 1.5, and so on.
If a script that is run by one application will communicate with another application, or add functionality that depends on another application, it must first check whether that application and version is installed. You can do this using the BridgeTalk.getSpecifier static function. For example:if( BridgeTalk.appName == "bridge" ) {// Check that PS CS2 is installed if( BridgeTalk.getSpecifier("photoshop",9)){ // add PS automate menu to Bridge UI }}
For interapplication communication details, see the Bridge JavaScript Reference, available with Creative Suite 2.
Adobe InDesign CS2 Scripting Guide Working with Documents in AppleScript 75
5 Working with Documents in AppleScript
Most of the work that you do in InDesign revolves around documents—creating them, saving them, and populating them with page items, colors, styles, and text. Documents are also important to InDesign scripting, and almost every document-related task can be automated using scripting.
This chapter shows you how to:
Do basic document management, including
Create a new document
Open a document
Close a document
Save a document
Do basic page layout, including
Set the page size and document length
Define bleed and slug areas
Specify page columns and margins
Change the pasteboard's appearance
Use guides and grids
Change measurement units and ruler origin
Define and apply document presets
Set up master pages (master spreads)
Set text-formatting defaults
Add XMP metadata (information about a file)
Create a document template
Print a document
Export a document as PDF
Export pages of a document as EPS
Note: If you have not already worked through Chapter 3, “Getting Started with InDesign Scripting,” you might want to do so before continuing with this chapter, which assumes that you have already read that chap-ter and know how to create a script.
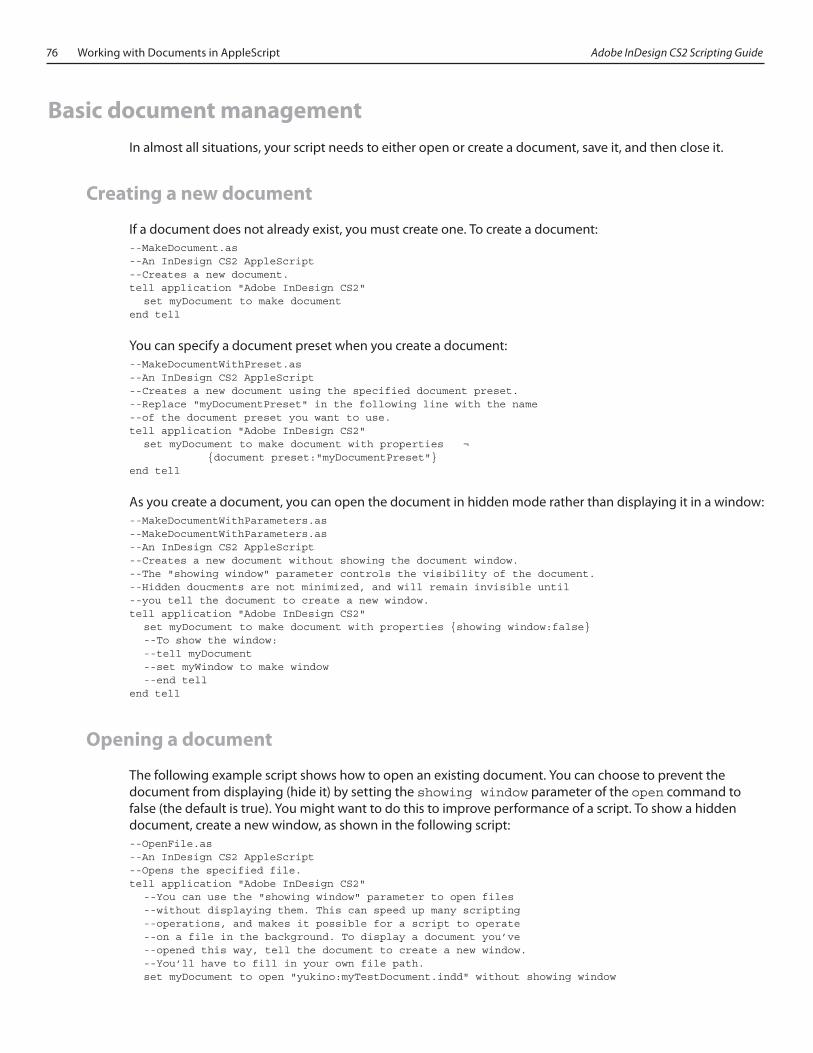
76 Working with Documents in AppleScript Adobe InDesign CS2 Scripting Guide
Basic document managementIn almost all situations, your script needs to either open or create a document, save it, and then close it.
Creating a new document
If a document does not already exist, you must create one. To create a document:--MakeDocument.as--An InDesign CS2 AppleScript--Creates a new document.tell application "Adobe InDesign CS2" set myDocument to make documentend tell
You can specify a document preset when you create a document:--MakeDocumentWithPreset.as--An InDesign CS2 AppleScript--Creates a new document using the specified document preset.--Replace "myDocumentPreset" in the following line with the name --of the document preset you want to use.tell application "Adobe InDesign CS2" set myDocument to make document with properties ¬ {document preset:"myDocumentPreset"}end tell
As you create a document, you can open the document in hidden mode rather than displaying it in a window: --MakeDocumentWithParameters.as--MakeDocumentWithParameters.as--An InDesign CS2 AppleScript--Creates a new document without showing the document window.--The "showing window" parameter controls the visibility of the document.--Hidden doucments are not minimized, and will remain invisible until--you tell the document to create a new window.tell application "Adobe InDesign CS2" set myDocument to make document with properties {showing window:false} --To show the window: --tell myDocument --set myWindow to make window --end tellend tell
Opening a document
The following example script shows how to open an existing document. You can choose to prevent the document from displaying (hide it) by setting the showing window parameter of the open command to false (the default is true). You might want to do this to improve performance of a script. To show a hidden document, create a new window, as shown in the following script:--OpenFile.as--An InDesign CS2 AppleScript--Opens the specified file.tell application "Adobe InDesign CS2" --You can use the "showing window" parameter to open files --without displaying them. This can speed up many scripting --operations, and makes it possible for a script to operate --on a file in the background. To display a document you’ve --opened this way, tell the document to create a new window. --You’ll have to fill in your own file path. set myDocument to open "yukino:myTestDocument.indd" without showing window
Adobe InDesign CS2 Scripting Guide Working with Documents in AppleScript 77
--At this point, your script could change or get information --from the hidden document. tell myDocument to make windowend tell
Closing a document
The close command closes a document:--CloseDocument.as--An InDesign CS2 AppleScript--Closes a document.tell application "Adobe InDesign CS2" close document 1 --document 1 always refers to the front-most document. --Note that you can also use: --close active documentend tell
The close command can take up to two optional parameters:--CloseWithParameters.as--An InDesign CS2 AppleScript--Use SaveOptions.yes to save the document,SaveOptions.no to close the document --without saving, or SaveOptions.ask to display a prompt. If you use --SaveOptions.yes,--you’ll need to provide a reference to a file to save to in the second --parameter (saving in).tell application "Adobe InDesign CS2" --If the file has never been saved (it’s an untitled file), display a prompt. if saved of active document is not equal to true then close active document saving ask --Or, to save to a specific file name (you’ll have to fill in the file path): --set myFile to "yukino:myTestDocument.indd" --close active document saving yes saving in myFile else --If the file has already been saved to a file, save it. close active document saving yes end ifend tell
This example closes all open documents without saving them:--CloseAll.as--An InDesign CS2 AppleScript--Closes all documents without saving.tell application "Adobe InDesign CS2" tell documents to close without savingend tell
Saving a document
In the InDesign user interface, you save a file by choosing Save from the File menu, and you save a file to another file name by choosing Save As. In InDesign scripting, the save command can do either operation:--SaveDocument.as--An InDesign CS2 AppleScript--Saves the active document.--If the active document has been changed since it was last saved, save it.tell application "Adobe InDesign CS2" if modified of active document is true then tell active document to save end ifend tell
78 Working with Documents in AppleScript Adobe InDesign CS2 Scripting Guide
The save command has two optional parameters: The first (to) specifies the file to save to; the second (stationery) can be set to true to save the document as a template:--SaveDocumentAs.as--An InDesign CS2 AppleScript--If the active document has not been saved (ever), save it.tell application "Adobe InDesign CS2" if saved of active document is false then --If you do not provide a file name, InDesign will display the Save dialog box. tell active document to save saving in "yukino:myTestDocument.indd" end ifend tell
The following example saves a document as a template:--SaveAsTemplate.as--An InDesign CS2 AppleScript--Save the active document as a template.tell application "Adobe InDesign CS2" set myDocument to active document tell myDocument if saved is true then --Convert the file name to a string. set myFileName to full name set myFileName to my myReplace(myFileName, ".indd", ".indt") else --If the document has not been saved, then give it a default file --name/file path. You’ll have to fill in the file path. set myFileName to "yukino:myTestDocument.indt" end if save to myFileName with stationery end tellend tellon myReplace(myString, myFindString, myChangeString) set AppleScript’s text item delimiters to myFindString set myTextList to every text item of (myString as text) set AppleScript’s text item delimiters to myChangeString set myString to myTextList as string set AppleScript’s text item delimiters to "" return myStringend myReplace
Basic page layoutEach document has a page size, assigned number of pages, bleed and slug working areas, and columns and margins to define the area into which material is placed.
Defining page size and document length
When you create a new document using the InDesign user interface, you can specify the page size, number of pages, page orientation, and whether the document uses facing pages. To create a document using InDesign scripting, you use the make document command, which does not specify these settings. After you’ve created a document, you can then use the document preferences object to control the settings:--DocumentPreferences.as--An InDesign CS2 AppleScript--Sets the page height, width, and orientation of a new document.tell application "Adobe InDesign CS2" set myDocument to make document
Adobe InDesign CS2 Scripting Guide Working with Documents in AppleScript 79
tell document preferences of myDocument set page height to "800pt" set page width to "600pt" set page orientation to landscape set pages per document to 16 end tellend tell
Note: The application object also has a document preferences object. You can set the application defaults for page height, page width, and other properties by changing the properties of this object.
Defining bleed and slug areas
Within InDesign, a bleed or a slug is an area outside the page margins that can be printed or included in an exported PDF. Typically, these areas are used for objects that extend beyond the page edges (bleed) and job/document information (slug). The two areas can be printed and exported independently—for example, you might want to omit slug information for the final printing of a document. The following script sets up the bleed and slug for a new document:--BleedAndSlug.as--An InDesign CS2 AppleScript--Shows how to define the bleed and slug areas of a document.tell application "Adobe InDesign CS2" --Create a new document. set myDocument to make document --The bleed and slug properties belong to the document preferences object. tell document preferences of myDocument --Bleed set document bleed bottom offset to "3p" set document bleed top offset to "3p" set document bleed inside or left offset to "3p" set document bleed outside or right offset to "3p" --Slug set slug bottom offset to "18p" set slug top offset to "3p" set slug inside or left offset to "3p" set slug right or outside offset to "3p" end tellend tell
If all the bleed distances are equal, as in the preceding example, you can alternatively use the document bleed uniform size property:--UniformBleed.as--An InDesign CS2 AppleScript--Shows how to use the uniform size property of the document bleed.tell application "Adobe InDesign CS2" --Create a new document. set myDocument to make document --The bleed properties belong to the document preferences object. tell document preferences of myDocument --Bleed set document bleed top offset to "3p" set document bleed uniform size to true end tellend tell
If all the slug distances are equal, you can instead use the document slug uniform size property:--UniformSlug.as--An InDesign CS2 AppleScript--Shows how to use the uniform size property of the document slug.--Create a new document.tell application "Adobe InDesign CS2" --Create a new document.
80 Working with Documents in AppleScript Adobe InDesign CS2 Scripting Guide
set myDocument to make document --The bleed properties belong to the document preferences object. tell document preferences of myDocument --Slug set document slug uniform size to true set slug top offset to "3p" end tellend tell
In addition to setting the bleed and slug widths and heights, you can control the color used to draw the guides defining the bleed and slug. This property is not in the document preferences object—instead, it’s in the pasteboard preferences object:--BleedSlugGuideColors.as--An InDesign CS2 AppleScript--Shows how to set the colors used to display the bleed and slug areas.tell application "Adobe InDesign CS2" --Assumes you have a document open. tell pasteboard preferences of active document --Any of InDesign’s guides can use the UIColors constants... set bleed guide color to cute teal set slug guide color to charcoal --...or you can specify a list of RGB values (with values from 0 to 255) set bleed guide color to {0, 198, 192} set slug guide color to {192, 192, 192} end tellend tell
Setting page margins and columns
Each page in a document can have its own margin and column settings. With InDesign scripting, these properties are part of the margin preferences object for each page. This example script creates a new document, then sets the margins and columns for all pages in the master spread:--PageMargins.as--An InDesign CS2 AppleScript--Shows how to set the margins of a new document.tell application "Adobe InDesign CS2" set myDocument to make document tell view preferences of myDocument set horizontal measurement units to points set vertical measurement units to points end tell tell master spread 1 of myDocument tell margin preferences of pages set top to 36 set left to 36 set bottom to 48 set right to 36 end tell end tellend tell
To set the page margins for an individual page, use the margin preferences for that page, as shown in the following example:--PageMarginsForOnePage.as--An InDesign CS2 AppleScript--Shows how to set the margins of a single page in a new document.tell application "Adobe InDesign CS2" set myDocument to make document tell view preferences of myDocument set horizontal measurement units to points set vertical measurement units to points end tell tell margin preferences of page 1 of myDocument
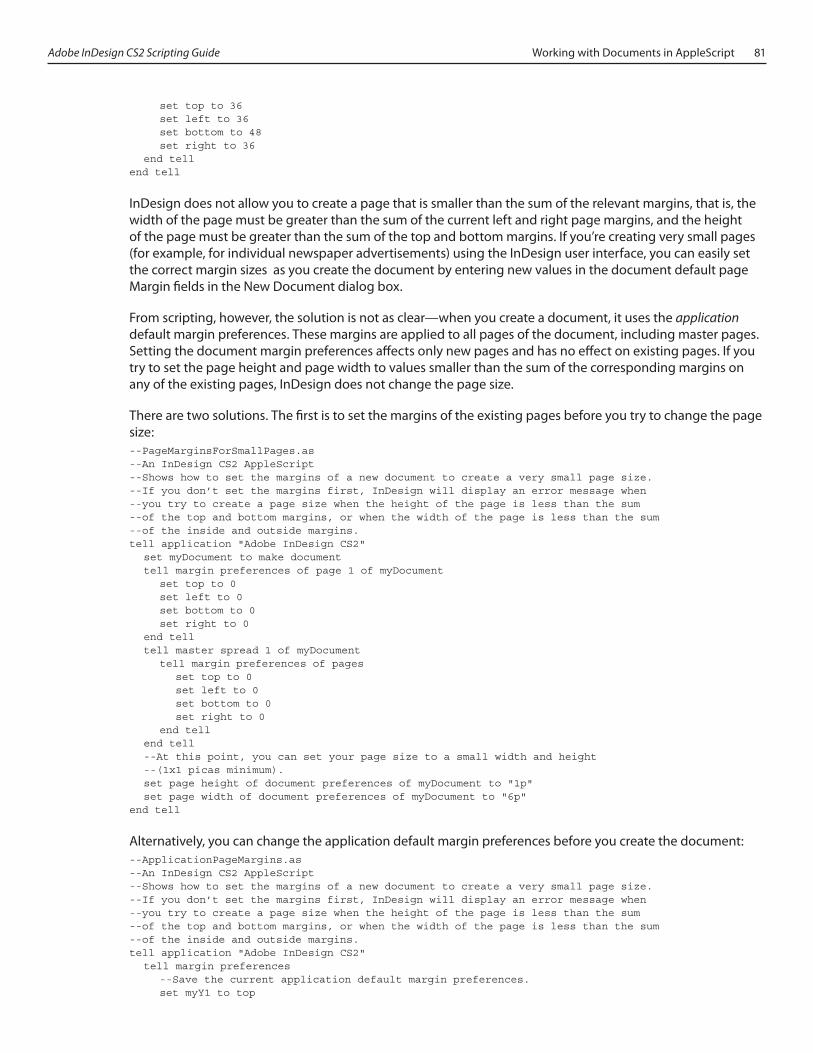
Adobe InDesign CS2 Scripting Guide Working with Documents in AppleScript 81
set top to 36 set left to 36 set bottom to 48 set right to 36 end tellend tell
InDesign does not allow you to create a page that is smaller than the sum of the relevant margins, that is, the width of the page must be greater than the sum of the current left and right page margins, and the height of the page must be greater than the sum of the top and bottom margins. If you’re creating very small pages (for example, for individual newspaper advertisements) using the InDesign user interface, you can easily set the correct margin sizes as you create the document by entering new values in the document default page Margin fields in the New Document dialog box.
From scripting, however, the solution is not as clear—when you create a document, it uses the application default margin preferences. These margins are applied to all pages of the document, including master pages. Setting the document margin preferences affects only new pages and has no effect on existing pages. If you try to set the page height and page width to values smaller than the sum of the corresponding margins on any of the existing pages, InDesign does not change the page size.
There are two solutions. The first is to set the margins of the existing pages before you try to change the page size:--PageMarginsForSmallPages.as--An InDesign CS2 AppleScript--Shows how to set the margins of a new document to create a very small page size.--If you don’t set the margins first, InDesign will display an error message when --you try to create a page size when the height of the page is less than the sum--of the top and bottom margins, or when the width of the page is less than the sum --of the inside and outside margins.tell application "Adobe InDesign CS2" set myDocument to make document tell margin preferences of page 1 of myDocument set top to 0 set left to 0 set bottom to 0 set right to 0 end tell tell master spread 1 of myDocument tell margin preferences of pages set top to 0 set left to 0 set bottom to 0 set right to 0 end tell end tell --At this point, you can set your page size to a small width and height --(1x1 picas minimum). set page height of document preferences of myDocument to "1p" set page width of document preferences of myDocument to "6p"end tell
Alternatively, you can change the application default margin preferences before you create the document:--ApplicationPageMargins.as--An InDesign CS2 AppleScript--Shows how to set the margins of a new document to create a very small page size.--If you don’t set the margins first, InDesign will display an error message when --you try to create a page size when the height of the page is less than the sum--of the top and bottom margins, or when the width of the page is less than the sum --of the inside and outside margins.tell application "Adobe InDesign CS2" tell margin preferences --Save the current application default margin preferences. set myY1 to top
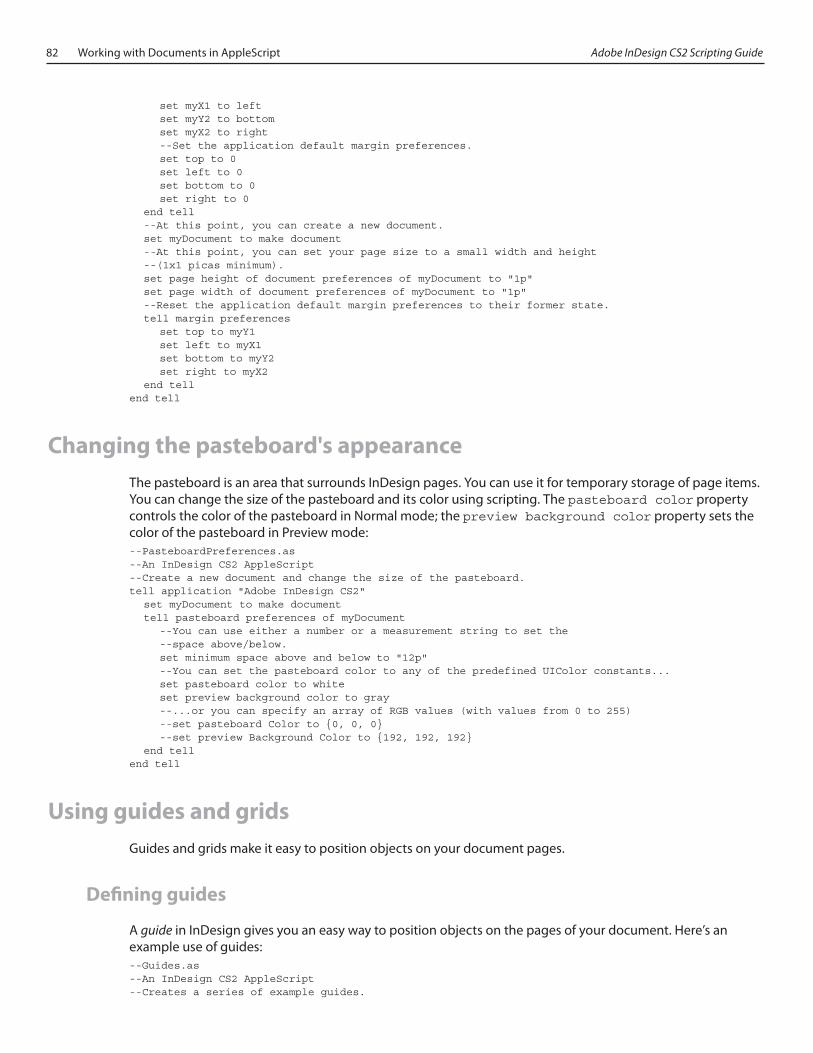
82 Working with Documents in AppleScript Adobe InDesign CS2 Scripting Guide
set myX1 to left set myY2 to bottom set myX2 to right --Set the application default margin preferences. set top to 0 set left to 0 set bottom to 0 set right to 0 end tell --At this point, you can create a new document. set myDocument to make document --At this point, you can set your page size to a small width and height --(1x1 picas minimum). set page height of document preferences of myDocument to "1p" set page width of document preferences of myDocument to "1p" --Reset the application default margin preferences to their former state. tell margin preferences set top to myY1 set left to myX1 set bottom to myY2 set right to myX2 end tellend tell
Changing the pasteboard's appearanceThe pasteboard is an area that surrounds InDesign pages. You can use it for temporary storage of page items. You can change the size of the pasteboard and its color using scripting. The pasteboard color property controls the color of the pasteboard in Normal mode; the preview background color property sets the color of the pasteboard in Preview mode:--PasteboardPreferences.as--An InDesign CS2 AppleScript--Create a new document and change the size of the pasteboard.tell application "Adobe InDesign CS2" set myDocument to make document tell pasteboard preferences of myDocument --You can use either a number or a measurement string to set the --space above/below. set minimum space above and below to "12p" --You can set the pasteboard color to any of the predefined UIColor constants... set pasteboard color to white set preview background color to gray --...or you can specify an array of RGB values (with values from 0 to 255) --set pasteboard Color to {0, 0, 0} --set preview Background Color to {192, 192, 192} end tellend tell
Using guides and gridsGuides and grids make it easy to position objects on your document pages.
Defining guides
A guide in InDesign gives you an easy way to position objects on the pages of your document. Here’s an example use of guides:--Guides.as--An InDesign CS2 AppleScript--Creates a series of example guides.
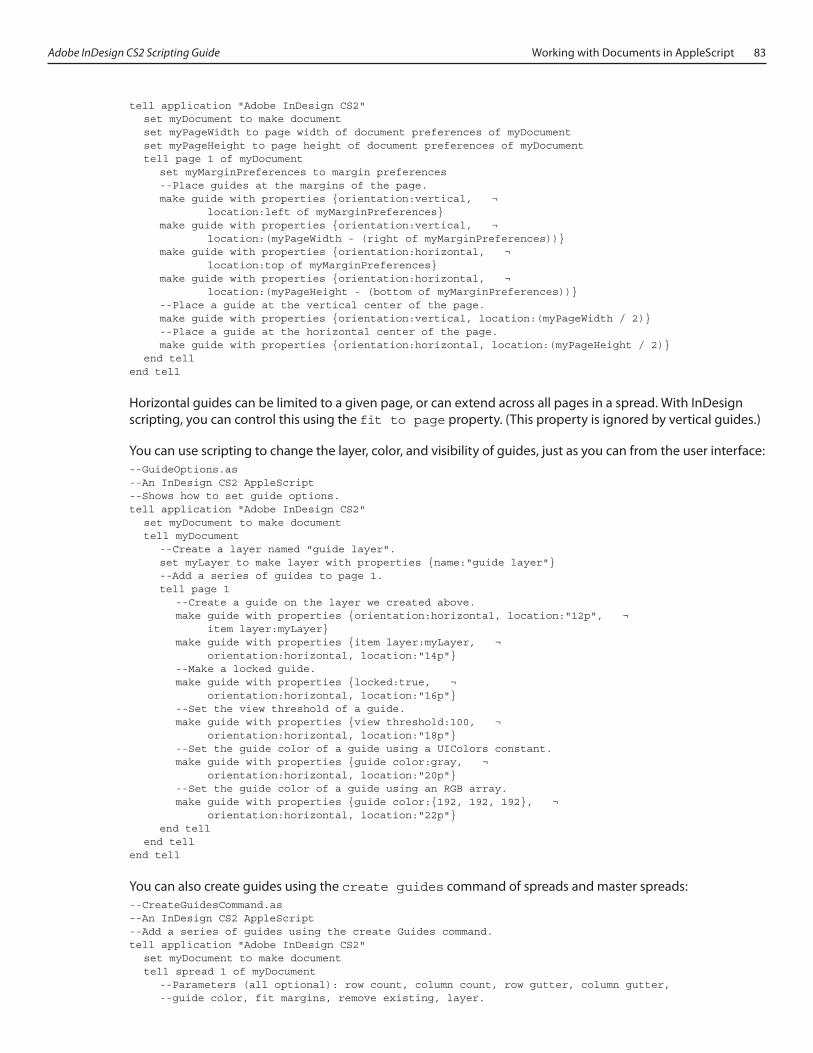
Adobe InDesign CS2 Scripting Guide Working with Documents in AppleScript 83
tell application "Adobe InDesign CS2" set myDocument to make document set myPageWidth to page width of document preferences of myDocument set myPageHeight to page height of document preferences of myDocument tell page 1 of myDocument set myMarginPreferences to margin preferences --Place guides at the margins of the page. make guide with properties {orientation:vertical, ¬ location:left of myMarginPreferences} make guide with properties {orientation:vertical, ¬ location:(myPageWidth - (right of myMarginPreferences))} make guide with properties {orientation:horizontal, ¬ location:top of myMarginPreferences} make guide with properties {orientation:horizontal, ¬ location:(myPageHeight - (bottom of myMarginPreferences))} --Place a guide at the vertical center of the page. make guide with properties {orientation:vertical, location:(myPageWidth / 2)} --Place a guide at the horizontal center of the page. make guide with properties {orientation:horizontal, location:(myPageHeight / 2)} end tellend tell
Horizontal guides can be limited to a given page, or can extend across all pages in a spread. With InDesign scripting, you can control this using the fit to page property. (This property is ignored by vertical guides.)
You can use scripting to change the layer, color, and visibility of guides, just as you can from the user interface:--GuideOptions.as--An InDesign CS2 AppleScript--Shows how to set guide options.tell application "Adobe InDesign CS2" set myDocument to make document tell myDocument --Create a layer named "guide layer". set myLayer to make layer with properties {name:"guide layer"} --Add a series of guides to page 1. tell page 1 --Create a guide on the layer we created above. make guide with properties {orientation:horizontal, location:"12p", ¬ item layer:myLayer} make guide with properties {item layer:myLayer, ¬ orientation:horizontal, location:"14p"} --Make a locked guide. make guide with properties {locked:true, ¬ orientation:horizontal, location:"16p"} --Set the view threshold of a guide. make guide with properties {view threshold:100, ¬ orientation:horizontal, location:"18p"} --Set the guide color of a guide using a UIColors constant. make guide with properties {guide color:gray, ¬ orientation:horizontal, location:"20p"} --Set the guide color of a guide using an RGB array. make guide with properties {guide color:{192, 192, 192}, ¬ orientation:horizontal, location:"22p"} end tell end tellend tell
You can also create guides using the create guides command of spreads and master spreads:--CreateGuidesCommand.as--An InDesign CS2 AppleScript--Add a series of guides using the create Guides command.tell application "Adobe InDesign CS2" set myDocument to make document tell spread 1 of myDocument --Parameters (all optional): row count, column count, row gutter, column gutter, --guide color, fit margins, remove existing, layer.
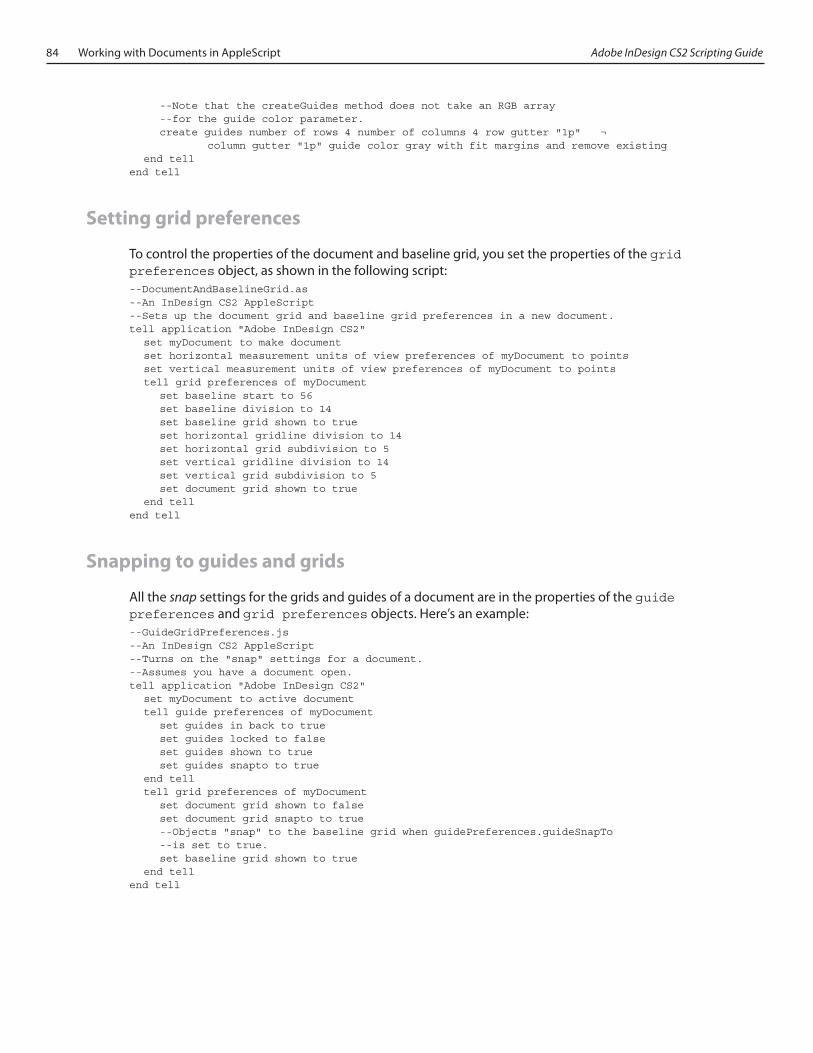
84 Working with Documents in AppleScript Adobe InDesign CS2 Scripting Guide
--Note that the createGuides method does not take an RGB array --for the guide color parameter. create guides number of rows 4 number of columns 4 row gutter "1p" ¬ column gutter "1p" guide color gray with fit margins and remove existing end tellend tell
Setting grid preferences
To control the properties of the document and baseline grid, you set the properties of the grid preferences object, as shown in the following script:--DocumentAndBaselineGrid.as--An InDesign CS2 AppleScript--Sets up the document grid and baseline grid preferences in a new document.tell application "Adobe InDesign CS2" set myDocument to make document set horizontal measurement units of view preferences of myDocument to points set vertical measurement units of view preferences of myDocument to points tell grid preferences of myDocument set baseline start to 56 set baseline division to 14 set baseline grid shown to true set horizontal gridline division to 14 set horizontal grid subdivision to 5 set vertical gridline division to 14 set vertical grid subdivision to 5 set document grid shown to true end tellend tell
Snapping to guides and grids
All the snap settings for the grids and guides of a document are in the properties of the guide preferences and grid preferences objects. Here’s an example:--GuideGridPreferences.js--An InDesign CS2 AppleScript--Turns on the "snap" settings for a document.--Assumes you have a document open.tell application "Adobe InDesign CS2" set myDocument to active document tell guide preferences of myDocument set guides in back to true set guides locked to false set guides shown to true set guides snapto to true end tell tell grid preferences of myDocument set document grid shown to false set document grid snapto to true --Objects "snap" to the baseline grid when guidePreferences.guideSnapTo --is set to true. set baseline grid shown to true end tellend tell
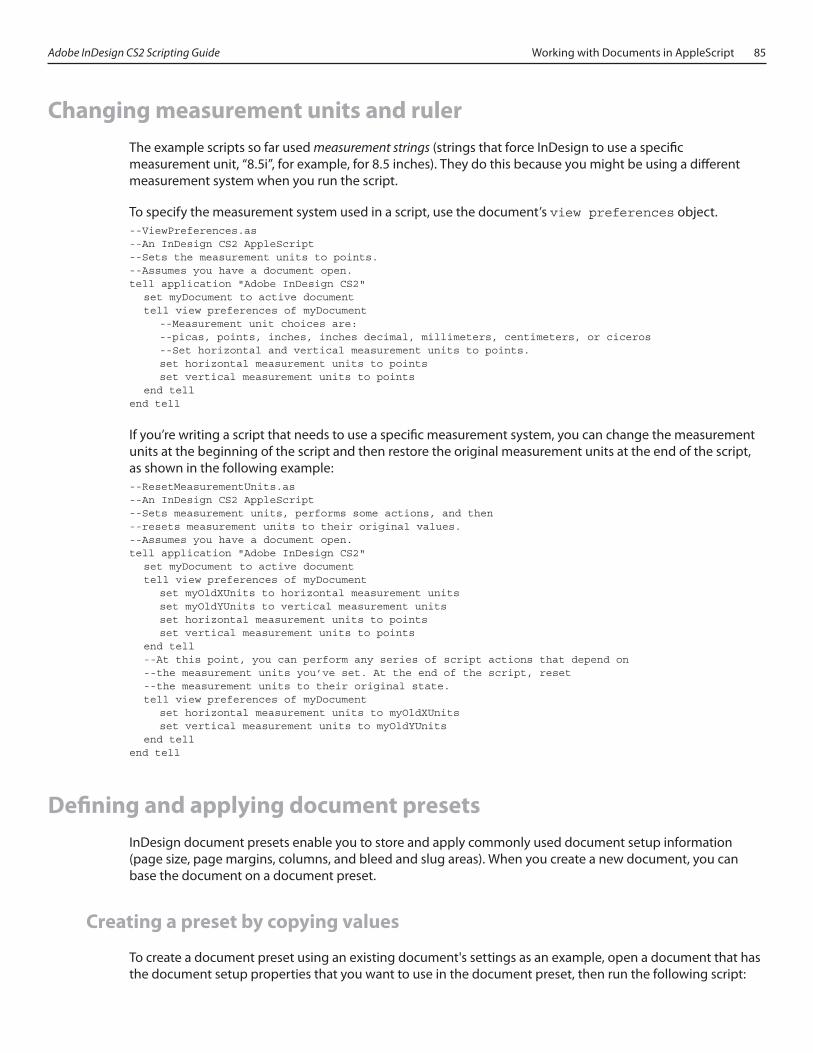
Adobe InDesign CS2 Scripting Guide Working with Documents in AppleScript 85
Changing measurement units and rulerThe example scripts so far used measurement strings (strings that force InDesign to use a specific measurement unit, “8.5i”, for example, for 8.5 inches). They do this because you might be using a different measurement system when you run the script.
To specify the measurement system used in a script, use the document’s view preferences object.--ViewPreferences.as--An InDesign CS2 AppleScript--Sets the measurement units to points.--Assumes you have a document open.tell application "Adobe InDesign CS2" set myDocument to active document tell view preferences of myDocument --Measurement unit choices are: --picas, points, inches, inches decimal, millimeters, centimeters, or ciceros --Set horizontal and vertical measurement units to points. set horizontal measurement units to points set vertical measurement units to points end tellend tell
If you’re writing a script that needs to use a specific measurement system, you can change the measurement units at the beginning of the script and then restore the original measurement units at the end of the script, as shown in the following example:--ResetMeasurementUnits.as--An InDesign CS2 AppleScript--Sets measurement units, performs some actions, and then --resets measurement units to their original values.--Assumes you have a document open.tell application "Adobe InDesign CS2" set myDocument to active document tell view preferences of myDocument set myOldXUnits to horizontal measurement units set myOldYUnits to vertical measurement units set horizontal measurement units to points set vertical measurement units to points end tell --At this point, you can perform any series of script actions that depend on --the measurement units you’ve set. At the end of the script, reset --the measurement units to their original state. tell view preferences of myDocument set horizontal measurement units to myOldXUnits set vertical measurement units to myOldYUnits end tellend tell
Defining and applying document presetsInDesign document presets enable you to store and apply commonly used document setup information (page size, page margins, columns, and bleed and slug areas). When you create a new document, you can base the document on a document preset.
Creating a preset by copying values
To create a document preset using an existing document's settings as an example, open a document that has the document setup properties that you want to use in the document preset, then run the following script:
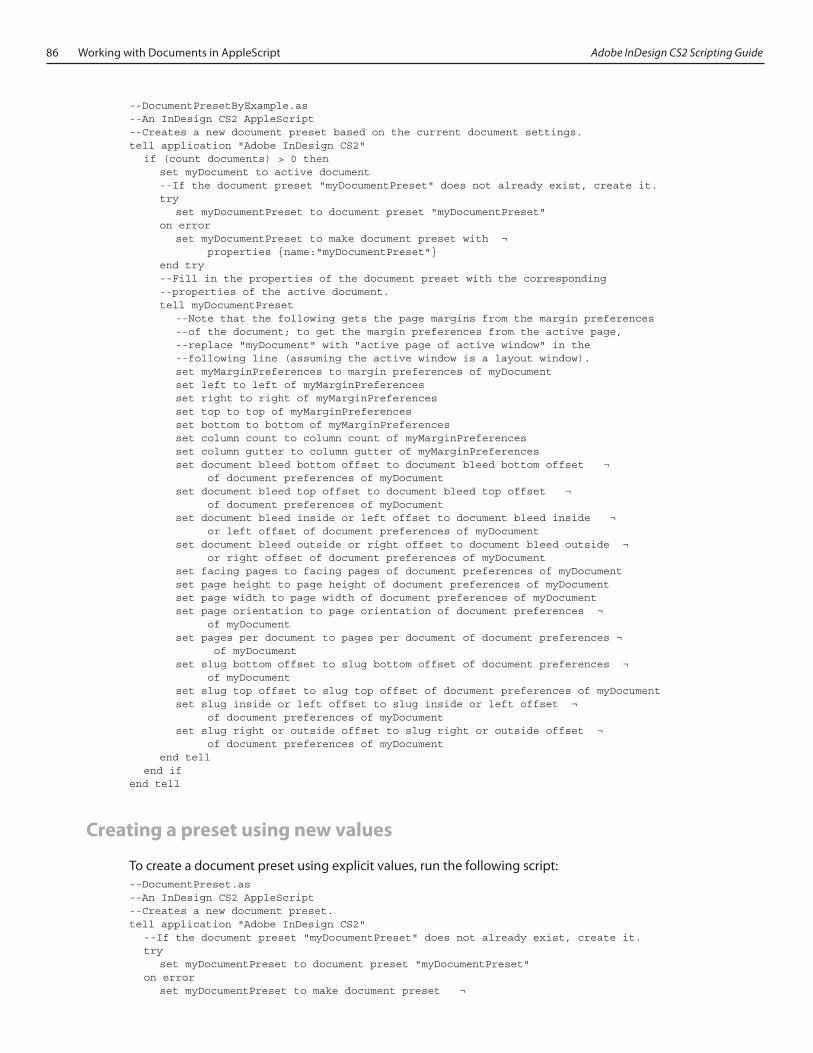
86 Working with Documents in AppleScript Adobe InDesign CS2 Scripting Guide
--DocumentPresetByExample.as--An InDesign CS2 AppleScript--Creates a new document preset based on the current document settings.tell application "Adobe InDesign CS2" if (count documents) > 0 then set myDocument to active document --If the document preset "myDocumentPreset" does not already exist, create it. try set myDocumentPreset to document preset "myDocumentPreset" on error set myDocumentPreset to make document preset with ¬ properties {name:"myDocumentPreset"} end try --Fill in the properties of the document preset with the corresponding --properties of the active document. tell myDocumentPreset --Note that the following gets the page margins from the margin preferences --of the document; to get the margin preferences from the active page, --replace "myDocument" with "active page of active window" in the --following line (assuming the active window is a layout window). set myMarginPreferences to margin preferences of myDocument set left to left of myMarginPreferences set right to right of myMarginPreferences set top to top of myMarginPreferences set bottom to bottom of myMarginPreferences set column count to column count of myMarginPreferences set column gutter to column gutter of myMarginPreferences set document bleed bottom offset to document bleed bottom offset ¬ of document preferences of myDocument set document bleed top offset to document bleed top offset ¬ of document preferences of myDocument set document bleed inside or left offset to document bleed inside ¬ or left offset of document preferences of myDocument set document bleed outside or right offset to document bleed outside ¬ or right offset of document preferences of myDocument set facing pages to facing pages of document preferences of myDocument set page height to page height of document preferences of myDocument set page width to page width of document preferences of myDocument set page orientation to page orientation of document preferences ¬ of myDocument set pages per document to pages per document of document preferences ¬ of myDocument set slug bottom offset to slug bottom offset of document preferences ¬ of myDocument set slug top offset to slug top offset of document preferences of myDocument set slug inside or left offset to slug inside or left offset ¬ of document preferences of myDocument set slug right or outside offset to slug right or outside offset ¬ of document preferences of myDocument end tell end ifend tell
Creating a preset using new values
To create a document preset using explicit values, run the following script:--DocumentPreset.as--An InDesign CS2 AppleScript--Creates a new document preset.tell application "Adobe InDesign CS2" --If the document preset "myDocumentPreset" does not already exist, create it. try set myDocumentPreset to document preset "myDocumentPreset" on error set myDocumentPreset to make document preset ¬
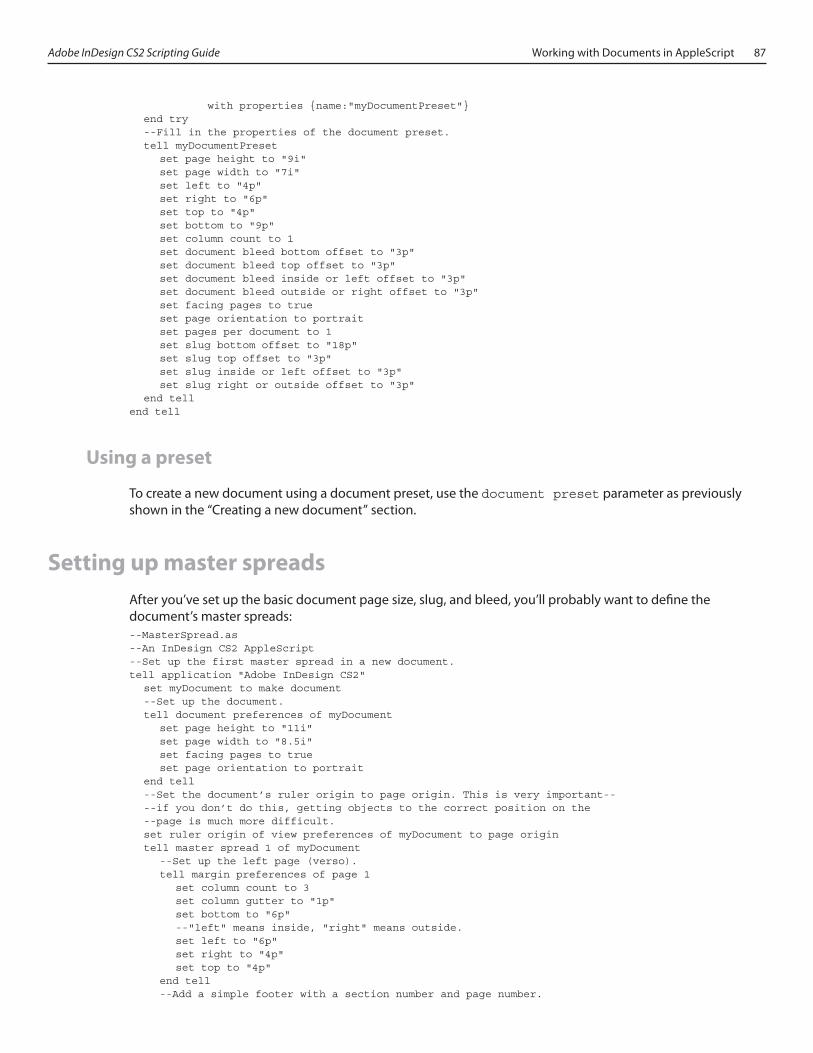
Adobe InDesign CS2 Scripting Guide Working with Documents in AppleScript 87
with properties {name:"myDocumentPreset"} end try --Fill in the properties of the document preset. tell myDocumentPreset set page height to "9i" set page width to "7i" set left to "4p" set right to "6p" set top to "4p" set bottom to "9p" set column count to 1 set document bleed bottom offset to "3p" set document bleed top offset to "3p" set document bleed inside or left offset to "3p" set document bleed outside or right offset to "3p" set facing pages to true set page orientation to portrait set pages per document to 1 set slug bottom offset to "18p" set slug top offset to "3p" set slug inside or left offset to "3p" set slug right or outside offset to "3p" end tellend tell
Using a preset
To create a new document using a document preset, use the document preset parameter as previously shown in the “Creating a new document” section.
Setting up master spreadsAfter you’ve set up the basic document page size, slug, and bleed, you’ll probably want to define the document’s master spreads:--MasterSpread.as--An InDesign CS2 AppleScript--Set up the first master spread in a new document.tell application "Adobe InDesign CS2" set myDocument to make document --Set up the document. tell document preferences of myDocument set page height to "11i" set page width to "8.5i" set facing pages to true set page orientation to portrait end tell --Set the document’s ruler origin to page origin. This is very important-- --if you don’t do this, getting objects to the correct position on the --page is much more difficult. set ruler origin of view preferences of myDocument to page origin tell master spread 1 of myDocument --Set up the left page (verso). tell margin preferences of page 1 set column count to 3 set column gutter to "1p" set bottom to "6p" --"left" means inside, "right" means outside. set left to "6p" set right to "4p" set top to "4p" end tell --Add a simple footer with a section number and page number.
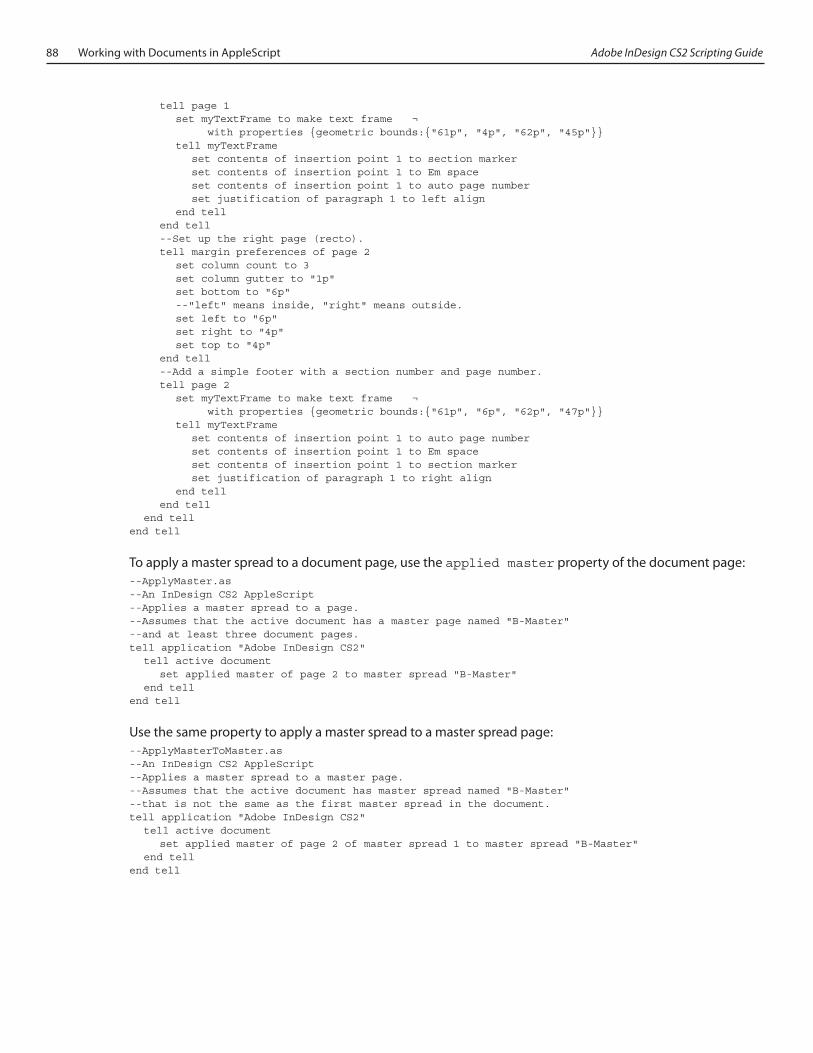
88 Working with Documents in AppleScript Adobe InDesign CS2 Scripting Guide
tell page 1 set myTextFrame to make text frame ¬ with properties {geometric bounds:{"61p", "4p", "62p", "45p"}} tell myTextFrame set contents of insertion point 1 to section marker set contents of insertion point 1 to Em space set contents of insertion point 1 to auto page number set justification of paragraph 1 to left align end tell end tell --Set up the right page (recto). tell margin preferences of page 2 set column count to 3 set column gutter to "1p" set bottom to "6p" --"left" means inside, "right" means outside. set left to "6p" set right to "4p" set top to "4p" end tell --Add a simple footer with a section number and page number. tell page 2 set myTextFrame to make text frame ¬ with properties {geometric bounds:{"61p", "6p", "62p", "47p"}} tell myTextFrame set contents of insertion point 1 to auto page number set contents of insertion point 1 to Em space set contents of insertion point 1 to section marker set justification of paragraph 1 to right align end tell end tell end tellend tell
To apply a master spread to a document page, use the applied master property of the document page:--ApplyMaster.as--An InDesign CS2 AppleScript--Applies a master spread to a page.--Assumes that the active document has a master page named "B-Master"--and at least three document pages.tell application "Adobe InDesign CS2" tell active document set applied master of page 2 to master spread "B-Master" end tellend tell
Use the same property to apply a master spread to a master spread page:--ApplyMasterToMaster.as--An InDesign CS2 AppleScript--Applies a master spread to a master page.--Assumes that the active document has master spread named "B-Master"--that is not the same as the first master spread in the document.tell application "Adobe InDesign CS2" tell active document set applied master of page 2 of master spread 1 to master spread "B-Master" end tellend tell
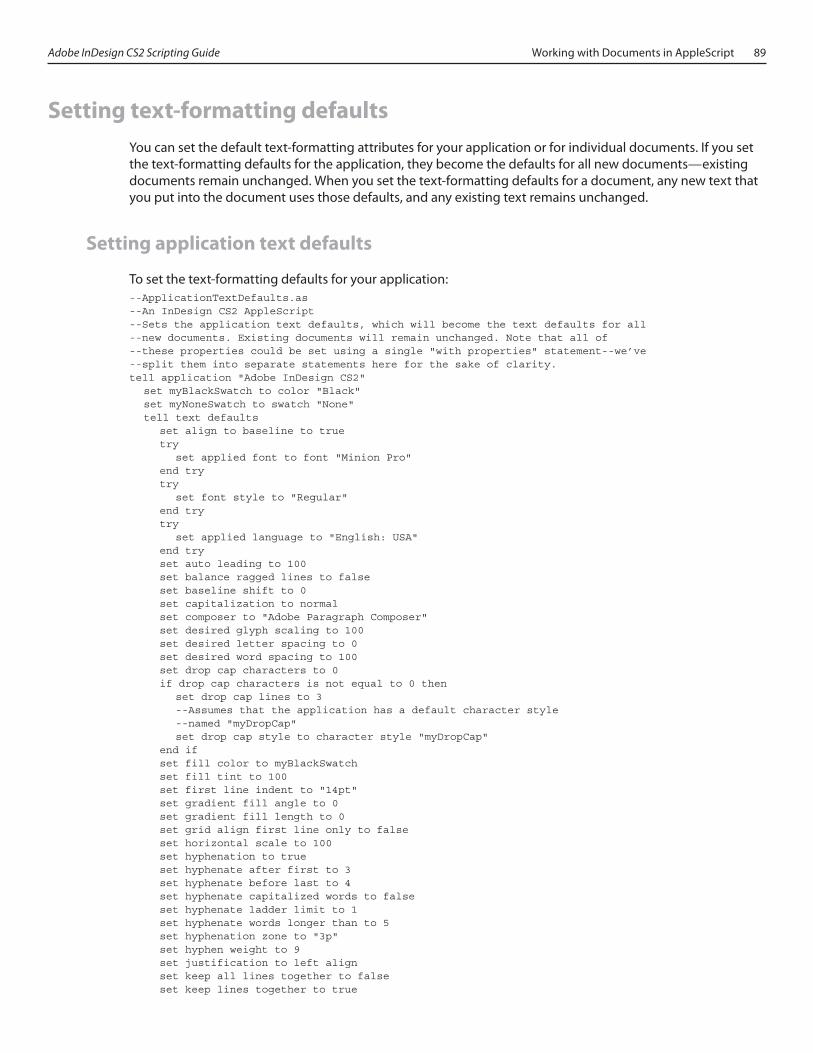
Adobe InDesign CS2 Scripting Guide Working with Documents in AppleScript 89
Setting text-formatting defaultsYou can set the default text-formatting attributes for your application or for individual documents. If you set the text-formatting defaults for the application, they become the defaults for all new documents—existing documents remain unchanged. When you set the text-formatting defaults for a document, any new text that you put into the document uses those defaults, and any existing text remains unchanged.
Setting application text defaults
To set the text-formatting defaults for your application:--ApplicationTextDefaults.as--An InDesign CS2 AppleScript--Sets the application text defaults, which will become the text defaults for all--new documents. Existing documents will remain unchanged. Note that all of --these properties could be set using a single "with properties" statement--we’ve--split them into separate statements here for the sake of clarity.tell application "Adobe InDesign CS2" set myBlackSwatch to color "Black" set myNoneSwatch to swatch "None" tell text defaults set align to baseline to true try set applied font to font "Minion Pro" end try try set font style to "Regular" end try try set applied language to "English: USA" end try set auto leading to 100 set balance ragged lines to false set baseline shift to 0 set capitalization to normal set composer to "Adobe Paragraph Composer" set desired glyph scaling to 100 set desired letter spacing to 0 set desired word spacing to 100 set drop cap characters to 0 if drop cap characters is not equal to 0 then set drop cap lines to 3 --Assumes that the application has a default character style --named "myDropCap" set drop cap style to character style "myDropCap" end if set fill color to myBlackSwatch set fill tint to 100 set first line indent to "14pt" set gradient fill angle to 0 set gradient fill length to 0 set grid align first line only to false set horizontal scale to 100 set hyphenation to true set hyphenate after first to 3 set hyphenate before last to 4 set hyphenate capitalized words to false set hyphenate ladder limit to 1 set hyphenate words longer than to 5 set hyphenation zone to "3p" set hyphen weight to 9 set justification to left align set keep all lines together to false set keep lines together to true

90 Working with Documents in AppleScript Adobe InDesign CS2 Scripting Guide
set keep first lines to 2 set keep last lines to 2 set keep with next to 0 set kerning method to "Optical" set leading to 14 set left indent to 0 set ligatures to true set maximum glyph scaling to 100 set maximum letter spacing to 0 set maximum word spacing to 160 set minimum glyph scaling to 100 set minimum letter spacing to 0 set minimum word spacing to 80 set no break to false set OTF contextual alternate to true set OTF discretionary ligature to true set OTF figure style to proportional oldstyle set OTF fraction to true set OTF ordinal to false set OTF slashed zero to false set OTF swash to false set OTF titling to false set overprint fill to false set overprint stroke to false set point size to 11 set position to normal set right indent to 0 set rule above to false if rule above is true then set rule above color to myBlackSwatch set rule above gap color to myNoneSwatch set rule above gap overprint to false set rule above gap tint to 100 set rule above left indent to 0 set rule above line weight to 0.25 set rule above offset to 14 set rule above overprint to false set rule above right indent to 0 set rule above tint to 100 set rule above type to stroke style "Solid" set rule above width to column width end if set rule below to false if rule below is true then set rule below color to color myBlackSwatch set rule below gap color to myNoneSwatch set rule below gap overPrint to false set rule below gap tint to 100 set rule below left indent to 0 set rule below line weight to 0.25 set rule below offset to 14 set rule below overPrint to false set rule below right indent to 0 set rule below tint to 100 set rule below type to stroke style "Solid" set rule below width to column width end if set single word justification to left align set skew to 0 set space after to 0 set space before to 0 set start paragraph to anywhere set strike thru to false if strike thru is true then set strike through color to color myBlackSwatch set strike through gap color to myNoneSwatch set strike through gap overprint to false set strike through gap tint to 100

Adobe InDesign CS2 Scripting Guide Working with Documents in AppleScript 91
set strike through offset to 3 set strike through overprint to false set strike through tint to 100 set strike through type to stroke style "Solid" set strike through weight to 0.25 end if set stroke color to myNoneSwatch set stroke tint to 100 set stroke weight to 0 set tracking to 0 set underline to false if underline is true then set underline color to color myBlackSwatch set underline gap color to myNoneSwatch set underline gap overprint to false set underline gap tint to 100 set underline offset to 3 set underline overprint to false set underline tint to 100 set underline type to stroke style "Solid" set underline weight to 0.25 end if set vertical scale to 100 end tellend tell
Setting the active document's defaults
To set the text defaults for the active document, change this line in the preceding example:tell text defaults
to:tell text defaults of active document
Using text defaults
To set text in a document to a default character style or paragraph style, use the following script:--SetTextDefaultToStyle.as--An InDesign CS2 AppleScript--Sets the default paragraph style for text in all new documents.--Assumes that an application default paragraph style named "BodyText" existstell application "Adobe InDesign CS2" tell text defaults set applied paragraph style to paragraph style "BodyText" end tellend tell
Adding XMP metadataMetadata is information that describes the content, origin, or other attributes of a file. In the InDesign user interface, you enter, edit, and view metadata using the File Info dialog box (File > File Info). This metadata includes the creation and modification dates of the document, the author of the document, the copyright status of the document, and other information. All this information is stored using XMP (Adobe Extensible Metadata Platform)—an open standard for embedding metadata in a document.
To learn more about XMP, see the XMP specification at http://partners.adobe.com/asn/developer/pdf/MetadataFramework.pdf.
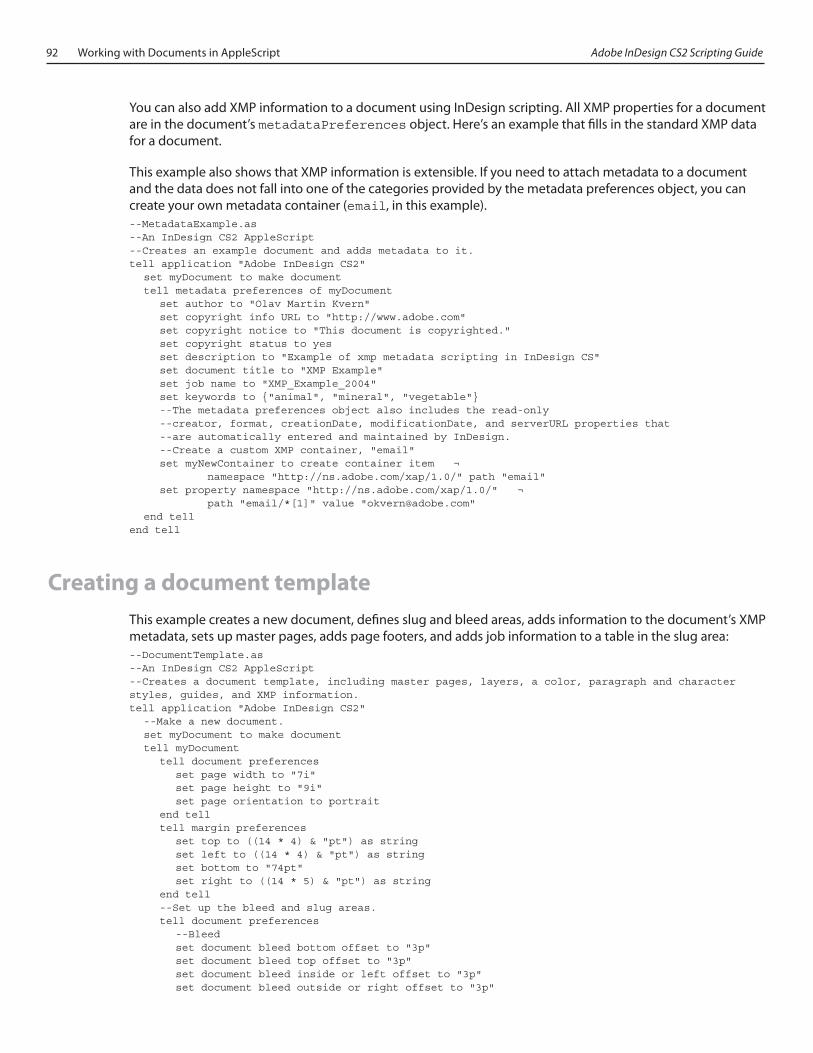
92 Working with Documents in AppleScript Adobe InDesign CS2 Scripting Guide
You can also add XMP information to a document using InDesign scripting. All XMP properties for a document are in the document’s metadataPreferences object. Here’s an example that fills in the standard XMP data for a document.
This example also shows that XMP information is extensible. If you need to attach metadata to a document and the data does not fall into one of the categories provided by the metadata preferences object, you can create your own metadata container (email, in this example).--MetadataExample.as--An InDesign CS2 AppleScript--Creates an example document and adds metadata to it.tell application "Adobe InDesign CS2" set myDocument to make document tell metadata preferences of myDocument set author to "Olav Martin Kvern" set copyright info URL to "http://www.adobe.com" set copyright notice to "This document is copyrighted." set copyright status to yes set description to "Example of xmp metadata scripting in InDesign CS" set document title to "XMP Example" set job name to "XMP_Example_2004" set keywords to {"animal", "mineral", "vegetable"} --The metadata preferences object also includes the read-only --creator, format, creationDate, modificationDate, and serverURL properties that --are automatically entered and maintained by InDesign. --Create a custom XMP container, "email" set myNewContainer to create container item ¬ namespace "http://ns.adobe.com/xap/1.0/" path "email" set property namespace "http://ns.adobe.com/xap/1.0/" ¬ path "email/*[1]" value "[email protected]" end tellend tell
Creating a document templateThis example creates a new document, defines slug and bleed areas, adds information to the document’s XMP metadata, sets up master pages, adds page footers, and adds job information to a table in the slug area:--DocumentTemplate.as--An InDesign CS2 AppleScript--Creates a document template, including master pages, layers, a color, paragraph and character styles, guides, and XMP information.tell application "Adobe InDesign CS2" --Make a new document. set myDocument to make document tell myDocument tell document preferences set page width to "7i" set page height to "9i" set page orientation to portrait end tell tell margin preferences set top to ((14 * 4) & "pt") as string set left to ((14 * 4) & "pt") as string set bottom to "74pt" set right to ((14 * 5) & "pt") as string end tell --Set up the bleed and slug areas. tell document preferences --Bleed set document bleed bottom offset to "3p" set document bleed top offset to "3p" set document bleed inside or left offset to "3p" set document bleed outside or right offset to "3p"
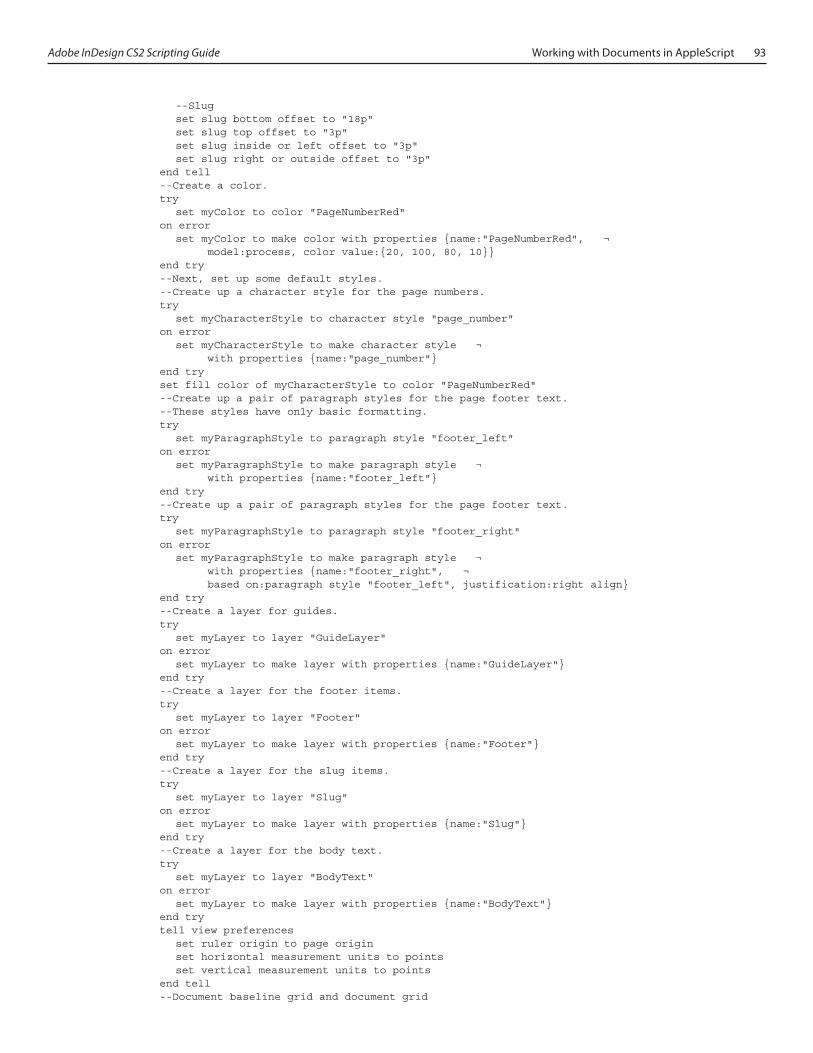
Adobe InDesign CS2 Scripting Guide Working with Documents in AppleScript 93
--Slug set slug bottom offset to "18p" set slug top offset to "3p" set slug inside or left offset to "3p" set slug right or outside offset to "3p" end tell --Create a color. try set myColor to color "PageNumberRed" on error set myColor to make color with properties {name:"PageNumberRed", ¬ model:process, color value:{20, 100, 80, 10}} end try --Next, set up some default styles. --Create up a character style for the page numbers. try set myCharacterStyle to character style "page_number" on error set myCharacterStyle to make character style ¬ with properties {name:"page_number"} end try set fill color of myCharacterStyle to color "PageNumberRed" --Create up a pair of paragraph styles for the page footer text. --These styles have only basic formatting. try set myParagraphStyle to paragraph style "footer_left" on error set myParagraphStyle to make paragraph style ¬ with properties {name:"footer_left"} end try --Create up a pair of paragraph styles for the page footer text. try set myParagraphStyle to paragraph style "footer_right" on error set myParagraphStyle to make paragraph style ¬ with properties {name:"footer_right", ¬ based on:paragraph style "footer_left", justification:right align} end try --Create a layer for guides. try set myLayer to layer "GuideLayer" on error set myLayer to make layer with properties {name:"GuideLayer"} end try --Create a layer for the footer items. try set myLayer to layer "Footer" on error set myLayer to make layer with properties {name:"Footer"} end try --Create a layer for the slug items. try set myLayer to layer "Slug" on error set myLayer to make layer with properties {name:"Slug"} end try --Create a layer for the body text. try set myLayer to layer "BodyText" on error set myLayer to make layer with properties {name:"BodyText"} end try tell view preferences set ruler origin to page origin set horizontal measurement units to points set vertical measurement units to points end tell --Document baseline grid and document grid

94 Working with Documents in AppleScript Adobe InDesign CS2 Scripting Guide
tell grid preferences set baseline start to 56 set baseline division to 14 set baseline grid shown to false set horizontal gridline division to 14 set horizontal grid subdivision to 5 set vertical gridline division to 14 set vertical grid subdivision to 5 set document grid shown to false end tell --Document XMP information. tell metadata preferences set author to "Olav Martin Kvern" set copyright info URL to "http:--www.adobe.com" set copyright notice to "This document is not copyrighted." set copyright status to no set description to "Example 7 x 9 book layout" set document title to "Example" set job name to "7 x 9 book layout template" set keywords to {"7 x 9", "book", "template"} set myNewContainer to create container item ¬ namespace "http://ns.adobe.com/xap/1.0/" path "email" set property namespace "http://ns.adobe.com/xap/1.0/" ¬ path "email/*[1]" value "[email protected]" end tell --Set up the master spread. tell master spread 1 tell page 1 set myMarginPreferences to margin preferences set myBottomMargin to (page height of document preferences of myDocument ¬ - (bottom of myMarginPreferences) set myLeftMargin to right of myMarginPreferences set myRightMargin to (page width of document preferences of myDocument) ¬ - (left of myMarginPreferences) make guide with properties {orientation:vertical, location:myRightMargin, ¬ item layer:layer "GuideLayer" of myDocument} make guide with properties {orientation:vertical, location:myLeftMargin, ¬ item layer:layer "GuideLayer" of myDocument} make guide with properties {orientation:horizontal, ¬ location:top of myMarginPreferences, ¬ item layer:layer "GuideLayer" of myDocument, fit to page:false} make guide with properties {orientation:horizontal, ¬ location:myBottomMargin, ¬ item layer:layer "GuideLayer" of myDocument, fit to page:false} make guide with properties {orientation:horizontal, ¬ location:myBottomMargin + 14, ¬ item layer:layer "GuideLayer" of myDocument, fit to page:false} make guide with properties {orientation:horizontal, ¬ location:myBottomMargin + 28, ¬ item layer:layer "GuideLayer" of myDocument, fit to page:false} set myLeftFooter to make text frame with properties ¬ {item layer:layer "Footer" of myDocument, ¬ geometric bounds:{myBottomMargin + 14, right of myMarginPreferences, ¬ myBottomMargin + 28, myRightMargin}} set contents of insertion point 1 of parent story of myLeftFooter ¬ to section marker set contents of insertion point 1 of parent story of myLeftFooter ¬ to Em space set contents of insertion point 1 of parent story of myLeftFooter ¬ to auto page number set applied character style of character 1 of parent story of ¬ myLeftFooter to character style "page_number" of myDocument set applied paragraph style of paragraph 1 of parent story of ¬ myLeftFooter to paragraph style "footer_left" of myDocument --Slug information. tell metadata preferences of myDocument set myEmail to get property ¬ namespace "http://ns.adobe.com/xap/1.0/" path "email/*[1]"

Adobe InDesign CS2 Scripting Guide Working with Documents in AppleScript 95
set myDate to current date set myString to "Author:" & tab & author & tab & "Description:" ¬ & tab & description & return & "Creation Date:" & tab & myDate ¬ & tab & "Email Contact" & tab & myEmail end tell set myLeftSlug to make text frame with properties ¬ {item layer:layer "Slug" of myDocument, ¬ geometric bounds:{(page height of document preferences of myDocument) ¬ + 36, right of myMarginPreferences, ¬ (page height of document preferences of myDocument) + 144, ¬ myRightMargin}, contents:myString} tell parent story of myLeftSlug convert to table text 1 end tell --Body text master text frame. set myLeftFrame to make text frame with properties ¬ {item layer:layer "BodyText" of myDocument, ¬ geometric bounds:{top of myMarginPreferences, ¬ right of myMarginPreferences, myBottomMargin, myRightMargin}} end tell tell page 2 set myMarginPreferences to margin preferences set myLeftMargin to left of myMarginPreferences set myRightMargin to (page width of document preferences of myDocument) ¬ - (right of myMarginPreferences) make guide with properties {orientation:vertical, location:myLeftMargin, ¬ item layer:layer "GuideLayer" of myDocument} make guide with properties {orientation:vertical, location:myRightMargin,¬ item layer:layer "GuideLayer" of myDocument} set myRightFooter to make text frame with properties ¬ {item layer:layer "Footer" of myDocument, ¬ geometric bounds:{myBottomMargin + 14, left of myMarginPreferences, ¬ myBottomMargin + 28, myRightMargin}} set contents of insertion point 1 of parent story of myRightFooter ¬ to auto page number set contents of insertion point 1 of parent story of myRightFooter ¬ to Em space set contents of insertion point 1 of parent story of myRightFooter ¬ to section marker set applied character style of character -1 of parent story of ¬ myRightFooter to character style "page_number" of myDocument set applied paragraph style of paragraph 1 of parent story of ¬ myRightFooter to paragraph style "footer_right" of myDocument --Slug information. set myRightSlug to make text frame with properties ¬ {item layer:layer "Slug" of myDocument, ¬ geometric bounds:{(page height of document preferences of myDocument) ¬ + 36, left of myMarginPreferences, ¬ (page height of document preferences of myDocument) + 144, ¬ myRightMargin}, contents:myString} tell parent story of myRightSlug convert to table text 1 end tell --Body text master text frame. set myRightFrame to make text frame with properties ¬ {item layer:layer "BodyText" of myDocument, ¬ geometric bounds:{top of myMarginPreferences, ¬ left of myMarginPreferences, myBottomMargin, myRightMargin}} end tell end tell --Add section marker text--this text will appear in the footer. set marker of section 1 of myDocument to "Section 1" --When you link the master page text frames, one of the frames sometimes --becomes selected. Deselect it. select nothing end tellend tell
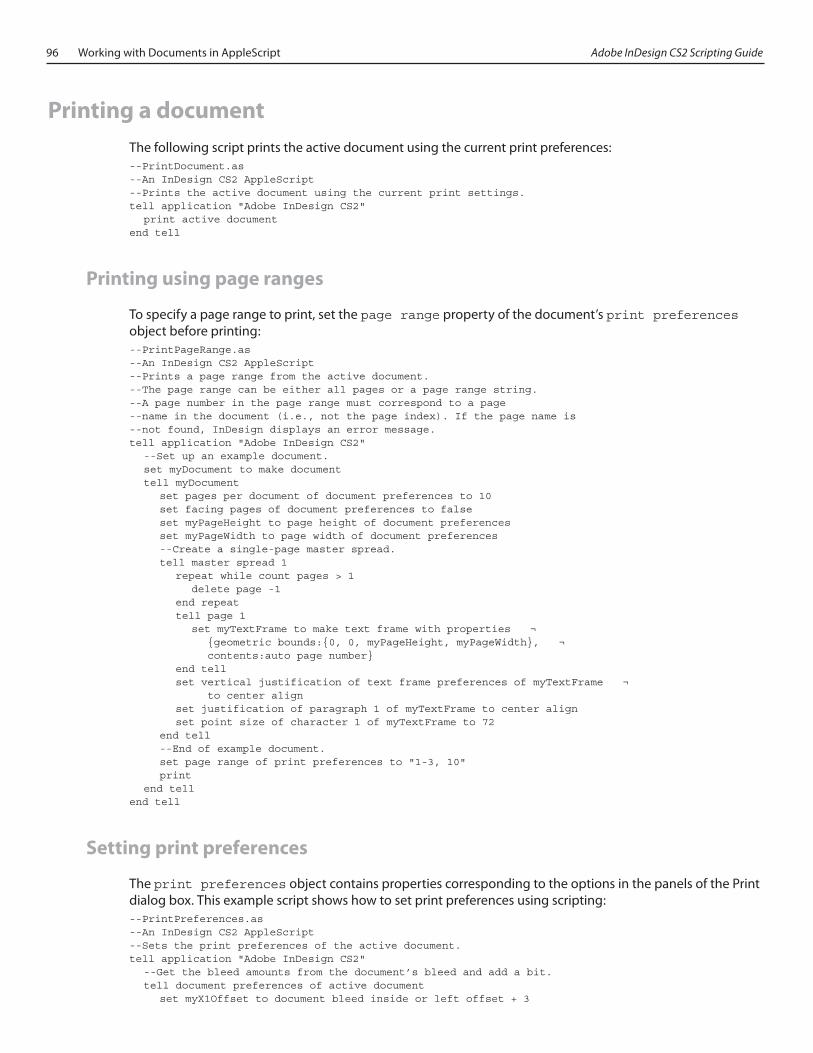
96 Working with Documents in AppleScript Adobe InDesign CS2 Scripting Guide
Printing a documentThe following script prints the active document using the current print preferences:--PrintDocument.as--An InDesign CS2 AppleScript--Prints the active document using the current print settings.tell application "Adobe InDesign CS2" print active documentend tell
Printing using page ranges
To specify a page range to print, set the page range property of the document’s print preferences object before printing:--PrintPageRange.as--An InDesign CS2 AppleScript--Prints a page range from the active document.--The page range can be either all pages or a page range string.--A page number in the page range must correspond to a page--name in the document (i.e., not the page index). If the page name is--not found, InDesign displays an error message.tell application "Adobe InDesign CS2" --Set up an example document. set myDocument to make document tell myDocument set pages per document of document preferences to 10 set facing pages of document preferences to false set myPageHeight to page height of document preferences set myPageWidth to page width of document preferences --Create a single-page master spread. tell master spread 1 repeat while count pages > 1 delete page -1 end repeat tell page 1 set myTextFrame to make text frame with properties ¬ {geometric bounds:{0, 0, myPageHeight, myPageWidth}, ¬ contents:auto page number} end tell set vertical justification of text frame preferences of myTextFrame ¬ to center align set justification of paragraph 1 of myTextFrame to center align set point size of character 1 of myTextFrame to 72 end tell --End of example document. set page range of print preferences to "1-3, 10" print end tellend tell
Setting print preferences
The print preferences object contains properties corresponding to the options in the panels of the Print dialog box. This example script shows how to set print preferences using scripting:--PrintPreferences.as--An InDesign CS2 AppleScript--Sets the print preferences of the active document.tell application "Adobe InDesign CS2" --Get the bleed amounts from the document’s bleed and add a bit. tell document preferences of active document set myX1Offset to document bleed inside or left offset + 3
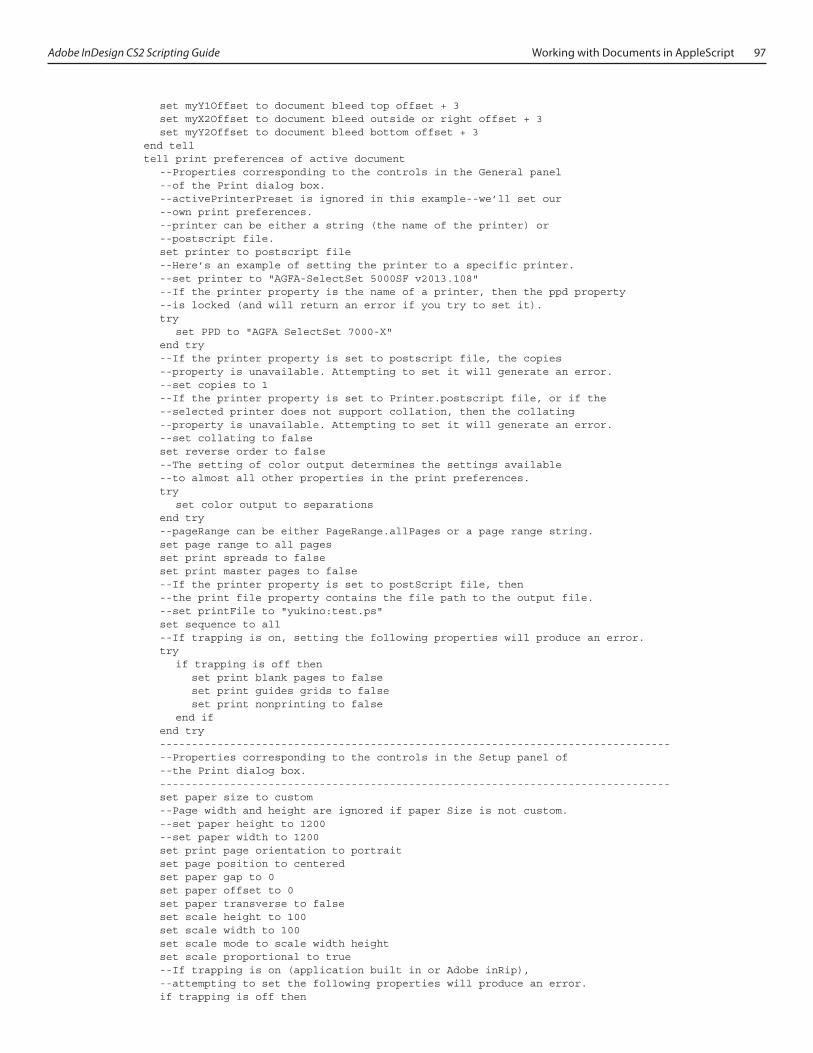
Adobe InDesign CS2 Scripting Guide Working with Documents in AppleScript 97
set myY1Offset to document bleed top offset + 3 set myX2Offset to document bleed outside or right offset + 3 set myY2Offset to document bleed bottom offset + 3 end tell tell print preferences of active document --Properties corresponding to the controls in the General panel --of the Print dialog box. --activePrinterPreset is ignored in this example--we’ll set our --own print preferences. --printer can be either a string (the name of the printer) or --postscript file. set printer to postscript file --Here’s an example of setting the printer to a specific printer. --set printer to "AGFA-SelectSet 5000SF v2013.108" --If the printer property is the name of a printer, then the ppd property --is locked (and will return an error if you try to set it). try set PPD to "AGFA SelectSet 7000-X" end try --If the printer property is set to postscript file, the copies --property is unavailable. Attempting to set it will generate an error. --set copies to 1 --If the printer property is set to Printer.postscript file, or if the --selected printer does not support collation, then the collating --property is unavailable. Attempting to set it will generate an error. --set collating to false set reverse order to false --The setting of color output determines the settings available --to almost all other properties in the print preferences. try set color output to separations end try --pageRange can be either PageRange.allPages or a page range string. set page range to all pages set print spreads to false set print master pages to false --If the printer property is set to postScript file, then --the print file property contains the file path to the output file. --set printFile to "yukino:test.ps" set sequence to all --If trapping is on, setting the following properties will produce an error. try if trapping is off then set print blank pages to false set print guides grids to false set print nonprinting to false end if end try -------------------------------------------------------------------------------- --Properties corresponding to the controls in the Setup panel of --the Print dialog box. -------------------------------------------------------------------------------- set paper size to custom --Page width and height are ignored if paper Size is not custom. --set paper height to 1200 --set paper width to 1200 set print page orientation to portrait set page position to centered set paper gap to 0 set paper offset to 0 set paper transverse to false set scale height to 100 set scale width to 100 set scale mode to scale width height set scale proportional to true --If trapping is on (application built in or Adobe inRip), --attempting to set the following properties will produce an error. if trapping is off then
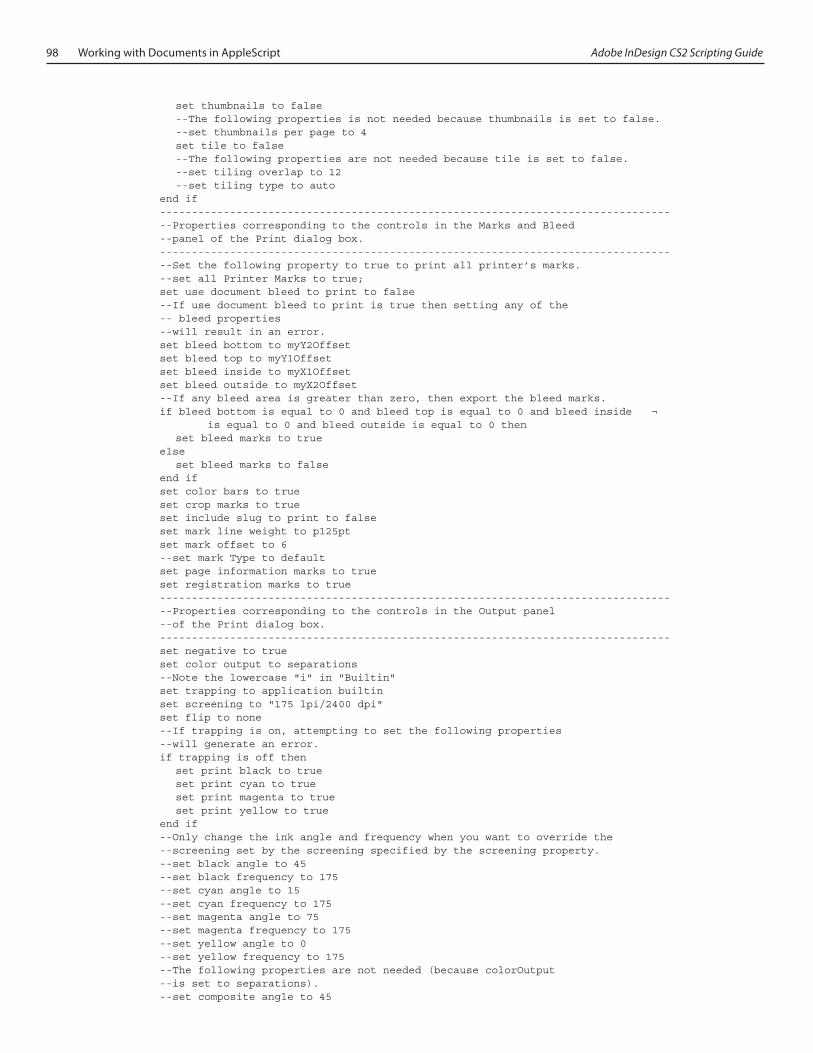
98 Working with Documents in AppleScript Adobe InDesign CS2 Scripting Guide
set thumbnails to false --The following properties is not needed because thumbnails is set to false. --set thumbnails per page to 4 set tile to false --The following properties are not needed because tile is set to false. --set tiling overlap to 12 --set tiling type to auto end if -------------------------------------------------------------------------------- --Properties corresponding to the controls in the Marks and Bleed --panel of the Print dialog box. -------------------------------------------------------------------------------- --Set the following property to true to print all printer’s marks. --set all Printer Marks to true; set use document bleed to print to false --If use document bleed to print is true then setting any of the -- bleed properties --will result in an error. set bleed bottom to myY2Offset set bleed top to myY1Offset set bleed inside to myX1Offset set bleed outside to myX2Offset --If any bleed area is greater than zero, then export the bleed marks. if bleed bottom is equal to 0 and bleed top is equal to 0 and bleed inside ¬ is equal to 0 and bleed outside is equal to 0 then set bleed marks to true else set bleed marks to false end if set color bars to true set crop marks to true set include slug to print to false set mark line weight to p125pt set mark offset to 6 --set mark Type to default set page information marks to true set registration marks to true -------------------------------------------------------------------------------- --Properties corresponding to the controls in the Output panel --of the Print dialog box. -------------------------------------------------------------------------------- set negative to true set color output to separations --Note the lowercase "i" in "Builtin" set trapping to application builtin set screening to "175 lpi/2400 dpi" set flip to none --If trapping is on, attempting to set the following properties --will generate an error. if trapping is off then set print black to true set print cyan to true set print magenta to true set print yellow to true end if --Only change the ink angle and frequency when you want to override the --screening set by the screening specified by the screening property. --set black angle to 45 --set black frequency to 175 --set cyan angle to 15 --set cyan frequency to 175 --set magenta angle to 75 --set magenta frequency to 175 --set yellow angle to 0 --set yellow frequency to 175 --The following properties are not needed (because colorOutput --is set to separations). --set composite angle to 45
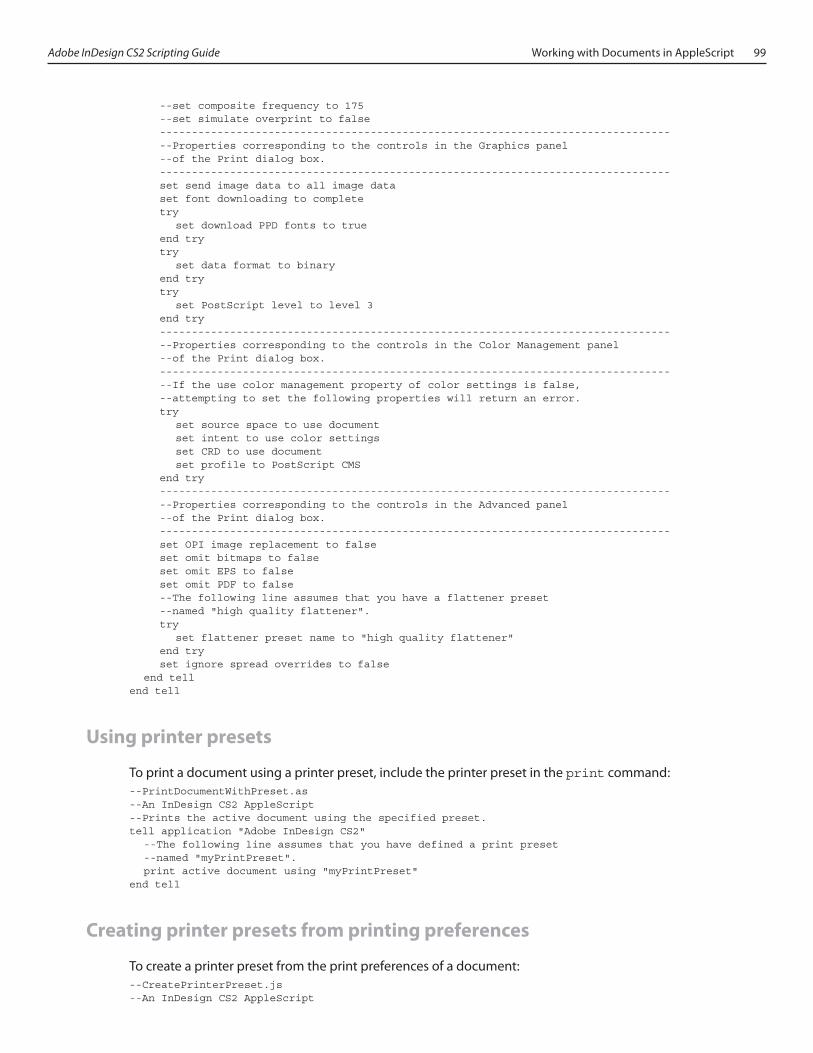
Adobe InDesign CS2 Scripting Guide Working with Documents in AppleScript 99
--set composite frequency to 175 --set simulate overprint to false -------------------------------------------------------------------------------- --Properties corresponding to the controls in the Graphics panel --of the Print dialog box. -------------------------------------------------------------------------------- set send image data to all image data set font downloading to complete try set download PPD fonts to true end try try set data format to binary end try try set PostScript level to level 3 end try -------------------------------------------------------------------------------- --Properties corresponding to the controls in the Color Management panel --of the Print dialog box. -------------------------------------------------------------------------------- --If the use color management property of color settings is false, --attempting to set the following properties will return an error. try set source space to use document set intent to use color settings set CRD to use document set profile to PostScript CMS end try -------------------------------------------------------------------------------- --Properties corresponding to the controls in the Advanced panel --of the Print dialog box. -------------------------------------------------------------------------------- set OPI image replacement to false set omit bitmaps to false set omit EPS to false set omit PDF to false --The following line assumes that you have a flattener preset --named "high quality flattener". try set flattener preset name to "high quality flattener" end try set ignore spread overrides to false end tellend tell
Using printer presets
To print a document using a printer preset, include the printer preset in the print command:--PrintDocumentWithPreset.as--An InDesign CS2 AppleScript--Prints the active document using the specified preset.tell application "Adobe InDesign CS2" --The following line assumes that you have defined a print preset --named "myPrintPreset". print active document using "myPrintPreset"end tell
Creating printer presets from printing preferences
To create a printer preset from the print preferences of a document:--CreatePrinterPreset.js--An InDesign CS2 AppleScript
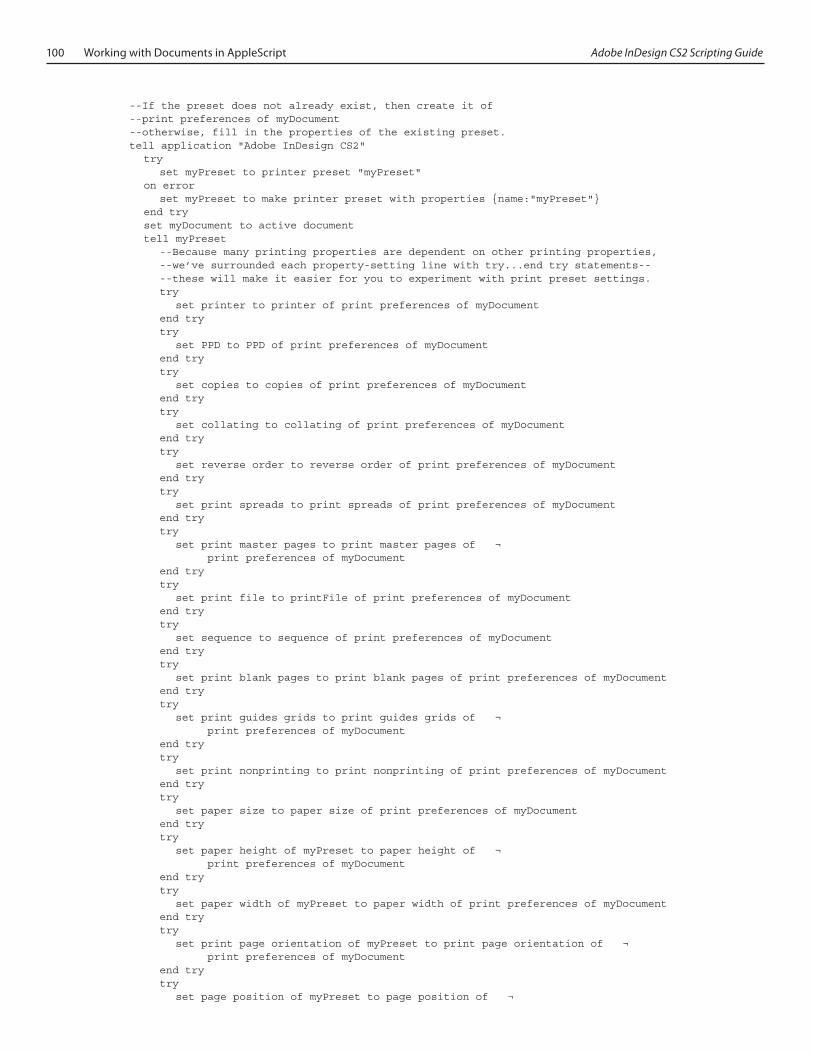
100 Working with Documents in AppleScript Adobe InDesign CS2 Scripting Guide
--If the preset does not already exist, then create it of --print preferences of myDocument--otherwise, fill in the properties of the existing preset.tell application "Adobe InDesign CS2" try set myPreset to printer preset "myPreset" on error set myPreset to make printer preset with properties {name:"myPreset"} end try set myDocument to active document tell myPreset --Because many printing properties are dependent on other printing properties, --we’ve surrounded each property-setting line with try...end try statements-- --these will make it easier for you to experiment with print preset settings. try set printer to printer of print preferences of myDocument end try try set PPD to PPD of print preferences of myDocument end try try set copies to copies of print preferences of myDocument end try try set collating to collating of print preferences of myDocument end try try set reverse order to reverse order of print preferences of myDocument end try try set print spreads to print spreads of print preferences of myDocument end try try set print master pages to print master pages of ¬ print preferences of myDocument end try try set print file to printFile of print preferences of myDocument end try try set sequence to sequence of print preferences of myDocument end try try set print blank pages to print blank pages of print preferences of myDocument end try try set print guides grids to print guides grids of ¬ print preferences of myDocument end try try set print nonprinting to print nonprinting of print preferences of myDocument end try try set paper size to paper size of print preferences of myDocument end try try set paper height of myPreset to paper height of ¬ print preferences of myDocument end try try set paper width of myPreset to paper width of print preferences of myDocument end try try set print page orientation of myPreset to print page orientation of ¬ print preferences of myDocument end try try set page position of myPreset to page position of ¬

Adobe InDesign CS2 Scripting Guide Working with Documents in AppleScript 101
print preferences of myDocument end try try set paper gap of myPreset to paper gap of print preferences of myDocument end try try set paper offset of myPreset to paper offset of ¬ print preferences of myDocument end try try set paper transverse of myPreset to paper transverse of ¬ print preferences of myDocument end try try set scale height of myPreset to scale height of ¬ print preferences of myDocument end try try set scale width of myPreset to scale width of print preferences of myDocument end try try set scale mode of myPreset to scale mode of print preferences of myDocument end try try set scale proportional of myPreset to scale proportional of ¬ print preferences of myDocument end try try set text as black of myPreset to text as black of ¬ print preferences of myDocument end try try set thumbnails of myPreset to thumbnails of print preferences of myDocument end try try set thumbnails per page of myPreset to thumbnails per page of ¬ print preferences of myDocument end try try set tile of myPreset to tile of print preferences of myDocument end try try set tiling type of myPreset to tiling type of print preferences of myDocument end try try set tiling overlap of myPreset to tiling overlap of ¬ print preferences of myDocument end try try set all printer marks of myPreset to all printer marks of ¬ print preferences of myDocument end try try set use document bleed to print of myPreset to use document bleed to ¬ print of print preferences of myDocument end try try set bleed bottom of myPreset to bleed bottom of ¬ print preferences of myDocument end try try set bleed top of myPreset to bleed top of print preferences of myDocument end try try set bleed inside of myPreset to bleed inside of ¬ print preferences of myDocument end try try
102 Working with Documents in AppleScript Adobe InDesign CS2 Scripting Guide
set bleed outside of myPreset to bleed outside of ¬ print preferences of myDocument end try try set bleed marks of myPreset to bleed marks of print preferences of myDocument end try try set color bars of myPreset to color bars of print preferences of myDocument end try try set crop marks of myPreset to crop marks of print preferences of myDocument end try try set include slug to print of myPreset to include slug to print of ¬ print preferences of myDocument end try try set mark line weight of myPreset to mark line weight of ¬ print preferences of myDocument end try try set mark offset of myPreset to mark offset of print preferences of myDocument end try try set mark type of myPreset to mark type of print preferences of myDocument end try try set page information marks of myPreset to page information marks of ¬ print preferences of myDocument end try try set registration marks of myPreset to registration marks of ¬ print preferences of myDocument end try try set negative of myPreset to negative of print preferences of myDocument end try try set color output of myPreset to color output of ¬ print preferences of myDocument end try try set trapping of myPreset to trapping of print preferences of myDocument end try try set screening of myPreset to screening of print preferences of myDocument end try try set flip of myPreset to flip of print preferences of myDocument end try try set print black of myPreset to print black of print preferences of myDocument end try try set print cyan of myPreset to print cyan of print preferences of myDocument end try try set print magenta of myPreset to print magenta of ¬ print preferences of myDocument end try try set print yellow of myPreset to print yellow of ¬ print preferences of myDocument end try try set black angle of myPreset to black angle of print preferences of myDocument end try try
Adobe InDesign CS2 Scripting Guide Working with Documents in AppleScript 103
set black frequency of myPreset to black frequency of ¬ print preferences of myDocument end try try set cyan angle of myPreset to cyan angle of print preferences of myDocument end try try set cyan frequency of myPreset to cyan frequency of ¬ print preferences of myDocument end try try set magenta angle of myPreset to magenta angle of ¬ print preferences of myDocument end try try set magenta frequency of myPreset to magenta frequency of ¬ print preferences of myDocument end try try set yellow angle of myPreset to yellow angle of ¬ print preferences of myDocument end try try set yellow frequency of myPreset to yellow frequency of ¬ print preferences of myDocument end try try set composite angle of myPreset to composite angle of ¬ print preferences of myDocument end try try set composite frequency of myPreset to composite frequency of ¬ print preferences of myDocument end try try set simulate overprint of myPreset to simulate overprint of ¬ print preferences of myDocument end try try set send image data of myPreset to send image data of ¬ print preferences of myDocument end try try set font downloading of myPreset to font downloading of ¬ print preferences of myDocument end try try set download PPD fonts of myPreset to download PPD fonts of ¬ print preferences of myDocument end try try set data format of myPreset to data format of print preferences of myDocument end try try set PostScript level of myPreset to PostScript level of ¬ print preferences of myDocument end try try set source space of myPreset to source space of ¬ print preferences of myDocument end try try set intent of myPreset to intent of print preferences of myDocument end try try set CRD of myPreset to CRD of print preferences of myDocument end try try

104 Working with Documents in AppleScript Adobe InDesign CS2 Scripting Guide
set profile of myPreset to profile of print preferences of myDocument end try try set OPI image replacement of myPreset to OPI image replacement of ¬ print preferences of myDocument end try try set omit bitmaps of myPreset to omit bitmaps of ¬ print preferences of myDocument end try try set omit EPS of myPreset to omit EPS of print preferences of myDocument end try try set omit PDF of myPreset to omit PDF of print preferences of myDocument end try try set flattener preset name of myPreset to flattener preset name of ¬ print preferences of myDocument end try try set ignore spread overrides of myPreset to ignore spread overrides of ¬ print preferences of myDocument end try display dialog ("Done!") end tellend tell
Exporting a document as PDFInDesign scripting offers full control over the creation of PDF files from your page layout documents.
Using current PDF export options
The following script exports the current document as PDF using a PDF export preset:--ExportPDF.as--An InDesign CS22 AppleScript--Assumes you have a document open--export command parameters are:--Format as (use either the pdf type enumeration or the string "Adobe PDF")--To as string (you’ll have to fill in a complete file path)--Showing options as boolean (setting this option to true displays --the PDF Export dialog box)--Using as PDF export preset (or a string that is the name of a PDF export preset)tell application "Adobe InDesign CS2" tell active document export format PDF type to "yukino:test.pdf" using "myTestPreset" without ¬ showing options end tellend tell
Setting PDF export options
The following example sets the PDF export options before exporting:--ExportPDFWithOptions.as--An InDesign CS2 AppleScript--Sets pdf export preferences.tell application "Adobe InDesign CS2" --Get the bleed amounts from the document’s bleed. tell document preferences of active document
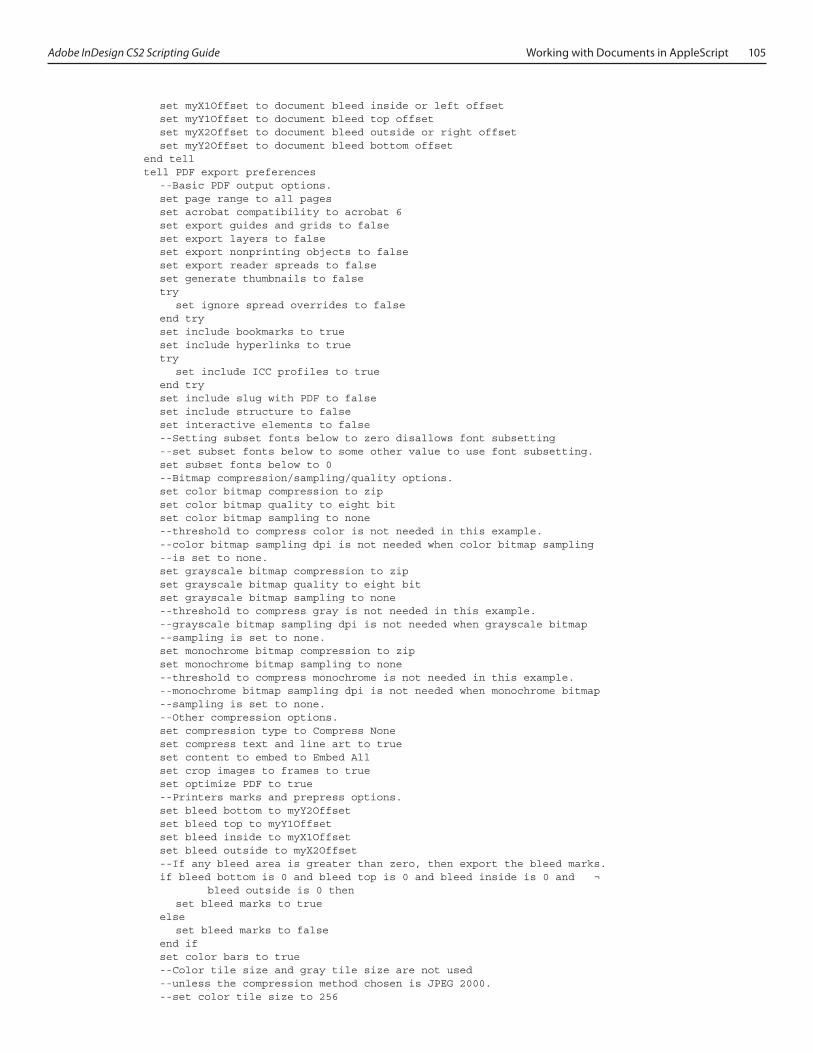
Adobe InDesign CS2 Scripting Guide Working with Documents in AppleScript 105
set myX1Offset to document bleed inside or left offset set myY1Offset to document bleed top offset set myX2Offset to document bleed outside or right offset set myY2Offset to document bleed bottom offset end tell tell PDF export preferences --Basic PDF output options. set page range to all pages set acrobat compatibility to acrobat 6 set export guides and grids to false set export layers to false set export nonprinting objects to false set export reader spreads to false set generate thumbnails to false try set ignore spread overrides to false end try set include bookmarks to true set include hyperlinks to true try set include ICC profiles to true end try set include slug with PDF to false set include structure to false set interactive elements to false --Setting subset fonts below to zero disallows font subsetting --set subset fonts below to some other value to use font subsetting. set subset fonts below to 0 --Bitmap compression/sampling/quality options. set color bitmap compression to zip set color bitmap quality to eight bit set color bitmap sampling to none --threshold to compress color is not needed in this example. --color bitmap sampling dpi is not needed when color bitmap sampling --is set to none. set grayscale bitmap compression to zip set grayscale bitmap quality to eight bit set grayscale bitmap sampling to none --threshold to compress gray is not needed in this example. --grayscale bitmap sampling dpi is not needed when grayscale bitmap --sampling is set to none. set monochrome bitmap compression to zip set monochrome bitmap sampling to none --threshold to compress monochrome is not needed in this example. --monochrome bitmap sampling dpi is not needed when monochrome bitmap --sampling is set to none. --Other compression options. set compression type to Compress None set compress text and line art to true set content to embed to Embed All set crop images to frames to true set optimize PDF to true --Printers marks and prepress options. set bleed bottom to myY2Offset set bleed top to myY1Offset set bleed inside to myX1Offset set bleed outside to myX2Offset --If any bleed area is greater than zero, then export the bleed marks. if bleed bottom is 0 and bleed top is 0 and bleed inside is 0 and ¬ bleed outside is 0 then set bleed marks to true else set bleed marks to false end if set color bars to true --Color tile size and gray tile size are not used --unless the compression method chosen is JPEG 2000. --set color tile size to 256
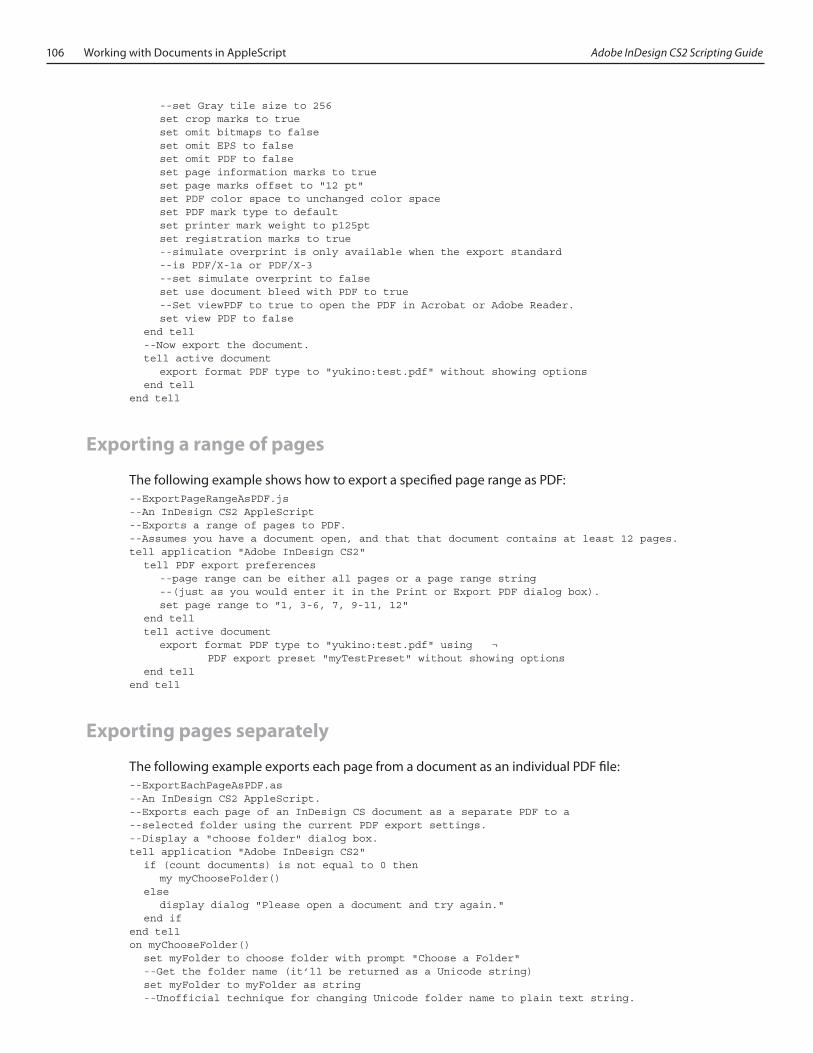
106 Working with Documents in AppleScript Adobe InDesign CS2 Scripting Guide
--set Gray tile size to 256 set crop marks to true set omit bitmaps to false set omit EPS to false set omit PDF to false set page information marks to true set page marks offset to "12 pt" set PDF color space to unchanged color space set PDF mark type to default set printer mark weight to p125pt set registration marks to true --simulate overprint is only available when the export standard --is PDF/X-1a or PDF/X-3 --set simulate overprint to false set use document bleed with PDF to true --Set viewPDF to true to open the PDF in Acrobat or Adobe Reader. set view PDF to false end tell --Now export the document. tell active document export format PDF type to "yukino:test.pdf" without showing options end tellend tell
Exporting a range of pages
The following example shows how to export a specified page range as PDF:--ExportPageRangeAsPDF.js--An InDesign CS2 AppleScript--Exports a range of pages to PDF.--Assumes you have a document open, and that that document contains at least 12 pages.tell application "Adobe InDesign CS2" tell PDF export preferences --page range can be either all pages or a page range string --(just as you would enter it in the Print or Export PDF dialog box). set page range to "1, 3-6, 7, 9-11, 12" end tell tell active document export format PDF type to "yukino:test.pdf" using ¬ PDF export preset "myTestPreset" without showing options end tellend tell
Exporting pages separately
The following example exports each page from a document as an individual PDF file:--ExportEachPageAsPDF.as--An InDesign CS2 AppleScript.--Exports each page of an InDesign CS document as a separate PDF to a--selected folder using the current PDF export settings.--Display a "choose folder" dialog box.tell application "Adobe InDesign CS2" if (count documents) is not equal to 0 then my myChooseFolder() else display dialog "Please open a document and try again." end ifend tellon myChooseFolder() set myFolder to choose folder with prompt "Choose a Folder" --Get the folder name (it’ll be returned as a Unicode string) set myFolder to myFolder as string --Unofficial technique for changing Unicode folder name to plain text string.
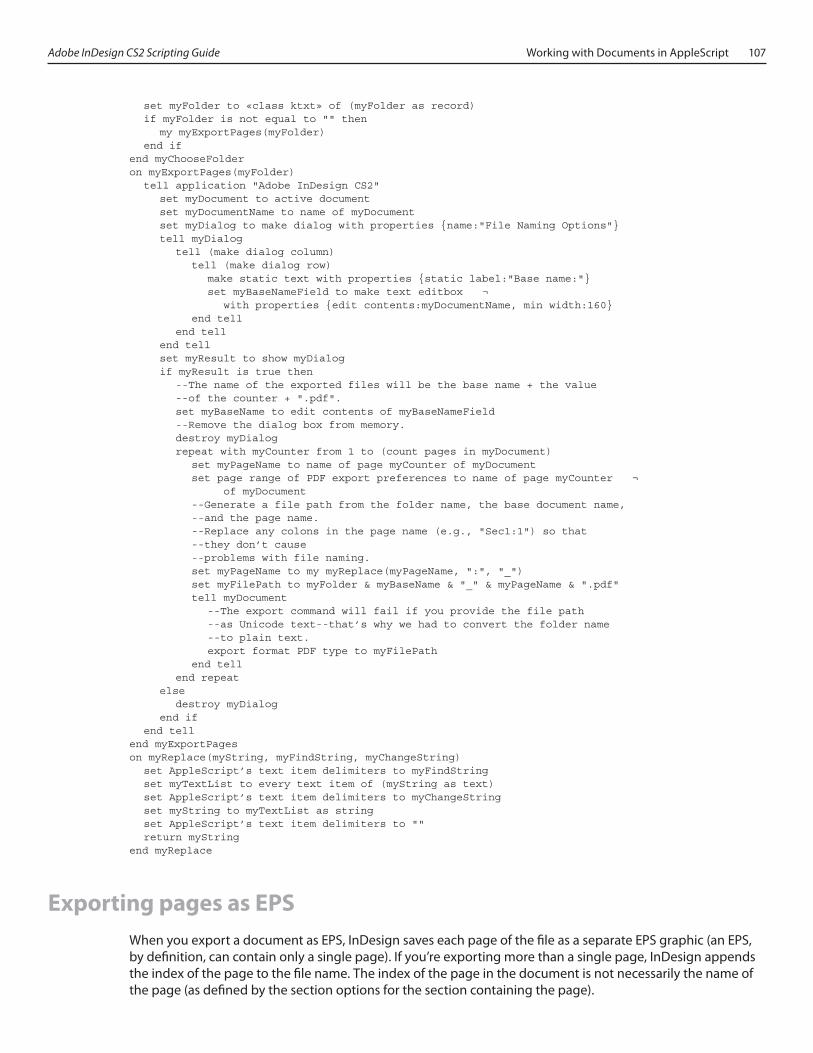
Adobe InDesign CS2 Scripting Guide Working with Documents in AppleScript 107
set myFolder to «class ktxt» of (myFolder as record) if myFolder is not equal to "" then my myExportPages(myFolder) end ifend myChooseFolderon myExportPages(myFolder) tell application "Adobe InDesign CS2" set myDocument to active document set myDocumentName to name of myDocument set myDialog to make dialog with properties {name:"File Naming Options"} tell myDialog tell (make dialog column) tell (make dialog row) make static text with properties {static label:"Base name:"} set myBaseNameField to make text editbox ¬ with properties {edit contents:myDocumentName, min width:160} end tell end tell end tell set myResult to show myDialog if myResult is true then --The name of the exported files will be the base name + the value --of the counter + ".pdf". set myBaseName to edit contents of myBaseNameField --Remove the dialog box from memory. destroy myDialog repeat with myCounter from 1 to (count pages in myDocument) set myPageName to name of page myCounter of myDocument set page range of PDF export preferences to name of page myCounter ¬ of myDocument --Generate a file path from the folder name, the base document name, --and the page name. --Replace any colons in the page name (e.g., "Sec1:1") so that --they don’t cause --problems with file naming. set myPageName to my myReplace(myPageName, ":", "_") set myFilePath to myFolder & myBaseName & "_" & myPageName & ".pdf" tell myDocument --The export command will fail if you provide the file path --as Unicode text--that’s why we had to convert the folder name --to plain text. export format PDF type to myFilePath end tell end repeat else destroy myDialog end if end tellend myExportPageson myReplace(myString, myFindString, myChangeString) set AppleScript’s text item delimiters to myFindString set myTextList to every text item of (myString as text) set AppleScript’s text item delimiters to myChangeString set myString to myTextList as string set AppleScript’s text item delimiters to "" return myStringend myReplace
Exporting pages as EPSWhen you export a document as EPS, InDesign saves each page of the file as a separate EPS graphic (an EPS, by definition, can contain only a single page). If you’re exporting more than a single page, InDesign appends the index of the page to the file name. The index of the page in the document is not necessarily the name of the page (as defined by the section options for the section containing the page).

108 Working with Documents in AppleScript Adobe InDesign CS2 Scripting Guide
Exporting all pages
The following script exports the pages of the active document to one or more EPS files:--ExportAsEPS.as--An InDesign CS2 AppleScript--Exports all of the pages in the active document to a series of EPS files--(an EPS, by definition, can contain only a single page).tell application "Adobe InDesign CS2" set page range of EPS export preferences to all pages tell active document --You’ll have to fill in your own file name. Files will be named --"myFile_01.eps", "myFile_02.eps", and so on. set myFileName to "yukino:myFile.eps" export format EPS type to myFileName without showing options end tellend tell
Exporting a range of pages
To control which pages are exported as EPS, set the page range property of the EPS export preferences to a page range string containing the page or pages that you want to export before exporting:--ExportPageRangeAsEPS.as--An InDesign CS2 AppleScript--Exports a range of pages to EPS.--Assumes you have a document open, and that that document --contains at least 12 pages.tell application "Adobe InDesign CS2" tell EPS export preferences --page range can be either all pages or a page range string --(just as you would enter it in the Print or Export EPS dialog box). set page range to "1, 3-6, 7, 9-11, 12" end tell tell active document export format EPS type to "yukino:test.eps" without showing options end tellend tell
Exporting with file naming
The following example exports each page as an EPS, but offers more control over file naming than the earlier example:--ExportEachPageAsEPS.as--An InDesign CS2 AppleScript--Exports each page of a document as EPS to a specified folder.--Display a "choose folder" dialog box.tell application "Adobe InDesign CS2" if (count documents) is not equal to 0 then my myChooseFolder() else display dialog "Please open a document and try again." end ifend tellon myChooseFolder() set myFolder to choose folder with prompt "Choose a Folder" --Get the folder name (it’ll be returned as a Unicode string) set myFolder to myFolder as string --Unofficial technique for changing Unicode folder name to plain text string. set myFolder to «class ktxt» of (myFolder as record) if myFolder is not equal to "" then my myExportPages(myFolder) end if

Adobe InDesign CS2 Scripting Guide Working with Documents in AppleScript 109
end myChooseFolderon myExportPages(myFolder) tell application "Adobe InDesign CS2" set myDocument to active document set myDocumentName to name of myDocument set myDialog to make dialog with properties {name:"ExportPages"} tell myDialog tell (make dialog column) tell (make dialog row) make static text with properties {static label:"Base Name:"} set myBaseNameField to make text editbox ¬ with properties {edit contents:myDocumentName, min width:160} end tell end tell end tell set myResult to show myDialog if myResult is true then --The name of the exported files will be the base name + the --value of the counter + ".pdf". set myBaseName to edit contents of myBaseNameField --Remove the dialog box from memory. destroy myDialog repeat with myCounter from 1 to (count pages in myDocument) --Get the name of the page and assign it to the variable "myPageName" set myPageName to name of page myCounter of myDocument --Set the page range to the name of the specific page. set page range of EPS export preferences to myPageName --Generate a file path from the folder name, the base document name, --and the page name. --Replace any colons in the page name (e.g., "Sec1:1") so that --they don’t cause --problems with file naming. set myPageName to my myReplace(myPageName, ":", "_") set myFilePath to myFolder & myBaseName & "_" & myPageName & ".eps" tell myDocument export format EPS type to myFilePath without showing options end tell end repeat else destroy myDialog end if end tellend myExportPageson myReplace(myString, myFindString, myChangeString) set AppleScript’s text item delimiters to myFindString set myTextList to every text item of (myString as text) set AppleScript’s text item delimiters to myChangeString set myString to myTextList as string set AppleScript’s text item delimiters to "" return myStringend myReplace

110 Working with Documents in AppleScript Adobe InDesign CS2 Scripting Guide

Adobe InDesign CS2 Scripting Guide Working with Documents in JavaScript 111
6 Working with Documents in JavaScript
Most of the work that you do in InDesign revolves around documents—creating them, saving them, and populating them with page items, colors, styles, and text. Documents are also important to InDesign scripting, and almost every document-related task can be automated using scripting.
This chapter shows you how to:
Do basic document management, including
Create a new document
Open a document
Close a document
Save a document
Do basic page layout, including
Set the page size and document length
Define bleed and slug areas
Specify page columns and margins
Change the pasteboard's appearance
Use guides and grids
Change measurement units and ruler origin
Define and apply document presets
Set up master pages (master spreads)
Set text-formatting defaults
Add XMP metadata (information about a file)
Create a document template
Print a document
Export a document as PDF
Export pages of a document as EPS
Note: If you have not already worked through Chapter 3, “Getting Started with InDesign Scripting,” you might want to do so before continuing with this chapter, which assumes that you have already read that chap-ter and know how to create a script.
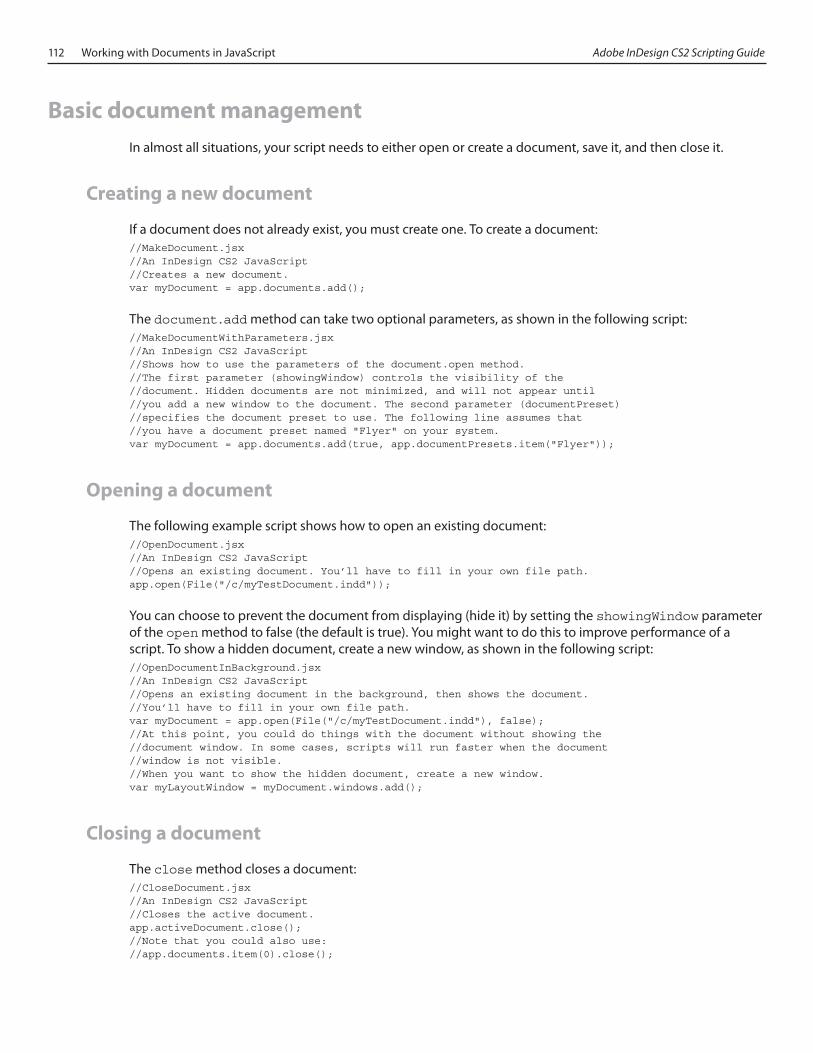
112 Working with Documents in JavaScript Adobe InDesign CS2 Scripting Guide
Basic document managementIn almost all situations, your script needs to either open or create a document, save it, and then close it.
Creating a new document
If a document does not already exist, you must create one. To create a document://MakeDocument.jsx//An InDesign CS2 JavaScript//Creates a new document.var myDocument = app.documents.add();
The document.add method can take two optional parameters, as shown in the following script://MakeDocumentWithParameters.jsx//An InDesign CS2 JavaScript//Shows how to use the parameters of the document.open method.//The first parameter (showingWindow) controls the visibility of the //document. Hidden documents are not minimized, and will not appear until //you add a new window to the document. The second parameter (documentPreset) //specifies the document preset to use. The following line assumes that //you have a document preset named "Flyer" on your system.var myDocument = app.documents.add(true, app.documentPresets.item("Flyer"));
Opening a document
The following example script shows how to open an existing document://OpenDocument.jsx//An InDesign CS2 JavaScript//Opens an existing document. You’ll have to fill in your own file path.app.open(File("/c/myTestDocument.indd"));
You can choose to prevent the document from displaying (hide it) by setting the showingWindow parameter of the open method to false (the default is true). You might want to do this to improve performance of a script. To show a hidden document, create a new window, as shown in the following script://OpenDocumentInBackground.jsx//An InDesign CS2 JavaScript//Opens an existing document in the background, then shows the document.//You’ll have to fill in your own file path.var myDocument = app.open(File("/c/myTestDocument.indd"), false);//At this point, you could do things with the document without showing the//document window. In some cases, scripts will run faster when the document//window is not visible.//When you want to show the hidden document, create a new window.var myLayoutWindow = myDocument.windows.add();
Closing a document
The close method closes a document://CloseDocument.jsx//An InDesign CS2 JavaScript//Closes the active document.app.activeDocument.close();//Note that you could also use://app.documents.item(0).close();
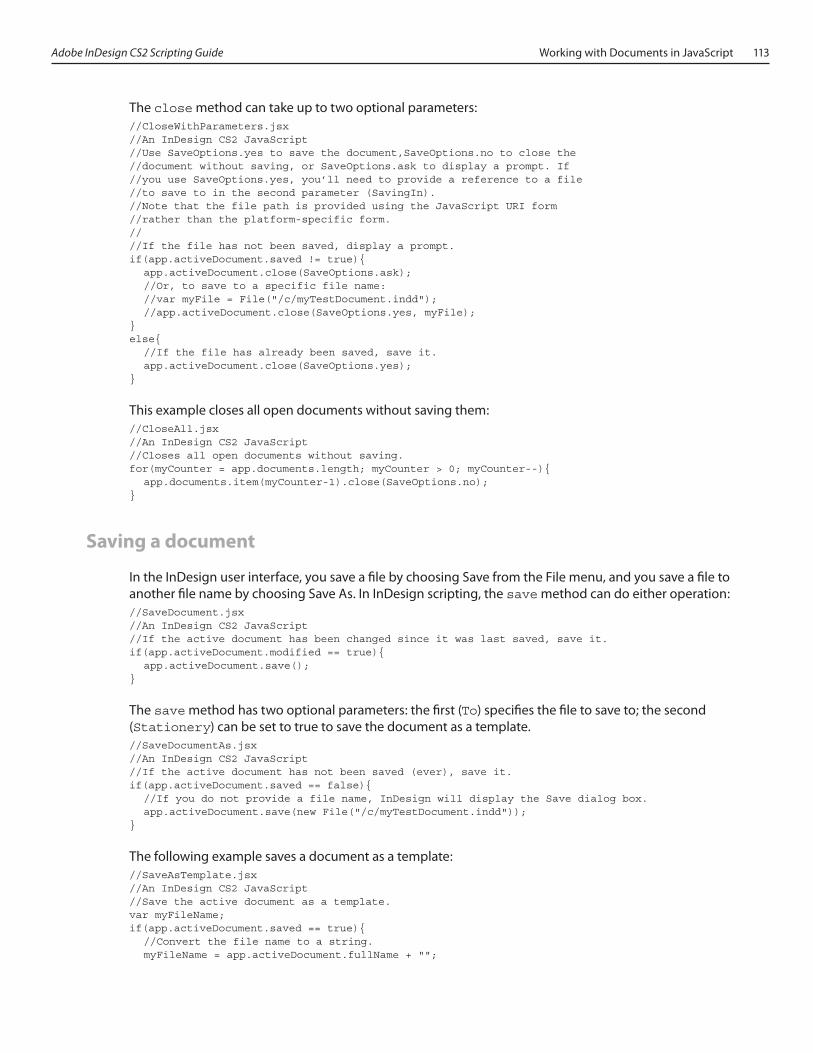
Adobe InDesign CS2 Scripting Guide Working with Documents in JavaScript 113
The close method can take up to two optional parameters://CloseWithParameters.jsx//An InDesign CS2 JavaScript//Use SaveOptions.yes to save the document,SaveOptions.no to close the //document without saving, or SaveOptions.ask to display a prompt. If //you use SaveOptions.yes, you’ll need to provide a reference to a file //to save to in the second parameter (SavingIn).//Note that the file path is provided using the JavaScript URI form //rather than the platform-specific form.////If the file has not been saved, display a prompt.if(app.activeDocument.saved != true){ app.activeDocument.close(SaveOptions.ask); //Or, to save to a specific file name: //var myFile = File("/c/myTestDocument.indd"); //app.activeDocument.close(SaveOptions.yes, myFile);}else{ //If the file has already been saved, save it. app.activeDocument.close(SaveOptions.yes);}
This example closes all open documents without saving them://CloseAll.jsx//An InDesign CS2 JavaScript//Closes all open documents without saving.for(myCounter = app.documents.length; myCounter > 0; myCounter--){ app.documents.item(myCounter-1).close(SaveOptions.no);}
Saving a document
In the InDesign user interface, you save a file by choosing Save from the File menu, and you save a file to another file name by choosing Save As. In InDesign scripting, the save method can do either operation://SaveDocument.jsx//An InDesign CS2 JavaScript//If the active document has been changed since it was last saved, save it.if(app.activeDocument.modified == true){ app.activeDocument.save();}
The save method has two optional parameters: the first (To) specifies the file to save to; the second (Stationery) can be set to true to save the document as a template.//SaveDocumentAs.jsx//An InDesign CS2 JavaScript//If the active document has not been saved (ever), save it.if(app.activeDocument.saved == false){ //If you do not provide a file name, InDesign will display the Save dialog box. app.activeDocument.save(new File("/c/myTestDocument.indd"));}
The following example saves a document as a template://SaveAsTemplate.jsx//An InDesign CS2 JavaScript//Save the active document as a template.var myFileName;if(app.activeDocument.saved == true){ //Convert the file name to a string. myFileName = app.activeDocument.fullName + "";
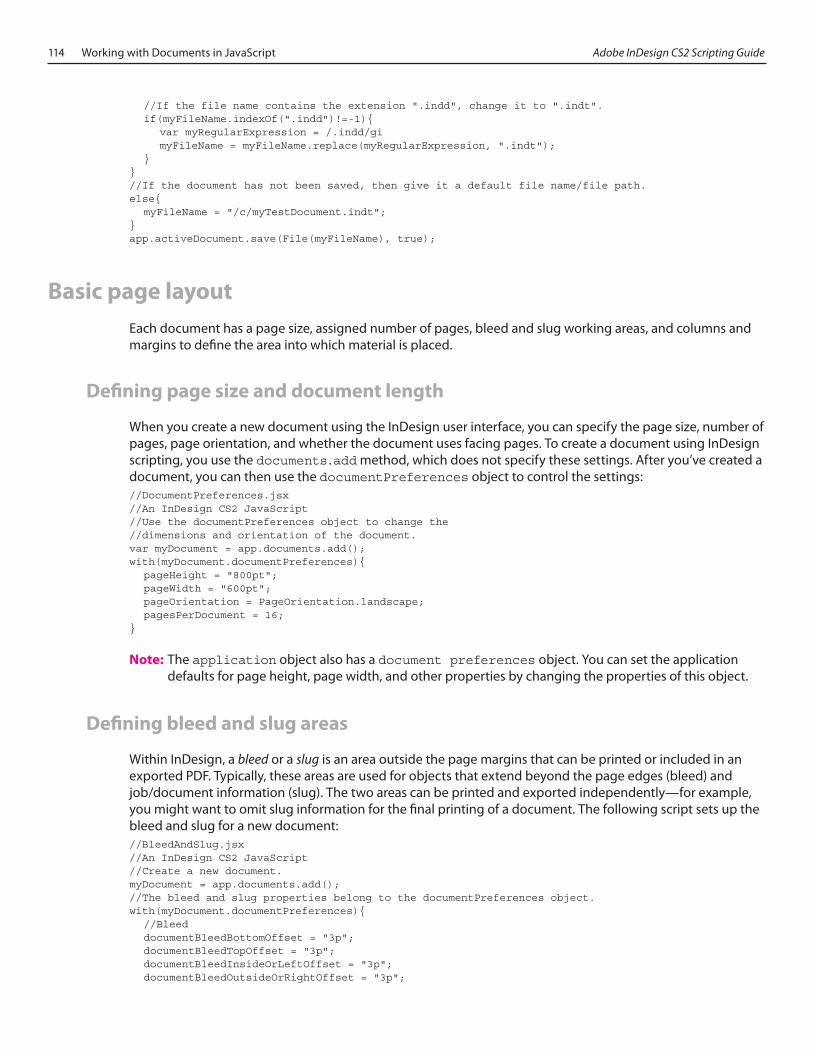
114 Working with Documents in JavaScript Adobe InDesign CS2 Scripting Guide
//If the file name contains the extension ".indd", change it to ".indt". if(myFileName.indexOf(".indd")!=-1){ var myRegularExpression = /.indd/gi myFileName = myFileName.replace(myRegularExpression, ".indt"); }}//If the document has not been saved, then give it a default file name/file path.else{ myFileName = "/c/myTestDocument.indt";}app.activeDocument.save(File(myFileName), true);
Basic page layoutEach document has a page size, assigned number of pages, bleed and slug working areas, and columns and margins to define the area into which material is placed.
Defining page size and document length
When you create a new document using the InDesign user interface, you can specify the page size, number of pages, page orientation, and whether the document uses facing pages. To create a document using InDesign scripting, you use the documents.add method, which does not specify these settings. After you’ve created a document, you can then use the documentPreferences object to control the settings://DocumentPreferences.jsx//An InDesign CS2 JavaScript//Use the documentPreferences object to change the //dimensions and orientation of the document.var myDocument = app.documents.add();with(myDocument.documentPreferences){ pageHeight = "800pt"; pageWidth = "600pt"; pageOrientation = PageOrientation.landscape; pagesPerDocument = 16;}
Note: The application object also has a document preferences object. You can set the application defaults for page height, page width, and other properties by changing the properties of this object.
Defining bleed and slug areas
Within InDesign, a bleed or a slug is an area outside the page margins that can be printed or included in an exported PDF. Typically, these areas are used for objects that extend beyond the page edges (bleed) and job/document information (slug). The two areas can be printed and exported independently—for example, you might want to omit slug information for the final printing of a document. The following script sets up the bleed and slug for a new document://BleedAndSlug.jsx//An InDesign CS2 JavaScript//Create a new document.myDocument = app.documents.add();//The bleed and slug properties belong to the documentPreferences object.with(myDocument.documentPreferences){ //Bleed documentBleedBottomOffset = "3p"; documentBleedTopOffset = "3p"; documentBleedInsideOrLeftOffset = "3p"; documentBleedOutsideOrRightOffset = "3p";
Adobe InDesign CS2 Scripting Guide Working with Documents in JavaScript 115
//Slug slugBottomOffset = "18p"; slugTopOffset = "3p"; slugInsideOrLeftOffset = "3p"; slugRightOrOutsideOffset = "3p";}
If all the bleed distances are equal, as in the preceding example, you can alternatively use the documentBleedUniformSize property://UniformBleed.jsx//An InDesign CS2 JavaScript//Create a new document.myDocument = app.documents.add();//The bleed properties belong to the documentPreferences object.with(myDocument.documentPreferences){ //Bleed documentBleedUniformSize = true; documentBleedTopOffset = "3p";}
If all the slug distances are equal, you can instead use the documentSlugUniformSize property://UniformSlug.jsx//An InDesign CS2 JavaScript//Create a new document.myDocument = app.documents.add();//The slug properties belong to the documentPreferences object.with(myDocument.documentPreferences){ //Slug: documentSlugUniformSize = true; slugTopOffset = "3p";}
In addition to setting the bleed and slug widths and heights, you can control the color used to draw the guides defining the bleed and slug. This property is not in the document preferences object—instead, it’s in the pasteboardPreferences object://BleedSlugGuideColors.jsx//An InDesign CS2 JavaScript//Set the colors used to display the bleed and slug guides.with(app.activeDocument.pasteboardPreferences){ //Any of InDesign’s guides can use the UIColors constants... bleedGuideColor = UIColors.cuteTeal; slugGuideColor = UIColors.charcoal; //...or you can specify an array of RGB values (with values from 0 to 255) //bleedGuideColor = [0, 198, 192]; //slugGuideColor = [192, 192, 192];}
Setting page margins and columns
Each page in a document can have its own margin and column settings. With InDesign scripting, these properties are part of the marginPreferences object for each page. This example script creates a new document, then sets the margins and columns for all pages in the master spread://MarginsAndColumns.jsx//An InDesign CS2 JavaScript//Sets up the margins and columns for the first page of an example document.myDocument = app.documents.add();with (myDocument.pages.item(0).marginPreferences){ columnCount = 3; //columnGutter can be a number or a measurement string. columnGutter = "1p"; bottom = "6p" //When document.documentPreference
116 Working with Documents in JavaScript Adobe InDesign CS2 Scripting Guide
s.facingPages == true, //"left" means inside; "right" means outside. left = "6p" right = "4p" top = "4p"}
InDesign does not allow you to create a page that is smaller than the sum of the relevant margins, that is, the width of the page must be greater than the sum of the current left and right page margins, and the height of the page must be greater than the sum of the top and bottom margins. If you’re creating very small pages (for example, for individual newspaper advertisements) using the InDesign user interface, you can easily set the correct margin sizes as you create the document by entering new values in the document default page Margin fields in the New Document dialog box.
From scripting, however, the solution is not as clear—when you create a document, it uses the application default margin preferences. These margins are applied to all pages of the document, including master pages. Setting the document margin preferences affects only new pages and has no effect on existing pages. If you try to set the page height and page width to values smaller than the sum of the corresponding margins on any of the existing pages, InDesign does not change the page size.
There are two solutions. The first is to set the margins of existing pages before trying to change the page size://PageMargins.jsx//An InDesign CS2 JavaSCript//Creates a new document and sets up page margins.var myDocument = app.documents.add();myDocument.marginPreferences.top = 0;myDocument.marginPreferences.left = 0;myDocument.marginPreferences.bottom = 0;myDocument.marginPreferences.right = 0;//The following assumes that your default document contains a single page.myDocument.pages.item(0).marginPreferences.top = 0;myDocument.pages.item(0).marginPreferences.left = 0;myDocument.pages.item(0).marginPreferences.bottom = 0;myDocument.pages.item(0).marginPreferences.right = 0;//The following assumes that your default master spread contains two pages.myDocument.masterSpreads.item(0).pages.item(0).marginPreferences.top = 0;myDocument.masterSpreads.item(0).pages.item(0).marginPreferences.left = 0;myDocument.masterSpreads.item(0).pages.item(0).marginPreferences.bottom = 0;myDocument.masterSpreads.item(0).pages.item(0).marginPreferences.right = 0;myDocument.masterSpreads.item(0).pages.item(1).marginPreferences.top = 0;myDocument.masterSpreads.item(0).pages.item(1).marginPreferences.left = 0;myDocument.masterSpreads.item(0).pages.item(1).marginPreferences.bottom = 0;myDocument.masterSpreads.item(0).pages.item(1).marginPreferences.right = 0;myDocument.documentPreferences.pageHeight = "1p";myDocument.documentPreferences.pageWidth = "6p";
Alternatively, you can change the application default margin preferences before you create the document://ApplicationPageMargins.jsx//An InDesign CS2 JavaScript//Sets the application default page margins. All new documents will be //created using these settings; existing documents will be unaffected.with (app.marginPreferences){ //Save the current application default margin preferences. var myY1 = top; var myX1 = left; var myY2 = bottom; var myX2 = right; //Set the application default margin preferences. top = 0; left = 0; bottom = 0; right = 0;}
Adobe InDesign CS2 Scripting Guide Working with Documents in JavaScript 117
//Create a new example document to demonstrate the change.var myDocument = app.documents.add();myDocument.documentPreferences.pageHeight = "1p";myDocument.documentPreferences.pageWidth = "6p";//Reset the application default margin preferences to their former state.with (app.marginPreferences){ top = myY1; left = myX1 ; bottom = myY2; right = myX2;}
Changing the pasteboard's appearanceThe pasteboard is an area that surrounds InDesign pages. You can use it for temporary storage of page items. You can change the size of the pasteboard and its color using scripting. The pasteboardColor property controls the color of the pasteboard in Normal mode; the previewBackgroundColor property sets the color of the pasteboard in Preview mode://PasteboardPreferences.jsx//An InDesign CS2 JavaScript//Create a new document and change the size of the pasteboard.myDocument = app.documents.add();with(myDocument.pasteboardPreferences){ //You can use either a number or a measurement string //to set the space above/below. minimumSpaceAboveAndBelow = "12p"; //You can set the pasteboard color to any of //the predefined UIColor enumerations... pasteboardColor = UIColors.white; previewBackgroundColor = UIColors.gray; //...or you can specify an array of RGB values //(with values from 0 to 255) //pasteboardColor = [0, 0, 0]; //previewBackgroundColor = [192, 192, 192]; }
Using guides and gridsGuides and grids make it easy to position objects on your document pages.
Defining guides
A guide in InDesign gives you an easy way to position objects on the pages of your document. Here’s an example use of guides://Guides.jsx//An InDesign CS2 JavaScript//Create a new document, add guides, and set guide properties.var myDocument = app.documents.add();var myPageWidth = myDocument.documentPreferences.pageWidth;var myPageHeight = myDocument.documentPreferences.pageHeight;with(myDocument.pages.item(0)){ //Place guides at the margins of the page. guides.add(undefined, {orientation:HorizontalOrVertical.vertical, location:marginPreferences.left}); guides.add(undefined, {orientation:HorizontalOrVertical.vertical, location:(myPageWidth - marginPreferences.right)}); guides.add(undefined, {orientation:HorizontalOrVertical.horizontal, location:marginPreferences.top});

118 Working with Documents in JavaScript Adobe InDesign CS2 Scripting Guide
guides.add(undefined, {orientation:HorizontalOrVertical.horizontal, location:(myPageHeight - marginPreferences.bottom)}); //Place a guide at the vertical center of the page. guides.add(undefined, {orientation:HorizontalOrVertical.vertical, location:(myPageWidth/2)}); //Place a guide at the horizontal center of the page. guides.add(undefined, {orientation:HorizontalOrVertical.horizontal, location:(myPageHeight/2)});}
Horizontal guides can be limited to a given page, or can extend across all pages in a spread. With InDesign scripting, you can control this using the fitToPage property. (This property is ignored by vertical guides.)//SpreadAndPageGuides.jsx//An InDesign CS2 JavaScript//Demonstrate the difference between spread guides and page guides.var myDocument = app.documents.add();myDocument.documentPreferences.facingPages = true;myDocument.documentPreferences.pagesPerDocument = 3;with(myDocument.spreads.item(1)){ //Note the difference between these two guides on pages 2 and 3. guides.add(undefined, {orientation:HorizontalOrVertical.horizontal, location:"6p", fitToPage:true}); guides.add(undefined, {orientation:HorizontalOrVertical.horizontal, location:"9p", fitToPage:false});}
You can use scripting to change the layer, color, and visibility of guides, just as you can from the user interface://GuideOptions.jsx//An InDesign CS2 JavaScript//Shows how to set guide options.var myGuide;var myDocument = app.documents.add();//Create a layer named "guide layer".var myLayer = myDocument.layers.add({name:"guide layer"});//Add a series of guides to page 1.with(myDocument.pages.item(0)){ //Create a guide on the layer we created above. myGuide = guides.add(myLayer, {orientation:HorizontalOrVertical.horizontal, location:"12p"}); //Another way to make a guide on a specific layer. myGuide = guides.add(undefined, {itemLayer:myLayer, orientation:HorizontalOrVertical.horizontal, location:"14p"}); //Make a locked guide. myGuide = guides.add(myLayer,{locked:true, orientation:HorizontalOrVertical.horizontal, location:"16p"}); //Set the view threshold of a guide. myGuide = guides.add(myLayer,{viewThreshold:100, orientation:HorizontalOrVertical.horizontal, location:"18p"}); //Set the guide color of a guide using a UIColors constant. myGuide = guides.add(myLayer,{guideColor:UIColors.gray, orientation:HorizontalOrVertical.horizontal, location:"20p"}); //Set the guide color of a guide using an RGB array. myGuide = guides.add(myLayer,{guideColor:[192, 192, 192], orientation:HorizontalOrVertical.horizontal, location:"22p"});}
You can also create guides using the createGuides method of spreads and master spreads://CreateGuides.jsx//An InDesign CS2 JavaScript//Add a series of guides using the createGuides method.var myDocument = app.documents.add();with (myDocument.spreads.item(0)){ //Parameters (all optional): row count, column count, row gutter, //column gutter,guide color, fit margins, remove existing, layer. //Note that the createGuides method does not take an RGB array //for the guide color parameter. createGuides(4, 4, "1p", "1p", UIColors.gray, true, true, myDocument.layers.item(0));}
Adobe InDesign CS2 Scripting Guide Working with Documents in JavaScript 119
Setting grid preferences
To control the properties of the document and baseline grid, you set the properties of the gridPreferences object, as shown in the following script://DocumentAndBaselineGrids.jsx//An InDesign CS2 JavaScript//Creates a document, then sets preferences for the //document grid and baseline grid.var myDocument = app.documents.add();//Set the document measurement units to points.myDocument.viewPreferences.horizontalMeasurementUnits = MeasurementUnits.points;myDocument.viewPreferences.verticalMeasurementUnits = MeasurementUnits.points;//Set up grid preferences.with(myDocument.gridPreferences){ baselineStart = 56; baselineDivision = 14; baselineShown = true; horizontalGridlineDivision = 14; horizontalGridSubdivision = 5 verticalGridlineDivision = 14; verticalGridSubdivision = 5 documentGridShown = true;}
Snapping to guides and grids
All the snap settings for the grids and guides of a document are in the properties of the guidePreferences and gridPreferences objects. Here’s an example://GuideAndGridPreferences.jsx//An InDesign CS2 JavaScript//Sets preferences for guides and grids.//Assumes you have a document open.var myDocument = app.activeDocument;with(myDocument.guidePreferences){ guidesInBack = true; guidesLocked = false; guidesShown = true; guidesSnapTo = true;}with(myDocument.gridPreferences){ documentGridShown = false; documentGridSnapTo = true; //Objects "snap" to the baseline grid when //guidePreferences.guideSnapTo is set to true. baselineGridShown = true;}
Changing measurement units and rulerThe example scripts so far used measurement strings (strings that force InDesign to use a specific measurement unit, “8.5i”, for example, for 8.5 inches). They do this because you might be using a different measurement system when you run the script.
To specify the measurement system used in a script, use the document’s viewPreferences object.//ViewPreferences.jsx//An InDesign CS2 JavaScript//Changes the measurement units used by the active document.//Assumes you have a document open.var myDocument = app.activeDocument;with(myDocument.viewPreferences){
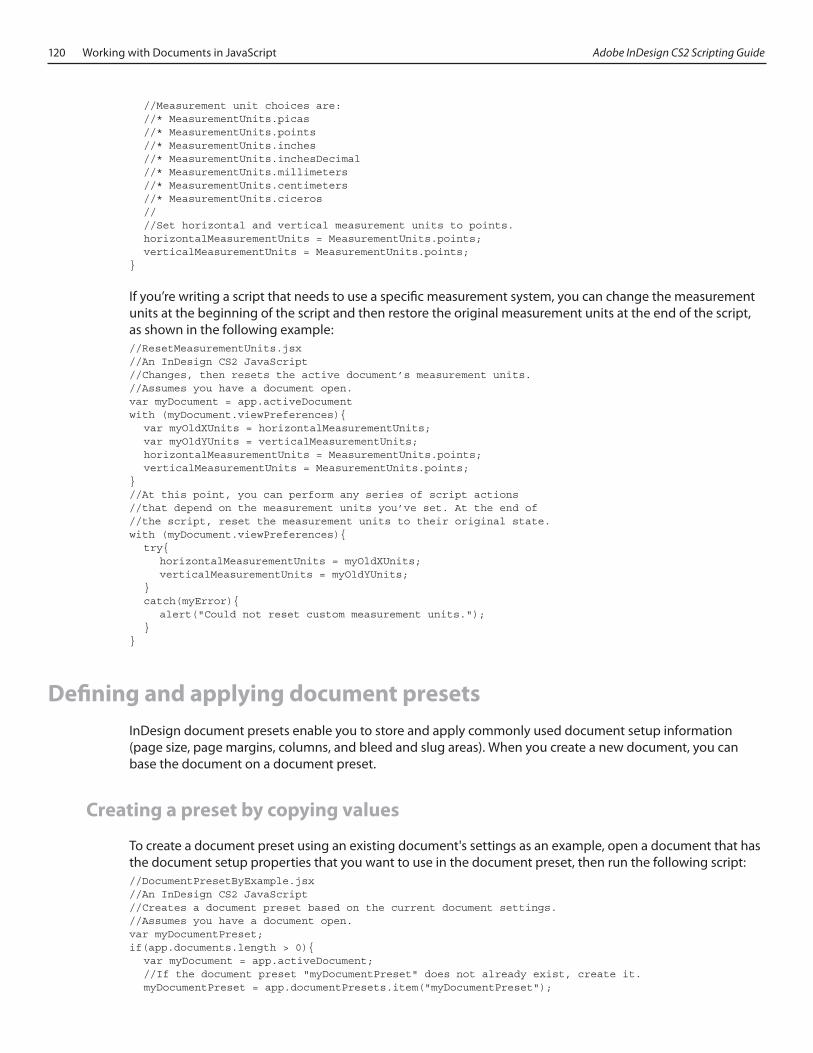
120 Working with Documents in JavaScript Adobe InDesign CS2 Scripting Guide
//Measurement unit choices are: //* MeasurementUnits.picas //* MeasurementUnits.points //* MeasurementUnits.inches //* MeasurementUnits.inchesDecimal //* MeasurementUnits.millimeters //* MeasurementUnits.centimeters //* MeasurementUnits.ciceros // //Set horizontal and vertical measurement units to points. horizontalMeasurementUnits = MeasurementUnits.points; verticalMeasurementUnits = MeasurementUnits.points;}
If you’re writing a script that needs to use a specific measurement system, you can change the measurement units at the beginning of the script and then restore the original measurement units at the end of the script, as shown in the following example://ResetMeasurementUnits.jsx//An InDesign CS2 JavaScript//Changes, then resets the active document’s measurement units.//Assumes you have a document open.var myDocument = app.activeDocumentwith (myDocument.viewPreferences){ var myOldXUnits = horizontalMeasurementUnits; var myOldYUnits = verticalMeasurementUnits; horizontalMeasurementUnits = MeasurementUnits.points; verticalMeasurementUnits = MeasurementUnits.points;}//At this point, you can perform any series of script actions //that depend on the measurement units you’ve set. At the end of//the script, reset the measurement units to their original state.with (myDocument.viewPreferences){ try{ horizontalMeasurementUnits = myOldXUnits; verticalMeasurementUnits = myOldYUnits; } catch(myError){ alert("Could not reset custom measurement units."); }}
Defining and applying document presetsInDesign document presets enable you to store and apply commonly used document setup information (page size, page margins, columns, and bleed and slug areas). When you create a new document, you can base the document on a document preset.
Creating a preset by copying values
To create a document preset using an existing document's settings as an example, open a document that has the document setup properties that you want to use in the document preset, then run the following script://DocumentPresetByExample.jsx//An InDesign CS2 JavaScript//Creates a document preset based on the current document settings.//Assumes you have a document open.var myDocumentPreset;if(app.documents.length > 0){ var myDocument = app.activeDocument; //If the document preset "myDocumentPreset" does not already exist, create it. myDocumentPreset = app.documentPresets.item("myDocumentPreset");
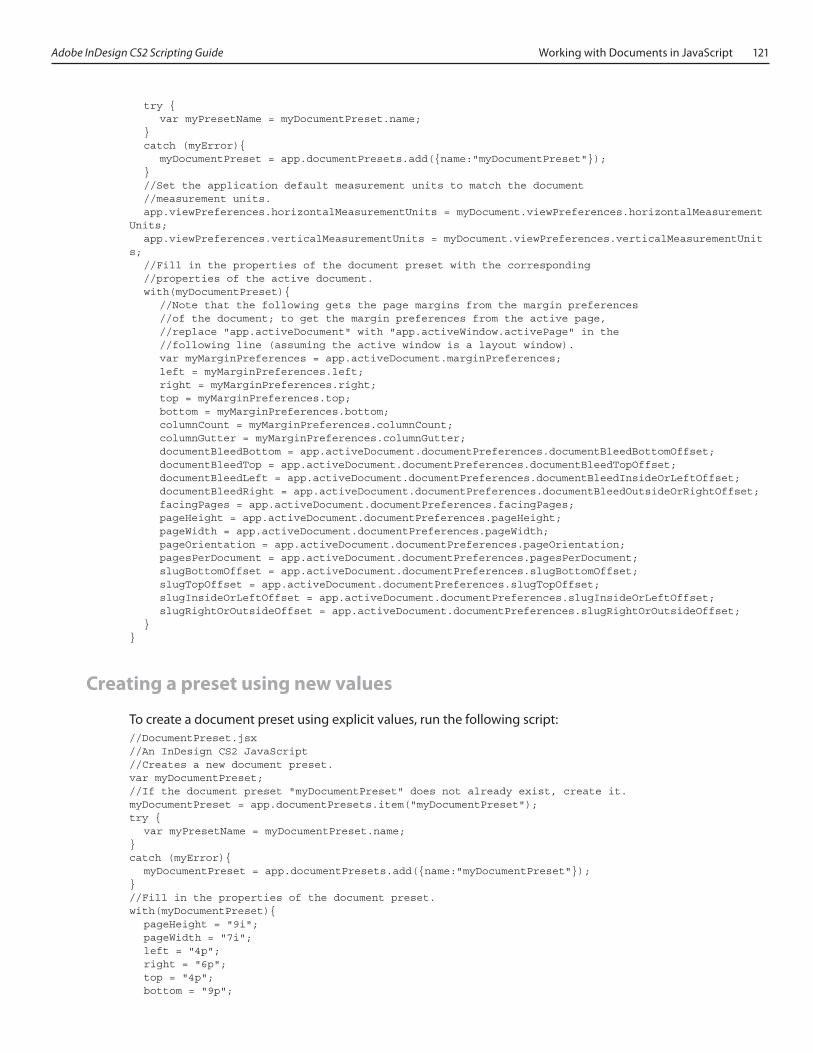
Adobe InDesign CS2 Scripting Guide Working with Documents in JavaScript 121
try { var myPresetName = myDocumentPreset.name; } catch (myError){ myDocumentPreset = app.documentPresets.add({name:"myDocumentPreset"}); } //Set the application default measurement units to match the document //measurement units. app.viewPreferences.horizontalMeasurementUnits = myDocument.viewPreferences.horizontalMeasurementUnits; app.viewPreferences.verticalMeasurementUnits = myDocument.viewPreferences.verticalMeasurementUnits; //Fill in the properties of the document preset with the corresponding //properties of the active document. with(myDocumentPreset){ //Note that the following gets the page margins from the margin preferences //of the document; to get the margin preferences from the active page, //replace "app.activeDocument" with "app.activeWindow.activePage" in the //following line (assuming the active window is a layout window). var myMarginPreferences = app.activeDocument.marginPreferences; left = myMarginPreferences.left; right = myMarginPreferences.right; top = myMarginPreferences.top; bottom = myMarginPreferences.bottom; columnCount = myMarginPreferences.columnCount; columnGutter = myMarginPreferences.columnGutter; documentBleedBottom = app.activeDocument.documentPreferences.documentBleedBottomOffset; documentBleedTop = app.activeDocument.documentPreferences.documentBleedTopOffset; documentBleedLeft = app.activeDocument.documentPreferences.documentBleedInsideOrLeftOffset; documentBleedRight = app.activeDocument.documentPreferences.documentBleedOutsideOrRightOffset; facingPages = app.activeDocument.documentPreferences.facingPages; pageHeight = app.activeDocument.documentPreferences.pageHeight; pageWidth = app.activeDocument.documentPreferences.pageWidth; pageOrientation = app.activeDocument.documentPreferences.pageOrientation; pagesPerDocument = app.activeDocument.documentPreferences.pagesPerDocument; slugBottomOffset = app.activeDocument.documentPreferences.slugBottomOffset; slugTopOffset = app.activeDocument.documentPreferences.slugTopOffset; slugInsideOrLeftOffset = app.activeDocument.documentPreferences.slugInsideOrLeftOffset; slugRightOrOutsideOffset = app.activeDocument.documentPreferences.slugRightOrOutsideOffset; }}
Creating a preset using new values
To create a document preset using explicit values, run the following script://DocumentPreset.jsx//An InDesign CS2 JavaScript//Creates a new document preset.var myDocumentPreset;//If the document preset "myDocumentPreset" does not already exist, create it. myDocumentPreset = app.documentPresets.item("myDocumentPreset");try { var myPresetName = myDocumentPreset.name;}catch (myError){ myDocumentPreset = app.documentPresets.add({name:"myDocumentPreset"});}//Fill in the properties of the document preset.with(myDocumentPreset){ pageHeight = "9i"; pageWidth = "7i"; left = "4p"; right = "6p"; top = "4p"; bottom = "9p";
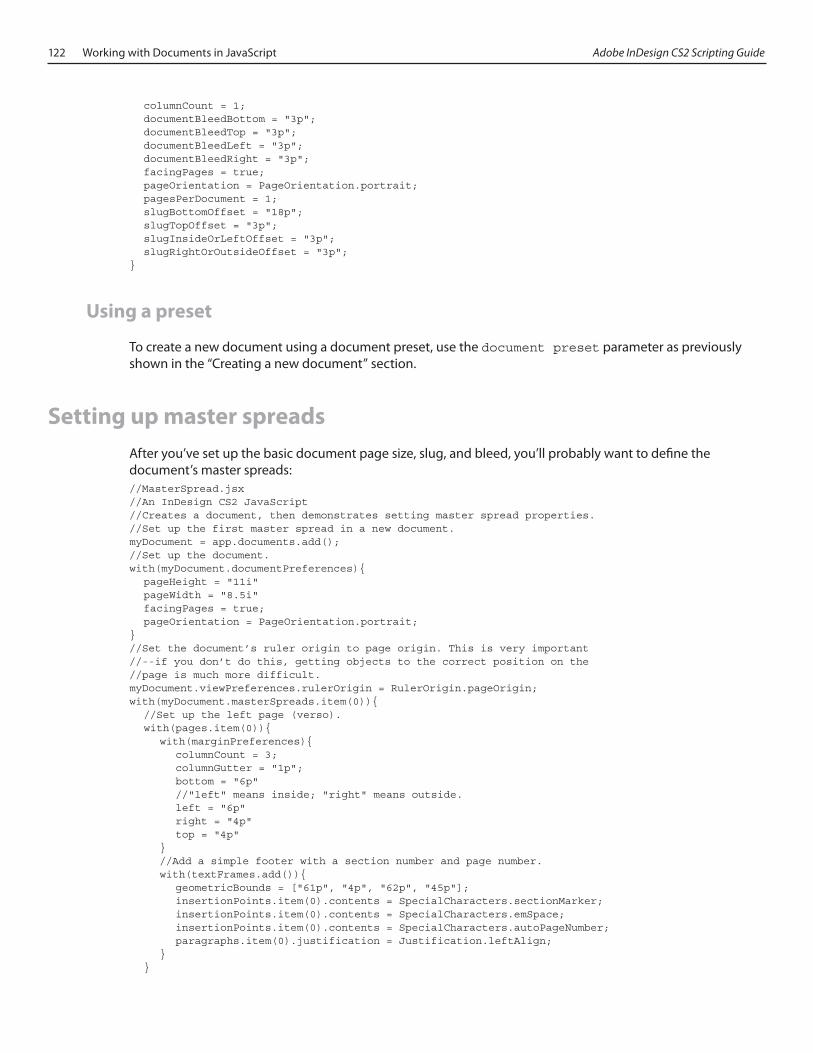
122 Working with Documents in JavaScript Adobe InDesign CS2 Scripting Guide
columnCount = 1; documentBleedBottom = "3p"; documentBleedTop = "3p"; documentBleedLeft = "3p"; documentBleedRight = "3p"; facingPages = true; pageOrientation = PageOrientation.portrait; pagesPerDocument = 1; slugBottomOffset = "18p"; slugTopOffset = "3p"; slugInsideOrLeftOffset = "3p"; slugRightOrOutsideOffset = "3p";}
Using a preset
To create a new document using a document preset, use the document preset parameter as previously shown in the “Creating a new document” section.
Setting up master spreadsAfter you’ve set up the basic document page size, slug, and bleed, you’ll probably want to define the document’s master spreads://MasterSpread.jsx//An InDesign CS2 JavaScript//Creates a document, then demonstrates setting master spread properties.//Set up the first master spread in a new document.myDocument = app.documents.add();//Set up the document.with(myDocument.documentPreferences){ pageHeight = "11i" pageWidth = "8.5i" facingPages = true; pageOrientation = PageOrientation.portrait;}//Set the document’s ruler origin to page origin. This is very important//--if you don’t do this, getting objects to the correct position on the//page is much more difficult.myDocument.viewPreferences.rulerOrigin = RulerOrigin.pageOrigin;with(myDocument.masterSpreads.item(0)){ //Set up the left page (verso). with(pages.item(0)){ with(marginPreferences){ columnCount = 3; columnGutter = "1p"; bottom = "6p" //"left" means inside; "right" means outside. left = "6p" right = "4p" top = "4p" } //Add a simple footer with a section number and page number. with(textFrames.add()){ geometricBounds = ["61p", "4p", "62p", "45p"]; insertionPoints.item(0).contents = SpecialCharacters.sectionMarker; insertionPoints.item(0).contents = SpecialCharacters.emSpace; insertionPoints.item(0).contents = SpecialCharacters.autoPageNumber; paragraphs.item(0).justification = Justification.leftAlign; } }
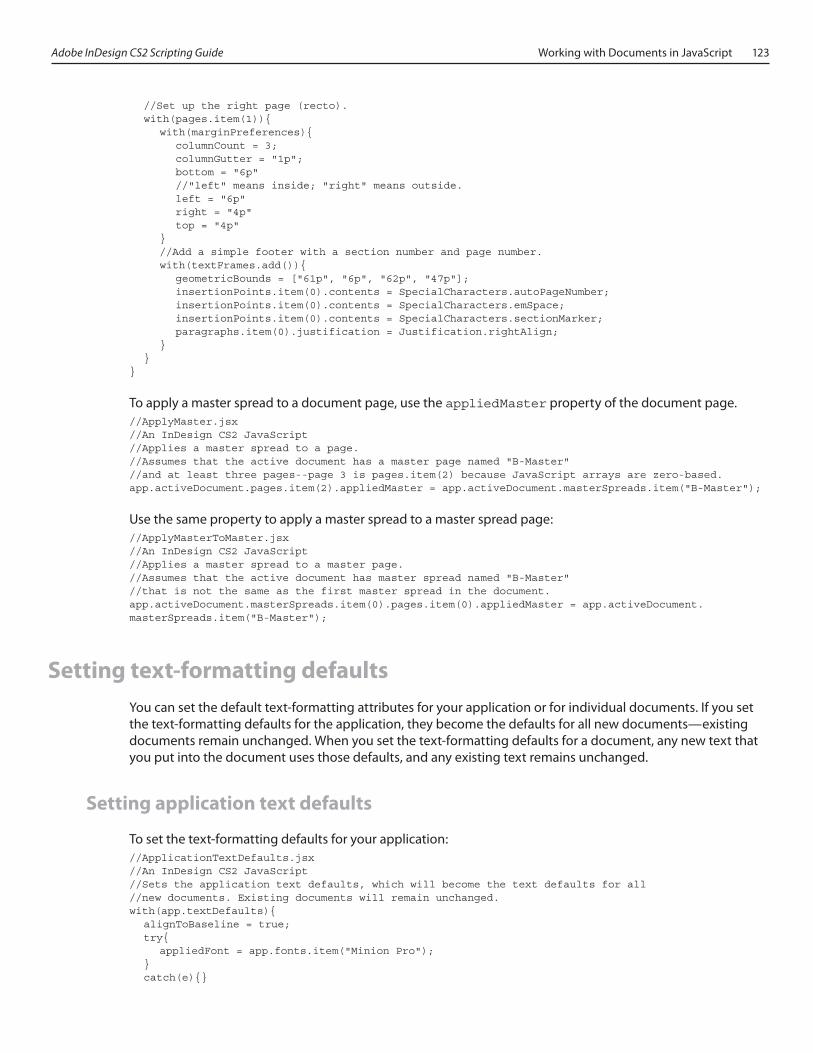
Adobe InDesign CS2 Scripting Guide Working with Documents in JavaScript 123
//Set up the right page (recto). with(pages.item(1)){ with(marginPreferences){ columnCount = 3; columnGutter = "1p"; bottom = "6p" //"left" means inside; "right" means outside. left = "6p" right = "4p" top = "4p" } //Add a simple footer with a section number and page number. with(textFrames.add()){ geometricBounds = ["61p", "6p", "62p", "47p"]; insertionPoints.item(0).contents = SpecialCharacters.autoPageNumber; insertionPoints.item(0).contents = SpecialCharacters.emSpace; insertionPoints.item(0).contents = SpecialCharacters.sectionMarker; paragraphs.item(0).justification = Justification.rightAlign; } }}
To apply a master spread to a document page, use the appliedMaster property of the document page.//ApplyMaster.jsx//An InDesign CS2 JavaScript//Applies a master spread to a page.//Assumes that the active document has a master page named "B-Master"//and at least three pages--page 3 is pages.item(2) because JavaScript arrays are zero-based.app.activeDocument.pages.item(2).appliedMaster = app.activeDocument.masterSpreads.item("B-Master");
Use the same property to apply a master spread to a master spread page://ApplyMasterToMaster.jsx//An InDesign CS2 JavaScript//Applies a master spread to a master page.//Assumes that the active document has master spread named "B-Master"//that is not the same as the first master spread in the document.app.activeDocument.masterSpreads.item(0).pages.item(0).appliedMaster = app.activeDocument.masterSpreads.item("B-Master");
Setting text-formatting defaultsYou can set the default text-formatting attributes for your application or for individual documents. If you set the text-formatting defaults for the application, they become the defaults for all new documents—existing documents remain unchanged. When you set the text-formatting defaults for a document, any new text that you put into the document uses those defaults, and any existing text remains unchanged.
Setting application text defaults
To set the text-formatting defaults for your application://ApplicationTextDefaults.jsx//An InDesign CS2 JavaScript//Sets the application text defaults, which will become the text defaults for all//new documents. Existing documents will remain unchanged.with(app.textDefaults){ alignToBaseline = true; try{ appliedFont = app.fonts.item("Minion Pro"); } catch(e){}

124 Working with Documents in JavaScript Adobe InDesign CS2 Scripting Guide
try{ fontStyle = "Regular"; } catch(e){} try{ appliedLanguage = "English: USA"; } catch(e){} autoLeading = 100; balanceRaggedLines = false; baselineShift = 0; capitalization = Capitalization.normal; composer = "Adobe Paragraph Composer"; desiredGlyphScaling = 100; desiredLetterSpacing = 0; desiredWordSpacing = 100; dropCapCharacters = 0; if(dropCapCharacters != 0){ dropCapLines = 3; //Assumes that the application has a default character style named "myDropCap" dropCapStyle = app.characterStyles.item("myDropCap"); } fillColor = app.colors.item("Black"); fillTint = 100; firstLineIndent = "14pt"; gridAlignFirstLineOnly = false; horizontalScale = 100; hyphenateAfterFirst = 3; hyphenateBeforeLast = 4; hyphenateCapitalizedWords = false; hyphenateLadderLimit = 1; hyphenateWordsLongerThan = 5; hyphenation = true; hyphenationZone = "3p"; hyphenWeight = 9; justification = Justification.leftAlign; keepAllLinesTogether = false; keepLinesTogether = true; keepFirstLines = 2; keepLastLines = 2; keepWithNext = 0; kerningMethod = "Optical"; kerningValue = 0; leading = 14; leftIndent = 0; ligatures = true; maximumGlyphScaling = 100; maximumLetterSpacing = 0; maximumWordSpacing = 160; minimumGlyphScaling = 100; minimumLetterSpacing = 0; minimumWordSpacing = 80; noBreak = false; otfContextualAlternate = true; otfDiscretionaryLigature = true; otfFigureStyle = OTFFigureStyle.proportionalOldstyle; otfFraction = true; otfHistorical = true; otfOrdinal = false; otfSlashedZero = true; otfSwash = false; otfTitling = false; overprintFill = false; overprintStroke = false; pointSize = 11; position = Position.normal; rightIndent = 0; ruleAbove = false;

Adobe InDesign CS2 Scripting Guide Working with Documents in JavaScript 125
if(ruleAbove == true){ ruleAboveColor = app.colors.item("Black"); ruleAboveGapColor = app.swatches.item("None"); ruleAboveGapOverprint = false; ruleAboveGapTint = 100; ruleAboveLeftIndent = 0; ruleAboveLineWeight = .25; ruleAboveOffset = 14; ruleAboveOverprint = false; ruleAboveRightIndent = 0; ruleAboveTint = 100; ruleAboveType = app.strokeStyles.item("Solid"); ruleAboveWidth = RuleWidth.columnWidth; } ruleBelow = false; if(ruleBelow == true){ ruleBelowColor = app.colors.item("Black"); ruleBelowGapColor = app.swatches.item("None"); ruleBelowGapOverprint = false; ruleBelowGapTint = 100; ruleBelowLeftIndent = 0; ruleBelowLineWeight = .25; ruleBelowOffset = 0; ruleBelowOverprint = false; ruleBelowRightIndent = 0; ruleBelowTint = 100; ruleBelowType = app.strokeStyles.item("Solid"); ruleBelowWidth = RuleWidth.columnWidth; } singleWordJustification = SingleWordJustification.leftAlign; skew = 0; spaceAfter = 0; spaceBefore = 0; startParagraph = StartParagraph.anywhere; strikeThru = false; if(strikeThru == true){ strikeThroughColor = app.colors.item("Black"); strikeThroughGapColor = app.swatches.item("None"); strikeThroughGapOverprint = false; strikeThroughGapTint = 100; strikeThroughOffset = 3; strikeThroughOverprint = false; strikeThroughTint = 100; strikeThroughType = app.strokeStyles.item("Solid"); strikeThroughWeight = .25; } strokeColor = app.swatches.item("None"); strokeTint = 100; strokeWeight = 0; tracking = 0; underline = false; if(underline == true){ underlineColor = app.colors.item("Black"); underlineGapColor = app.swatches.item("None"); underlineGapOverprint = false; underlineGapTint = 100; underlineOffset = 3; underlineOverprint = false; underlineTint = 100; underlineType = app.strokeStyles.item("Solid"); underlineWeight = .25 } verticalScale = 100;}
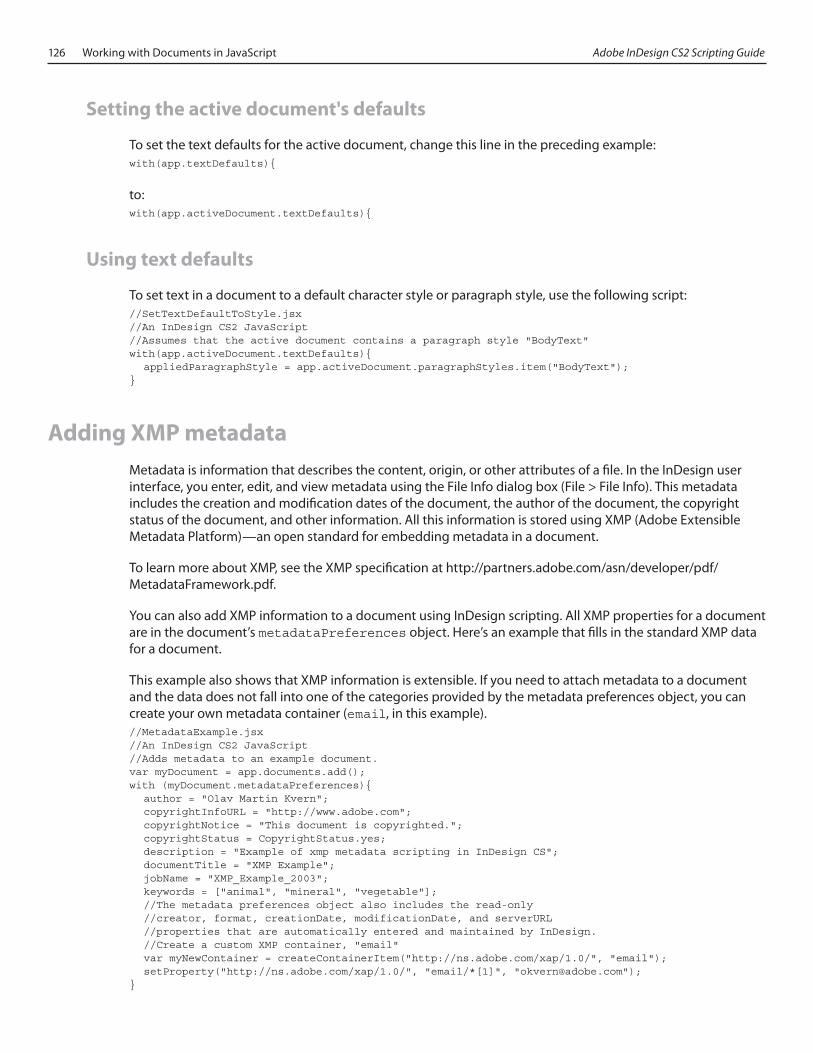
126 Working with Documents in JavaScript Adobe InDesign CS2 Scripting Guide
Setting the active document's defaults
To set the text defaults for the active document, change this line in the preceding example:with(app.textDefaults){
to:with(app.activeDocument.textDefaults){
Using text defaults
To set text in a document to a default character style or paragraph style, use the following script://SetTextDefaultToStyle.jsx//An InDesign CS2 JavaScript//Assumes that the active document contains a paragraph style "BodyText"with(app.activeDocument.textDefaults){ appliedParagraphStyle = app.activeDocument.paragraphStyles.item("BodyText");}
Adding XMP metadataMetadata is information that describes the content, origin, or other attributes of a file. In the InDesign user interface, you enter, edit, and view metadata using the File Info dialog box (File > File Info). This metadata includes the creation and modification dates of the document, the author of the document, the copyright status of the document, and other information. All this information is stored using XMP (Adobe Extensible Metadata Platform)—an open standard for embedding metadata in a document.
To learn more about XMP, see the XMP specification at http://partners.adobe.com/asn/developer/pdf/MetadataFramework.pdf.
You can also add XMP information to a document using InDesign scripting. All XMP properties for a document are in the document’s metadataPreferences object. Here’s an example that fills in the standard XMP data for a document.
This example also shows that XMP information is extensible. If you need to attach metadata to a document and the data does not fall into one of the categories provided by the metadata preferences object, you can create your own metadata container (email, in this example).//MetadataExample.jsx//An InDesign CS2 JavaScript//Adds metadata to an example document.var myDocument = app.documents.add();with (myDocument.metadataPreferences){ author = "Olav Martin Kvern"; copyrightInfoURL = "http://www.adobe.com"; copyrightNotice = "This document is copyrighted."; copyrightStatus = CopyrightStatus.yes; description = "Example of xmp metadata scripting in InDesign CS"; documentTitle = "XMP Example"; jobName = "XMP_Example_2003"; keywords = ["animal", "mineral", "vegetable"]; //The metadata preferences object also includes the read-only //creator, format, creationDate, modificationDate, and serverURL //properties that are automatically entered and maintained by InDesign. //Create a custom XMP container, "email" var myNewContainer = createContainerItem("http://ns.adobe.com/xap/1.0/", "email"); setProperty("http://ns.adobe.com/xap/1.0/", "email/*[1]", "[email protected]");}
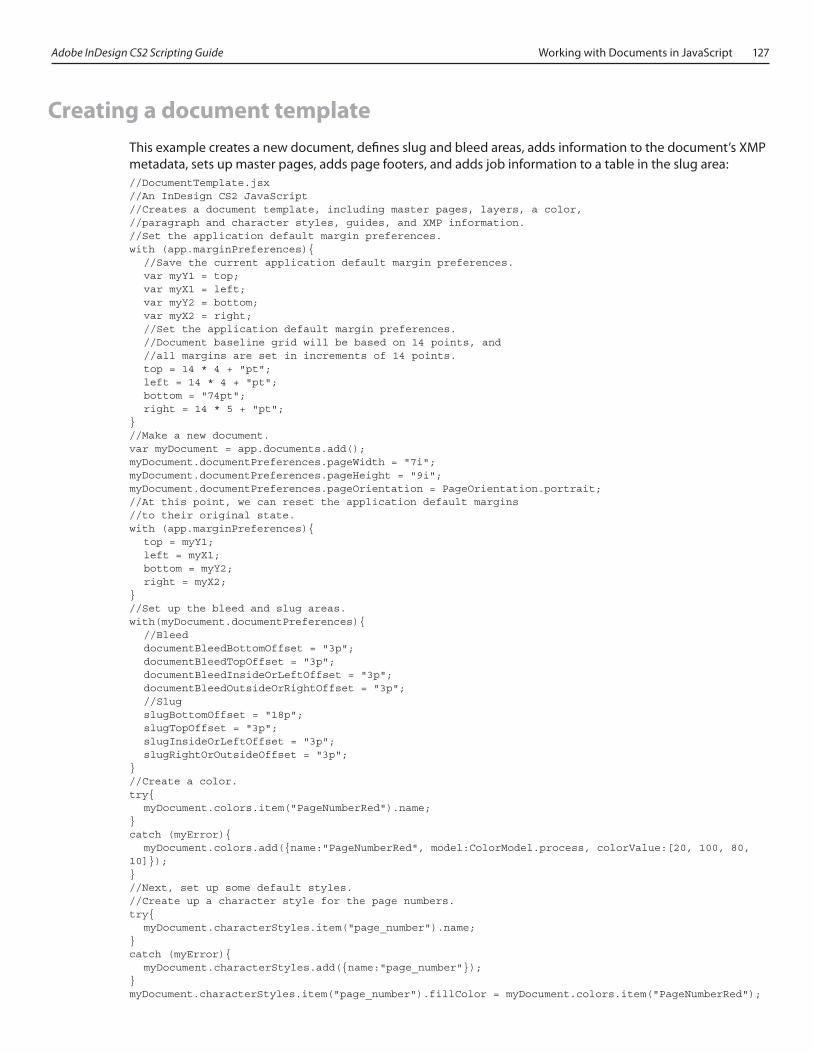
Adobe InDesign CS2 Scripting Guide Working with Documents in JavaScript 127
Creating a document templateThis example creates a new document, defines slug and bleed areas, adds information to the document’s XMP metadata, sets up master pages, adds page footers, and adds job information to a table in the slug area://DocumentTemplate.jsx//An InDesign CS2 JavaScript//Creates a document template, including master pages, layers, a color, //paragraph and character styles, guides, and XMP information.//Set the application default margin preferences.with (app.marginPreferences){ //Save the current application default margin preferences. var myY1 = top; var myX1 = left; var myY2 = bottom; var myX2 = right; //Set the application default margin preferences. //Document baseline grid will be based on 14 points, and //all margins are set in increments of 14 points. top = 14 * 4 + "pt"; left = 14 * 4 + "pt"; bottom = "74pt"; right = 14 * 5 + "pt";}//Make a new document.var myDocument = app.documents.add();myDocument.documentPreferences.pageWidth = "7i";myDocument.documentPreferences.pageHeight = "9i";myDocument.documentPreferences.pageOrientation = PageOrientation.portrait;//At this point, we can reset the application default margins //to their original state.with (app.marginPreferences){ top = myY1; left = myX1; bottom = myY2; right = myX2;}//Set up the bleed and slug areas.with(myDocument.documentPreferences){ //Bleed documentBleedBottomOffset = "3p"; documentBleedTopOffset = "3p"; documentBleedInsideOrLeftOffset = "3p"; documentBleedOutsideOrRightOffset = "3p"; //Slug slugBottomOffset = "18p"; slugTopOffset = "3p"; slugInsideOrLeftOffset = "3p"; slugRightOrOutsideOffset = "3p";}//Create a color.try{ myDocument.colors.item("PageNumberRed").name;}catch (myError){ myDocument.colors.add({name:"PageNumberRed", model:ColorModel.process, colorValue:[20, 100, 80, 10]});}//Next, set up some default styles.//Create up a character style for the page numbers.try{ myDocument.characterStyles.item("page_number").name;}catch (myError){ myDocument.characterStyles.add({name:"page_number"});}myDocument.characterStyles.item("page_number").fillColor = myDocument.colors.item("PageNumberRed");
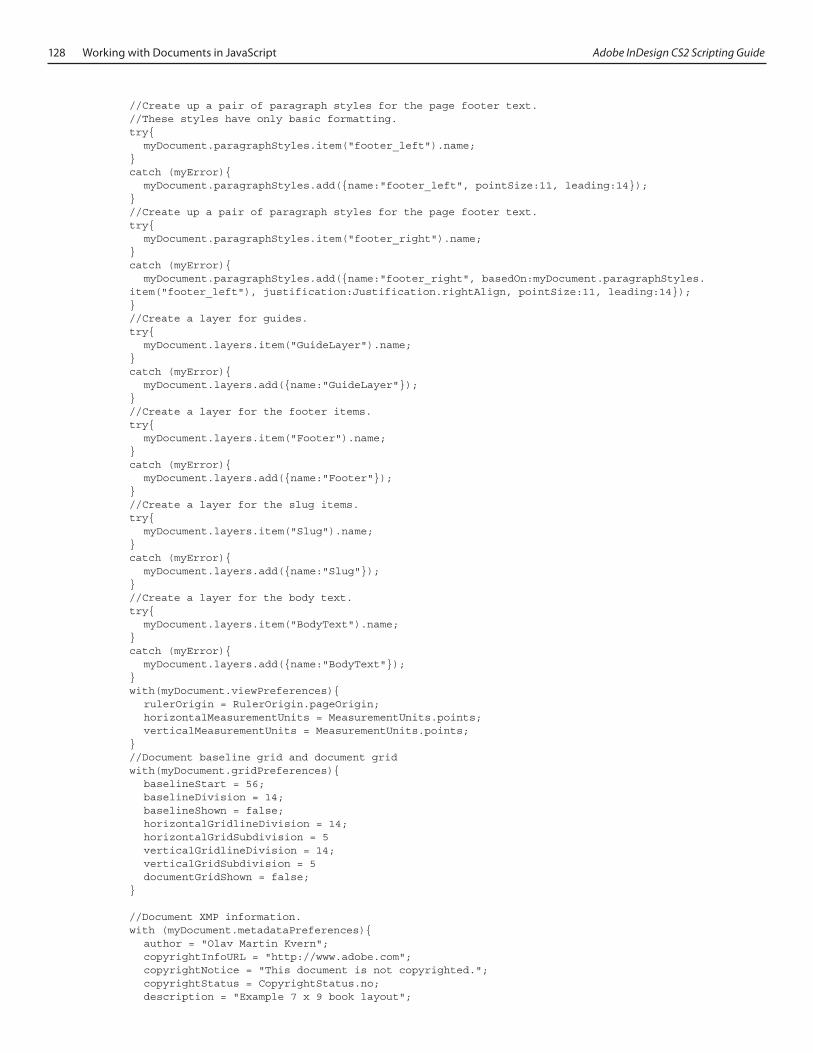
128 Working with Documents in JavaScript Adobe InDesign CS2 Scripting Guide
//Create up a pair of paragraph styles for the page footer text.//These styles have only basic formatting.try{ myDocument.paragraphStyles.item("footer_left").name;}catch (myError){ myDocument.paragraphStyles.add({name:"footer_left", pointSize:11, leading:14});}//Create up a pair of paragraph styles for the page footer text.try{ myDocument.paragraphStyles.item("footer_right").name;}catch (myError){ myDocument.paragraphStyles.add({name:"footer_right", basedOn:myDocument.paragraphStyles.item("footer_left"), justification:Justification.rightAlign, pointSize:11, leading:14});}//Create a layer for guides.try{ myDocument.layers.item("GuideLayer").name;}catch (myError){ myDocument.layers.add({name:"GuideLayer"});}//Create a layer for the footer items.try{ myDocument.layers.item("Footer").name;}catch (myError){ myDocument.layers.add({name:"Footer"});}//Create a layer for the slug items.try{ myDocument.layers.item("Slug").name;}catch (myError){ myDocument.layers.add({name:"Slug"});}//Create a layer for the body text.try{ myDocument.layers.item("BodyText").name;}catch (myError){ myDocument.layers.add({name:"BodyText"});}with(myDocument.viewPreferences){ rulerOrigin = RulerOrigin.pageOrigin; horizontalMeasurementUnits = MeasurementUnits.points; verticalMeasurementUnits = MeasurementUnits.points;}//Document baseline grid and document gridwith(myDocument.gridPreferences){ baselineStart = 56; baselineDivision = 14; baselineShown = false; horizontalGridlineDivision = 14; horizontalGridSubdivision = 5 verticalGridlineDivision = 14; verticalGridSubdivision = 5 documentGridShown = false;}
//Document XMP information.with (myDocument.metadataPreferences){ author = "Olav Martin Kvern"; copyrightInfoURL = "http://www.adobe.com"; copyrightNotice = "This document is not copyrighted."; copyrightStatus = CopyrightStatus.no; description = "Example 7 x 9 book layout";

Adobe InDesign CS2 Scripting Guide Working with Documents in JavaScript 129
documentTitle = "Example"; jobName = "7 x 9 book layout template"; keywords = ["7 x 9", "book", "template"]; var myNewContainer = createContainerItem("http://ns.adobe.com/xap/1.0/", "email"); setProperty("http://ns.adobe.com/xap/1.0/", "email/*[1]", "[email protected]");}//Set up the master spread.with(myDocument.masterSpreads.item(0)){ with(pages.item(0)){ //Left and right are reversed for left-hand pages (becoming "inside" and "outside"-- //this is also true in the InDesign user interface). var myBottomMargin = myDocument.documentPreferences.pageHeight - marginPreferences.bottom; var myRightMargin = myDocument.documentPreferences.pageWidth - marginPreferences.left; guides.add(myDocument.layers.item("GuideLayer"), {orientation:HorizontalOrVertical.vertical,location:marginPreferences.right}); guides.add(myDocument.layers.item("GuideLayer"), {orientation:HorizontalOrVertical.vertical, location:myRightMargin}); guides.add(myDocument.layers.item("GuideLayer"), {orientation:HorizontalOrVertical.horizontal, location:marginPreferences.top, fitToPage:false}); guides.add(myDocument.layers.item("GuideLayer"), {orientation:HorizontalOrVertical.horizontal, location:myBottomMargin, fitToPage:false}); guides.add(myDocument.layers.item("GuideLayer"), {orientation:HorizontalOrVertical.horizontal, location:myBottomMargin + 14, fitToPage:false}); guides.add(myDocument.layers.item("GuideLayer"), {orientation:HorizontalOrVertical.horizontal, location:myBottomMargin + 28, fitToPage:false}); var myLeftFooter = textFrames.add(myDocument.layers.item("Footer"), undefined, undefined, {geometricBounds:[myBottomMargin+14, marginPreferences.right, myBottomMargin+28, myRightMargin]}) myLeftFooter.parentStory.insertionPoints.item(0).contents = SpecialCharacters.sectionMarker; myLeftFooter.parentStory.insertionPoints.item(0).contents = SpecialCharacters.emSpace; myLeftFooter.parentStory.insertionPoints.item(0).contents = SpecialCharacters.autoPageNumber; myLeftFooter.parentStory.characters.item(0).appliedCharacterStyle = myDocument.characterStyles.item("page_number"); myLeftFooter.parentStory.paragraphs.item(0).applyStyle(myDocument.paragraphStyles.item("footer_left", false)); //Slug information. with(myDocument.metadataPreferences){ var myString = "Author:\t" + author + "\tDescription:\t" + description + "\rCreation Date:\t" + new Date + "\tEmail Contact\t" + getProperty("http://ns.adobe.com/xap/1.0/", "email/*[1]"); } var myLeftSlug = textFrames.add(myDocument.layers.item("Slug"), undefined, undefined, {geometricBounds:[myDocument.documentPreferences.pageHeight+36, marginPreferences.right, myDocument.documentPreferences.pageHeight + 144, myRightMargin], contents:myString}); myLeftSlug.parentStory.tables.add(); //Body text master text frame. var myLeftFrame = textFrames.add(myDocument.layers.item("BodyText"), undefined, undefined, {geometricBounds:[marginPreferences.top, marginPreferences.right, myBottomMargin, myRightMargin]}); } with(pages.item(1)){ var myBottomMargin = myDocument.documentPreferences.pageHeight - marginPreferences.bottom; var myRightMargin = myDocument.documentPreferences.pageWidth - marginPreferences.right; guides.add(myDocument.layers.item("GuideLayer"), {orientation:HorizontalOrVertical.vertical,location:marginPreferences.left}); guides.add(myDocument.layers.item("GuideLayer"), {orientation:HorizontalOrVertical.vertical, location:myRightMargin}); var myRightFooter = textFrames.add(myDocument.layers.item("Footer"), undefined, undefined, {geometricBounds:[myBottomMargin+14, marginPreferences.left, myBottomMargin+28, myRightMargin]}) myRightFooter.parentStory.insertionPoints.item(0).contents = SpecialCharacters.autoPageNumber; myRightFooter.parentStory.insertionPoints.item(0).contents = SpecialCharacters.emSpace; myRightFooter.parentStory.insertionPoints.item(0).contents = SpecialCharacters.sectionMarker; myRightFooter.parentStory.characters.item(-1).appliedCharacterStyle = myDocument.characterStyles.item("page_number"); myRightFooter.parentStory.paragraphs.item(0).applyStyle(myDocument.paragraphStyles.item("footer_right", false)); //Slug information. var myRightSlug = textFrames.add(myDocument.layers.item("Slug"), undefined, undefined, {geometricBounds:[myDocument.documentPreferences.pageHeight+36, marginPreferences.left, myDocument.documentPreferences.pageHeight + 144, myRightMargin], contents:myString});

130 Working with Documents in JavaScript Adobe InDesign CS2 Scripting Guide
myRightSlug.parentStory.tables.add(); //Body text master text frame. var myRightFrame = textFrames.add(myDocument.layers.item("BodyText"), undefined, undefined, {geometricBounds:[marginPreferences.top, marginPreferences.left, myBottomMargin, myRightMargin], previousTextFrame:myLeftFrame}); }}//Add section marker text--this text will appear in the footer.myDocument.sections.item(0).marker = "Section 1";//When you link the master page text frames, one of the frames sometimes becomes selected. Deselect it.app.select(NothingEnum.nothing, undefined);
Printing a documentThe following script prints the active document using the current print preferences://PrintDocument.jsx//An InDesign CS2 JavaScript//Prints the active document.app.activeDocument.print();
Printing using page ranges
To specify a page range to print, set the pageRange property of the document’s printPreferences object before printing://PrintPageRange.jsx//An InDesign CS2 JavaScript//Prints a page range from the active document.//Assumes that you have a document open, that it contains a page named "22".//The page range can be either PageRange.allPages or a page range string.//A page number entered in the page range must correspond to a page//name in the document (i.e., not the page index). If the page name is//not found, InDesign will display an error message.app.activeDocument.printPreferences.pageRange = "22"app.activeDocument.print(false);
Setting print preferences
The printPreferences object contains properties corresponding to the options in the panels of the Print dialog box. This example script shows how to set print preferences using scripting://PrintPreferences.jsx//An InDesign CS2 JavaScript//Sets the print preferences of the active document.with(app.activeDocument.printPreferences){ //Properties corresponding to the controls in the General panel //of the Print dialog box. activePrinterPreset is ignored in this //example--we’ll set our own print preferences. printer can be //either a string (the name of the printer) or Printer.postscriptFile. printer = "AGFA-SelectSet 5000SF v2013.108"; //If the printer property is the name of a printer, then the ppd property //is locked (and will return an error if you try to set it). //ppd = "AGFA-SelectSet5000SF"; //If the printer property is set to Printer.postscript file, the copies //property is unavailable. Attempting to set it will generate an error. copies = 1; //If the printer property is set to Printer.postscript file, or if the //selected printer does not support collation, then the collating //property is unavailable. Attempting to set it will generate an error. //collating = false;
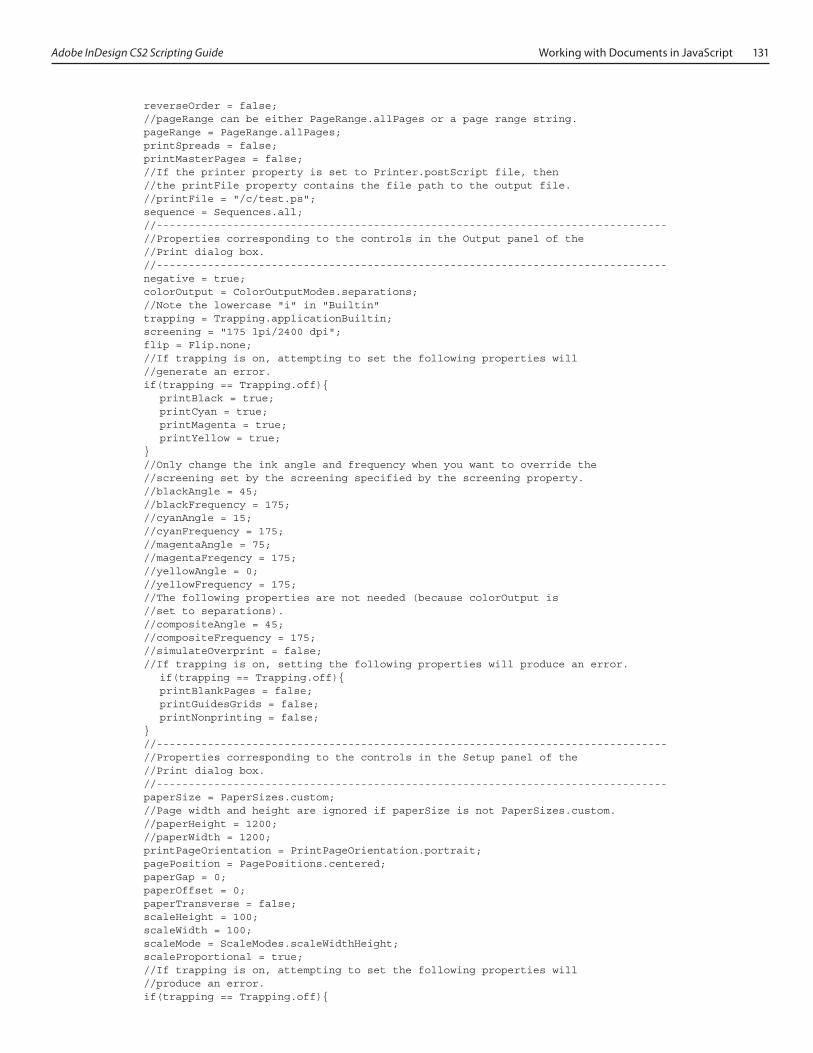
Adobe InDesign CS2 Scripting Guide Working with Documents in JavaScript 131
reverseOrder = false; //pageRange can be either PageRange.allPages or a page range string. pageRange = PageRange.allPages; printSpreads = false; printMasterPages = false; //If the printer property is set to Printer.postScript file, then //the printFile property contains the file path to the output file. //printFile = "/c/test.ps"; sequence = Sequences.all; //-------------------------------------------------------------------------------- //Properties corresponding to the controls in the Output panel of the //Print dialog box. //-------------------------------------------------------------------------------- negative = true; colorOutput = ColorOutputModes.separations; //Note the lowercase "i" in "Builtin" trapping = Trapping.applicationBuiltin; screening = "175 lpi/2400 dpi"; flip = Flip.none; //If trapping is on, attempting to set the following properties will //generate an error. if(trapping == Trapping.off){ printBlack = true; printCyan = true; printMagenta = true; printYellow = true; } //Only change the ink angle and frequency when you want to override the //screening set by the screening specified by the screening property. //blackAngle = 45; //blackFrequency = 175; //cyanAngle = 15; //cyanFrequency = 175; //magentaAngle = 75; //magentaFreqency = 175; //yellowAngle = 0; //yellowFrequency = 175; //The following properties are not needed (because colorOutput is //set to separations). //compositeAngle = 45; //compositeFrequency = 175; //simulateOverprint = false; //If trapping is on, setting the following properties will produce an error. if(trapping == Trapping.off){ printBlankPages = false; printGuidesGrids = false; printNonprinting = false; } //-------------------------------------------------------------------------------- //Properties corresponding to the controls in the Setup panel of the //Print dialog box. //-------------------------------------------------------------------------------- paperSize = PaperSizes.custom; //Page width and height are ignored if paperSize is not PaperSizes.custom. //paperHeight = 1200; //paperWidth = 1200; printPageOrientation = PrintPageOrientation.portrait; pagePosition = PagePositions.centered; paperGap = 0; paperOffset = 0; paperTransverse = false; scaleHeight = 100; scaleWidth = 100; scaleMode = ScaleModes.scaleWidthHeight; scaleProportional = true; //If trapping is on, attempting to set the following properties will //produce an error. if(trapping == Trapping.off){
132 Working with Documents in JavaScript Adobe InDesign CS2 Scripting Guide
textAsBlack = false; thumbnails = false; //The following properties is not needed because thumbnails is set to false. //thumbnailsPerPage = 4; tile = false; //The following properties are not needed because tile is set to false. //tilingOverlap = 12; //tilingType = TilingTypes.auto; }
//-------------------------------------------------------------------------------- //Properties corresponding to the controls in the Marks and Bleed panel of //the Print dialog box. //-------------------------------------------------------------------------------- //Set the following property to true to print all printer’s marks. //allPrinterMarks = true; useDocumentBleedToPrint = false; //If useDocumentBleedToPrint = false then setting any of the bleed properties //will result in an error. //Get the bleed amounts from the document’s bleed and add a bit. bleedBottom = app.activeDocument.documentPreferences.documentBleedBottomOffset+3; bleedTop = app.activeDocument.documentPreferences.documentBleedTopOffset+3; bleedInside = app.activeDocument.documentPreferences.documentBleedInsideOrLeftOffset+3; bleedOutside = app.activeDocument.documentPreferences.documentBleedOutsideOrRightOffset+3; //If any bleed area is greater than zero, then export the bleed marks. if(bleedBottom == 0 && bleedTop == 0 && bleedInside == 0 && bleedOutside == 0){ bleedMarks = true; } else{ bleedMarks = false; } colorBars = true; cropMarks = true; includeSlugToPrint = false; markLineWeight = MarkLineWeight.p125pt markOffset = 6; //markType = MarkTypes.default; pageInformationMarks = true; registrationMarks = true;
//-------------------------------------------------------------------------------- //Properties corresponding to the controls in the Graphics panel of the //Print dialog box. //-------------------------------------------------------------------------------- sendImageData = ImageDataTypes.allImageData; fontDownloading = FontDownloading.complete; downloadPPDFOnts = true; try{ dataFormat = DataFormat.binary; } catch(e){} try{ postScriptLevel = PostScriptLevels.level3; } catch(e){}
//-------------------------------------------------------------------------------- //Properties corresponding to the controls in the Color Management panel of //the Print dialog box. //-------------------------------------------------------------------------------- //If the useColorManagement property of app.colorSettings is false, //attempting to set the following properties will return an error. try{ sourceSpace = SourceSpaces.useDocument; intent = RenderingIntent.useColorSettings; crd = ColorRenderingDictionary.useDocument;
Adobe InDesign CS2 Scripting Guide Working with Documents in JavaScript 133
profile = Profile.postscriptCMS; } catch(e){}
//-------------------------------------------------------------------------------- //Properties corresponding to the controls in the Advanced panel of the //Print dialog box. //-------------------------------------------------------------------------------- opiImageReplacement = false; omitBitmaps = false; omitEPS = false; omitPDF = false; //The following line assumes that you have a flattener preset named "high quality flattener". try{ flattenerPresetName = "high quality flattener"; } catch(e){} ignoreSpreadOverrides = false;}
Using printer presets
To print a document using a printer preset, include the printer preset in the print method://PrintDocumentWithPreset.jsx//An InDesign CS2 JavaScript//Prints the active document using the specified printer preset.//Assumes you have a printer preset named "myPreset" and that a document is open.app.activeDocument.print(false, app.printerPresets.item("myPreset"));
Creating printer presets from printing preferences
To create a printer preset from the print preferences of a document://CreatePrinterPreset.jsx//An InDesign CS2 JavaScript//Creates a new printer preset.//If the preset does not already exist, then create it;//otherwise, fill in the properties of the existing preset.var myPreset;myPreset = app.printerPresets.item("myPreset");try{ myPreset.name;}catch(myError){ myPreset = app.printerPresets.add({name:"myPreset"});}with(app.activeDocument.printPreferences){ //Because many printing properties are dependent on other printing properties, //we’ve surrounded each property-setting line with try...catch statements-- //these will make it easier for you to experiment with print preset settings. try{ myPreset.printer = printer; } catch(e){} try{ myPreset.ppd = ppd; } catch(e){} try{ myPreset.copies = copies; }
134 Working with Documents in JavaScript Adobe InDesign CS2 Scripting Guide
catch(e){} try{ myPreset.collating = collating; } catch(e){} try{ myPreset.reverseOrder = reverseOrder; } catch(e){} try{ myPreset.pageRange = pageRange; } catch(e){} try{ myPreset.printSpreads = printSpreads; } catch(e){} try{ myPreset.printMasterPages = printMasterPages; } catch(e){} try{ myPreset.printFile = printFile; } catch(e){} try{ myPreset.sequence = sequence; } catch(e){} try{ myPreset.printBlankPages = printBlankPages; } catch(e){} try{ myPreset.printGuidesGrids = printGuidesGrids; } catch(e){} try{ myPreset.printNonprinting = printNonprinting; } catch(e){} try{ myPreset.paperSize = paperSize; } catch(e){} try{ myPreset.paperHeight = paperHeight; } catch(e){} try{ myPreset.paperWidth = paperWidth; } catch(e){} try{ myPreset.printPageOrientation = printPageOrientation; } catch(e){} try{ myPreset.pagePosition = pagePosition; } catch(e){} try{ myPreset.paperGap = paperGap; } catch(e){} try{ myPreset.paperOffset = paperOffset; }
Adobe InDesign CS2 Scripting Guide Working with Documents in JavaScript 135
catch(e){} try{ myPreset.paperTransverse = paperTransverse; } catch(e){} try{ myPreset.scaleHeight = scaleHeight; } catch(e){} try{ myPreset.scaleWidth = scaleWidth; } catch(e){} try{ myPreset.scaleMode = scaleMode; } catch(e){} try{ myPreset.scaleProportional = scaleProportional; } catch(e){} try{ myPreset.textAsBlack = textAsBlack; } catch(e){} try{ myPreset.thumbnails = thumbnails; } catch(e){} try{ myPreset.thumbnailsPerPage = thumbnailsPerPage; } catch(e){} try{ myPreset.tile = tile; } catch(e){} try{ myPreset.tilingType = tilingType; } catch(e){} try{ myPreset.tilingOverlap = tilingOverlap; } catch(e){} try{ myPreset.allPrinterMarks = allPrinterMarks; } catch(e){} try{ myPreset.useDocumentBleedToPrint = useDocumentBleedToPrint; } catch(e){} try{ myPreset.bleedBottom = bleedBottom; } catch(e){} try{ myPreset.bleedTop = bleedTop; } catch(e){} try{ myPreset.bleedInside = bleedInside; } catch(e){} try{ myPreset.bleedOutside = bleedOutside; }

136 Working with Documents in JavaScript Adobe InDesign CS2 Scripting Guide
catch(e){} try{ myPreset.bleedMarks = bleedMarks; } catch(e){} try{ myPreset.colorBars = colorBars; } catch(e){} try{ myPreset.cropMarks = cropMarks; } catch(e){} try{ myPreset.includeSlugToPrint = includeSlugToPrint; } catch(e){} try{ myPreset.markLineWeight = markLineWeight; } catch(e){} try{ myPreset.markOffset = markOffset; } catch(e){} try{ myPreset.markType = markType; } catch(e){} try{ myPreset.pageInformationMarks = pageInformationMarks; } catch(e){} try{ myPreset.registrationMarks = registrationMarks; } catch(e){} try{ myPreset.negative = negative; } catch(e){} try{ myPreset.colorOutput = colorOutput ; } catch(e){} try{ myPreset.trapping = trapping; } catch(e){} try{ myPreset.screening = screening; } catch(e){} try{ myPreset.flip = flip; } catch(e){} try{ myPreset.printBlack = printBlack; } catch(e){} try{ myPreset.printCyan = printCyan; } catch(e){} try{ myPreset.printMagenta = printMagenta; }

Adobe InDesign CS2 Scripting Guide Working with Documents in JavaScript 137
catch(e){} try{ myPreset.printYellow = printYellow; } catch(e){} try{ myPreset.blackAngle = blackAngle; } catch(e){} try{ myPreset.blackFrequency = blackFrequency; } catch(e){} try{ myPreset.cyanAngle = cyanAngle; } catch(e){} try{ myPreset.cyanFrequency = cyanFrequency; } catch(e){} try{ myPreset.magentaAngle = magentaAngle; } catch(e){} try{ myPreset.magentaFreqency = magentaFreqency; } catch(e){} try{ myPreset.yellowAngle = yellowAngle; } catch(e){} try{ myPreset.yellowFrequency = yellowFrequency; } catch(e){} try{ myPreset.compositeAngle = compositeAngle; } catch(e){} try{ myPreset.compositeFrequency = compositeFrequency; } catch(e){} try{ myPreset.simulateOverprint = simulateOverprint; } catch(e){} try{ myPreset.sendImageData = sendImageData; } catch(e){} try{ myPreset.fontDownloading = fontDownloading; } catch(e){} try{ myPreset.downloadPPDFOnts = downloadPPDFOnts; } catch(e){} try{ myPreset.dataFormat = dataFormat; } catch(e){} try{ myPreset.postScriptLevel = postscriptLevel; }

138 Working with Documents in JavaScript Adobe InDesign CS2 Scripting Guide
catch(e){} try{ myPreset.sourceSpace = sourceSpace; } catch(e){} try{ myPreset.intent = intent; } catch(e){} try{ myPreset.crd = crd; } catch(e){} try{ myPreset.profile = profile; } catch(e){} try{ myPreset.opiImageReplacement = opiImageReplacement; } catch(e){} try{ myPreset.omitBitmaps = omitBitmaps; } catch(e){} try{ myPreset.omitEPS = omitEPS; } catch(e){} try{ myPreset.omitPDF = omitPDF; } catch(e){} try{ myPreset.flattenerPresetName = flattenerPresetName ; } catch(e){} try{ myPreset.ignoreSpreadOverrides = ignoreSpreadOverrides; } catch(e){} alert("Done!");}
Exporting a document as PDFInDesign scripting offers full control over the creation of PDF files from your page layout documents.
Using current PDF export options
The following script exports the current document as PDF using a PDF export preset://ExportPDF.jsx//An InDesign CS2 JavaScript//Assumes you have a document open and that you have defined a PDF export //preset named "prepress".//document.export parameters are://Format as (use either the ExportFormat.pdfType enumeration//or the string "Adobe PDF")//To as File//ShowingOptions as boolean (setting this option to true displays the //PDF Export dialog box)//Using as PDF export preset (or a string that is the name of a //PDF export preset)

Adobe InDesign CS2 Scripting Guide Working with Documents in JavaScript 139
var myPDFExportPreset = app.pdfExportPresets.item("prepress");app.activeDocument.exportFile(ExportFormat.pdfType, File("/c/myTestDocument.pdf"), false, myPDFExportPreset);
Setting PDF export options and exporting pages separately
The following example sets the PDF export options before exporting://ExportEachPageAsPDF.jsx//An InDesign CS2 JavaScript//Exports each page of an InDesign CS document as a separate PDF to //a selected folder using the current PDF export settings.//Display a "choose folder" dialog box.if(app.documents.length != 0){ var myFolder = Folder.selectDialog ("Choose a Folder"); if(myFolder != null){ myExportPages(myFolder); }}else{ alert("Please open a document and try again.");}function myExportPages(myFolder){ var myPageName, myFilePath, myFile; var myDocument = app.activeDocument; var myDocumentName = myDocument.name; var myDialog = app.dialogs.add(); with(myDialog.dialogColumns.add().dialogRows.add()){ staticTexts.add({staticLabel:"Base name:"}); var myBaseNameField = textEditboxes.add({editContents:myDocumentName, minWidth:160}); } var myResult = myDialog.show({name:"ExportPages"}); if(myResult == true){ var myBaseName = myBaseNameField.editContents; //Remove the dialog box from memory. myDialog.destroy(); for(var myCounter = 0; myCounter < myDocument.pages.length; myCounter++){ myPageName = myDocument.pages.item(myCounter).name; app.pdfExportPreferences.pageRange = myPageName; //The name of the exported files will be the base name + the //page name + ".pdf". //If the page name contains a colon (as it will if the document //contains sections), //then remove the colon. var myRegExp = new RegExp(":","gi"); myPageName = myPageName.replace(myRegExp, "_"); myFilePath = myFolder + "/" + myBaseName + "_" + myPageName + ".pdf"; myFile = new File(myFilePath); myDocument.exportFile(ExportFormat.pdfType, myFile, false); } } else{ myDialog.destroy(); }}
The next example shows an example set of PDF export preferences (this set is not complete—no security features are changed).//ExportPDFWithOptions.jsx//An InDesign CS2 JavaScript//Sets PDF export options, then exports the active document as PDF.with(app.pdfExportPreferences){ //Basic PDF output options. pageRange = PageRange.allPages; acrobatCompatibility = AcrobatCompatibility.acrobat6;

140 Working with Documents in JavaScript Adobe InDesign CS2 Scripting Guide
exportGuidesAndGrids = false; exportLayers = false; exportNonPrintingObjects = false; exportReaderSpreads = false; generateThumbnails = false; try{ ignoreSpreadOverrides = false; } catch(e){} includeBookmarks = true; includeHyperlinks = true; includeICCProfiles = true; includeSlugWithPDF = false; includeStructure = false; interactiveElements = false; //Setting subsetFontsBelow to zero disallows font subsetting; //set subsetFontsBelow to some other value to use font subsetting. subsetFontsBelow = 0; // //Bitmap compression/sampling/quality options. colorBitmapCompression = BitmapCompression.zip; colorBitmapQuality = CompressionQuality.eightBit; colorBitmapSampling = Sampling.none; //thresholdToCompressColor is not needed in this example. //colorBitmapSamplingDPI is not needed when colorBitmapSampling is set to none. grayscaleBitmapCompression = BitmapCompression.zip; grayscaleBitmapQuality = CompressionQuality.eightBit; grayscaleBitmapSampling = Sampling.none; //thresholdToCompressGray is not needed in this example. //grayscaleBitmapSamplingDPI is not needed when grayscaleBitmapSampling is //set to none. monochromeBitmapCompression = BitmapCompression.zip; monochromeBitmapSampling = Sampling.none; //thresholdToCompressMonochrome is not needed in this example. //monochromeBitmapSamplingDPI is not needed when monochromeBitmapSampling is //set to none. // //Other compression options. compressionType = PDFCompressionType.compressNone; compressTextAndLineArt = true; contentToEmbed = PDFContentToEmbed.embedAll; cropImagesToFrames = true; optimizePDF = true; // //Printers marks and prepress options. //Get the bleed amounts from the document’s bleed. bleedBottom = app.activeDocument.documentPreferences.documentBleedBottomOffset; bleedTop = app.activeDocument.documentPreferences.documentBleedTopOffset; bleedInside = app.activeDocument.documentPreferences.documentBleedInsideOrLeftOffset; bleedOutside = app.activeDocument.documentPreferences.documentBleedOutsideOrRightOffset; //If any bleed area is greater than zero, then export the bleed marks. if(bleedBottom == 0 && bleedTop == 0 && bleedInside == 0 && bleedOutside == 0){ bleedMarks = true; } else{ bleedMarks = false; } colorBars = true; colorTileSize = 128; grayTileSize = 128; cropMarks = true; omitBitmaps = false; omitEPS = false; omitPDF = false; pageInformationMarks = true; pageMarksOffset = 12; pdfColorSpace = PDFColorSpace.unchangedColorSpace; //Default mark type.
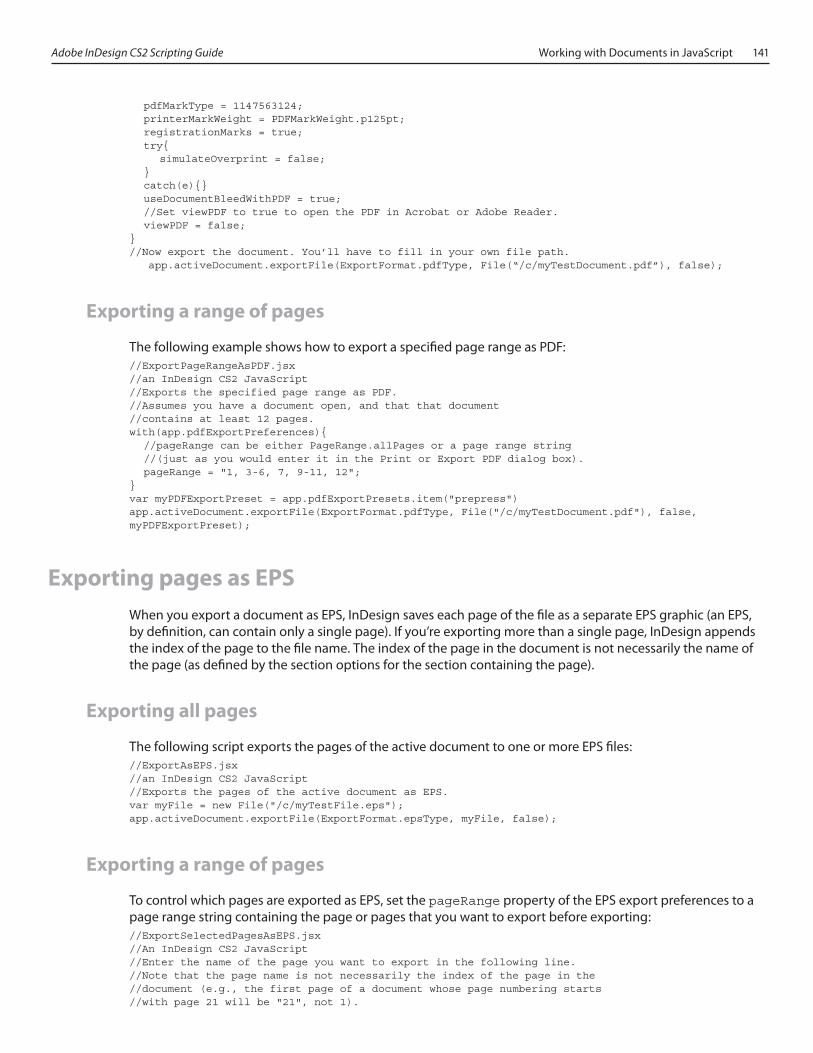
Adobe InDesign CS2 Scripting Guide Working with Documents in JavaScript 141
pdfMarkType = 1147563124; printerMarkWeight = PDFMarkWeight.p125pt; registrationMarks = true; try{ simulateOverprint = false; } catch(e){} useDocumentBleedWithPDF = true; //Set viewPDF to true to open the PDF in Acrobat or Adobe Reader. viewPDF = false;}//Now export the document. You’ll have to fill in your own file path.
app.activeDocument.exportFile(ExportFormat.pdfType, File(“/c/myTestDocument.pdf”), false);
Exporting a range of pages
The following example shows how to export a specified page range as PDF://ExportPageRangeAsPDF.jsx//an InDesign CS2 JavaScript//Exports the specified page range as PDF.//Assumes you have a document open, and that that document //contains at least 12 pages.with(app.pdfExportPreferences){ //pageRange can be either PageRange.allPages or a page range string //(just as you would enter it in the Print or Export PDF dialog box). pageRange = "1, 3-6, 7, 9-11, 12";}var myPDFExportPreset = app.pdfExportPresets.item("prepress")app.activeDocument.exportFile(ExportFormat.pdfType, File("/c/myTestDocument.pdf"), false, myPDFExportPreset);
Exporting pages as EPSWhen you export a document as EPS, InDesign saves each page of the file as a separate EPS graphic (an EPS, by definition, can contain only a single page). If you’re exporting more than a single page, InDesign appends the index of the page to the file name. The index of the page in the document is not necessarily the name of the page (as defined by the section options for the section containing the page).
Exporting all pages
The following script exports the pages of the active document to one or more EPS files://ExportAsEPS.jsx//an InDesign CS2 JavaScript//Exports the pages of the active document as EPS.var myFile = new File("/c/myTestFile.eps");app.activeDocument.exportFile(ExportFormat.epsType, myFile, false);
Exporting a range of pages
To control which pages are exported as EPS, set the pageRange property of the EPS export preferences to a page range string containing the page or pages that you want to export before exporting://ExportSelectedPagesAsEPS.jsx//An InDesign CS2 JavaScript//Enter the name of the page you want to export in the following line.//Note that the page name is not necessarily the index of the page in the//document (e.g., the first page of a document whose page numbering starts//with page 21 will be "21", not 1).
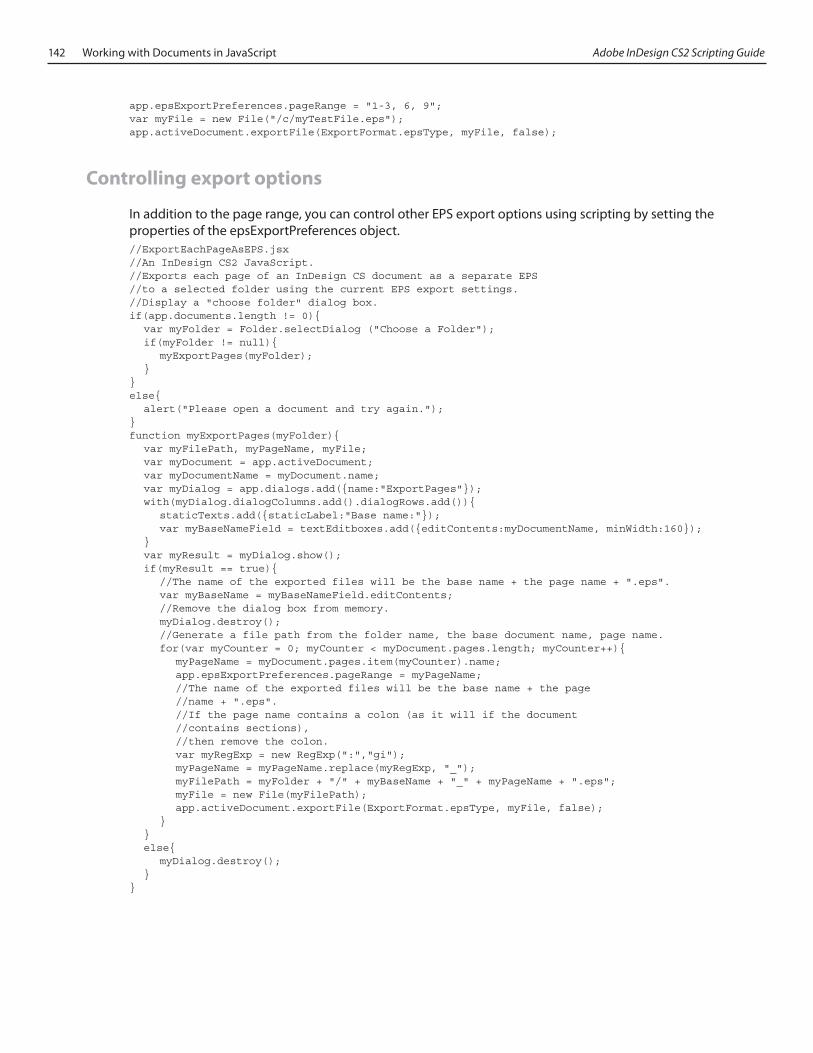
142 Working with Documents in JavaScript Adobe InDesign CS2 Scripting Guide
app.epsExportPreferences.pageRange = "1-3, 6, 9";var myFile = new File("/c/myTestFile.eps");app.activeDocument.exportFile(ExportFormat.epsType, myFile, false);
Controlling export options
In addition to the page range, you can control other EPS export options using scripting by setting the properties of the epsExportPreferences object.//ExportEachPageAsEPS.jsx//An InDesign CS2 JavaScript.//Exports each page of an InDesign CS document as a separate EPS//to a selected folder using the current EPS export settings.//Display a "choose folder" dialog box.if(app.documents.length != 0){ var myFolder = Folder.selectDialog ("Choose a Folder"); if(myFolder != null){ myExportPages(myFolder); }}else{ alert("Please open a document and try again.");}function myExportPages(myFolder){ var myFilePath, myPageName, myFile; var myDocument = app.activeDocument; var myDocumentName = myDocument.name; var myDialog = app.dialogs.add({name:"ExportPages"}); with(myDialog.dialogColumns.add().dialogRows.add()){ staticTexts.add({staticLabel:"Base name:"}); var myBaseNameField = textEditboxes.add({editContents:myDocumentName, minWidth:160}); } var myResult = myDialog.show(); if(myResult == true){ //The name of the exported files will be the base name + the page name + ".eps". var myBaseName = myBaseNameField.editContents; //Remove the dialog box from memory. myDialog.destroy(); //Generate a file path from the folder name, the base document name, page name. for(var myCounter = 0; myCounter < myDocument.pages.length; myCounter++){ myPageName = myDocument.pages.item(myCounter).name; app.epsExportPreferences.pageRange = myPageName; //The name of the exported files will be the base name + the page //name + ".eps". //If the page name contains a colon (as it will if the document //contains sections), //then remove the colon. var myRegExp = new RegExp(":","gi"); myPageName = myPageName.replace(myRegExp, "_"); myFilePath = myFolder + "/" + myBaseName + "_" + myPageName + ".eps"; myFile = new File(myFilePath); app.activeDocument.exportFile(ExportFormat.epsType, myFile, false); } } else{ myDialog.destroy(); }}
Adobe InDesign CS2 Scripting Guide Working with Documents in VBScript 143
7 Working with Documents in VBScript
Most of the work that you do in InDesign revolves around documents—creating them, saving them, and populating them with page items, colors, styles, and text. Documents are also important to InDesign scripting, and almost every document-related task can be automated using scripting.
This chapter shows you how to:
Do basic document management, including
Create a new document
Open a document
Close a document
Save a document
Do basic page layout, including
Set the page size and document length
Define bleed and slug areas
Specify page columns and margins
Change the pasteboard's appearance
Use guides and grids
Change measurement units and ruler origin
Define and apply document presets
Set up master pages (master spreads)
Set text-formatting defaults
Add XMP metadata (information about a file)
Create a document template
Print a document
Export a document as PDF
Export pages of a document as EPS
Note: If you have not already worked through Chapter 3, “Getting Started with InDesign Scripting,” you might want to do so before continuing with this chapter, which assumes that you have already read that chap-ter and know how to create a script.
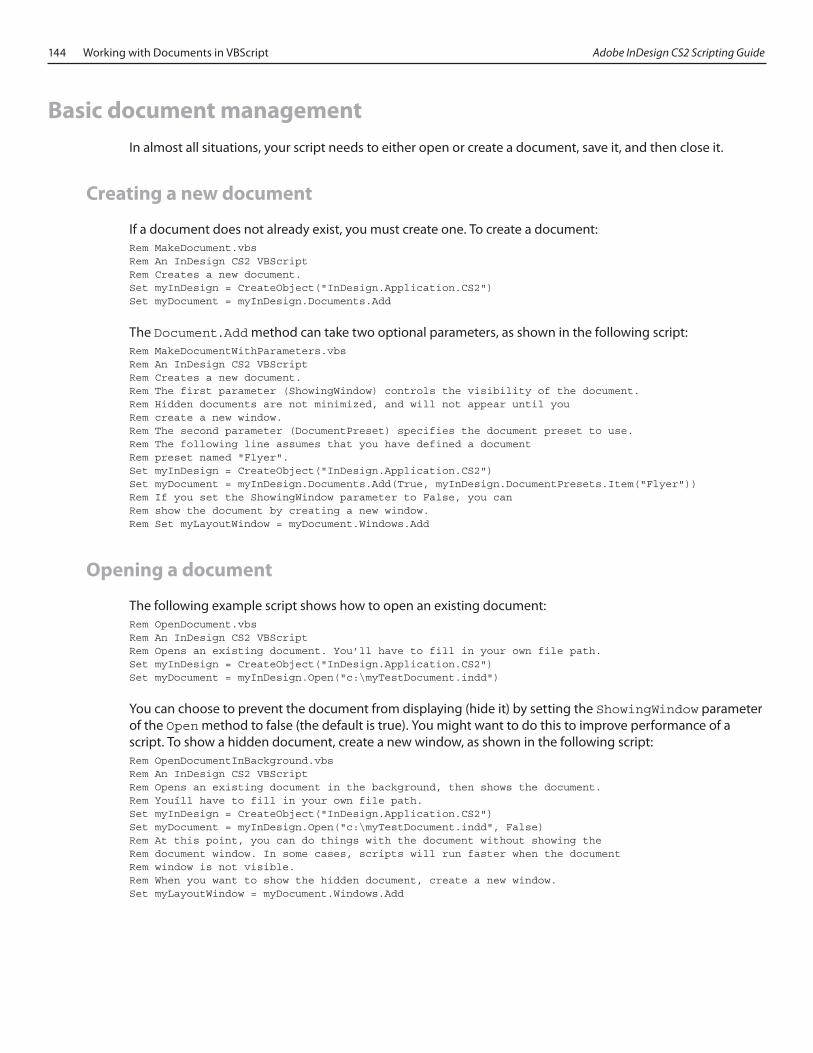
144 Working with Documents in VBScript Adobe InDesign CS2 Scripting Guide
Basic document managementIn almost all situations, your script needs to either open or create a document, save it, and then close it.
Creating a new document
If a document does not already exist, you must create one. To create a document:Rem MakeDocument.vbsRem An InDesign CS2 VBScriptRem Creates a new document.Set myInDesign = CreateObject("InDesign.Application.CS2")Set myDocument = myInDesign.Documents.Add
The Document.Add method can take two optional parameters, as shown in the following script:Rem MakeDocumentWithParameters.vbsRem An InDesign CS2 VBScriptRem Creates a new document.Rem The first parameter (ShowingWindow) controls the visibility of the document.Rem Hidden documents are not minimized, and will not appear until youRem create a new window.Rem The second parameter (DocumentPreset) specifies the document preset to use.Rem The following line assumes that you have defined a documentRem preset named "Flyer".Set myInDesign = CreateObject("InDesign.Application.CS2")Set myDocument = myInDesign.Documents.Add(True, myInDesign.DocumentPresets.Item("Flyer"))Rem If you set the ShowingWindow parameter to False, you canRem show the document by creating a new window.Rem Set myLayoutWindow = myDocument.Windows.Add
Opening a document
The following example script shows how to open an existing document:Rem OpenDocument.vbsRem An InDesign CS2 VBScriptRem Opens an existing document. You’ll have to fill in your own file path.Set myInDesign = CreateObject("InDesign.Application.CS2")Set myDocument = myInDesign.Open("c:\myTestDocument.indd")
You can choose to prevent the document from displaying (hide it) by setting the ShowingWindow parameter of the Open method to false (the default is true). You might want to do this to improve performance of a script. To show a hidden document, create a new window, as shown in the following script:Rem OpenDocumentInBackground.vbsRem An InDesign CS2 VBScriptRem Opens an existing document in the background, then shows the document.Rem Youíll have to fill in your own file path.Set myInDesign = CreateObject("InDesign.Application.CS2")Set myDocument = myInDesign.Open("c:\myTestDocument.indd", False)Rem At this point, you can do things with the document without showing theRem document window. In some cases, scripts will run faster when the documentRem window is not visible.Rem When you want to show the hidden document, create a new window.Set myLayoutWindow = myDocument.Windows.Add
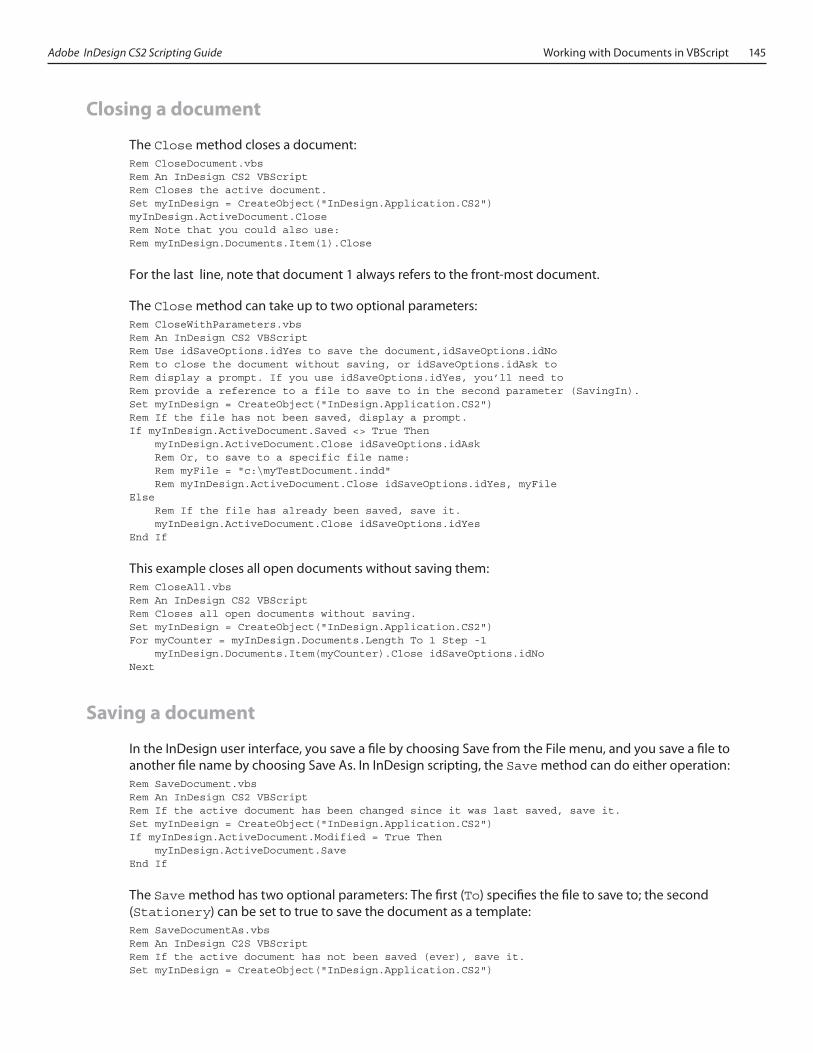
Adobe InDesign CS2 Scripting Guide Working with Documents in VBScript 145
Closing a document
The Close method closes a document:Rem CloseDocument.vbsRem An InDesign CS2 VBScriptRem Closes the active document.Set myInDesign = CreateObject("InDesign.Application.CS2")myInDesign.ActiveDocument.CloseRem Note that you could also use:Rem myInDesign.Documents.Item(1).Close
For the last line, note that document 1 always refers to the front-most document.
The Close method can take up to two optional parameters:Rem CloseWithParameters.vbsRem An InDesign CS2 VBScriptRem Use idSaveOptions.idYes to save the document,idSaveOptions.idNoRem to close the document without saving, or idSaveOptions.idAsk toRem display a prompt. If you use idSaveOptions.idYes, you’ll need toRem provide a reference to a file to save to in the second parameter (SavingIn).Set myInDesign = CreateObject("InDesign.Application.CS2")Rem If the file has not been saved, display a prompt.If myInDesign.ActiveDocument.Saved <> True Then myInDesign.ActiveDocument.Close idSaveOptions.idAsk Rem Or, to save to a specific file name: Rem myFile = "c:\myTestDocument.indd" Rem myInDesign.ActiveDocument.Close idSaveOptions.idYes, myFileElse Rem If the file has already been saved, save it. myInDesign.ActiveDocument.Close idSaveOptions.idYesEnd If
This example closes all open documents without saving them:Rem CloseAll.vbsRem An InDesign CS2 VBScriptRem Closes all open documents without saving.Set myInDesign = CreateObject("InDesign.Application.CS2")For myCounter = myInDesign.Documents.Length To 1 Step -1 myInDesign.Documents.Item(myCounter).Close idSaveOptions.idNoNext
Saving a document
In the InDesign user interface, you save a file by choosing Save from the File menu, and you save a file to another file name by choosing Save As. In InDesign scripting, the Save method can do either operation:Rem SaveDocument.vbsRem An InDesign CS2 VBScriptRem If the active document has been changed since it was last saved, save it.Set myInDesign = CreateObject("InDesign.Application.CS2")If myInDesign.ActiveDocument.Modified = True Then myInDesign.ActiveDocument.SaveEnd If
The Save method has two optional parameters: The first (To) specifies the file to save to; the second (Stationery) can be set to true to save the document as a template:Rem SaveDocumentAs.vbsRem An InDesign C2S VBScriptRem If the active document has not been saved (ever), save it.Set myInDesign = CreateObject("InDesign.Application.CS2")
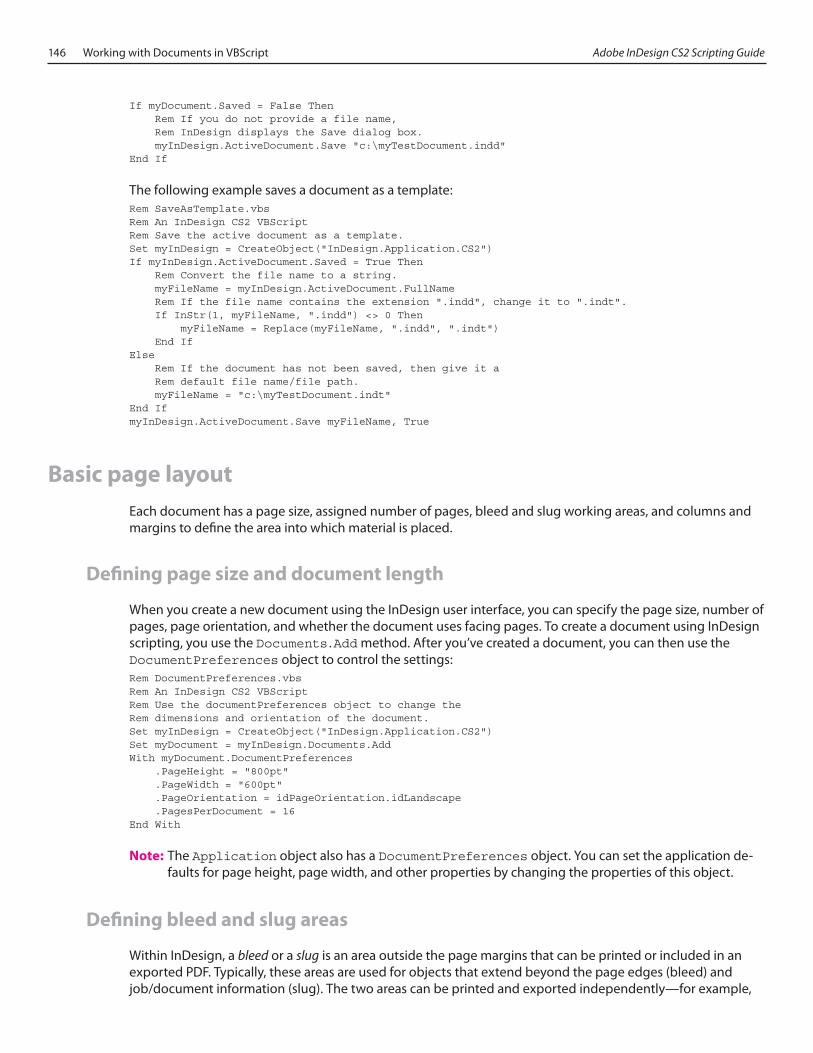
146 Working with Documents in VBScript Adobe InDesign CS2 Scripting Guide
If myDocument.Saved = False Then Rem If you do not provide a file name, Rem InDesign displays the Save dialog box. myInDesign.ActiveDocument.Save "c:\myTestDocument.indd"End If
The following example saves a document as a template:Rem SaveAsTemplate.vbsRem An InDesign CS2 VBScriptRem Save the active document as a template.Set myInDesign = CreateObject("InDesign.Application.CS2")If myInDesign.ActiveDocument.Saved = True Then Rem Convert the file name to a string. myFileName = myInDesign.ActiveDocument.FullName Rem If the file name contains the extension ".indd", change it to ".indt". If InStr(1, myFileName, ".indd") <> 0 Then myFileName = Replace(myFileName, ".indd", ".indt") End IfElse Rem If the document has not been saved, then give it a Rem default file name/file path. myFileName = "c:\myTestDocument.indt"End IfmyInDesign.ActiveDocument.Save myFileName, True
Basic page layoutEach document has a page size, assigned number of pages, bleed and slug working areas, and columns and margins to define the area into which material is placed.
Defining page size and document length
When you create a new document using the InDesign user interface, you can specify the page size, number of pages, page orientation, and whether the document uses facing pages. To create a document using InDesign scripting, you use the Documents.Add method. After you’ve created a document, you can then use the DocumentPreferences object to control the settings:Rem DocumentPreferences.vbsRem An InDesign CS2 VBScriptRem Use the documentPreferences object to change theRem dimensions and orientation of the document.Set myInDesign = CreateObject("InDesign.Application.CS2")Set myDocument = myInDesign.Documents.AddWith myDocument.DocumentPreferences .PageHeight = "800pt" .PageWidth = "600pt" .PageOrientation = idPageOrientation.idLandscape .PagesPerDocument = 16End With
Note: The Application object also has a DocumentPreferences object. You can set the application de-faults for page height, page width, and other properties by changing the properties of this object.
Defining bleed and slug areas
Within InDesign, a bleed or a slug is an area outside the page margins that can be printed or included in an exported PDF. Typically, these areas are used for objects that extend beyond the page edges (bleed) and job/document information (slug). The two areas can be printed and exported independently—for example,

Adobe InDesign CS2 Scripting Guide Working with Documents in VBScript 147
you might want to omit slug information for the final printing of a document. The following script sets up the bleed and slug for a new document:Rem BleedAndSlug.vbsRem An InDesign CS2 VBScriptRem Create a new document.Set myInDesign = CreateObject("InDesign.Application.CS2")Set myDocument = myInDesign.Documents.AddRem The bleed and slug properties belong to the documentPreferences object.With myDocument.DocumentPreferences Rem Bleed .DocumentBleedBottomOffset = "3p" .DocumentBleedTopOffset = "3p" .DocumentBleedInsideOrLeftOffset = "3p" .DocumentBleedOutsideOrRightOffset = "3p" Rem Slug .SlugBottomOffset = "18p" .SlugTopOffset = "3p" .SlugInsideOrLeftOffset = "3p" .SlugRightOrOutsideOffset = "3p"End With
If all the bleed distances are equal, as in the preceding example, you can alternatively use the DocumentBleedUniformSize property:Rem UniformBleed.vbsRem An InDesign CS2 VBScriptRem Create a new document.Set myInDesign = CreateObject("InDesign.Application.CS2")Set myDocument = myInDesign.Documents.AddRem The bleed properties belong to the documentPreferences object.With myDocument.DocumentPreferences Rem Bleed .DocumentBleedTopOffset = "3p" .DocumentBleedUniformSize = TrueEnd With
If all the slug distances are equal, you can instead use the DocumentSlugUniformSize property:Rem UniformSlug.vbsRem An InDesign CS2 VBScriptRem Create a new document.Set myInDesign = CreateObject("InDesign.Application.CS2")Set myDocument = myInDesign.Documents.AddRem The slug properties belong to the documentPreferences object.With myDocument.DocumentPreferences Rem Slug: .SlugTopOffset = "3p" .DocumentSlugUniformSize = TrueEnd With
In addition to setting the bleed and slug widths and heights, you can control the color used to draw the guides defining the bleed and slug. This property is not in the DocumentPreferences object—instead, it’s in the PasteboardPreferences object:Rem BleedSlugGuideColors.vbsRem An InDesign CS2 VBScriptRem Set the colors used to display the bleed and slug guides.Set myInDesign = CreateObject("InDesign.Application.CS2")With myInDesign.ActiveDocument.PasteboardPreferences Rem Any of InDesign’s guides can use the UIColors constants... .BleedGuideColor = idUIColors.idCuteTeal .SlugGuideColor = idUIColors.idCharcoal Rem ...or you can specify an array of RGB values (with values from 0 to 255) Rem .BleedGuideColor = Array(0, 198, 192) Rem .SlugGuideColor = Array(192, 192, 192)End With
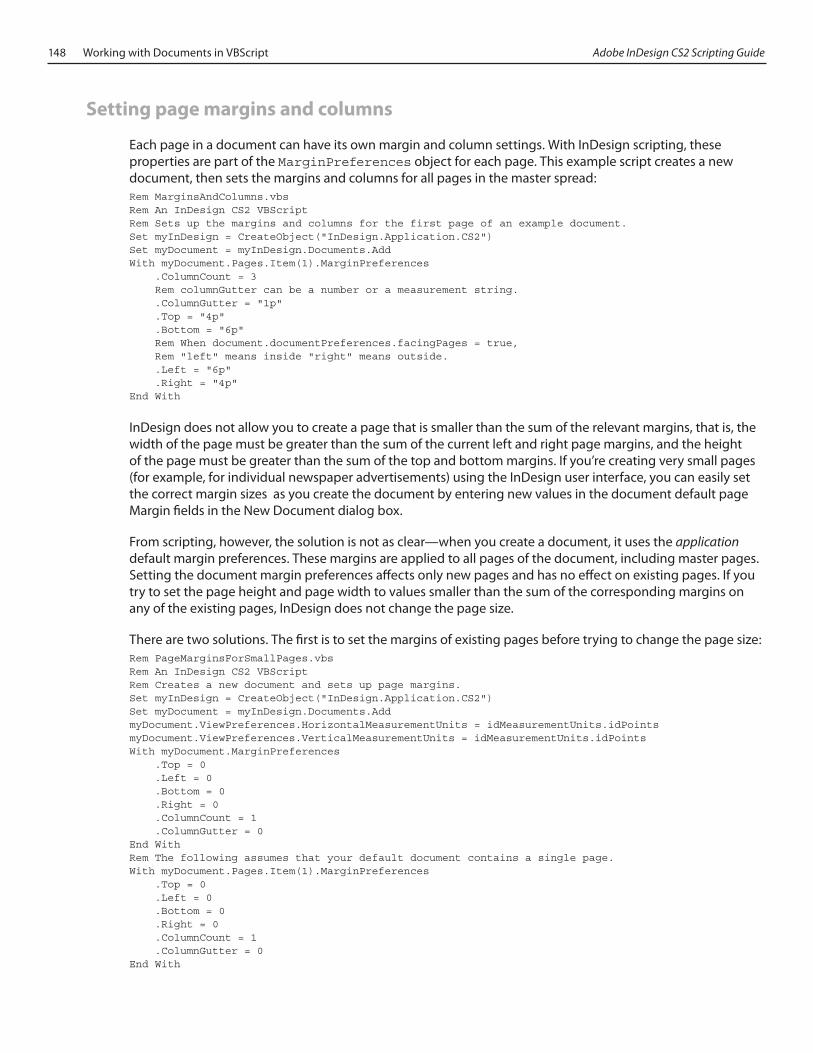
148 Working with Documents in VBScript Adobe InDesign CS2 Scripting Guide
Setting page margins and columns
Each page in a document can have its own margin and column settings. With InDesign scripting, these properties are part of the MarginPreferences object for each page. This example script creates a new document, then sets the margins and columns for all pages in the master spread:Rem MarginsAndColumns.vbsRem An InDesign CS2 VBScriptRem Sets up the margins and columns for the first page of an example document.Set myInDesign = CreateObject("InDesign.Application.CS2")Set myDocument = myInDesign.Documents.AddWith myDocument.Pages.Item(1).MarginPreferences .ColumnCount = 3 Rem columnGutter can be a number or a measurement string. .ColumnGutter = "1p" .Top = "4p" .Bottom = "6p" Rem When document.documentPreferences.facingPages = true, Rem "left" means inside "right" means outside. .Left = "6p" .Right = "4p"End With
InDesign does not allow you to create a page that is smaller than the sum of the relevant margins, that is, the width of the page must be greater than the sum of the current left and right page margins, and the height of the page must be greater than the sum of the top and bottom margins. If you’re creating very small pages (for example, for individual newspaper advertisements) using the InDesign user interface, you can easily set the correct margin sizes as you create the document by entering new values in the document default page Margin fields in the New Document dialog box.
From scripting, however, the solution is not as clear—when you create a document, it uses the application default margin preferences. These margins are applied to all pages of the document, including master pages. Setting the document margin preferences affects only new pages and has no effect on existing pages. If you try to set the page height and page width to values smaller than the sum of the corresponding margins on any of the existing pages, InDesign does not change the page size.
There are two solutions. The first is to set the margins of existing pages before trying to change the page size:Rem PageMarginsForSmallPages.vbsRem An InDesign CS2 VBScriptRem Creates a new document and sets up page margins.Set myInDesign = CreateObject("InDesign.Application.CS2")Set myDocument = myInDesign.Documents.AddmyDocument.ViewPreferences.HorizontalMeasurementUnits = idMeasurementUnits.idPointsmyDocument.ViewPreferences.VerticalMeasurementUnits = idMeasurementUnits.idPointsWith myDocument.MarginPreferences .Top = 0 .Left = 0 .Bottom = 0 .Right = 0 .ColumnCount = 1 .ColumnGutter = 0End WithRem The following assumes that your default document contains a single page.With myDocument.Pages.Item(1).MarginPreferences .Top = 0 .Left = 0 .Bottom = 0 .Right = 0 .ColumnCount = 1 .ColumnGutter = 0End With
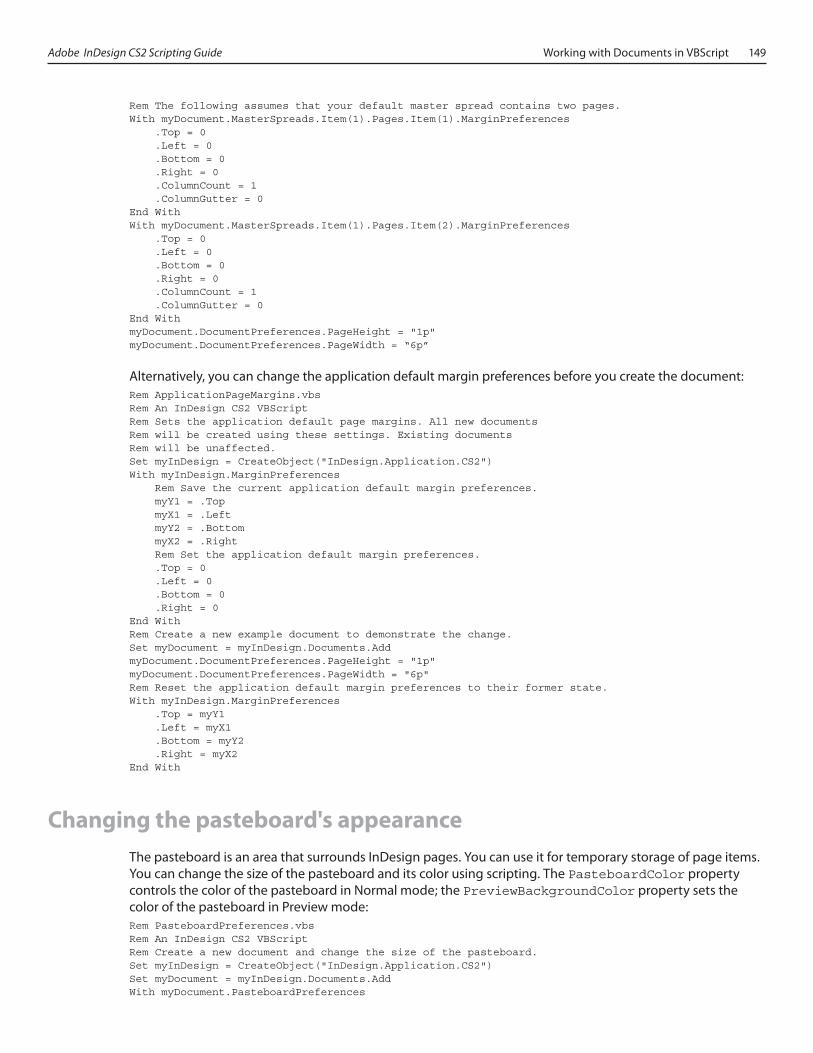
Adobe InDesign CS2 Scripting Guide Working with Documents in VBScript 149
Rem The following assumes that your default master spread contains two pages.With myDocument.MasterSpreads.Item(1).Pages.Item(1).MarginPreferences .Top = 0 .Left = 0 .Bottom = 0 .Right = 0 .ColumnCount = 1 .ColumnGutter = 0End WithWith myDocument.MasterSpreads.Item(1).Pages.Item(2).MarginPreferences .Top = 0 .Left = 0 .Bottom = 0 .Right = 0 .ColumnCount = 1 .ColumnGutter = 0End WithmyDocument.DocumentPreferences.PageHeight = "1p"myDocument.DocumentPreferences.PageWidth = “6p”
Alternatively, you can change the application default margin preferences before you create the document:Rem ApplicationPageMargins.vbsRem An InDesign CS2 VBScriptRem Sets the application default page margins. All new documentsRem will be created using these settings. Existing documentsRem will be unaffected.Set myInDesign = CreateObject("InDesign.Application.CS2")With myInDesign.MarginPreferences Rem Save the current application default margin preferences. myY1 = .Top myX1 = .Left myY2 = .Bottom myX2 = .Right Rem Set the application default margin preferences. .Top = 0 .Left = 0 .Bottom = 0 .Right = 0End WithRem Create a new example document to demonstrate the change.Set myDocument = myInDesign.Documents.AddmyDocument.DocumentPreferences.PageHeight = "1p"myDocument.DocumentPreferences.PageWidth = "6p"Rem Reset the application default margin preferences to their former state.With myInDesign.MarginPreferences .Top = myY1 .Left = myX1 .Bottom = myY2 .Right = myX2End With
Changing the pasteboard's appearanceThe pasteboard is an area that surrounds InDesign pages. You can use it for temporary storage of page items. You can change the size of the pasteboard and its color using scripting. The PasteboardColor property controls the color of the pasteboard in Normal mode; the PreviewBackgroundColor property sets the color of the pasteboard in Preview mode:Rem PasteboardPreferences.vbsRem An InDesign CS2 VBScriptRem Create a new document and change the size of the pasteboard.Set myInDesign = CreateObject("InDesign.Application.CS2")Set myDocument = myInDesign.Documents.AddWith myDocument.PasteboardPreferences
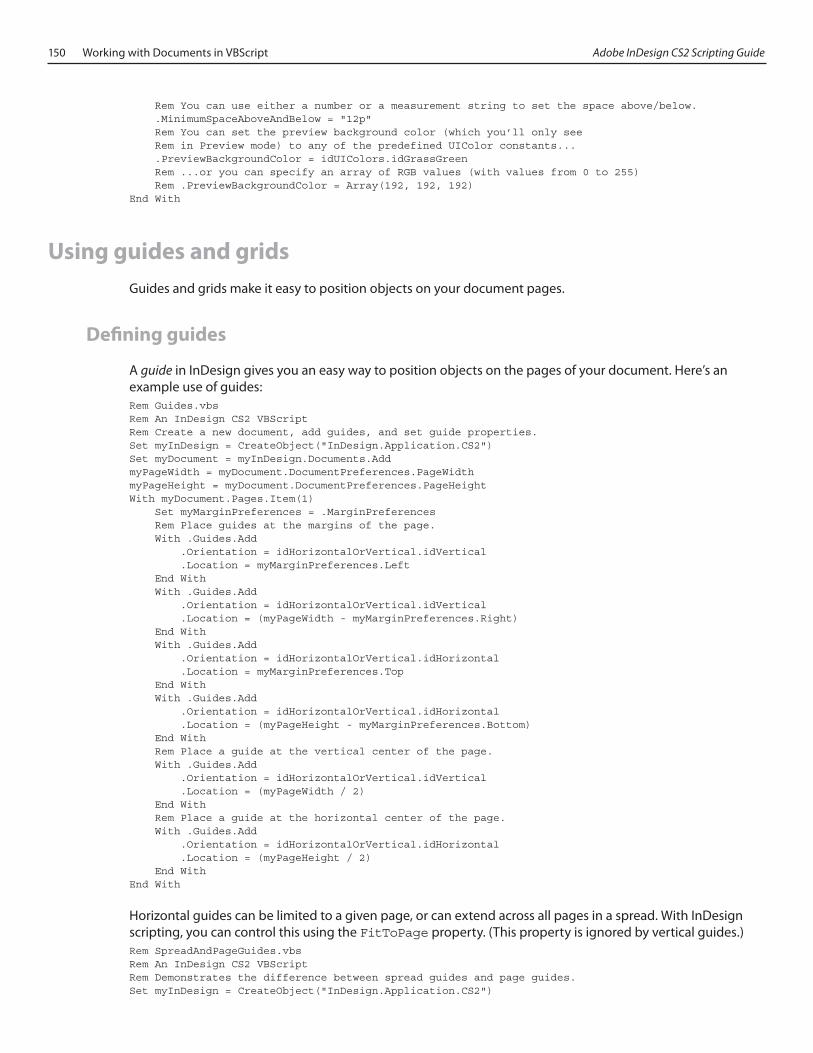
150 Working with Documents in VBScript Adobe InDesign CS2 Scripting Guide
Rem You can use either a number or a measurement string to set the space above/below. .MinimumSpaceAboveAndBelow = "12p" Rem You can set the preview background color (which you’ll only see Rem in Preview mode) to any of the predefined UIColor constants... .PreviewBackgroundColor = idUIColors.idGrassGreen Rem ...or you can specify an array of RGB values (with values from 0 to 255) Rem .PreviewBackgroundColor = Array(192, 192, 192)End With
Using guides and gridsGuides and grids make it easy to position objects on your document pages.
Defining guides
A guide in InDesign gives you an easy way to position objects on the pages of your document. Here’s an example use of guides:Rem Guides.vbsRem An InDesign CS2 VBScriptRem Create a new document, add guides, and set guide properties.Set myInDesign = CreateObject("InDesign.Application.CS2")Set myDocument = myInDesign.Documents.AddmyPageWidth = myDocument.DocumentPreferences.PageWidthmyPageHeight = myDocument.DocumentPreferences.PageHeightWith myDocument.Pages.Item(1) Set myMarginPreferences = .MarginPreferences Rem Place guides at the margins of the page. With .Guides.Add .Orientation = idHorizontalOrVertical.idVertical .Location = myMarginPreferences.Left End With With .Guides.Add .Orientation = idHorizontalOrVertical.idVertical .Location = (myPageWidth - myMarginPreferences.Right) End With With .Guides.Add .Orientation = idHorizontalOrVertical.idHorizontal .Location = myMarginPreferences.Top End With With .Guides.Add .Orientation = idHorizontalOrVertical.idHorizontal .Location = (myPageHeight - myMarginPreferences.Bottom) End With Rem Place a guide at the vertical center of the page. With .Guides.Add .Orientation = idHorizontalOrVertical.idVertical .Location = (myPageWidth / 2) End With Rem Place a guide at the horizontal center of the page. With .Guides.Add .Orientation = idHorizontalOrVertical.idHorizontal .Location = (myPageHeight / 2) End WithEnd With
Horizontal guides can be limited to a given page, or can extend across all pages in a spread. With InDesign scripting, you can control this using the FitToPage property. (This property is ignored by vertical guides.)Rem SpreadAndPageGuides.vbsRem An InDesign CS2 VBScriptRem Demonstrates the difference between spread guides and page guides.Set myInDesign = CreateObject("InDesign.Application.CS2")

Adobe InDesign CS2 Scripting Guide Working with Documents in VBScript 151
Set myDocument = myInDesign.Documents.AddmyDocument.DocumentPreferences.FacingPages = TruemyDocument.DocumentPreferences.PagesPerDocument = 3With myDocument.Spreads.Item(2) Rem Note the difference between these two guides on pages 2 and 3. With .Guides.Add .Orientation = idHorizontalOrVertical.idHorizontal .Location = "6p" .FitToPage = True End With With .Guides.Add .Orientation = idHorizontalOrVertical.idHorizontal .Location = "9p" .FitToPage = False End WithEnd With
You can use scripting to change the layer, color, and visibility of guides, just as you can from the user interface.Rem GuideOptions.vbsRem An InDesign CS2 VBScriptRem Shows how to set guide options.Set myInDesign = CreateObject("InDesign.Application.CS2")Set myDocument = myInDesign.Documents.AddRem Create a layer named "guide layer".Set myLayer = myDocument.Layers.AddmyLayer.Name = "guide layer"Rem Add a series of guides to page 1.With myDocument.Pages.Item(1) Rem Create a guide on the layer we created above. With .Guides.Add(myLayer) .Orientation = idHorizontalOrVertical.idHorizontal .Location = "12p" End With Rem Another way to make a guide on a specific layer. With .Guides.Add() .ItemLayer = myLayer .Orientation = idHorizontalOrVertical.idHorizontal .Location = "14p" End With Rem Make a locked guide. With .Guides.Add() .ItemLayer = myLayer .Orientation = idHorizontalOrVertical.idHorizontal .Location = "16p" .Locked = True End With Rem Set the view threshold of a guide. With .Guides.Add() .ItemLayer = myLayer .Orientation = idHorizontalOrVertical.idHorizontal .Location = "18p" .ViewThreshold = 100 End With Rem Set the guide color of a guide using a UIColors constant. With .Guides.Add() .ItemLayer = myLayer .Orientation = idHorizontalOrVertical.idHorizontal .Location = "18p" .GuideColor = idUIColors.idGray End With
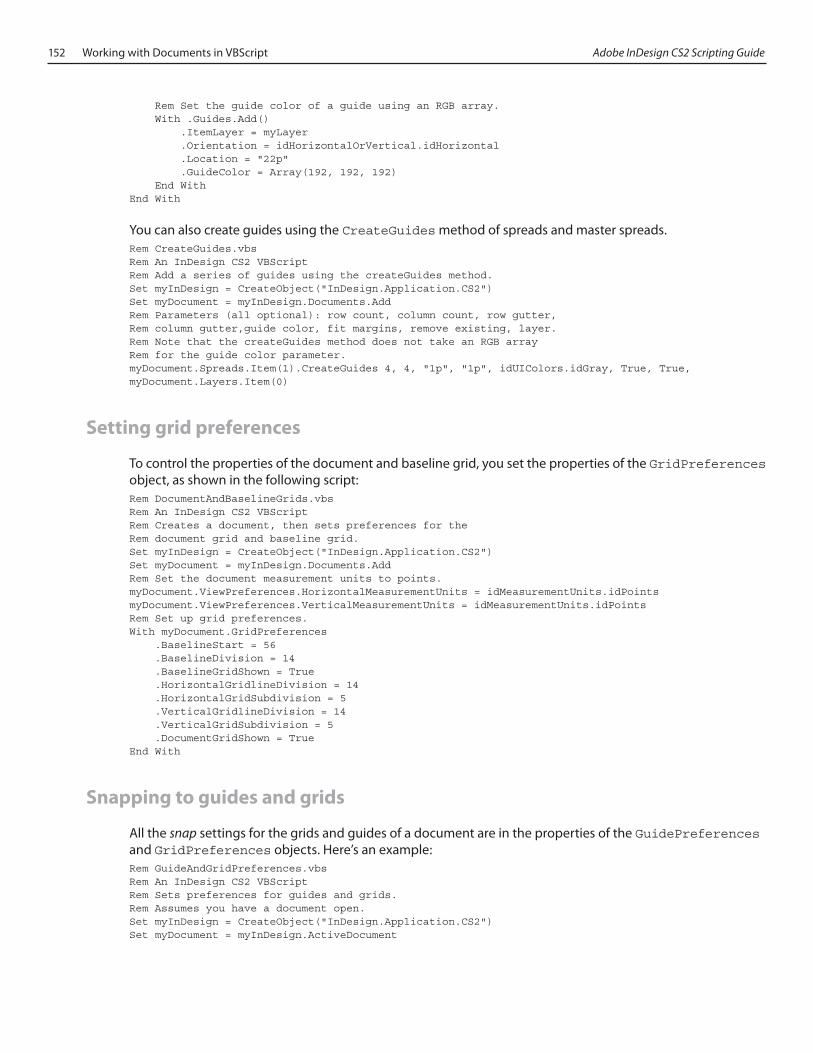
152 Working with Documents in VBScript Adobe InDesign CS2 Scripting Guide
Rem Set the guide color of a guide using an RGB array. With .Guides.Add() .ItemLayer = myLayer .Orientation = idHorizontalOrVertical.idHorizontal .Location = "22p" .GuideColor = Array(192, 192, 192) End WithEnd With
You can also create guides using the CreateGuides method of spreads and master spreads.Rem CreateGuides.vbsRem An InDesign CS2 VBScriptRem Add a series of guides using the createGuides method.Set myInDesign = CreateObject("InDesign.Application.CS2")Set myDocument = myInDesign.Documents.AddRem Parameters (all optional): row count, column count, row gutter,Rem column gutter,guide color, fit margins, remove existing, layer.Rem Note that the createGuides method does not take an RGB arrayRem for the guide color parameter.myDocument.Spreads.Item(1).CreateGuides 4, 4, "1p", "1p", idUIColors.idGray, True, True, myDocument.Layers.Item(0)
Setting grid preferences
To control the properties of the document and baseline grid, you set the properties of the GridPreferences object, as shown in the following script:Rem DocumentAndBaselineGrids.vbsRem An InDesign CS2 VBScriptRem Creates a document, then sets preferences for theRem document grid and baseline grid.Set myInDesign = CreateObject("InDesign.Application.CS2")Set myDocument = myInDesign.Documents.AddRem Set the document measurement units to points.myDocument.ViewPreferences.HorizontalMeasurementUnits = idMeasurementUnits.idPointsmyDocument.ViewPreferences.VerticalMeasurementUnits = idMeasurementUnits.idPointsRem Set up grid preferences.With myDocument.GridPreferences .BaselineStart = 56 .BaselineDivision = 14 .BaselineGridShown = True .HorizontalGridlineDivision = 14 .HorizontalGridSubdivision = 5 .VerticalGridlineDivision = 14 .VerticalGridSubdivision = 5 .DocumentGridShown = TrueEnd With
Snapping to guides and grids
All the snap settings for the grids and guides of a document are in the properties of the GuidePreferences and GridPreferences objects. Here’s an example:Rem GuideAndGridPreferences.vbsRem An InDesign CS2 VBScriptRem Sets preferences for guides and grids.Rem Assumes you have a document open.Set myInDesign = CreateObject("InDesign.Application.CS2")Set myDocument = myInDesign.ActiveDocument
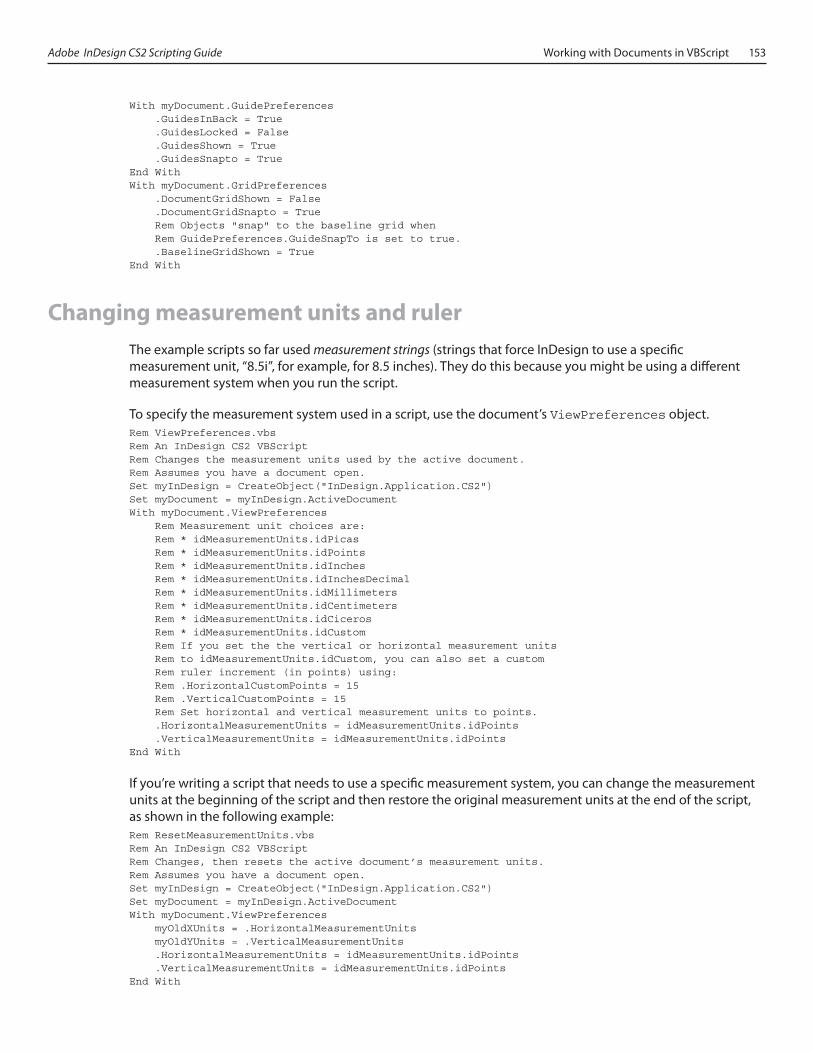
Adobe InDesign CS2 Scripting Guide Working with Documents in VBScript 153
With myDocument.GuidePreferences .GuidesInBack = True .GuidesLocked = False .GuidesShown = True .GuidesSnapto = TrueEnd WithWith myDocument.GridPreferences .DocumentGridShown = False .DocumentGridSnapto = True Rem Objects "snap" to the baseline grid when Rem GuidePreferences.GuideSnapTo is set to true. .BaselineGridShown = TrueEnd With
Changing measurement units and rulerThe example scripts so far used measurement strings (strings that force InDesign to use a specific measurement unit, “8.5i”, for example, for 8.5 inches). They do this because you might be using a different measurement system when you run the script.
To specify the measurement system used in a script, use the document’s ViewPreferences object.Rem ViewPreferences.vbsRem An InDesign CS2 VBScriptRem Changes the measurement units used by the active document.Rem Assumes you have a document open.Set myInDesign = CreateObject("InDesign.Application.CS2")Set myDocument = myInDesign.ActiveDocumentWith myDocument.ViewPreferences Rem Measurement unit choices are: Rem * idMeasurementUnits.idPicas Rem * idMeasurementUnits.idPoints Rem * idMeasurementUnits.idInches Rem * idMeasurementUnits.idInchesDecimal Rem * idMeasurementUnits.idMillimeters Rem * idMeasurementUnits.idCentimeters Rem * idMeasurementUnits.idCiceros Rem * idMeasurementUnits.idCustom Rem If you set the the vertical or horizontal measurement units Rem to idMeasurementUnits.idCustom, you can also set a custom Rem ruler increment (in points) using: Rem .HorizontalCustomPoints = 15 Rem .VerticalCustomPoints = 15 Rem Set horizontal and vertical measurement units to points. .HorizontalMeasurementUnits = idMeasurementUnits.idPoints .VerticalMeasurementUnits = idMeasurementUnits.idPointsEnd With
If you’re writing a script that needs to use a specific measurement system, you can change the measurement units at the beginning of the script and then restore the original measurement units at the end of the script, as shown in the following example:Rem ResetMeasurementUnits.vbsRem An InDesign CS2 VBScriptRem Changes, then resets the active document’s measurement units.Rem Assumes you have a document open.Set myInDesign = CreateObject("InDesign.Application.CS2")Set myDocument = myInDesign.ActiveDocumentWith myDocument.ViewPreferences myOldXUnits = .HorizontalMeasurementUnits myOldYUnits = .VerticalMeasurementUnits .HorizontalMeasurementUnits = idMeasurementUnits.idPoints .VerticalMeasurementUnits = idMeasurementUnits.idPointsEnd With
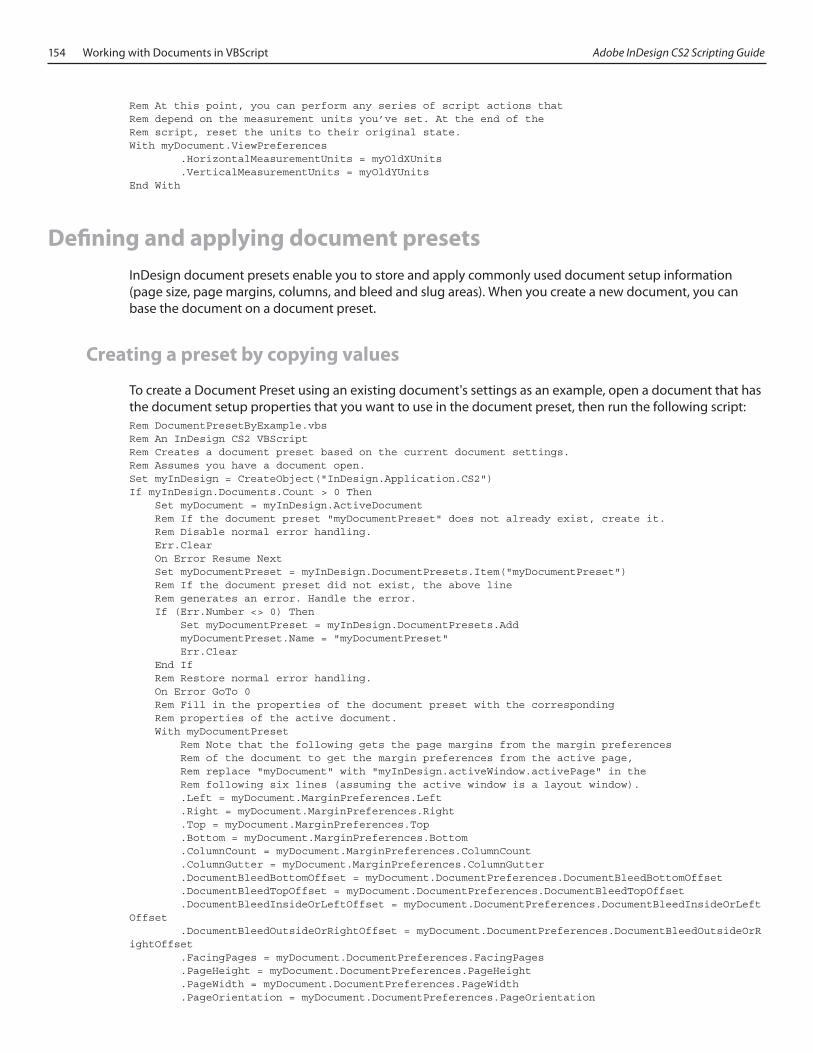
154 Working with Documents in VBScript Adobe InDesign CS2 Scripting Guide
Rem At this point, you can perform any series of script actions that Rem depend on the measurement units you’ve set. At the end of the Rem script, reset the units to their original state.With myDocument.ViewPreferences .HorizontalMeasurementUnits = myOldXUnits .VerticalMeasurementUnits = myOldYUnitsEnd With
Defining and applying document presetsInDesign document presets enable you to store and apply commonly used document setup information (page size, page margins, columns, and bleed and slug areas). When you create a new document, you can base the document on a document preset.
Creating a preset by copying values
To create a Document Preset using an existing document's settings as an example, open a document that has the document setup properties that you want to use in the document preset, then run the following script:Rem DocumentPresetByExample.vbsRem An InDesign CS2 VBScriptRem Creates a document preset based on the current document settings.Rem Assumes you have a document open.Set myInDesign = CreateObject("InDesign.Application.CS2")If myInDesign.Documents.Count > 0 Then Set myDocument = myInDesign.ActiveDocument Rem If the document preset "myDocumentPreset" does not already exist, create it. Rem Disable normal error handling. Err.Clear On Error Resume Next Set myDocumentPreset = myInDesign.DocumentPresets.Item("myDocumentPreset") Rem If the document preset did not exist, the above line Rem generates an error. Handle the error. If (Err.Number <> 0) Then Set myDocumentPreset = myInDesign.DocumentPresets.Add myDocumentPreset.Name = "myDocumentPreset" Err.Clear End If Rem Restore normal error handling. On Error GoTo 0 Rem Fill in the properties of the document preset with the corresponding Rem properties of the active document. With myDocumentPreset Rem Note that the following gets the page margins from the margin preferences Rem of the document to get the margin preferences from the active page, Rem replace "myDocument" with "myInDesign.activeWindow.activePage" in the Rem following six lines (assuming the active window is a layout window). .Left = myDocument.MarginPreferences.Left .Right = myDocument.MarginPreferences.Right .Top = myDocument.MarginPreferences.Top .Bottom = myDocument.MarginPreferences.Bottom .ColumnCount = myDocument.MarginPreferences.ColumnCount .ColumnGutter = myDocument.MarginPreferences.ColumnGutter .DocumentBleedBottomOffset = myDocument.DocumentPreferences.DocumentBleedBottomOffset .DocumentBleedTopOffset = myDocument.DocumentPreferences.DocumentBleedTopOffset .DocumentBleedInsideOrLeftOffset = myDocument.DocumentPreferences.DocumentBleedInsideOrLeftOffset .DocumentBleedOutsideOrRightOffset = myDocument.DocumentPreferences.DocumentBleedOutsideOrRightOffset .FacingPages = myDocument.DocumentPreferences.FacingPages .PageHeight = myDocument.DocumentPreferences.PageHeight .PageWidth = myDocument.DocumentPreferences.PageWidth .PageOrientation = myDocument.DocumentPreferences.PageOrientation
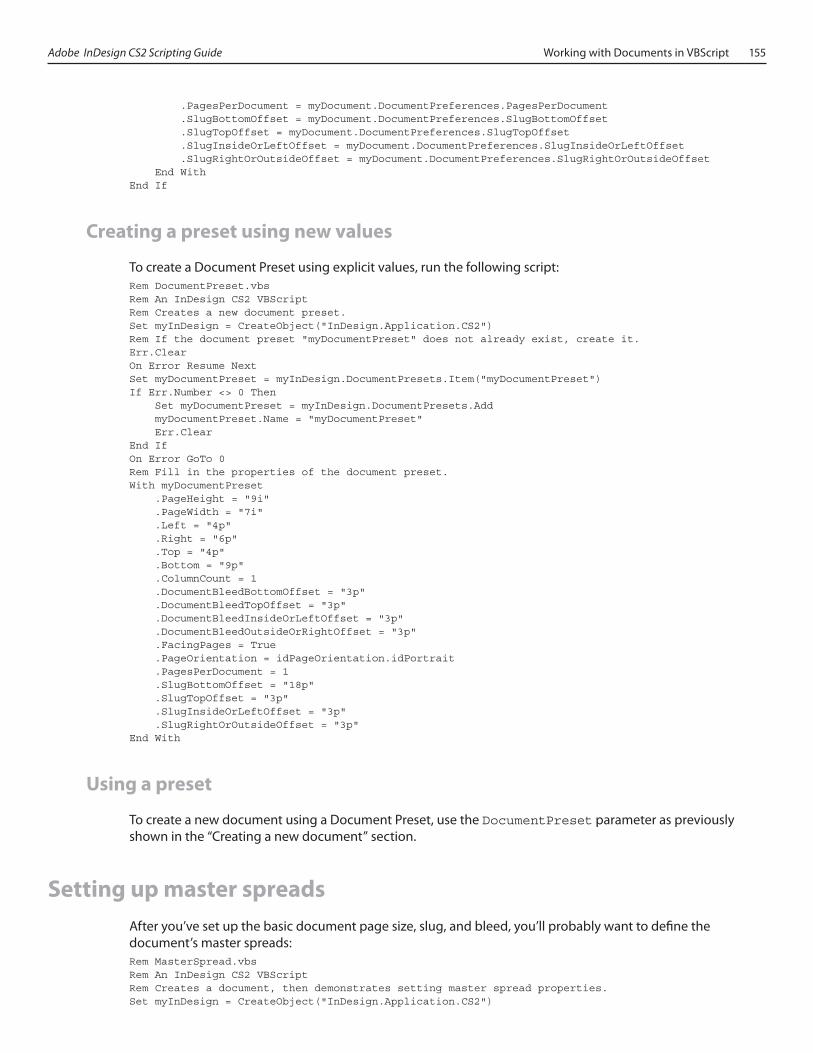
Adobe InDesign CS2 Scripting Guide Working with Documents in VBScript 155
.PagesPerDocument = myDocument.DocumentPreferences.PagesPerDocument .SlugBottomOffset = myDocument.DocumentPreferences.SlugBottomOffset .SlugTopOffset = myDocument.DocumentPreferences.SlugTopOffset .SlugInsideOrLeftOffset = myDocument.DocumentPreferences.SlugInsideOrLeftOffset .SlugRightOrOutsideOffset = myDocument.DocumentPreferences.SlugRightOrOutsideOffset End WithEnd If
Creating a preset using new values
To create a Document Preset using explicit values, run the following script:Rem DocumentPreset.vbsRem An InDesign CS2 VBScriptRem Creates a new document preset.Set myInDesign = CreateObject("InDesign.Application.CS2")Rem If the document preset "myDocumentPreset" does not already exist, create it.Err.ClearOn Error Resume NextSet myDocumentPreset = myInDesign.DocumentPresets.Item("myDocumentPreset")If Err.Number <> 0 Then Set myDocumentPreset = myInDesign.DocumentPresets.Add myDocumentPreset.Name = "myDocumentPreset" Err.ClearEnd IfOn Error GoTo 0Rem Fill in the properties of the document preset.With myDocumentPreset .PageHeight = "9i" .PageWidth = "7i" .Left = "4p" .Right = "6p" .Top = "4p" .Bottom = "9p" .ColumnCount = 1 .DocumentBleedBottomOffset = "3p" .DocumentBleedTopOffset = "3p" .DocumentBleedInsideOrLeftOffset = "3p" .DocumentBleedOutsideOrRightOffset = "3p" .FacingPages = True .PageOrientation = idPageOrientation.idPortrait .PagesPerDocument = 1 .SlugBottomOffset = "18p" .SlugTopOffset = "3p" .SlugInsideOrLeftOffset = "3p" .SlugRightOrOutsideOffset = "3p"End With
Using a preset
To create a new document using a Document Preset, use the DocumentPreset parameter as previously shown in the “Creating a new document” section.
Setting up master spreadsAfter you’ve set up the basic document page size, slug, and bleed, you’ll probably want to define the document’s master spreads:Rem MasterSpread.vbsRem An InDesign CS2 VBScriptRem Creates a document, then demonstrates setting master spread properties.Set myInDesign = CreateObject("InDesign.Application.CS2")

156 Working with Documents in VBScript Adobe InDesign CS2 Scripting Guide
Rem Set up the first master spread in a new document.Set myDocument = myInDesign.Documents.AddRem Set up the document.With myDocument.DocumentPreferences .PageHeight = "11i" .PageWidth = "8.5i" .FacingPages = True .PageOrientation = idPageOrientation.idPortraitEnd WithRem Set the document’s ruler origin to page origin. This is very importantRem --if you don’t do this, getting objects to the correct position on theRem page is much more difficult.myDocument.ViewPreferences.RulerOrigin = idRulerOrigin.idPageOriginWith myDocument.MasterSpreads.Item(1) Rem Set up the left page (verso). With .Pages.Item(1) With .MarginPreferences .ColumnCount = 3 .ColumnGutter = "1p" .Bottom = "6p" Rem "left" means inside "right" means outside. .Left = "6p" .Right = "4p" .Top = "4p" End With Rem Add a simple footer with a section number and page number. With .TextFrames.Add .GeometricBounds = Array("61p", "4p", "62p", "45p") .InsertionPoints.Item(1).Contents = idSpecialCharacters.idSectionMarker .InsertionPoints.Item(1).Contents = idSpecialCharacters.idEmSpace .InsertionPoints.Item(1).Contents = idSpecialCharacters.idAutoPageNumber .Paragraphs.Item(1).Justification = idJustification.idLeftAlign End With End With Rem Set up the right page (recto). With .Pages.Item(2) With .MarginPreferences .ColumnCount = 3 .ColumnGutter = "1p" .Bottom = "6p" Rem "left" means inside "right" means outside. .Left = "6p" .Right = "4p" .Top = "4p" End With Rem Add a simple footer with a section number and page number. With .TextFrames.Add .GeometricBounds = Array("61p", "6p", "62p", "47p") .InsertionPoints.Item(1).Contents = idSpecialCharacters.idAutoPageNumber .InsertionPoints.Item(1).Contents = idSpecialCharacters.idEmSpace .InsertionPoints.Item(1).Contents = idSpecialCharacters.idSectionMarker .Paragraphs.Item(1).Justification = idJustification.idRightAlign End With End WithEnd With
To apply a master spread to a document page, use the AppliedMaster property of the document page:Rem ApplyMaster.vbsRem An InDesign CS2 VBScriptRem Applies a master spread to a page.Set myInDesign = CreateObject("InDesign.Application.CS2")Rem Assumes that the active document has a master page named "B-Master"Rem and at least two pages.myInDesign.ActiveDocument.Pages.Item(2).AppliedMaster = myInDesign.ActiveDocument.MasterSpreads.Item("B-Master")
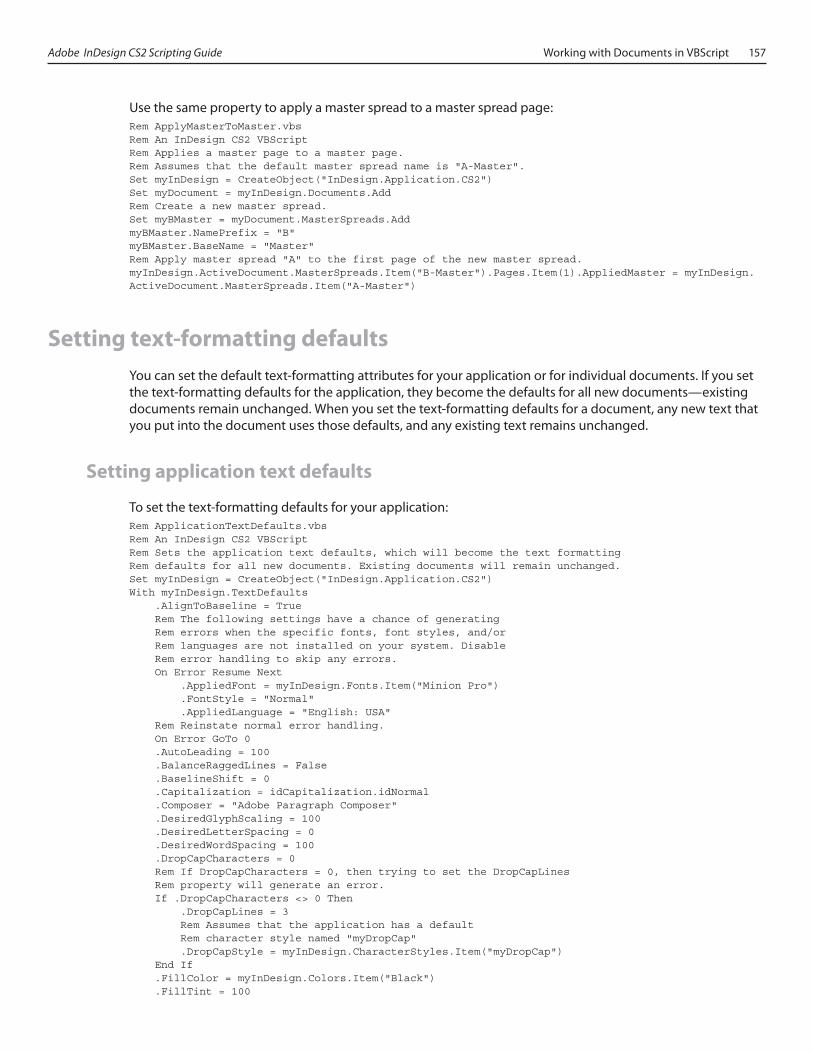
Adobe InDesign CS2 Scripting Guide Working with Documents in VBScript 157
Use the same property to apply a master spread to a master spread page:Rem ApplyMasterToMaster.vbsRem An InDesign CS2 VBScriptRem Applies a master page to a master page.Rem Assumes that the default master spread name is "A-Master".Set myInDesign = CreateObject("InDesign.Application.CS2")Set myDocument = myInDesign.Documents.AddRem Create a new master spread.Set myBMaster = myDocument.MasterSpreads.AddmyBMaster.NamePrefix = "B"myBMaster.BaseName = "Master"Rem Apply master spread "A" to the first page of the new master spread.myInDesign.ActiveDocument.MasterSpreads.Item("B-Master").Pages.Item(1).AppliedMaster = myInDesign.ActiveDocument.MasterSpreads.Item("A-Master")
Setting text-formatting defaultsYou can set the default text-formatting attributes for your application or for individual documents. If you set the text-formatting defaults for the application, they become the defaults for all new documents—existing documents remain unchanged. When you set the text-formatting defaults for a document, any new text that you put into the document uses those defaults, and any existing text remains unchanged.
Setting application text defaults
To set the text-formatting defaults for your application:Rem ApplicationTextDefaults.vbsRem An InDesign CS2 VBScriptRem Sets the application text defaults, which will become the text formattingRem defaults for all new documents. Existing documents will remain unchanged.Set myInDesign = CreateObject("InDesign.Application.CS2")With myInDesign.TextDefaults .AlignToBaseline = True Rem The following settings have a chance of generating Rem errors when the specific fonts, font styles, and/or Rem languages are not installed on your system. Disable Rem error handling to skip any errors. On Error Resume Next .AppliedFont = myInDesign.Fonts.Item("Minion Pro") .FontStyle = "Normal" .AppliedLanguage = "English: USA" Rem Reinstate normal error handling. On Error GoTo 0 .AutoLeading = 100 .BalanceRaggedLines = False .BaselineShift = 0 .Capitalization = idCapitalization.idNormal .Composer = "Adobe Paragraph Composer" .DesiredGlyphScaling = 100 .DesiredLetterSpacing = 0 .DesiredWordSpacing = 100 .DropCapCharacters = 0 Rem If DropCapCharacters = 0, then trying to set the DropCapLines Rem property will generate an error. If .DropCapCharacters <> 0 Then .DropCapLines = 3 Rem Assumes that the application has a default Rem character style named "myDropCap" .DropCapStyle = myInDesign.CharacterStyles.Item("myDropCap") End If .FillColor = myInDesign.Colors.Item("Black") .FillTint = 100

158 Working with Documents in VBScript Adobe InDesign CS2 Scripting Guide
.FirstLineIndent = "14pt" .GradientFillAngle .GradientFillLength .GridAlignFirstLineOnly = False .HorizontalScale = 100 .HyphenateAfterFirst = 3 .HyphenateBeforeLast = 4 .HyphenateCapitalizedWords = False .HyphenateLadderLimit = 1 .HyphenateWordsLongerThan = 5 .Hyphenation = True .HyphenationZone = "3p" .HyphenWeight = 9 .Justification = idJustification.idLeftAlign .KeepAllLinesTogether = False .KeepLinesTogether = True .KeepFirstLines = 2 .KeepLastLines = 2 .KeepWithNext = 0 .KerningMethod = "Optical" .Leading = 14 .LeftIndent = 0 .Ligatures = True .MaximumGlyphScaling = 100 .MaximumLetterSpacing = 0 .MaximumWordSpacing = 160 .MinimumGlyphScaling = 100 .MinimumLetterSpacing = 0 .MinimumWordSpacing = 80 .NoBreak = False .OTFContextualAlternate = True .OTFDiscretionaryLigature = True .OTFFigureStyle = idOTFFigureStyle.idProportionalOldstyle .OTFFraction = True .OTFHistorical = True .OTFOrdinal = False .OTFSlashedZero = True .OTFSwash = False .OTFTitling = False .OverprintFill = False .OverprintStroke = False .PointSize = 11 .Position = idPosition.idNormal .RightIndent = 0 .RuleAbove = False Rem If RuleAbove is false, attempting to set some of the Rem rule above properties will generate an error. Though Rem we’ve set RuleAbove to false, we’ve included the properties Rem to provide a more complete example. If .RuleAbove = True Then .RuleAboveColor = myInDesign.Colors.Item("Black") .RuleAboveGapColor = myInDesign.Swatches.Item("None") .RuleAboveGapOverprint = False .RuleAboveGapTint = 100 .RuleAboveLeftIndent = 0 .RuleAboveLineWeight = 0.25 .RuleAboveOffset = 14 .RuleAboveOverprint = False .RuleAboveRightIndent = 0 .RuleAboveTint = 100 .RuleAboveType = myInDesign.StrokeStyles.Item("Solid") .RuleAboveWidth = idRuleWidth.idColumnWidth End If .RuleBelow = False Rem If RuleBelow is false, attempting to set some of the Rem rule below properties will generate an error. Though Rem we’ve set RuleBelow to false, we’ve included the properties Rem to provide a more complete example.

Adobe InDesign CS2 Scripting Guide Working with Documents in VBScript 159
If .RuleBelow = True Then .RuleBelowColor = myInDesign.Colors.Item("Black") .RuleBelowGapColor = myInDesign.Swatches.Item("None") .RuleBelowGapOverPrint = False .RuleBelowGapTint = 100 .RuleBelowLeftIndent = 0 .RuleBelowLineWeight = 0.25 .RuleBelowOffset = 0 .RuleBelowOverPrint = False .RuleBelowRightIndent = 0 .RuleBelowTint = 100 .RuleBelowType = myInDesign.StrokeStyles.Item("Solid") .RuleBelowWidth = idRuleWidth.idColumnWidth End If .SingleWordJustification = idSingleWordJustification.idLeftAlign .Skew = 0 .SpaceAfter = 0 .SpaceBefore = 0 .StartParagraph = idStartParagraph.idAnywhere .StrikeThru = False Rem If StrikeThru is false, attempting to set some of the Rem strikethrough properties will generate an error. Though Rem we’ve set StrikeThru to false, we’ve included the properties Rem to provide a more complete example. If .StrikeThru = True Then .StrikeThroughColor = myInDesign.Colors.Item("Black") .StrikeThroughGapColor = myInDesign.Swatches.Item("None") .StrikeThroughGapOverprint = False .StrikeThroughGapTint = 100 .StrikeThroughOffset = 3 .StrikeThroughOverprint = False .StrikeThroughTint = 100 .StrikeThroughType = myInDesign.StrokeStyles.Item("Solid") .StrikeThroughWeight = 0.25 End If .StrokeColor = myInDesign.Swatches.Item("None") .StrokeTint = 100 .StrokeWeight = 0 .Tracking = 0 .Underline = False Rem If Underline is false, attempting to set some of the Rem underline properties will generate an error. Though Rem we’ve set Underline to false, we’ve included the properties Rem to provide a more complete example. If .Underline = True Then .UnderlineColor = myInDesign.Colors.Item("Black") .UnderlineGapColor = myInDesign.Swatches.Item("None") .UnderlineGapOverprint = False .UnderlineGapTint = 100 .UnderlineOffset = 3 .UnderlineOverprint = False .UnderlineTint = 100 .UnderlineType = myInDesign.StrokeStyles.Item("Solid") .UnderlineWeight = 0.25 End If .VerticalScale = 100End With
Setting the active document's defaults
To set the text defaults for the active document, change this line in the preceding example:with myInDesign.TextDefaults
to:with myInDesign.ActiveDocument.TextDefaults
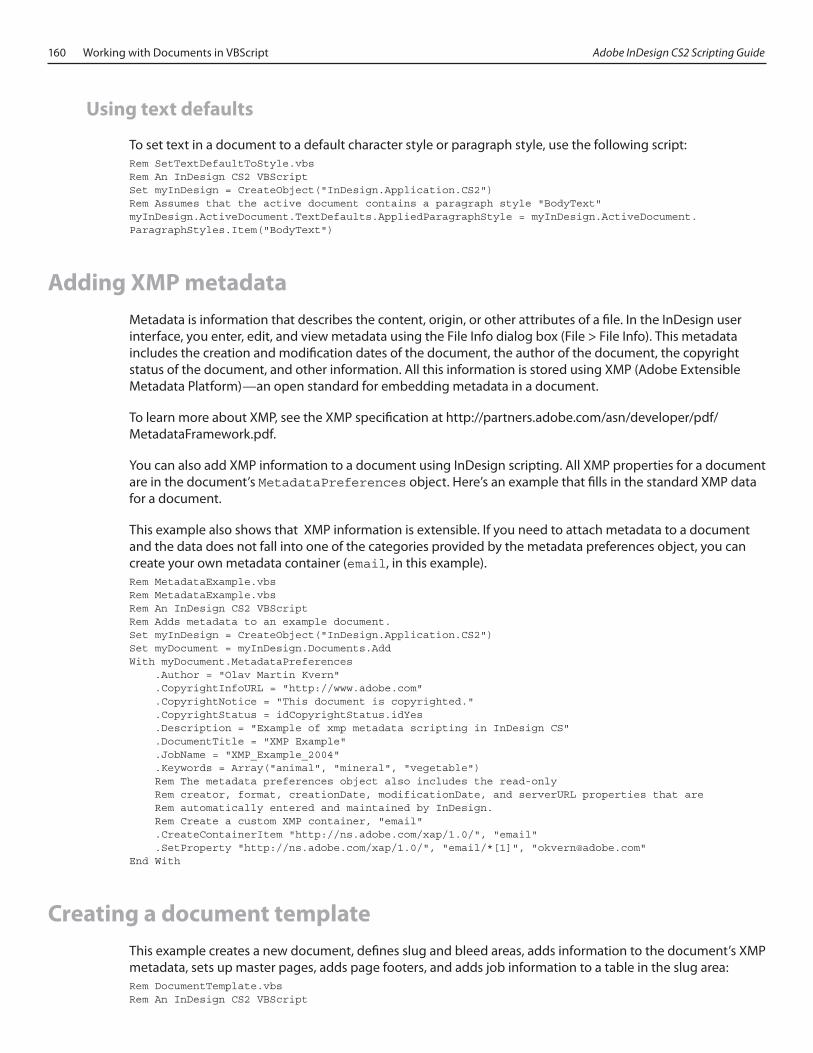
160 Working with Documents in VBScript Adobe InDesign CS2 Scripting Guide
Using text defaults
To set text in a document to a default character style or paragraph style, use the following script:Rem SetTextDefaultToStyle.vbsRem An InDesign CS2 VBScriptSet myInDesign = CreateObject("InDesign.Application.CS2")Rem Assumes that the active document contains a paragraph style "BodyText"myInDesign.ActiveDocument.TextDefaults.AppliedParagraphStyle = myInDesign.ActiveDocument.ParagraphStyles.Item("BodyText")
Adding XMP metadataMetadata is information that describes the content, origin, or other attributes of a file. In the InDesign user interface, you enter, edit, and view metadata using the File Info dialog box (File > File Info). This metadata includes the creation and modification dates of the document, the author of the document, the copyright status of the document, and other information. All this information is stored using XMP (Adobe Extensible Metadata Platform)—an open standard for embedding metadata in a document.
To learn more about XMP, see the XMP specification at http://partners.adobe.com/asn/developer/pdf/MetadataFramework.pdf.
You can also add XMP information to a document using InDesign scripting. All XMP properties for a document are in the document’s MetadataPreferences object. Here’s an example that fills in the standard XMP data for a document.
This example also shows that XMP information is extensible. If you need to attach metadata to a document and the data does not fall into one of the categories provided by the metadata preferences object, you can create your own metadata container (email, in this example).Rem MetadataExample.vbsRem MetadataExample.vbsRem An InDesign CS2 VBScriptRem Adds metadata to an example document.Set myInDesign = CreateObject("InDesign.Application.CS2")Set myDocument = myInDesign.Documents.AddWith myDocument.MetadataPreferences .Author = "Olav Martin Kvern" .CopyrightInfoURL = "http://www.adobe.com" .CopyrightNotice = "This document is copyrighted." .CopyrightStatus = idCopyrightStatus.idYes .Description = "Example of xmp metadata scripting in InDesign CS" .DocumentTitle = "XMP Example" .JobName = "XMP_Example_2004" .Keywords = Array("animal", "mineral", "vegetable") Rem The metadata preferences object also includes the read-only Rem creator, format, creationDate, modificationDate, and serverURL properties that are Rem automatically entered and maintained by InDesign. Rem Create a custom XMP container, "email" .CreateContainerItem "http://ns.adobe.com/xap/1.0/", "email" .SetProperty "http://ns.adobe.com/xap/1.0/", "email/*[1]", "[email protected]"End With
Creating a document templateThis example creates a new document, defines slug and bleed areas, adds information to the document’s XMP metadata, sets up master pages, adds page footers, and adds job information to a table in the slug area:Rem DocumentTemplate.vbsRem An InDesign CS2 VBScript

Adobe InDesign CS2 Scripting Guide Working with Documents in VBScript 161
Rem Creates a document template, including master pages, layers,Rem a color, paragraph and character styles, guides, and XMP information.Set myInDesign = CreateObject("InDesign.Application.CS2")Rem Set the application measurement unit defaults to points.myInDesign.ViewPreferences.HorizontalMeasurementUnits = idMeasurementUnits.idPointsmyInDesign.ViewPreferences.VerticalMeasurementUnits = idMeasurementUnits.idPointsRem Set the application default margin preferences.With myInDesign.MarginPreferences Rem Save the current application default margin preferences. myY1 = .Top myX1 = .Left myY2 = .Bottom myX2 = .Right Rem Set the application default margin preferences. Rem Document baseline grid will be based on 14 points, and Rem all margins are set in increments of 14 points. .Top = 14 * 4 .Left = 14 * 4 .Bottom = 74 .Right = 14 * 5End WithRem Make a new document.Set myDocument = myInDesign.Documents.AddmyDocument.DocumentPreferences.PageWidth = "7i"myDocument.DocumentPreferences.PageHeight = "9i"myDocument.DocumentPreferences.PageOrientation = idPageOrientation.idPortraitRem At this point, we can reset the application default marginsRem to their original state.With myInDesign.MarginPreferences .Top = myY1 .Left = myX1 .Bottom = myY2 .Right = myX2End WithRem Set up the bleed and slug areas.With myDocument.DocumentPreferences Rem Bleed .DocumentBleedBottomOffset = "3p" .DocumentBleedTopOffset = "3p" .DocumentBleedInsideOrLeftOffset = "3p" .DocumentBleedOutsideOrRightOffset = "3p" Rem Slug .SlugBottomOffset = "18p" .SlugTopOffset = "3p" .SlugInsideOrLeftOffset = "3p" .SlugRightOrOutsideOffset = "3p"End WithRem Create a color.Err.ClearOn Error Resume Next Rem If the color does not already exist, InDesign will generate an error. Set myColor = myDocument.Colors.Item("PageNumberRed") If Err.Number <> 0 Then Set myColor = myDocument.Colors.Add myColor.Name = "PageNumberRed" myColor.colorModel = idColorModel.idProcess myColor.ColorValue = Array(20, 100, 80, 10) Err.Clear End IfRem restore normal error handlingOn Error GoTo 0Rem Next, set up some default styles.Rem Create up a character style for the page numbers.Err.ClearOn Error Resume Next Rem If the character style does not already exist, InDesign will generate an error. Set myCharacterStyle = myDocument.CharacterStyles.Item("page_number") If Err.Number <> 0 Then

162 Working with Documents in VBScript Adobe InDesign CS2 Scripting Guide
Set myCharacterStyle = myDocument.CharacterStyles.Add myCharacterStyle.Name = "page_number" Err.Clear End IfRem restore normal error handlingOn Error GoTo 0myDocument.CharacterStyles.Item("page_number").FillColor = myDocument.Colors.Item("PageNumberRed")Rem Create up a pair of paragraph styles for the page footer text.Rem These styles have only basic formatting.Err.ClearOn Error Resume Next Rem If the paragraph style does not already exist, InDesign will generate an error. Set myParagraphStyle = myDocument.ParagraphStyles.Item("footer_left") If Err.Number <> 0 Then Set myParagraphStyle = myDocument.ParagraphStyles.Add myParagraphStyle.Name = "footer_left" myParagraphStyle.PointSize = 11 myParagraphStyle.Leading = 14 Err.Clear End IfRem restore normal error handlingOn Error GoTo 0Err.ClearOn Error Resume Next Rem If the paragraph style does not already exist, InDesign will generate an error. Set myParagraphStyle = myDocument.ParagraphStyles.Item("footer_right") If Err.Number <> 0 Then Set myParagraphStyle = myDocument.ParagraphStyles.Add myParagraphStyle.Name = "footer_right" myParagraphStyle.BasedOn = myDocument.ParagraphStyles.Item("footer_left") myParagraphStyle.Justification = idJustification.idRightAlign myParagraphStyle.PointSize = 11 myParagraphStyle.Leading = 14 Err.Clear End IfRem restore normal error handlingOn Error GoTo 0Rem Create a layer for guides.Err.ClearOn Error Resume Next Set myLayer = myDocument.Layers.Item("GuideLayer") If Err.Number <> 0 Then Set myLayer = myDocument.Layers.Add myLayer.Name = "GuideLayer" Err.Clear End IfRem restore normal error handlingOn Error GoTo 0Rem Create a layer for the footer items.Err.ClearOn Error Resume Next Set myLayer = myDocument.Layers.Item("Footer") If Err.Number <> 0 Then Set myLayer = myDocument.Layers.Add myLayer.Name = "Footer" Err.Clear End IfRem restore normal error handlingOn Error GoTo 0Rem Create a layer for the slug items.Err.ClearOn Error Resume Next Set myLayer = myDocument.Layers.Item("Slug") If Err.Number <> 0 Then Set myLayer = myDocument.Layers.Add myLayer.Name = "Slug" Err.Clear End If

Adobe InDesign CS2 Scripting Guide Working with Documents in VBScript 163
Rem restore normal error handlingOn Error GoTo 0Rem Create a layer for the body text.Err.ClearOn Error Resume Next Set myLayer = myDocument.Layers.Item("BodyText") If Err.Number <> 0 Then Set myLayer = myDocument.Layers.Add myLayer.Name = "BodyText" Err.Clear End IfRem restore normal error handlingOn Error GoTo 0With myDocument.ViewPreferences .RulerOrigin = idRulerOrigin.idPageOrigin .HorizontalMeasurementUnits = idMeasurementUnits.idPoints .VerticalMeasurementUnits = idMeasurementUnits.idPointsEnd WithRem Document baseline grid and document gridWith myDocument.GridPreferences .BaselineStart = 56 .BaselineDivision = 14 .BaselineGridShown = False .HorizontalGridlineDivision = 14 .HorizontalGridSubdivision = 5 .VerticalGridlineDivision = 14 .VerticalGridSubdivision = 5 .DocumentGridShown = FalseEnd WithRem Document XMP information.With myDocument.MetadataPreferences .Author = "Olav Martin Kvern" .CopyrightInfoURL = "http:rem www.adobe.com" .CopyrightNotice = "This document is not copyrighted." .CopyrightStatus = idCopyrightStatus.idNo .Description = "Example 7 x 9 book layout" .DocumentTitle = "Example" .JobName = "7 x 9 book layout template" .Keywords = Array("7 x 9", "book", "template") .CreateContainerItem "http://ns.adobe.com/xap/1.0/", "email" .SetProperty "http://ns.adobe.com/xap/1.0/", "email/*[1]", "[email protected]"End WithRem Set up the master spread.With myDocument.MasterSpreads.Item(1) With .Pages.Item(1) Rem Left and right are reversed for left-hand pages (becoming "inside" and "outside"-- Rem this is also true in the InDesign user interface). myTopMargin = .MarginPreferences.Top myBottomMargin = myDocument.DocumentPreferences.PageHeight - .MarginPreferences.Bottom myRightMargin = myDocument.DocumentPreferences.PageWidth - .MarginPreferences.Left myLeftMargin = .MarginPreferences.Right With .Guides.Add .ItemLayer = myDocument.Layers.Item("GuideLayer") .Orientation = idHorizontalOrVertical.idVertical .Location = myLeftMargin End With With .Guides.Add .ItemLayer = myDocument.Layers.Item("GuideLayer") .Orientation = idHorizontalOrVertical.idVertical .Location = myRightMargin End With With .Guides.Add .ItemLayer = myDocument.Layers.Item("GuideLayer") .Orientation = idHorizontalOrVertical.idHorizontal .Location = myTopMargin .FitToPage = False End With With .Guides.Add

164 Working with Documents in VBScript Adobe InDesign CS2 Scripting Guide
.ItemLayer = myDocument.Layers.Item("GuideLayer") .Orientation = idHorizontalOrVertical.idHorizontal .Location = myBottomMargin .FitToPage = False End With With .Guides.Add .ItemLayer = myDocument.Layers.Item("GuideLayer") .Orientation = idHorizontalOrVertical.idHorizontal .Location = myBottomMargin + 14 .FitToPage = False End With With .Guides.Add .ItemLayer = myDocument.Layers.Item("GuideLayer") .Orientation = idHorizontalOrVertical.idHorizontal .Location = myBottomMargin + 28 .FitToPage = False End With Set myLeftFooter = .TextFrames.Add myLeftFooter.ItemLayer = myDocument.Layers.Item("Footer") myLeftFooter.GeometricBounds = Array(myBottomMargin + 14, .MarginPreferences.Right, myBottomMargin + 28, myRightMargin) myLeftFooter.ParentStory.InsertionPoints.Item(1).Contents = idSpecialCharacters.idSectionMarker myLeftFooter.ParentStory.InsertionPoints.Item(1).Contents = idSpecialCharacters.idEmSpace myLeftFooter.ParentStory.InsertionPoints.Item(1).Contents = idSpecialCharacters.idAutoPageNumber myLeftFooter.ParentStory.Characters.Item(1).AppliedCharacterStyle = myDocument.CharacterStyles.Item("page_number") myLeftFooter.ParentStory.Paragraphs.Item(1).ApplyStyle myDocument.ParagraphStyles.Item("footer_left"), False Rem Slug information. myDate = Date With myDocument.MetadataPreferences myString = "Author:" & vbTab & .Author & vbTab & "Description:" & vbTab & .Description & vbCrLf & _ "Creation Date:" & vbTab & myDate & vbTab & "Email Contact" & vbTab & .GetProperty("http://ns.adobe.com/xap/1.0/", "email/*[1]") End With Set myLeftSlug = .TextFrames.Add myLeftSlug.ItemLayer = myDocument.Layers.Item("Slug") myLeftSlug.GeometricBounds = Array(myDocument.DocumentPreferences.PageHeight + 36, .MarginPreferences.Right, myDocument.DocumentPreferences.PageHeight + 144, myRightMargin) myLeftSlug.Contents = myString myLeftSlug.ParentStory.Texts.Item(1).ConvertToTable Rem Body text master text frame. Set myLeftFrame = .TextFrames.Add myLeftFrame.ItemLayer = myDocument.Layers.Item("BodyText") myLeftFrame.GeometricBounds = Array(.MarginPreferences.Top, .MarginPreferences.Right, myBottomMargin, myRightMargin) End With With .Pages.Item(2) myTopMargin = .MarginPreferences.Top myBottomMargin = myDocument.DocumentPreferences.PageHeight - .MarginPreferences.Bottom myRightMargin = myDocument.DocumentPreferences.PageWidth - .MarginPreferences.Right myLeftMargin = .MarginPreferences.Left With .Guides.Add .ItemLayer = myDocument.Layers.Item("GuideLayer") .Orientation = idHorizontalOrVertical.idVertical .Location = myLeftMargin End With With .Guides.Add .ItemLayer = myDocument.Layers.Item("GuideLayer") .Orientation = idHorizontalOrVertical.idVertical .Location = myRightMargin End With Set myRightFooter = .TextFrames.Add myRightFooter.ItemLayer = myDocument.Layers.Item("Footer") myRightFooter.GeometricBounds = Array(myBottomMargin + 14, .MarginPreferences.Left,
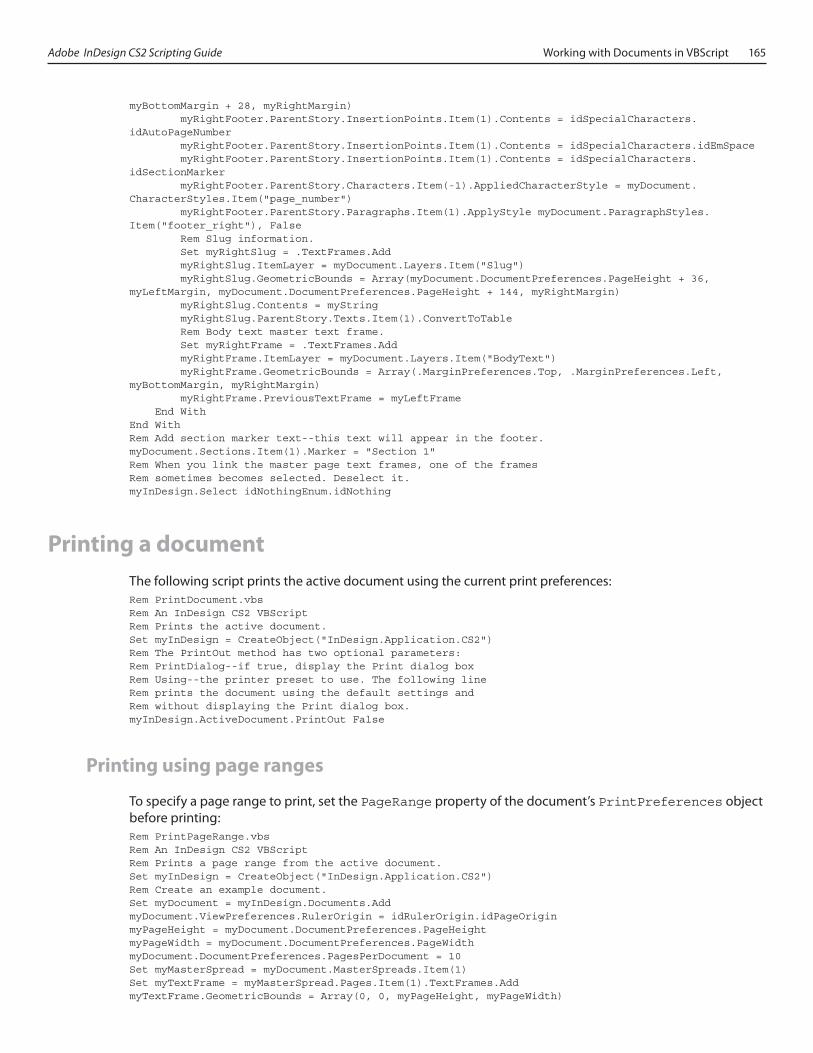
Adobe InDesign CS2 Scripting Guide Working with Documents in VBScript 165
myBottomMargin + 28, myRightMargin) myRightFooter.ParentStory.InsertionPoints.Item(1).Contents = idSpecialCharacters.idAutoPageNumber myRightFooter.ParentStory.InsertionPoints.Item(1).Contents = idSpecialCharacters.idEmSpace myRightFooter.ParentStory.InsertionPoints.Item(1).Contents = idSpecialCharacters.idSectionMarker myRightFooter.ParentStory.Characters.Item(-1).AppliedCharacterStyle = myDocument.CharacterStyles.Item("page_number") myRightFooter.ParentStory.Paragraphs.Item(1).ApplyStyle myDocument.ParagraphStyles.Item("footer_right"), False Rem Slug information. Set myRightSlug = .TextFrames.Add myRightSlug.ItemLayer = myDocument.Layers.Item("Slug") myRightSlug.GeometricBounds = Array(myDocument.DocumentPreferences.PageHeight + 36, myLeftMargin, myDocument.DocumentPreferences.PageHeight + 144, myRightMargin) myRightSlug.Contents = myString myRightSlug.ParentStory.Texts.Item(1).ConvertToTable Rem Body text master text frame. Set myRightFrame = .TextFrames.Add myRightFrame.ItemLayer = myDocument.Layers.Item("BodyText") myRightFrame.GeometricBounds = Array(.MarginPreferences.Top, .MarginPreferences.Left, myBottomMargin, myRightMargin) myRightFrame.PreviousTextFrame = myLeftFrame End WithEnd WithRem Add section marker text--this text will appear in the footer.myDocument.Sections.Item(1).Marker = "Section 1"Rem When you link the master page text frames, one of the framesRem sometimes becomes selected. Deselect it.myInDesign.Select idNothingEnum.idNothing
Printing a documentThe following script prints the active document using the current print preferences:Rem PrintDocument.vbsRem An InDesign CS2 VBScriptRem Prints the active document.Set myInDesign = CreateObject("InDesign.Application.CS2")Rem The PrintOut method has two optional parameters:Rem PrintDialog--if true, display the Print dialog boxRem Using--the printer preset to use. The following lineRem prints the document using the default settings andRem without displaying the Print dialog box.myInDesign.ActiveDocument.PrintOut False
Printing using page ranges
To specify a page range to print, set the PageRange property of the document’s PrintPreferences object before printing:Rem PrintPageRange.vbsRem An InDesign CS2 VBScriptRem Prints a page range from the active document.Set myInDesign = CreateObject("InDesign.Application.CS2")Rem Create an example document.Set myDocument = myInDesign.Documents.AddmyDocument.ViewPreferences.RulerOrigin = idRulerOrigin.idPageOriginmyPageHeight = myDocument.DocumentPreferences.PageHeightmyPageWidth = myDocument.DocumentPreferences.PageWidthmyDocument.DocumentPreferences.PagesPerDocument = 10Set myMasterSpread = myDocument.MasterSpreads.Item(1)Set myTextFrame = myMasterSpread.Pages.Item(1).TextFrames.AddmyTextFrame.GeometricBounds = Array(0, 0, myPageHeight, myPageWidth)
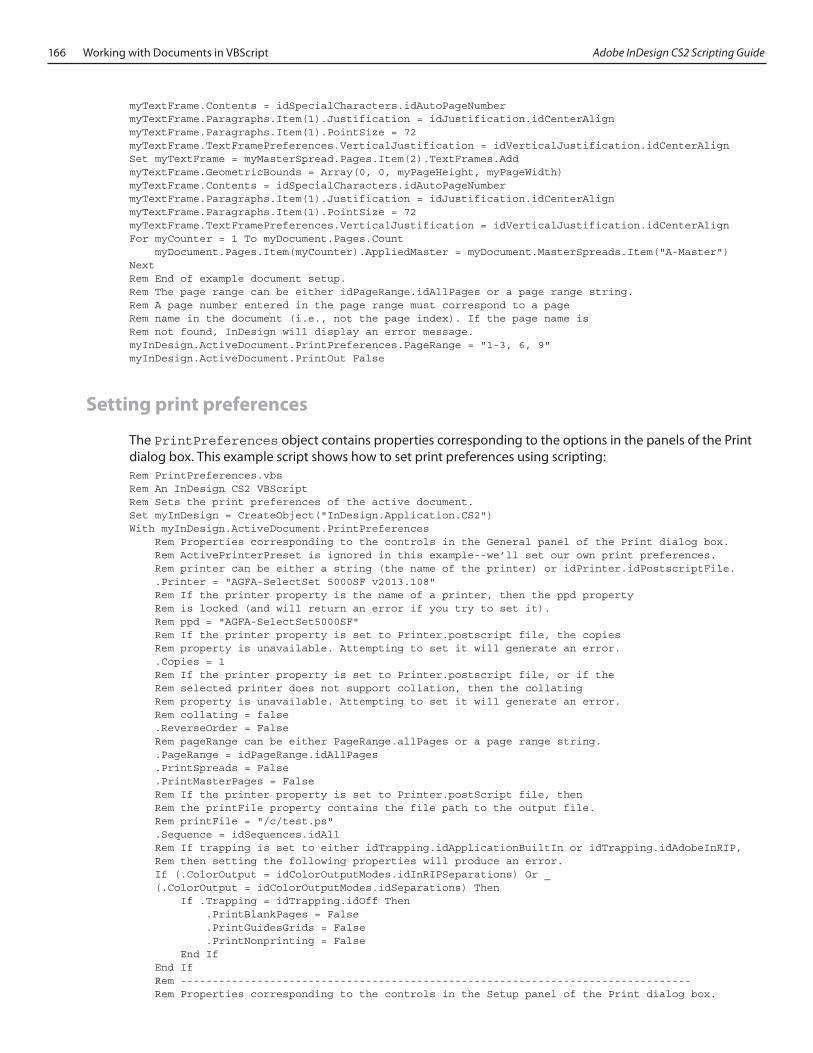
166 Working with Documents in VBScript Adobe InDesign CS2 Scripting Guide
myTextFrame.Contents = idSpecialCharacters.idAutoPageNumbermyTextFrame.Paragraphs.Item(1).Justification = idJustification.idCenterAlignmyTextFrame.Paragraphs.Item(1).PointSize = 72myTextFrame.TextFramePreferences.VerticalJustification = idVerticalJustification.idCenterAlignSet myTextFrame = myMasterSpread.Pages.Item(2).TextFrames.AddmyTextFrame.GeometricBounds = Array(0, 0, myPageHeight, myPageWidth)myTextFrame.Contents = idSpecialCharacters.idAutoPageNumbermyTextFrame.Paragraphs.Item(1).Justification = idJustification.idCenterAlignmyTextFrame.Paragraphs.Item(1).PointSize = 72myTextFrame.TextFramePreferences.VerticalJustification = idVerticalJustification.idCenterAlignFor myCounter = 1 To myDocument.Pages.Count myDocument.Pages.Item(myCounter).AppliedMaster = myDocument.MasterSpreads.Item("A-Master")NextRem End of example document setup.Rem The page range can be either idPageRange.idAllPages or a page range string.Rem A page number entered in the page range must correspond to a pageRem name in the document (i.e., not the page index). If the page name isRem not found, InDesign will display an error message.myInDesign.ActiveDocument.PrintPreferences.PageRange = "1-3, 6, 9"myInDesign.ActiveDocument.PrintOut False
Setting print preferences
The PrintPreferences object contains properties corresponding to the options in the panels of the Print dialog box. This example script shows how to set print preferences using scripting:Rem PrintPreferences.vbsRem An InDesign CS2 VBScriptRem Sets the print preferences of the active document.Set myInDesign = CreateObject("InDesign.Application.CS2")With myInDesign.ActiveDocument.PrintPreferences Rem Properties corresponding to the controls in the General panel of the Print dialog box. Rem ActivePrinterPreset is ignored in this example--we’ll set our own print preferences. Rem printer can be either a string (the name of the printer) or idPrinter.idPostscriptFile. .Printer = "AGFA-SelectSet 5000SF v2013.108" Rem If the printer property is the name of a printer, then the ppd property Rem is locked (and will return an error if you try to set it). Rem ppd = "AGFA-SelectSet5000SF" Rem If the printer property is set to Printer.postscript file, the copies Rem property is unavailable. Attempting to set it will generate an error. .Copies = 1 Rem If the printer property is set to Printer.postscript file, or if the Rem selected printer does not support collation, then the collating Rem property is unavailable. Attempting to set it will generate an error. Rem collating = false .ReverseOrder = False Rem pageRange can be either PageRange.allPages or a page range string. .PageRange = idPageRange.idAllPages .PrintSpreads = False .PrintMasterPages = False Rem If the printer property is set to Printer.postScript file, then Rem the printFile property contains the file path to the output file. Rem printFile = "/c/test.ps" .Sequence = idSequences.idAll Rem If trapping is set to either idTrapping.idApplicationBuiltIn or idTrapping.idAdobeInRIP, Rem then setting the following properties will produce an error. If (.ColorOutput = idColorOutputModes.idInRIPSeparations) Or _ (.ColorOutput = idColorOutputModes.idSeparations) Then If .Trapping = idTrapping.idOff Then .PrintBlankPages = False .PrintGuidesGrids = False .PrintNonprinting = False End If End If Rem -------------------------------------------------------------------------------- Rem Properties corresponding to the controls in the Setup panel of the Print dialog box.
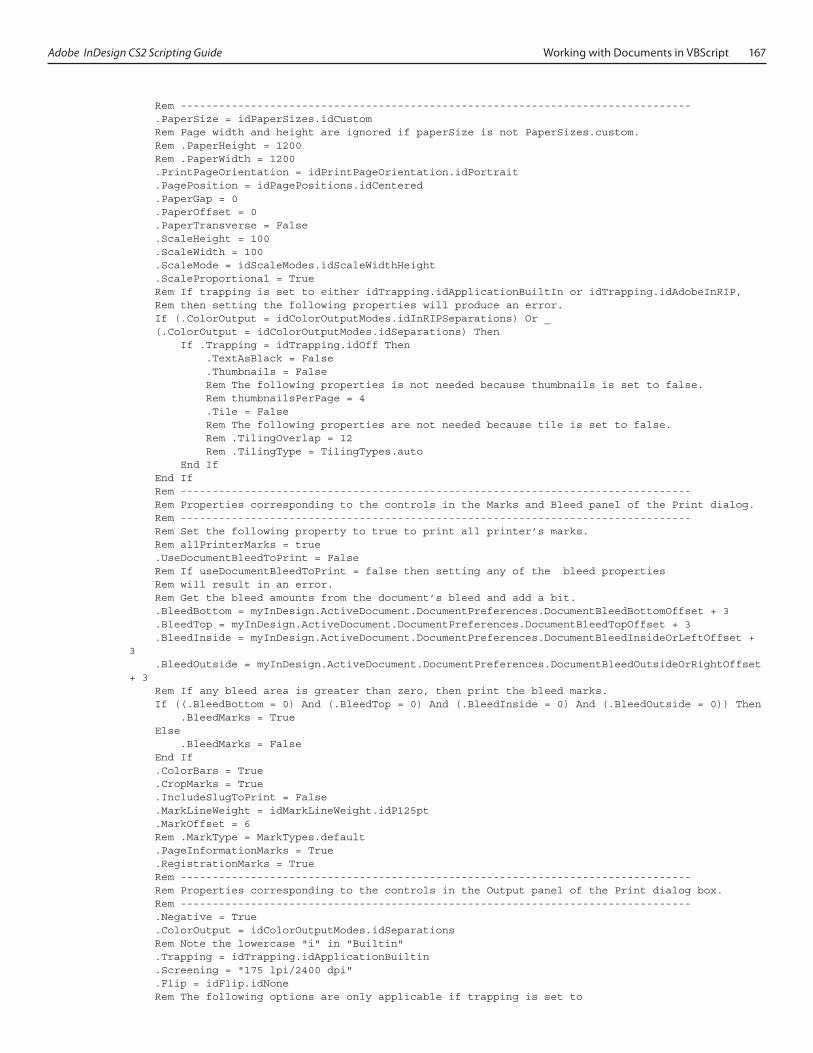
Adobe InDesign CS2 Scripting Guide Working with Documents in VBScript 167
Rem -------------------------------------------------------------------------------- .PaperSize = idPaperSizes.idCustom Rem Page width and height are ignored if paperSize is not PaperSizes.custom. Rem .PaperHeight = 1200 Rem .PaperWidth = 1200 .PrintPageOrientation = idPrintPageOrientation.idPortrait .PagePosition = idPagePositions.idCentered .PaperGap = 0 .PaperOffset = 0 .PaperTransverse = False .ScaleHeight = 100 .ScaleWidth = 100 .ScaleMode = idScaleModes.idScaleWidthHeight .ScaleProportional = True Rem If trapping is set to either idTrapping.idApplicationBuiltIn or idTrapping.idAdobeInRIP, Rem then setting the following properties will produce an error. If (.ColorOutput = idColorOutputModes.idInRIPSeparations) Or _ (.ColorOutput = idColorOutputModes.idSeparations) Then If .Trapping = idTrapping.idOff Then .TextAsBlack = False .Thumbnails = False Rem The following properties is not needed because thumbnails is set to false. Rem thumbnailsPerPage = 4 .Tile = False Rem The following properties are not needed because tile is set to false. Rem .TilingOverlap = 12 Rem .TilingType = TilingTypes.auto End If End If Rem -------------------------------------------------------------------------------- Rem Properties corresponding to the controls in the Marks and Bleed panel of the Print dialog. Rem -------------------------------------------------------------------------------- Rem Set the following property to true to print all printer’s marks. Rem allPrinterMarks = true .UseDocumentBleedToPrint = False Rem If useDocumentBleedToPrint = false then setting any of the bleed properties Rem will result in an error. Rem Get the bleed amounts from the document’s bleed and add a bit. .BleedBottom = myInDesign.ActiveDocument.DocumentPreferences.DocumentBleedBottomOffset + 3 .BleedTop = myInDesign.ActiveDocument.DocumentPreferences.DocumentBleedTopOffset + 3 .BleedInside = myInDesign.ActiveDocument.DocumentPreferences.DocumentBleedInsideOrLeftOffset + 3 .BleedOutside = myInDesign.ActiveDocument.DocumentPreferences.DocumentBleedOutsideOrRightOffset + 3 Rem If any bleed area is greater than zero, then print the bleed marks. If ((.BleedBottom = 0) And (.BleedTop = 0) And (.BleedInside = 0) And (.BleedOutside = 0)) Then .BleedMarks = True Else .BleedMarks = False End If .ColorBars = True .CropMarks = True .IncludeSlugToPrint = False .MarkLineWeight = idMarkLineWeight.idP125pt .MarkOffset = 6 Rem .MarkType = MarkTypes.default .PageInformationMarks = True .RegistrationMarks = True Rem -------------------------------------------------------------------------------- Rem Properties corresponding to the controls in the Output panel of the Print dialog box. Rem -------------------------------------------------------------------------------- .Negative = True .ColorOutput = idColorOutputModes.idSeparations Rem Note the lowercase "i" in "Builtin" .Trapping = idTrapping.idApplicationBuiltin .Screening = "175 lpi/2400 dpi" .Flip = idFlip.idNone Rem The following options are only applicable if trapping is set to

168 Working with Documents in VBScript Adobe InDesign CS2 Scripting Guide
Rem idTrapping.idAdobeInRIP. If .Trapping = idTrapping.idAdobeInRIP Then .PrintBlack = True .PrintCyan = True .PrintMagenta = True .PrintYellow = True End If Rem Only change the ink angle and frequency when you want to override the Rem screening set by the screening specified by the screening property. Rem .BlackAngle = 45 Rem .BlackFrequency = 175 Rem .CyanAngle = 15 Rem .CyanFrequency = 175 Rem .MagentaAngle = 75 Rem .MagentaFreqency = 175 Rem .YellowAngle = 0 Rem .YellowFrequency = 175 Rem The following properties are not needed (because colorOutput is set to separations). Rem .CompositeAngle = 45 Rem .CompositeFrequency = 175 Rem .SimulateOverprint = false Rem -------------------------------------------------------------------------------- Rem Properties corresponding to the controls in the Graphics panel of the Print dialog. Rem -------------------------------------------------------------------------------- .SendImageData = idImageDataTypes.idAllImageData .FontDownloading = idFontDownloading.idComplete Err.Clear On Error Resume Next .DownloadPPDFonts = True .DataFormat = idDataFormat.idBinary .PostScriptLevel = idPostScriptLevels.idLevel3 If Err.Number <> 0 Then Err.Clear End If On Error GoTo 0 Rem -------------------------------------------------------------------------------- Rem Properties corresponding to the controls in the Color Management panel of the Print dialog. Rem -------------------------------------------------------------------------------- Rem If the UseColorManagement property of myInDesign.ColorSettings is false, Rem attempting to set the following properties will return an error. Err.Clear On Error Resume Next .SourceSpace = SourceSpaces.useDocument .Intent = RenderingIntent.useColorSettings .CRD = ColorRenderingDictionary.useDocument .Profile = Profile.postscriptCMS If Err.Number <> 0 Then Err.Clear End If On Error GoTo 0 Rem -------------------------------------------------------------------------------- Rem Properties corresponding to the controls in the Advanced panel of the Print dialog. Rem -------------------------------------------------------------------------------- .OPIImageReplacement = False .OmitBitmaps = False .OmitEPS = False .OmitPDF = False Rem The following line assumes that you have a flattener preset named "high quality flattener". Err.Clear On Error Resume Next .FlattenerPresetName = "high quality flattener" If Err.Number <> 0 Then Err.Clear End If On Error GoTo 0 .IgnoreSpreadOverrides = FalseEnd With
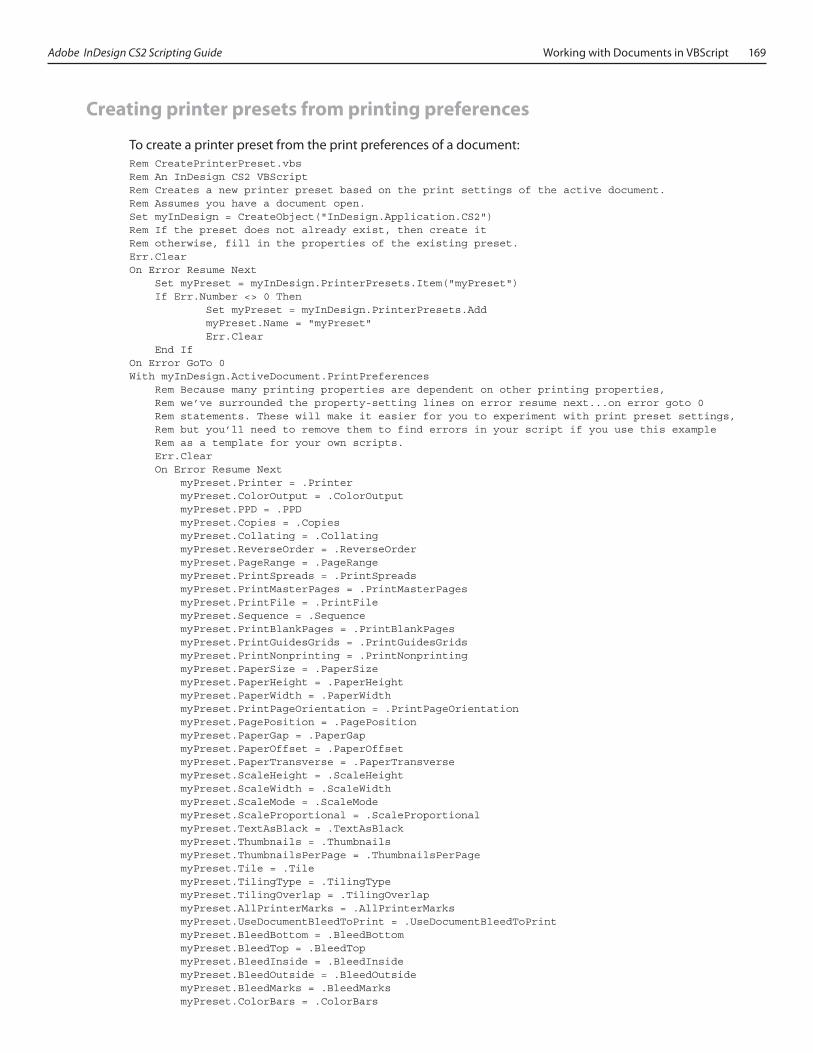
Adobe InDesign CS2 Scripting Guide Working with Documents in VBScript 169
Creating printer presets from printing preferences
To create a printer preset from the print preferences of a document:Rem CreatePrinterPreset.vbsRem An InDesign CS2 VBScriptRem Creates a new printer preset based on the print settings of the active document.Rem Assumes you have a document open.Set myInDesign = CreateObject("InDesign.Application.CS2")Rem If the preset does not already exist, then create itRem otherwise, fill in the properties of the existing preset.Err.ClearOn Error Resume Next Set myPreset = myInDesign.PrinterPresets.Item("myPreset") If Err.Number <> 0 Then Set myPreset = myInDesign.PrinterPresets.Add myPreset.Name = "myPreset" Err.Clear End IfOn Error GoTo 0With myInDesign.ActiveDocument.PrintPreferences Rem Because many printing properties are dependent on other printing properties, Rem we’ve surrounded the property-setting lines on error resume next...on error goto 0 Rem statements. These will make it easier for you to experiment with print preset settings, Rem but you’ll need to remove them to find errors in your script if you use this example Rem as a template for your own scripts. Err.Clear On Error Resume Next myPreset.Printer = .Printer myPreset.ColorOutput = .ColorOutput myPreset.PPD = .PPD myPreset.Copies = .Copies myPreset.Collating = .Collating myPreset.ReverseOrder = .ReverseOrder myPreset.PageRange = .PageRange myPreset.PrintSpreads = .PrintSpreads myPreset.PrintMasterPages = .PrintMasterPages myPreset.PrintFile = .PrintFile myPreset.Sequence = .Sequence myPreset.PrintBlankPages = .PrintBlankPages myPreset.PrintGuidesGrids = .PrintGuidesGrids myPreset.PrintNonprinting = .PrintNonprinting myPreset.PaperSize = .PaperSize myPreset.PaperHeight = .PaperHeight myPreset.PaperWidth = .PaperWidth myPreset.PrintPageOrientation = .PrintPageOrientation myPreset.PagePosition = .PagePosition myPreset.PaperGap = .PaperGap myPreset.PaperOffset = .PaperOffset myPreset.PaperTransverse = .PaperTransverse myPreset.ScaleHeight = .ScaleHeight myPreset.ScaleWidth = .ScaleWidth myPreset.ScaleMode = .ScaleMode myPreset.ScaleProportional = .ScaleProportional myPreset.TextAsBlack = .TextAsBlack myPreset.Thumbnails = .Thumbnails myPreset.ThumbnailsPerPage = .ThumbnailsPerPage myPreset.Tile = .Tile myPreset.TilingType = .TilingType myPreset.TilingOverlap = .TilingOverlap myPreset.AllPrinterMarks = .AllPrinterMarks myPreset.UseDocumentBleedToPrint = .UseDocumentBleedToPrint myPreset.BleedBottom = .BleedBottom myPreset.BleedTop = .BleedTop myPreset.BleedInside = .BleedInside myPreset.BleedOutside = .BleedOutside myPreset.BleedMarks = .BleedMarks myPreset.ColorBars = .ColorBars
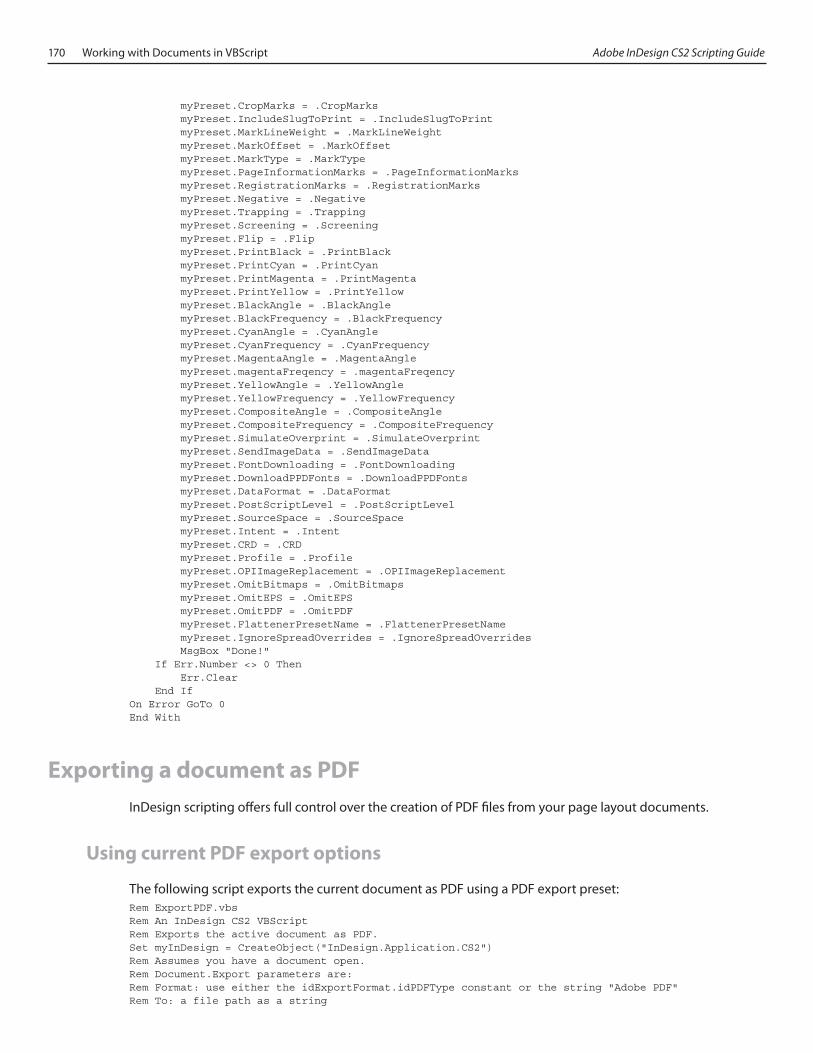
170 Working with Documents in VBScript Adobe InDesign CS2 Scripting Guide
myPreset.CropMarks = .CropMarks myPreset.IncludeSlugToPrint = .IncludeSlugToPrint myPreset.MarkLineWeight = .MarkLineWeight myPreset.MarkOffset = .MarkOffset myPreset.MarkType = .MarkType myPreset.PageInformationMarks = .PageInformationMarks myPreset.RegistrationMarks = .RegistrationMarks myPreset.Negative = .Negative myPreset.Trapping = .Trapping myPreset.Screening = .Screening myPreset.Flip = .Flip myPreset.PrintBlack = .PrintBlack myPreset.PrintCyan = .PrintCyan myPreset.PrintMagenta = .PrintMagenta myPreset.PrintYellow = .PrintYellow myPreset.BlackAngle = .BlackAngle myPreset.BlackFrequency = .BlackFrequency myPreset.CyanAngle = .CyanAngle myPreset.CyanFrequency = .CyanFrequency myPreset.MagentaAngle = .MagentaAngle myPreset.magentaFreqency = .magentaFreqency myPreset.YellowAngle = .YellowAngle myPreset.YellowFrequency = .YellowFrequency myPreset.CompositeAngle = .CompositeAngle myPreset.CompositeFrequency = .CompositeFrequency myPreset.SimulateOverprint = .SimulateOverprint myPreset.SendImageData = .SendImageData myPreset.FontDownloading = .FontDownloading myPreset.DownloadPPDFonts = .DownloadPPDFonts myPreset.DataFormat = .DataFormat myPreset.PostScriptLevel = .PostScriptLevel myPreset.SourceSpace = .SourceSpace myPreset.Intent = .Intent myPreset.CRD = .CRD myPreset.Profile = .Profile myPreset.OPIImageReplacement = .OPIImageReplacement myPreset.OmitBitmaps = .OmitBitmaps myPreset.OmitEPS = .OmitEPS myPreset.OmitPDF = .OmitPDF myPreset.FlattenerPresetName = .FlattenerPresetName myPreset.IgnoreSpreadOverrides = .IgnoreSpreadOverrides MsgBox "Done!" If Err.Number <> 0 Then Err.Clear End IfOn Error GoTo 0End With
Exporting a document as PDFInDesign scripting offers full control over the creation of PDF files from your page layout documents.
Using current PDF export options
The following script exports the current document as PDF using a PDF export preset:Rem ExportPDF.vbsRem An InDesign CS2 VBScriptRem Exports the active document as PDF.Set myInDesign = CreateObject("InDesign.Application.CS2")Rem Assumes you have a document open.Rem Document.Export parameters are:Rem Format: use either the idExportFormat.idPDFType constant or the string "Adobe PDF"Rem To: a file path as a string

Adobe InDesign CS2 Scripting Guide Working with Documents in VBScript 171
Rem ShowingOptions: boolean (setting this option to true displays the PDF Export dialog box)Rem Using: PDF export preset (or a string that is the name of a PDF export preset)Rem The default PDF export preset names are surrounded by squar breackets (e.g., "[Screen]").myInDesign.ActiveDocument.Export idExportFormat.idPDFType, "c:\myTestDocument.pdf", False, myInDesign.PDFExportPresets.Item("[Press]")
Setting PDF export options
The following example sets the PDF export options before exporting:Rem ExportPDFWithOptions.vbsRem An InDesign CS2 VBScriptRem Sets PDF export options, then exports the active document as PDF.Set myInDesign = CreateObject("InDesign.Application.CS2")With myInDesign.PDFExportPreferences Rem Basic PDF output options. .PageRange = idPageRange.idAllPages .AcrobatCompatibility = idAcrobatCompatibility.idAcrobat6 .ExportGuidesAndGrids = False .ExportLayers = False .ExportNonprintingObjects = False .ExportReaderSpreads = False .GenerateThumbnails = False On Error Resume Next .IgnoreSpreadOverrides = False .IncludeICCProfiles = True On Error GoTo 0 .IncludeBookmarks = True .IncludeHyperlinks = True .IncludeSlugWithPDF = False .IncludeStructure = False .InteractiveElements = False Rem Setting subsetFontsBelow to zero disallows font subsetting Rem set subsetFontsBelow to some other value to use font subsetting. .SubsetFontsBelow = 0 Rem Bitmap compression/sampling/quality options (note the additional "s" in "compression"). .ColorBitmapCompression = idBitmapCompression.idZip .ColorBitmapQuality = idCompressionQuality.idEightBit .ColorBitmapSampling = idSampling.idNone Rem ThresholdToCompressColor is not needed in this example. Rem ColorBitmapSamplingDPI is not needed when ColorBitmapSampling is set to none. .GrayscaleBitmapCompression = idBitmapCompression.idZip .GrayscaleBitmapQuality = idCompressionQuality.idEightBit .GrayscaleBitmapSampling = idSampling.idNone Rem ThresholdToCompressGray is not needed in this example. Rem GrayscaleBitmapSamplingDPI is not needed when GrayscaleBitmapSampling is set to none. .MonochromeBitmapCompression = idBitmapCompression.idZip .MonochromeBitmapSampling = idSampling.idNone Rem ThresholdToCompressMonochrome is not needed in this example. Rem MonochromeBitmapSamplingDPI is not needed when MonochromeBitmapSampling is set to none. Rem Other compression options. .CompressionType = idPDFCompressionType.idCompressNone .CompressTextAndLineArt = True .ContentToEmbed = idPDFContentToEmbed.idEmbedAll .CropImagesToFrames = True .OptimizePDF = True Rem Printers marks and prepress options. Rem Get the bleed amounts from the document’s bleed. .BleedBottom = myInDesign.ActiveDocument.DocumentPreferences.DocumentBleedBottomOffset .BleedTop = myInDesign.ActiveDocument.DocumentPreferences.DocumentBleedTopOffset .BleedInside = myInDesign.ActiveDocument.DocumentPreferences.DocumentBleedInsideOrLeftOffset .BleedOutside = myInDesign.ActiveDocument.DocumentPreferences.DocumentBleedOutsideOrRightOffset Rem If any bleed area is greater than zero, then export the bleed marks. If ((.BleedBottom = 0) And (.BleedTop = 0) And (.BleedInside = 0) And (.BleedOutside = 0)) Then .BleedMarks = True Else
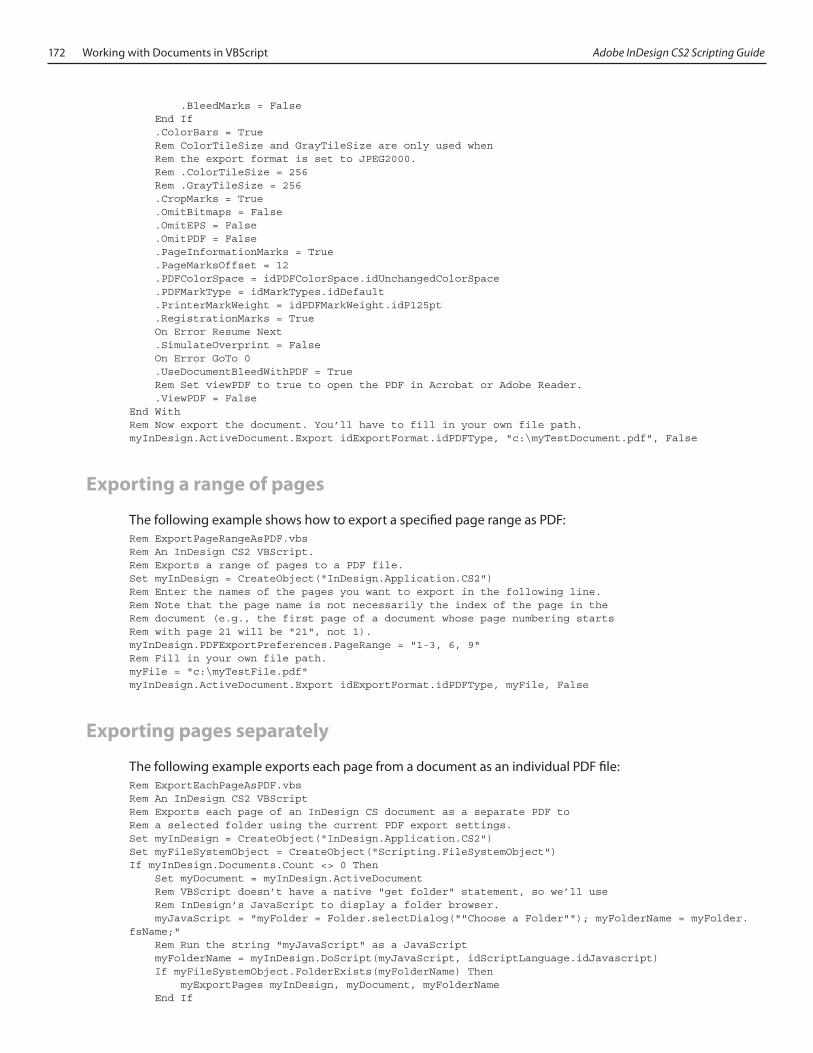
172 Working with Documents in VBScript Adobe InDesign CS2 Scripting Guide
.BleedMarks = False End If .ColorBars = True Rem ColorTileSize and GrayTileSize are only used when Rem the export format is set to JPEG2000. Rem .ColorTileSize = 256 Rem .GrayTileSize = 256 .CropMarks = True .OmitBitmaps = False .OmitEPS = False .OmitPDF = False .PageInformationMarks = True .PageMarksOffset = 12 .PDFColorSpace = idPDFColorSpace.idUnchangedColorSpace .PDFMarkType = idMarkTypes.idDefault .PrinterMarkWeight = idPDFMarkWeight.idP125pt .RegistrationMarks = True On Error Resume Next .SimulateOverprint = False On Error GoTo 0 .UseDocumentBleedWithPDF = True Rem Set viewPDF to true to open the PDF in Acrobat or Adobe Reader. .ViewPDF = FalseEnd WithRem Now export the document. You’ll have to fill in your own file path.myInDesign.ActiveDocument.Export idExportFormat.idPDFType, "c:\myTestDocument.pdf", False
Exporting a range of pages
The following example shows how to export a specified page range as PDF:Rem ExportPageRangeAsPDF.vbsRem An InDesign CS2 VBScript.Rem Exports a range of pages to a PDF file.Set myInDesign = CreateObject("InDesign.Application.CS2")Rem Enter the names of the pages you want to export in the following line.Rem Note that the page name is not necessarily the index of the page in theRem document (e.g., the first page of a document whose page numbering startsRem with page 21 will be "21", not 1).myInDesign.PDFExportPreferences.PageRange = "1-3, 6, 9"Rem Fill in your own file path.myFile = "c:\myTestFile.pdf"myInDesign.ActiveDocument.Export idExportFormat.idPDFType, myFile, False
Exporting pages separately
The following example exports each page from a document as an individual PDF file:Rem ExportEachPageAsPDF.vbsRem An InDesign CS2 VBScriptRem Exports each page of an InDesign CS document as a separate PDF toRem a selected folder using the current PDF export settings.Set myInDesign = CreateObject("InDesign.Application.CS2")Set myFileSystemObject = CreateObject("Scripting.FileSystemObject")If myInDesign.Documents.Count <> 0 Then Set myDocument = myInDesign.ActiveDocument Rem VBScript doesn’t have a native "get folder" statement, so we’ll use Rem InDesign’s JavaScript to display a folder browser. myJavaScript = "myFolder = Folder.selectDialog(""Choose a Folder""); myFolderName = myFolder.fsName;" Rem Run the string "myJavaScript" as a JavaScript myFolderName = myInDesign.DoScript(myJavaScript, idScriptLanguage.idJavascript) If myFileSystemObject.FolderExists(myFolderName) Then myExportPages myInDesign, myDocument, myFolderName End If
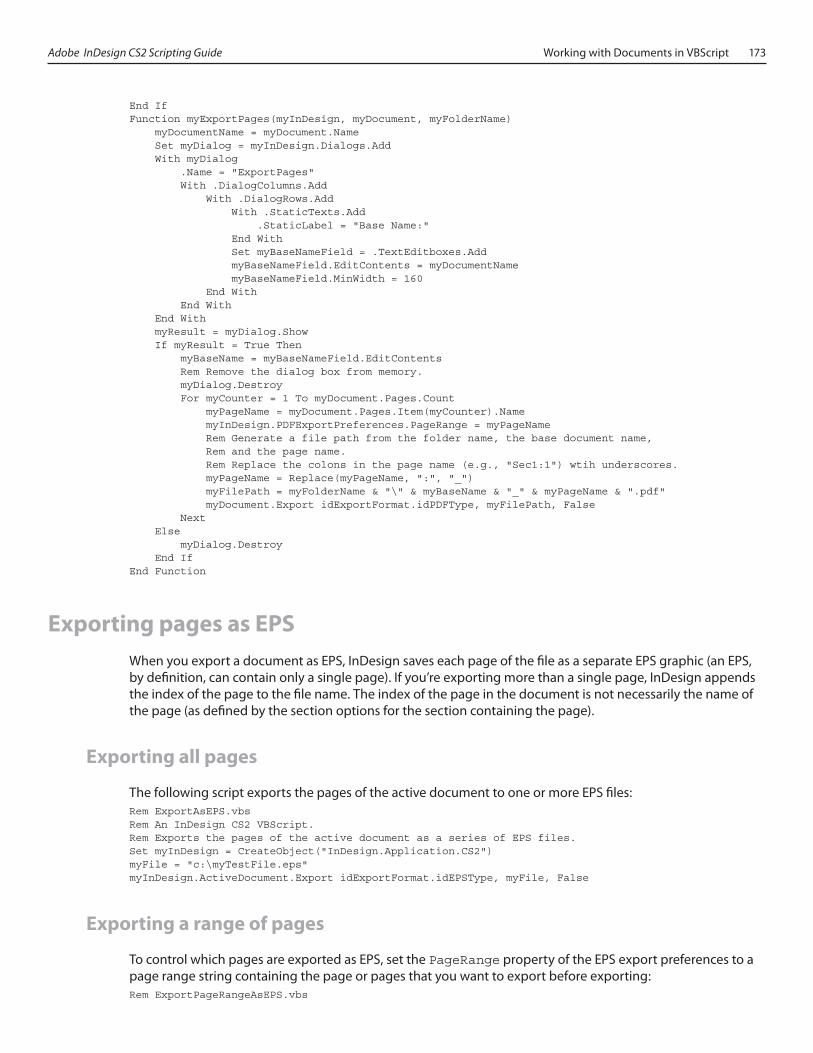
Adobe InDesign CS2 Scripting Guide Working with Documents in VBScript 173
End IfFunction myExportPages(myInDesign, myDocument, myFolderName) myDocumentName = myDocument.Name Set myDialog = myInDesign.Dialogs.Add With myDialog .Name = "ExportPages" With .DialogColumns.Add With .DialogRows.Add With .StaticTexts.Add .StaticLabel = "Base Name:" End With Set myBaseNameField = .TextEditboxes.Add myBaseNameField.EditContents = myDocumentName myBaseNameField.MinWidth = 160 End With End With End With myResult = myDialog.Show If myResult = True Then myBaseName = myBaseNameField.EditContents Rem Remove the dialog box from memory. myDialog.Destroy For myCounter = 1 To myDocument.Pages.Count myPageName = myDocument.Pages.Item(myCounter).Name myInDesign.PDFExportPreferences.PageRange = myPageName Rem Generate a file path from the folder name, the base document name, Rem and the page name. Rem Replace the colons in the page name (e.g., "Sec1:1") wtih underscores. myPageName = Replace(myPageName, ":", "_") myFilePath = myFolderName & "\" & myBaseName & "_" & myPageName & ".pdf" myDocument.Export idExportFormat.idPDFType, myFilePath, False Next Else myDialog.Destroy End IfEnd Function
Exporting pages as EPSWhen you export a document as EPS, InDesign saves each page of the file as a separate EPS graphic (an EPS, by definition, can contain only a single page). If you’re exporting more than a single page, InDesign appends the index of the page to the file name. The index of the page in the document is not necessarily the name of the page (as defined by the section options for the section containing the page).
Exporting all pages
The following script exports the pages of the active document to one or more EPS files:Rem ExportAsEPS.vbsRem An InDesign CS2 VBScript.Rem Exports the pages of the active document as a series of EPS files.Set myInDesign = CreateObject("InDesign.Application.CS2")myFile = "c:\myTestFile.eps"myInDesign.ActiveDocument.Export idExportFormat.idEPSType, myFile, False
Exporting a range of pages
To control which pages are exported as EPS, set the PageRange property of the EPS export preferences to a page range string containing the page or pages that you want to export before exporting:Rem ExportPageRangeAsEPS.vbs
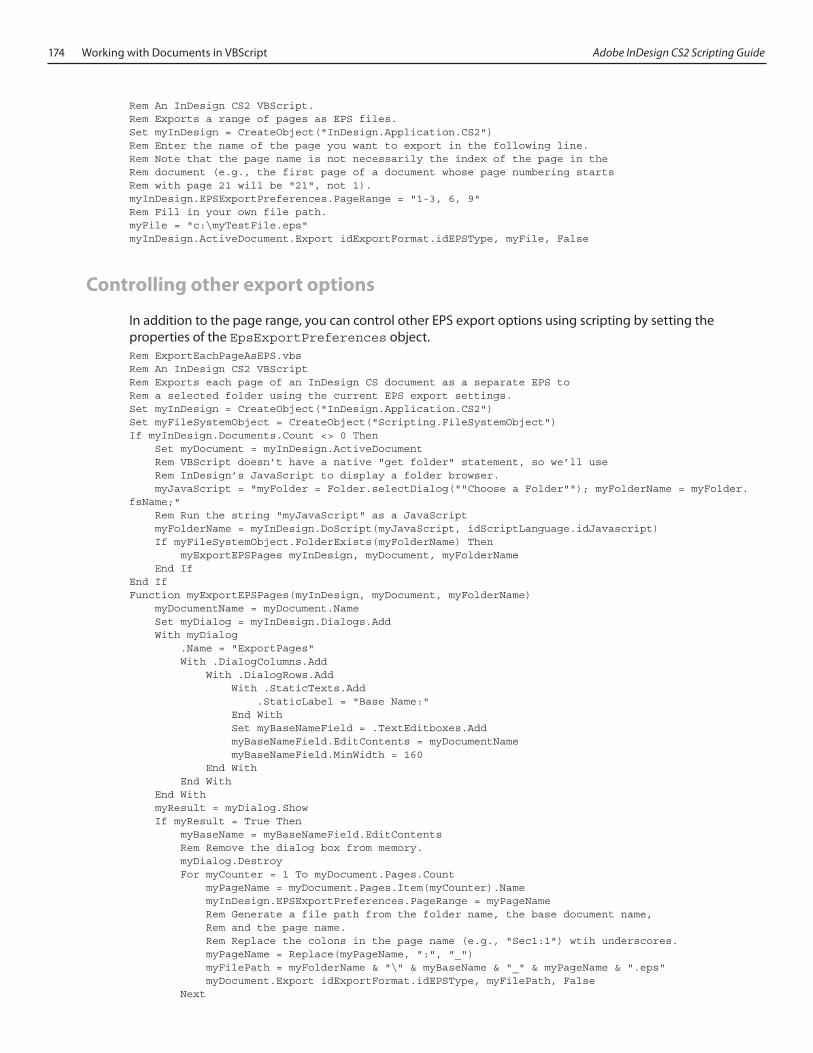
174 Working with Documents in VBScript Adobe InDesign CS2 Scripting Guide
Rem An InDesign CS2 VBScript.Rem Exports a range of pages as EPS files.Set myInDesign = CreateObject("InDesign.Application.CS2")Rem Enter the name of the page you want to export in the following line.Rem Note that the page name is not necessarily the index of the page in theRem document (e.g., the first page of a document whose page numbering startsRem with page 21 will be "21", not 1).myInDesign.EPSExportPreferences.PageRange = "1-3, 6, 9"Rem Fill in your own file path.myFile = "c:\myTestFile.eps"myInDesign.ActiveDocument.Export idExportFormat.idEPSType, myFile, False
Controlling other export options
In addition to the page range, you can control other EPS export options using scripting by setting the properties of the EpsExportPreferences object.Rem ExportEachPageAsEPS.vbsRem An InDesign CS2 VBScriptRem Exports each page of an InDesign CS document as a separate EPS toRem a selected folder using the current EPS export settings.Set myInDesign = CreateObject("InDesign.Application.CS2")Set myFileSystemObject = CreateObject("Scripting.FileSystemObject")If myInDesign.Documents.Count <> 0 Then Set myDocument = myInDesign.ActiveDocument Rem VBScript doesn’t have a native "get folder" statement, so we’ll use Rem InDesign’s JavaScript to display a folder browser. myJavaScript = "myFolder = Folder.selectDialog(""Choose a Folder""); myFolderName = myFolder.fsName;" Rem Run the string "myJavaScript" as a JavaScript myFolderName = myInDesign.DoScript(myJavaScript, idScriptLanguage.idJavascript) If myFileSystemObject.FolderExists(myFolderName) Then myExportEPSPages myInDesign, myDocument, myFolderName End IfEnd IfFunction myExportEPSPages(myInDesign, myDocument, myFolderName) myDocumentName = myDocument.Name Set myDialog = myInDesign.Dialogs.Add With myDialog .Name = "ExportPages" With .DialogColumns.Add With .DialogRows.Add With .StaticTexts.Add .StaticLabel = "Base Name:" End With Set myBaseNameField = .TextEditboxes.Add myBaseNameField.EditContents = myDocumentName myBaseNameField.MinWidth = 160 End With End With End With myResult = myDialog.Show If myResult = True Then myBaseName = myBaseNameField.EditContents Rem Remove the dialog box from memory. myDialog.Destroy For myCounter = 1 To myDocument.Pages.Count myPageName = myDocument.Pages.Item(myCounter).Name myInDesign.EPSExportPreferences.PageRange = myPageName Rem Generate a file path from the folder name, the base document name, Rem and the page name. Rem Replace the colons in the page name (e.g., "Sec1:1") wtih underscores. myPageName = Replace(myPageName, ":", "_") myFilePath = myFolderName & "\" & myBaseName & "_" & myPageName & ".eps" myDocument.Export idExportFormat.idEPSType, myFilePath, False Next

Adobe InDesign CS2 Scripting Guide Working with Documents in VBScript 175
Else myDialog.Destroy End IfEnd Function

176 Working with Documents in VBScript Adobe InDesign CS2 Scripting Guide