in-ground greenhouse tomato production 2011 · in-ground greenhouse tomato production ... fertility...
TRANSCRIPT

In-Ground
Greenhouse Tomato Production
By Anthony Carver Extension Agent Grainger County
Programs in agriculture and natural resources, 4-H youth development, family and consumer sciences, and resource development. University of Tennessee Institute of Agriculture, U.S. Department of Agriculture and county governments cooperating. UT Extension provides equal opportunities in programs and employment.
2
Table of Contents Acknowledgements......…………………………………….….. 3 Varieties…………………………………………………….….. 4 Growing Methods……...……………………………………….. 5 Problem Identification ……………………………………….... 9 Disease & Insect Control Information………………………...12

3
Acknowledgements Special thanks goes to the following people and sources of information for making this manual possible.
UT Extension’s Commerical Tomato Production Publication #737
2010 North Carolina Agricultural Chemical Manual
2011 UT Extension Commercial Vegetable Disease
Control Guide
Dr. Annette Wszelaki, UT Vegetable Specialist Dr. Allen Straw, Virginia Tech Vegetable Specialist Cornell University Department of Plant Pathology
Website Rutgers University, North Carolina Extension, A.F.
Sherf, and R. Providenti, pictures
Diane Brickey, editing
4
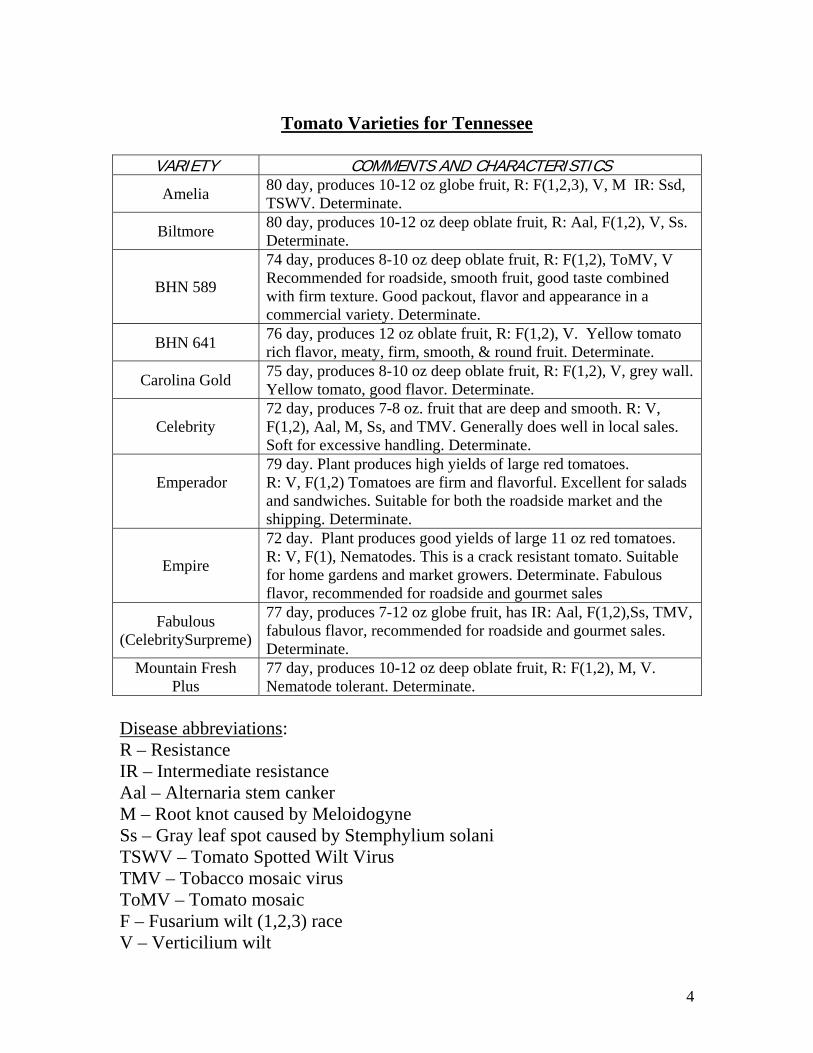
Tomato Varieties for Tennessee
VARIETY COMMENTS AND CHARACTERISTICS
Amelia 80 day, produces 10-12 oz globe fruit, R: F(1,2,3), V, M IR: Ssd, TSWV. Determinate.
Biltmore 80 day, produces 10-12 oz deep oblate fruit, R: Aal, F(1,2), V, Ss. Determinate.
BHN 589
74 day, produces 8-10 oz deep oblate fruit, R: F(1,2), ToMV, V Recommended for roadside, smooth fruit, good taste combined with firm texture. Good packout, flavor and appearance in a commercial variety. Determinate.
BHN 641 76 day, produces 12 oz oblate fruit, R: F(1,2), V. Yellow tomato rich flavor, meaty, firm, smooth, & round fruit. Determinate.
Carolina Gold 75 day, produces 8-10 oz deep oblate fruit, R: F(1,2), V, grey wall. Yellow tomato, good flavor. Determinate.
Celebrity 72 day, produces 7-8 oz. fruit that are deep and smooth. R: V, F(1,2), Aal, M, Ss, and TMV. Generally does well in local sales. Soft for excessive handling. Determinate.
Emperador
79 day. Plant produces high yields of large red tomatoes. R: V, F(1,2) Tomatoes are firm and flavorful. Excellent for salads and sandwiches. Suitable for both the roadside market and the shipping. Determinate.
Empire
72 day. Plant produces good yields of large 11 oz red tomatoes. R: V, F(1), Nematodes. This is a crack resistant tomato. Suitable for home gardens and market growers. Determinate. Fabulous flavor, recommended for roadside and gourmet sales
Fabulous (CelebritySurpreme)
77 day, produces 7-12 oz globe fruit, has IR: Aal, F(1,2),Ss, TMV, fabulous flavor, recommended for roadside and gourmet sales. Determinate.
Mountain Fresh Plus
77 day, produces 10-12 oz deep oblate fruit, R: F(1,2), M, V. Nematode tolerant. Determinate.
Disease abbreviations: R – Resistance IR – Intermediate resistance Aal – Alternaria stem canker M – Root knot caused by Meloidogyne Ss – Gray leaf spot caused by Stemphylium solani TSWV – Tomato Spotted Wilt Virus TMV – Tobacco mosaic virus ToMV – Tomato mosaic F – Fusarium wilt (1,2,3) race V – Verticilium wilt
5
Growing Methods
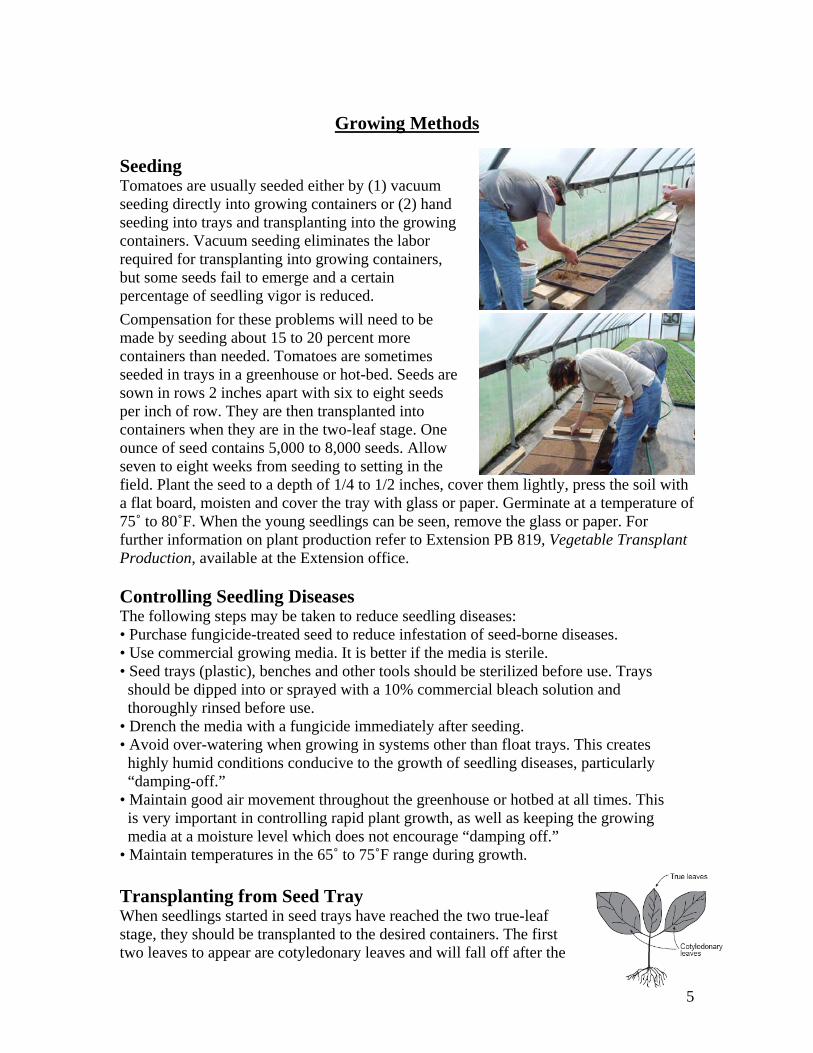
Seeding Tomatoes are usually seeded either by (1) vacuum seeding directly into growing containers or (2) hand seeding into trays and transplanting into the growing containers. Vacuum seeding eliminates the labor required for transplanting into growing containers, but some seeds fail to emerge and a certain percentage of seedling vigor is reduced.
Compensation for these problems will need to be made by seeding about 15 to 20 percent more containers than needed. Tomatoes are sometimes seeded in trays in a greenhouse or hot-bed. Seeds are sown in rows 2 inches apart with six to eight seeds per inch of row. They are then transplanted into containers when they are in the two-leaf stage. One ounce of seed contains 5,000 to 8,000 seeds. Allow seven to eight weeks from seeding to setting in the field. Plant the seed to a depth of 1/4 to 1/2 inches, cover them lightly, press the soil with a flat board, moisten and cover the tray with glass or paper. Germinate at a temperature of 75˚ to 80˚F. When the young seedlings can be seen, remove the glass or paper. For further information on plant production refer to Extension PB 819, Vegetable Transplant Production, available at the Extension office. Controlling Seedling Diseases The following steps may be taken to reduce seedling diseases: • Purchase fungicide-treated seed to reduce infestation of seed-borne diseases. • Use commercial growing media. It is better if the media is sterile. • Seed trays (plastic), benches and other tools should be sterilized before use. Trays should be dipped into or sprayed with a 10% commercial bleach solution and thoroughly rinsed before use. • Drench the media with a fungicide immediately after seeding. • Avoid over-watering when growing in systems other than float trays. This creates highly humid conditions conducive to the growth of seedling diseases, particularly “damping-off.” • Maintain good air movement throughout the greenhouse or hotbed at all times. This is very important in controlling rapid plant growth, as well as keeping the growing media at a moisture level which does not encourage “damping off.” • Maintain temperatures in the 65˚ to 75˚F range during growth. Transplanting from Seed Tray When seedlings started in seed trays have reached the two true-leaf stage, they should be transplanted to the desired containers. The first two leaves to appear are cotyledonary leaves and will fall off after the
6
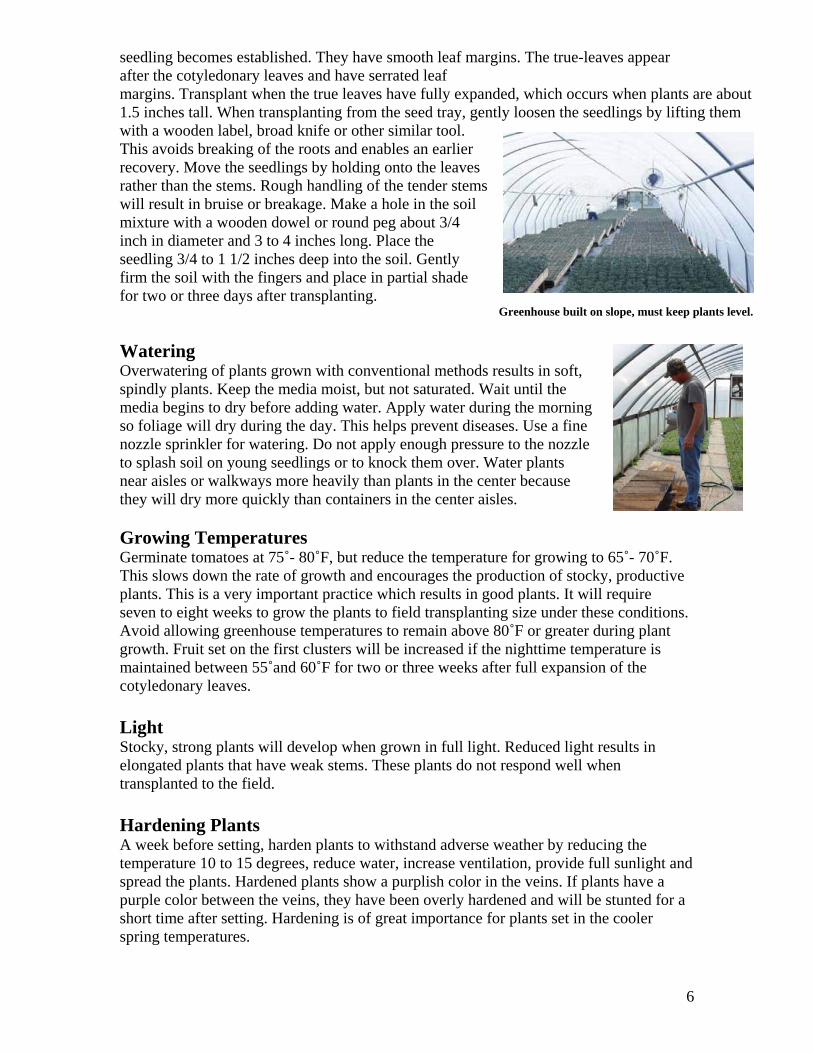
seedling becomes established. They have smooth leaf margins. The true-leaves appear after the cotyledonary leaves and have serrated leaf margins. Transplant when the true leaves have fully expanded, which occurs when plants are about 1.5 inches tall. When transplanting from the seed tray, gently loosen the seedlings by lifting them with a wooden label, broad knife or other similar tool. This avoids breaking of the roots and enables an earlier recovery. Move the seedlings by holding onto the leaves rather than the stems. Rough handling of the tender stems will result in bruise or breakage. Make a hole in the soil mixture with a wooden dowel or round peg about 3/4 inch in diameter and 3 to 4 inches long. Place the seedling 3/4 to 1 1/2 inches deep into the soil. Gently firm the soil with the fingers and place in partial shade for two or three days after transplanting. Greenhouse built on slope, must keep plants level.
Watering Overwatering of plants grown with conventional methods results in soft, spindly plants. Keep the media moist, but not saturated. Wait until the media begins to dry before adding water. Apply water during the morning so foliage will dry during the day. This helps prevent diseases. Use a fine nozzle sprinkler for watering. Do not apply enough pressure to the nozzle to splash soil on young seedlings or to knock them over. Water plants near aisles or walkways more heavily than plants in the center because they will dry more quickly than containers in the center aisles. Growing Temperatures Germinate tomatoes at 75˚- 80˚F, but reduce the temperature for growing to 65˚- 70˚F. This slows down the rate of growth and encourages the production of stocky, productive plants. This is a very important practice which results in good plants. It will require seven to eight weeks to grow the plants to field transplanting size under these conditions. Avoid allowing greenhouse temperatures to remain above 80˚F or greater during plant growth. Fruit set on the first clusters will be increased if the nighttime temperature is maintained between 55˚and 60˚F for two or three weeks after full expansion of the cotyledonary leaves.
Light Stocky, strong plants will develop when grown in full light. Reduced light results in elongated plants that have weak stems. These plants do not respond well when transplanted to the field.
Hardening Plants A week before setting, harden plants to withstand adverse weather by reducing the temperature 10 to 15 degrees, reduce water, increase ventilation, provide full sunlight and spread the plants. Hardened plants show a purplish color in the veins. If plants have a purple color between the veins, they have been overly hardened and will be stunted for a short time after setting. Hardening is of great importance for plants set in the cooler spring temperatures.
7
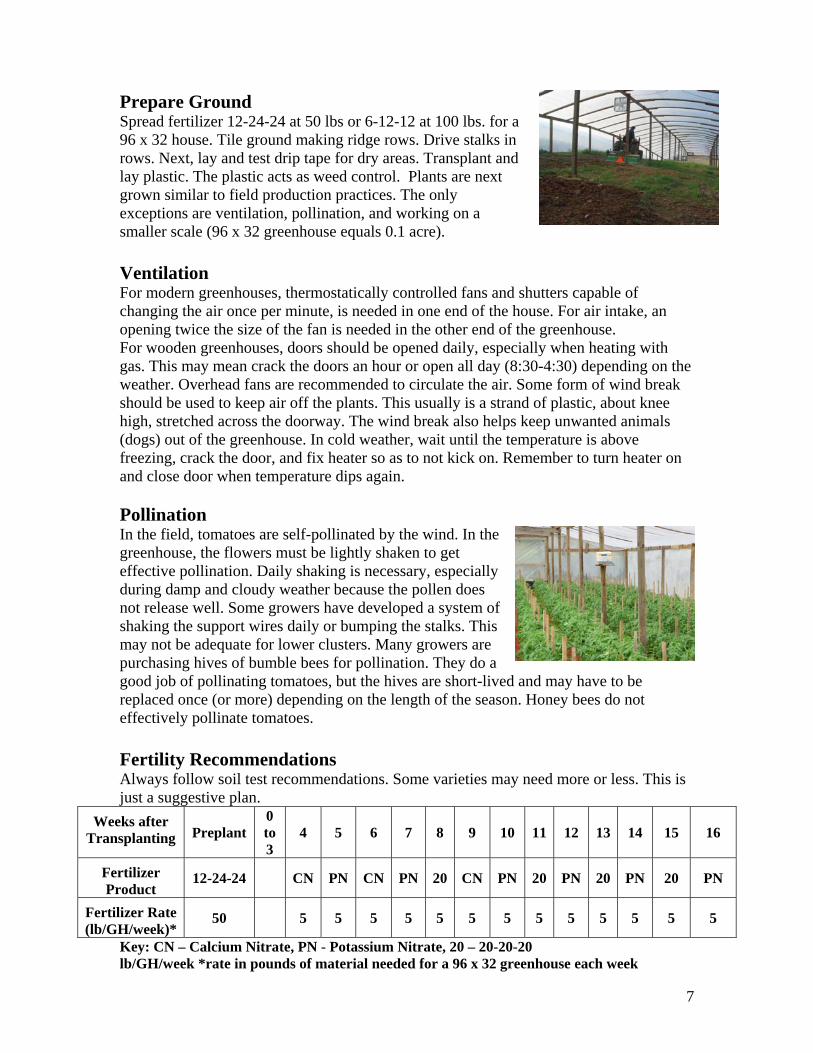
Prepare Ground Spread fertilizer 12-24-24 at 50 lbs or 6-12-12 at 100 lbs. for a 96 x 32 house. Tile ground making ridge rows. Drive stalks in rows. Next, lay and test drip tape for dry areas. Transplant and lay plastic. The plastic acts as weed control. Plants are next grown similar to field production practices. The only exceptions are ventilation, pollination, and working on a smaller scale (96 x 32 greenhouse equals 0.1 acre). Ventilation For modern greenhouses, thermostatically controlled fans and shutters capable of changing the air once per minute, is needed in one end of the house. For air intake, an opening twice the size of the fan is needed in the other end of the greenhouse. For wooden greenhouses, doors should be opened daily, especially when heating with gas. This may mean crack the doors an hour or open all day (8:30-4:30) depending on the weather. Overhead fans are recommended to circulate the air. Some form of wind break should be used to keep air off the plants. This usually is a strand of plastic, about knee high, stretched across the doorway. The wind break also helps keep unwanted animals (dogs) out of the greenhouse. In cold weather, wait until the temperature is above freezing, crack the door, and fix heater so as to not kick on. Remember to turn heater on and close door when temperature dips again. Pollination In the field, tomatoes are self-pollinated by the wind. In the greenhouse, the flowers must be lightly shaken to get effective pollination. Daily shaking is necessary, especially during damp and cloudy weather because the pollen does not release well. Some growers have developed a system of shaking the support wires daily or bumping the stalks. This may not be adequate for lower clusters. Many growers are purchasing hives of bumble bees for pollination. They do a good job of pollinating tomatoes, but the hives are short-lived and may have to be replaced once (or more) depending on the length of the season. Honey bees do not effectively pollinate tomatoes.
Fertility Recommendations Always follow soil test recommendations. Some varieties may need more or less. This is just a suggestive plan.
Key: CN – Calcium Nitrate, PN - Potassium Nitrate, 20 – 20-20-20 lb/GH/week *rate in pounds of material needed for a 96 x 32 greenhouse each week
Weeks after Transplanting Preplant
0 to 3
4 5 6 7 8 9 10 11 12 13 14 15 16
Fertilizer Product
12-24-24 CN PN CN PN 20 CN PN 20 PN 20 PN 20 PN
Fertilizer Rate (lb/GH/week)*
50 5 5 5 5 5 5 5 5 5 5 5 5 5
8
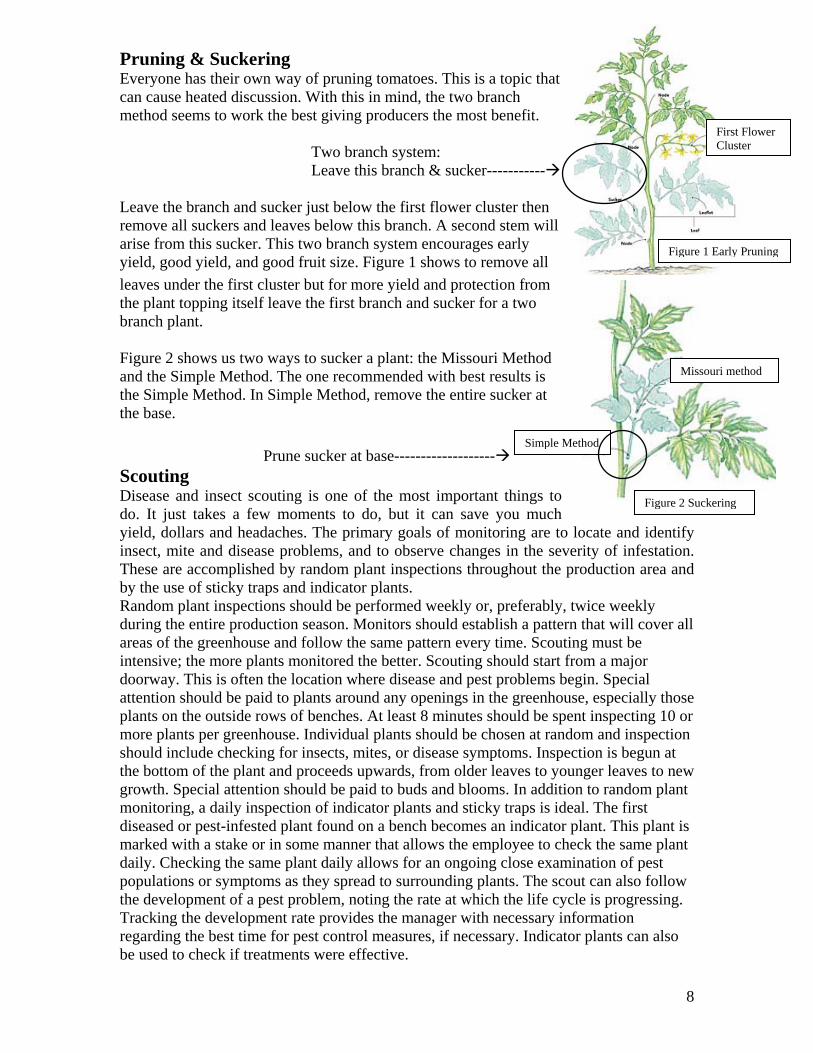
Pruning & Suckering Everyone has their own way of pruning tomatoes. This is a topic that can cause heated discussion. With this in mind, the two branch method seems to work the best giving producers the most benefit.
Two branch system: Leave this branch & sucker-----------
Leave the branch and sucker just below the first flower cluster then remove all suckers and leaves below this branch. A second stem will arise from this sucker. This two branch system encourages early yield, good yield, and good fruit size. Figure 1 shows to remove all
leaves under the first cluster but for more yield and protection from the plant topping itself leave the first branch and sucker for a two branch plant. Figure 2 shows us two ways to sucker a plant: the Missouri Method and the Simple Method. The one recommended with best results is the Simple Method. In Simple Method, remove the entire sucker at the base.
Prune sucker at base-------------------
Scouting Disease and insect scouting is one of the most important things to do. It just takes a few moments to do, but it can save you much yield, dollars and headaches. The primary goals of monitoring are to locate and identify insect, mite and disease problems, and to observe changes in the severity of infestation. These are accomplished by random plant inspections throughout the production area and by the use of sticky traps and indicator plants. Random plant inspections should be performed weekly or, preferably, twice weekly during the entire production season. Monitors should establish a pattern that will cover all areas of the greenhouse and follow the same pattern every time. Scouting must be intensive; the more plants monitored the better. Scouting should start from a major doorway. This is often the location where disease and pest problems begin. Special attention should be paid to plants around any openings in the greenhouse, especially those plants on the outside rows of benches. At least 8 minutes should be spent inspecting 10 or more plants per greenhouse. Individual plants should be chosen at random and inspection should include checking for insects, mites, or disease symptoms. Inspection is begun at the bottom of the plant and proceeds upwards, from older leaves to younger leaves to new growth. Special attention should be paid to buds and blooms. In addition to random plant monitoring, a daily inspection of indicator plants and sticky traps is ideal. The first diseased or pest-infested plant found on a bench becomes an indicator plant. This plant is marked with a stake or in some manner that allows the employee to check the same plant daily. Checking the same plant daily allows for an ongoing close examination of pest populations or symptoms as they spread to surrounding plants. The scout can also follow the development of a pest problem, noting the rate at which the life cycle is progressing. Tracking the development rate provides the manager with necessary information regarding the best time for pest control measures, if necessary. Indicator plants can also be used to check if treatments were effective.
Figure 2 Suckering
Figure 1 Early Pruning
Simple Method
Missouri method
First Flower Cluster
9
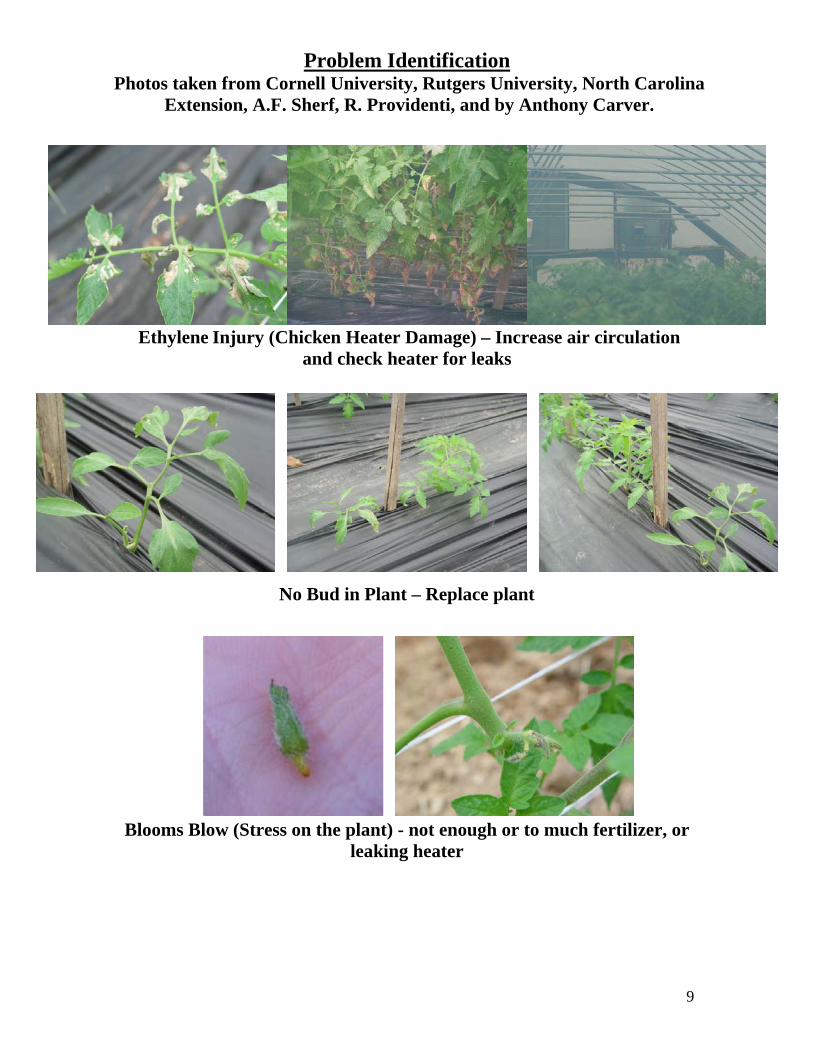
Problem Identification Photos taken from Cornell University, Rutgers University, North Carolina
Extension, A.F. Sherf, R. Providenti, and by Anthony Carver.
Ethylene Injury (Chicken Heater Damage) – Increase air circulation and check heater for leaks
No Bud in Plant – Replace plant
Blooms Blow (Stress on the plant) - not enough or to much fertilizer, or leaking heater
10
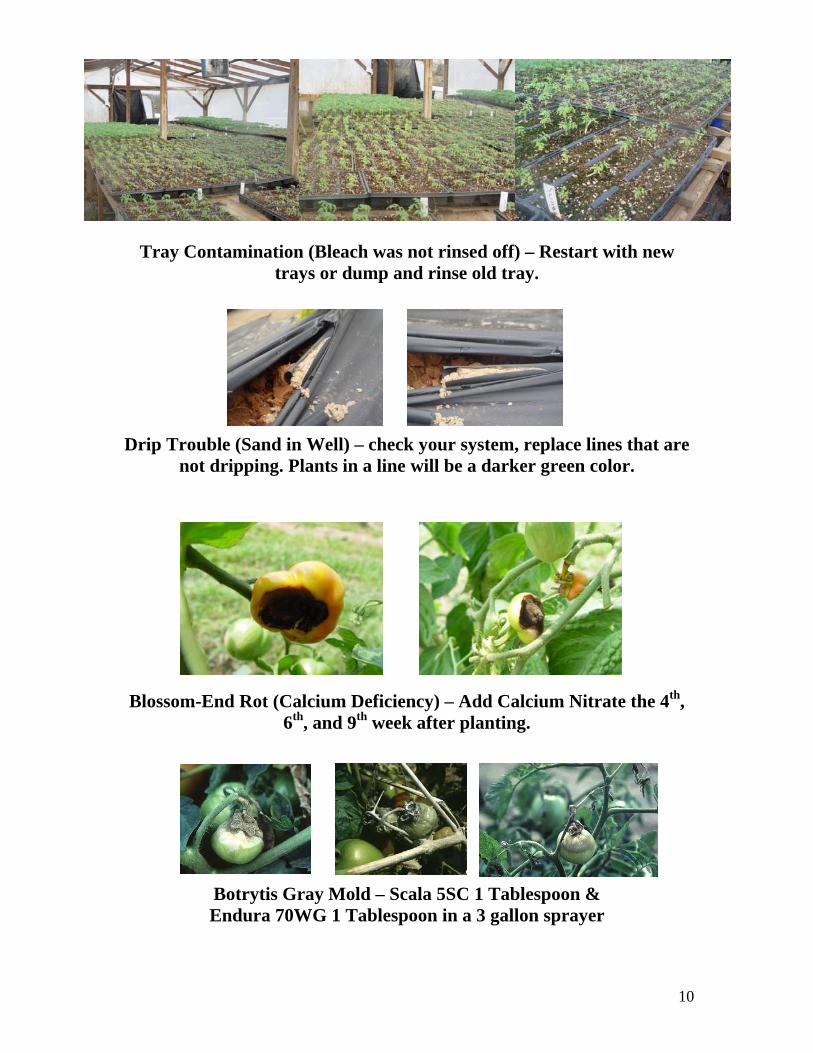
Tray Contamination (Bleach was not rinsed off) – Restart with new trays or dump and rinse old tray.
Drip Trouble (Sand in Well) – check your system, replace lines that are not dripping. Plants in a line will be a darker green color.
Blossom-End Rot (Calcium Deficiency) – Add Calcium Nitrate the 4th, 6th, and 9th week after planting.
Botrytis Gray Mold – Scala 5SC 1 Tablespoon & Endura 70WG 1 Tablespoon in a 3 gallon sprayer
11
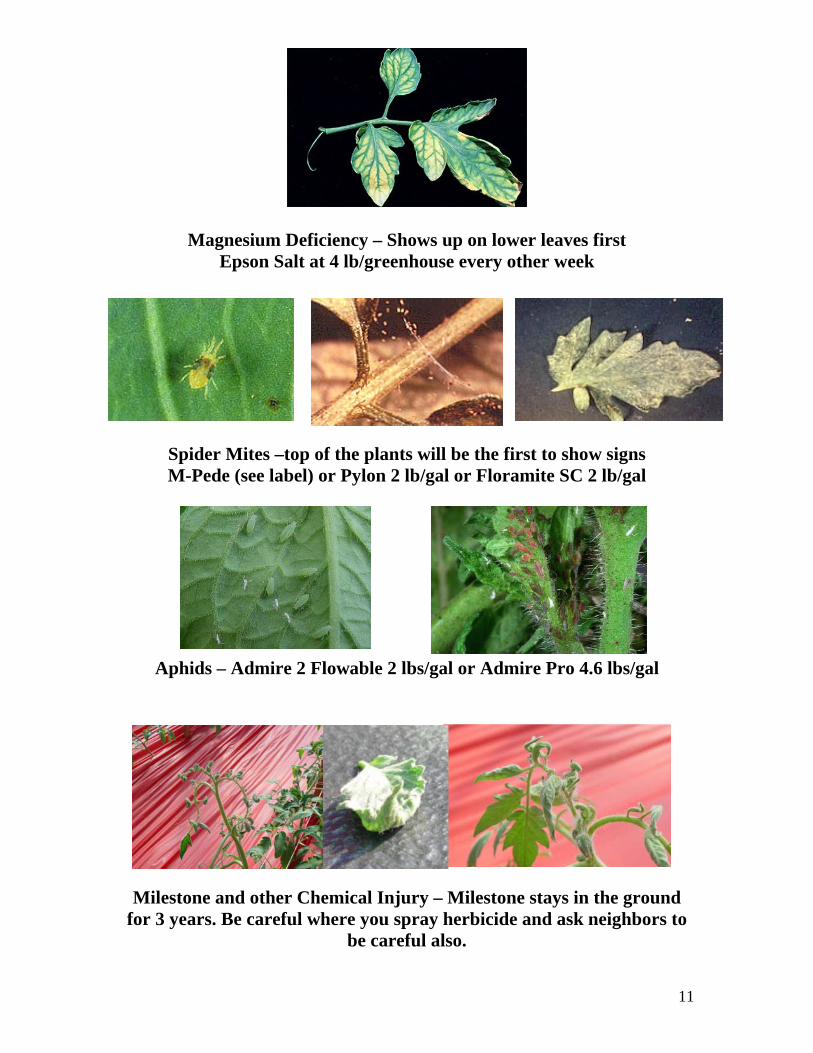
Magnesium Deficiency – Shows up on lower leaves first Epson Salt at 4 lb/greenhouse every other week
Spider Mites –top of the plants will be the first to show signs M-Pede (see label) or Pylon 2 lb/gal or Floramite SC 2 lb/gal
Aphids – Admire 2 Flowable 2 lbs/gal or Admire Pro 4.6 lbs/gal
Milestone and other Chemical Injury – Milestone stays in the ground for 3 years. Be careful where you spray herbicide and ask neighbors to
be careful also.

12
Greenhouse Disease Control Table taken from UT Extension 2011 Commercial Vegetable Disease Control Guide
Pest Fungicide Suggested Rate/Acre
PHI days
Maximum
Use/Acre/
Season Remarks & Precautions
TOMATO, Transplant Production
Early Blight, Gray Leaf Spot, Late Blight, Leaf Mold
Mancozeb 80WP
1.5-2 lb/43,560 sq ft
22.4 lb Apply in 100 gal of water
Bacterial Spot and Speck Small, dark spots on foliage and fruit.
Streptomycin sulfate AgriPhage
1 lb/100 gal 3-8 fl oz/9600 sq ft
For transplant production only – apply if symptoms appear and repeat at 4-5 day intervals until transplanting. Apply every day if symptoms present. Do not mix with copper products.
Botrytis – general
Decree 50 WDG Serenade
1.5 lb/43,560 sq ft 2-6 qt/43,560 sq ft
6 lb
Do not make more than 2 consecutive applications of decree before rotating with another effective product.
Pythium root rot
Previcur Flex 6F Ranman
Stock solution 12.8 fl oz/100 gal 3 fl oz/100 gal
2 app
1 app
Before transplanting: apply stock solution to pre-wet cubes at 3.4 – 6.8 fl oz per cube. Refer to label for application to soil or soilless seed bed. Drench the growing medium at time of planting or anytime thereafter up until 1 week before transplanting.
13
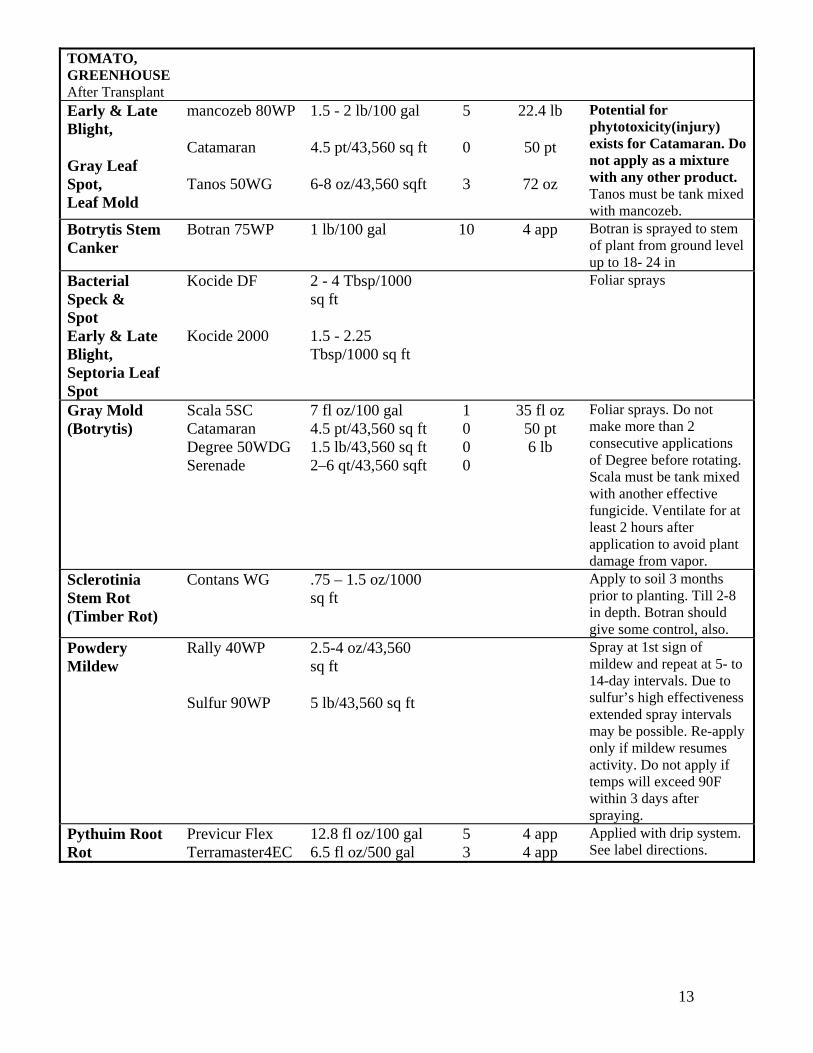
TOMATO, GREENHOUSE After Transplant
Early & Late Blight, Gray Leaf Spot, Leaf Mold
mancozeb 80WP Catamaran Tanos 50WG
1.5 - 2 lb/100 gal
4.5 pt/43,560 sq ft
6-8 oz/43,560 sqft
5 0 3
22.4 lb
50 pt
72 oz
Potential for phytotoxicity(injury) exists for Catamaran. Do not apply as a mixture with any other product. Tanos must be tank mixed with mancozeb.
Botrytis Stem Canker
Botran 75WP
1 lb/100 gal
10
4 app Botran is sprayed to stem of plant from ground level up to 18- 24 in
Bacterial Speck & Spot Early & Late Blight, Septoria Leaf Spot
Kocide DF Kocide 2000
2 - 4 Tbsp/1000 sq ft 1.5 - 2.25 Tbsp/1000 sq ft
Foliar sprays
Gray Mold (Botrytis)
Scala 5SC Catamaran Degree 50WDG Serenade
7 fl oz/100 gal 4.5 pt/43,560 sq ft 1.5 lb/43,560 sq ft 2–6 qt/43,560 sqft
1 0 0 0
35 fl oz 50 pt 6 lb
Foliar sprays. Do not make more than 2 consecutive applications of Degree before rotating. Scala must be tank mixed with another effective fungicide. Ventilate for at least 2 hours after application to avoid plant damage from vapor.
Sclerotinia Stem Rot (Timber Rot)
Contans WG .75 – 1.5 oz/1000 sq ft
Apply to soil 3 months prior to planting. Till 2-8 in depth. Botran should give some control, also.
Powdery Mildew
Rally 40WP Sulfur 90WP
2.5-4 oz/43,560 sq ft 5 lb/43,560 sq ft
Spray at 1st sign of mildew and repeat at 5- to 14-day intervals. Due to sulfur’s high effectiveness extended spray intervals may be possible. Re-apply only if mildew resumes activity. Do not apply if temps will exceed 90F within 3 days after spraying.
Pythuim Root Rot
Previcur Flex Terramaster4EC
12.8 fl oz/100 gal 6.5 fl oz/500 gal
5 3
4 app 4 app
Applied with drip system. See label directions.
14
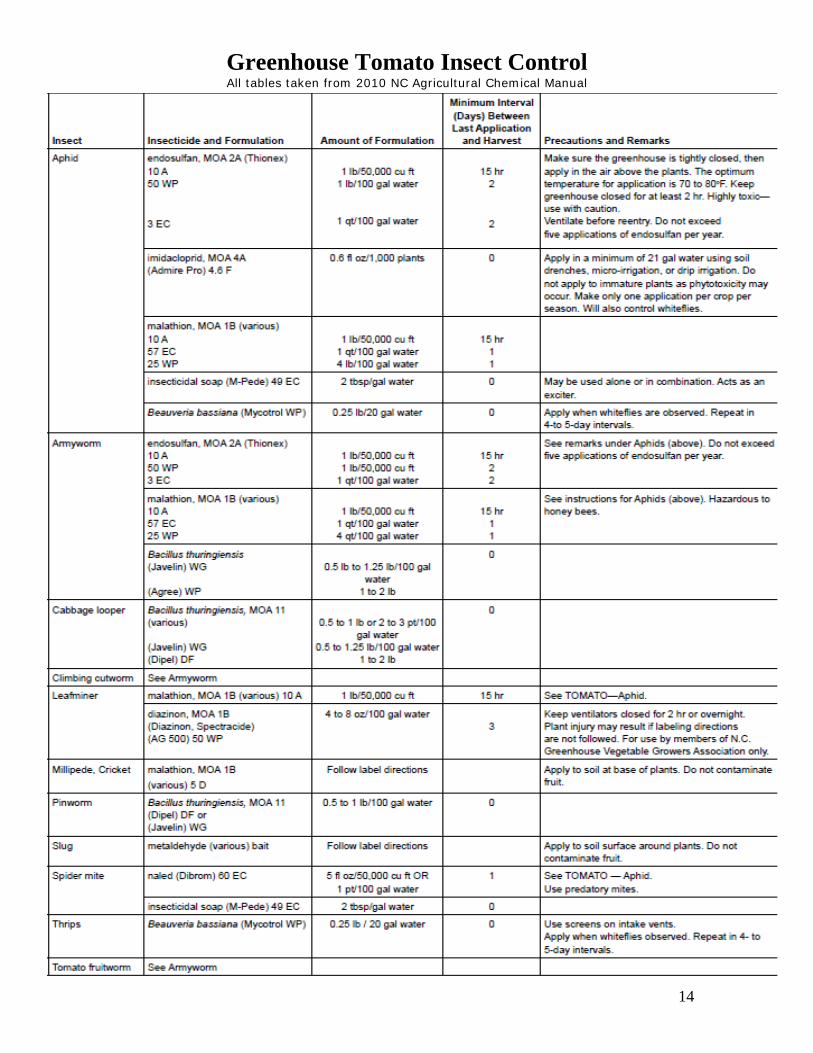
Greenhouse Tomato Insect Control All tables taken from 2010 NC Agricultural Chemical Manual
15
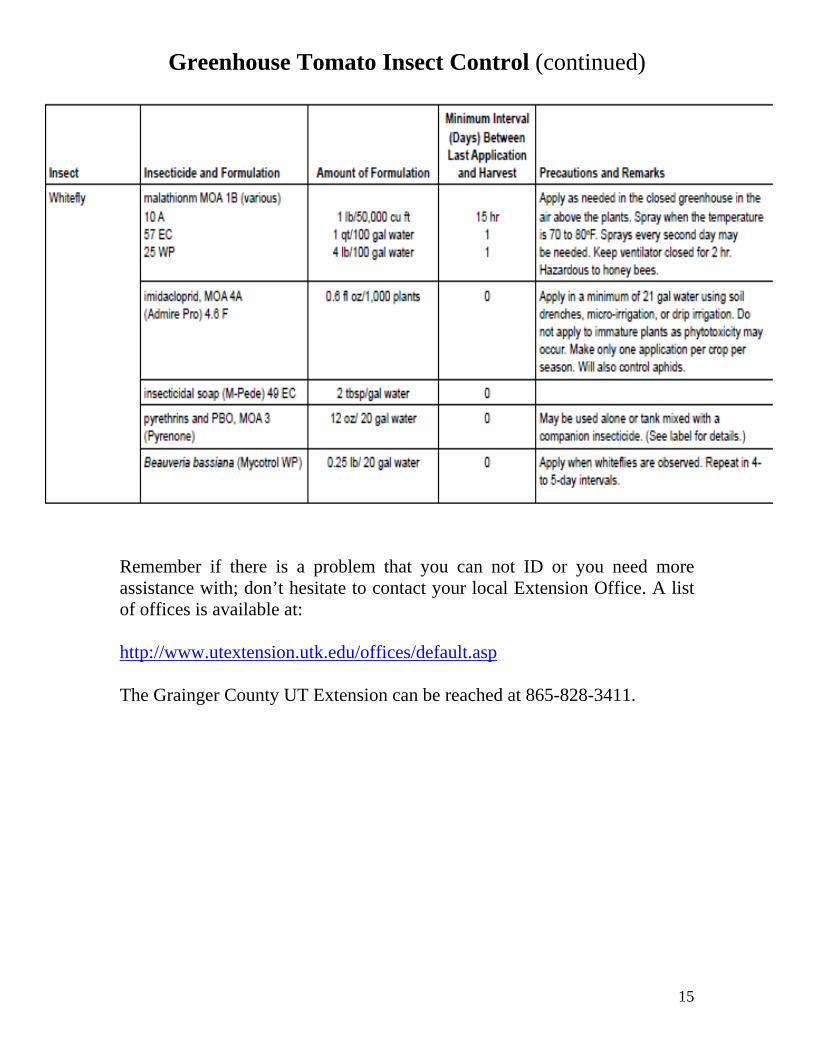
Greenhouse Tomato Insect Control (continued)
Remember if there is a problem that you can not ID or you need more assistance with; don’t hesitate to contact your local Extension Office. A list of offices is available at: http://www.utextension.utk.edu/offices/default.asp The Grainger County UT Extension can be reached at 865-828-3411.