important safeguards - sunpak · warning failure to observe the instructions marked by this symbol...
TRANSCRIPT
10
WARNING
● Do not attempt to open, repair, or modify this unit. It contains a high-voltage circuit, which may cause a fire, electric shock, or serious injury.
● Do not use accessories other than those specified by SEA & SEA SUNPAK CO., LTD. Doing so may cause a fire, electric shock, or other injury.
● Do not touch any exposed internal component of the unit if the unit is dropped or damaged, or if foreign matter enters the unit.
● Do not operate the unit near the eyes (especially those of infants). ● Flashing the unit near someone's eyes may cause visual impairment. Make sure
to allow a minimum distance of about 3 feet (1 meter) or more from the subject, especially when taking pictures of infants.
● Make sure to install the batteries with correct +/- polarity. When replacing batteries, replace all of the batteries with new ones of the same manufacturer and type. Using batteries improperly may result in leakage, overheating, rupture, shortened service life or contact failure.
● Keep the unit away from beverages, cosmetics or chemicals. If spilled or splashed liquid gets inside the unit, it may result in fire, electric shock or injury.
● Do not operate the unit in extremely humid environments, such as a bathroom or near a humidifier. This may result in a fire, electric shock or injury.
● Do not plug or unplug the AC adapter and sync cord with a wet hand. This may result in an electric shock or malfunction.
Important Safeguards
● Always remove batteries and unplug the power cord from the wall outlet before cleaning or otherwise maintaining the unit. When unplugging the power cord, do not hold and pull the cord with a strong force.
● Do not operate the unit if there is any possibility that a flammable or explosive gas is present.
CAUTION Do not expose the unit to splashes, sprays or water droplets. Do not expose batteries to a very hot environment. Do not attempt to charge disposable batteries. Do not place the unit in direct sunlight or where it can be exposed to high humidity. This can result in excessive humidity inside the unit, which can cause damage to or failure of the unit. Do not store the unit in a dusty place; otherwise, subsequent use of the unit may result in a fire or electric shock. Do not place the unit in an unstable position, otherwise, the unit may fall or drop accidentally, causing damage to the unit or personal injury.Other PrecautionsDo not clean the unit with benzene or other solvents. This can result in discoloration or deformation of the unit. Stains or dirt should be removed with a soft dry cloth.
SAVE THESE INSTRUCTIONS
CAUTION● DO NOT EXPOSE TO SPLASHES OR DROPS OF WATER.
● BATTERIES SHOULD NOT BE EXPOSED TO EXCESSIVE HEAT SUCH AS
INTENSE SUNLIGHT, FIRE, ETC.
● DISPOSABLE BATTERIES (SUCH AS CARBON-ZINC AND ALKALINE
CELLS) SHOULD NEVER BE CHARGED.
WARNING Failure to observe the instructions marked by this symbol while handling the product may result in loss of life or serious bodily injury. Make sure to observe the instructions.
CAUTION Failure to observe the instructions marked by this symbol while handling the product may result in serious bodily injury or damage to property. Make sure to observe the instructions.
Please read and follow these essential safety procedures to prevent accidents, injury to yourself and others, as well as property damage. Read all these instructions carefully to insure the safe use of your Sunpak flash unit.
11
English
Welcome to the worldwide family of Sunpak Owners.Your Sunpak PZ42X is specially designed for Canon (E-TTL II/E-TTL), Nikon (I-TTL/D-TTL) and Sony (ADI) cameras.Please read this owner’s manual carefully so that you can use the PX42X correctly.
Table of Contents
Important Safeguards ........................................................................................... 10Table of Contents/Features and Functions of Sunpak PZ42X .............................. 11Description of Parts/Using the AF Auxiliary Light ................................................. 12Installing the batteries/Mounting the PZ42X on the Camera ................................ 13Automatic Power Save .......................................................................................... 13LCD Panel Indicators ............................................................................................ 14Setup .................................................................................................................... 15Shooting in TTL Mode/Shooting in Manual Mode ................................................. 16Using the Wide Panel/Bounce Lighting ................................................................ 16Notes for Continuous Shooting ............................................................................. 17Technical Specifications of PZ42X ....................................................................... 17
* Compact, lightweight flash powered by four “AA”-size batteries (the lightest flash among flashes with a guide number of 40):
With a recycle time of only about 3.5 seconds, you will not miss critical moments (in wedding ceremonies, parties, sport meetings, etc.).
* High light intensity equivalent to a guide number of 42 (ISO100 m). This can cover the light irradiation range for a focal distance of 100 mm (value
converted to the equivalent values with a 35 mm film camera) considered most suitable for portraits. (Max. range 21 meters)
* Free bouncing The light-emitting section can be tilted 90° up, and panned 180° left or 120° right.
A powerful function that allows you to effectively deal with any bounce lighting situations.
* EV correction EV correction of up to +/-1.5 allows you to more effective control image
composition and expression. ※ Correction can be set in 7 steps (-1.5, -1, -0.5, 0, +0.5, +1 and +1.5).
* Power ratio setting The power ratio function can set the light intensity in 7 steps (FULL, 1/2, 1/4,
1/8, 1/16, 1/32 and 1/64).* AF (autofocus) auxiliary light supports focusing under low or no light.* Focal distance indication switching The focal distance can be indicated either in digits (APS-C size) or in a value
equivalent to the 35 mm film camera. You can check the focal distance of the lens during shooting.
* Built-in wide panel The PX42X is also compatible with superwide-angle lenses, covering focal
distances of more than 20 mm (value converted to the equivalent values with a 35 mm film camera).
* Wide range of power supply from any of alkaline, Ni-Cd, Ni-MH and Oxyride batteries.
Features and Functions of Sunpak PZ42X
■ Before Use ● After this unit has been installed on the camera, be sure to hold the camera
by its body. If you carry the camera by holding the flash, the camera may slip out of the shoe.
● For information on function interlocking with the camera, please contact our service center or visit the Sunpak website (sunpak.jp).
● The distance range indication may not be shown with certain cameras or lenses.
12
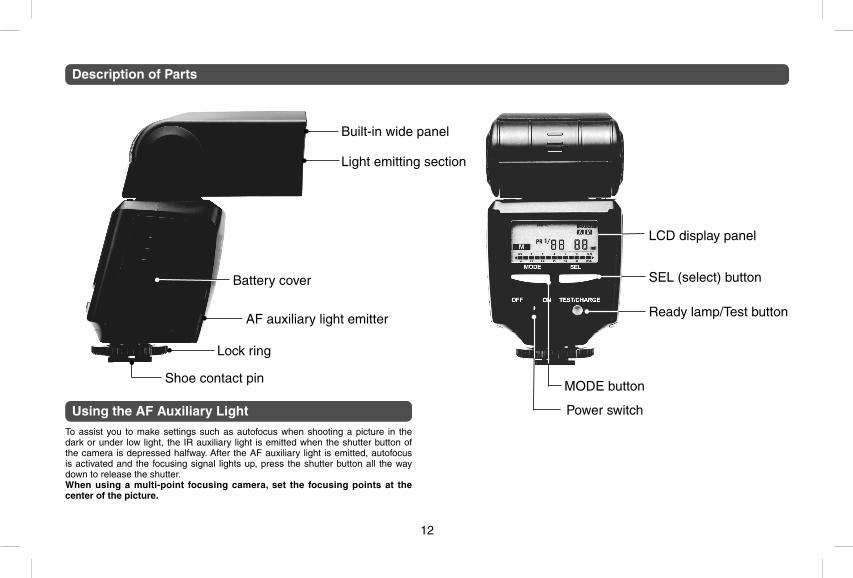
Description of Parts
To assist you to make settings such as autofocus when shooting a picture in the dark or under low light, the IR auxiliary light is emitted when the shutter button of the camera is depressed halfway. After the AF auxiliary light is emitted, autofocus is activated and the focusing signal lights up, press the shutter button all the way down to release the shutter.When using a multi-point focusing camera, set the focusing points at the center of the picture.
Using the AF Auxiliary Light
Built-in wide panel
Light emitting section
Battery cover
AF auxiliary light emitter
Lock ring
Shoe contact pin
LCD display panel
SEL (select) button
Ready lamp/Test button
MODE button
Power switch
13
English
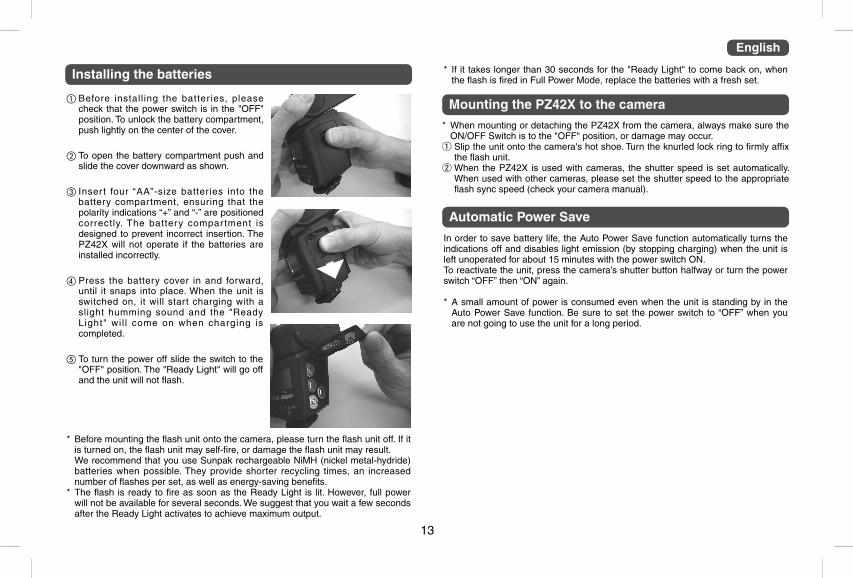
Installing the batteries
A Before install ing the batter ies, please check that the power switch is in the "OFF" position. To unlock the battery compartment, push lightly on the center of the cover.
B To open the battery compartment push and slide the cover downward as shown.
C Inser t four “AA”-size batteries into the battery compartment, ensuring that the polarity indications “+” and “-” are positioned correctly. The battery compar tment is designed to prevent incorrect insertion. The PZ42X will not operate if the batteries are installed incorrectly.
D Press the battery cover in and forward, until it snaps into place. When the unit is switched on, it will start charging with a slight humming sound and the "Ready Light" wi l l come on when charging is completed.
E To turn the power off slide the switch to the "OFF" position. The "Ready Light" will go off and the unit will not flash.
* Before mounting the flash unit onto the camera, please turn the flash unit off. If it is turned on, the flash unit may self-fire, or damage the flash unit may result.
We recommend that you use Sunpak rechargeable NiMH (nickel metal-hydride) batteries when possible. They provide shorter recycling times, an increased number of flashes per set, as well as energy-saving benefits.
* The flash is ready to fire as soon as the Ready Light is lit. However, full power will not be available for several seconds. We suggest that you wait a few seconds after the Ready Light activates to achieve maximum output.
* If it takes longer than 30 seconds for the "Ready Light" to come back on, when the flash is fired in Full Power Mode, replace the batteries with a fresh set.
Mounting the PZ42X to the camera
Automatic Power Save
In order to save battery life, the Auto Power Save function automatically turns the indications off and disables light emission (by stopping charging) when the unit is left unoperated for about 15 minutes with the power switch ON. To reactivate the unit, press the camera’s shutter button halfway or turn the power switch “OFF” then “ON” again.
* A small amount of power is consumed even when the unit is standing by in the Auto Power Save function. Be sure to set the power switch to “OFF” when you are not going to use the unit for a long period.
* When mounting or detaching the PZ42X from the camera, always make sure the ON/OFF Switch is to the "OFF" position, or damage may occur. Slip the unit onto the camera's hot shoe. Turn the knurled lock ring to firmly affix the flash unit. When the PZ42X is used with cameras, the shutter speed is set automatically. When used with other cameras, please set the shutter speed to the appropriate flash sync speed (check your camera manual).
14
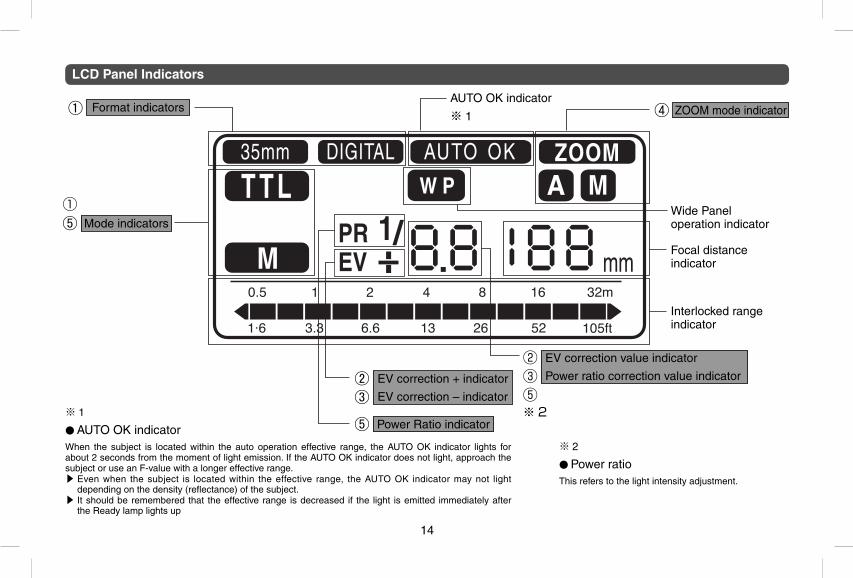
LCD Panel Indicators
※ 1
●AUTO OK indicatorWhen the subject is located within the auto operation effective range, the AUTO OK indicator lights for about 2 seconds from the moment of light emission. If the AUTO OK indicator does not light, approach the subject or use an F-value with a longer effective range.▶ Even when the subject is located within the effective range, the AUTO OK indicator may not light
depending on the density (reflectance) of the subject.▶ It should be remembered that the effective range is decreased if the light is emitted immediately after
the Ready lamp lights up
※ 2
●Power ratioThis refers to the light intensity adjustment.
Format indicators
① Mode indicators
Power Ratio indicator
AUTO OK indicator
※ 1 ZOOM mode indicator
Wide Panel operation indicator
Focal distance indicator
Interlocked range indicator
EV correction + indicator
EV correction – indicator
EV correction value indicator
Power ratio correction value indicator②③⑤※2
15
English
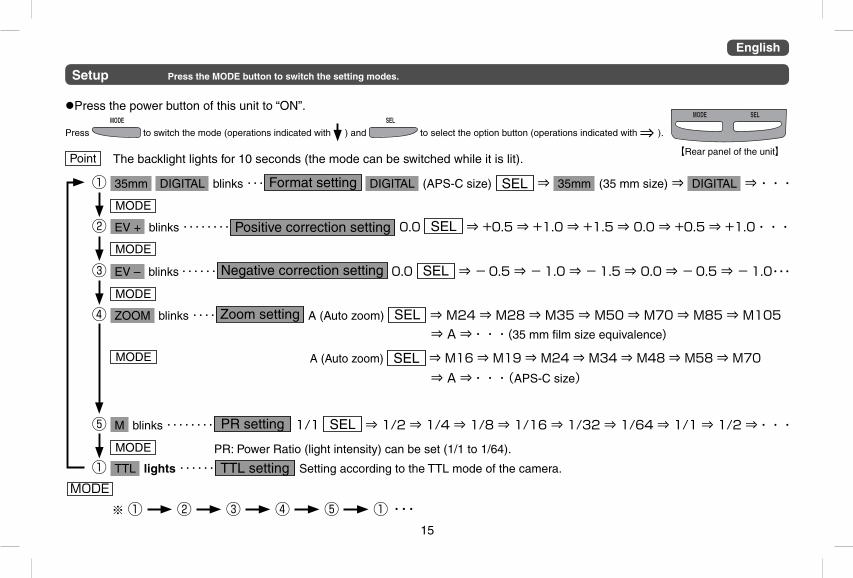
Setup Press the MODE button to switch the setting modes.
Press the power button of this unit to “ON”.
Press to switch the mode (operations indicated with ) and to select the option button (operations indicated with ⇒ ).
Point The backlight lights for 10 seconds (the mode can be switched while it is lit).【Rear panel of the unit】
① 35mm DIGITAL blinks ・・・ Format setting DIGITAL (APS-C size) SEL ⇒ 35mm (35 mm size) ⇒ DIGITAL ⇒ ・・・
MODE
② EV + blinks ・・・・・・・・ Positive correction setting 0.0 SEL ⇒ +0.5 ⇒ +1.0 ⇒ +1.5 ⇒ 0.0 ⇒ +0.5 ⇒ +1.0・・・
MODE
③ EV – blinks ・・・・・・ Negative correction setting 0.0 SEL ⇒ -0.5 ⇒ -1.0 ⇒ -1.5 ⇒ 0.0 ⇒ -0.5 ⇒ -1.0・・・
MODE
④ ZOOM blinks ・・・・ Zoom setting A (Auto zoom) SEL ⇒ M24 ⇒ M28 ⇒ M35 ⇒ M50 ⇒ M70 ⇒ M85 ⇒ M105 ⇒ A ⇒・・・(35 mm film size equivalence)
MODE A (Auto zoom) SEL ⇒ M16 ⇒ M19 ⇒ M24 ⇒ M34 ⇒ M48 ⇒ M58 ⇒ M70 ⇒ A ⇒・・・(APS-C size)
⑤ M blinks ・・・・・・・・ PR setting 1/1 SEL ⇒ 1/2 ⇒ 1/4 ⇒ 1/8 ⇒ 1/16 ⇒ 1/32 ⇒ 1/64 ⇒ 1/1 ⇒ 1/2 ⇒・・・
MODE PR: Power Ratio (light intensity) can be set (1/1 to 1/64).
① TTL lights ・・・・・・ TTL setting Setting according to the TTL mode of the camera.
MODE ※ ① ② ③ ④ ⑤ ① ・・・
16
The PX42X is capable of manual mode shooting in 7 steps from Full power to 1/64 power (in 1 EV steps). In the following cases, press the MODE button until “M” is displayed to make full use of the effects of the Manual mode.
When daylight sync flashing (in outdoor shooting under sunlight, the strobe light can be used as an auxiliary light to minimize shadows on the subject) or shooting against backlight is required.
▶ This indicates the shooting range displayed on the LCD panel. “▶ ” is displayed when the maximum distance (105 ft, or 32 m) is exceeded.
Shooting in Manual Mode
Shooting in TTL Mode
Mount the PZ42X on the camera and press the MODE button to enter the TTL mode, in which the built-in microcomputer instantaneously calculates exposure based on the camera’s aperture (F-value), ISO speed and other information. The effective TTL range is also calculated and optimum light emission is set according to the TTL information.The TTL effective range is displayed only when the shutter button of the camera is halfway depressed or the Ready light comes on. A bar graph shows the range from 1.5 ft to 105 ft (0.5m to 32m). “▶ ” will be displayed if this distance is exceeded.▶ The TTL mode of this unit adjusts automatically according to the mode of the
camera .▶ The shutter speed is set by X second below the shutter speed set on the
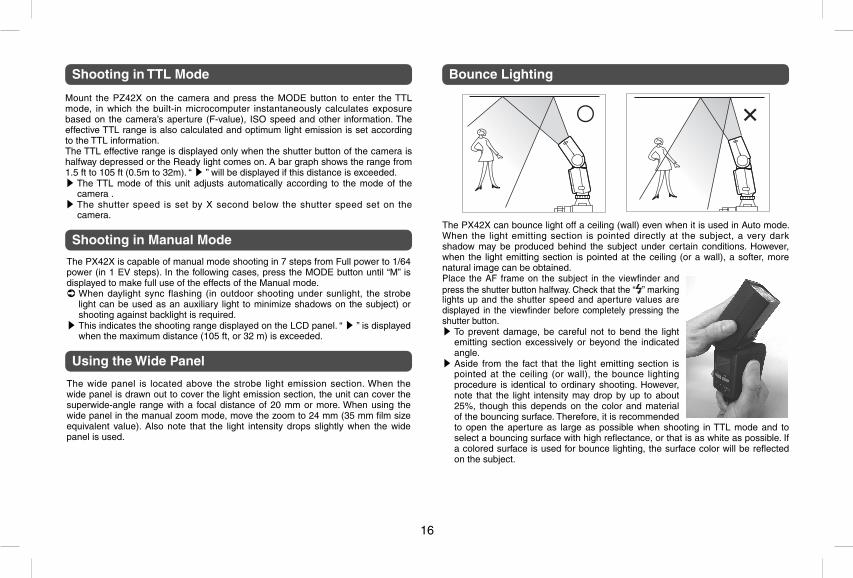
camera.The PX42X can bounce light off a ceiling (wall) even when it is used in Auto mode. When the light emitting section is pointed directly at the subject, a very dark shadow may be produced behind the subject under certain conditions. However, when the light emitting section is pointed at the ceiling (or a wall), a softer, more natural image can be obtained.Place the AF frame on the subject in the viewfinder and press the shutter button halfway. Check that the “ ” marking lights up and the shutter speed and aperture values are displayed in the viewfinder before completely pressing the shutter button.▶ To prevent damage, be careful not to bend the light
emitting section excessively or beyond the indicated angle.
▶ Aside from the fact that the light emitting section is pointed at the ceiling (or wall), the bounce lighting procedure is identical to ordinary shooting. However, note that the light intensity may drop by up to about 25%, though this depends on the color and material of the bouncing surface. Therefore, it is recommended to open the aperture as large as possible when shooting in TTL mode and to select a bouncing surface with high reflectance, or that is as white as possible. If a colored surface is used for bounce lighting, the surface color will be reflected on the subject.
Bounce Lighting
The wide panel is located above the strobe light emission section. When the wide panel is drawn out to cover the light emission section, the unit can cover the superwide-angle range with a focal distance of 20 mm or more. When using the wide panel in the manual zoom mode, move the zoom to 24 mm (35 mm film size equivalent value). Also note that the light intensity drops slightly when the wide panel is used.
Using the Wide Panel
17
Notes for Continuous Shooting
To prevent damage to the unit due to heat produced by continuous operation, do not use the flash continuously for more than about 10 shots. After continuous shooting, let the flash rest for at least 10 minutes before using it again.
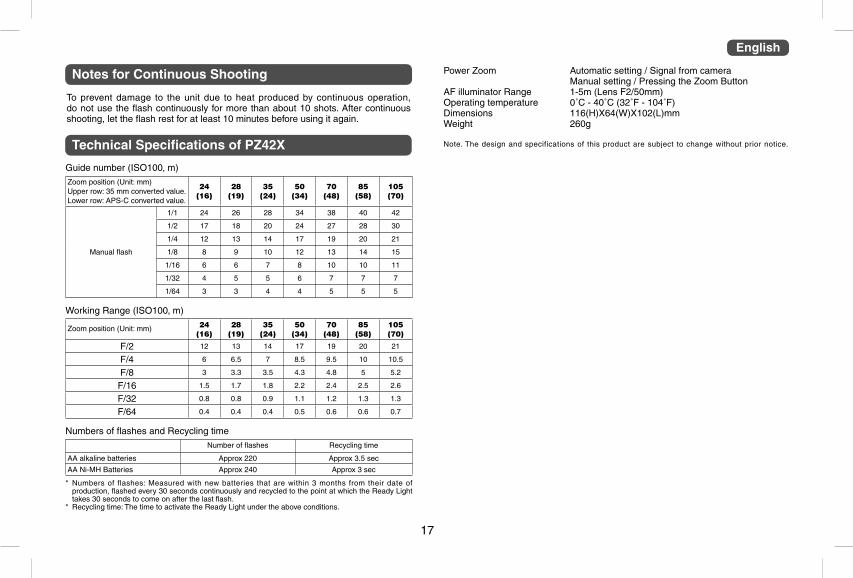
Technical Specifications of PZ42X
English
Power Zoom Automatic setting / Signal from camera Manual setting / Pressing the Zoom ButtonAF illuminator Range 1-5m (Lens F2/50mm)Operating temperature 0˚C - 40˚C (32˚F - 104˚F)Dimensions 116(H)X64(W)X102(L)mmWeight 260g
Note. The design and specifications of this product are subject to change without prior notice.
Guide number (ISO100‚ m)
Zoom position (Unit: mm)Upper row: 35 mm converted value.Lower row: APS-C converted value.
24(16)
28(19)
35(24)
50(34)
70(48)
85(58)
105(70)
Manual flash
1/1 24 26 28 34 38 40 42
1/2 17 18 20 24 27 28 30
1/4 12 13 14 17 19 20 21
1/8 8 9 10 12 13 14 15
1/16 6 6 7 8 10 10 11
1/32 4 5 5 6 7 7 7
1/64 3 3 4 4 5 5 5
Working Range (ISO100‚ m)
Zoom position (Unit: mm) 24(16)
28(19)
35(24)
50(34)
70(48)
85(58)
105(70)
F/2 12 13 14 17 19 20 21
F/4 6 6.5 7 8.5 9.5 10 10.5
F/8 3 3.3 3.5 4.3 4.8 5 5.2
F/16 1.5 1.7 1.8 2.2 2.4 2.5 2.6
F/32 0.8 0.8 0.9 1.1 1.2 1.3 1.3
F/64 0.4 0.4 0.4 0.5 0.6 0.6 0.7
Numbers of flashes and Recycling time
Number of flashes Recycling time
AA alkaline batteries Approx 220 Approx 3.5 sec
AA Ni-MH Batteries Approx 240 Approx 3 sec
* Numbers of flashes: Measured with new batteries that are within 3 months from their date of production, flashed every 30 seconds continuously and recycled to the point at which the Ready Light takes 30 seconds to come on after the last flash.
* Recycling time: The time to activate the Ready Light under the above conditions.