ihc/icc protocol guide
TRANSCRIPT

IHC/ICC Protocol Guide

Cover images generated using R&D Systems brand antibodies. To view the continuously updated IHC/ICC image gallery, please visit rndsystems.com/IHCimages.
©2014 R&D Systems
Trademark and registered trademarks are the property of their respective owners.
This guide provides an introduction to the techniques, protocols, and troubleshooting methods that lead to a successful immunohistochemistry (IHC) or immunocytochemistry (ICC) experiment. Contributors include scientists from our IHC/ICC core facility who have experience qualifying thousands of antibodies for these applications and our expert technical service team who have guided researchers through a range of IHC/ICC-related issues. To view these protocols online, please visit rndsystems.com/IHCProtocol.
To learn more about R&D Systems brand antibodies, please visit rndsystems.com/Antibodies. This page also allows you to search for primary and secondary antibodies for your research. Use the drop-down menu to filter by species, application, and conjugate.
Introduction to the IHC/ICC Method . . . . . . . . . . . . . . . . . . . . . . . . . 1–11
Designing a Successful IHC/ICC Experiment . . . . . . . . . . . . . . . . . . . . . .3
Sample Preparation . . . . . . . . . . . . . . . . . . . . . . . . . . . . . . . . . . . . . . . . . .4
Paraffin-Embedded Tissue
Frozen Tissue
Cell Samples
Fixation . . . . . . . . . . . . . . . . . . . . . . . . . . . . . . . . . . . . . . . . . . . . . . . . . . . .5
Formaldehyde
Alcohols
Acetone
Fixation of Tissues
Fixation of Cultured Cells
Preventing Non-Specific Staining . . . . . . . . . . . . . . . . . . . . . . . . . . . . . . .6
Preventing Non-Specific Hydrophobic Interactions
Preventing Non-Specific Ionic Interactions
Endogenous Enzyme Interference
Endogenous Biotin Interference
Primary Antibody Selection and Optimization . . . . . . . . . . . . . . . . . . . . .7
Selecting a Primary Antibody Supplier
Selecting a Monoclonal or Polyclonal Antibody
Affinity Purification of Polyclonal Antibodies
Optimization of Primary Antibody Incubation
Detection and Visualization . . . . . . . . . . . . . . . . . . . . . . . . . . . . . . . . . 8–9
Direct or Indirect Detection and Amplification
Fluorescence Detection
Chromogenic Detection
IHC/ICC Controls . . . . . . . . . . . . . . . . . . . . . . . . . . . . . . . . . . . . . . . . . . .10
Endogenous Tissue Background Control
No Primary Antibody Control
Isotype Control
Absorption Control
Tissue Type Control
Limitations of Western Blot Comparisons
Antigen Retrieval . . . . . . . . . . . . . . . . . . . . . . . . . . . . . . . . . . . . . . . . . . 11
Antigen Retrieval Techniques
Protease-Induced Epitope Retrieval (PIER)
Heat-Induced Epitope Retrieval (HIER)
Optimization and Limitations
IHC/ICC Protocols . . . . . . . . . . . . . . . . . . . . . . . . . . . . . . . . . . . . . . . 13–22
Making a 4% Formaldehyde Solution in PBS . . . . . . . . . . . . . . . . . . . . .14
Preparation of Gelatin-Coated Slides for Histological Tissue Sections . . . . . . . . . . . . . . . . . . . . . . . . . . . . . . 15
Chromogenic Staining of Tissue Sections Using HRP-DAB Detection . . . . . . . . . . . . . . . . . . . . . . . . . . . . . . . . 16–17
Slide Preparation
Chromogenic Staining Using HRP-DAB Detection
IHC Staining of Tissue Sections for Fluorescence Microscopy . . . . . . 18
Antigen Retrieval Using Heat-Induced Epitope Retrieval (HIER) . . . . . 19
Preparation of Coverslips and Cell Fixation for ICC . . . . . . . . . . . . . . . 20
Coverslip Preparation Using Gelatin
Preparation and Fixation of Cells on Coverslips
Fluorescent ICC Staining of Cultured Cells . . . . . . . . . . . . . . . . . . . . . .21
Preparation of a Cell Smear for Non-Adherent Cell ICC . . . . . . . . . . . 22
Troubleshooting Guide . . . . . . . . . . . . . . . . . . . . . . . . . . . . . . . . . . . . . . .23
Table of Contents


Introduction to the IHC/ICC Method
1

IHC/ICC Protocol Guide
2

3
Designing a Successful IHC/ICC ExperimentImmunohistochemistry (IHC) and immunocyto-chemistry (ICC) are techniques employed to localize antigen expression and are dependent on specific epitope-antibody interactions. IHC refers to the use of tissue sections, whereas ICC describes the use of cultured cells or cell suspensions. In both methods, positive staining is visualized using a molecular label, which can be fluorescent or chromogenic. Briefly, samples are fixed to preserve cellular integrity and then subjected to incubation with blocking reagents to prevent non-specific binding of the antibodies. Samples are subsequently incubated with primary and secondary antibodies, and the signal is visualized for microscopic analysis.
Technically, IHC/ICC are relatively simple and straightforward experimental methods. However, there are many variables which must be recognized and optimized for each individual IHC/ICC study. The most challenging aspect of these techniques is determining the experimental conditions necessary to generate a strong and specific signal for each antigen of interest. For example, detection of an abundant protein in cultured cells may require a short fixation period, minimal blocking, and may be compatible with direct visualization using a flurochrome-conjugated primary antibody. In contrast, detection of a phosphorylation-dependent epitope in a section of frozen tissue may require antigen retrieval and be dependent on amplified chromogenic visuali zation. This guide provides information on the IHC/ICC variables listed below and is intended to assist in the design, optimization, and trouble shooting of IHC/ICC experiments.
Examples of Fluorescence Detection by IHC and ICC. A. Fluorescence detection of V-Set and Ig Domain-Containing Protein 1 (VSIG1) in immersion-fi xed frozen sections of human testis using a Sheep Anti-Human VSIG1 Antigen Affi nity-Purifi ed Polyclonal Antibody (Catalog # AF4818). The tissue was stained using the NorthernLights™ 557-Conjugated Donkey Anti-Sheep IgG Secondary Antibody (Catalog # NL010; red) and counterstained with DAPI (blue). B. Fluorescence detection of Glial Fibrillary Acidic Protein (GFAP) expression in differentiating cultures of rat cortical stem cells using a Sheep Anti-Human GFAP Antigen Affi nity-Purifi ed Polyclonal Antibody (Catalog # AF2594). The cells were stained using the NorthernLights 557-Conjugated Donkey Anti-Sheep IgG Secondary Antibody (Catalog # NL010; red) and counter-stained with DAPI (blue).
Examples of Chromogenic Detection by IHC and ICC. A. Chromogenic detection of Interferon Regulator Transcription Factor 8 (IRF8) expression in immersion-fi xed paraffi n-embedded sections of human lymphoma tissue using a Sheep Anti-Human IRF8 Antigen Affi nity-Purifi ed Polyclonal Antibody (Catalog # AF5117). The tissue was stained using the Anti-Sheep HRP-DAB Cell & Tissue Staining Kit (Catalog # CTS019; brown) and counter stained with hematoxylin (blue). B. Chromogenic detection of IFN-γ expression in human peripheral blood mononuclear cells that were stimulated with 0.5 mg/mL of calcium ionomycin and 50 ng/mL of PMA using a Goat Anti-Human IFN-γ Antigen Affi nity-Purifi ed Polyclonal Antibody (Catalog # AF285). The cells were stained using the Anti-Goat HRP-DAB Cell & Tissue Staining Kit (Catalog # CTS008; brown) and counterstained with hematoxylin (blue).
Variable Factors
Antigen Species, expression levels, sample types, and subcellular location
Epitope Dependence on conformation or post-translation modifi cation
Sample Type Tissue or cells
Sample PreparationTissue: embedded or frozen
Cells: adhered cell cultures or cell suspensions
Appropriate ControlsNo primary antibody, isotype control, absorption control, tissue type control
Fixation Method Perfusion or immersion (with or without freezing)
Fixative* Formaldehyde, alcohols, or acetone
Blocking Reagent* Normal serum, bovine serum albumin (BSA), or non-fat milk
Antigen Retrieval*Protease-Induced Epitope Retrieval (PIER) or Heat-Induced Epitope Retrieval (HIER)
Detection Method Direct or indirect (with or without amplifi cation)
Variable Factors
Primary Antibody* Monoclonal or polyclonal
Secondary Antibody* Species and label
Labeling Method Fluorescence or chromogenic
Label
Fluorochromes and spectral properties
Chromogens: 3,3'-diaminobenzidine (DAB), 3-amino-9-ethylcarbazole (AEC)
Counterstain*Fluorescence: 4,6'-diamidino-2-phenylindole (DAPI)
Chromogenic: hematoxylin
Mounting Reagent
Fluorescence: anti-fade mounting medium
Chromogenic: aqueous mounting medium
Visualization and Analysis
Fluorescence microscope or standard light microscope
Variables for Experimental Design and Optimization
A. A.
B. B.
Introduction to the IHC/ICC Method
* These variables require optimization of additional factors including concentration, pH, temperature, incubation time, and diluent.
This table is not intended to be comprehensive but represents themost commonly applied IHC/ICC methods at R&D Systems.
IHC/ICC Protocol Guide
4
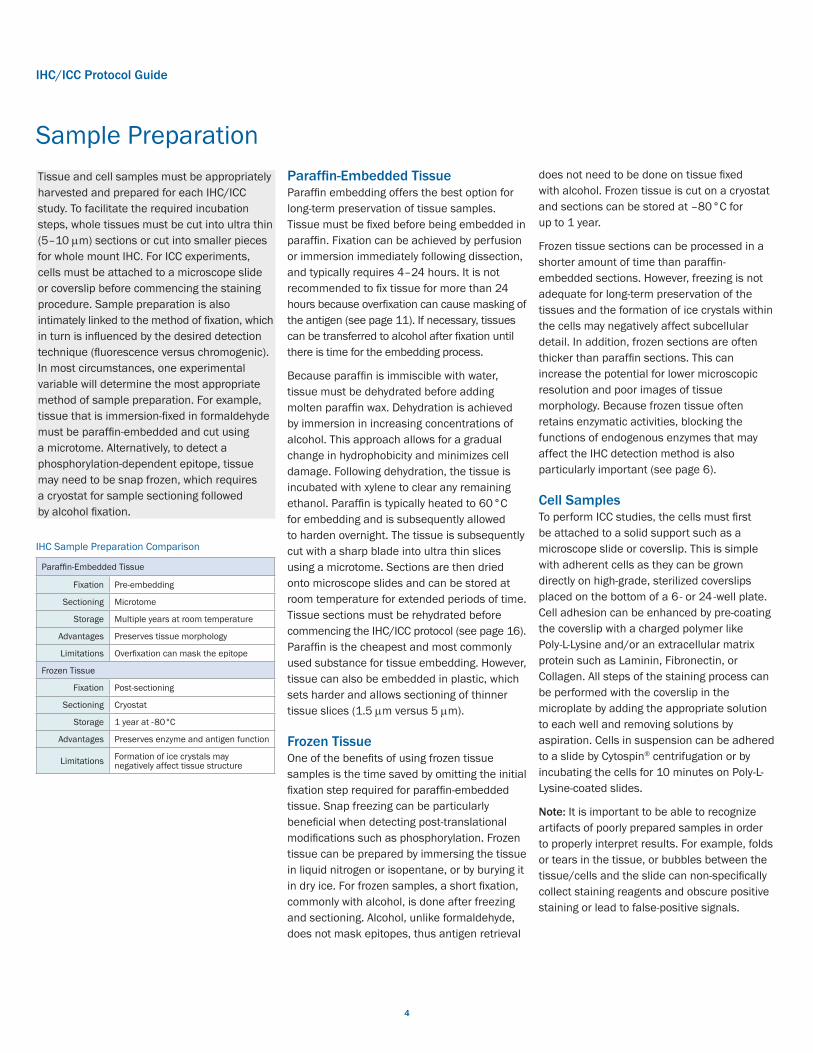
Tissue and cell samples must be appropriately harvested and prepared for each IHC/ICC study. To facilitate the required incubation steps, whole tissues must be cut into ultra thin (5–10 mm) sections or cut into smaller pieces for whole mount IHC. For ICC experiments, cells must be attached to a microscope slide or coverslip before commencing the staining procedure. Sample preparation is also intimately linked to the method of fixation, which in turn is influenced by the desired detection technique (fluorescence versus chromo genic). In most circumstances, one experimental variable will determine the most appropriate method of sample preparation. For example, tissue that is immersion-fixed in formaldehyde must be paraffin-embedded and cut using a microtome. Alternatively, to detect a phosphorylation-dependent epitope, tissue may need to be snap frozen, which requires a cryostat for sample sectioning followed by alcohol fixation.
Paraffin-Embedded TissueParaffin embedding offers the best option for long-term preservation of tissue samples. Tissue must be fixed before being embedded in paraffin. Fixation can be achieved by perfusion or immersion immediately following dissection, and typically requires 4–24 hours. It is not recommended to fix tissue for more than 24 hours because overfixation can cause masking of the antigen (see page 11). If necessary, tissues can be transferred to alcohol after fixation until there is time for the embedding process.
Because paraffin is immiscible with water, tissue must be dehydrated be fore adding molten paraffin wax. Dehydration is achieved by immersion in increasing concentrations of alcohol. This approach allows for a gradual change in hydropho bicity and minimizes cell damage. Following dehydration, the tissue is incubated with xylene to clear any remaining ethanol. Paraffin is typi cally heated to 60 °C for embedding and is subsequently allowed to harden overnight. The tissue is subsequently cut with a sharp blade into ultra thin slices using a microtome. Sections are then dried onto micro scope slides and can be stored at room temperature for extended periods of time. Tissue sections must be rehydrated before commencing the IHC/ICC protocol (see page 16). Paraffin is the cheapest and most commonly used substance for tissue embedding. However, tissue can also be embedded in plastic, which sets harder and allows sectioning of thinner tissue slices (1.5 mm versus 5 mm).
Frozen TissueOne of the benefits of using frozen tissue samples is the time saved by omitting the initial fixation step required for paraffin-embedded tissue. Snap freezing can be particularly beneficial when detecting post-translational modifications such as phosphorylation. Frozen tissue can be prepared by immersing the tissue in liquid nitrogen or isopentane, or by burying it in dry ice. For frozen samples, a short fixation, commonly with alcohol, is done after freezing and sectioning. Alcohol, unlike formaldehyde, does not mask epitopes, thus antigen retrieval
does not need to be done on tissue fixed with alcohol. Frozen tissue is cut on a cryostat and sections can be stored at –80 °C for up to 1 year.
Frozen tissue sections can be processed in a shorter amount of time than paraffin-embedded sections. However, freezing is not adequate for long-term preservation of the tissues and the formation of ice crystals within the cells may negatively affect subcellular detail. In addition, frozen sections are often thicker than paraffin sections. This can increase the potential for lower microscopic resolution and poor images of tissue morphology. Because frozen tissue often retains enzymatic activities, blocking the functions of endogenous enzymes that may affect the IHC detection method is also particularly important (see page 6).
Cell SamplesTo perform ICC studies, the cells must first be attached to a solid support such as a microscope slide or coverslip. This is simple with adherent cells as they can be grown directly on high-grade, sterilized coverslips placed on the bottom of a 6- or 24-well plate. Cell adhesion can be enhanced by pre-coating the coverslip with a charged polymer like Poly-L-Lysine and/or an extracellular matrix protein such as Laminin, Fibronectin, or Collagen. All steps of the staining process can be performed with the coverslip in the microplate by adding the appropriate solution to each well and removing solutions by aspiration. Cells in suspension can be adhered to a slide by Cytospin® centrifugation or by incubating the cells for 10 minutes on Poly-L-Lysine-coated slides.
Note: It is important to be able to recognize artifacts of poorly prepared samples in order to properly interpret results. For example, folds or tears in the tissue, or bubbles between the tissue/cells and the slide can non-specifically collect staining reagents and obscure positive staining or lead to false-positive signals.
Sample Preparation
Paraffin-Embedded Tissue
Fixation Pre-embedding
Sectioning Microtome
Storage Multiple years at room temperature
Advantages Preserves tissue morphology
Limitations Overfixation can mask the epitope
Frozen Tissue
Fixation Post-sectioning
Sectioning Cryostat
Storage 1 year at -80°C
Advantages Preserves enzyme and antigen function
Limitations Formation of ice crystals may negatively affect tissue structure
IHC Sample Preparation Comparison

5
FormaldehydeFormaldehyde is the most common fixative used to preserve protein targets within tissues and cells. Formaldehyde-mediated tissue fixation is thought to be dependent on the formation of protein-protein and protein-nucleic acid cross-links involving methylene bridges (-CH2-). Formaldehyde can chemically link NH2 (amino) and CONH (peptide) groups, NH2 and NH, or NH2 and NH2 groups.
Formaldehyde is a good choice for most IHC/ICC applications but is not a universal fixative. Overfixation with formaldehyde can modify the amino acids that are part of an epitope and can block an antibody from binding to it. However, in most cases, the epitope can be unmasked to restore antibody bind ing using antigen retrieval techniques (see page 11). Formaldehyde has been shown to induce intracellular translocation of phosphorylation-dependent epitopes from the membrane to the cytoplasm. In situations like this, ice-cold absolute methanol or absolute ethanol are appropriate alternative fixatives.
Note: Although there are many different fixatives available, formaldehyde is most commonly used, and is an appropriate starting point for most IHC/ICC experiments. Formaldehyde-based solutions should be
aliquoted and frozen, or stored at 4–8°C for up to one month. See page 14 for a protocol for making a typical 4% formaldehyde solution.
AlcoholsThe most popular alcohols used for cell and tissue fixation are methanol and ethanol. The molecular structures of methanol and ethanol closely resemble that of water. Therefore, they compete with water for protein hydrogen bonds, replacing water molecules in tissues. This causes proteins to precipitate at their isoelectric points by reducing their dielectric constant, and can block antibody-epitope binding due to changes in conformation. While alcohols affect the tertiary structure of proteins by breaking hydrophobic bonds, it appears that they can stabilize the secondary structure of proteins.
However, it is generally thought that alcohols do not preserve tissue morphology as well as formaldehyde-based fixatives. Alcohols do not penetrate as well as formaldehyde and are primarily used to fix frozen tissue sections and cells. Consequently, alcohol fixation is more suitable for membrane surface antigens. Antigen retrieval is not recommended following alcohol fixation as it is generally considered too harsh and will likely compromise the integrity of the tissue sections or cells.
AcetoneAcetone is a strong dehydrating agent that can cause irreversible pre cipitation of tissue proteins. It is usually used on sections of unfixed, snap-frozen tissues, followed by fixation with alcohols or formaldehyde.
Fixation of Tissues Whole animal perfusion-fixation is often the best way to preserve antigens when studying intact tissues of small animals such as mice, rats, and guinea pigs. It involves replacing the animal’s systemic blood with a fixative solution. However, whole animal perfusion may not be sufficient to fix the tissues of interest. In cases such as these, dissected tissues can be immersed in the fixative. For example, 4% formaldehyde in PBS is commonly used as a solution for perfusion- and immersion-fixation of tissues.
To enhance penetration of the fixative during immersion-fixation, it is recommended that tissues be no thicker than 10 mm. For complete fix a tion, the volume of the fixative should be 50–100 times larger than the volume of the tissue. Fixation is usually achieved at room temperature for 4–24 hours. It is very important to optimize fixation conditions since underfixation or overfixation may reduce or abolish tissue immunoreac tivity.
Fixation of Cultured CellsIn contrast to tissue samples, cultured cells can be fixed for a shorter period of time with a less concentrated fixative solution. For example, fix ation with a 2% formaldehyde solution for 20 minutes at room tempera ture is often sufficient to preserve both cellular morphology and antigenicity.
Fixation of cultured cells is usually achieved by simply discarding the culture medium and adding the fixative solution. However, the change in surface tension following removal of the culture medium can damage some cell types. If this is the case, the fixative can be added directly into the culture medium. For example, adding the same volume of 4% form aldehyde as the volume of culture medium will result in a 2% formalde hyde solution, which is strong enough to pre-fix the cells. After 2 minutes, the pre-fixation culture medium should be replaced with a fresh volume of 2% fixative. The pre-fixation step makes the cells more rigid so they can withstand any potential deleterious effects created by changes in surface tension.
Note: Fixa tion can result in hydrophobic cross-linking of tissue proteins. The time, temperature, pH, and fixative used will determine the degree of cross-linking. Once the fixation protocol has been optimized, the same pro cedure should be used consistently.
FixationAll samples used in IHC/ICC experiments must be fixed to preserve tissue morphology and retain the antigenicity of the target molecules. Fixation alters the chemical composition of tissues and often requires a compromise between preserving tissue structure and preserving the epitope. Incomplete fixation (underfixation) of cells or tissues may allow rapid proteolytic degradation of target proteins within the tissue and can reduce specific immunoreactivity. However, excessive fixation (overfixation) may result in masking of the epitope or in strong non-specific background staining that can obscure specific labeling. As discussed in the previous section, the method and timing of fixation must be considered in terms of sample preparation. In addition, duration, temperature, and pH will all affect the degree of fixation.
Introduction to the IHC/ICC Method
IHC/ICC Protocol Guide
6
Preventing Non-Specifi c Hydrophobic InteractionsAlthough hydrophobic interactions play an essential role in epitope-antibody binding, these forces can also promote non-specifi c binding. Most proteins have some degree of hydrophobicity due to the neutral side chains of several amino acids. Tissue incubation with heat-inactivated normal serum or bovine serum albumin (BSA) is a common procedure used to reduce non-specifi c hydrophobic binding. Selection of the type of normal serum is important to prevent interactions with the primary or secondary antibodies, or with the tissues/cells being stained. For example, goat serum would not be advised as a blocking reagent for use with a goat-derived primary antibody. Instead, a serum identical to the host animal of the secondary antibody or from an unrelated species is recommended. BSA and non-fat dry milk are also frequently used as blocking reagents. One of these reagents is
typically included in the diluents for the primary and secondary antibodies. The addition of non-ionic detergents including 0.3% Triton™ X-100 or Tween 20™ can also reduce non-specifi c hydrophobic interactions.
Preventing Non-Specifi c Ionic InteractionsIf the antibody employed and the target tissue have net opposite charge, ionic interactions can cause non-specifi c background staining. For ex ample, non-specifi c staining may be due to attraction between opposing carboxyl and amino groups. Van der Waals forces, weak electrostatic interactions between dipolar molecules, can also contribute. Increasing the ionic strength of the fi xative and/or the antibody diluent buffer can reduce ionic interactions. However, epitope-antibody binding is common ly dependent on ionic forces, so this approach also has the potential to negatively impact staining specifi city. Due to their single epitope speci fi city, increasing ionic strength is more likely to impair monoclonal rather than polyclonal antibody performance
Endogenous Enzyme InterferenceChromogenic detection methods often use a conjugated enzyme to vis ualize epitope-antibody interactions. When using this method of detection, the endogenous activity of the same enzyme must be blocked. For example, protocols that include Horseradish Peroxidase (HRP) or Alkaline Phospha tase (AP) may require reagents to prevent non-specifi c signals. Tissues such as kidney, liver, or vascular areas with red blood cells, contain endogenous peroxidase activity. Peroxidase blocking reagents formulated with 3–10% H2O2 can be used to prevent endogenous peroxidase from cleaving the substrate. Endogenous AP found in intestine, kidney, lymphoid, and other tissue can be blocked with 1 mM Levamisole. The intestinal form of AP is unaffected by Levamisole but can be blocked by using 1% acetic acid.
Endogenous Biotin InterferenceStreptavidin binding to a biotinylated primary or secondary antibody is another common detection system that is utilized for IHC/ICC experiments (see page 8). Therefore, endogenous Biotin must be blocked before Strep ta vidin incubation. Endo genous Biotin is found in many tissues including liver, kidney, heart, brain, and lung. Pre-incubation of the sample with Avidin is routinely used to block endogenous Biotin. This must be followed by a sub sequent incubation with Biotin to block additional Biotin binding sites on the Avidin molecule. Following these Biotin/Avidin blocking steps, the sample can be incubated with the primary antibody.
Once the tissue or cell samples have been appropriately prepared and fixed, the samples are ready to be stained. All IHC/ICC studies are dependent on specific antibody-epitope binding, which is governed by hydrophobic interactions, ionic interactions, hydrogen bonding, and other intermolecular forces. However, the same attractive forces can also result in non-specific staining, i.e. binding of the primary antibody to amino acids other than those within the desired epitope of the antigen. This is a common problem that occurs in IHC/ICC experiments. The challenge is to reduce non-specific interactions without impairing antibody-epitope binding. Causes of non-specific staining include interactions of the primary and secondary antibodies with serum proteins, ionic interactions between antibodies and tissues, and interactions with endogenous molecules capable of affecting the IHC detection system. These issues can result in high background and an inability to visualize the antigen of interest in its appropriate cellular location. Staining problems of this type can be addressed by blocking non-specific interactions using a blocking reagent. These steps are performed prior to incubation of the sample with the primary antibody.
Preventing Non-Specifi c Staining
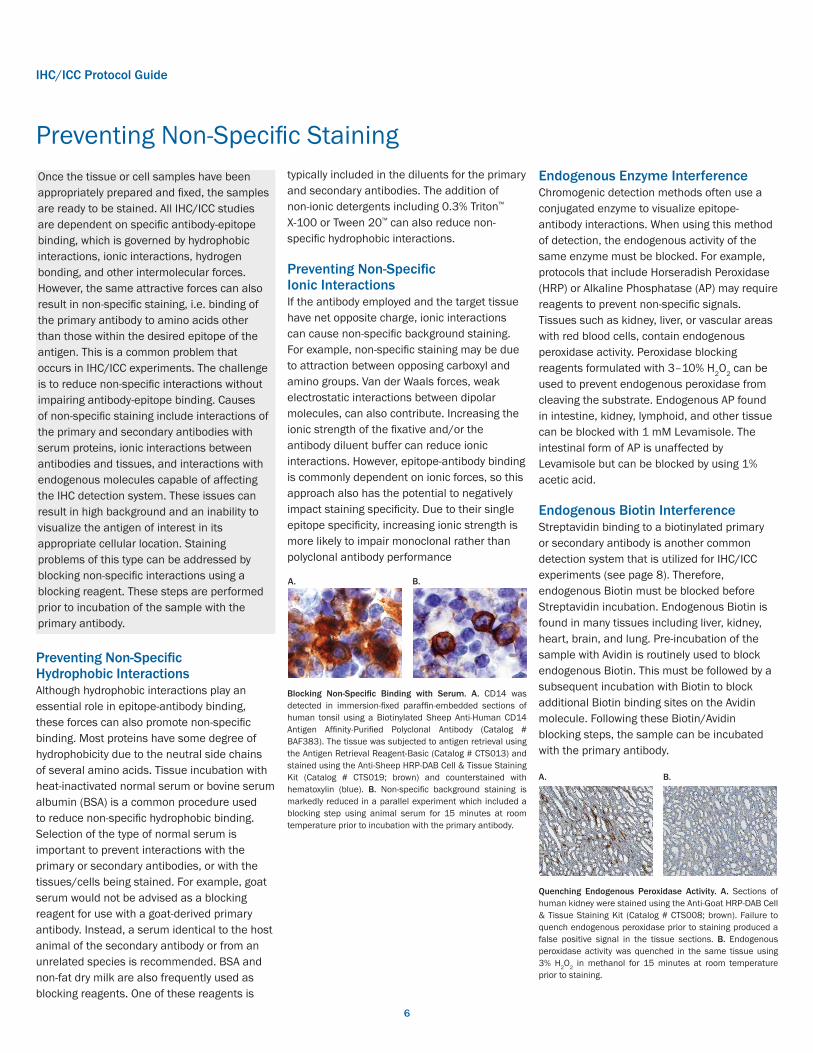
Blocking Non-Specifi c Binding with Serum. A. CD14 was detected in immersion-fi xed paraffi n-embedded sections of human tonsil using a Biotinylated Sheep Anti-Human CD14 Antigen Affi nity-Purifi ed Polyclonal Antibody (Catalog # BAF383). The tissue was subjected to antigen retrieval using the Antigen Retrieval Reagent-Basic (Catalog # CTS013) and stained using the Anti-Sheep HRP-DAB Cell & Tissue Staining Kit (Catalog # CTS019; brown) and counterstained with hematoxylin (blue). B. Non-specifi c back ground staining is markedly reduced in a parallel experiment which included a blocking step using animal serum for 15 minutes at room temperature prior to incubation with the primary antibody.
A. B.
Quenching Endogenous Peroxidase Activity. A. Sections of human kidney were stained using the Anti-Goat HRP-DAB Cell & Tissue Staining Kit (Catalog # CTS008; brown). Failure to quench endogenous peroxidase prior to staining produced a false positive signal in the tissue sections. B. Endogenous peroxidase activity was quenched in the same tissue using 3% H2O2 in methanol for 15 minutes at room temperature prior to staining.
A. B.
7
Selecting a Primary Antibody SupplierWhen searching for a primary antibody, it is likely that products will be available from several different commercial sources, offering varying degrees of antibody quality. This initial choice can make the difference between a successful experiment and a missed opportunity. The first step in searching for a primary antibody is to look for independent verification. This includes checking for prior successful use of the antibody in the literature. Many commercial suppliers, including Bio-Techne, can provide assistance to researchers looking for this information. Another potential question to ask is whether the antibody is actually manufactured by the supplier or is it purchased and resold? Purchasing an antibody directly from the manufacturer ensures the commercial source has had complete control of manufacturing, quality control processes, and shipping and storage conditions of the antibody. In addition, the manufacturer may be in the best position to provide quality technical service should questions arise about the use of the antibody.
Selecting a Monoclonal or Polyclonal AntibodyThe inherent features of monoclonal and polyclonal antibodies are as sociated with advantages and limitations when applied to IHC/ICC. Mono clonal antibodies, produced from a single B cell clone, represent a homo-
geneous population that bind with high affinity and specificity to a single epitope. This can be particularly useful when detecting a single member of a protein family that shares a high percentage of amino acid sequence identity.
Antibody binding is often dependent on the target protein maintaining its native conformational state. Access to a desired epitope can be com promised by interactions with other proteins, post-translational modifica-tions, temperature, pH, fixation, and salt concen tration. Because polyclonal antibodies are heterogeneous and can recognize multiple epitopes, they are less likely to be affected by changes in protein conformation. In general, polyclonal antibodies are also more stable than monoclonal antibodies over a range of pH and salt concentration. For these reasons, polyclonal anti bodies are more frequently used for IHC/ICC experiments than monoclonal antibodies.
Affinity Purification of Polyclonal AntibodiesPolyclonal antiserum contains a mixture of antibodies produced by a large number of B cell clones. Antibodies comprising polyclonal antiserum bind to target epitopes with different specificities and affinities, as well as cross-react with irrelevant target molecules (non-specific interactions). To enrich for antibodies with the highest specificity and affinity toward the antigen of interest, R&D Systems brand polyclonal antibodies are antigen affinity-purified. During this process, polyclonal antiserum is passed through an affinity column containing immobilized antigen molecules. Specific antibodies are retained by the immobilized antigen, whereas non-specific anti bodies pass through the column and are discarded. The retained antigen affinity-purified antibodies are subsequently eluted from the column. Antigen af finity-purified antibodies interact predominantly with their target antigen,reduce background staining, and produce more consistent results com pared to non-purified antibodies.
Optimization of Primary Antibody IncubationPrimary antibody concentration, diluent, incubation time, and temperature all impact the quality of staining. These variables need to be optimized for each antibody and sample to achieve specific staining and low background. Often optimization is approached by maintaining a constant incubation time and temperature, while varying the antibody concentration to deter mine when an optimal signal is achieved with low background noise. For example, if a high-affinity antibody is used, then the antibody can be used at a relatively high concentration for a shorter incubation time. Alter natively, a high-affinity antibody at a lower antibody concentration may be used with a longer incubation time. Longer incubation durations are often employed to ensure penetration of the antibody throughout tissue sections. T o promote specific staining, longer incubation periods are often conducted at lower tempera-tures (i.e. 4 °C versus room temperature).
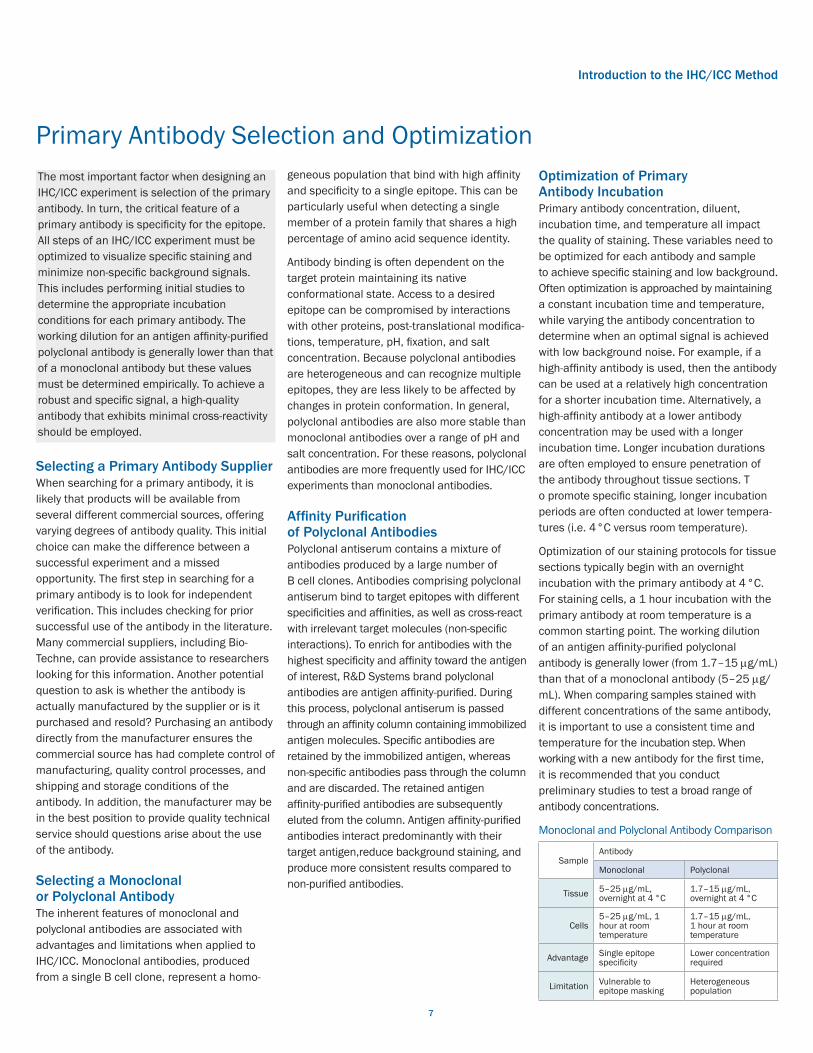
Optimization of our staining protocols for tissue sections typi cally begin with an overnight incubation with the primary antibody at 4 °C. For staining cells, a 1 hour incubation with the primary antibody at room temperature is a common starting point. The working dilution of an anti gen affinity-purified polyclonal antibody is generally lower (from 1.7–15 mg/mL) than that of a monoclonal antibody (5–25 mg/mL). When comparing samples stained with different concen trations of the same antibody, it is im portant to use a consistent time and temperature for the incubation step. When working with a new antibody for the first time, it is recom mended that you conduct preliminary studies to test a broad range of antibody concentrations.
The most important factor when designing an IHC/ICC experiment is selection of the primary antibody. In turn, the critical feature of a primary antibody is specificity for the epitope. All steps of an IHC/ICC experiment must be optimized to visualize specific staining and minimize non-specific background signals. This includes performing initial studies to determine the appropriate incubation conditions for each primary antibody. The working dilution for an antigen affinity-purified polyclonal antibody is generally lower than that of a monoclonal antibody but these values must be determined empirically. To achieve a robust and specific signal, a high-quality antibody that exhibits minimal cross-reactivity should be employed.
Primary Antibody Selection and Optimization
Introduction to the IHC/ICC Method
SampleAntibody
Monoclonal Polyclonal
Tissue 5–25 mg/mL, overnight at 4 °C
1.7–15 mg/mL, overnight at 4 °C
Cells5–25 mg/mL, 1 hour at room temperature
1.7–15 mg/mL, 1 hour at room temperature
Advantage Single epitope specificity
Lower concentration required
Limitation Vulnerable to epitope masking
Heterogeneous population
Monoclonal and Polyclonal Antibody Comparison

IHC/ICC Protocol Guide
8
Direct or Indirect Detection and Amplifi cationThe choice of whether to use direct or indirect detection is often dictated by the level of antigen expression. For example, detection of a highly expressed epitope might be possible using a primary antibody directly conjugated to a label. Advantages of direct detection include the ease of use for multicolor staining and the elimination of concerns regarding non-specifi c binding of the secondary antibody. The major disadvantage is that direct detection may lack the sensitivity required to visualize lower expression levels. In rare cases, the conjugation process may also have a negative impact on the affi nity of the primary antibody.
In contrast, indirect detection methods generally have a higher level of sensitivity and generate a more intense signal. The signal is amplifi ed us ing the indirect method because of the potential for at least two labeled secondary antibodies to bind to each primary antibody. However, the use of a secondary antibody requires extra blocking steps and additional controls.
Further amplifi cation of the signal can be achieved by taking advantage of the strong affi nity of Avidin and Streptavidin to bind Biotin. Avidin is a glycopro tein in egg white that combines stoichiometrically with Biotin. Streptavidin is purifi ed from the bacterium Streptomyces avidinii, is not glycosylated, and exhibits lower non-specifi c binding than Avidin. Both proteins bind four Biotins per molecule. If a biotinylated secondary anti body is employed, the signal can be signifi cantly amplifi ed by subsequent incubation with an Avidin-Biotin complex (ABC Method), or labeled Streptavidin-Biotin (LSAB Method). Streptavidin may be conju gated to a detection enzyme (i.e. Horseradish Peroxidase or Alka line Phosphatase) or fl uorochrome. Using these amplifi cation methods requires additional steps to prevent non-specifi c binding (see page 6).
Following incubation with the primary antibody, antibody binding is visualized using an appropriate detection system. The method of detection can be direct or indirect, and may generate a fluorescent or chromogenic signal. Direct detection involves the use of primary antibodies that are directly conjugated to a label. Indirect detection methods utilize a labeled secondary antibody raised against the primary antibody host species. Indirect methods can also include amplification steps to increase signal intensity. Commonly used labels for the visualization of epitope-antibody interactions include fluorophores and enzymes that convert soluble substrates into insoluble, chromogenic end products. The choice of label is affected by the detection method employed, personal preference, and the type of microscope equipment that is available.
Detection and VisualizationDetection Methods and Signal Intensity
Direct
Advantage Limitation
Good for multicolor labeling
Lower sensitivity
Indirect
Advantage Limitation
Higher sensitivity Potential non-specifi c binding of secondary antibodies
Amplifi cation – ABC Method
Advantage Limitation
Increased signal intensity Requires additional timeand controls
Amplifi cation – LSAB Method
Advantage Limitation
Increased signal intensity Requires additional timeand controls
KeyHRP
High-Sensitivity Streptavidin
Biotin
Secondary Antibody
Primary Antibody
Antigen

9
Fluorescence DetectionFluorescence detection is based on the use of fl uorochromes that emit light when excited by light of a shorter wavelength. The fl uorochrome can be conjugated directly to the primary or secondary antibody, or to Streptavidin. Immunofl uorescence is commonly used for the simultaneous visual ization of multiple cellular targets. For example, tissues can be incubated with a mixture of different primary antibodies followed by incubation with secondary reagents conjugated to fl uoro chromes that emit light at different wavelengths.
Multicolor experiments must be designed to limit cross-reactivity between the detection reagents and crossover between the spectral properties of the fl uorochromes being used. To limit cross-reactivity between secondary reagents, the primary antibodies should be derived from different species. This allows for the use of species-specifi c secondary antibodies that recognize only one primary antibody. However, there may be some instances when it is necessary to simultaneously use antibodies from the same species. This can be achieved using a biotinylated form of one of the primary antibodies. When using this
technique, tissues must be incubated with the non-biotinylated antibody fi rst, followed by incubation with the fl uorophore-conjugated secondary antibody. The tissues are then incubated with the biotinylated primary antibody followed by incubation with a Streptavidin-conjugated fl uorochrome. This approach will ensure that the Streptavidin conjugate will only bind the biotinylated antibody, limiting cross-reactivity.
Chromogenic DetectionTo facilitate chromogenic detection, the primary antibody, secondary anti body, or Streptavidin is conjugated to an enzyme. When a soluble organic substrate is applied, the enzyme reacts with the substrate to generate an insoluble colored product that is localized to the sites of antigen expression. Commonly used enzymes include Horseradish Peroxidase (HRP) and Al kaline Phosphatase, which convert 3,3′-diaminobenzidine (DAB) and 3-amino-9-ethylcarbazole (AEC) into brown and red end prod ucts, re spectively. DAB is more commonly used than AEC since the latter is soluble in alcohol and is more prone to fade when exposed to excessive light. Aqueous counterstain and mounting media must be used with AEC.
Chromogenic detection is considered to be more sensitive than that of immuno-fl uorescence, but is less convenient because it includes more incubation and blocking steps. Like immuno fl uorescence, chromogenic detection allows for the visualization of multiple antigens, but only if the antigens are confi ned to different locations in the cell and tissue because overlapping colors may obscure results. An advantage of DAB chromogen ic staining is that the colored precipitate formed during the reaction between HRP and DAB is not sensitive to light and the slides can be stored for many years. Unlike fl uorescence microscopy, which requires a specialized light source and fi lter sets, chromogenic techniques require only a typical light microscope.
Emission Filter
Dichroic Mirror
Sample
Excitation Filter
Excitation Light Source
Detection
Multicolor Fluorescence Microscopy. A typical immuno-fl uorescence setup that depicts the light source, a suitable fi lter set for the fl uorochrome of interest, and a detection mechanism.
R&D Systems Brand NorthernLights Fluorochromes Have Non-Overlapping Spectral Proper ties That Make Them Ideal for Multicolor IHC and ICC. A. Emission curves for NorthernLights 493-Conjugated Donkey Anti-Goat IgG (Catalog # NL003; green) and NorthernLights 557-Conjugated Donkey Anti-Mouse IgG (Catalog # NL007; red) Secondary Antibodies. B. Multicolor detection of β-III Tubulin and Nestin in immersion-fi xed differentiated Rat Cortical Stem Cells (Catalog # NSC001) using a Mouse Anti-Neuron-Specifi c β-III Tubulin Monoclonal Antibody (Catalog # MAB1195) and a Goat Anti-Rat Nestin Antigen Affi nity-Purifi ed Polyclonal Antibody (Catalog # AF2736). The cells were stained for β-III Tubulin using the NorthernLights 557-Conjugated Donkey Anti-Mouse IgG Secondary Antibody (Catalog # NL007; red) and for Nestin using the NorthernLights 493-Conjugated Donkey Anti-Goat IgG Secondary Antibody (Catalog # NL003; green). Nuclei were counterstained with DAPI (blue).
Emiss
ion
Inte
nsity
Wavelength (nm)
400 450 500 550 600 650 700
A.
B.
Introduction to the IHC/ICC Method
IHC/ICC Protocol Guide
10
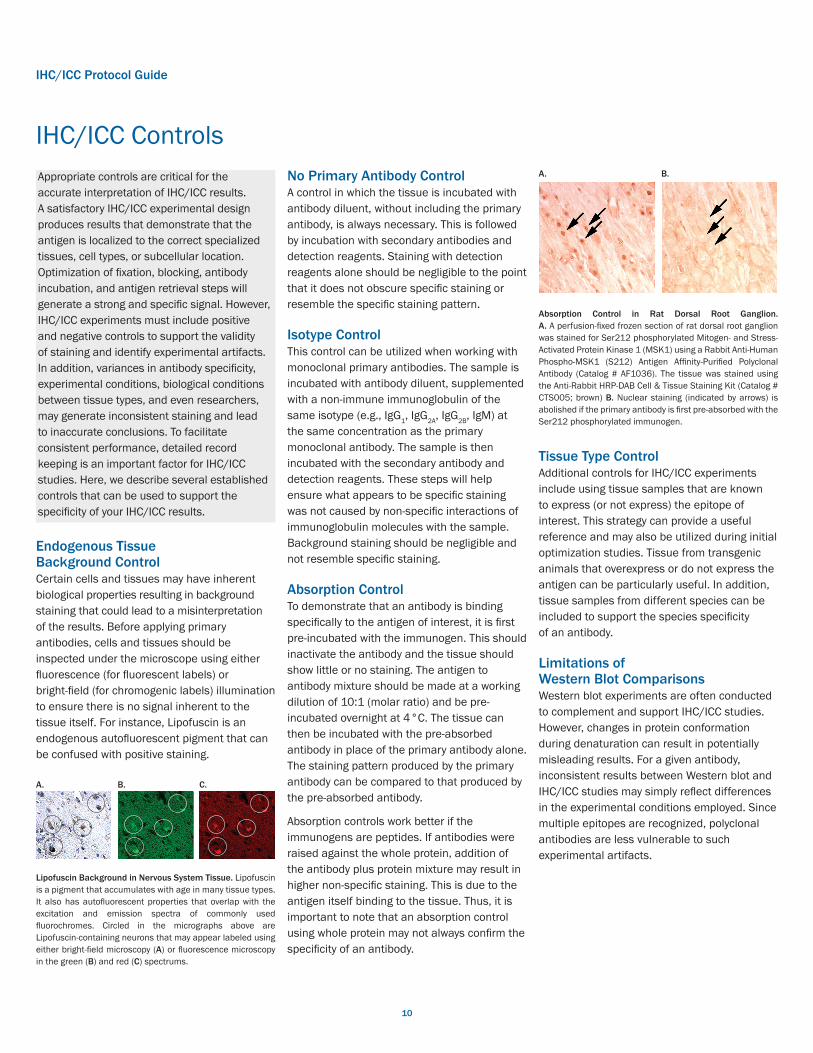
Endogenous Tissue Background Control Certain cells and tissues may have inherent bio logical properties resulting in background staining that could lead to a misinterpretation of the re sults. Before applying primary antibodies, cells and tissues should be in spected under the microscope using either fluorescence (for fl uores cent labels) or bright-fi eld (for chromogenic labels) illumination to ensure there is no signal inherent to the tissue itself. For instance, Lipofuscin is an endogenous autofl uorescent pigment that can be confused with positive staining.
No Primary Antibody Control A control in which the tissue is incubated with antibody diluent, without including the primary anti body, is always necessary. This is followed by incubation with secondary antibodies and detection reagents. Staining with detection reagents alone should be negligible to the point that it does not obscure specific staining or resemble the specifi c staining pattern.
Isotype Control This control can be utilized when working with monoclonal primary antibodies. The sample is incubated with antibody diluent, supplemented with a non-immune immuno globulin of the same isotype (e.g., IgG1, IgG2A, IgG2B, IgM) at the same concentration as the primary monoclonal anti body. The sample is then incubated with the secondary antibody and de tection reagents. These steps will help ensure what appears to be spe cific staining was not caused by non-specific interactions of immuno globulin molecules with the sample. Background staining should be neg ligible and not resemble specific staining.
Absorption Control To demonstrate that an antibody is binding specifi cally to the antigen of interest, it is fi rst pre-incubated with the immunogen. This should inactivate the antibody and the tissue should show little or no staining. The antigen to antibody mixture should be made at a working dilution of 10:1 (molar ratio) and be pre-incubated overnight at 4 °C. The tissue can then be incubated with the pre-absorbed antibody in place of the primary antibody alone. The staining pattern produced by the primary anti body can be compared to that produced by the pre-absorbed antibody.
Absorption controls work better if the immunogens are peptides. If antibodies were raised against the whole protein, addition of the antibody plus protein mixture may result in higher non-specifi c staining. This is due to the antigen itself binding to the tissue. Thus, it is important to note that an absorption control using whole protein may not always confi rm the specifi city of an antibody.
Tissue Type Control Additional controls for IHC/ICC experiments include using tissue samples that are known to express (or not express) the epitope of interest. This strategy can provide a useful reference and may also be utilized during initial optimization studies. Tissue from transgenic animals that overexpress or do not express the antigen can be particularly useful. In addition, tissue samples from different species can be included to support the species specifi city of an antibody.
Limitations of Western Blot ComparisonsWestern blot experiments are often conducted to complement and support IHC/ICC studies. However, changes in protein conformation during denaturation can result in potentially misleading results. For a given antibody, inconsistent results between Western blot and IHC/ICC studies may simply refl ect differences in the experimental conditions employed. Since multiple epitopes are recognized, polyclonal antibodies are less vulnerable to such experimental artifacts.
Appropriate controls are critical for the accurate interpretation of IHC/ICC results. A satisfactory IHC/ICC experimental design produces results that demonstrate that the antigen is localized to the correct specialized tissues, cell types, or sub cellular location. Optimization of fixation, blocking, antibody incubation, and antigen retrieval steps will generate a strong and specific signal. However, IHC/ICC experiments must include positive and negative controls to support the validity of staining and identify experimental artifacts. In addition, variances in antibody specificity, experimental conditions, biological conditions between tissue types, and even researchers, may generate inconsistent staining and lead to inaccurate conclusions. To facilitate consistent performance, detailed record keeping is an important factor for IHC/ICC studies. Here, we describe several established controls that can be used to support the specificity of your IHC/ICC results.
IHC/ICC Controls
Lipofuscin Background in Nervous System Tissue. Lipofuscin is a pigment that accumulates with age in many tissue types. It also has autofl uorescent properties that overlap with the excitation and emission spectra of commonly used fl uorochromes. Circled in the micrographs above are Lipofuscin-containing neurons that may appear labeled using either bright-fi eld microscopy (A) or fl uorescence microscopy in the green (B) and red (C) spectrums.
A. B. C.
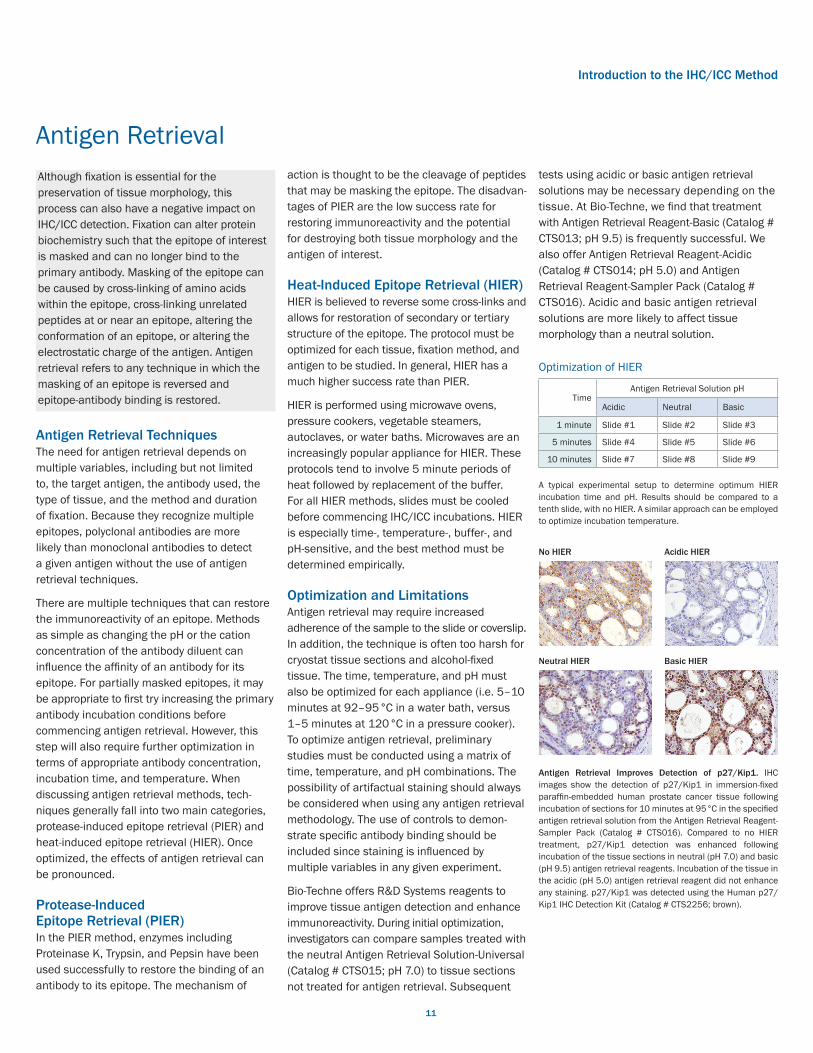
Absorption Control in Rat Dorsal Root Ganglion.A. A perfusion-fi xed frozen section of rat dorsal root ganglion was stained for Ser212 phosphorylated Mitogen- and Stress-Activated Protein Kinase 1 (MSK1) using a Rabbit Anti-Human Phospho-MSK1 (S212) Antigen Affi nity-Purifi ed Polyclonal Antibody (Catalog # AF1036). The tissue was stained using the Anti-Rabbit HRP-DAB Cell & Tissue Staining Kit (Catalog # CTS005; brown) B. Nuclear staining (indicated by arrows) is abolished if the primary antibody is fi rst pre-absorbed with the Ser212 phosphorylated immunogen.
A. B.
11
Antigen Retrieval TechniquesThe need for antigen retrieval depends on multiple variables, including but not limited to, the target antigen, the antibody used, the type of tissue, and the method and duration of fixation. Because they recognize multiple epitopes, polyclonal antibodies are more likely than monoclonal antibod ies to de tect a given antigen without the use of antigen retrieval techniques.
There are multiple techniques that can restore the immuno reactivity of an epitope. Methods as simple as changing the pH or the cation concentration of the antibody diluent can influence the affinity of an antibody for its epitope. For partially masked epitopes, it may be appropriate to first try increasing the primary antibody incubation conditions before commen cing antigen retrieval. However, this step will also require further op timization in terms of appropriate antibody concentration, incubation time, and temperature. When discussing antigen retrieval methods, tech-niques generally fall into two main categories, protease-induced epitope retrieval (PIER) and heat-induced epitope retrieval (HIER). Once optimized, the effects of antigen retrieval can be pronounced.
Protease-Induced Epitope Retrieval (PIER) In the PIER method, enzymes including Proteinase K, Trypsin, and Pepsin have been used success fully to restore the binding of an antibody to its epitope. The mechanism of
action is thought to be the cleavage of pep tides that may be masking the epitope. The disadvan-tages of PIER are the low success rate for restoring immuno reactivity and the potential for destroying both tissue morphology and the antigen of interest.
Heat-Induced Epitope Retrieval (HIER)HIER is believed to reverse some cross-links and allows for restoration of secondary or tertiary structure of the epitope. The protocol must be opti mized for each tissue, fixation method, and antigen to be studied. In gen eral, HIER has a much higher success rate than PIER.
HIER is performed using microwave ovens, pressure cookers, vegetable steamers, autoclaves, or water baths. Microwaves are an increasingly pop ular appliance for HIER. These protocols tend to involve 5 minute periods of heat followed by replacement of the buffer. For all HIER methods, slides must be cooled before commencing IHC/ICC incubations. HIER is especially time-, temperature-, buffer-, and pH-sensitive, and the best method must be determined em pirically.
Optimization and Limitations Antigen retrieval may require increased adherence of the sample to the slide or coverslip. In addition, the technique is often too harsh for cryostat tissue sections and alcohol-fixed tissue. The time, temperature, and pH must also be optimized for each appliance (i.e. 5–10 minutes at 92–95 °C in a water bath, versus 1–5 minutes at 120 °C in a pressure cooker). To optimize antigen retrieval, preliminary studies must be conducted using a matrix of time, temperature, and pH com binations. The possibility of artifactual staining should always be considered when using any antigen retrieval methodology. The use of controls to demon-strate specific anti body bind ing should be included since staining is influenced by multiple variables in any given experiment.
Bio-Techne offers R&D Systems reagents to improve tissue antigen detection and enhance immuno reactivity. During initial optimization, investigators can compare samples treated with the neutral Antigen Retrieval Solution-Universal (Catalog # CTS015; pH 7.0) to tissue sections not treated for antigen retrieval. Subsequent
tests using acidic or basic antigen retrieval solutions may be necessary depending on the tissue. At Bio-Techne, we find that treatment with Antigen Retrieval Reagent-Basic (Catalog # CTS013; pH 9.5) is frequently successful. We also offer Antigen Retrieval Reagent-Acidic (Catalog # CTS014; pH 5.0) and Antigen Retrieval Reagent-Sampler Pack (Catalog # CTS016). Acidic and basic antigen retrieval solutions are more likely to affect tissue morphology than a neutral solution.
Although fixation is essential for the preservation of tissue morphology, this process can also have a negative impact on IHC/ICC detection. Fixation can alter protein biochemistry such that the epitope of interest is masked and can no longer bind to the primary antibody. Masking of the epitope can be caused by cross-linking of amino acids within the epitope, cross-linking unrelated peptides at or near an epitope, altering the conformation of an epitope, or altering the electrostatic charge of the antigen. Antigen retrieval refers to any technique in which the masking of an epitope is reversed and epitope-antibody binding is restored.
Antigen Retrieval
Antigen Retrieval Improves Detection of p27/Kip1. IHC images show the detection of p27/Kip1 in immersion-fixed paraffin-embedded human prostate cancer tissue following incubation of sections for 10 minutes at 95 °C in the specified antigen retrieval solution from the Antigen Retrieval Reagent-Sampler Pack (Catalog # CTS016). Compared to no HIER treatment, p27/Kip1 detection was enhanced following incubation of the tissue sections in neutral (pH 7.0) and basic (pH 9.5) antigen retrieval reagents. Incubation of the tissue in the acidic (pH 5.0) antigen retrieval reagent did not enhance any staining. p27/Kip1 was detected using the Human p27/Kip1 IHC Detection Kit (Catalog # CTS2256; brown).
Neutral HIER
No HIER
Basic HIER
Acidic HIER
A typical experimental setup to determine optimum HIER incubation time and pH. Results should be compared to a tenth slide, with no HIER. A similar approach can be employed to optimize incubation temperature.
TimeAntigen Retrieval Solution pH
Acidic Neutral Basic
1 minute Slide #1 Slide #2 Slide #3
5 minutes Slide #4 Slide #5 Slide #6
10 minutes Slide #7 Slide #8 Slide #9
Optimization of HIER
Introduction to the IHC/ICC Method

IHC/ICC Protocol Guide
12

13
IHC/ICC Protocols
14
IHC/ICC Protocol Guide
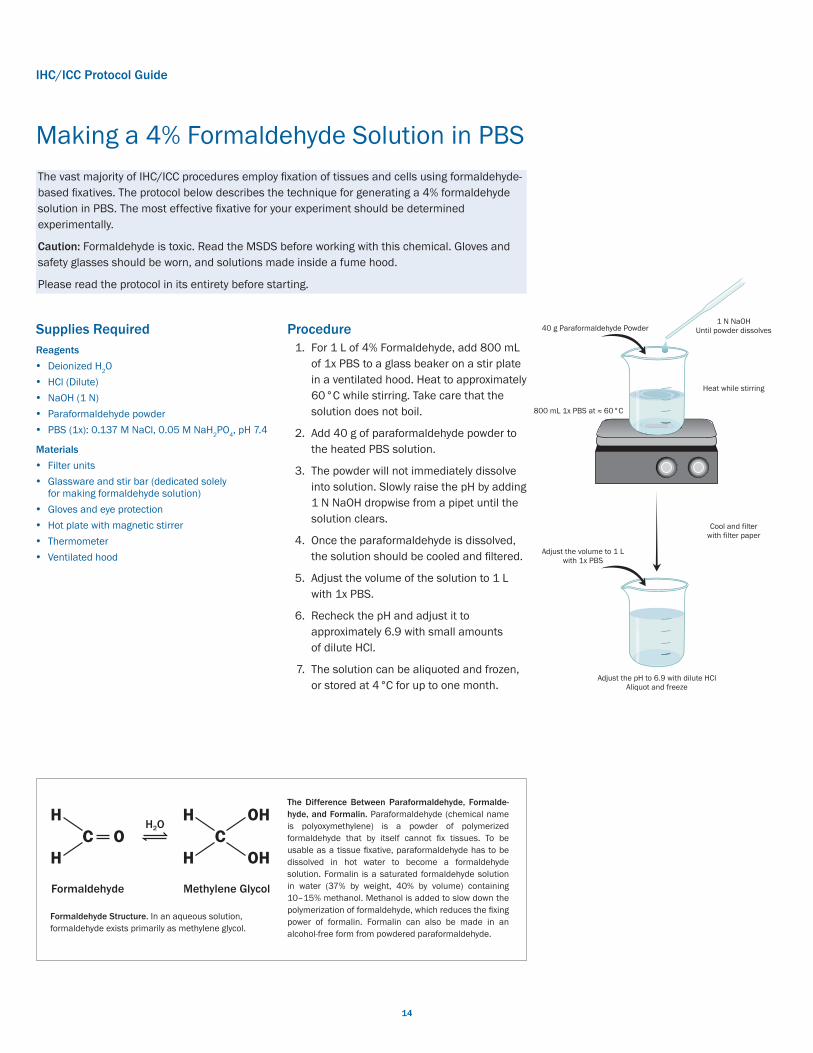
Making a 4% Formaldehyde Solution in PBSThe vast majority of IHC/ICC procedures employ fixation of tissues and cells using formaldehyde-based fixatives. The protocol below describes the tech nique for generating a 4% formaldehyde solution in PBS. The most effective fixative for your experiment should be deter mined experimentally.
Caution: Formaldehyde is toxic. Read the MSDS before working with this chemical. Gloves and safety glasses should be worn, and solutions made inside a fume hood.
Please read the protocol in its entirety before starting.
Formaldehyde Methylene Glycol
H2OH
HC
OH
OH
H
HC O
Supplies RequiredReagents Deionized H2O HCl (Dilute) NaOH (1 N) Paraformaldehyde powder PBS (1x): 0.137 M NaCl, 0.05 M NaH2PO4, pH 7.4
Materials Filter units Glassware and stir bar (dedicated solely
for making formaldehyde solution) Gloves and eye protection Hot plate with magnetic stirrer Thermometer Ventilated hood
Procedure 1. For 1 L of 4% Formaldehyde, add 800 mL
of 1x PBS to a glass beaker on a stir plate in a ventilated hood. Heat to approximately 60 °C while stirring. Take care that the solution does not boil.
2. Add 40 g of paraformaldehyde powder to the heated PBS solution.
3. The powder will not immediately dissolve into solution. Slowly raise the pH by adding 1 N NaOH dropwise from a pipet until the solution clears.
4. Once the paraformaldehyde is dissolved, the solution should be cooled and fi ltered.
5. Adjust the volume of the solution to 1 L with 1x PBS.
6. Recheck the pH and adjust it to approximately 6.9 with small amounts of dilute HCl.
7. The solution can be aliquoted and frozen, or stored at 4 °C for up to one month.
40 g Paraformaldehyde Powder
Heat while stirring
1 N NaOHUntil powder dissolves
Adjust the volume to 1 Lwith 1x PBS
Cool and filterwith filter paper
800 mL 1x PBS at ≈ 60 °C
Adjust the pH to 6.9 with dilute HClAliquot and freeze
The Difference Between Paraformaldehyde, Formalde-hyde, and Formalin. Paraformaldehyde (chemical name is polyoxymethylene) is a powder of polymerized formaldehyde that by itself cannot fix tissues. To be usable as a tissue fixative, paraformaldehyde has to be dissolved in hot water to become a formaldehyde solution. Formalin is a saturated formaldehyde solution in water (37% by weight, 40% by volume) containing 10–15% methanol. Methanol is added to slow down the poly merization of formaldehyde, which reduces the fixing power of formalin. Formalin can also be made in an alcohol-free form from powdered para formaldehyde.
Formaldehyde Structure. In an aqueous solution, formaldehyde exists primarily as methylene glycol.

15
Supplies RequiredReagents Gelatin-coating solution: 1 L deionized H2O, 5 g
gelatin, 0.5 g chromium potassium sulfate (CrK(SO4)2)
Materials Filter units Histological slides Hot plate with magnetic stirrer Slide racks Staining dish Thermometer
Procedure 1. Prepare the gelatin-coating solution by
dissolving 5 g of gelatin in 1 L of heated, deionized H2O (temperature should not exceed 45 °C).
2. After the gelatin has dissolved, add 0.5 g of CrK(SO4)2, which will positively charge the slides, allowing them to attract negatively charged tissue sections.
3. Cool solution to room temperature and then fi lter. Store at 2–8 °C until use. It is recommended that this solution be fi ltered again immediately before use (adjust to room temperature before fi ltering).
4. Place the histological slides into metal racks.
Note: The slides should be cleaned by washing them in soapy water and rinsing them thoroughly, fi rst in tap water, and fi nally in deionized water.
5. Dip the racks containing the slides 3 to 5 times (~5 seconds each) into the gelatin-coating solution.
6. Remove the racks containing the slides and let them drain. Blot excess solution from the racks onto fi lter paper (gently tap the racks against the fi lter paper for better drainage).
7. Place the racks containing the slides on the lab bench and cover them with paper towels to protect them from dust.
8. Dry at room temperature for 48 hours.
9. Dried slides can be put back into the boxes that they arrived in and stored at room temperature until use. Slides intended for cryostat sections should be stored at –20 °C.
In order for tissue sections to be retained on histological slides during staining and washing steps, slides need to be coated with adhesive compounds. Although there are a variety of such compounds, gelatin is the most frequently used for histo logical purposes.
Please read the protocol in its entirety before starting.
Preparation of Gelatin-Coated Slides for Histological Tissue Sections
Heat to 45 °Cwhile stirring
Cool toroom temperature
and filter
1 L Deionized H20
Histological Slides
Staining Dish
5 g GelatinAfter the gelatin dissolves
Add 0.5 g CrK(SO4)2
Add gelatin-coating solution
Dip racks with slides3 to 5 times,
5 seconds each
Dry at room temperaturefor 48 hours
Store at room temperature or at -20 °C if intended for cryostat sections
IHC/ICC Protocols

Supplies RequiredReagents Aqueous Mounting Medium
(Catalog # CTS011, or equivalent) Primary antibodies Cell & Tissue Staining Kit: Anti-Goat (Catalog # CTS008),
Anti-Mouse (Catalog # CTS002), Anti-Rabbit (Catalog # CTS005), Anti-Rat (Catalog # CTS017)Kit contents: Peroxidase blocking reagent, Avidin blocking reagent, Biotin blocking reagent, biotinylated secondary antibodies, high sensitivity Streptavidin-HRP conjugate (HSS-HRP), DAB chromogen solution, serum blocking reagents
Deionized H20 Dilution buffer: PBS (1x), 1% BSA, 1% normal
donkey serum, 0.3% Triton X-100, and 0.01% sodium azide
PBS (1x): 0.137 M NaCl, 0.05 M NaH2PO4, pH 7.4 Wash buffer: PBS (1x) For paraffi n-embedded tissue sections:
xylenes (mixed isomers) 100% denatured alcohol 95% denatured alcohol 70% denatured alcohol 50% denatured alcohol
Optional Reagents Antigen retrieval reagents (see page 19) DAB Enhancer (Catalog # CTS010)
Materials Coverslips Hydrophobic barrier pen Slides with paraffi n-embedded
or cryostat tissue sections
Slide Preparation
Procedure 1. For Cryostat Sections
a. When staining cryostat sections stored in a freezer, thaw the slides at room temperature for 10–20 minutes.
For Paraffi n-Embedded Tissue Sections
a. Immerse the slides in xylene (mixed isomers) 2 times for 10 minutes each.b. Immerse the slides in 100% alcohol 2 times for 10 minutes each.c. Immerse the slides in 95% alcohol for 5 minutes.d. Immerse the slides in 70% alcohol for 5 minutes.e. Immerse the slides in 50% alcohol for 5 minutes.f. Rinse the slides with deionized H20.
2. Rehydrate the slides with wash buffer for 10 minutes. Drain the excess wash buffer. If proceeding directly to one of the staining protocols on pages 17 or 18, surround the tissue with a hydrophobic barrier using a barrier pen.
If necessary, perform antigen retrieval at this point (see page 19 for protocol)
Perform if endogenous peroxidase is present in the tissue
3. Incubate the sample with 1–3 drops of peroxidase blocking reagent for 5 minutes.
Note: This procedure may affect the morphology of unfi xed frozen tissue sections. Reduction in the incubation time may be required.
4. Rinse the sample, then gently wash in wash buffer for 5 minutes.
5. Surround the tissue with a hydrophobic barrier using a barrier pen. Proceed to the staining protocol on page 17.
16
IHC/ICC Protocol Guide
Chromogenic Staining of Tissue Sections Using HRP-DAB DetectionThe following protocol has been developed and optimized by our IHC/ICC laboratory using R&D Systems brand HRP-DAB Cell & Tissue Staining Kits. Protocols may need to be modified depending on the type of tissue used. Each investigator should determine the optimal working dilution of an antibody. If using R&D Systems brand primary antibodies, refer to the product data sheets to obtain approximate working dilutions. For all other reagents, follow the manufacturer’s instructions.
Caution: DAB is hazardous. Gloves and safety glasses should be worn, and all steps performed inside a fume hood.
Please read the protocol in its entirety before starting.
Thaw slides at room
temperature10–20 minutes
Rehydrate the slideswith wash buffer
for 5 minutes
Paraffin-Embedded Tissue SectionsCryostat Sections
Drain excesswash bufferand perform
antigen retrieval if necessary
2 times10 min.
Xylene 100%Alcohol
95%Alcohol
70%Alcohol
50%Alcohol
2 times10 min.
1 time5 min.
1 time5 min.
1 time5 min.
Rinse withdeionized H20

17
Chromogenic Staining Using HRP-DAB Detection
Procedure 1. Block the slides with 1–3 drops of serum
blocking reagent for 15 minutes. Drain the slides and wipe away any excess blocking reagent before proceeding to the next step. Do not rinse.
2. Incubate the sample with 1–3 drops of Avidin blocking reagent for 15 minutes. Rinse the sample with wash buffer, drain slides, and wipe away any excess wash buffer.
3. Incubate the sample with 1–3 drops of Biotin blocking reagent for 15 minutes. Rinse with wash buffer, drain the slides, and wipe away any excess wash buffer.
4. Incubate the sample with primary antibodies in dilution buffer. Follow manufacturer’s recommendations regarding working dilution, incubation time, and temperature. These variables may need to be modifi ed for your system.
5. Rinse the sample with wash buffer and then wash 3 times in wash buffer for 5 minutes each and drain the slides.
6. Incubate the sample with 1–3 drops of biotinylated secondary antibodies for 30–60 minutes, adjusting the incubation time depending on the thickness of the section (approximately 30 minutes for 5–10 mm thick sections and 60 minutes for 10–20 mm thick sections).
7. Rinse the sample with wash buffer then wash 3 times in wash buffer for 15 minutes each and drain the slides.
8. Incubate the sample with 1–3 drops of HSS-HRP for 30 minutes.
9. Rinse the sample with wash buffer then wash 3 times in wash buffer for 2 minutes each.
10. Calculate the working volume of DAB chromogen solution given that 100–200 mL is required to cover the entire tissue section on a slide. Add 1–5 drops of DAB chromogen solution to cover the en tire tissue section and incubate for 3–20 minutes. Monitor the inten sity of the tissue staining under a microscope.
Note: DAB Enhancer can be used to intensify the DAB chromogen solution. DAB is hazardous. Refer to the MSDS for safe deactivation.
11. Wash the sample with wash buffer 3 times for 10 minutes each.
12. Rinse in deionized H20 and drain the slides.
13. Stained tissue can be mounted either without counterstaining or counterstained with hematoxylin for better visualization of the tissue morphology.
14. Cover stained tissue with a coverslip of an appropriate size. Place slides vertically on a fi lter paper or towel to drain excess mounting medium and allow them to dry.
15. Visualize tissue under a light microscope.
Add Primary Antibodies
AddHSS-HRP
AddDAB Chromogen
Solution
Incubate for30–60 minutes
Rinse, wash 3 timesin wash buffer
for 5 minutes each, and drain
Rinse, wash 3 timesin wash buffer
for 15 minutes each, and drain
Wash 3 timesin wash buffer
10 minutes each,and rinse 1 time
with deionized H2O,and drainCounterstain
if required
Incubate 3–20 minutesmonitoring intensity
of tissue stainingunder a microscope
Rinse, wash 3 times in
wash buffer for 2 minutes each
AddBiotinylated Secondary
Antibodies
Rinse with wash buffer,drain slides
Blocking (Follow steps 1–3)
Incubate the sampleaccording to themanufacturer’s
recommendations
Incubate for 30 minutes
Mount withaqueous mounting
medium
IHC/ICC Protocols

IHC/ICC Protocol Guide
Supplies RequiredReagents Primary antibodies NorthernLights Guard Mounting Media
(Catalog # NL996, or equivalent) Blocking buffer: 10% normal donkey serum,
0.3% Triton X-100 Dilution buffer: PBS (1x), 1% BSA, 1% normal
donkey serum, 0.3% Triton X-100, and 0.01% sodium azide
NorthernLights-Conjugated Secondary Antibodies/Streptavidin conjugates (or equivalent)
PBS (1x): 0.137 M NaCl, 0.05 M NaH2PO4, pH 7.4 Wash buffer: PBS (1x)
Materials Coverslips Slides with paraffi n-embedded
or cryostat tissue sections
Procedure 1. Slide preparation
(See Steps 1–2 on page 16)
2. Block the slides using blocking buffer for 15 minutes at room temperature and rinse with wash buffer.
3. Make working dilutions of the primary antibodies in dilution buffer according to manufacturer’s instructions. Add small volumes of these dilutions to the slides and incubate at 4 °C overnight, or for 30–60 minutes at room temperature.
Note: Multiple primary antibodies to different antigens can be added in step 3 as long as care is taken to avoid the use of secondary reagents with overlapping spectra. If possible, primary antibodies should also be raised in different species. Please see page 9 for more details.
Note: A negative control and/or an isotype-matched control should be included to identify non-specifi c binding from the secondary antibody. Please see page 10 for more details about IHC/ICC controls.
4. Wash the slides 3 times for 15 minutes each in wash buffer.
5. Incubate for 1 hour at room temperature with a NorthernLights-Conjugated Secondary Antibody (or equivalent) in dilution buffer designed to recognize the host species of the primary antibody. Alternatively, a NorthernLights-Streptavidin conjugate (or equivalent) can be used if the primary antibody is biotinylated.
Note: Some tissues may bind non-specifi cally to Biotin-Avidin labeling components resulting in high background staining. (See page 6)
6. Wash the slides 3 times for 15 minutes each in wash buffer.
7. Mount with an anti-fade mounting medium.
The following protocol has been developed and optimized by our IHC/ICC laboratory using R&D Systems brand NorthernLights fluorescent secondary reagents. Protocols may need to be modified depending on the type of tissue used. Each investigator should determine the optimal working dilution of an antibody. If using R&D Systems brand primary antibodies, refer to the product data sheets to obtain approximate working dilutions. For all other reagents follow the manufacturer’s instructions.
Please read the protocol in its entirety before starting.
IHC Staining of Tissue Sections for Fluorescence Microscopy
Add Primary Antibodies
Incubate for1 hour at
room temperature
Wash 3 times inwash buffer
for 15 minutes
Wash 3 times inwash buffer
for 15 minutes
Mount withAnti-fade Medium
Incubate for15 minutes at
room temperature
Rinse withwash buffer
Blocking
Add Secondary Antibodies
Incubate sampleat 4°C overnight
or 1 hour atroom temperature
18
19
Supplies RequiredReagents Antigen Retrieval Solution (10x):
Antigen Retrieval Reagent-Basic (Catalog # CTS013), Antigen Retrieval Reagent-Acidic (Catalog # CTS014), or Antigen Retrieval Reagent-Universal (Catalog # CTS015)
Deionized H2O PBS (1x): 0.137 M NaCl, 0.05 M NaH2PO4, pH 7.4
Equipment Polypropylene Coplin staining jar (or equivalent) Water bath at 92–95 °C
Materials Slides with paraffi n-embedded
or cryostat tissue sections
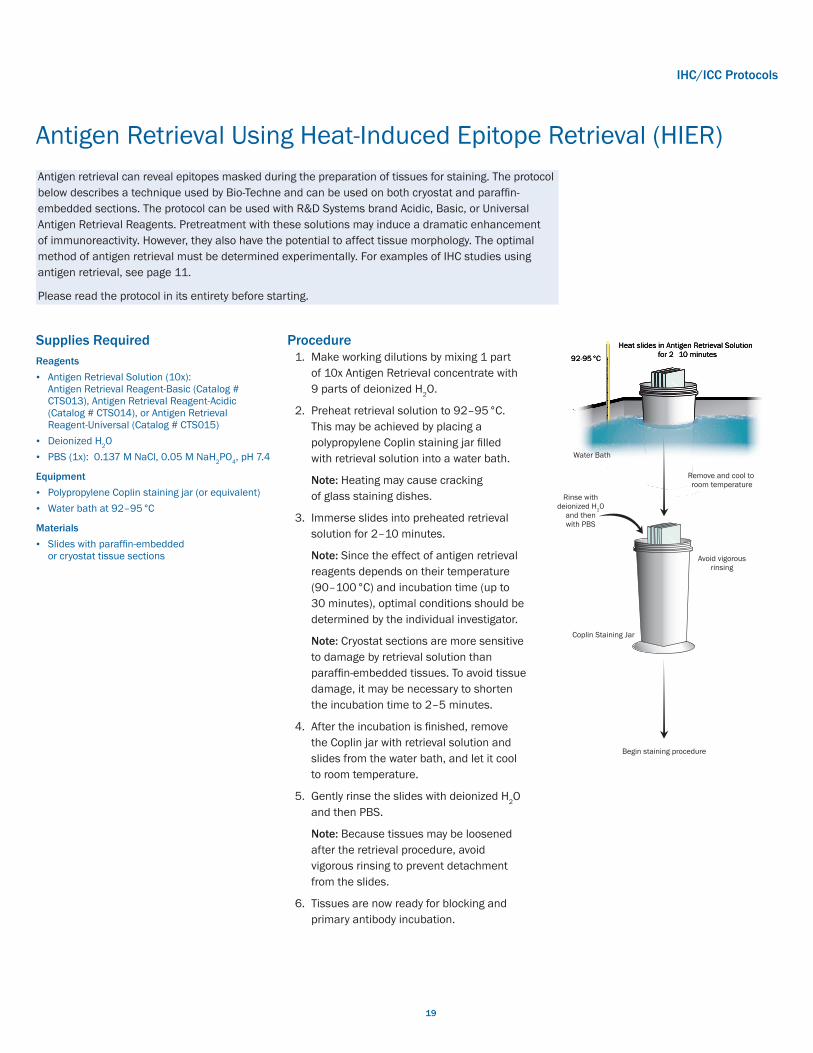
Procedure 1. Make working dilutions by mixing 1 part
of 10x Antigen Retrieval concentrate with 9 parts of deionized H2O.
2. Preheat retrieval solution to 92–95 °C. This may be achieved by placing a polypropylene Coplin staining jar fi lled with retrieval solution into a water bath.
Note: Heating may cause cracking of glass staining dishes.
3. Immerse slides into preheated retrieval solution for 2–10 minutes.
Note: Since the effect of antigen retrieval reagents depends on their temperature (90–100 °C) and incubation time (up to 30 minutes), optimal conditions should be determined by the individual investigator.
Note: Cryostat sections are more sensitive to damage by retrieval solution than paraffi n-embedded tissues. To avoid tissue damage, it may be necessary to shorten the incubation time to 2–5 minutes.
4. After the incubation is fi nished, remove the Coplin jar with retrieval solution and slides from the water bath, and let it cool to room temperature.
5. Gently rinse the slides with deionized H2O and then PBS.
Note: Because tissues may be loosened after the retrieval procedure, avoid vigorous rinsing to prevent detachment from the slides.
6. Tissues are now ready for blocking and primary antibody incubation.
Antigen retrieval can reveal epitopes masked during the preparation of tis sues for staining. The protocol below describes a technique used by Bio-Techne and can be used on both cryostat and paraffin-embedded sections. The protocol can be used with R&D Systems brand Acidic, Basic, or Universal Antigen Retrieval Reagents. Pretreatment with these solutions may induce a dramatic enhancement of immunoreactivity. However, they also have the potential to affect tissue morphology. The optimal method of antigen retrieval must be determined experiment ally. For examples of IHC studies using antigen retrieval, see page 11.
Please read the protocol in its entirety before starting.
Antigen Retrieval Using Heat-Induced Epitope Retrieval (HIER)
Heat slides in Antigen Retrieval Solution for 2–10 minutes
Begin staining procedure
92-95 °C
Heat slides in Antigen Retrieval Solution for 2–10 minutes92-95°C
Water Bath
Coplin Staining Jar
Rinse withdeionized H20
and thenwith PBS
Avoid vigorousrinsing
Remove and cool to room temperature
IHC/ICC Protocols
20
IHC/ICC Protocol Guide
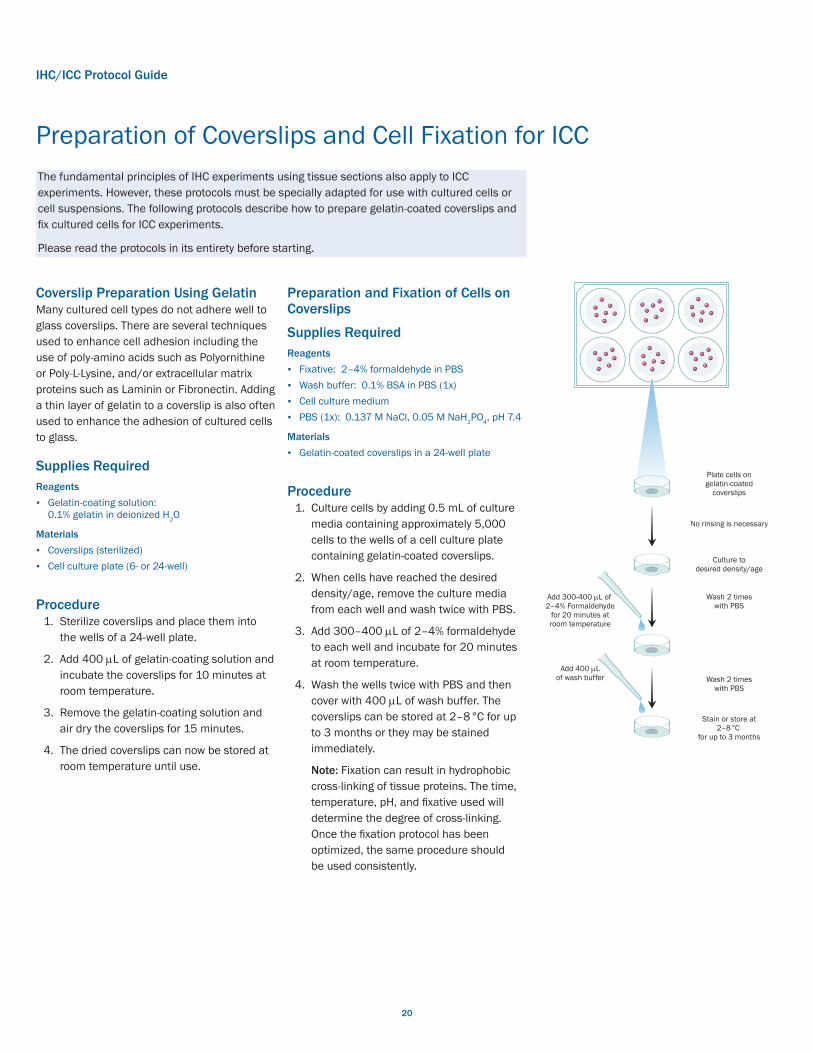
Coverslip Preparation Using GelatinMany cultured cell types do not adhere well to glass coverslips. There are several techniques used to enhance cell adhesion including the use of poly-amino acids such as Polyornithine or Poly-L-Lysine, and/or extracellular matrix proteins such as Laminin or Fibronectin. Adding a thin layer of gelatin to a coverslip is also often used to enhance the adhesion of cultured cells to glass.
Supplies RequiredReagents Gelatin-coating solution:
0.1% gelatin in deionized H2O
Materials Coverslips (sterilized) Cell culture plate (6- or 24-well)
Procedure 1. Sterilize coverslips and place them into
the wells of a 24-well plate.
2. Add 400 mL of gelatin-coating solution and incubate the coverslips for 10 minutes at room temperature.
3. Remove the gelatin-coating solution and air dry the coverslips for 15 minutes.
4. The dried coverslips can now be stored at room temperature until use.
Preparation and Fixation of Cells on Coverslips
Supplies RequiredReagents Fixative: 2–4% formaldehyde in PBS Wash buffer: 0.1% BSA in PBS (1x) Cell culture medium PBS (1x): 0.137 M NaCl, 0.05 M NaH2PO4, pH 7.4
Materials Gelatin-coated coverslips in a 24-well plate
Procedure 1. Culture cells by adding 0.5 mL of culture
media containing approximately 5,000 cells to the wells of a cell culture plate containing gelatin-coated coverslips.
2. When cells have reached the desired density/age, remove the culture media from each well and wash twice with PBS.
3. Add 300–400 mL of 2–4% formaldehyde to each well and incubate for 20 minutes at room temperature.
4. Wash the wells twice with PBS and then cover with 400 mL of wash buffer. The coverslips can be stored at 2–8 °C for up to 3 months or they may be stained immediately.
Note: Fixa tion can result in hydrophobic cross-linking of tissue proteins. The time, temperature, pH, and fi xative used will determine the degree of cross-linking. Once the fi xation protocol has been optimized, the same pro cedure should be used consistently.
The fundamental principles of IHC experiments using tissue sections also apply to ICC experiments. However, these protocols must be specially adapted for use with cultured cells or cell suspensions. The following protocols describe how to prepare gelatin-coated coverslips and fix cultured cells for ICC experiments.
Please read the protocols in its entirety before starting.
Preparation of Coverslips and Cell Fixation for ICC
Culture todesired density/age
Add 400 µLof wash buffer
Stain or store at2–8 °C
for up to 3 months
Plate cells ongelatin-coated
coverslips
No rinsing is necessary
Wash 2 timeswith PBS
Wash 2 timeswith PBS
Add 300-400 µL of 2–4% Formaldehyde
for 20 minutes atroom temperature
21
Supplies RequiredReagents Primary antibodies Blocking buffer: 10% normal donkey serum,
0.3% Triton X-100 DAPI (4',6-diamidino-2-phenylindole) solution:
add 1 mL of 14.3 mM stock for every 5 mL of PBS. Store any unused DAPI at 2–8 °C, wrapped in aluminum foil
Deionized H2O Dilution buffer: PBS (1x), 1% BSA, 1% normal
donkey serum, 0.3% Triton X-100, and 0.01% sodium azide
Anti-fade mounting medium NorthernLights-Conjugated Secondary Antibodies,
or equivalent PBS (1x): 0.137 M NaCl, 0.05 M NaH2PO4, pH 7.4 Wash and antibody dilution buffer: 0.1% BSA
in PBS (1x)
Materials Cell-covered coverslips in a 6- or 24-well plate Fine tweezers
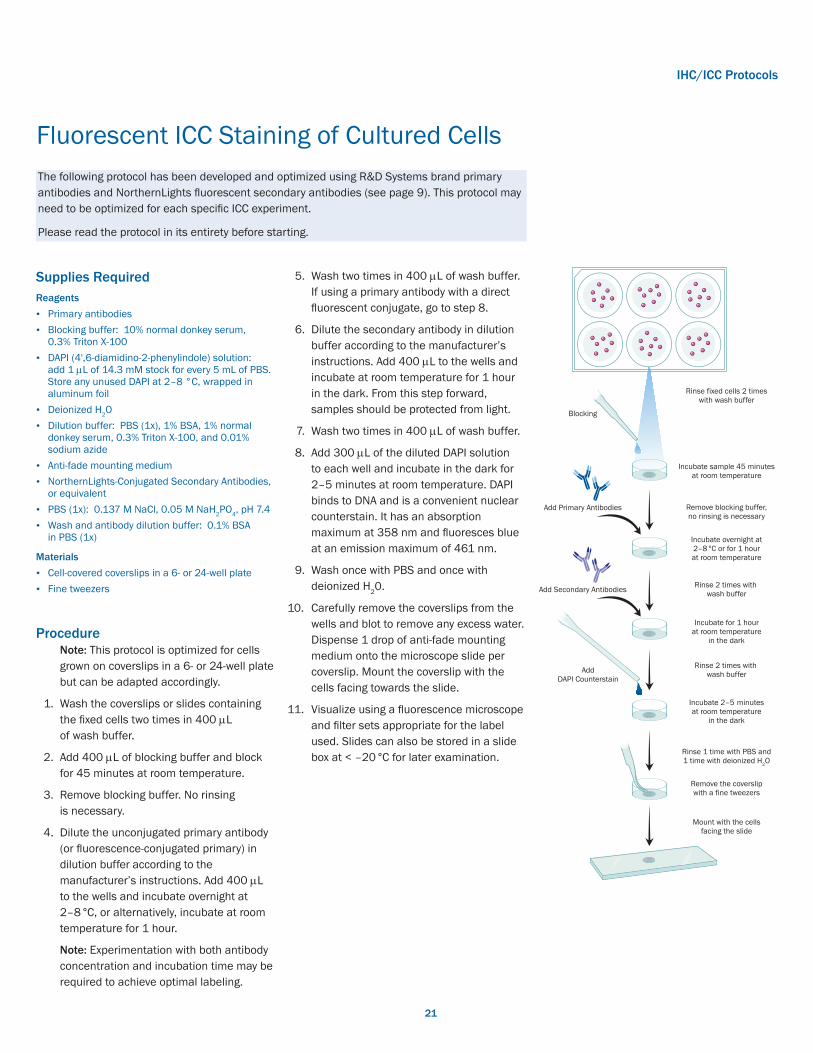
ProcedureNote: This protocol is optimized for cells grown on coverslips in a 6- or 24-well plate but can be adapted accordingly.
1. Wash the coverslips or slides containing the fi xed cells two times in 400 mL of wash buffer.
2. Add 400 mL of blocking buffer and block for 45 minutes at room temp erature.
3. Remove blocking buffer. No rinsing is necessary.
4. Dilute the unconjugated primary antibody (or fl uorescence-conjugated primary) in dilution buffer according to the manufacturer’s instructions. Add 400 mL to the wells and incubate overnight at 2–8 °C, or alternatively, incubate at room temperature for 1 hour.
Note: Experimentation with both antibody concentration and incubation time may be required to achieve optimal labeling.
5. Wash two times in 400 mL of wash buffer. If using a primary antibody with a direct fl uorescent conjugate, go to step 8.
6. Dilute the secondary antibody in dilution buffer according to the manufacturer’s instructions. Add 400 mL to the wells and incubate at room temperature for 1 hour in the dark. From this step forward, samples should be protected from light.
7. Wash two times in 400 mL of wash buffer.
8. Add 300 mL of the diluted DAPI solution to each well and incubate in the dark for 2–5 minutes at room temperature. DAPI binds to DNA and is a convenient nuclear counterstain. It has an absorption maximum at 358 nm and fl uoresces blue at an emission maximum of 461 nm.
9. Wash once with PBS and once with deionized H20.
10. Carefully remove the coverslips from the wells and blot to remove any excess water. Dispense 1 drop of anti-fade mounting medium onto the microscope slide per coverslip. Mount the coverslip with the cells facing towards the slide.
11. Visualize using a fl uorescence microscope and fi lter sets appropriate for the label used. Slides can also be stored in a slide box at < –20 °C for later examination.
The following protocol has been developed and optimized using R&D Systems brand primary antibodies and NorthernLights fluorescent secondary antibodies (see page 9). This protocol may need to be optimized for each specific ICC experiment.
Please read the protocol in its entirety before starting.
Fluorescent ICC Staining of Cultured Cells
Incubate overnight at2–8 °C or for 1 hourat room temperature
Incubate 2–5 minutesat room temperature
in the dark
Rinse 1 time with PBS and1 time with deionized H2O
Rinse fixed cells 2 timeswith wash buffer
Incubate sample 45 minutesat room temperature
Remove blocking buffer,no rinsing is necessary
Rinse 2 times with wash buffer
Rinse 2 times with wash buffer
Remove the coverslipwith a fine tweezers
Mount with the cellsfacing the slide
Incubate for 1 hourat room temperature
in the dark
AddDAPI Counterstain
Add Secondary Antibodies
Add Primary Antibodies
Blocking
IHC/ICC Protocols
IHC/ICC Protocol Guide
22
Supplies RequiredReagents Deionized H2O Fixative: 4% formaldehyde in PBS (1x) PBS (1x): 0.137 M NaCl, 0.05 M NaH2PO4, pH 7.4
Materials Microfuge tube (1.5 mL) Gelatin-coated microscope slides Hot plate Hydrophobic barrier pen Microfuge
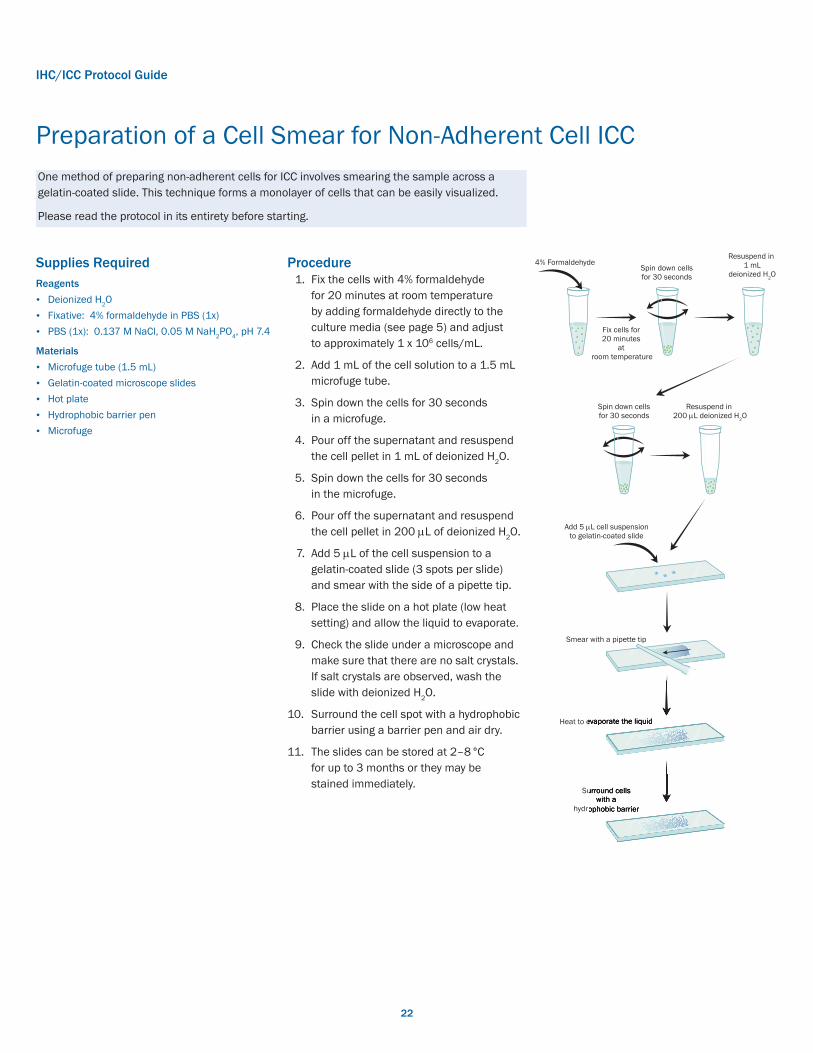
Procedure 1. Fix the cells with 4% formaldehyde
for 20 minutes at room temperature by adding formaldehyde directly to the culture media (see page 5) and adjust to approximately 1 x 10⁶ cells/mL.
2. Add 1 mL of the cell solution to a 1.5 mL microfuge tube.
3. Spin down the cells for 30 seconds in a microfuge.
4. Pour off the supernatant and resuspend the cell pellet in 1 mL of deionized H2O.
5. Spin down the cells for 30 seconds in the microfuge.
6. Pour off the supernatant and resuspend the cell pellet in 200 mL of deionized H2O.
7. Add 5 mL of the cell suspension to a gelatin-coated slide (3 spots per slide) and smear with the side of a pipette tip.
8. Place the slide on a hot plate (low heat setting) and allow the liquid to evaporate.
9. Check the slide under a microscope and make sure that there are no salt crystals. If salt crystals are observed, wash the slide with deionized H2O.
10. Surround the cell spot with a hydrophobic barrier using a barrier pen and air dry.
11. The slides can be stored at 2–8 °C for up to 3 months or they may be stained immediately.
Preparation of a Cell Smear for Non-Adherent Cell ICCOne method of preparing non-adherent cells for ICC involves smearing the sample across a gelatin-coated slide. This technique forms a monolayer of cells that can be easily visualized.
Please read the protocol in its entirety before starting.
Fix cells for 20 minutes
at room temperature
Resuspend in 1 mL
deionized H2O
Resuspend in 200 µL deionized H2O
Add 5 µL cell suspensionto gelatin-coated slide
Smear with a pipette tip
Heat to evaporate the liquid
Surround cellswith a
hydrophobic barrier
Spin down cellsfor 30 seconds
Spin down cellsfor 30 seconds
Heat to evaporate the liquid
with ahydrophobic barrier
Surround cells
4% Formaldehyde

23
Troubleshooting GuideProblem: Lack of Staining
Possible Source Test or Action
Lack of antigen. Check protein expression by in situ hybridization (in some rare cases translation may be blocked even though mRNA is detected).
Antibodies do not work due to improper storage. Follow storage instructions on the datasheet. In general, aliquot antibodies into smaller volumes sufficient to make a working solution for a single experiment. Store aliquots in a manual defrost freezer (–20 to –70 °C) and avoid repeated freeze-thaw cycles.
Inactive primary or secondary antibodies. Test reporter system independently to assess reagent viability.
Inadequate tissue fixation. Try increasing the fixation time or try a different fixative.
Tissue overfixation. Reduce the duration of the immersion or post-fixation steps. If immersion-fixation cannot be avoided (e.g., collection of postmortem tissues or biopsies in pathology lab), antigens may be unmasked by treatment with antigen retrieval reagents.
Incompatible secondary and primary antibodies. Use a secondary antibody that will interact with the primary antibody. For example, if the primary antibody was raised in rabbits, use an anti-rabbit secondary antibody.
Antigen was destroyed before incubation with the primary antibody. If quenching of endogenous peroxidase was done prior to the addition of primary antibodies, block peroxidase after incubation with the primary antibody.
Epitope altered during fixation or embedding procedure. Try restoring immunoreactivity through various antigen retrieval techniques. Embed tissue at 58 °C or below.
Antigen retrieval was ineffective. Increase the time of treatment or change the treatment solution.
Reagents omitted or used in wrong order. Repeat staining and confirm that correct reagents are used and are added in the correct order.
Problem: High BackgroundPossible Source Test or Action
High concentration of primary and or secondary antibodies. Titer antibody to determine optimal concentration needed to promote a specific reaction of the primary and the secondary antibodies.
Hydrophobic interactions of the antibody and proteins in the tissue. Lower the ionic strength of the antibody diluent (particularly, monoclonal antibodies respond well to reducing the salt concentration).
Non-specific binding of primary and/or secondary reagents to tissues. Use blocking step just prior to primary antibody incubation (we use 1% BSA with 10% normal donkey serum, or non-fat dry milk is another option).
Non-specific binding of secondary antibody. Use an antibody that has had cross-reactive IgG species removed (absorbed against sample species).
Tissue dried out. Avoid letting the tissue dry during the staining procedure.
Reagents sticking to old or poorly prepared slides. Start over with freshly prepared or purchased slides.
Background due to ionic interactions. Increase the ionic strength of the diluent buffer.
Problem: Cell/Tissue Morphology DestroyedPossible Source Test or Action
Antigen retrieval methods are too harsh. Empirically determine the conditions that preserve tissue morphology while restoring the immuno reactivity of the antigen.
Tissue sections falling off slide (more common with frozen sections). Increase fixation time. Empirically determine an additional or alternative fixative. Use freshly prepared, adequately charged slides.
Tissue section appears torn or folded. Air bubbles under section. Re-cut sections using a sharp blade, or ignore damaged areas when analyzing the results.
Poor resolution of tissue morphology. Cut thinner tissue sections. Ice crystals may have destroyed morphology of frozen sections.
Underfixation has physically damaged the tissue or cells during the staining process.
Increase fixation time and/or add a post-fixation step. Increase the fixative/tissue ratio. Cut smaller pieces of tissue for more thorough immersion-fixation.
Autolysis of tissue leading to staining of necrotic debris. Increase the fixation time, ratio. Consider using cross-linking fixative.
Problem: Staining is InappropriatePossible Source Test or Action
Fixation method is inappropriate for the antigen. Try a different fixative or increase the fixation time.
Antigen retrieval may be inappropriate for this antigen or tissue. Try different antigen retrieval conditions.
Electrostatic charge of the antigen has been altered. Try adjusting the pH or cation concentration of the antibody diluent.
Delay in fixation caused diffusion of the antigen. Fix tissue promptly. Try a cross-linking fixative rather than organic (alcohol) fixative.
Troubleshooting Guide

IHC/ICC Protocol Guide
24

25

26
IHC/ICC Protocol Guide

27

International Distributors Please visit rndsystems.com/Distributors for a full list of international distributors.
To view these protocols online, please visit rndsystems.com/Protocol.
To learn more about and search for specific R&D Systems brand antibodies, please visit rndsystems.com/Antibodies.
To view our IHC/ICC image gallery, please visit rndsystems.com/IHCImages.
Trademark and registered trademarks are the property of their respective owners.
CA_IHC/ICC_SFN_09.14_1212
Bio-Techne is a trading name for R&D Systems
[email protected]@bio-techne.com TEL 800 343 7475
North [email protected] +86 (21) 52380373
China
TEL +1 612 379 2956bio-techne.com/find-us/distributorsRest of World
TEL +44 (0)1235 529449
Europe ● Middle East ● Africa
LEARN MORE rndsystems.com/Antibodies