icims hiring manager user guide - · pdf fileicims hiring manager user guide ... hiring...
TRANSCRIPT

3/21/2012
ICIMS Hiring Manager User Guide University of Massachusetts
Medical School
2
Table of Contents
Introduction and Overview………………………………………………………………..3 Glossary of Terms………….……………………………………………………………....4 Icons……………………….……………………………………………………………....5 Logging into iCIMS………..……………………………………………………………...6 General Navigation…………..…………………………………………………………….7 Create a New Job Requisition..…………………………………………………………….8 General Information………………………………………………………………9 Assignment………………………………………………………………………10 Compensation……………………………………………………………………11 Requisition Justification…………………………………………………………12 Interview Team…………………………………………………………………..12 Foreign Project Registration……………………………………………………..13
Job Description………………...…………………………………………………13 Additional Information………...…………………………………………………14
Job Requisition Approval ……………………………………………………………….15 Copy a Job Requisition………………...……………...…………………………………18 Reviewing Dashboard…………….……………………………………………………. .19 Taking Action on Applicants.…………………………………………………………....24 Scheduling Interviews……………………………………………………………………26 Request Offer and Close Candidates…………………………………………………….28
View how an applicant applies for a position………...…………………………………..31
3
Introduction and Overview The Human Resource team has created this user guide to help you understand and begin using UMMS’ new talent management system iCIMS. This system will be replacing the current applicant tracking system HR Logix. In this guide are step by step instructions on how to access, navigate and use the capabilities of the system to facilitate the recruitment process. Business practice changes and system differences from HR Logix will be highlighted and explained as well. Highlights of the iCIMS system include: For Managers: Access anytime, anywhere with Internet connectivity The ability to copy an existing job requisition. Improved communication on status of requisitions The interview scheduler function can set up multiple interviews.
For Applicants: Friendlier application process Timelier communication regarding status of application Internal applicants have more streamlined experience
For UMMS: Recruitment lifecycle is streamlined The recruitment process is all captured in iCIMS reducing paper duplication. iCIMS is compliant with OFCCP regulations.
As always we enjoy working with you and welcome any questions you have. The recruitment team is available to help and answer any questions you have using the system. During the first week after going live, Human Resources will operate a call center during business hours to assist with questions/issues. If you have a question, please call extension: 508-856-8500. We look forward to working with you! The iCIMS implementation team.

4
Glossary:
Applicant: An individual who submits an expression of interest in employment and possesses the basic qualifications for the position.
Candidate: An applicant who is being considered for the position.
Coordinator: Contact person within HR.
ICIMS: The iCIMS Talent Platform is a talent management system. The platform makes it easier to manage and streamline all recruitment, hiring and employee management processes.
Hiring Manager: A system user from a department that can create and manages job requisitions.
Requisition Creator: A system user from a department that can create and manage job requisitions in support of a hiring manager.
OFCCP: Office of Federal Contract Compliance Programs. OFCCP is responsible for ensuring that employers doing business with the federal government comply with the laws and regulations requiring nondiscrimination.
Portal: External and internal links where jobs are posted.
Status: The current position of an applicant or candidate in the recruitment process for a particular job requisition.
Talent Specialist: New title for a recruiter or employment specialist.

5
Icons:
This icon indicates the source where the candidate heard about the position.
This icon lets you know if the EEO information was completed or not.
This icon gives you the answers to the screening questions
This icon lets you take action on the candidate to put them into another status by selecting the values in the drop down
Download VCard– allows you to add this applicant/candidate to your contacts in Outlook.
Send this Profile by Email– allows you to send person’s resume to someone. Submit to Workflow – allows you to submit the applicant to another position. Additional Documents– allows you to view additional documents on the
applicant/candidate.
Associated Expenses– allows you to see any expenses on the applicant/candidate.
Prints Profile – allows you to print the applicant’s/candidate’s profile.
View Folder Log– allows you to see the history on the applicant/candidate.
Profile Audit Trail– gives you an audit on the when and who touched the different tabs on the applicant/candidate.
Download Resume Icon
Extract Skills icon
Resume History Icon shows you all the different resumes that the applicant/candidate has uploaded.
Communication Center - where you send out correspondence to the applicant/candidate
New Interview– allows you to schedule an interview for the candidate. Edit interview– allows you to edit the interview with the candidate. New Task - creates a task.
IForms Center– allows you to see the IForms on the applicant/candidate. Export– exports data into excel
Generate Chart– creates chart
Refresh
Required by OFCCP

6
Logging into iCIMS. Step 1: http://umms.icims.com Step 2: Enter your username and password.

7
General Navigation Dashboard:
The dashboard displays panels for hiring managers to access and manage their requisitions and candidates in iCIMS.
Dashboard Panels:
Welcome Screen: Provides instructions on how to manage requisitions and candidates. New Applicants by Requisition: Displays new applicants. My Open Jobs: Displays all active open positions currently being recruited for. Pending Jobs: Displays all jobs opened by hiring manager but waiting for approval.
Tool Bar:
New Job : Use to create a new requisition from available job templates. Tools: Allows access to Preferences, Task, Appointment, Announcements Managers Toolkit: Access to all forms used in iCIMS.

8
Create a new Job Requisition Step 1: Select the New Job tab at the top of the screen.
Tip: All required fields have a * and any field that is grey cannot be edited. Step 2: In the Template Field, type the Job Code or Job Title, then press Enter.
Step 3: Click the drop down arrow to display all of the jobs that match your search criteria
Step 4: Scroll to locate the job and then select it.

9
Step 5: Review the job information that has prefilled.
Step 6: Complete the following fields: Working Title: Pre-populated. Hiring manager can enter the name of the working title if it
is different than the Job Title. This title will appear on all postings, internal and external.
Position Number: Enter only if your department is using position control. Category: Pre-populated
Position Type: Select from drop down
Hire Type: Select from drop down
Union Code: Pre-populated but can be changed
Funding Source 1: Select from drop down
Funding Source 2: Select if applicable
Funding Source 3: Select if applicable
# of Openings: Pre-populated with 1. UMCH has an exception for per diem requisitions.

10
Step 7: Complete the Assignment Section. Hiring Manager will default to current user name but another person can be designated.
Tip: iCIMS allows two users to be assigned to a job requisition. The requisition creator and user assigned in the hiring manger field will have access.
Step 8: Select the Talent Specialist. Step 9: Select the Coordinator. Step 10: Select the Department.
Click on the Show List Picker icon to select the SBU (CMW, Mass Biological Labs, School) then select the appropriate Department.
11
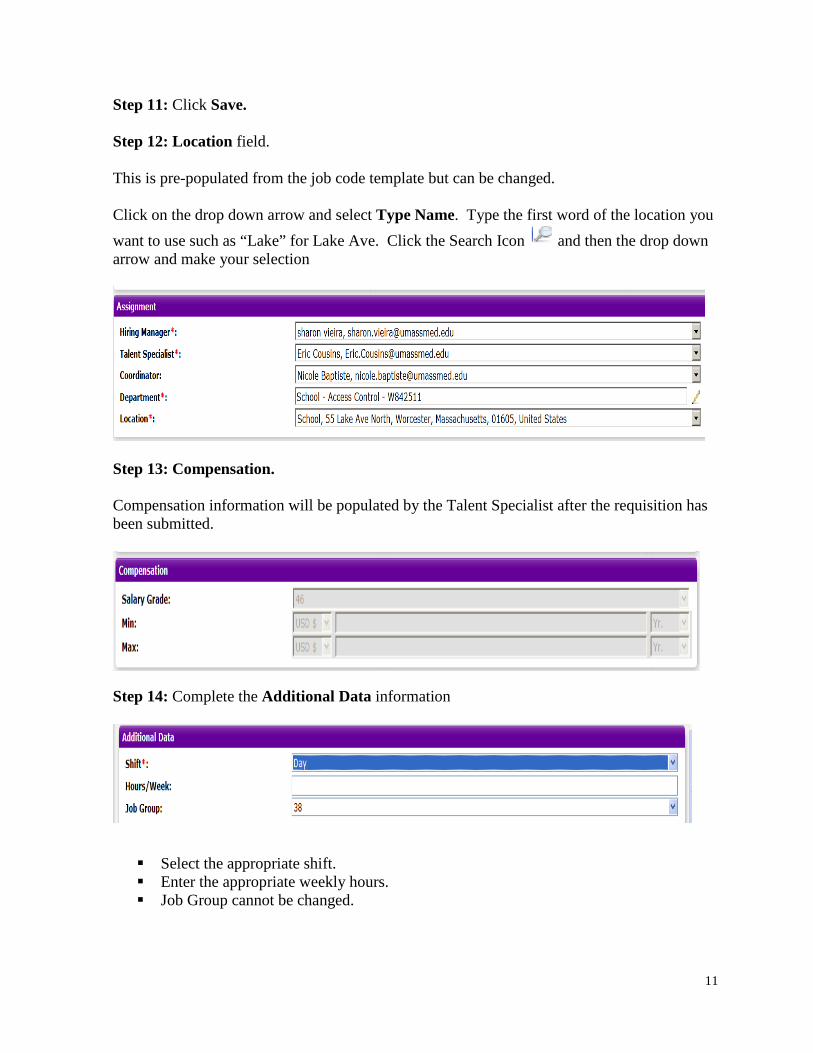
Step 11: Click Save.
Step 12: Location field.
This is pre-populated from the job code template but can be changed. Click on the drop down arrow and select Type Name. Type the first word of the location you want to use such as “Lake” for Lake Ave. Click the Search Icon and then the drop down arrow and make your selection
Step 13: Compensation. Compensation information will be populated by the Talent Specialist after the requisition has been submitted.
Step 14: Complete the Additional Data information
Select the appropriate shift. Enter the appropriate weekly hours. Job Group cannot be changed.
12
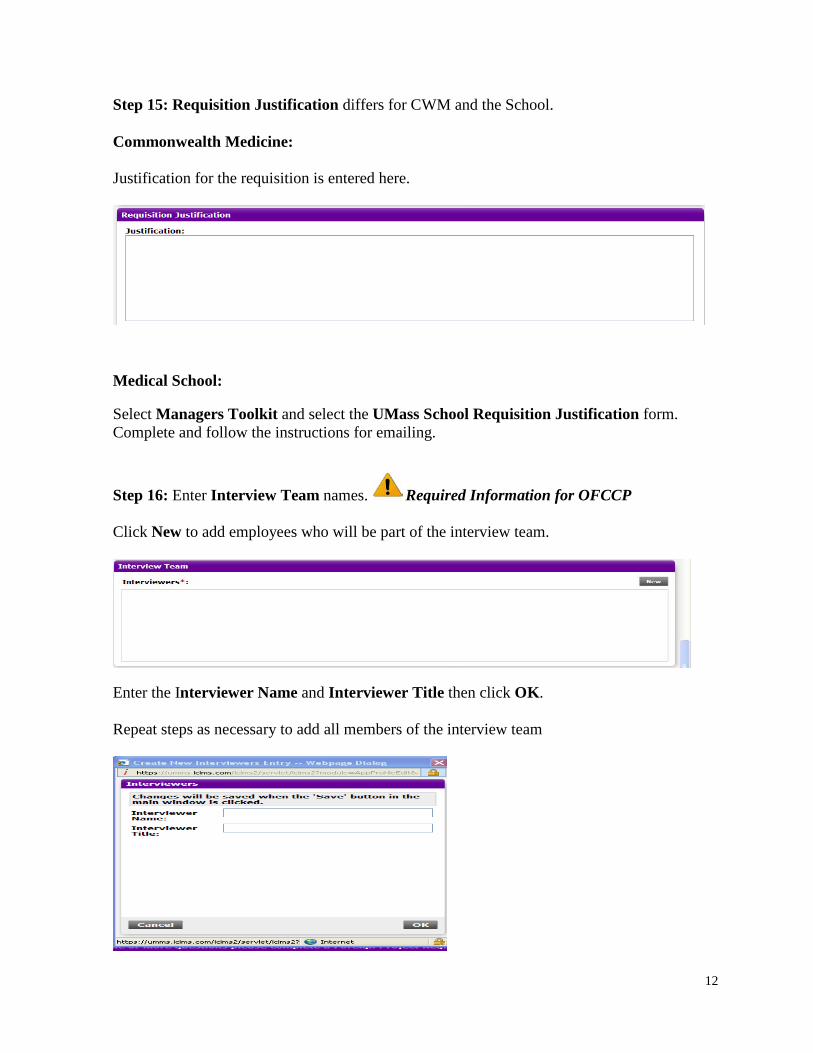
Step 15: Requisition Justification differs for CWM and the School. Commonwealth Medicine: Justification for the requisition is entered here.
Medical School: Select Managers Toolkit and select the UMass School Requisition Justification form. Complete and follow the instructions for emailing.
Step 16: Enter Interview Team names. Required Information for OFCCP
Click New to add employees who will be part of the interview team.
Enter the Interviewer Name and Interviewer Title then click OK.
Repeat steps as necessary to add all members of the interview team

13
Step 17: Review the list of interviewers Click Edit to update interviewer information Click X to delete an interviewer
Step 18: Foreign Project Registration. Click the drop down arrow and answer Yes or No to questions regarding hiring and residence outside of the US.
Note: If you answer Yes to either question, you must complete the Foreign Project Registration form located in the Manager’s Toolbox.
Step 19: Click Next. Step 20: Review the Job Description information. Your talent specialist can help you with any updates or changes.

14
Tip: Use the Previous icon to make any changes to the req. Any additional information can be put into Additional Data. The following DEEO statement is required on all job descriptions. As an equal opportunity and affirmative action employer, UMMS recognizes the power of a diverse community and encourages applications from individuals with varied experiences, perspectives and backgrounds.
Step 21: Click Finish.
\

15
Job Requisition Approval
Commonwealth Medicine and Mass Biologics:
Select your approvers in the following order to ensure they are listed as such which will allow the approval process to flow correctly. If you make an error in order you will have to manually move the approver after you have finished selecting.
Manager/Division Administrator Department Head/Department Administrator Charlene Cutroni, Associate Director Reporting and Metrics, CWM Finance Michelle Jones-Johnson, Director of Human Resources, Talent Management Talent Specialist
Medical School: Select your approvers in the following order to ensure they are listed as such which will allow the approval process to flow correctly. If you make an error in order you will have to manually move the approvers after you have finished selecting.
Manager/Division Administrator Department Head/Department Administrator Michelle Jones-Johnson, Director of Human Resources, Talent Management Talent Specialist
Step 1: From Search Approvers: Use the Search Icon
.

16
Step 2: Select appropriate approver by clicking on their name from the drop down menu or manually type in a name.
Step 3: Click Add Approver button. Repeat as necessary to add additional approvers.
Step 5: Click Begin Approvals Link. IMPORTANT: You must click this link to start the approval process. Clicking the “Save” button will not start the process it will only save the approver listing that you have created.

17
Step 6: Message window will appear, Click OK.
Once req has been approved by all approvers, the Talent Specialist will post the position internally/externally and to websites if applicable.
Applicants who apply for the job will be screened by the Talent Specialist.
Talent Specialist will forward qualified applicants to the Hiring Manager’s and if applicable the requisition creator.
An email will be generated and sent to the hiring manger requesting they approve the requisition.
In the email the hiring manger will click on the hyperlink and approve the job.

18
Copying A Job Requisition Step 1: While on your dashboard page, select the job requisition that you wish to copy.
Step 2: Click on the copy icon
Step 3: This will bring you to the job template with all fields completed that were on the job req you copied. Follow the “create new job” instructions for completing the req.

19
Reviewing Dashboard Step 1: To view the candidate pool, click Dashboard.
Step 2: For the Hiring Manager user look under Jobs and in My Open Jobs and search for the requisition.
Step 3: For the Requisition creator user look under Quick Links and select the Jobs Created link and search for the requisition.

20
Step 3: Click on the Requisition Number and you will go the requisition detail.
Step 4: Click on Description to view the Job Description information.
Step 5: Click on Approval to view the requisition approval information.

21
Step 6: Click on Applicant Flow tab to view the applicants that your Talent Specialist has forwarded to you for review. Click the “+” next to the status to expand
Step 7: Inside the applicant flow tab, click on Applicant name to view their information.
Step 8: Click on quick information icon next to the Applicants name
A pop up window will appear with a link for the applicants resume. Click on the link for the resume and you will be able to view it. Close resume when done and you will be back to your original screen.
22
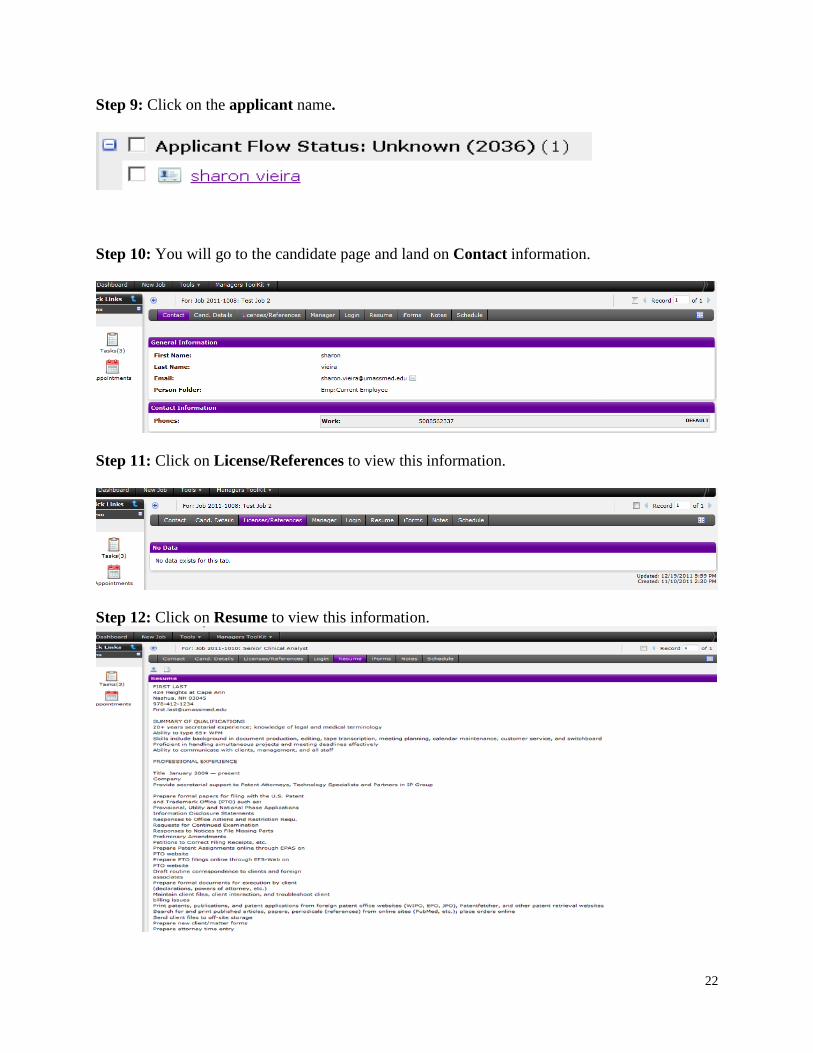
Step 9: Click on the applicant name.
Step 10: You will go to the candidate page and land on Contact information.
Step 11: Click on License/References to view this information.
Step 12: Click on Resume to view this information.
23
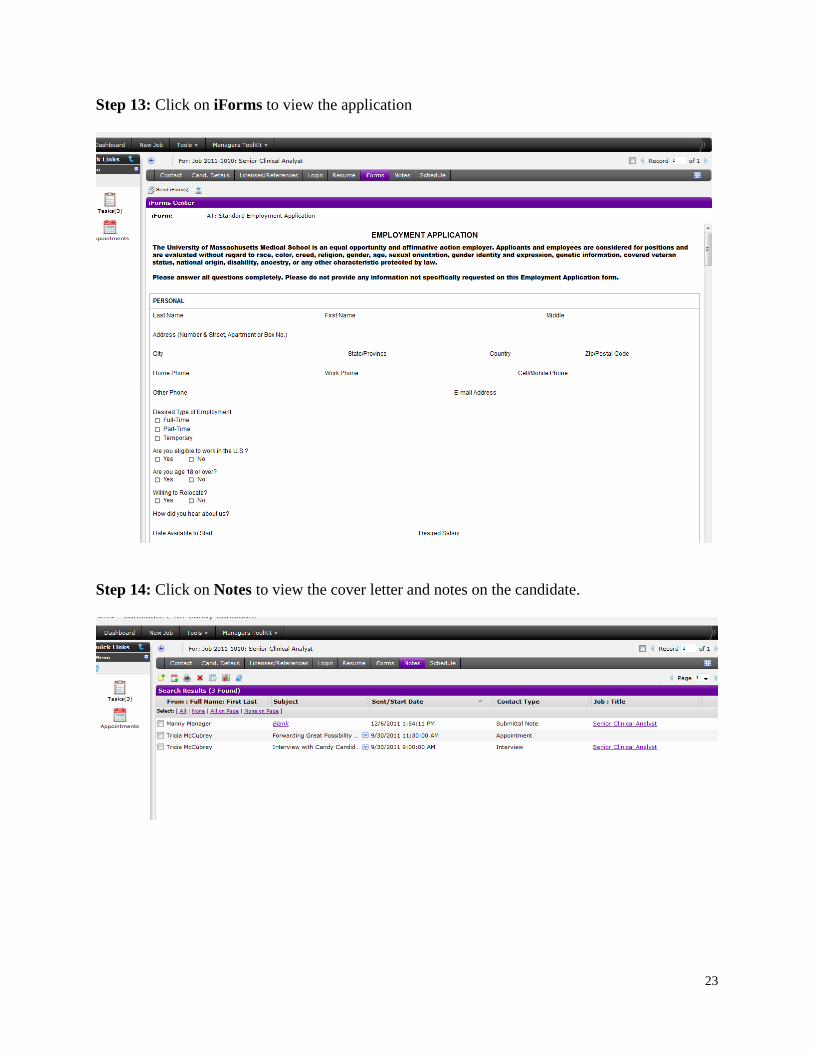
Step 13: Click on iForms to view the application
Step 14: Click on Notes to view the cover letter and notes on the candidate.
24
Taking Action on Applicants
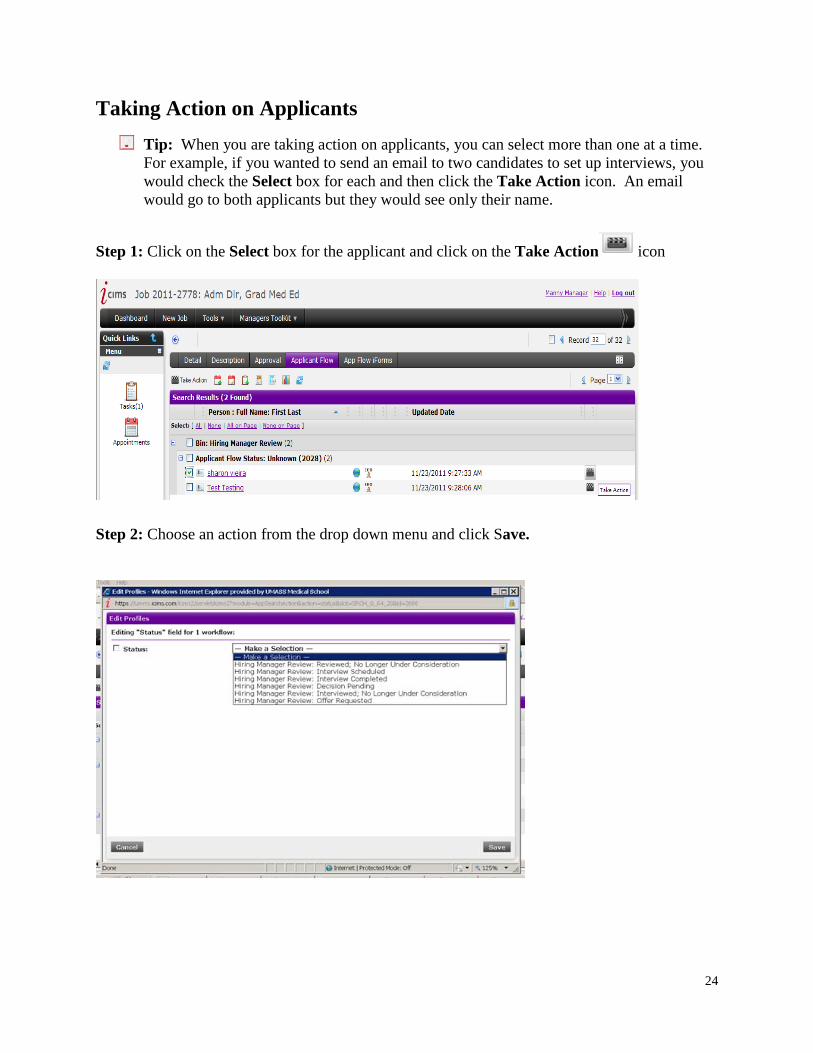
Tip: When you are taking action on applicants, you can select more than one at a time. For example, if you wanted to send an email to two candidates to set up interviews, you would check the Select box for each and then click the Take Action icon. An email would go to both applicants but they would see only their name.
Step 1: Click on the Select box for the applicant and click on the Take Action icon
Step 2: Choose an action from the drop down menu and click Save.

25
Description of Dispositions:

26
Schedule Interviews
Note: all interviews need to be scheduled through iCIMS to be in compliance with OFCCP. Step 1: Choose Interview scheduled from the drop down menu and click Save.
Step 2: Email window will open. Click on Invite Attendees, and draft your email to the applicant. Send email when completed. You can change the subject field. You also have the option of adding interviewers to this email by cc’ing them. Emails from iCIMS are compatible with Outlook.

27
Step 3: Status will change on the applicant. Repeat for other applicants and select the appropriate status.

28
Requesting Offer and Closing out Candidates
Required Information for OFCCP. Step 1: Once a decision is made, action needs to be taken on each candidate. For the candidate you want to request a hire:
Click on the Select box for that candidate and click on the Take Action icon. Select Hiring Manager Review: Offer Requested, then Click Save. This will send a notification to your Talent Specialist.
Step 2: Update the status on each of the remaining candidates.
Click on the Select box for each candidate. Click on the Take Action icon and make the appropriate selection. Click Save.

29
Step 3: Select a Reason from the drop down menu and Save.
Description of Dispositions:
30
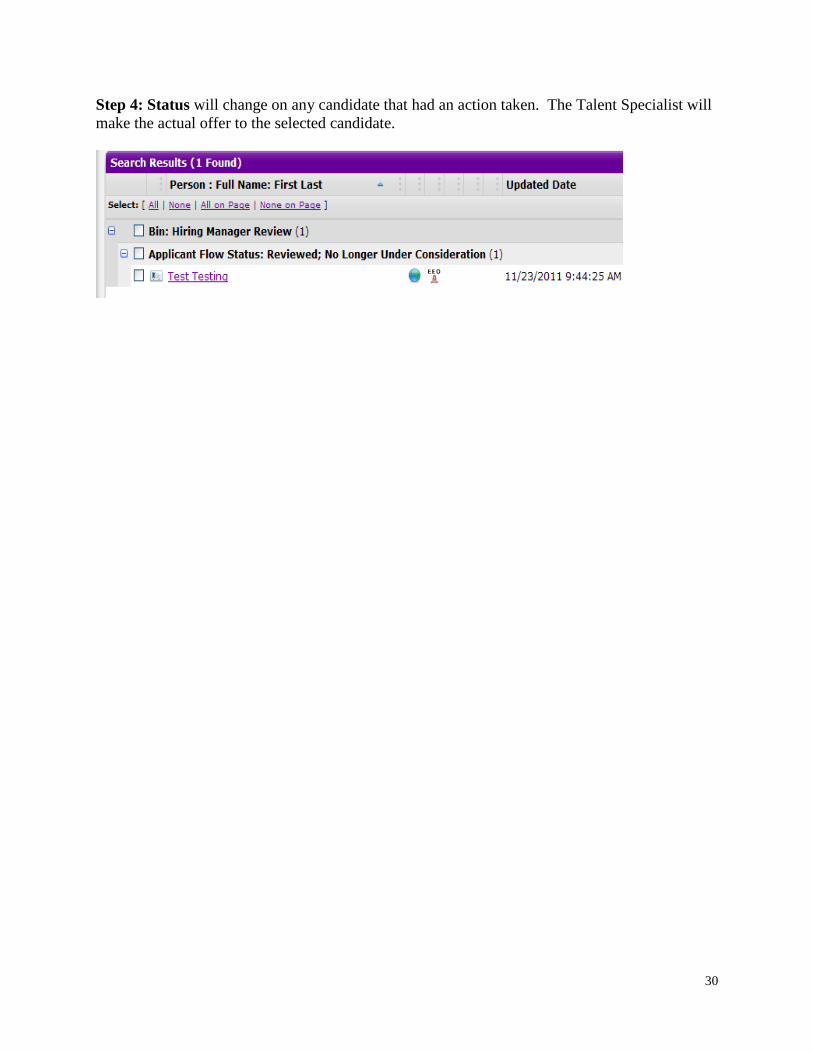
Step 4: Status will change on any candidate that had an action taken. The Talent Specialist will make the actual offer to the selected candidate.

31
Applicant View This is what the process is like for an applicant applying for a position. Step 1: Applicant searches for the position.
Step 2: Applicant reviews the job information.
Step 3: Applicant clicks on the Job Title to view additional details

32
Step 4: Applicant clicks the Apply for this job Online link
Step 5: Applicant will see Login screen.
Step 6: Applicant completes application if they have not done so yet. Applicant receives a confirmation on their screen after applying for the position.