hp indigo epm preflight solution (v3) · 5.2. the hp indigo epm kit the hp indigo epm kit is a zip...
TRANSCRIPT

HP Indigo EPM PreflightSolution (v3)

Switch
Contents
1. Copyrights............................................................................................................................................... 3
2. Introduction.............................................................................................................................................4
3. Differences with previous versions........................................................................................................ 5
4. Solution deliverables.............................................................................................................................. 6
5. Installation.............................................................................................................................................. 75.1. Switch and PitStop Server.................................................................................................................... 75.2. The HP Indigo EPM kit..........................................................................................................................75.3. Installing the HP Indigo Device Link Creator application.................................................................... 75.4. Using the device links...........................................................................................................................85.5. Importing the Switch flows................................................................................................................... 8
6. Configuration...........................................................................................................................................96.1. Overview of the properties of the app.................................................................................................. 9
6.1.1. Page selection.............................................................................................................................96.1.2. Perform spot color check...........................................................................................................96.1.3. Perform small black objects check..........................................................................................106.1.4. Perform black pages check......................................................................................................116.1.5. Perform rich black pages check.............................................................................................. 126.1.6. Perform ink coverage check.....................................................................................................136.1.7. Perform deltaE check............................................................................................................... 136.1.8. Perform deltaC check...............................................................................................................14
6.2. Outgoing connection properties..........................................................................................................146.2.1. Report dataset name................................................................................................................ 146.2.2. Preflight result type.................................................................................................................. 146.2.3. Private data key.........................................................................................................................15
6.3. Creation of device links.......................................................................................................................16
7. Guidelines..............................................................................................................................................267.1. Defining adequate deltaE and deltaC values......................................................................................267.2. Flow design..........................................................................................................................................277.3. Output connections..............................................................................................................................277.4. Multiple instances of the app............................................................................................................. 287.5. Before or after imposition?.................................................................................................................28
ii

Switch
1. Copyrights© 2019 Enfocus BVBA all rights reserved. Enfocus is an Esko company.
Certified PDF is a registered trademark of Enfocus BVBA.
Enfocus PitStop Pro, Enfocus PitStop Workgroup Manager, Enfocus PitStop Server, EnfocusConnect YOU, Enfocus Connect ALL, Enfocus Connect SEND, Enfocus StatusCheck, EnfocusCertifiedPDF.net, Enfocus PDF Workflow Suite, Enfocus Switch, Enfocus SwitchClient, EnfocusSwitchScripter and Enfocus Browser are product names of Enfocus BVBA.
Adobe, Acrobat, Distiller, InDesign, Illustrator, Photoshop, FrameMaker, PDFWriter,PageMaker, Adobe PDF Library™, the Adobe logo, the Acrobat logo and PostScript aretrademarks of Adobe Systems Incorporated.
Datalogics, the Datalogics logo, PDF2IMG™ and DLE™ are trademarks of Datalogics, Inc.
Apple, Mac, Mac OS, Macintosh, iPad and ColorSync are trademarks of Apple Computer, Inc.registered in the U.S. and other countries.
Windows, Windows 7, Windows 8.1, Windows 10, Windows 2008 Server, Windows 2008 ServerR2, Windows Server 2012, Windows Server 2012 R2 and Windows Server 2016 are registeredtrademarks of Microsoft Corporation.
PANTONE® Colors displayed here may not match PANTONE-identified standards. Consultcurrent PANTONE Color Publications for accurate color. PANTONE® and other Pantone, Inc.trademarks are the property of Pantone, Inc. ©Pantone, Inc., 2006.
OPI is a trademark of Aldus Corporation.
Quark, QuarkXPress, QuarkXTensions, XTensions and the XTensions logo among others, aretrademarks of Quark, Inc. and all applicable affiliated companies, Reg. U.S. Pat. & Tm. Off. andin many other countries.
This product and use of this product is under license from Markzware under U.S.Patent No.5,963,641.
Other brand and product names may be trademarks or registered trademarks of theirrespective holders. All specifications, terms and descriptions of products and services aresubject to change without notice or recourse.
3

Switch
2. IntroductionThe HP Indigo EPM Preflight Solution is based on Enfocus Switch and PitStop Server. Itautomates the filtering of files based on whether they are suited for EPM or not.
The filtering of the files is based on eight checks that are performed in this order:
1. A check if the job has any color pages.2. A check for the presence of acceptable or unacceptable spot colors.3. A check for small black items that may be difficult to print in EPM (small black text and thin
black lines).4. A check for a high amount of black content pages.5. A check for the use of rich black.6. A check for a high ink coverage.7. A check of the deltaE against the EPM color space.8. A check of the deltaC against the EPM color space.
When the file fails a test it is immediately rejected for EPM. It is only accepted when it haspassed all tests.
4

Switch
3. Differences with previous versionsThe original HP EPM Preflight solution was based on a set of configurators. As of v2, it is basedon a single app. In other words, it is a complete overhaul. It works completely differently, whichmeans that if you want to integrate the app in your production you will have to redesign yourflows. Do not worry too much about this, however, as the app is a lot easier to use than theoriginal implementation.
The most obvious change is that it is now a single app instead of a set of configurators toaccomplish the task of what was a complete and complex flow in v1. That makes the redesignof the flows also an easy task. The two versions can be used next to each other so the transitioncan be done at your own pace.
It is now possible to use a page selection. Especially for large jobs it may not be really necessaryto check all the pages, but only a certain page range or a random selection of pages. This makesthe processing of course a lot faster.
The checks are more granular: instead of 5 checks, there are now 8. Seven of the checks areuser definable. The first one, the check if the job contains color and is not a complete black andwhite job, is always done and is therefore not represented in the properties of the app.
The configuration of the properties is much easier. In v1 changing the properties of some of thechecks required modifying Action Lists inside Preflight Profiles. Now all properties are definedin the app itself.
Internally some of the checks work differently. Exploiting some of the new features of PitStopServer in combination with the more granular approach means that a job is processed moreefficiently giving a faster throughput. How much faster the app is than v1 depends heavily on thejob and the combination of the many properties.
V1 had a Configurator to create HTML and/or CSV logfiles. This can still be used in combinationwith the app, but it is not included with the app anymore. In the meantime there are apps thatcover this functionality and the Reporting Module introduced with Switch 2018 update 2 givesmuch more possibilities for presenting results.
V3 of the app has a fourth output type to handle files that generate non-critical PitStop Servererrors in a clean way. We also fixed the report on Windows (now it is the intended low-resolutionreport).
5

Switch
4. Solution deliverablesTo install the HP Indigo EPM Preflight Solution the following components are needed:
• The Switch 2018 installer (or later).• The PitStop Server 2018 installer (or later).• The HP Indigo EPM kit containing all the necessary resources to install the HP Indigo EPM
Preflight Solution on top of Switch and PitStop Server.• The HP EPM Preflight app.
6

Switch
5. Installation
5.1. Switch and PitStop ServerThe Switch and PitStop Server products should be installed together on a separate computer,so not on the HP Indigo DFE. That computer can run Windows or OS X. For the latest hardwarerequirements we refer to the Enfocus website: http://www.enfocus.com/en/products/switch/system-requirements.
The installation and activation process is the regular one for those products, and is thereforenot explained any further here. If necessary, please consult the documentation of the respectiveproducts.
5.2. The HP Indigo EPM kitThe HP Indigo EPM kit is a ZIP file containing the necessary resources. Unzip it in a location ofyour choice on the Switch Server.
This will generate the following folders and the following content:
• Device Link Creator: this folder contains the HP Indigo EPM Device Link Creator application.This application creates the device links that are used in the deltaE and deltaC preflightchecks.
• Device links: this folder contains 4 default device links, 2 for the deltaE check, 2 for the deltaCcheck, with one being for RGB and one for CMYK for both cases.
• Switch flows: this folder contains a couple of sample flows that illustrate how the HP EPMPreflight app can be used in a flow.
• Test files: the test files in this folder are artificial. They can be used to illustrate the behaviorof certain settings, but real testing should be done with a representative set of productionfiles.
5.3. Installing the HP Indigo Device Link Creatorapplication
The HP Indigo EPM Device Link Creator application is a ready-to-run executable (with a fewsupporting files) that does not require a separate installer. The Device Link Creator uses ICCprofiles that are stored on the HP Indigo DFE, so it makes sense to install it there. Simply copythe folder to a suitable location on the HP Indigo DFE. The resulting device link profiles have tobe used on the computer running Switch.
7

Switch
5.4. Using the device linksThe device links are for use in the deltaE and deltaC checks. Simply browse to those files fromthe respective properties. There is no need to use the default files when you are creating yourown device links, of course.
5.5. Importing the Switch flowsImport the Switch flows using the Import flow function. This is not mandatory. These flows areexamples only. Click on the Document flow button to see more information.
8

Switch
6. Configuration
6.1. Overview of the properties of the app
6.1.1. Page selection
It is not always necessary to check all pages of a file to determine its suitability for EPM.Variable data printing jobs, for example, will usually consist of a repeat of sections, so instead ofchecking all pages it may suffice to check just the size of the section.
Example: a 1000-page file is made up of 250 individualized brochures; checking just pages 1 to 4will make the check considerably faster.
A page range is defined as it is in PitStop:
• 1-4• 1-4,9-12• 3-R3 (from page 3 to the third-last page)
For large jobs it may suffice to check only a sample of the pages. There is a property to definewhat percentage of pages should be checked. The app will choose that percentage of pages atrandom from the input file. Note that this setting is not compatible with the check of the amountof black pages. The exact selection of pages is added to private data for reference (see further).
6.1.2. Perform spot color check
This check verifies if the job contains any spot colors that are not desired when printing in EPMmode. There are three modes:
• White list• White list plus safe colors• Black list
9

Switch
Choosing “White list” means you start from the premise that no spot colors are acceptableunless you specifically define them as being acceptable. This is the cautious approach.
Spot colors in PDFs have a so-called alternate color space. This is often defined as the CMYKvalues for rendering that specific spot color in CMYK. When the alternate color space definesthe black component as 0% it means the spot color can be rendered using only CMY and istherefore by definition safe for use in EPM.
Note: When the alternate color space is RGB, Gray or Lab is ignored. You can allow thesafe colors next to any other white-listed spot colors by choosing the option “White listplus safe colors”. This is also the default.
The more optimistic approach is to choose “Black list”. In that case all spot colors are allowedexcept the ones that you specify as being problematic, perhaps as the result of a previous printrun that did not give satisfactory results.
The “List of spot colors” is the list of acceptable or unacceptable spot colors based on theprevious setting. You can define any number of spot colors in a list and you can use regularexpressions. Think of regular expressions as wildcards on steroids. In the example in thescreenshot the first line will match all Pantone spot colors that have 4 digits in the name, andthe second line all the Pantone spot colors that have “Cool” in the name. This is not the place fora tutorial on regular expressions. You will probably already get quite far if you know that the *wildcard is written as .* in a regular expression, and that the ? wildcard is represented by . (dot).The Switch help contains a chapter on regular expressions where you can find more informationon this topic.
In the property “List of technical colors to be ignored” you can specify a list of spot colors thatare not printed and that therefore should be ignored (cut lines, crease lines, …). The principle ofdefining the names is exactly the same as for defining the list of spot colors. The objects in thosecolors will be ignored in all checks, but they are not removed from the file. The spot color “All”is always ignored and does not have to be specified.
When the job fails this check the report will be a logfile listing the spot colors that do not followthe rules.
6.1.3. Perform small black objects check
This check verifies there are no thin black lines or small black texts inside the trim box. Whenspecifying a value for the lines, the default is in millimeters, but you can also add “pt” (points) or“in” (inches) after the value. The value for the texts is obviously in point size.
The check ignores lines that look like trim lines, i.e. lines that are thinner than 0.1mm with alength between 3mm and 7mm. When checking imposed files it is common that there are suchthin lines inside the trim box of the imposed result. As the quality with which these lines areprinted is of no importance they can safely be ignored. This is to avoid all imposed files endingup being rejected on this basis.
10

Switch
Should you wish to check only for small texts and not care about thin lines, then simply set thevalue for the thin lines to 0 mm.
When the job fails this check the report will be a PitStop Server low-resolution annotated report.
6.1.4. Perform black pages check
Before explaining what the properties mean, first a word on the different ways black is handledon the HP Indigo DFE, both on color pages and on black and white pages.
When printing in CMYK mode, black is of course always printed as black, both on color pagesand on black and white pages. Black and white pages are automatically recognized as such andonly 1 separation will be output, in other words, only one click will be counted for a black andwhite page.
When printing in EPM mode, black is always printed as CMY, regardless of whether it is a colorpage or a black and white page. In other words, all pages generate 3 clicks.
When printing in EPM+ mode, black is printed as CMY on a colored page, and as black on a blackand white page ON THE CONDITION that all the objects on a black page are in the DeviceGraycolor space. If that condition is not met the black and white page will be printed in CMY. Theproblem here is that black objects in PDF are often defined in the DeviceCMYK color space with0 values for CMY and these objects are not recognized as being black only. The same is true forRGB objects with equal RGB values.
Let us assume a 100-page job with 70% color pages and 30% black and white pages. In CMYKmode this will generate (70*4)+(30*1) clicks: 310. In EPM mode that will be 100*3: 300. In EPM+ mode the result is (70*3)+(30*1): 240. When you think in number of clicks EPM+ is always themost economical choice.
Note that the above example takes a 100-page job as it is easy to illustrate the principle.However, you must not apply this logic to a non-imposed job, but to an imposed job! A multipagejob with a 50/50 split between color pages and black and white pages could turn out to be a100% color job after imposition.
The first property of the black check allows defining that the file fails for EPM if the percentageof black and white pages is above a certain value, or if there are more black and white pagesthan a fixed value. The value is the second property.
If you want to print EPM+ then having a lot of black and white pages is not a problem, but thenyou want to make sure that the black and white pages only contain DeviceGray. Set the fail modeto “percentage of pages” and the fail value to 100. As there can be never be more than 100% ofblack and white pages, this check will never fail. And force the conversion of black and whitepages to DeviceGray (see below).
11

Switch
If you think that having lots of black and white pages is a reason for printing CMYK, then use alow fail value.
The third property “Ignore small color areas” is useful when a predominantly black and whitepage with a little bit of color should be counted as a black page instead of a color page in theblack pages check as described in the previous paragraphs. Think of, for example, a logo in theheader, a colored page number in the footer, etc. The value is the percentage of the surfacecoverage of the black. The reason for using this property is to make sure that the black textin jobs with predominantly black text gets printed in black and not in CMY. In other words,this property should only be used when there is a quality concern over lots of black text beingprinted in CMY.
Setting the “Convert black pages to DeviceGray” property to “Yes” is highly recommended whenyou are using EPM+ as otherwise you are not sure that all black and white pages contain onlyDeviceGray objects and as explained above this a requirement to ensure the use of black only forblack and white pages.
Warning: The check for the amount of black pages is only reliable when ALL pagesare being checked. Therefore setting this property to “Yes” is only valid when the pageselection property is set to “All pages”.
When the job fails this check the report will be a logfile containing an overview of the color typesof the pages in the job.
6.1.5. Perform rich black pages check
Rich black is black combined with a certain percentage of cyan, sometimes also magenta and oryellow to give the black an extra dark appearance. It is obvious that this effect cannot be realizedby printing in CMY only. This check allows to detect if such a rich black is used in a large enoughamount so it can be decided to print the job in CMYK.
Not everybody uses the same recipe for rich black so there are 6 properties for setting theminimum and maximum values for the cyan, magenta and yellow components of the rich black.
The percentage value of the property “Fail EPM if the rich black coverage is above” is that of thepage surface. In this way it can be avoided that a small piece of rich black that may have beenadded by mistake makes the job fail for EPM. The percentage is calculated on the basis of the
12

Switch
bounding box of the rich black objects. Note that the job fails as soon as one single page fails therich black test.
When the job fails this check the report will be a logfile listing all the pages that contain richblack and the percentage coverage on those pages. The list of pages that contain rich black isalso added to the private data (see further).
6.1.6. Perform ink coverage check
The “Maximum ink coverage” value checks for the amounts of ink from different colors on topof each other. The reason for this check is that EPM does not use black so there is a risk thatvery dark areas cannot be rendered accurately. The “Ignore areas smaller than” makes the inkcoverage check a bit less sensitive, so that even when there are areas that are too dark, the filewill still pass the test if these areas are smaller than the value that is defined here.
When the job fails this check the report will be a PitStop Server report with a heatmap of theareas that are too dark.
6.1.7. Perform deltaE check
DeltaE is a unit of color deviation. The method used to determine the color deviation from theEPM gamut of your press is by applying a device link conversion that creates a heatmap of thatdeviation. In ideal circumstances the heatmap is empty.
In the two device link properties you select the respective device links that were created with theHP EPM Device Link Creator application.
There is a value to define the maximum allowed deltaE. The “Ignore areas smaller than”property works in the same way as for the maximum ink coverage check.
The most adequate value for deltaE has to be determined empirically. The procedure to do thatis described further in the document.
13

Switch
When the job fails this check the report will be a PDF file with the heatmap of the deviation.
6.1.8. Perform deltaC check
DeltaC is a unit of neutral gray deviation. The method used to determine the gray deviation fromthe EPM gamut of your press is by applying a device link conversion that creates a heatmap ofthat deviation. In ideal circumstances the heatmap is empty.
In the two device link properties you select the respective device links that were created with theHP EPM Device Link Creator application.
There is a value to define the maximum allowed deltaC. The “Ignore areas smaller than”property works in the same way as for the maximum ink coverage check. The deltaC checkcan be made less sensitive by setting the “Ignore black text for deltaC” property to “Yes”. Thisignores black text in knockout from the job before performing the deltaC check. Black text inoverprint is kept as it may interfere with the background.
The most adequate value for deltaC has to be determined empirically. The procedure to do thatis described further in the document.
When the job fails this check the report will be a PDF file with the heatmap of the deviation.
6.2. Outgoing connection properties
6.2.1. Report dataset name
The report that is created in the case of a failed check is attached to the job as a dataset withthe name defined in this property. The report will either be a text file with the extension .log or aPDF file.
The initial report that is created by the app as a basis for some of the checks is attached as adataset with a fixed name: com.enfocus.HP_EPM_Preflight.Report. This could be interesting fortroubleshooting purposes.
6.2.2. Preflight result type
There are four possible results:
14

Switch
• First, the job is completely black and white which means that no other checks wereperformed. Note that there was also no conversion to DeviceGray if so requested! Thenatural route for such a job is that it is sent to a black and white input channel on the DFE soa conversion to DeviceGray is not necessary.
• Second, the job failed one of the checks. There is a Yes/No setting for each individual type of
check allowing you to define what route is taken based on a certain check failing. You can addmultiple output connections, each with its own settings for accepting a certain type of job,or not. You might for example wish to send jobs that failed the black pages test directly to aCMYK input channel on the DFE, but send jobs that failed the deltaE check to a checkpointso you can look at the heatmap report to assess whether or not the job is not suited for EPMafter all.
• Third, the job passed all EPM checks and is therefore suited for being sent directly to an EPM
or EPM+ input channel on the DFE.
• Fourth, a file can cause a non-critical error in PitStop Server because of some file-specific
problem. For example, a missing glyph in a font causes the ink coverage check to fail. Inother words, it is impossible to determine whether or not the file passes that particular EPMcheck or not. In such cases, the file is sent along this output connection.
When there is no appropriate outgoing connection for the job, it is sent to Problem jobs.
6.2.3. Private data key
The app adds a couple of pieces of private data to each job.
<key>.Status This is one of the following values:
• BlackWhiteJob• FailedSpotColors• FailedSmallObjects• FailedBlackPages
15

Switch
• FailedRichBlack• FailedInkCoverage• FailedDeltaE• FailedDeltaC• PassedAllChecks• PitStopError
<key>.PageRange It can be interesting to know when a random selection ofpages was chosen, what pages were actually selected. Thisvalue is a comma-separated list of the page numbers. Whenall pages were processed the value is 1-R1.
<key>.RichBlackPages This is the page range of the pages that were found tocontain an amount of rich black that was higher than thethreshold. If there were no such pages, this value is empty.
<key>.EPM+ The possible values are “true” or “false”. It is true if theproperty to convert black and white pages to DeviceGray wasset to “Yes”. Note that the value is set regardless of whetherany black and white pages were converted to DeviceGray ornot; after all, any job that is suited for EPM+ is also suited forEPM.
6.3. Creation of device linksThe deltaE and deltaC checks use ICC device links to determine if a file is within the color gamutof the EPM color space. When the ICC profiles on the Indigo DFE or SmartStream ProductionPro have been customized, then also customized device links have to be created.
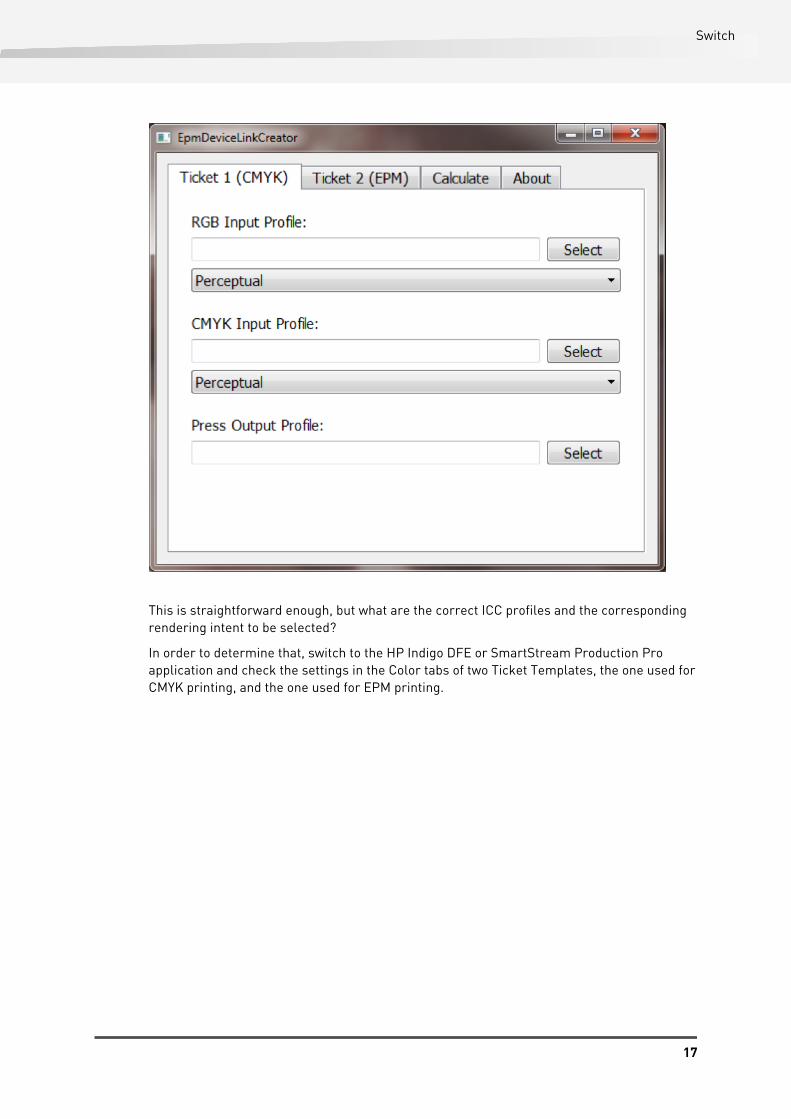
Start the application by double clicking the “EPMDeviceLinkCreator.exe”. There are three tabswhere the ICC profiles have to be loaded before hitting the “Calculate” button on the third tab.
16
Switch
This is straightforward enough, but what are the correct ICC profiles and the correspondingrendering intent to be selected?
In order to determine that, switch to the HP Indigo DFE or SmartStream Production Proapplication and check the settings in the Color tabs of two Ticket Templates, the one used forCMYK printing, and the one used for EPM printing.
17

Switch
18

Switch
Check the name of the RGB input color profile in the DFE, switch to the EPMDeviceLinkCreatorapplication and select that profile there. The ICC profiles can usually be found in C:\RIP\ICCProfiles. Repeat this for the CMYK profile, and the press profile. Do this for both the CMYKand EPM tabs.
19

Switch
20

Switch
21

Switch
In the “Calculate” tab choose the press profile that should be used in the calculation to estimatethe final color (Lab). Therefore it is important to have a good profile that characterizes the presscolor. In our example we use the “HPIndigoGlossExpo05.icc” that well describes the IndigoCMYK printed on a glossy substrate.
22

Switch
23

Switch
24

Switch
Click the “Calculate” button. This will create four device link profiles in the same folder as theexecutable: two are for deltaE, two for deltaC, and two are for converting from CMYK, two forconverting from RGB.
Once the device links are created, copy them to the Switch environment. There are fourproperties in the HP EPM Preflight app where the four device links can be loaded.
25

Switch
7. Guidelines
7.1. Defining adequate deltaE and deltaC valuesThe objective of the HP Indigo EPM Preflight Solution is to make an automatic distinctionbetween files that will render accurately using the EPM mode and files that will not.
The first step of the process is to compile a set of test files and evaluate them. There are anumber of test files provided as part of the kit, but you should use a representative set of yourown files. You print the test files, once without EPM and once with EPM. You then classifythem visually as files that are acceptable and hence should pass the test, and files that are notacceptable and hence should fail the test. Put that list in a spreadsheet.
In the second step you run the test files through the deltaE and deltaC test flows with differentvalues and add to the spreadsheet whether the file passed or failed the test. There is no point intesting values below 4, because those are too strict and will lead to most files being rejected.
You will now have three possible combinations:
1. The deltaE/C test results match your expectation.2. The file fails the test, but you find it acceptable: a false negative.3. The file passes the test, but you do not find it acceptable: a false positive.
Ideally, the results of the tests match your expectations, but it is unlikely that this will be thecase: objective number crunching and subjective assessment in matters of color do not give aperfect match.
You should now choose the values that best suit your strategy: you can choose the values thatyield the highest number of files that pass with the risk of false positives, or you choose amore conservative approach meaning you will have false negatives and you will not use the fullpotential of EPM.
26

Switch
7.2. Flow design
7.3. Output connectionsThe app should at least have 3 outgoing connections, one for each preflight result type.However, it is conceptually better to have 4 outgoing connections. It makes sense to split thefailed checks in two groups: the clear-cut ones, and the ones with a risk of false negatives. Theobjective checks with a clear-cut result are the small objects check, the spot color check, theblack pages check and the rich black check. There is no discussion possible about the result.
The ink coverage check and the two delta checks can give a result that is objectively outsideof the specification, but that you would subjectively let pass anyhow, for example, because thedelta deviation affects parts of an image that are not considered crucial. That is called a falsenegative.
From a flow design perspective it therefore makes perfect sense to route the subjectivechecks to a checkpoint so an operator can have a look at the original file and the report withthe heatmap. He or she can then easily and quickly determine if the out-of-gamut areas areessential for a color-accurate rendering of the job or not and decide whether or not to continuewith EPM or not. Looking at a file is a quicker and less costly method than making two prints inorder to compare them.
27

Switch
7.4. Multiple instances of the appIt is quite obvious that there can be multiple instances of the app in the same flow usingdifferent values for the different properties depending on some meta property of the job: booksare preflighted like this, brochures like that; jobs with a small page count are preflighted likethis, jobs with a large page count like that; etc.
You should also consider, however, that it is possible to chain the different checks one after theother, rather than performing all the checks in one element. This can be useful for large jobsthat take up a long processing time. In the Switch Preferences in the “Error handling” sectionyou can define a time-out after which long processes will be aborted. As the ink coveragechecks and the delta checks are very resource-intensive checks performing all those checksin one element could make the processing take longer than this limit, although each checkindividually would not. Performing the checks consecutively solves that. There is no point insplitting up the first five checks as the information used to evaluate them is gathered at thesame time in one run of PitStop Server. When doing this you should take care not to activatechecks that were already done in previous instances.
Another reason for chaining multiple instances is that you may want certain checks to be donebefore a certain type of processing takes place and others after it, as explained in the nextchapter.
7.5. Before or after imposition?The app will of course accept any PDF, be it the customer-supplied multipage input file, be it theresult after imposition, but consider that the results of the checks can be affected by doing thembefore or after imposition.
The spot color check will always give the same result whether performed before or afterimposition.
The small objects check will usually give the same result. An imposition program is likely toadd marks that will make the job fail the small objects check, but an attempt is made to ignorethose. However, there are so many different ways in which imposition programs add suchlines that the detection of those lines is probably not 100% accurate across all programs. It isworthwhile checking if the imposition program gives you some control over the creation of themarks. The easiest and safest approach is for the imposition program to place those marks inthe spot color All, as this color is always ignored in the EPM checks.
The black pages check is best performed after imposition. A job may have 30% of black andwhite pages before imposition, but become a 100% color job after imposition if all the black andwhite pages find themselves being combined with at least one color page on the same sheetside. Also the conversion to DeviceGray is best done on the imposed file: the imposition programmay have added objects that are black but not defined in DeviceGray which would cause the EPM+ mode to print the whole page/sheet in EPM instead of using just black.
28

Switch
The rich black check will give the same result, but the value for the coverage should bedifferent: in absolute terms 10% of the surface of an individual page is not the same as 10% ofthe surface of an imposed sheet.
The ink coverage check and the delta checks will also give the same result whether performedbefore or after imposition: out of gamut is out of gamut.
One can conclude that all checks are best done on the input file, except for the black pagescheck. Note that the reason a job failed one of the checks is stored in private data, so it is alwayspossible to use that information later on in the flow.
29