how to transfer data to your new account - · pdf filehow to transfer data to your new account...
TRANSCRIPT

How to Transfer Data to your New Account Page 1 of 16
How to Transfer Data to your New Account
Guide done on: 23 Feb 2013
Illustrations using: Windows 7 and Outlook 2010

How to Transfer Data to your New Account Page 2 of 16
Introduction This guide will show the step by step instructions on how to back up and transfer the following important data from your old computer account to the new computer account. A. Emails B. Calendars & Contacts C. Personal Folders D. Documents (Files and Folders) E. Favorites F. H Drive G. Friendly Mail Address

How to Transfer Data to your New Account Page 3 of 16
A. Emails Firstly, let’s use Outlook Personal Folders to store emails from your Exchange mailbox to your local computer. You could then transfer the Personal Folders to your new account via a storage media, such as an external hard disk. Creating a Personal Folder in your Old Account 1. From the File menu bar, choose Info > Account Settings > Account Settings…
2. Click on Data Files > Add…

How to Transfer Data to your New Account Page 4 of 16
3. Select Outlook data file (.pst) and click OK.
4. Next, choose the file name and folder location which you wish to save your Personal Folder. Click OK.
Note: Remember the folder location where you saved your Personal Folder. It is from this same location which you will back up your Personal Folder to a storage media, such as external hard disks.

How to Transfer Data to your New Account Page 5 of 16
The new Personal Folder will be added into the Data Files.
5. Your Personal Folder is now created and it will appear in your folder list.

How to Transfer Data to your New Account Page 6 of 16
Moving your emails to Personal Folders Simply do a left-click to drag your emails to the folder inside your Personal Folder. You can create new sub-folders within Personal Folder to manage your stored emails properly.
Note: Dragging the emails to the Personal Folder will remove them from the Exchange server. You will no longer view them from Outlook Web Access or mobile phones or from another computer. If you wish to retain your emails in Exchange server, do a copy of the emails to the Personal Folder instead – do a right-click to drag the emails to the folder and you can choose the option “Copy”.

How to Transfer Data to your New Account Page 7 of 16
Also remember to restore any archived emails from the Enterprise Vault first, before moving them to the Personal Folder.
If you only back up the archived shortcuts , these cannot be opened from a Personal Folder.
To restore the emails, highlight a batch of archived emails and click on Enterprise Vault > Restore
Once the email icons are restored back to the original envelope , you could now start to drag your emails to the Personal Folder.

How to Transfer Data to your New Account Page 8 of 16
B. Calendars & Contacts You could also make use of the Personal Folder to back up your Calendars and Contacts. Moving your Calendars of Old Account to Personal Folders 1. Right-click on Calendar from your Folder List and select Copy Calendar. 2. Select the Personal Folder and click OK.
3. The Calendar is now stored on your Personal Folder.
Moving your Contacts of Old Account to Personal Folders 1. Right-click on Contacts from your Folder List and select Copy Folder. 2. Select the Personal Folder and click OK.

How to Transfer Data to your New Account Page 9 of 16
3. The Contacts is now stored on your Personal Folder.
C. Personal Folders After moving your emails, calendars and contacts to the Personal Folder, it’s time to back up the Personal Folder itself. 1. Firstly, you need to know the folder location of the Personal Folder file (the file extension is *.pst). 2. To know the folder location, from the File menu bar, choose Info > Account Settings > Account Settings… 3. Under Data Files, highlight your Personal Folder and click on Open File Location.
4. Copy the Personal Folder file to another storage media, such as an external hard-disk.
Note: Please close your Microsoft Outlook first, before copying the Personal Folder. This is to prevent corruption to the file.

How to Transfer Data to your New Account Page 10 of 16
Transferring the Personal Folder to your new account With the Personal Folder which contains the backup of your emails, calendars and contacts, you could now transfer it to your new account. 1. Copy the Personal Folder file from your storage media to a folder on your computer. 2. Login to Outlook with your New Account. 3. From the File menu bar, choose Info > Account Settings > Account Settings…
4. Click on Data Files > Add…

How to Transfer Data to your New Account Page 11 of 16
5. Select Outlook data file (.pst) and click OK.
6. Next, browse to the folder which you stored the Personal Folder and choose the file. Click OK.
7. The Personal Folder is now added in your folder list. You can now access your emails, calendar and contacts of your old account in your new account via the Personal Folder.

How to Transfer Data to your New Account Page 12 of 16
D. Documents (Files and Folders) The common folders which contain your important documents would include: Documents, Desktop and D drive. 1. From the computer which you login with the old account, navigate to your Documents by going to Start > Documents This will open a window which shows all your files and folders stored under Documents. Simply copy them to your storage media, such as external hard-disk or thumb-drive.
2. For Desktop, copy the files and folders which you need on your Windows Desktop. 3. For D drive, go to Start > Computer > double-click on D: Copy the files and folders which you need to your storage media.
4. Login to your new account, and copy the data from your storage media and transfer them back to the same folder locations.
Alternatively, you can copy all of them to the local D drive and access your old documents from there.

How to Transfer Data to your New Account Page 13 of 16
E. Favorites Favorites are the list of links to your frequently visited websites in Internet Explorer. 1. To back up your Favorites from your old account, login to the computer with your old account > go to Start > Computer > C drive > Users > double-click the folder which is named after your old NUSNET UserID > look for the Favorites folder and copy it to your storage media.
2. To transfer the Favorites to your new account, login to the computer with your new account > go to Start > Computer > C drive > Users > double-click the folder which is named after your new NUSNET UserID > copy the Favorites folder from your storage media and overwrite the existing one. Open Internet Explorer and you will see your favorite links again.
F. H Drive If your computer is on the NUS domain, you will have a Home Directory (H Drive) in your Computer. This is the network drive provided by Computer Centre for you to access files between different computers. 1. To back up the files from the H Drive, login to the computer with your old account, go to Start > Computer > look for the H drive and double-click on it. Copy the files and folders which you need to your storage media.
2. To transfer the files to the H Drive of your new account, login to the computer with your new account, go to Start > Computer > look for the H drive and double-click on it. Copy the files and folders from your storage media to the H drive.

How to Transfer Data to your New Account Page 14 of 16
F. Friendly Mail Address A Friendly Mail Address is an alternate email address which will be associated to the same mailbox as your default email address.
You could transfer the Friendly Mail Address from your old email account to your new email account by doing the following:
1. Login to https://exchange.nus.edu.sg/pea/applypea/pea.asp with your old email account.
2. Clear the box field and click Submit. This will disassociate the existing Friendly Email from your old account.
3. Click OK.
4. Click Close.
5. Wait for 5 minutes and login to https://exchange.nus.edu.sg/pea/applypea/pea.asp with your new email account to re-apply the same Friendly Mail Address for your new account.
How to Transfer Data to your New Account Page 15 of 16
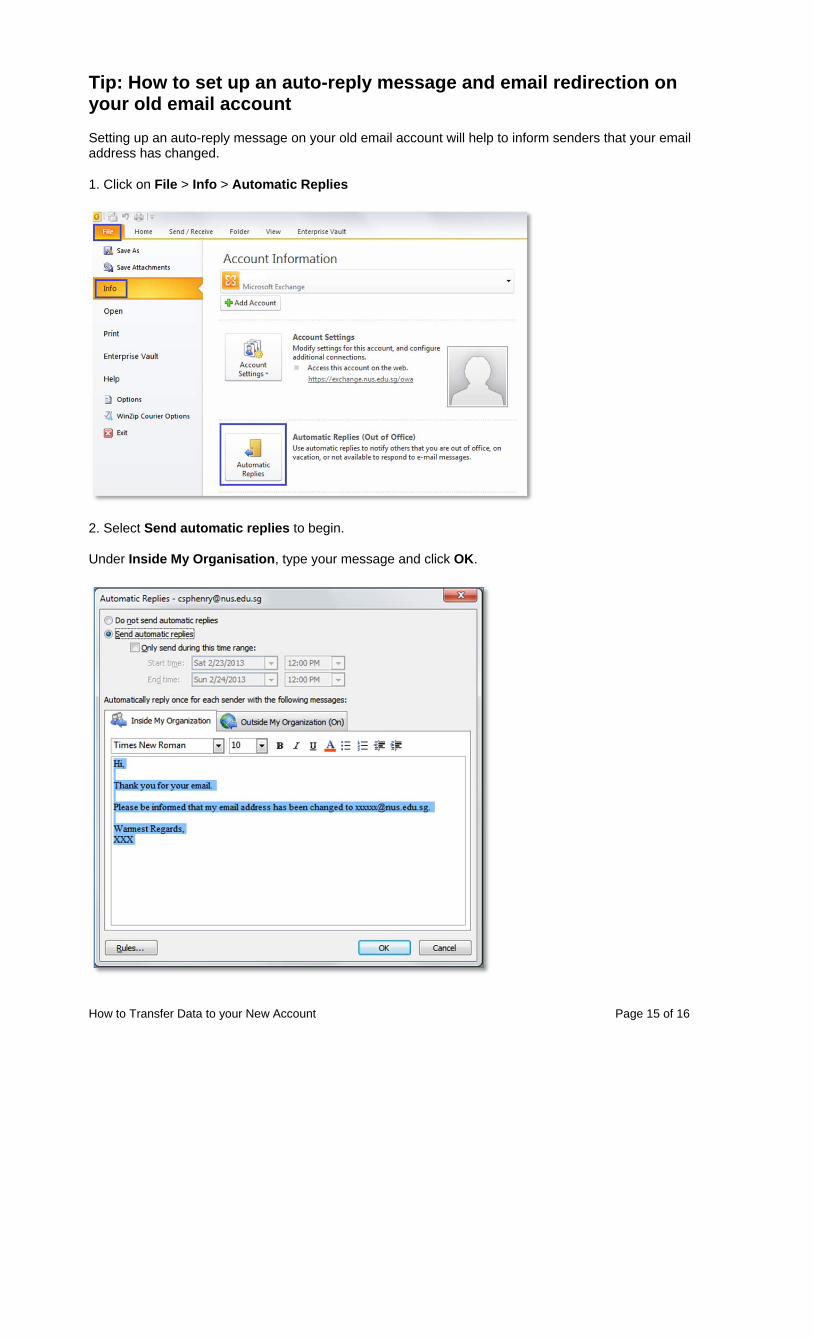
Tip: How to set up an auto-reply message and email redirection on your old email account
Setting up an auto-reply message on your old email account will help to inform senders that your email address has changed.
1. Click on File > Info > Automatic Replies
2. Select Send automatic replies to begin.
Under Inside My Organisation, type your message and click OK.

How to Transfer Data to your New Account Page 16 of 16
3. If you want to send the auto-reply to external senders, click on Outside My Organization and tick on “Auto-reply to people outside my organisation”.
Type your message and click OK.
If you select the option “My Contacts only”, this means that only external senders which are already in your Address Book will get the auto-reply.
Setting up an email redirection will help to redirect new emails to the old email account, to your new email account.
1. Login to https://exchange.nus.edu.sg/autoforward with your old email account.
2. Enter the full email address of your new account and click Save. Tick on “Keep a copy of the email in my original mailbox”.
Note: both auto-reply message and email redirection will stop once your old email account is deleted.