homemade deep hollowing tools - woodworkers of …wwset.org/programs/homemade tools.pdf · homemade...
TRANSCRIPT

Homemade Deep Hollowing Tools
Homemade Tools Richard Hicks on October 28, 2013
In 2003, we (Earl, Richard, Steve and Pete) attended a Saturday club meeting about wood turning presented by Lyman Frugia. During that meeting, Lyman demonstrated his homemade Deep Hollowing System. We decided that we would like to do some deep hollowing, so we checked the prices of the hollowing tools and found the Lyle Jamieson system was about $300 to $500 – just for the boring bar. We were so impressed by the performance of Lyman’s system, we decided to build our own.
We took pictures and measurements of Lyman’s system and made note of several minor changes Lyman said he would make if he built it again.
Homemade Deep Hollowing Tools
Homemade Tools Richard Hicks on October 28, 2013
The Deep Hollowing System includes:
•The boring bar system:
•The boring bar and tip holder
•The cage assembly
•The secondary tool rest
•Internal lighting
•A steady rest
•A wall thickness indicator

Homemade Tools Richard Hicks on October 28, 2013
Homemade Deep Hollowing Tools
Lyman’s Original Boring Bar System
Homemade Deep Hollowing Tools
Homemade Tools Richard Hicks on October 28, 2013
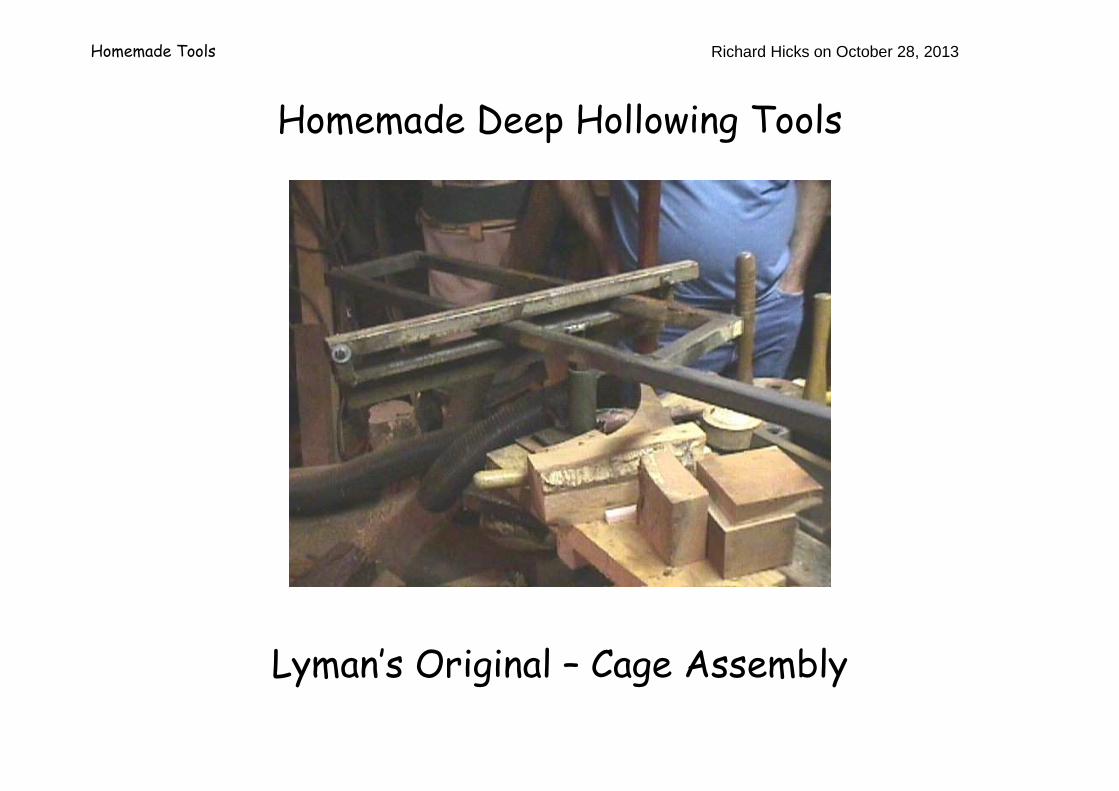
Lyman’s Original – Cage Assembly
Homemade Tools Richard Hicks on October 28, 2013
Homemade Deep Hollowing Tools
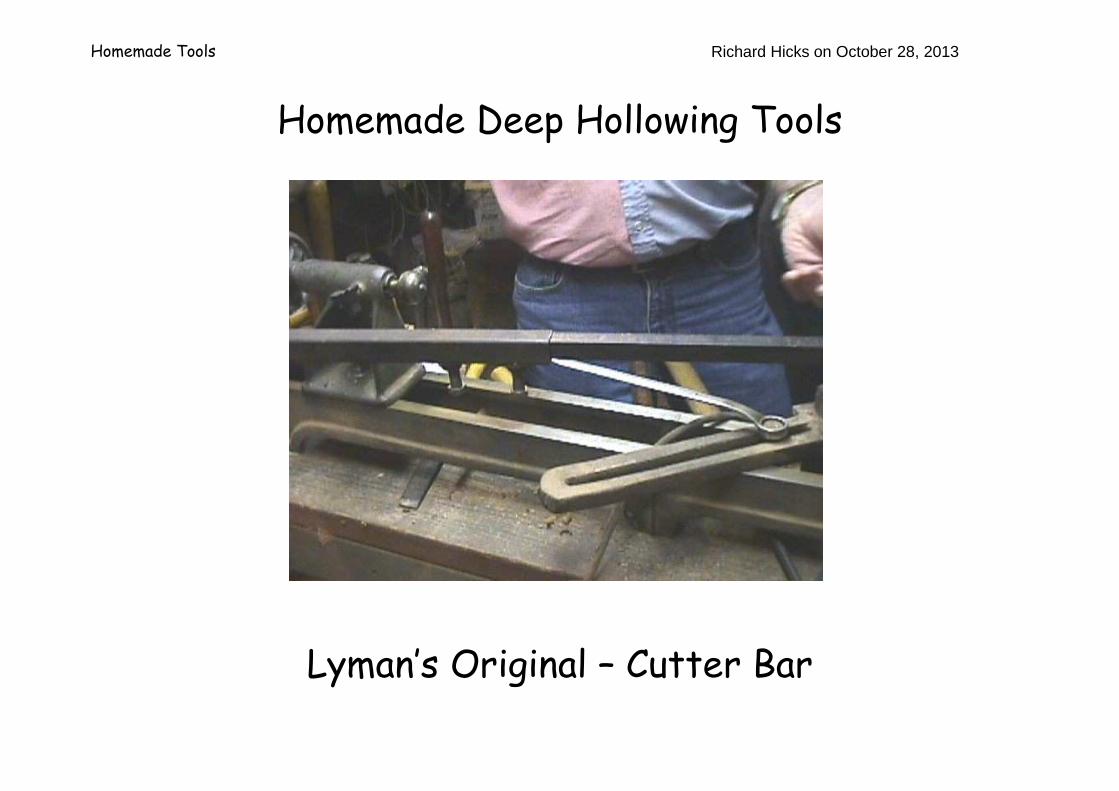
Lyman’s Original – Cutter Bar

Homemade Tools Richard Hicks on October 28, 2013
Homemade Deep Hollowing Tools
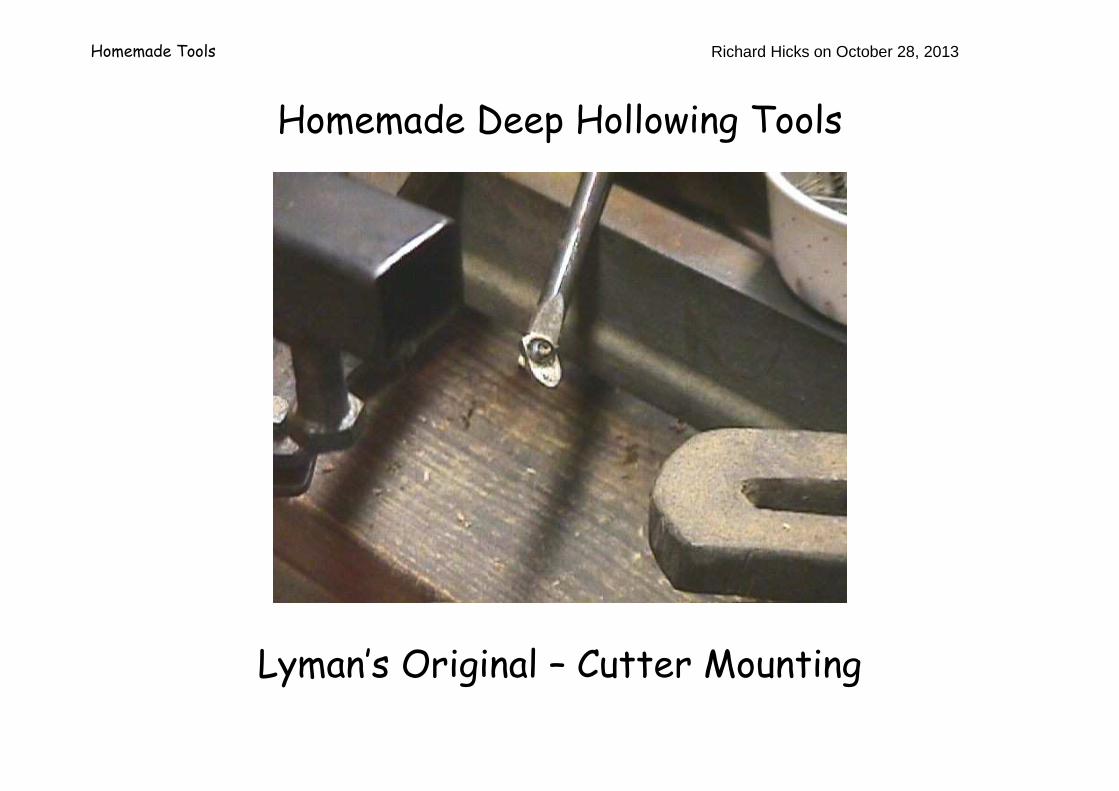
Lyman’s Original – Cutter Mounting
Homemade Tools Richard Hicks on October 28, 2013
Homemade Deep Hollowing Tools
Lyman’s Original – Cutter Mounting

Homemade Tools Richard Hicks on October 28, 2013
Basic Drawing of the Cage Assembly
Homemade Deep Hollowing Tools
Homemade Tools Richard Hicks on October 28, 2013
Homemade Deep Hollowing Tools
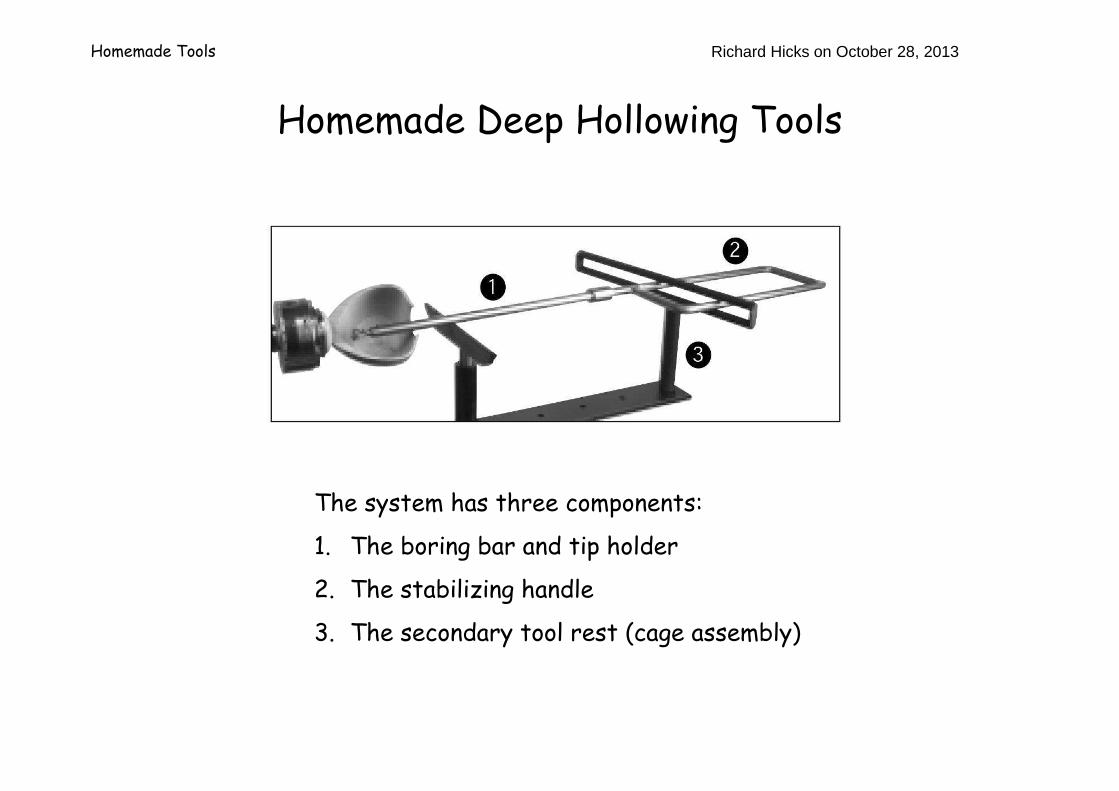
The system has three components:
1. The boring bar and tip holder
2. The stabilizing handle
3. The secondary tool rest (cage assembly)
Homemade Tools Richard Hicks on October 28, 2013
Homemade Deep Hollowing Tools
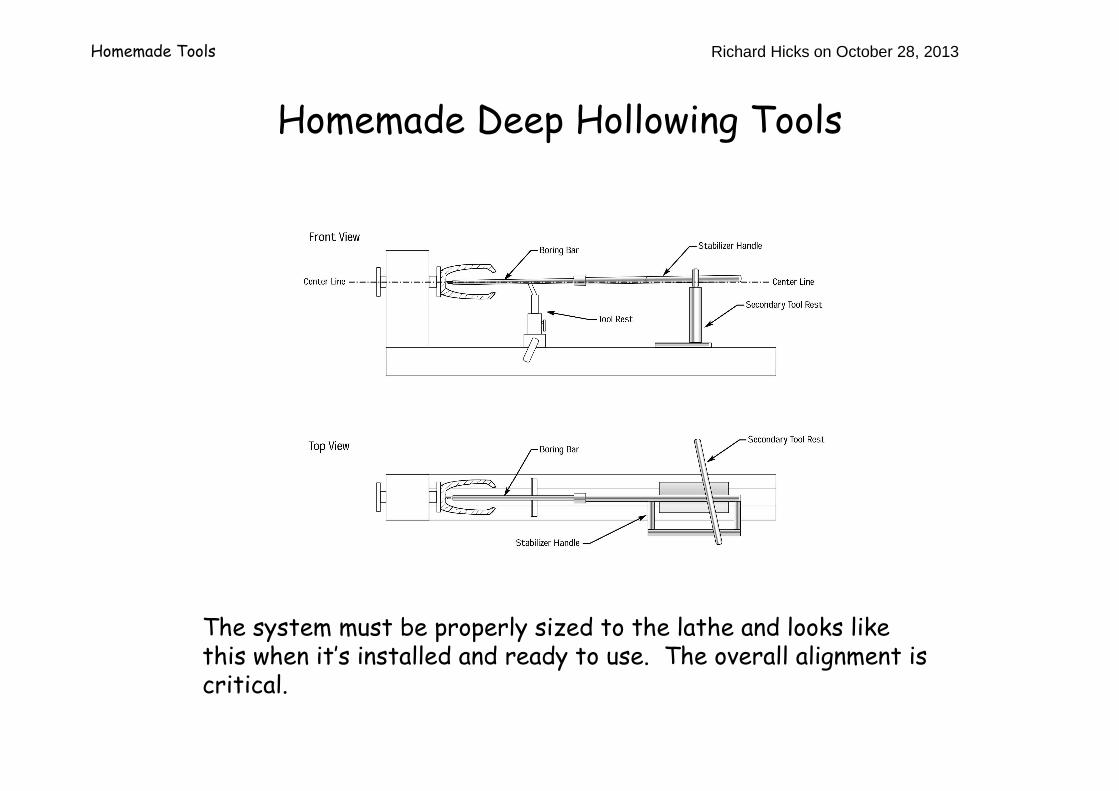
The system must be properly sized to the lathe and looks like this when it’s installed and ready to use. The overall alignment is critical.
Homemade Tools Richard Hicks on October 28, 2013
Homemade Deep Hollowing Tools
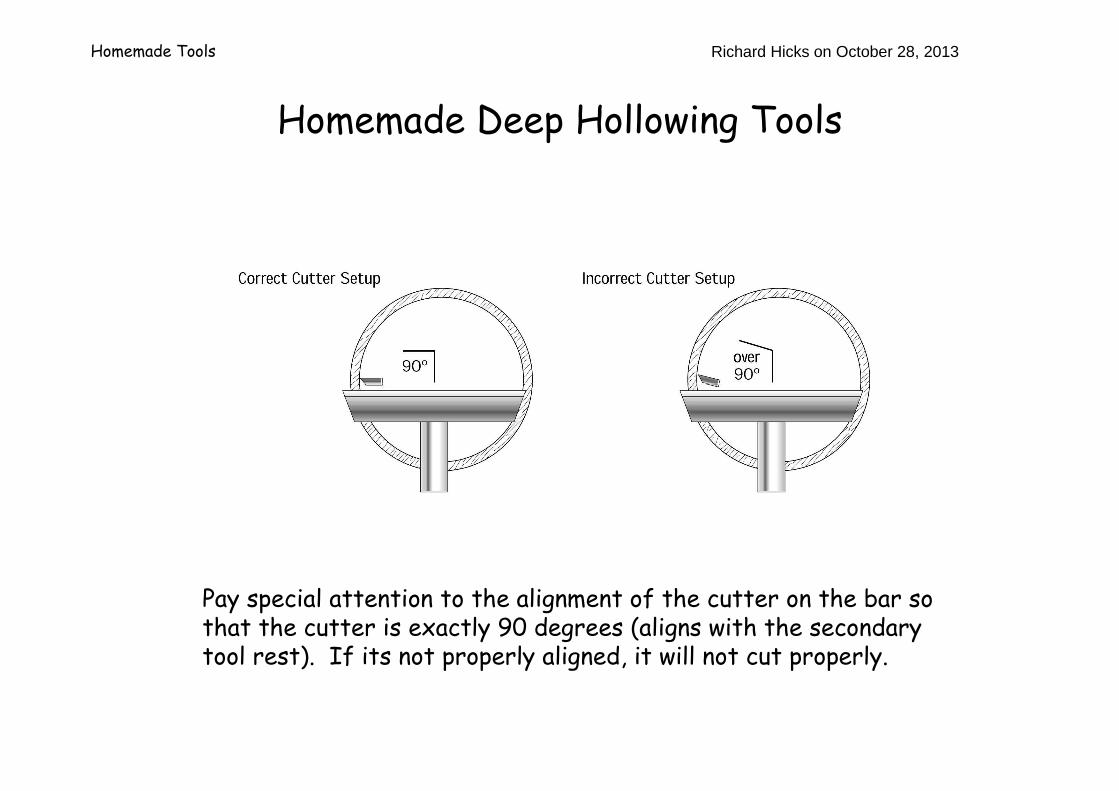
Pay special attention to the alignment of the cutter on the bar so that the cutter is exactly 90 degrees (aligns with the secondarytool rest). If its not properly aligned, it will not cut properly.
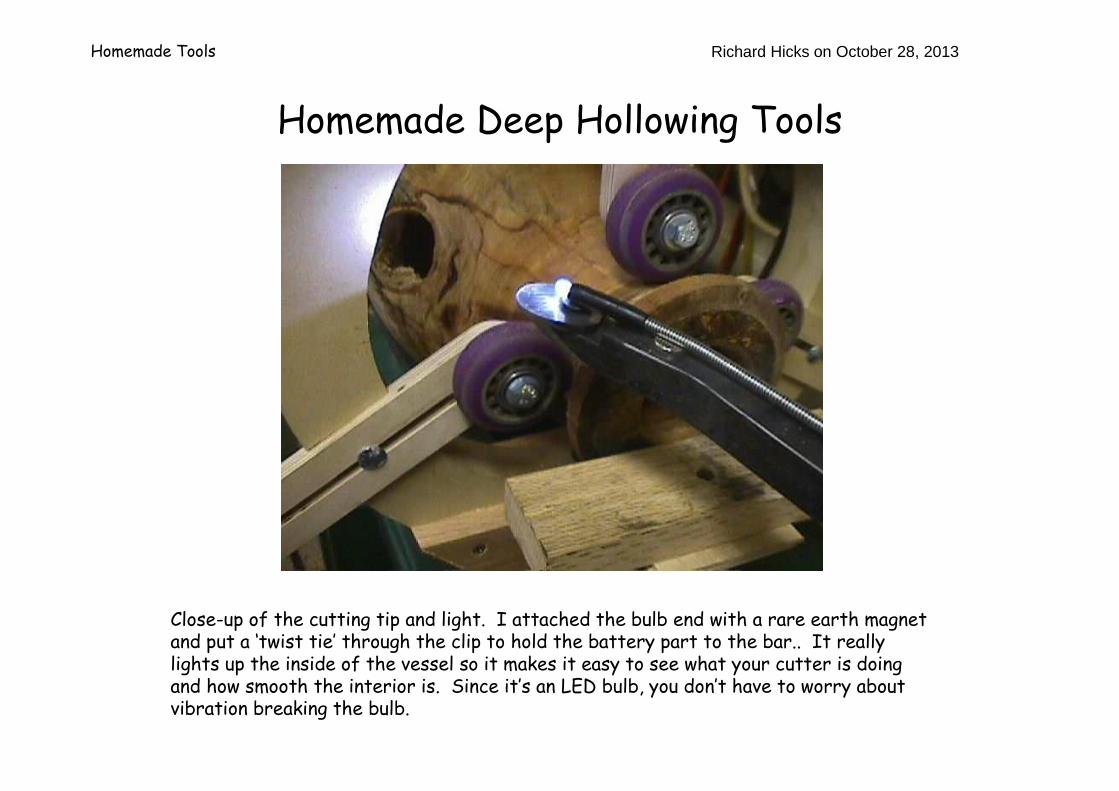
Close-up of the cutting tip and light. I attached the bulb end with a rare earth magnet and put a ‘twist tie’ through the clip to hold the battery part to the bar.. It really lights up the inside of the vessel so it makes it easy to see what your cutter is doing and how smooth the interior is. Since it’s an LED bulb, you don’t have to worry about vibration breaking the bulb.
Homemade Deep Hollowing Tools
Richard Hicks on October 28, 2013Homemade Tools
Homemade Tools Richard Hicks on October 28, 2013
Homemade Deep Hollowing Tools
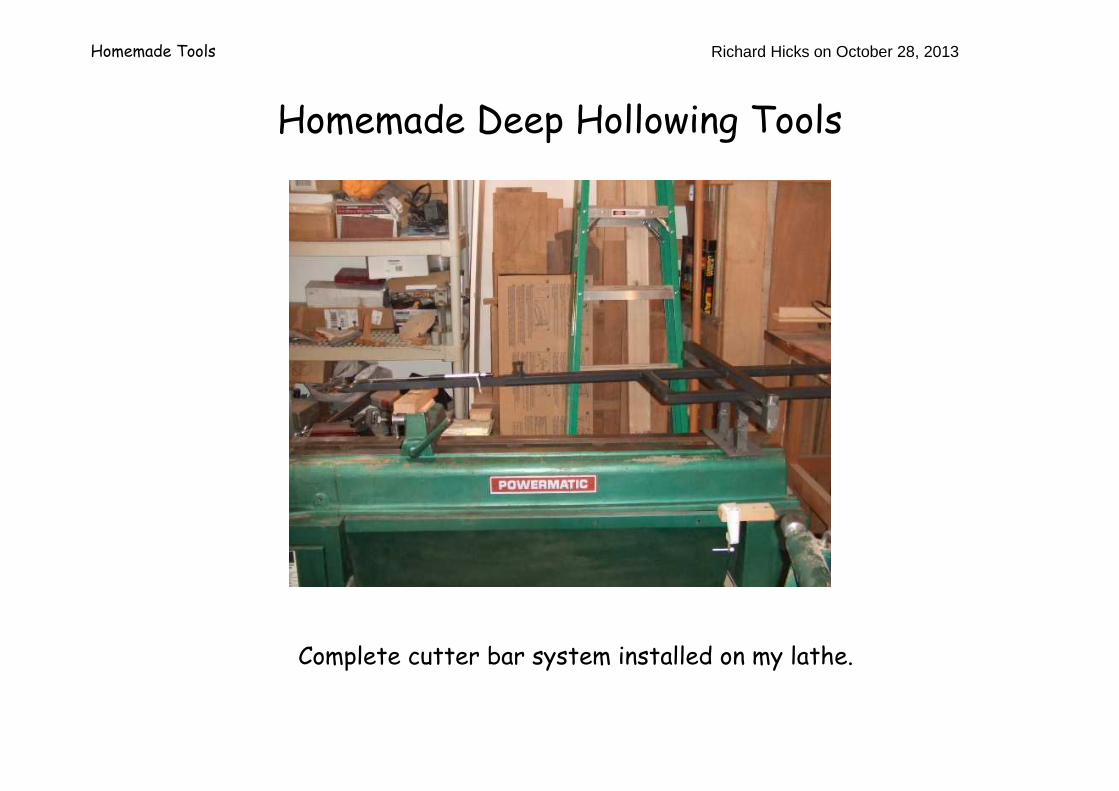
Complete cutter bar system installed on my lathe.
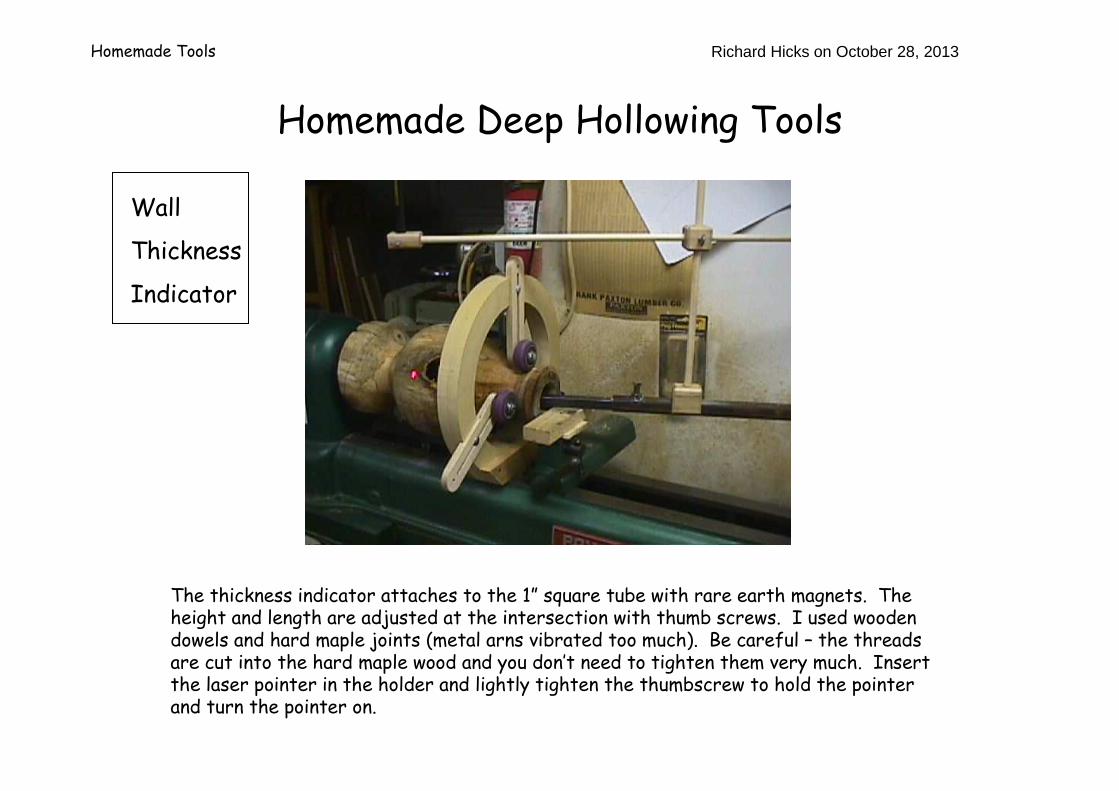
The thickness indicator attaches to the 1” square tube with rare earth magnets. The height and length are adjusted at the intersection with thumb screws. I used wooden dowels and hard maple joints (metal arns vibrated too much). Be careful – the threads are cut into the hard maple wood and you don’t need to tighten them very much. Insert the laser pointer in the holder and lightly tighten the thumbscrew to hold the pointer and turn the pointer on.
Homemade Deep Hollowing Tools
Homemade Tools Richard Hicks on October 28, 2013
Wall
Thickness
Indicator
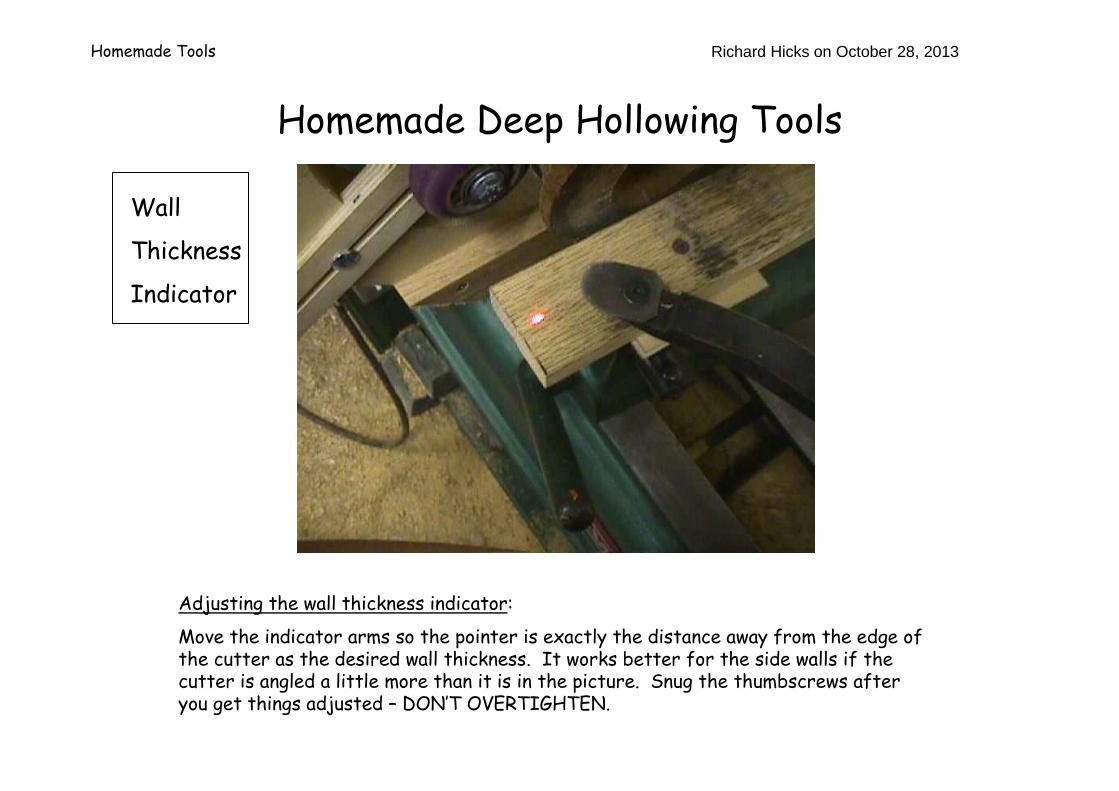
Adjusting the wall thickness indicator:
Move the indicator arms so the pointer is exactly the distance away from the edge of the cutter as the desired wall thickness. It works better for the side walls if the cutter is angled a little more than it is in the picture. Snug the thumbscrews after you get things adjusted – DON’T OVERTIGHTEN.
Homemade Tools Richard Hicks on October 28, 2013
Homemade Deep Hollowing Tools
Wall
Thickness
Indicator
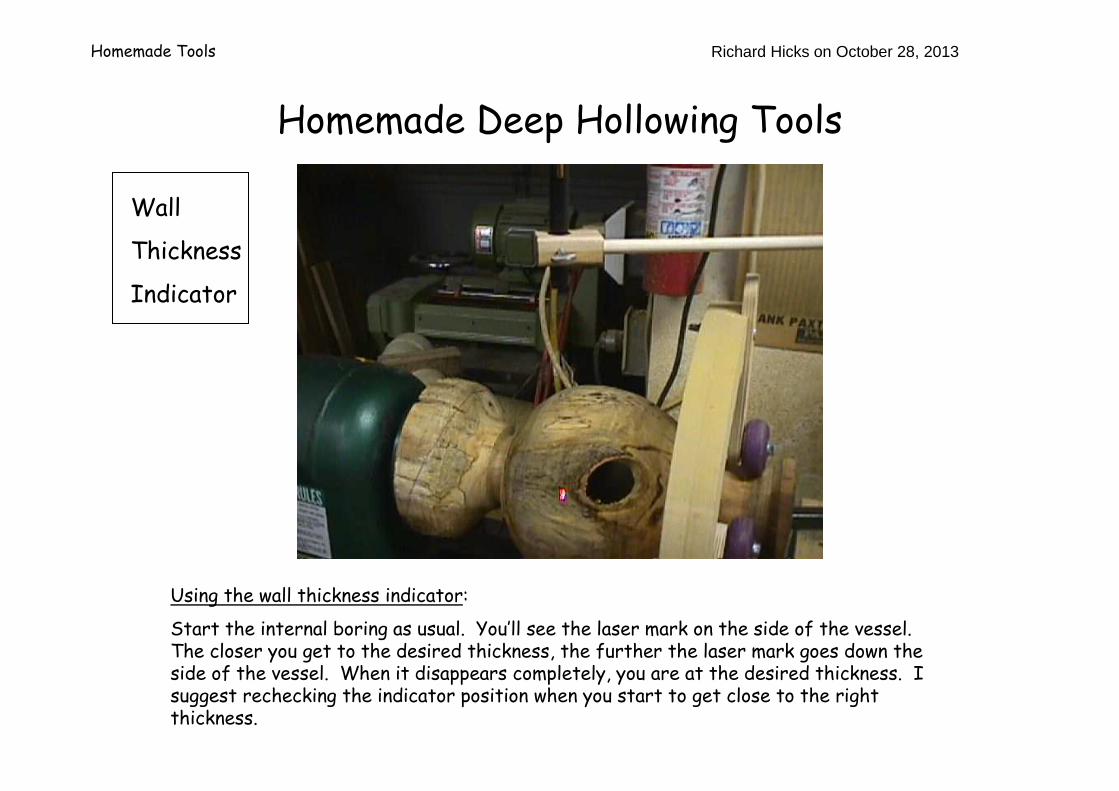
Using the wall thickness indicator:
Start the internal boring as usual. You’ll see the laser mark on the side of the vessel. The closer you get to the desired thickness, the further the laser mark goes down the side of the vessel. When it disappears completely, you are at the desired thickness. I suggest rechecking the indicator position when you start to get close to the right thickness.
Homemade Tools Richard Hicks on October 28, 2013
Homemade Deep Hollowing Tools
Wall
Thickness
Indicator
Homemade Tools Richard Hicks on October 28, 2013
Homemade Deep Hollowing Tools
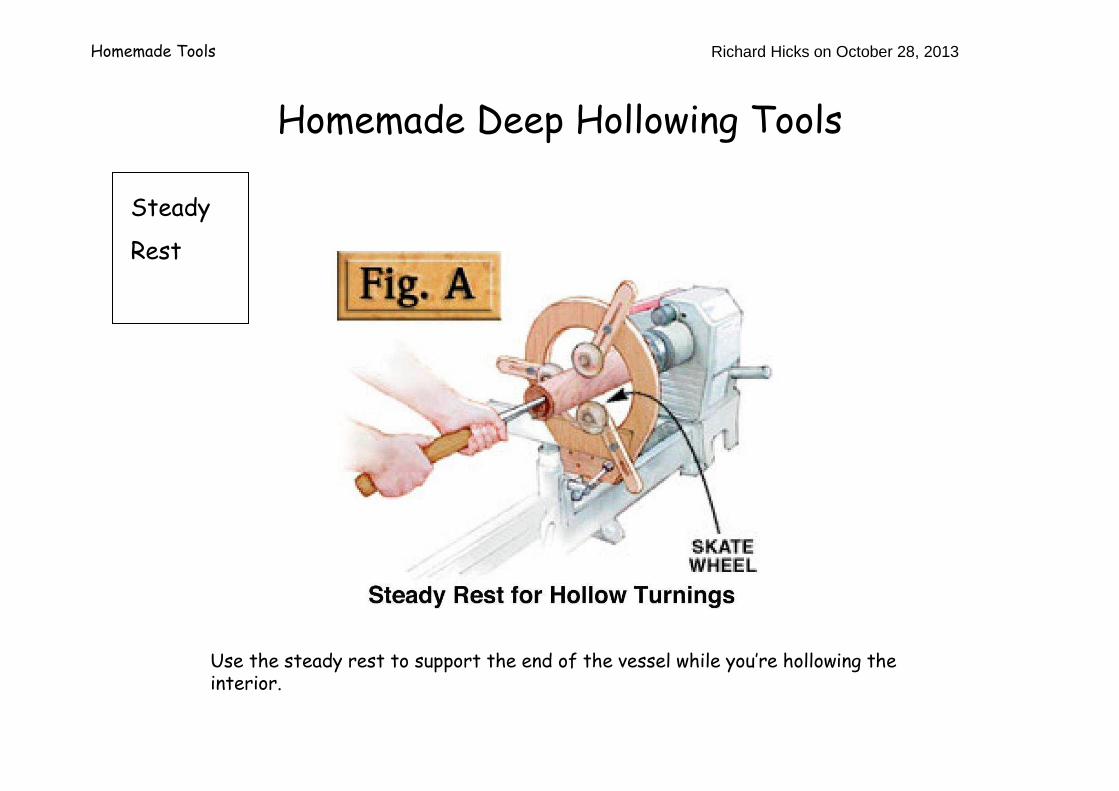
Use the steady rest to support the end of the vessel while you’re hollowing the interior.
Steady
Rest
Homemade Tools Richard Hicks on October 28, 2013
Homemade Deep Hollowing Tools
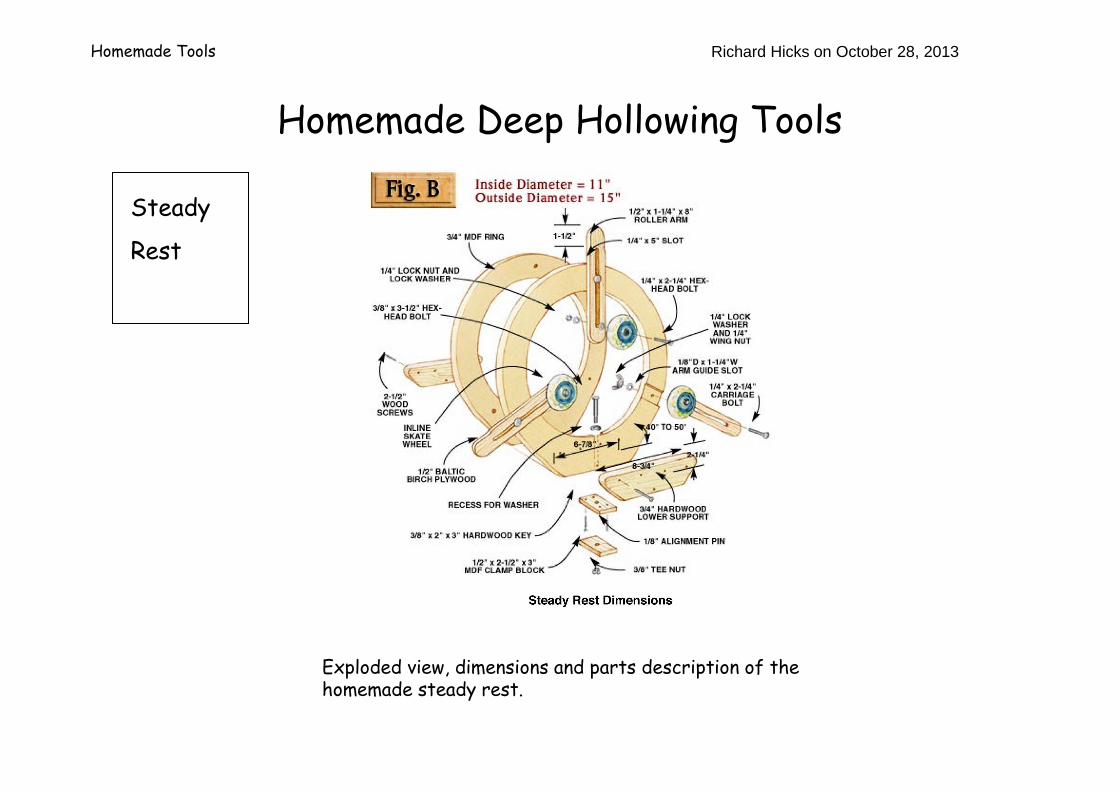
Exploded view, dimensions and parts description of the homemade steady rest.
Steady
Rest
Homemade Tools Richard Hicks on October 28, 2013
Homemade Deep Hollowing Tools
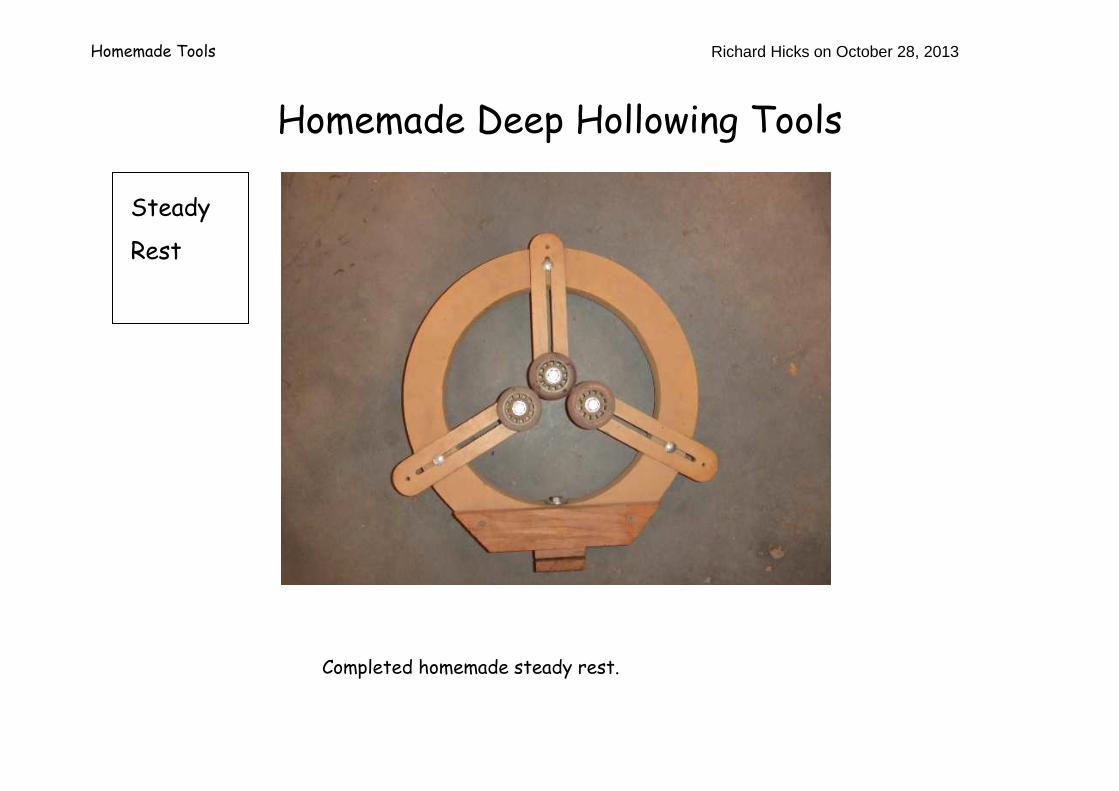
Completed homemade steady rest.
Steady
Rest
Homemade Tools Richard Hicks on October 28, 2013
Homemade Deep Hollowing Tools
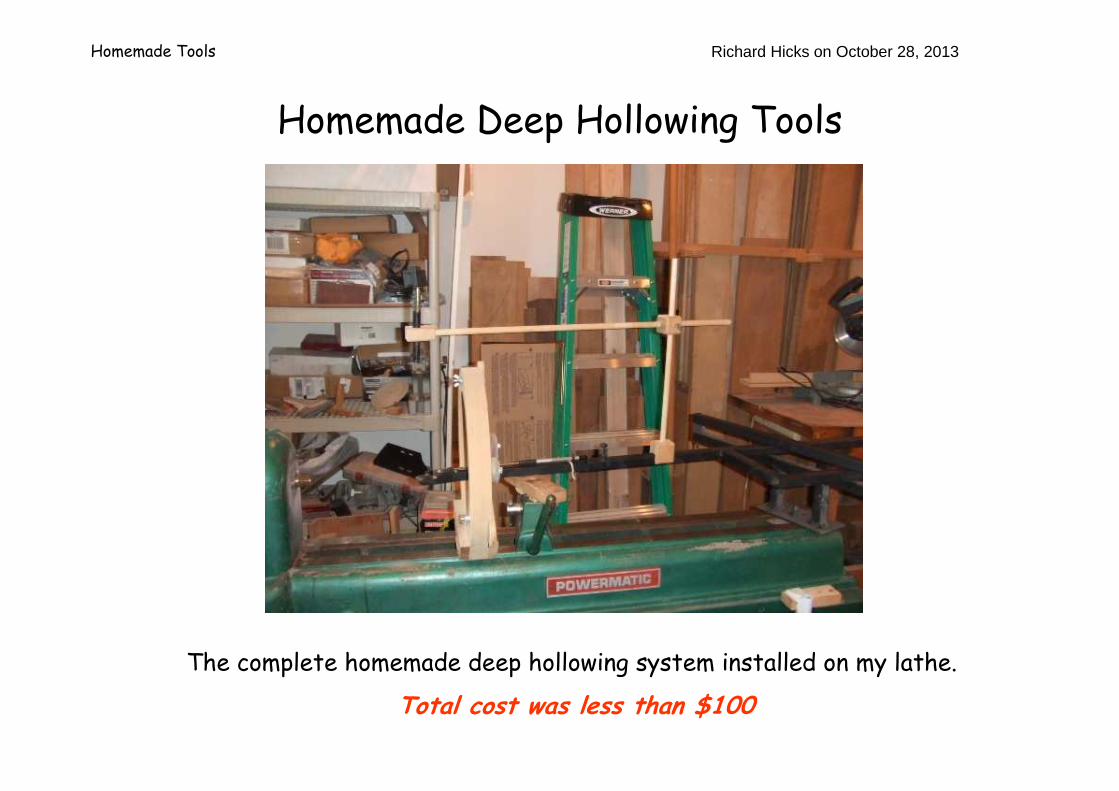
The complete homemade deep hollowing system installed on my lathe.
Total cost was less than $100