hol6765 build openstack iaas private cloud with … build openstack iaas private cloud with oracle...
TRANSCRIPT
HOL6765
Build OpenStack IaaS Private Cloud with Oracle OpenStack and Oracle VM
Simon COTER
Principal Product Manager - Oracle VM & VirtualBox
2
CONTENTS
1 INTRODUCTION ............................................................................................................................. 4
1.1 Lab Objective .................................................................................................................................. 4 1.2 Global Picture ................................................................................................................................. 5
2 INITIAL INSTRUCTIONS ................................................................................................................ 6 2.1 Start both servers (VirtualBox VMs) ............................................................................................... 6 2.2 Connect to the Oracle OpenStack Dashboard ............................................................................... 7 2.3 Create new OpenStack Project ...................................................................................................... 7 2.4 Create User dedicated to the OpenStack Project ......................................................................... 10 2.5 Log out from the OpenStack Dashboard ...................................................................................... 12
3 CONFIGURE OPENSTACK PROJECT “OOW2016” .................................................................... 13 3.1 Import Oracle Linux OpenStack Image ......................................................................................... 13 3.2 Create new Private Virtual Machine Networks ............................................................................. 16
4 LAUNCH AN INSTANCE ON OOW2016 PROJECT .................................................................... 19 4.1 Create new ssh-key to login to Instances ..................................................................................... 19 4.2 Launch new Instance .................................................................................................................... 20
5 CONFIGURATION TASKS AS ADMINISTRATOR ....................................................................... 23 5.1 Login as admin to Oracle OpenStack ........................................................................................... 23 5.2 Create new External & Shared Network ....................................................................................... 24 5.3 Create new OpenStack Flavor ...................................................................................................... 27
6 FURTHER ACTIVITIES ON OOW2016 PROJECT ....................................................................... 30 6.1 Login as oow to Oracle OpenStack .............................................................................................. 30 6.2 CONFIGURE NETWORK ROUTER – INTERNAL – .................................................................... 31 6.3 CONFIGURE NETWORK ROUTER – EXTERNAL – ................................................................... 35 6.4 VERIFY NETWORK TOPOLOGY AND ROUTING ...................................................................... 37
7 FLOATING IPs AND NETWORK ROUTING ................................................................................. 38 7.1 ADD FLOATING IP TO THE INSTANCE (ol72_alpha) ................................................................ 38 7.2 Launch further instance on OOW2016 Project ............................................................................. 40 7.3 Connect by ssh to running Instances ............................................................................................ 43 7.4 Connect to Instances Console ...................................................................................................... 46
8 MANAGING OPENSTACK VOLUMES ......................................................................................... 47 8.1 Create a Volume and attach to an Instance ................................................................................. 48 8.2 Verify Volume Attachment to the Instance .................................................................................... 50
9 References: ................................................................................................................................... 52 9.1 Oracle OpenStack 2.1 documentation .......................................................................................... 52
3
9.2 Oracle VM 3.4 Documentation ...................................................................................................... 52 9.3 This document .............................................................................................................................. 52
Last update: September 14th, 2016 Author : Simon COTER Special thanks to : Christophe Pauliat, Sundeep Dhall
4
1 INTRODUCTION
1.1 LAB OBJECTIVE This document details all actions that you will be running during Oracle OpenWorld session Hands On Lab HOL6765. OpenStack is open source cloud management software and provides a scalable, pluggable framework for creating private and public clouds. Users can pick and choose various components for network, storage, and compute capabilities to create an OpenStack deployment using their technologies of choice. This lab will walk you through the complete process of exercise some key features of Oracle OpenStack Kilo release (2.1) and Oracle VM Server 3.4 to build an IaaS Private Cloud solution. The lab is designed specifically to run inside an Oracle VM VirtualBox virtual machine (VM) to allow you to try out OpenStack and also Oracle VM Server on a laptop without any requirements for a server or storage. STEPS TO PERFORM BEFORE CONTINUING READING : TO SAVE TIME, THE FIRST THING TO DO IS TO START BOTH VirtualBox VMs (Oracle OpenStack controller node and Oracle VM Server – compute node) :
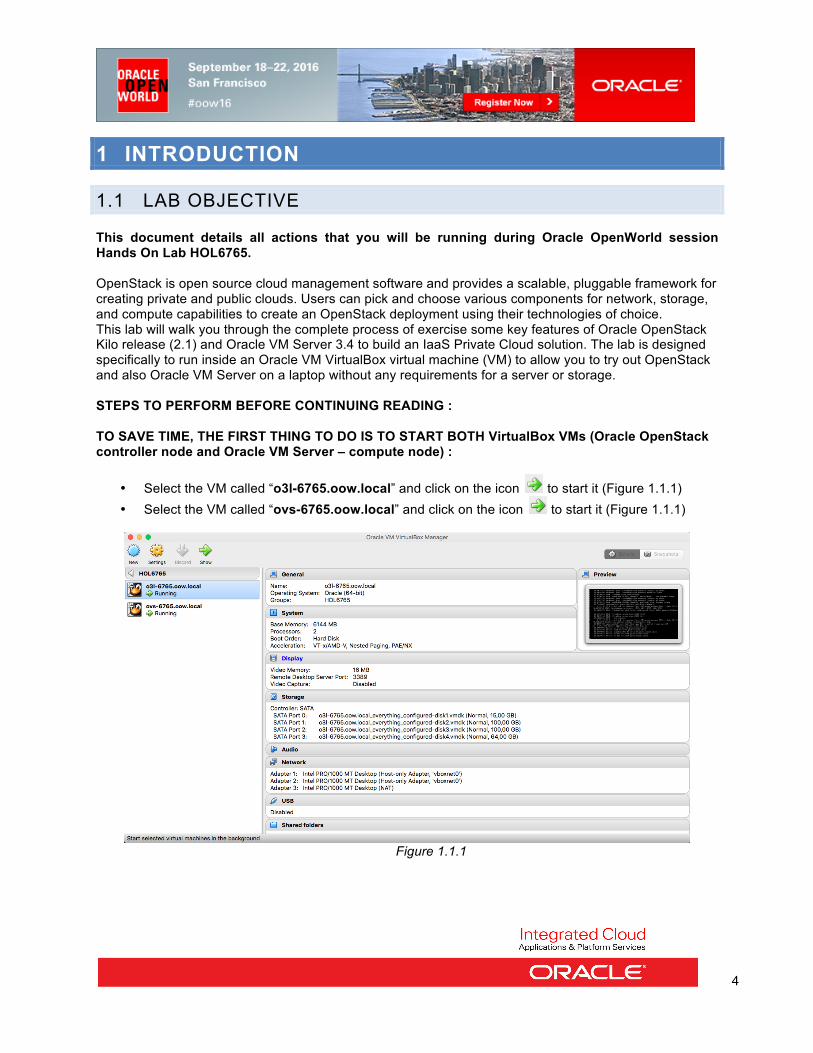
• Select the VM called “o3l-6765.oow.local” and click on the icon to start it (Figure 1.1.1) • Select the VM called “ovs-6765.oow.local” and click on the icon to start it (Figure 1.1.1)
Figure 1.1.1
5
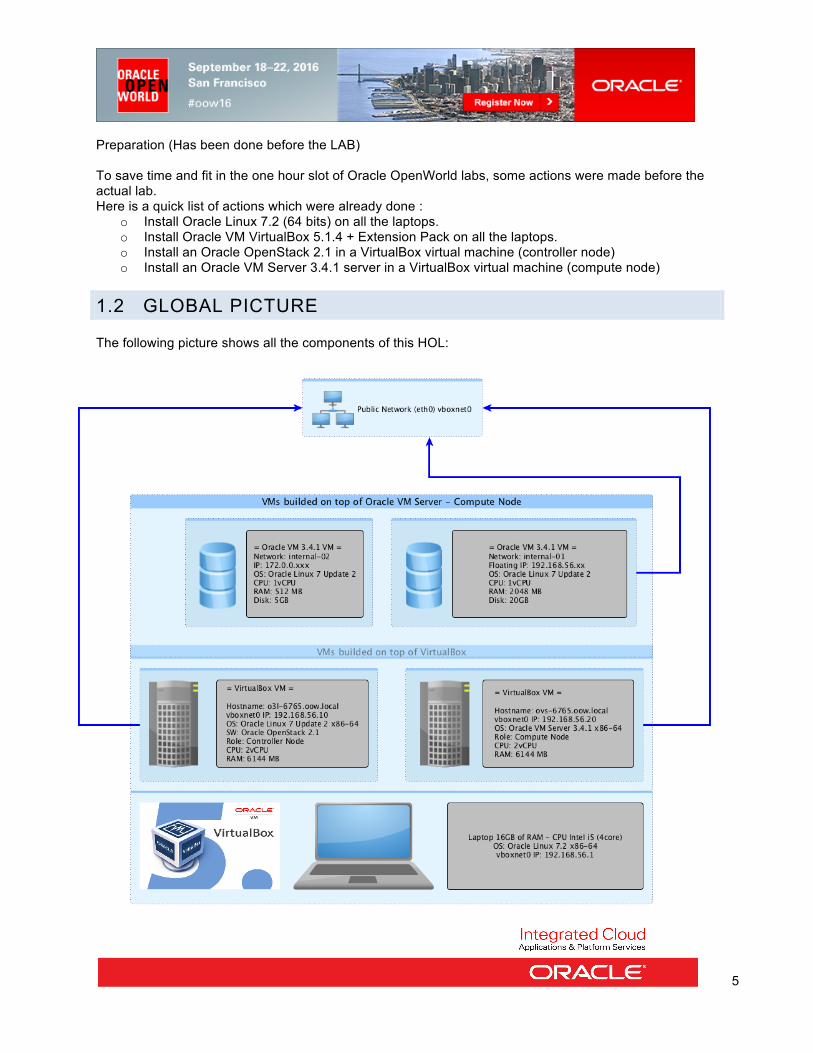
Preparation (Has been done before the LAB) To save time and fit in the one hour slot of Oracle OpenWorld labs, some actions were made before the actual lab. Here is a quick list of actions which were already done :
o Install Oracle Linux 7.2 (64 bits) on all the laptops. o Install Oracle VM VirtualBox 5.1.4 + Extension Pack on all the laptops. o Install an Oracle OpenStack 2.1 in a VirtualBox virtual machine (controller node) o Install an Oracle VM Server 3.4.1 server in a VirtualBox virtual machine (compute node)
1.2 GLOBAL PICTURE The following picture shows all the components of this HOL:
6
2 INITIAL INSTRUCTIONS
2.1 START BOTH SERVERS (VIRTUALBOX VMS)
As previously explained, we will use Oracle VirtualBox to host the 2 OpenStack components (controller and compute) on a single laptop. Both VMs should have been started in 1.1, if not please start both VMs as described in Chapter 1.1 TO DO :
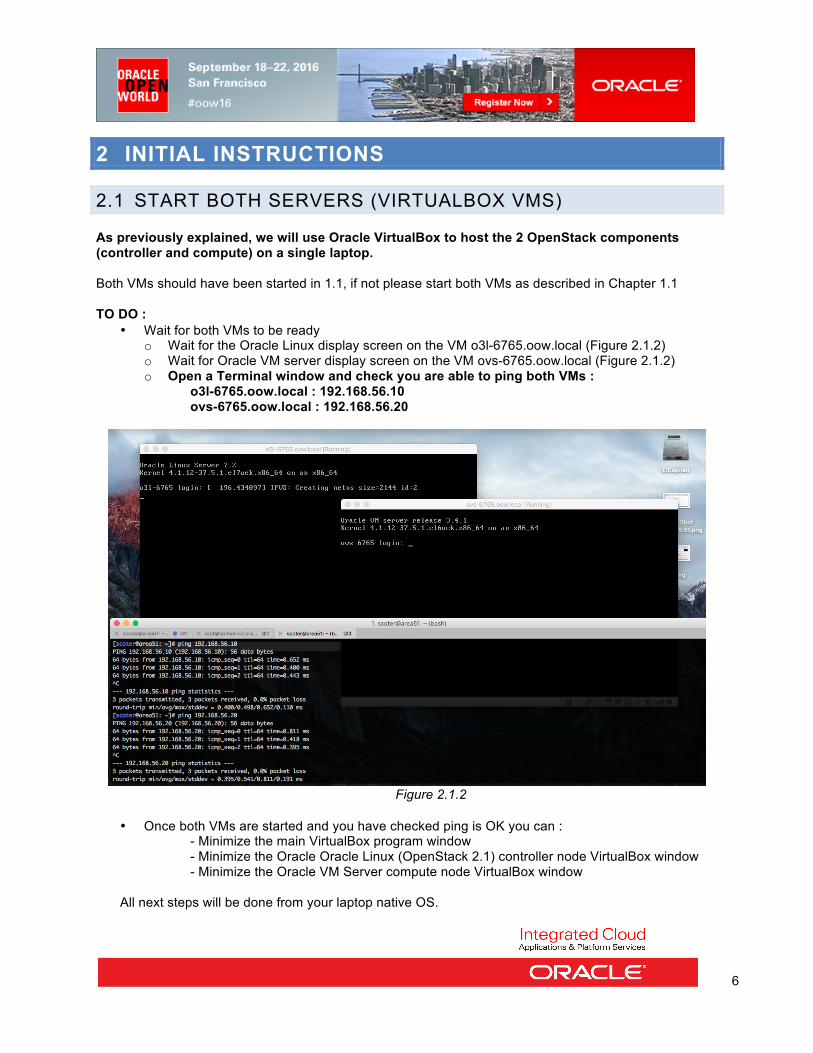
• Wait for both VMs to be ready o Wait for the Oracle Linux display screen on the VM o3l-6765.oow.local (Figure 2.1.2) o Wait for Oracle VM server display screen on the VM ovs-6765.oow.local (Figure 2.1.2) o Open a Terminal window and check you are able to ping both VMs : o3l-6765.oow.local : 192.168.56.10 ovs-6765.oow.local : 192.168.56.20
Figure 2.1.2
• Once both VMs are started and you have checked ping is OK you can : - Minimize the main VirtualBox program window - Minimize the Oracle Oracle Linux (OpenStack 2.1) controller node VirtualBox window - Minimize the Oracle VM Server compute node VirtualBox window All next steps will be done from your laptop native OS.
7
2.2 CONNECT TO THE ORACLE OPENSTACK DASHBOARD TO DO :
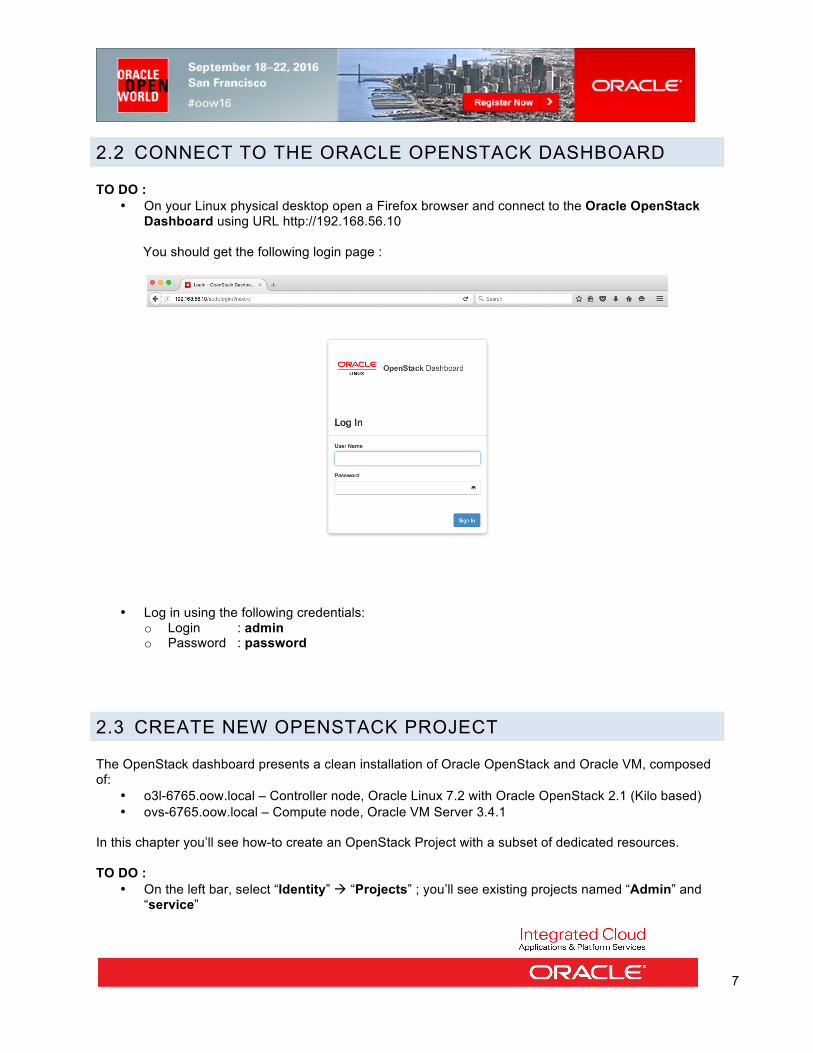
• On your Linux physical desktop open a Firefox browser and connect to the Oracle OpenStack Dashboard using URL http://192.168.56.10 You should get the following login page :
• Log in using the following credentials: o Login : admin o Password : password
2.3 CREATE NEW OPENSTACK PROJECT The OpenStack dashboard presents a clean installation of Oracle OpenStack and Oracle VM, composed of:
• o3l-6765.oow.local – Controller node, Oracle Linux 7.2 with Oracle OpenStack 2.1 (Kilo based) • ovs-6765.oow.local – Compute node, Oracle VM Server 3.4.1
In this chapter you’ll see how-to create an OpenStack Project with a subset of dedicated resources. TO DO :
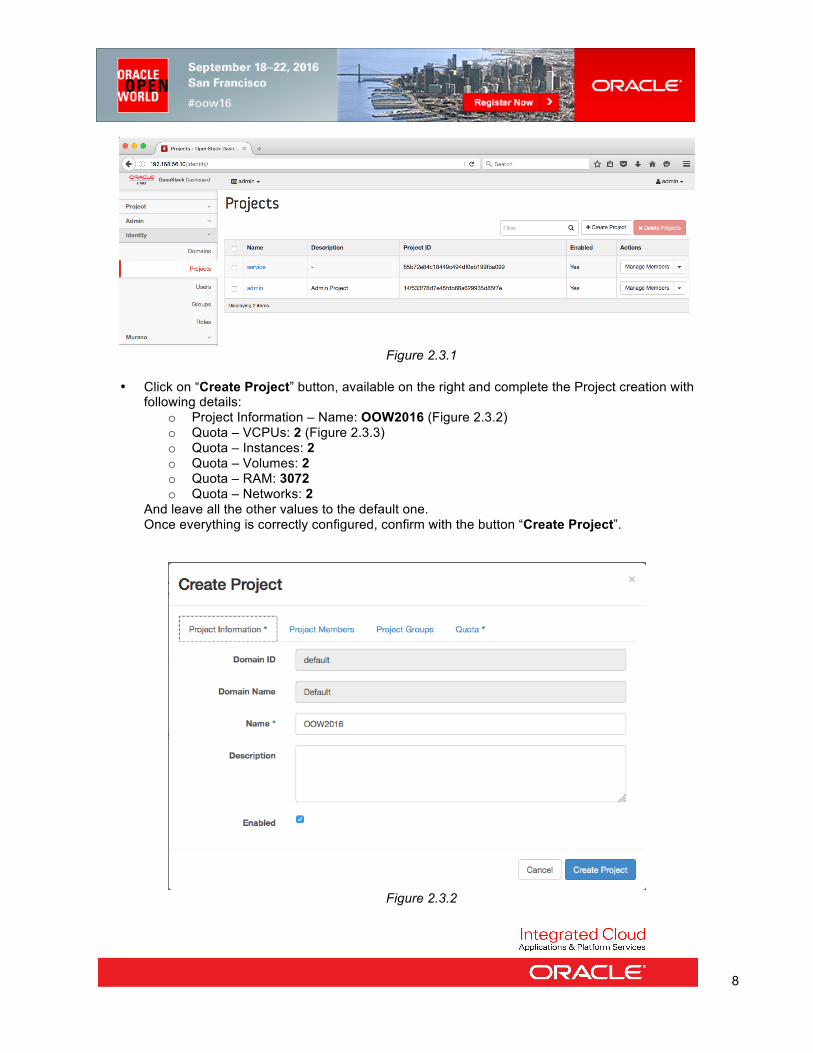
• On the left bar, select “Identity” à “Projects” ; you’ll see existing projects named “Admin” and “service”
8
Figure 2.3.1
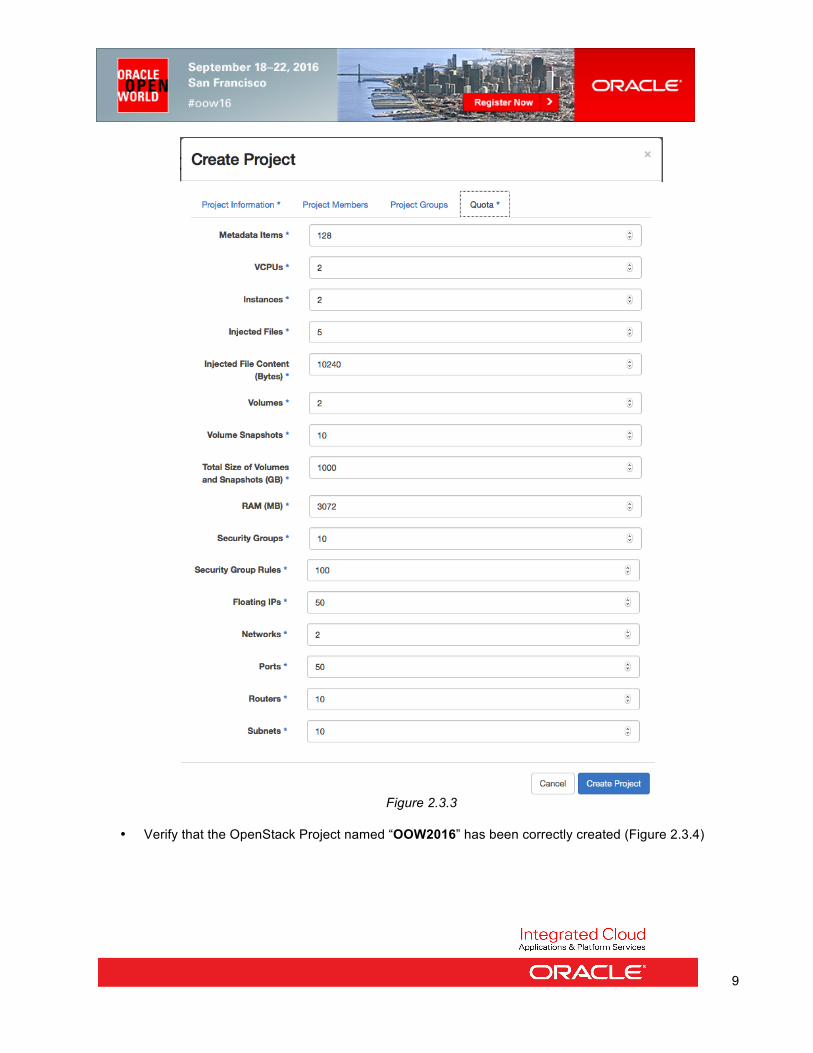
• Click on “Create Project” button, available on the right and complete the Project creation with
following details: o Project Information – Name: OOW2016 (Figure 2.3.2) o Quota – VCPUs: 2 (Figure 2.3.3) o Quota – Instances: 2 o Quota – Volumes: 2 o Quota – RAM: 3072 o Quota – Networks: 2
And leave all the other values to the default one. Once everything is correctly configured, confirm with the button “Create Project”.
Figure 2.3.2
9
Figure 2.3.3
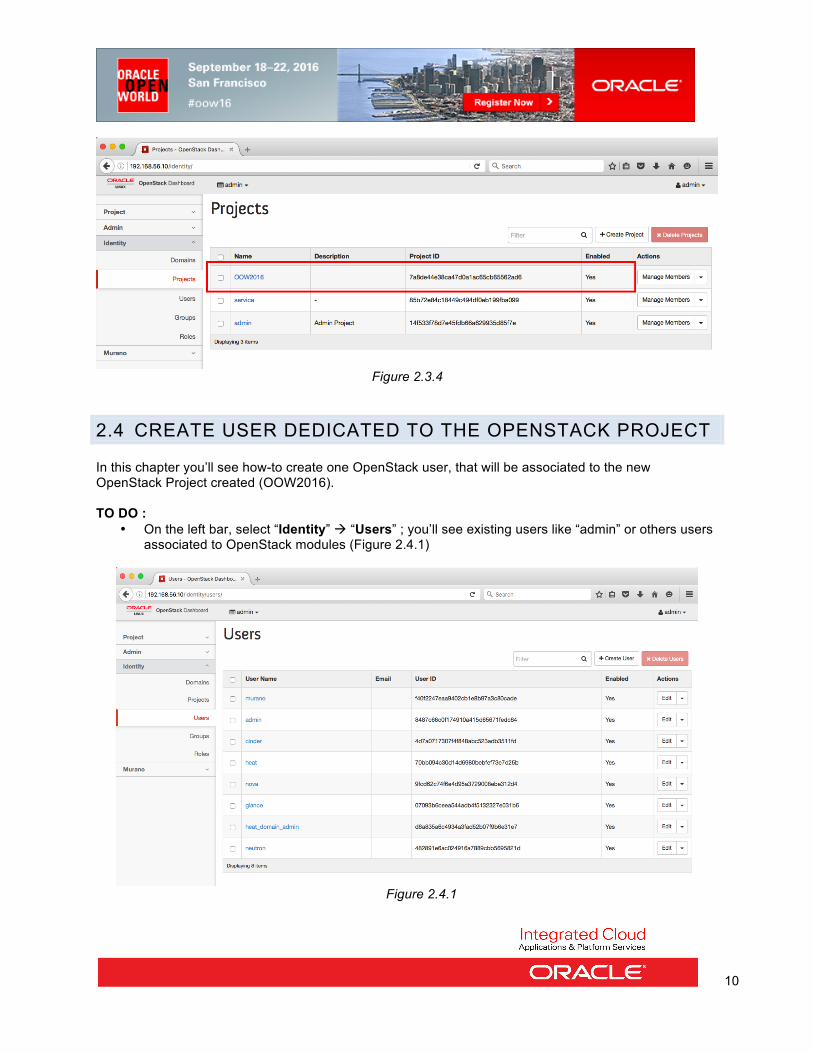
• Verify that the OpenStack Project named “OOW2016” has been correctly created (Figure 2.3.4)
10
Figure 2.3.4
2.4 CREATE USER DEDICATED TO THE OPENSTACK PROJECT In this chapter you’ll see how-to create one OpenStack user, that will be associated to the new OpenStack Project created (OOW2016). TO DO :
• On the left bar, select “Identity” à “Users” ; you’ll see existing users like “admin” or others users associated to OpenStack modules (Figure 2.4.1)
Figure 2.4.1
11
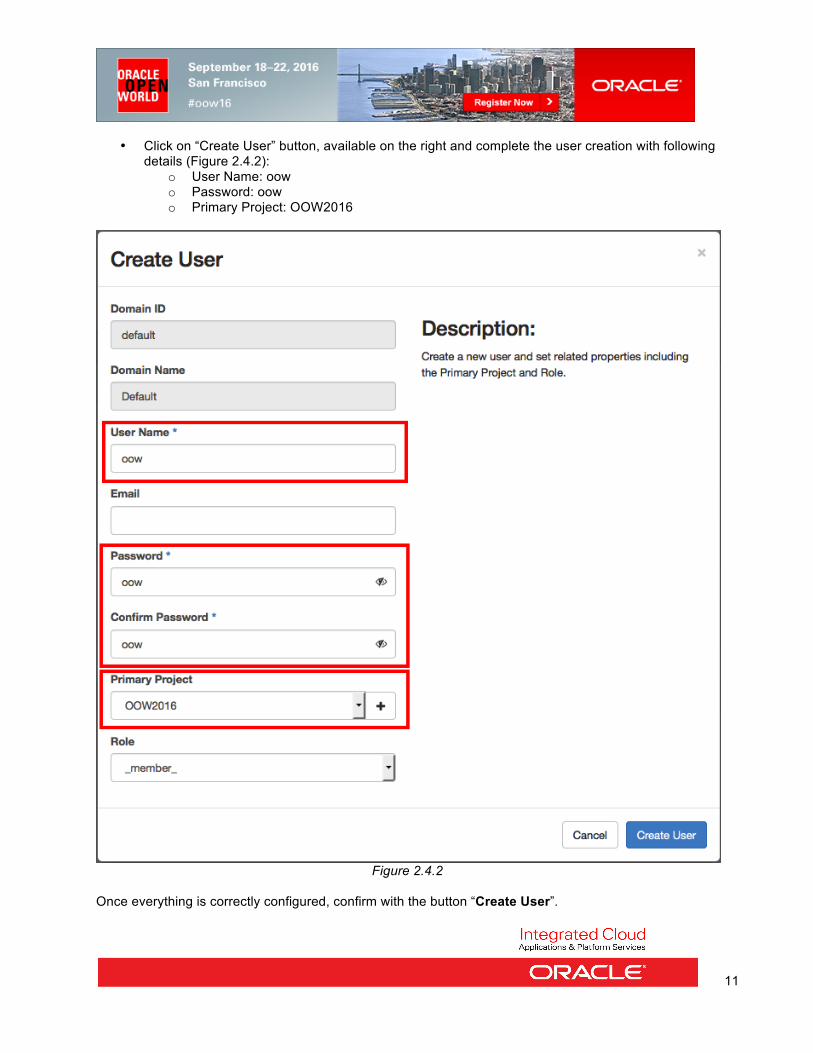
• Click on “Create User” button, available on the right and complete the user creation with following details (Figure 2.4.2):
o User Name: oow o Password: oow o Primary Project: OOW2016
Figure 2.4.2
Once everything is correctly configured, confirm with the button “Create User”.
12
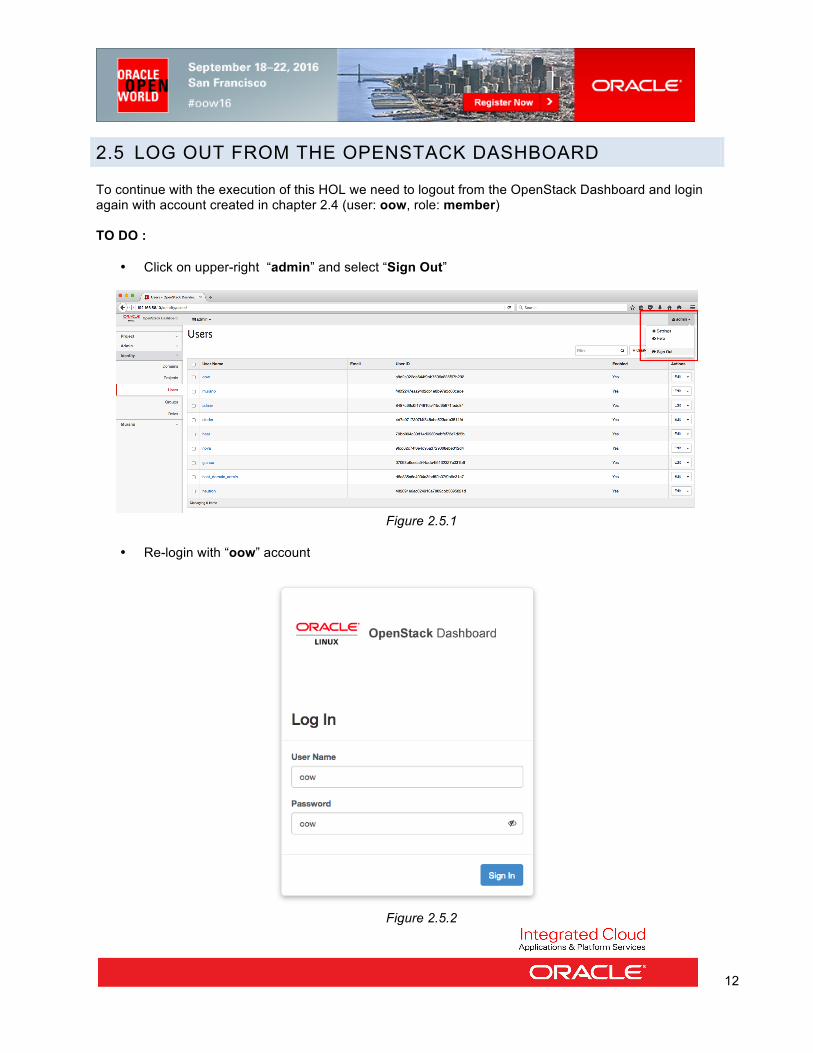
2.5 LOG OUT FROM THE OPENSTACK DASHBOARD To continue with the execution of this HOL we need to logout from the OpenStack Dashboard and login again with account created in chapter 2.4 (user: oow, role: member) TO DO :
• Click on upper-right “admin” and select “Sign Out”
Figure 2.5.1
• Re-login with “oow” account
Figure 2.5.2
13
3 CONFIGURE OPENSTACK PROJECT “OOW2016” Once logged with “oow” user, you immediately get an overview of project limits, in term of:
• Instances: number of virtual-machine that can be deployed • VCPUs: number of virtual-cpu available for this project • RAM: amount of ram available for this project • Floating IPs: IP that get access to the public network • Volumes: storage volumes that can be created and associated to VMs • Volume Storage: max-size of volume storage that can be allocated
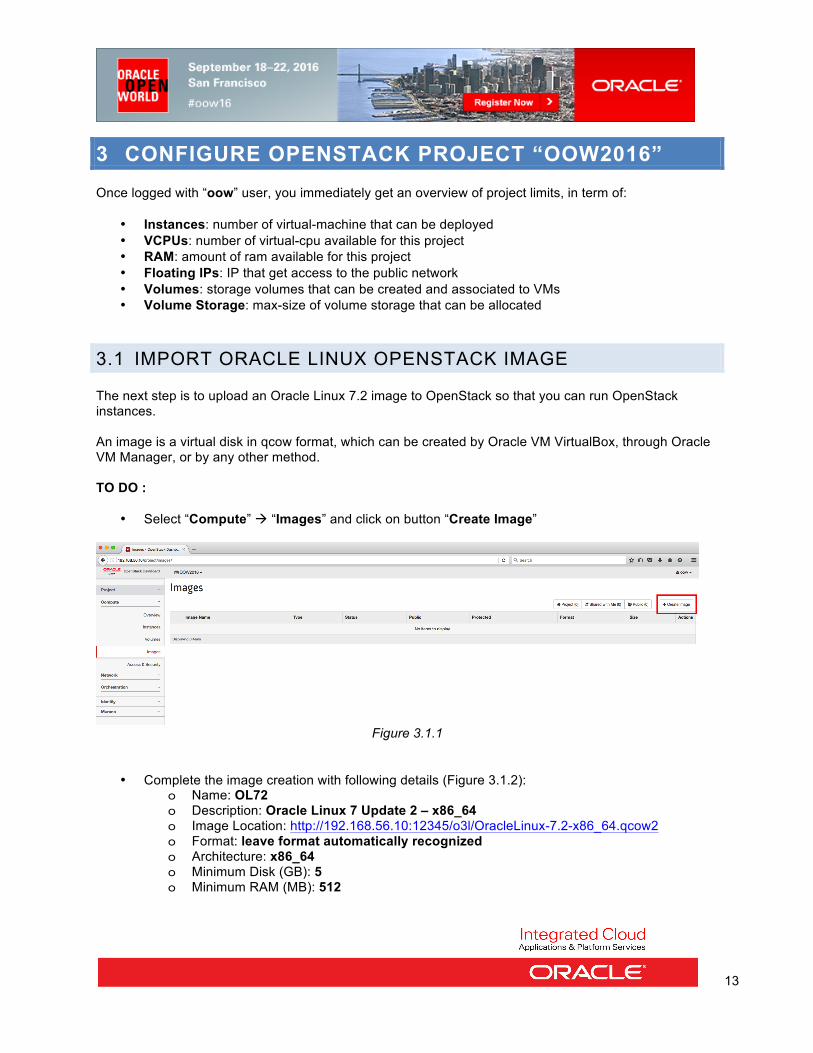
3.1 IMPORT ORACLE LINUX OPENSTACK IMAGE The next step is to upload an Oracle Linux 7.2 image to OpenStack so that you can run OpenStack instances. An image is a virtual disk in qcow format, which can be created by Oracle VM VirtualBox, through Oracle VM Manager, or by any other method. TO DO :
• Select “Compute” à “Images” and click on button “Create Image”
Figure 3.1.1
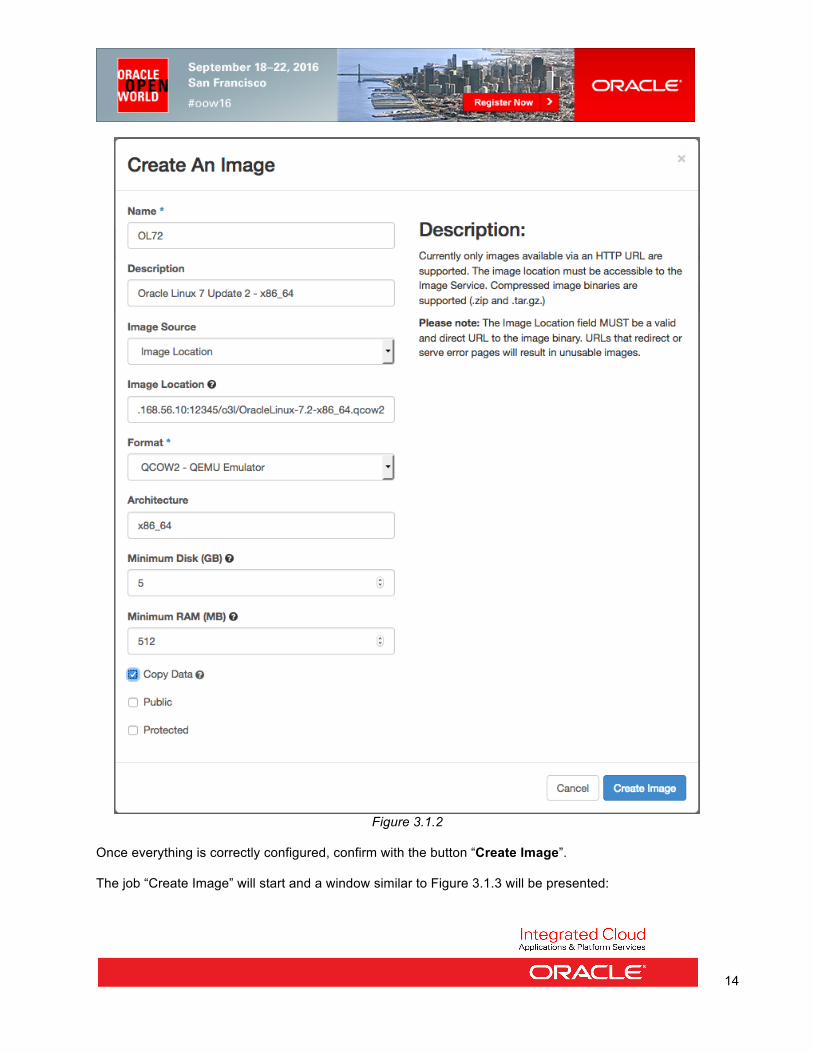
• Complete the image creation with following details (Figure 3.1.2): o Name: OL72 o Description: Oracle Linux 7 Update 2 – x86_64 o Image Location: http://192.168.56.10:12345/o3l/OracleLinux-7.2-x86_64.qcow2 o Format: leave format automatically recognized o Architecture: x86_64 o Minimum Disk (GB): 5 o Minimum RAM (MB): 512
14
Figure 3.1.2
Once everything is correctly configured, confirm with the button “Create Image”. The job “Create Image” will start and a window similar to Figure 3.1.3 will be presented:
15
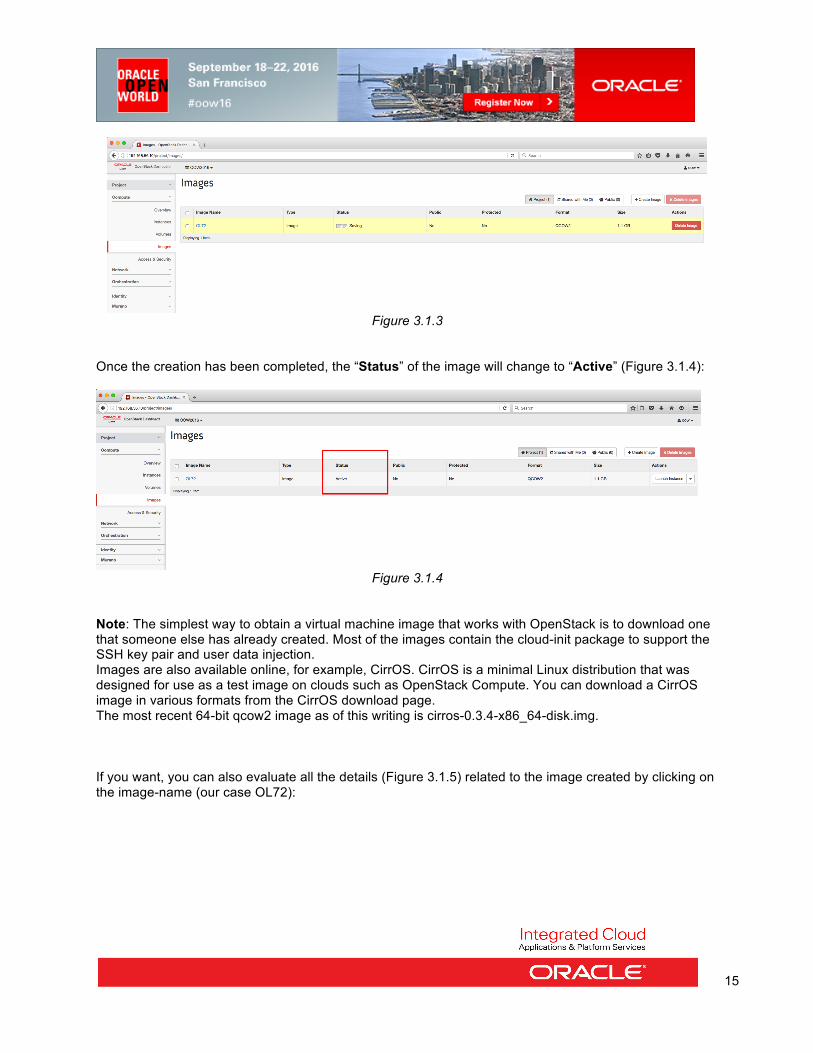
Figure 3.1.3
Once the creation has been completed, the “Status” of the image will change to “Active” (Figure 3.1.4):
Figure 3.1.4
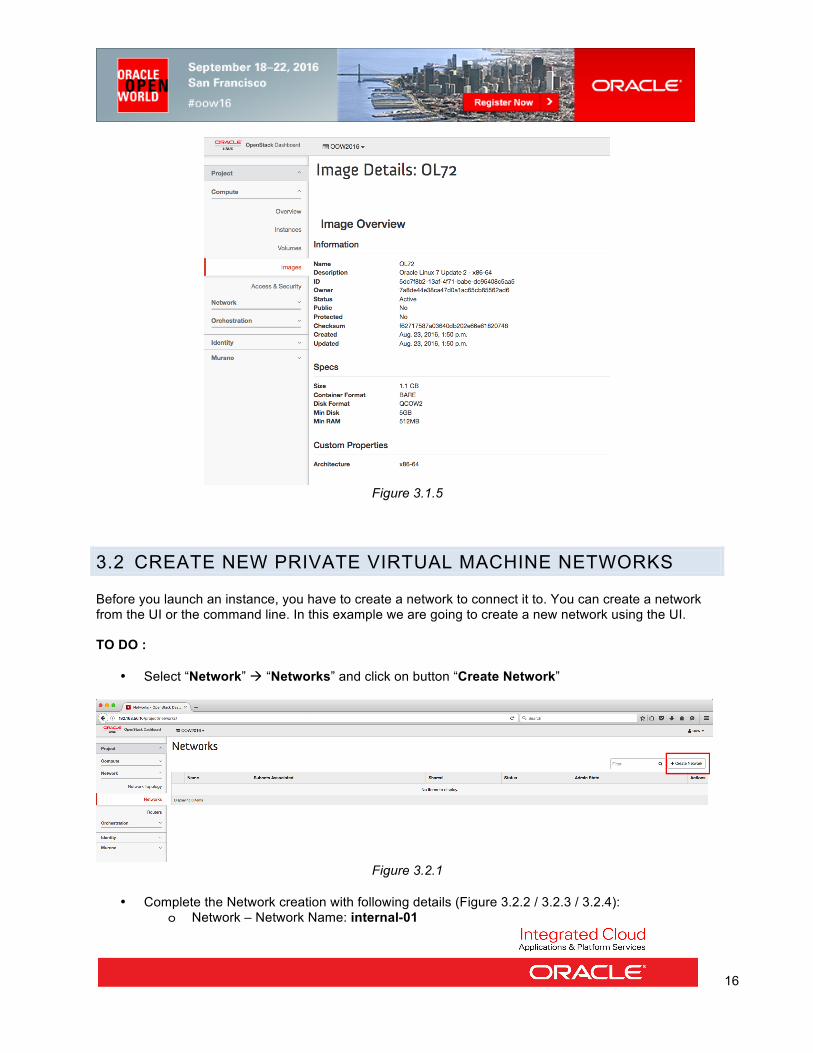
Note: The simplest way to obtain a virtual machine image that works with OpenStack is to download one that someone else has already created. Most of the images contain the cloud-init package to support the SSH key pair and user data injection. Images are also available online, for example, CirrOS. CirrOS is a minimal Linux distribution that was designed for use as a test image on clouds such as OpenStack Compute. You can download a CirrOS image in various formats from the CirrOS download page. The most recent 64-bit qcow2 image as of this writing is cirros-0.3.4-x86_64-disk.img. If you want, you can also evaluate all the details (Figure 3.1.5) related to the image created by clicking on the image-name (our case OL72):
16
Figure 3.1.5
3.2 CREATE NEW PRIVATE VIRTUAL MACHINE NETWORKS Before you launch an instance, you have to create a network to connect it to. You can create a network from the UI or the command line. In this example we are going to create a new network using the UI. TO DO :
• Select “Network” à “Networks” and click on button “Create Network”
Figure 3.2.1
• Complete the Network creation with following details (Figure 3.2.2 / 3.2.3 / 3.2.4):
o Network – Network Name: internal-01
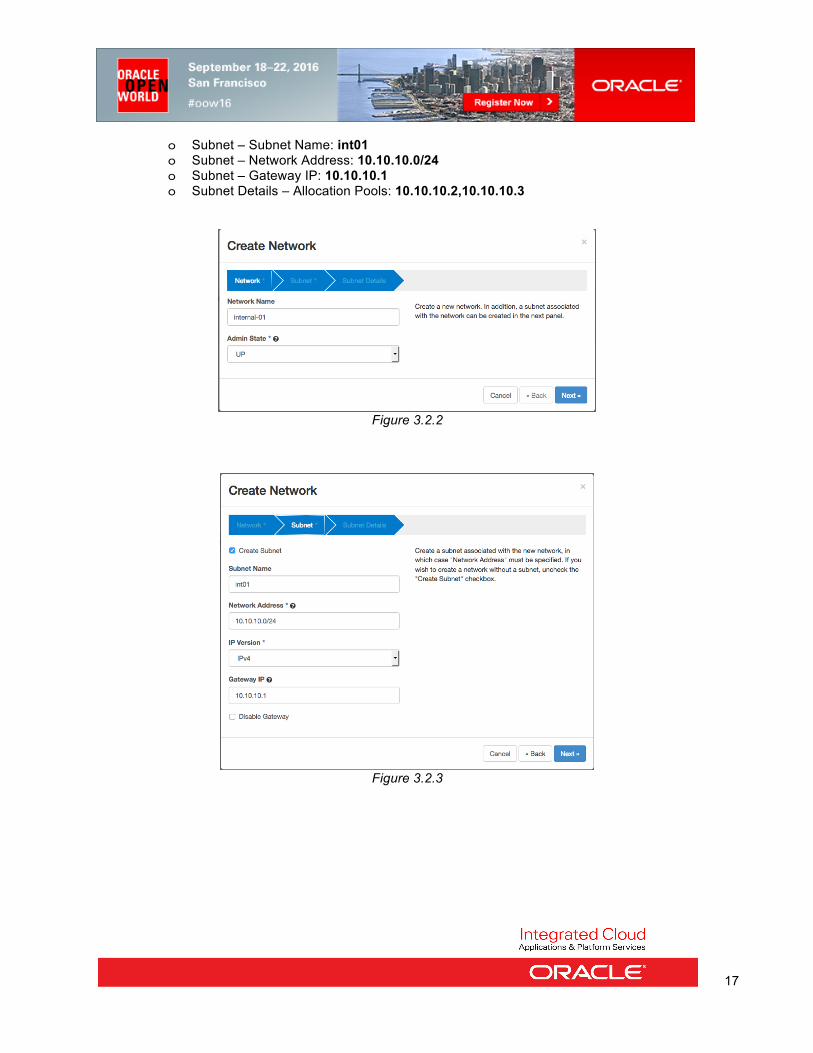
17
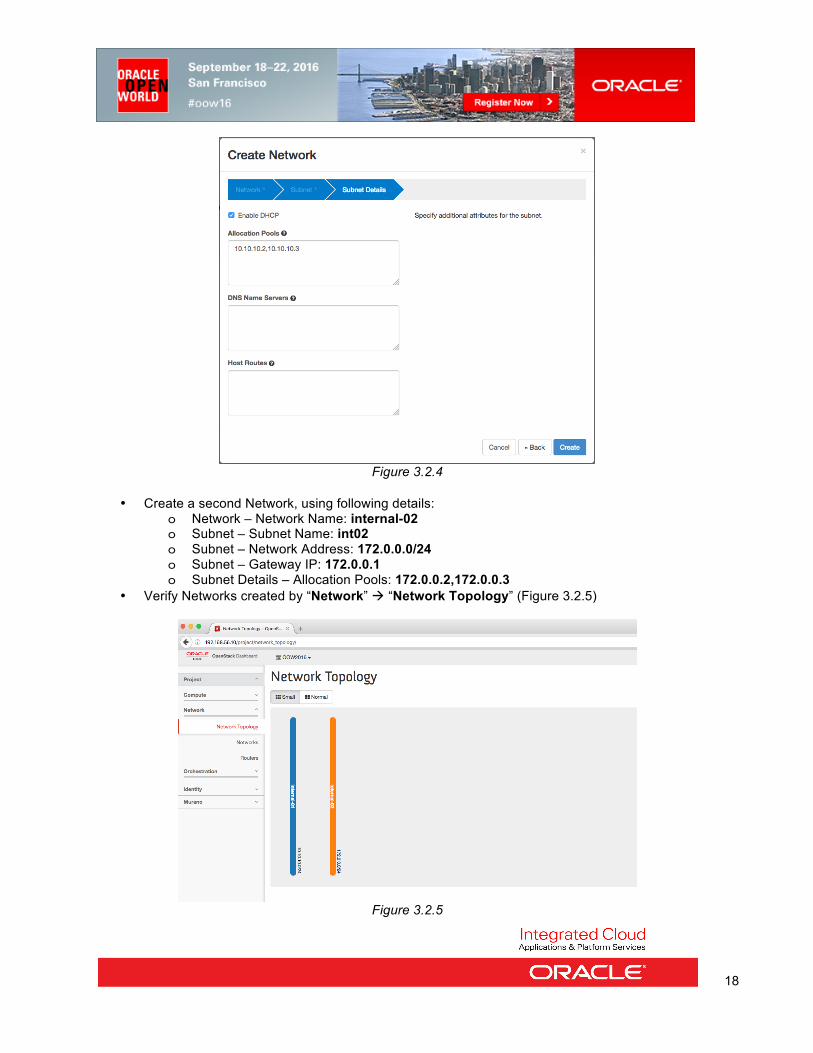
o Subnet – Subnet Name: int01 o Subnet – Network Address: 10.10.10.0/24 o Subnet – Gateway IP: 10.10.10.1 o Subnet Details – Allocation Pools: 10.10.10.2,10.10.10.3
Figure 3.2.2
Figure 3.2.3
18
Figure 3.2.4
• Create a second Network, using following details:
o Network – Network Name: internal-02 o Subnet – Subnet Name: int02 o Subnet – Network Address: 172.0.0.0/24 o Subnet – Gateway IP: 172.0.0.1 o Subnet Details – Allocation Pools: 172.0.0.2,172.0.0.3
• Verify Networks created by “Network” à “Network Topology” (Figure 3.2.5)
Figure 3.2.5
19
4 LAUNCH AN INSTANCE ON OOW2016 PROJECT An instance is a VM that OpenStack provisions on a compute node.
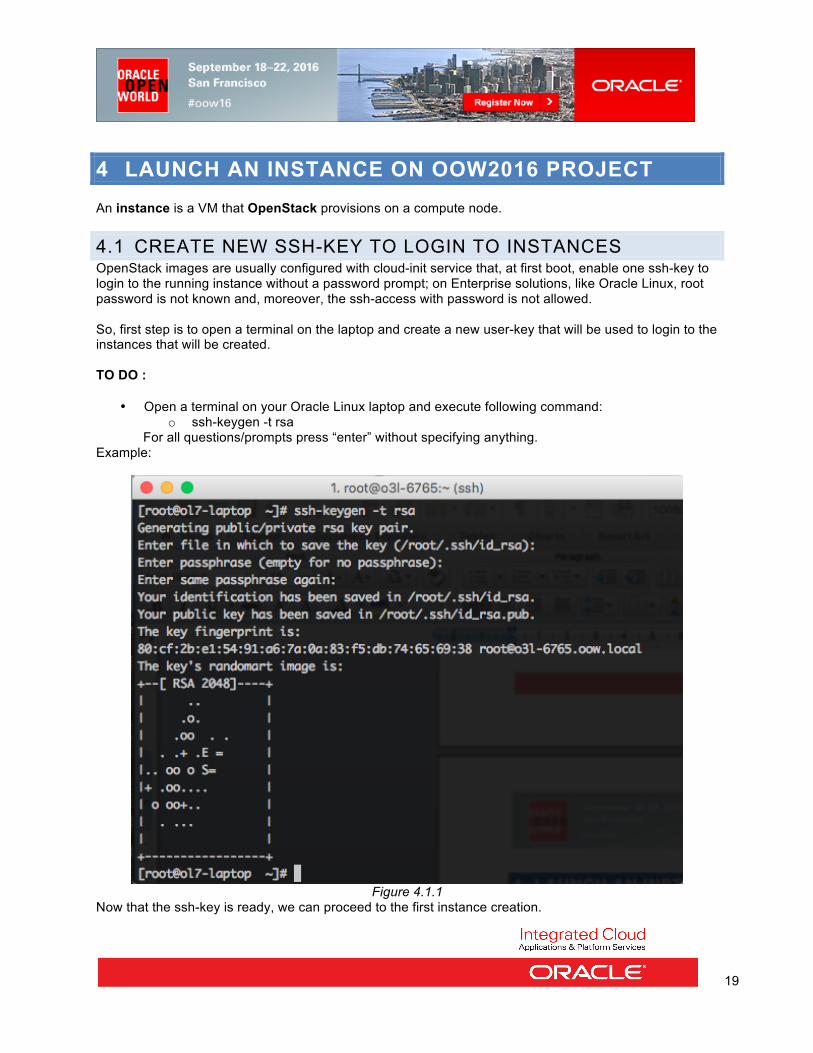
4.1 CREATE NEW SSH-KEY TO LOGIN TO INSTANCES OpenStack images are usually configured with cloud-init service that, at first boot, enable one ssh-key to login to the running instance without a password prompt; on Enterprise solutions, like Oracle Linux, root password is not known and, moreover, the ssh-access with password is not allowed. So, first step is to open a terminal on the laptop and create a new user-key that will be used to login to the instances that will be created. TO DO :
• Open a terminal on your Oracle Linux laptop and execute following command: o ssh-keygen -t rsa
For all questions/prompts press “enter” without specifying anything. Example:
Figure 4.1.1
Now that the ssh-key is ready, we can proceed to the first instance creation.
20
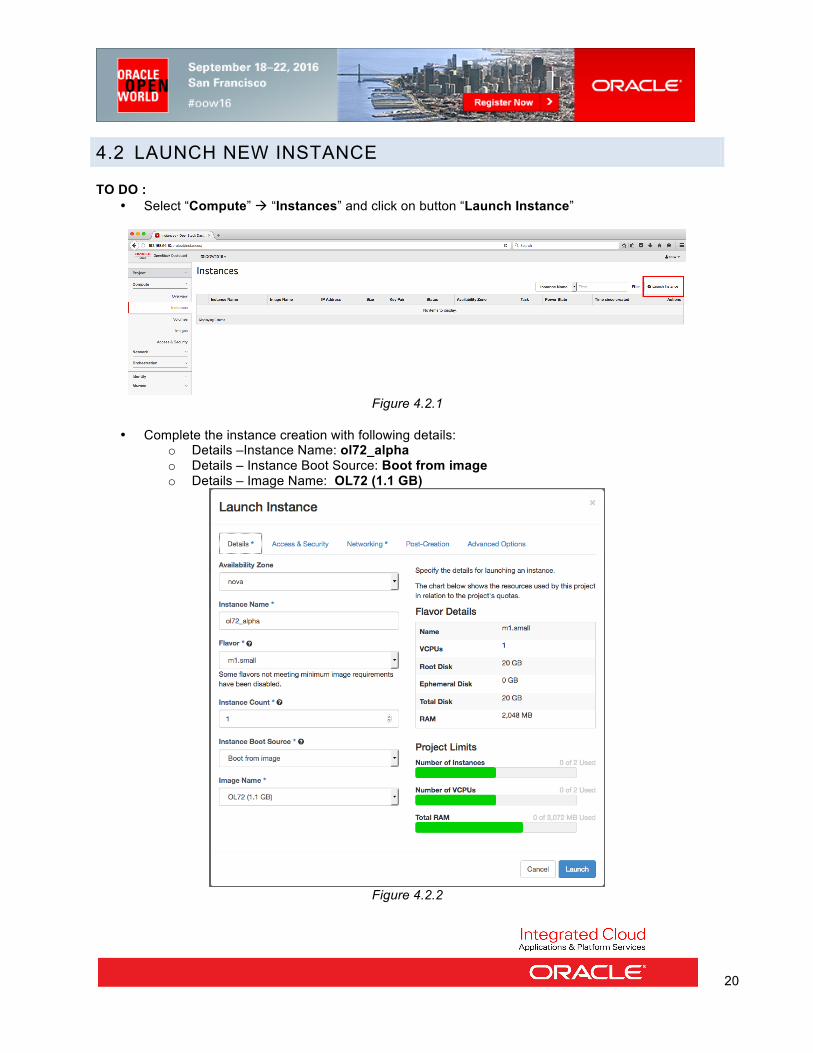
4.2 LAUNCH NEW INSTANCE TO DO :
• Select “Compute” à “Instances” and click on button “Launch Instance”
Figure 4.2.1
• Complete the instance creation with following details:
o Details –Instance Name: ol72_alpha o Details – Instance Boot Source: Boot from image o Details – Image Name: OL72 (1.1 GB)
Figure 4.2.2
21
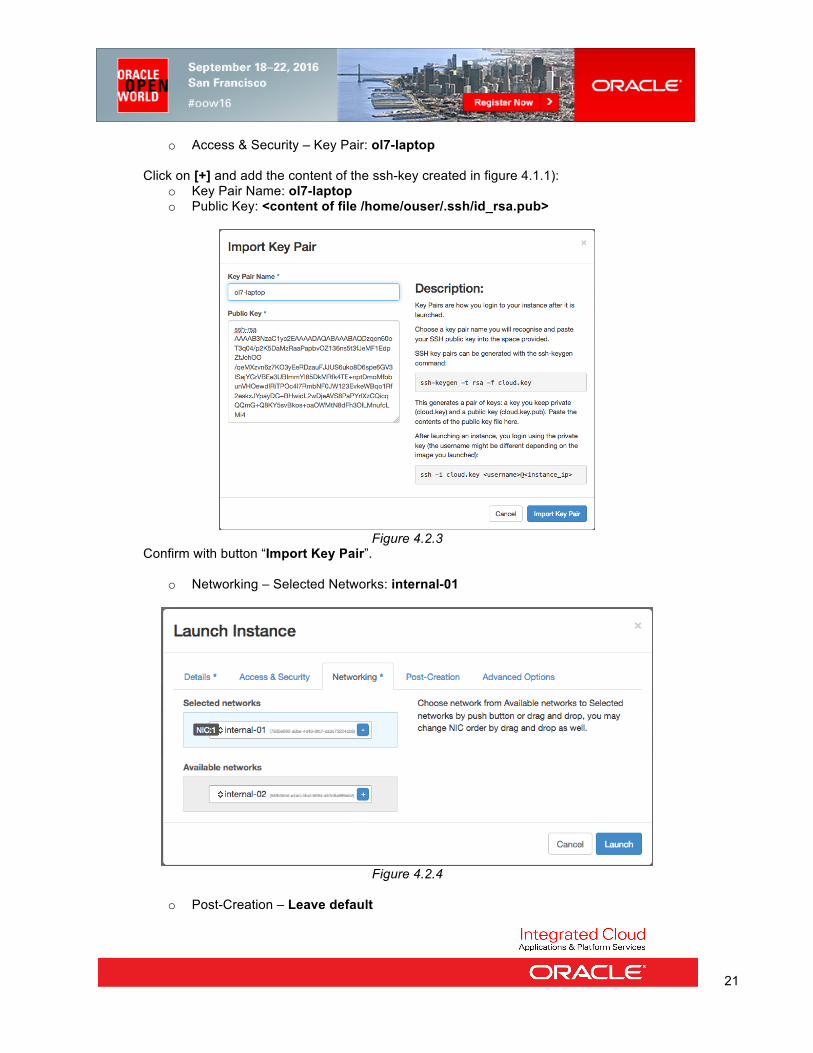
o Access & Security – Key Pair: ol7-laptop
Click on [+] and add the content of the ssh-key created in figure 4.1.1): o Key Pair Name: ol7-laptop o Public Key: <content of file /home/ouser/.ssh/id_rsa.pub>
Figure 4.2.3
Confirm with button “Import Key Pair”.
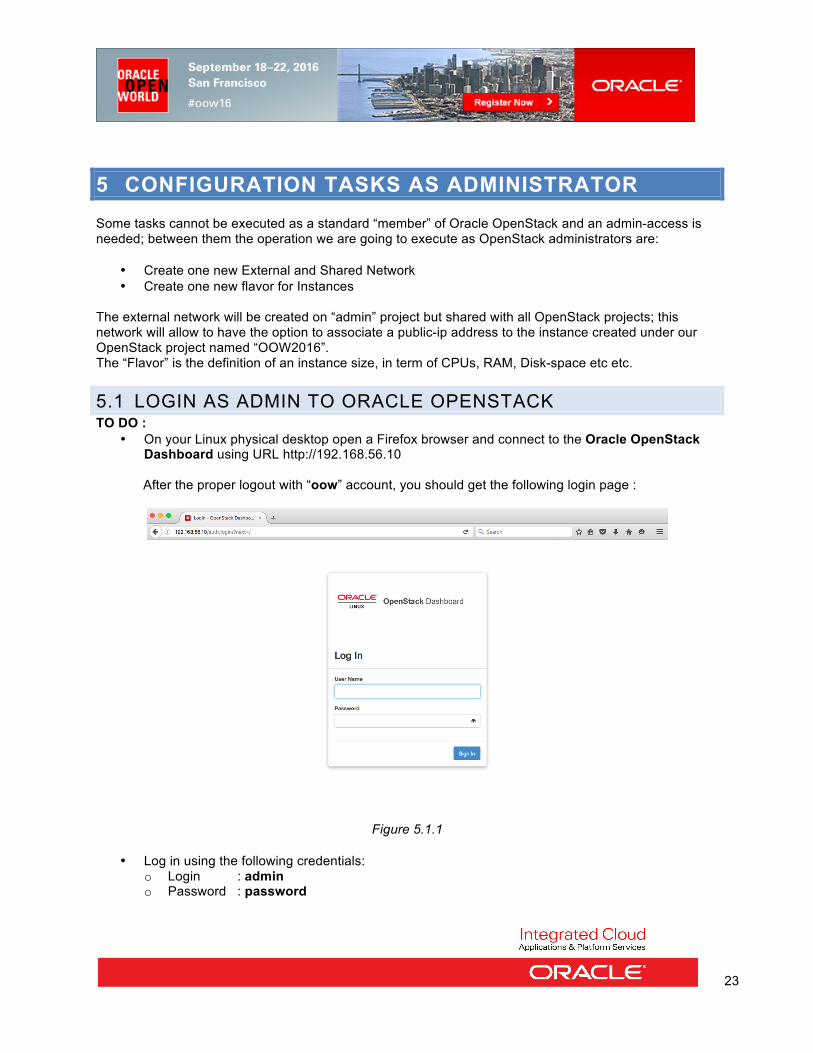
o Networking – Selected Networks: internal-01
Figure 4.2.4
o Post-Creation – Leave default

22
o Advanced Options – Leave default Once everything is correctly configured, confirm with the button “Launch”. While waiting for the Instance creation, you’ll see all the tasks executed like in “Figure 4.2.5”:
Figure 4.2.5
Once the Instance is up&running you’ll see all the informations, IP address included, of it:
Figure 4.2.6
23
5 CONFIGURATION TASKS AS ADMINISTRATOR Some tasks cannot be executed as a standard “member” of Oracle OpenStack and an admin-access is needed; between them the operation we are going to execute as OpenStack administrators are:
• Create one new External and Shared Network • Create one new flavor for Instances
The external network will be created on “admin” project but shared with all OpenStack projects; this network will allow to have the option to associate a public-ip address to the instance created under our OpenStack project named “OOW2016”. The “Flavor” is the definition of an instance size, in term of CPUs, RAM, Disk-space etc etc.
5.1 LOGIN AS ADMIN TO ORACLE OPENSTACK TO DO :
• On your Linux physical desktop open a Firefox browser and connect to the Oracle OpenStack Dashboard using URL http://192.168.56.10 After the proper logout with “oow” account, you should get the following login page :
Figure 5.1.1
• Log in using the following credentials:
o Login : admin o Password : password
24
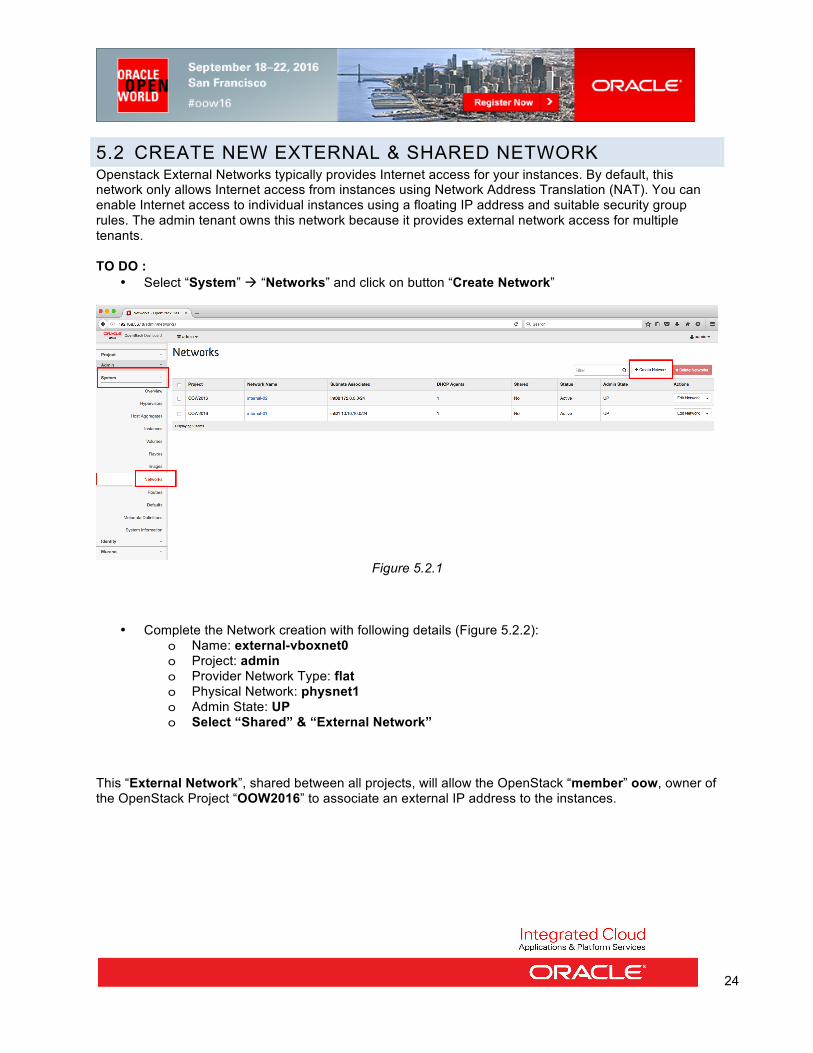
5.2 CREATE NEW EXTERNAL & SHARED NETWORK Openstack External Networks typically provides Internet access for your instances. By default, this network only allows Internet access from instances using Network Address Translation (NAT). You can enable Internet access to individual instances using a floating IP address and suitable security group rules. The admin tenant owns this network because it provides external network access for multiple tenants. TO DO :
• Select “System” à “Networks” and click on button “Create Network”
Figure 5.2.1
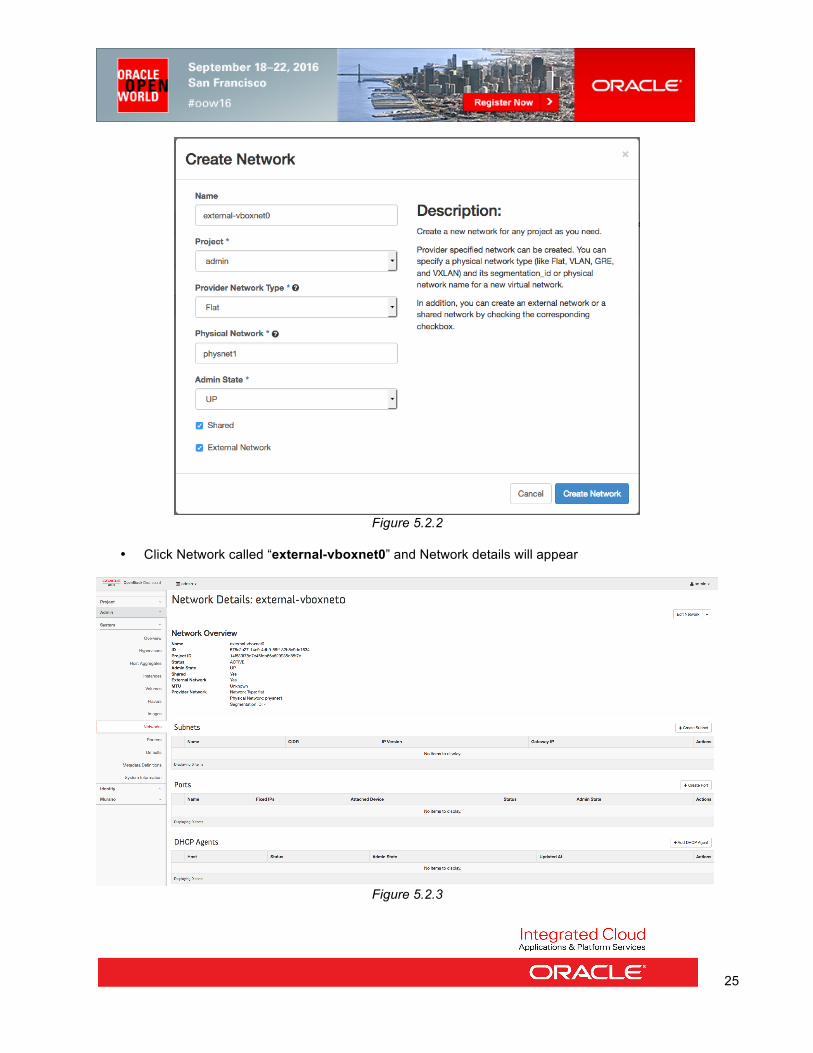
• Complete the Network creation with following details (Figure 5.2.2): o Name: external-vboxnet0 o Project: admin o Provider Network Type: flat o Physical Network: physnet1 o Admin State: UP o Select “Shared” & “External Network”
This “External Network”, shared between all projects, will allow the OpenStack “member” oow, owner of the OpenStack Project “OOW2016” to associate an external IP address to the instances.
25
Figure 5.2.2
• Click Network called “external-vboxnet0” and Network details will appear
Figure 5.2.3
26
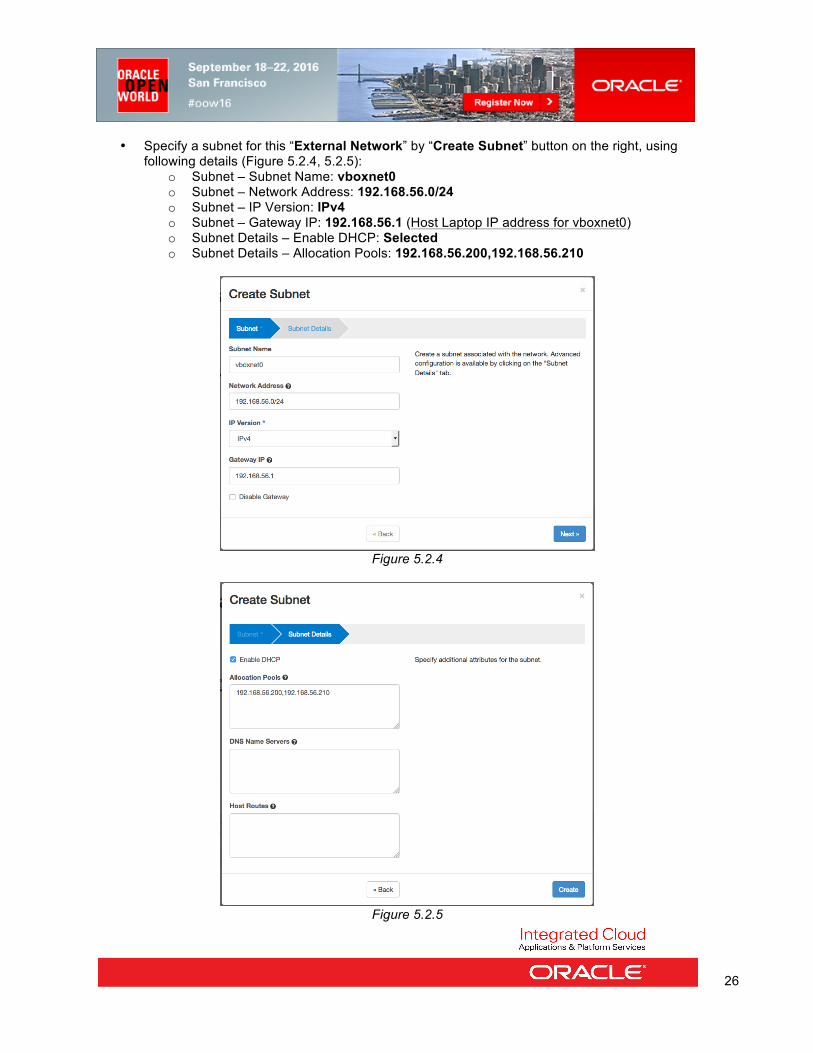
• Specify a subnet for this “External Network” by “Create Subnet” button on the right, using following details (Figure 5.2.4, 5.2.5):
o Subnet – Subnet Name: vboxnet0 o Subnet – Network Address: 192.168.56.0/24 o Subnet – IP Version: IPv4 o Subnet – Gateway IP: 192.168.56.1 (Host Laptop IP address for vboxnet0) o Subnet Details – Enable DHCP: Selected o Subnet Details – Allocation Pools: 192.168.56.200,192.168.56.210
Figure 5.2.4
Figure 5.2.5

27
Once everything is correctly configured, confirm with the button “Create”; the created “Subnet” should be like in Figure 5.2.6:
Figure 5.2.6
5.3 CREATE NEW OPENSTACK FLAVOR Since we are short on memory in this configuration, but we still would like to start some instances, create a special flavor called m1.micro that has only 256 MB for the instance, a single virtual CPU and 5gb of disk space. This is enough for the purposes of this exercise. TO DO :
• select “Admin” à “System” à “Flavors” and click on “Create Flavor” button (Figure 5.3.1)
Figure 5.3.1
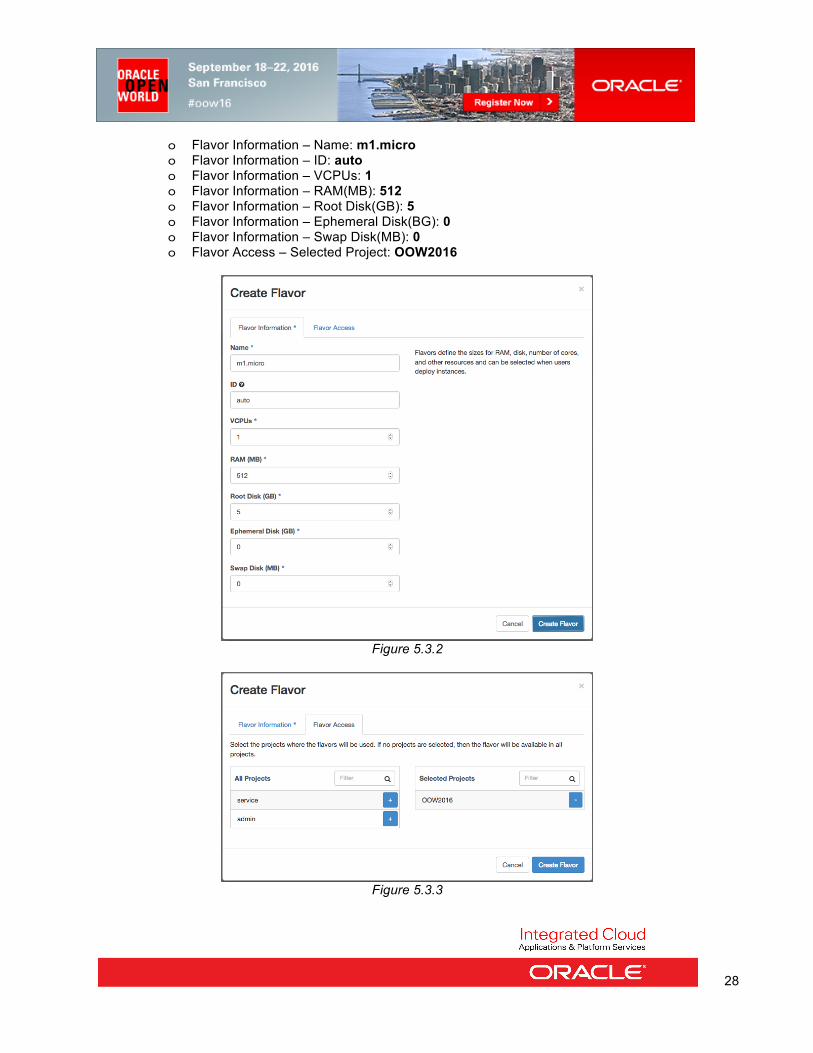
• Complete the Flavor creation with following details (Figure 5.3.2, 5.3.3):
28
o Flavor Information – Name: m1.micro o Flavor Information – ID: auto o Flavor Information – VCPUs: 1 o Flavor Information – RAM(MB): 512 o Flavor Information – Root Disk(GB): 5 o Flavor Information – Ephemeral Disk(BG): 0 o Flavor Information – Swap Disk(MB): 0 o Flavor Access – Selected Project: OOW2016
Figure 5.3.2
Figure 5.3.3
29
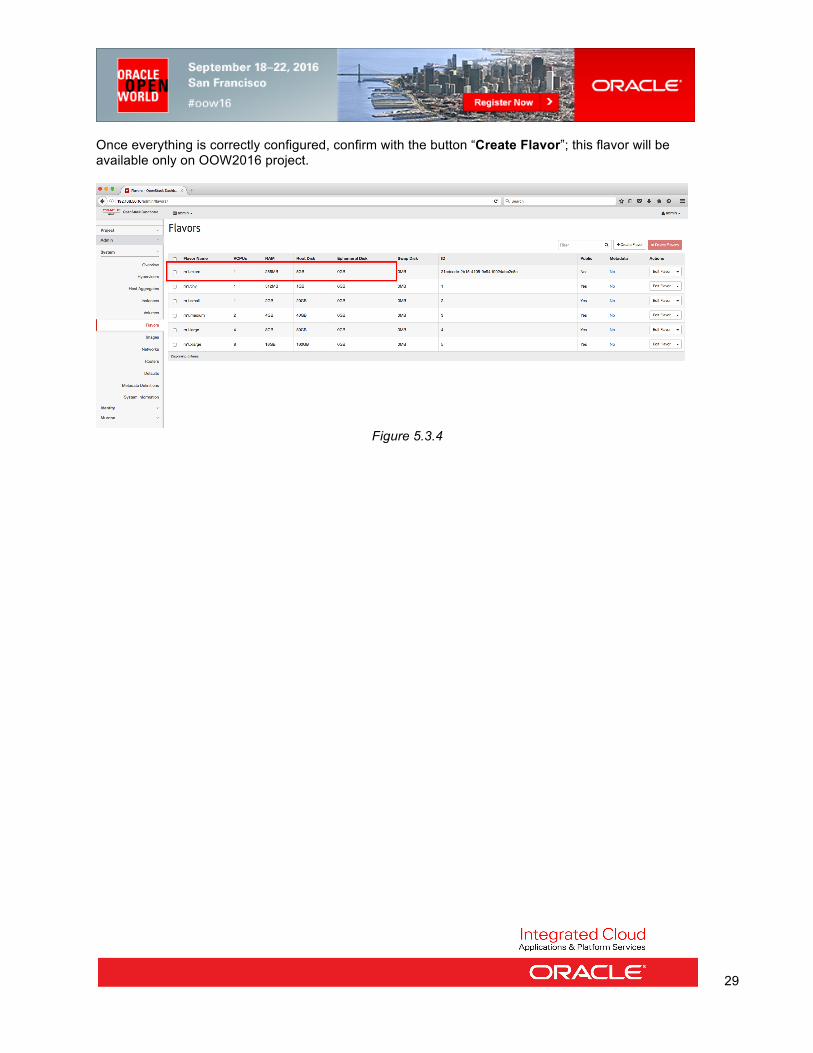
Once everything is correctly configured, confirm with the button “Create Flavor”; this flavor will be available only on OOW2016 project.
Figure 5.3.4
30
6 FURTHER ACTIVITIES ON OOW2016 PROJECT Now, with “External Network” configured and new “Flavor” defined we can proceed to the creation of a further instance and, at the same time, work on Networks to:
• Configure one Instance to reach External Network • Configure one Instance to get access from the laptop
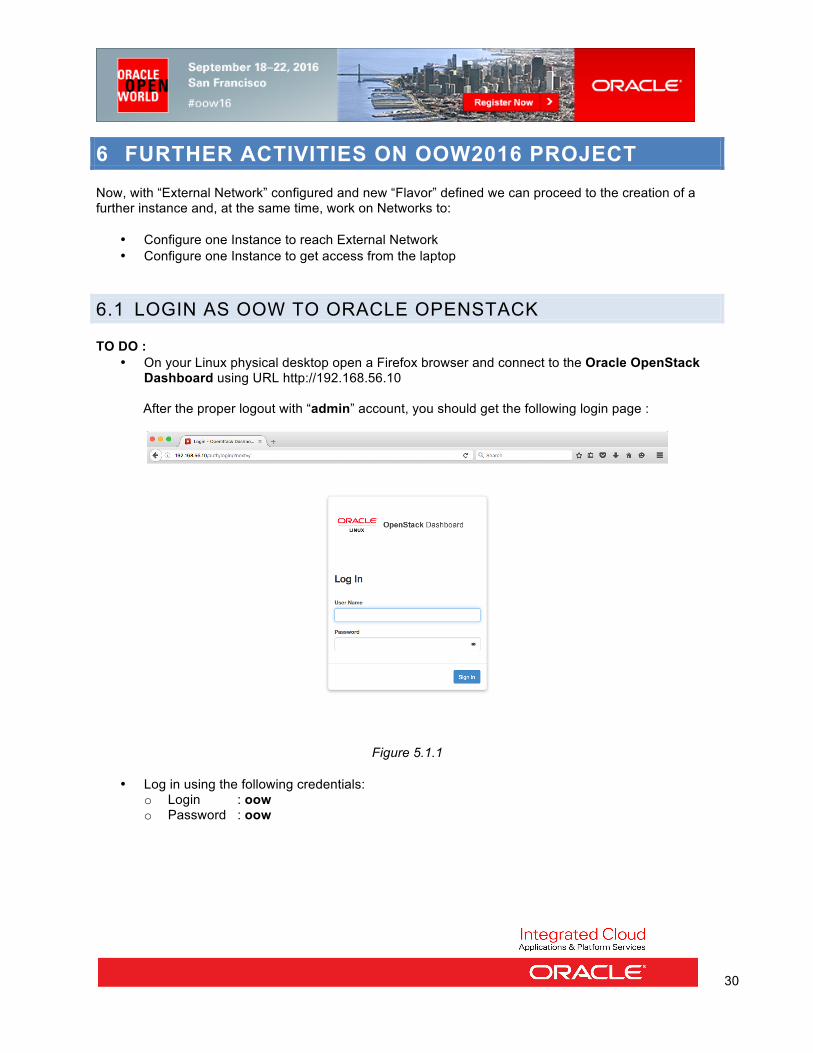
6.1 LOGIN AS OOW TO ORACLE OPENSTACK TO DO :
• On your Linux physical desktop open a Firefox browser and connect to the Oracle OpenStack Dashboard using URL http://192.168.56.10 After the proper logout with “admin” account, you should get the following login page :
Figure 5.1.1
• Log in using the following credentials:
o Login : oow o Password : oow
31
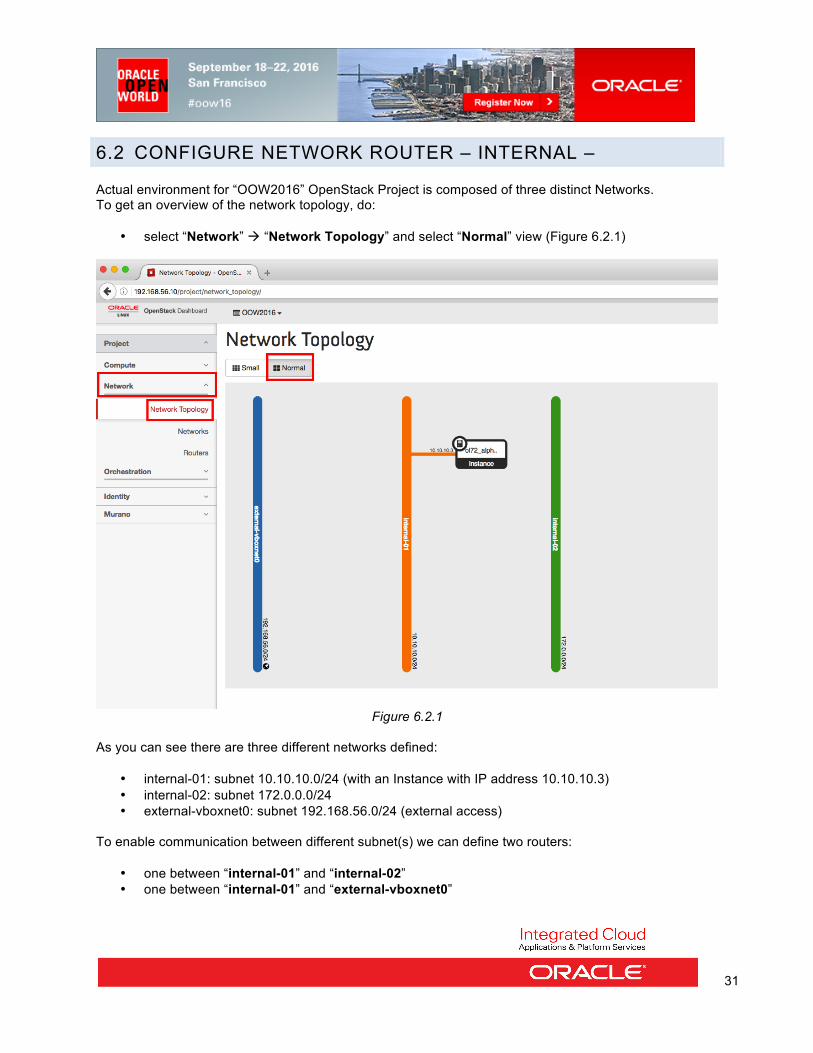
6.2 CONFIGURE NETWORK ROUTER – INTERNAL – Actual environment for “OOW2016” OpenStack Project is composed of three distinct Networks. To get an overview of the network topology, do:
• select “Network” à “Network Topology” and select “Normal” view (Figure 6.2.1)
Figure 6.2.1
As you can see there are three different networks defined:
• internal-01: subnet 10.10.10.0/24 (with an Instance with IP address 10.10.10.3) • internal-02: subnet 172.0.0.0/24 • external-vboxnet0: subnet 192.168.56.0/24 (external access)
To enable communication between different subnet(s) we can define two routers:
• one between “internal-01” and “internal-02” • one between “internal-01” and “external-vboxnet0”
32
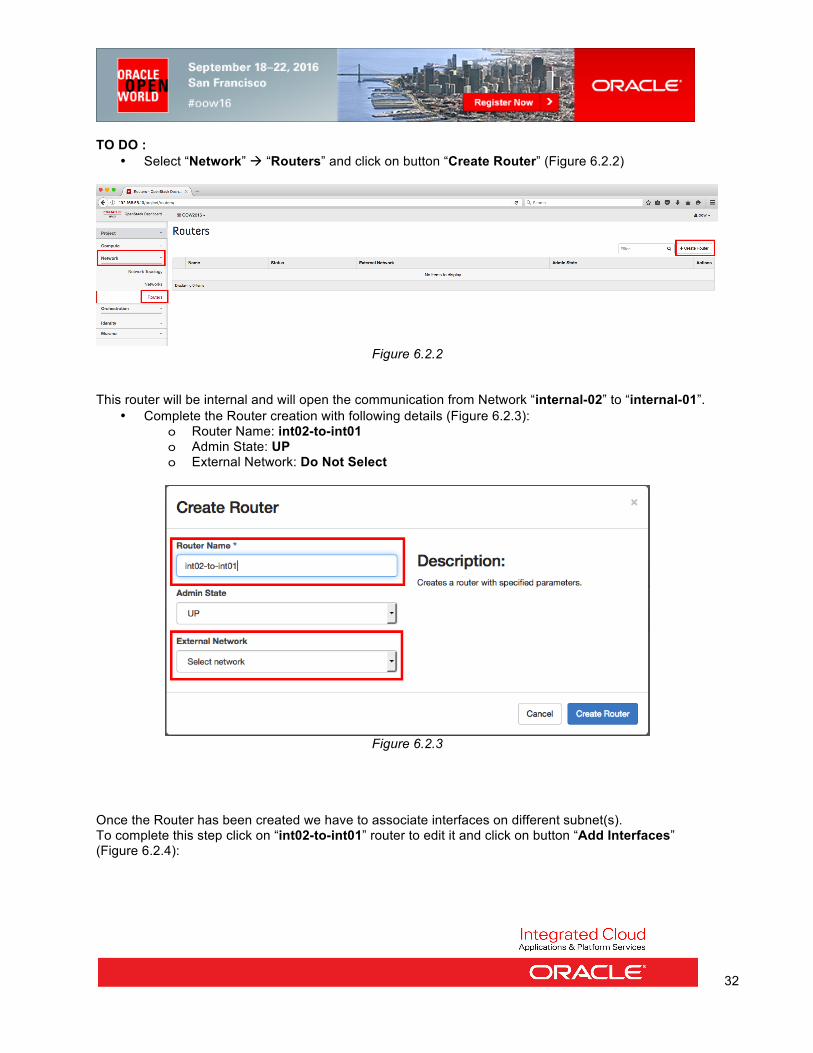
TO DO : • Select “Network” à “Routers” and click on button “Create Router” (Figure 6.2.2)
Figure 6.2.2
This router will be internal and will open the communication from Network “internal-02” to “internal-01”.
• Complete the Router creation with following details (Figure 6.2.3): o Router Name: int02-to-int01 o Admin State: UP o External Network: Do Not Select
Figure 6.2.3
Once the Router has been created we have to associate interfaces on different subnet(s). To complete this step click on “int02-to-int01” router to edit it and click on button “Add Interfaces” (Figure 6.2.4):
33
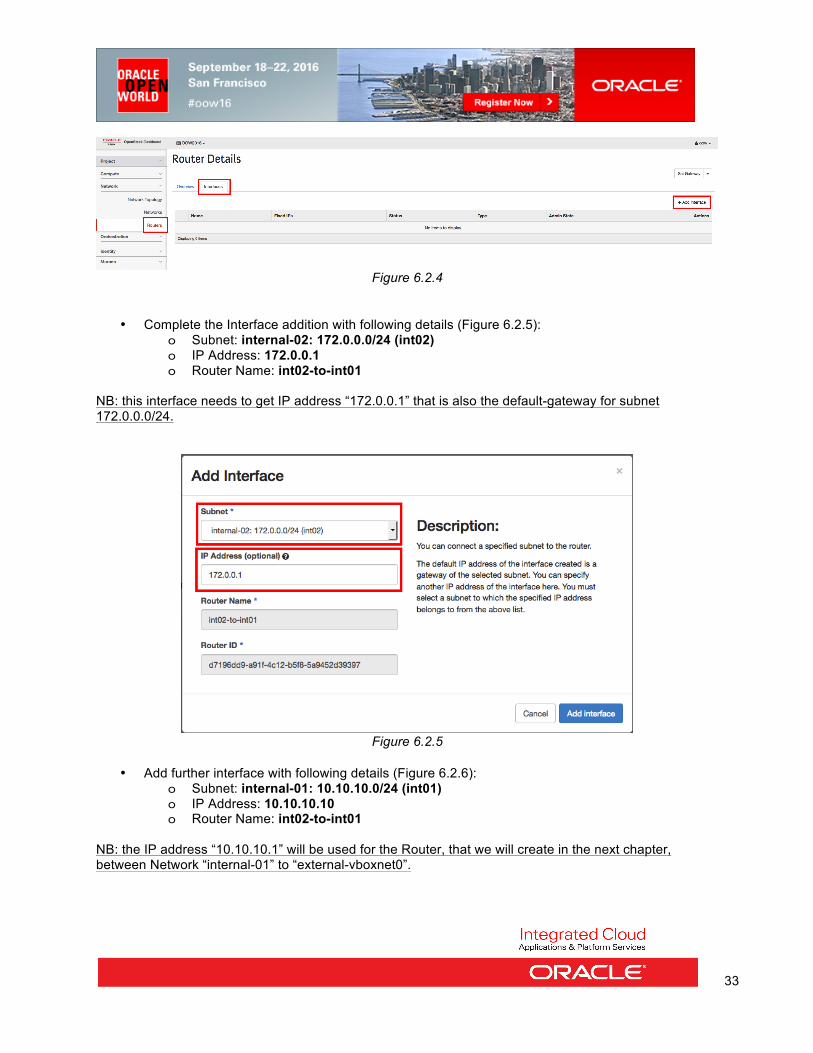
Figure 6.2.4
• Complete the Interface addition with following details (Figure 6.2.5): o Subnet: internal-02: 172.0.0.0/24 (int02) o IP Address: 172.0.0.1 o Router Name: int02-to-int01
NB: this interface needs to get IP address “172.0.0.1” that is also the default-gateway for subnet 172.0.0.0/24.
Figure 6.2.5
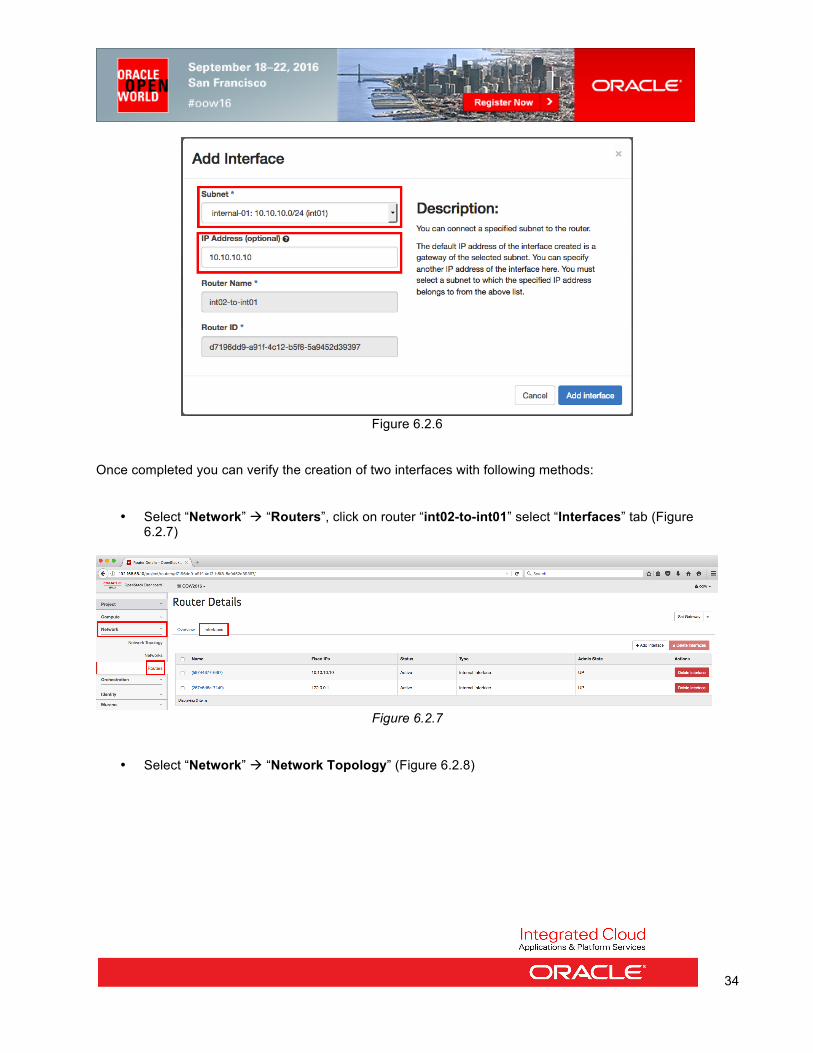
• Add further interface with following details (Figure 6.2.6):
o Subnet: internal-01: 10.10.10.0/24 (int01) o IP Address: 10.10.10.10 o Router Name: int02-to-int01
NB: the IP address “10.10.10.1” will be used for the Router, that we will create in the next chapter, between Network “internal-01” to “external-vboxnet0”.
34
Figure 6.2.6
Once completed you can verify the creation of two interfaces with following methods:
• Select “Network” à “Routers”, click on router “int02-to-int01” select “Interfaces” tab (Figure
6.2.7)
Figure 6.2.7
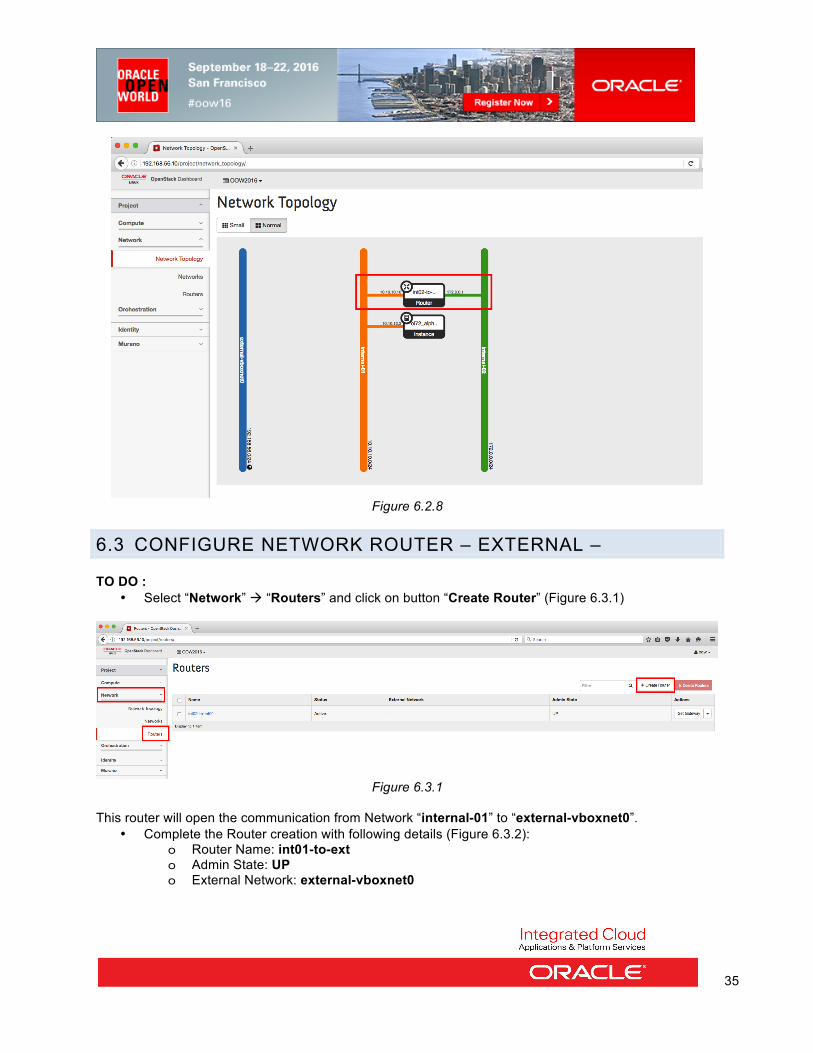
• Select “Network” à “Network Topology” (Figure 6.2.8)
35
Figure 6.2.8
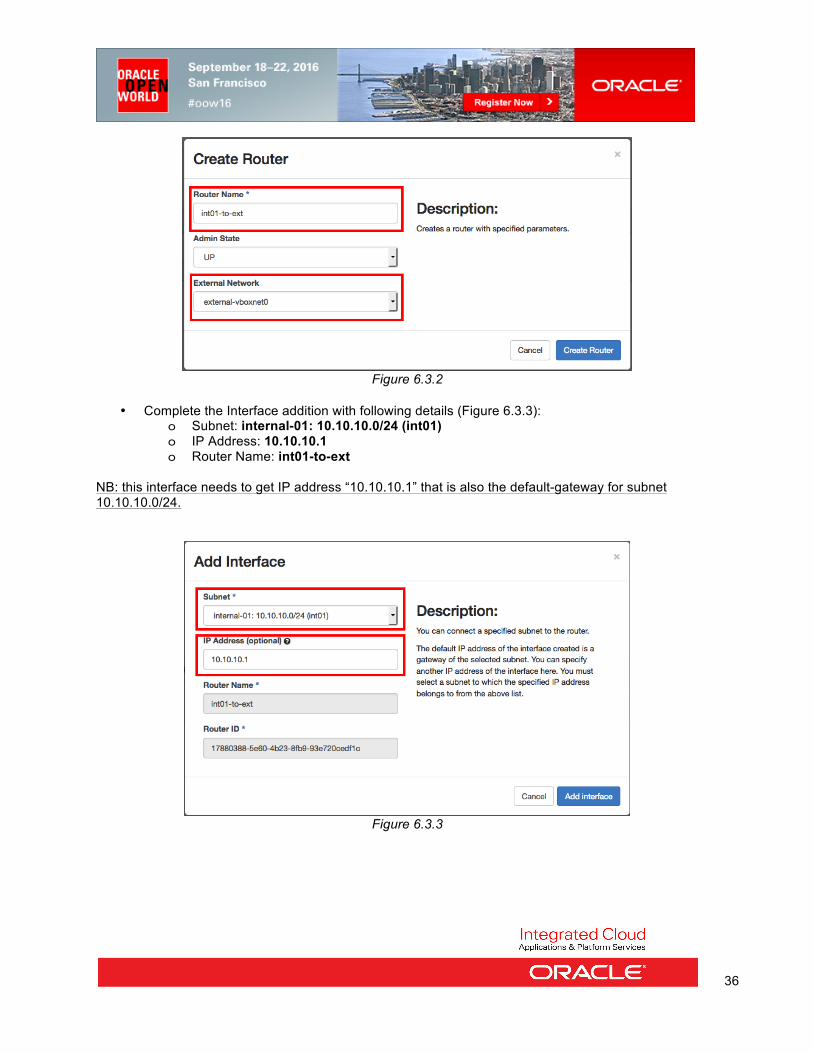
6.3 CONFIGURE NETWORK ROUTER – EXTERNAL – TO DO :
• Select “Network” à “Routers” and click on button “Create Router” (Figure 6.3.1)
Figure 6.3.1
This router will open the communication from Network “internal-01” to “external-vboxnet0”.
• Complete the Router creation with following details (Figure 6.3.2): o Router Name: int01-to-ext o Admin State: UP o External Network: external-vboxnet0
36
Figure 6.3.2
• Complete the Interface addition with following details (Figure 6.3.3):
o Subnet: internal-01: 10.10.10.0/24 (int01) o IP Address: 10.10.10.1 o Router Name: int01-to-ext
NB: this interface needs to get IP address “10.10.10.1” that is also the default-gateway for subnet 10.10.10.0/24.
Figure 6.3.3
37
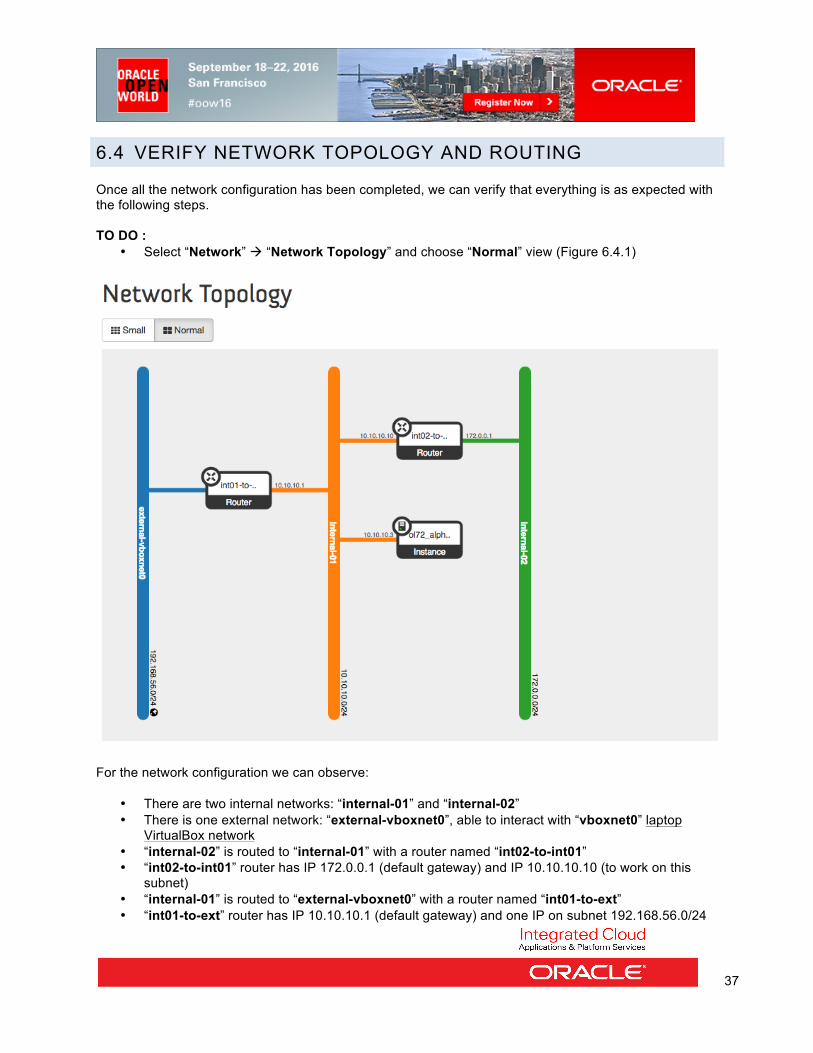
6.4 VERIFY NETWORK TOPOLOGY AND ROUTING Once all the network configuration has been completed, we can verify that everything is as expected with the following steps. TO DO :
• Select “Network” à “Network Topology” and choose “Normal” view (Figure 6.4.1)
For the network configuration we can observe:
• There are two internal networks: “internal-01” and “internal-02” • There is one external network: “external-vboxnet0”, able to interact with “vboxnet0” laptop
VirtualBox network • “internal-02” is routed to “internal-01” with a router named “int02-to-int01” • “int02-to-int01” router has IP 172.0.0.1 (default gateway) and IP 10.10.10.10 (to work on this
subnet) • “internal-01” is routed to “external-vboxnet0” with a router named “int01-to-ext” • “int01-to-ext” router has IP 10.10.10.1 (default gateway) and one IP on subnet 192.168.56.0/24
38
7 FLOATING IPS AND NETWORK ROUTING The actual network configuration grant access to the external network (public) to the Instance created (ol72_alpha) but, at the same time, this Instance cannot be directly reached by the external network (our laptop). The solution to associate a public IP address to the running Instance is the use of “Floating IPs”. A floating IP address is a service provided by Neutron. As a matter of fact the guest's operating system has no idea that it was assigned a floating IP address. The delivery of packets to the interface with the assigned floating address is the responsibility of Neutron's L3 agent. Instances with an assigned floating IP address can be accessed from the public network by the floating IP. A floating IP address and a private IP address can be used at the same time on a single network-interface. The private IP address is likely to be used for accessing the instance by other instances in private networks while the floating IP address would be used for accessing the instance from public networks.
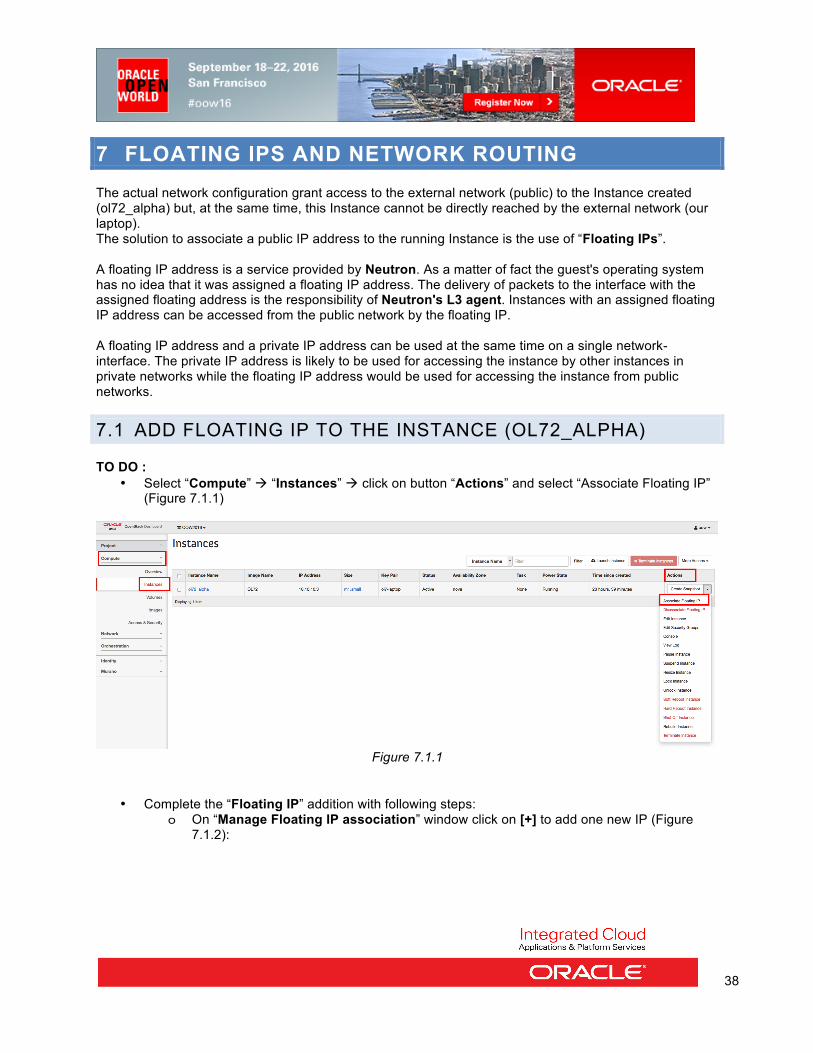
7.1 ADD FLOATING IP TO THE INSTANCE (OL72_ALPHA) TO DO :
• Select “Compute” à “Instances” à click on button “Actions” and select “Associate Floating IP” (Figure 7.1.1)
Figure 7.1.1
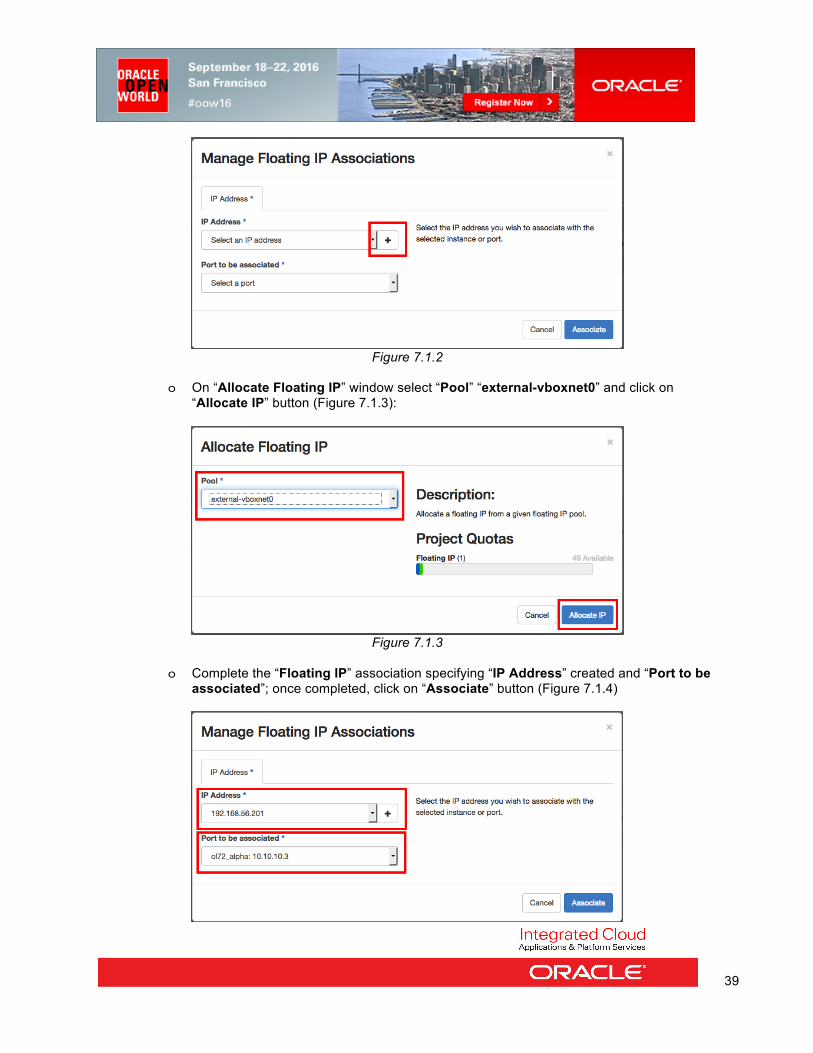
• Complete the “Floating IP” addition with following steps: o On “Manage Floating IP association” window click on [+] to add one new IP (Figure
7.1.2):
39
Figure 7.1.2
o On “Allocate Floating IP” window select “Pool” “external-vboxnet0” and click on
“Allocate IP” button (Figure 7.1.3):
Figure 7.1.3
o Complete the “Floating IP” association specifying “IP Address” created and “Port to be
associated”; once completed, click on “Associate” button (Figure 7.1.4)
40
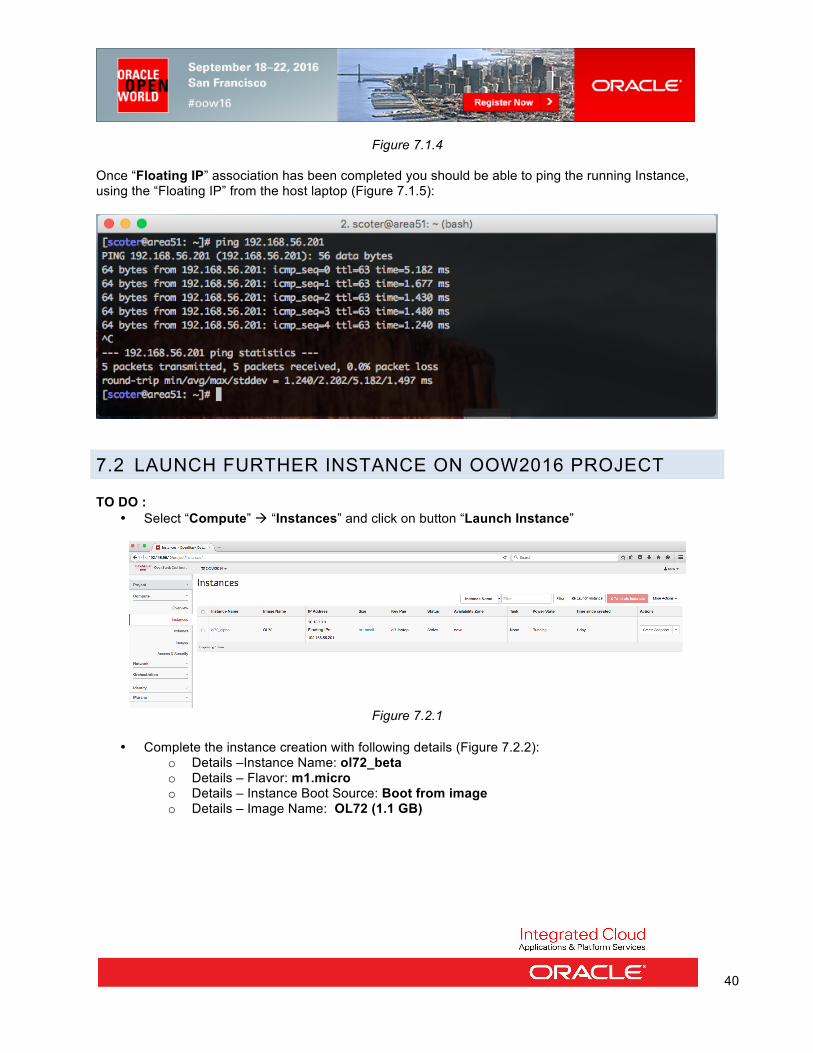
Figure 7.1.4 Once “Floating IP” association has been completed you should be able to ping the running Instance, using the “Floating IP” from the host laptop (Figure 7.1.5):
7.2 LAUNCH FURTHER INSTANCE ON OOW2016 PROJECT TO DO :
• Select “Compute” à “Instances” and click on button “Launch Instance”
Figure 7.2.1
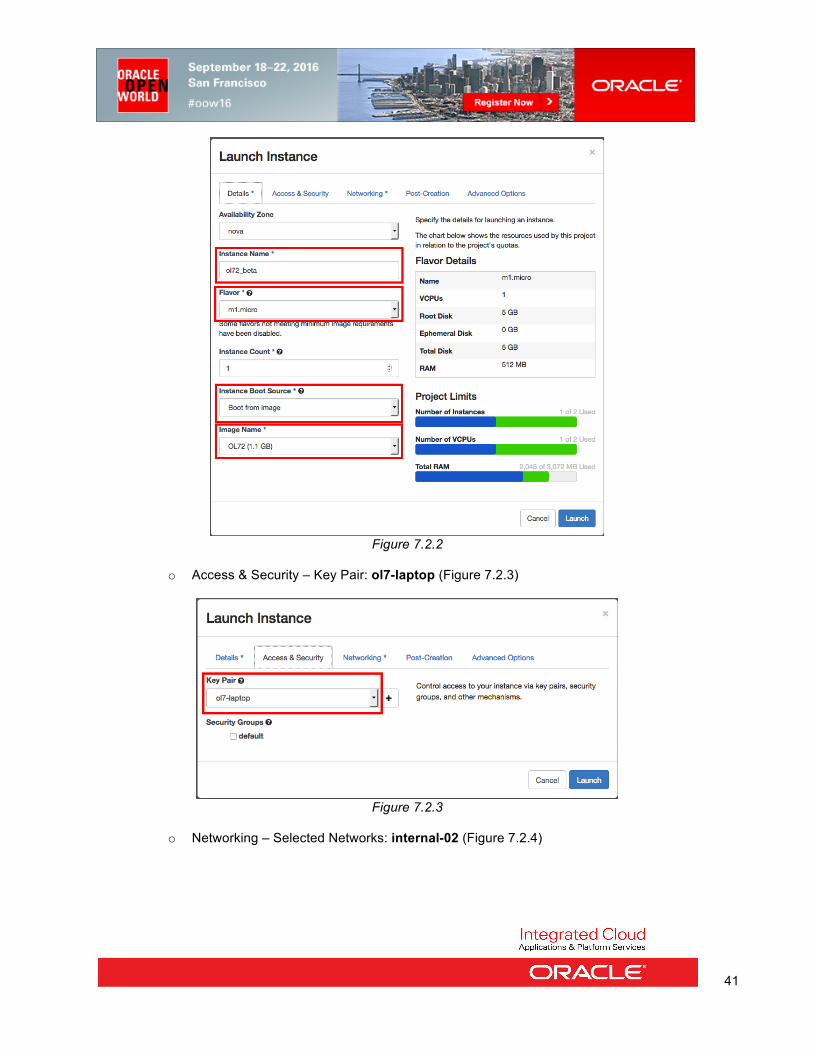
• Complete the instance creation with following details (Figure 7.2.2):
o Details –Instance Name: ol72_beta o Details – Flavor: m1.micro o Details – Instance Boot Source: Boot from image o Details – Image Name: OL72 (1.1 GB)
41
Figure 7.2.2
o Access & Security – Key Pair: ol7-laptop (Figure 7.2.3)
Figure 7.2.3
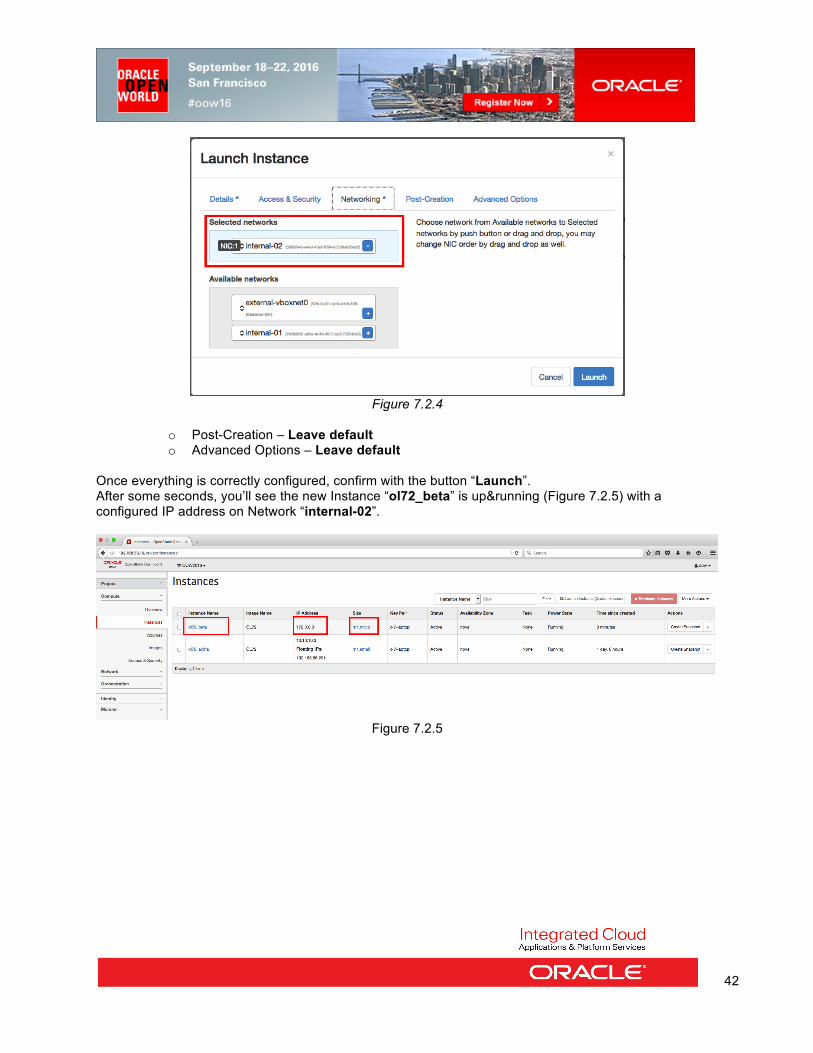
o Networking – Selected Networks: internal-02 (Figure 7.2.4)
42
Figure 7.2.4
o Post-Creation – Leave default o Advanced Options – Leave default
Once everything is correctly configured, confirm with the button “Launch”. After some seconds, you’ll see the new Instance “ol72_beta” is up&running (Figure 7.2.5) with a configured IP address on Network “internal-02”.
Figure 7.2.5
43
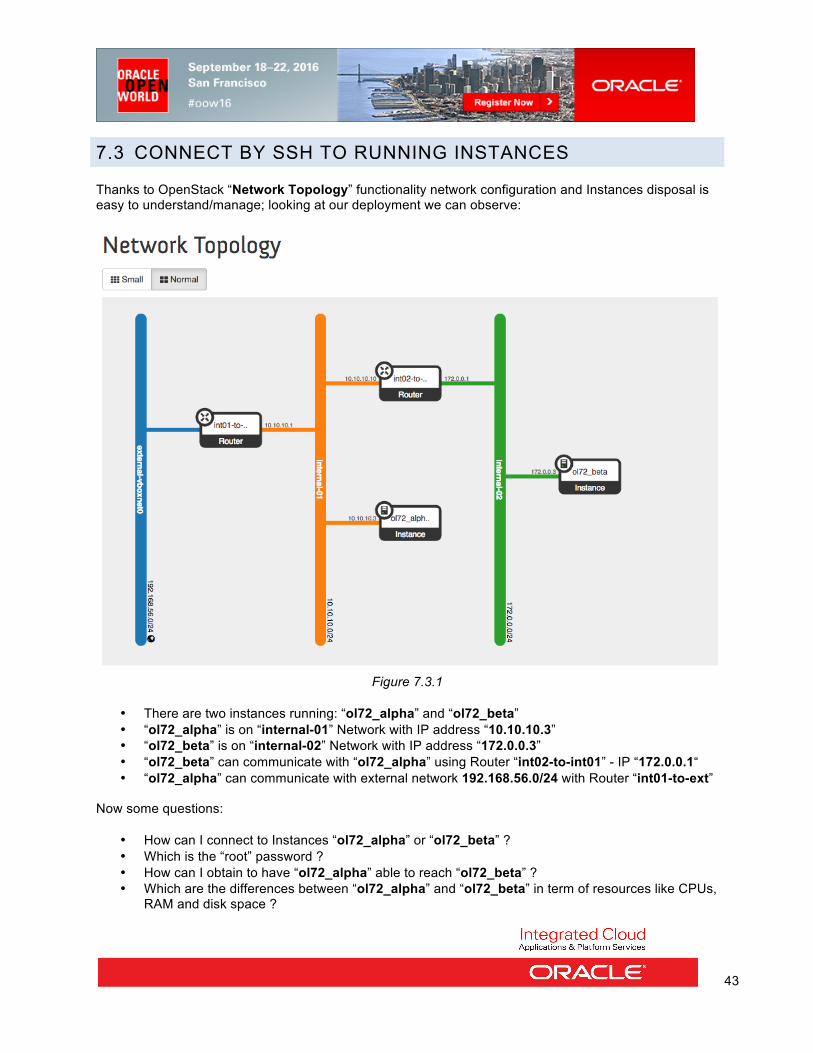
7.3 CONNECT BY SSH TO RUNNING INSTANCES Thanks to OpenStack “Network Topology” functionality network configuration and Instances disposal is easy to understand/manage; looking at our deployment we can observe:
Figure 7.3.1
• There are two instances running: “ol72_alpha” and “ol72_beta” • “ol72_alpha” is on “internal-01” Network with IP address “10.10.10.3” • “ol72_beta” is on “internal-02” Network with IP address “172.0.0.3” • “ol72_beta” can communicate with “ol72_alpha” using Router “int02-to-int01” - IP “172.0.0.1“ • “ol72_alpha” can communicate with external network 192.168.56.0/24 with Router “int01-to-ext”
Now some questions:
• How can I connect to Instances “ol72_alpha” or “ol72_beta” ? • Which is the “root” password ? • How can I obtain to have “ol72_alpha” able to reach “ol72_beta” ? • Which are the differences between “ol72_alpha” and “ol72_beta” in term of resources like CPUs,
RAM and disk space ?
44
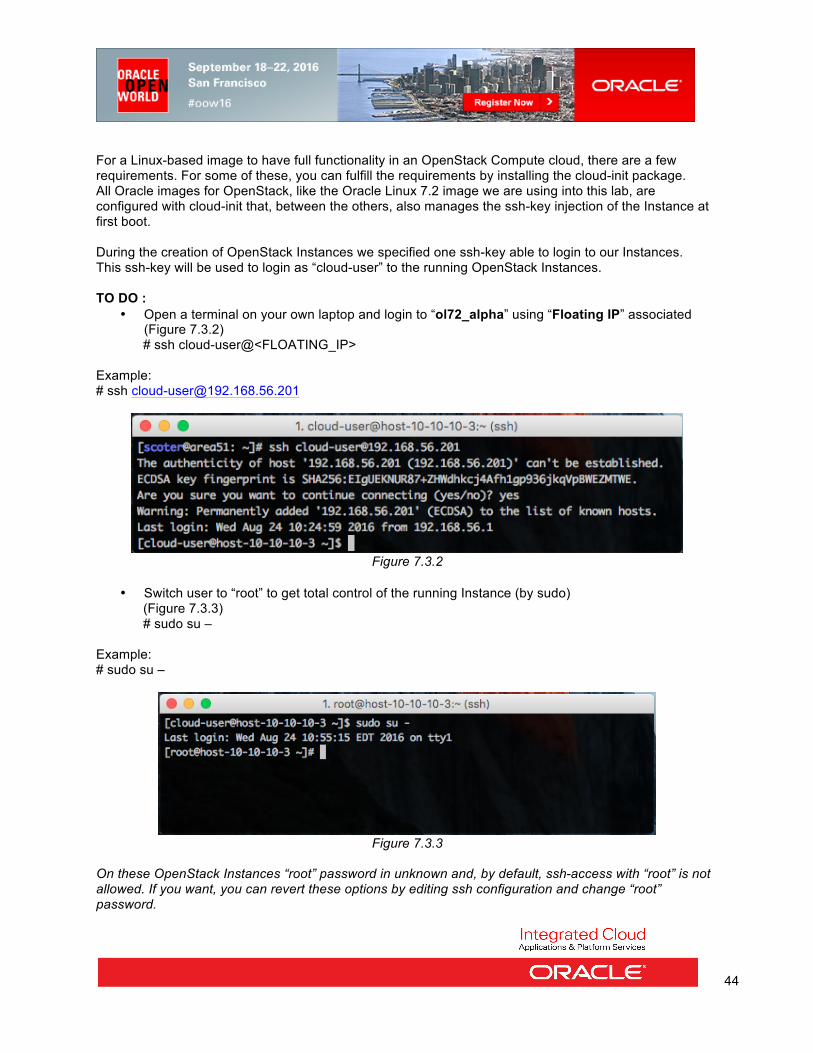
For a Linux-based image to have full functionality in an OpenStack Compute cloud, there are a few requirements. For some of these, you can fulfill the requirements by installing the cloud-init package. All Oracle images for OpenStack, like the Oracle Linux 7.2 image we are using into this lab, are configured with cloud-init that, between the others, also manages the ssh-key injection of the Instance at first boot. During the creation of OpenStack Instances we specified one ssh-key able to login to our Instances. This ssh-key will be used to login as “cloud-user” to the running OpenStack Instances. TO DO :
• Open a terminal on your own laptop and login to “ol72_alpha” using “Floating IP” associated (Figure 7.3.2) # ssh cloud-user@<FLOATING_IP>
Example: # ssh [email protected]
Figure 7.3.2
• Switch user to “root” to get total control of the running Instance (by sudo)
(Figure 7.3.3) # sudo su –
Example: # sudo su –
Figure 7.3.3
On these OpenStack Instances “root” password in unknown and, by default, ssh-access with “root” is not allowed. If you want, you can revert these options by editing ssh configuration and change “root” password.
45
To connect to “ol72_beta” machine we have two different options:
• Add a further interface to the Instance on Network “internal-01” and, possibly, a “Floating IP” • Use an other Instance as a bridge to connect to “ol72_beta” Instance.
In this example we are going to use “ol72_alpha” as a bridge to execute the first connection to “ol72_beta”.
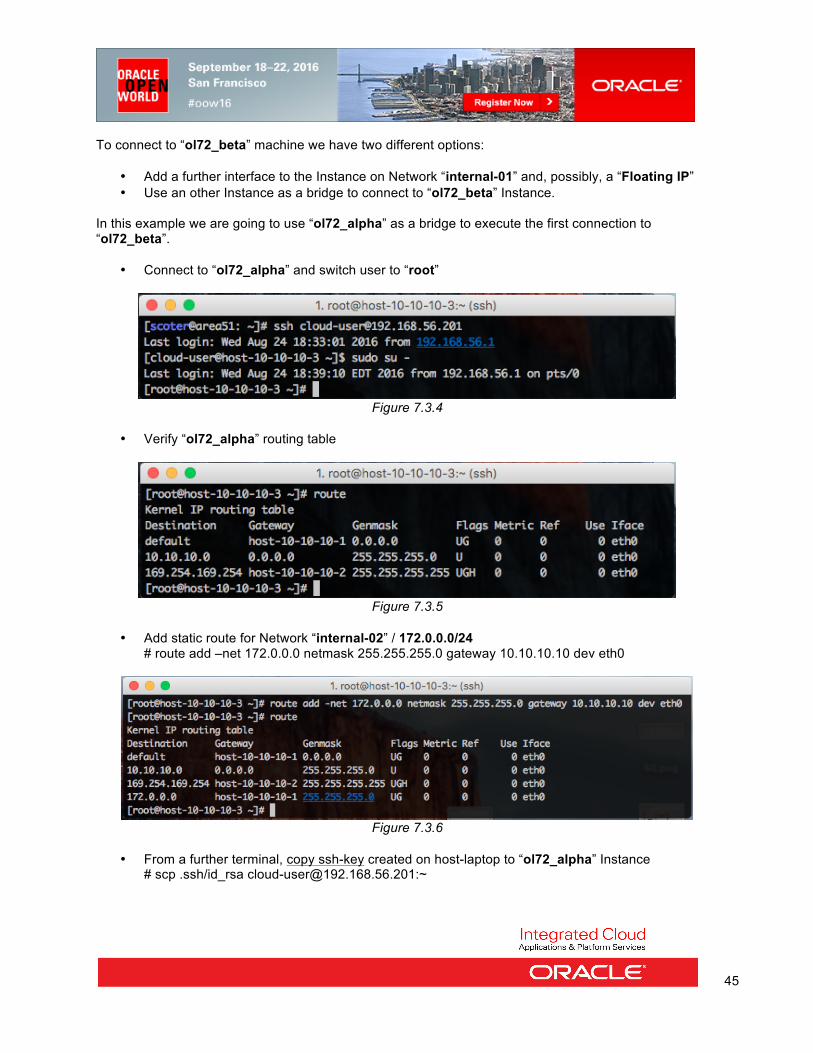
• Connect to “ol72_alpha” and switch user to “root”
Figure 7.3.4
• Verify “ol72_alpha” routing table
Figure 7.3.5
• Add static route for Network “internal-02” / 172.0.0.0/24
# route add –net 172.0.0.0 netmask 255.255.255.0 gateway 10.10.10.10 dev eth0
Figure 7.3.6
• From a further terminal, copy ssh-key created on host-laptop to “ol72_alpha” Instance
# scp .ssh/id_rsa [email protected]:~

46
Figure 7.3.7
• Now from Instance “ol72_alpha” connect to Instance “ol72_beta” as cloud-user
# ssh -I id_rsa 172.0.0.3
Figure 7.3.8
Optionally on Instance “ol72_beta” you can evaluate to edit ssh daemon configuration and change password(s) for different account(s).
7.4 CONNECT TO INSTANCES CONSOLE If an Instance encounter some connectivity problems you can always connect to its console using OpenStack Dashboard. TO DO :
• Select “Compute” à “Instances” and click on one of the running Instances (Figure 7.4.1)
Figure 7.4.1
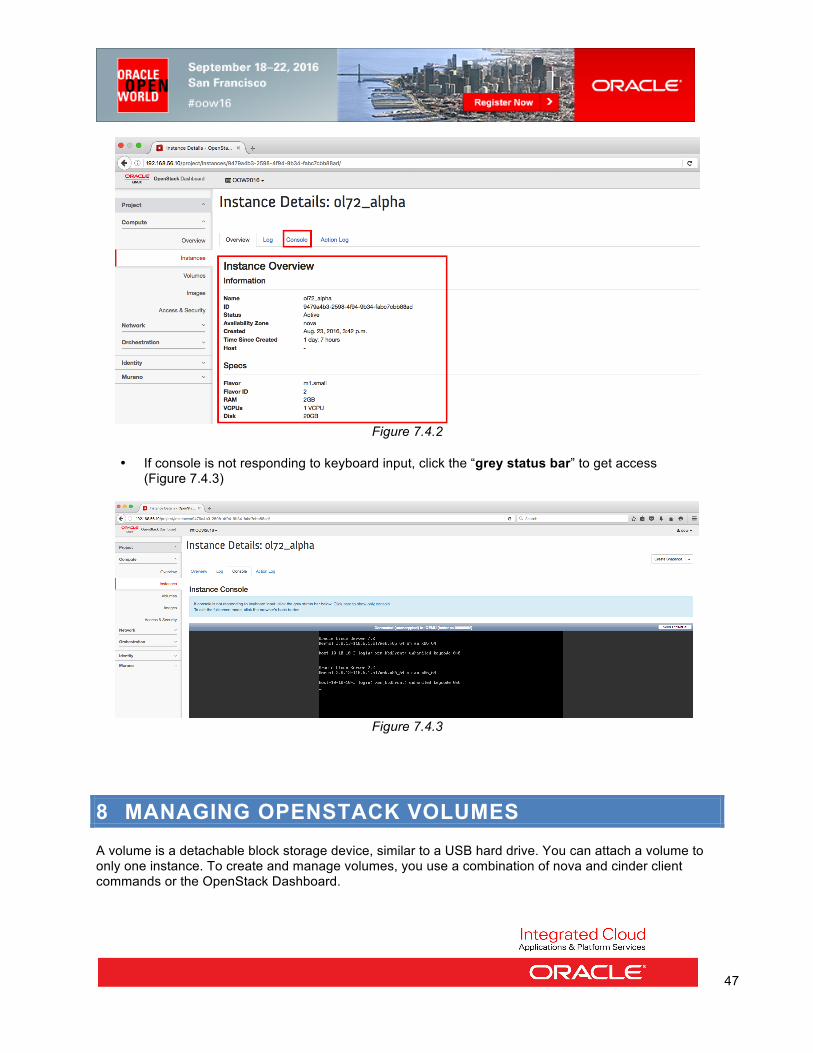
• You’ll get all the details related to the running Instance and the option to select “Console” Tab
(Figure 7.4.2)
47
Figure 7.4.2
• If console is not responding to keyboard input, click the “grey status bar” to get access
(Figure 7.4.3)
Figure 7.4.3
8 MANAGING OPENSTACK VOLUMES A volume is a detachable block storage device, similar to a USB hard drive. You can attach a volume to only one instance. To create and manage volumes, you use a combination of nova and cinder client commands or the OpenStack Dashboard.
48
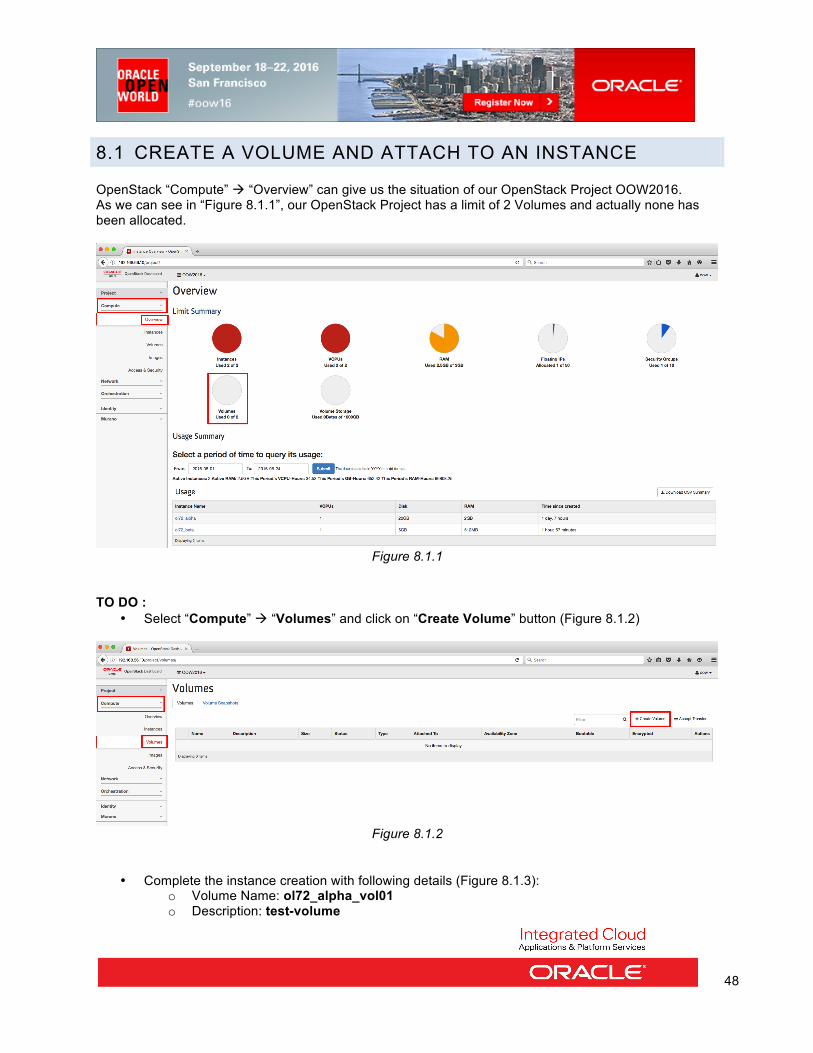
8.1 CREATE A VOLUME AND ATTACH TO AN INSTANCE OpenStack “Compute” à “Overview” can give us the situation of our OpenStack Project OOW2016. As we can see in “Figure 8.1.1”, our OpenStack Project has a limit of 2 Volumes and actually none has been allocated.
Figure 8.1.1
TO DO :
• Select “Compute” à “Volumes” and click on “Create Volume” button (Figure 8.1.2)
Figure 8.1.2
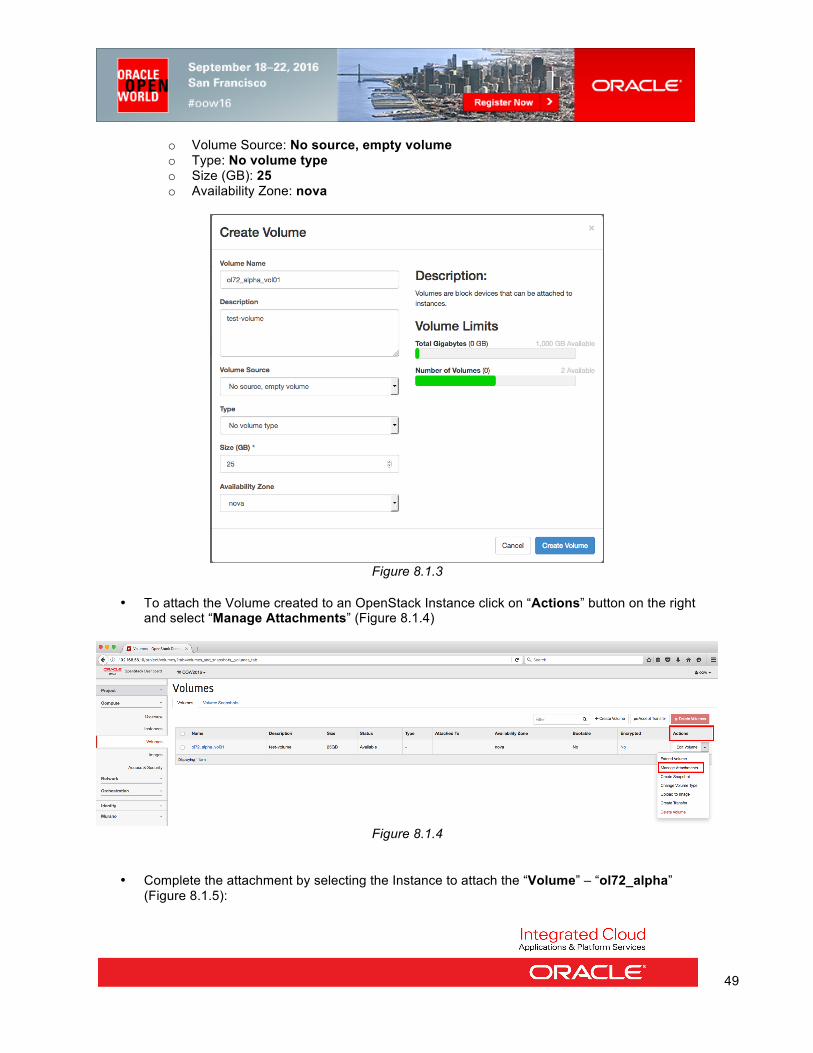
• Complete the instance creation with following details (Figure 8.1.3): o Volume Name: ol72_alpha_vol01 o Description: test-volume
49
o Volume Source: No source, empty volume o Type: No volume type o Size (GB): 25 o Availability Zone: nova
Figure 8.1.3
• To attach the Volume created to an OpenStack Instance click on “Actions” button on the right
and select “Manage Attachments” (Figure 8.1.4)
Figure 8.1.4
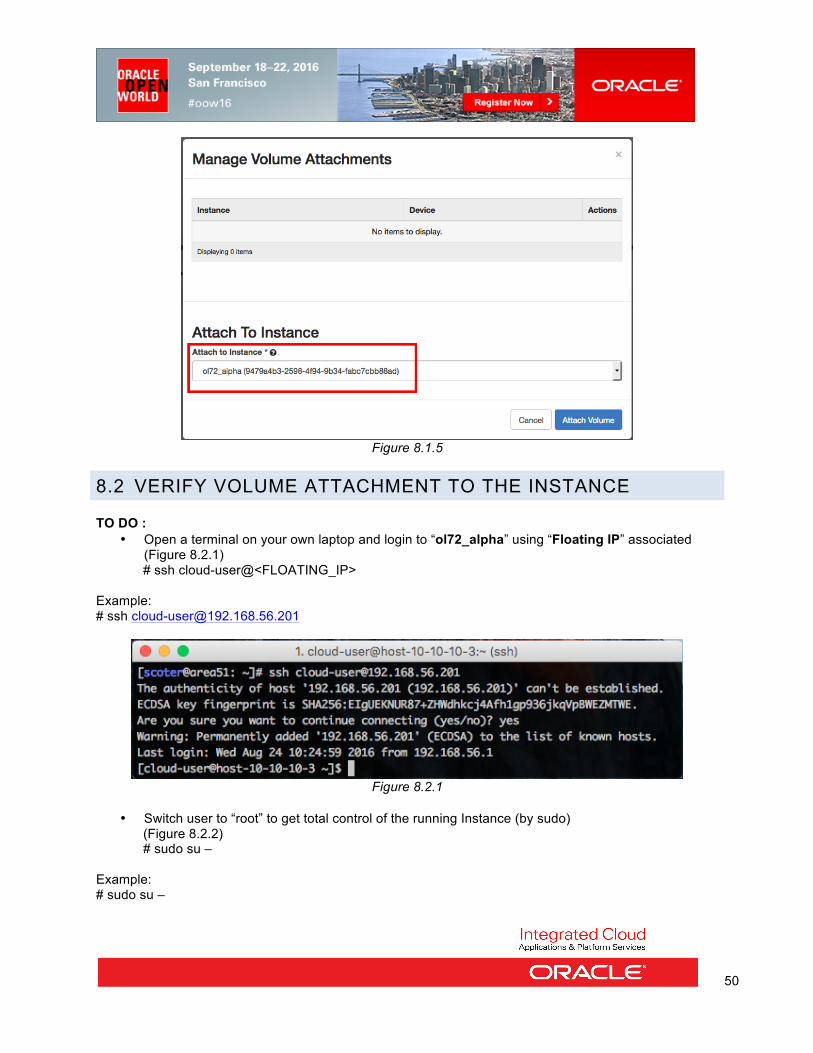
• Complete the attachment by selecting the Instance to attach the “Volume” – “ol72_alpha” (Figure 8.1.5):
50
Figure 8.1.5
8.2 VERIFY VOLUME ATTACHMENT TO THE INSTANCE TO DO :
• Open a terminal on your own laptop and login to “ol72_alpha” using “Floating IP” associated (Figure 8.2.1) # ssh cloud-user@<FLOATING_IP>
Example: # ssh [email protected]
Figure 8.2.1
• Switch user to “root” to get total control of the running Instance (by sudo)
(Figure 8.2.2) # sudo su –
Example: # sudo su –
51
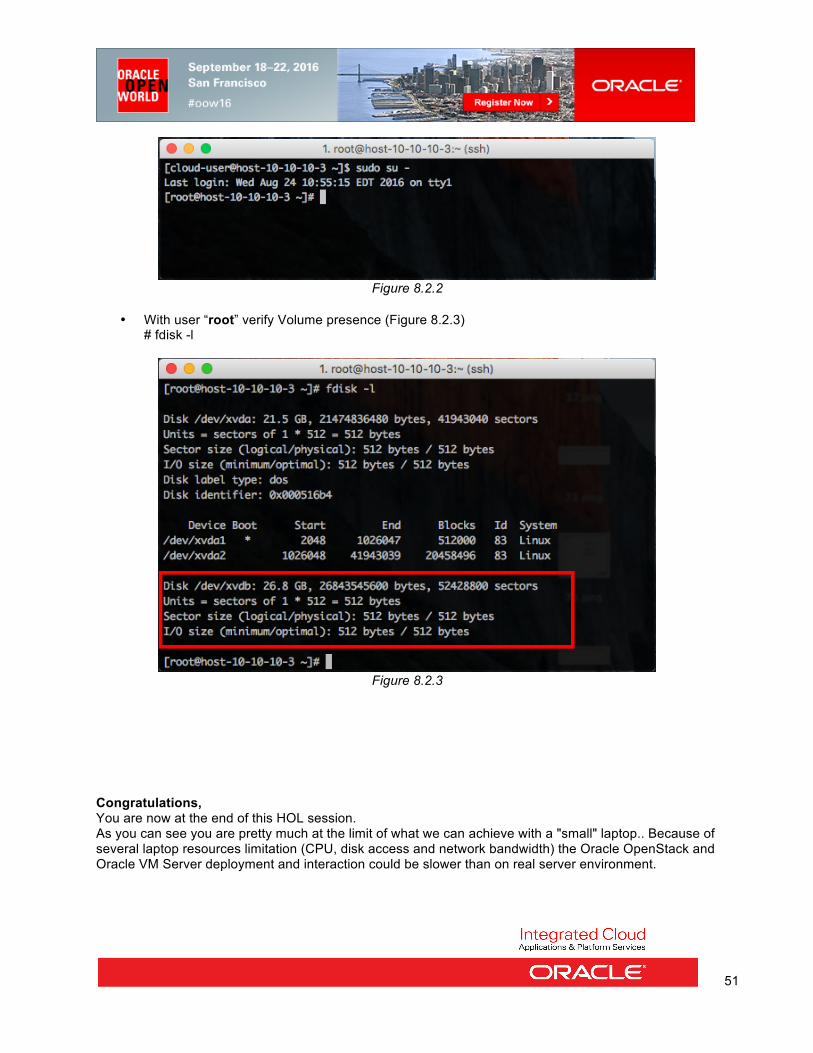
Figure 8.2.2
• With user “root” verify Volume presence (Figure 8.2.3)
# fdisk -l
Figure 8.2.3
Congratulations, You are now at the end of this HOL session. As you can see you are pretty much at the limit of what we can achieve with a "small" laptop.. Because of several laptop resources limitation (CPU, disk access and network bandwidth) the Oracle OpenStack and Oracle VM Server deployment and interaction could be slower than on real server environment.
52
9 REFERENCES:
9.1 ORACLE OPENSTACK 2.1 DOCUMENTATION
http://docs.oracle.com/cd/E73172_01/
9.2 ORACLE VM 3.4 DOCUMENTATION http://docs.oracle.com/cd/E64076_01/
9.3 THIS DOCUMENT
This document can be found on https://blogs.oracle.com/scoter