helen ruffin reading bowl club phase iii welcome to the
TRANSCRIPT

Helen Ruffin Reading Bowl Club Helen Ruffin Reading Bowl Club Phase III
Welcome to theWelcome to the

Agenda- July 28Agenda- July 28
• Welcome
• Procedures and rules- HRRB style!
• Words of wisdom from former coaches
• Questions- the good, the bad, and the ugly
• Let’s write 25 GOOD questions!
• Sample book trailers
• Sell your book
• Group meeting

Format and RulesFormat and Rules
• Let’s learn as we play!

Let’s hear from the coaches…Let’s hear from the coaches…
• Let’s hear from the voice of experience…• Recruit a co-sponsor or coach to help you. Parents can be a
valuable resource.• Get your students reading the Georgia Book Award
Nominees.• Make a specific reading requirement for students, example:
read four books per child. Make sure you have coverage for all the books.
• Have multiple copies of the books.• Start meeting with interested students.• Select your team…the earlier the better.• Discuss the books.• Students create practice questions.• Share book talks about the book.• Practice for the bowl!

Writing questionsWriting questions
• Good questions…– One correct answer– A brief answer– The answer is a fact from the book– Note the page where the answer can be found
• Bad and ugly questions…– Multiple answers– Long and complicated answers– Analysis questions

Can you tell the difference?Can you tell the difference?
• In the book, The Thing About Georgie, what sport was Georgie able to take lessons in? swimming, pg. 137
• In the book, The Story of Jonas , how did Jonas's mother die? of cholera, pg. 4
• In the book, Way Down Deep, Ruby would be the only child in school who had a what as a pet? Goat, pg. 19
• In the book, Journey to the Blue Moon, what did the Norn have to say about Alex’s and Zeke’s threads of time? That Alex’s had gotten into a bit of a tangle and Zeke’s was nearly broken off altogether., pg. 110-111
• In the book, The Absolutely True Diary of a Part-Time Indian, what two names did the kids call Junior when they would spin him around? Orbit and Globe


Writing questions- use the templateWriting questions- use the template
Do all the questions begin with “In the book, (title of the book), ….”? The questions are written using proper grammar and correct
spelling? Do the questions have only one unique straight forward answer? Could all the answers be easily pulled out from a page of the book? Is the page number listed on the question template? Is the vocabulary used in the question appropriate for the students
competing?
Please email completed questions to <[email protected]>.
Please complete and email questions for all your readings by August 31st.

Book trailers…Book trailers…
• A book trailer is a short montage of images related to the story accompanied by mood setting music, and thoughtful glimpses into the plot. The trailer should peek the interest of perspective readers.
• Sample trailers• Another sample trailer…• And one more sample…• Programs that can help you create a trailer
include Animoto.com, Moviemaker, and Frames.• Follow Fair Use Guidelines! This could be a
media festival opportunity for students.

Planning is essential!Planning is essential!
You will work to create a trailer for your book.
Steps to Follow:1. Review your book and begin by gathering your
ideas using the Planning Sheet. 2. Once you have completed your planning
sheet, select a partner.3. Share your planning sheet. 4. As a group, select one book for which to create
a trailer.

You have the idea, now what?You have the idea, now what?
• Discuss the following with your partner:– Will you use Animoto.com?– If using Animoto.com
• Who will find photos?• Who will find music?• What text will be included?• Will you need to use PowerPoint slides?
• Create a brief storyboard now or for homework. Learn more here. Storyboard template here!
• Make a list before leaving and bring your items tomorrow!

You have the idea, now what?You have the idea, now what?
• Discuss the following with your partner:– Will you use Frames?– If using Frames:
• Who will find the photos?• What objects will you need to bring or create?• Who will find music?• What text will be included?• Will you need to use PowerPoint slides?
• Create a brief storyboard now or for homework. Learn more here. Storyboard template here!
• Make a list before leaving and bring your items tomorrow!

Suggested materialsSuggested materials
• Nondrying modeling clay, example- Van Aken • Tin foil for forming armatures• Pipe cleaners• Googly eyes, yarn, cloth• Fishing wire• Poster board, shoebox, or file folders for set
design• Cookie sheet or other magnetic surface for
foundation• Toothpicks• Magnets for feet stability• Styrofoam

Agenda- July 29Agenda- July 29
• Learn Animoto.com– Build a sample as you learn
• Learn Frames– Build a sample as you learn
• Creation time– Work with your partner to complete your
project.• Sharing time
– Share finished products.

Keeping it together
• Create a project folder and save all your work and resources in it
1. Right click on the desktop
2. Select New and Folder3. Type the name for your folder

Fair use guidelinesFair use guidelines
Don’t Forget About Copyright!
Fair Use Guidelines

Locate your imagesLocate your images
• http://search.creativecommons.org
• Look for images you can build upon. You can search by keyword.
• Browse your findings.

Locate your imagesLocate your images
• Click on the photo to view a larger copy.
• Right click on this photo and select Save Target.
• Browse for your project folder. You will save all your photos to one folder.
• Copy and paste the credits line into the summary area of the image’s properties.

Create text slides using PowerPointCreate text slides using PowerPoint
• If you want a picture in the background or a certain font, consider using PowerPoint to create your text slides.
• Create the desired slides and save them in the jpeg format.
• Now all your slides will be treated as if they are photos.
Tip: Insert your background image. Right click on the image and select PictureFormat. Select the Picture tab. Set theColor option to Washout.

Getting started with Animoto.comGetting started with Animoto.com
• Sign up for an educator account: https://animoto.com/sign_up?promo=edu6lab1109
• Fill out the registration site. Copy and paste the promotional code. Click sign up.

Choose full-length videoChoose full-length video

Select imagesSelect images
1. You can browse and upload images from your computer.
2. If you use online photo collection sights, like Flicker, you can retrieve personal pictures.
3. You can also use Animoto.com photos.
We will be using the first option.

Uploading imagesUploading images
• Click on the first image, hold Shift, and click on the last image. This will select all of the images.
• Click Open.• Click and drag
photos into order.• You can still add
more photos, add text, rotate photos, add a spotlight, or delete photos.

Add musicAdd music
• Click the Music tab.• Select upload.
TIP: You can click thebottom back arrow to revisit a previous step.
• You can preview the music before clicking Save.

SettingsSettings
• Select Full-length video.
• Click continue.
• Add your title and description.
• Click Create Video.

Building the videoBuilding the video
• The video will take a few minutes to build.

SharingSharing
• Click the play button to preview your work.
• Click Share.

• Click Download to save a copy on your computer.
• Click Embed.

Getting your trailer on the blog…Getting your trailer on the blog…
• Select the first size option.
• Click the Copy button.
• Email [email protected] your code.

Working with Frames 4Working with Frames 4

Why is clay animation a great project idea?Why is clay animation a great project idea?
• Clay animation projects require students to choose and transform information.
• Students must write, design, organize, and carry out a plan.
• Clay animation projects allow students to tap into their creativity and work as a team.
• Students use multiple intelligences: bodily-kinesthetic, linguistic, interpersonal, spatial, and logical-mathematical intelligences.
• Don’t forget the technology skills used!

Animation resources Animation resources
• Sample Clay Animation Films– Animation sample
– Core content related examples
• Teacher Resources
– Literature Lesson Ideas
– Several Lesson Plans

• Student groups should include between 4-6 students, suggested roles include:
– Digital photographers– Movie editors– Set designers– Character designers– Script writers/ story board planners
• Make sure supplies are on hand• Planning via brainstorming and storyboards• Create clay figures• Create back drop or scene setting
Classroom planningClassroom planning

Character creationCharacter creation

Quiet on the set!Quiet on the set!

Animation tips
• Keep your hands clean
• Be careful not to move or bump into objects that are meant to stay stationary
• Try changing the camera view or zoom in occasionally to add effect
• When editing- remove any photos that show your hands
• Add background music and sound effects

Opening Frames 4Opening Frames 4
•Click Start•Click All Programs•Locate and select Tech4learning•Click Frames 4Open Frames!

Adding FramesAdding Frames
• Add frames to the animation to begin
• Add a single frame from file or a series of frames from a folder
• Browse for desired files
• Click Open
Add a frame!

Capturing from videoCapturing from video
• Click the Camera Mode button in the Preview area
• Preview from the video source will appear
• Click the Capture button• A new frame will be added
every time you click the Capture button
• When you are finished capturing frames, click the Edit Mode button in the Preview area Capture a
Frames and Preview it!

Adding blank FramesAdding blank Frames
• Click the last frame in the Frame List.
• Click the New Blank Frame button at the bottom of the Frame List.
Add a frame!

Adding imagesAdding images
• Click Frame
• Click Add Image from File
• Browse for desired image
• Click Open
• Click Library tab
• Browse Clip Art for desired picture
Add an image to a frame!
Add an image from the library to a frame!

Editing imagesEditing images
• Click an image to select it
• Image editing options will appear in the Options panel
• When you are finished, click Go Back
Edit an image!

Adding a shapeAdding a shape
• Click the Shape button on the toolbar
• Click desired shape
• Click and drag down and to the right to draw the shape
• Release the mouse button
Add a shape to a frame!

Editing shapesEditing shapes
• Click a shape to select it• Click Fill to change the fill
color• Choose desired color
from palette• Click Stroke Color to
change the color of the border around the shape
• Choose desired color from palette
Edit a shape!

Filling shapesFilling shapes
• Click a shape to select it• Click Choose File in the Fill
area• Locate the file you want to use• Click the file to select it• Click Open • You will see the shape filled
with the picture• Go to the View menu and
choose Fill Handles• You will see four triangular fill
controls for the image• Click and drag a fill control
handle to resize the image
Fill an image with a picture!

Editing shape nodesEditing shape nodes
• Click a shape to select it• Go to the View menu and
choose Node Handles• Small squares will appear at
each node on the shape• Double-click a node & blue
arrows will appear (adjusts both sides of shape)
• Double-click node again (adjusts one side)
Use the Nodes to edit your shape!

Using the drawing toolsUsing the drawing tools
• The pencil tool allows you to draw free hand.
• You can also edit the lines in the Options panel once you have selected the desired line.
Use the pencil to draw! Adjust the options.
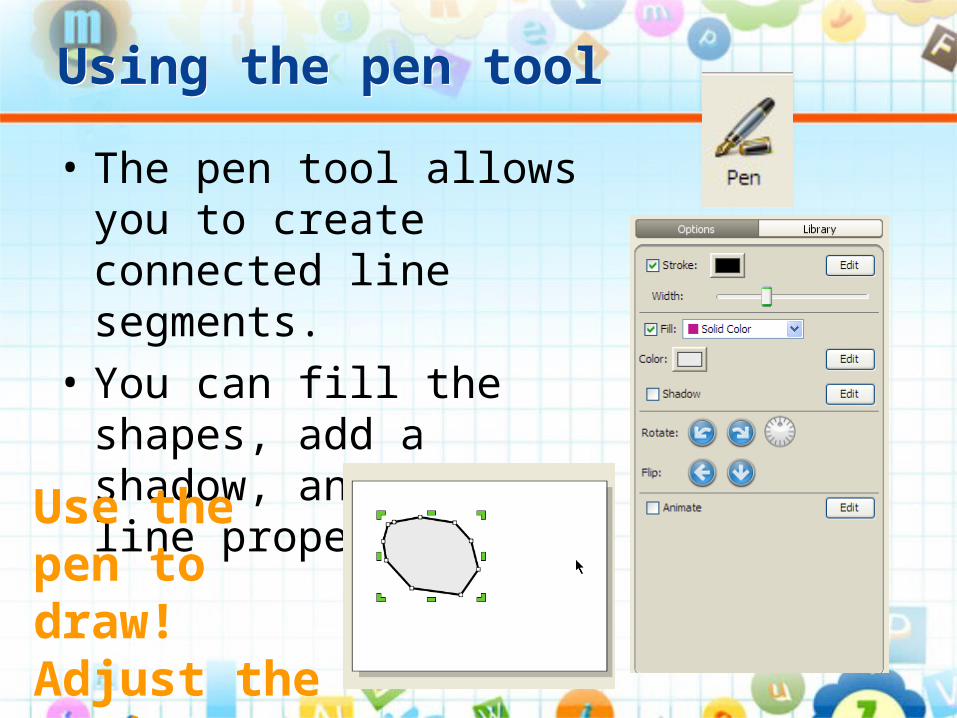
Using the pen toolUsing the pen tool
• The pen tool allows you to create connected line segments.
• You can fill the shapes, add a shadow, and change line properties
Use the pen to draw! Adjust the options.

Select toolSelect tool
• Click the Select button and pick the desired option
• Click the object you want to manipulate
• Move the object from the outside corner
Skew your selection.

Aligning objectsAligning objects
• Select the objects you want to align
• Go to the Options menu and choose Align
Add another shape and align them!

Saving your workSaving your work
• You should save the animation as you work on it
• Click the Save button on the toolbar
• You will see the Save Animation As dialog box
• Name your file• Specify where to save• Click Save
Save this practice file in your project folder.

Previewing animationPreviewing animation
• You can preview the animation at any time
• Select the first frame
• Click the Play button in the Preview area to watch the animation

Changing background colorChanging background color
• Click the Fill color box on the Options Panel
• Choose desired color from color palette
• You can change the background on the title page so that it looks differently from the animated frames
Experiment with the background of the slide.

Adding textAdding text
• You can add text to create a title for the animation
• Click the Text button on the toolbar
• You will see a text object in the middle of the frame
Add text to a frame.

Adding textAdding text
• Double-click the text object
• You will see a blinking cursor
• Type in the desired text
• Click the area around the frame when you are done
• The text object will no longer be selected

Editing textEditing text
• Click Text Color box to choose a new text color
• You will see a color palette
• Click the color you want for the text
• Click the grey area around the preview when you are done
Edit your text.

Editing textEditing text
• Click the Font pull-down menu on the Options panel to choose a new font
• Click and drag the Size slider on the Options panel to make the font larger

Filling textFilling text• Click a text object to select it• Click the Choose File button next to the Text Color
button• Locate the file you want to add and click Open• The text will be filled with the image you chose• You can resize the image within the text• Go to the View menu and choose Fill Handles• You will see four triangular fill controls for the
image• Click and drag a fill control handle to resize the
image

Animating textAnimating text
• Click the text you want to animate
• Select Edit on the Options panel next to Animate
• Make your selections and click Go Back
Animate your text.

Frame durationFrame duration
• Title frame should last longer than other frames in the animation
• You will see the frame duration in the Options panel
• Click and drag the Duration slider to the desired duration time

Adding soundsAdding sounds
• Click the first frame button in the Preview area to have the sound start at the beginning or click on desired slide
• Locate the desired sound in the Library, Sounds folder
• Preview or insert the sound
Add a sound to a frame.

Recording a soundRecording a sound
• Click the Record button on the toolbar• Click Record Sound• Click the Record button• Click the Stop button when you are done recording• You can preview the sound you recorded• Click the Play button to preview the sound• Click the OK button if you are happy with the
sound• You will see the sound added to one of the audio
tracks in the timeline at the bottom of the Frames window

Adding sound from fileAdding sound from file
• Click Frame on the menu and select Add Audio File…
• Search for desired file
• Click the audio file to select it
• Click the Open button
• The audio file will be added to a track in the timeline
Add a sound to a frame.

Changing audio volumeChanging audio volume
• Click the audio object you want to edit on the audio track
• Audio editing options will be displayed in the Options panel
• Click and drag the Volume slider to the left to decrease and to the right to increase the volume of the audio object

Editing audioEditing audio• Click the audio object you want to edit in the
audio track• To change the duration of the audio, move
the cursor over the end of the audio object in the audio track
• The selected area will turn gray• You can cut the selected area by selection
the scissors.• You can restore the sound to its original
form with the restore button.
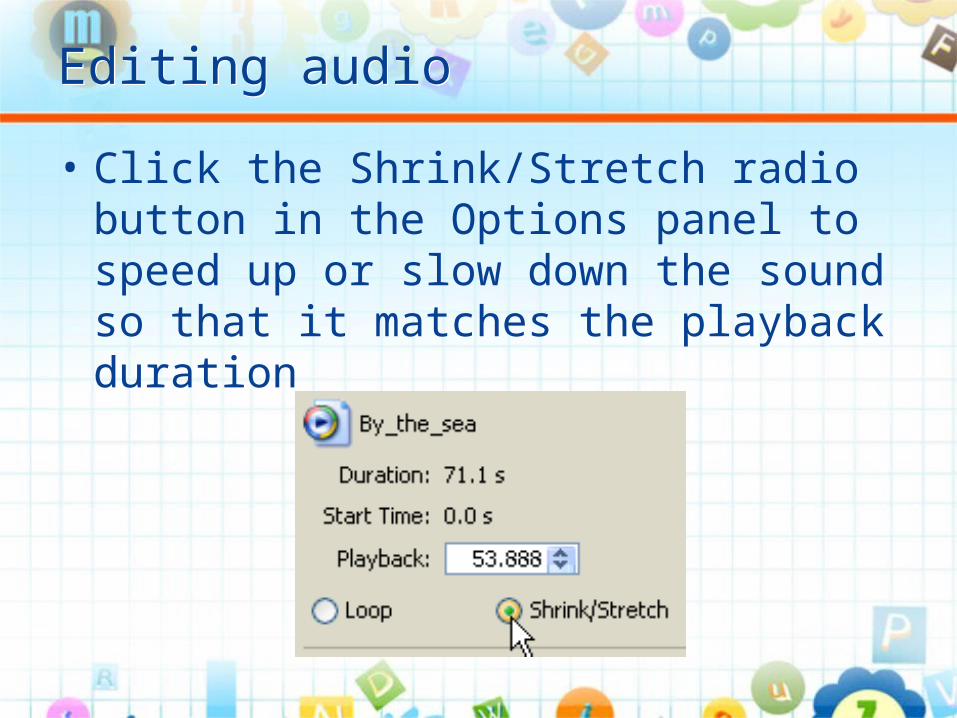
Editing audioEditing audio
• Click the Shrink/Stretch radio button in the Options panel to speed up or slow down the sound so that it matches the playback duration

Using onion skinUsing onion skin
• Click a frame in the Frame List or Storyboard
• Click the Onion Skin check box• Both the current frame and the previous
frame will appear in the Preview area• Click and drag objects in the Preview area
to align the current frame with the previous frame
• Continue to align other frames

Adding transitionsAdding transitions
• A great way to move from a stationary title to the first frame is with a transition
• Click the frame you want the transition to follow
• Click the Library tab and select the Transitions folder
• Preview and add the transition• You can edit the transition
using the pull down options menu
Add a transition.

Chroma keyChroma key
• Access the Tutorial files in the library.
• Click and drag the Blue Screen frames to the work area.
• Go to the Edit menu and choose Chroma Key
• You will see the Chroma Key dialog

Chroma keyChroma key
• Click On
• Click the Eye Dropper tool
• Move the cursor over the background of your picture

ToleranceTolerance
• Click the mouse button• You will see the background disappear• Click and drag the Tolerance slider so that no
background is showing and you still see all of the object
• Click OK• You will return to your animation• Click the first frame in the Frame List

Chroma KeyChroma Key
• You will see a black background behind your object
• You can choose a picture to be the background of a frame
• Click the Options tab to see the editing options for the frame

Chroma KeyChroma Key
• Use the pull down menu to select File
• Browse to the desired file
• You can apply the background to all the frames
• You can also set the frame to Pan and Zoom
Add a Chroma Key Effect and apply to all.

Copying & pasting framesCopying & pasting frames
• Copy and paste frames in the animation to have frames and actions repeat
• You can also duplicate frames or images
Duplicate a few of your frames.

Changing the order of framesChanging the order of frames
• Click on the desired frame
• Click and drag
• Release the mouse button when you see a black line above the first frame in the Frame List

Adding a credits frameAdding a credits frame• Type the credits text• Click on the text• Animate options will be displayed
in the Options panel• Click Credits in the Effect list• Use the Options pull-down menu
to choose Up• Use the up Duration arrow to
change the durationAdd credits to a frame.

Exporting your fileExporting your file
• Export the animation as a movie file you can share with other people
• Click the Make button on the toolbar
• You will see the Export Animation dialog box
• Click the desired export option• Click Export• When prompted, click Save
Web will work best for the use on the blog.

Work timeWork time
• Work with your partner to create your book trailer.
• If you use Frames, save your trailer to the supplied pen drive in the web format.
• If you use Animoto.com, download your trailer to the supplied pen drive. Remember to also email [email protected] with your html code.
• We will share our products at the end of class.