headrest dvd player owners manual - … dvd player owners manual ... may encourage moisture around...
TRANSCRIPT

Rockvillestore.com
HEADREST DVD PLAYER OWNERS MANUAL
Rockvillestore.com

Thank you for purchasing this Rockville Headrest DVD unit. We have spared no expense in designing and manufacturing this DVD Headrests to meet the highest quality standards. With proper care and installation this unit should provide you with many years of performance and reliability.
Please read this installation guide carefully for proper use of your Rockville Headrest DVD unit. Should you need technical assistance during or after your installation please call our technical help line at 1-646-758-0144, Monday through Friday, 9am to 5pm EST.

Rockvillestore.com
CONTENTS
1
Accessories
Precautions and Warnings
Key Features
Installation Instructions
Headrest Functions
Remote Functions
Touchscreen Functions
Troubleshooting
Technical Specifications and Parameters
2
3
4
5
6
10
12
18
19

2
ACCESSORIES
• Multifunction Remotes (Remote Type Varies Depending on Headrest Model)
• Owner’s Manual
• Matching Slip Covers
• Power and AV Cables (Cable Type Varies Depending on Headrest Model)
• Detachable Steel Posts
• Steel Fitting Sleeves: 10mm (.4in), 12mm (.27in)
• 6 Plastic Inserts for Proper Fitting: 12mm (.47in), 12.7mm (.50in), 13.5mm (.53in), 14mm (.55in), 16mm (.63in)
OPTIONAL ACCESSORIES • Wireless Headphones
USERS MANUAL FOR ROCKVILLE DVD PLAYER
RTSVD96, RTSVD76, RVD72, RVD95
RDP93, RDP71
RHP9, RHP7
Rockvillestore.com
3
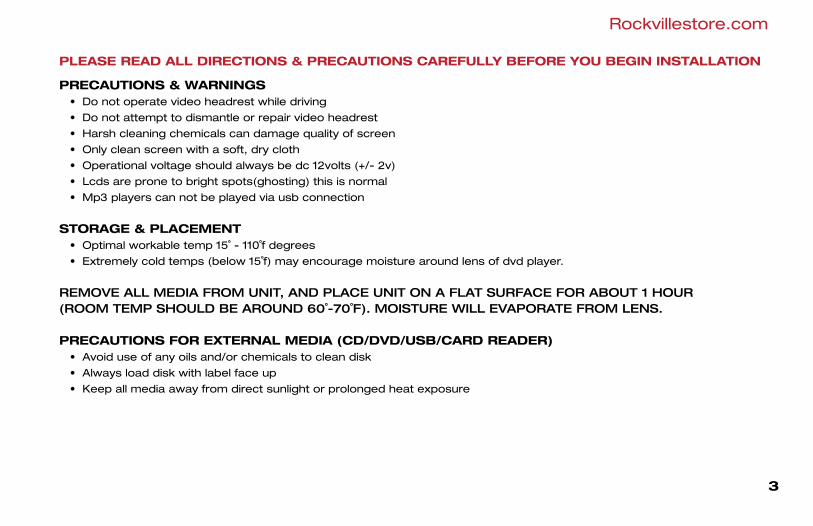
PLEASE READ ALL DIRECTIONS & PRECAUTIONS CAREFULLY BEFORE YOU BEGIN INSTALLATION
PRECAUTIONS & WARNINGS • Do not operate video headrest while driving
• Do not attempt to dismantle or repair video headrest
• Harsh cleaning chemicals can damage quality of screen
• Only clean screen with a soft, dry cloth
• Operational voltage should always be dc 12volts (+/- 2v)
• Lcds are prone to bright spots(ghosting) this is normal
• Mp3 players can not be played via usb connection
STORAGE & PLACEMENT • Optimal workable temp 15˚ - 110˚f degrees
• Extremely cold temps (below 15˚f) may encourage moisture around lens of dvd player.
REMOVE ALL MEDIA FROM UNIT, AND PLACE UNIT ON A FLAT SURFACE FOR ABOUT 1 HOUR(ROOM TEMP SHOULD BE AROUND 60˚-70˚F). MOISTURE WILL EVAPORATE FROM LENS.
PRECAUTIONS FOR EXTERNAL MEDIA (CD/DVD/USB/CARD READER) • Avoid use of any oils and/or chemicals to clean disk
• Always load disk with label face up
• Keep all media away from direct sunlight or prolonged heat exposure

4
KEY FEATURES • All in one unit, no extra equipment needed!
• Built in FM-Stereo Transmitter; allows for wireless connection and play through factory radio
• Supports a wide range of formats (see chart below)
• Plays mp3/mp4/wma/jpg & other downloadable content
• Album art; unit can display album art for mp3s if content is readable
• For more downloadable content; visit www.Native32.com
DVD HEADREST DOES NOT SUPPORT THE FOLLOWING MEDIA • .RM
• .RA
• .RAM
• .RMVB
• .AST
• .MKV
TYPE
SUPPORTED MEDIA
DVD/DVD-R/DVD-ROM MPEG1 AUDIO/VIDEO
AUDIO/VIDEO
AUDIO/VIDEO
STILL IMAGES/SLIDE SHOW
CD/CD-R/CD-RW/VCD MP3, MP4, JPG, WMA
USB/SD/MS/MSD MP3, MP4, JPG, WMA
PICTURES JPG
FORMATS CONTENTS

Rockvillestore.com
5
INSTALLATION INSTRUCTIONS*** DOUBLE CHECK ALL MEASUREMENTS TO ENSURE PROPER FIT AND PLACEMENT OF UNIT BEFORE BEGINNING INSTALLATION.
EASY FIT INSTALL GUIDE • Remove original headrest
• Use the supplied steel pipes to match the factory headrest pole diameter
• Test the fit of the headrest and make appropriate adjustments to ensure a snug fit
• Use the supplied plastic inserts to further secure placement of new headrest
• All connections should be run through headrest poles
• Use electrical tape/solder to ensure a long lasting, secure connection
• Before final mount/install, ensure all connections are fully functional
+12V
GROUNDVIDEO IN
L AUDIO IN
R AUDIO IN
L AUDIO OUTR AUDIO OUTVIDEO OUTTV ANTENNA (OPTIONAL)
6
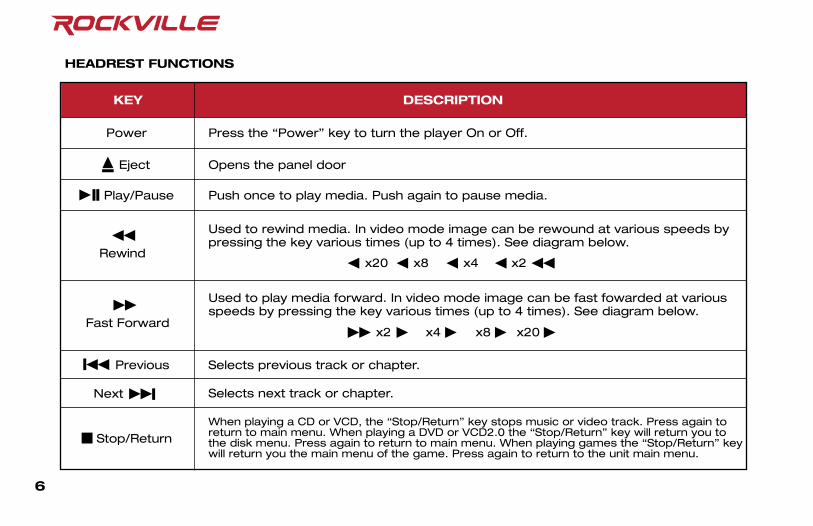
HEADREST FUNCTIONS
KEY DESCRIPTION
Power
Eject
Play/Pause
Rewind
Previous
Stop/Return
Next
Fast Forward
Push once to play media. Push again to pause media.
Used to rewind media. In video mode image can be rewound at various speeds bypressing the key various times (up to 4 times). See diagram below.
Used to play media forward. In video mode image can be fast fowarded at various speeds by pressing the key various times (up to 4 times). See diagram below.
Press the “Power” key to turn the player On or Off.
Opens the panel door
Selects previous track or chapter.
Selects next track or chapter.
When playing a CD or VCD, the “Stop/Return” key stops music or video track. Press again to return to main menu. When playing a DVD or VCD2.0 the “Stop/Return” key will return you to the disk menu. Press again to return to main menu. When playing games the “Stop/Return” key will return you the main menu of the game. Press again to return to the unit main menu.
x20 x8 x4 x2
x2 x4 x8 x20

Rockvillestore.com
7
HEADREST FUNCTIONS
DESCRIPTIONKEY
Slow
Program
Repeat
Mute
Title
MENU PBC(Play Back Control)
Slow motion key allows you to view the image at up to 1/7th speed in DVD mode. Press the key repeatedly to decrease speed. Press the “Play/Pause” key to return to normal play.
The “Program” key allows you to set the order of tracks to be played. Programmingis not allowed for MP3 disks. While in program mode you can use the “Previous/Next” keys to move between tracks. To cancel the program function press the “Program” key to enter the menu interface. Select the “Clear” key and then press “Enter” to comfirm.
Repeat allows you to loop the selected title/chapter or track/album. When playing a DVD press the key successively to select the title or chapter to play. For other types of disks press “Repeat” key successively to switch between track repeat or album repeat
PBC allows you to move through sections of the tracks on a VCD2.0 or SVCD while viewing a moving image as opposed to the standard manner which only shows a still image.
Press the “Mute” key once to cancel all sound. Press the “Mute” key again toresume sound.
Use the “Title” key to stop playback and return to the title menu of the disk. Press the direction key to select your desired title. Now press the enter key toconfirm your selection and enter the chapter menu.
1/31/2 1/4 1/5 1/6 1/7
8
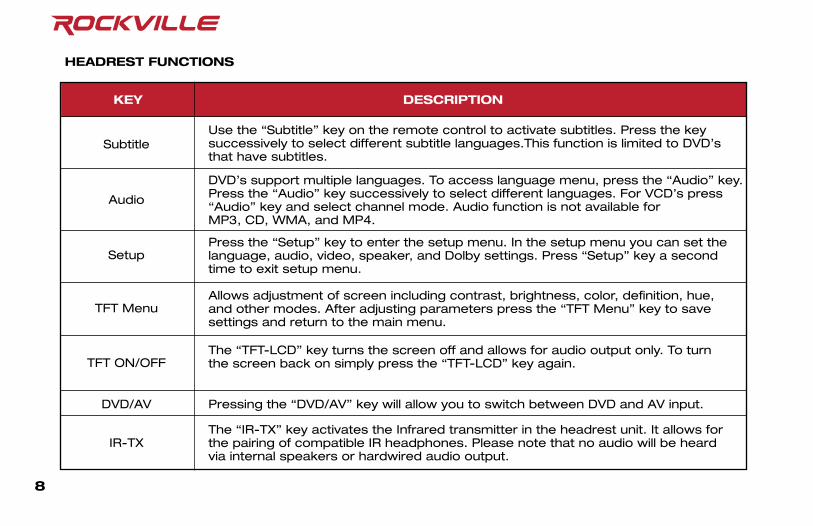
KEY DESCRIPTION
Subtitle
Audio
Setup
TFT Menu
TFT ON/OFF
DVD/AV
IR-TX
Use the “Subtitle” key on the remote control to activate subtitles. Press the key successively to select different subtitle languages.This function is limited to DVD’s that have subtitles.
DVD’s support multiple languages. To access language menu, press the “Audio” key. Press the “Audio” key successively to select different languages. For VCD’s press “Audio” key and select channel mode. Audio function is not available for MP3, CD, WMA, and MP4.
Press the “Setup” key to enter the setup menu. In the setup menu you can set the language, audio, video, speaker, and Dolby settings. Press “Setup” key a second time to exit setup menu.
Allows adjustment of screen including contrast, brightness, color, definition, hue, and other modes. After adjusting parameters press the “TFT Menu” key to save settings and return to the main menu.
The “TFT-LCD” key turns the screen off and allows for audio output only. To turn the screen back on simply press the “TFT-LCD” key again.
Pressing the “DVD/AV” key will allow you to switch between DVD and AV input.
The “IR-TX” key activates the Infrared transmitter in the headrest unit. It allows for the pairing of compatible IR headphones. Please note that no audio will be heardvia internal speakers or hardwired audio output.
HEADREST FUNCTIONS
Rockvillestore.com
9
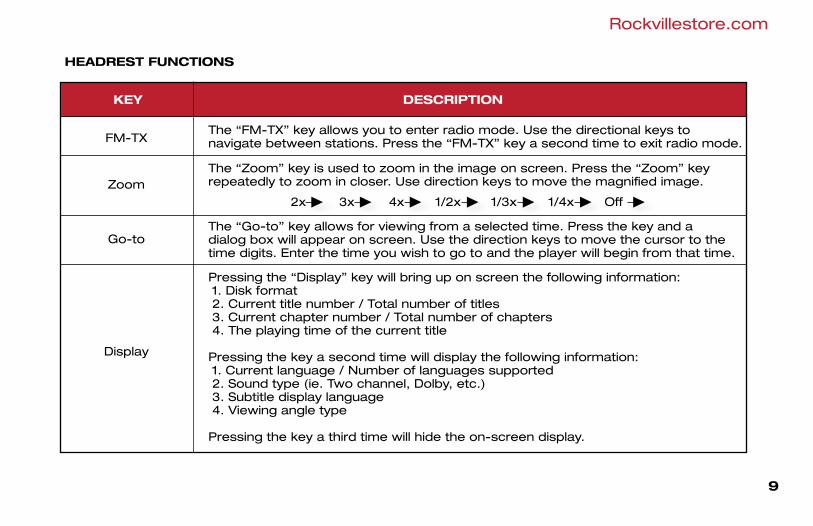
KEY DESCRIPTION
FM-TX
Zoom
Go-to
Display
The “FM-TX” key allows you to enter radio mode. Use the directional keys to navigate between stations. Press the “FM-TX” key a second time to exit radio mode.
The “Zoom” key is used to zoom in the image on screen. Press the “Zoom” keyrepeatedly to zoom in closer. Use direction keys to move the magnified image.
The “Go-to” key allows for viewing from a selected time. Press the key and adialog box will appear on screen. Use the direction keys to move the cursor to thetime digits. Enter the time you wish to go to and the player will begin from that time.
Pressing the “Display” key will bring up on screen the following information: 1. Disk format 2. Current title number / Total number of titles 3. Current chapter number / Total number of chapters 4. The playing time of the current title
Pressing the key a second time will display the following information: 1. Current language / Number of languages supported 2. Sound type (ie. Two channel, Dolby, etc.) 3. Subtitle display language 4. Viewing angle type
Pressing the key a third time will hide the on-screen display.
HEADREST FUNCTIONS
2x 3x 4x 1/2x 1/3x 1/4x Off

10
579111315171921
23
25
26
27
3
13
4
6
2
1
11
21
25
7
5
9
13
15
17
19
23
27
2
11
25
45
3
1. Start2. Function Keys3. Select4. Mute5. Power6. Home7. Menu8. Direction Keys / Enter9. Display10. PBC11. Repeat12. Rewind / Fast Forward13. Angle14. Volume15. Set up16. Zoom17. Play / Pause18. Goto19. Stop20. Slow21. Previous / Next22. Audio23. Number Keys24. Secondary Direction Keys25. Search26. Subtitle27. Return
1. PBC / Menu2. Title3. Power4. Mute5. Number Keys6. Goto7. Subtitle8. Rewind / Fast Forward9. Display10. Previous / Next11. Audio12. Volume13. Angle14. USB / Card15. Set up16. Play / Pause17. Directional Key / Enter18. Stop / Return19. Menu20. Zoom21. FM-TX22. Repeat23. IR-TX24. Slow25. DVD / AV26. Program27. TFT On / Off
1. Reset 2. Function Keys3. Direction Keys4. Start5. Select
1. Power 2. Video Select3. Menu4. Back5. Forward6. Mode Select
4
2
6
8
10
12
14
1816
20
2422
26
4
68101214
16182022
24
3
REMOTE FUNCTIONS

Rockvillestore.com
11
16 F
eet
REMOTE FUNCTIONS
Application of Remote Control • Horizontal: ±30° • Vertical: ±30° • Max Distance: 16 ft
±30°

12
TOUCHSCREEN MENU FUNCTIONSDISC LOAD
1. Load a disc into the unit. Ensure that the disk is compat-ible with your unit. Press the “DISC” icon to begin playing your disc. If it is a DVD or VCD, the disc will load and begin to play automatically (Figure 1).
Figure 1 Figure 2
2. If it is a CD, CDR, or CDR/RW the menu pictured be-low will appear once you’ve pressed “DISC” icon. Touch the corresponding icon to access your disc. The “RETURN” icon at the bottom will bring you back to the main menu screen (Figure 2).

Rockvillestore.com
13
USB INPUT
Figure 3 Figure 4
Connect USB drive via available USB port. Touch “USB” icon to access the USB drive (Figure 3). In the next screen (Figure 4) select the media you would like to access: Video, Music, Photo, or Text. Touching any of the icons wll take you to a submenu screen which will allow you to view or listen to the desired media.
SD INPUT
Figure 5 Figure 6
Plug SD card into SD card slot (copper strips facing up). Touch the “SD” icon to access the SD card (Figure 5). In the next screen (Figure 6) select the media you would like to access: Video, Music, Photo, or Text. Touching any of the icons will take you to a submenu screen which will allow you to view or listen to the desired media.
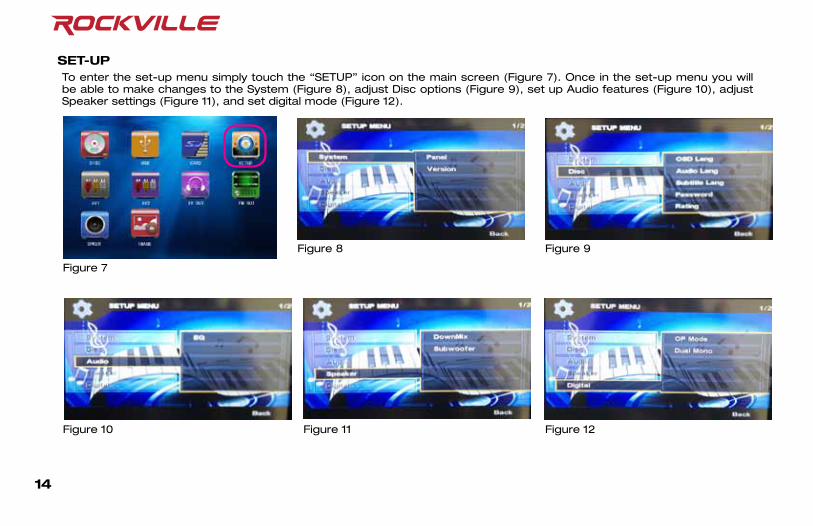
SET-UP
Figure 7
Figure 10
Figure 8
Figure 11
Figure 9
Figure 12
To enter the set-up menu simply touch the “SETUP” icon on the main screen (Figure 7). Once in the set-up menu you will be able to make changes to the System (Figure 8), adjust Disc options (Figure 9), set up Audio features (Figure 10), adjust Speaker settings (Figure 11), and set digital mode (Figure 12).
14

Rockvillestore.com
AV1 / AV2 INPUT
IR OUT
Figure 13
Figure 15
Figure 14
Figure 16
To access any external AV sources touch either AV1 (Figure 13) or AV2 (Figure 14) in the main menu.
Touching the “IR OUT” icon (Figure 15) will bring up the IR Settings screen (Figure 16). Here you will be able to select your IR Headphone transmitting frequency, as well as turn off the IR option if desired. (IR Headphones sold seperately)
15

FM OUT
SPEAKER
Figure 17
Figure 19
Figure 18
Touching the “FM OUT” icon (Figure 17) will bring up the FM Settings screen (Figure 18). Here you will be able to select the FM band for output of unit audio via your factory speakers. Touching the “OFF” button will turn off this feature.
Touch the “SPEAKER” icon (Figure 19) to bring up the Volume control bar. Use the “+” and “-” icons to adjust the volume to the desired level.
16
Rockvillestore.com
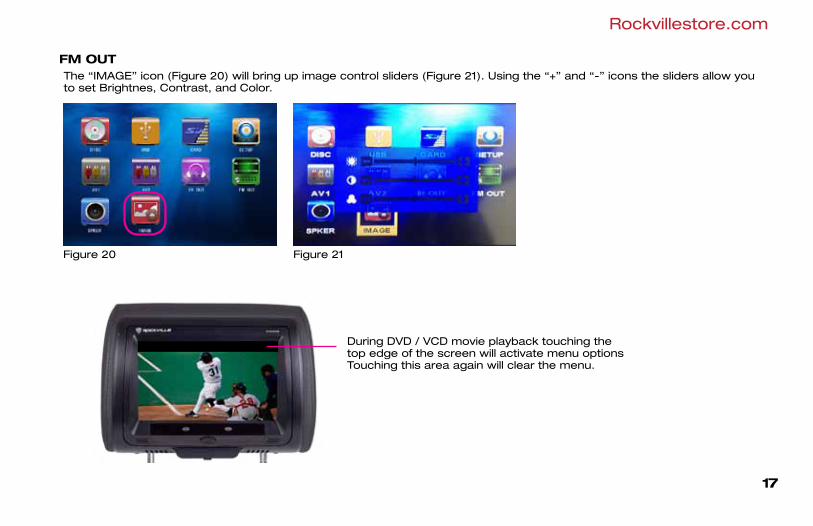
FM OUT
Figure 20 Figure 21
The “IMAGE” icon (Figure 20) will bring up image control sliders (Figure 21). Using the “+” and “-” icons the sliders allow you to set Brightnes, Contrast, and Color.
During DVD / VCD movie playback touching thetop edge of the screen will activate menu optionsTouching this area again will clear the menu.
17

18
SYMPTOM SOLUTION
No Power
No Image
No Sound
Disk Does Not Read
ImproperImage Size
Remote ControlDoes Not Work
1. Check all power connections and ensure that the unit is wired properly.
1. Check that the unit is powered on.2. Ensure that the input cable is connected properly.3. Check unit settings; ensure that it is set for the proper type of input.
1. Check all connections.2. Check unit settings to ensure that proper sound mode is selected.3. Check volume settings.
1. Check that the disk has been properly loaded.2. Check that the disk is not damaged or dirty. Clean disk with a soft cloth from the center out.3. Check disk and unit settings for proper region code. 4. Check disk for proper format.
1. Restore default settings.2. Select proper screen format from the set-up menu.
1. Check the battery to make sure its properly installed.2. Make sure battery is good. Replace battery if needed.3. Make sure that you are not too far from the unit.3. If remote still does not work, contact retailer to obtain a replacement.
TROUBLESHOOTING
DO NOT, UNDER ANY CIRCUMSTANCES, DISMANTLE THE DEVICE.
Rockvillestore.com
Working Temp
19
Disk Type(Signal Source)
Display
Output
Input
Video System
Voltage
Power Consumption
VideoCharacterisitcs
AudioCharacterisitcs
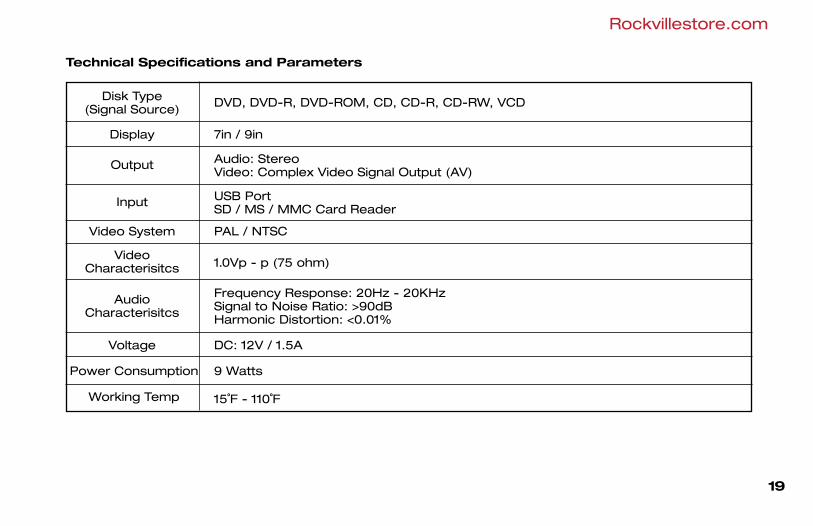
DVD, DVD-R, DVD-ROM, CD, CD-R, CD-RW, VCD
7in / 9in
Audio: StereoVideo: Complex Video Signal Output (AV)
USB PortSD / MS / MMC Card Reader
PAL / NTSC
DC: 12V / 1.5A
9 Watts
15˚F - 110˚F
1.0Vp - p (75 ohm)
Frequency Response: 20Hz - 20KHzSignal to Noise Ratio: >90dBHarmonic Distortion: <0.01%
Technical Specifications and Parameters

© 2012 ROCKVILLE // Features and specifications are subject to change and or improvement without notice.