harcourt math center for intervention • problem solving ...€¦ · intervention • problem...
TRANSCRIPT

Harcourt Math Center
Network V 2.3
User’s Guide
For
Assessment System
Intervention • Problem Solving
Intervention • Skills
Harcourt Mega Math
User’s Guide Macintosh® and Microsoft Windows®

Harcourt Math Center
Copyright Page
Copyright © by Harcourt, Inc.
All rights reserved. No part of this publication may be reproduced or transmitted in any form or by any means, electronic or mechanical, including photocopy, recording, or any information storage or retrieval system.
Permission is hereby granted to individual teachers using the corresponding student's textbook or kit as the major vehicle for regular classroom instruction to photocopy Copying Masters from this publication in classroom quantities for instructional use and not for resale. Requests for information on other matters regarding duplication of this work should be addressed to School Permissions and Copyrights, Harcourt, Inc., 6277 Sea Harbor Drive, Orlando, Florida 32887-6777. Fax: 407-345-2418.
HARCOURT and the Harcourt Logo are trademarks of Harcourt, Inc. Microsoft Windows® is a registered trademark of Microsoft Corporation. Apple® and Macintosh® are registered trademarks of Apple Computer Inc. SoundBlaster® is a registered trademark of Creative Technology Ltd. Pentium® is a registered trademark of Intel.
©Harcourt, Inc. All rights reserved.
Page 2

Harcourt Math Center
Table of Contents About the Harcourt Math Center ............................................................................................................... 6
What’s on the CD? ....................................................................................................................................... 7
System Administrator Features.................................................................................................................. 7
Teacher Features....................................................................................................................................... 8
Student Features ........................................................................................................................................ 9
Installing the Software ............................................................................................................................... 10
Minimum System Requirements ............................................................................................................... 10 Single-Computer Version ................................................................................................................... 10 Site License Version ........................................................................................................................... 10 Single-Site Network Version .............................................................................................................. 11
Installing the Harcourt Math Center ....................................................................................................... 12 Single-Computer and Site License Version Installation ..................................................................... 12
Windows Single-Computer and Site License Version Installation ................................................ 12 Macintosh Single-Computer and Site License Version Installation............................................... 15
Single-Site Network Version Installation ........................................................................................... 17 Windows Single-Site Network Version Installation ...................................................................... 17 Macintosh Single-Site Network Version Installation..................................................................... 21
Installing Additional Math Center Products............................................................................................ 25
Launching Math Center Products ........................................................................................................... 26
Uninstalling Math Center Products .......................................................................................................... 27
Uninstalling Single-Computer and Site License Versions ....................................................................... 27 Windows Uninstalling Single-Computer and Site License Versions.................................................. 27 Macintosh Uninstalling Single-Computer and Site License Versions ................................................ 28
Uninstalling the Single-Site Network Version ......................................................................................... 29 Windows Client .................................................................................................................................. 29 Macintosh Client ................................................................................................................................. 29 Uninstalling Databases........................................................................................................................ 30 Uninstalling the Single-Site Network Client Installers ....................................................................... 30
Uninstalling Content – Site License & Single-Site Network.................................................................... 30
Exploring the Math Center........................................................................................................................ 32
General Navigation Buttons .................................................................................................................... 32
Working with Lists ................................................................................................................................... 33
Setting Up the Math Center....................................................................................................................... 35
Logging In to the Math Center ................................................................................................................ 35 First Time User Log In........................................................................................................................ 35 The Log In Screen............................................................................................................................... 37
Page 3
Harcourt Math Center
Log In............................................................................................................................................. 37 Check for Installed Products .......................................................................................................... 39 Log in as a Guest............................................................................................................................ 39 Ending a Math Center Session ....................................................................................................... 40
System Administrator Options ................................................................................................................. 41 Manage Teachers ................................................................................................................................ 41
Adding Teacher Profiles ................................................................................................................ 41 Editing Teacher Profiles................................................................................................................. 42 Removing a Teacher Profile........................................................................................................... 43
Edit School Name ............................................................................................................................... 43 Custom Student Fields ........................................................................................................................ 43 Version Information............................................................................................................................ 44 Export Data ......................................................................................................................................... 44 End of Year Maintenance.................................................................................................................... 45
More About Using the Promote Students Option........................................................................... 46
Teacher Options ...................................................................................................................................... 49 Manage Classes................................................................................................................................... 50
Adding a Class ............................................................................................................................... 50 Adding a Group.............................................................................................................................. 51 Adding Student Profiles Manually ................................................................................................. 51 Tips for Adding Student Data ........................................................................................................ 53 Adding Student Profiles by Importing a Student List .................................................................... 53 Export a Student List...................................................................................................................... 54 Printing a Student List.................................................................................................................... 54 Removing a Class, Group, or Student ............................................................................................ 55
Make Assignments.............................................................................................................................. 56 View Reports ...................................................................................................................................... 59 Resources and Options........................................................................................................................ 60
Harcourt Mega Math ...................................................................................................................... 60 Intervention .................................................................................................................................... 61 Assessment..................................................................................................................................... 61
Create Tests......................................................................................................................................... 61
Introducing the Math Center to Students ................................................................................................ 62
Exploring the Student Screens ................................................................................................................. 62
Student Home Screen............................................................................................................................... 65
Assignments Screen ................................................................................................................................. 66 Completing an Assignment ................................................................................................................. 67 Reviewing Test Results....................................................................................................................... 68
Exploring Harcourt Math Learning Activities......................................................................................... 69 Tour a Check What You Know ............................................................................................................ 71 Reviewing Check What You Know Answers....................................................................................... 72 Tour an Intervention Lesson ............................................................................................................... 73
Show Me ........................................................................................................................................ 73 Try These ....................................................................................................................................... 74 Practice on Your Own.................................................................................................................... 75 Quiz................................................................................................................................................ 76
Intervention Enrichment Activities ..................................................................................................... 76
Using the Harcourt Assessment System ................................................................................................... 77
Page 4

Harcourt Math Center
Overview.................................................................................................................................................. 77 Inventory Tests.................................................................................................................................... 77 End of Year Tests................................................................................................................................ 77 Unit Tests ............................................................................................................................................ 77 Chapter Review/Tests ......................................................................................................................... 78 Chapter Tests ...................................................................................................................................... 78 Custom Tests....................................................................................................................................... 78 Prescriptions........................................................................................................................................ 78 Making Assessment Assignments....................................................................................................... 78
Create Tests ............................................................................................................................................. 79 Creating a Custom Test....................................................................................................................... 79 Navigating in Create Tests .................................................................................................................. 81 Duplicating a Test ............................................................................................................................... 81 Previewing Tests ................................................................................................................................. 81 Importing and Exporting Tests............................................................................................................ 82
Exporting Tests .............................................................................................................................. 82 Importing Tests .............................................................................................................................. 82
Reports..................................................................................................................................................... 83
Using Intervention...................................................................................................................................... 84
Intervention • Problem Solving................................................................................................................ 84 Overview............................................................................................................................................. 84 How to Begin ...................................................................................................................................... 85
Using Intervention • Skills ....................................................................................................................... 86 Overview............................................................................................................................................. 86 How to Begin ...................................................................................................................................... 86
Intervention Reports ................................................................................................................................ 87
Using Harcourt Mega Math....................................................................................................................... 88
Overview.................................................................................................................................................. 88
Grow Slides ............................................................................................................................................. 89 Vocabulary.......................................................................................................................................... 89 Printing................................................................................................................................................ 89
Reports..................................................................................................................................................... 90 Class Skills Completed Report Sample.......................................................................................... 90 Class Number of Skills Completed Report Sample........................................................................ 91 Student Skills Completed Report Sample ...................................................................................... 91
Open Access (student) ........................................................................................................................ 92 My Assignment Screen (student) ........................................................................................................ 93 Assignment Preview (teacher only) .................................................................................................... 93
Exploring Harcourt Mega Math.............................................................................................................. 94 Question Formats ................................................................................................................................ 95
Technical Support & Customer Service ................................................................................................... 96
Technical Help......................................................................................................................................... 96
Customer Service..................................................................................................................................... 96
Page 5

Harcourt Math Center
About the Harcourt Math Center The Harcourt Math Center is a suite of software products in which students and teachers can access any installed Harcourt Math Center product title using one username and password unique to them. In the Math Center, teachers can set up their classes, make assignments, and view reports. Students can access their assignments, freely explore all titles except the Assessment System, and review their answers. The Math Center is a management tool for the teacher and a content portal for the student. After logging in, the program will look very different to each of these two types of users.
The first step in effectively using the Math Center is to set it up. Teacher and student accounts must be created and assignments made in order for the Math Center to collect and store student data and generate informative reports on student progress.
During the first installation of any of the products listed below, the Math Center is automatically installed. When additional titles are installed, the program will automatically check for the Math Center files and install only the files needed.
The Math Center simplifies using and managing software in the classroom.
Math Center products include the Harcourt Math Assessment System, Intervention • Skills, Intervention • Problem Solving, and Harcourt Mega Math.
Product Title Brief Description
Assessment System Includes Inventory Test, End of Year Test, Unit Tests, Chapter Tests and Chapter Review tests for Harcourt Math© 2004.
Intervention • Skills Readies students for the chapter ahead Intervention • Problem Solving
Sharpens problem-solving strategies and builds problem-solving success
Harcourt Mega Math Provides practice for core skills with ability to progress
Page 6

Harcourt Math Center
What’s on the CD? System Administrator Features
The Math Center provides the following options for system administrators.
Feature Description
Manage Teachers o Add or remove teacher o Edit teacher profiles o Import/export teacher data
Edit School Name o Make changes to the school name Custom Student Fields o Specify up to six customized fields for student profiles Version Information o Check the current version of the Math Center
o Determine which software titles have been installed o Export the Version Information to a PDF file o Add state standards and other benchmarks to your
system Export Data o Specify up to six customized fields for student profiles End of Year Maintenance
o Optimize databases for better performance o Perform a backup of current databases o Archive all data from current database and delete
student profiles o Restore data from a previous backup or archive
Setup Options o Set the database path o Install/uninstall content o Set the content path o Set a unique System Administrator password
Page 7

Harcourt Math Center
Teacher Features
The teacher options in the Math Center enable you to effectively manage your students’ learning.
Feature Description
Manage Classes o Add or remove students o Add or remove a class o Add or remove a group o Import student lists o Export student lists o Print student lists
Make Assignments o Assign lessons and tests to a class, group, or student Reports o View class, group, and individual student reports
o Print class, group, and individual student reports o Save class, group, and individual student reports
Resources and Options o Set options for printing in Harcourt Mega Math o Set options for automatic assignments in the
Intervention products o Select prescriptions for use with the Assessment System
Create Tests* o Create custom tests for students and classes from state standards, learning goals, and lesson objectives
o Import and export custom tests o Duplicate existing tests o Preview and print existing tests
* Available only if the Assessment System is installed
Page 8

Harcourt Math Center
Student Features
The Math Center Student Edition includes the following options.
Feature Description
My Assignments o View current and completed assignments o View start and finish dates of assignments o View scores and percentages on completed assignments
Explore o Intervention • Problem
Solving o Check What You Know tests o Problem Solving or Strategy lessons
o Intervention • Skills o Harcourt Math Chapter Check What You Know tests o Skill lessons
o Harcourt Mega Math o A direct link to each of the Harcourt Mega Math titles: - Country Countdown - Shapes Ahoy! - Numberopolis - The Number Games - Ice Station Exploration - Fraction Action
Note: Chart shows the features that will be available if all products are installed. Your students will have access to only those products that are installed on your system.
Page 9

Harcourt Math Center
Installing the Software Minimum System Requirements
Single-Computer Version PC® Macintosh®
Pentium II 300 MHz or better 128MB RAM (recommend 256MB for
2000and XP ) MB RAM for Windows XP and Windows
2000 (256MB recommended) Windows 98; ME; XP Pro; XP Home; 2000
Service Pack 4; or NT4.0 Service Pack 6 800 x 600 high color 16-bit (thousands of
colors) 16x CD-ROM drive or better Sound-Blaster® 16 or compatible sound card
with headphones optional 100MB free hard disk space
G3 350 MHz (500 MHz recommended for OSX)
128MB RAM, virtual memory enabled 128MB RAM for OSX (256MB recommended)
Mac OS 8.6 to 9.2.2; OSX 10.1.2 or later 800 x 600 16-bit (thousands of colors) 16x CD-ROM drive or better Standard Macintosh sound headphones optional 100MB free hard disk space
Site License Version PC® Macintosh®
Pentium II 300 MHz or better 128MB RAM (256MB recommended for
Windows XP and Windows 2000) Windows 98; ME; XP Pro; XP Home; 2000
Service Pack 4; or NT4.0 Service Pack 6 800 x 600 high color 16-bit (thousands of
colors) 16x CD-ROM drive or better Sound-Blaster® 16 or compatible sound card
with headphones 100 MB free hard drive space minimum (for
Math Center). Additional space is required to install content on the computer. Space requirements per CD-ROM are shown here. Assessment System 300 MB Intervention • Problem Solving 150 MB Intervention • Skills 210 MB Harcourt Mega Math 150 MB
G3 350 MHz (500 MHz recommended for OSX)
128MB RAM, virtual memory enabled (128MB RAM for OSX (256MB recommended)
Mac OS 8.6 to 9.2.2 or OSX 10.1.2 or later 800 x 600 16-bit (thousands of colors) 16x CD-ROM drive or better Standard Macintosh sound with headphones 100 MB free hard drive space minimum (for
Math Center). Additional space is required to install content on the computer. Space requirements per CD-ROM are shown here. Assessment System 300 MB Intervention • Problem Solving 150 MB Intervention • Skills 210 MB Harcourt Mega Math 150 MB
Page 10

Harcourt Math Center
Single-Site Network Version PC® Macintosh®
Server Single or Dual Pentium III 450Mhz or AMD
K6-2 400 256MB RAM Windows NT4.0 SP6a; Windows Server 2000
with latest Server Pack; Novell 6.5 100BaseT network card or better 16x CD-ROM drive SCSI drives recommended Total space required to install each product:
Assessment System 300 MB Intervention • Problem Solving 750 MB
(150MB per CD-ROM) Intervention • Skills 1050 MB
(210MB per CD-ROM) Harcourt Mega Math 900 MB
(150MB per CD-ROM) User data 700 MB
(100MB per grade) Client Installer 80MB
Server Single or Dual G3 or G4 256MB RAM OS X 10.2 or later 100BaseT network card or better 16x CD-ROM drive SCSI drives recommended Total space required to install each product:
Assessment System 300 MB Intervention • Problem Solving 750 MB
(150MB per CD-ROM) Intervention • Skills 1050 MB
(210MB per CD-ROM) Harcourt Mega Math 900 MB
(150MB per CD-ROM) User data 700 MB
(100MB per grade) Client Installer 80MB
Client Pentium II 300 MHz or better 64MB RAM (128MB recommended)
128MB RAM for Windows XP and Windows 2000 (256MB recommended)
Windows 98; ME; XP Pro; XP Home; 2000 Service Pack 4; or NT4.0 Service Pack 6
10BaseT or better network card 800 x 600 high color 16-bit (thousands of
colors) 16x CD-ROM drive or better Sound-Blaster® 16 or compatible sound card
with headphones 100MB free hard disk space
Client G3 350 MHz (500 MHz recommended for
OSX) 64MB RAM, virtual memory enabled (128MB
recommended) 128MB RAM for OSX (256MB
recommended) Mac OS 8.6 to 9.2.2; OSX 10.1.2 or later 10BaseT or better network card 800 x 600 16-bit (thousands of colors) 16x CD-ROM drive or better Standard Macintosh sound with headphones 100MB free hard disk space
Note: The network requires a 100Mbps backbone at minimum.
Page 11
Harcourt Math Center
Installing the Harcourt Math Center
The Math Center program must be installed before any program titles can be accessed. This occurs automatically the first time you install a Math Center product. Once the Math Center is installed, each software title can be accessed through it. The Single-Computer version will install the Math Center on the workstation, but content will be accessed from the CD-ROM. A Site License version allows users to install the content to individual computers and use the program without having the CD-ROM in the computer’s CD-ROM drive. Those sites installing on a Single-Site Network version must follow a two-step installation procedure.
Single-Computer and Site License Version Installation
The installation process for Windows and Macintosh systems is detailed in the following two sections.
Windows Single-Computer and Site License Version Installation
Note:
You may need Administrator rights to install software on some operating systems. You must install the Math Center software on each computer.
1. Insert the CD into your CD-ROM drive. 2. Click the Install button in the window that appears. 3. Click Next on the Math Center Setup screen (Figure A.1).
Figure A.1: Harcourt Math Center Setup Screen 4. Click Next at the Welcome screen.
Page 12
Harcourt Math Center
5. Read the Software License Agreement, then click Yes. 6. You must install the Math Center software on each computer. Students using the site
license version will not need a CD-ROM in the drive when working in the Math Center.
7. Click Next at the Choose Destination Location window (figure A.2) to accept the
default location for the Math Center, which is C:\Program Files\Harcourt Math Center.
Warning! The location you select for the Harcourt Math Center installation determines whether or not the program runs properly.
Windows users should ensure that they choose the same location for each installation. It is recommended that you choose the default destination location, which is C:\Program Files\Harcourt Math Center. However if you choose a different directory you must ensure subsequent installations are installed to the same directory.
Figure A.2: Choose Destination Location Screen.
8. Select a State Name or Other, then click Next. 9. Type your School Name, then click Next.
There is a 25-character limit for the school name entry. If you enter a longer name, it will not display properly in the program.
10. Site License Installation Only. After specifying the State and School Name, you will
be prompted to select a Destination Location for Content files. Ensure that you select
Page 13

Harcourt Math Center
the same destination location as you specified in step 7 above (which, if you selected the default, is C:\Program Files\Harcourt Math Center). Click Next
11. Click Next at the Select Program Folder window to accept the default location. 12. The Ready To Install screen (figure A.3) opens next. This outlines a summary of the
information entered by the user during installation. If you need to change any of the information entered (that is the Destination Location(s), State, School Name) click on the Back button. This will take you to the Choose Destination Location screen again. Note: You will have to enter State and School Name information again if you do this. Destination Location(s) information will be retained. Click Next.
Figure A.3: Ready to Install, Summary Screen
Note:
The Site License Version content installation may take a few minutes to complete.
13. Acrobat Reader Prompt. You may see a message prompting you to install Acrobat
Reader or to update your copy of the program. It is highly recommended that you click Install Now, since Acrobat Reader is used to open reports and the User’s Guide. If you choose to install Acrobat Reader at a later date, you will find the Acrobat Reader installer in the Additional folder on the CD-ROM.
14. After the installation is complete the Finished screen opens. The Readme.txt file will
open after you click Close. If you do not want to view the Readme.txt file at this time uncheck the box on this screen.
15. The Harcourt Math Center main screen (Figure A.4) automatically opens after
installation is complete. You may now access the system to set up a Teachers account
Page 14
Harcourt Math Center
by clicking Play to launch the program. Or you may exit and log in as a System Administrator at a later time (see Setting Up the Math Center page 35 for details). Congratulations! You have successfully installed the Math Center software.
Figure A.4: Harcourt Math Center Main Screen
Macintosh Single-Computer and Site License Version Installation
Note:
You may need Administrator rights to install software on some operating systems. You must install the Math Center software on each computer.
1. Insert the CD into your CD-ROM drive.
Double-click the disk icon on the desktop, then double-click Setup.
2. Click Continue on the Math Center Setup screen (Figure A.5).
Page 15

Harcourt Math Center
Figure A.5: Harcourt Math Center Setup Screen
3. Read the Software License Agreement, then click Accept.
4. Click Next at the Welcome screen.
5. Click Browse at the Select HMC Folder window to select a location for the Math Center.
Warning! The location you select for the Math Center installation determines whether or not the program runs properly.
Mac users should note the location in which the files are installed (typically the Applications folder or the root of the hard drive). Any subsequent programs must be installed in the same location or the Math Center will not run properly.
Site License Installation Only. After selecting the destination for the Math Center files, you will be prompted to select a Destination Location for content files. It is highly recommended that the content is installed in the same location as the Harcourt Math Center files.
6. Select a State Name or Other, then click Next.
7. Type your School Name, then click Next. There is a 25-character limit for the school name entry. If you enter a longer
name, it will not display properly in the program.
The Harcourt Math Center will now be installed.
8. Click Browse at the Select Content Folder window and select the same location that the Harcourt Math Center files have been installed to as specified in step 5.
The content will now be installed and may take several minutes.
Page 16

Harcourt Math Center
9. Acrobat Reader Prompt. You may see a message prompting you to install Acrobat Reader or to update your copy of the program. It is highly recommended that you click Install Now, since Acrobat Reader is used to open reports and User’s Guide. If you choose to install Acrobat Reader at a later date, you will find the Acrobat Reader installer in the Additional folder on the CD-ROM.
10. Click OK when the installation is finished.
Note:
You can access the system by clicking on the Harcourt Math Center icon. You will be prompted to create a Teachers account to access the system see Setting Up the Math Center page 35 for details).
Single-Site Network Version Installation
The installation procedure for a Single-Site Network Version requires two steps. First, software and content and installers for the client are installed on the server. Then the Math Center software is installed on each client (student) computer.
Note:
Installation of the network version should be performed by a System Administrator or other authorized person who has the right to map drives and install software to the server.
Windows Single-Site Network Version Installation
Installation of the Windows Single-Site Network Version is a two-step process:
Step 1: Server Installation. This will install content, databases and the client installer to the server.
Step 2: Client Installation. This will install a client version of the Harcourt Math Center onto a client machine.
Step One: Server Installation 1. Insert the CD into your CD-ROM drive. 2. Click the Install button in the window that appears.
Page 17
Harcourt Math Center
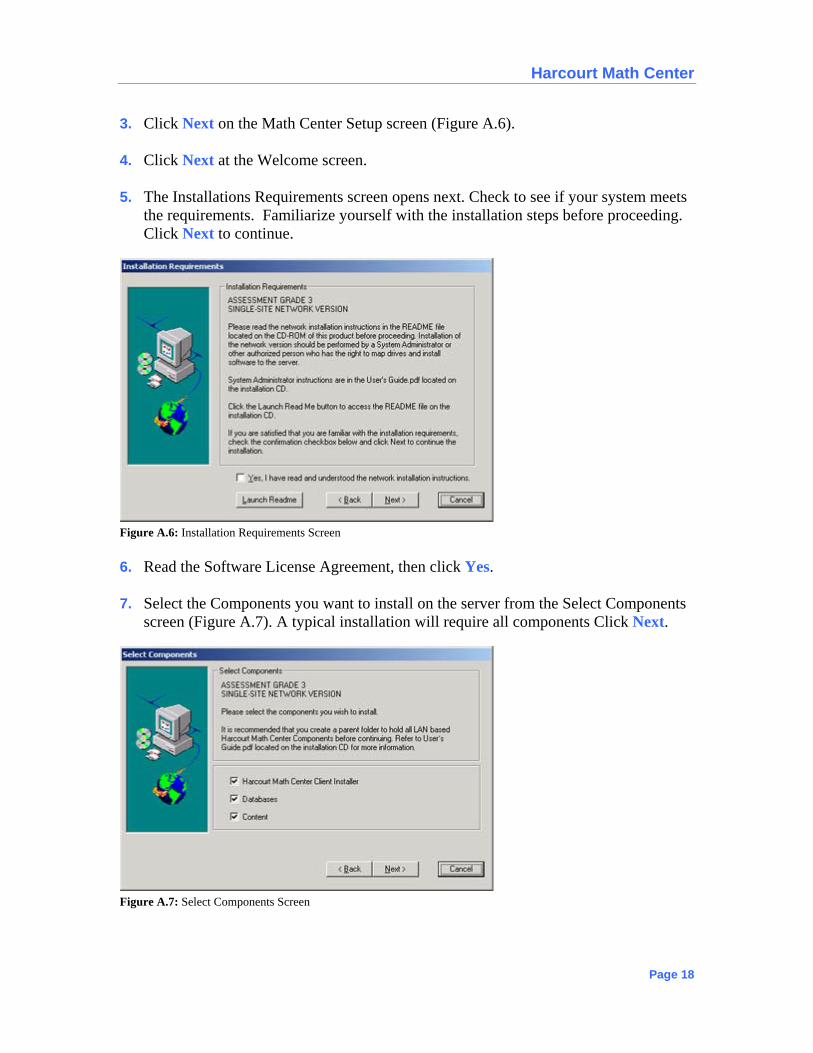
3. Click Next on the Math Center Setup screen (Figure A.6). 4. Click Next at the Welcome screen. 5. The Installations Requirements screen opens next. Check to see if your system meets
the requirements. Familiarize yourself with the installation steps before proceeding. Click Next to continue.
Figure A.6: Installation Requirements Screen 6. Read the Software License Agreement, then click Yes. 7. Select the Components you want to install on the server from the Select Components
screen (Figure A.7). A typical installation will require all components Click Next.
Figure A.7: Select Components Screen
Page 18

Harcourt Math Center
8. The Choose Client Installer Destination Location screen opens next. Use the Browse
button to specify the location for the Harcourt Math Center Client Installer.
Warning! The location you select for the Harcourt Math Center installation determines whether or not the program runs properly.
Windows users should ensure that they choose the same location for each installation. For Single-Site Network Version Server Installation it is recommended that you choose the same destination location for each of the components. This location should be on a server, and should be accessible from the client machine(s) through a mapped network drive.
9. The Choose Database Destination Location screen opens next. Use the Browse button
to specify the same location for the Math Center Client Installer then click Next. 10. Select a State Name or Other, then click Next. 11. Type your School Name, then click Next.
There is a 25-character limit for the school name entry. If you type a longer name, it will not be displayed properly in the program.
12. The Choose Content Destination Location screen opens next. Use the Browse button
to specify the same location for the Math Center Client Installer & Databases then click Next.
13. The Ready To Install screen opens next. This outlines a summary of the information
entered by the user during installation. If you need to change any of the information entered (i.e.: Destination Location(s), State, School Name) click on the Back button. This will take you to the Select Components screen again. Note: You will have to enter State and School Name information again if you do this. Destination Location(s) information will be retained. Click Next.
Note:
The content installation may take a few minutes to complete.
14. After the installation is complete the Finished screen opens. The Readme.txt file will
open after you click Close. If you do not want to view the Readme.txt file at this time uncheck the box on this screen.
Page 19

Harcourt Math Center
Note:
Be sure to pass the name of the folder you created to hold the Math Center program to the person or persons who will be doing the Client installs. They will need this folder name when installing the client or the program will not be able to find content or data that was installed on the server.
Step Two: Client Installation 1. Copy the LAN Windows Client Install folder to your hard drive from the network or
the CD. 2. Open the LAN Windows Client Install folder and double-click WinClientSetup.exe
to launch the install program. 3. Click Next on the Math Center Setup screen (Figure A.1). 4. Click Next at the Welcome screen. 5. Read the Software License Agreement, then click Yes. 6. Click Next at the Choose Destination Location screen to accept the default location
for the Math Center on the client’s hard drive.
Accepting the default location suggested by the installation program ensure that the Math Center software titles will install correctly.
On the Choose Database Location window (figure A.8) click the Browse button and navigate to the folder where the databases are installed (this will in the folder created in Step One: Server Installation by the System Administrator). Then click Next. Note: An error message will display if an invalid database path is specified.
Page 20

Harcourt Math Center
Figure A.8: Choose Database Location Screen. 7. Acrobat Reader Prompt. You may see a message prompting you to install Acrobat
Reader or to update your copy of the program. It is highly recommended that you click Install Now, since Acrobat Reader is used to open reports and the User’s Guide. If you choose to install Acrobat Reader at a later date, you will find the Acrobat Reader installer in the Additional folder on the CD-ROM or in the LAN Windows Client Install folder on the hard drive.
8. After the installation is complete the Finished screen opens. The Readme.txt file will
open after you click Close. If you do not want to view the Readme.txt file at this time uncheck the box on this screen.
Macintosh Single-Site Network Version Installation
Installation of the Macintosh Single-Site Network Version is a two-step process:
Step 1: Server Installation. This will install content, databases and the Client Installer to the server.
Step 2: Client Installation. This will install a Client version of the Harcourt Math Center onto a client machine.
Page 21

Harcourt Math Center
Step One: Server Installation
Recommendation:
It is recommended that you create a parent folder to hold all network based Harcourt Math Center components (for example Harcourt Math Center). You may do this before starting the installation process. Or you may do so during the installation process itself when prompted to select a folder on the Select LAN Client Folder step of the install.
1. Insert the CD into your CD-ROM drive.
Double-click the disk icon on the desktop, then double-click Setup.
2. Click Continue on the Math Center Setup screen (Figure A.5).
3. Read the Software License Agreement, then click Accept.
4. The Installations Requirements screen opens next. Check to see if your system meets the requirements. Familiarize yourself with the installation steps before proceeding. Click Next to continue (Figure A.9).
Figure A.9: Installation Requirements
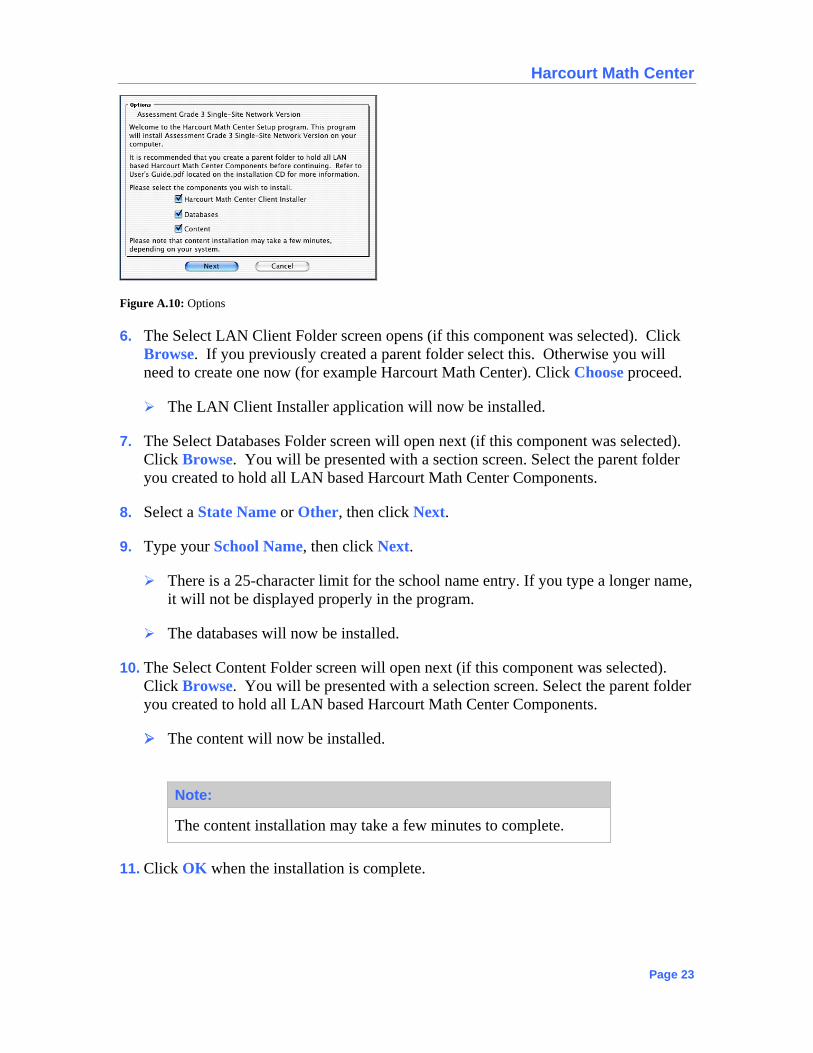
5. The Options screen opens next. Select the components you want to install. A typical installation will require all components. Click Next (Figure A.10).
The following steps will vary depending on which components you selected to install.
Page 22
Harcourt Math Center
Figure A.10: Options
6. The Select LAN Client Folder screen opens (if this component was selected). Click Browse. If you previously created a parent folder select this. Otherwise you will need to create one now (for example Harcourt Math Center). Click Choose proceed.
The LAN Client Installer application will now be installed.
7. The Select Databases Folder screen will open next (if this component was selected). Click Browse. You will be presented with a section screen. Select the parent folder you created to hold all LAN based Harcourt Math Center Components.
8. Select a State Name or Other, then click Next.
9. Type your School Name, then click Next.
There is a 25-character limit for the school name entry. If you type a longer name, it will not be displayed properly in the program.
The databases will now be installed.
10. The Select Content Folder screen will open next (if this component was selected). Click Browse. You will be presented with a selection screen. Select the parent folder you created to hold all LAN based Harcourt Math Center Components.
The content will now be installed.
Note:
The content installation may take a few minutes to complete.
11. Click OK when the installation is complete.
Page 23

Harcourt Math Center
Note:
Be sure to give the name of the folder you created to hold the Harcourt Math Center program to the person or persons who will be doing the client installs. They will need this folder name when installing the client or the program will not be able to find content or data that was installed on the server.
Step Two: Client Installation
1. Mount a local drive on the client computer to the server’s network location. This allows the LAN Client Installer to locate the LAN server databases during the installation process.
Caution!
The program will need access to this drive at all times to function correctly.
2. Copy the LAN Mac Client Install folder to your hard drive from the network or the CD.
3. Open the LAN Mac Client Install folder and double-click Mac Client Setup to launch the install program.
4. Click Continue on the Math Center Setup screen (Figure A.5).
5. Read the Software License Agreement, then click Accept.
6. Click Install at the Mac Client Setup window to accept the default installation location for the Math Center, which is the Applications folder on the startup disk.
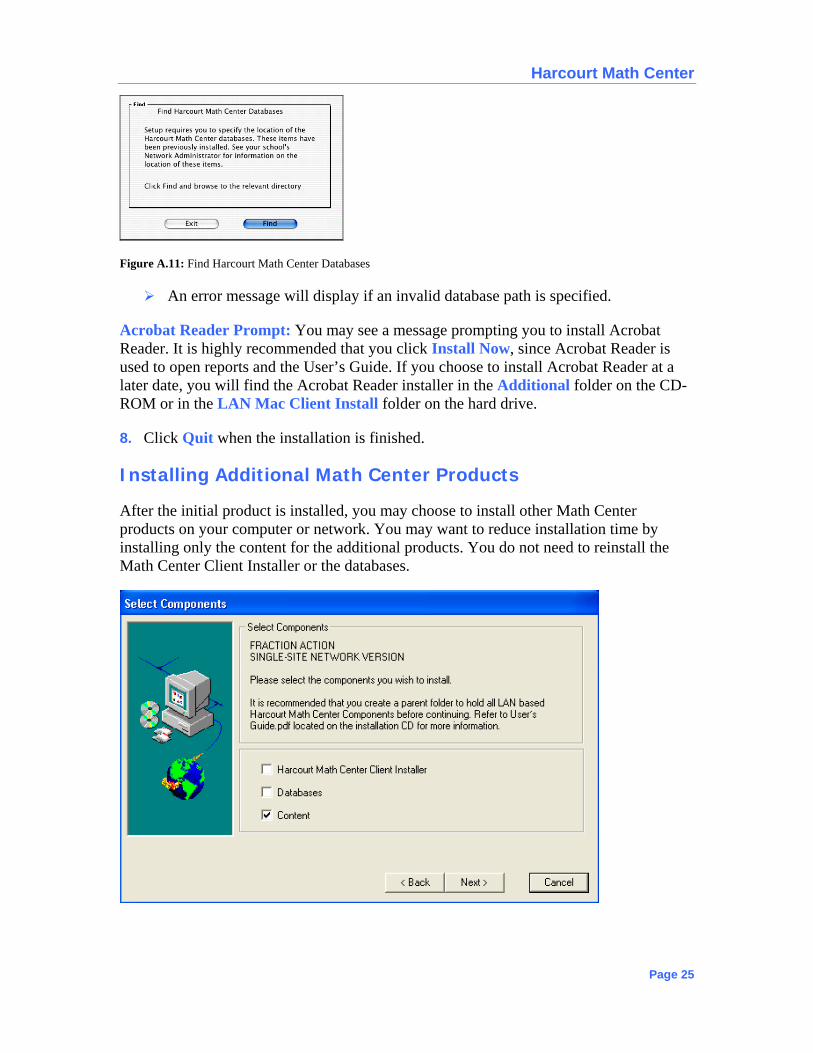
7. On the Find Harcourt Math Center Databases screen (figure A.11), click Find and select the mounted drive path to the network server.
For example, this may be “Mounted Server name:Harcourt Math Center:database”. If you do not know this you should contact the System Administrator.
Page 24
Harcourt Math Center
Figure A.11: Find Harcourt Math Center Databases
An error message will display if an invalid database path is specified.
Acrobat Reader Prompt: You may see a message prompting you to install Acrobat Reader. It is highly recommended that you click Install Now, since Acrobat Reader is used to open reports and the User’s Guide. If you choose to install Acrobat Reader at a later date, you will find the Acrobat Reader installer in the Additional folder on the CD-ROM or in the LAN Mac Client Install folder on the hard drive.
8. Click Quit when the installation is finished.
Installing Additional Math Center Products
After the initial product is installed, you may choose to install other Math Center products on your computer or network. You may want to reduce installation time by installing only the content for the additional products. You do not need to reinstall the Math Center Client Installer or the databases.
Page 25
Harcourt Math Center
1. To install additional products, insert the new CD into the CD-ROM drive and follow the directions for your particular system.
Warning! It is critical that all products are installed to the same location as the initial product or the Math Center will not run properly.
2. After the installation is complete the Finished screen opens. The Readme.txt file will
open after you click Close. If you do not want to view the Readme.txt file at this time uncheck the box on the screen.
Launching Math Center Products
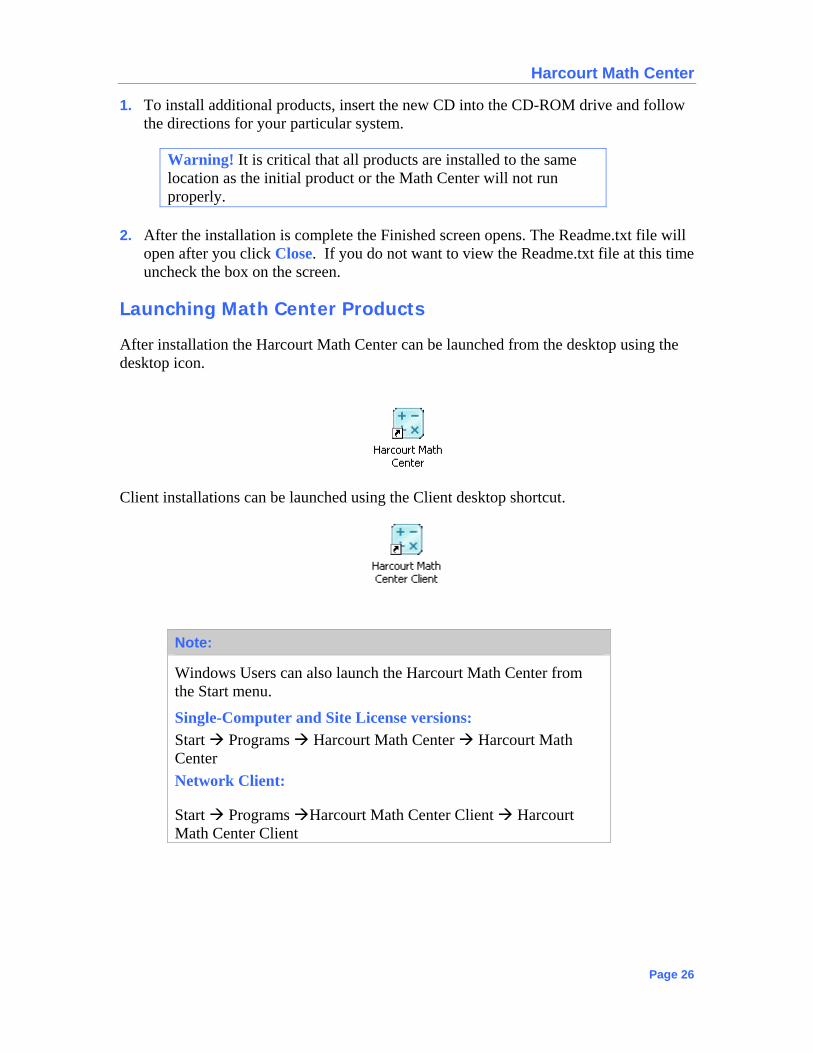
After installation the Harcourt Math Center can be launched from the desktop using the desktop icon.
Client installations can be launched using the Client desktop shortcut.
Note:
Windows Users can also launch the Harcourt Math Center from the Start menu.
Single-Computer and Site License versions: Start Programs Harcourt Math Center Harcourt Math Center Network Client:
Start Programs Harcourt Math Center Client Harcourt Math Center Client
Page 26

Harcourt Math Center
Uninstalling Math Center Products Uninstalling the Harcourt Math Center or any of its related titles takes place on the computers used by the students, including the client computers in a network setting. Completing the uninstall process removes application files only. Content files must be deleted manually. Grade and user databases are also excluded from the uninstall process, allowing administrators to retain student and teacher records. In addition, any reports or other files (for example; log files) that were generated by the Math Center are not included in the uninstall process.
Uninstalling Single-Computer and Site License Versions
Windows Uninstalling Single-Computer and Site License Versions
1. Navigate to Start/Settings/Control Panel, then double-click to open Add/Remove Programs.
2. Select Harcourt Math Center from the list of programs, then click OK.
3. In the window that opens, select the component(s) that you wish to uninstall. Then click Next.
Selecting the Harcourt Math Center option uninstalls the Math Center as well as all installed Math Center products (i.e., Assessment, Intervention, etc.).
Selecting an individual software title such as Intervention • Problem Solving or Harcourt Mega Math will uninstall only that component. The Math Center will still be installed on the computer.
Page 27

Harcourt Math Center
4. You may remove the databases and reports folder by moving them to the Recycle Bin. You can find these folders in the parent folder (for example; Harcourt Math Center) created during installation. It is recommended that you archive or back up any data files before they are deleted (see End of Year Maintenance page 45)
Macintosh Uninstalling Single-Computer and Site License Versions
Note:
To uninstall a software title on a Macintosh system, you must have the appropriate CD:
Single-Computer – To uninstall a specific product title you need its CD. If you do not have the CD you will need to log in as System Administrator and uninstall the specific product title from the Setup Options screen.
Site License – Any site license software CD may be used to uninstall the entire Harcourt Math Center program and all related titles.
1. Insert the CD into the drive of the computer.
2. Run the Uninstall application from the root of the CD.
3. In the window that opens, select your preferred uninstall option.
Uninstalling the Harcourt Math Center uninstalls the Math Center as well as all installed Math Center products (i.e., Assessment, Intervention, etc.).
Uninstalling an individual software title such as Intervention • Problem Solving or Harcourt Mega Math will uninstall only that component. The Math Center will still be installed on the computer.
Page 28
Harcourt Math Center
4. Confirm the uninstall location.
5. Click Quit to exit the uninstaller.
6. You may remove the databases and reports folder by moving them to the Trash. It is recommended that you archive or back up data files (see End of Year Maintenance page 45) before they are deleted.
You may remove the Harcourt Math Center and all related titles—including the user and grade databases—by moving the HMC Data folder and desktop alias to the Trash.
Uninstalling the Single-Site Network Version
Warning! Do not uninstall specific software titles located on the server unless all clients will not be using the files. This may cause problems for other users on the networked system.
Windows Client
1. On the client machine navigate to Start/Settings/Control Panel, then double-click to open Add/Remove Programs.
2. Select Harcourt Math Center Client from the list of programs, then click OK.
3. Follow the directions on-screen to uninstall the client application.
Macintosh Client
1. Run the Mac LAN Client Installer application from the location on the client machine to which it was copied during installation.
Note: If you have deleted the Mac LAN Client Installer application you will need to copy this from the server or the CD onto the client machine.
2. Select Uninstall from the pop-menu on the main screen.
3. Follow the on-screen directions to uninstall the client application.
Page 29

Harcourt Math Center
Uninstalling Databases
The uninstall programs leave the grade and user databases on the system to prevent the loss of teacher and student information. If you determine that the databases are no longer needed, the System Administrator may take the following steps to remove the databases from the network.Back up or archive the databases to avoid accidental loss of data. Manually delete the database files that are no longer needed. The files can be located in the Database folder.
Uninstalling the Single-Site Network Client Installers The LAN Client Installer folder is copied to the local machine during the installation process. It may be deleted when it is no longer required.
Windows users should delete the folder called LAN Windows Client Install. Macintosh users should delete the folder called LAN Mac Client Install.
Uninstalling Content – Site License & Single-Site Network
In order to prevent problems, the System Administrator should be the only person to remove content files.
Warning! The Assessment, Intervention • Problem Solving, and Intervention • Skills titles often overlap at various levels. Because of this, content for these titles should not be removed if any level of the program is still in use. Removing the Intervention folder for one level of Intervention Skills, for example, may remove content needed for another installed Intervention • Skills or Problem Solving title. It is recommended that all content be left on the server if any grade level of these titles is still being used.
When you are certain that you are ready to uninstall the content files, refer to the following chart to determine which folders should be deleted from your system.
Page 30

Harcourt Math Center
To Remove Delete This Folder Assessment assessment and all subfolders
Intervention • Skills intervention and all subfolders
Intervention • Problem Solving intervention and all subfolders Harcourt Mega Math Country Countdown megamathcd1 and all subfolders Harcourt Mega Math Shapes Ahoy! megamathcd2 and all subfolders Harcourt Mega Math Numberopolis megamathcd3 and all subfolders Harcourt Mega Math Number Games megamathcd4 and all subfolders Harcourt Mega Math Ice Station Exploration megamathcd5 and all subfolders Harcourt Mega Math Fraction Action megamathcd6 and all subfolders
Page 31

Harcourt Math Center
Exploring the Math Center Before you begin setting up and interacting with the Math Center, it will be helpful to familiarize yourself with the buttons and functionality that you will encounter in the System Administrator and Teacher modules.
General Navigation Buttons
Click on the desktop to launch the Harcourt Math Center.
Click for help.
Click to log on after entering your name and password.
Click to go to the next screen
Click to go back to the previous screen.
Click to log off of the system.
Click to close the Math Center.
Click to determine which products are installed on your system.
Page 32
Harcourt Math Center
Click to specify due dates for assignments or date ranges for reports.
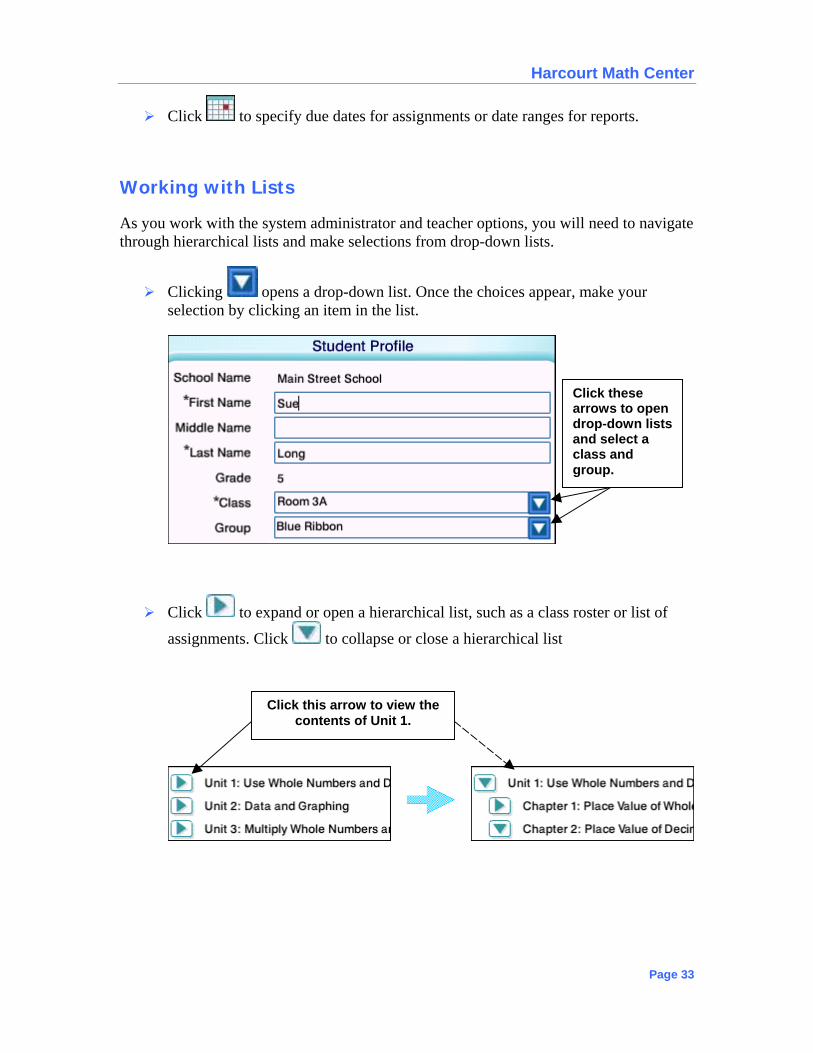
Working with Lists
As you work with the system administrator and teacher options, you will need to navigate through hierarchical lists and make selections from drop-down lists.
Clicking opens a drop-down list. Once the choices appear, make your selection by clicking an item in the list.
Click these arrows to open drop-down listsand select a class and group.
Click to expand or open a hierarchical list, such as a class roster or list of
assignments. Click to collapse or close a hierarchical list
Click this arrow to view the contents of Unit 1.
Page 33

Harcourt Math Center
Click this arrow to close Unit 1.
Page 34

Harcourt Math Center
Setting Up the Math Center After you have installed the Math Center on your workstation(s), use the following procedures to start the product and log in. The username and password that you enter determine whether you will have access to System Administrator options, Teacher options, or Student options. The System Administrator must log in and set up teacher accounts before teachers can access the Math Center. (The System Administrator role may be assigned to one person—typical in a network implementation—or each teacher may act as System Administrator for the computers in their classroom.) Teachers, in turn, must create student accounts and make assignments before students may begin work on the system.
If you are using a Single-Computer system be sure the CD is in the CD-ROM drive before you begin setting up the Math Center.
Logging In to the Math Center
Each person using the Math Center must be assigned a unique username and password. The username and password identifies the user as a teacher, student, or system administrator and determines which options are available.
First Time User Log In
Unless you created a teacher account as part of the installation process; the first time the Math Center is launched after installation, you must log in as the System Administrator in order to set up teacher accounts.
1. If the program is not open, double-click the Math Center icon on your desktop.
PC users may alternately navigate to Start/Programs/Harcourt/Harcourt Math to launch the program.
2. On the Log In screen (Figure 1), type system administrator for the username and pass for the password. Then click the Go button or press the Enter key.
You may use the Tab key to move from field to field, or click in each field with your mouse.
Page 35

Harcourt Math Center
Figure 1: System Administrator Log In
The Harcourt Mega Math Grade Selection Screen
The first time you log in after installing a Harcourt Mega Math product, a Grade Selection screen displays showing the appropriate grade levels for that product. Select the grade level with which you will be using the product and click Go.
3. The System Administrator screen displays (Figure 2).
Teachers using Single-Computer or site license software can log in to the system as a System Administrator after the Teacher Accounts have been created. Simply type system administrator as the username and your teacher account password. Then click Go.
When the Math Center is installed on a network, only one System Administrator account is allowed. Individual teachers will not have access to the System Administrator features through their teacher passwords.
Page 36

Harcourt Math Center
Figure 2: System Administration Screen
4. Follow the directions detailed under sub-section Manage Teachers in the following section to create a teacher profile.
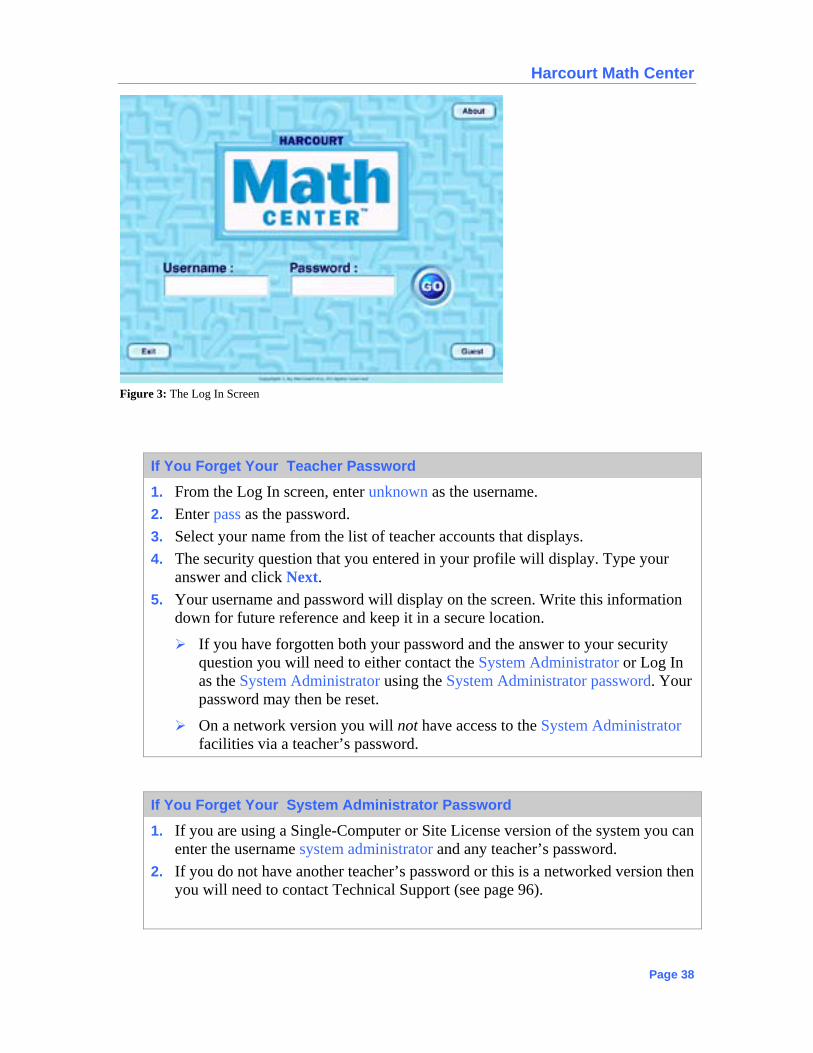
The Log In Screen
From the Log In screen, you may log into the Math Center as a student, teacher or system administrator; preview Math Center products as a guest (except for Assessment); check to see which products have been installed; or exit the program.
Log In
1. On the Log In screen (Figure 3), enter your username and password.
You may use the Tab key to move from field to field, or click in each field with your mouse.
2. Click the Go button or press the Enter key to enter the Math Center. The screen that displays next varies, depending on whether you are a teacher, student, or system administrator.
Page 37
Harcourt Math Center
Figure 3: The Log In Screen
If You Forget Your Teacher Password
1. From the Log In screen, enter unknown as the username. 2. Enter pass as the password. 3. Select your name from the list of teacher accounts that displays. 4. The security question that you entered in your profile will display. Type your
answer and click Next. 5. Your username and password will display on the screen. Write this information
down for future reference and keep it in a secure location.
If you have forgotten both your password and the answer to your security question you will need to either contact the System Administrator or Log In as the System Administrator using the System Administrator password. Your password may then be reset.
On a network version you will not have access to the System Administrator facilities via a teacher’s password.
If You Forget Your System Administrator Password
1. If you are using a Single-Computer or Site License version of the system you can enter the username system administrator and any teacher’s password.
2. If you do not have another teacher’s password or this is a networked version then you will need to contact Technical Support (see page 96).
Page 38

Harcourt Math Center
Check for Installed Products
1. Click the About button to open a window showing the Math Center products (Figure 4).
Bold titles are installed on your computer.
Gray titles are not installed on your computer.
Figure 4: About Screen
2. Click the Close button to return to the Log In screen.
Log in as a Guest
1. Click the Guest button to explore the Intervention or Harcourt Mega Math products.
There are no Guest privileges for Assessment System products. If Assessment is the only product installed, the Guest button will not appear on the Log In screen.
Only Intervention and Harcourt Mega Math products installed on the computer will be available for exploration.
No performance data is saved for Guests.
Page 39

Harcourt Math Center
2. Click the drop-down list and select a grade level if prompted (Figure 5). Then click OK.
Figure 5: Grade Level Selection - Guest
3. Click the Back button in the lower left corner to return to the Log In screen.
Ending a Math Center Session
When you are done working in the Math Center, return to the Log In screen and click the Exit button.
Page 40

Harcourt Math Center
System Administrator Options
Logging in as the System Administrator provides access to seven system management functions, including setting up teacher accounts and customizing the information to be gathered in student profiles. After the teacher accounts have been created, teachers using single-computer and site license systems may access the System Administrator options.
Warning! Do not perform any system administrator functions while teachers or students are working on the system. This may result in database errors.
Manage Teachers
This option allows you to add, edit, and remove teacher profiles.
Adding Teacher Profiles
1. From the System Administration home screen, click the Manage Teachers button.
2. Click the Add Teacher button at the bottom of the screen to create a new teacher profile.
Figure 8: System Administration – Add Teacher Profile
Page 41
Harcourt Math Center
3. Complete the following fields for each teacher profile:
First name
Middle name (optional)
Last name
Grade level(s)—click all that apply
Username
Password
Security Question
Answer
Note: The security question and answer are used if a password is forgotten.
4. Click the Save Teacher button.
5. Repeat Steps 1-4 until all teacher accounts have been created.
Note: Use the Import and Export buttons on the left side of the screen to import and export teachers and students to a comma separated value (*.csv) file that can be viewed in a spreadsheet or database program.
Tip: Create one teacher and student profile and export it. This sets up the correct file structure and enables you to use a spreadsheet or database program to enter the rest of the teacher data. When the data has been entered, use the Import button to transfer the information to the Math Center. This is especially useful when setting up multiple teachers and students in a network setting.
Teacher Header Row Format: Username, Password, Grade, Question, Answer, First_Name, Middle Name, Last_Name, Class, Group, Existing Teacher Student Header Row Format: Grade, Username, Password, First Name, Middle Name, Last Name, Student Id, Custom Field, Custom Field, Custom Field, Custom Field, Custom Field, Custom Field, Teacher User Name, Class, Group, Existing Student
Note: The Existing Teacher and Student fields should be left empty or as 0 (zero) unless the student or teacher already exist in the current database.
Editing Teacher Profiles
1. Click a teacher’s name in the list on the left side of the screen. The profile displays on the right.
2. Make any changes that are necessary, and then click the Save Teacher button.
Page 42

Harcourt Math Center
Removing a Teacher Profile
1. Open the teacher profile you want to delete.
2. Click to remove the checkmark by the grade(s) he/she was assigned.
3. Click the Save Teacher button.
4. Reassign any students from the deleted teacher’s class to another teacher in that grade level.
Edit School Name
1. From the System Administration home screen, click the Edit School Name button.
2. Type the name of the school. There is a limit of 25 characters.
3. Click Save when you are done.
Custom Student Fields
This option enables you to set up customized fields for the student profiles. This information will become part of the students’ profiles.
Each field name is limited to 12 characters.
1. From the System Administration home screen, click the Custom Student Fields button.
2. Double-click to highlight the field you want to edit. Then type the name you would like to use for this field.
3. Click the Enable box for the field. An X in this box indicates that the field will appear in the Student Profile.
To remove a custom field from the student profiles, click the Enable box to remove the X. Any data previously entered for a custom field is saved in the student database, even though it will no longer be available on screen.
4. When you are finished, click the Save Changes button.
Customized student fields appear as optional fields on the Student Profile.
Page 43

Harcourt Math Center
Version Information
You may need to refer to the version information if you have to contact Technical Support about a software issue. You can also print information about the standards that you have installed for use with the Math Center.
1. From the System Administration home screen, click the Version Information button.
2. The Version Information window provides data about your system, including the current version of the Math Center, the software titles that have been installed, and the standards and benchmarks that have been added. Use the scroll bar to view all available information.
3. To print the Version Information in a report form, click the Export to PDF button. Then use the toolbar in Acrobat Reader to print the report.
You must have Acrobat Reader installed before you can export the version information. If you did not install Acrobat Reader during the initial installation of the Math Center, you can install it now. The install program is located in the Additional folder on the Math Center CD.
4. Click the Back button to return to the System Administrator home screen.
5. You can also view the version by clicking the About button at the login screen. The version will be listed at the top right corner of the screen. This option was added in version 2.2.
Export Data
The Export Data button allows you to export the information available from the Math Center reports as a .csv file (Note: .csv = comma separated value).
1. From the System Administration home screen, click the Export Data button.
2. Click View Export for Data.
3. Select the report you wish to export from the drop-down list.
4. Click Export Data.
Page 44

Harcourt Math Center
End of Year Maintenance
Warning! Do not perform any system administrator functions while teachers or students are working on the system. This may result in database errors.
1. From the System Administration home screen, click the End of Year Maintenance button.
2. Five tasks appear in the Maintenance Options window (Figure 9) they are: Optimize Databases, Backup, Archive, Promote Students, and Restore.
Figure 9: Maintenance Options
3. Select the task that you would like to perform and follow the directions on the screen.
Select the Optimize Databases option periodically to reduce the size of the grade and users databases and enable them run at peak efficiency. This is necessary because when records are deleted from the system, the size of the databases doesn’t always change. Using the Optimize Databases function compacts the databases and reflects their true sizes.
The Backup option allows you to backup all data in the system. This will create a folder specified as specified by you and will copy all the grade and user databases here.
Select the Archive option to backup all data in the system and open a new, clean database. This is the same as Backup with the addition that the databases are
Page 45
Harcourt Math Center
cleaned to allow new data to be entered. This option moves all student data into an archived database resulting in an empty student database. Use this option when you plan to create all new student accounts for the new school year.
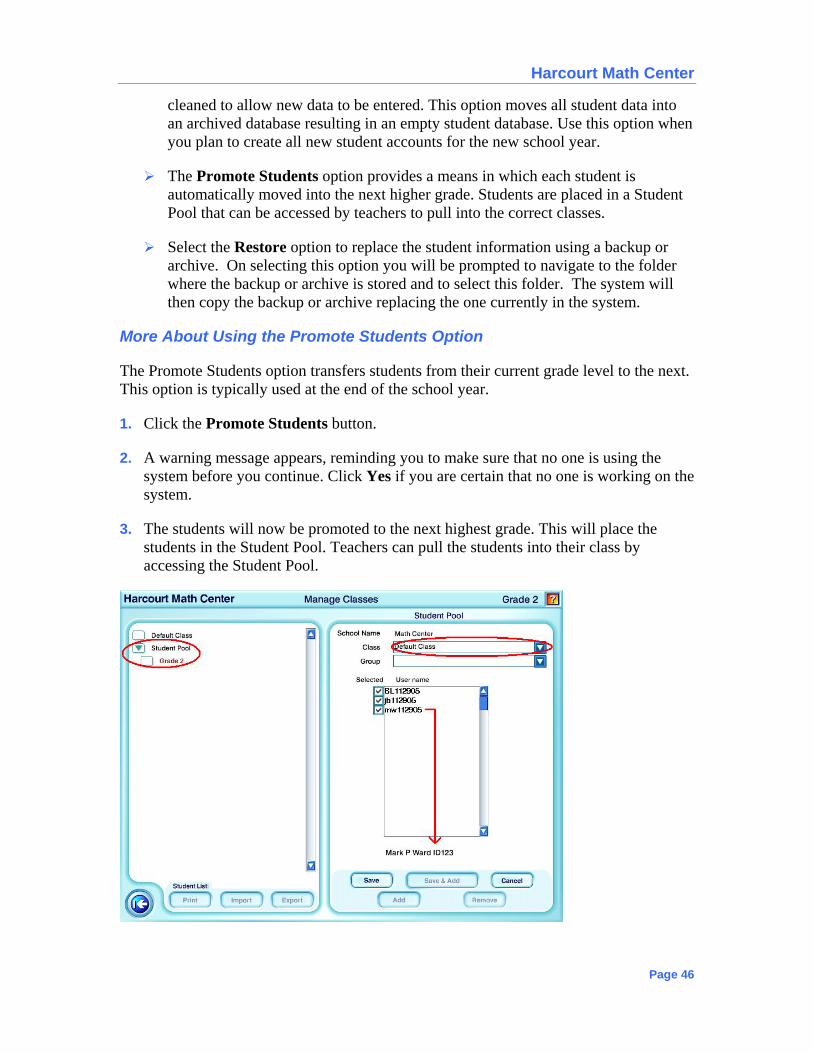
The Promote Students option provides a means in which each student is automatically moved into the next higher grade. Students are placed in a Student Pool that can be accessed by teachers to pull into the correct classes.
Select the Restore option to replace the student information using a backup or archive. On selecting this option you will be prompted to navigate to the folder where the backup or archive is stored and to select this folder. The system will then copy the backup or archive replacing the one currently in the system.
More About Using the Promote Students Option
The Promote Students option transfers students from their current grade level to the next. This option is typically used at the end of the school year.
1. Click the Promote Students button.
2. A warning message appears, reminding you to make sure that no one is using the system before you continue. Click Yes if you are certain that no one is working on the system.
3. The students will now be promoted to the next highest grade. This will place the students in the Student Pool. Teachers can pull the students into their class by accessing the Student Pool.
Page 46
Harcourt Math Center
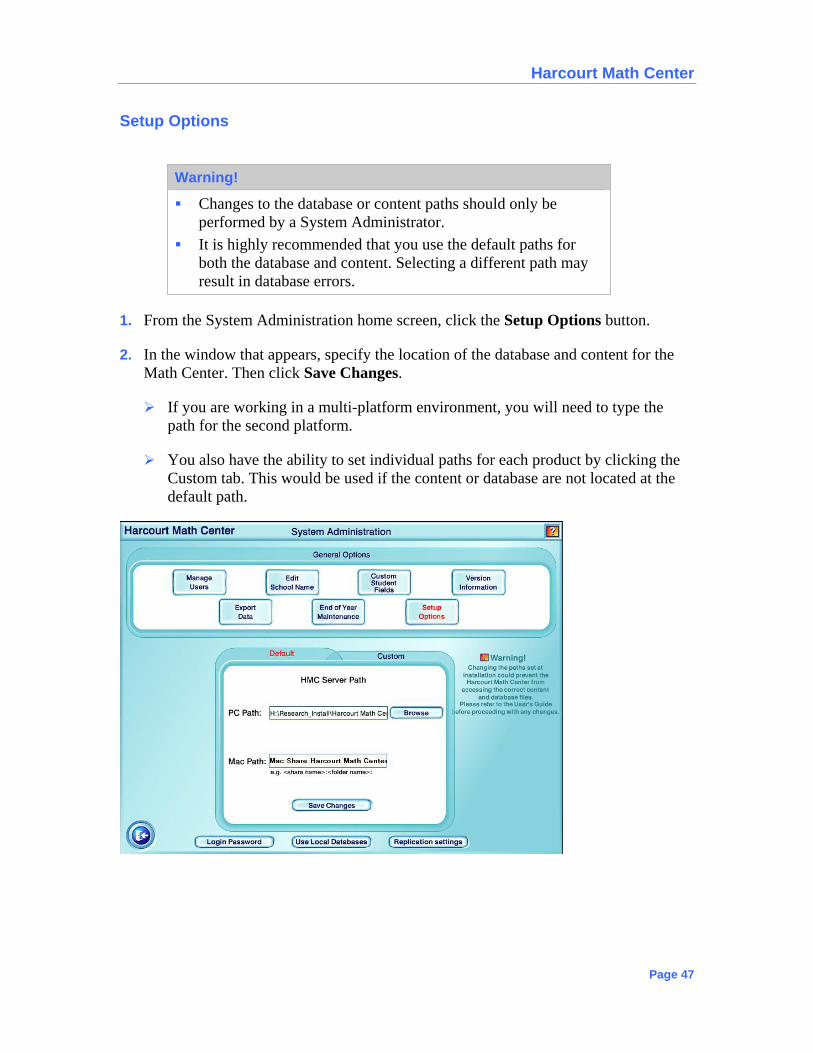
Setup Options
Warning!
Changes to the database or content paths should only be performed by a System Administrator.
It is highly recommended that you use the default paths for both the database and content. Selecting a different path may result in database errors.
1. From the System Administration home screen, click the Setup Options button.
2. In the window that appears, specify the location of the database and content for the Math Center. Then click Save Changes.
If you are working in a multi-platform environment, you will need to type the path for the second platform.
You also have the ability to set individual paths for each product by clicking the Custom tab. This would be used if the content or database are not located at the default path.
Page 47
Harcourt Math Center
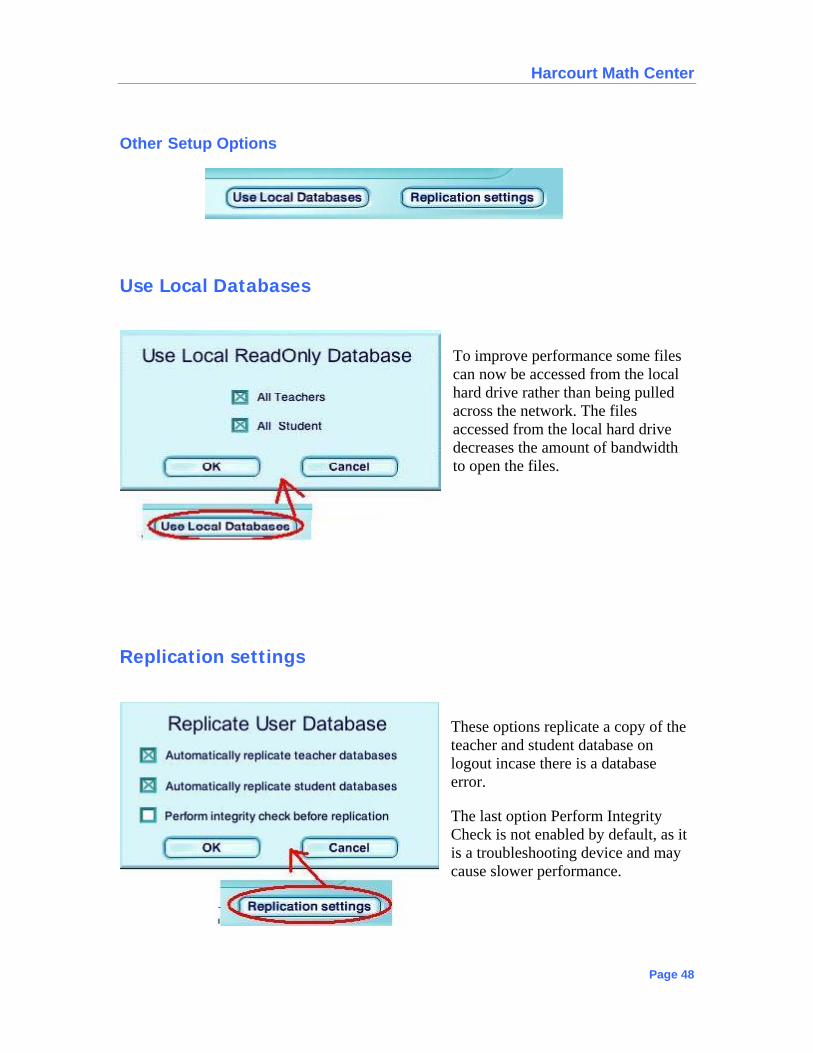
Other Setup Options
Use Local Databases
To improve performance some files can now be accessed from the local hard drive rather than being pulled across the network. The files accessed from the local hard drive decreases the amount of bandwidth to open the files.
Replication settings
These options replicate a copy of the teacher and student database on logout incase there is a database error.
The last option Perform Integrity Check is not enabled by default, as it is a troubleshooting device and may cause slower performance.
Page 48

Harcourt Math Center
Teacher Options
Logging in as a teacher enables you to set up student accounts and manage your students’ learning. From the Teacher home screen (Figure 11), you can manage classes, make assignments, view reports, and access various teacher resources and options. If the Assessment system is installed, you will also have the ability to create custom tests.
Your name, the current date, and the school name appear on the Teacher home screen, as does the grade level with which you are currently working. This allows you to verify that you are logged in properly.
Warning! Performing any teacher functions while students are working on the system may result in database errors. Make sure that all students are off the system before you begin.
If you teach more than one grade level, select the grade you want to work on from the drop-down list that appears on the screen.
Figure 11: Teacher Home Screen (with Assessment installed)
Page 49

Harcourt Math Center
Manage Classes
Students can use Mega Math and Intervention by logging in as a Guest. However before you can track students’ results as they complete assignments in the Math Center, they must have an account, or profile, and a learning assignment. The Manage Classes screen (Figure 12) allows you to complete the first step: setting up student profiles and assigning students to a group and class. You can also import and export student data and print a student list from this screen.
Click the Manage Classes button on the Teacher home screen to access these options.
Figure 12: Manage Classes Screen
Adding a Class
1. From the Manage Classes screen, click the Add button.
2. Select the Class option in the window that appears and click OK.
3. The Class Profile appears on the right. Enter the Class Name.
The class name cannot exceed 25 characters.
4. Click the Save button.
Page 50

Harcourt Math Center
If you are adding more than one class, use the Save + Add button instead. It saves the information you entered and automatically opens the next Class Name field.
5. The class you entered now appears on the left side of the screen.
6. To edit a class name, simply click the class name to select it. The class profile appears on the right.
The first time you enter the Manage Classes screen, you will see a Default Class folder on the left. You may edit the name of that folder or remove it.
Adding a Group
1. From the Manage Classes screen, click the Add button.
2. Select the Group option in the window that appears and click OK.
3. The Group Profile appears on the right. Enter the Group Name.
The group name cannot exceed 25 characters.
4. Select the Class in which the group should appear from the drop-down list.
5. Click the Save button.
If you are adding more than one class, use the Save + Add button instead. It saves the information you entered and automatically opens the next Group Name field.
6. To view or edit a group once it has been created, click the arrow next to the class name to expand its contents. Then click the group name to select it. The group profile appears on the right.
Adding Student Profiles Manually
1. From the Manage Classes screen, click the Add button.
2. Select the Student option in the window that appears and click OK.
Page 51
Harcourt Math Center
Figure 13: Manage Classes – Add Students Manually
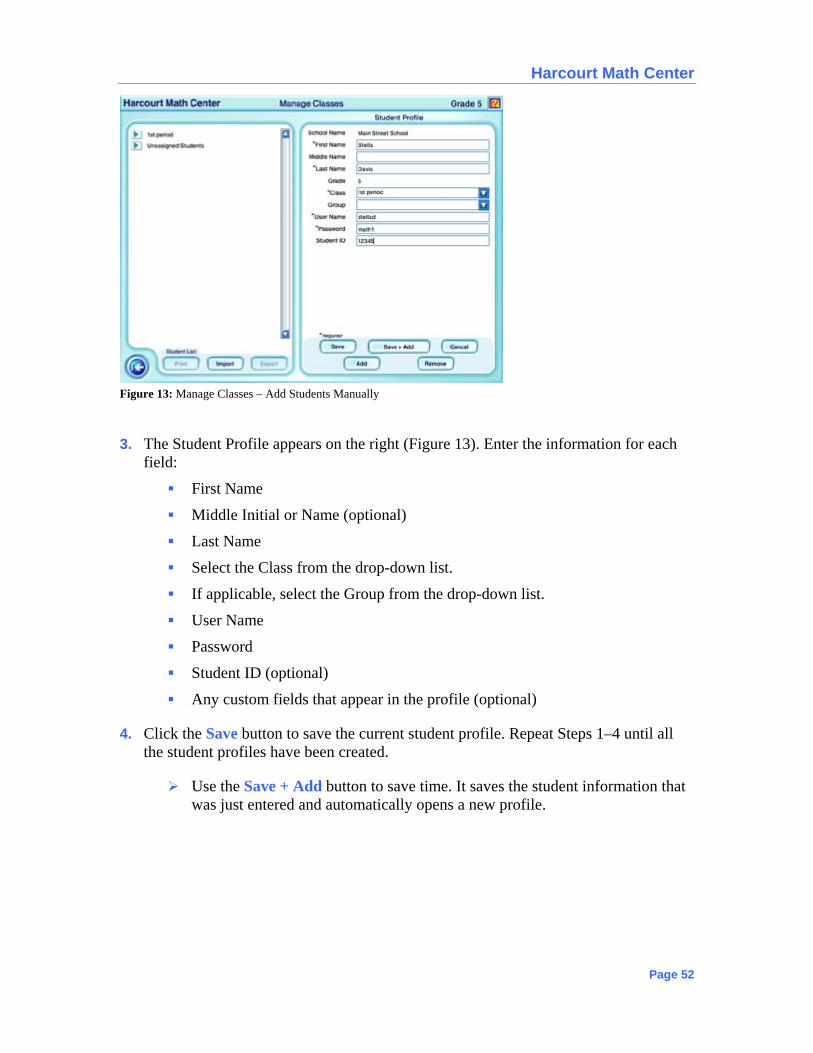
3. The Student Profile appears on the right (Figure 13). Enter the information for each field:
First Name
Middle Initial or Name (optional)
Last Name
Select the Class from the drop-down list.
If applicable, select the Group from the drop-down list.
User Name
Password
Student ID (optional)
Any custom fields that appear in the profile (optional)
4. Click the Save button to save the current student profile. Repeat Steps 1–4 until all the student profiles have been created.
Use the Save + Add button to save time. It saves the student information that was just entered and automatically opens a new profile.
Page 52

Harcourt Math Center
Tips for Adding Student Data
Student usernames must be unique.
No more than 25 characters can be used for student usernames, passwords, and IDs.
Assign passwords according to students’ ability to memorize them.
Print a class list in case student passwords are forgotten. Be sure to store the list in a secure location.
Adding Student Profiles by Importing a Student List
Tip: The student list to be imported must be in a comma separated value (*.csv) format. An easy way to create the proper file structure is to enter one student’s information manually in the Math Center and export the data. You can then use a spreadsheet or database program to enter the rest of the student profiles and import the data into the Math Center.
1. From the Manage Classes screen, click the Import button.
2. Navigate to the location of the student list (Figure 14).
Figure 14: Manage Classes – Import Student List
Page 53

Harcourt Math Center
3. Select the file to be imported. Then click Open.
4. The student profiles are imported as Unassigned Students. To assign a student to a class and/or group, click the student’s name in the list, then select the class (and group, if appropriate) from the drop-down list(s) in the Student Profile.
Export a Student List
1. Click to select the class or group that you want to export.
2. Click the Export button.
3. Navigate to the location where you want to save the file and click OK.
4. Click Save.
Printing a Student List
You can print a student list containing student usernames and passwords. Student lists are created from the information you entered and are converted into a PDF format so they can be read in Acrobat Reader. Once created, you can send the file to a printer or save it as you would any file for future use.
1. From the Manage Classes screen, select the class for which you would like a list.
2. Click the Print button.
3. Adobe Acrobat Reader will display a class roster, which you may view, print, or save to another location.
Warning!
This list contains student passwords and should be stored in a secure location.
Page 54

Harcourt Math Center
Removing a Class, Group, or Student
There may be an instance when it is necessary to remove a class, group, and/or student profile from the Math Center. If you remove a group, students who were assigned to that group will be displayed under the class; their profiles will not be deleted. If you remove a student, the student is moved to and will display under Unassigned Students or the Student Pool depending on the choice. Follow the procedures listed below to remove a class, group, or student.
1. From the Manage Classes screen, navigate to the Class, Group, or Student in the left column that you wish to remove.
2. Click the Remove button.
3. Click Yes to confirm your decision to remove the class, group, or student.
Once you have moved the Class, Group, or Student into the Unassigned Students list you may delete the student by selecting the student and clicking Remove. This will delete the student from the system.
Warning!
Removing the student will delete the student from the system. The only way to retrieve the student will be to use the Restore function available to System Administrator under the End of Year Maintenance option. Restoring a student is only possible if the database has previously been backed-up.
Page 55
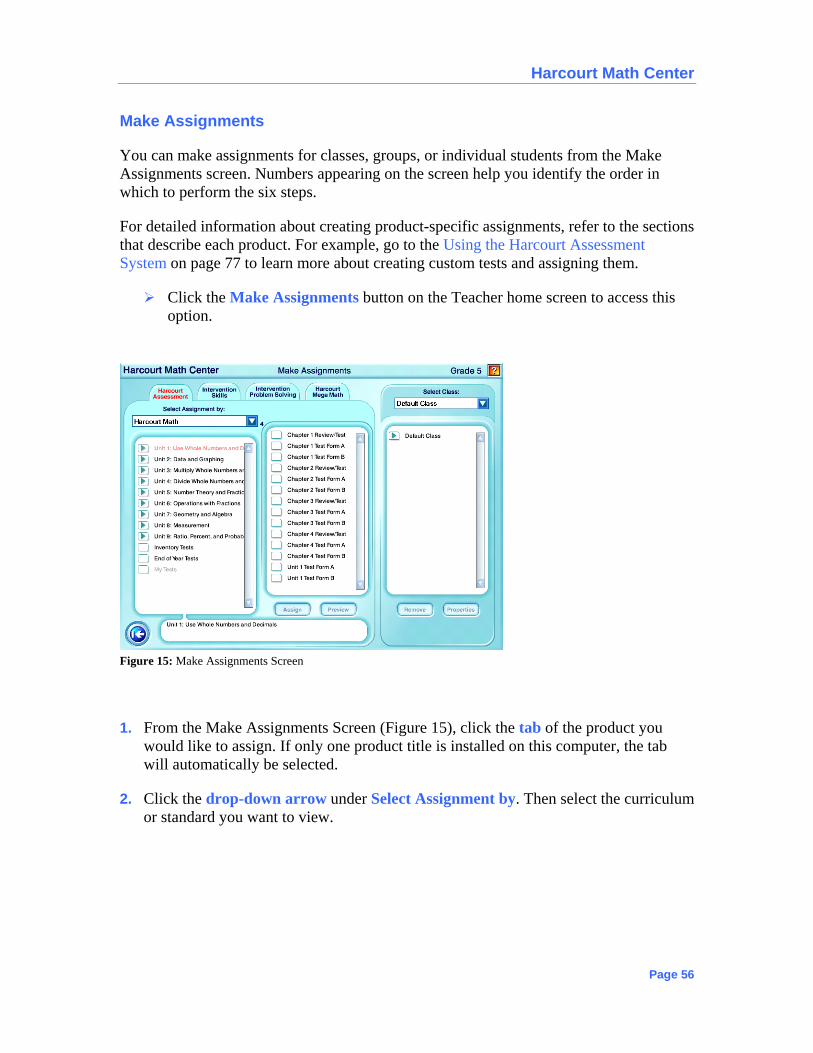
Harcourt Math Center
Make Assignments
You can make assignments for classes, groups, or individual students from the Make Assignments screen. Numbers appearing on the screen help you identify the order in which to perform the six steps.
For detailed information about creating product-specific assignments, refer to the sections that describe each product. For example, go to the Using the Harcourt Assessment System on page 77 to learn more about creating custom tests and assigning them.
Click the Make Assignments button on the Teacher home screen to access this option.
Figure 15: Make Assignments Screen
1. From the Make Assignments Screen (Figure 15), click the tab of the product you would like to assign. If only one product title is installed on this computer, the tab will automatically be selected.
2. Click the drop-down arrow under Select Assignment by. Then select the curriculum or standard you want to view.
Page 56

Harcourt Math Center
3. Use the arrows to view the curriculum. Click to select the unit, standard, or topic for the assignment. If you have used the Assessment System to create custom tests, they will appear in the list of Assessment items.
Moving your mouse over an item allows you to view the full text at the bottom of the screen.
4. In the center panel, click the activity to be assigned.
You may preview any assignment by selecting it in the center panel and clicking the Preview button at the bottom of the screen. If you are working on a single-computer version, you will be prompted to insert the appropriate CD into the CD-ROM drive.
5. Select the appropriate class from the Select Class drop-down list on the right.
6. Click to highlight the student(s) to whom you want to make the assignment.
Selecting a class name allows you to assign the chosen activity to every student in that class.
Highlighting a group name enables you to assign the selected activity to every student in a particular group within a class.
Selecting an individual student name allows you to assign the chosen activity to one student within the class.
7. Click the Assign button in the center panel to complete the assignment.
8. To remove an assignment, select the assignment and click the Remove button. If a student has already completed the assignment, his/her results will be saved for reporting. If the activity was assigned to more than one student, you will be asked whether to remove the assignment for all students or just the one selected. Activities that are partially completed cannot be removed.
Any changes that you make while in the Make Assignments module will be automatically saved to the database when you return to the Teacher home screen.
Page 57
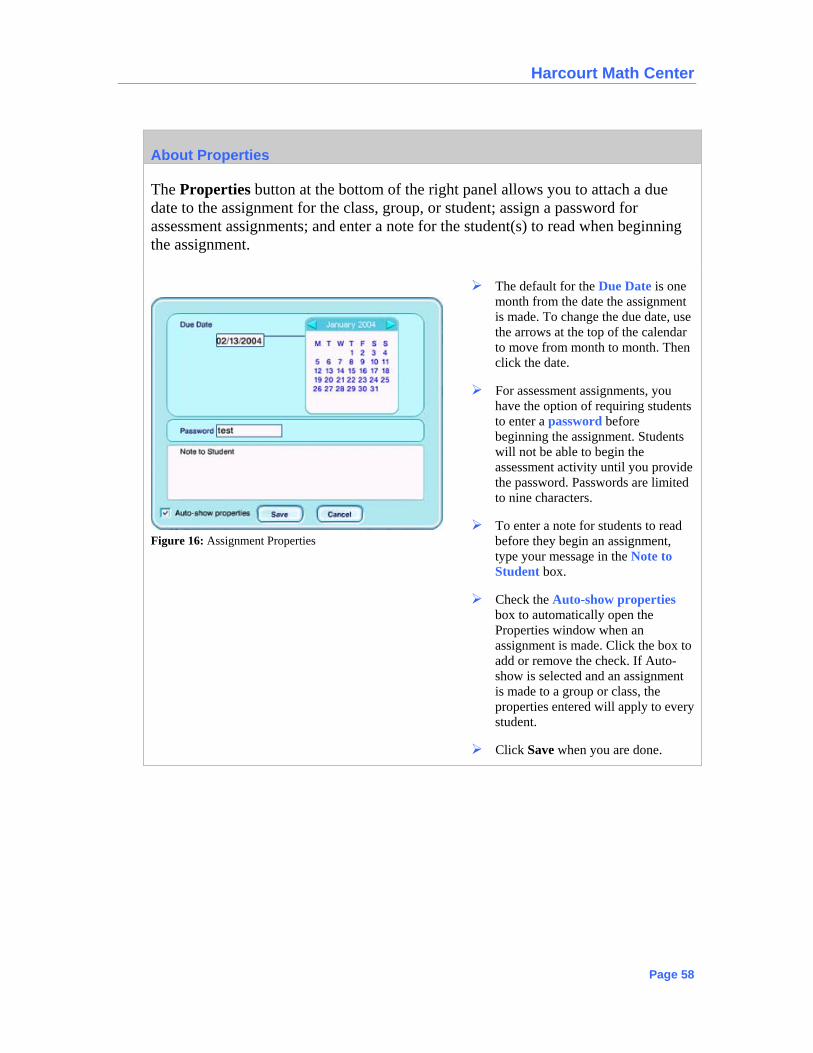
Harcourt Math Center
About Properties
The Properties button at the bottom of the right panel allows you to attach a due date to the assignment for the class, group, or student; assign a password for assessment assignments; and enter a note for the student(s) to read when beginning the assignment.
Figure 16: Assignment Properties
The default for the Due Date is one month from the date the assignment is made. To change the due date, use the arrows at the top of the calendar to move from month to month. Then click the date.
For assessment assignments, you have the option of requiring students to enter a password before beginning the assignment. Students will not be able to begin the assessment activity until you provide the password. Passwords are limited to nine characters.
To enter a note for students to read before they begin an assignment, type your message in the Note to Student box.
Check the Auto-show properties box to automatically open the Properties window when an assignment is made. Click the box to add or remove the check. If Auto-show is selected and an assignment is made to a group or class, the properties entered will apply to every student.
Click Save when you are done.
Page 58

Harcourt Math Center
View Reports
After students have completed assignments in any Math Center product, the results are stored in a database where they can be accessed through many types of student and class reports.
More detailed information about reports is provided in the sections that describe each product.
Click the View Reports button on the Teacher home screen to access this option.
Figure 17: View Reports Screen
1. From the View Reports screen (Figure 17), use the drop-down arrow to select the product for which you want a report.
2. Click the drop-down arrow to select a class, group, or student.
Use the arrows to expand the list if you want make selections at the group and student levels.
3. The available reports appear in the left panel. Moving your mouse over a report title displays a description of the report contents in the right panel.
4. Click a report title to select it. The options for that report are displayed.
To change the date range for a report, click the calendar button. Then use the arrows to scroll through the months and select a date.
5. Click the View Report button to display the report on the screen.
Reports are displayed in Adobe Acrobat Reader. Use the Acrobat Reader toolbar to print the report or save it to another location.
Page 59
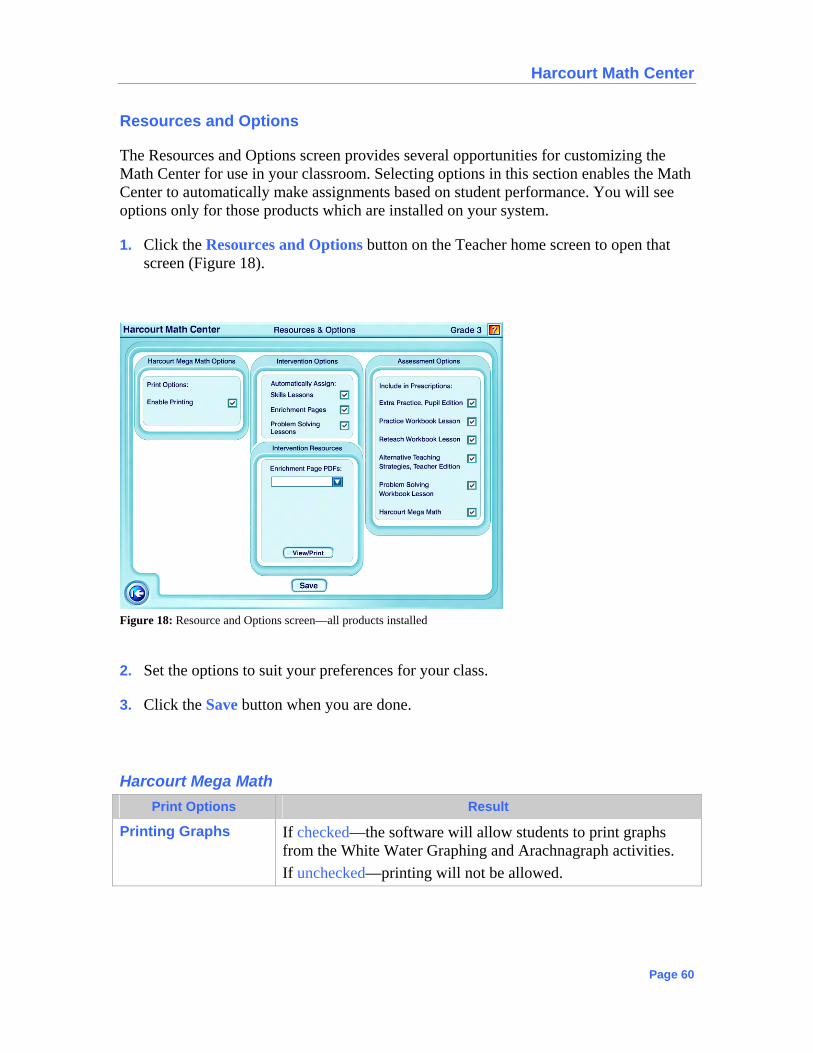
Harcourt Math Center
Resources and Options
The Resources and Options screen provides several opportunities for customizing the Math Center for use in your classroom. Selecting options in this section enables the Math Center to automatically make assignments based on student performance. You will see options only for those products which are installed on your system.
1. Click the Resources and Options button on the Teacher home screen to open that screen (Figure 18).
Figure 18: Resource and Options screen—all products installed
2. Set the options to suit your preferences for your class.
3. Click the Save button when you are done.
Harcourt Mega Math Print Options Result
Printing Graphs If checked—the software will allow students to print graphs from the White Water Graphing and Arachnagraph activities. If unchecked—printing will not be allowed.
Page 60
Harcourt Math Center
Intervention Options Result
Automatic Assignments
If checked—the software will automatically assign lessons and enrichment pages based on students’ performance in Intervention activities. If unchecked—software will not make automatic assignments.
Enrichment Pages Select a chapter and click the View/Print button to view and or print enrichment assignments or answer keys.
Assessment Options Result
Prescriptions If unchecked—the software will automatically prescribe lessons, strategies, and learning activities on prescription reports for that resource. If unchecked—prescriptions will not appear on reports.
Create Tests
The Math Center products provide many pre-constructed tests for you to assign to your students. You will be able to create customized tests for your students if the Assessment System is installed on your computer. While the pre-constructed tests that come with the Math Center products are arranged by scope and sequence, the tests that you create will appear in a section called My Tests.
This option is described in detail in the Using the Harcourt Assessment System section of this guide.
Page 61
Harcourt Math Center
Introducing the Math Center to Students This section of the guide describes what students will see as they log on to the Math Center and begin working on assignments and exploring activities. Keep in mind that only those products installed on your system will be available to your students.
Remember that before students can log into the Math Center, you must create profiles for them. You will also need to make assignments in order for the students to complete Assessment activities. Refer to the Manage Classes and Make Assignments sections of the Teacher Options chapter in this guide for more information. If you have not created student accounts, students may log in as Guests and explore Intervention and Harcourt Mega Math, but their scores will not be saved. See Exploring Harcourt Math Learning Activities section on page 69 of this guide.
Exploring the Student Screens
The buttons shown here help you navigate through the Intervention and Assessment activities. The buttons used in Harcourt Mega Math activities are described in that section of the guide.
Useful Tip
The following page has been formatted to fit on across two isolated pages so you can print it out and place it by students’ computers for easy reference.
Page 62

Harcourt Math Center
Click on the desktop to launch the Harcourt Math Center.
Click for help.
Click to log on after entering your name and password.
Click to go to the next screen.
Click to go back to the previous screen.
Click to log off of the system.
Click to return to the student home screen.
Click to open the Glossary and view the definition of specified math terms.
Click to turn the sound on or off.
Page 63

Harcourt Math Center
Use the navigation box to move between the screens of a lesson or test. The buttons may appear in different colors in different parts of the lessons and tests.
Click Done when you are through answering all
the questions. Click this arrowto move back a
screen.
Click this arrow to move to the next screen.
Page 64

Harcourt Math Center
Student Home Screen
After logging in, students will be at the student home screen (Figure 19) where they will see their name, school, teacher’s name, and the current date. This information confirms that they are correctly logged in, enabling the Math Center to collect data about their performance while they are using the software. The data is used to create student reports.
If Assessment is the only software title installed, then the program will go directly to the Assignments screen after the student logs in.
Figure 19: Sample Student Home Screen
The student home screen varies depending upon what products are installed on the computer. From this screen, students can click the My Assignments button to access their assignments and review completed assignments. They may also click a product button to freely explore any of the Math Center products that are installed on their system except Assessment.
Intervention • Problem Solving
Intervention • Skills
Harcourt Mega Math
When students click on an assignment or choose a product to explore, a dialog box may open that prompts them to place the appropriate CD-ROM in the drive. A character appears on the screen and on the CD-ROM to aid the student in inserting the correct CD-ROM.
Page 65

Harcourt Math Center
Assignments Screen
The Assignments screen is divided into two sections, Current Assignments and Completed Assignments. The Current Assignments portion lists activities that you have assigned to the student using the Make Assignments option. If you have installed an Intervention product, assignments may also be made based on the student’s performance on the Check What You Know tests. You can read more about this in the Intervention section.
Clicking My Assignments on the student home screen opens the Assignments screen (Figure 20).
Figure 20: Assignments Screen
Page 66
Harcourt Math Center
Completing an Assignment
1. From the Current Assignments section, click an assignment to highlight it.
2. Click the Go button.
If the selected lesson or test has a note associated with it, the Note window may display. Otherwise, the activity’s Direction screen will display.
3. Follow the directions on the screen to complete the activity.
4. Click the Back button to return to the Assignments screen.
If students must leave the Math Center before they complete an Assessment assignment, their data is saved. They may return to the Assessment assignment, by re-launching the Assignment from My Assignments screen. The questions already completed by the student are held.
Page 67
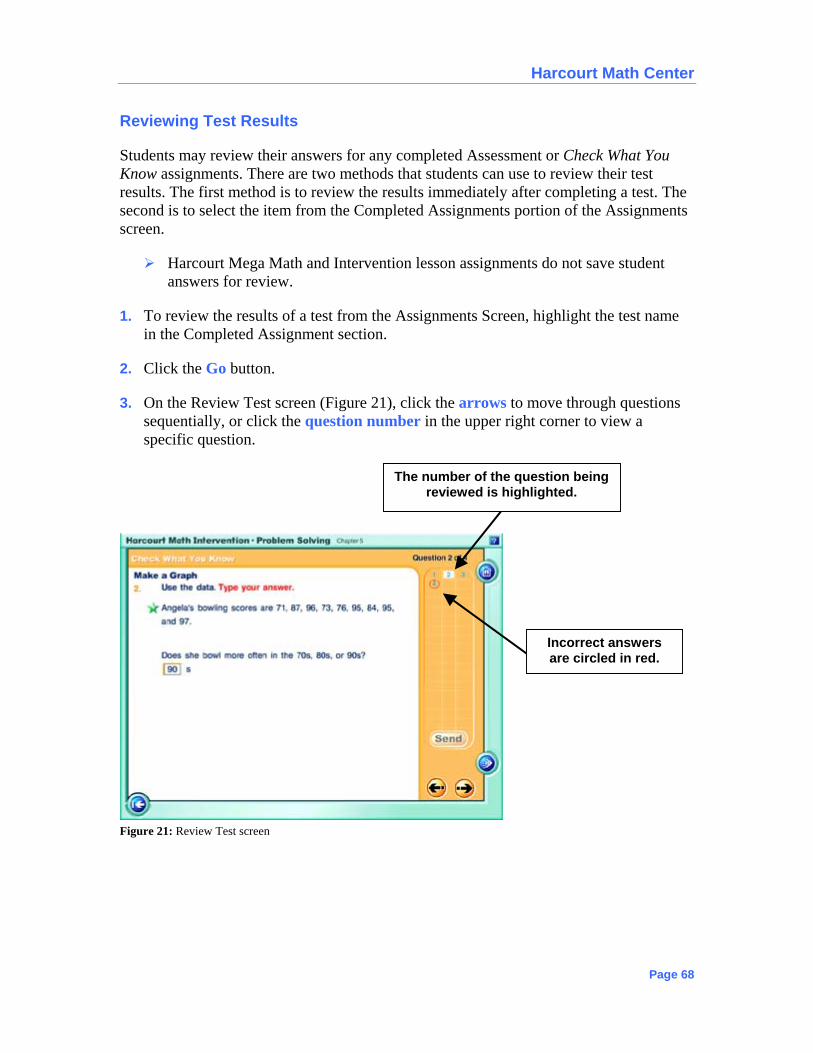
Harcourt Math Center
Reviewing Test Results
Students may review their answers for any completed Assessment or Check What You Know assignments. There are two methods that students can use to review their test results. The first method is to review the results immediately after completing a test. The second is to select the item from the Completed Assignments portion of the Assignments screen.
Harcourt Mega Math and Intervention lesson assignments do not save student answers for review.
1. To review the results of a test from the Assignments Screen, highlight the test name in the Completed Assignment section.
2. Click the Go button.
3. On the Review Test screen (Figure 21), click the arrows to move through questions sequentially, or click the question number in the upper right corner to view a specific question.
The number of the question being reviewed is highlighted.
Incorrect answers are circled in red.
Figure 21: Review Test screen
Page 68

Harcourt Math Center
Exploring Harcourt Math Learning Activities
Students can explore any Intervention or Harcourt Mega Math activities that are installed on their computer, regardless of whether they have been assigned.
1. To explore Intervention activities, click the Intervention button. A menu opens, enabling you to explore any Skills or Problem Solving lessons and activities that have been installed.
Figure 22: Exploring Intervention
2. Click either Skills or Problem Solving to view the topics to explore.
3. Click the type of activity to open—Check What You Know, Lessons, or Enrichment.
Page 69

Harcourt Math Center
Figure 23: Exploring Intervention Skills by Chapter
4. Click a tab to view the activities by Chapter or Number.
5. Select the activity you want to explore, then click the Go button.
6. Follow the same procedures to explore Harcourt Mega Math activities.
Detailed information about the Harcourt Mega Math activities is found in the Using Harcourt Mega Math section of the Harcourt Mega Math Teacher’s Guide located on the CD-ROM of Harcourt Mega Math products.
Page 70

Harcourt Math Center
Tour a Check What You Know
This section demonstrates what the student will see when they access a Check What You Know test while exploring. Access to Check What You Know for Skills and Problem Solving is very similar. This section uses Problem Solving screens as an example.
Remember that any data that is collected when a student is exploring the tests, lessons, or activities will be overwritten if later accessed during an assignment.
Figure 24: Sample Check What You Know Screen
Move to Next Question
Turn sound
off or on
Return to Student Home
Screen
Question Tracking
Directions Plays the Directions
1. When a student launches a Check What You Know, the screen displays the first question (Figure 24).
2. Students follow the instructions at the top of the page to answer the questions.
Use the arrows in the lower right to navigate through the questions, or
Click the question numbers in the upper right side of the screen to move between questions.
Page 71
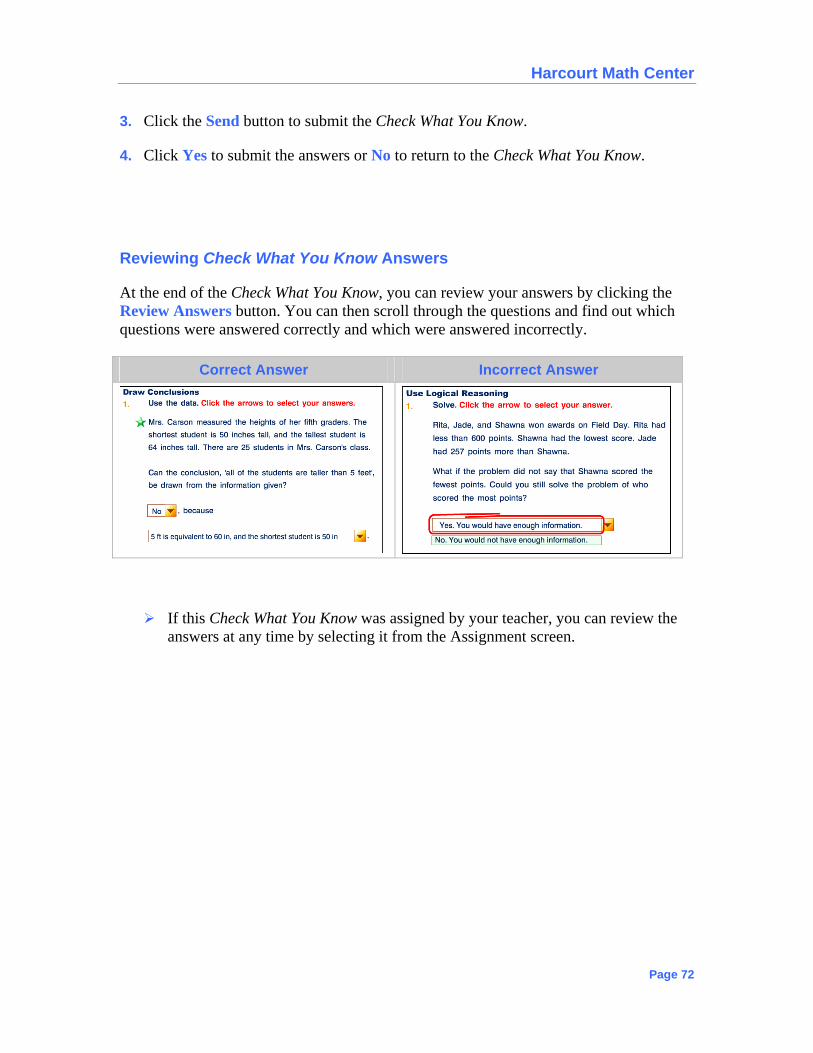
Harcourt Math Center
3. Click the Send button to submit the Check What You Know.
4. Click Yes to submit the answers or No to return to the Check What You Know.
Reviewing Check What You Know Answers
At the end of the Check What You Know, you can review your answers by clicking the Review Answers button. You can then scroll through the questions and find out which questions were answered correctly and which were answered incorrectly.
Correct Answer Incorrect Answer
If this Check What You Know was assigned by your teacher, you can review the answers at any time by selecting it from the Assignment screen.
Page 72

Harcourt Math Center
Tour an Intervention Lesson
This section gives a brief overview of an Intervention lesson from the student view. The structure of the lesson is similar for both Intervention • Problem Solving and Intervention • Skills. An Intervention • Problem Solving lesson is used in the illustrations for this tour.
Intervention lessons are divided into four parts: Show Me, Try These, Practice on Your Own, and Quiz.
Show Me The Show Me section opens with the lesson objective for the skill or strategy selected. In this section, interactive movies containing problems and examples that illustrate the skill or strategy are shown using text, audio, sound effects, graphics, and animation. Important vocabulary words appear highlighted with yellow. The student can click these highlighted terms to launch a glossary window containing the term and its definition. In the window, they can click the speaker to hear the term and its definition read. During the progression of the Show Me section, the student has opportunities to answer questions and complete various types of non-judged interactivities. For example, the student may be required to click one or several objects on screen, input text, click and drag one or more objects, or use animated controls. These questions and interactions are designed to engage the student in the instruction and pace his/her progression through the lesson while he/she is also receiving constructive feedback.
Figure 25: Show Me Screen—View Lesson Objective
Page 73

Harcourt Math Center
Figure 26: Show Me Screen—Sample Interactivity
Try These
The Try These section gives the student an opportunity to answer questions based on the examples in the Show Me section. The student receives immediate feedback and hints if necessary.
Figure 27: Try These Screen
Page 74

Harcourt Math Center
Students follow the instructions for each question and click the Done button after answering each question. The arrows are used to navigate through the questions. If the student answers a question incorrectly, he/she will receive a guided response to help work out the answer.
Practice on Your Own
The Practice on Your Own section enables students to try one or more questions on their own. To use Practice on Your Own, the student will follow the instructions at the top of the page and click the Done button when the answer has been selected or is complete.
Figure 28: Practice On Your Own Screen
Page 75

Harcourt Math Center
Quiz
The Quiz section is a short test to determine if the student understands the skill and only gives feedback when he/she has completed the entire Quiz. Upon answering all the questions, the student will click the Send button to submit his/her responses. Figure 29 shows an example of the type of feedback that students will receive after taking a quiz. The results of the Quiz are saved and appear on certain reports.
Figure 29: Sample Quiz Feedback
Intervention Enrichment Activities
If a student is assigned a Check What You Know test and the score indicates mastery on all skills presented on the test, they will be given an enrichment assignment. This assignment will appear on the My Assignment screen and will be a PDF document that the student may print and work on while away from the computer. Teachers may disable this feature by removing the checkmark on the Enrichment pages box on the Resources and Options screen.
Teachers may also print copies of the Enrichment pages and the answers for them by selecting a chapter and clicking view to open a PDF of the Enrichment pages for that chapter from the Resources & Options screen.
Page 76

Harcourt Math Center
Using the Harcourt Assessment System Overview
Harcourt Math Assessment Software ensures student success by measuring achievement before, during, and after instruction.
Assessment helps to determine what the students know, how well they know it, and the processes that they use to reach their understanding. Students are tested on concepts and skills that provide a foundation for the math curriculum material.
Assessment questions on all tests are mapped to Learning Goals, Lesson Objectives, and State Standards. Students can practice for and take assigned tests. Teachers can assign tests, collect and store information via the Harcourt Math Center, and report on students’ performance and proficiency.
Assessment data should be used to modify the content that students are to learn and the processes through which the content is to be taught.
The Harcourt Math Center Assessment includes six types of Assessment Tests:
Inventory Tests
Students are tested at the beginning of the year to see if they have the prerequisite skills. There are 2 forms of this test: Form A and a Form B. The Form A version consists of multiple-choice items. The Form B version consists of free-response items using a combination of fill-in-the-blank, multiple-choice, and drop-down lists.
End of Year Tests
Students are tested at the end of the course on concepts and skills covered throughout the year. This test contains approximately 20 test items for grades 1 and 2, and approximately 40 test items for grades 3 and up. There are 2 forms of this test: Form A and Form B. The Form A version consists of multiple-choice items. The Form B version consists of free response items using a combination of fill-in-the-blank, multiple-choice, and drop-down lists.
Unit Tests
Students are tested at the end of each unit on concepts and skills that were covered throughout the unit. This test contains approximately 20 test items for grades 1 and 2, and approximately 40 test items for grades 3 and up. There are 2 forms of each unit test: Form A version and a Form B version. The Form A version consists of multiple-choice items. The Form B version consists of free response items using a combination of fill-in-the-blank, multiple-choice, and drop-down lists.
Page 77

Harcourt Math Center
Chapter Review/Tests
Students are tested on concepts and skills taught in the selected chapter. This test can be used as a review or a test. Grades 1 and 2 Chapter Review/ Tests contain approximately eight items, grades 3–5 have approximately 25 items, and grade 6 has 35 items. There are 30 Chapter Review Tests per grade.
Chapter Tests
Students are tested on concepts and skills taught in the selected chapter. Grades 1 and 2 Chapter Tests contain approximately 10 items, grades 3–5 have approximately 20 items, and grade 6 has approximately 25 items. There are two forms of each chapter test: Form A and Form B. Form A consists of multiple-choice items and the Form B test consists of free responses using a combination of fill-in-the-blank, multiple-choice, and drop-down lists.
Custom Tests
The Harcourt Assessment System also allows you to create tests tailored to your specific instructional needs or plans using the extensive bank of test items on the CD-ROM. Learn more about creating custom tests in the Create Tests section on page 61 of this guide.
Prescriptions
Prescriptions refer the teacher to additional resources for students who have not yet mastered specific content. The references are to Harcourt Math components such as workbooks, Alternative Teaching Strategies, Harcourt Mega Math Software, and Extra Practice in the student’s edition. Prescriptive material can be assigned to students based on their results from each assessment. Student performance is assessed when each test is submitted and a prescription may be recommended when necessary. The prescription is based on the lesson objectives, learning goals, or state standards that match the test items that were completed unsatisfactorily. Prescriptions are found in the Prescriptions Reports.
Making Assessment Assignments
You will need to make assignments before students log in for the first time. Once an assignment has been made, the student can enter the Harcourt Assessment System by logging in with his/her assigned username and password and clicking the My Assignments button. Refer to the Make Assignments section of this guide for instructions on making assignments. Instructions for creating custom tests can be found in the next section.
Page 78

Harcourt Math Center
Create Tests
The Create Tests module allows you to create your own tests based on the tests included in the Math Center or by selecting individual items from the extensive database of items included on the CD-ROM.
Useful Tip
You can use the Harcourt Math Center to create custom tests. You can print these tests for classroom use.
Creating a Custom Test
1. From the Math Center Home screen, click the Create Test button.
2. The Create Tests screen displays the available pre-constructed grade-level tests.
Figure 30: Create Tests screen
3. Click the Grade Level and module.
4. Click the Create button to display the curriculum objectives, standards, and learning goals (Figure 31).
Page 79

Harcourt Math Center
Figure 31: View Curriculum Objectives
5. Select a category to view all associated test items in the center panel.
Clicking a test item and clicking the Preview button allows you to preview individual test questions.
6. Double-click a test item to add it to the test you are creating. The item appears in the far right panel.
You may also select a test item in the center panel and add it to the test by clicking the right arrow. To remove an item, select the item in the test and click the left arrow.
To remove all test items from a test, click the Reset button.
7. Type the name of the test in the field at the top right.
8. Click the Save button to save a copy of the test in My Tests.
Page 80

Harcourt Math Center
Navigating in Create Tests
Buttons Description
Right and Left Arrows The right arrow allows you to add questions to the test. The left arrow allows you to remove questions from the test.
Up and Down Arrows Use these arrows to sequence your questions. Highlight the item to move, then click the up or down arrow to change its order in the list.
Preview Button The Preview button allows you to preview the question before adding it to a test.
Reset Button This button sets the test back to the last saved version. Note: A test must have been saved in order to use this feature.
Save Button Use this button to save and name the test that you created.
Duplicating a Test
You can customize a test by first duplicating an existing test, then following the instructions from the Creating a Custom Test section of this guide.
1. From the Create Test screen, click to select a test.
2. Click the Duplicate button.
3. Type the name of the new test to be saved. The name of the new test must be unique.
4. Click OK. The test will be duplicated and placed in My Tests.
Previewing Tests
1. From the Create Test screen, select the test you would like to view.
2. Click the Preview button to display the test on your screen.
3. Use the arrows to navigate through the questions.
4. Click the Back button to navigate back to the Create Test screen.
Page 81

Harcourt Math Center
Importing and Exporting Tests
If you are using more than one computer in your classroom and you have the single-computer or site license version installed, you may want to import and export custom tests so that students can access the same material on every computer.
Exporting Tests
1. From the Create Test main screen, select the custom test you want to export.
2. Click the Export button to display the Export Test window.
3. Navigate to the location where you want to save the test and click OK.
4. Click Save.
Importing Tests
1. From the Create Test screen, click the Import button to display the Import a Custom Test window.
2. Navigate to the location of the custom test to import and select the test.
3. Click Open. The imported test will be added and displayed in the left column of the Create Test screen.
Page 82

Harcourt Math Center
Reports
Report Name Description
Class Status on One Test
This report summarizes the performance on a selected test by all students in a selected class or group. The status of the assignment is provided for each student as well as a class or group average.
Class Test Summary by Student
This report displays a Class or Group roster and total scores for each test selected.
Class Progress This report summarizes class results in relation to selected standards and benchmarks, learning goals, or lesson objectives.
Class Prescriptions This report displays the results of tests completed during the designated time. The corresponding standards and benchmarks, learning goals, or lesson objectives and their associated prescriptions are provided when students do not meet criteria for mastery of these skills.
Student Test Summary This report provides details on all the tests taken by a particular student, including the average score for all tests.
Student Progress This report lists the assignments completed by a selected student, related to selected standards and benchmarks, learning goals, or lesson objectives.
Student Prescriptions This report displays the results of tests completed by the selected student. The corresponding standards and benchmarks, learning goals, or lesson objectives and their associated prescriptions are provided if the student does not meet criteria for master of these skills.
Class Activity Status by Student.
This report displays the results of all tests taken in the Math Center (all products). Note: This report does not include any data that is reported to the Math Center when students are exploring the CD-ROMs and are not working on assignments.
Page 83

Harcourt Math Center
Using Intervention
Intervention • Problem Solving
Overview
The Intervention • Problem Solving CD-ROM provides intervention for problem-solving lessons in Harcourt Math 2004. The CD contains interactive, animated lessons—complete with audio—that provide step-by-step support for problem solving. These intervention lessons help students apply problem-solving strategies and improve their reading comprehension of word problems.
Students start with Check What You Know, a set of problems used to assess mastery of the problem-solving strategy or skill in each chapter of Harcourt Math. If a student does not demonstrate mastery, then the software automatically assigns step-by-step problem-solving intervention:
Show Me is a carefully sequenced tutorial for the assigned problem-solving strategy or skill. An interactive model teaches students to understand, plan, solve, and check. Students use a variety of problem-solving aids—including Math Maps, which are unique interactive graphic organizers. Math Maps help students analyze word problems and choose the correct operation or operations to solve the problem.
Try These is a set of problems that provides guided practice with immediate feedback.
Practice on Your Own offers independent practice with feedback.
Quiz is an assessment to show mastery. It is computer-scored, and results are reported to the Math Center. The Math Center can generate a variety of student and class reports.
The Intervention• Problem Solving CD-ROM directly integrates with the problem-solving lessons in Harcourt Math, providing a seamless connection between classroom instruction and electronic intervention. This software can be used with all students to strengthen their problem-solving ability, to build their confidence, and to help them experience success on state and standardized tests.
Page 84

Harcourt Math Center
How to Begin
Students should begin with Check What You Know described in the preceding paragraphs. It is recommended that the teacher assign the Check What You Know to the student. Please refer to the Make Assignments section of this guide for directions on making assignments. The student can then access the Check What You Know by logging into the Math Center, clicking the My Assignments button, and launching the Check What You Know assignment.
Students can also access the Check What You Know and any other Intervention • Problem Solving content by logging into the Math Center, clicking the Intervention • Problem Solving button, and selecting an activity to explore. Any data collected when a student is exploring the Intervention • Problem Solving CD will be overwritten by any data collected from an assignment. For instance, if a student chooses to explore the CD and completes a Check What You Know that is not an assignment, that score will be overwritten if the teacher assigns the same material and the student takes the Check What You Know again.
The results of Check What You Know will automatically be scored by the Math Center software. Assignments to Problem Solving lessons will be added to the student’s assignment list for any strategy or skill for which the student does not show mastery. Teachers may disable this automatic assignment feature by going to the Resources and Options section of the Math Center and clicking to remove automatic assignments.
Page 85
Harcourt Math Center
Using Intervention • Skills
Overview
The Intervention • Skills CD-ROM diagnoses, reteaches, and assesses skills that students need for success in each chapter of Harcourt Math©2004. The CD-ROM contains interactive, animated lessons—with audio—that provide scaffolded help for the skills students have not yet mastered. The Math Center tracks students’ progress and produces class or individual student reports.
Students start with Check What You Know, a set of problems that assesses mastery of prerequisite skills for each chapter in Harcourt Math. If a student does not demonstrate mastery of one or more skills, then the software automatically assigns step-by-step intervention:
Show Me is a carefully sequenced tutorial that uses pre-worked examples and interactive models with audio to build in-depth understanding.
Try These is a set of problems that provide guided practice with immediate feedback.
Practice on Your Own offers independent practice with feedback.
Quiz is an assessment to show mastery. It is computer-scored, and results are reported to the Math Center. The Math Center can generate a variety of student and class reports.
The Harcourt Math Intervention • Skills CD-ROM is a comprehensive intervention program; it diagnoses, reteaches, and reports on progress, allowing teachers to easily meet and manage students’ individual needs. The Intervention • Skills CD-ROM also integrates directly with the lessons in Harcourt Math, providing a seamless connection between classroom instruction and electronic intervention.
How to Begin Students should begin with Check What You Know described in the preceding paragraphs. It is recommended that the teacher assign the Check What You Know to the student. Please refer to the Make Assignments section of this guide for directions on making assignments. The student can then access the Check What You Know by logging into the Math Center, clicking the My Assignments button, and launching the Check What You Know assignment.
Students can also access Check What You Know and any other Intervention • Skills content by logging into the Math Center, clicking the Intervention • Skills button, and selecting an activity to explore. Any data collected when a student is exploring the Intervention • Skills CD will be overwritten by any data collected from an assignment. For instance, if a student chooses to explore the CD and completes a Check What You Know that is not an assignment, that score will be overwritten if the teacher assigns the same material and the student takes the Check What You Know again.
Page 86

Harcourt Math Center
The results of the Check What You Know will be automatically scored by the Math Center software. Skills lessons will be added to the students’ assignment lists for any strategy or skill for which the student does not show mastery. Enrichment Pages will be assigned for those skills and strategies which have been mastered. Teachers may disable this automatic assignment feature by going to the Resources and Options section of the Math Center and clicking to remove automatic assignments.
Intervention Reports
The following reports can be accessed to check student performance in the Intervention software.
Report Name Description
Class Summary by Student This class report displays scores for the student for Check What You Know assignments and related skills. In addition to prescribed lessons, other lessons completed by the student are reported.
Class Quiz Results by Student This class reports displays scores by student for each quiz.
Student intervention Status This individual student report displays Check What You Know and Quiz scores for completed assignments. Incomplete assignments are also listed.
Student Activity Status by Student
This report summarizes all activity for students in class or group.
Page 87

Harcourt Math Center
Using Harcourt Mega Math
Note:
The information in this section along with detailed information on each module in Harcourt Mega Math can be accessed in the Harcourt Mega Math Teacher’ Guide located on each Harcourt Mega Math CD-ROM.
In Harcourt Mega Math, students are invited into an animated world of math adventure. Two friendly characters, Tally and Penny, take students around the world to practice the skills, concepts, and problem-solving strategies that directly link to math lessons in the Harcourt Math© 2004 Student Editions.
Overview
The six programs in Harcourt Mega Math are comprehensive. While each of these programs can be used alone, together they cover all the strands and topics taught in kindergarten through sixth grade mathematics.
Shapes Ahoy! (K-2nd Grade) Numberopolis (K-2nd Grade) Country Countdown (K-3rd Grade) The Number Games (3-6th Grade) Ice Station Exploration (3-6th Grade) Fraction Action (3-6th Grade)
Students experience a seamless connection between the concepts they are learning in classes and the concepts that are practiced, enhanced, and extended through Harcourt Mega Math. Even the hands-on lessons from Harcourt Math© 2004 are reinforced in Harcourt Mega Math through a unique technology called Virtual Manipulatives. Connecting good instruction with electronic learning has never been so easy.
Harcourt Mega Math also makes it easy to meet students’ individual needs. Children can begin with concepts they understand and practice them until completed. Through Harcourt Mega Math’s unique grow slides, students are automatically advanced to more challenging problems and concepts. This careful sequencing of leveled practice and instruction ensures student success. For teachers, the Math Center in Harcourt Mega Math remembers what each child has completed and prints individual and class reports to track progress.
Harcourt Mega Math is an exciting, interactive adventure that offers students the right math at the right levels with the right connections to classroom instruction.
Page 88

Harcourt Math Center
Grow Slides
Each Harcourt Mega Math CD-ROM features a Grow Slide. This Grow Slide organizes the practice into skill groups or topics. As students answer questions correctly, the Grow Slide moves up a letter and offers the student practice on a more difficult but related skill.
Figure 32: Harcourt Mega Math - Grow Slide
Teachers may assign content in Harcourt Mega Math through the Math Center using the Create Assignments tab or students may access the content by clicking the Harcourt Mega Math button on their Home Page. In either case, each level that the student completes will be reported to the Math Center. Teachers may access reports of student activity and levels achieved by the student in Harcourt Mega Math.
Vocabulary
Students may click the vocabulary button when available to see and hear definitions for terms used in the Harcourt Mega Math activity in which they are practicing.
Printing A few modules in Harcourt Mega Math allow students to print their work.
Teachers may disable this option by accessing the Resources and Options button in the Math Center.
Page 89
Harcourt Math Center
Reports
Report Name Description
Class Skills Completed This class report is a grid showing which skills have been completed by each student in a given module.
Class Number of Skills Completed
This class report displays a summary of how many skills have been completed by each student in each module.
Student Skills Completed This student report shows which skills have been completed in each module.
Class Skills Completed Report Sample
Page 90

Harcourt Math Center
Class Number of Skills Completed Report Sample
Student Skills Completed Report Sample
Page 91

Harcourt Math Center
Accessing Harcourt Mega Math Modules
Open Access (student)
When students enter Harcourt Mega Math in Open Access mode, they have access to all Harcourt Mega Math activities and all Grow Slide levels.
1. From the Harcourt Math Center, click .
2. From the drop-down list of CD titles (Figure 33), click the desired Harcourt Mega Math title.
3. From the Main Menu of the CD, click the desired module.
Figure 33: Selecting Harcourt Mega Math Through Open Access (student)
Page 92

Harcourt Math Center
My Assignment Screen (student)
From the My Assignments Screen students can access only the specific Harcourt Mega Math activity and level that the teacher has assigned.
1. From the Harcourt Math Center, click the My Assignments button.
2. From the list of assignments, click an assignment from the desired Harcourt Mega Math module.
When entering from the My Assignments screen the program will bypass the main menu and go directly into the activity at the assigned level.
Assignment Preview (teacher only)
Assignment Preview is a feature of the Math Center. Using this feature, teachers can preview Harcourt Mega Math activities from the Make Assignments screen before assigning the activities to students.
1. After selecting an assignment, click Preview to preview the assignment.
2. You will enter the module at the start of a specific topic.
When entering from the Make Assignments screen you will bypass the main menu and go directly into the activity at the assigned level.
Page 93

Harcourt Math Center
Exploring Harcourt Mega Math
The buttons shown here help you navigate through the Harcourt Mega Math activities.
Click or if you need help answering a specific question or step of a question.
Click to see the meaning of a vocabulary term used in the activity.
Click if you want to repeat a question.
Click to erase what your answer to a question.
Click if you want to repeat an entire level of questions.
Click when you have finished answering a question.
Click when you want to move on to the next question or on to the next step of a question.
Click to see what skill level you are on or to move to a different skill level.
Click to return to the Main Menu.
Page 94
Harcourt Math Center
Question Formats
To address different learning styles and content needs, and to provide variety to enhance student interest, Harcourt Mega Math presents questions using a variety of formats. These include:
Single Choice: Students click one of two or more possible options.
Multiple Choice: Students click two or more of several possible options.
Drag and Drop: Students click and drag objects on the screen.
Numeric Entry: Students click and drag a number from the Number Input Pad to an answer area. Buggy Bargains and Up, Up, and Array are the only modules with type in functionality. Students can type an answer using the digits 0 to 9 on the keyboard.
Some modules use additional question formats that are uniquely designed for the content covered in those modules. These are described fully in the module descriptions found in the Harcourt Mega Math Teacher’s Guide located on each Mega Math CD-ROM.
Figure 34: Sample Numeric Entry Question
Number Input Pad
Answer area
Page 95
Harcourt Math Center
Technical Support & Customer Service Technical Help
If you experience difficulties installing or running this software, please contact Harcourt Technical Support using the information below:
Contact
Technology Service Hotline 1-800-419-3900
Interactive Technical Support on the Web www.harcourtschool.com/support
Customer Service
For questions concerning your order, to order additional products, or to request a catalog:
Call Customer Service at 1-800-225-5425
Visit MarketPlace on the Web at www.harcourtschool.com/marketplace
Thank you!
Page 96