hair bows made easy - bowdabra€¦ · create a beautiful mini bowdabra hair bow 7) red and green...
TRANSCRIPT
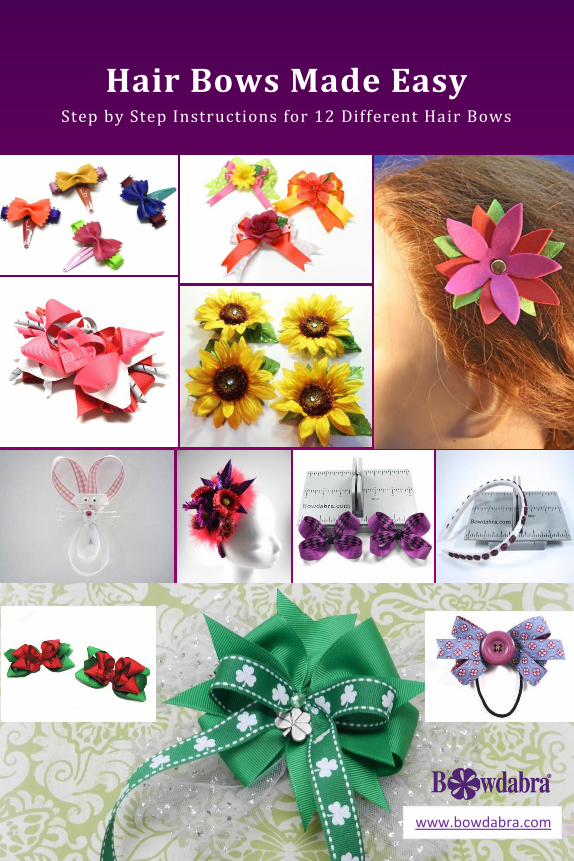
Hair Bows Made Easy Step by Step Instructions for 12 Different Hair Bows
www.bowdabra.com
Hair Bows Made Easy Step by Step Instructions for 12 Different Hair Bows
Bowdabra. © 2014 All Rights Reserved.| 2
Table of Content
1) Bow Tie Noodles Hair Bows A super fun and creative kid’s craft!
2) Spring Flower Craft Foam Hair Clips
Design these easy to make spring flower craft foam hair clips. Mix and match colors and let kids get in on the fun.
3) Spring Themed Floral Hair Clips With A Bowdabra Bow
Create beautiful spring themed floral hair clips with a Bowdabra Bow.
4) Beautiful Spring Flower Hair Clips
Celebrate spring with super easy to make beautiful spring flower hair clips.
5) Hair Bow For This St. Patrick’s Day
Create a boutique style bow with long ribbon tails – perfect for ponytails!
Hair Bows Made Easy Step by Step Instructions for 12 Different Hair Bows
Bowdabra. © 2014 All Rights Reserved.| 3
6) Valentine's Day: Heart Shaped Hair Bow
Create a beautiful Mini Bowdabra hair bow
7) Red And Green Christmas Holiday Hair Bow
Using the Mini Bowdabra and Hair Bow Tool & Ruler de-sign a red and green Christmas loopy holiday hair bow.
8) Twisted Boutique Hair Bow
Celebrate spring with beautiful spring flower hair clips. Flower hair clips are super easy to make.
9) Red Hat Society Hair band
What if you belong to the Red Hat Society but you are not a hat person? Find out an amazingly easy way to create Red Hat Society Hair Band.

Hair Bows Made Easy Step by Step Instructions for 12 Different Hair Bows
Bowdabra. © 2014 All Rights Reserved.| 4
10) Button Headband With A Mini Bow
Headbands are not just for little girls they are great for all ages and hair styles. Headband is so versatile; add some buttons and a bow to a headband and I am completely sold!
11) Ponytail Bow Make a bow and attach it to a ponytail all in one easy step! Give as a gift to mom for Mother’s Day or create cheerleader and soccer bows with the elastic already at-tached!
12) How To Make A Bunny Hair Bow
Create a bunny hair bow with the Bowdabra Hair Bow Tool and Ruler.
Hair Bows Made Easy Step by Step Instructions for 12 Different Hair Bows
Bowdabra. © 2014 All Rights Reserved.| 5
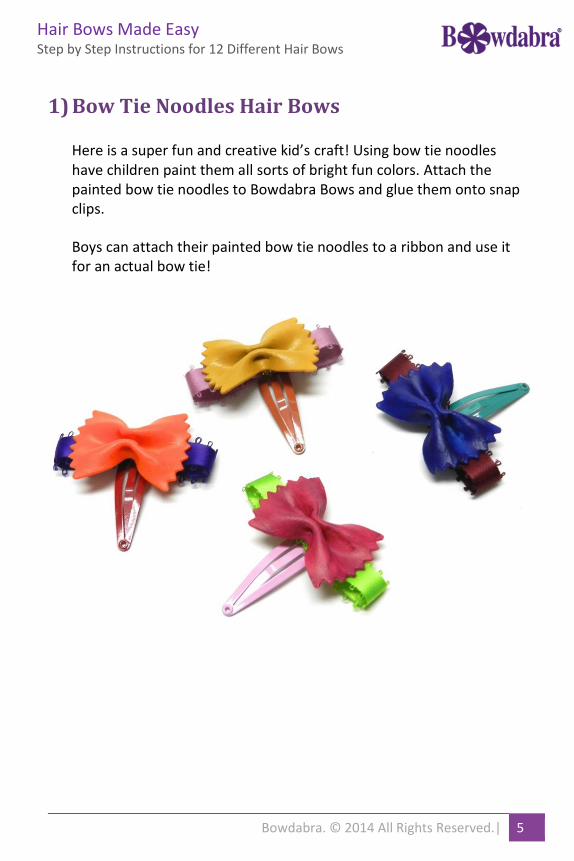
1) Bow Tie Noodles Hair Bows
Here is a super fun and creative kid’s craft! Using bow tie noodles have children paint them all sorts of bright fun colors. Attach the painted bow tie noodles to Bowdabra Bows and glue them onto snap clips.
Boys can attach their painted bow tie noodles to a ribbon and use it for an actual bow tie!
Hair Bows Made Easy Step by Step Instructions for 12 Different Hair Bows
Bowdabra. © 2014 All Rights Reserved.| 6
Materials Needed:
Bow Tie Noodles
Assorted Ribbon 5.5″ long
Snap Clips
Acrylic Paint
Hot Glue and/or E6000 Glue
Mini Bowdabra
Hair Bow Tool & Ruler
Bowdabra Bow Wire
Instructions:
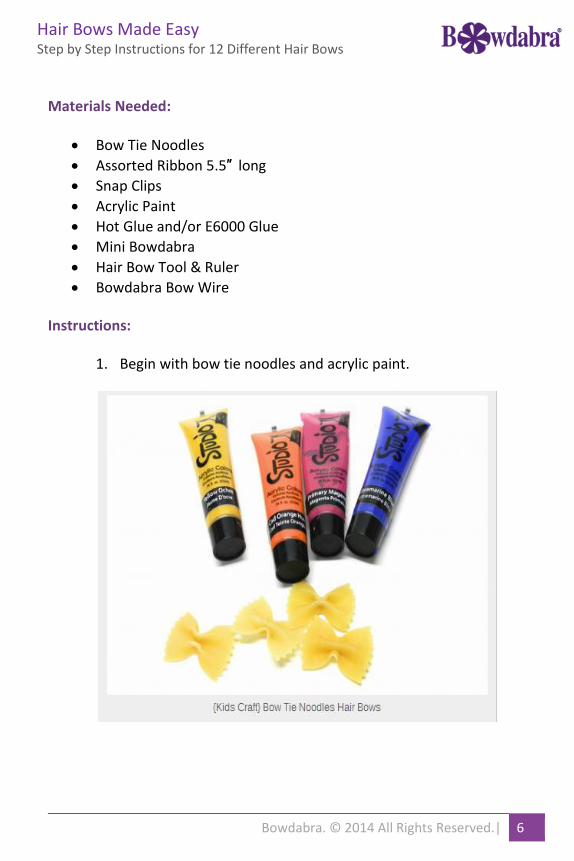
1. Begin with bow tie noodles and acrylic paint.
Hair Bows Made Easy Step by Step Instructions for 12 Different Hair Bows
Bowdabra. © 2014 All Rights Reserved.| 7
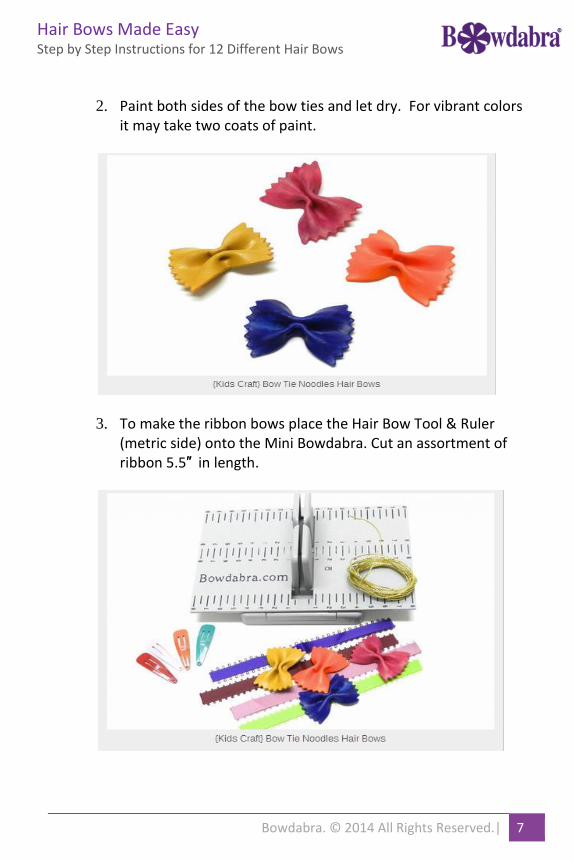
2. Paint both sides of the bow ties and let dry. For vibrant colors it may take two coats of paint.
3. To make the ribbon bows place the Hair Bow Tool & Ruler (metric side) onto the Mini Bowdabra. Cut an assortment of ribbon 5.5″ in length.
Hair Bows Made Easy Step by Step Instructions for 12 Different Hair Bows
Bowdabra. © 2014 All Rights Reserved.| 8
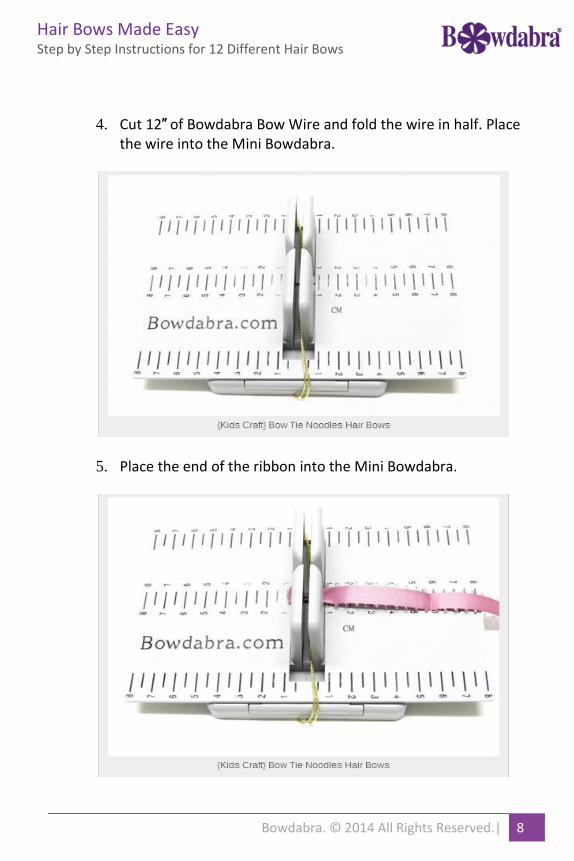
4. Cut 12″ of Bowdabra Bow Wire and fold the wire in half. Place the wire into the Mini Bowdabra.
5. Place the end of the ribbon into the Mini Bowdabra.
Hair Bows Made Easy Step by Step Instructions for 12 Different Hair Bows
Bowdabra. © 2014 All Rights Reserved.| 9
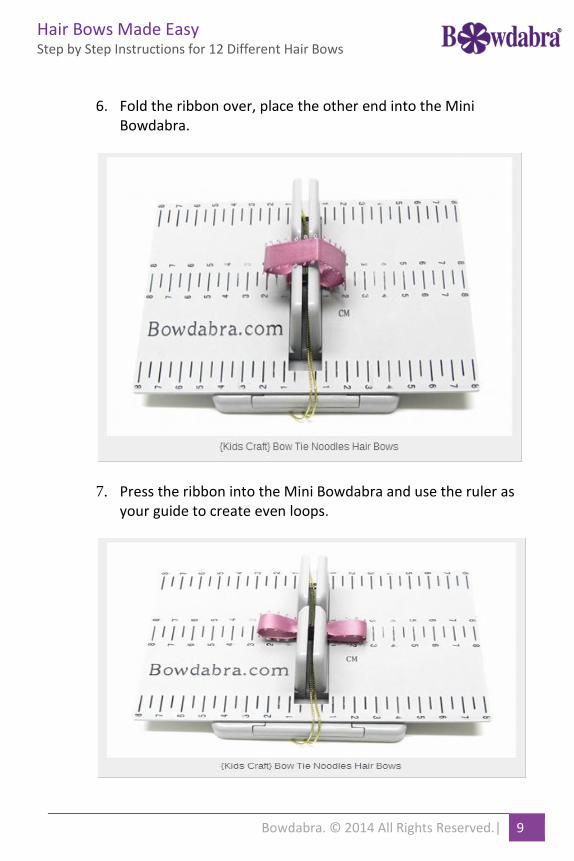
6. Fold the ribbon over, place the other end into the Mini Bowdabra.
7. Press the ribbon into the Mini Bowdabra and use the ruler as your guide to create even loops.
Hair Bows Made Easy Step by Step Instructions for 12 Different Hair Bows
Bowdabra. © 2014 All Rights Reserved.| 10
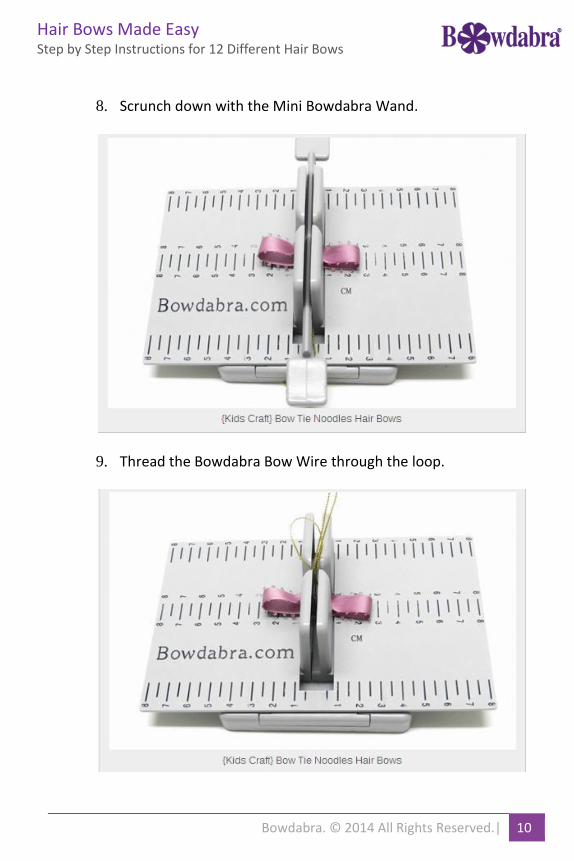
8. Scrunch down with the Mini Bowdabra Wand.
9. Thread the Bowdabra Bow Wire through the loop.
Hair Bows Made Easy Step by Step Instructions for 12 Different Hair Bows
Bowdabra. © 2014 All Rights Reserved.| 11
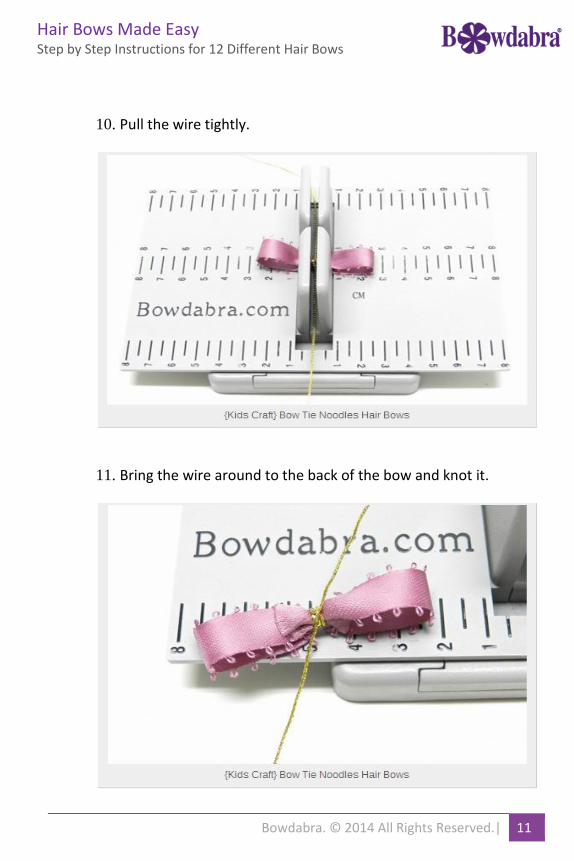
10. Pull the wire tightly.
11. Bring the wire around to the back of the bow and knot it.
Hair Bows Made Easy Step by Step Instructions for 12 Different Hair Bows
Bowdabra. © 2014 All Rights Reserved.| 12
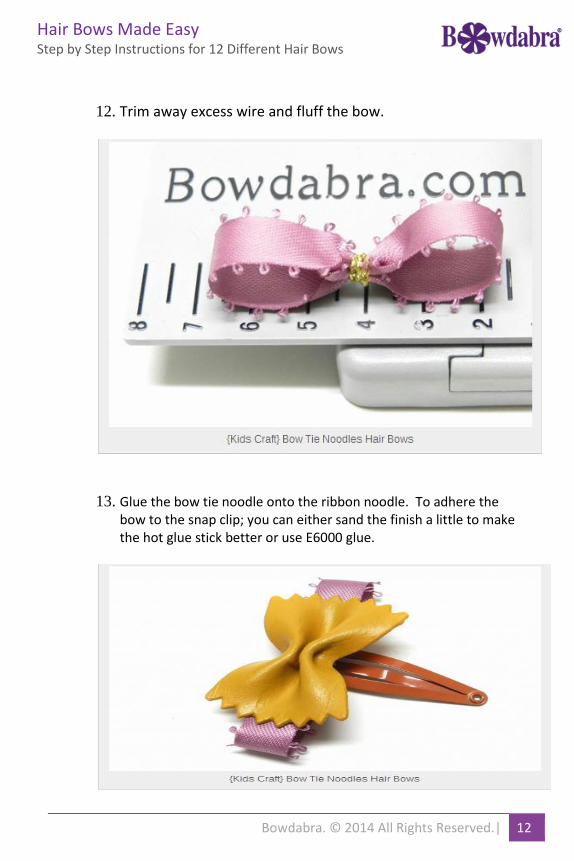
12. Trim away excess wire and fluff the bow.
13. Glue the bow tie noodle onto the ribbon noodle. To adhere the bow to the snap clip; you can either sand the finish a little to make the hot glue stick better or use E6000 glue.

Hair Bows Made Easy Step by Step Instructions for 12 Different Hair Bows
Bowdabra. © 2014 All Rights Reserved.| 13
14. Follow the instructions to make several bows and hair clips.
Hair Bows Made Easy Step by Step Instructions for 12 Different Hair Bows
Bowdabra. © 2014 All Rights Reserved.| 14
2) Spring Flower Craft Foam Hair Clips
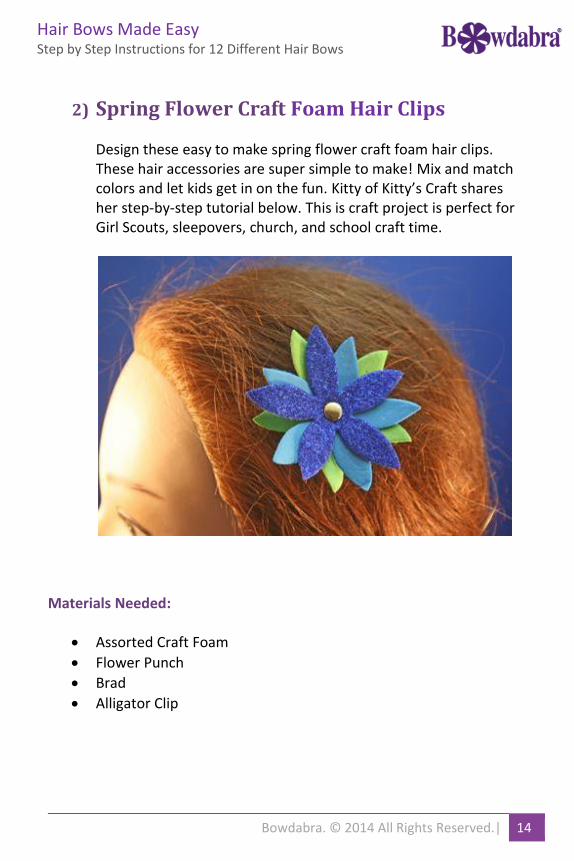
Design these easy to make spring flower craft foam hair clips. These hair accessories are super simple to make! Mix and match colors and let kids get in on the fun. Kitty of Kitty’s Craft shares her step-by-step tutorial below. This is craft project is perfect for Girl Scouts, sleepovers, church, and school craft time.
Materials Needed:
Assorted Craft Foam
Flower Punch
Brad
Alligator Clip
Hair Bows Made Easy Step by Step Instructions for 12 Different Hair Bows
Bowdabra. © 2014 All Rights Reserved.| 15
Instructions:
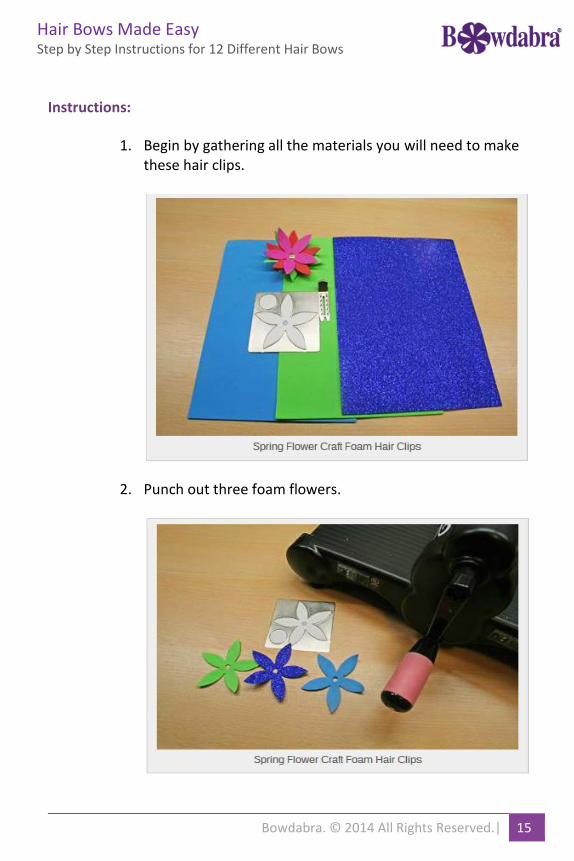
1. Begin by gathering all the materials you will need to make these hair clips.
2. Punch out three foam flowers.
Hair Bows Made Easy Step by Step Instructions for 12 Different Hair Bows
Bowdabra. © 2014 All Rights Reserved.| 16
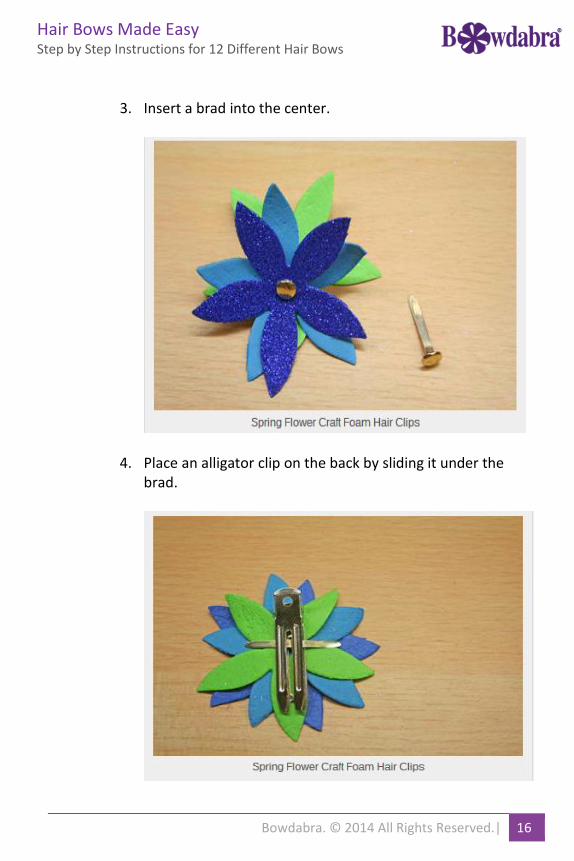
3. Insert a brad into the center.
4. Place an alligator clip on the back by sliding it under the brad.
Hair Bows Made Easy Step by Step Instructions for 12 Different Hair Bows
Bowdabra. © 2014 All Rights Reserved.| 17
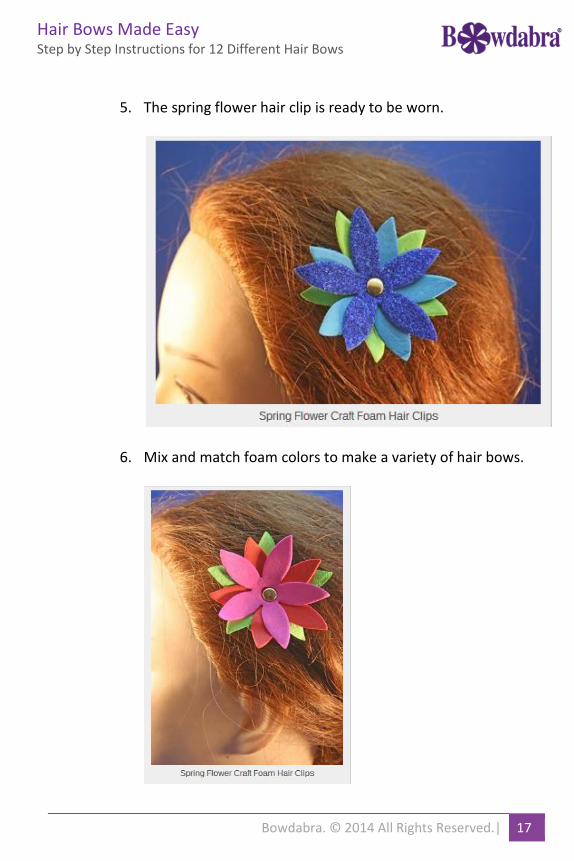
5. The spring flower hair clip is ready to be worn.
6. Mix and match foam colors to make a variety of hair bows.

Hair Bows Made Easy Step by Step Instructions for 12 Different Hair Bows
Bowdabra. © 2014 All Rights Reserved.| 18
3) Spring Themed Floral Hair Clips With A Bowdabra Bow
Create beautiful spring themed floral hair clips with a Bowdabra
Bow. Use the Mini Bowdabra with Ruler to make a multi-layered
bow. Finish the bow with a silk flower in the center. Attach the
bow to an alligator clip or bobby pin.
Materials Needed:
1.5″ Wide Ribbon 34″ long (bottom bow)
assorted width ribbon 28″ long (top bow)
5/8″ wide ribbon 4″ long (ribbon spray)
silk flower
bobby pin or alligator clip
seamstress tape
scissors
hot glue gun
Hair Bows Made Easy Step by Step Instructions for 12 Different Hair Bows
Bowdabra. © 2014 All Rights Reserved.| 19
Instructions:
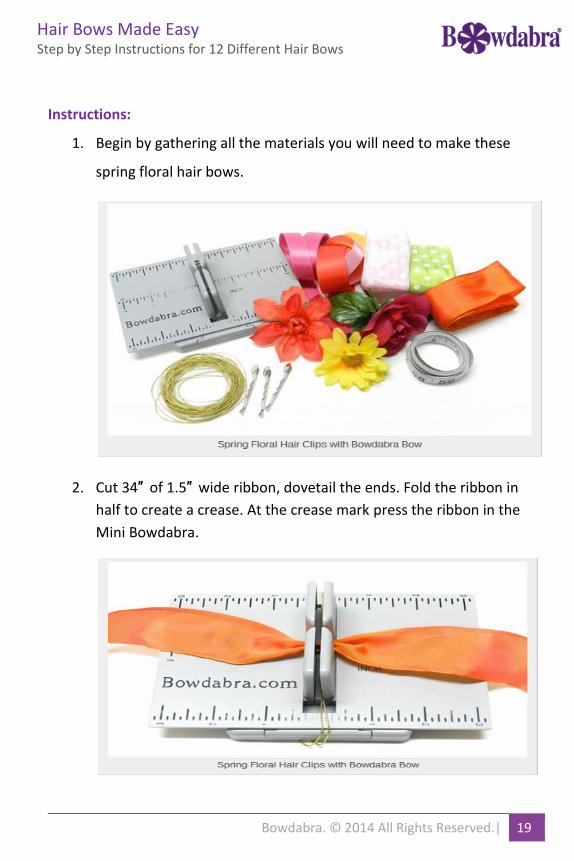
1. Begin by gathering all the materials you will need to make these
spring floral hair bows.
2. Cut 34″ of 1.5″ wide ribbon, dovetail the ends. Fold the ribbon in
half to create a crease. At the crease mark press the ribbon in the
Mini Bowdabra.
Hair Bows Made Easy Step by Step Instructions for 12 Different Hair Bows
Bowdabra. © 2014 All Rights Reserved.| 20
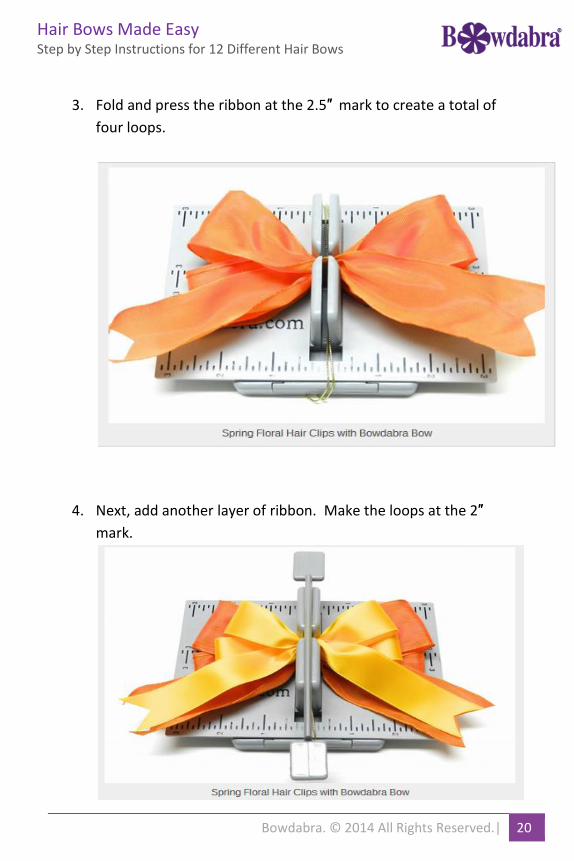
3. Fold and press the ribbon at the 2.5″ mark to create a total of
four loops.
4. Next, add another layer of ribbon. Make the loops at the 2″
mark.
Hair Bows Made Easy Step by Step Instructions for 12 Different Hair Bows
Bowdabra. © 2014 All Rights Reserved.| 21
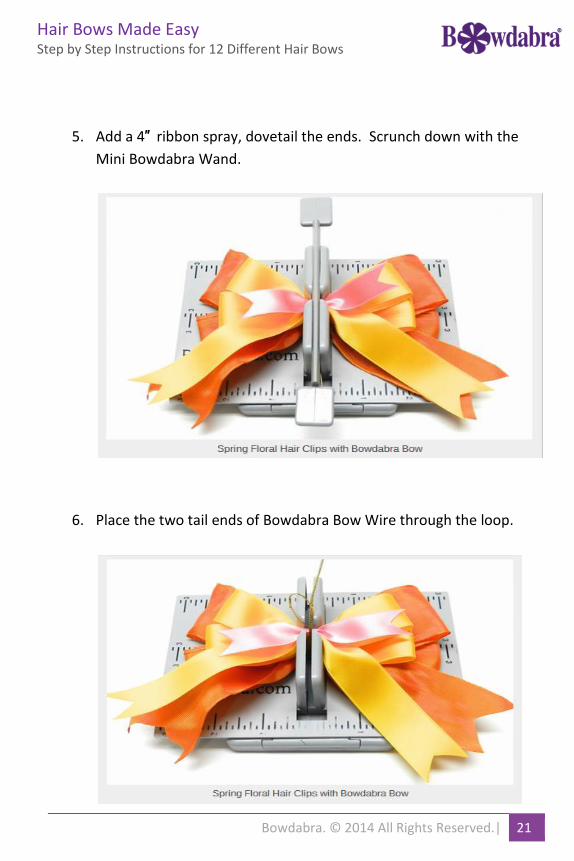
5. Add a 4″ ribbon spray, dovetail the ends. Scrunch down with the
Mini Bowdabra Wand.
6. Place the two tail ends of Bowdabra Bow Wire through the loop.
Hair Bows Made Easy Step by Step Instructions for 12 Different Hair Bows
Bowdabra. © 2014 All Rights Reserved.| 22
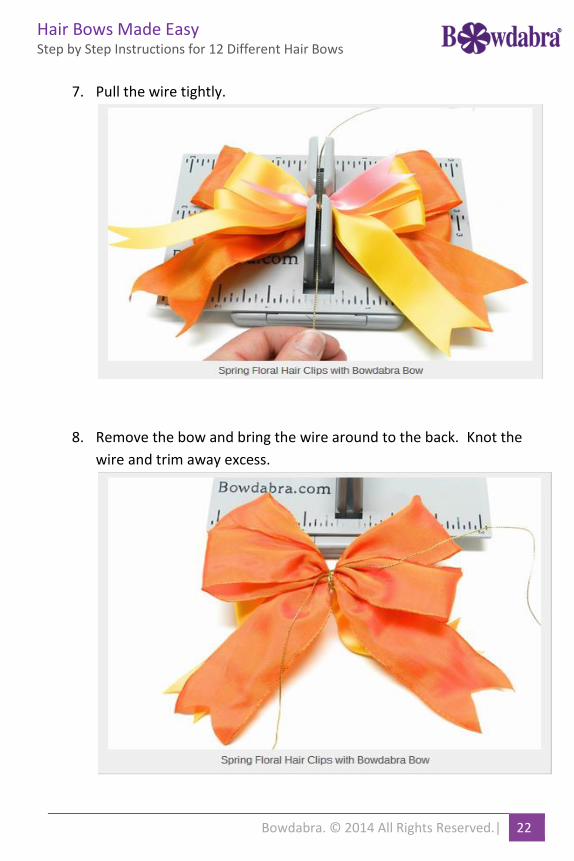
7. Pull the wire tightly.
8. Remove the bow and bring the wire around to the back. Knot the
wire and trim away excess.
Hair Bows Made Easy Step by Step Instructions for 12 Different Hair Bows
Bowdabra. © 2014 All Rights Reserved.| 23
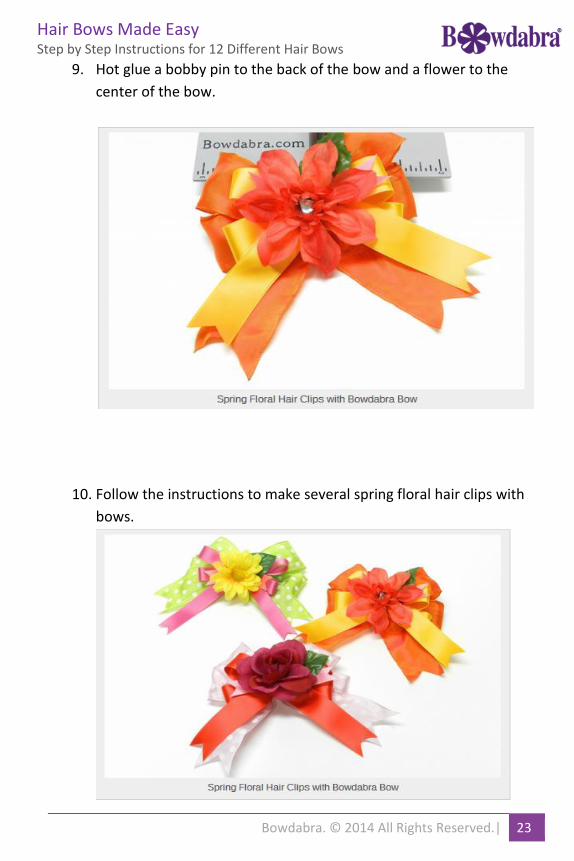
9. Hot glue a bobby pin to the back of the bow and a flower to the
center of the bow.
10. Follow the instructions to make several spring floral hair clips with
bows.
Hair Bows Made Easy Step by Step Instructions for 12 Different Hair Bows
Bowdabra. © 2014 All Rights Reserved.| 24
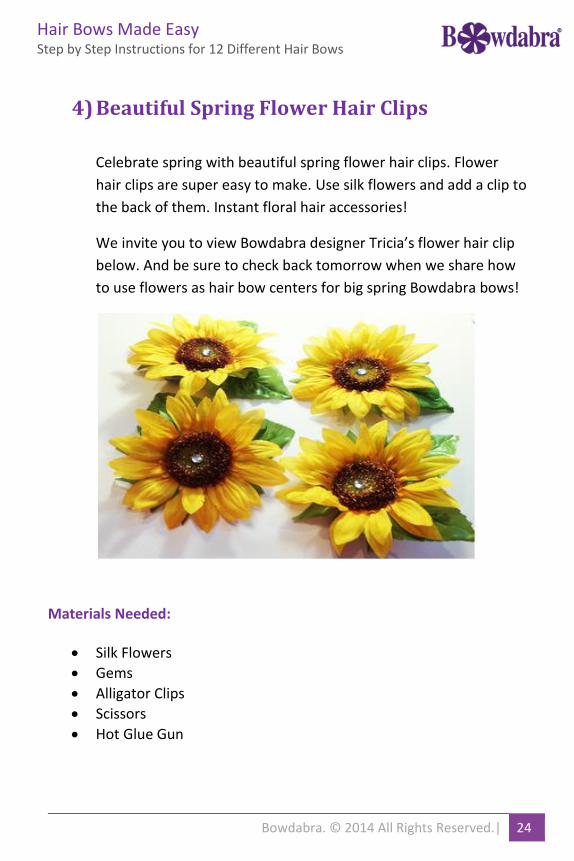
4) Beautiful Spring Flower Hair Clips
Celebrate spring with beautiful spring flower hair clips. Flower
hair clips are super easy to make. Use silk flowers and add a clip to
the back of them. Instant floral hair accessories!
We invite you to view Bowdabra designer Tricia’s flower hair clip
below. And be sure to check back tomorrow when we share how
to use flowers as hair bow centers for big spring Bowdabra bows!
Materials Needed:
Silk Flowers
Gems
Alligator Clips
Scissors
Hot Glue Gun
Hair Bows Made Easy Step by Step Instructions for 12 Different Hair Bows
Bowdabra. © 2014 All Rights Reserved.| 25
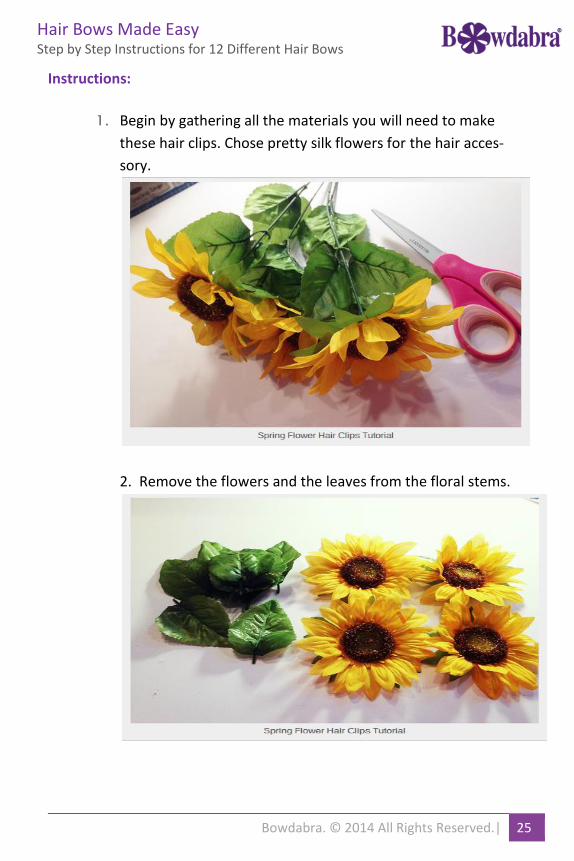
Instructions:
1. Begin by gathering all the materials you will need to make
these hair clips. Chose pretty silk flowers for the hair acces-
sory.
2. Remove the flowers and the leaves from the floral stems.
Hair Bows Made Easy Step by Step Instructions for 12 Different Hair Bows
Bowdabra. © 2014 All Rights Reserved.| 26
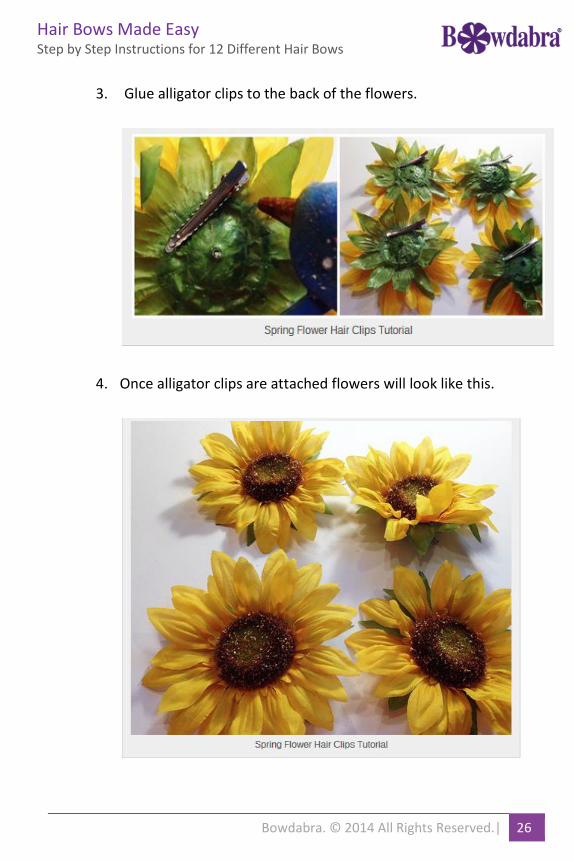
3. Glue alligator clips to the back of the flowers.
4. Once alligator clips are attached flowers will look like this.
Hair Bows Made Easy Step by Step Instructions for 12 Different Hair Bows
Bowdabra. © 2014 All Rights Reserved.| 27
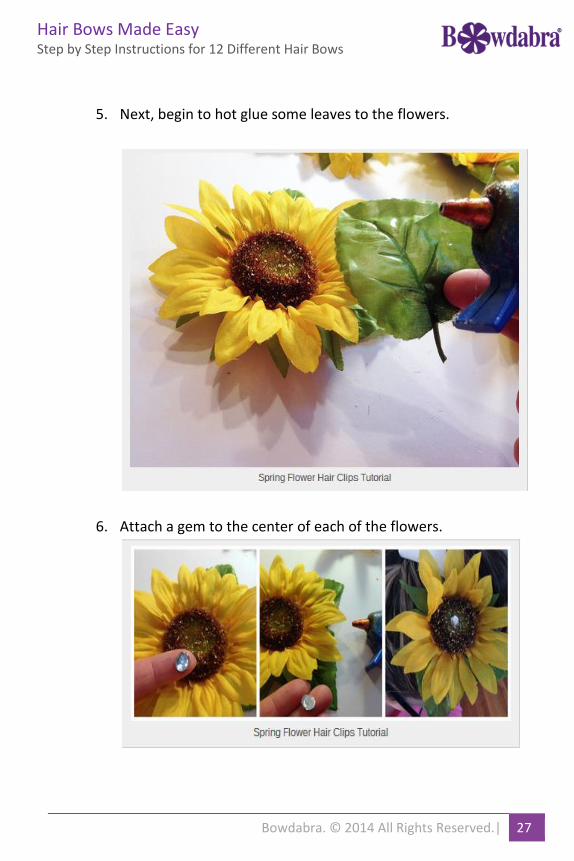
5. Next, begin to hot glue some leaves to the flowers.
6. Attach a gem to the center of each of the flowers.
Hair Bows Made Easy Step by Step Instructions for 12 Different Hair Bows
Bowdabra. © 2014 All Rights Reserved.| 28
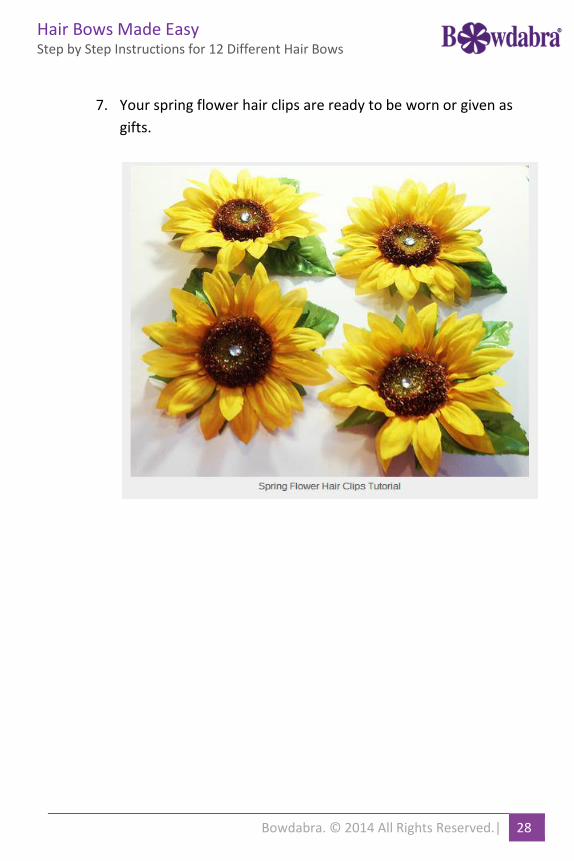
7. Your spring flower hair clips are ready to be worn or given as
gifts.

Hair Bows Made Easy Step by Step Instructions for 12 Different Hair Bows
Bowdabra. © 2014 All Rights Reserved.| 29
5) Hair Bow For This St. Patrick’s Day
Design a hair bow for this St. Patrick’s Day. Create a boutique
style bow with long ribbon tails using your Mini Bowdabra along
with the Hair Bow Tool & Ruler. This style bow is perfect for
ponytails!
Materials Needed:
Tulle
1.5″ Grosgrain Ribbon
5/8″ Grosgrain Printed Ribbon
Mini Bowdabra
Hair Bow Tool & Ruler
Bowdabra Bow Wire
Clover Charm
Gem

Hair Bows Made Easy Step by Step Instructions for 12 Different Hair Bows
Bowdabra. © 2014 All Rights Reserved.| 30
Hair Clip
Hot Glue Gun
Scissors
Instructions:
1. Begin by gathering all the materials you will need to make this hair
bow. Place the Hair Bow Tool & Ruler onto the Mini Bowdabra. Cut 18″
of Bowdabra Bow Wire and fold the wire in half. Place the wire inside of
the Mini Bowdabra.
Hair Bows Made Easy Step by Step Instructions for 12 Different Hair Bows
Bowdabra. © 2014 All Rights Reserved.| 31
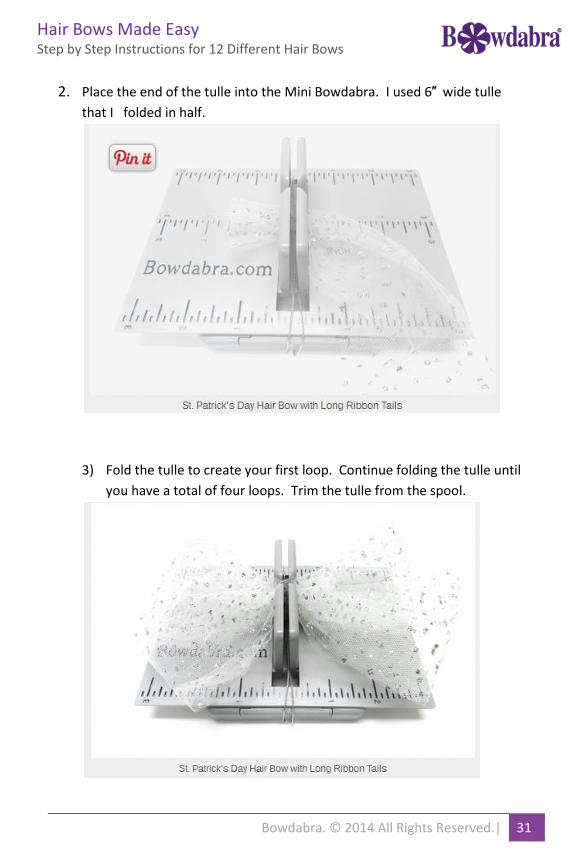
2. Place the end of the tulle into the Mini Bowdabra. I used 6″ wide tulle
that I folded in half.
3) Fold the tulle to create your first loop. Continue folding the tulle until
you have a total of four loops. Trim the tulle from the spool.
Hair Bows Made Easy Step by Step Instructions for 12 Different Hair Bows
Bowdabra. © 2014 All Rights Reserved.| 32
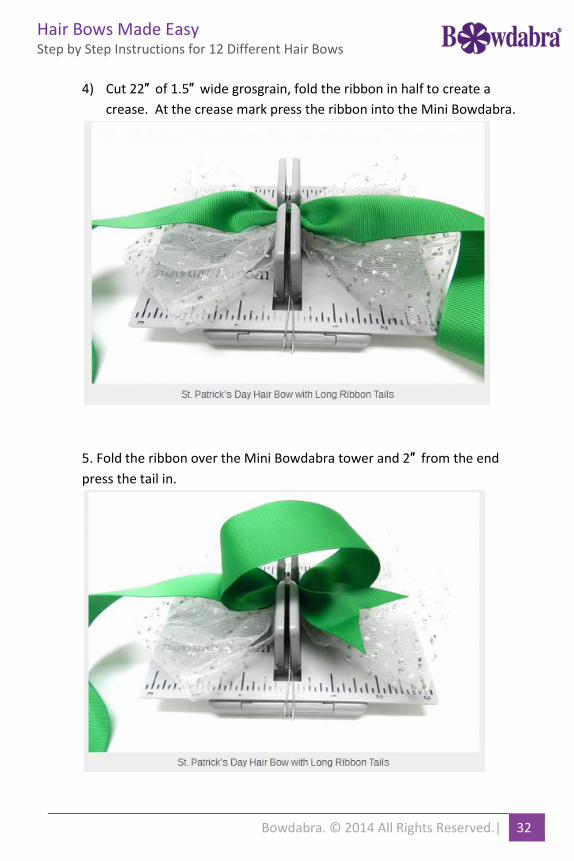
4) Cut 22″ of 1.5″ wide grosgrain, fold the ribbon in half to create a
crease. At the crease mark press the ribbon into the Mini Bowdabra.
5. Fold the ribbon over the Mini Bowdabra tower and 2″ from the end
press the tail in.

Hair Bows Made Easy Step by Step Instructions for 12 Different Hair Bows
Bowdabra. © 2014 All Rights Reserved.| 33
6. Fold the other ribbon over the Mini Bowdabra towers and press it into
the Mini Bowdabra 2″ from the end of the ribbon.
7. Press the ribbon loops into the Mini Bowdabra. Scrunch down with the
wand to hold it all in place.

Hair Bows Made Easy Step by Step Instructions for 12 Different Hair Bows
Bowdabra. © 2014 All Rights Reserved.| 34
8. Cut a 5″ piece of 1.5″ wide grosgrain ribbon, dovetail the ends. Place
the ribbon strand into the Mini Bowdabra.
9. Cut a 22″ piece of 5/8″ wide printed ribbon. Fold the ribbon in half to
find the center, at the center point press the ribbon into the Mini
Bowdabra. Use the wand to hold it all in place.
Hair Bows Made Easy Step by Step Instructions for 12 Different Hair Bows
Bowdabra. © 2014 All Rights Reserved.| 35
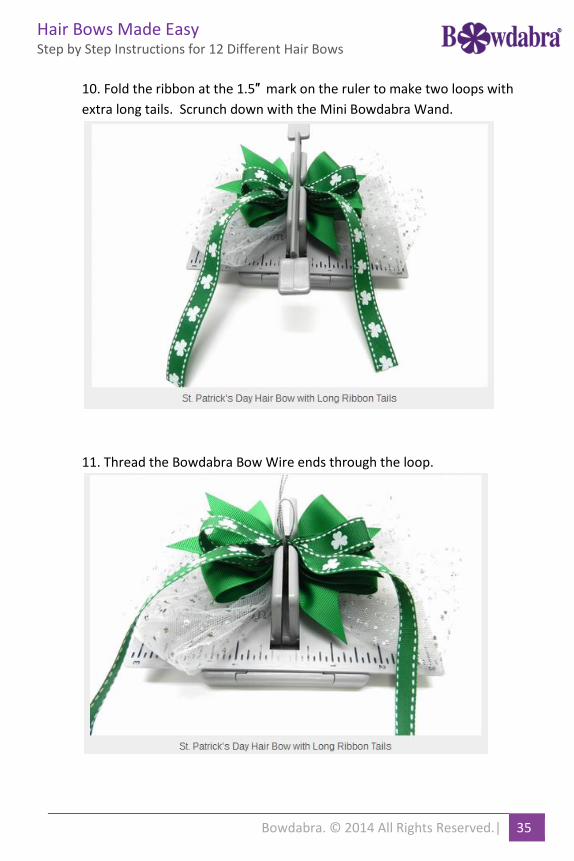
10. Fold the ribbon at the 1.5″ mark on the ruler to make two loops with
extra long tails. Scrunch down with the Mini Bowdabra Wand.
11. Thread the Bowdabra Bow Wire ends through the loop.
Hair Bows Made Easy Step by Step Instructions for 12 Different Hair Bows
Bowdabra. © 2014 All Rights Reserved.| 36
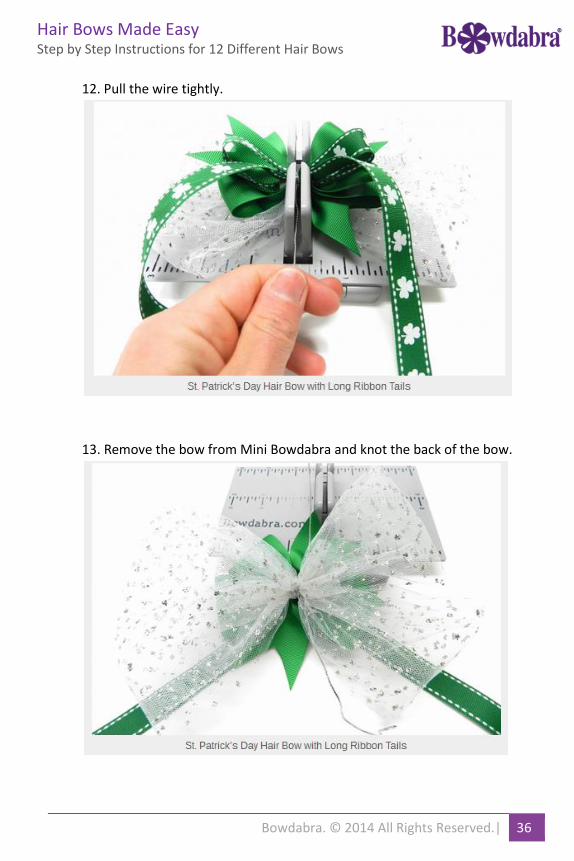
12. Pull the wire tightly.
13. Remove the bow from Mini Bowdabra and knot the back of the bow.
Hair Bows Made Easy Step by Step Instructions for 12 Different Hair Bows
Bowdabra. © 2014 All Rights Reserved.| 37
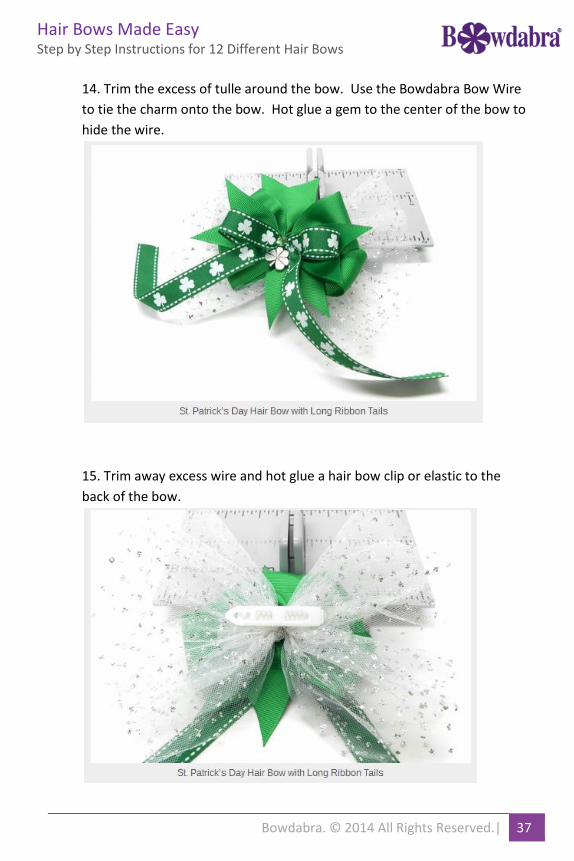
14. Trim the excess of tulle around the bow. Use the Bowdabra Bow Wire
to tie the charm onto the bow. Hot glue a gem to the center of the bow to
hide the wire.
15. Trim away excess wire and hot glue a hair bow clip or elastic to the
back of the bow.
Hair Bows Made Easy Step by Step Instructions for 12 Different Hair Bows
Bowdabra. © 2014 All Rights Reserved.| 38
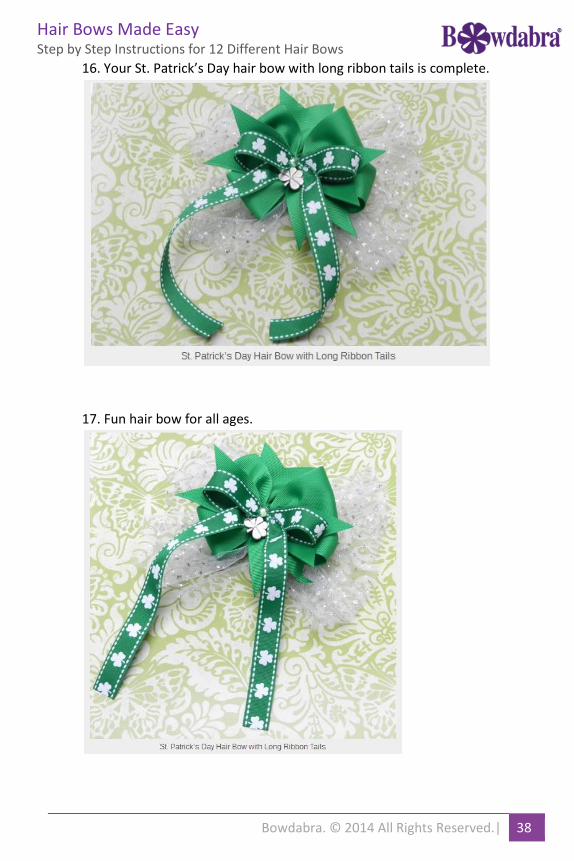
16. Your St. Patrick’s Day hair bow with long ribbon tails is complete.
17. Fun hair bow for all ages.
Hair Bows Made Easy Step by Step Instructions for 12 Different Hair Bows
Bowdabra. © 2014 All Rights Reserved.| 39
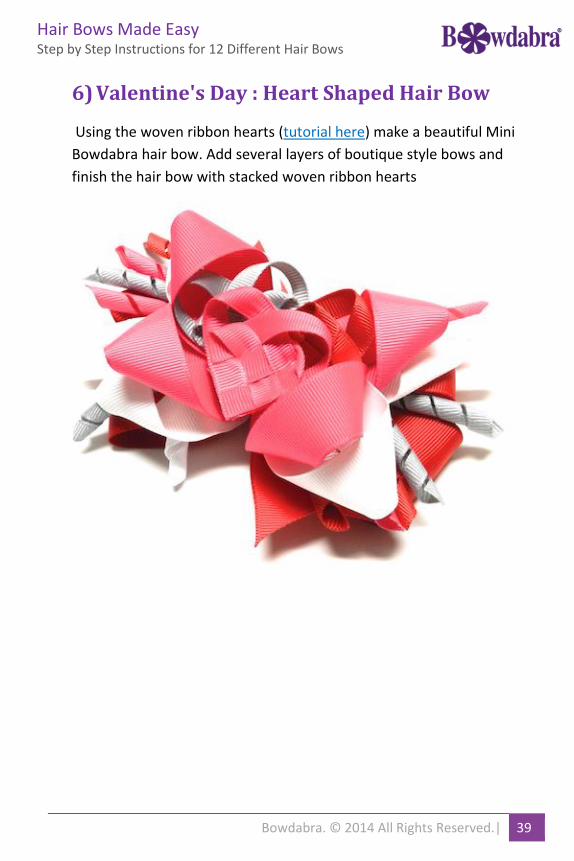
6) Valentine's Day : Heart Shaped Hair Bow
Using the woven ribbon hearts (tutorial here) make a beautiful Mini
Bowdabra hair bow. Add several layers of boutique style bows and
finish the hair bow with stacked woven ribbon hearts
Hair Bows Made Easy Step by Step Instructions for 12 Different Hair Bows
Bowdabra. © 2014 All Rights Reserved.| 40
Materials Needed:
Woven Ribbon Hearts (Tutorial Here)
26″ of 1.5″ wide Grosgrain (for Boutique Bow with Tails)
Assorted Korker Ribbon
26″ of 7/8″ wide Grosgrain (for Pointed Bows) x2
Hair Clip Lined with Ribbon
Mini Bowdabra Hair Bow Tool & Ruler
Bowdabra Bow Wire
Hot Glue Gun
Lighter or Clear Nail Polish to seal the ribbon
Instructions:
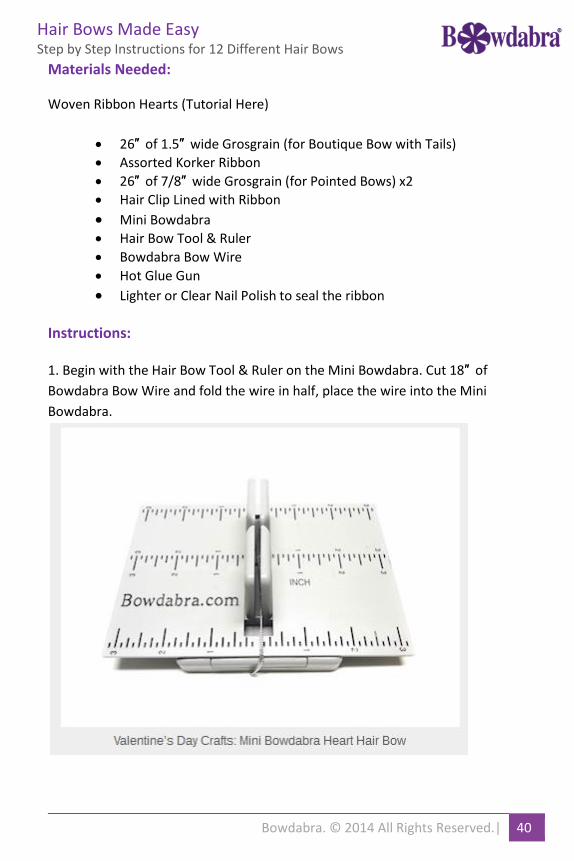
1. Begin with the Hair Bow Tool & Ruler on the Mini Bowdabra. Cut 18″ of
Bowdabra Bow Wire and fold the wire in half, place the wire into the Mini
Bowdabra.
Hair Bows Made Easy Step by Step Instructions for 12 Different Hair Bows
Bowdabra. © 2014 All Rights Reserved.| 41
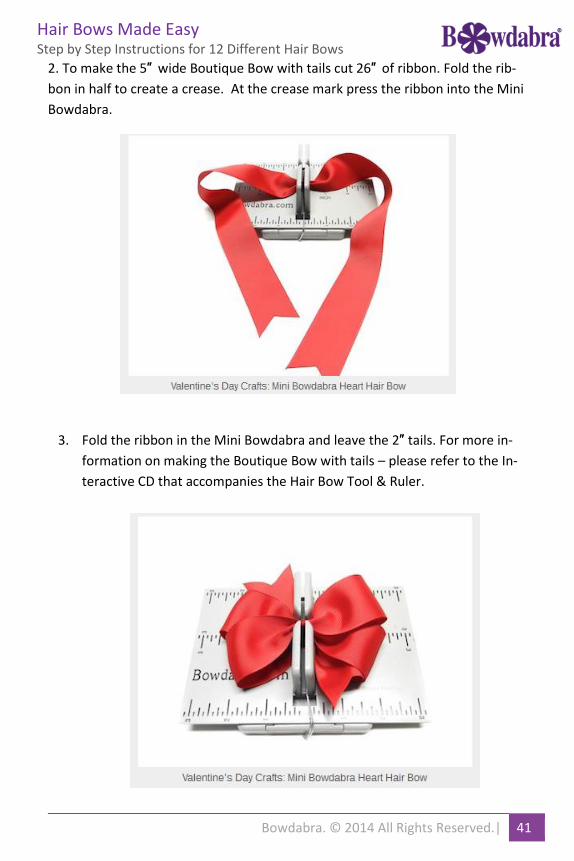
2. To make the 5″ wide Boutique Bow with tails cut 26″ of ribbon. Fold the rib-
bon in half to create a crease. At the crease mark press the ribbon into the Mini
Bowdabra.
3. Fold the ribbon in the Mini Bowdabra and leave the 2″ tails. For more in-
formation on making the Boutique Bow with tails – please refer to the In-
teractive CD that accompanies the Hair Bow Tool & Ruler.
Hair Bows Made Easy Step by Step Instructions for 12 Different Hair Bows
Bowdabra. © 2014 All Rights Reserved.| 42
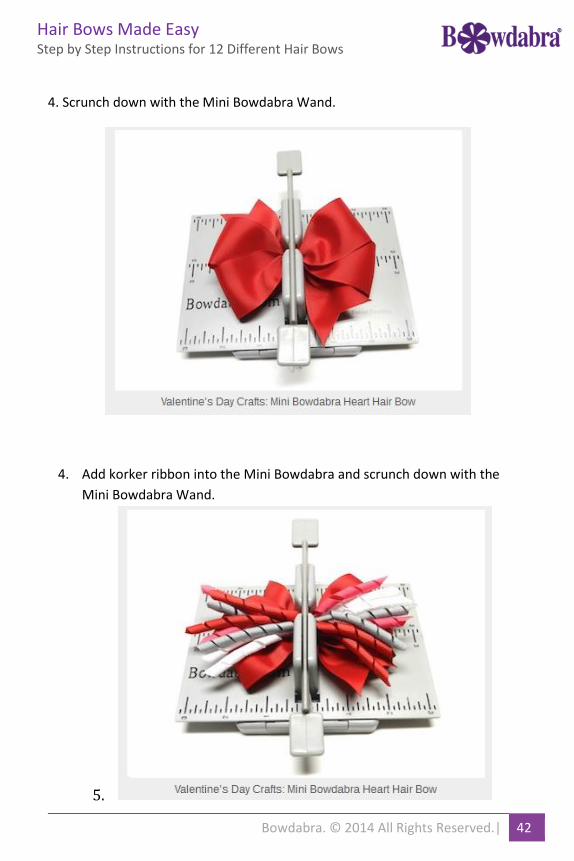
4. Scrunch down with the Mini Bowdabra Wand.
4. Add korker ribbon into the Mini Bowdabra and scrunch down with the
Mini Bowdabra Wand.
5.

Hair Bows Made Easy Step by Step Instructions for 12 Different Hair Bows
Bowdabra. © 2014 All Rights Reserved.| 43
6. To make the pointed bows use two pieces of same sized ribbon cut 26″
long. Place the ends of the ribbon together in the Mini Bowdabra.
7. Create a point with the ribbon at the 2.5″ mark. Press the ribbon into the
Mini Bowdabra.

Hair Bows Made Easy Step by Step Instructions for 12 Different Hair Bows
Bowdabra. © 2014 All Rights Reserved.| 44
8. Continue creating points, a total of four. Scrunch down with the Mini
Bowdabra Wand.
9. Thread the two tail ends of wire through the loop. Pull the wire tightly. Re-
move the bow and knot it in the back.
Hair Bows Made Easy Step by Step Instructions for 12 Different Hair Bows
Bowdabra. © 2014 All Rights Reserved.| 45
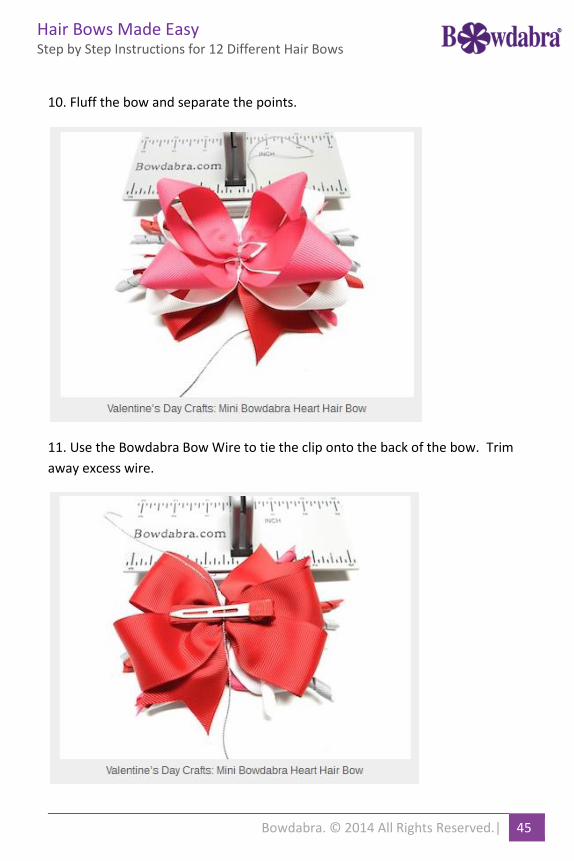
10. Fluff the bow and separate the points.
11. Use the Bowdabra Bow Wire to tie the clip onto the back of the bow. Trim
away excess wire.
Hair Bows Made Easy Step by Step Instructions for 12 Different Hair Bows
Bowdabra. © 2014 All Rights Reserved.| 46
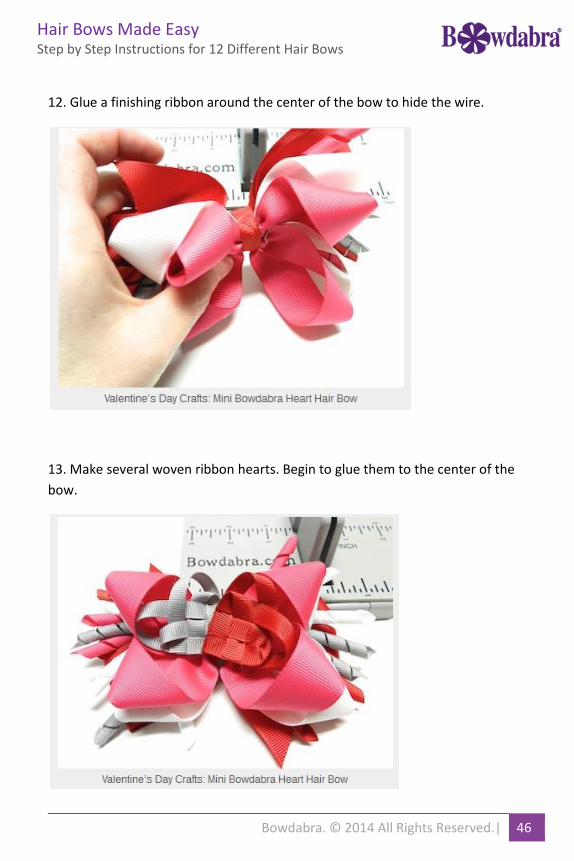
12. Glue a finishing ribbon around the center of the bow to hide the wire.
13. Make several woven ribbon hearts. Begin to glue them to the center of the
bow.

Hair Bows Made Easy Step by Step Instructions for 12 Different Hair Bows
Bowdabra. © 2014 All Rights Reserved.| 47
14. Add a final heart to the center of the bow.
15. Your Valentine hair clip is complete and ready to be worn.
Hair Bows Made Easy Step by Step Instructions for 12 Different Hair Bows
Bowdabra. © 2014 All Rights Reserved.| 48
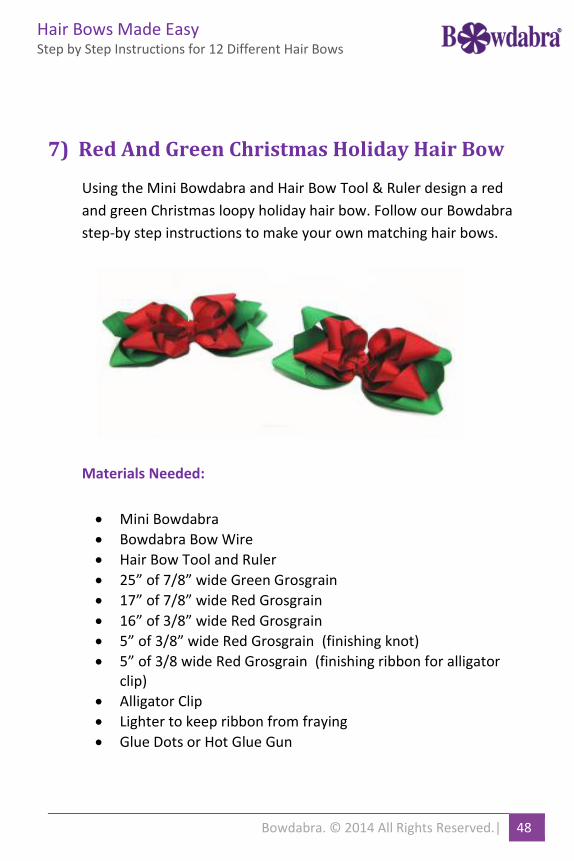
7) Red And Green Christmas Holiday Hair Bow
Using the Mini Bowdabra and Hair Bow Tool & Ruler design a red
and green Christmas loopy holiday hair bow. Follow our Bowdabra
step-by step instructions to make your own matching hair bows.
Materials Needed:
Mini Bowdabra
Bowdabra Bow Wire
Hair Bow Tool and Ruler
25” of 7/8” wide Green Grosgrain
17” of 7/8” wide Red Grosgrain
16” of 3/8” wide Red Grosgrain
5” of 3/8” wide Red Grosgrain (finishing knot)
5” of 3/8 wide Red Grosgrain (finishing ribbon for alligator clip)
Alligator Clip
Lighter to keep ribbon from fraying
Glue Dots or Hot Glue Gun
Hair Bows Made Easy Step by Step Instructions for 12 Different Hair Bows
Bowdabra. © 2014 All Rights Reserved.| 49
Instructions:
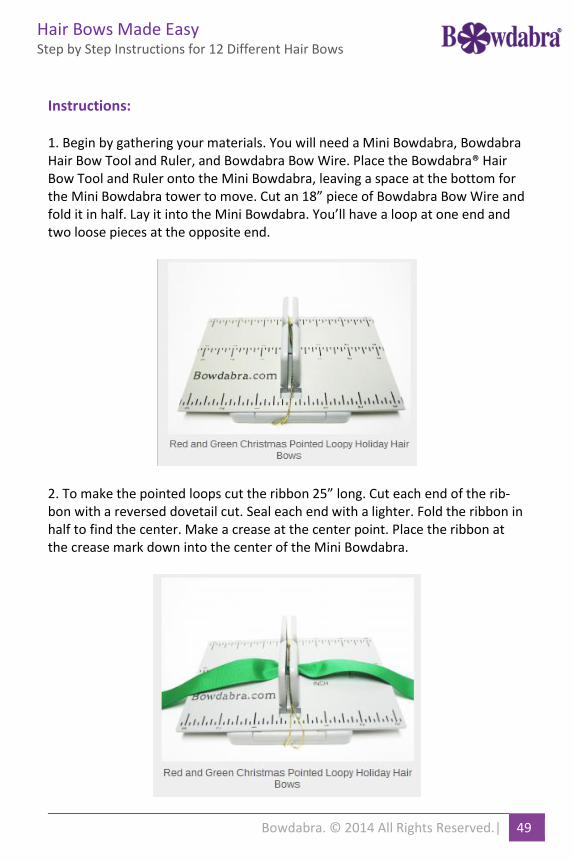
1. Begin by gathering your materials. You will need a Mini Bowdabra, Bowdabra Hair Bow Tool and Ruler, and Bowdabra Bow Wire. Place the Bowdabra® Hair Bow Tool and Ruler onto the Mini Bowdabra, leaving a space at the bottom for the Mini Bowdabra tower to move. Cut an 18” piece of Bowdabra Bow Wire and fold it in half. Lay it into the Mini Bowdabra. You’ll have a loop at one end and two loose pieces at the opposite end.
2. To make the pointed loops cut the ribbon 25” long. Cut each end of the rib-bon with a reversed dovetail cut. Seal each end with a lighter. Fold the ribbon in half to find the center. Make a crease at the center point. Place the ribbon at the crease mark down into the center of the Mini Bowdabra.

Hair Bows Made Easy Step by Step Instructions for 12 Different Hair Bows
Bowdabra. © 2014 All Rights Reserved.| 50
3. To make your first loop turn the ribbon at an angle place the bottom of the ribbon up, fold, crease the ribbon, and press into the Mini Bowdabra at the 2” mark. Tail should be facing down. Next fold the other side making a loop at the same width. Tail should be facing down.
4. To make the bottom loops. Make another loop the same width as the others with the tail in the center. Fold and crease the ribbon and press into the Mini Bowdabra. Make the last loop with the other tail on the opposite side in the center.
Hair Bows Made Easy Step by Step Instructions for 12 Different Hair Bows
Bowdabra. © 2014 All Rights Reserved.| 51
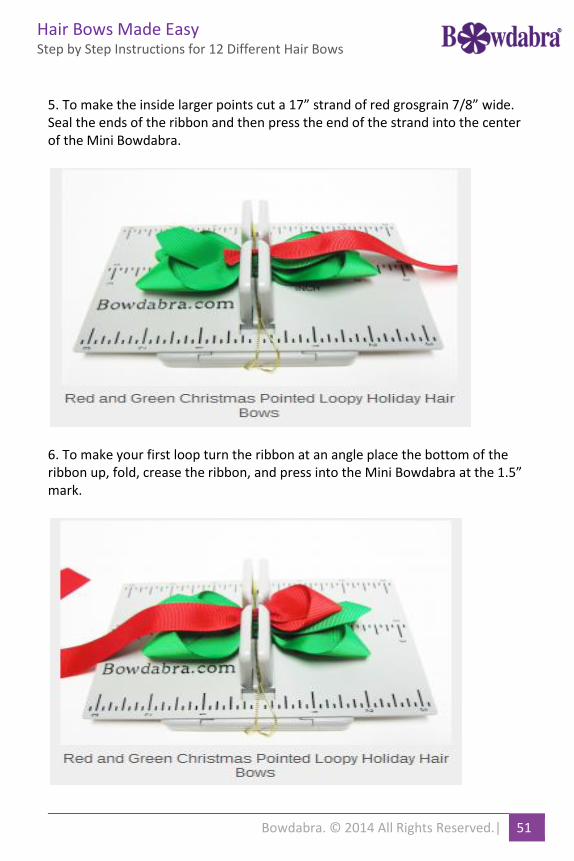
5. To make the inside larger points cut a 17” strand of red grosgrain 7/8” wide. Seal the ends of the ribbon and then press the end of the strand into the center of the Mini Bowdabra.
6. To make your first loop turn the ribbon at an angle place the bottom of the ribbon up, fold, crease the ribbon, and press into the Mini Bowdabra at the 1.5” mark.
Hair Bows Made Easy Step by Step Instructions for 12 Different Hair Bows
Bowdabra. © 2014 All Rights Reserved.| 52
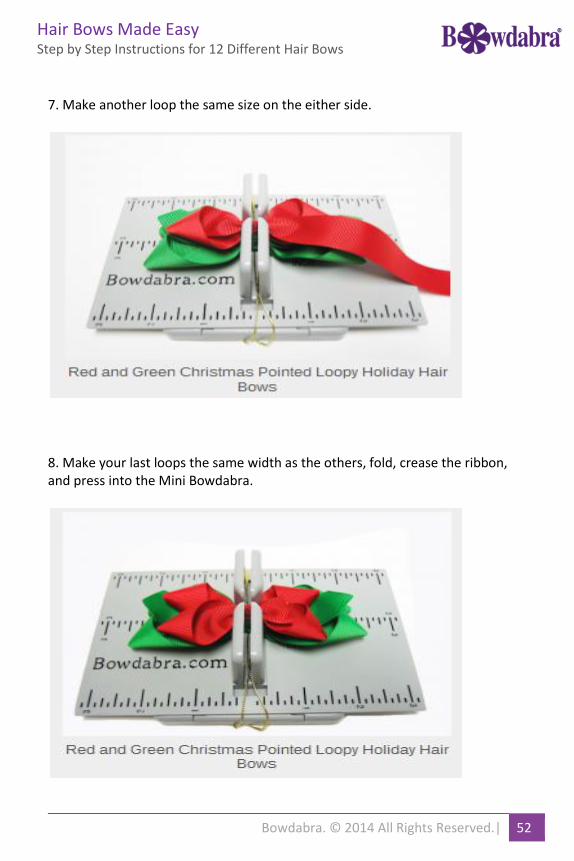
7. Make another loop the same size on the either side.
8. Make your last loops the same width as the others, fold, crease the ribbon, and press into the Mini Bowdabra.
Hair Bows Made Easy Step by Step Instructions for 12 Different Hair Bows
Bowdabra. © 2014 All Rights Reserved.| 53
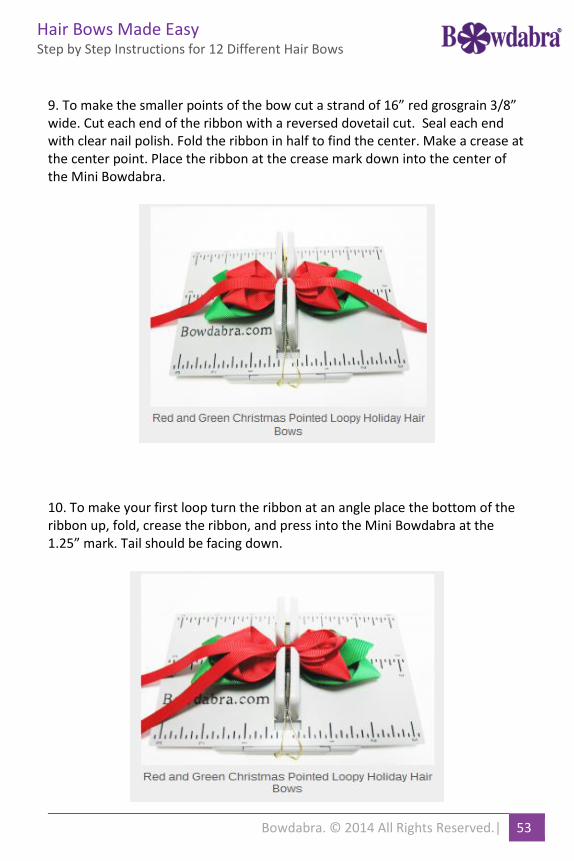
9. To make the smaller points of the bow cut a strand of 16” red grosgrain 3/8” wide. Cut each end of the ribbon with a reversed dovetail cut. Seal each end with clear nail polish. Fold the ribbon in half to find the center. Make a crease at the center point. Place the ribbon at the crease mark down into the center of the Mini Bowdabra.
10. To make your first loop turn the ribbon at an angle place the bottom of the ribbon up, fold, crease the ribbon, and press into the Mini Bowdabra at the 1.25” mark. Tail should be facing down.
Hair Bows Made Easy Step by Step Instructions for 12 Different Hair Bows
Bowdabra. © 2014 All Rights Reserved.| 54
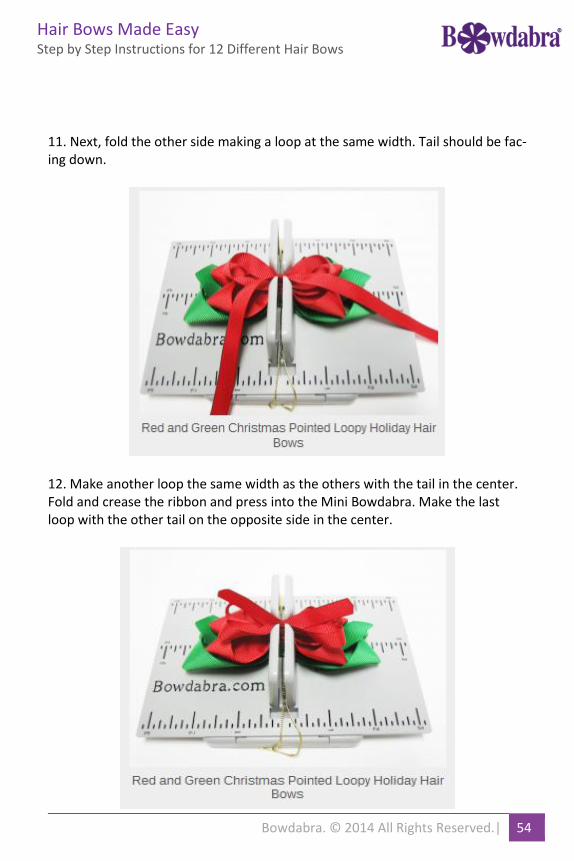
11. Next, fold the other side making a loop at the same width. Tail should be fac-ing down.
12. Make another loop the same width as the others with the tail in the center. Fold and crease the ribbon and press into the Mini Bowdabra. Make the last loop with the other tail on the opposite side in the center.
Hair Bows Made Easy Step by Step Instructions for 12 Different Hair Bows
Bowdabra. © 2014 All Rights Reserved.| 55
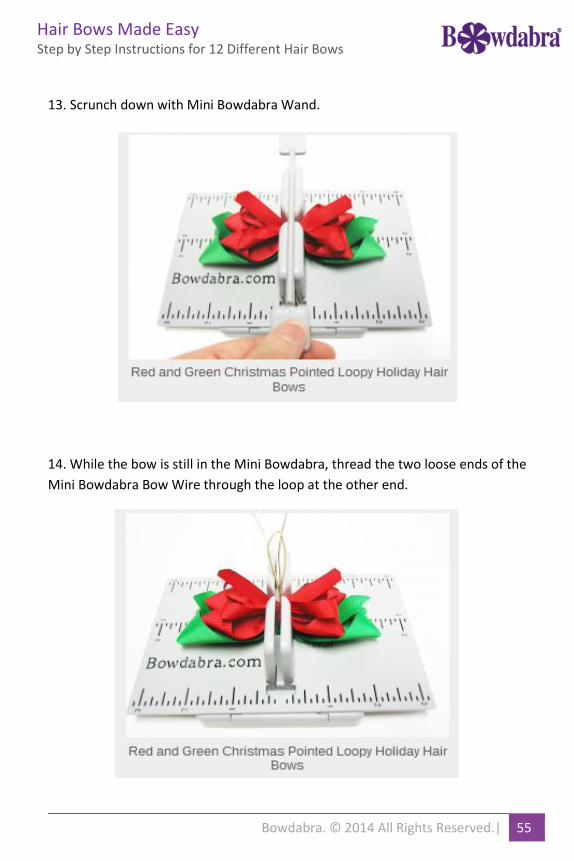
13. Scrunch down with Mini Bowdabra Wand.
14. While the bow is still in the Mini Bowdabra, thread the two loose ends of the
Mini Bowdabra Bow Wire through the loop at the other end.
Hair Bows Made Easy Step by Step Instructions for 12 Different Hair Bows
Bowdabra. © 2014 All Rights Reserved.| 56
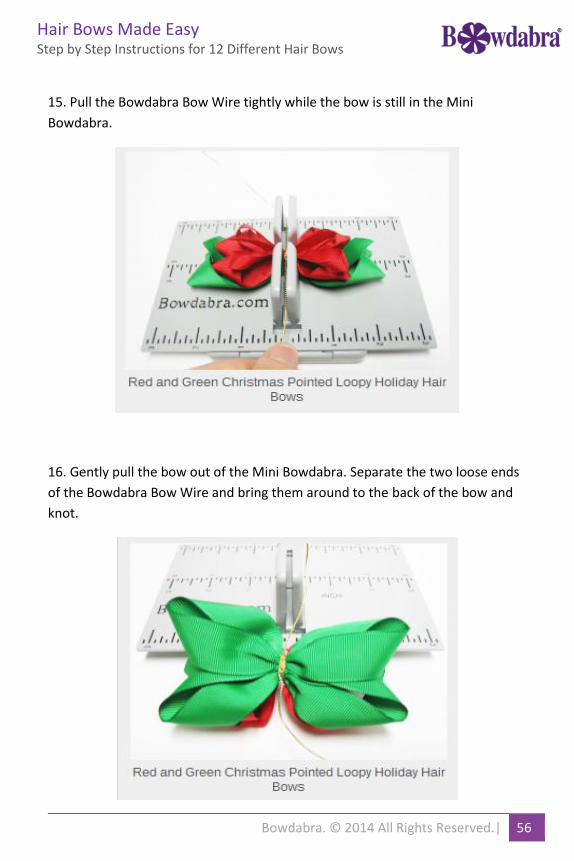
15. Pull the Bowdabra Bow Wire tightly while the bow is still in the Mini
Bowdabra.
16. Gently pull the bow out of the Mini Bowdabra. Separate the two loose ends
of the Bowdabra Bow Wire and bring them around to the back of the bow and
knot.
Hair Bows Made Easy Step by Step Instructions for 12 Different Hair Bows
Bowdabra. © 2014 All Rights Reserved.| 57
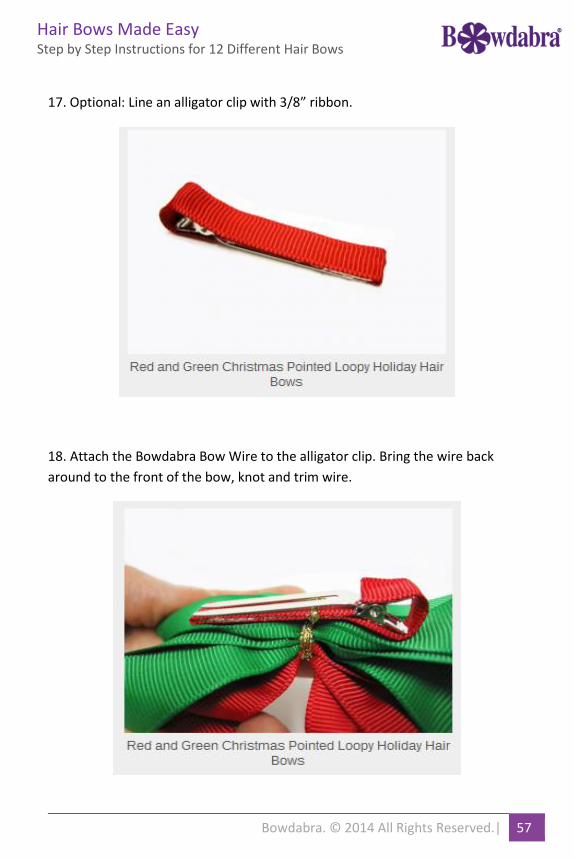
17. Optional: Line an alligator clip with 3/8” ribbon.
18. Attach the Bowdabra Bow Wire to the alligator clip. Bring the wire back
around to the front of the bow, knot and trim wire.
Hair Bows Made Easy Step by Step Instructions for 12 Different Hair Bows
Bowdabra. © 2014 All Rights Reserved.| 58
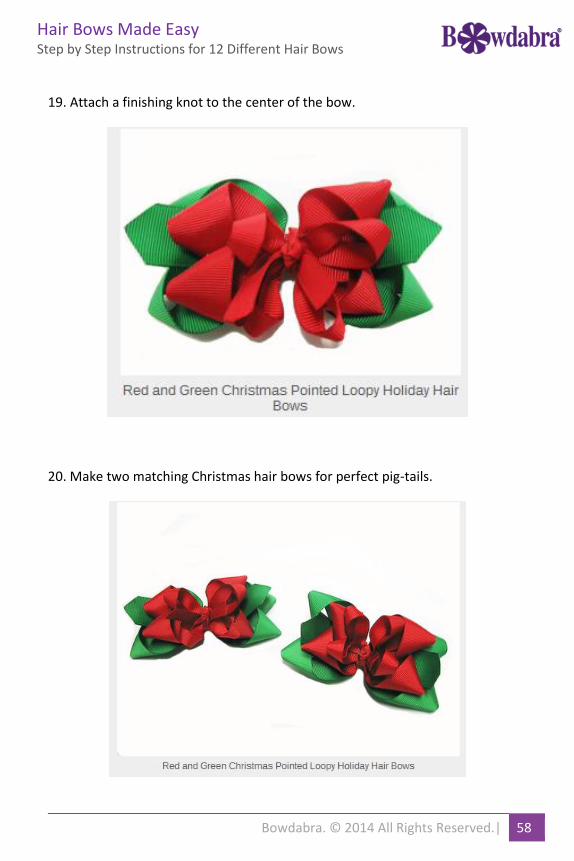
19. Attach a finishing knot to the center of the bow.
20. Make two matching Christmas hair bows for perfect pig-tails.
Hair Bows Made Easy Step by Step Instructions for 12 Different Hair Bows
Bowdabra. © 2014 All Rights Reserved.| 59
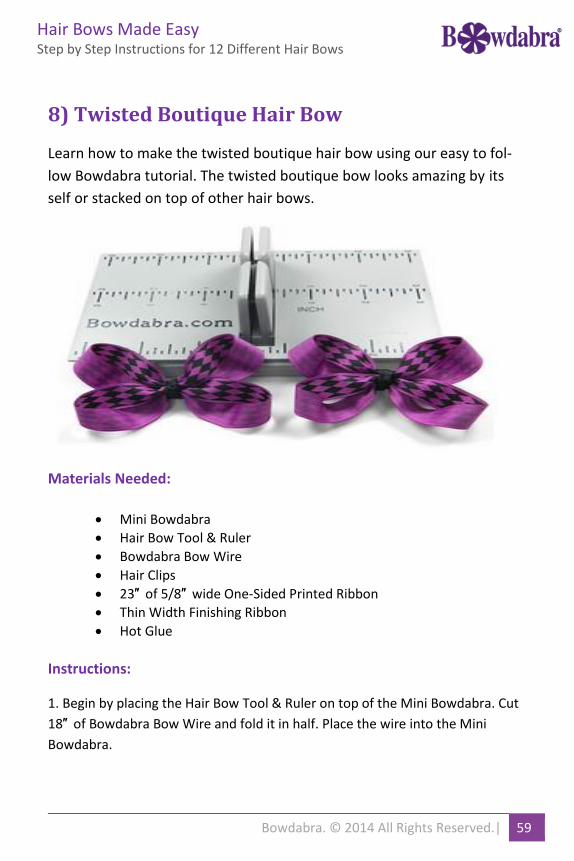
8) Twisted Boutique Hair Bow
Learn how to make the twisted boutique hair bow using our easy to fol-
low Bowdabra tutorial. The twisted boutique bow looks amazing by its
self or stacked on top of other hair bows.
Materials Needed:
Mini Bowdabra
Hair Bow Tool & Ruler
Bowdabra Bow Wire
Hair Clips
23″ of 5/8″ wide One-Sided Printed Ribbon
Thin Width Finishing Ribbon
Hot Glue
Instructions:
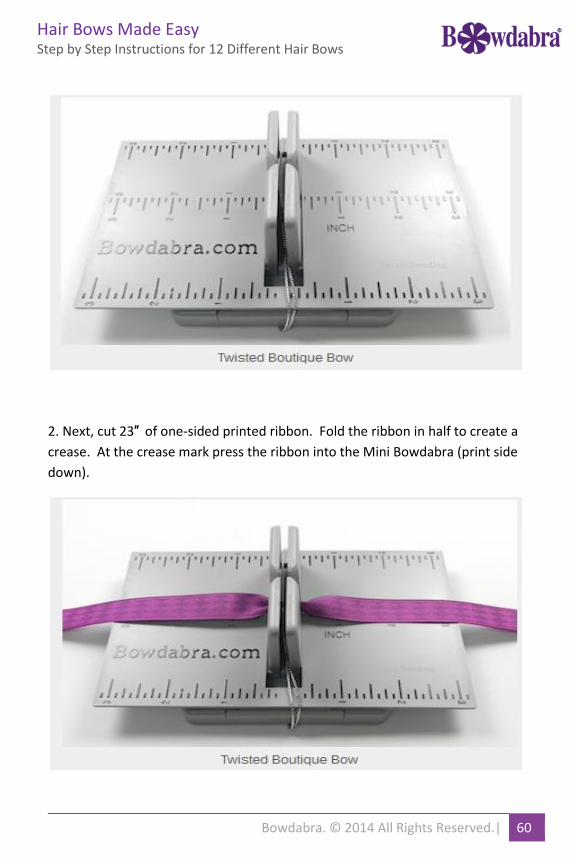
1. Begin by placing the Hair Bow Tool & Ruler on top of the Mini Bowdabra. Cut
18″ of Bowdabra Bow Wire and fold it in half. Place the wire into the Mini
Bowdabra.
Hair Bows Made Easy Step by Step Instructions for 12 Different Hair Bows
Bowdabra. © 2014 All Rights Reserved.| 60
2. Next, cut 23″ of one-sided printed ribbon. Fold the ribbon in half to create a
crease. At the crease mark press the ribbon into the Mini Bowdabra (print side
down).
Hair Bows Made Easy Step by Step Instructions for 12 Different Hair Bows
Bowdabra. © 2014 All Rights Reserved.| 61
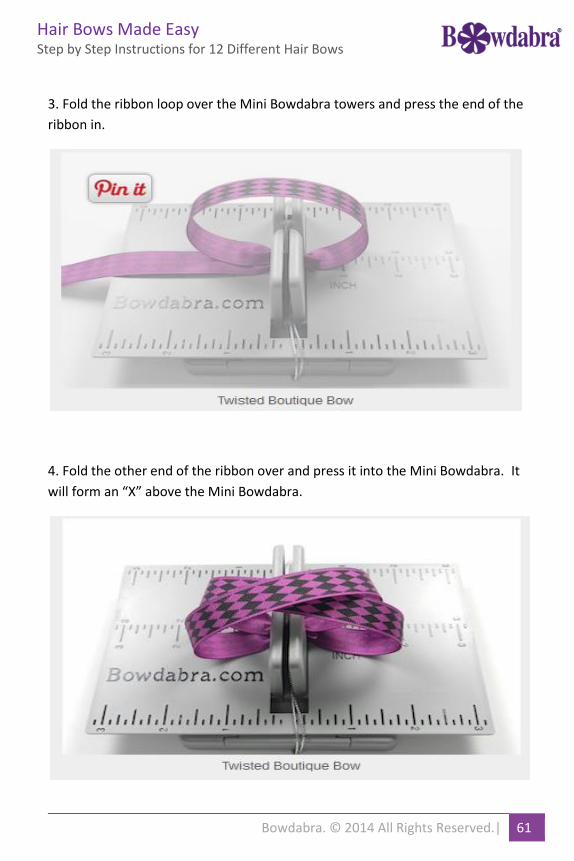
3. Fold the ribbon loop over the Mini Bowdabra towers and press the end of the
ribbon in.
4. Fold the other end of the ribbon over and press it into the Mini Bowdabra. It
will form an “X” above the Mini Bowdabra.
Hair Bows Made Easy Step by Step Instructions for 12 Different Hair Bows
Bowdabra. © 2014 All Rights Reserved.| 62
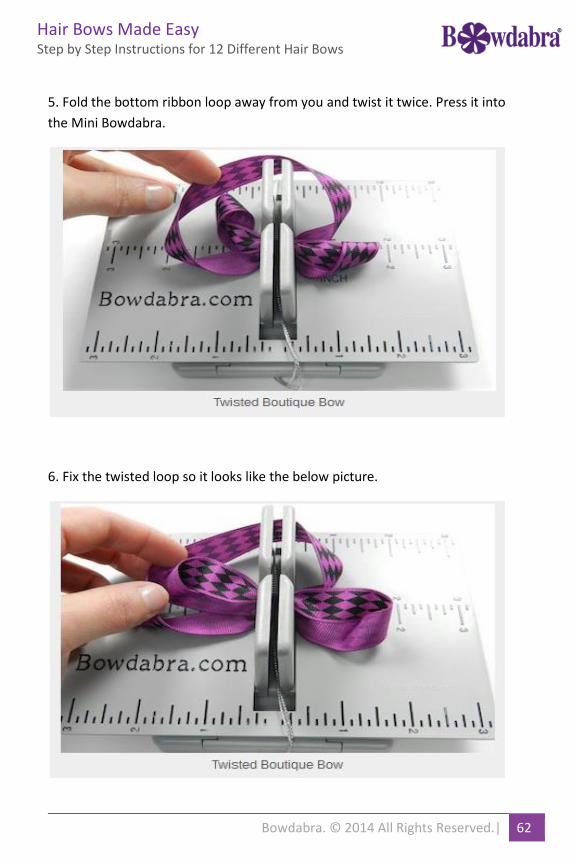
5. Fold the bottom ribbon loop away from you and twist it twice. Press it into
the Mini Bowdabra.
6. Fix the twisted loop so it looks like the below picture.
Hair Bows Made Easy Step by Step Instructions for 12 Different Hair Bows
Bowdabra. © 2014 All Rights Reserved.| 63
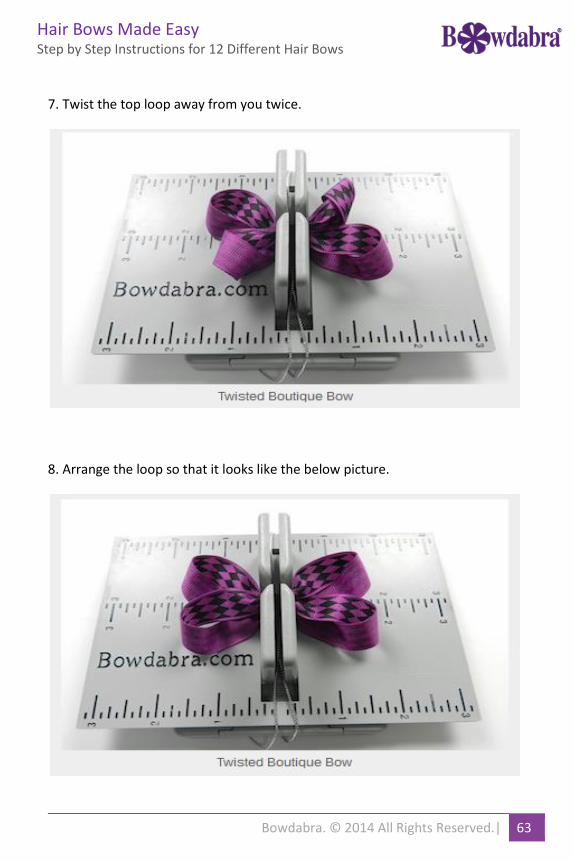
7. Twist the top loop away from you twice.
8. Arrange the loop so that it looks like the below picture.
Hair Bows Made Easy Step by Step Instructions for 12 Different Hair Bows
Bowdabra. © 2014 All Rights Reserved.| 64
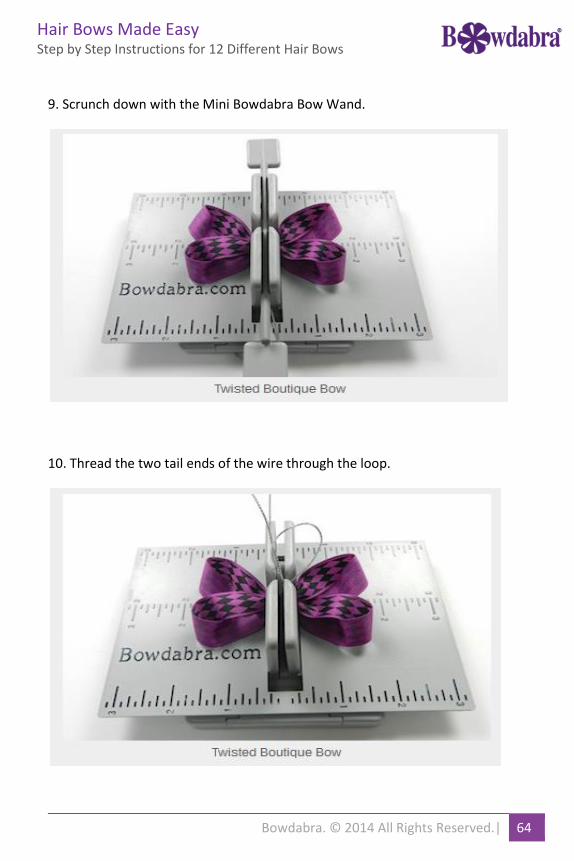
9. Scrunch down with the Mini Bowdabra Bow Wand.
10. Thread the two tail ends of the wire through the loop.

Hair Bows Made Easy Step by Step Instructions for 12 Different Hair Bows
Bowdabra. © 2014 All Rights Reserved.| 65
11. Pull the wire tightly.
12. Remove the bow from the Mini Bowdabra and bring the wire around the
back of the bow and knot.
Hair Bows Made Easy Step by Step Instructions for 12 Different Hair Bows
Bowdabra. © 2014 All Rights Reserved.| 66
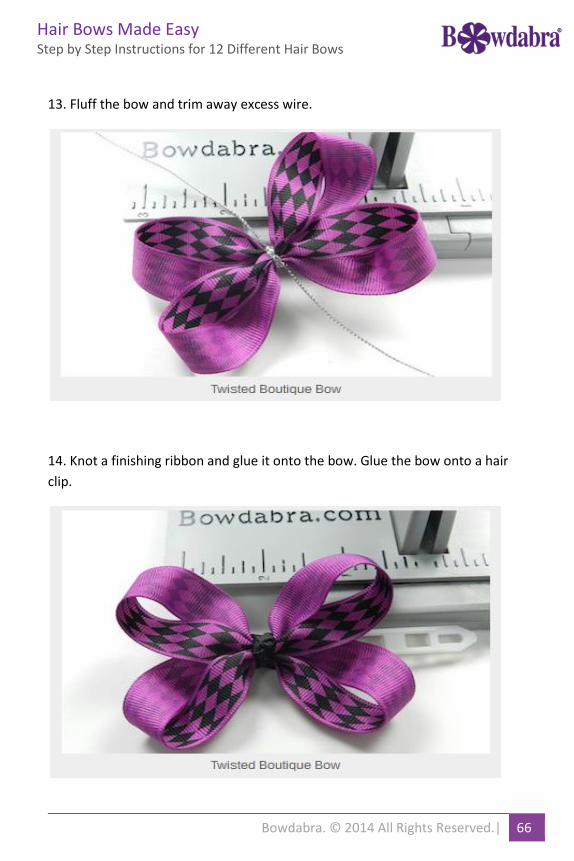
13. Fluff the bow and trim away excess wire.
14. Knot a finishing ribbon and glue it onto the bow. Glue the bow onto a hair
clip.
Hair Bows Made Easy Step by Step Instructions for 12 Different Hair Bows
Bowdabra. © 2014 All Rights Reserved.| 67
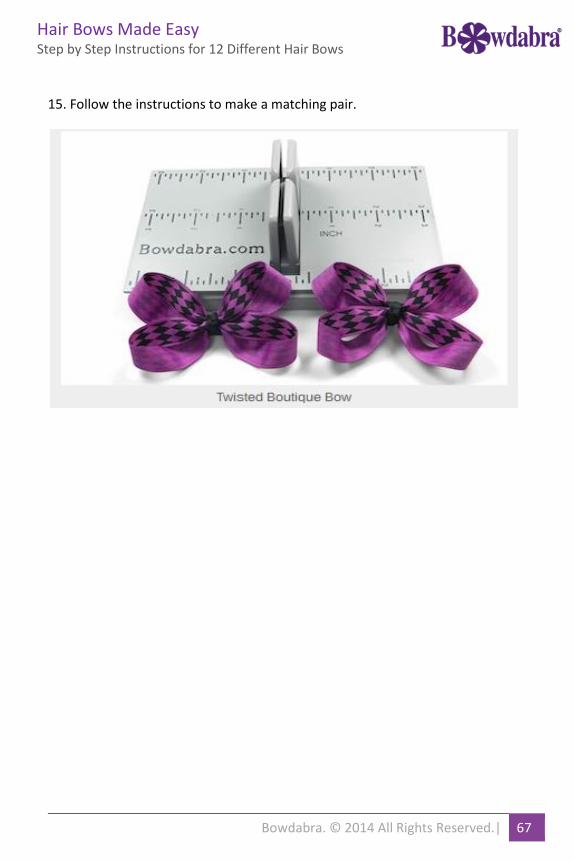
15. Follow the instructions to make a matching pair.
Hair Bows Made Easy Step by Step Instructions for 12 Different Hair Bows
Bowdabra. © 2014 All Rights Reserved.| 68
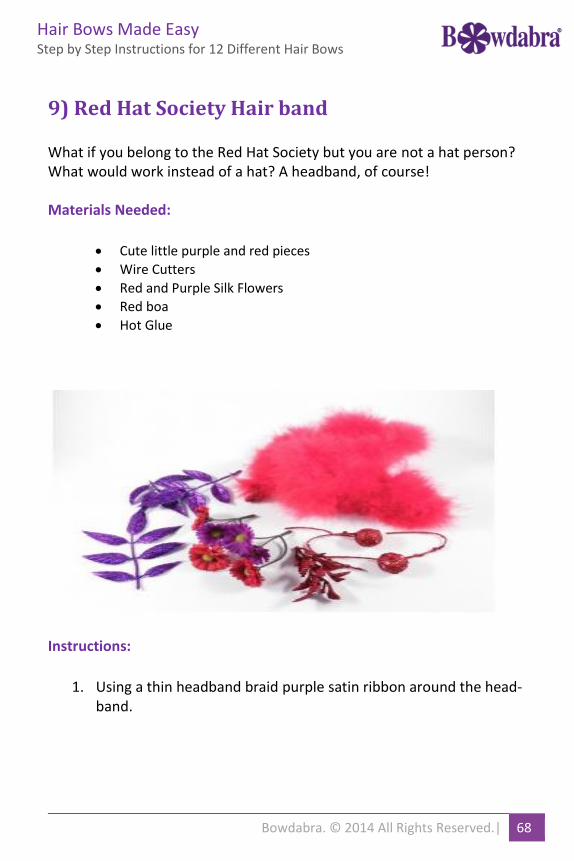
9) Red Hat Society Hair band
What if you belong to the Red Hat Society but you are not a hat person? What would work instead of a hat? A headband, of course!
Materials Needed:
Cute little purple and red pieces
Wire Cutters
Red and Purple Silk Flowers
Red boa
Hot Glue
Instructions:
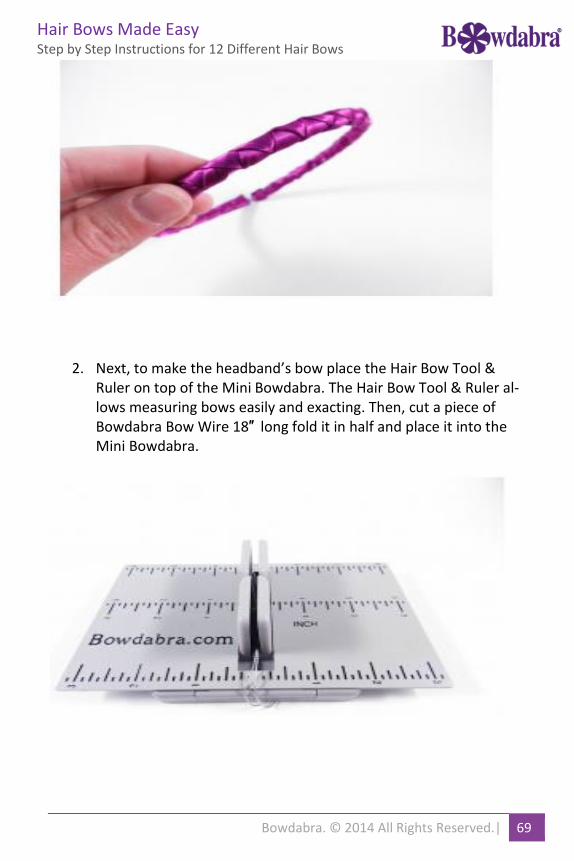
1. Using a thin headband braid purple satin ribbon around the head-band.
Hair Bows Made Easy Step by Step Instructions for 12 Different Hair Bows
Bowdabra. © 2014 All Rights Reserved.| 69
2. Next, to make the headband’s bow place the Hair Bow Tool & Ruler on top of the Mini Bowdabra. The Hair Bow Tool & Ruler al-lows measuring bows easily and exacting. Then, cut a piece of Bowdabra Bow Wire 18″ long fold it in half and place it into the Mini Bowdabra.

Hair Bows Made Easy Step by Step Instructions for 12 Different Hair Bows
Bowdabra. © 2014 All Rights Reserved.| 70
3. Place the red boa into the Mini Bowdabra. Make 3″ boa loops on one side and 1.5″ boa loops on the other.
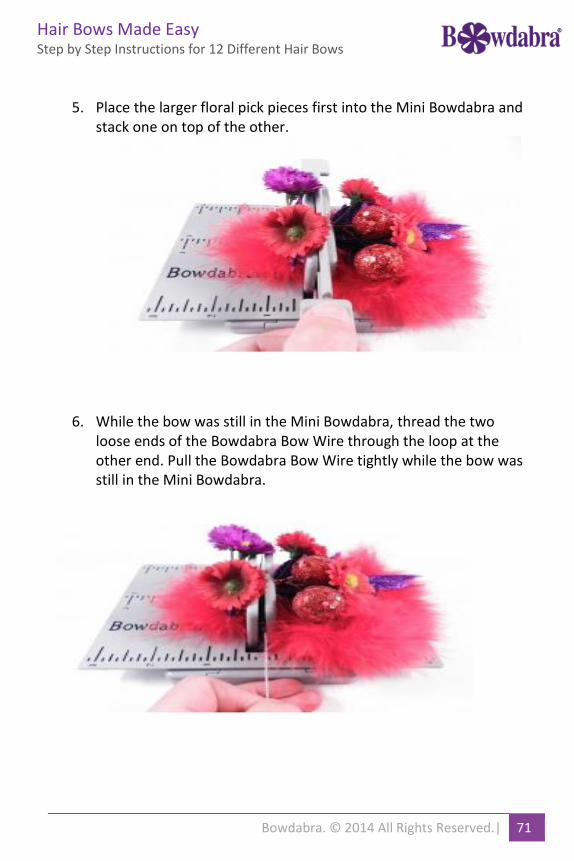
4. Place the larger floral pick pieces first into the Mini Bowdabra and stack one on top of the other.
Hair Bows Made Easy Step by Step Instructions for 12 Different Hair Bows
Bowdabra. © 2014 All Rights Reserved.| 71
5. Place the larger floral pick pieces first into the Mini Bowdabra and stack one on top of the other.
6. While the bow was still in the Mini Bowdabra, thread the two loose ends of the Bowdabra Bow Wire through the loop at the other end. Pull the Bowdabra Bow Wire tightly while the bow was still in the Mini Bowdabra.
Hair Bows Made Easy Step by Step Instructions for 12 Different Hair Bows
Bowdabra. © 2014 All Rights Reserved.| 72
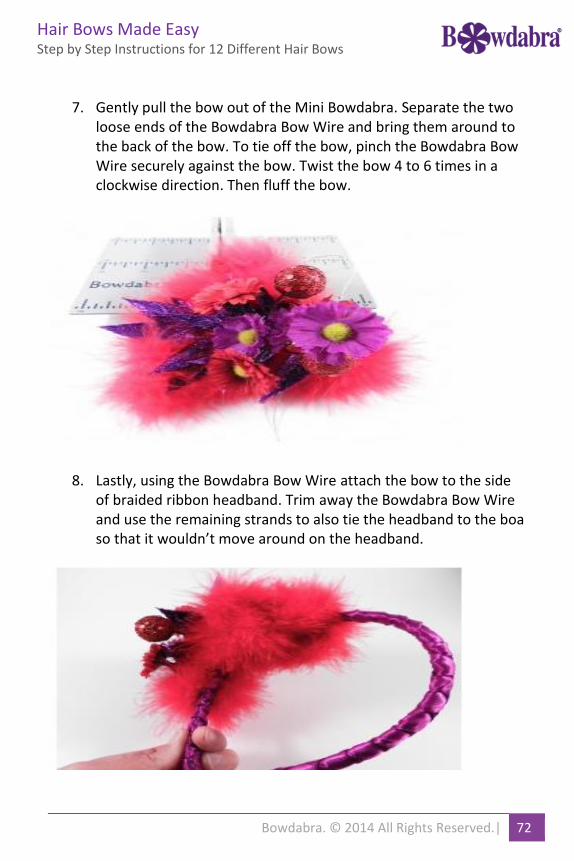
7. Gently pull the bow out of the Mini Bowdabra. Separate the two loose ends of the Bowdabra Bow Wire and bring them around to the back of the bow. To tie off the bow, pinch the Bowdabra Bow Wire securely against the bow. Twist the bow 4 to 6 times in a clockwise direction. Then fluff the bow.
8. Lastly, using the Bowdabra Bow Wire attach the bow to the side of braided ribbon headband. Trim away the Bowdabra Bow Wire and use the remaining strands to also tie the headband to the boa so that it wouldn’t move around on the headband.
Hair Bows Made Easy Step by Step Instructions for 12 Different Hair Bows
Bowdabra. © 2014 All Rights Reserved.| 73
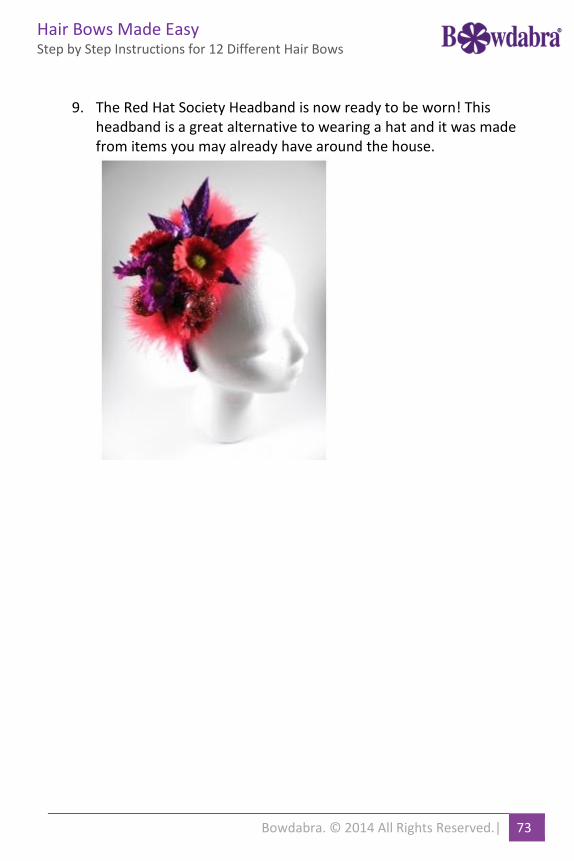
9. The Red Hat Society Headband is now ready to be worn! This headband is a great alternative to wearing a hat and it was made from items you may already have around the house.
Hair Bows Made Easy Step by Step Instructions for 12 Different Hair Bows
Bowdabra. © 2014 All Rights Reserved.| 74
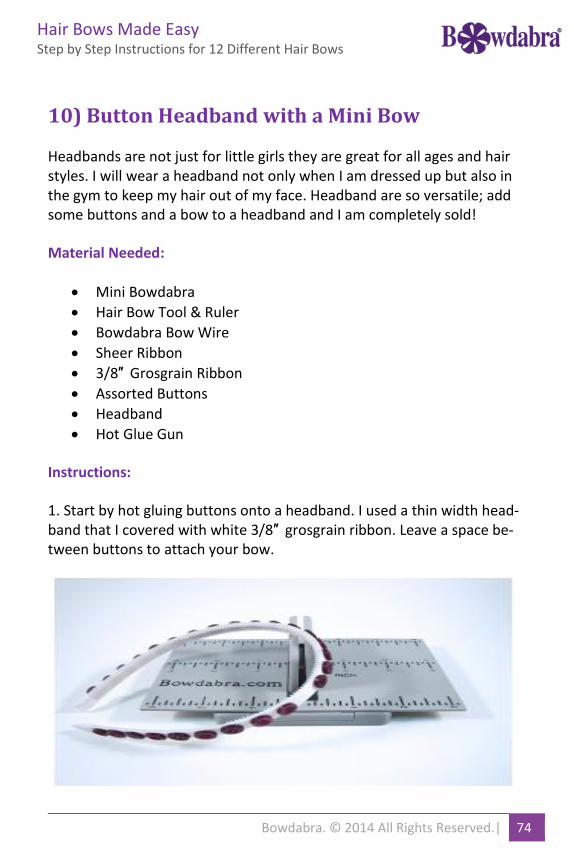
10) Button Headband with a Mini Bow
Headbands are not just for little girls they are great for all ages and hair styles. I will wear a headband not only when I am dressed up but also in the gym to keep my hair out of my face. Headband are so versatile; add some buttons and a bow to a headband and I am completely sold!
Material Needed:
Mini Bowdabra
Hair Bow Tool & Ruler
Bowdabra Bow Wire
Sheer Ribbon
3/8″ Grosgrain Ribbon
Assorted Buttons
Headband
Hot Glue Gun
Instructions:
1. Start by hot gluing buttons onto a headband. I used a thin width head-band that I covered with white 3/8″ grosgrain ribbon. Leave a space be-tween buttons to attach your bow.
Hair Bows Made Easy Step by Step Instructions for 12 Different Hair Bows
Bowdabra. © 2014 All Rights Reserved.| 75
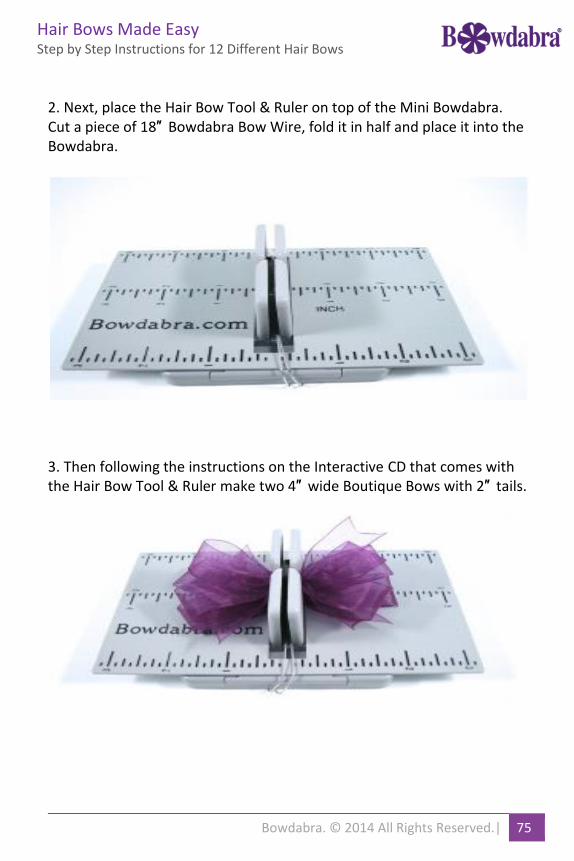
2. Next, place the Hair Bow Tool & Ruler on top of the Mini Bowdabra. Cut a piece of 18″ Bowdabra Bow Wire, fold it in half and place it into the Bowdabra.
3. Then following the instructions on the Interactive CD that comes with the Hair Bow Tool & Ruler make two 4″ wide Boutique Bows with 2″ tails.
Hair Bows Made Easy Step by Step Instructions for 12 Different Hair Bows
Bowdabra. © 2014 All Rights Reserved.| 76
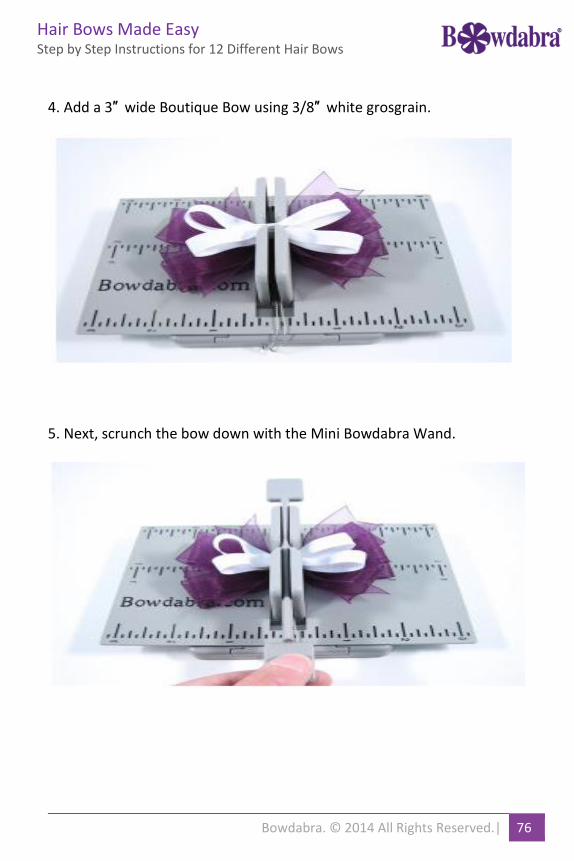
4. Add a 3″ wide Boutique Bow using 3/8″ white grosgrain.
5. Next, scrunch the bow down with the Mini Bowdabra Wand.

Hair Bows Made Easy Step by Step Instructions for 12 Different Hair Bows
Bowdabra. © 2014 All Rights Reserved.| 77
6. While the bow is still in the Mini Bowdabra, thread the two loose ends of the Bowdabra Bow Wire through the loop at the other end. Pull the Bowdabra Bow Wire tightly while the bow is still in the Mini Bowdabra.
7. Gently pull the bow out of the Mini Bowdabra. Separate the two loose ends of the Bowdabra Bow Wire and bring them around to the back of the bow. To tie off the bow, pinch the Bowdabra Bow Wire securely against the bow. Twist the bow 4 to 6 times in a clockwise direction.
Hair Bows Made Easy Step by Step Instructions for 12 Different Hair Bows
Bowdabra. © 2014 All Rights Reserved.| 78
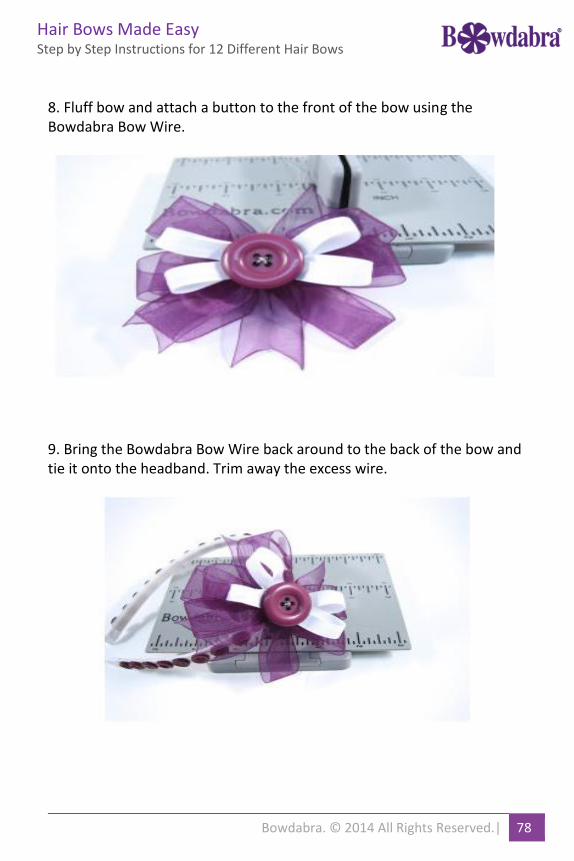
8. Fluff bow and attach a button to the front of the bow using the Bowdabra Bow Wire.
9. Bring the Bowdabra Bow Wire back around to the back of the bow and tie it onto the headband. Trim away the excess wire.
Hair Bows Made Easy Step by Step Instructions for 12 Different Hair Bows
Bowdabra. © 2014 All Rights Reserved.| 79
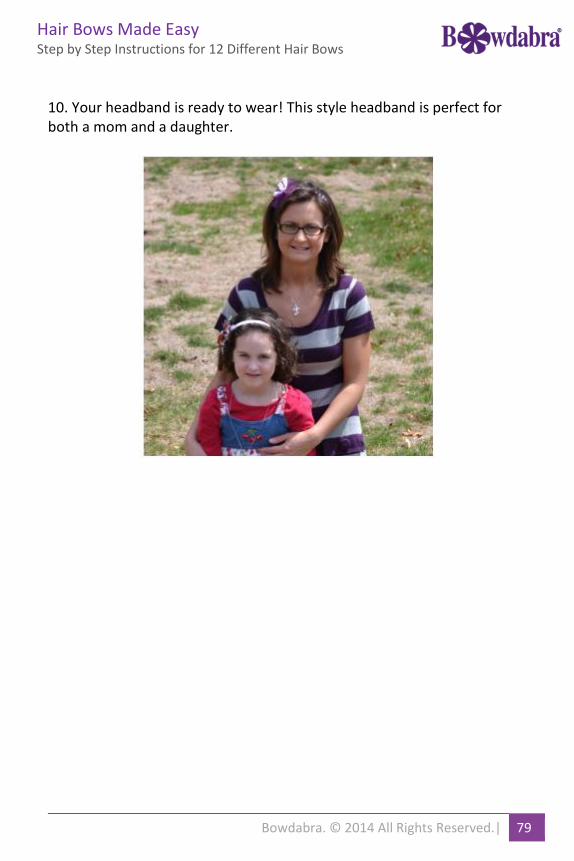
10. Your headband is ready to wear! This style headband is perfect for both a mom and a daughter.
Hair Bows Made Easy Step by Step Instructions for 12 Different Hair Bows
Bowdabra. © 2014 All Rights Reserved.| 80
11) Ponytail Bow
A ponytails bow is perfect for older teens and women. This tutorial is to help you make a pony-o or ponytail streamer bow. Make a bow and at-tach it to a ponytail all in one easy step!
Material Needed:
Mini Bowdabra
Hair Bow Tool & Ruler
Bowdabra Bow Wire
Elastic Hair Bow
Rubber Band
Instructions:
1. To create a hair bow with elastic attached, begin with the rubber-band in the Mini Bowdabra. No extra tying the bow to the pony-tail you finish the bow with everything completely done!
2. To begin place the Hair Bow Tool & Ruler over the Mini Bowdabra. The Hair Bow Tool & Ruler will help you to measure you hair bow loops exactly. The Hair Bow Tool & Ruler also come with an inter-active that gives you step-by-step instructions on how to make 70 different hair bows.
3. Next, cut a piece of 18″ Bowdabra Bow Wire and fold it in half and lay it into the Mini Bowdabra.
Hair Bows Made Easy Step by Step Instructions for 12 Different Hair Bows
Bowdabra. © 2014 All Rights Reserved.| 81
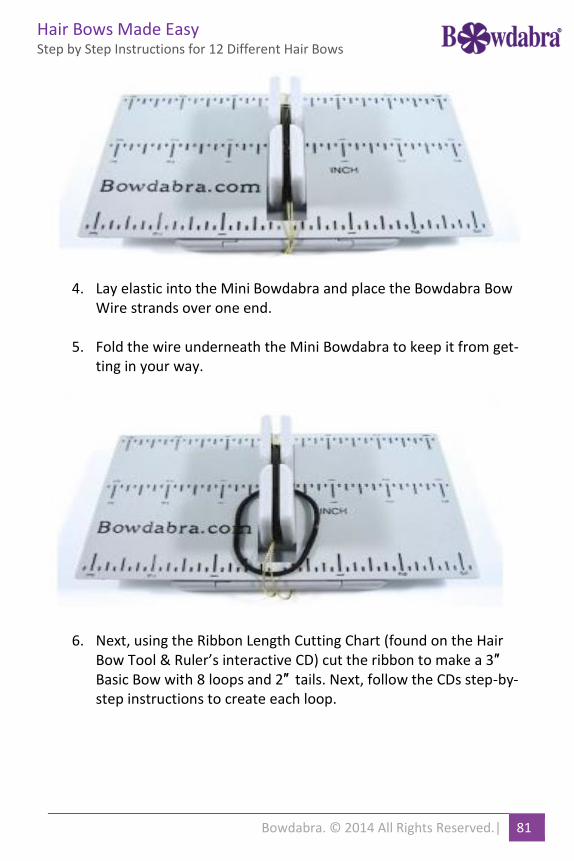
4. Lay elastic into the Mini Bowdabra and place the Bowdabra Bow Wire strands over one end.
5. Fold the wire underneath the Mini Bowdabra to keep it from get-ting in your way.
6. Next, using the Ribbon Length Cutting Chart (found on the Hair Bow Tool & Ruler’s interactive CD) cut the ribbon to make a 3″ Basic Bow with 8 loops and 2″ tails. Next, follow the CDs step-by-step instructions to create each loop.
Hair Bows Made Easy Step by Step Instructions for 12 Different Hair Bows
Bowdabra. © 2014 All Rights Reserved.| 82
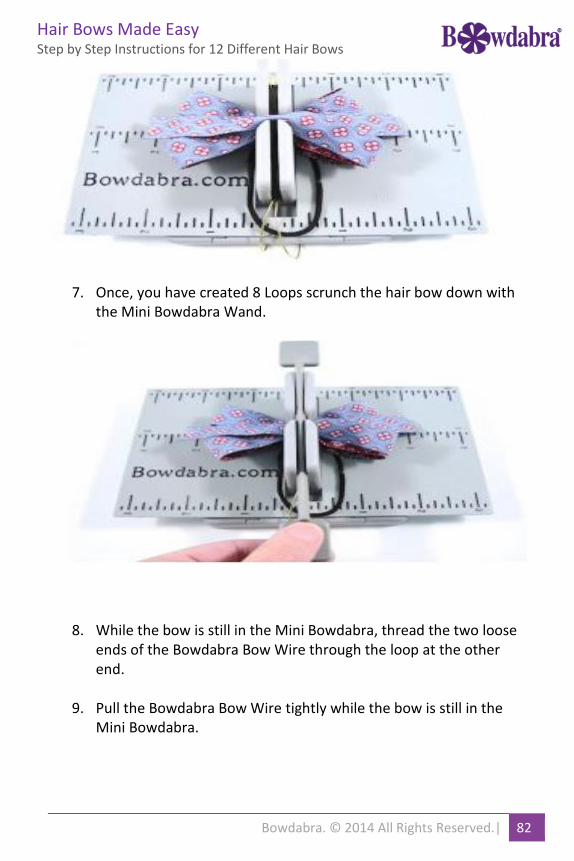
7. Once, you have created 8 Loops scrunch the hair bow down with the Mini Bowdabra Wand.
8. While the bow is still in the Mini Bowdabra, thread the two loose ends of the Bowdabra Bow Wire through the loop at the other end.
9. Pull the Bowdabra Bow Wire tightly while the bow is still in the Mini Bowdabra.
Hair Bows Made Easy Step by Step Instructions for 12 Different Hair Bows
Bowdabra. © 2014 All Rights Reserved.| 83
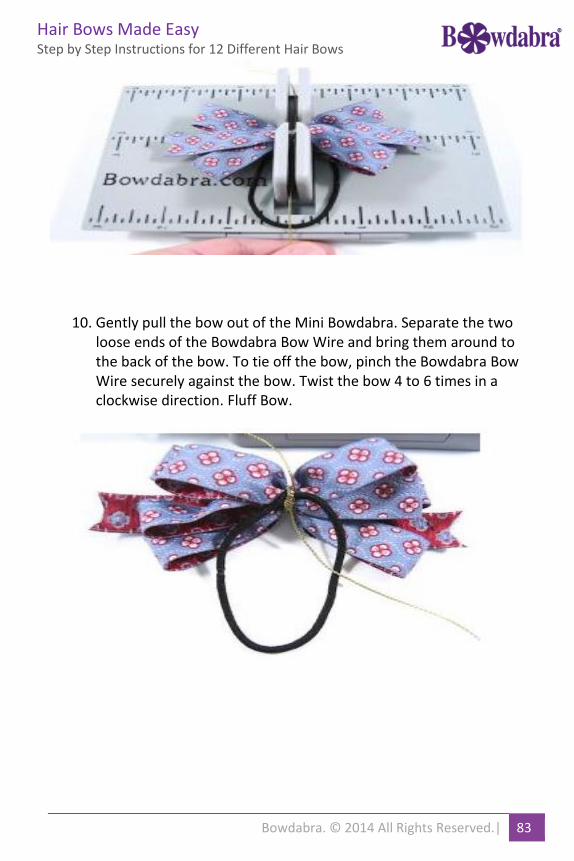
10. Gently pull the bow out of the Mini Bowdabra. Separate the two loose ends of the Bowdabra Bow Wire and bring them around to the back of the bow. To tie off the bow, pinch the Bowdabra Bow Wire securely against the bow. Twist the bow 4 to 6 times in a clockwise direction. Fluff Bow.
Hair Bows Made Easy Step by Step Instructions for 12 Different Hair Bows
Bowdabra. © 2014 All Rights Reserved.| 84
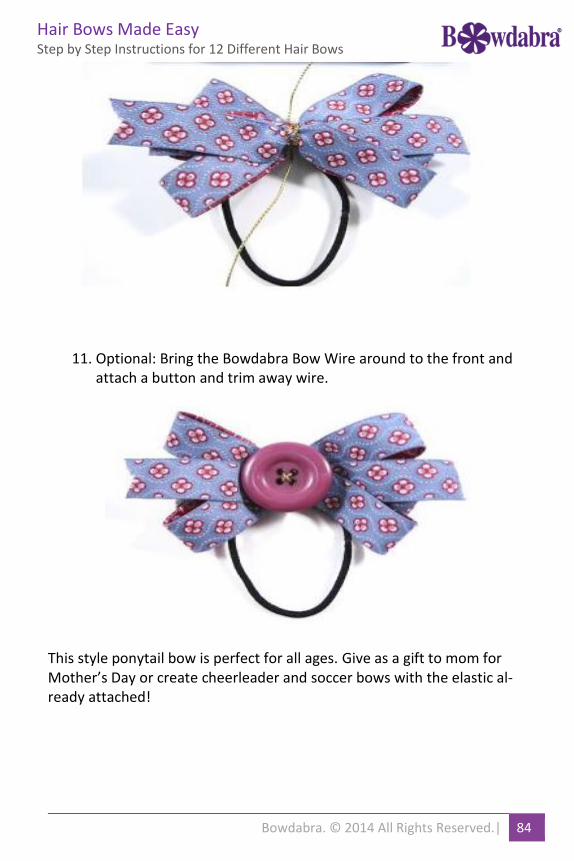
11. Optional: Bring the Bowdabra Bow Wire around to the front and attach a button and trim away wire.
This style ponytail bow is perfect for all ages. Give as a gift to mom for Mother’s Day or create cheerleader and soccer bows with the elastic al-ready attached!

Hair Bows Made Easy Step by Step Instructions for 12 Different Hair Bows
Bowdabra. © 2014 All Rights Reserved.| 85
12) How To Make A Bunny Hair Bow
Have you seen Bowdabra’s newest product? We are so proud of the Hair
Bow Tool & Ruler. The Hair Bow Tool and Ruler fits over the Mini
Bowdabra and allows you to measure your hair bow loops evenly. The
ruler comes with an interactive CD with step-by-step instructions on how
to make 70 different hair bows. In addition, to the all the informative hair
bow making resources you receive when you purchase the Hair Bow Tool
& Ruler, Bowdabra’s Design Team will also be providing frequent hair
bow tutorials.
Material Needed:
Mini Bowdabra
Hair Bow Tool & Ruler
Bowdabra Bow Wire
3/8 white grosgrain
Pink Gingham Ribbon
Hair Bow Hardware (we used a double prong alligator clip)
Glue Gun or Glue Dots
Lighter to seal ribbon or Clear Nail Polish
Pink Rhinestone & 2 Pearls
Floral Pearl Stamens

Hair Bows Made Easy Step by Step Instructions for 12 Different Hair Bows
Bowdabra. © 2014 All Rights Reserved.| 86
Instructions:
1. Begin by placing the Hair Bow Tool & Ruler on top of the Mini Bowdabra (inches side up). Next, cut a piece of 18″ Bowdabra Bow Wire, place the wire inside of the Mini Bowdabra.
2. Using 3/8″ white grosgrain and pink gingham place them on top of each other. Insert the ends into the Mini Bowdabra. Form your first bunny ear by making a loop at the 2.5″ mark, then bring the ribbon back through the towers inserting it with the pink gingham on top.
Hair Bows Made Easy Step by Step Instructions for 12 Different Hair Bows
Bowdabra. © 2014 All Rights Reserved.| 87
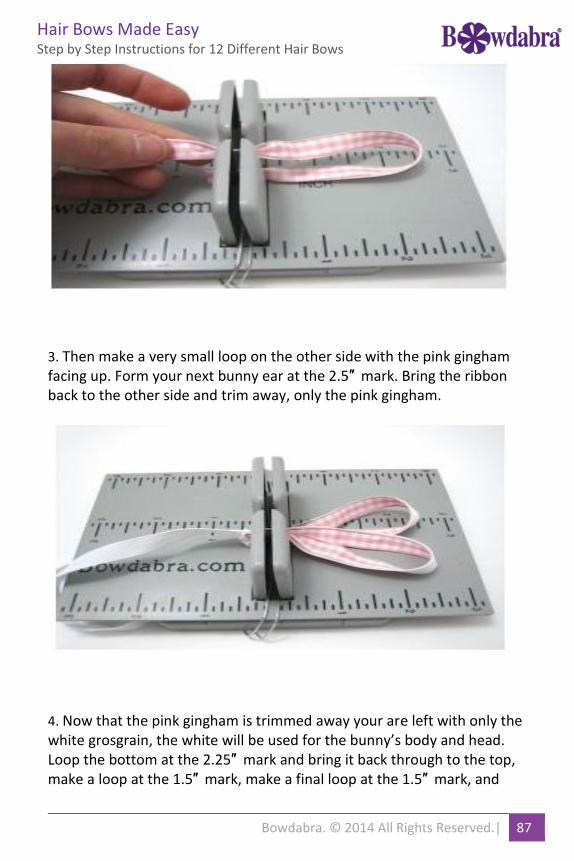
3. Then make a very small loop on the other side with the pink gingham facing up. Form your next bunny ear at the 2.5″ mark. Bring the ribbon back to the other side and trim away, only the pink gingham.
4. Now that the pink gingham is trimmed away your are left with only the white grosgrain, the white will be used for the bunny’s body and head. Loop the bottom at the 2.25″ mark and bring it back through to the top, make a loop at the 1.5″ mark, make a final loop at the 1.5″ mark, and
Hair Bows Made Easy Step by Step Instructions for 12 Different Hair Bows
Bowdabra. © 2014 All Rights Reserved.| 88
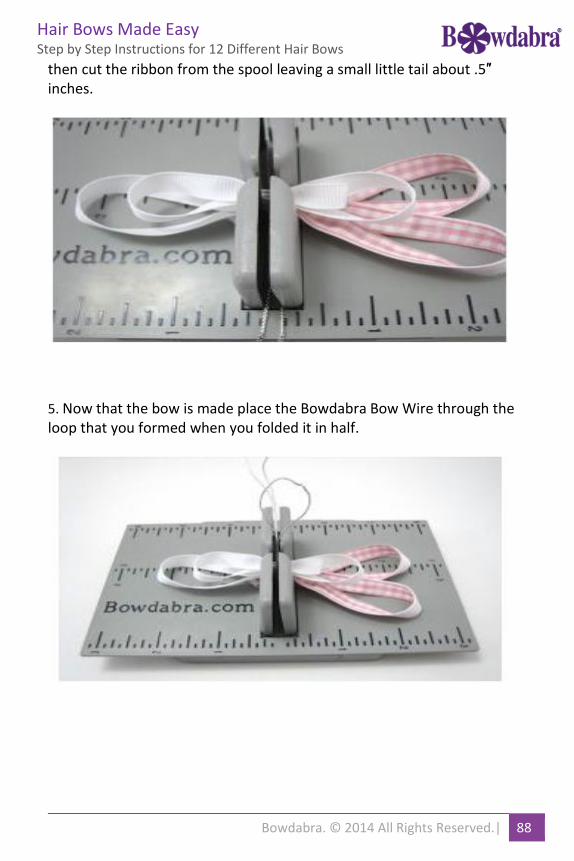
then cut the ribbon from the spool leaving a small little tail about .5″ inches.
5. Now that the bow is made place the Bowdabra Bow Wire through the loop that you formed when you folded it in half.
Hair Bows Made Easy Step by Step Instructions for 12 Different Hair Bows
Bowdabra. © 2014 All Rights Reserved.| 89
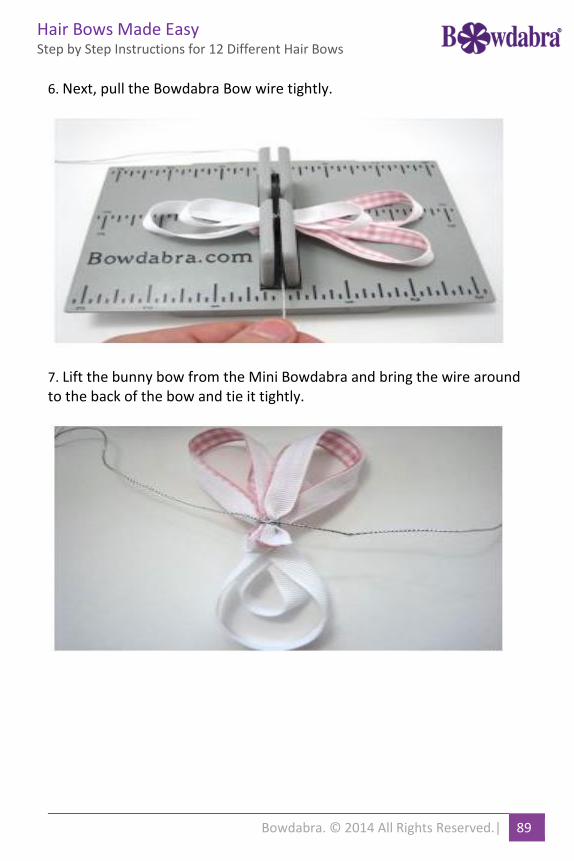
6. Next, pull the Bowdabra Bow wire tightly.
7. Lift the bunny bow from the Mini Bowdabra and bring the wire around to the back of the bow and tie it tightly.
Hair Bows Made Easy Step by Step Instructions for 12 Different Hair Bows
Bowdabra. © 2014 All Rights Reserved.| 90
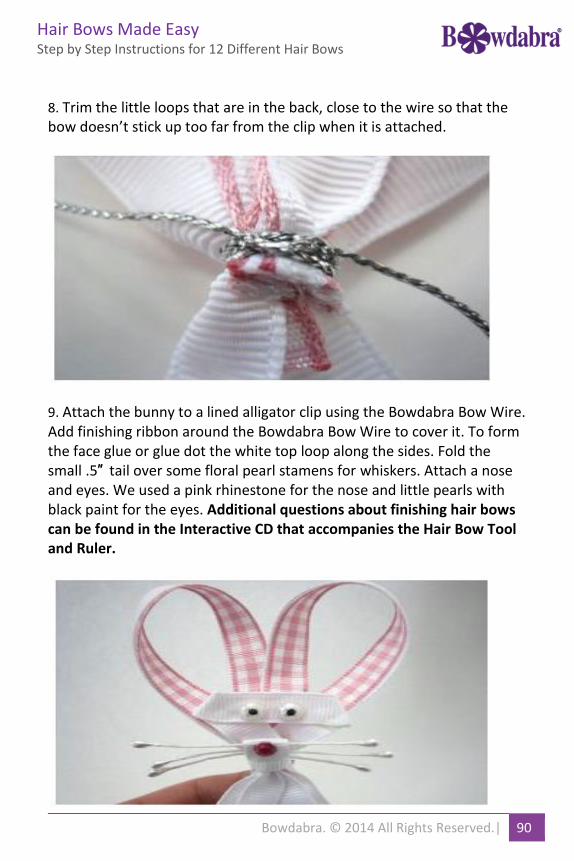
8. Trim the little loops that are in the back, close to the wire so that the bow doesn’t stick up too far from the clip when it is attached.
9. Attach the bunny to a lined alligator clip using the Bowdabra Bow Wire. Add finishing ribbon around the Bowdabra Bow Wire to cover it. To form the face glue or glue dot the white top loop along the sides. Fold the small .5″ tail over some floral pearl stamens for whiskers. Attach a nose and eyes. We used a pink rhinestone for the nose and little pearls with black paint for the eyes. Additional questions about finishing hair bows can be found in the Interactive CD that accompanies the Hair Bow Tool and Ruler.
Hair Bows Made Easy Step by Step Instructions for 12 Different Hair Bows
Bowdabra. © 2014 All Rights Reserved.| 91
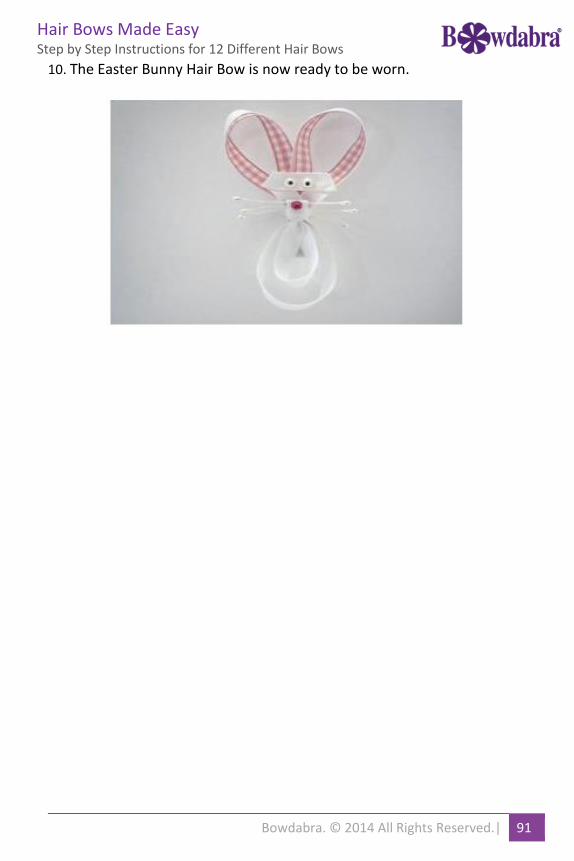
10. The Easter Bunny Hair Bow is now ready to be worn.