growing mother tree seedlings - teacher handbook for school gardening
TRANSCRIPT

Growing Mother-tree Seedlings
A Share-Net Resource Book
Reading-to-learn curriculum materials to support
Technology, Natural Sciences and Language learning areas
1
Acknowledgments
The Handprint resource books have been compiled by Rob O’Donoghue and Helen Fox of
the Rhodes University Environmental Education and Sustainability Unit. Lawrence Sisitka
was responsible for coordination and review, and Kim Ward for editorial review and
production for curriculum and Eco-School use. Development funding was provided by
CAPE. Cover illustrations are by Tammy Griffin.
Knowledge and activity support materials have been adapted from various sources
including the Internet, and web addresses have been provided for readers to access any
copyright materials directly.
A very big thank you to Garth Cambray, PhD in Biotechnology, for his time and
knowledge shared. His experience and information formed the basis of the narrative.
.
Any part of this resource book may be reproduced copyright free, provided that if the materials are
produced in booklet or published form, there is acknowledgment of Share-Net.
Available from Share-Net
P O Box 394, Howick, 3290, South Africa
Tel (033) 3303931
January 2009
ISBN 978-1-919991-07-8

2
RESOURCE BOOKS
The Handprint Resource Books have been designed for creative educators who are
looking or practical ideas to work with in the learning areas of the National Curriculum.
The focus is on sustainability practices that can be taken up within the perspective
that each learning area brings to environment and sustainability concerns.
The resource books are intended to provide teachers with authentic start-up materials for
change-orientated learning. The aim is to work towards re-imagining more sustainable
livelihood practices in a warming world. Each start-up story was developed as a reading-
to-learn account of environmental learning and change. Included are copies of the
knowledge resources that informed those involved in the actual learning experiences
described here. Working with local cases of learning and change has allowed us to
develop the resource books around locally relevant knowledge resources and
practical learning activities that relate to our African context. We are grateful to
teachers and Eco-School support groups who have willingly shared their learning
experiences and activities.
The Handprint Resource Books are an attempt to work from authentic cases of
environmental learning and change. They combine some of the best teaching and
learning tools that are being used to support change-orientated learning in the everyday
realities of our South African schools. The resource books include:
1. Start-up stories with knowledge support materials (Reading for information
to build up a picture)
2. Questions to talk about (Talking to clarify issues and to plan local enquiry)
3. Tools to find out about local concerns (Writing about and reporting on local
issues)
4. Things to try out (Writing up and reporting on what has been tried out)
5. Ideas to deliberate (Discussing, weighing up and recording decisions that will
allow us to ‘re-imagine and re-write’ our sustainability practices in a warming
world).
2. Talk
about local concerns, questions and possibilities
1. Read a case story
5. Deliberate change to more
sustainable practices
4. Try out
new ideas
3. Find out
about local concerns
Start-up story Knowledge support materials
Open-ended questions and key word searches
Enquiry investigations with activity / audit sheets
Practical learning-by-doing project options
Report on change and deliberation ideas Write up your own story of learning and change
1-2 Start-up story to situate 2-4 Local learning engagement 5. Reporting and reflection
1
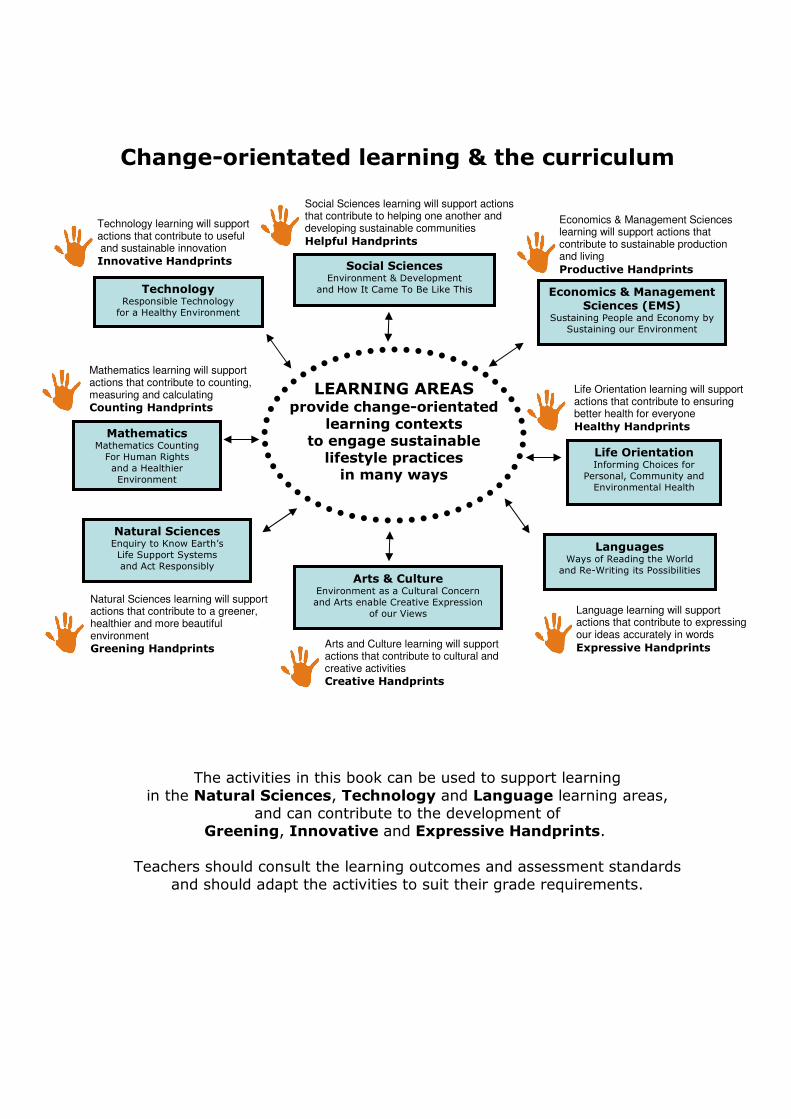
LEARNING AREAS provide change-orientated
learning contexts to engage sustainable lifestyle practices in many ways
Change-orientated learning & the curriculum
Technology Responsible Technology
for a Healthy Environment
Social Sciences Environment & Development
and How It Came To Be Like This Economics & Management Sciences (EMS)
Sustaining People and Economy by
Sustaining our Environment
Life Orientation Informing Choices for
Personal, Community and
Environmental Health
Languages Ways of Reading the World
and Re-Writing its Possibilities
Mathematics Mathematics Counting
For Human Rights
and a Healthier
Environment
Natural Sciences Enquiry to Know Earth’s
Life Support Systems
and Act Responsibly
Arts & Culture Environment as a Cultural Concern
and Arts enable Creative Expression
of our Views
Social Sciences learning will support actions that contribute to helping one another and developing sustainable communities
Helpful Handprints
Arts and Culture learning will support actions that contribute to cultural and creative activities
Creative Handprints
Economics & Management Sciences learning will support actions that contribute to sustainable production and living
Productive Handprints
Mathematics learning will support actions that contribute to counting, measuring and calculating
Counting Handprints
Technology learning will support actions that contribute to useful and sustainable innovation
Innovative Handprints
Life Orientation learning will support actions that contribute to ensuring better health for everyone
Healthy Handprints
Language learning will support actions that contribute to expressing our ideas accurately in words
Expressive Handprints
Natural Sciences learning will support actions that contribute to a greener, healthier and more beautiful environment
Greening Handprints
The activities in this book can be used to support learning
in the Natural Sciences, Technology and Language learning areas, and can contribute to the development of
Greening, Innovative and Expressive Handprints.
Teachers should consult the learning outcomes and assessment standards
and should adapt the activities to suit their grade requirements.

1
CONTENTS
Starting points
1. Reading to Learn ........................................................................................... 1
School story: How a yellowwood tree can become a forest
2. Comprehension Questions .............................................................................. 3
to guide local learning
3. Discussion Points............................................................................................ 3
to start local enquiry and action
4. Finding Out Activities ..................................................................................... 4
5. Trying Out Activity.......................................................................................... 4
6. Deliberation Ideas .......................................................................................... 5
to think carefully about and debate
Ideas and Tools for Local Learning
Knowledge & Activity Support Materials (SM)
SM 1. Podocarpus Latifolius .................................................................................... 5
SM 2. The Rameron Pigeon ..................................................................................... 6
SM 3. Propagating Seedlings in a Milk Carton ............................................................ 7
SM 4. Mycorrhiza................................................................................................... 8
SM 5. How to Plant a Tree ...................................................................................... 9

1
How a yellowwood tree can become a forest
Pikisile Zondane is
a local champion in
Grahamstown. In
2004 he initiated
the Millennium
Tree Planting
Project. This project encourages people
to plant trees in township gardens. He
gets trees from the municipality. Pikisile
and his colleague Thandoxolo teach
members of the family how to look after
the tree. After a year they go back to the
same family to see how the tree is
growing. By the end of 2007 they had
planted over 400 trees and many of
these had survived. Their next plan was
to establish a tree nursery of their own.
Garth Cambray is a scientist and
entrepreneur who works on the outskirts
of Grahamstown, producing honey mead
and bio-diesel. He is well known in
Grahamstown and his face often appears
in local and national newspapers. Garth
also knows a lot about yellowwood trees.
Did you know that this is South Africa’s
national tree?
Pikisile was interested to meet Garth and
hear his story about mother-tree
seedlings. Garth started: “I was always
fascinated to see so many little
yellowwoods growing beneath the single
yellowwood tree on our plot without any
other visible tree to cross-pollinate with”.
He gave Pikisile a page of information on
the yellowwood tree (scientific name
Podocarpus latifolius) that he had found
on the Internet (SM 1).
“I realised that the seeds under my tree
had come from somewhere else, and had
been brought there by the rameron
pigeons who would come to roost in the
yellowwood tree and would drop their
faeces on the fertile ground below.”
Pikisile was surprised when Garth gave
him another page of information, this
time not about trees at all, but about the
rameron pigeon (SM 2).
Garth continued: “Yellowwood seeds
have an inhibitor in the skin that
prevents them from germinating until
they have been digested by an animal as
this removes the skin. Birds like the
rameron pigeon thus play an important
role in the germination of new seedlings.
I would see the rameron pigeons flying
from the direction of a small grove of
yellowwoods in the valley to the west of
where I live. It was seeds from this
grove which were germinating beneath
my yellowwood tree. In the past the
whole area used to be a yellowwood
forest and you can still see the old
logging pits for cutting the yellowwoods.”
He went on to say that the pigeons have
brought a variety of other seeds too –
little knobwoods, wild plums and loquats
are all coming up. “It’s always a surprise
to see what’s growing.” Garth and his
gardener had been pulling up the tree
seedlings like weeds so he was very
willing to let Pikisile collect some to
propagate for his nursery. Pikisile
propagated about 40 seedlings in milk
cartons (SM 3).
Key words
Cross-pollinate Germinate Propagate Reforestation Mycorrhiza
School story

2
Pikisile had read somewhere that it is
important to use some of the forest soil
in the potting soil mix when propagating
seedlings. He asked Garth about this,
who explained that forest soil contain
mychorrizal fungi. These fungi play a
very important role in supporting the
intake of plant nutrients by roots. Pikisile
did some research on the Internet to find
out more about this fascinating
relationship (SM 4). He made sure he
added some mychorrizal fungi to the
potting soil for his seedlings.
Pikisile’s enthusiasm inspired Garth to
propagate some of these seedlings to
plant around his plot. “I am excited
about growing these trees as they will
have some important benefits. We
experience strong westerly winds from
Cape Town on our plot because we are
on a plateau. In about three years, if we
look after the trees well, they will have
grown tall enough to provide us and our
livestock with shelter from the wind.
Another problem is that our cellars keep
flooding. This is because the water table
is very high on our plot, only a metre
below the ground. Because trees take up
a lot of water, in some cases as much as
190 litres per day, they should lower the
water table and our cellars should no
longer flood as frequently, if at all. The
most important benefit for me though is
that this is a mini reforestation project.
There used to be many more
yellowwoods growing here, but they
have been over harvested. My hope is
that in ten years time we will have
another yellowwood forest.”
Glossary
Bio-diesel: a biofuel produced from vegetable oils, animal fats or algae.
Cross-pollinate: when pollen is transferred from the flower of one plant to the
flowers of a different plant.
Germinate: when a seed grows into a young plant.
Faeces: poo
Mycorrhiza: special relationship between a fungus and the roots or rhizoids of a
plant.
Over-harvesting: taking out more plants or animals than can be reproduced.
Propagate: to produce new plants.
Reforestation: the replanting of trees in to forests that were previously removed.
Propagating seedlings in milk cartons

3
Comprehension Questions
1. What prevents yellowwood seedlings from germinating before being eaten by an
animal?
2. What impact do you think logging had on rameron pigeons and yellowwoods?
3. What are the three benefits that planting trees will bring to Garth Cambray’s plot?
4. Why do you think Podocarpus latifolius was heavily harvested in the past? (SM 1)
5. What interesting information did you learn about the role of rameron pigeons?
(SM 2)
6. What did you learn about propagating seedlings in a milk carton? (SM 3)
7. What did you find out about mychorriza the relationship between a special fungus
and the roots of trees? (SM 4)
Discussion Points
Do you think planting
trees is always a good
thing? When do you
think it could be a bad
idea?
What is your
favourite tree
and why?
Add your own ideas and questions
4
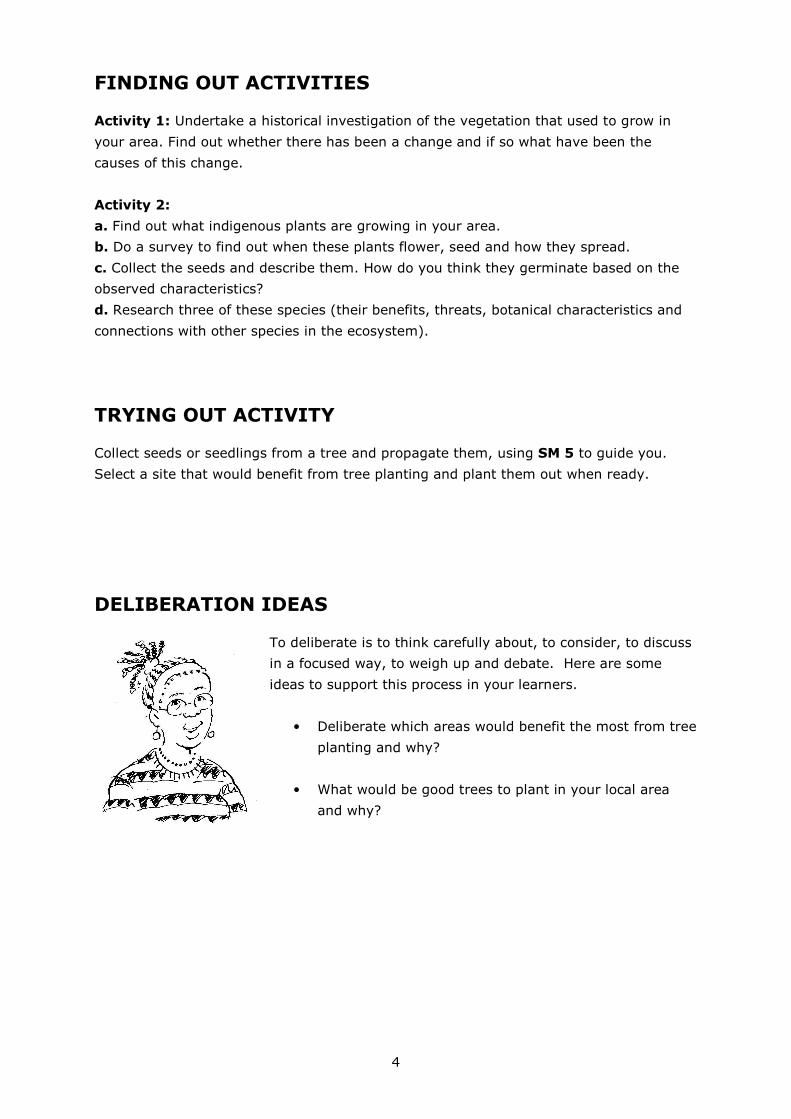
FINDING OUT ACTIVITIES
Activity 1: Undertake a historical investigation of the vegetation that used to grow in
your area. Find out whether there has been a change and if so what have been the
causes of this change.
Activity 2:
a. Find out what indigenous plants are growing in your area.
b. Do a survey to find out when these plants flower, seed and how they spread.
c. Collect the seeds and describe them. How do you think they germinate based on the
observed characteristics?
d. Research three of these species (their benefits, threats, botanical characteristics and
connections with other species in the ecosystem).
TRYING OUT ACTIVITY
Collect seeds or seedlings from a tree and propagate them, using SM 5 to guide you.
Select a site that would benefit from tree planting and plant them out when ready.
DELIBERATION IDEAS
To deliberate is to think carefully about, to consider, to discuss
in a focused way, to weigh up and debate. Here are some
ideas to support this process in your learners.
• Deliberate which areas would benefit the most from tree
planting and why?
• What would be good trees to plant in your local area
and why?

5
PODOCARPUS LATIFOLIUS
The real yellowwood is one of South Africa’s most valued timber trees. It is also South
Africa’s national tree.
Botanical Description
Podocarpus latifolius is a slow-growing, usually large, evergreen tree, which grows to 20-
30 m in height. The wood is yellow and quite similar to P. falcatus, the Outeniqua
yellowwood, although not as dark or of the same quality. The bark is greyish and smooth
when young but shows longitudinal fissures or ‘long cracks’ as it matures. The bark peels
off in strips. The glossy green leaves are long and narrow. The leaves on young trees are
always larger than on mature trees. The new leaves are very noticeable as they form
clusters of pale green or bronze at the ends of branches, compared to the dark green of
the older leaves. There are male and female trees. The male cones (July to September)
resemble catkins (a type of flower adapted for wind pollination) while the female tree
develops round, grey/blue seeds on thickened, fleshy, stalks known as receptacles, which
turn purple as they mature.
Status
All the species of Podocarpus are protected in South Africa. In the past, they were so
sought after as timber trees, that from being an abundant resource they became almost
extinct in some areas. Yellowwood furniture is expensive today because the trees are
becoming rare.
Distribution and Habitat
The real yellowwood grows naturally in mountainous areas and forests in the southern,
eastern and northern parts of South Africa, extending into Zimbabwe and further north.
It is also found on rocky hillsides and mountain slopes but does not get as tall where it is
exposed as it does in the forests.
Derivation of name and historical aspects
The genus and species names are derived from Greek words, podo which means foot,
carpus which means fruit, lati which means wide and folius which means leaf.
Podocarpaceae is a small cone-bearing family, which, along with the indigenous cedars,
represent the small number of coniferous tree species indigenous to South Africa.
Ecology
When the berry-like receptacles ripen, birds such as pigeons and turacos feed on them.
They are also eaten by monkeys, bushpigs and sometimes by people. The real
yellowwood is slow-growing, but very long-lived and it is able to withstand some frost.
Uses and cultural aspects
The real yellowwood has apparently been used more than any other South African
timber. Floors in the old Cape homesteads were made of this wood. The soft yellow
colour of the wood contrasts beautifully with the dark-coloured stinkwood (Ocotea
bullata) and these two timbers were often used together to make furniture. The real
yellowwood was often used for tables and cupboards, as it polishes up very well. The
South African Railways used to use the timber to make railway sleepers.
Reference: (adapted from) Podocarpus latifolius.
http://www.plantzafrica.com/plantnop/podocarplati.htm
Knowledge & activity support material 1
Common Names: real yellowwood (English); opregte geelhout (Afrikaans); Umkhomba (Xhosa); Mogobagoba (Northern Sotho); Muhovho-hovho (Venda); Umsonti (Zulu).
6
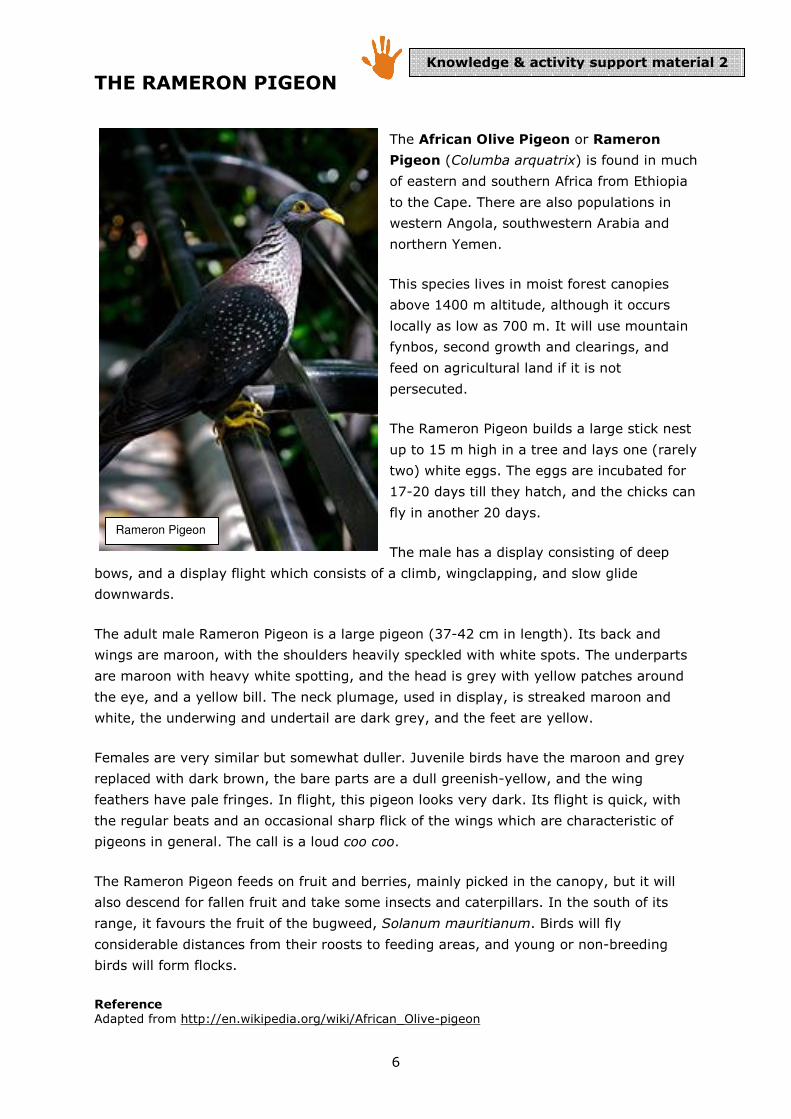
THE RAMERON PIGEON
The African Olive Pigeon or Rameron
Pigeon (Columba arquatrix) is found in much
of eastern and southern Africa from Ethiopia
to the Cape. There are also populations in
western Angola, southwestern Arabia and
northern Yemen.
This species lives in moist forest canopies
above 1400 m altitude, although it occurs
locally as low as 700 m. It will use mountain
fynbos, second growth and clearings, and
feed on agricultural land if it is not
persecuted.
The Rameron Pigeon builds a large stick nest
up to 15 m high in a tree and lays one (rarely
two) white eggs. The eggs are incubated for
17-20 days till they hatch, and the chicks can
fly in another 20 days.
The male has a display consisting of deep
bows, and a display flight which consists of a climb, wingclapping, and slow glide
downwards.
The adult male Rameron Pigeon is a large pigeon (37-42 cm in length). Its back and
wings are maroon, with the shoulders heavily speckled with white spots. The underparts
are maroon with heavy white spotting, and the head is grey with yellow patches around
the eye, and a yellow bill. The neck plumage, used in display, is streaked maroon and
white, the underwing and undertail are dark grey, and the feet are yellow.
Females are very similar but somewhat duller. Juvenile birds have the maroon and grey
replaced with dark brown, the bare parts are a dull greenish-yellow, and the wing
feathers have pale fringes. In flight, this pigeon looks very dark. Its flight is quick, with
the regular beats and an occasional sharp flick of the wings which are characteristic of
pigeons in general. The call is a loud coo coo.
The Rameron Pigeon feeds on fruit and berries, mainly picked in the canopy, but it will
also descend for fallen fruit and take some insects and caterpillars. In the south of its
range, it favours the fruit of the bugweed, Solanum mauritianum. Birds will fly
considerable distances from their roosts to feeding areas, and young or non-breeding
birds will form flocks.
Reference Adapted from http://en.wikipedia.org/wiki/African_Olive-pigeon
Knowledge & activity support material 2
Rameron Pigeon

7
PROPAGATING SEEDLINGS IN A MILK CARTON
Step 1: Make a potting soil mix that consists of
- 1 part river sand
- 2 parts compost
- 2 parts top soil (you can get excellent top
soil from mole hills).
Make sure the potting soil is well mixed.
Step 2: Collect 1 litre rectangular milk cartons
(as seen in the picture).
Step 3: Fill these milk cartons with your potting
soil.
Step 4: Snip off the bottom four corners to allow water to drain, but ensure that soil is
still contained in the milk containers.
Step 5: Carefully dig up each seedling, making sure that you don’t damage their roots. If
the tree is growing in a healthy forest be sure to collect some of the soil the seedling was
growing in as this will contain the fungi (mychorriza) that will help the little tree grow.
Step 6: If you want to make sure your plant survives, buy some mychorriza from the
local nursery and add a teaspoon to the soil before you put your seedling in.
Step 7: Make a hole in the potting soil and carefully plant your seedling. Press the soil
gently around the roots of the little tree.
Step 8: Water your seedling well and watch it grow.
Step 9: When your seedling looks strong enough (this can take between 6 months to
two years), carefully remove it from the milk carton and plant it in a 1 metre square hole
in the ground. Make sure you put in lots of compost and water well.
Knowledge & activity support material 3

8
MYCORRHIZA
Mychorriza describes the close
association between fungi and plant
roots. This relationship is an example of
mutual symbioses. The mycorrhizal fungi
affect a plant’s growth, health and also
strengthen the plant against
environmental stress. The fungi benefit
from the relationship by gaining
nutrients from the tree.
Almost all plants need mychorriza. The
fungus provides soil resources to the
plant and in exchange gets energy
manufactured by the plant. The
symbiosis means greater productivity
under stress for the plant and a steady
energy supply for the fungus.
Mycorrhizal associations play important
roles in the ecological functioning of
ecosystems, as they form an important
part of the nutrient cycle. Mycorrhizal
fungi break down organic nutrients,
absorb inorganic nutrients and transport
these to the plant. This is necessary for
the survival of over 90% of all flowering
plants.
Plants grown in bare soils often perform
poorly without the addition of spores of
mycorrhizal fungi to colonise the plant
roots and help with the uptake of soil
mineral nutrients. If there are no
mycorrhizal fungi in the soil (e.g. if the
landscape is degraded), this can also
slow down plant growth.
References (Adapted from)
• Hawley, G.L., and Dames, J. F. 2004.
Mycorrhizal status of indigenous tree
species in a forest biome of the
Eastern Cape, South Africa. South
African Journal of Science 100,
Nov/Dec.
• Wikipedia.http://www.wikipedia.org/
Soul Shava, a botanist in the
Environmental Education Unit explained
the complex detail of mychorrizae more
simply, by answering two questions
asked by Pikisile.
Question 1: What are mycorrhizae?
The word "mycorrhizae" literally means
"fungus-roots" and defines the close
mutually beneficial relationship between
specialized soil fungi (mycorrhizal fungi)
and plant roots. About 95% of the
world’s land plants form the mycorrhizal
relationship in their native habitats. It is
estimated that mycorrhizal fungal
filaments explore hundreds to thousands
more soil volume compared to roots
alone.
Question 2: What are the benefits?
• Improved nutrient and water uptake
• Improved root growth
• Improved plant growth and yield
• Reduced transplant shock and
drought stress
Knowledge & activity support material 4

9
HOW TO PLANT A TREE
Trees start life as seedlings. Seedlings can be grown in four main
ways:
• From seed
• From stem or branch cuttings (large branch cuttings are
called truncheons)
• From root cuttings
• By transplanting wild seedlings
The raw materials:
Wild seedlings and cuttings: Look around where you live. You
may find young plants close to trees. These have grown from root
suckers or seeds that have fallen from the tree. With permission
from the landowner, you could transplant some of these. As long
as you do not take them all, and do not harvest plants that are
endangered and protected by law, this will do no harm as most of them will die in
competition for light. It is best to transplant wild seedlings early on when they are yet to
develop larger tap-roots. Cuttings from branches can also be grown. If you are making a
cutting from a root sucker, you may need to cut it away from the parent root
underground. Take care not to damage the parent plant.
Seeds: Collect your own seeds from the ripe fruit of local trees. Fruit or seed pods that
are ripe and ready to be planted may fall off the tree and split open when they hit the
ground, shooting out the seeds. Find out when useful tree species flower and go on a
collecting expedition. This is probably the best source of seeds as the trees you grow will
already be adapted to the climate and soil in your area.
• Choose healthy-looking trees to collect
seeds from.
• Collect seeds from more than one
tree, so that your seeds will have
natural genetic variation. This means
that later, when the seeds have been
planted, you can select the healthiest
seedling.
• Store collected seeds in a porous bag
or sack.
• Have a good look at the seeds when you get back home. Some seeds may have
been damaged by insects. Seeds that will grow when planted look solid and full,
and will not have any holes.
• Perform the float test. A good way to tell whether a seed is healthy is to put it into
a container of water. Good seeds sink, poor seeds float.
Knowledge & activity support material 5

10
How do we prepare seeds before planting?
Some seeds in nature will only germinate after a fire or after being chewed and eaten by
animals. We need to imitate these conditions to encourage them to germinate. Ways to
do this include:
• Making a cut in the hard outside cover (called scarification).
• Removing completely the outside cover.
• Soaking the seeds in hot (not boiling) water overnight.
• Heating seeds on the edge of a fire for a few minutes.
Find out the best way to prepare each seed before you plant it. Books and experienced
people will be able to help.
You can plant seeds into seedbeds or containers.
• Prepare a potting soil - one part sand, two parts compost/manure, two parts top
soil. Two or three handfuls of wood ash for every wheelbarrow of soil will help
feed the seedling.
• Put the potting soil into a seedbed or container (leaving a space at the top of the
container for water).
• Put the seed at its own height below the surface of the soil.
• Water well with a fine spray of water and put mulch on top.
• Label the container or seedbed.
Once planted in soil, seeds need moisture, darkness and warmth to germinate. Seedbeds
and containers need to be kept under shade cover and somewhere you can move them
to out in the sun. After a few weeks, you should expect to see seedlings poking through
the soil.
How do you plant a cutting?
• Some species can be grown from cuttings taken towards the end of the growing
season.
• Select a healthy shoot from the current year’s growth.
• Cut a straight 25cm section directly above a bud at the top and below a bottom
bud. Clean the leaves off the cutting, leaving only four at the top.
• Bury two thirds of the cutting into free draining soil or sand.
• Water regularly.
• Plant several cuttings at a time, to make sure at least one survives.
• If available, cuttings can be dipped into root hormone mixture to help rooting.
• Some trees can sprout from truncheons (thick cuttings of 70 – 150mm in
diameter and 2-3 metres long). Plant lots of truncheons in a row to make a living
fence.
How can we look after our seedlings while they grow?
• Shade containers and seedbeds from the sun for two months.
• When seedlings are old enough, move them to a place with lighter shade and
make sure they are getting enough sun during the day. Plants need light to grow!
• If you live in a place where the nights are cold, you may have to put a plastic
bottle cover over the seedling containers when they are young. This helps to keep

11
the heat in, but still allows light through. At some point, the seedlings need to
learn to survive without any covering. This is called “hardening off.” Starting in
the late afternoon, the plastic cover should be taken off for one hour the first day,
for two hours the next day, and so on until the plant can survive a whole night
and day without its cover.
• Protect from animals: Fence out goats, rats, sheep and cattle.
• Protect from termites: Termites hate wood ash!
• Protect from cold: Apply mulch around the seedlings but do not cover them. Mulch
warms the soil like a blanket; prevents weeds from growing; and helps water get
to the plants.
• Weed seedbeds regularly. Pull weeds out by the roots when they are still small.
Don’t let weeds make seeds! Pull them out before they flower. Avoid disturbing
the tree seedling when weeding – hold the soil around the seedling down with one
hand while you pull out the weeds
• Protect from each other: Don’t let the seedlings get overcrowded. Pull out weaker,
sick or dying plants to make more space for the strong ones.
How often should we water our seedlings?
• Keep the soil damp until the seeds germinate.
• Water daily afterwards.
• Test the soil before watering. If it sticks to your fingers, it
is wet enough.
• Plants need more water in hot summer weather.
• Don’t over-water! It can kill the seedling. You will know you
are over watering if you get green algae or moss (green
slime) growing on top of the soil.
• Water gently next to the base of the tree, until the water
runs out of the bottom of the container. Don’t splash the
leaves.
• Never let your tree go to sleep with wet feet! It can cause
disease and makes it easier for frost to kill the plant.
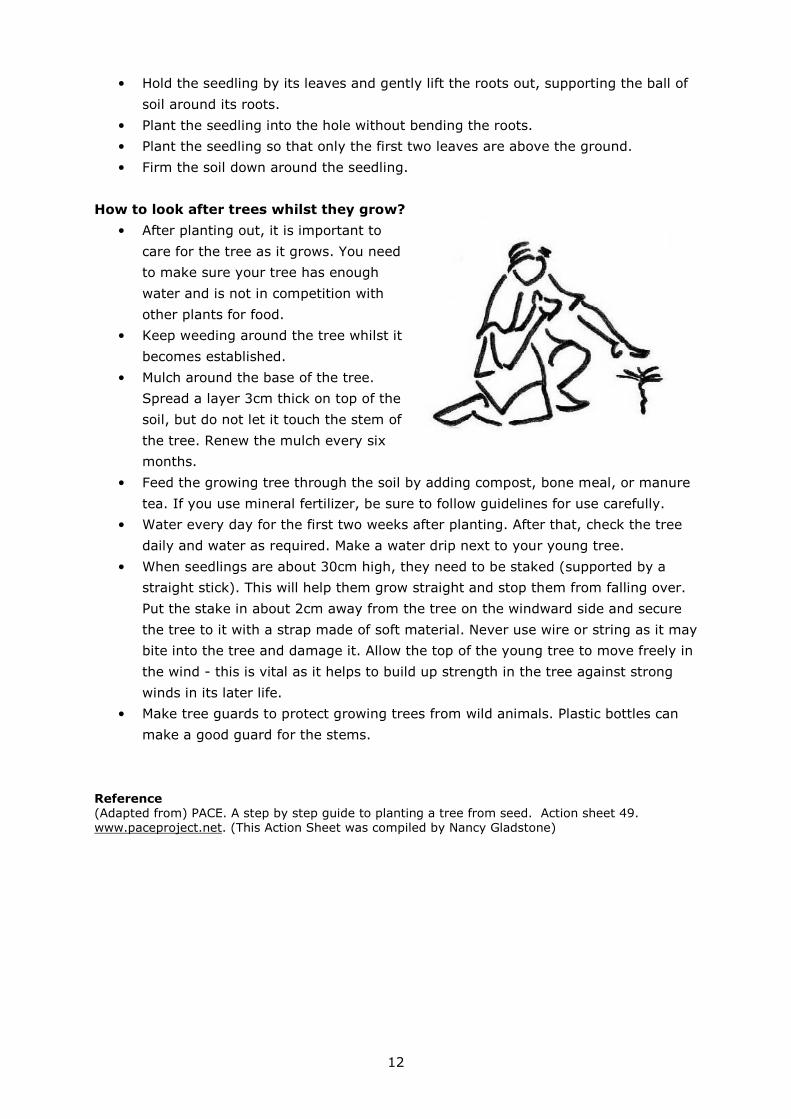
How should we transplant seedlings?
• Transplant seedlings from containers when they have become as big as their
containers. Transplant seedlings from a seed bed when the first two sets of leaves
are open.
• Transplant seedlings on a cloudy day and never in the sun at the hottest part of
the day.
• Prepare the ground, removing unwanted plants.
• Always keep bare tree roots damp while planting.
• Dig a hole large enough to take the roots and some compost.
• When planting, spread the roots and fix in soil or soil/compost mix, firming well as
you progress; do not add soil above the previous soil line on the stem.
• Prepare a hole where you want to plant the seedling.
• Carefully dig around the roots of your seedling.
12
• Hold the seedling by its leaves and gently lift the roots out, supporting the ball of
soil around its roots.
• Plant the seedling into the hole without bending the roots.
• Plant the seedling so that only the first two leaves are above the ground.
• Firm the soil down around the seedling.
How to look after trees whilst they grow?
• After planting out, it is important to
care for the tree as it grows. You need
to make sure your tree has enough
water and is not in competition with
other plants for food.
• Keep weeding around the tree whilst it
becomes established.
• Mulch around the base of the tree.
Spread a layer 3cm thick on top of the
soil, but do not let it touch the stem of
the tree. Renew the mulch every six
months.
• Feed the growing tree through the soil by adding compost, bone meal, or manure
tea. If you use mineral fertilizer, be sure to follow guidelines for use carefully.
• Water every day for the first two weeks after planting. After that, check the tree
daily and water as required. Make a water drip next to your young tree.
• When seedlings are about 30cm high, they need to be staked (supported by a
straight stick). This will help them grow straight and stop them from falling over.
Put the stake in about 2cm away from the tree on the windward side and secure
the tree to it with a strap made of soft material. Never use wire or string as it may
bite into the tree and damage it. Allow the top of the young tree to move freely in
the wind - this is vital as it helps to build up strength in the tree against strong
winds in its later life.
• Make tree guards to protect growing trees from wild animals. Plastic bottles can
make a good guard for the stems.
Reference (Adapted from) PACE. A step by step guide to planting a tree from seed. Action sheet 49.
www.paceproject.net. (This Action Sheet was compiled by Nancy Gladstone)

13
NOTES
14
TITLE
LEARNING AREAS COVERED (BROADLY)
1. Reusing Shower and Bath Water
Language Natural Sciences Technology
2. The Buzz on Honey Bee Economics
Language Natural Sciences Social Sciences Technology Economics & Management Sciences
3. Have you Sequestrated
your Carbon?
Language Natural Sciences Technology
Mathematics
4. Did you Grow your Greens? Language Natural Sciences Social Sciences
Life Orientation Arts & Culture
5. Clearing Invasive Weeds
Language Natural Sciences Technology
6. The Secret of a Spring Language Natural Sciences Social Sciences
Life Orientation Technology Mathematics
7. The Secret of the Disappearing River
Language Life Orientation Social Sciences Economics & Management Sciences
8. Creative Garden Design
Language Natural Sciences Technology
9. Recycling, Waste Reduction and Creative Re-use
Language Social Sciences Life Orientation Arts & Culture Technology Economics & Management Sciences
10. Worming Waste
Language Natural Sciences Technology
11. Growing Mother-tree Seedlings
Language Natural Sciences Technology
12. Rooibos: a Biodiversity
Economy at Risk
Language Natural Sciences
Economics & Management Sciences
Many more Handprint resource books are in the planning stages. These resource books and many others for teacher educators and teachers are available
electronically in pdf format on www.tessafrica.net. The Handprint resource books can also be downloaded from www.handsforchange.org.
The adaptive use of these resource books for educational purposes is encouraged. Anyone wishing to develop their own resource or adapt one, can contact Share-Net
[email protected] for a version in Microsoft Word.
Handprint resource books available from Share-Net

15
Increase your handprint. Decrease your footprint.Increase your handprint. Decrease your footprint.Increase your handprint. Decrease your footprint.Increase your handprint. Decrease your footprint.
Human impact on the Earth has tripled since 1961 and our human footprint is now 25% bigger than the planet can support. In other words we are using 25% more natural resources and services than the planet can create and provide. The ‘Ecological Footprint’ is one way to measure what area of land and water the whole human population requires to produce the resources it consumes and to absorb its wastes, and we now need 25% more area than is available on the whole planet. This means that the planet is simply being damaged beyond what it can repair, and this cannot continue without causing very serious threats to all life, including our own. Education is a key way to achieve the changes we need to live in a manner that the planet can support. Environment and Sustainability Education (an environmentally focussed approach to Education for Sustainable Development – ESD) is a move away from seeing education just as a means of producing the skills to carry on doing what we are doing. It develops the abilities needed to address the big issues affecting the planet, and builds the capacity in communities to make important decisions about their future. Environment and Sustainability Education calls for action. The Handprint is one measure of Environment and Sustainability Education action. The idea is to decrease the human footprint and to make the world more sustainable. The Handprint is a new approach or ‘tool’ being developed by the Centre for Environment Education (CEE), in Ahmedabad India, with many partners across the globe. The purpose of the Handprint is to help measure positive action for change at different levels. We all need to decide what we can do at the individual, community, national and global level in order to increase our Handprint, and decrease our Footprint.
“Through our actions, we add substance and vigour to the quest for sustainable living.”
The Ahmedabad Declaration 2007: A Call to Action, 4th International Conference for Environmental Education
This handprint is of a 10-year-old girl, Srija, from a school in Hyderabad, India, who was involved in a project taking action for sustainability. Her handprint can be taken as a symbol for positive action.
wwwwwwwwwwww....hhhhaaaannnnddddssssffffoooorrrrcccchhhhaaaannnnggggeeee....oooorrrrgggg