going further with matchithelpitsystems.com/docs/us/going_further_with_matchit_v5.pdf• if you know...
TRANSCRIPT

Going Further with matchIT
Version 5.2

Copyright matchIT is copyright © helpIT systems ltd 1994-2008, all rights reserved. FoxPro is copyright © Microsoft Corporation 1988-2008, all rights reserved. Trademarks matchIT is a registered trademark of helpIT systems ltd. FoxPro is a registered trademark of Microsoft Corporation. All other trademarks are also acknowledged.

Contents
1 ...................................................................... 1 This Guide
2 .................................................... 2 Using matchIT’s Menus
.................................................................... 2 2.1 Import Menu ................................................................ 2 2.2 Matching Menu ............................................................ 3 2.3 Merge/Purge Menu .................................................................... 3 2.4 Output Menu .............................................................. 4 2.5 Jobs/Setup Menu ...................................................................... 5 2.6 Tools Menu ....................................................................... 5 2.7 Help Menu
3 ........................................ 6 Using the Manual Import Wizard
4 ................................... 8 Importing a file into an existing DBF
5 ......................................................................... 10 Options
............ 10 5.1 Changing the options without restarting the process .............. 11 5.2 Processing options at the end of the Setup Wizard ................................................................. 11 5.3 Input Options ............................................................ 12 5.4 Matching Options ........................................................ 13 5.5 Operational Options ....................................................... 14 5.6 File Location Options ......................................................... 15 5.7 Save/Restore Setup ..................................................... 16 5.8 Names & Words Table ................................................. 18 5.9 Intelligent Merge Options
6 ...................................................................... 19 Matching
............................................... 19 6.1 Explanation of Match Keys ........................................... 21 6.2 Household/Address Matching ............................................. 21 6.3 Contact/Individual Matching ......................................................... 22 6.4 Company Matching ........................................ 22 6.5 Household/Address Match Keys ............................................................... 23 6.6 Exact Matching ........................................................... 24 6.7 Verifying Matches
7 .......................................................... 30 Modifying Reports
............................................................. 30 7.1 Report Branding ............................................................... 30 7.2 Report Layouts

8 .................................................................... 32 Useful Tips
8.1 ......................................................... 32 Recently Used Files8.2 ............................................................ 32 View Original File8.3 ........................................................... 32 Performance Data8.4 ........................................................................ 32 Error Log8.5 ........................................................ 32 Using the Print Icon
9 ......................................................... 33 Common questions
9.1 ................................... 33 Applying a matchIT USB activation9.2 ........................ 33 Moving a matchIT activation to Another PC9.3 ...................................................... 33 matchIT’s Online FAQ

1 This Guide This guide bridges the gap between Getting Started with matchIT and the full User Manual and On-Line Help. It describes common processes and options that are not covered by the Getting Started guide and cross refers to the User Manual where appropriate.
Going Further with matchIT 1

2 Using matchIT’s Menus
2.1 Import Menu • You can use this menu to access the Setup Wizard when
ever you need to, no need to restart matchIT every time.
• The Import Records option allows you to import a source file into a previously created DBF structure. (See Importing a file into an existing DBF)
• You also have the ability to Generate Keys from this menu, once a Main File has already been created.
2.2 Matching Menu • You can use the Find Matches option to find duplicate
records within a file.
• The matching menu will allow you to access the View Matches option, which will provide a report of matching records.
• Accessing the Verify Matches option will allow you to manually go through each matching pair or set that has been found.
• Use the Flag Matches option to mark records that are over a defined score.
• This menu also provides the ability to Transfer Data within a defined scoring range.
Going Further with matchIT 2

2.3 Merge/Purge Menu • You can use the Find Overlap option to find overlapping
records between two separate files.
• Utilizing the View Overlap option will provide a report of the overlapping records.
• Accessing the Verify Overlap option will allow you to manually go through each overlapping pair that has been found.
• The Merge Files option will add unique records from the secondary file to the Main File, after the overlapping records have been found.
• Using the Transfer Data option will allow users to move data from one file to another. matchIT scoring regulates this option.
• By using the Write Overlapping Records option, you can ‘Create Main File’ containing the overlapping records (from the Main file) that have been found within a certain scoring range.
2.4 Output Menu • Using the Output Matched Records option is another way
of writing out matches. With this option, though, you can select their desired output type.
• You can access matchIT’s Quality Assurance Wizard for data summaries, viewing data, viewing records by category, outputting to a file, outputting to a page, outputting to a label, or for writing flagged records.
• Output To File allows users to create a custom output format for files that have been processed through matchIT. Before actually generating the output, take a moment to look at the options in the lower half of this dialog. Check the Use Sequential Numbering? box to give each output record a unique number. The other options allow you to output either all the records or just a selection from the file
Going Further with matchIT 3
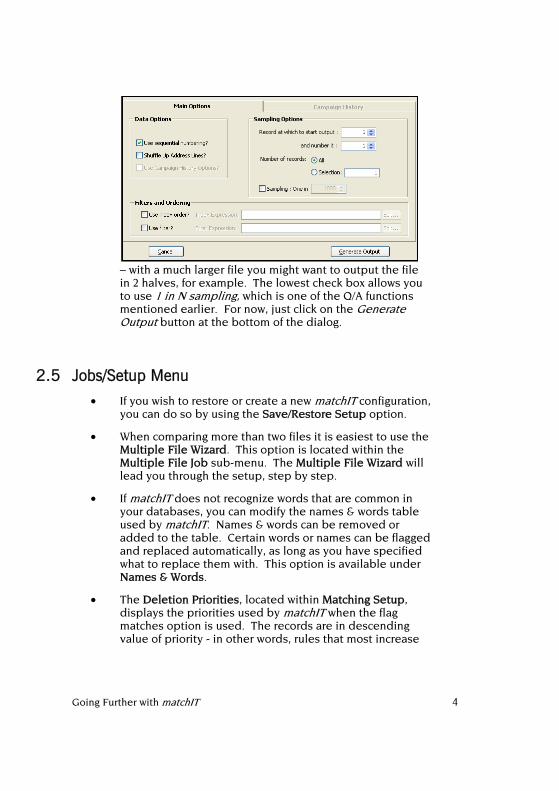
– with a much larger file you might want to output the file in 2 halves, for example. The lowest check box allows you to use 1 in N sampling, which is one of the Q/A functions mentioned earlier. For now, just click on the Generate Output button at the bottom of the dialog.
2.5 Jobs/Setup Menu • If you wish to restore or create a new matchIT configuration,
you can do so by using the Save/Restore Setup option.
• When comparing more than two files it is easiest to use the Multiple File Wizard. This option is located within the Multiple File Job sub-menu. The Multiple File Wizard will lead you through the setup, step by step.
• If matchIT does not recognize words that are common in your databases, you can modify the names & words table used by matchIT. Names & words can be removed or added to the table. Certain words or names can be flagged and replaced automatically, as long as you have specified what to replace them with. This option is available under Names & Words.
• The Deletion Priorities, located within Matching Setup, displays the priorities used by matchIT when the flag matches option is used. The records are in descending value of priority - in other words, rules that most increase
Going Further with matchIT 4

the likelihood of a record being kept are at the top, with rules that most reduce it being kept at the bottom.
• The main options screen for the IDM (Intelligent Data Merge) process can be found under Matching Setup as Intelligent Merge Options. This option allows you to select which fields should be involved in the IDM process, and what options should be applied to those fields.
2.6 Tools Menu • matchIT’s Database Utilities can be used for many different
things, for example: modifying layouts, clearing out certain fields, clear a whole table, rebuild corrupt indexes, etc.
• If you know some FoxPro (matchIT uses Visual FoxPro) or dBase (known as "xBASE") programming, you can key simple xBASE commands into matchIT’s System Commands window. These commands can be used to make ‘out of the ordinary’ changes to your matchIT DBF that the standard functions cannot make.
• Using the Main File Layout Utilities allows you to copy a DBF layout, create a layout report, or create a field widths report.
2.7 Help Menu • The help menu provides all pertinent information for the
use and support of matchIT.
• Such information includes: The user manual, a getting started guide, an interactive support session, etc.
Going Further with matchIT 5

3 Using the Manual Import Wizard If you are unable to use the Automatic Import Wizard to determine the type of data in each field, choose Switch to Manual Wizard. You can then see your data (one field at a time) and name each field in turn, as shown below. For each field, the choices are similar to the automatic process, described in the “Getting Started Guide”. Here, though, you can change the suggested field width in one of two ways – you can either click on the Field Width Ruler at the top of the dialog box, or type in the value in the Field Width window near the top right of the dialog box. If you’re not sure what to do, the Notes at the bottom of the screen give relevant instructions at any stage, depending on the data shown in the Contents of Field window.
To describe the Manual Wizard process we will use EXAMPLE1.TXT as a guide. In EXAMPLE1.TXT the first field contains all the elements of the addressee’s name, so it should be named FULLNAME/ADDRESSEE from the drop down list of field names below the main window area. Once you have named the first field, click on the Forward button to move on to the next field. The second field in the Rest of World sample data file contains job titles, so scroll through the drop down list to select JOB TITLE. The next field is clearly company name, so select COMPANY from the list. The
Going Further with matchIT 6

next 3 fields are all address lines, and you should select ADDRESS LINE from the list for each of these fields. Within some records the next field contains a Zip or Postcode, but within most records it contains address data, so select ADDRESS LINE. By default, matchIT finds Zip codes and Postcodes in the address lines and moves them to a specific field. matchIT does not require State to be in a fixed field, but it can relocate it to a fixed field if required.
The next field is a separate Zip or Postcode field, so the relevant field name is ZIP/POSTCODE from the drop down list. Change the width of this field to 10 characters, either by clicking on the field width ruler at the top of the dialog, or changing the value in the Field Width box at the top right. The last field in the US sample data file is telephone number, which is also selectable from the drop down list. You can go back to a previously named field and change the name or width if you wish, before leaving the Import Wizard’s file layout stage.
When you have named the last of the fields in your data, the Import Wizard displays the message ‘No more Fields’ in the Contents of Field window and the Continue button becomes active.
Going Further with matchIT 7

4 Importing a file into an existing DBF matchIT gives the user the ability to import a source file into a previously created DBF. This can come in handy for several situations, such as: building a job that you want to run later, or creating a "shell" DBF (see Save and Exit in the Online Help) for constantly growing files.
To import a file into the matchIT DBF, it must be in the same format as the original file that was used to create the DBF.
To use matchIT's import feature, select Import Records from the Import menu. If no DBF is open, you will be prompted for the DBF you would like to import into. Otherwise, make sure the DBF you would like to use is open as the Main DBF. The Input Parameters window will then be displayed (as pictured below). Here you will see what the input format is set to, what the default salutation is, the next reference number to be used, and if matchIT is set to wait after the import stage.
By clicking Restore Standard Parameters, you will be taken to matchIT's Save/Restore window. To change the DBF's current input format or default salutation, you would select Change Basic Parameters. This option will take you into the matchIT options window (see Input Option in the Online Help). Once you have
Going Further with matchIT 8
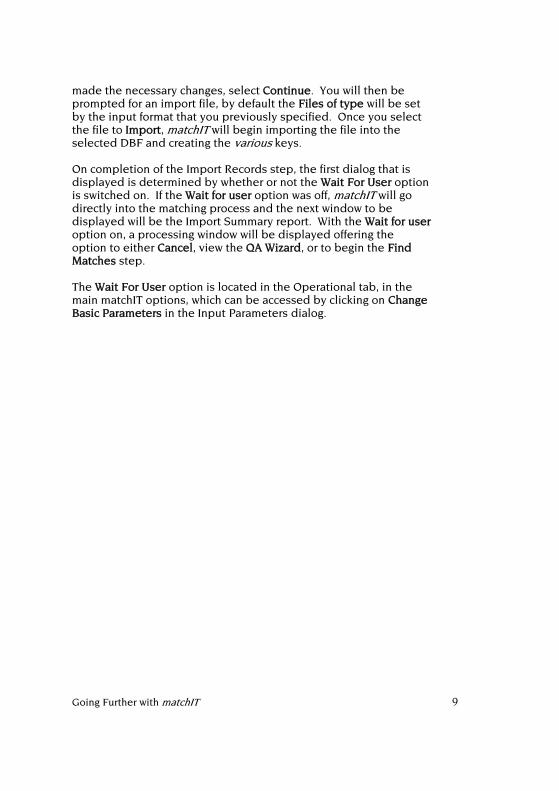
made the necessary changes, select Continue. You will then be prompted for an import file, by default the Files of type will be set by the input format that you previously specified. Once you select the file to Import, matchIT will begin importing the file into the selected DBF and creating the various keys. On completion of the Import Records step, the first dialog that is displayed is determined by whether or not the Wait For User option is switched on. If the Wait for user option was off, matchIT will go directly into the matching process and the next window to be displayed will be the Import Summary report. With the Wait for user option on, a processing window will be displayed offering the option to either Cancel, view the QA Wizard, or to begin the Find Matches step. The Wait For User option is located in the Operational tab, in the main matchIT options, which can be accessed by clicking on Change Basic Parameters in the Input Parameters dialog.
Going Further with matchIT 9

5 Options
5.1 Changing the options without restarting the process
If you would like to change any of matchIT’s options (e.g. change the Default Salutation, or switch on or off the Correctly Case Incoming Data function) after importing your file but without having to start the whole process again, you can to so with the aid of the Generate Keys function. In order to use this function, you should simply make the necessary changes, and then select Generate Keys from the Import menu. If you then choose Ok, matchIT will re-generate the keys in your file as per the new options that you have selected. Your data may also be modified, if the changes you have made to the options require it to be (e.g. if since the initial import you have switched on the Correctly Case Incoming Data function).
The same principle applies to the matching options. After importing your file, or both importing and Finding Matches, you wish to change any of the matching options, you can do so, then select Find Matches from the Matching menu. Doing so will produce the Matching Key and Range dialog. You can at this point select the match keys you would like to use, then choose Continue.
Going Further with matchIT 10

5.2 Processing options at the end of the Setup Wizard More… will open several other processing options. These additional options are Import Only, Find Matches, and Save & Exit. Some of their functionality will be discussed later.
5.3 Input Options Using the matchIT Input Options (see also Input Options in the Online Help), you can select the input format of data, the default salutation, and the default sex. matchIT has the ability to Extract zip codes from anywhere within the address fields. It will find mis-located zip codes and file them into a ‘ZIP’ field which, if it does not already exist, will be created automatically. Furthermore, you have the option to; Proper Case Incoming Data,useful when working with a very large, or ill-structured, data set. Another important option is Use Full Name In Contact Field. This option will allow matchIT to derive full contact names from the information available. If matchIT cannot determine a full contact name when generating salutations in your data, it will use the Default Salutation.
Going Further with matchIT 11

5.4 Matching Options The Matching Options will enable you to determine some of the more important options. You can choose whether you want to match on personal or business names, you can determine the minimum score for matchIT to report, and there is also the ability to use Household Matching (matching on address only). To specify a different matching level, you must utilize the Save/Restore Setup function (located in the Jobs/Setup Menu). The most common use of this screen is to set the options for Minimum score to report & for Must have house/building number match.
Going Further with matchIT 12

5.5 Operational Options Many of matchIT’s Operational Options (see also Operational Options in the Online Help) can be changed within this window. You have the ability to change the Sound Effects, toggle Show Startup Tips, and several other options. The most common options here are Wait after Import, Browse after Adding Records, Print Structure, and Min, Max, Average Field Widths. Setting the Wait after Import option allows you to specify instructions after the Import stage. The Browse after Adding Records option allows you to view the Main File contents before any keys are generated. Turning on Print Structure will display the Main File structure prior to the Import stage. To display the file structure and field widths after Import, turn on the Min, Max, Average Field Widths option.
Going Further with matchIT 13

5.6 File Location Options Within the File Location Options, (see also File Location Options in the Online Help), there is a box labeled Temporary File Directory. matchIT creates many temporary files while processing through data. These files may be stored in a directory of your choosing. Click the “…” button to designate a path to the temporary file directory you would like to use. The File Location Options window also allows you to see where much of matchIT’s information and default folders are located. The Import directory is the default location for the files you will be loading into matchIT, while the Database folder is where matchIT will store the DBF's created when a file is imported.
Going Further with matchIT 14

5.7 Save/Restore Setup The Save/Restore option (located under the Jobs/Setup menu) allows users to restore matchIT’s default settings. More experienced users will also want to save or restore a custom configuration using this function.
Here you can restore matching weights, the name matching matrix and the main options for Personal configurations, Business configurations, Household/Address configurations, Family configurations, or Custom configurations at any time. This will allow users to set configurations for files whose structure is already known, without going through the Setup Wizard. Furthermore, you can use this window to prepare matchIT for data that is of a nationality other than that of its default setting (your installation nationality).
If you change from one matching level to another after import, you should always regenerate the match keys (Import Menu>Generate
Keys) before finding matches or overlap.
To save a custom configuration, specify the nationality and check which options (Weights, Matching Matrix &/or Options) you would like to save. Then set the configuration to Custom and type in a unique file extension. Once you have done the above requirements, you can Create/Update the configuration. When you are ready to
Going Further with matchIT 15

restore your configuration, just set the configuration to Custom, type in your custom File Extension, and then click on Restore Setup.
NB: If you are restoring a Custom configuration, you must first restore options for the nationality under which you saved the Custom setup, unless the nationality has not changed since you saved the configuration.
5.8 Names & Words Table Using the Names & Words option under Jobs/Setup allows you to modify names and words within matchIT. You can also add your own entries that may not already be in the table. You can also search through the table for a specific word or name to see if it is located in matchIT’s directory. Some words or names may have different properties than matchIT lists. In this case you can select to change an entry or add a completely new one. Either way, it is very important to note the name of the old Names and Words database. This will allow a user to restore matchIT’s original settings, in the event that your modifications begin to cause problems.
Going Further with matchIT 16

You must Save the changes made to the Names & Words table before you close the window. Otherwise, all modifications will be
lost.
To add an exclusion word, simply select the Add Entry button. The window shown will then be displayed. You will want to specify Exclusion as the Of type, and type in the exclusion word in the Word to add box. If you like, you can specify a Matching equivalent by entering one in the appropriate box. There is no need to specify the Proper case of the word, as it is set to be excluded. Once you have filled out the necessary information, you can select Add. To add an Exclusion word for a double word phrase, simply change the Look at drop-down, located at the bottom of the Names Data Maintenance dialog, to Double Word Phrases. As in the previous example, we will add an exclusion, but this time it will be for a Double Word Phrase. Select Add Entry and the same window from the previous example will open. This time we will set matchIT to exclude the phrase "Mickey Mouse". Once again, specify Exclusion as the Of type, and type in the exclusion word in the Phrase to add box. Once you have filled out the necessary information, you can select Add. Now, during import, ifmatchIT finds any records that contain “Mickey Mouse” in any
of
their fields, these records will be excluded.
Going Further with matchIT 17

5.9 Intelligent Merge Options The main options screen for the intelligent data merge process can be found under the menu Jobs/Setup > Matching Setup as Intelligent Merge Options. A file must be open to access this option. The Intelligent Merge Options allow you to select fields for the merging process, and the options to apply to those fields. The Available Fields box will show the fields that are within the current database. If there are two databases open, this window will show common field names between the two. Fields listed inside the Fields Selected box are items that will be included in the intelligent data merge process. You have the option of editing these options and saving their changes by selecting OK after the changes have been made. Cancel will disregard any changes that you made to this window.
Going Further with matchIT 18

6 Matching For more information on the matching process, see Introduction to
Matching in the Online Help
6.1 Explanation of Match Keys
Whether matchIT is comparing two databases at a time or finding duplicates within one database, it would take far too long if matchIT compared every record in the database with every other record. To overcome this problem, matchIT generates phonetic and other keys that are used to find groups of records that are worth comparing – these can be described as “candidate matches”. This screen allows you to select the keys used to find these candidates. You can use any of the fields in the database as matching keys, but you should ensure that they are appropriate. As a general rule, you should select three keys, which instructs matchIT to look through the database using three different search criteria. There should not be a common element to all the keys e.g. you must make sure that Phonetic Lastname Key is not contained within every key. This will help ensure that you pick up all duplication, no matter how the data is structured.
Going Further with matchIT 19

Consider the first key listed in the top half of the dialog, Phonetic Lastname Key & Initial + First 5 characters of Zip Code. This means that matchIT will look at all groups of records where all of the Zip fields, & the phonetic key of last name plus the initial of first name are the same, so that it can check which (if any) of these records it should report as potential duplicates. matchIT examines every pair of records within each group looking at all the relevant fields in those two records, and works out a ‘score’ that represents how closely they match overall. For example:
• Bill Dayton of 3526 River View Pkwy, 19428-2721 and
• Bob Dayton of 1940 Hartford Blvd, 19428
…would be compared because they are both B Dayton and are both in the 19428 Zip area. However, they would not warrant a score that is high enough for matchIT to show them as a duplicate. However:
• Mr W J Deighton of 3526 Riverview Parkway, 19428
would be shown as a potential duplicate of Bill Dayton above, because matchIT knows that Bill can be a short form of William and that Dayton sounds like Deighton.
Select the option Use default keys from the bottom left of the dialog. You will see that the keys shown below are chosen. The plain English description of these keys is:
• phonetic lastname key + Zip
• phonetic lastname key together with first initial + phonetic street key
• street number + phonetic address key (city and street).
You can use these defaults with confidence when finding duplicates in nearly all normal US data files. In cases where you are dealing with complicated or badly structured data, matchIT has the flexibility to find all of the duplicates, no matter how difficult the data may be to process – but for this you need matchIT training or careful reading of the Online Help or User Manual, with time to experiment.
Scroll down the list of keys, and you will see that any of the fields that occur in one or both databases for overlap, can be used to find duplicates. Fields that begin with a lower case letter have not been
Going Further with matchIT 20

standardized by matchIT, and are not as reliable for finding matches as those that have been standardized.
If you are selecting match keys rather than using the defaults, you must select New Key before each new match key that you select.
6.2 Household/Address Matching This level of matching is used primarily for residential data. Household matching will link records with the same address, regardless of last name. For example: John Smith Lucy Jones 1818 Harvard St. 1818 Harvard St. San Jose, Ca 95128 San Jose, Ca 95128
6.3 Contact/Individual Matching Matching at contact level is primarily the same as using individual level matching. Contact matching will deduplicate down to one record per person at a location. Contact level matching will link these two contacts.
For example: Jonathan Smith Mr. J. Smith 1818 Harvard St. 1818 Harvard St. San Jose, Ca 95128 San Jose, 95128
Even in the following example, the records would be considered as contact level matches.
For example: Jonathan Smith MR. J. Smith XYZ Inc. ABC Group 1818 Harvard St. 1818 Harvard ST. San Jose, CA 95128 San Jose, 95128
This is because, by default, the company name is ignored when looking for contact level matches – perhaps XYZ Inc is part of ABC Group and J Smith acts for both levels of the company, or perhaps the company has changed its name. It is much more common for the records to represent the same person than different people in this kind of scenario.
Going Further with matchIT 21

6.4 Company Matching This level is used to produce one record per company or business, thus ignoring any contact names. Therefore, two different employees working for the same company will be matched, as long as the addresses and zip codes match well enough. Company level matching will link the following records.
For example: John Smith Lucy Jones XYZ Inc. XYZ 1818 Harvard St. 1818 Harvard St. San Jose, Ca 95128 San Jose, Ca 95128
6.5 Household/Address Match Keys If you are matching at household i.e. address level, the normal default match keys are not so effective, because two of them include the phonetic key of last name. If you have personal or company names in your data file, it is quite reasonable to use a key that includes last name, as long as the majority of the keys that you use do not rely on the last name key being the same. Therefore, in this case we recommend using the following keys:
• LEFT(ZIP,5)+SUBSTR(ADD_KEY,5,4)+PREMISE i.e. 5 digit Zip plus phonetic key of street + building/house/apartment number
• ADD_KEY+PREMISE i.e. phonetic key of city and street + building/house/apartment number
• NAME1+LEFT(ZIP,5) i.e. phonetic key of last name plus 5 digit Zip
If you do not have personal or company names in your data file, replace the last key with PUN_TRIM(ADDRESS1+ADDRESS2)+LEFT(ZIP,5) i.e. the first two lines of address, upper cased and with punctuation removed, plus 5 digit Zip.
Going Further with matchIT 22

6.6 Exact Matching You can perform exact matching on any database. Exact matching just does an exact match on one field or a combination of fields – no fuzzy matching or matching weights are used. Exact matching can be carried out, not only using matchIT’s standardized fields (e.g. NAME, POSTCODE, etc), but can also be carried out using fields that matchIT does not recognize (e.g. ACCOUNT, DOB, etc). After selecting the match key(s) you would like to use for exact matching, you need to select the Advanced radio button within the Matching Key and Range window. The option of Fuzzy matching or Exact matching will now appear. As well as selecting a single field as each match key, you can also combine fields to create exact match keys.
Going Further with matchIT 23

6.7 Verifying Matches The Verify Matches option within matchIT has the ability to display matching records in either a pairs view (default) or a sets view. To change the default view for the Verify Matches option you will need to relabel a file named "NotVerifySetsFromWizard.txt" in the matchIT directory (C:\Program Files\matchITv51). Essentially the file should be named "NotVerifySetsFromWizard.txt" if you wish to examine records in the pairs view. However, if you wish to look at records in a sets view the file needs to be renamed to "VerifySetsFromWizard.txt". The following examples highlight a Pair view. For more information on the Pairs or Sets view, please see “Verify Matches Window” in the User Manual. Once your data file has been imported to matchIT and internally deduped, you have the ability to manually verify each match. You can access this option under the Matching Results window, or use the Verify Matches option under the Matching menu. Alternatively (or after using Verify Matches), you can enter a threshold score at and above which you want to flag records as duplicates, by selecting Flag Matches from the Matching Results window.
This screen (see next page) displays potential duplicates, in pairs or sets. The matches are shown with the least likely dupes (lowest match scores) first, as you may only want to review the lower scoring pairs. If any pair shown is not a true match, select the False Match button to disregard the match. If you find that most of the matches at the lower scores are false matches, you can use either the or
buttons to flag any records which are true matches at these lower scores.
Going Further with matchIT 24

The different colored highlighting is used to help distinguish which fields differ between the two records. Red highlighting is used to show where a field is different between the two records shown, whereas yellow shows that the field contents are a subset of the corresponding field in the matching record. The buttons in the top right part of the screen control movement through the table; other buttons allow further options. The functions of the relevant buttons are as follows:
Going Further with matchIT 25

Go back to the first pair displayed (lowest matching score selected).
Go back to the previous pair displayed (or press Page Down).
Go forward to the next pair, which may be for a higher score than the current pair displayed (or press Page Up).
Jump to the pair with the next highest score. (A little message "No more scores!" appears in the top right when the end of the pairs is reached.)
If the pair shown is not a true match, you can select this button to remove the match – this means that this pair will no longer be flagged as a match. If you make a mistake, select Restore Match before you move on to the next pair of records (or press Ctrl+Delete).
Select either of these buttons to interactively flag records for deletion (usually just in the lower scoring bands of matches). When you click on one of these buttons, it changes to a green tick. If you click on one of these buttons by mistake, just click on the green tick button to unflag the record.
This button allows you to select different fields to view in the matching pairs, or change the field order (more detail is given in Verify Matches in the User Manual).
This button asks matchIT to remember the current pair so you can return to this pair later.
This button will return to the marked pair. When you have finished reviewing matches, select Done.
This window also provides you with powerful data merging tools. Right clicking in either of the records can access these tools. You will then see a drop down menu that offers options such as copy to the left hand or right hand side, cut, paste, and Intelligent Data Merge. Before using the Intelligent Data Merge option, you must set the Intelligent Data Merge priorities from the Matching Setup sub-menu, located in matchIT’s Jobs/Setup menu.
Going Further with matchIT 26

Verify Matches in Sets
This screen will display potential duplicates, in sets. The different coloured highlighting is used to help distinguish where the differing fields are in the records. Fields in red are different, yellow shows information which is contained in the same field in the other record and white displays those fields which are identical. The tick boxes between matching records (in the top right part of the screen) control what information is transferred to the Master record.
specifies what fields to transfer to the Master record.
transfers selected fields to the Master record.
Going Further with matchIT 27

goes forward to the next page of matching sets.
expands all matching sets shown in the current page of matching sets.
Below the matching pair display there are various buttons for dealing with that particular matched pair:
to flag the duplicate record in the pairs view section, select this button. The button then changes: to "Restore Record" which allows you to unflag the record.
False Match is Ctrl+Delete
if the pair shown is not a true match, you can select this button to remove the match – meaning that this pair will no longer be regarded as a match. The button then changes: to "Restore Match" which allows you to reactivate the displayed matching pair.
uses the Intelligent Data Merge (see Intelligent Data Merge) settings specified by the user to create a meta-record of the two records shown in the pairs section.
Typically, you either flag false matches in a score band if most of them are true matches, or flag the odd true match if most of them are false. You do not need to both flag false matches and flag true matches within a score band, as a global deletion will flag all matches above a match score as long as they have not been declared false. If you are using the Matrix Report or Group Matches feature, any matches you flag interactively will not be included. To allow this, you can increase the match score of any pair in the grey area, so that you move them into the area that is being automatically flagged or grouped.
Going Further with matchIT 28

quickly find records that contain a piece of information as specified by you. The records that contain the information will then be displayed in the Verify Matches in Sets window.
customizes the "Verify Matches in Sets" window by allowing the user to apply filters and sort orders so that only records of specified concern are displayed.
allows you to enter the name or names of any additional fields that you want to see in the "Matches in Group" section. Just scroll down and type the name of the field at the end of the list. You have to know the exact spelling of the field name or it will not be displayed, but you don't have to specify the field type or width. You can also change the order in which the fields are displayed, by dragging the square button to the left of the name. Then select OK and say "Yes" to the question "Make structure changes permanent". NB: this question refers to the structure of a temporary work file, not the structure of the Main File.
jumps to the first matching set of a specified match score.
Click "Done" when you have finished.
Going Further with matchIT 29

7 Modifying Reports
7.1 Report Branding Many of the reports that are created by matchIT have the ability to be customized. Users can even change the company information on the report. This option is located under the Edit menu > Output Layouts as Report Branding. Here you can change the company name, telephone number, e-mail address, and company logo. Modifying the matchIT Logo will require that you copy your custom logo to the matchIT Directory (C:\Program Files\matchITv51).
Adding fields to an already existing or developed report is possible, but should only be attempted by advanced users. Please refer to the User Manual For a detailed explanation on the process used to edit a report layout.
7.2 Report Layouts This option should be used, only, if you have experience editing reports or the document detailing the editing process. This option is located under the menu Edit > Output Layouts as Letter/Page/Report (a file must be open or you will be prompted). This will bring up a window showing all of matchIT’s existing report
Going Further with matchIT 30

formats. It is best to find a format that closely resembles your desired format, thus making the editing process easier. The following window will be displayed once a report is chosen. It is best to use the matchIT User Manual for proper documentation when attempting this procedure.
Going Further with matchIT 31

8 Useful Tips
8.1 Recently Used Files Under the File menu there is a list of recently used databases. This will allow you to access databases quickly, without scouring through your computers directories.
8.2 View Original File Under the View menu, you will find an option to View Text File. If your original source file was a text file, this function will enable you to view this file.
8.3 Performance Data The Performance Data function (within the View menu) allows you to view information on all data runs. This option will show match keys used for previous runs.
8.4 Error Log The Error Log function under the View menu allows you to view why and where an error occurred. This is very helpful when referring your problem to tech-support. When referring a problem please report the program used and the line number.
8.5 Using the Print Icon If you print a report from the printer icon in preview mode, one copy of the complete report is sent to the default printer. If however, you select Destination: Printer from e.g. the View Matches screen, you can choose which printer to use, what page range to print and how many copies you would like.
Going Further with matchIT 32

Going Further with matchIT 33
9 Common questions
9.1 Applying a matchIT USB activation To activate an installation of matchIT, you need to move the activation token from the helpIT USB to the matchIT installation. To do this, just insert the supplied Activation USB stick and select PrInstall.EXE within the matchIT directory folder and follow the onscreen directions. If you do not have an Activation USB stick, contact your supplier for one – then you can install on the new PC as normal. If you are running under Windows 2003, XP or Vista, you must have administrator rights to be able to move a token.
9.2 Moving a matchIT activation to Another PC To move an existing installation to a new PC, you need to remove the activation token from the old PC. To do this, just insert the supplied Activation USB stick and select PrMove.EXE within the matchIT directory folder and follow the onscreen directions. If you do not have an Activation USB stick, contact your supplier for one – then you can install on the new PC as normal. If you are running under Windows 2003, XP or Vista, you must have administrator rights to be able to move a token.
9.3 matchIT’s Online FAQ To view common questions and answers please access the FAQ within matchIT’s Help menu.