glenmore sailboats ltdglenmoresailboats.com/wp/wp-content/uploads/2013/09/sea-spray-15... ·...
TRANSCRIPT
GLENMORE SAILBOATS LTD. (403) 266-3055
THE CATAMARAN PEOPLE since 1964
Enquire about our other fine sailboats
Commodore * Enterprise * Kolibiri * DS 16 Overnighter
ASSEMBLY INSTRUCTIONS All the parts necessary to assemble your SEA SPRAY are contained in the packing carton or crate. Assembly should be done in sequence and prior thereto we suggest you lay out the parts and familiarize yourself with them. The numbers throughout the text refer to the diagrams on later pages. TOOLS NEEDED
• Two wrenches 7/16” open end or socket • Bottle detergent or spray wax • Medium screw driver • Pair Pliers
STEP 1 – CONNECTING THE HULLS Parts:
4 SS sheet metal screws and 4 washers (same as used in small shipping beam. *1 2 Hulls *13 Forward mast beam (4” diam with trampoline rail) *14 Rear beam (4” diam with camel hooks on underside) After lubricating end of beams with detergent or wax, slide hulls on to beams. Make sure beams are all the way into the hull socket. Align the pre-drilled holes in the deck with pre-drilled holes in the beams and install the sheet metal screws.
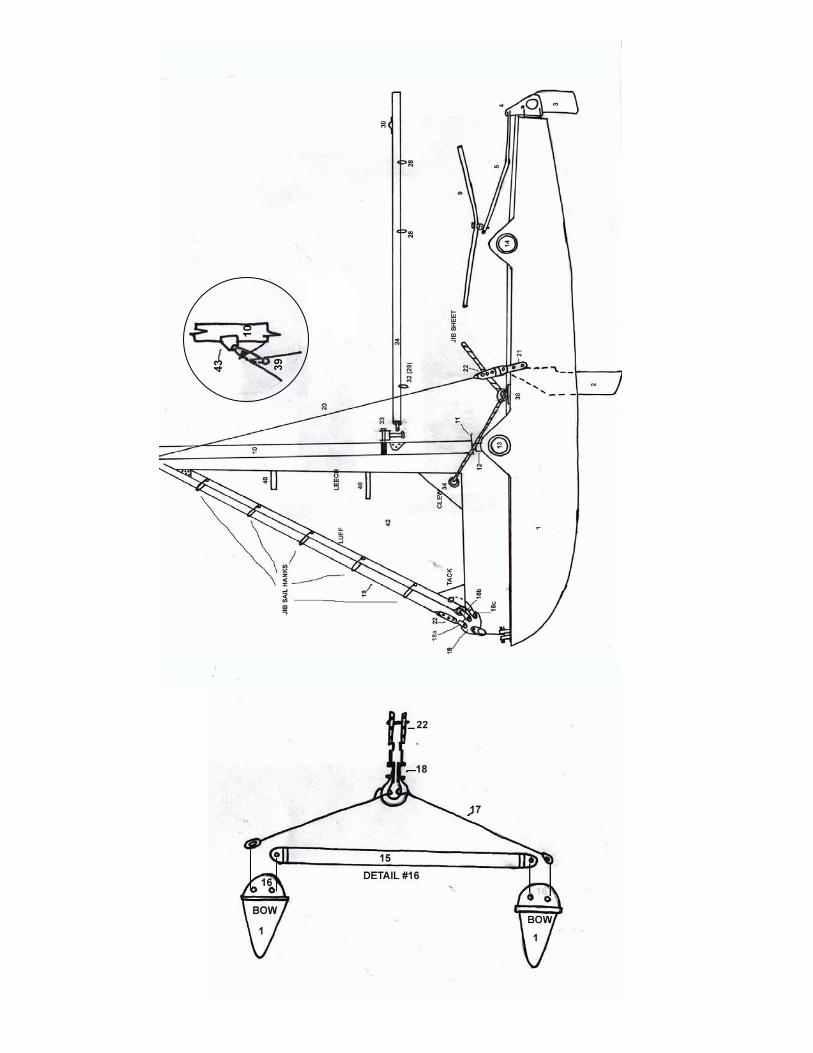
STEP 2 – INSTALL BOW CROSS TUBE Parts: 4 ¼ x 20 x 1 ¼ bolts 4 Self-locking nuts * 15 1 Bow Cross Tube * 17 1 Bridle Install bow tube *15 to inner bow casting holes *16 on each hull. Connect bridle *17 to the outer bow casting hole *16. Some models may have different style bow castings which each require the use of 4 supplied bolts and nuts for installation, and to which the bridle is attached by a shackle. STEP 3 – TRAMPOLINE DECK *35 Warning – Inserting the trampoline is not always the easiest task; it is manufactured to fit as taut as possible to prevent sag and you may need a little extra patience! The forward edge of the trampoline has a notch cut in the center tube pocket (for the cleat on the center tube *23). The top side has hiking straps installed. Using liquid detergent or spray wax, lubricate the bolt rope in the trampoline on four sides, and the aluminum trampoline track on the mast cross beam and side rails. Slide the forward edge of the trampoline into the forward rail which is riveted to the mast cross beam *13. Insert the sides of the trampoline into the side rails. Start with the aft edge of the trampoline into the front of the hull side rails, and work backwards, alternately pulling each side in an inch or so at a time. Do not let one side of the trampoline get too far ahead of the other or it will bind. Be sure to keep the rail and bolt roe well waxed during installation. STEP 4 – CENTER TRAMPOLINE TUBE *23 Parts: 2” trampoline tube with cleat on top side, forward end. 1 ½ x 20 x 2 ½ bolt plus nut Slip tube into front end of center tube pocket sewn on trampoline. Insert front end of tube into side of mast step casting *11, and slide back end of tube into rear beam casting *14. Install bolt through rear beam casting. STEP 5 – AFT EDGE OF TRAMPOLINE Parts: *36 1 Aft trampoline rail 1 Rail lacing line 3/16 diameter Slide rail along aft edge of trampoline (wax will help if needed). Lace the rail to the hooks under the rear beam *14 – lace tightly.
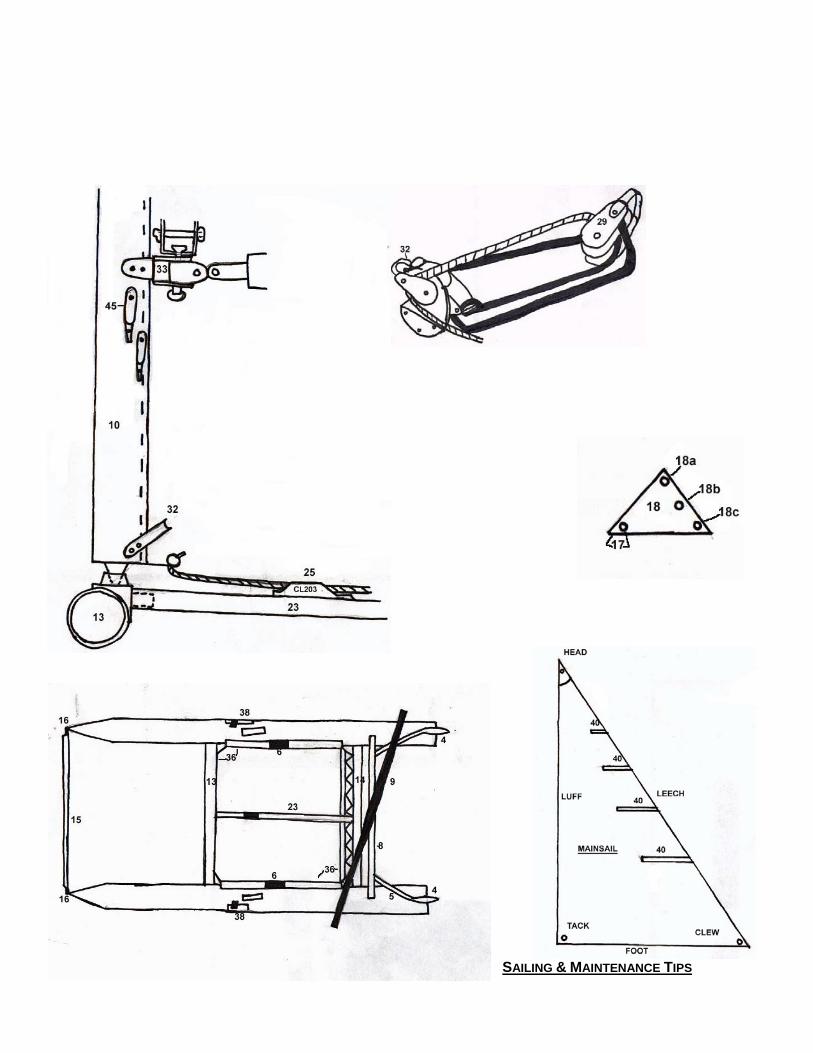
STEP 6 – RUDDER ASSEMBLY This unit is completely assembled except for the tiller connector *8, and helicopter *9. Note the tiller arms *5 slope inwards resulting in the rudders being parallel when installed. Mount the rudder head casting *4 onto the rudder gudgeon *7 by means of ¼ x 20 x 5 ¼ bolt and ¼ self locking nut (already in gudgeon). Affix the ends of the tiller connector *8 to the tiller arm *5 with the bold and nut supplied (bolt goes in from the top). If shock cord in the tiller arm hinders bolt insertion, push cord aside with small screwdriver or similar rd. To ensure tiller connector is installed to correct tiller arm, turn helicopter *9 to center of SEA SPRAY and ensure it runs parallel with center tube; if it points upwards the connector has been joined to the wrong arm. There is one line from each rudder which locks the rudder in “down” position when sailing. The rudder will raise automatically as soon as each line is uncleated. To install, run line through guide under rear cross beam (about 1” inboard of each hull) and then through cleat *6 along trampoline track on top deck. Knot line end once through cleat to prevent it accidentally slipping out. If rudders do not raise automatically when line is uncleated, tighten the shock cord in the tiller arm by changing the position of the knot. STEP 7 – RIGGING THE MAST *10 Parts: Mast (with main and jib halyards installed) *20 2 shrouds (attached to mast hound) *19 1 forestay (attached to mast hound) Before proceeding ensure the bridle has been installed the right way round; it is correct if the empty hole *18a sits naturally at the top position, and the side with three holes points towards the back of the boat. With the SEA SPRAY on land, lay the mast on the boat with the foot of the mast pointing forward and laying underneath the bow tube. Attach the shrouds *20 to the shroud plates *21 with the shroud adjuster *22. Lift the mast to a vertical position and place the foot of the mast *11 into the mast step socket *12. Continue to hold mast vertical with one hand, and carefully pull the forestay *19 forward and attach it with the adjuster to the top hole *18a in the bridle plate *18; when sufficient tension is on the forestay during the latter maneuver, you can stop holding the mast. Tension will have to be put on the forestay to attach it to the bridle. This may be done more easily with a small length of line from the forestay to the bow tube *15. The mast should be perpendicular or raked backwards a few degrees; later tuning experiments will indicate where it is best to have YOUR mast to gain maximum performance. Always make sure there is a small amount of bearing grease in the mast step *12 to prevent mast base from grinding on the aluminum mast step. The forestay and shrouds should be medium-tight all round. Once the mast is stepped, feed the length of line (mast rotation control line) attached to the foot of the mast, through the cleat *25 on the center tube *23. STEP 8 – INSTALLING THE BOOM *24 Insert the stainless steel shaft protruding from the boom end between the plates of the gooseneck *33 which is permanently attached to the mast. Then insert the pin through the holes in the gooseneck and shaft, and secure with the locking ring.
STEP 9 – RAISING THE SAILS We feel that hoisting the sails is self-evident; the main and jib halyards are pre-installed on the mast. The mainsail should be raised tautly but not beyond the top mastband. The foot of the mainsail should not fall below the lower mastband. Insert all battens BEFORE raising sails, and remove battens when not in use to prevent elastic tensioner fatigue. Dry wet sails to prevent mildew and fold neatly before packing in sailbag. The jib tack grommet is attached with a shackle to hole *18b in the bridle plate. The mainsail tack grommet (lower hole) is attached with a captive pin shackle which sits above the gooseneck fitting ready to receive the mainsail. The clew grommet of the mainsail is attached to the outhaul slide *30 on the aft end of the boom with a shackle. In the gooseneck area is a line approximately 30” long (Cunningham control line) attached to the mast. Thread this line through the upper grommet (Cunningham control) in the mainsail tack area., then through the cleat *45 on the mast. This line enables you to stretch the luff of the mainsail, to remove wrinkles and/or to adjust the camber (belly) of the mainsail. The Cunningham control downhaul system is used in conjunction with the boom outhaul system *30 to achieve the desired mainsail setting or shape. The boom is supplied with the outhaul system installed. The mainsail should be slackened in light winds and downwind sailing, and tightened in heavy winds and upwind sailing. The rigging link in the *18c hole in the bridle plate is used for downhaul adjustments to the jib luff, utilizing the line running from the jib tack grommet. STEP 10 – BOOM VANG *32 The boom vang line *32 is attached to the foot of the mast from the double (or fiddle) block *29 on the boom, and is shown in the illustration. The boom vang is used to keep the boom fairly level as one lets out the mainsail and prevents excessive mainsail twist. When sailing under normal conditions, adjust the vang to medium tension. STEP 11 – SHEETS (same as ‘line’ or ‘rope’) The jib sheet should be threaded through the jib clew grommet and knotted at mid point. Lead each jib sheet from the clew through the jib fairlead *38 on the deck. Knot the ends. We suggest tying the two knotted ends together to more easily locate the jib sheet when sailing single handed. The mainsheet *26 is threaded through the 4:1 ratchet block and two pulleys *28 as shown in the illustration. Attach the two pulleys *28 to the boom, and the mainsheet ratchet block to the casting midway on the rear cross beam *14. The end of the mainsheet should be knotted after threading.

PART DESCRIPTION
1. Hull 18a. Forestay attachment 34. Jib clew
2. Daggerboard 18b. Jib luff attachment 35. Trampoline
3. Rudder 18c. Jib luff downhaul
36. Trampoline track or rails
4. Rudder head casting 19. Forestay 37. Trampoline
lacing
5. Tiller arm 20. Shroud / sidestay 38. Jib fairlead
6. Rudder downhaul cleat 21. Shroud plate 39. Mainsail
7. Gudgeon 22. Shroud adjuster 40. Batten
8. Tiller Connector 23. Center or trampoline tube 41.
9. Helicopter 24. Boom 42. Jib Sail
10. Mast 25. Mast rotation cleat 43. Mast hounds
11. Mast foot casting 26. Mainsheet 44. Rudder
downhaul guide
12. Mast step casting
27. Self-lubricating needle bearing 4:1 ratchet mainsheet block
45. Cunningham Control cleat
13. Main beam or mast cross tube
28. Mainsheet pulley blocks
46. Cunningham control grommet
14. Rear beam or aft cross tube
29. Boomvang double or fiddle block
47. Mainsail tack grommet
15. Bow or compression tube 30. Outhaul
16. Bridle attachment
point
31. Outhaul cleat
17. Bridle 32. Boomvang attachment
18. Bridle Plate 33. Gooseneck
SAILING & MAINTENANCE TIPS
Coming About Changing to a new tack on a catamaran requires different techniques from a monohull. The best approach is – bring the SEA SPRAY right through the direction from which the wind is coming, by reversing the rudders in a fairly slow movement; maintain as much speed as possible and KEEP THE JIB SHEET CLEATED. Release the mainsheet approximately 6” during this procedure. By this time the mainsail has swung over; as soon as the jib has filled, change your position to the other hull, THEN RELEASE THE JIB SHEET and pull the jib in on its new side. Seating Position The main aim whether one or more are on board, is to find an almost horizontal balance, which means the transoms should not be sunk deeply in the water, and the bows should be well clear above the water line. In light winds (approximately 1-6 knots) sit close to the mast cross beam; in medium winds (6-11 knots) sit midship; in heavier winds move aft (the higher the wind the farther back, so that the bows are high and clear the waves easily). Adjust the foregoing instructions if more than one is onboard. Wave conditions affect balance and you should adjust to them. Capsizes The SEA SPRAY is easily righted by one person. In heavy winds it is advisable not to have the mainsheet cleated while sailing – play the big puffs to spill sufficient wind to prevent capsizing. If your SEA SPRAY is not pointing into the wind at the time or capsize, BEFORE commencing the righting procedure, swim to the bow, grab the bow tube and swing the bow into the wind. BEFORE making ANY righting procedure make sure the jib and mainsheet are UNCLEATED. In a 90˚ capsize, immediately move from the raised hull (backwards preferably) to the daggerboard of the lower hull (stand as CLOSE to the hull as possible). If the bow is pointing into the wind, hang on to the upper daggerboard (or jib sheet, letting it slide slowly through your hands), and lean backwards as far as possible, allowing the wind to get under the sails. The mast and boat will start to lift, and when up about 45˚, jump from the daggerboard and grab the mast beam; pull yourself up onto the trampoline. Do not attempt to climb aboard over the side of the hull. The FASTER one commences righting procedures the better; allowing the sails to fill with water makes more weight to right (although the SEA SPRAY’s loose footed mainsail is a great feature for spilling water). In an 180˚ capsize (turtle) sit on either upturned hull and lean out as far as possible (or rock) until the mast comes up past the 90˚ point, when flotation will take effect. Then proceed as for a 90˚ capsize. One can approach an 180˚ capsize also by swimming to the leeward hull, grasping the daggerboard or slot, levering feet against the gunwale and leaning out. This will bring the mast out of the vertical position and permit flotation to take effect up to the 90˚ point. Make sure your SEA SPRAY is never less than 45˚ into the wind before attempting to right. Mast The mast is manufactured airtight (for floatation purposes) but a loose rivet could cause loss of seal. Therefore check your mast occasionally for a tight seal, by submerging in water and watching for bubbles. Use silicone to seal any leakage point. Tying to right a SEA SPRAY with a water filled mast is extremely difficult. Before raising the mast be sure it will clear all overhead power lines; contact with high voltage power lines could be fatal.
Drain Plugs Hulls are manufactured as airtight as possible however slights seepage may occur, as well as condensation. After sailing or during or after long periods of non-use, we suggest leaving the drain plugs open for a while. If necessary drain any hull moisture. Always check the drain plugs are IN TIGHT before you go sailing! Silicone the drain plug area if any leakage is suspected. Daggerboards To prevent finish deterioration, don’t leave wet boards on the trampoline for extended periods. Make sure daggerboard rubbers are installed with a self-locking nut. These rubbers will work loose and off with constant rolling on the deck, if a self-locking nut is not used. Waxing Waxing hulls and decks (EXCEPT anti-slip areas) twice a year will help prevent fading and preserve finish. Storage The SEA SPRAY is easily disassembled for compact winter storage. Also, hoisting an assembled SEA SPRAY into garage rafters is a good winter storage idea. An assembled SEA SPRAY should not be stored on its side. Silvatrim (No Virginia, the silvatrim does not hold the hull and deck together; it just prevents damage if you hit the dock!) Silvatrim butyl seepage may occur on some new boats, but the excess usually disappears after the first few sails. To clean away any seepage use lacquer thinner (NOT pain thinner or acetone) and/or a razor blade for trimming. Traveling We suggest removing trampoline on long trips; wind and high speed passing trucks can cause lift and possible boat and trailer flipping. Miscellaneous The top of the jib should be a few inches away from the mast to enable free air flow channel. If in “irons” (Slipping backwards especially when coming about), “backwind” the jib (i.e. pull jib over to its unnatural side) and move rudders to the opposite direction (with mainsail released). After a few seconds slippage will stop, quickly reverse the jib to its proper side, replace rudders to correct position, cleat in jib – and you’re off again. Note: These assembly instructions apply to current models; earlier models may require modifications.
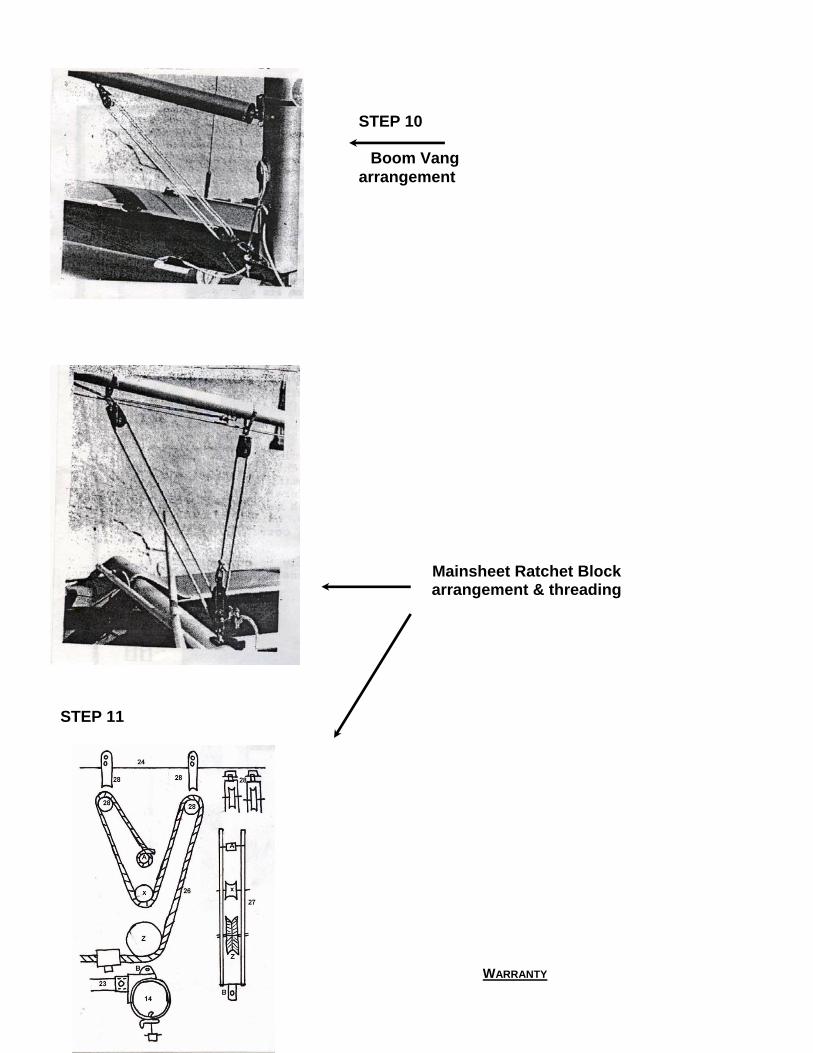
Mainsheet Ratchet Block arrangement & threading
STEP 10
Boom Vang arrangement
STEP 11
WARRANTY

1. T
he SEA SPRAY catamaran is guaranteed against defects in workmanship or faulty materials for a period of 2 YEARS from the date of purchase in the case of the hull, and 1 YEAR in the case of all other parts EXCLUDING rudders, daggerboards and sails.
2. Glenmore Sailboats will replace or repair at its option FOB Factory at Calgary, Alberta, such parts of its
manufacture found upon inspection to be defective in material or workmanship. Such defective item(s) must be returned to factory within 14 days from date of claim, freight prepaid.
3. Ordinary use, wear, tear, neglect or misuses are not covered by this Warranty.
4. Glenmore Sailboats reserves the right to make changes and/or improvements upon the SEA SPRAY
without imposing any obligation to install the same, upon products theretofore manufactured.
5. To expedite Warranty Adjustments please complete and return the following at time of purchase to:
Glenmore Sailboats 1520 Meridian Road N.E.
Calgary, Alberta T2A 2N9
PURCHASER’S NAME____________________________
PURCHASER’S ADDRESS________________________
DEALER’S NAME ________________________________
DATE OF PURCHASE ___________
SAIL#___________ HULL#____________
DEALER’S SIGNATURE_________________________
JOIN THE CDN SEA SPRAY CATAMARAN ASSOCIATION AT REDUCED RATE!
Membership is required for certain National, International and Class events Members receive Class Rules, regular Newsletter with current regatta events, racing and sailing tips, etc. Membership is currently $15 annually, however a SPECIRAL $1.00 1st year Membership is offered to new SEA SPRAY owners. Send form and $1:
GLENMORE SAILBOATS LTD.
Sea Spray Association
609, 3339 Rideau Place SW Calgary AB
T2S 1Z5
NAME ________________________________________
ADDRESS _____________________________________
PHONE (____) _______________
SAIL # KC____________ ________________________
Code The applicant agrees to abide by the Class Constitution and By-Laws. Applicants Signature ______________________________
GST # R102114154 1520 Meridian Road N.E.
Calgary, Alberta T2A 2N9
(403) 266-3055 Fax (403) 266-3057
email: [email protected]
www.glenmoresailboats.com