getting started with adobe premiere elements 13 · information about registering your purchased...
TRANSCRIPT

Adobe Premiere Elements 13
Getting Started with

Getting Started withAdobe Premiere Elements 13

© 2014 Adobe Systems Incorporated and its licensors. All rights reserved. Getting Started with Adobe Premiere Elements 13 This guide is licensed for use under the terms of the Creative Commons Attribution Non-Commercial 3.0 License. This License allows users to copy, distribute, and transmit the guide for noncommercial purposes only so long as (1) proper attribution to Adobe is given as the owner of the guide; and (2) any reuse or distribution of the guide contains a notice that use of the guide is governed by these terms. The best way to provide notice is to include the following link. To view a copy of this license, visit http://creativecommons.org/licenses/by-nc-sa/3.0/. Adobe, the Adobe logo, Adobe Premiere, and Photoshop are either registered trademarks or trademarks of Adobe Systems Incorporated in the United States and/or other countries. Windows and Windows Vista are either registered trademarks or trademarks of Microsoft Corporation in the United States and/or other countries. All other trademarks are the property of their respective owners. Adobe Systems Incorporated, 345 Park Avenue, San Jose, California 95110, USA.

CONTENTSGetting started with Adobe Premiere Elements
System requirements 1Installing/uninstalling Adobe Premiere Elements 1Supported software and hardware 4Help resources 5What’s new in Adobe Premiere Elements 13 8Get started quickly 9

GET STARTED
Adobe Premiere Elements 13 is a video editor that helps you create professional-looking movies using video clips imported from smartphones, cameras, AVCHD camcorders, webcams, and other sources. With Adobe Premiere Elements, you can apply various professional-grade effects and transitions simply by dragging them on to your clips. After you create a video, you can burn it to a DVD or Blu-ray or share it on mobile devices and social websites, such as YouTube and Facebook.
SYSTEM REQUIREMENTS
Make sure that you have the required hardware and software to run Adobe Premiere Elements. If you are connected to the Internet , check out the latest system requirements athttp://www.adobe.com/go/learn_pre_systemreq_enOtherwise, refer to the ReadMe file on the installation disc.
INSTALL ADOBE PREMIERE ELEMENTS FROM DISC
You can have more than one version of Adobe Premiere Elements installed on your computer so there’s no need to uninstall any earlier version of Adobe Premiere
1Getting Started with Adobe Premiere Elements 13

Elements you may already have. You can uninstall earlier versions of Adobe Premiere Elements once you are comfortable with the latest version of the software.
Before you begin
• Ensure that you have a DVD drive (not CD drive) connected to your computer. Insert the DVD into the drive and follow the instructions.
• Temporarily disable any anti-virus software installed on your computer. Disabling the anti-virus program speeds up the installation process.
• Locate the serial number. The serial number is on the back of the DVD case and starts with the number 1057:.
Install Adobe Premiere Elements (Microsoft Windows)
1. Insert the Adobe Premiere Elements DVD (disc 1) into your computer.
2. In the Adobe Premiere Elements 13 dialog box, click Install Adobe Premiere Elements 13.
If you close the dialog box or if the security settings on your computer do not permit AutoPlay, browse to the DVD using Windows Explorer and double-click Setup.exe. If
any security warnings appear, click Yes.
3. On the Welcome screen, click Install to start installation in serialized mode.
You can choose to install Adobe Premiere Elements as a trial and enter the serial
number later.
4. On the Sign In Required screen, click Sign In to proceed with signing in. Enter your Adobe ID and password and click Sign In.
5. In the License Agreement dialog box, click Accept .
2 Getting Started with Adobe Premiere Elements 13

6. On the Serial Number screen, enter the serial number and click Next .
7. Click Install to install at the default location. If you want to modify the install location, click Change and select the folder on your computer where you want to install Adobe Premiere Elements. Click Install. The installer copies the files to your computer.
8. When the installation is complete, click Close.
Install Adobe Premiere Elements (Mac OS)
1. Insert the Adobe Premiere Elements DVD (disc 2) into your computer.
2. Navigate to Adobe Premiere Elements 13/Install.app and launch the installer.
3. On the Welcome screen, click Install to start installation in serialized mode.
You can choose to install Adobe Premiere Elements as a trial and enter the serial
number later.
4. On the Sign In Required screen, click Sign In to proceed with signing in. Enter your Adobe ID and password. Click Sign In.
5. In the License Agreement dialog box, click Accept .
6. On the Serial Number screen, enter the serial number and click Next .
7. Click Install to install at the default location. To modify the install location, click Change and select the folder on your computer where you want to install Adobe Premiere Elements. Click Install. The installer copies the files to your computer.
8. When the installation is complete, click Launch Now.
3Getting Started with Adobe Premiere Elements 13

Your Adobe ID
An Adobe ID is similar to a Gmail or Facebook ID that you use to secure and personalize your account. Use your Adobe ID for the following activities:
• Registration You need an Adobe ID to register your software. When you register your copy of Adobe Premiere Elements, Adobe keeps a record of your serial number. This way, Adobe knows that you are eligible for upgrades. For information about registering your purchased Adobe product and the benefits of registering , see
http://www.adobe.com/go/learn_adoberegistration_en• Trials Use your Adobe ID to get free 30-day trials.• Ordering Use your Adobe ID to order products and track orders.• Getting support Log online support cases using your Adobe ID.• Forums and events Use your Adobe ID to log in to forums and register for
events. To learn how you can create an Adobe ID, see http://www.adobe.com/go/learn_adobeid_en
Uninstall Adobe Premiere Elements
To uninstall Adobe Premiere Elements, seehttp://www.adobe.com/go/learn_uninstallpre_en
SUPPORTED SOFTWARE AND HARDWARE
For the latest information on file formats, graphics drivers, and hardware and devices
4 Getting Started with Adobe Premiere Elements 13

that Adobe Premiere Elements supports, seehttp://www.adobe.com/go/learn_pre13_readme_enIf you do not have access to the Internet , open the ReadMe file on the installation disc.
HELP RESOURCES
If you have questions about installing or using Adobe Premiere Elements, you will find many resources on the web or from within your installed application. Adobe recommends that you use these resources before contacting Adobe Customer Care.
eLive
Adobe Premiere Elements comes with a new tab called eLIve. With eLive, you can access a stream of learning and troubleshooting resources from your workspace. These resources are fetched live from the web so you can stay up-to-date.
In-app step-by-step guidance from the Guided tab
From the Guided tab in the Adobe Premiere Elements workspace, you can access easy-to-follow, integrated tutorials that help you learn Adobe Premiere Elements as you use the software. If you are new to Adobe Premiere Elements, remember to try the first tutorial—Getting started with Adobe Premiere Elements. This quick visual resource helps you become familiar with the interface of Adobe Premiere Elements and a basic import and editing workflow using the software.
5Getting Started with Adobe Premiere Elements 13

Adobe Premiere Elements Help
From the Help menu of Adobe Premiere Elements, you can access a host of resources that help you learn, use, or troubleshoot Adobe Premiere Elements while you create your movies.
Built-in tutorials in the Guided mode
6 Getting Started with Adobe Premiere Elements 13

Adobe Premiere Elements Help: Comprehensive guide for using the various featuresGetting Started: Step-by-step guide for a simple getting started workflowKey Concepts: Visual dictionary of key video conceptsVideo Tutorial: Hand-picked video tutorials for learning the productUser Forum: Quick link to the vibrant discussion forum for the product
Troubleshooting tips
If you encounter a problem, try these steps before you contact customer support:
• Restart Adobe Premiere Elements, or restart your computer.• Reset the Adobe Premiere Elements preferences. Hold down the Ctrl +
Alt + Shift keys (Windows) or Option + Command + Shift keys (Mac OS) immediately after you choose to open Adobe Premiere Elements or Elements Organizer.
• Turn off other programs, including anti-virus, firewall, and CD/DVD burning applications that run in the background, until you find the cause.
• Make sure that the computer operating system is up-to-date. Install the latest drivers for your video card, sound card, printer, and other devices.
• If Adobe Premiere Elements was working fine until recently, remove any recent additions to your computer. What was the last thing you changed on your computer before the problem began? Did you install a new printer, font , or other software?
• If a problem occurs when you open or edit a video, check whether the problem occurs with all videos or with videos from different cameras or sources.
• If something in Adobe Premiere Elements doesn’t seem to work properly,
7Getting Started with Adobe Premiere Elements 13

check for resources at http://helpx.adobe.com/premiere-elements.html
Ask the experts
Check the Frequently Asked Questions (FAQs) in the Adobe Premiere Elements forum (http://www.adobe.com/go/learn_pre_forums_en) and follow the discussions. If you don’t find the answer to your problem, post your question. Add enough information to help the experts troubleshoot your problem.
Contact customer support
For the most efficient ways to get through to customer support , Adobe recommends visiting http://helpx.adobe.com/contact.htmlYou will find quick links to community forums, live chat , and phone. If you call Adobe Customer Care and experience a long hold time, you can schedule a callback for a more convenient time
WHAT’S NEW IN ADOBE PREMIERE ELEMENTS 13
To learn about new and enhanced features, visithttp://www.adobe.com/go/learn_pre_features_en
8 Getting Started with Adobe Premiere Elements 13

GET STARTED QUICKLY
Double-click the Adobe Premiere Elements 13 icon on your desktop to launch the application. The Welcome Screen displays the Organizer and Video Editor options to start Elements Organizer and Adobe Premiere Elements.
• The Elements Organizer lets you import , manage, view, search, and share all of your media (photos and video clips). After collecting hundreds and thousands of photos and videos on your computer, you’ll discover that finding and managing them with the Elements Organizer is much easier. You can also instantly fix photos in the Organizer workspace.
• The Video Editor lets you turn your video clips into memorable home movies. You can get step-by-step, easy-to-follow guidance to make several types of edits.
9Getting Started with Adobe Premiere Elements 13
Welcome Screen

After working with your videos in either workspace, you can create movies and share them over the web. Click Organizer to start importing your photos and videos. If you get a prompt to import or convert your catalog , follow the on-screen instructions.
Convert a catalog from a previous versionWhen you import media, Adobe Premiere Elements stores the details of the imported files in a catalog. The catalog contains links to the files and records of details, such as tags that you attach to your clips.
If you created a catalog with a previous version of Adobe Premiere Elements, Adobe Premiere Elements prompts you to convert your catalog so that it is compatible with the current version.
Converting a catalog is a one-time process.
Import photos and videos
You can bring all your photos and videos into the Elements Organizer from any folder on a computer or from devices such as cameras, card readers, and scanners.
Import from your computer
If your photos and videos are already stored on the hard drive of your computer,
Prompts to import your photos and videos
10 Getting Started with Adobe Premiere Elements 13
follow these steps to import them in Elements Organizer to organize them or access them for editing and sharing :
1. In the Organizer workspace, click Import > From Files and Folders.2. In the Get Photos and Videos from Files and Folders dialog box, choose
the folder that has the photos and videos you want to import and click Get Media.
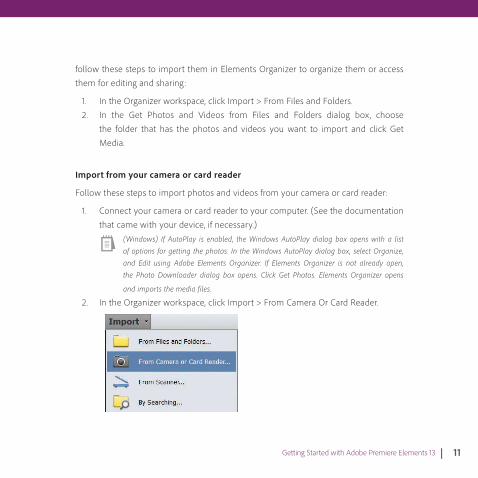
Import from your camera or card reader
Follow these steps to import photos and videos from your camera or card reader:
1. Connect your camera or card reader to your computer. (See the documentation that came with your device, if necessary.)
(Windows) If AutoPlay is enabled, the Windows AutoPlay dialog box opens with a list of options for getting the photos. In the Windows AutoPlay dialog box , select Organize, and Edit using Adobe Elements Organizer. If Elements Organizer is not already open, the Photo Downloader dialog box opens. Click Get Photos. Elements Organizer opens
and imports the media files.
2. In the Organizer workspace, click Import > From Camera Or Card Reader.
11Getting Started with Adobe Premiere Elements 13

3. In the Photo Downloader dialog box, under Source, select where to copy/import from using the Get Photos From drop-down list .
4. If prompted, select folders on the device from which you want to import photos.
5. Use default settings, or set appropriate options in the Import Settings area.6. Click Get Media. Respond to on-screen prompts if necessary. The photos and
videos are copied to your hard drive.
Manage your photos easily in the Elements Organizer
With the Elements Organizer, you can easily view and manage your ever-growing collection of video clips in many ways. You can organize your related photos and videos in ways that you find interesting and useful. For example, you can create an album for photos and videos you had shot last summer on a visit to Europe. Mobile albums are accessible from your smartphones and tablets; so with mobile albums, you can take your videos and photos with you wherever you go.
Create an album
1. In the left panel of the Organizer workspace, click Create Album .2. In the right pane, specify a name for the album.3. Drag-and-drop photos from the Media view to the Content area of the Add
New Album panel.
12 Getting Started with Adobe Premiere Elements 13
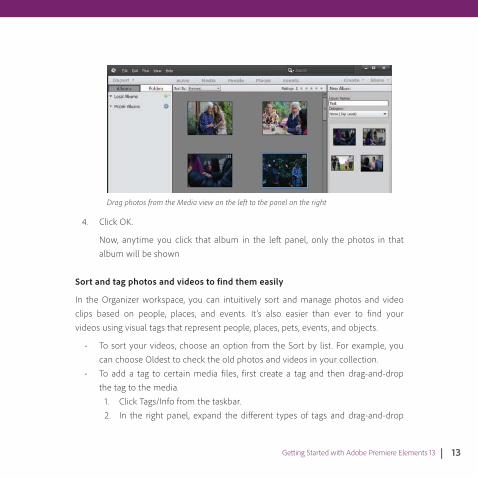
4. Click OK.
Now, anytime you click that album in the left panel, only the photos in that album will be shown
Sort and tag photos and videos to find them easily
In the Organizer workspace, you can intuitively sort and manage photos and video clips based on people, places, and events. It ’s also easier than ever to find your videos using visual tags that represent people, places, pets, events, and objects.
• To sort your videos, choose an option from the Sort by list . For example, you can choose Oldest to check the old photos and videos in your collection.
• To add a tag to certain media files, first create a tag and then drag-and-drop the tag to the media.
1. Click Tags/Info from the taskbar.2. In the right panel, expand the different types of tags and drag-and-drop
Drag photos from the Media view on the left to the panel on the right
13Getting Started with Adobe Premiere Elements 13

a tag to the media file. For example, you can drag-and-drop the Nature tag from Keywords tags to your photos and videos of exotic locations.
• To view media files that have the same tags, select the tags in the right panel.
If you want to learn more about organizing your media, visit :http://helpx.adobe.com/elements-organizer/topics.html
Create your first movie
In the Video Editor, assemble the clips you want and make edits as required to create your first movie.
If you are in the Organizer workspace, select a video and then click the pull-down arrow next to Editor on the Action bar, and select Video Editor to launch Adobe Premiere Elements
Editor.
Photos and videos with the Nature tag
14 Getting Started with Adobe Premiere Elements 13

Quick, Guided, and Expert modes in the Editor workspace
The Quick and Expert modes in Adobe Premiere Elements give you different levels of editing capabilities. The Guided mode provides help as you use Adobe Premiere Elements. Start with Quick and Guided. When you have gained some experience, explore the powerful tools in the Expert mode.
Editor menu
15Getting Started with Adobe Premiere Elements 13
Modes in Adobe Premiere Elements Editor

Quick Lets you quickly perform the most common editing tasksGuided Provides built-in tutorials for key editing tasksExpert Lets you edit and enhance your videos using the complete set of powerful tools available in Adobe Premiere Elements
Assemble movie clips in the Quick view timeline
The quickest way to assemble movie clips is to use the timeline in the Quick view. The Quick view timeline presents a simplified interface where you can edit your clips quickly.
1. In the Video Editor, click Add Media and select Elements Organizer.2. Drag-and-drop the clips you want to use in your movie onto the Timeline. 3. Change the order of your clips as required by dragging them to where they need
to be on the Timeline.
Edit movie clips
Adobe Premiere Elements has video-editing tools that meet many needs. You can preview and trim imported clips to eliminate unwanted material. You can also adjust clip properties such as, speed, direction, and duration.
Split a clip to remove unwanted portions
If you have long video clips, you can split them into smaller clips. Smaller clips are easier to manage and edit .
1. From the Quick view timeline, select a clip.2. Drag the current time indicator (CTI) to the point where you want to split the
16 Getting Started with Adobe Premiere Elements 13

clip.3. Click the scissors icon to split the clip into two sections.4. Select the section you want to remove by clicking on it , and click Delete on
your keyboard.
Trim a clip
Trimming helps you remove bad footage from the beginning and end of a clip.1. From the Quick view timeline, select the clip.2. Drag the vertical edges of the clip to the left or right to shorten the clip.
Add a transition
Transitions help you phase out one clip and phase in the next or to stylize the beginning or end of a single clip. You generally place transitions on a cut between two clips.
1. On the Action bar, click Transitions.
Trimming a clip
17Getting Started with Adobe Premiere Elements 13

2. Drag a transition (for example, the Cross Dissolve transition) between two clips. The Transition Options dialog appears.
3. Modify the properties of the transition as required, and click Done.
Video adjustments
The Adjustments panel lets you modify the inherent properties of your clip, such as color and lighting. You can also use the Smart Fix tool to enhance the quality of your video footage. To display the Adjustments panel, select the clip and then click Adjust on the right .
Apply special effects to a clip
1. From the Quick view timeline, select the clip.2. On the Action bar, click the Effects control.3. Drag a special effect , for example Twirl, on to the clip to apply the effect .
If necessary, use the options in the Applied Effects panel to modify the effect you applied.
Adding a transition
18 Getting Started with Adobe Premiere Elements 13

Add music scores to a video clip
To add a score to a video clip:1. Click Audio on the Action bar.2. Click the drop-down list to view the various scores.
3. Select the score you want to apply to the video clip and drag-and-drop it to the timeline below the intended video clip.
If you’d like to learn more about the editing power of Adobe Premiere Elements, visithttp://helpx.adobe.com/premiere-elements/topics.html
Publish and share videos
Once you are through with editing your movie, there are several ways you can enjoy sharing them with friends and family.Use the Publish and Share drop-down menu in the upper-right corner of the Video
Selecting a score
19Getting Started with Adobe Premiere Elements 13

Editor workspace to save and share (export) your finished videos:
Private Web Album Click Publish + Share and then select Private Web Album to upload your video to the internet so you can share a private link with friends and family.Social Websites Click Publish + Share and then select Social Websites to upload your video to YouTube, Facebook , or Vimeo.Disc Insert a blank disc into a recordable DVD, Blu-ray, or AVCHD disc drive. Click Publish + Share and then select Disc. Specify the settings as desired, and then click Burn to share your video via discs.Computer Click Publish + Share and then select Computer to export your video for viewing on computers. Mobile Phones and Players Click Publish + Share and then select Mobile Phones and Players to export your video for viewing on mobile phones and other devices.
This guide provides you a quick walkthrough to help you get started with Adobe Premiere Elements. You will find more in-depth information in the following resources on the web:http://www.adobe.com/go/learn_pre_gettingstartedhttp://www.adobe.com/go/learn_pre_onlinehelphttp://www.adobe.com/go/learn_pre_videos
20 Getting Started with Adobe Premiere Elements 13

Capture or transfer video to your computer
The process of transferring video from a recording device to your hard disk is called capturing. When you capture a movie using Adobe Premiere Elements, the movie clips are converted to a compatible format and saved on your hard disk . Adobe Premiere Elements creates references to the captured movie clips in the project .
Transferring from a DVD
If you are using a DVD camera, finalize the disc , and then remove it . Follow these steps to transfer a movie from a DVD to the computer:
1. Insert the DVD in the computer ’s DVD drive.
2. Start Adobe Premiere Elements. On the Welcome screen, click Video Editor. Click Add Media, and then click DVD camera or computer drive. In Video Importer, select the DVD drive from the Source menu.
Connect your device to the computerYou can capture videos with various devices and bring them into Adobe Premiere Elements for editing. To connect smartphones, AVCHD cameras, and other USB devices to the computer, use the USB cable that you got with the device.Here are some guidelines that are good to follow:
• Read the documentation that came with your device.
• Switch on the device.• Follow any instructions that appear
on the computer to install drivers and other software.
• If your camera or computer is not responding, try using a card reader instead
Connecting devices to computer
21Getting Started with Adobe Premiere Elements 13
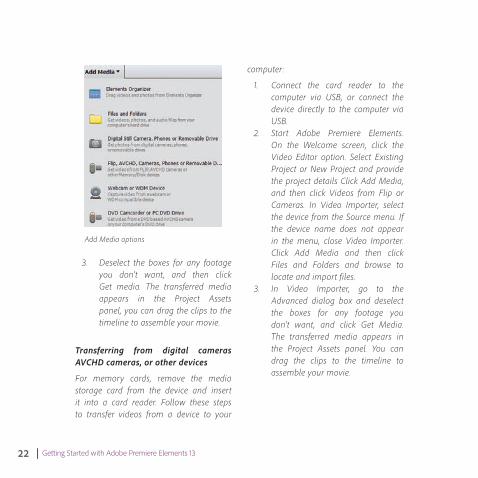
Add Media options
computer:
1. Connect the card reader to the computer via USB, or connect the device directly to the computer via USB.
2. Start Adobe Premiere Elements. On the Welcome screen, click the Video Editor option. Select Existing Project or New Project and provide the project details Click Add Media, and then click Videos from Flip or Cameras. In Video Importer, select the device from the Source menu. If the device name does not appear in the menu, close Video Importer. Click Add Media and then click Files and Folders and browse to locate and import files.
3. In Video Importer, go to the Advanced dialog box and deselect the boxes for any footage you don’t want , and click Get Media. The transferred media appears in the Project Assets panel. You can drag the clips to the timeline to assemble your movie.
22 Getting Started with Adobe Premiere Elements 13
3. Deselect the boxes for any footage you don’t want , and then click Get media. The transferred media appears in the Project Assets panel, you can drag the clips to the timeline to assemble your movie.
Transferring from digital cameras AVCHD cameras, or other devices
For memory cards, remove the media storage card from the device and insert it into a card reader. Follow these steps to transfer videos from a device to your

Adobe Systems Incorporated345 Park Avenue, San Jose, CA 95110-2704 USAwww.adobe.com