getting microsoft® outlook® and salesforce in...
TRANSCRIPT
Getting Microsoft® Outlook®
and Salesforce in SyncSalesforce, Winter ’17
@salesforcedocsLast updated: October 31, 2016

© Copyright 2000–2016 salesforce.com, inc. All rights reserved. Salesforce is a registered trademark of salesforce.com, inc.,as are other names and marks. Other marks appearing herein may be trademarks of their respective owners.
CONTENTS
Syncing Microsoft® Outlook® and Salesforce Basics . . . . . . . . . . . . . . . . . . . . . . . . . . . 1
Getting a High-Level View of Your Integration Work . . . . . . . . . . . . . . . . . . . . . . . . . . . 2
Salesforce for Outlook System Requirements . . . . . . . . . . . . . . . . . . . . . . . . . . . . . . . . 5
The Big Picture for Setting Up Salesforce for Outlook . . . . . . . . . . . . . . . . . . . . . . . . . . 7
Download the Salesforce for Outlook Installer . . . . . . . . . . . . . . . . . . . . . . . . . . . . . . . 8
Install and Set Up Salesforce for Outlook . . . . . . . . . . . . . . . . . . . . . . . . . . . . . . . . . . . 9
Customizing Salesforce for Outlook . . . . . . . . . . . . . . . . . . . . . . . . . . . . . . . . . . . . . . . 11
Syncing Between Outlook and Salesforce . . . . . . . . . . . . . . . . . . . . . . . . . . . . . . . . . . 12
Adding Emails, Events, and Tasks to Salesforce Records . . . . . . . . . . . . . . . . . . . . . . . 13

SYNCING MICROSOFT® OUTLOOK® AND SALESFORCEBASICS
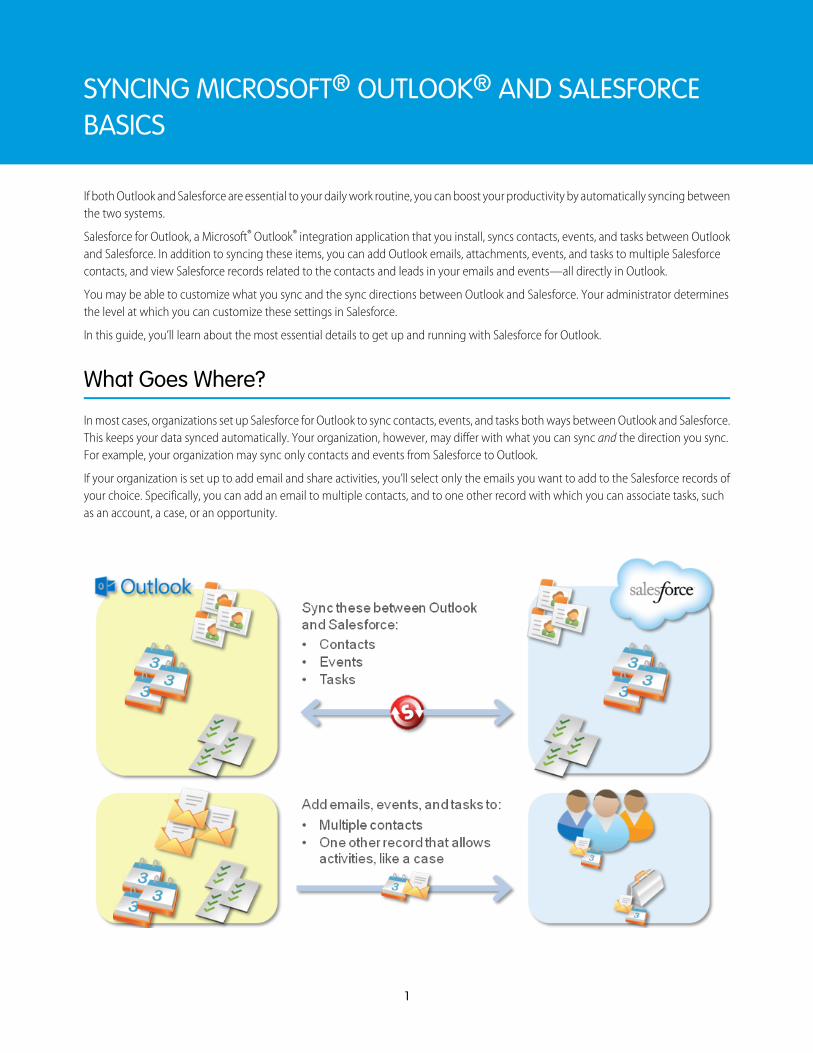
If both Outlook and Salesforce are essential to your daily work routine, you can boost your productivity by automatically syncing betweenthe two systems.
Salesforce for Outlook, a Microsoft® Outlook® integration application that you install, syncs contacts, events, and tasks between Outlookand Salesforce. In addition to syncing these items, you can add Outlook emails, attachments, events, and tasks to multiple Salesforcecontacts, and view Salesforce records related to the contacts and leads in your emails and events—all directly in Outlook.
You may be able to customize what you sync and the sync directions between Outlook and Salesforce. Your administrator determinesthe level at which you can customize these settings in Salesforce.
In this guide, you’ll learn about the most essential details to get up and running with Salesforce for Outlook.
What Goes Where?
In most cases, organizations set up Salesforce for Outlook to sync contacts, events, and tasks both ways between Outlook and Salesforce.This keeps your data synced automatically. Your organization, however, may differ with what you can sync and the direction you sync.For example, your organization may sync only contacts and events from Salesforce to Outlook.
If your organization is set up to add email and share activities, you’ll select only the emails you want to add to the Salesforce records ofyour choice. Specifically, you can add an email to multiple contacts, and to one other record with which you can associate tasks, suchas an account, a case, or an opportunity.
1
GETTING A HIGH-LEVEL VIEW OF YOUR INTEGRATIONWORK
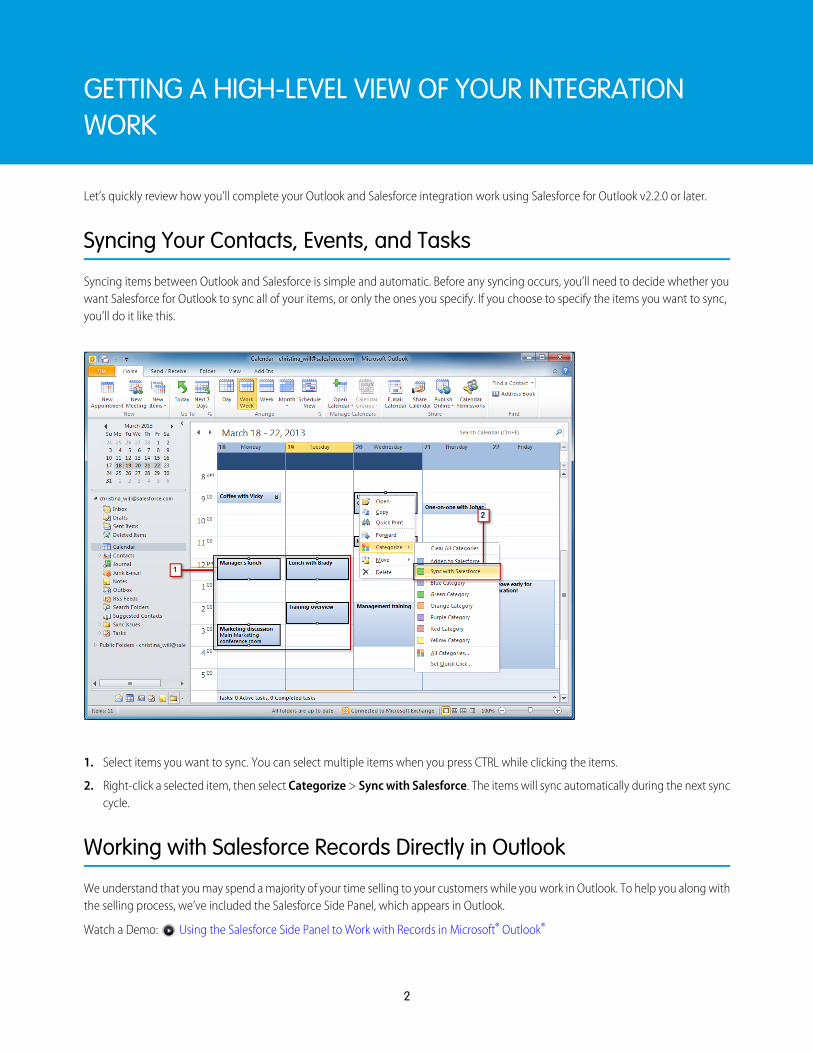
Let’s quickly review how you’ll complete your Outlook and Salesforce integration work using Salesforce for Outlook v2.2.0 or later.
Syncing Your Contacts, Events, and Tasks
Syncing items between Outlook and Salesforce is simple and automatic. Before any syncing occurs, you’ll need to decide whether youwant Salesforce for Outlook to sync all of your items, or only the ones you specify. If you choose to specify the items you want to sync,you’ll do it like this.
1. Select items you want to sync. You can select multiple items when you press CTRL while clicking the items.
2. Right-click a selected item, then select Categorize > Sync with Salesforce. The items will sync automatically during the next synccycle.
Working with Salesforce Records Directly in Outlook
We understand that you may spend a majority of your time selling to your customers while you work in Outlook. To help you along withthe selling process, we’ve included the Salesforce Side Panel, which appears in Outlook.
Watch a Demo: Using the Salesforce Side Panel to Work with Records in Microsoft® Outlook®
2
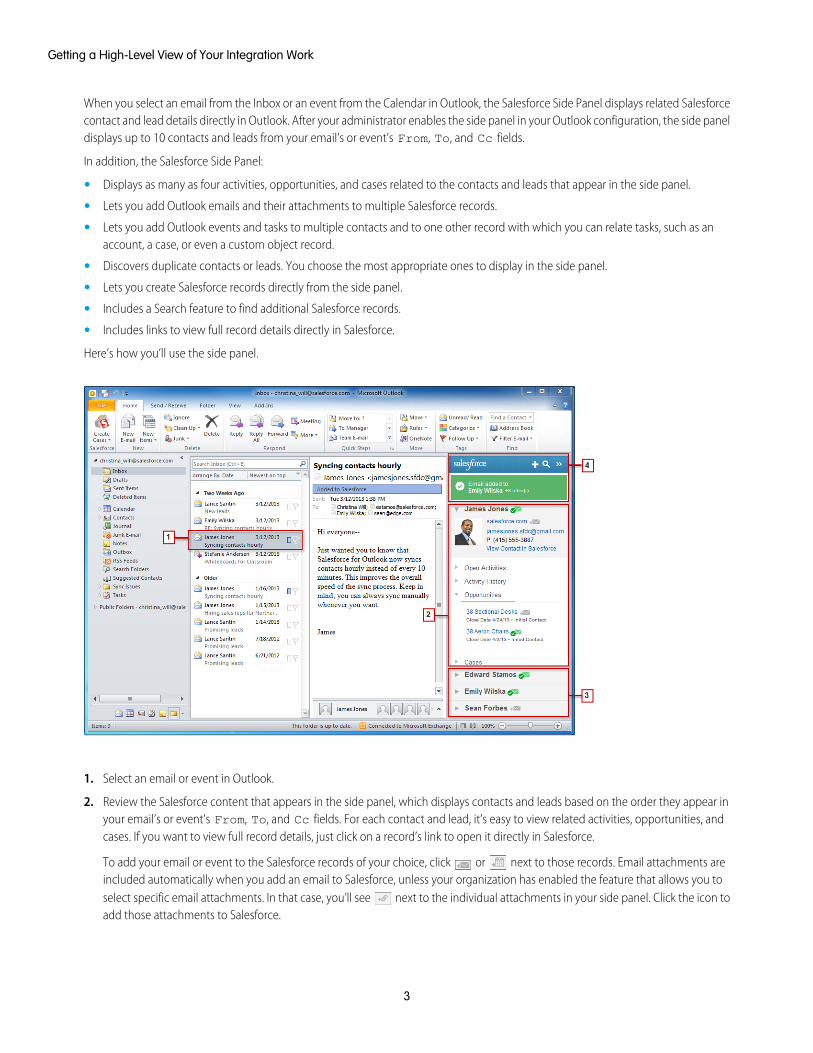
When you select an email from the Inbox or an event from the Calendar in Outlook, the Salesforce Side Panel displays related Salesforcecontact and lead details directly in Outlook. After your administrator enables the side panel in your Outlook configuration, the side paneldisplays up to 10 contacts and leads from your email’s or event’s From, To, and Cc fields.
In addition, the Salesforce Side Panel:
• Displays as many as four activities, opportunities, and cases related to the contacts and leads that appear in the side panel.
• Lets you add Outlook emails and their attachments to multiple Salesforce records.
• Lets you add Outlook events and tasks to multiple contacts and to one other record with which you can relate tasks, such as anaccount, a case, or even a custom object record.
• Discovers duplicate contacts or leads. You choose the most appropriate ones to display in the side panel.
• Lets you create Salesforce records directly from the side panel.
• Includes a Search feature to find additional Salesforce records.
• Includes links to view full record details directly in Salesforce.
Here’s how you’ll use the side panel.
1. Select an email or event in Outlook.
2. Review the Salesforce content that appears in the side panel, which displays contacts and leads based on the order they appear inyour email’s or event’s From, To, and Cc fields. For each contact and lead, it’s easy to view related activities, opportunities, andcases. If you want to view full record details, just click on a record’s link to open it directly in Salesforce.
To add your email or event to the Salesforce records of your choice, click or next to those records. Email attachments areincluded automatically when you add an email to Salesforce, unless your organization has enabled the feature that allows you toselect specific email attachments. In that case, you’ll see next to the individual attachments in your side panel. Click the icon toadd those attachments to Salesforce.
3
Getting a High-Level View of Your Integration Work

If you have the Social Accounts and Contacts feature enabled in Salesforce, the side panel displays either Facebook® or Twitter™
profile photos—whichever ones you chose to show in Salesforce for those contacts and leads.
3. Select the other contacts and leads related to your email to view their details, along with related activities, cases, and opportunities.
4. Quickly see the Salesforce records to which you’ve added emails or events. If you’d like to create a new account, case, contact, lead,opportunity, or a custom object record related to your email, click . If you don’t see records you’re looking for, click to find otherrecords, and then add emails, events, or tasks from the Outlook tasks list to them. There’s even a collapse feature ( ) to hide theside panel.
4
Getting a High-Level View of Your Integration Work
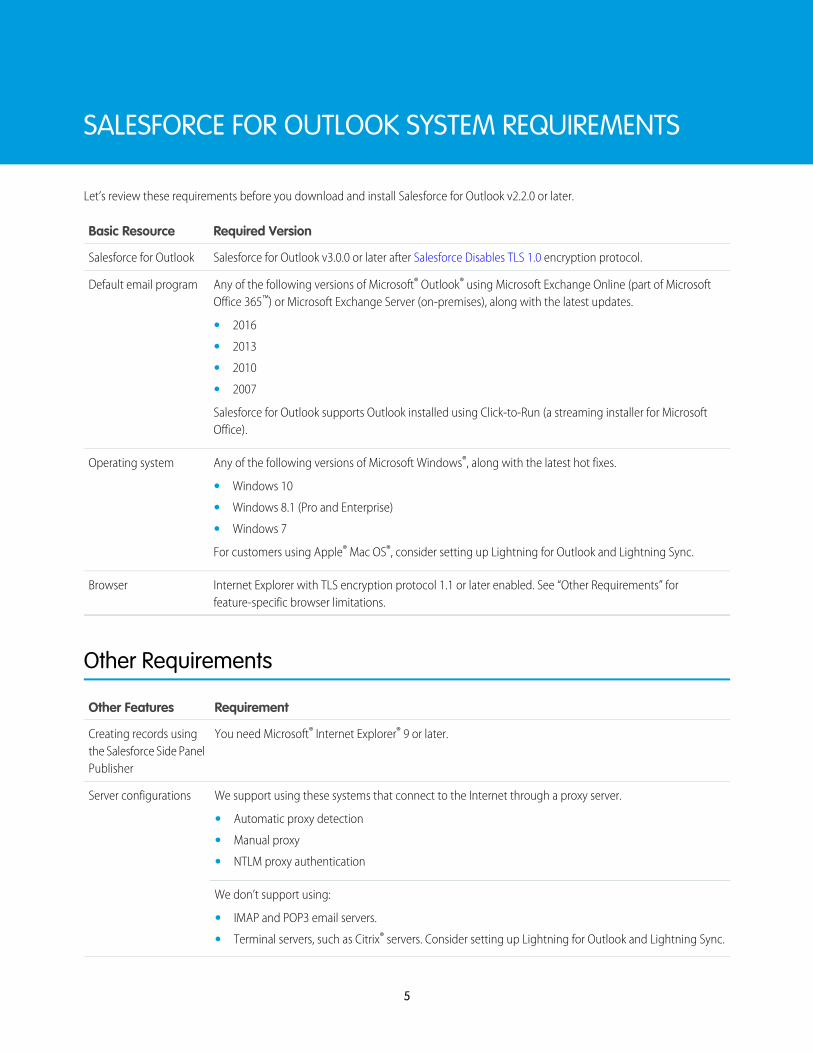
SALESFORCE FOR OUTLOOK SYSTEM REQUIREMENTS
Let’s review these requirements before you download and install Salesforce for Outlook v2.2.0 or later.
Required VersionBasic Resource
Salesforce for Outlook v3.0.0 or later after Salesforce Disables TLS 1.0 encryption protocol.Salesforce for Outlook
Any of the following versions of Microsoft® Outlook® using Microsoft Exchange Online (part of MicrosoftOffice 365™) or Microsoft Exchange Server (on-premises), along with the latest updates.
Default email program
• 2016
• 2013
• 2010
• 2007
Salesforce for Outlook supports Outlook installed using Click-to-Run (a streaming installer for MicrosoftOffice).
Any of the following versions of Microsoft Windows®, along with the latest hot fixes.Operating system
• Windows 10
• Windows 8.1 (Pro and Enterprise)
• Windows 7
For customers using Apple® Mac OS®, consider setting up Lightning for Outlook and Lightning Sync.
Internet Explorer with TLS encryption protocol 1.1 or later enabled. See “Other Requirements” forfeature-specific browser limitations.
Browser
Other Requirements
RequirementOther Features
You need Microsoft® Internet Explorer® 9 or later.Creating records usingthe Salesforce Side PanelPublisher
We support using these systems that connect to the Internet through a proxy server.Server configurations
• Automatic proxy detection
• Manual proxy
• NTLM proxy authentication
We don’t support using:
• IMAP and POP3 email servers.
• Terminal servers, such as Citrix® servers. Consider setting up Lightning for Outlook and Lightning Sync.
5
RequirementOther Features
• Proxy Automatic Configuration files (.pac).
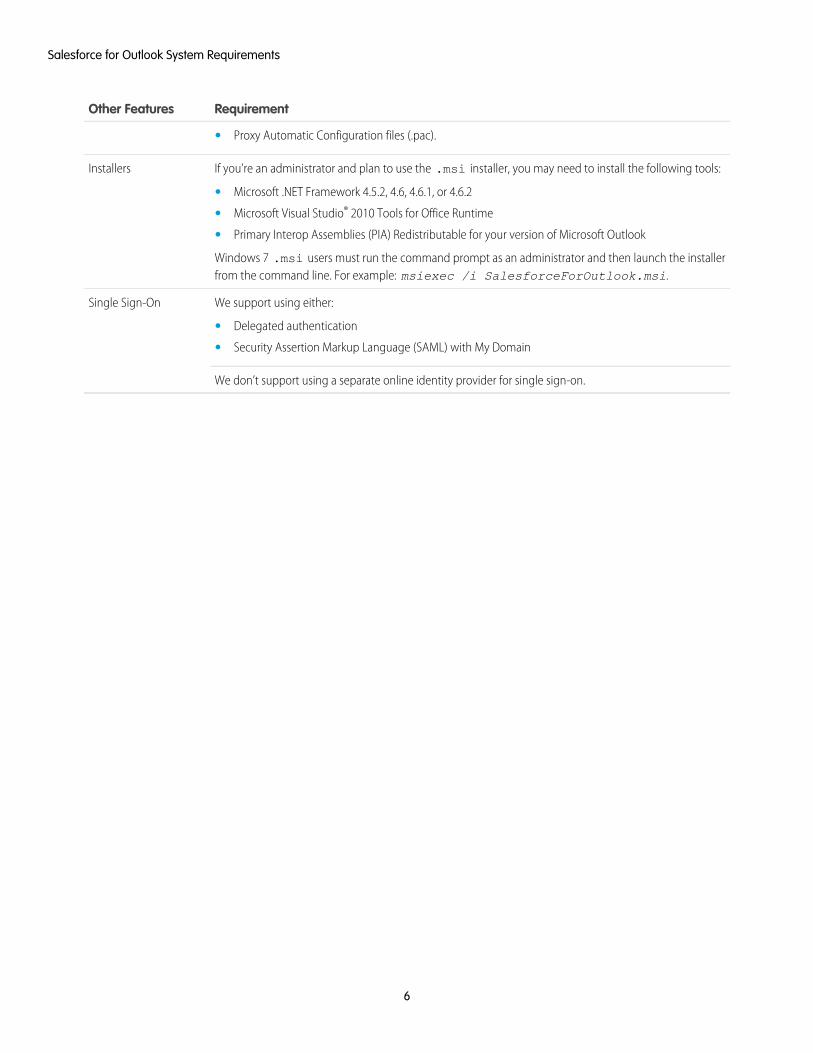
If you’re an administrator and plan to use the .msi installer, you may need to install the following tools:Installers
• Microsoft .NET Framework 4.5.2, 4.6, 4.6.1, or 4.6.2
• Microsoft Visual Studio® 2010 Tools for Office Runtime
• Primary Interop Assemblies (PIA) Redistributable for your version of Microsoft Outlook
Windows 7 .msi users must run the command prompt as an administrator and then launch the installerfrom the command line. For example: msiexec /i SalesforceForOutlook.msi.
We support using either:Single Sign-On
• Delegated authentication
• Security Assertion Markup Language (SAML) with My Domain
We don’t support using a separate online identity provider for single sign-on.
6
Salesforce for Outlook System Requirements
THE BIG PICTURE FOR SETTING UPSALESFORCE FOR OUTLOOK
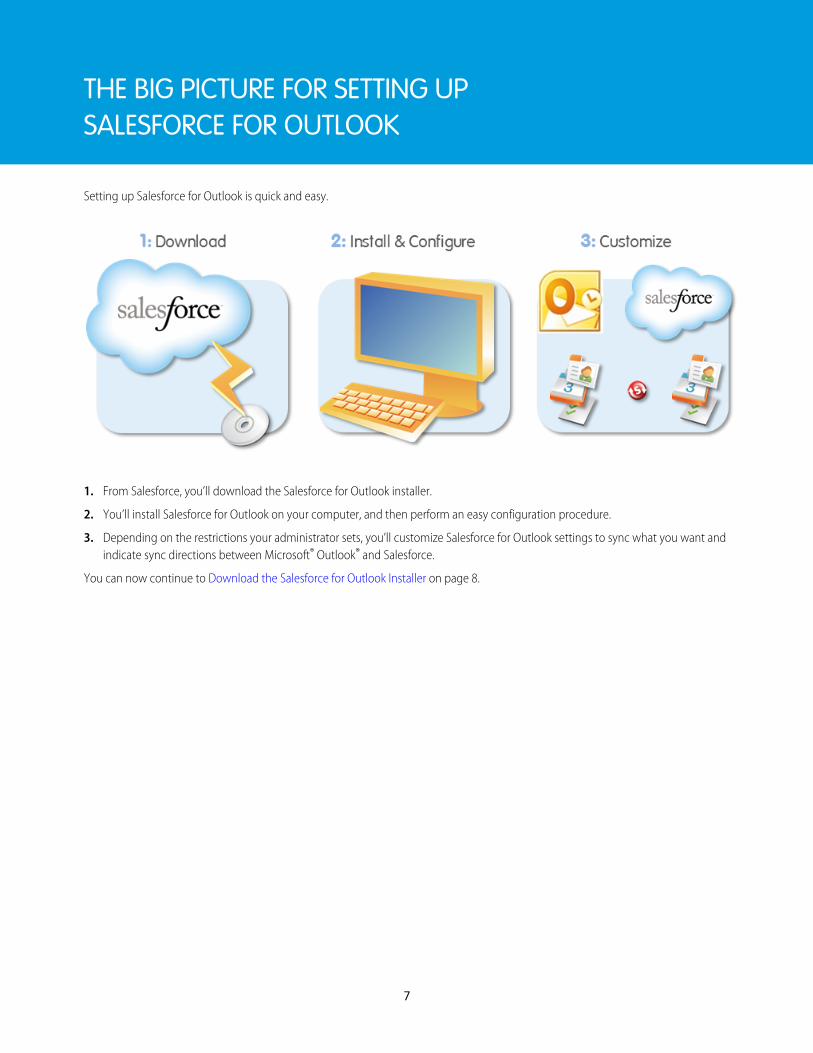
Setting up Salesforce for Outlook is quick and easy.
1. From Salesforce, you’ll download the Salesforce for Outlook installer.
2. You’ll install Salesforce for Outlook on your computer, and then perform an easy configuration procedure.
3. Depending on the restrictions your administrator sets, you’ll customize Salesforce for Outlook settings to sync what you want andindicate sync directions between Microsoft® Outlook® and Salesforce.
You can now continue to Download the Salesforce for Outlook Installer on page 8.
7
DOWNLOAD THE SALESFORCE FOR OUTLOOK INSTALLER
You’ll download the installer from Salesforce.
1. Close Microsoft® Outlook®.
2. If you’re downloading Salesforce for Outlook for the first time, continue to the next step. If you’re upgrading, first closeSalesforce for Outlook by right-clicking the Salesforce for Outlook icon ( ) in your system tray, and clicking Exit. Then, follow thesteps based on the version that you’re upgrading from:
a. To upgrade from Salesforce for Outlook v2.4.2 or earlier, uninstall your current version from the Microsoft Windows® ControlPanel.
b. To upgrade from Salesforce for Outlook v2.5.0. or later, continue to the next step.
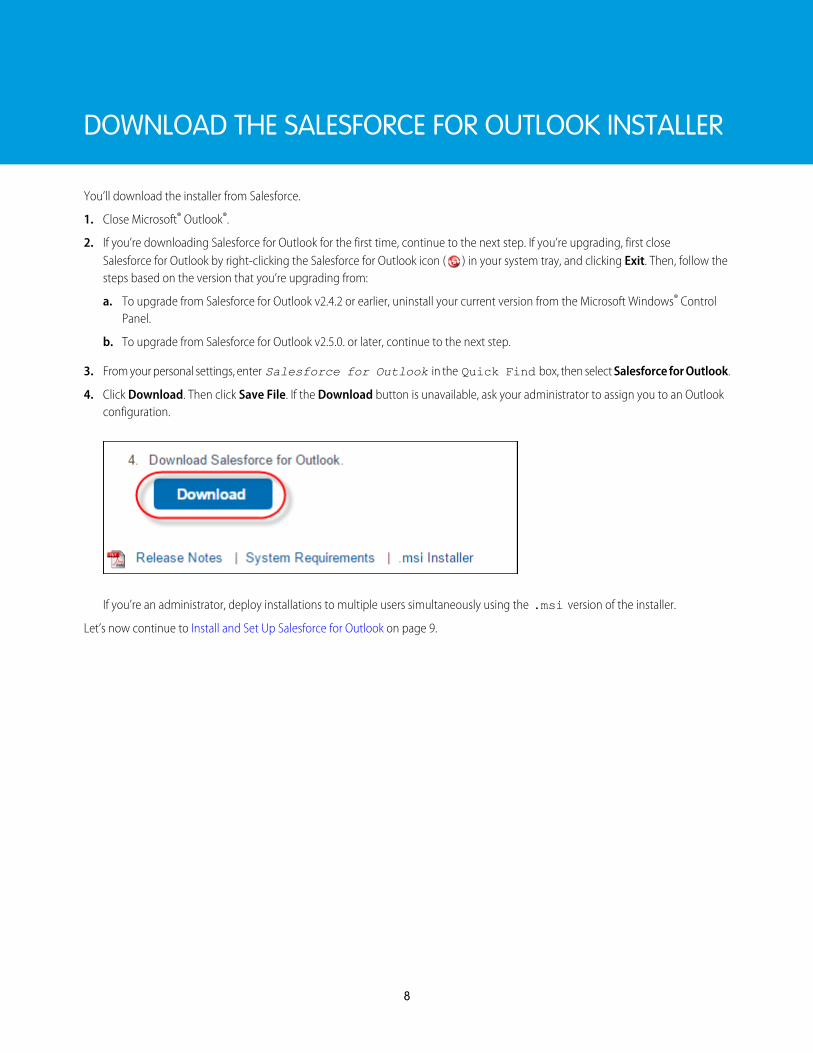
3. From your personal settings, enter Salesforce for Outlook in the Quick Find box, then select Salesforce for Outlook.
4. Click Download. Then click Save File. If the Download button is unavailable, ask your administrator to assign you to an Outlookconfiguration.
If you’re an administrator, deploy installations to multiple users simultaneously using the .msi version of the installer.
Let’s now continue to Install and Set Up Salesforce for Outlook on page 9.
8
INSTALL AND SET UP SALESFORCE FOR OUTLOOK
Now that you’ve downloaded the installer, you can begin the installation and setup process.
1. Open the installation file you downloaded and saved, and complete the installation wizard.
Note: If you don’t yet have .NET 4 installed, the installation wizard installs it for you. Keep in mind that the installation wizardprompts you to restart your machine after it installs .NET 4. After restarting, run the installation wizard again to complete theinstallation process.
2. Open Microsoft® Outlook®. The setup wizard opens, and the Salesforce for Outlook icon ( ) appears in your system tray. If the wizarddoesn’t open, you can start it manually. Right-click and click Settings.
3. If you want to log in to a Salesforce site other than the default, click Change URL and pick the server to which you want to connect.If the server you want isn’t listed, select Other... and enter the URL, such as a custom domain used by your organization.
4. Enter your Salesforce username and password.
5. Click Approve. Doing so creates a secure connection between Outlook and Salesforce. You don’t have to log in again unless youencounter an error.
Note: If your organization restricts IP addresses, logins from untrusted IPs are blocked until they’re activated. Salesforceautomatically sends you an activation email that you can use to log in. Doing so lets you connect without IP restrictions fromanywhere.
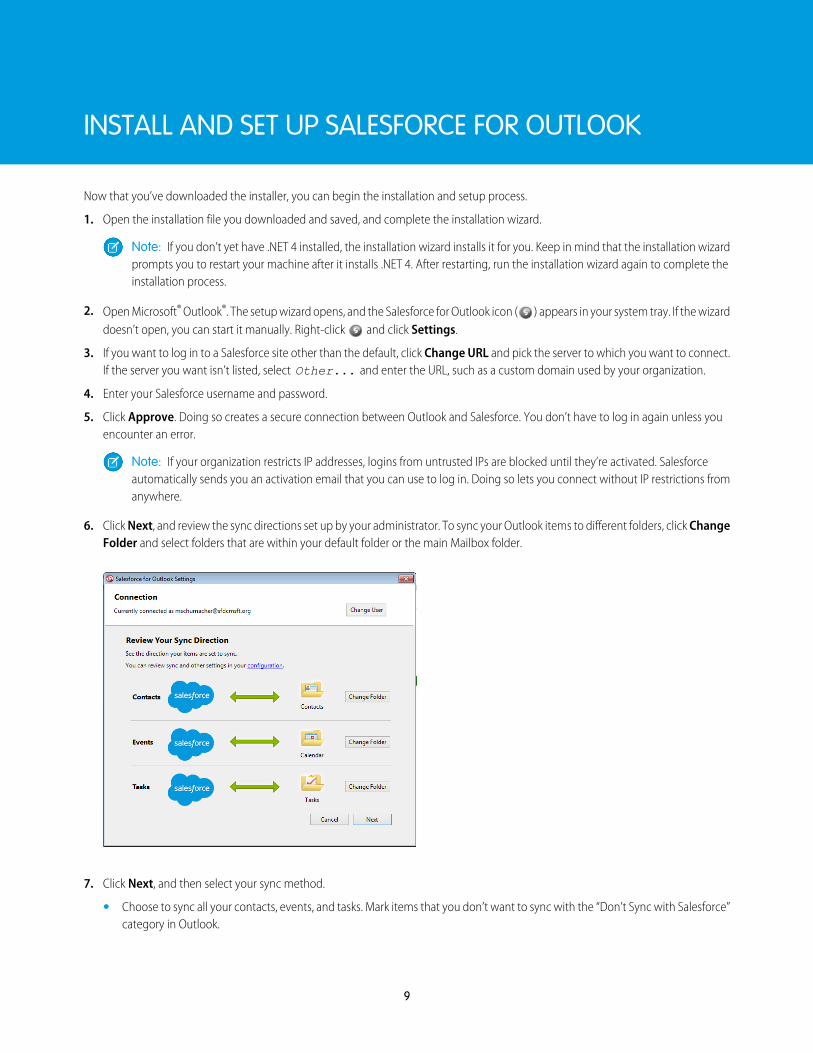
6. Click Next, and review the sync directions set up by your administrator. To sync your Outlook items to different folders, click ChangeFolder and select folders that are within your default folder or the main Mailbox folder.
7. Click Next, and then select your sync method.
• Choose to sync all your contacts, events, and tasks. Mark items that you don’t want to sync with the “Don’t Sync with Salesforce”category in Outlook.
9
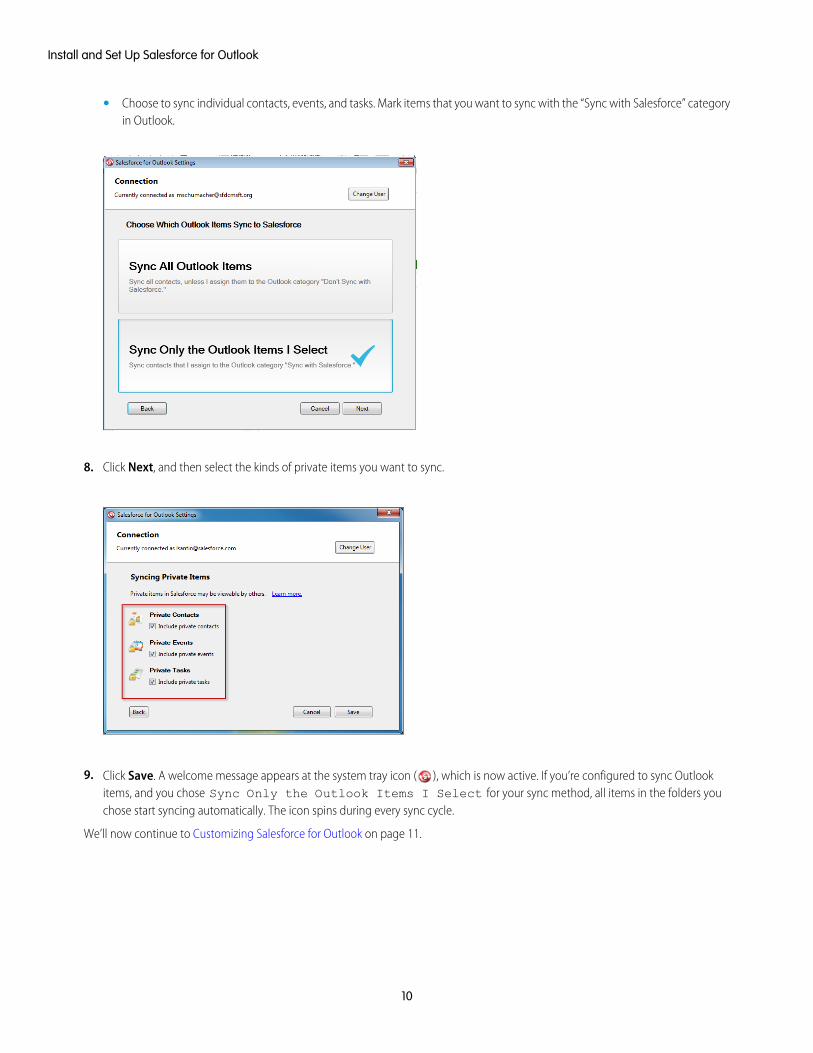
• Choose to sync individual contacts, events, and tasks. Mark items that you want to sync with the “Sync with Salesforce” categoryin Outlook.
8. Click Next, and then select the kinds of private items you want to sync.
9. Click Save. A welcome message appears at the system tray icon ( ), which is now active. If you’re configured to sync Outlookitems, and you chose Sync Only the Outlook Items I Select for your sync method, all items in the folders youchose start syncing automatically. The icon spins during every sync cycle.
We’ll now continue to Customizing Salesforce for Outlook on page 11.
10
Install and Set Up Salesforce for Outlook
CUSTOMIZING SALESFORCE FOR OUTLOOK
Depending on the restrictions your administrator sets, you may be able to customize:
• What you sync, including contacts, events, and tasks
• The direction you sync between Microsoft® Outlook® and Salesforce
• Your ability to manually add Outlook emails to Salesforce records
We’ll now review and adjust settings in your Salesforce for Outlook configuration.
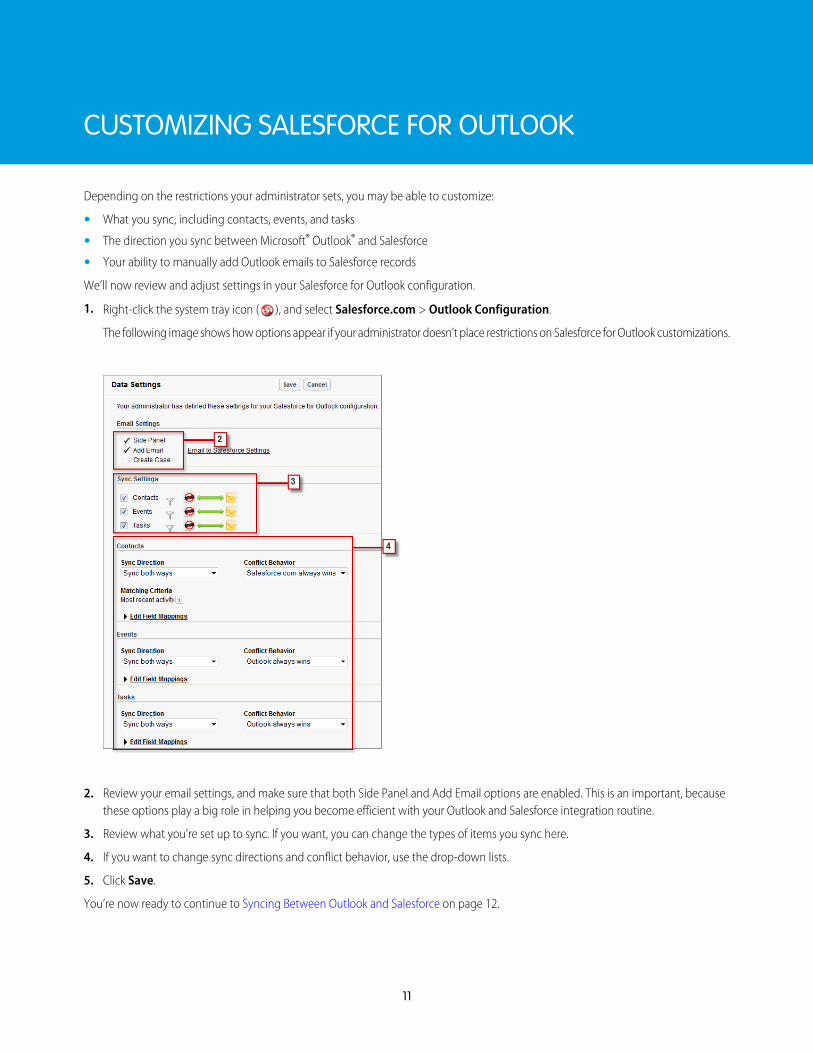
1. Right-click the system tray icon ( ), and select Salesforce.com > Outlook Configuration.
The following image shows how options appear if your administrator doesn’t place restrictions on Salesforce for Outlook customizations.
2. Review your email settings, and make sure that both Side Panel and Add Email options are enabled. This is an important, becausethese options play a big role in helping you become efficient with your Outlook and Salesforce integration routine.
3. Review what you’re set up to sync. If you want, you can change the types of items you sync here.
4. If you want to change sync directions and conflict behavior, use the drop-down lists.
5. Click Save.
You’re now ready to continue to Syncing Between Outlook and Salesforce on page 12.
11
SYNCING BETWEEN OUTLOOK AND SALESFORCE
When Salesforce for Outlook syncs your contacts, events, and tasks, it does so on a schedule. Events and tasks sync automatically everyten minutes; contacts sync automatically every hour. If, however, Salesforce for Outlook detects keyboard or mouse inactivity for 30minutes, the sync frequency for events and tasks changes to 30 minutes. After two hours of inactivity, the frequency for all updateschanges to hourly, and after four hours, the frequency changes to every four hours.
Managing Items That Don’t Assign Automatically to Salesforce Records
If details in the items you sync are either missing or duplicated, Salesforce for Outlook can’t assign these items to Salesforce records. Thebest way to keep these unresolved items to a minimum is to use the Salesforce Side Panel for adding emails and events to Salesforcerecords, which we cover a little later.
The remaining items that these features can’t automatically assign to Salesforce records appear in My Unresolved Items.
1. Easily access the My Unresolved Items page using the Unresolved Items shortcut on the sidebar.
2. Quickly review unassigned items by type using the tabs Contacts, Events, and Tasks.
3. View your unassigned items.
4. Assign your items to Salesforce records—either manually or using Salesforce recommendations—or confirm you want to leavethem unassigned.
Let’s now continue to Adding Emails, Events, and Tasks to Salesforce Records on page 13.
12

ADDING EMAILS, EVENTS, AND TASKS TO SALESFORCERECORDS
If you want to add important emails, events, and tasks to Salesforce records, doing so is a snap. Here’s an example of how you’ll add anemail to Salesforce records.
1. Select an email in Outlook. The side panel displays Salesforce records related to the contacts in your email.
2. Next to each Salesforce record to which you’re adding your email, click . After you add the email, the added email indicator appears next to those records.
3. Keep track of the records to which you added your email.
You’ll add events the same way you add emails. Just select an event from your Outlook calendar and go through the same steps.
What’s Next?
Now that you know the basics of syncing items and adding emails, you can review these online help topics to learn how to keep yoursystems in sync.
• Managing Your Salesforce for Outlook Configuration
• Using the Salesforce for Outlook System Tray Application
• Salesforce for Outlook FAQ
Thanks for using Salesforce!
13