general information - brotherdownload.brother.com/welcome/docp000589/sc2000usb_usaeng...3 set up...
TRANSCRIPT

General informationCompilation and Publication NoticeUnder the supervision of Brother Industries Ltd., this manual has been compiled and published, covering the latest product’sdescriptions and specifications.
The contents of this manual and the specifications of this product are subject to change without notice.
Brother reserves the right to make changes without notice in the specifications and materials contained herein and shall notbe responsible for any damages (including consequential) caused by reliance on the materials presented, including but notlimited to typographical and other errors relating to the publication.
© 2011 Brother Industries Ltd.
TrademarksThe Brother logo is a registered trademark of Brother Industries, Ltd.
Brother is a registered trademark of Brother Industries, Ltd.
© 2011 Brother Industries, Ltd. All rights reserved.
The names of other software or products used in this document are trademarks or registered trademarks of the respectivecompanies that developed them.
Each company whose software title is mentioned in this manual has a Software License Agreement specific to its proprietaryprograms.
All other brand and product names mentioned in this manual are registered trademarks of their respective companies.
Microsoft, Windows and Windows Vista are registered trademarks of Microsoft Corporation in the United States and other countries.
Warning
Caution
Warning
Safety precautionsRead all of these instructions and save them for later reference. Follow all warnings and instructions marked on the product.
Tells you what to do to avoid the risk of injury.
Tells you about procedures you must follow to prevent damage to the printer.
The symbols used in this manual are as follows:
Action NOT allowed to do
DO NOT splash the product with orimmerse the product in water.
Mandatory action
Alerts to the possibility of electrical shock
DO NOT disassemble the product.
DO NOT touch a given portion of the product.
Unplugging
� To use the machine safely
Follow these guidelines to avoid fire, electric shock, or other damage.
� The Printer
Unplug the power cord immediately and stop using the printer during an electrical storm. There may be a remote risk of electric shock from lightning.Do not touch any metal parts near the print head. The print head becomes very hot during use and remains very hot immediately after use. Do not touch itdirectly with your hands.Dispose of plastic bags correctly and keep away from babies and children. Do not wear or play with plastic bags.Unplug the power cord immediately and stop using the printer if you notice any abnormal odor, heat, discoloration, deformation or anything unusual when the printer is in use or storage.Do not disassemble the printer.For inspection, adjustment and repair of the printer contact the retail outlet where the printer was purchased or your local authorized service center.Do not drop, hit or otherwise bang the printer.
Do not allow the printer to get wet in any way.
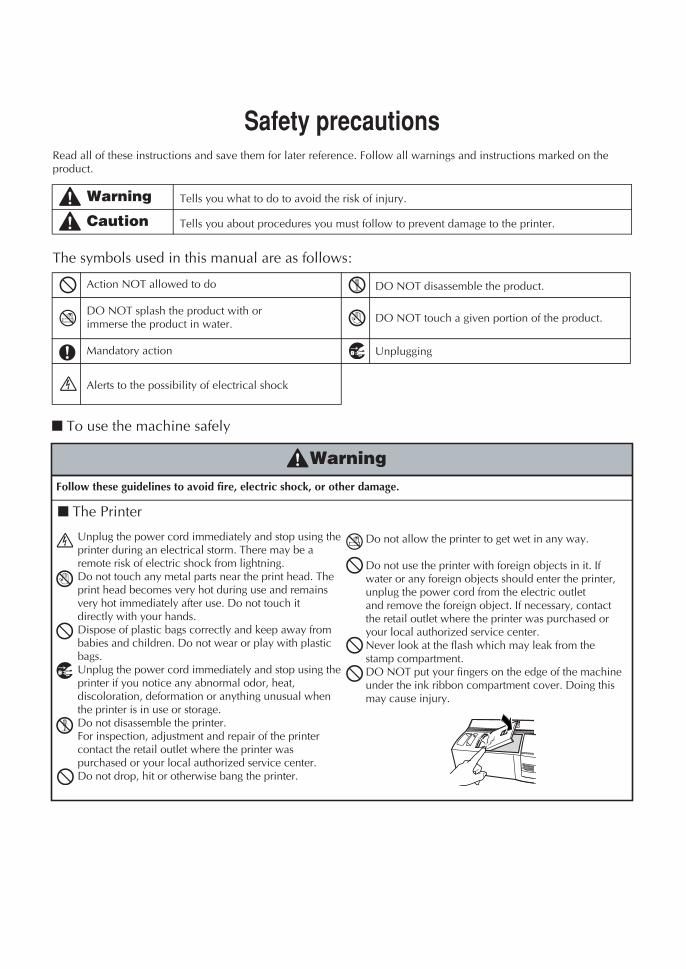
Do not use the printer with foreign objects in it. If water or any foreign objects should enter the printer, unplug the power cord from the electric outletand remove the foreign object. If necessary, contact the retail outlet where the printer was purchased or your local authorized service center.Never look at the flash which may leak from the stamp compartment.DO NOT put your fingers on the edge of the machine under the ink ribbon compartment cover. Doing this may cause injury.
Follow these guidelines to avoid fire, electric shock, or other damage.
� Power Cord
CautionFollow these guidelines to avoid fire, electric shock, or other damage.
� The PrinterThe standard electrical outlet should be close to the printer and be easily accessible.
� Power Cord
� Installation/StoragePlace the printer on a flat, stable surface such as a desk. Do not place any heavy objects on top of the printer.
� Others
Warning
Avoid contact of the stamp ink, stamp correction pen, or print head cleaning pen with your mouth, eyes and skin.
Keep the stamp correction pen and print head cleaning pen away from flames.
Use only the authorized power source (120 V AC) for the printer.Use only the power cord included with the printer.Do not handle the power cord or plug if your hands are wet.Do not overload the power outlet socket with too many appliances or insert the power cord into a damaged outlet socket.
Do not cut, damage, alter or place heavy objects on the power cord.Do not use the power cord if it is damaged.Ensure the power plug is correctly inserted into the power outlet.If the printer will not be used for an extended period, remove the power supply cord from the electrical outlet.
Always hold the power plug when removing the power cord from or inserting it into the outlet. Pulling on the power cord cable could cause problems with the power cord.
1
SET UP
Table of ContentsSET UPFCC Compliance ...................................... 2General Precautions ................................ 2Unpacking ............................................... 3Machine Mode Operations ...................... 5Changing the LCD display language......... 5Connecting the Interface and PowerSupply Cables .......................................... 6System Requirements ............................... 6Installing the Software ............................. 7
Stampcreator P-touch Editor, StampcreatorExpress and printer driver ............................... 7
First Steps .............................................. 12
DESIGINING A STAMPOverview ............................................... 14Stampcreator P-touch Editor.................. 15Tools for Formatting .............................. 16
Properties Dock ........................................ 16Tools ......................................................... 17Object Dock ............................................. 18
Formatting a Stamp .......................... 19Selecting the stamp size ............................ 19Typing text ................................................ 19Changing the font ..................................... 19Changing the character size ...................... 20Changing style effects ............................... 20Changing the font of a text block .............. 20Changing the character size of a text block ...... 21Centering text within a block .................... 22Vertical and horizontal block alignment .... 22Drawing lines in a stamp .......................... 23Drawing a frame ....................................... 24Changing the frame size ............................ 24Using special design frames ...................... 25Creating stamps with clip art images ......... 26Creating stamps with pictures ................... 26
Advanced Steps ................................ 27Importing graphics from a scanner, digitalcamera, or other clip art source................. 27Making a stamp containing a photo .......... 28Auto Format .............................................. 32
Stampcreator Express ....................... 33Formatting a stamp ................................... 33Printing a draft sheet ................................. 34Making an ID label ................................... 35Adding new styles to the StampcreatorExpress software ........................................ 36
MAKING A STAMPFinal Steps.............................................. 38
Getting ready ............................................ 38Printing a draft sheet ................................. 38Engraving a stamp ..................................... 40Assembling the stamp ............................... 42Making an ID label ................................... 43Applying an ID label ................................. 43
CARE & TROUBLESHOOTINGPeriodic Maintenance ............................ 44
Cleaning the draft sheet rollers .................. 44Cleaning the ID label rollers ..................... 44Cleaning the Print Heads .......................... 45Replacing the xenon lamp unit ................. 45
Removing a Jam and Correcting a Stamp... 46Removing a jammed draft sheet or ID labelsheet ......................................................... 46Correcting an imperfect stamp surface ...... 47Cure time imperfections ............................ 47
Refilling the Stamp Ink........................... 48Easy Reference Trouble Shooting Guide ... 49
Error message list ...................................... 51
SUPPLIES & ACCESSORIESStamp Ordering Information ................. 52
How to order stamps ................................. 52Stamp samples .......................................... 53Supply items ............................................. 55Maintenance items .................................... 56
SUPPORT NUMBERS
2
FCC ComplianceFederal Communications Commission (FCC) Declaration of Conformity (For USA Only)Responsible Party: Brother International Corp.
100 Somerset Corporate Blvd.Bridgewater, NJ 08807-0911USATEL: (908) 704-1700
declares that the product:Product Name: Brother Stamp Creation System
“Stampcreator Pro”Model Number: SC-2000USBcomplies with Part 15 of the FCC Rules. Operation is subject to the following two conditions: (1) this device maynot cause harmful interference, and (2) this device must accept any interference received, including interferencethat may cause undesired operation.
This equipment has been tested and found to comply with the limits for a Class B digital device, pursuant to Part 15 of the FCCRules. These limits are designed to provide reasonable protection against harmful interference in a residential installation.This equipment generates, uses, and can radiate radio frequency energy and, if not installed and used in accordancewith the instructions, may cause harmful interference to radio communications. However, there is no guarantee thatinterference will not occur in a particular installation. If this equipment does cause harmful interference to radio ortelevision reception, which can be determined by turning the equipment off and on, the user is encouraged to try tocorrect the interference by one or more of the following measures.
To correct interference• Reorient or relocate the receiving antenna.• Increase the separation between the equipment and receiver.• Connect the equipment to an outlet on a circuit different from that to which the receiver is connected.• Consult the dealer or an experienced radio/TV technician for help.• The enclosed interface cable should be used in order to ensure compliance with the limits for a Class B digital device.• Changes or modifications not expressly approved by Brother Industries, Ltd. could void the user’s authority to operate the equipment.
General Precautions• Be sure the machine is always placed on a level, stable surface.• Keep the machine and its accessories out of direct sunlight and extremely dusty places. Dust and dirt can cause distortion to the stamp image.• Do not expose the machine, or any of its accessories, to extreme temperatures or high humidity.• Do not try to disassemble the machine or any of its accessories.• When connecting and disconnecting the cables, always be sure to grab the connectors, not the cords.• Store the draft sheets, ID labels, and cleaning sheets in their packages.• Do not use folded or damaged draft sheets, ID labels, or cleaning sheets.• Do not look directly at the flash from the xenon lamp unit.• Be careful that the CD ROM is not scratched.• Do not put heavy objects on the CD ROM.• Do not touch the printed draft sheet before creating a stamp.• Do not remove the clear protective film before engraving a stamp.• Do not reuse the ink pad as ink will have permeated the pad surface.• Do not stand the stamp upside down immediately after it is assembled.• Do not place the stamp on its side immediately after it is assembled.• Do not touch the print heads.• Do not use cleaning devices other than the print head cleaning pen and cleaning sheets supplied with the
Stampcreator Pro.• Only lift the machine by grabbing the specified areas.• Make sure that the power requirements specified for this machine are met.• Do not touch the machine’s internal parts since they can become extremely hot after the machine has been used for a long
period of time.• To prevent dust from entering the machine, do not leave the machine for a long period of time with the ink ribbon
compartment cover or stamp compartment cover open or the xenon lamp unit or draft sheet magazine tray uninstalled.• Do not touch any of the machine’s internal sensors.

3
SET UP
UnpackingSC-2000USB
Xenon lamp unitrelease button
Xenon lamp unit
Power switch
Power supply cord (for connecting the SC-2000USB to the AC outlet)
STARTER KIT
Draft sheet magazine tray (forfeeding in the draft sheets)
150 draft sheets (for printing thedata in order to engrave the stamp)
5 stamp skirts 5 grips
5 stamps with capssize 1438 ( × 2)size 1850 ( × 2)size 2770 ( × 1)
5 ID label sheets (for printinga label that can be attached toeach stamp for identification)size 1438 ( × 2)size 1850 ( × 2)size 2770 ( × 1)
Xenon Lamp UnitInk Ribbon Cartridge
Draft sheet magazine tray slot
ID label slot
Stamp compartmentcover
Mode and Set buttons
Ink ribboncompartment cover
Exit slot
LCD
4
SET UP
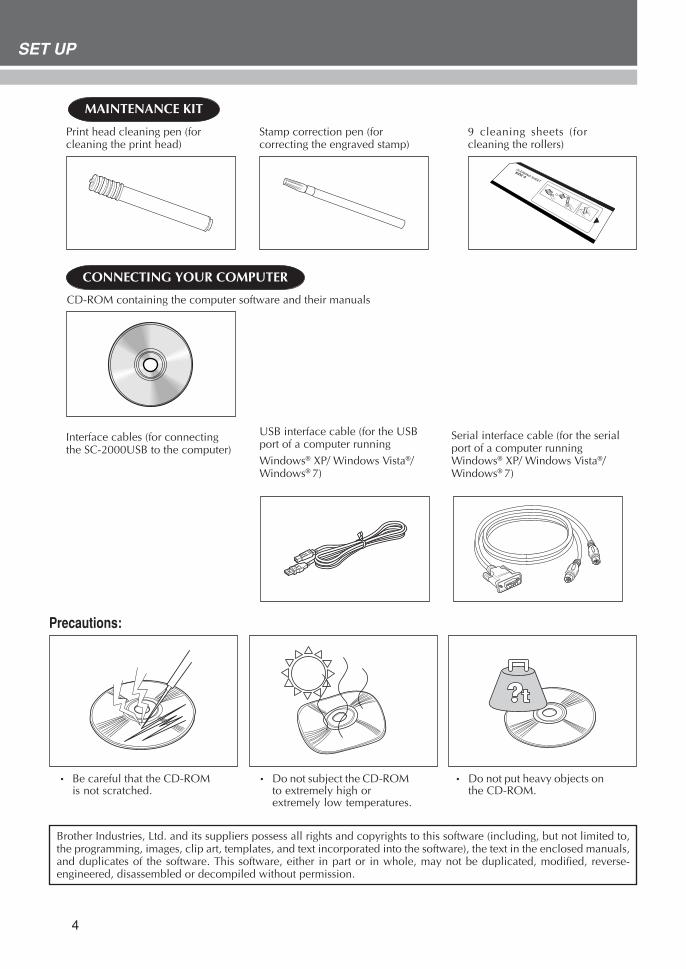
Interface cables (for connectingthe SC-2000USB to the computer)
USB interface cable (for the USBport of a computer runningWindows® XP/ Windows Vista®/Windows® 7)
Serial interface cable (for the serialport of a computer runningWindows® XP/ Windows Vista®/Windows® 7)
MAINTENANCE KIT
9 cleaning sheets (forcleaning the rollers)
Print head cleaning pen (forcleaning the print head)
Stamp correction pen (forcorrecting the engraved stamp)
CONNECTING YOUR COMPUTER
CD-ROM containing the computer software and their manuals
• Be careful that the CD-ROMis not scratched.
• Do not subject the CD-ROMto extremely high orextremely low temperatures.
• Do not put heavy objects onthe CD-ROM.
Precautions:
Brother Industries, Ltd. and its suppliers possess all rights and copyrights to this software (including, but not limited to,the programming, images, clip art, templates, and text incorporated into the software), the text in the enclosed manuals,and duplicates of the software. This software, either in part or in whole, may not be duplicated, modified, reverse-engineered, disassembled or decompiled without permission.
5
SET UP
Machine Mode OperationsThe Stampcreator Pro has different modes for performing different operations.Follow the operations described below to select the desired mode.
Initializing the machine• Turn the machine off, then on again to initialize it. The message “INITIALIZE” appears in the LCD.• When data has been cleared, the message “READY” appears in the LCD.
Removing the draft sheet and clearing data• Press the Mode button once until “RESET” appears in the LCD.• Press the Set button.
Periodic machine cleaning• Press the Mode button twice until “CLEAN” appears in the LCD, and then insert a cleaning sheet.• Press the Set button (see page 44).
Resetting the xenon lamp counter• Reset the counter only after the xenon lamp unit has been replaced with a new one.• Press the Mode button four times until “RESET COUNTER” appears in the LCD, and then install a new xenon
lamp unit.• Press the Set button (see page 45).
Baud Rate (For serial connection only)The baud rate of the COM port on the PC must match the baud rate of the Stampcreator macnihe.
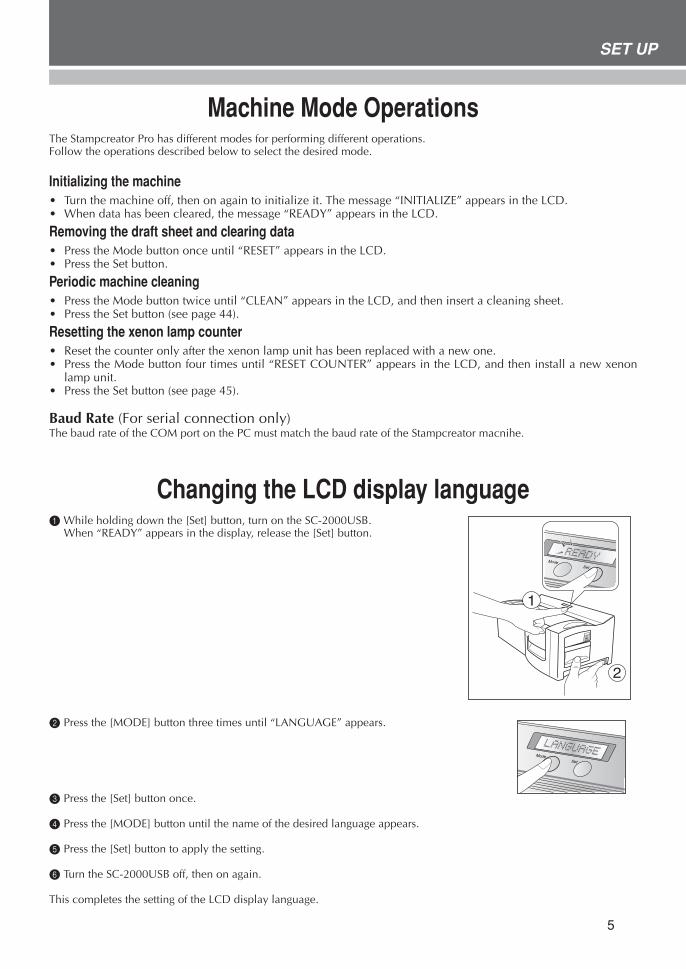
Changing the LCD display language1 While holding down the [Set] button, turn on the SC-2000USB.
When “READY” appears in the display, release the [Set] button.
2 Press the [MODE] button three times until “LANGUAGE” appears.
3 Press the [Set] button once.
4 Press the [MODE] button until the name of the desired language appears.
5 Press the [Set] button to apply the setting.
6 Turn the SC-2000USB off, then on again.
This completes the setting of the LCD display language.
Mode
Set
Mode
Set
6
SET UP
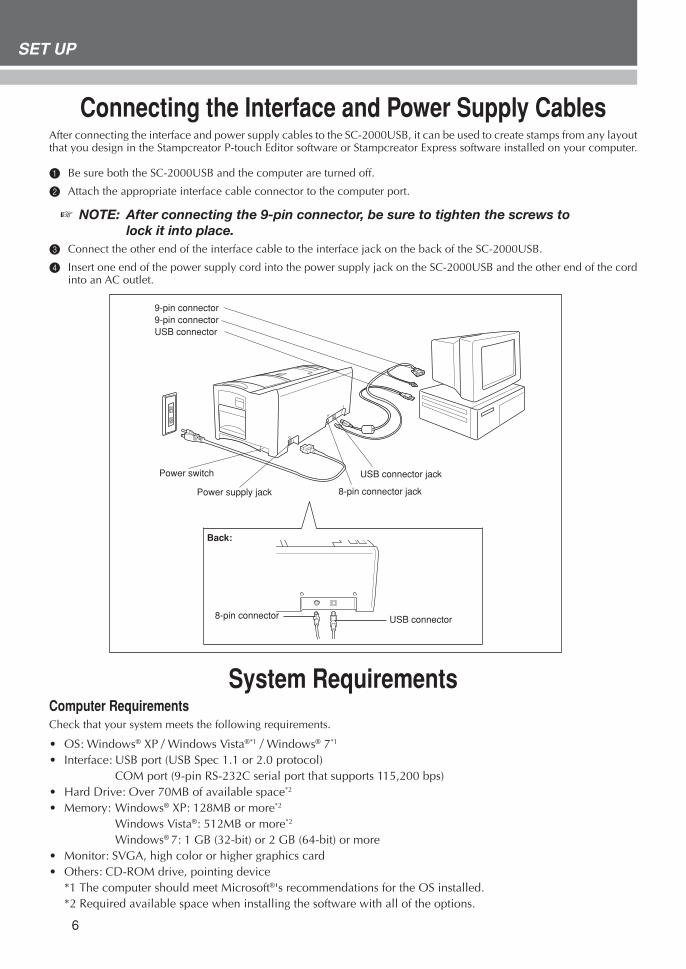
Connecting the Interface and Power Supply CablesAfter connecting the interface and power supply cables to the SC-2000USB, it can be used to create stamps from any layoutthat you design in the Stampcreator P-touch Editor software or Stampcreator Express software installed on your computer.
1 Be sure both the SC-2000USB and the computer are turned off.
2 Attach the appropriate interface cable connector to the computer port.
� NOTE: After connecting the 9-pin connector, be sure to tighten the screws tolock it into place.
3 Connect the other end of the interface cable to the interface jack on the back of the SC-2000USB.
4 Insert one end of the power supply cord into the power supply jack on the SC-2000USB and the other end of the cordinto an AC outlet.
System RequirementsComputer RequirementsCheck that your system meets the following requirements.
• OS: Windows® XP / Windows Vista®*1 / Windows® 7*1
• Interface: USB port (USB Spec 1.1 or 2.0 protocol)COM port (9-pin RS-232C serial port that supports 115,200 bps)
• Hard Drive: Over 70MB of available space*2
• Memory: Windows® XP: 128MB or more*2
Windows Vista®: 512MB or more*2
Windows® 7: 1 GB (32-bit) or 2 GB (64-bit) or more• Monitor: SVGA, high color or higher graphics card• Others: CD-ROM drive, pointing device
*1 The computer should meet Microsoft®'s recommendations for the OS installed.*2 Required available space when installing the software with all of the options.
USB connector8-pin connector
Back:
USB connector jack
9-pin connector9-pin connectorUSB connector
8-pin connector jackPower supply jack
Power switch
7
SET UP
Installing the SoftwareStampcreator P-touch Editor, Stampcreator Express and printer driverBefore stamps can be engraved on the SC-2000USB, the stamp-editing tool Stampcreator P-touch Editor software, StampcreatorExpress software and the SC-2000USB printer driver must be installed.Follow the procedure described below to install the software onto the computer.
� NOTE: You must have administrator privileges in order to install the software on acomputer running Windows® XP, Windows Vista® or Windows® 7.
1 Connect the SC-2000USB to the computer’s USB or serial port, and then turn on only the computer.
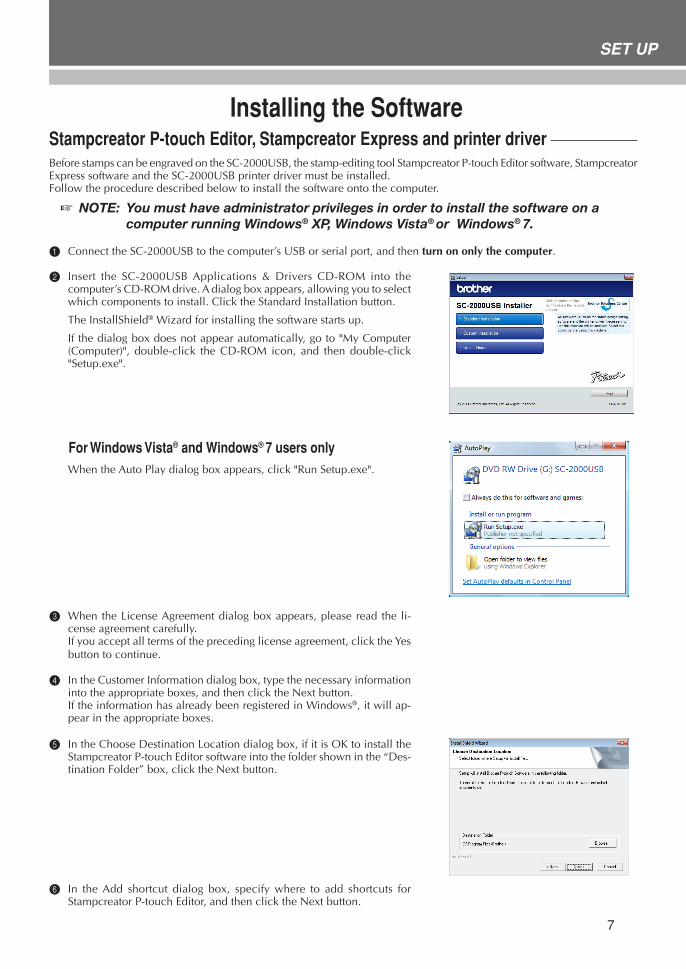
2 Insert the SC-2000USB Applications & Drivers CD-ROM into thecomputer’s CD-ROM drive. A dialog box appears, allowing you to selectwhich components to install. Click the Standard Installation button.
The InstallShield® Wizard for installing the software starts up.
If the dialog box does not appear automatically, go to "My Computer(Computer)", double-click the CD-ROM icon, and then double-click"Setup.exe".
For Windows Vista® and Windows® 7 users only When the Auto Play dialog box appears, click "Run Setup.exe".
3 When the License Agreement dialog box appears, please read the li-cense agreement carefully.If you accept all terms of the preceding license agreement, click the Yesbutton to continue.
4 In the Customer Information dialog box, type the necessary informationinto the appropriate boxes, and then click the Next button.If the information has already been registered in Windows®, it will ap-pear in the appropriate boxes.
5 In the Choose Destination Location dialog box, if it is OK to install theStampcreator P-touch Editor software into the folder shown in the “Des-tination Folder” box, click the Next button.
6 In the Add shortcut dialog box, specify where to add shortcuts forStampcreator P-touch Editor, and then click the Next button.
8
SET UP
7 If you are satisfied with the settings that appear in the Start Copying Filesdialog box, click the Next button to begin copying files.
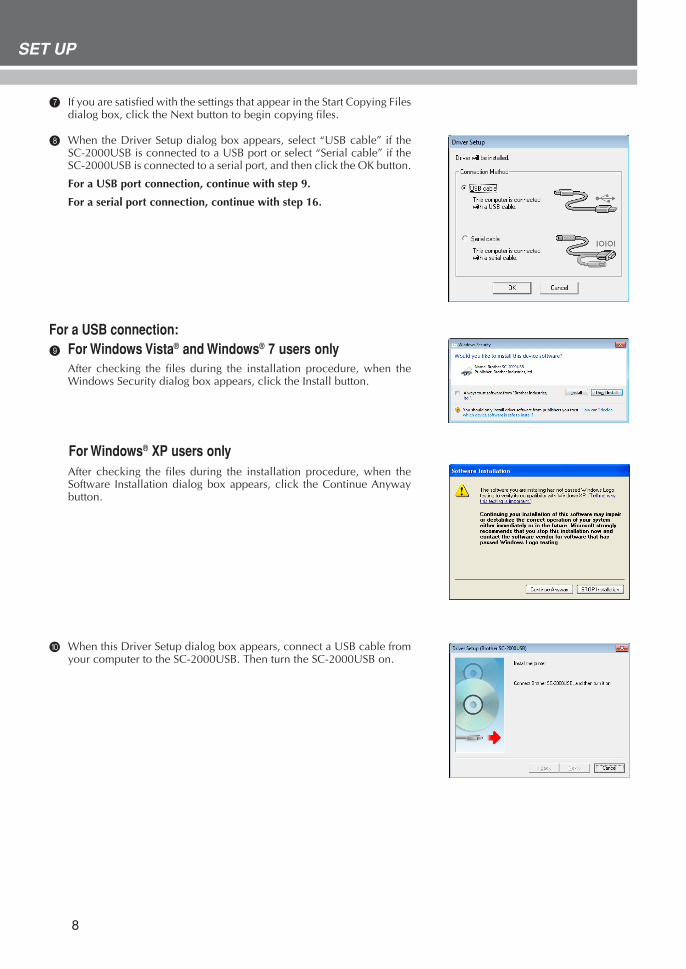
8 When the Driver Setup dialog box appears, select “USB cable” if theSC-2000USB is connected to a USB port or select “Serial cable” if theSC-2000USB is connected to a serial port, and then click the OK button.
For a USB port connection, continue with step 9.
For a serial port connection, continue with step 16.
For a USB connection:9 For Windows Vista® and Windows® 7 users only
After checking the files during the installation procedure, when theWindows Security dialog box appears, click the Install button.
For Windows® XP users onlyAfter checking the files during the installation procedure, when theSoftware Installation dialog box appears, click the Continue Anywaybutton.
0 When this Driver Setup dialog box appears, connect a USB cable fromyour computer to the SC-2000USB. Then turn the SC-2000USB on.

9
SET UP
For Windows Vista® and Windows® 7 usersA Click the Finish button to exit the wizard.
This completes the installation of Stampcretor P-touch Editor,Stampcreator Express and the printer driver for USB connection.
Restart your computer now.
For Windows® XP usersA The Found New Hardware Wizard starts up.
When asked if Windows can connect to Windows Update to search forsoftware, select “No, not this time”, and then click the Next button.
B In the next dialog box, select “Install the software automatically(Recommended)”, and then click the Next button.
C When the hardware Installation dialog box appears, click the ContinueAnyway button.
D Click the Finish button to exit the Found New Hardware Wizard.
10
SET UP
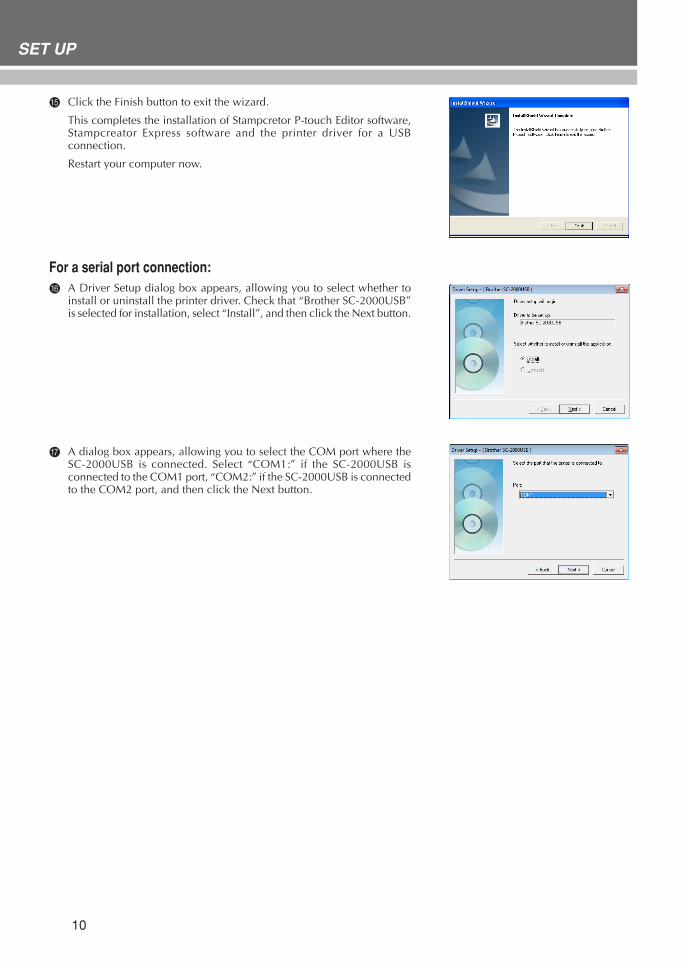
E Click the Finish button to exit the wizard.
This completes the installation of Stampcretor P-touch Editor software,Stampcreator Express software and the printer driver for a USBconnection.
Restart your computer now.
For a serial port connection:F A Driver Setup dialog box appears, allowing you to select whether to
install or uninstall the printer driver. Check that “Brother SC-2000USB”is selected for installation, select “Install”, and then click the Next button.
G A dialog box appears, allowing you to select the COM port where theSC-2000USB is connected. Select “COM1:” if the SC-2000USB isconnected to the COM1 port, “COM2:” if the SC-2000USB is connectedto the COM2 port, and then click the Next button.

11
SET UP
H In the dialog box that appears, allowing you to confirm how theinstallation will be carried out, check that the installation will be carriedout as desired, and then click the Next button.
I A dialog box showing that the printer has been installed appears.Click the Next button.
J Click the Finish button to exit the wizard.
This completes the installation of Stampcretor P-touch Editor software,Stampcreator Express software and the printer driver for a serialconnection.
Restart your computer now.
12
SET UP
First StepsAfter you have designed a stamp layout using the Stampcreator P-touch Editor software or Stampcreator Express software,you can engrave it into a stamp.
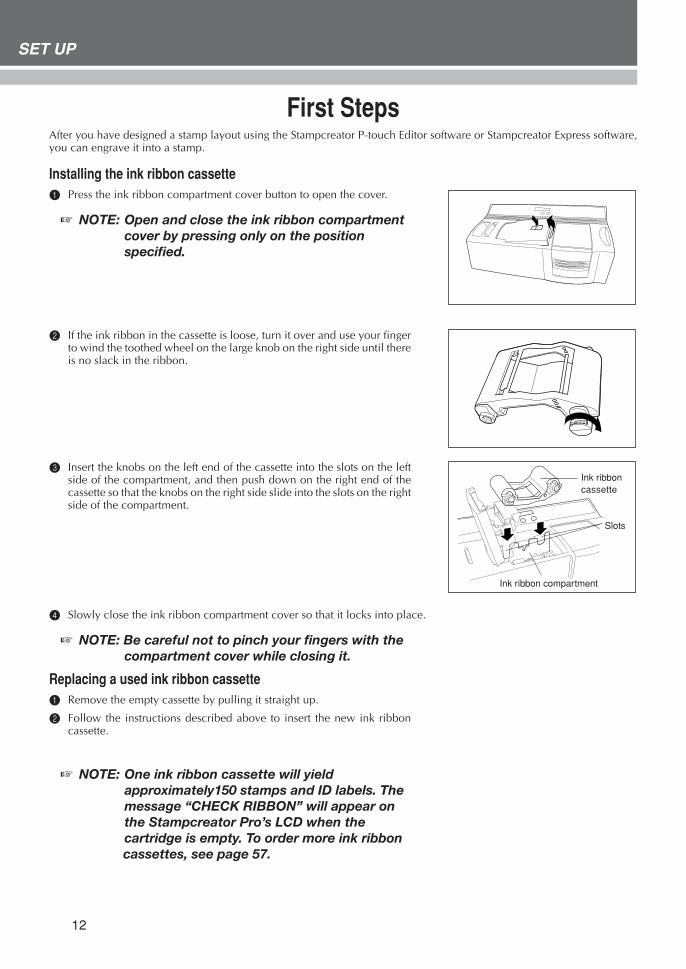
Installing the ink ribbon cassette1 Press the ink ribbon compartment cover button to open the cover.
� NOTE: Open and close the ink ribbon compartmentcover by pressing only on the positionspecified.
2 If the ink ribbon in the cassette is loose, turn it over and use your fingerto wind the toothed wheel on the large knob on the right side until thereis no slack in the ribbon.
3 Insert the knobs on the left end of the cassette into the slots on the leftside of the compartment, and then push down on the right end of thecassette so that the knobs on the right side slide into the slots on the rightside of the compartment.
4 Slowly close the ink ribbon compartment cover so that it locks into place.
� NOTE: Be careful not to pinch your fingers with thecompartment cover while closing it.
Replacing a used ink ribbon cassette1 Remove the empty cassette by pulling it straight up.
2 Follow the instructions described above to insert the new ink ribboncassette.
� NOTE: One ink ribbon cassette will yieldapproximately150 stamps and ID labels. Themessage “CHECK RIBBON” will appear onthe Stampcreator Pro’s LCD when thecartridge is empty. To order more ink ribbon
cassettes, see page 57.
Slots
Ink ribboncassette
Ink ribbon compartment
13
SET UP
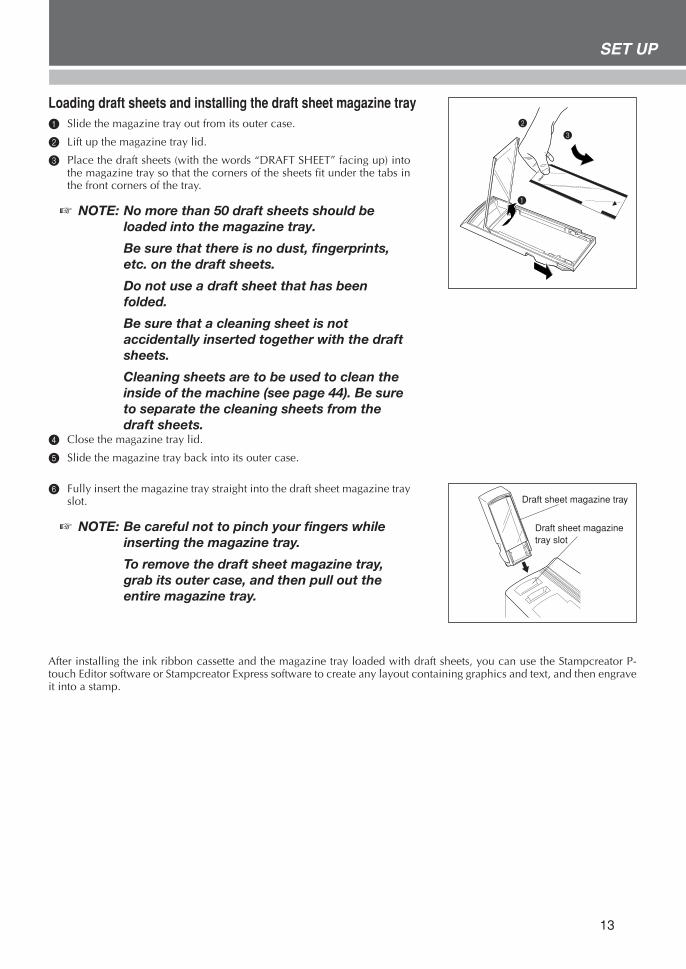
Loading draft sheets and installing the draft sheet magazine tray1 Slide the magazine tray out from its outer case.
2 Lift up the magazine tray lid.
3 Place the draft sheets (with the words “DRAFT SHEET” facing up) intothe magazine tray so that the corners of the sheets fit under the tabs inthe front corners of the tray.
� NOTE: No more than 50 draft sheets should beloaded into the magazine tray.
Be sure that there is no dust, fingerprints,etc. on the draft sheets.
Do not use a draft sheet that has beenfolded.
Be sure that a cleaning sheet is notaccidentally inserted together with the draftsheets.
Cleaning sheets are to be used to clean the inside of the machine (see page 44). Be sure to separate the cleaning sheets from the draft sheets.
4 Close the magazine tray lid.
5 Slide the magazine tray back into its outer case.
6 Fully insert the magazine tray straight into the draft sheet magazine trayslot.
� NOTE: Be careful not to pinch your fingers whileinserting the magazine tray.
To remove the draft sheet magazine tray,grab its outer case, and then pull out theentire magazine tray.
After installing the ink ribbon cassette and the magazine tray loaded with draft sheets, you can use the Stampcreator P-touch Editor software or Stampcreator Express software to create any layout containing graphics and text, and then engraveit into a stamp.
1
2
3
Draft sheet magazine tray
Draft sheet magazinetray slot

14
DESIGINING A STAMP
OverviewThere are two stamp-editing tools: Stampcreator P-touch Editor and Stampcreator Express. Use the Stampcreator P-touchEditor software to create a stamp design with a wide variety of functions. The Stampcreator Express software is a simplestamp-editing tool. Simply select a style (template), and then change the text.
15
DESIGINING A STAMP (Stampcreator P-touch Editor)
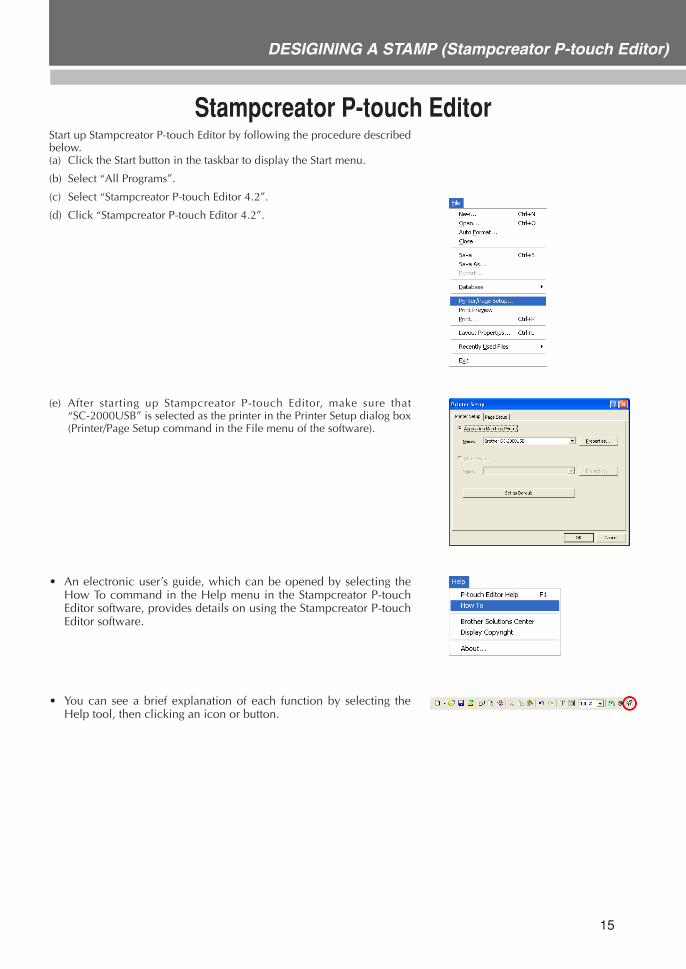
Stampcreator P-touch EditorStart up Stampcreator P-touch Editor by following the procedure describedbelow.(a) Click the Start button in the taskbar to display the Start menu.
(b) Select “All Programs”.
(c) Select “Stampcreator P-touch Editor 4.2”.
(d) Click “Stampcreator P-touch Editor 4.2”.
(e) After starting up Stampcreator P-touch Editor, make sure that“SC-2000USB” is selected as the printer in the Printer Setup dialog box(Printer/Page Setup command in the File menu of the software).
• An electronic user’s guide, which can be opened by selecting theHow To command in the Help menu in the Stampcreator P-touchEditor software, provides details on using the Stampcreator P-touchEditor software.
• You can see a brief explanation of each function by selecting theHelp tool, then clicking an icon or button.
16
DESIGINING A STAMP (Stampcreator P-touch Editor)
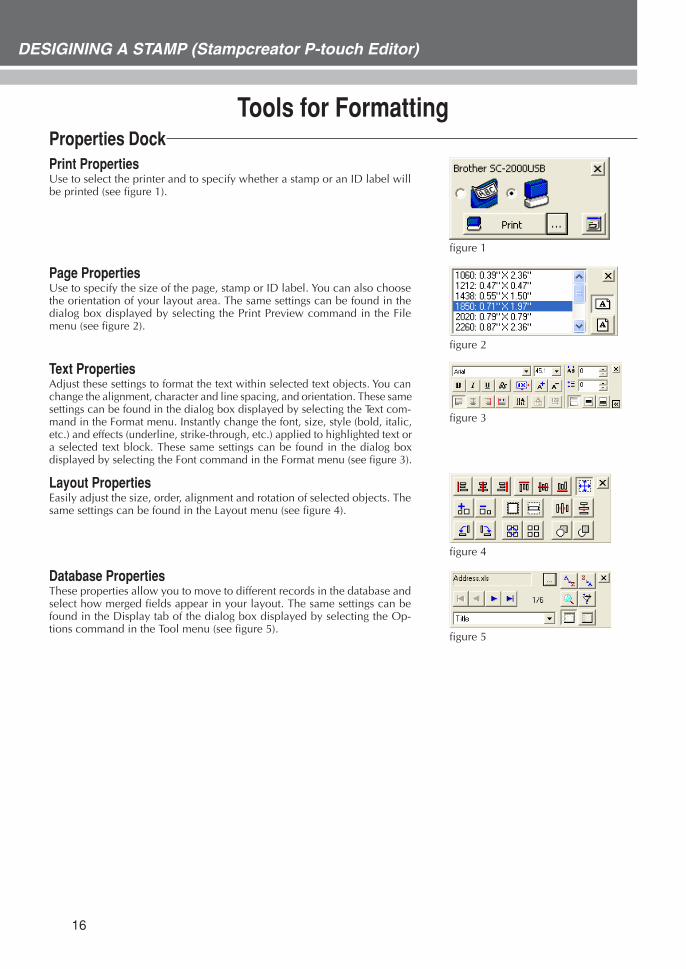
Tools for FormattingProperties DockPrint PropertiesUse to select the printer and to specify whether a stamp or an ID label willbe printed (see figure 1).
Page PropertiesUse to specify the size of the page, stamp or ID label. You can also choosethe orientation of your layout area. The same settings can be found in thedialog box displayed by selecting the Print Preview command in the Filemenu (see figure 2).
Text PropertiesAdjust these settings to format the text within selected text objects. You canchange the alignment, character and line spacing, and orientation. These samesettings can be found in the dialog box displayed by selecting the Text com-mand in the Format menu. Instantly change the font, size, style (bold, italic,etc.) and effects (underline, strike-through, etc.) applied to highlighted text ora selected text block. These same settings can be found in the dialog boxdisplayed by selecting the Font command in the Format menu (see figure 3).
Layout PropertiesEasily adjust the size, order, alignment and rotation of selected objects. Thesame settings can be found in the Layout menu (see figure 4).
Database PropertiesThese properties allow you to move to different records in the database andselect how merged fields appear in your layout. The same settings can befound in the Display tab of the dialog box displayed by selecting the Op-tions command in the Tool menu (see figure 5).
figure 3
figure 4
figure 5
figure 1
figure 2
17
DESIGINING A STAMP (Stampcreator P-touch Editor)
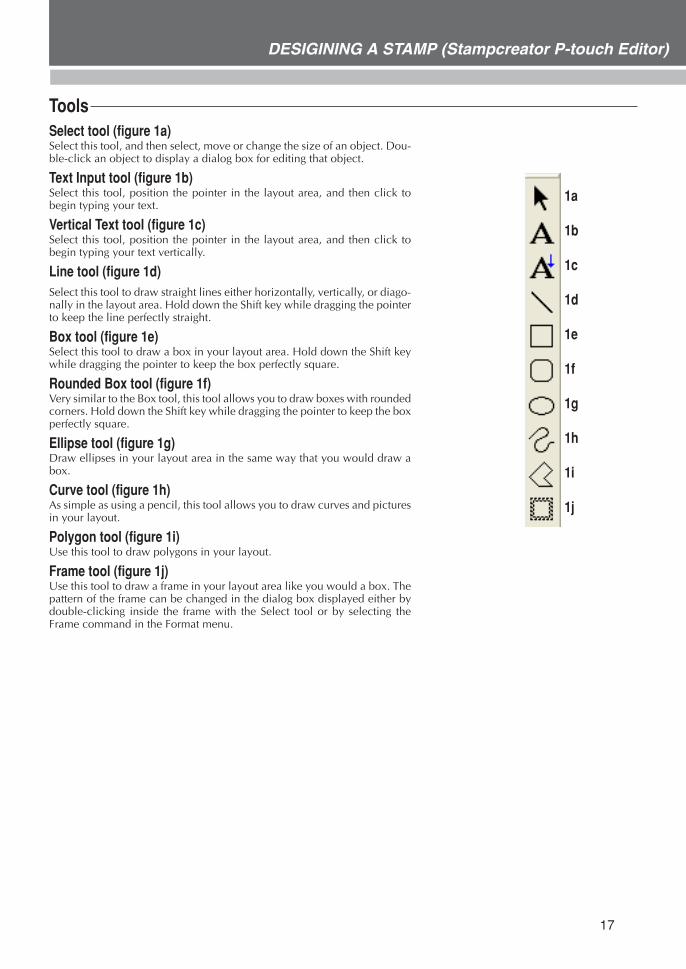
ToolsSelect tool (figure 1a)Select this tool, and then select, move or change the size of an object. Dou-ble-click an object to display a dialog box for editing that object.
Text Input tool (figure 1b)Select this tool, position the pointer in the layout area, and then click tobegin typing your text.
Vertical Text tool (figure 1c)Select this tool, position the pointer in the layout area, and then click tobegin typing your text vertically.
Line tool (figure 1d)Select this tool to draw straight lines either horizontally, vertically, or diago-nally in the layout area. Hold down the Shift key while dragging the pointerto keep the line perfectly straight.
Box tool (figure 1e)Select this tool to draw a box in your layout area. Hold down the Shift keywhile dragging the pointer to keep the box perfectly square.
Rounded Box tool (figure 1f)Very similar to the Box tool, this tool allows you to draw boxes with roundedcorners. Hold down the Shift key while dragging the pointer to keep the boxperfectly square.
Ellipse tool (figure 1g)Draw ellipses in your layout area in the same way that you would draw abox.
Curve tool (figure 1h)As simple as using a pencil, this tool allows you to draw curves and picturesin your layout.
Polygon tool (figure 1i)Use this tool to draw polygons in your layout.
Frame tool (figure 1j)Use this tool to draw a frame in your layout area like you would a box. Thepattern of the frame can be changed in the dialog box displayed either bydouble-clicking inside the frame with the Select tool or by selecting theFrame command in the Format menu.
1a
1b
1c
1d
1e
1f
1g
1h
1i
1j
18
DESIGINING A STAMP (Stampcreator P-touch Editor)
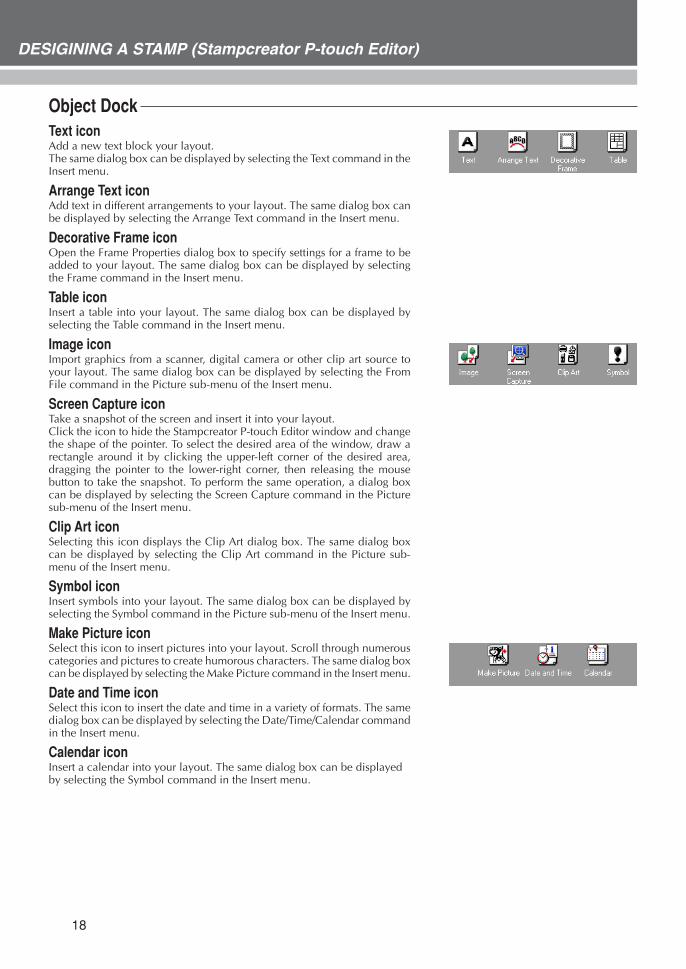
Object DockText iconAdd a new text block your layout.The same dialog box can be displayed by selecting the Text command in theInsert menu.
Arrange Text iconAdd text in different arrangements to your layout. The same dialog box canbe displayed by selecting the Arrange Text command in the Insert menu.
Decorative Frame iconOpen the Frame Properties dialog box to specify settings for a frame to beadded to your layout. The same dialog box can be displayed by selectingthe Frame command in the Insert menu.
Table iconInsert a table into your layout. The same dialog box can be displayed byselecting the Table command in the Insert menu.
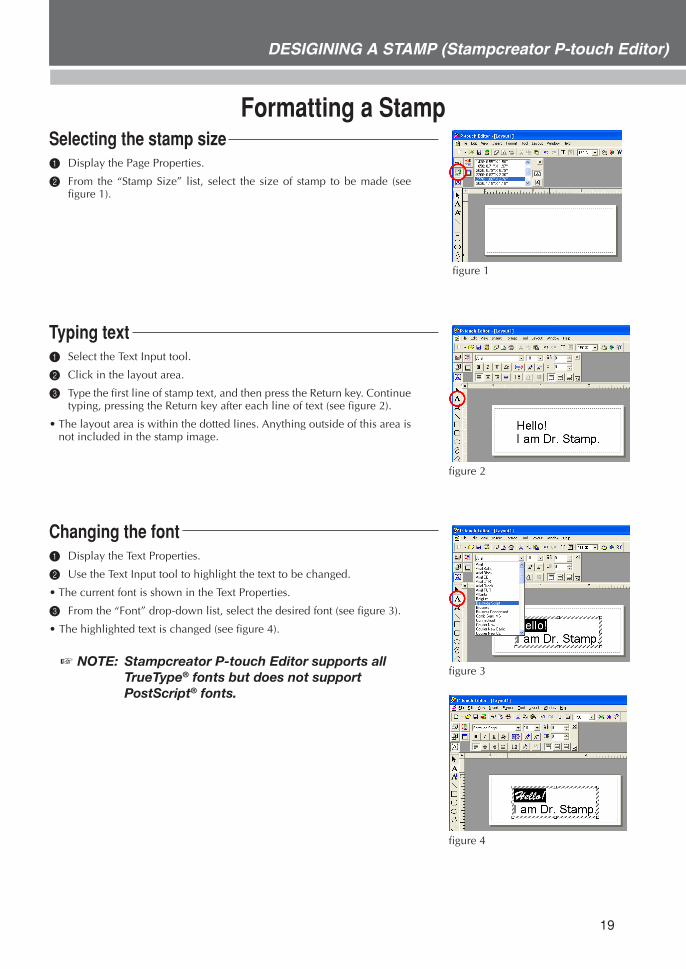
Image iconImport graphics from a scanner, digital camera or other clip art source toyour layout. The same dialog box can be displayed by selecting the FromFile command in the Picture sub-menu of the Insert menu.
Screen Capture iconTake a snapshot of the screen and insert it into your layout.Click the icon to hide the Stampcreator P-touch Editor window and changethe shape of the pointer. To select the desired area of the window, draw arectangle around it by clicking the upper-left corner of the desired area,dragging the pointer to the lower-right corner, then releasing the mousebutton to take the snapshot. To perform the same operation, a dialog boxcan be displayed by selecting the Screen Capture command in the Picturesub-menu of the Insert menu.
Clip Art iconSelecting this icon displays the Clip Art dialog box. The same dialog boxcan be displayed by selecting the Clip Art command in the Picture sub-menu of the Insert menu.
Symbol iconInsert symbols into your layout. The same dialog box can be displayed byselecting the Symbol command in the Picture sub-menu of the Insert menu.
Make Picture iconSelect this icon to insert pictures into your layout. Scroll through numerouscategories and pictures to create humorous characters. The same dialog boxcan be displayed by selecting the Make Picture command in the Insert menu.
Date and Time iconSelect this icon to insert the date and time in a variety of formats. The samedialog box can be displayed by selecting the Date/Time/Calendar commandin the Insert menu.
Calendar iconInsert a calendar into your layout. The same dialog box can be displayedby selecting the Symbol command in the Insert menu.
19
DESIGINING A STAMP (Stampcreator P-touch Editor)
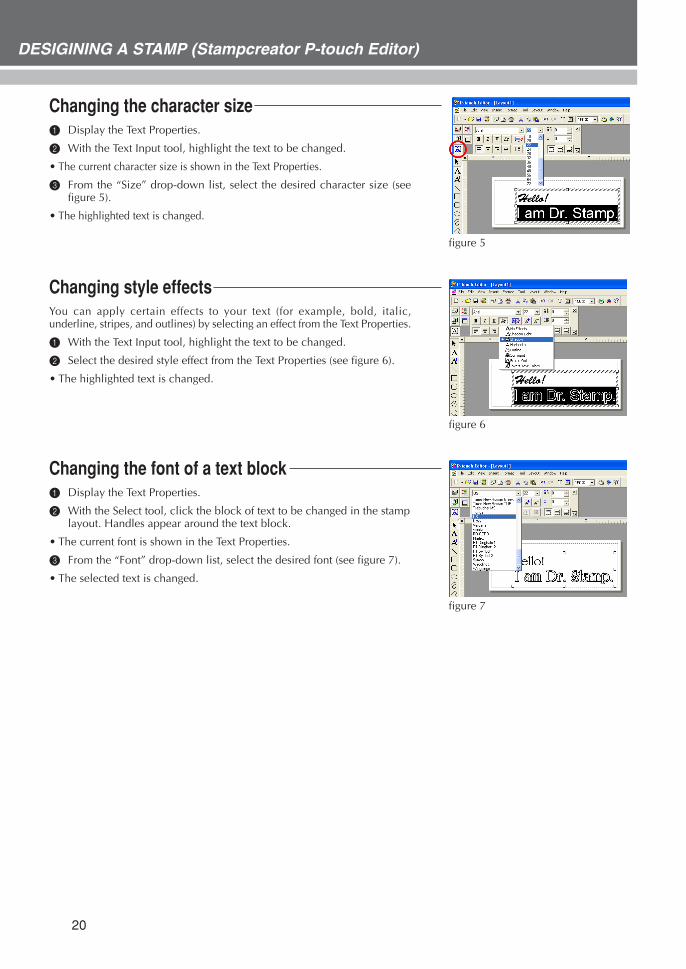
Formatting a StampSelecting the stamp size1 Display the Page Properties.
2 From the “Stamp Size” list, select the size of stamp to be made (seefigure 1).
Typing text1 Select the Text Input tool.
2 Click in the layout area.
3 Type the first line of stamp text, and then press the Return key. Continuetyping, pressing the Return key after each line of text (see figure 2).
• The layout area is within the dotted lines. Anything outside of this area isnot included in the stamp image.
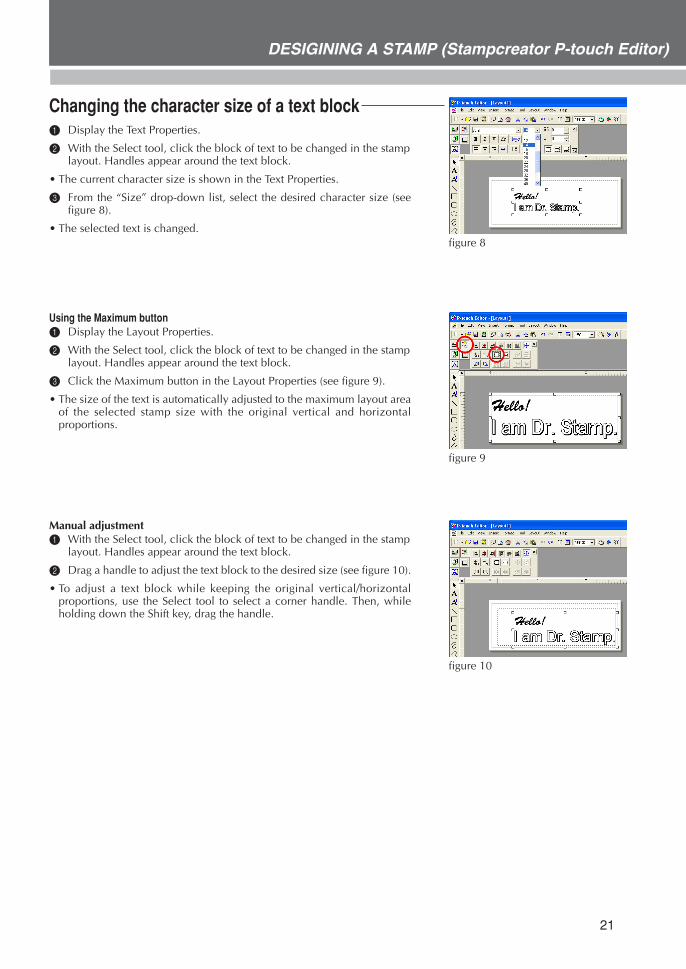
Changing the font1 Display the Text Properties.
2 Use the Text Input tool to highlight the text to be changed.
• The current font is shown in the Text Properties.
3 From the “Font” drop-down list, select the desired font (see figure 3).
• The highlighted text is changed (see figure 4).
� NOTE: Stampcreator P-touch Editor supports allTrueType® fonts but does not supportPostScript® fonts.
figure 1
figure 2
figure 3
figure 4
20
DESIGINING A STAMP (Stampcreator P-touch Editor)
Changing the character size1 Display the Text Properties.
2 With the Text Input tool, highlight the text to be changed.
• The current character size is shown in the Text Properties.
3 From the “Size” drop-down list, select the desired character size (seefigure 5).
• The highlighted text is changed.
Changing style effectsYou can apply certain effects to your text (for example, bold, italic,underline, stripes, and outlines) by selecting an effect from the Text Properties.
1 With the Text Input tool, highlight the text to be changed.
2 Select the desired style effect from the Text Properties (see figure 6).
• The highlighted text is changed.
Changing the font of a text block1 Display the Text Properties.
2 With the Select tool, click the block of text to be changed in the stamplayout. Handles appear around the text block.
• The current font is shown in the Text Properties.
3 From the “Font” drop-down list, select the desired font (see figure 7).
• The selected text is changed.
figure 5
figure 7
figure 6
21
DESIGINING A STAMP (Stampcreator P-touch Editor)
Changing the character size of a text block1 Display the Text Properties.
2 With the Select tool, click the block of text to be changed in the stamplayout. Handles appear around the text block.
• The current character size is shown in the Text Properties.
3 From the “Size” drop-down list, select the desired character size (seefigure 8).
• The selected text is changed.
Using the Maximum button1 Display the Layout Properties.
2 With the Select tool, click the block of text to be changed in the stamplayout. Handles appear around the text block.
3 Click the Maximum button in the Layout Properties (see figure 9).
• The size of the text is automatically adjusted to the maximum layout areaof the selected stamp size with the original vertical and horizontalproportions.
Manual adjustment1 With the Select tool, click the block of text to be changed in the stamp
layout. Handles appear around the text block.
2 Drag a handle to adjust the text block to the desired size (see figure 10).
• To adjust a text block while keeping the original vertical/horizontalproportions, use the Select tool to select a corner handle. Then, whileholding down the Shift key, drag the handle.
figure 8
figure 9
figure 10

22
DESIGINING A STAMP (Stampcreator P-touch Editor)
Centering text within a blockThis section explains how to center text within a text block. To align eachblock in the layout area, refer to the section “Vertical and horizontal blockalignment” below.
1 Display the Text Properties, and then click the Enlarge/Reduce button todisplay the advanced settings.
2 With the Select tool, click the block of text to be changed in the stamplayout. Handles appear around the text block.
3 Click the Center Alignment button (see figure 11).
• The selected text is changed.• Use this method to align the text at the right, left, top or bottom within the
text block.
� NOTE: The setting is in effect until you change it.
Vertical and horizontal block alignmentThis section describes how to align the text blocks. To change the alignmentof text within the text block, refer to the section “Centering text within ablock” above.
1 Display the Text Properties.
2 With the Select tool, click the block of text to be changed in the stamplayout. Handles appear around the text block.
3 Click the Align sub-menu in the Layout menu (see figure 12).
4 Select the Align in Relation to Print Area command.
5 Click the Align Horizontal Center or Aligner Vertical Center button inthe Layout Properties.
• The selected text is changed (see figure 13).• Use this method to align the text blocks at the right, left, top or bottom
within the layout area.
figure 11
figure 12
figure 13

23
DESIGINING A STAMP (Stampcreator P-touch Editor)
Drawing lines in a stamp1 Type in the text (refer to the section “Typing text” on page 19).
� NOTE: Text can be inserted before or after drawinga line.
2 Select the Line tool, and then drag the pointer in the layout area to drawthe desired line (see figure 14).
� NOTE: To draw a straight line, drag the pointerwhile holding down the Shift key.
Changing the line length1 With the Select tool, click the line.
• A box appears on both ends of the line.
2 Drag either box to adjust the line length.
Changing the line width and style1 With the Select tool, double-click the line to display the Line Properties
dialog box.
2 On the Drawing tab, select the line style and/or weight, and then clickthe OK button (see figure 15).
� NOTE: The line width and style can only be appliedonce to each line.
Deleting a line1 With the Select tool, click the line.
2 Press the Delete key on the keyboard.
figure 14
figure 15
24
DESIGINING A STAMP (Stampcreator P-touch Editor)
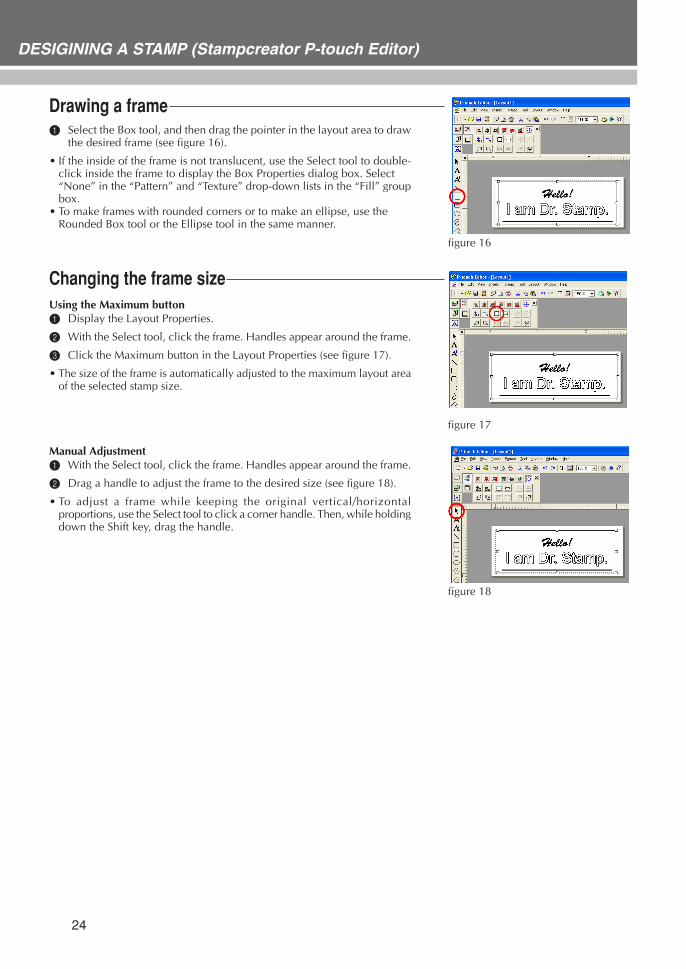
Drawing a frame1 Select the Box tool, and then drag the pointer in the layout area to draw
the desired frame (see figure 16).
• If the inside of the frame is not translucent, use the Select tool to double-click inside the frame to display the Box Properties dialog box. Select“None” in the “Pattern” and “Texture” drop-down lists in the “Fill” groupbox.
• To make frames with rounded corners or to make an ellipse, use theRounded Box tool or the Ellipse tool in the same manner.
Changing the frame sizeUsing the Maximum button1 Display the Layout Properties.
2 With the Select tool, click the frame. Handles appear around the frame.
3 Click the Maximum button in the Layout Properties (see figure 17).
• The size of the frame is automatically adjusted to the maximum layout areaof the selected stamp size.
Manual Adjustment1 With the Select tool, click the frame. Handles appear around the frame.
2 Drag a handle to adjust the frame to the desired size (see figure 18).
• To adjust a frame while keeping the original vertical/horizontalproportions, use the Select tool to click a corner handle. Then, while holdingdown the Shift key, drag the handle.
figure 16
figure 17
figure 18
25
DESIGINING A STAMP (Stampcreator P-touch Editor)
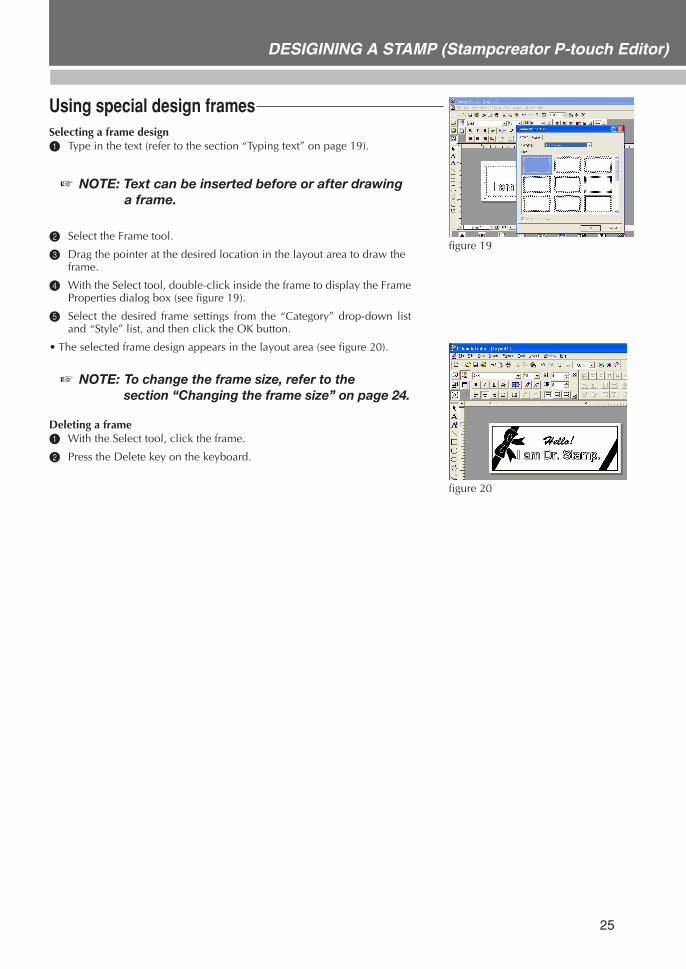
Using special design framesSelecting a frame design1 Type in the text (refer to the section “Typing text” on page 19).
� NOTE: Text can be inserted before or after drawinga frame.
2 Select the Frame tool.
3 Drag the pointer at the desired location in the layout area to draw theframe.
4 With the Select tool, double-click inside the frame to display the FrameProperties dialog box (see figure 19).
5 Select the desired frame settings from the “Category” drop-down listand “Style” list, and then click the OK button.
• The selected frame design appears in the layout area (see figure 20).
� NOTE: To change the frame size, refer to the section “Changing the frame size” on page 24.
Deleting a frame1 With the Select tool, click the frame.
2 Press the Delete key on the keyboard.
figure 19
figure 20
26
DESIGINING A STAMP (Stampcreator P-touch Editor)
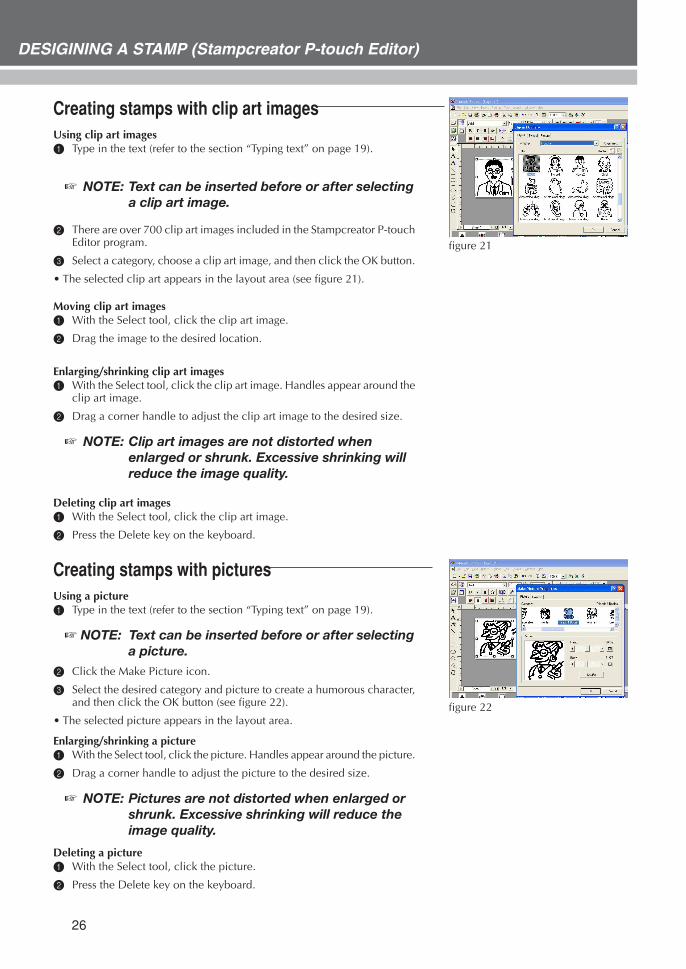
Creating stamps with clip art imagesUsing clip art images1 Type in the text (refer to the section “Typing text” on page 19).
� NOTE: Text can be inserted before or after selectinga clip art image.
2 There are over 700 clip art images included in the Stampcreator P-touchEditor program.
3 Select a category, choose a clip art image, and then click the OK button.
• The selected clip art appears in the layout area (see figure 21).
Moving clip art images1 With the Select tool, click the clip art image.
2 Drag the image to the desired location.
Enlarging/shrinking clip art images1 With the Select tool, click the clip art image. Handles appear around the
clip art image.
2 Drag a corner handle to adjust the clip art image to the desired size.
� NOTE: Clip art images are not distorted whenenlarged or shrunk. Excessive shrinking willreduce the image quality.
Deleting clip art images1 With the Select tool, click the clip art image.
2 Press the Delete key on the keyboard.
Creating stamps with picturesUsing a picture1 Type in the text (refer to the section “Typing text” on page 19).
� NOTE: Text can be inserted before or after selecting a picture.
2 Click the Make Picture icon.
3 Select the desired category and picture to create a humorous character,and then click the OK button (see figure 22).
• The selected picture appears in the layout area.
Enlarging/shrinking a picture1 With the Select tool, click the picture. Handles appear around the picture.
2 Drag a corner handle to adjust the picture to the desired size.
� NOTE: Pictures are not distorted when enlarged orshrunk. Excessive shrinking will reduce theimage quality.
Deleting a picture1 With the Select tool, click the picture.
2 Press the Delete key on the keyboard.
figure 21
figure 22

27
DESIGINING A STAMP (Stampcreator P-touch Editor)
Advanced StepsImporting graphics from a scanner, digital camera, or other clip art source1 Save the graphic image taken from the scanner, digital camera, etc., as
one of the file formats Stampcreator P-touch Editor supports.
Bitmap file (bmp, dib)JPEG file (jpg, jpeg)Uncompressed TIFF file (tif)ICON file (ico)Windows Meta file (wmf, emf)PNG file (png)GIF file (gif)
2 Click the Image icon.
The same dialog box can be displayed by selecting the From File com-mand in the Picture sub-menu of the Insert menu.
3 Select the folder and saved file, and then click the OK button (see figure 1).
• The selected image appears in the layout area (see figure 2).• Images in supported formats can easily be imported by using the Copy
and Paste commands in addition to the method described above.
� NOTE: Saving photo images as JPG reduces the file size.
You can import BMP, DIB, JPG, JPEG, TIF, ICO, WMF, EMF, PNG andGIF files directly into the Stampcreator P-touch Editor. For other graphicfile formats, use a graphic file conversion software package to changethe file format before importing the file into the Stampcreator P-touchEditor.
� NOTE: Stampcreater P-touch Editor can not importimages saved in unsupported file formats.
Enlarging/shrinking imported images1 With the Select tool, click the image. Handles appear around the image.
2 Drag a corner handle to adjust the image to the desired size.
� NOTE: If the scanned image is unsatisfactory,rescan with a resolution of 600 dpi andimport the image again.
Adding imported images to the Stampcreator P-touch Editor clip art list1 After importing graphics and making the necessary corrections, use the
Select Tool to double-click the image to display the Image Propertiesdialog box.
• The image is shown in the preview box of the dialog box.2 Click the Add to Clip Art button.
3 Select the category where you would like to add the image, and thenclick the OK button.
• The selected image is registered in the Stampcreator P-touch Editor clipart list.
• To open an added image, refer to the section “Creating stamps with clipart images” on page 26.
Moving imported images1 With the Select tool, click the image.
2 Drag the image to the desired location.
Deleting imported images1 With the Select tool, click the image.
2 Press the Delete key on the keyboard.
figure 1
figure 2
28
DESIGINING A STAMP (Stampcreator P-touch Editor)
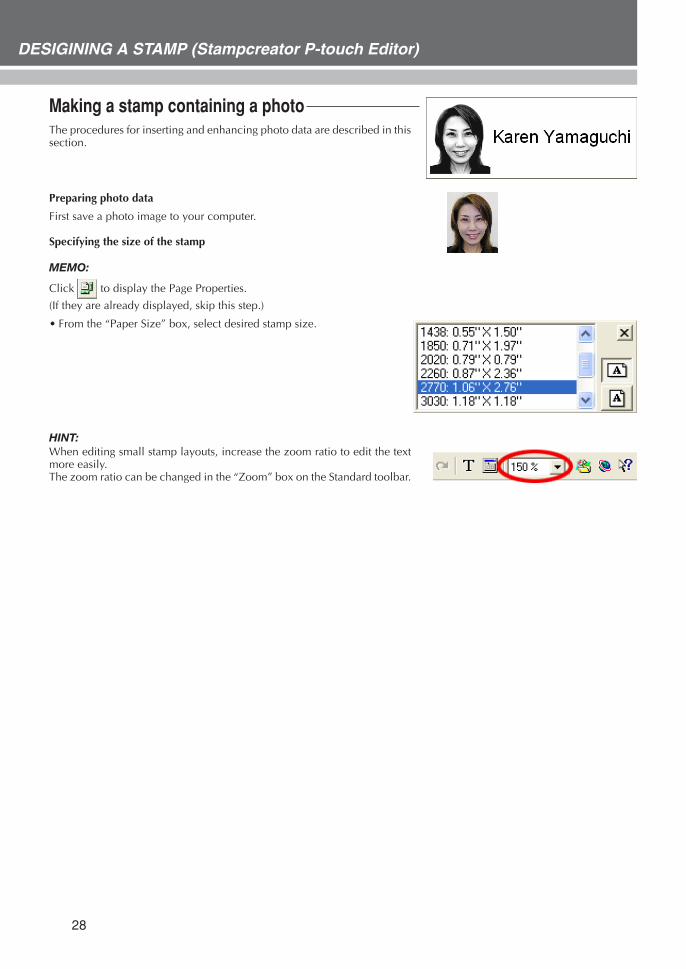
Making a stamp containing a photoThe procedures for inserting and enhancing photo data are described in thissection.
Preparing photo data
First save a photo image to your computer.
Specifying the size of the stamp
MEMO:
Click to display the Page Properties.
(If they are already displayed, skip this step.)
• From the “Paper Size” box, select desired stamp size.
HINT:When editing small stamp layouts, increase the zoom ratio to edit the textmore easily.The zoom ratio can be changed in the “Zoom” box on the Standard toolbar.
29
DESIGINING A STAMP (Stampcreator P-touch Editor)
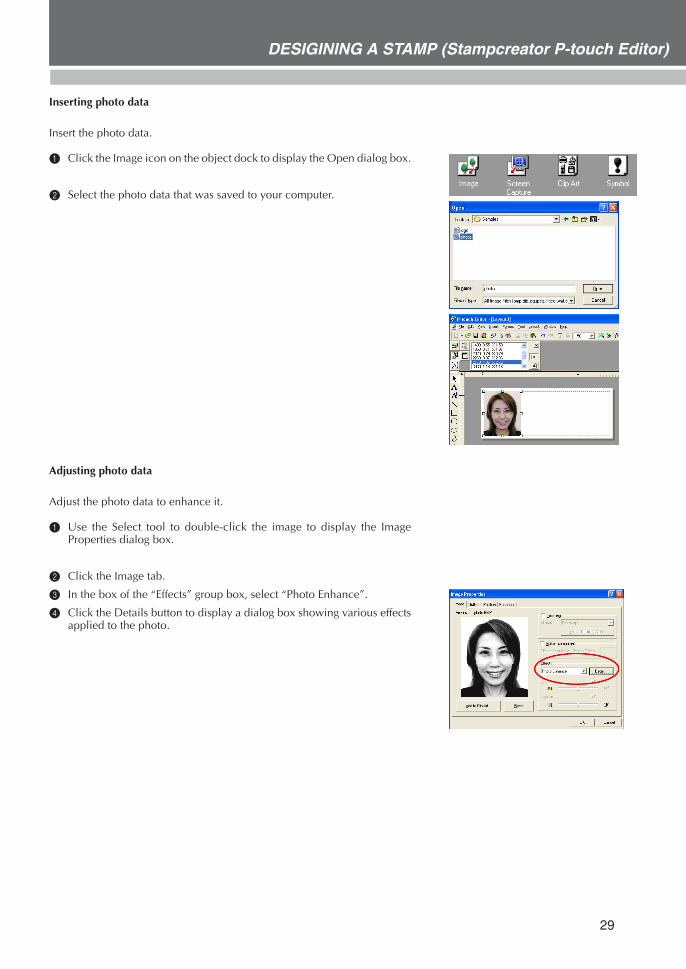
Inserting photo data
Insert the photo data.
1 Click the Image icon on the object dock to display the Open dialog box.
2 Select the photo data that was saved to your computer.
Adjusting photo data
Adjust the photo data to enhance it.
1 Use the Select tool to double-click the image to display the ImageProperties dialog box.
2 Click the Image tab.
3 In the box of the “Effects” group box, select “Photo Enhance”.
4 Click the Details button to display a dialog box showing various effectsapplied to the photo.
30
DESIGINING A STAMP (Stampcreator P-touch Editor)
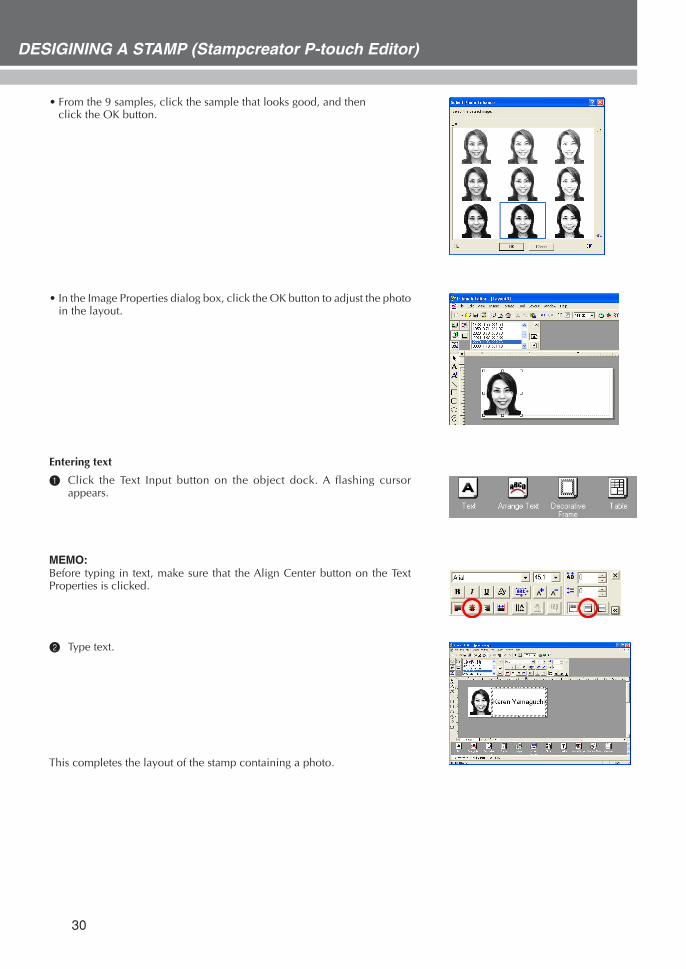
• From the 9 samples, click the sample that looks good, and thenclick the OK button.
• In the Image Properties dialog box, click the OK button to adjust the photoin the layout.
Entering text
1 Click the Text Input button on the object dock. A flashing cursorappears.
MEMO:Before typing in text, make sure that the Align Center button on the TextProperties is clicked.
2 Type text.
This completes the layout of the stamp containing a photo.

31
DESIGINING A STAMP (Stampcreator P-touch Editor)
Printing data containing graphics (photos)Stampcreator P-touch Editor automatically selects the print mode that bestsuits your design and will produce the best stamp quality. The various printmodes are described below.
1 Select “Stamp”, and then select the appropriate setting in the“Document Type” drop-down list.
Logo: Best for stamps with a logo mark
Text: Good for stamps with text only
Text+Photo: Good for stamps with text and photos (graphics)
Photo: Best for stamps containing photos with the “Photo Enhance”effect applied
• The print mode can be changed using the setting in the Page Properties.
� NOTE: In order for the Stampcreator P-touch Editorto select the correct print modeautomatically, the Color palette for themonitor should be set to “High Color”.
32
DESIGINING A STAMP (Stampcreator P-touch Editor)
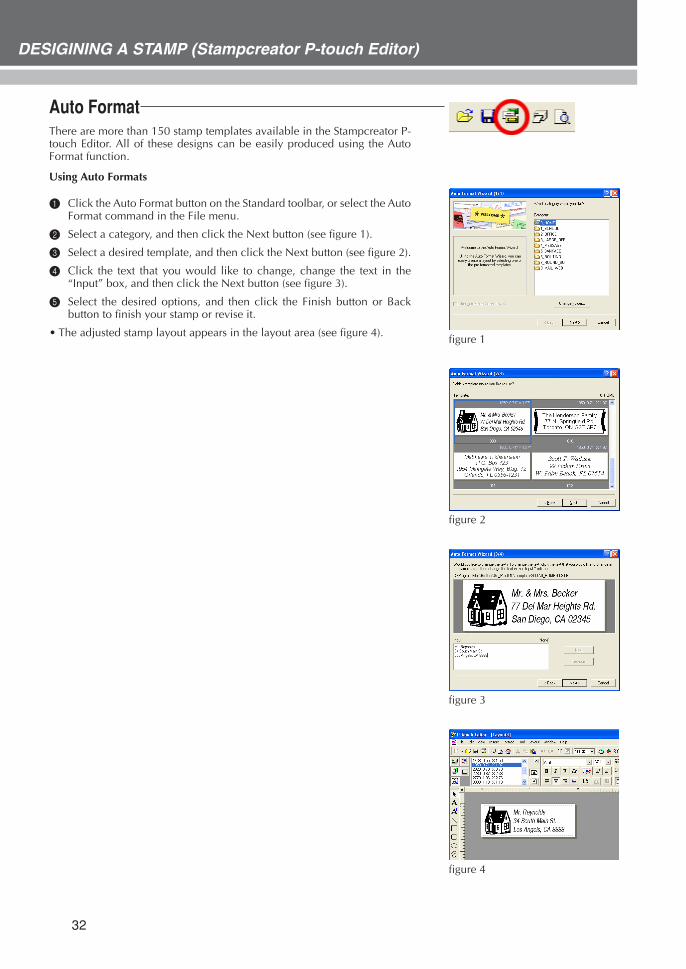
Auto FormatThere are more than 150 stamp templates available in the Stampcreator P-touch Editor. All of these designs can be easily produced using the AutoFormat function.
Using Auto Formats
1 Click the Auto Format button on the Standard toolbar, or select the AutoFormat command in the File menu.
2 Select a category, and then click the Next button (see figure 1).
3 Select a desired template, and then click the Next button (see figure 2).
4 Click the text that you would like to change, change the text in the“Input” box, and then click the Next button (see figure 3).
5 Select the desired options, and then click the Finish button or Backbutton to finish your stamp or revise it.
• The adjusted stamp layout appears in the layout area (see figure 4). figure 1
figure 2
figure 3
figure 4
33
DESIGINING A STAMP (Stampcreator Express)
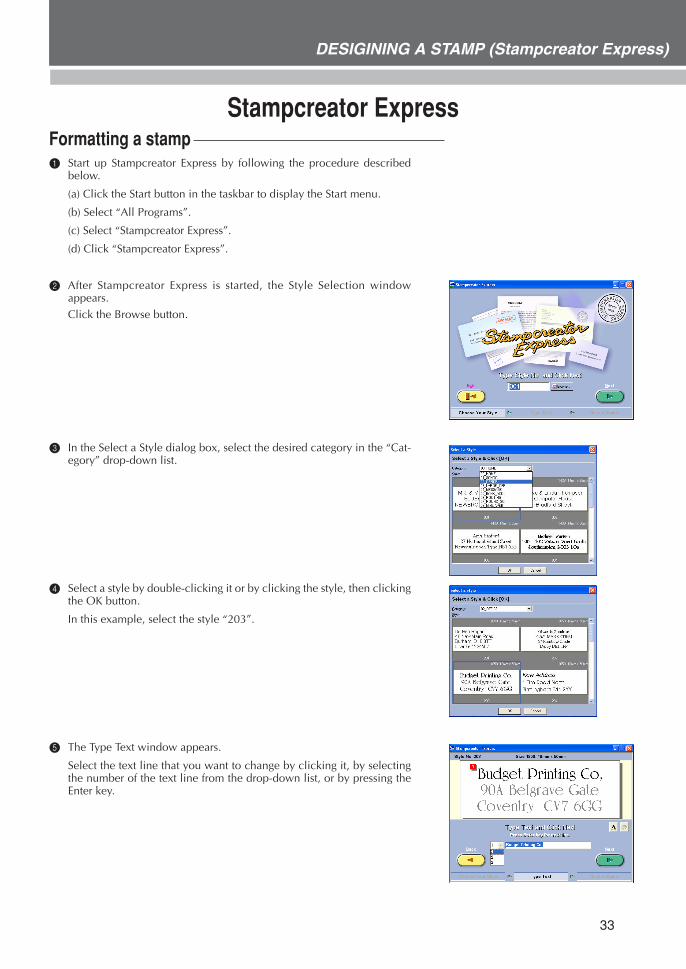
Stampcreator ExpressFormatting a stamp1 Start up Stampcreator Express by following the procedure described
below.
(a) Click the Start button in the taskbar to display the Start menu.
(b) Select “All Programs”.
(c) Select “Stampcreator Express”.
(d) Click “Stampcreator Express”.
2 After Stampcreator Express is started, the Style Selection windowappears.Click the Browse button.
3 In the Select a Style dialog box, select the desired category in the “Cat-egory” drop-down list.
4 Select a style by double-clicking it or by clicking the style, then clickingthe OK button.
In this example, select the style “203”.
5 The Type Text window appears.
Select the text line that you want to change by clicking it, by selectingthe number of the text line from the drop-down list, or by pressing theEnter key.
34
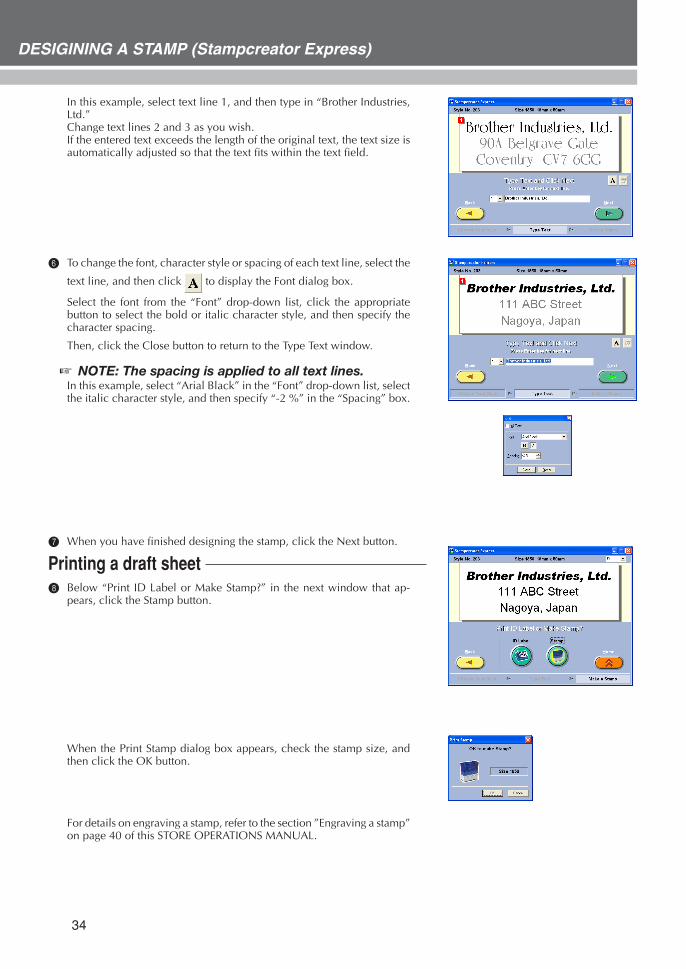
DESIGINING A STAMP (Stampcreator Express)
In this example, select text line 1, and then type in “Brother Industries,Ltd.”Change text lines 2 and 3 as you wish.If the entered text exceeds the length of the original text, the text size isautomatically adjusted so that the text fits within the text field.
6 To change the font, character style or spacing of each text line, select the
text line, and then click to display the Font dialog box.
Select the font from the “Font” drop-down list, click the appropriatebutton to select the bold or italic character style, and then specify thecharacter spacing.
Then, click the Close button to return to the Type Text window.
� NOTE: The spacing is applied to all text lines.In this example, select “Arial Black” in the “Font” drop-down list, selectthe italic character style, and then specify “-2 %” in the “Spacing” box.
7 When you have finished designing the stamp, click the Next button.
Printing a draft sheet8 Below “Print ID Label or Make Stamp?” in the next window that ap-
pears, click the Stamp button.
When the Print Stamp dialog box appears, check the stamp size, andthen click the OK button.
For details on engraving a stamp, refer to the section ”Engraving a stamp”on page 40 of this STORE OPERATIONS MANUAL.

35
DESIGINING A STAMP (Stampcreator Express)
Making an ID label9 Below “Print ID Label or Make Stamp?” in the window, click the ID
Label button.
When the Print ID Label dialog box appears, check the stamp size, in-sert the appropriate ID label into the ID label slot of SC-2000USB, andthen click the OK button.
For details on printing an ID label, refer to the section ”Making an IDlabel” on page 43 of this STORE OPERATIONS MANUAL.
For details on assembling a stamp, refer to the section ”Assembling thestamp” on page 42 of this STORE OPERATIONS MANUAL.
36
DESIGINING A STAMP (Stampcreator Express)
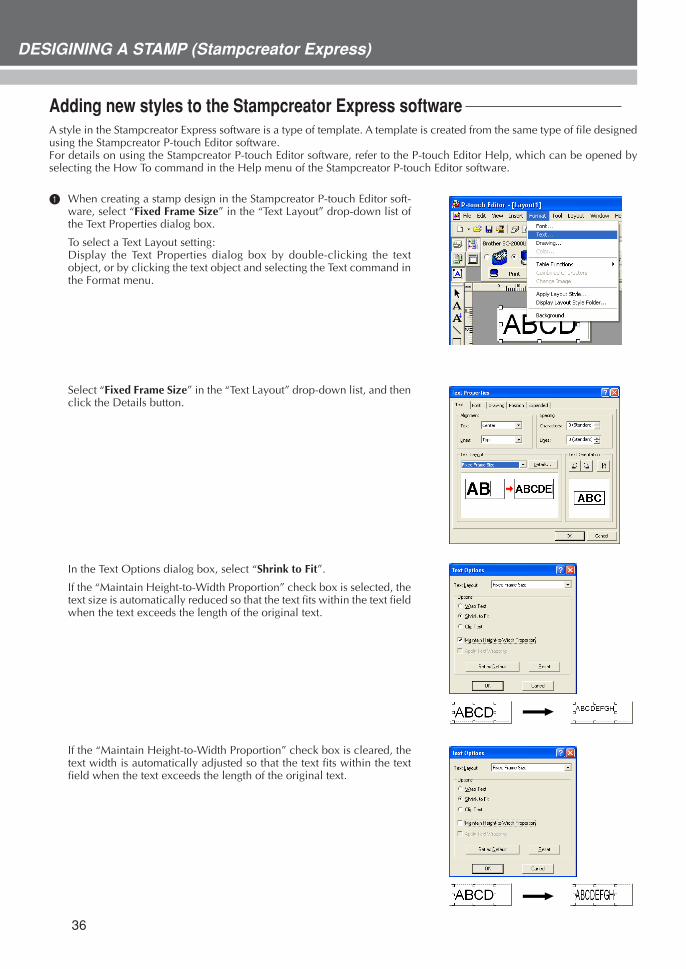
Adding new styles to the Stampcreator Express softwareA style in the Stampcreator Express software is a type of template. A template is created from the same type of file designedusing the Stampcreator P-touch Editor software.For details on using the Stampcreator P-touch Editor software, refer to the P-touch Editor Help, which can be opened byselecting the How To command in the Help menu of the Stampcreator P-touch Editor software.
1 When creating a stamp design in the Stampcreator P-touch Editor soft-ware, select “Fixed Frame Size” in the “Text Layout” drop-down list ofthe Text Properties dialog box.
To select a Text Layout setting:Display the Text Properties dialog box by double-clicking the textobject, or by clicking the text object and selecting the Text command inthe Format menu.
Select “Fixed Frame Size” in the “Text Layout” drop-down list, and thenclick the Details button.
In the Text Options dialog box, select “Shrink to Fit”.
If the “Maintain Height-to-Width Proportion” check box is selected, thetext size is automatically reduced so that the text fits within the text fieldwhen the text exceeds the length of the original text.
If the “Maintain Height-to-Width Proportion” check box is cleared, thetext width is automatically adjusted so that the text fits within the textfield when the text exceeds the length of the original text.
37
DESIGINING A STAMP (Stampcreator Express)
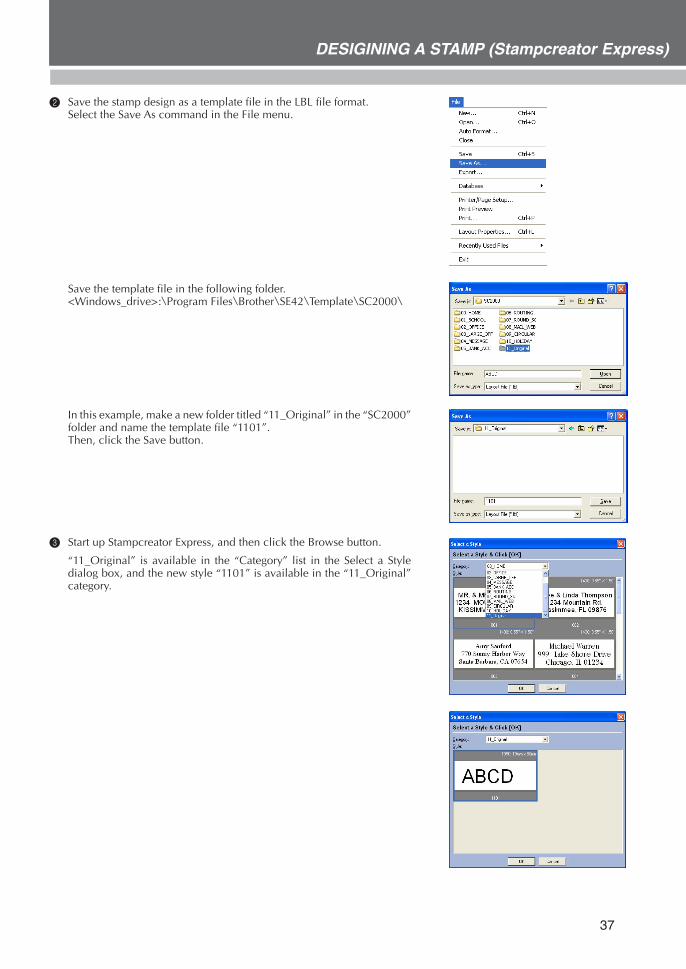
2 Save the stamp design as a template file in the LBL file format.Select the Save As command in the File menu.
Save the template file in the following folder.<Windows_drive>:\Program Files\Brother\SE42\Template\SC2000\
In this example, make a new folder titled “11_Original” in the “SC2000”folder and name the template file “1101”.Then, click the Save button.
3 Start up Stampcreator Express, and then click the Browse button.
“11_Original” is available in the “Category” list in the Select a Styledialog box, and the new style “1101” is available in the “11_Original”category.

38
MAKING A STAMP
Final StepsGetting ready1 Start up Stampcreator P-touch Editor.
For details on using the Stampcreator Express software, refer to pages 33through 34.
2 Make sure that “SC-2000USB” is selected as the printer in the PrinterSetup dialog box (Printer/Page Setup command in the File menu of thesoftware).
3 Design a stamp.
� NOTE: You cannot reprint or reuse a stamp once ithas already been used. Before printing, openthe stamp shutter to make sure that you areusing the correct draft sheet.
Dust may cause poor printing and engraving.Make sure that there is no dust on theprinting side of the stamp before insertingthe stamp into the machine.
Printing a draft sheet1 Load a draft sheet into the machine to print a positive image.
Fully insert the draft sheet magazine tray straight into the draft sheetmagazine tray slot.
� Be careful not to pinch your fingers while inserting the draft sheetmagazine tray.To remove the draft sheet magazine tray, grab its outer case, andthen pull out the entire magazine tray.
2 Turn on the machine.
3 Make sure the message “READY” appears in the LCD.
4 Click to display the Print Properties. (If they are already displayed,
skip this step.)
Click in the Print Properties to display the Printer Setup dialog box.
5 Check that “Brother SC-2000USB” is selected below “Application Match-ing Printer”, and then click the OK button.
Click in the Print Properties. The Print dialog box appears.
Draft sheetmagazine tray
Draft sheetmagazine tray slot
39
DESIGINING A STAMPMAKING A STAMP
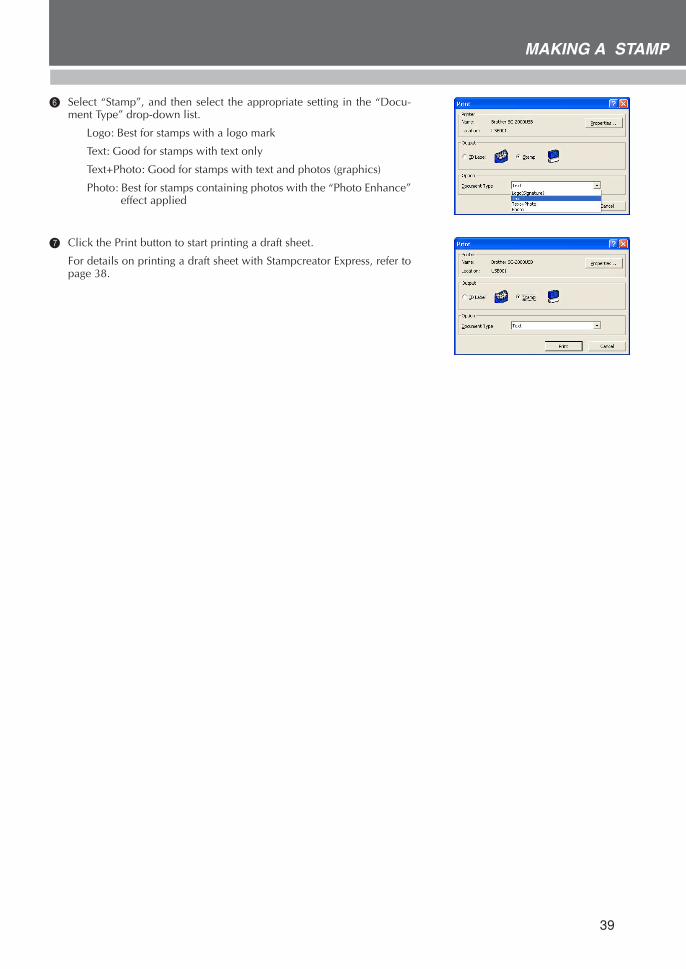
6 Select “Stamp”, and then select the appropriate setting in the “Docu-ment Type” drop-down list.
Logo: Best for stamps with a logo mark
Text: Good for stamps with text only
Text+Photo: Good for stamps with text and photos (graphics)
Photo: Best for stamps containing photos with the “Photo Enhance”effect applied
7 Click the Print button to start printing a draft sheet.
For details on printing a draft sheet with Stampcreator Express, refer topage 38.

40
MAKING A STAMP
Engraving a stamp1 After the data is printed onto the draft sheet, which is then fed over the
xenon lamp unit, the message “INSTALL STAMP !” appears in the LCDof the SC-2000USB.
2 Lift open the stamp compartment cover, slowly pull the lever toward youto open the doors in the stamp compartment, and then check that theprinted draft sheet has stopped over the xenon lamp unit (see figure 1).
� NOTE: Be careful not to touch the draft sheet thathas stopped over the xenon lamp unit.
Do not allow the clear plastic surface of thexenon lamp unit to become dirty orscratched. Use a soft cloth to wipe off anydust on the clear plastic surface.
To cancel engraving, press the Mode buttonon the SC-2000USB until “CANCEL” appearsin the LCD, and then press the Set button tofeed out the draft sheet.
3 Select a blank stamp pad in the desired size.Make sure that the stamp size you have selected in the drop-down listmatches the size indicated on the stamp holder (see figure 2).
4 Remove the cap from the stamp.
� NOTE: Do not reuse an ink pad after ink haspermeated the pad’s surface (see figure 3).
� NOTE: Do not peel off the clear protective filmbefore engraving the stamp (see figure 4).
IMPORTANT NOTE:
• Do not touch the printed draft sheet.• Do not remove the stamp’s clear protective film before engraving.
Doors
Lever
Stamp compartmentcover
figure 1
figure 3
figure 4
figure 2
DESIGINING A STAMP
41
MAKING A STAMP
ModeSet
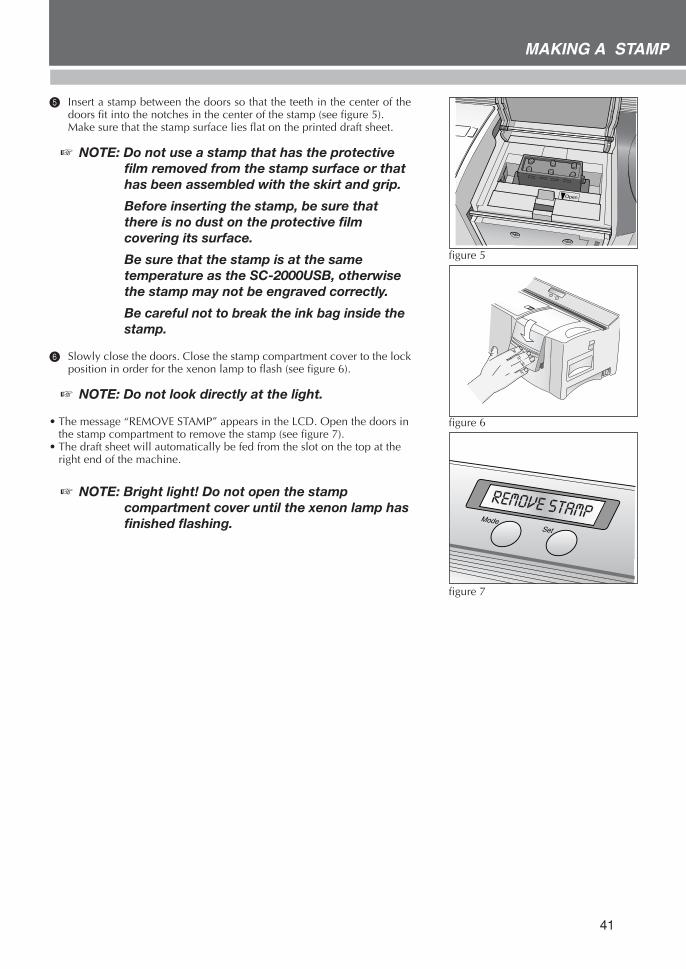
5 Insert a stamp between the doors so that the teeth in the center of thedoors fit into the notches in the center of the stamp (see figure 5).Make sure that the stamp surface lies flat on the printed draft sheet.
� NOTE: Do not use a stamp that has the protectivefilm removed from the stamp surface or thathas been assembled with the skirt and grip.
Before inserting the stamp, be sure thatthere is no dust on the protective filmcovering its surface.
Be sure that the stamp is at the sametemperature as the SC-2000USB, otherwisethe stamp may not be engraved correctly.
Be careful not to break the ink bag inside thestamp.
6 Slowly close the doors. Close the stamp compartment cover to the lockposition in order for the xenon lamp to flash (see figure 6).
� NOTE: Do not look directly at the light.
• The message “REMOVE STAMP” appears in the LCD. Open the doors inthe stamp compartment to remove the stamp (see figure 7).
• The draft sheet will automatically be fed from the slot on the top at theright end of the machine.
� NOTE: Bright light! Do not open the stampcompartment cover until the xenon lamp hasfinished flashing.
figure 5
figure 6
figure 7
42
MAKING A STAMP
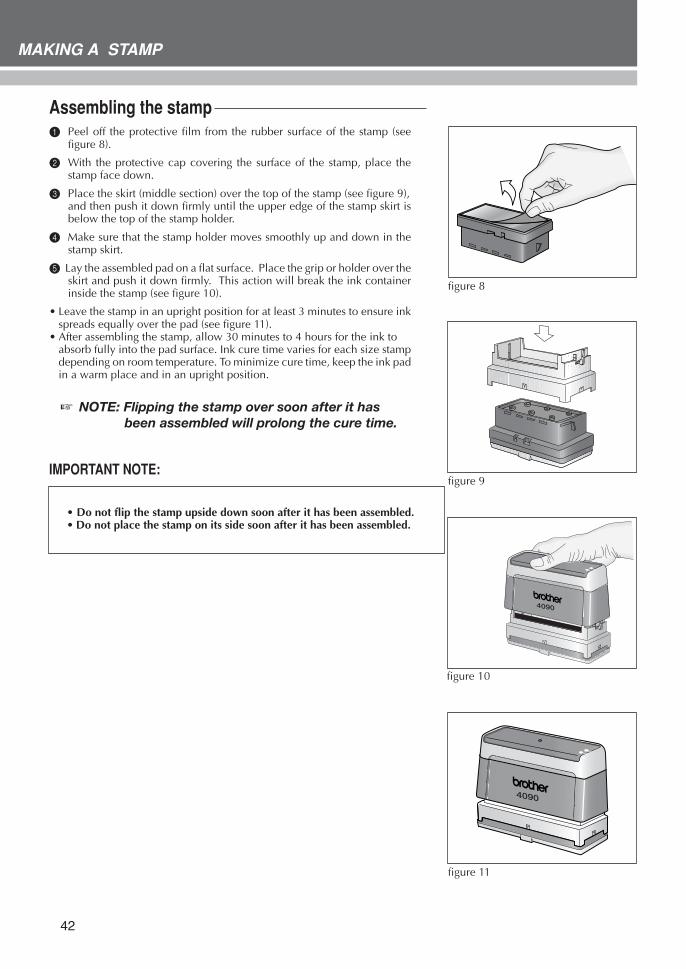
Assembling the stamp1 Peel off the protective film from the rubber surface of the stamp (see
figure 8).
2 With the protective cap covering the surface of the stamp, place thestamp face down.
3 Place the skirt (middle section) over the top of the stamp (see figure 9),and then push it down firmly until the upper edge of the stamp skirt isbelow the top of the stamp holder.
4 Make sure that the stamp holder moves smoothly up and down in thestamp skirt.
5 Lay the assembled pad on a flat surface. Place the grip or holder over theskirt and push it down firmly. This action will break the ink containerinside the stamp (see figure 10).
• Leave the stamp in an upright position for at least 3 minutes to ensure inkspreads equally over the pad (see figure 11).
• After assembling the stamp, allow 30 minutes to 4 hours for the ink toabsorb fully into the pad surface. Ink cure time varies for each size stampdepending on room temperature. To minimize cure time, keep the ink padin a warm place and in an upright position.
� NOTE: Flipping the stamp over soon after it hasbeen assembled will prolong the cure time.
IMPORTANT NOTE:
figure 8
figure 9
figure 10
figure 11
• Do not flip the stamp upside down soon after it has been assembled.• Do not place the stamp on its side soon after it has been assembled.
DESIGINING A STAMP
43
MAKING A STAMP
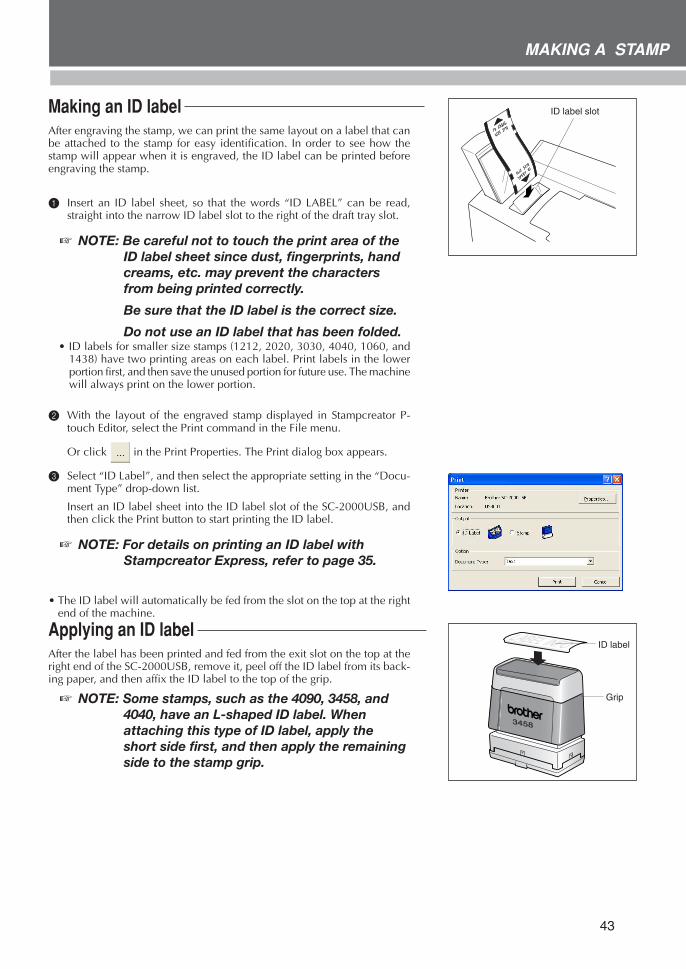
Making an ID labelAfter engraving the stamp, we can print the same layout on a label that canbe attached to the stamp for easy identification. In order to see how thestamp will appear when it is engraved, the ID label can be printed beforeengraving the stamp.
1 Insert an ID label sheet, so that the words “ID LABEL” can be read,straight into the narrow ID label slot to the right of the draft tray slot.
� NOTE: Be careful not to touch the print area of theID label sheet since dust, fingerprints, handcreams, etc. may prevent the charactersfrom being printed correctly.
Be sure that the ID label is the correct size.
Do not use an ID label that has been folded.• ID labels for smaller size stamps (1212, 2020, 3030, 4040, 1060, and
1438) have two printing areas on each label. Print labels in the lowerportion first, and then save the unused portion for future use. The machinewill always print on the lower portion.
2 With the layout of the engraved stamp displayed in Stampcreator P-touch Editor, select the Print command in the File menu.
Or click in the Print Properties. The Print dialog box appears.
3 Select “ID Label”, and then select the appropriate setting in the “Docu-ment Type” drop-down list.
Insert an ID label sheet into the ID label slot of the SC-2000USB, andthen click the Print button to start printing the ID label.
� NOTE: For details on printing an ID label withStampcreator Express, refer to page 35.
• The ID label will automatically be fed from the slot on the top at the rightend of the machine.
Applying an ID labelAfter the label has been printed and fed from the exit slot on the top at theright end of the SC-2000USB, remove it, peel off the ID label from its back-ing paper, and then affix the ID label to the top of the grip.
� NOTE: Some stamps, such as the 4090, 3458, and4040, have an L-shaped ID label. Whenattaching this type of ID label, apply theshort side first, and then apply the remainingside to the stamp grip.
ID label slot
Grip
ID label

DESIGINING A STAMP
44
CARE & TROUBLESHOOTING
Periodic MaintenanceIt is recommended that the Stampcreator Pro be cleaned after 50 stampengravings have been made. Use three cleaning sheets to clean inside of themachine. Three cleaning sheets are provided for every 50 draft sheets.
Cleaning the draft sheet rollersSheet 11 At the pre-cut line, peel the backing from the cleaning sheet (see figure
1).
2 Load the cleaning sheet into the magazine tray so that the cleaning sheetis slid above the front guide pins, but below the back guide pins. Thefront edge of the paper should stay above the front guides (see figure 2).
3 Press the Mode button on the machine until “CLEAN” appears in theLCD (see figure 3).
4 Press the Set button to feed the cleaning sheet. The cleaning sheet willautomatically be fed out from the exit slot.
Cleaning the ID label rollersSheet 21 Peel off the backing at the pre-cut line.
2 Load the cleaning sheet into the ID label slot so that the front side facesup (see figure 4).
3 Press the Mode button until “CLEAN” appears in the LCD, and thenpress the Set button to feed the cleaning sheet.
� NOTE: Never reuse a cleaning sheet.
Do not use a cleaning sheet that has beenfolded or damaged or has had any part ofthe paper other than the pre-cut sectionremoved.
� NOTE: Store unused cleaning sheets in theirpackages and do not expose them to hightemperatures, high humidity or directsunlight.
ModeSet
figure 1
figure 2
figure 3
figure 4
45
CARE & TROUBLESHOOTING
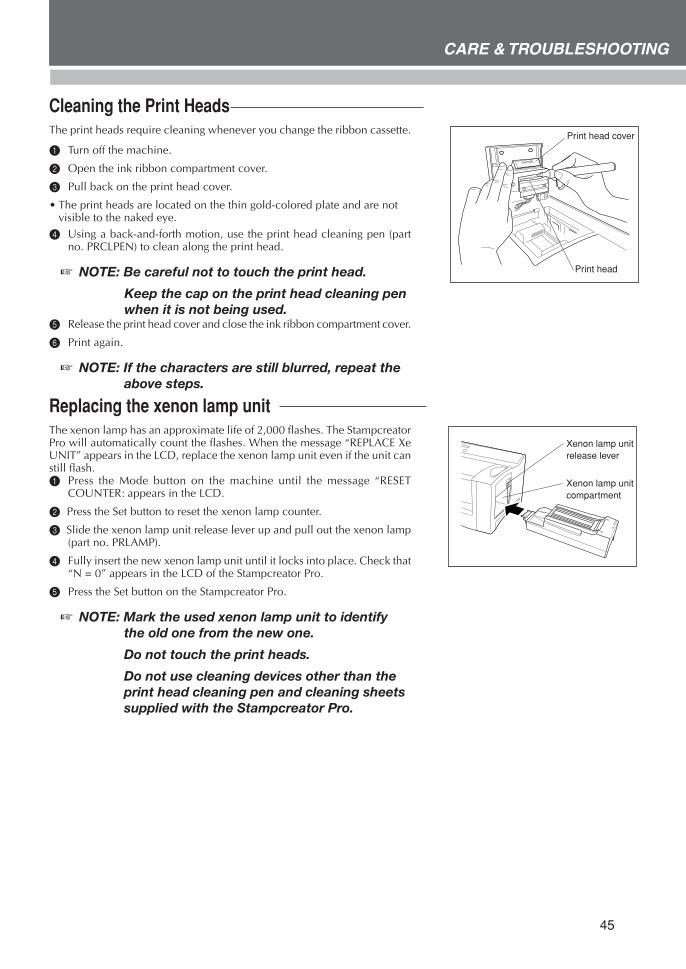
Cleaning the Print HeadsThe print heads require cleaning whenever you change the ribbon cassette.
1 Turn off the machine.
2 Open the ink ribbon compartment cover.
3 Pull back on the print head cover.
• The print heads are located on the thin gold-colored plate and are notvisible to the naked eye.
4 Using a back-and-forth motion, use the print head cleaning pen (partno. PRCLPEN) to clean along the print head.
� NOTE: Be careful not to touch the print head.
Keep the cap on the print head cleaning penwhen it is not being used.
5 Release the print head cover and close the ink ribbon compartment cover.
6 Print again.
� NOTE: If the characters are still blurred, repeat theabove steps.
Replacing the xenon lamp unitThe xenon lamp has an approximate life of 2,000 flashes. The StampcreatorPro will automatically count the flashes. When the message “REPLACE XeUNIT” appears in the LCD, replace the xenon lamp unit even if the unit canstill flash.1 Press the Mode button on the machine until the message “RESET
COUNTER: appears in the LCD.
2 Press the Set button to reset the xenon lamp counter.
3 Slide the xenon lamp unit release lever up and pull out the xenon lamp(part no. PRLAMP).
4 Fully insert the new xenon lamp unit until it locks into place. Check that“N = 0” appears in the LCD of the Stampcreator Pro.
5 Press the Set button on the Stampcreator Pro.
� NOTE: Mark the used xenon lamp unit to identifythe old one from the new one.
Do not touch the print heads.
Do not use cleaning devices other than theprint head cleaning pen and cleaning sheetssupplied with the Stampcreator Pro.
Print head cover
Print head
Xenon lamp unitrelease lever
Xenon lamp unitcompartment
46
CARE & TROUBLESHOOTING
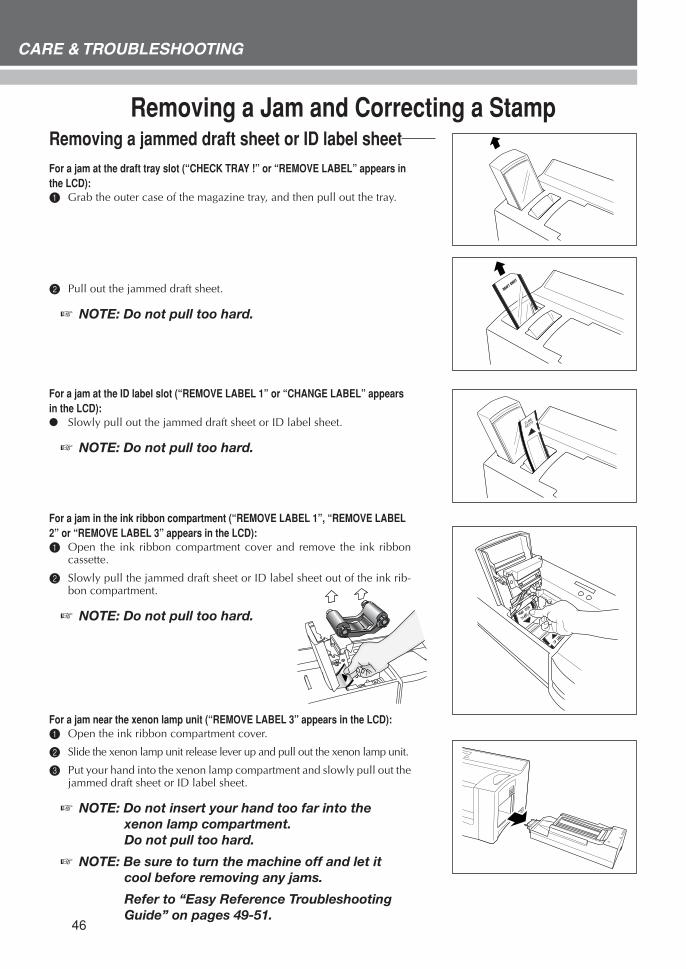
Removing a Jam and Correcting a StampRemoving a jammed draft sheet or ID label sheetFor a jam at the draft tray slot (“CHECK TRAY !” or “REMOVE LABEL” appears inthe LCD):1 Grab the outer case of the magazine tray, and then pull out the tray.
2 Pull out the jammed draft sheet.
� NOTE: Do not pull too hard.
For a jam at the ID label slot (“REMOVE LABEL 1” or “CHANGE LABEL” appearsin the LCD):� Slowly pull out the jammed draft sheet or ID label sheet.
� NOTE: Do not pull too hard.
For a jam in the ink ribbon compartment (“REMOVE LABEL 1”, “REMOVE LABEL2” or “REMOVE LABEL 3” appears in the LCD):1 Open the ink ribbon compartment cover and remove the ink ribbon
cassette.
2 Slowly pull the jammed draft sheet or ID label sheet out of the ink rib-bon compartment.
� NOTE: Do not pull too hard.
For a jam near the xenon lamp unit (“REMOVE LABEL 3” appears in the LCD):1 Open the ink ribbon compartment cover.
2 Slide the xenon lamp unit release lever up and pull out the xenon lamp unit.
3 Put your hand into the xenon lamp compartment and slowly pull out thejammed draft sheet or ID label sheet.
� NOTE: Do not insert your hand too far into thexenon lamp compartment.Do not pull too hard.
� NOTE: Be sure to turn the machine off and let itcool before removing any jams.
Refer to “Easy Reference TroubleshootingGuide” on pages 49-51.
DESIGINING A STAMP
47
CARE & TROUBLESHOOTING
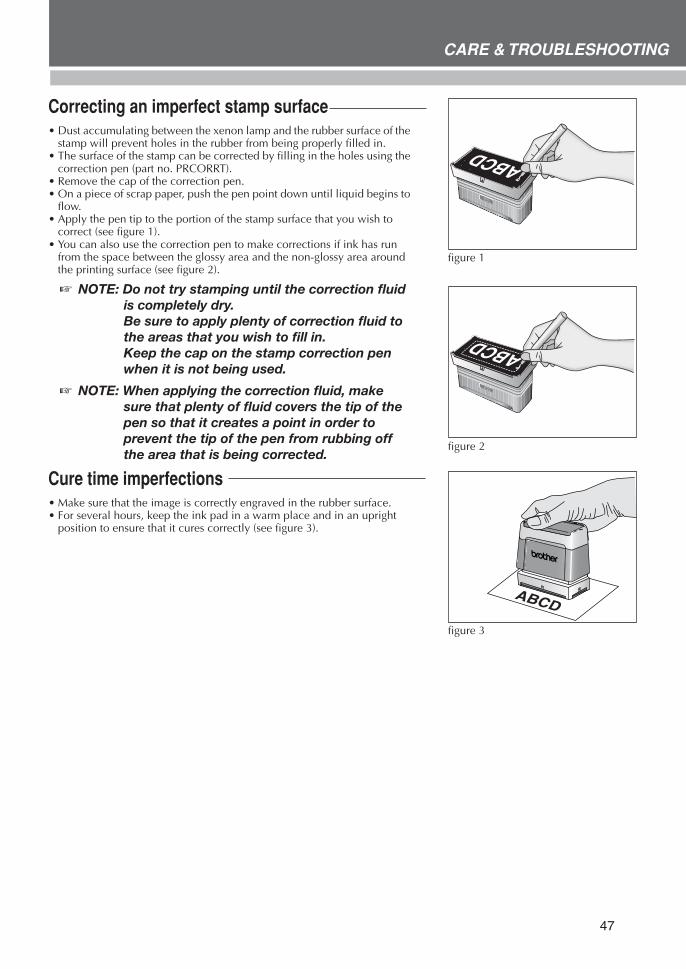
Correcting an imperfect stamp surface• Dust accumulating between the xenon lamp and the rubber surface of the
stamp will prevent holes in the rubber from being properly filled in.• The surface of the stamp can be corrected by filling in the holes using the
correction pen (part no. PRCORRT).• Remove the cap of the correction pen.• On a piece of scrap paper, push the pen point down until liquid begins to
flow.• Apply the pen tip to the portion of the stamp surface that you wish to
correct (see figure 1).• You can also use the correction pen to make corrections if ink has run
from the space between the glossy area and the non-glossy area aroundthe printing surface (see figure 2).
� NOTE: Do not try stamping until the correction fluidis completely dry.Be sure to apply plenty of correction fluid tothe areas that you wish to fill in.Keep the cap on the stamp correction penwhen it is not being used.
� NOTE: When applying the correction fluid, makesure that plenty of fluid covers the tip of thepen so that it creates a point in order toprevent the tip of the pen from rubbing offthe area that is being corrected.
Cure time imperfections• Make sure that the image is correctly engraved in the rubber surface.• For several hours, keep the ink pad in a warm place and in an upright
position to ensure that it cures correctly (see figure 3).
figure 1
figure 2
figure 3
48
CARE & TROUBLESHOOTING
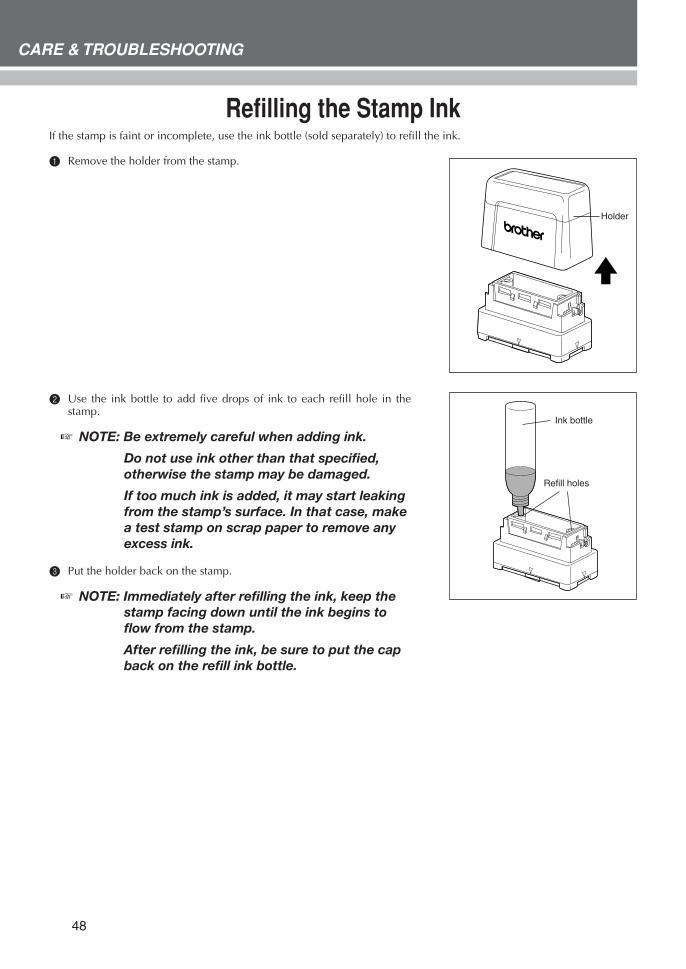
Refilling the Stamp InkIf the stamp is faint or incomplete, use the ink bottle (sold separately) to refill the ink.
1 Remove the holder from the stamp.
2 Use the ink bottle to add five drops of ink to each refill hole in thestamp.
� NOTE: Be extremely careful when adding ink.
Do not use ink other than that specified,otherwise the stamp may be damaged.
If too much ink is added, it may start leakingfrom the stamp’s surface. In that case, makea test stamp on scrap paper to remove anyexcess ink.
3 Put the holder back on the stamp.
� NOTE: Immediately after refilling the ink, keep thestamp facing down until the ink begins toflow from the stamp.
After refilling the ink, be sure to put the capback on the refill ink bottle.
Ink bottle
Refill holes
Holder

DESIGINING A STAMP
49
CARE & TROUBLESHOOTING
PROBLEM
• Nothing happens after the OK button is clicked in thePrint dialog box.
• The printed characters are blurred.
• Some of the printed characters are missing.
• The characters are not printed on the ID label orengraved in the stamp in the correct position.
• A draft sheet was not fed from the draft sheetmagazine tray.
• The ID label sheet is not fed into the ID label slot.
• The stamp cannot be inserted.
• The draft sheet is fed out before the message“INSTALL STAMP !” is displayed.
SOLUTION
• Delete the print job and after turning the machine off,then on again, try printing again.
• Clean the print head. (See page 45.)
• Clean the print head. (See page 45.)• Check that there is no slack or wrinkles in the ink rib-
bon. (See page 12.)• If there is dust, fingerprints, etc. on the draft sheet or ID
label sheet, use a cleaning sheet. (See page 44.)
• Check that the ID label or stamp is the correct size.• If the problem cannot be corrected, contact your serv-
ice representative.
• Check that the draft sheet has been correctly loaded intothe draft sheet magazine tray. (See page 13.)
• Check that no more than 50 draft sheets are loaded intothe draft sheet magazine tray.
• Check that the draft sheet magazine tray has been fully in-serted into the draft sheet magazine tray slot. (See page 13.)
• Clean the draft sheet rollers. (See page 44.)
• Check that the ID label sheet has been inserted into theID label slot as far as possible.
• Check that the ID label sheet is inserted so that the words“ID LABEL” can be read. (See page 43.)
• Check that the ID label is the correct size.• Clean the ID label rollers. (See page 44.)
• Be sure to open the doors within the stamp compart-ment by pulling the lever toward you. (See page 40.)
• Check that the cap was removed from the stamp beforetrying to insert it.
• Check that the skirt is not attached to the stamp beforetrying to insert it.
• Check that the grip is not attached to the stamp beforetrying to insert it.
• Turn off the machine, and wait a while before turning itback on and trying again to engrave a stamp.
Easy Reference Trouble Shooting Guide
50
CARE & TROUBLESHOOTING
PROBLEM
• The stamp could not be engraved.
• The xenon lamp flashed, but the desired stamp couldnot be engraved.
• The stamp was engraved too much.
• The stamp was not engraved well enough.
• Half of the stamp was either engraved too much or notenough.
• The stamp is attached to the printed draft sheet.
• The draft sheet is not fed out after the stamp isengraved (the xenon lamp flashed).
• The draft sheet or ID label sheet is jammed within theunit or the error message “REMOVE LABEL 1”,“REMOVE LABEL 2”, or “REMOVE LABEL 3” appearsin the LCD.
SOLUTION
• Check that the stamp is inserted correctly. (See page 41.)• Check that the stamp is the correct size. (See page 40.)• Check that the message “INSTALL STAMP !” appears in
the LCD and that the printed draft sheet has stoppedover the xenon lamp unit.
• Check that the stamp compartment cover is closed sothat it locks. (See page 41.)
• If the problem cannot be corrected, contact your serv-ice representative.
• Check that the cap was removed from the stamp beforeit was inserted. (See page 40.)
• Check that there is no dust on the protective film cover-ing the surface of the stamp.
• Check that the clear plastic surface of the xenon lampunit is not dirty.
• Check that the printed draft sheet stopped over the xe-non lamp unit before trying to engrave a stamp.
• The lines in the layout are too thin, the text is too small,or the fill pattern is too detailed.
• Replace the xenon lamp unit. (See page 45.)
• The layout is too detailed.
• Check that the clear plastic surface of the xenon lampunit is not dirty.
• Replace the xenon lamp unit. (See page 45.)
• Check that the stamp is inserted so that its surface lies flat onthe printed draft sheet before being engraved. (See page 40.)
• Check that the protective film was not peeled off thesurface of the stamp before it was engraved.
• Check that the draft sheet feeds out automatically thenext time that an ID label sheet or another draft sheet isprinted.
• Turn off the machine, and then remove the jammed draftsheet or ID label sheet. (See page 46.)
DESIGINING A STAMP
51
CARE & TROUBLESHOOTING
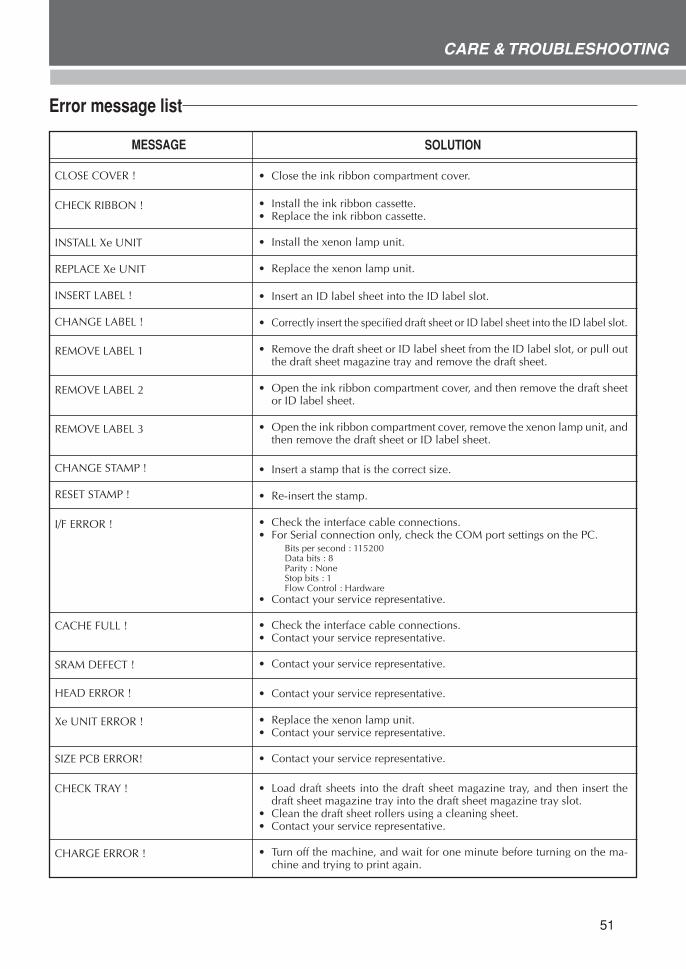
SOLUTION
• Close the ink ribbon compartment cover.
• Install the ink ribbon cassette.• Replace the ink ribbon cassette.
• Install the xenon lamp unit.
• Replace the xenon lamp unit.
• Insert an ID label sheet into the ID label slot.
• Correctly insert the specified draft sheet or ID label sheet into the ID label slot.
• Remove the draft sheet or ID label sheet from the ID label slot, or pull outthe draft sheet magazine tray and remove the draft sheet.
• Open the ink ribbon compartment cover, and then remove the draft sheetor ID label sheet.
• Open the ink ribbon compartment cover, remove the xenon lamp unit, andthen remove the draft sheet or ID label sheet.
• Insert a stamp that is the correct size.
• Re-insert the stamp.
• Check the interface cable connections.• For Serial connection only, check the COM port settings on the PC.
Bits per second : 115200Data bits : 8Parity : NoneStop bits : 1Flow Control : Hardware
• Contact your service representative.
• Check the interface cable connections.• Contact your service representative.
• Contact your service representative.
• Contact your service representative.
• Replace the xenon lamp unit.• Contact your service representative.
• Contact your service representative.
• Load draft sheets into the draft sheet magazine tray, and then insert thedraft sheet magazine tray into the draft sheet magazine tray slot.
• Clean the draft sheet rollers using a cleaning sheet.• Contact your service representative.
• Turn off the machine, and wait for one minute before turning on the ma-chine and trying to print again.
MESSAGE
CLOSE COVER !
CHECK RIBBON !
INSTALL Xe UNIT
REPLACE Xe UNIT
INSERT LABEL !
CHANGE LABEL !
REMOVE LABEL 1
REMOVE LABEL 2
REMOVE LABEL 3
CHANGE STAMP !
RESET STAMP !
I/F ERROR !
CACHE FULL !
SRAM DEFECT !
HEAD ERROR !
Xe UNIT ERROR !
SIZE PCB ERROR!
CHECK TRAY !
CHARGE ERROR !
Error message list
52
SUPPLIES & ACCESSORIES
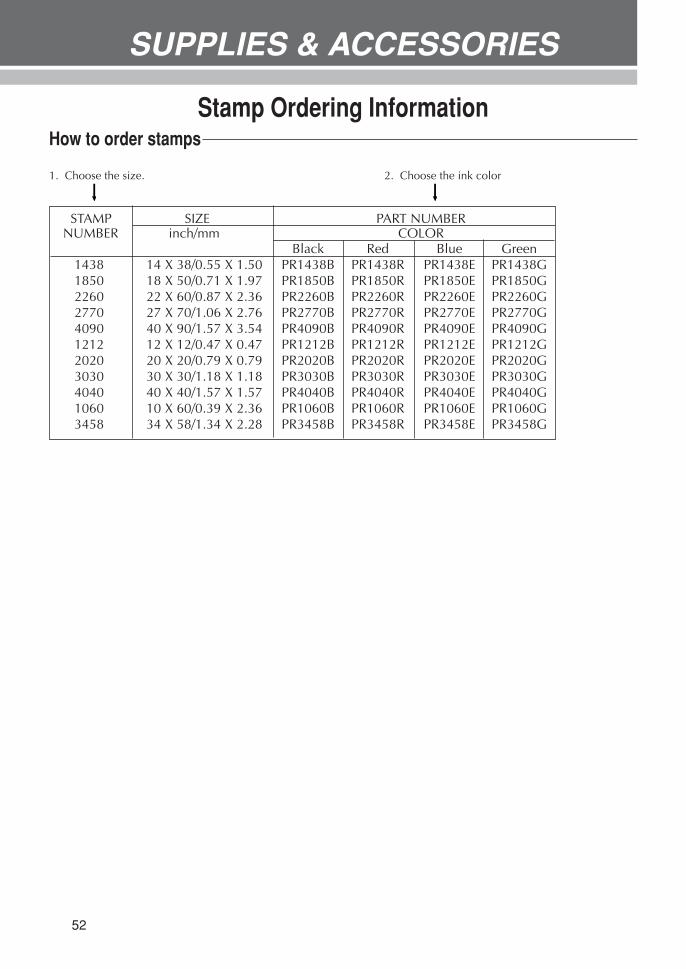
STAMP SIZE PART NUMBERNUMBER inch/mm COLOR
Black Red Blue Green1438 14 X 38/0.55 X 1.50 PR1438B PR1438R PR1438E PR1438G1850 18 X 50/0.71 X 1.97 PR1850B PR1850R PR1850E PR1850G2260 22 X 60/0.87 X 2.36 PR2260B PR2260R PR2260E PR2260G2770 27 X 70/1.06 X 2.76 PR2770B PR2770R PR2770E PR2770G4090 40 X 90/1.57 X 3.54 PR4090B PR4090R PR4090E PR4090G1212 12 X 12/0.47 X 0.47 PR1212B PR1212R PR1212E PR1212G2020 20 X 20/0.79 X 0.79 PR2020B PR2020R PR2020E PR2020G3030 30 X 30/1.18 X 1.18 PR3030B PR3030R PR3030E PR3030G4040 40 X 40/1.57 X 1.57 PR4040B PR4040R PR4040E PR4040G1060 10 X 60/0.39 X 2.36 PR1060B PR1060R PR1060E PR1060G3458 34 X 58/1.34 X 2.28 PR3458B PR3458R PR3458E PR3458G
Stamp Ordering InformationHow to order stamps
1. Choose the size. 2. Choose the ink color
53
SUPPLIES & ACCESSORIES
Wendy Stewart1234 Mountainz Avenue
New York, NY 01234
Dr. Paul Sm ith, M.D.1234 Ocean Blvd.
Santa Ana, CA 98765License # 12345678
FOR DEPOSIT ONLYFFTA BANK
2000 Computer Systems, Inc.Acct. #9876543210
http://[email protected]
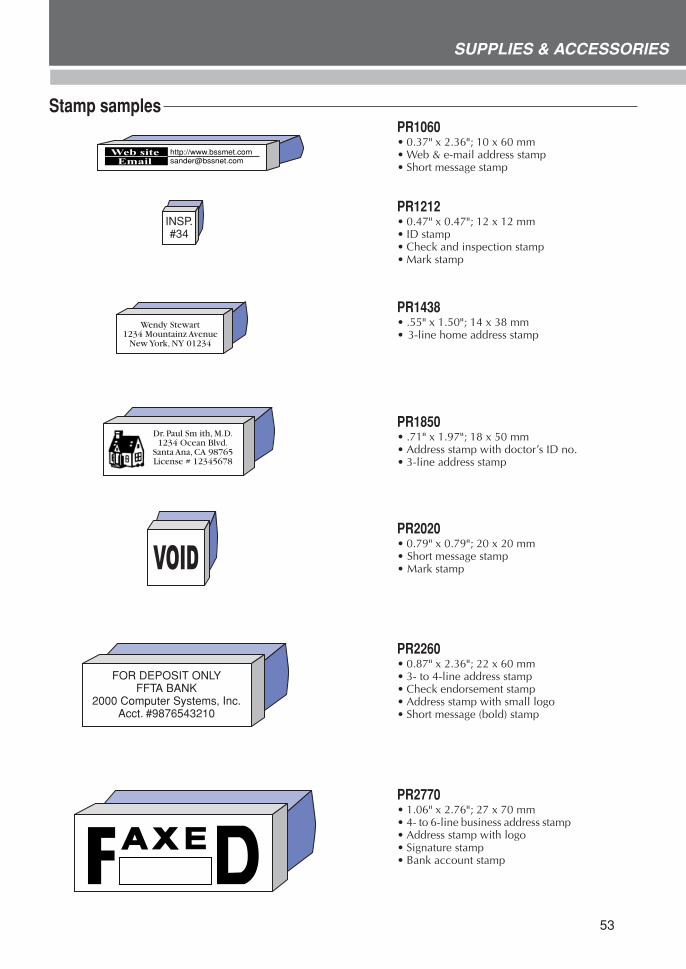
Stamp samples
INSP.#34
PR1060• 0.37" x 2.36"; 10 x 60 mm• Web & e-mail address stamp• Short message stamp
PR1438• .55" x 1.50"; 14 x 38 mm• 3-line home address stamp
PR1850• .71" x 1.97"; 18 x 50 mm• Address stamp with doctor’s ID no.• 3-line address stamp
PR2020• 0.79" x 0.79"; 20 x 20 mm• Short message stamp• Mark stamp
PR2260• 0.87" x 2.36"; 22 x 60 mm• 3- to 4-line address stamp• Check endorsement stamp• Address stamp with small logo• Short message (bold) stamp
PR2770• 1.06" x 2.76"; 27 x 70 mm• 4- to 6-line business address stamp• Address stamp with logo• Signature stamp• Bank account stamp
PR1212• 0.47" x 0.47"; 12 x 12 mm• ID stamp• Check and inspection stamp• Mark stamp
54
SUPPLIES & ACCESSORIES
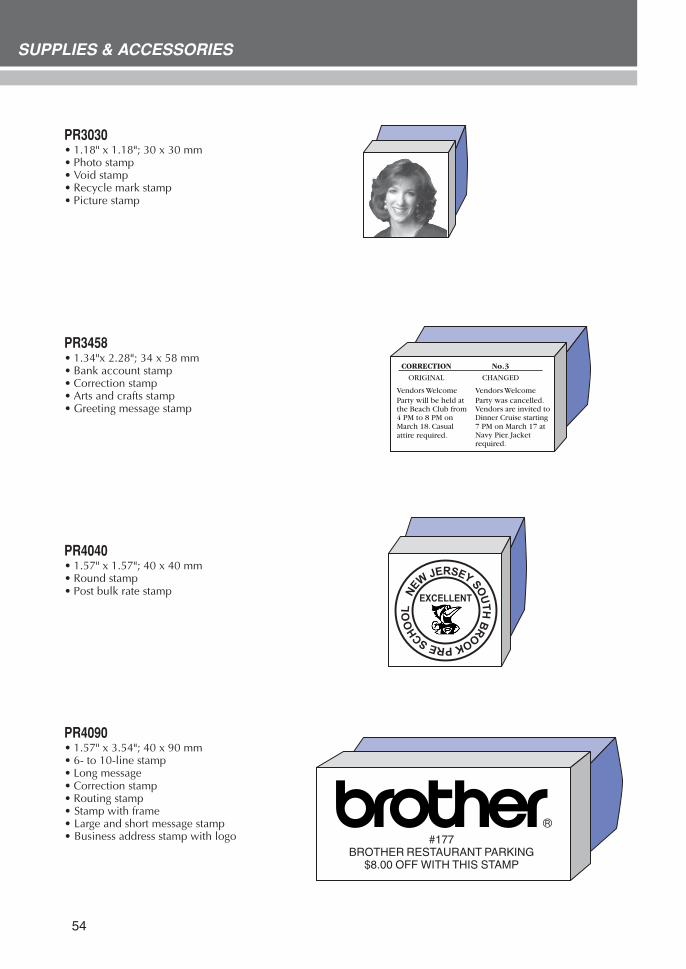
PR3030• 1.18" x 1.18"; 30 x 30 mm• Photo stamp• Void stamp• Recycle mark stamp• Picture stamp
PR3458• 1.34"x 2.28"; 34 x 58 mm• Bank account stamp• Correction stamp• Arts and crafts stamp• Greeting message stamp
PR4040• 1.57" x 1.57"; 40 x 40 mm• Round stamp• Post bulk rate stamp
PR4090• 1.57" x 3.54"; 40 x 90 mm• 6- to 10-line stamp• Long message• Correction stamp• Routing stamp• Stamp with frame• Large and short message stamp• Business address stamp with logo
No.3
CHANGED
Vendors WelcomeParty was cancelled.Vendors are invited toDinner Cruise starting7 PM on March 17 atNavy Pier. Jacketrequired.
CORRECTION
ORIGINAL
Vendors WelcomeParty will be held atthe Beach Club from4 PM to 8 PM onMarch 18. Casualattire required.
#177BROTHER RESTAURANT PARKING
$8.00 OFF WITH THIS STAMP
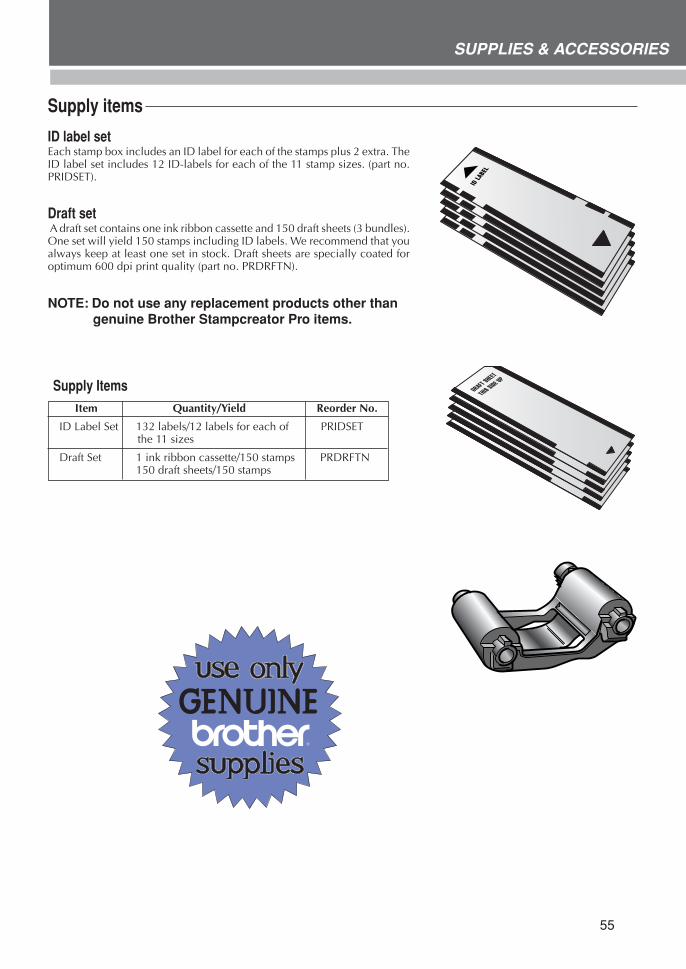
55
SUPPLIES & ACCESSORIES
Supply items
ID label setEach stamp box includes an ID label for each of the stamps plus 2 extra. TheID label set includes 12 ID-labels for each of the 11 stamp sizes. (part no.PRIDSET).
Draft set A draft set contains one ink ribbon cassette and 150 draft sheets (3 bundles).One set will yield 150 stamps including ID labels. We recommend that youalways keep at least one set in stock. Draft sheets are specially coated foroptimum 600 dpi print quality (part no. PRDRFTN).
NOTE: Do not use any replacement products other thangenuine Brother Stampcreator Pro items.
Supply Items Item Quantity/Yield Reorder No.
ID Label Set 132 labels/12 labels for each of PRIDSET the 11 sizes
Draft Set 1 ink ribbon cassette/150 stamps PRDRFTN150 draft sheets/150 stamps

56
SUPPLIES & ACCESSORIES
Maintenance items
Cleaning sheetsUse a cleaning sheet to clean the inside of the machine as indicated in thismanual. Three cleaning sheets are provided for every 50 draft sheets.
Print head cleaning penUse this cleaning pen to clean the inside components (like the print heads)of the machine.
Stamp correction penCorrect an imperfect stamp surface using this pen.
Xenon lamp unitUsed to engrave the stamps, the xenon lamp unit is good for approximately2,000 stamp exposures.
Maintenance ItemsItem Quantity/Pack Reorder No.
Print head 1 pen PRCLPENcleaning pen
Stamp correction pen 1 pen PRCORRTXenon lamp unit 1 lamp PRLAMP

57
SUPPORT NUMBERS
For technical support, or service, warranty or repair infor-mation, dial our help line at:
877-Brother or 877-276-8437


Printed in JapanLBA907001
FOR MORE INFORMATION PLEASE VISIT OUR WEB SITE AT http://www.brother.com
BROTHER INTERNATIONAL CORPORATION 100 Somerset Corporate Blvd., Bridgewater, NJ 08807-0911
All specifications subject to change without notice.All registered trademarks referenced herein are the property of their respective companies.