ge fanuc 90/30 & 90/70 snp serial driver guide fanuc 90-30 and 90-70 s… · webaccess device...
TRANSCRIPT

WebAccess Device Driver Guide GE 9030 & 9070 Serial
GE FANUC 90/30 and 90/70 Serial Device Driver Guide (GE9030 & GE9070) for devices capable of using SNP (Series Ninety Protocol)
Version 6.0 rev 2 Broadwin Technology, Inc. 2007
WebAccess Device Driver Guide GE 9030 & 9070 Serial
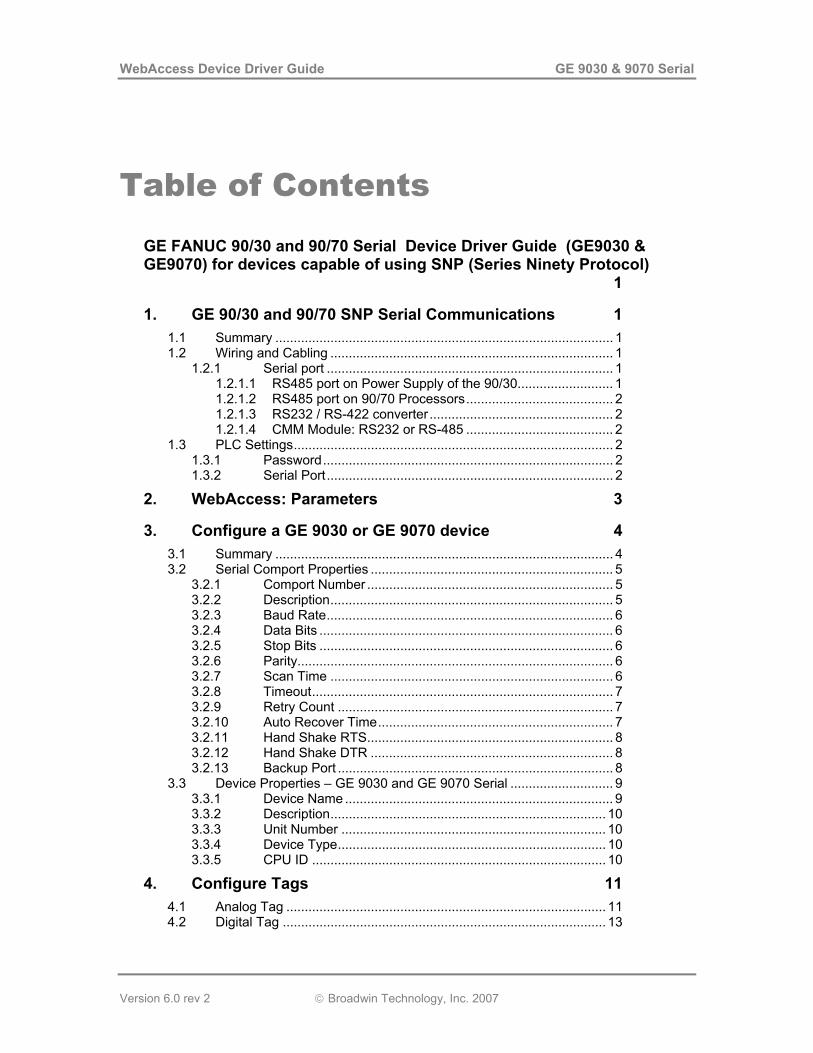
Table of Contents
GE FANUC 90/30 and 90/70 Serial Device Driver Guide (GE9030 & GE9070) for devices capable of using SNP (Series Ninety Protocol) 1
1. GE 90/30 and 90/70 SNP Serial Communications 1 1.1 Summary ............................................................................................ 1 1.2 Wiring and Cabling ............................................................................. 1
1.2.1 Serial port .............................................................................. 1 1.2.1.1 RS485 port on Power Supply of the 90/30.......................... 1 1.2.1.2 RS485 port on 90/70 Processors........................................ 2 1.2.1.3 RS232 / RS-422 converter.................................................. 2 1.2.1.4 CMM Module: RS232 or RS-485 ........................................ 2
1.3 PLC Settings....................................................................................... 2 1.3.1 Password............................................................................... 2 1.3.2 Serial Port.............................................................................. 2
2. WebAccess: Parameters 3
3. Configure a GE 9030 or GE 9070 device 4 3.1 Summary ............................................................................................ 4 3.2 Serial Comport Properties .................................................................. 5
3.2.1 Comport Number ................................................................... 5 3.2.2 Description............................................................................. 5 3.2.3 Baud Rate.............................................................................. 6 3.2.4 Data Bits ................................................................................ 6 3.2.5 Stop Bits ................................................................................ 6 3.2.6 Parity...................................................................................... 6 3.2.7 Scan Time ............................................................................. 6 3.2.8 Timeout.................................................................................. 7 3.2.9 Retry Count ........................................................................... 7 3.2.10 Auto Recover Time................................................................ 7 3.2.11 Hand Shake RTS................................................................... 8 3.2.12 Hand Shake DTR .................................................................. 8 3.2.13 Backup Port ........................................................................... 8
3.3 Device Properties – GE 9030 and GE 9070 Serial ............................ 9 3.3.1 Device Name ......................................................................... 9 3.3.2 Description........................................................................... 10 3.3.3 Unit Number ........................................................................ 10 3.3.4 Device Type......................................................................... 10 3.3.5 CPU ID ................................................................................ 10
4. Configure Tags 11 4.1 Analog Tag ....................................................................................... 11 4.2 Digital Tag ........................................................................................ 13
Version 6.0 rev 2 Broadwin Technology, Inc. 2007
WebAccess Device Driver Guide GE 9030 & 9070 Serial
August 22, 2007
Version 6.0 rev 2 Broadwin Technology, Inc. 2007

WebAccess Device Driver Guide GE 9030 & 9070 Serial
1.
1.1
1.2
1.2.1
1.2.1.1
GE 90/30 and 90/70 SNP Serial Communications
Summary The WebAccess SCADA Node provides an interface to the GE FANUC 90/30 and 90/70 series of Programmable using the SNP protocol (Series Ninety Protocol). This manual describes using a Serial RS232 or RS422 connection from the SCADA node to a GE SNP compatible device.
The WebAccess software configuration of both is identical. Both the 90/30 and 90/70 processors can be used concurrently on the same RS-422 network.
Wiring and Cabling Typically, there are two methods to connect a SCADA Node to the GE Fanuc Series 90 Processor:
1. Point-to-point. A SCADA Node with serial connection a single GE Fanuc Series 90 Processor.
2. Multi-drop. A SCADA Node with serial connection to a maximum of 256 GE Fanuc processors. Sixteen groups of sixteen GE Fanuc processors can be connected to an RS-422 network through the use of isolated repeaters.
Please refer to the Manufacturer’s Documentation for a description of wiring and cabling.
Serial port
RS485 port on Power Supply of the 90/30
Power supply of the 90-30 of many models has an RS-485/RS-422 Port. It is usually a 15 pin D-type (F).
Please refer to the Manufacturer’s Documentation for a description of Interface capabilities.
Version 6.0 rev 2 Broadwin Technology, Inc. 2007 page 1
WebAccess Device Driver Guide GE 9030 & 9070 Serial
1.2.1.2
1.2.1.3
1.2.1.4
1.3 1.3.1
1.3.2
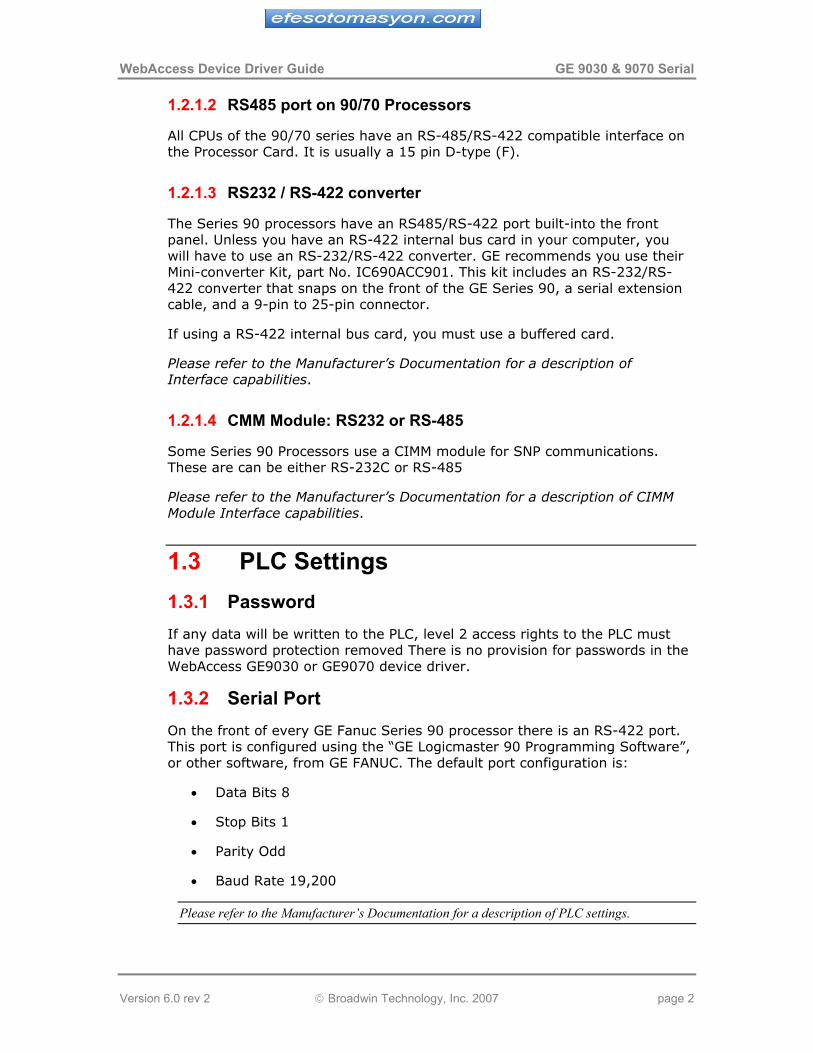
RS485 port on 90/70 Processors
All CPUs of the 90/70 series have an RS-485/RS-422 compatible interface on the Processor Card. It is usually a 15 pin D-type (F).
RS232 / RS-422 converter
The Series 90 processors have an RS485/RS-422 port built-into the front panel. Unless you have an RS-422 internal bus card in your computer, you will have to use an RS-232/RS-422 converter. GE recommends you use their Mini-converter Kit, part No. IC690ACC901. This kit includes an RS-232/RS-422 converter that snaps on the front of the GE Series 90, a serial extension cable, and a 9-pin to 25-pin connector.
If using a RS-422 internal bus card, you must use a buffered card.
Please refer to the Manufacturer’s Documentation for a description of Interface capabilities.
CMM Module: RS232 or RS-485
Some Series 90 Processors use a CIMM module for SNP communications. These are can be either RS-232C or RS-485
Please refer to the Manufacturer’s Documentation for a description of CIMM Module Interface capabilities.
PLC Settings Password
If any data will be written to the PLC, level 2 access rights to the PLC must have password protection removed There is no provision for passwords in the WebAccess GE9030 or GE9070 device driver.
Serial Port On the front of every GE Fanuc Series 90 processor there is an RS-422 port. This port is configured using the “GE Logicmaster 90 Programming Software”, or other software, from GE FANUC. The default port configuration is:
• Data Bits 8
• Stop Bits 1
• Parity Odd
• Baud Rate 19,200
Please refer to the Manufacturer’s Documentation for a description of PLC settings.
Version 6.0 rev 2 Broadwin Technology, Inc. 2007 page 2
WebAccess Device Driver Guide GE 9030 & 9070 Serial
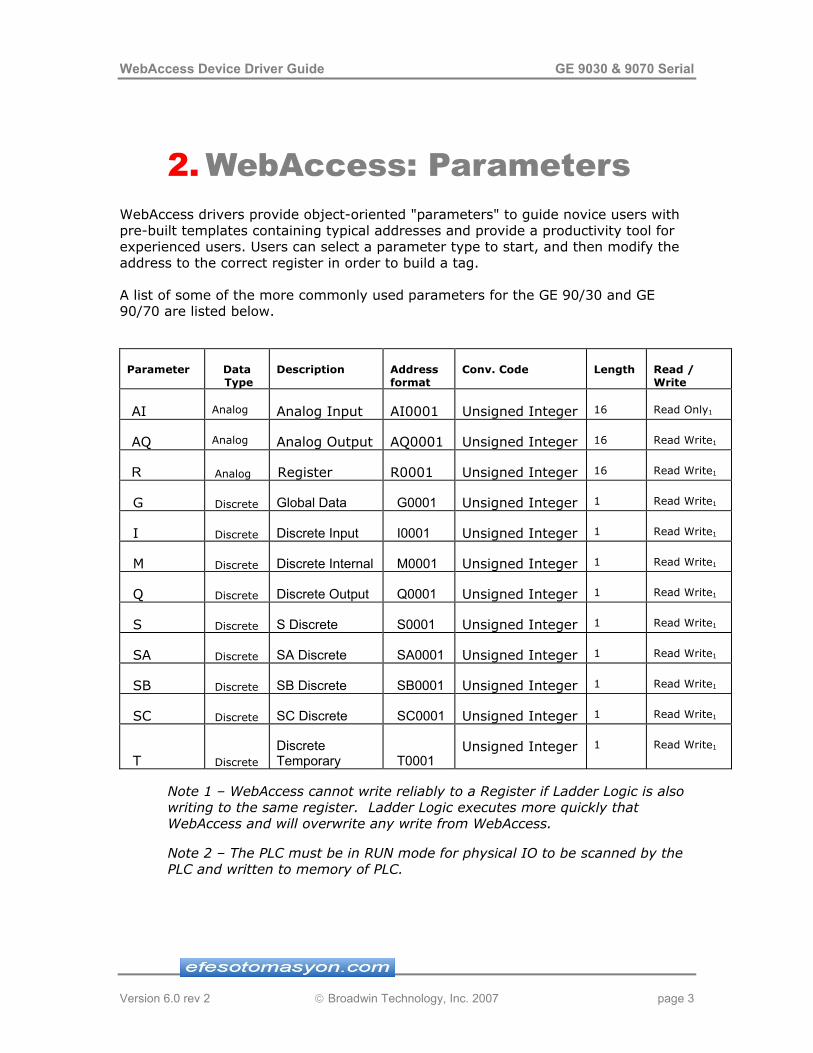
2. WebAccess: Parameters WebAccess drivers provide object-oriented "parameters" to guide novice users with pre-built templates containing typical addresses and provide a productivity tool for experienced users. Users can select a parameter type to start, and then modify the address to the correct register in order to build a tag.
A list of some of the more commonly used parameters for the GE 90/30 and GE 90/70 are listed below.
Parameter Data Type
Description Address format
Conv. Code Length Read / Write
AI Analog Analog Input AI0001 Unsigned Integer 16 Read Only1
AQ Analog Analog Output AQ0001 Unsigned Integer 16 Read Write1
R Analog Register R0001 Unsigned Integer 16 Read Write1
G Discrete Global Data G0001 Unsigned Integer 1 Read Write1
I Discrete Discrete Input I0001 Unsigned Integer 1 Read Write1
M Discrete Discrete Internal M0001 Unsigned Integer 1 Read Write1
Q Discrete Discrete Output Q0001 Unsigned Integer 1 Read Write1
S Discrete S Discrete S0001 Unsigned Integer 1 Read Write1
SA Discrete SA Discrete SA0001 Unsigned Integer 1 Read Write1
SB Discrete SB Discrete SB0001 Unsigned Integer 1 Read Write1
SC Discrete SC Discrete SC0001 Unsigned Integer 1 Read Write1
T Discrete Discrete Temporary T0001
Unsigned Integer 1 Read Write1
Note 1 – WebAccess cannot write reliably to a Register if Ladder Logic is also writing to the same register. Ladder Logic executes more quickly that WebAccess and will overwrite any write from WebAccess.
Note 2 – The PLC must be in RUN mode for physical IO to be scanned by the PLC and written to memory of PLC.
Version 6.0 rev 2 Broadwin Technology, Inc. 2007 page 3
WebAccess Device Driver Guide GE 9030 & 9070 Serial
3.
3.1
Configure a GE 9030 or GE 9070 device
The configuration of both the 90/30 and 90/70 processors is identical. Both the 90/30 and 90/70 processors can be used concurrently on the same RS-422 network.
Summary
1. Start the Internet Explorer Web Browser. 2. Enter IP address of the Project Node. 3. Select WebAccess Configuration. 4. Open or Create a Project. 5. Select a SCADA Node or use ADD SCADA node to create one. (A
SCADA node is the PC that will connect to the PLC5 or Interface Module).
6. Configure a serial comport using ADD Comport for the SCADA Node. 7. Select Serial type Comport. 8. Configure Baud Rate, Data Bit, Stop Bits and Parity to match those in
the PLC. All PLCs on this Comport must use the same settings. Typical settings are: Data Length = 8 bits Stop Bit = 1 Parity = Odd Transfer Rate = 19200 HandShakeRts to match the RS232/RS422 converter’s settings and cabling requirements. HandShakeDtr to match the RS232/RS422 converter’s settings and cabling requirements
9. Press Submit. 10. Select the Comport from the list at left. 11. Select Add Device. 12. Select GE9030 or GE9070 as the Device Type. 13. Enter a Unit Number. This is a virtual number used by WebAccess. 14. Enter the CPU ID of the GE Processor. 15. Use Add Tag to create tags. 16. Select a parameter to match the type of data to be read (AI, AQ, DI,
R, I, etc.). The data type of the parameter must match the data type being read (e.g. Analog or Digital/Discrete).
17. Modify the Address to match the actual address. 18. Apply a Tag name. 19. Optionally, assign Scaling, Engineering Units, Description and other
features.
Version 6.0 rev 2 Broadwin Technology, Inc. 2007 page 4

WebAccess Device Driver Guide GE 9030 & 9070 Serial
3.2
3.2.1
3.2.2
Serial Comport Properties The Serial Comport is associated with an RS232C or RS422A port on the SCADA Node PC (usually an RS232C port). This number must match the actual COM1, COM2, etc on the SCADA node.
Figure 3.1 Serial Comport properties for GE 90/30 or 90/70, typical settings
Comport Number The Serial Comport requires the comport number to match that of the physical interface (e.g. COM1, COM2, COM3, etc) on the SCADA Node.
Description This is an optional field used for user reference.
Version 6.0 rev 2 Broadwin Technology, Inc. 2007 page 5
WebAccess Device Driver Guide GE 9030 & 9070 Serial
3.2.3
3.2.4
3.2.5
3.2.6
3.2.7
Baud Rate For the GE 90 Series, values are from 300 to 38400 baud. Typical setting is 19200. Use the highest baud rate the SCADA Node PC, cabling and PLC or RS232/422 converter can support to obtain the performance.
This must match the baud rate configured in the PLC. Please refer to the Manufacturer’s Documentation to determine the actual baud rate set in the PLC.
All PLCs connected to this comport must use the same Baud Rate.
Data Bits For the GE 90 Series, the values are 7 or 8 Data Bits. The typical setting for a GE 90 Series is 8 bits.
This must match the number of data bits configured in the PLC. Please refer to the Manufacturer’s Documentation to determine the actual number of Data Bits set in the PLC.
All PLCs connected to this comport must use the same number of data bits. A typical value is 8 bits.
Stop Bits For the GE 90 Series there can be 1 or 2 Stop Bits. The typical setting for a GE 90 Series is 1 Stop bit.
This must match the number of stop bits configured in the PLC. Please refer to the Manufacturer’s Documentation to determine the actual number of Stop Bits set in the PLC.
All PLCs connected to this comport must use the same number of stop bits.
Parity For the GE 90 Series, the Parity can be None, Odd, Even or Disabled.
The typical setting for a GE 90/30 or GE 90/70 is Parity = Odd.
This must match the parity configured in the PLC. Please refer to the Manufacturer’s Documentation to determine the actual number of Parity set in the PLC.
All PLCs connected to this comport must use the parity.
Scan Time This is the time in milliseconds to scan the PLC. This must match the ability of the PLC to respond. A typical scan rate is 1 per second.
If the PLC cannot respond as fast as the SCAN Time entered, WebAccess will scan at a slower rate.
Version 6.0 rev 2 Broadwin Technology, Inc. 2007 page 6

WebAccess Device Driver Guide GE 9030 & 9070 Serial
3.2.8
3.2.9
3.2.10
Timeout With a 1 second scan rate, a typical Time Out = 200 Milliseconds.
Timeout is the time waited before re-sending a communications packet that did not have a reply.
Timeout specifies how long the software waits for a response to a data request, specifically to wait for a reply from one packet. A recommended value is one-fifth the scan rate, longer if the communication device is slow.
Combined with Retry count, Timeout also determines time to consider a device or port as BAD. Timeout is the time to wait since last communication packet sent without a reply. Time is in milliseconds. Slow or poor quality communications require longer timeout. The faster the communications, the shorter the timeout required. Shorter timeouts result in faster reconnects after communication failures.
Retry Count A typical Retry count = 3.
Number of times to retry communications if no reply is received from a device. Combined with Timeout, also determines time to consider a device or port as BAD.
This is the number of times after the first attempt has failed that communication should be attempted before indicating a failure. (If Retry count is 3, a total of 4 failed requests have occurred before tags are marked bad). Specifically, this is how many times to send a single packet after the field device fails to respond to the first packet. After the retry count is exceeded, all the tags in the packet are marked with asterisks and the next packet of requests is sent. A reasonable value is 3 to 5 times. After this number of tries, the tags in this packet are marked as "fail to respond" (i.e. asterisks) and are disabled. In reality, increasing the number of retries hides failures on the part of the field device to respond to a request. Essentially, increasing the retries gives the field device more chances to reply.
Auto Recover Time A typical Auto Recover Time = 60 Seconds.
Auto Recover Time is the time to wait before attempting to re-establish communications with a BAD device or port.
If communications to the PLC is unusually slow due to hardware, communications or network issues, you might consider increasing this value. If communications to the PLC or RTU fails frequently, you may want to decrease this number in order to have WebAccess try to re-establish communications sooner.
Version 6.0 rev 2 Broadwin Technology, Inc. 2007 page 7

WebAccess Device Driver Guide GE 9030 & 9070 Serial
If communications to the PLC, RTU or device Fails (i.e. exceeds Timeout) WebAccess will wait the Auto Recover Time before trying to re-establish communications.
3.2.11
3.2.12
3.2.13
Hand Shake RTS The RTS (Request To Send) signal is raised and lowered on the Serial Communications Port if this value set to Yes. RTS is determined by settings in the field device or the RS232/422 converter. Refer to your device interface manual to determine the value for this field and the type of cable used.
Hand Shake DTR The DTR (Data Terminal Ready) signal raised and lowered on the Serial Communications Port if this value is set to Yes. DTR is determined by settings in the field device, or the RS232/422 converter and the type of cable used. Please refer to the Manufacturer’s Documentation to determine if DTR handshake is set in the PLC.
Backup Port The Backup Port has not been tested for the GE 90/30 or GE 90/70.
Version 6.0 rev 2 Broadwin Technology, Inc. 2007 page 8

WebAccess Device Driver Guide GE 9030 & 9070 Serial
3.3
3.3.1
Device Properties – GE 9030 and GE 9070 Serial
Add your device to the Serial Port, by selecting the Serial Port you have configured, then select Add Device. Or, to modify an existing Device, Select Device Properties.
Figure 3-12 GE 9070 Device
Device Name A Device is a PLC, Controller, VAV or other automation hardware or software entity. Device name is a User-assigned name that will appear in the Project
Version 6.0 rev 2 Broadwin Technology, Inc. 2007 page 9

WebAccess Device Driver Guide GE 9030 & 9070 Serial
Manager (Configuration Tool) and in runtime VIEW Displays. Choosing a descriptive Name can help technicians identify the location of your device.
Changing only the Device Name will rename the existing device.
Changing both the Device Name and the Unit Number will make a copy of the device (e.g. create another device).
3.3.2
3.3.3
3.3.4
3.3.5
Description User assigned description up to 32 characters
Unit Number Unit Number is a virtual number used by WebAccess (for the device type). This does not affect the GE9030 or GE9070 device communications.
Device Type The Device Type is GE9030 or GE9070. The devices are indentical and either driver can be used for communications to both device types.
CPU ID The CPU ID must be entered in the exact syntax as that configured using the GE Logicmaster Programming Software or other programming software from GE FANUC. Communications will not be successful without the proper CPU ID. An example of a CPU ID syntax is 33101A
The CPU ID is assigned to the processor using the Logicmaster 90 programming software, or other software, from GE FANUC.
Version 6.0 rev 2 Broadwin Technology, Inc. 2007 page 10

WebAccess Device Driver Guide GE 9030 & 9070 Serial
4.
4.1
Configure Tags
Analog Tag This example is to configure a Tag that reads an Analog Input from the AI range of registers (Address AI0001).
1. Open Internet Explorer.
2. Connect to Project Node.
3. Start WebAccess Configuration.
4. Select your Project.
5. Select SCADA Node.
6. Select the GE 90 Series Device.
7. Select Add Tag.
Version 6.0 rev 2 Broadwin Technology, Inc. 2007 page 11

WebAccess Device Driver Guide GE 9030 & 9070 Serial
8. From Parameter Pull Down List select the AI parameter. This will configure an Analog Input. Wait for the Page to update.
9. Optionally, select ALARM from the ALARM pulldown list. Wait for the Page to update with a PINK highlight around alarm (an additional Alarm Fields at bottom of page).
10. Enter a Tagname users can use to identify this Analog Input measurement. For example, if this is a Gas Flow measurement, enter Gas_Flow1.
11. Edit the Address to the actual address. From the example, Enter: AI0002
12. Enter a Description. This will help identify this tag to Users and Operators. For example, enter Gas Flow to Unit 1.
13. Optionally enter, Scaling, Span Hi, Span Low, Engineering Units, and Alarms; enable data logging, etc.
14. Press Submit.
Version 6.0 rev 2 Broadwin Technology, Inc. 2007 page 12

WebAccess Device Driver Guide GE 9030 & 9070 Serial
4.2 Digital Tag This example is to configure a Tag that writes a Digital Output (Address Q0001 ).
15. Select the GE 90 Series Device.
16. Select Add Tag.
17. From Parameter Pull Down List select Q. This will configure an Analog Input. Wait for the Page to update.
18. Optionally, select ALARM from the ALARM pull down list. Wait for the Page to update with a PINK highlight around alarm (an additional Alarm Fields at bottom of page).
19. Enter a Tagname users can use to identify this Discrete Output measurement. For example, enter DO1.
Version 6.0 rev 2 Broadwin Technology, Inc. 2007 page 13

WebAccess Device Driver Guide GE 9030 & 9070 Serial
20. Edit the Address to the actual address. From the example, Enter: Q0001
21. Enter a Description. This will help identify this tag to Users and Operators. For example, enter Discrete Output 1.
22. Optionally enter, State 0 Description, State 1 Description, Alarms, enable data logging, etc. For example, State 0 = OFF and State 1 = ON.
23. Press Submit.
Congratulations! You have just configured a Measurement and Output Tags to GE 90 Series device.
Version 6.0 rev 2 Broadwin Technology, Inc. 2007 page 14