fswidgets efbxp operators manual - index · charts – pdf 10 charts – img 11 ... (delphi) and...
TRANSCRIPT


FSWidgets EFBXP Operators Manual - Index
Introduction to EFBXP 3 Pre-Installation 4 EFBXP Demo 4 Registering EFBXP 4 Installation 5 Launching EFBXP 5 Powering Up EFBXP 5 Main EFBXP Window 6 Main EFBXP Window – Behavior 7 Moving/Showing/Hiding EFBXP 7 Understanding the EFBXP Concept 7 Operating EFBXP 8 Charts 9 Charts – PDF 10 Charts – IMG 11 Charts – Installing 12 Moving Map - Menu 13 Moving Map – GMap Support 13 Moving Map 14 Moving Map – XML Calibrated Chart Support 15 NAV Log 16 Manuals 17 Manuals – PDF 18 Manuals – HTM 19 Manuals – Installing 20 Checklist 21 Checklist - Installing 22 WX (Weather) 23 NET (Network) 24 Settings – General 25 Settings – Map 25 Settings - WX 25 Settings – NET 25 Appendix 1 – Network Version 26 Frequently Asked Questions 27 Version History 30 License Agreement 32

FSWidgets - EFB for X-Plane 3
EFBXP Operators Manual – Revised 2/25/2014 Copyright © 2011 FSWidgets
Introduction to EFBXP The EFBXP (Electronic Flight Bag for X-Plane) is a software-based display system intended primarily for the cockpit/flight deck. In real world aviation EFB devices usually consist of software and hardware (hand-held tablet PC or integrated display). They can display a variety of aviation functions that in the past were traditionally accomplished using paper references. EFB systems may be approved to replace some of the bulky hard copy material that pilots typically carry in their flight bags. They can be found in everything from light single-engine props to multi-engine jet airliners. This EFBXP software can retrieve and display such documents as:
Approach Plates Aeronautical Navigation Charts Pilot Operating Handbooks General Operations Manual Standard Operating Procedures Minimum Equipment Lists
The EFBXP can also go online and download/display real-time data such as:
Weather Radar Weather Briefings Any web-based information
Other features include:
Heads-Up audio checklist system Moving Map Display Navigation Log display of the current X-Plane FMS plan.
The EFBXP software is designed to minimize a pilot’s workload and head-down time, delivering a virtually paperless cockpit environment. Before using the EFBXP please take the time to read through this Operators Manual. We have been mindful of keeping it as brief and direct as possible so you can spend less time reading and more time enjoying the product. Always consult the Version History (page 30) for additional features/updates.
Thanks/Acknowledgements
I would like to firstly acknowledge the massive support and encouragement of John Hnidec who gave me my start in Windows software development (Delphi) and who was instrumental in this EFBXP getting off the ground. Without his unending patience and friendship the EFBXP would simply not exist. A special word of thanks goes to our loyal, patient, hard-working team of beta testers who never tired of the seemingly endless builds and who were instrumental in ferreting out the bugs – thanks guys! Fermin Fernandez FSWidgets Developer
WARNING: THIS EFBXP SOFTWARE IS FOR FLIGHT SIMULATION USE ONLY

FSWidgets - EFB for X-Plane 4
EFBXP Operators Manual – Revised 2/25/2014 Copyright © 2011 FSWidgets
Pre-Installation
Before installing the EFBXP it is important to consider if your system setup is adequate for running X-Plane smoothly. The way the EFBXP has been designed, as a separate process external to X-Plane (EXE), means the unit itself should not impact heavily on frame rates and you should barely notice any drop in FPS, except perhaps during significant hard disk activity such as when loading a large navigation chart. However, loading large amounts of data can be taxing on your system so we do want to establish the minimum system requirements for EFBXP as follows:
PC: 32-bit Pentium 4 (or AMD) 1.8 GHz+ PC: 64-bit systems (DEP - Data Execution Protection) turned off Screen Resolution: 1024x768 pixels OS: Microsoft Windows Vista or later (With IE9 or later) Simulator: X-Plane 9 or 10 (not tested on previous versions) Additional Software: Latest Adobe Reader (or Acrobat)# Disk Space: 75 MB
# Free Adobe Reader can be downloaded from http://www.adobe.com/
EFBXP Demo The file you have downloaded is a fully-functional demo of the EFBXP. The limitation is you can only use it for a maximum of 20 minutes at a time each X-Plane session. A timer under the FSWidgets logo will display how long you have until the end of the demo session. During the last 10 seconds the timer will flash and the EFBXP will shut down after the demo time has elapsed. The only difference between the demo version and the full version is the registration key which removes the time and usage limitation. In all other respects it is identical.
Registering EFBXP At FSWidgets we can appreciate the only real way of evaluating software is to provide it as a free working demo. That way you have the security of knowing that if you don’t like EFBXP or it doesn’t work for you there is no need to buy it – simple as that. If after evaluating the EFBXP thoroughly you are happy with it and would like to purchase a registration key it can be obtained directly from the developers at this address: http://fswidgets.com/shop To register EFBXP, run the Registration application via the program shortcut:
Windows START > All Programs > FSWidgets EFBXP > Register EFBXP You can alternatively execute the Registration.exe file in the folder:
C:\[Path to your X-Plane folder]\FSWidgets\EFBXP

FSWidgets - EFB for X-Plane 5
EFBXP Operators Manual – Revised 2/25/2014 Copyright © 2011 FSWidgets
Installation To install EFBXP run the setup.exe file and follow the prompts. For the non-networked version select "Standard Version" from the drop-down list. (For notes on the EFBXP Network Version see Appendix 1) Point the installer to the location of the root X-Plane folder, the folder that has the main X-Plane EXE file in it. The setup routine will install several Program Group shortcuts that can be found by following the Windows menu (default):
START > All Programs > FSWidgets – EFBXP The installed Program Group links are:
EFBXP Operators Manual Uninstall EFBXP Visit FSWidgets Forum Visit FSWidgets Website Register EFBXP
Launching EFBXP To launch the EFBXP, start up X-Plane and select the Plugins menu and select Electronic Flight Bag. If the unit has not yet run there will be a short delay while it is launched. If the EFBXP is already running in the background but hidden, it will simply display. You may also launch EFBXP by directly executing the EFBXP.exe file in the installation folder (i.e. by double-clicking on the EXE file).
Powering Up EFBXP When the unit first displays it will be turned off as seen on the right and the PWR (power) button must be clicked in order to initialize it. On pressing PWR all the buttons on the lower bezel will light up and a short booting sequence will begin. When complete the Main Menu page will display and the unit is ready for use. The PWR button can also be used to simulate a power-down, however to fully reset the unit it must be shut down and re-started via the X key.

FSWidgets - EFB for X-Plane 6
EFBXP Operators Manual – Revised 2/25/2014 Copyright © 2011 FSWidgets
Main EFBXP Window The EFBXP window will float on the X-Plane and can be moved to any desired location on the desktop within the X-Plane window. By necessity the EFBXP window needs to be relatively large. In order to aid readability and following FAA recommendations, real EFB units are generally large enough to display electronic approach charts to the same size as their paper versions. The EFBXP screen is therefore locked to a size to 600 x 755 pixels and the minimum screen resolution required is 1024 x 768 pixels.
Fullscreen Mode Work-Around From our own observations it appears that if the X-Plane screen resolution in the Settings > Rendering Options dialog is set to exactly the same resolution as your monitor (e.g. 1680x1050) the result is X-Plane automatically puts the simulation into fullscreen mode, even if the related Set Color-depth and Screen Resolution on X-Plane Startup option is not ticked. This may result in X-Plane taking control of the desktop, including the extended desktop if any additional monitors are connected, blacking them out. Fullscreen mode will not normally allow the EFBXP window to show on top of the X-Plane window.
TIP: One way around this is to set your X-Plane resolution to a height of one pixel less than the actual screen height (e.g. 1680x1049 – instead of 1680x1050). Also deselect the option: Set Color-depth and Screen
Resolution on X-Plane Startup. This will make X-Plane fill the entire main monitor screen (e.g. as shown in the image above) but at the same time allowing EFBXP to float on top. Any additional monitors and the extended desktop should also be available for EFBXP or other applications.
_____________________________________________
Note 1: There are two special zoom options that enlarge the viewing window (See the Charts, Manuals and NET sections for more details). Note 2: There is a special screen resolution over-ride that allows the EFBXP to run at less than 1024x768 pixels. This function is for cockpit builders who perhaps want to use the EFBXP on a separate screen such as a Tablet PC running at 600x800 pixels (portrait mode). To enable the over-ride simply add a blank text file called NoResChk.ini to the main EFBXP folder.

FSWidgets - EFB for X-Plane 7
EFBXP Operators Manual – Revised 2/25/2014 Copyright © 2011 FSWidgets
Main EFBXP Window - Behavior
The EFBXP is not an internal X-Plane gauge but a module (XPL) and application (EXE) which allows us to achieve some features not normally possible using a panel gauge. Because of this we are using our own method to float the EFBXP on top of the main X-Plane window. Clicking and dragging or using the EFBXP functions will not pause the simulation; however it is important to understand that at times focus will need to be transferred to the EFBXP. When program focus is on the EFBXP you will notice that X-Plane keyboard inputs will not respond because the Windows controls within the EFBXP unit are receiving the focus, however this will not create a pause in the simulation or the sound. When Focus is transferred to EFBXP Using some of the controls within the EFBXP will of a necessity transfer focus to the EFBXP (e.g. when ticking boxes, moving a PDF chart around with the Adobe Hand-shaped cursor). Returning focus back to X-Plane After using the EFBXP, slowly moving the mouse outside the inner screen will return the focus back to X-Plane. If you are in an expanded Mini/Maxi Zoom view, hovering the mouse over the Top/Side Tool Bar to restore focus to X-Plane. The same re-focusing function is triggered when the surrounding faceplate is clicked and dragged Moving/Showing/Hiding EFBXP To move the EFBXP unit around on the desktop click anywhere on the outer faceplate with the left mouse button and drag it to your preferred location (e.g. a second monitor). The keyboard shortcut to toggle Show/Hide is CTRL + SHIFT + z, this may also be achieved via the Plugins menu in X-Plane. Understanding the EFBXP concept The open-ended architecture of the EFBXP provides a framework that allows each user (or group of users) to customize it and add their own charts, approach plates, manuals, WX/NET links and checklists. For obvious reasons we cannot for example include an exhaustive list of world-wide weather links or a complete collection of charts, PDF approach plates and audio checklists. The amount of data out there is staggering and to include it all the download would be in the order of several GB's. Therefore as part of the installation, and to show what the possibilities are, we only provide a few samples. Adding more custom data is relatively simple (see the applicable section of this Operators Manual for more detailed instructions).

FSWidgets - EFB for X-Plane 8
EFBXP Operators Manual – Revised 2/25/2014 Copyright © 2011 FSWidgets
Operating EFBXP The EFBXP is operated via the 4 buttons on the lower part of the face plate and the 8-button menu system on the inner screen. The following table outlines each button and its function:
Button Name Function
Exit Button Shuts down EFBXP, unloading it from memory. If the unit is
powered up a shutdown confirmation will be displayed, otherwise it exits immediately.
Power Button Powers the EFBXP up/down. The power down is simulated only
(i.e. does not reset the unit, for a full reset use the Exit button).
Menu Button Returns directly to the main menu.
Previous Page Toggles between previous page and current page.
Charts Button Displays the Charts page.
Map Button Displays the Moving Map page.
Nav Log Button Displays the Nav Log.
Manuals Button Displays the Manuals page.
Checklist Button Displays the Aircraft Checklist page.
WX Button Displays the Weather Information page.
NET Button Displays the NET page.
Settings Button Displays the EFBXP Settings page.

FSWidgets - EFB for X-Plane 9
EFBXP Operators Manual – Revised 2/25/2014 Copyright © 2011 FSWidgets
Charts The charts page provides a static display of approach plates (PDF, JPG, and BMP) and other aeronautical navigation charts. To view any available charts click on the IDENT in list on the left, if there are any files present in the currently selected view format (PDF or IMG) they will be displayed in the window on the right-hand side. The IDENT list displays the sub-folders under the selected Charts folder. By default this will be the X-Plane\EFBXP\charts folder, however you can also point the EFBXP to a custom charts folder (for more details see the section: Charts – Installing). By default on startup this function always reverts to PDF, to see any IMG-based charts (JPG & BMP) click on the IMG button:
Clicking on the PDF button will toggle back to the PDF charts:
To view a chart highlight it and click the View button, or double-click on the chart filename:
EFBXP installs a few sample charts:
US TAC (1x JPG) US SEC (1 x JPG, 2 x BMP) VMMC (3 x PDF, 1 x JPG, 1 x BMP)
To add more charts see the section: Charts – Installing.

FSWidgets - EFB for X-Plane 10
EFBXP Operators Manual – Revised 2/25/2014 Copyright © 2011 FSWidgets
Charts – PDF When viewing PDF approach/departure procedures the charts will open up as you see depicted on the right. The EFBXP has an internal toolbar that gives some limited navigation and display options for the PDF document:
The 10 toolbar buttons from left to right are as follows:
Return to Charts loading page# Zoom PDF to 100% Go to Previous page Go to Next page Go to First page Go to Last page Hide/Show Adobe scrollbars and lower toolbar Hide/Show main Adobe toolbar* Mini Zoom Maxi Zoom
The Mini Zoom icon will expand the chart-viewing area to fill the entire space occupied by the unit (600x755 pixels). Clicking the Maxi Zoom icon will expand the charts to full-screen. In either of these two special views the EFBXP unit can be moved by clicking and dragging the upper toolbar. All of the normal buttons, toolbars and functions associated with the Adobe Reader software are also available when those elements are displayed. ______________________________________________ # NOTE: When you have called up a PDF chart the EFBXP will remember it, even if you exit to the Main Menu page and access other functions such as WX or Checklists. When you return to the Charts section via the Main Menu the previously loaded chart will still be displayed. Use this button to return to the Charts loading page if a change to another chart is required. * NOTE: If the Adobe toolbar is displayed you will have access to all the advanced Reader functions such as the Hand Tool, Zoom and Search. However please keep in mind that enabling some of the Adobe functions (e.g. Save & Print) will create a pause the simulation.

FSWidgets - EFB for X-Plane 11
EFBXP Operators Manual – Revised 2/25/2014 Copyright © 2011 FSWidgets
Charts – IMG When first viewing an IMG (image-based) chart, regardless of its size and shape it will be automatically resized to fit the viewing region as seen in the screenshot on the right. This default IMG chart viewing Mode has an aspect ratio optimized for approach charts (greater height than width). In this case only the top/bottom 2 buttons on the side bar are active. If an aeronautical chart (e.g. US sectional) is loaded and you would like to Scroll and Zoom, click the Scroll Mode button (second from the top on the side bar). Enabling the Scroll Mode will reload the chart at 100% Zoom and allows viewing and scrolling of the entire chart using the vertical and horizontal scroll bars (See screenshot on the bottom right). Toggling the scroll mode will also activate the 4 associated scroll mode buttons as highlighted on the side toolbar below; the function of each button is as follows:
Return to Chart Loading page# Toggle Scroll Mode Zoom In Zoom Out Zoom 100% Center Chart Mini Zoom Maxi Zoom
The Mini Zoom icon will expand the chart-viewing area to fill the entire space occupied by the unit (600x755 pixels). Clicking the Maxi Zoom icon will expand the chart to full-screen. In either of these two special views the EFBXP unit can be moved by clicking and dragging the side toolbar. ______________________________________________ # NOTE: When you have called up an IMG chart the EFBXP will remember and display it when returning to the Charts page, as in the case of the PDF charts use this Return to Chart Loading icon to view another chart (also see footnote on previous page).
These four buttons are only available in the Scroll Mode

FSWidgets - EFB for X-Plane 12
EFBXP Operators Manual – Revised 2/25/2014 Copyright © 2011 FSWidgets
Charts – Installing Adding more charts to the EFBXP is a simple operation. Place them in separate dedicated folders under the charts folder, by default this is the main X-Plane\EFBXP\charts folder. You may also select a custom charts folder location, perhaps on a different drive (see the Settings – General section) #:
It is recommended that each group of charts be placed in a folder named after the four-letter ICAO identifier (e.g. YSSY – Sydney Kingsford-Smith International Airport). # For aeronautical charts covering larger areas an appropriate abbreviation for a folder might be something like US SEC (US Sectional), US TAC (US VFR Terminal Area Chart), AU WAC (Australian World Aeronautical Chart) or AU VNC (Australian Visual Navigation Chart). Due to the width of the IDENT list it is preferable to keep the designation short. If you have a large number of charts in the IDENT list you can scroll down to find the airport you are looking for, or alternatively you may also click on any IDENT in the list and press the first letter of the ICAO code (e.g. Y for YMML), the list will then automatically scroll down to IDENTS that begin with that letter. ______________________________________________ # NOTE: Only one level under the main charts folder will be recognized, sub-folders will not be shown in the IDENT list. If you are installing the charts to a custom charts folder on a separate drive it is recommended that you use a structure such as E:\charts and place the individual chart folders under this directory. The chart IDENT folders must not be placed in the root of the drive, the EFBXP will warn about this situation. When using a custom folder point the EFBXP to the main charts folder, one level above the IDENT folders (e.g. C:\My Charts).
Create separate folders for each group of charts, only one level below the main charts folder

FSWidgets - EFB for X-Plane 13
EFBXP Operators Manual – Revised 2/25/2014 Copyright © 2011 FSWidgets
Moving Map – Menu Beginning with Version 1.2 the EFBXP Moving Map comes with two options: 1. Vector – A vector-based map display. 2. GMap – Google Maps display. When you click the MAP button for the first time you will be presented with the MAP MENU page. Here you can select which of the two types of map listed above you wish to display. In addition to this initial Map menu, you can toggle between both maps types by clicking the smaller VECTOR or GMAP buttons found on the lower panel of the moving map displays.
Moving Map – GMap Support The GMAP page provides support for the freeware GMap for X-Plane moving map utility which can be downloaded from the FSWidgets website: http://fswidgets.com/ (See Download Files > Free Tools/Utilities Section) The GMap moving map is a stand-alone application, but can also be used as a module under EFBXP which enables other enhancements such as:
1. Floating X-Plane Window - no pause in sound or simulation. 2. Ability to Select and Save any custom Flight Plans Folder. 3. Optional Save of GMap Zoom and Map Type preferences.
To enabled EFBXP support for the GMap feature please download the latest release of GMap for X-Plane from the website and drop the FSWidgetsGMap.exe file (must be the X-Plane edition, not the FSX edition) into the same folder as the EFBXP.exe file and the Flight Bag will detect the presence of the GMap file and import the function into the EFBXP. For further details regarding the operation of the GMap module please see pages 6 to 9 of the GMap PDF manual.

FSWidgets - EFB for X-Plane 14
EFBXP Operators Manual – Revised 2/25/2014 Copyright © 2011 FSWidgets
Moving Map - Vector The Moving Map is a relatively simple display mainly designed as an aid to situational awareness, handy in both the pre-flight and in-flight stage. The Map is not intended to replace the standard GPS or any other NAV instrument; it does not for example have some of the more advanced GPS functions such as Direct-To, DME-To-Waypoint or Ground Speed information. Real-world EFB units are not designed to replace the GPS and some models include no moving maps system at all, however it has been included as a nice-to-have addition to the EFBXP. Some of the useful features include:
North-Up Display referenced by HDG TRUE Wide range of Zoom options (10-1200 NM) X-Plane FMS Plan load and display World-wide Airport database (23,700+) World-wide VOR Database (4100+) World-wide NDB Database (8790+) World-wide Intersections Database (75,700+). World-wide Airspace data (C, TCA, FIR, PROHIB, RESTR) Lakes & Rivers Database (major bodies of water only) All data types able to be individually toggled Hi/Low-Res shoreline data options Hi-Res terrain texture (above a selected Zoom level)
Flight Plan Display The Flight Plan Display feature will superimpose any saved X-Plane FMS Plane file onto the Moving Map. To load a flight plan click the FLT PLN button. A dialog box will open to the currently set FMS Plan Folder. By default this will be the X-Plane\Output\FMS Plans folder; this is where FMS Plans are saved by X-Plane by default. If you have another custom folder where your plans are saved the Settings – Map page can be used to remember the folder location. The Load X-Plane FMS Plan Dialog has 3 buttons as seen on the bottom screenshot on the right.
Clear – Clears the currently loaded FMS Plan Load – Loads the currently selected FMS Plan # Close – Exit the Load X-Plane FMS Plan dialog
______________________________________________ # NOTE: Loading an X-Plane FMS Plan file (.FMS) via the EFBXP will not load the plan into the X-Plane FMS on the aircraft panel (or visa-versa). These are two independent processes.

FSWidgets - EFB for X-Plane 15
EFBXP Operators Manual – Revised 2/25/2014 Copyright © 2011 FSWidgets
Moving Map – XML Calibrated Chart Support The Moving Map also supports older XML-calibrated charts as used by the FSFlightMax and FSGarmin simulators (released for FS2004). These charts are not native to the EFBXP but many folks already have a nice collection of maps and this feature allows them to use these pre-calibrated charts. New charts can be easily created using the FSFlightMax Map Creator II which is available from the FSWidgets Downloads page or in the AVSIM file library (file ID 25923 - there are also a number of XML-calibrated charts on this same site). Calibrated BMP charts and their associated XML files need to be placed under the charts folder following the same method as outlined in the section Charts – Installing. Any compatible XML charts will be automatically recognized and added to the list in the Load Calibrated Chart dialog.* How to load a chart:
Click the CHART button Select the chart folder from the dropdown list Click the Load button
To remove a chart from the display, click the Clear button. NOS/GEO Calibrated Chart Support As of Version 1.1 the EFBXP Moving Map now supports NOS/GEO calibrated charts which are available from AeroPlanner.com (Sim Pack). The installation and loading of NOS/GEO charts is identical to the method outlined above for BMP/XML charts. Please note: This proprietary chart format requires the NOS/GEO plug-in (filename: ngx.ocx) to be registered in Windows by the EFBXP installer. If the installation does not accomplish this for any reason (e.g. being blocked by anti-virus software) it can be done manually using the RegOCX.exe utility installed in the X-Plane\EFBXP folder. ______________________________________________ * NOTE: At this stage only 256-color (8bit) indexed BMP charts are supported, to check if a chart is compatible right-click on the BMP file in Windows Explorer and select Properties, then the Summary tab. If you are not in the Advanced view then click that button. The entry for Bit Depth should be 8. Due to charts being primarily in Lambert Conformal Conic Projection some unique features may not always line up perfectly. # NOTE: EFBXP will automatically search your EFBXP\charts folder and only folders that contain XML and NOS/GEO calibrated charts will be available in the charts folder dropdown box. Selecting a folder from the dropdown list will present any NOS/GEO or BMP charts that have an associated XML file. The EFBXP installation includes a few small sample GEO/NOS (Guam) and XML charts (Seattle and New York).

FSWidgets - EFB for X-Plane 16
EFBXP Operators Manual – Revised 2/25/2014 Copyright © 2011 FSWidgets
NAV Log This page will display the Navigation Log associated with the currently loaded FMS Plan (i.e. an FMS plan loaded via the EFBXP Moving Map, not the panel-mounted X-Plane FMS gauge). This NAV Log HTM file is not part of X-Plane, it is automatically generated by EFBXP when a plan is loaded and simply displays the basic waypoint information gleaned from the FMS file. When the Load Nav Log button is clicked EFBXP will detect if you have loaded an FMS plan file and generate the file, displaying it as shown in the screenshot on the right. If there is no loaded FMS plan a status message will appear at the bottom of the EFBXP screen informing of this. ______________________________________________ * NOTE: Loading an X-Plane FMS Plan file (.FMS) via the EFBXP will not load the plan into the X-Plane panel instrument (or visa-versa). These are two independent processes. Also keep in mind the Nav Log page is associated with the plan file loaded by the X-Plane Map page.

FSWidgets - EFB for X-Plane 17
EFBXP Operators Manual – Revised 2/25/2014 Copyright © 2011 FSWidgets
Manuals EFBXP supports the viewing of PDF manuals and HTM aircraft reference materials and checklists. To view any available documents click on the AIRCRAFT in the list on the left, they will be displayed on the right-hand side. By default this always reverts to PDF, if you would like to see any HTM-based documents click on the HTM button:
Clicking on the PDF button will toggle back to the PDF manuals:
To view a manual highlight it in the list on the right and click the View button, or double-click on the filename:
EFBXP installs two sample aircraft manuals:
B200 - Aeroworx (1 x PDF, 1 x HTM) The sample PDF manual installed with EFBXP is a 10-page excerpt of the Aeroworx Aviation Super King Air B200 POH (in this case a FS2004 aircraft). The HTM sample document is the B200 checklist (both included here with the kind permission of Aeroworx). To add an aircraft manual see the section: Manuals – Installing.

FSWidgets - EFB for X-Plane 18
EFBXP Operators Manual – Revised 2/25/2014 Copyright © 2011 FSWidgets
Manuals – PDF When viewing a PDF manual it will be opened as you see depicted on the upper right screenshot. The EFBXP has an internal toolbar that gives some limited navigation and display of the PDF document:
The 10 buttons from left to right are as follows:
Return to Manuals page# Zoom PDF to 100% Go to Previous page Go to Next page Go to First page Go to Last page Hide/Show Adobe scrollbars and lower toolbar Hide/Show main Adobe toolbar* Mini Zoom Maxi Zoom
The Mini Zoom icon will expand the manual-viewing area to fill the entire space occupied by the unit (see bottom right screenshot). Clicking the Maxi Zoom icon will expand the manual to full-screen. In either of these two special views the EFBXP unit can be moved by clicking and dragging the upper toolbar. All of the normal buttons, toolbars and functions associated with the Adobe Reader software are also available when those elements are displayed such as the Adobe Pages navigation sidebar as seen in this screenshot on the lower right. ______________________________________________ # NOTE: When you have called up a PDF manual the EFBXP will remember it, even if you exit to the Main Menu page and access other functions such as WX or Checklists. When you return to the Manuals section via the Main Menu the previously loaded manual will still be displayed. Use this Return to Manuals button to exit to the Manuals loading page if a change to another document is required. * NOTE: If the Adobe toolbar is displayed you will have access to all the advanced Reader functions such as the Hand Tool, Zoom and Search. However please keep in mind that enabling some of the Adobe functions (e.g. Save & Print) will create a pause in the simulation.

FSWidgets - EFB for X-Plane 19
EFBXP Operators Manual – Revised 2/25/2014 Copyright © 2011 FSWidgets
Manuals – HTM Any HTM files placed in the aircraft manual folder you created will appear in the list when the HTM button is clicked.* When viewing HTM-based manuals or reference material it will be opened as you see depicted on the right. The EFBXP has an internal toolbar that provides navigation and display of the HTM document:
The 5 toolbar buttons from left to right are as follows:
Return to Manuals page# Go Back Go Forward Mini Zoom Maxi Zoom
The Go Back and Go Forward buttons will only become active if you have navigated to a different HTM file or to a bookmark via a link on the HTM document you initially loaded. The Mini Zoom icon will expand the manual-viewing area to fill the entire space occupied by the unit. Clicking the Maxi Zoom icon will expand the manual to full-screen. In either of these two special views the EFBXP unit can be moved by clicking and dragging the upper toolbar. The HTM document viewer is in fact a full web browser and if any link to an online document is clicked it will download it from the internet. When copying HTM reference material which includes graphics (e.g. pictures, icons, etc) stored in a separate sub-folder, make sure you also copy that folder. Preserve the original relative folder structure and the data will display correctly (e.g. See the installed Aeroworx Super King Air B200 HTM example). ______________________________________________ * NOTE: Only *.htm files will be shown in the list as this is the recognized X-Plane format, *.html files added to the aircraft folder will not be listed, however they can be navigated to via a hyperlink on any HTM file if one is present. # NOTE: When you have called up an HTM document EFBXP will remember it, even if you exit to the Main Menu page and access other functions such as WX or Checklists. When you return to the Manuals section via the Main Menu the previously loaded manual will still be displayed. Use this Return to Manuals button to exit to the Manuals loading page if a change to another document is required.

FSWidgets - EFB for X-Plane 20
EFBXP Operators Manual – Revised 2/25/2014 Copyright © 2011 FSWidgets
Manuals – Installing Adding more aircraft manuals and reference materials is a simple procedure. Create a new folder under the main X-Plane\EFBXP\manuals folder (e.g. Piper Meridian) and copy the PDF or HTM files into that directory#:
Due to the width of the AIRCRAFT list it is preferable to keep the designation short as in the above examples. If you have a large number of manuals in the AIRCRAFT list you may scroll down to find the one you are looking for, or alternatively you may also click on any aircraft in the list and press the first letter of the aircraft name (e.g. P for Piper) and it will automatically scroll advance to the list of aircraft that begin with that letter. ______________________________________________ # NOTE: Only one level under the main aircraft folder will be recognized, sub-folders will not be shown on the AIRCRAFT list.
Create separate folders for each group of manuals, only one level below the main manual folder

FSWidgets - EFB for X-Plane 21
EFBXP Operators Manual – Revised 2/25/2014 Copyright © 2011 FSWidgets
Checklist This page allows you to have access to an unlimited number of aircraft checklists with tick-able items. The checklist can be either standard or audio-enabled. To load a particular checklist, first select it from the drop-down list at the top of the screen. Each main section of the checklist will be displayed in the CHECKS window. Clicking on the items in the CHECKS column will load the individual items in the list on the right. If the checklist is audio-enabled you will also hear the associated sound (e.g. Before Start Checklist). Each entry in the ITEM window can be ticked to indicate it has been completed. If the checklist is audio-enabled it will also play the recorded sound file for that item (e.g. Altimeters – Set). There are two additional options on the checklist page:
Mute Sound – prevents the WAV files from playing. Auto Check Items – Normally to tick off an item you must actually click
on the box itself. With this option enabled highlighting an item in the list it will automatically tick the box. Additionally, when using the TAB and right arrow () on the keyboard to navigate the checklist on highlighting the checklist item it will automatically tick the box.
EFBXP installs two sample checklists:
Cessna 172 – Audio Lear 45 – Standard (no audio)
For additional checklists please see the downloads page on the FSWidgets website – http://fswidgets.com To add or create a new checklist, check out the section of this manual entitled: Checklist – Installing.

FSWidgets - EFB for X-Plane 22
EFBXP Operators Manual – Revised 2/25/2014 Copyright © 2011 FSWidgets
Checklist - Installing Adding or creating a new checklist is a relatively, simple task. First create a folder under the X-Plane\EFBXP\checklists folder as shown here:
Next create a standard text file with an .ini extension and place it in that folder.* The INI file must be named EXACTLY as the folder it is placed in (e.g. if your folder is C172 – AUDIO then the INI file must be named C172 – AUDIO.ini). Note this includes respecting any spaces or other characters such as the dash in this example above. Uppercase/lowercase is best kept uniform. To add items open the INI file and enter the data as follows:
[BEFORE START]
Brakes=TEST AND SET
Electrical Equipment=OFF
...etc
Each main section of the checklist must be placed in square brackets (e.g. [BEFORE START]). These sections will appear in the CHECKS window on the left. Individual items under a section must be entered with the item name, an equal sign and response (e.g. Brakes=TEST AND SET). To enable a sound for each checklist item record a standard Windows WAV file using your own voice (or a Text-To-Speech utility) and save it in the desired checklist folder as follows:#
Ini Entry Record & Save As…
[BEFORE START] BEFORE START.wav
Brakes=TEST AND SET Brakes=TEST AND SET.wav
For more details please see the comments in the header of the two example checklists installed with EFBXP (Cessna 172 & Lear 45), note in particular the instructions regarding how to handle a repeat item in any main section. ______________________________________________ * NOTE: If you do not see file extensions follow these steps in the Windows Explorer Menu - Tools > Folder Options > View Tab > Deselect the option called Hide extensions for known file types. # NOTE: Please use only alphanumerical characters for the checklist sections and items. If required parenthesis signs () and the standard dash – are also acceptable. Please DO NOT use any other special characters such as /, &, $, ?, etc, as this may prevent windows from playing the sound file.
Create separate folders for each checklist. The INI file must have the same name as the folder. The checklist WAV files must also be placed here with the INI

FSWidgets - EFB for X-Plane 23
EFBXP Operators Manual – Revised 2/25/2014 Copyright © 2011 FSWidgets
WX (Weather) The WX page can download and display real-time weather data in the form of JPG or PNG images from any online WX resource. EFBXP comes with a generous collection of pre-configured examples (mainly from the US) which includes:
Current Conditions (IFR/MVFR) Current Surface (MSL) Infrared Satellite Visual Satellite Doppler Radar Current Temps Current Dew Points Thunderstorm Forecasts Severe WX Alerts Winds Clouds
In order to display a WX area, select it from the drop down box and click the Get WX button. You may also choose the Auto Update option, the selectable interval ranges from 1-60 minutes and reverts by default to 5 min. New WX areas can be easily added via the Settings page (see Settings section of this manual). All the example WX areas installed with EFBXP were located by simply entering the following keywords into the Google or Yahoo Image search engine (either individually or in combination):
Weather (or WX) Radar Doppler JPG (to request only JPG files) (Specific Location)
When you have found a suitable image, right-click on it and select Properties. Copy and paste the full image URL and plug that into the WX section of the Settings page and save. Things to keep in mind regarding WX images
Check the time stamp to make sure it is being regularly updated and is not a static example screen
Use only good quality images, enter the URL into your browser to check the full size and resolution
Why only JPG/PNG files, what about GIF images? Online WX images come in all shapes and sizes. However, only JPG and PNG images are 24-bit RGB images and EFBXP uses an advanced 32-bit image resizing filter to display full-colour images nice and sharp in the WX display window (490 x 400 pixels). Compressed or indexed 256-colour image formats such as GIF files do not allow smooth resizing and results are not satisfactory. However GIF WX images can be accessed via the NET page (see NET and Settings – NET).

FSWidgets - EFB for X-Plane 24
EFBXP Operators Manual – Revised 2/25/2014 Copyright © 2011 FSWidgets
NET (Network) The NET page provides the ability to connect to a wide variety of web-based online resources which include, but is not limited to the following:
METARS Terminal Forecasts GIF/PNG Radar Images Aircraft Performance Data Aviation/Navigation Calculators Approach/Departure Procedures Any Standard Web page
EFBXP comes with a set of example links that cover most of the items in the above-mentioned list. To access a NET link select it from the drop down box and click the Connect button. There is also an Auto Update option with a refresh range of 1-60 minutes for data that is of a dynamic nature and where frequent updating is required. Adding a new NET link is simply a matter of saving the entry via the NET section of the EFBXP Settings page. Once it has been saved it will be available in the drop down box on the NET page. Because it is essentially a web browser anything that can be displayed in an Internet Explorer-type application can be linked to via the NET page. Although it is not intended for viewing larger web pages, if the page being displayed has hyperlinks they can also be followed. When clicking the Connect button 2 buttons will appear in the top right-hand corner (from left to right):
Mini Zoom Maxi Zoom
The Mini Zoom icon will expand the NET browser to fill the entire space occupied by the unit (600x755 pixels). Clicking the Maxi Zoom icon will expand the NET browser to full-screen. In either of these two special views the EFBXP unit can be moved by clicking and dragging the upper panel.
FSWidgets - EFB for X-Plane 25
EFBXP Operators Manual – Revised 2/25/2014 Copyright © 2011 FSWidgets
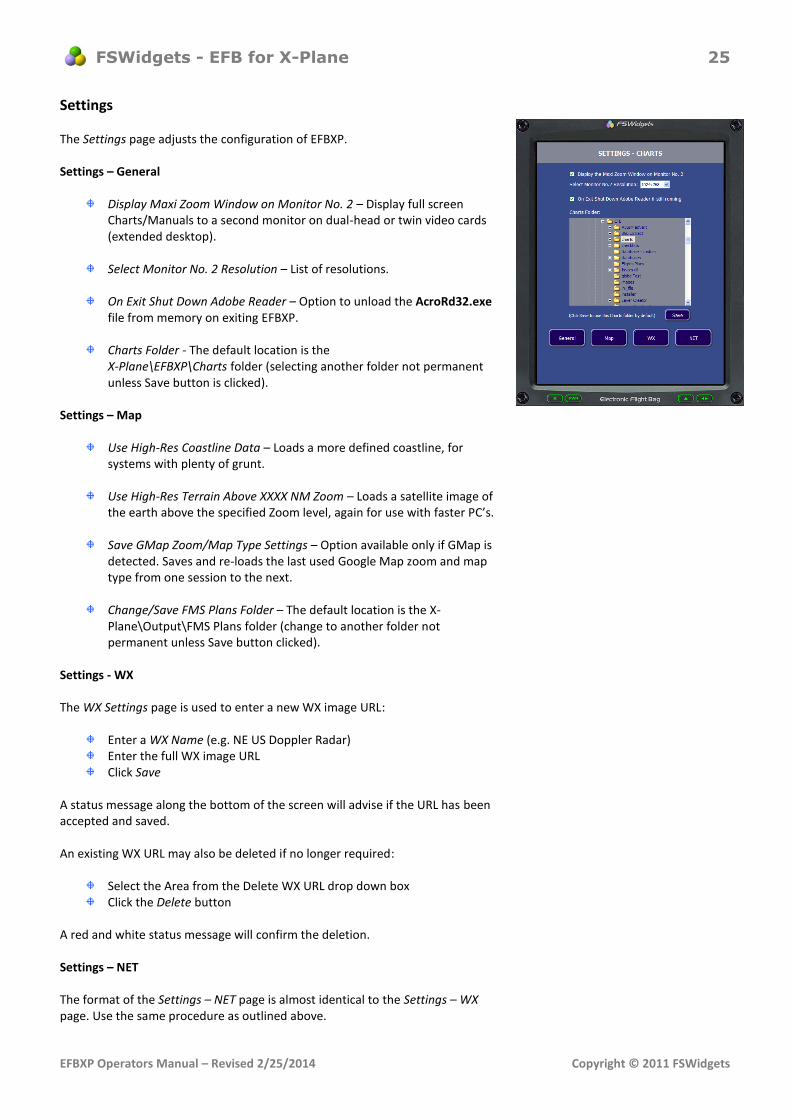
Settings The Settings page adjusts the configuration of EFBXP. Settings – General
Display Maxi Zoom Window on Monitor No. 2 – Display full screen Charts/Manuals to a second monitor on dual-head or twin video cards (extended desktop).
Select Monitor No. 2 Resolution – List of resolutions.
On Exit Shut Down Adobe Reader – Option to unload the AcroRd32.exe
file from memory on exiting EFBXP.
Charts Folder - The default location is the X-Plane\EFBXP\Charts folder (selecting another folder not permanent unless Save button is clicked).
Settings – Map
Use High-Res Coastline Data – Loads a more defined coastline, for systems with plenty of grunt.
Use High-Res Terrain Above XXXX NM Zoom – Loads a satellite image of
the earth above the specified Zoom level, again for use with faster PC’s.
Save GMap Zoom/Map Type Settings – Option available only if GMap is detected. Saves and re-loads the last used Google Map zoom and map type from one session to the next.
Change/Save FMS Plans Folder – The default location is the X-
Plane\Output\FMS Plans folder (change to another folder not permanent unless Save button clicked).
Settings - WX The WX Settings page is used to enter a new WX image URL:
Enter a WX Name (e.g. NE US Doppler Radar) Enter the full WX image URL Click Save
A status message along the bottom of the screen will advise if the URL has been accepted and saved. An existing WX URL may also be deleted if no longer required:
Select the Area from the Delete WX URL drop down box Click the Delete button
A red and white status message will confirm the deletion. Settings – NET The format of the Settings – NET page is almost identical to the Settings – WX page. Use the same procedure as outlined above.

FSWidgets - EFB for X-Plane 26
EFBXP Operators Manual – Revised 2/25/2014 Copyright © 2011 FSWidgets
Appendix 1 – EFBXP Network Version
Installation When installing the EFBXP on the remote machine select the "Network Version" from the drop-down menu. The setup routine will install the same Program Group shortcuts as in the Standard Version with the addition of the following:
Additional Program Group icon - Launch EFBXP Desktop Icon Option – Launch EFBXP
This capability does come with some compromises over the standard non-networked version of EFBXP: All Approach Plates/Charts/Manuals and flight plans (.FMS) must be housed on the remote machine. After installation you must add the appropriate settings to the EFBXP_NET.ini file which is installed in the same folder as the EFBXP.exe file. Open it with a text editor and you will see the following default entries:
[Connection]
Host=127.0.0.1
Port=1234
Set the entries to your desired IP address (or network name) and port number, then save the EFBXP_NET.ini file. Launching EFBXP To launch the EFBXP, use either of the two above-mentioned shortcuts, or execute the file EFBXP.exe directly. You may run more than one copy of the EFBXP on the remote machine, for example one to view the moving map and another for charts etc. You may as well use the extra resources! Powering Up EFBXP Before powering up the EFBXP you will need to start the FSWidgets Net Host application and connect it to X-Plane. On pressing the PWR button the boot sequence will include a network connection status message. If network connection is unsuccessful the EFBXP boot screen will advise and to attempt another connection you must power down the unit and up again (not necessary to exit the EFBXP). An LED on the top right of the faceplate will advise of connection status: GREEN = Connected, RED = Disconnected, GRAY = Idle. EFBXP Demo The demo of the Network Version has been extended to a 30-minute session, but only once every Windows session (obviously there is no X-Plane on the remote machine as in the case of the Standard Version).
These notes list the main differences in the Network Version of EFBXP. To use it you must also install the FSWidgets Network Pack on the host machine – see Downloads http://fswidgets.com

FSWidgets - EFB for X-Plane 27
EFBXP Operators Manual – Revised 2/25/2014 Copyright © 2011 FSWidgets
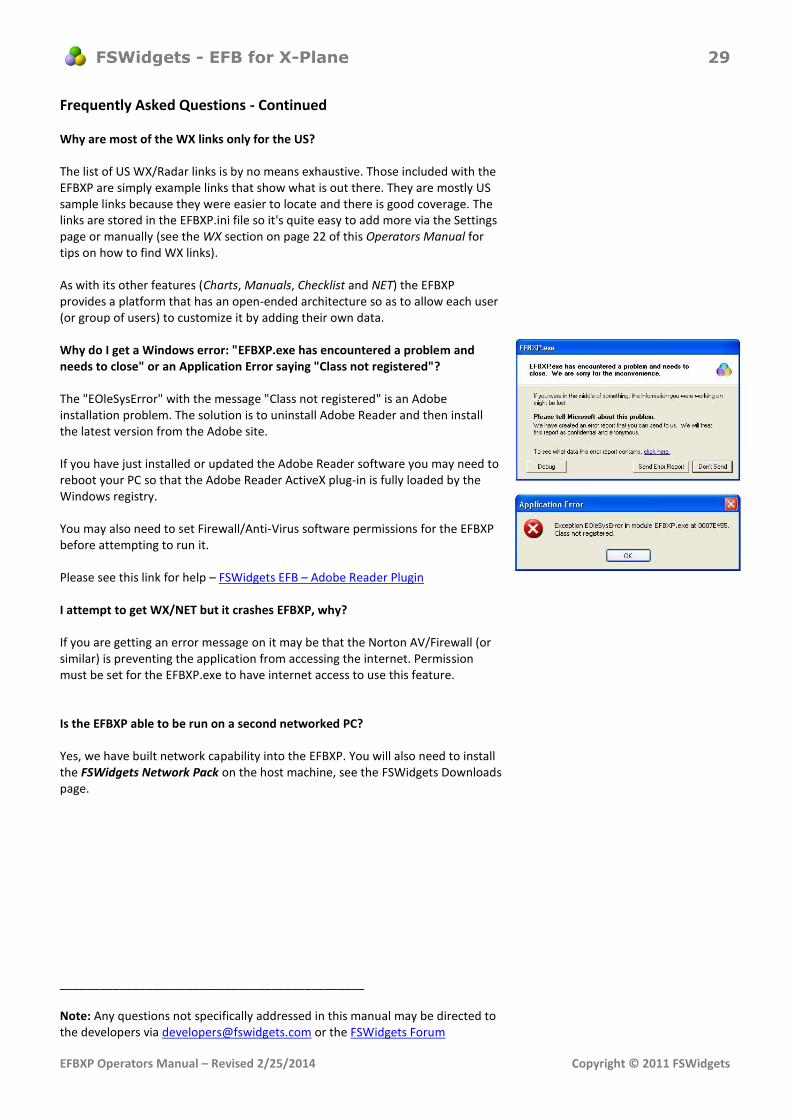
Frequently Asked Questions Is Adobe Reader mandatory? Yes, we are using the latest Adobe Reader ActiveX plug-in (installed by the Reader) to display PDF approach charts and it must be installed prior to using EFBXP - Adobe Reader Download (Users of Adobe Acrobat do not require the Reader). Is the EFBXP resizable? The EFBXP faceplate itself is fixed in size, but when viewing any PDF/BMP charts, PDF/HTM manuals or the NET page there are two special zoom options that enlarge the viewing window (See the Charts, Manuals and NET section for details). Due to the nature of the information being displayed and the Windows elements being employed (not a scalable BMP-based gauge) the unit needs to be a reasonable size. In the real world the FAA Advisory Circular (AC No. 120-76A) recommends that EFB display size be at least the same size as the traditional paper approach charts and for good reason, any smaller and legibility will suffer, even in vector-based diagrams such as Adobe PDF documents. Therefore, after careful consideration of the variety of data that is displayed by the EFBXP we have created the unit at a size optimized to ensure the best viewing and as such the minimum system requirement is a screen resolution of 1024x768 pixels. On exiting X-Plane I am getting an error message, why? The processes running within the EFBXP (e.g. Adobe Reader plug-in, etc) may generate an error on shutting down X-Plane on some systems. If you use ALT+F4 to close X-Plane the error may state "EFBXP.exe has encountered a problem and needs to close", if you use the quit menu item it may say "X-Plane has encountered a problem and needs to close". In such cases it is always recommended you shut down the EFBXP unit with the X key on the EFBXP bezel before exiting X-Plane. I get pop-ups accessing some sites via the NET page, why? The NET page is in effect a full web browser. If you access a site which has a JavaScript pop-up advertisement then it may display, EFBXP does not have control over this but it is website-related. Our advice – stay away from these sites!

FSWidgets - EFB for X-Plane 28
EFBXP Operators Manual – Revised 2/25/2014 Copyright © 2011 FSWidgets
Frequently Asked Questions - Continued Why am I getting a network activity pop-up from my Firewall? You have either attempted to download a WX image or a NET link and so EFBXP needs to go online, naturally enough. Until you add EFBXP to the list of allowed programs you will see this message. You will also get a similar message when attempting to run the Networked Version. Why do I get a message telling me my screen width and height is only 800x600 when I know I have my desktop set to a higher resolution? The EFBXP reads your screen resolution in real time and it appears you may be running X-Plane in fullscreen mode at a resolution lower than 1024x768. When you run X-Plane, it may be changing your screen resolution to whatever setting you have in the Rendering options, here’s how to check: 1. Follow the X-Plane menu "Settings – Rendering Options" 2. Check the "Screen Res" setting 3. Note if you have the option "Set Color-depth and monitor resolution on X-Plane startup" What does it mean if I get this message on the WX page?
It means there is either a network problem (check your connection) or more likely, the image you are trying to download no longer exists. Open the EFBXP.ini file in the main X-Plane\EFBXP folder and check the full URL address to the JPG with a browser.
FSWidgets - EFB for X-Plane 29
EFBXP Operators Manual – Revised 2/25/2014 Copyright © 2011 FSWidgets
Frequently Asked Questions - Continued Why are most of the WX links only for the US? The list of US WX/Radar links is by no means exhaustive. Those included with the EFBXP are simply example links that show what is out there. They are mostly US sample links because they were easier to locate and there is good coverage. The links are stored in the EFBXP.ini file so it's quite easy to add more via the Settings page or manually (see the WX section on page 22 of this Operators Manual for tips on how to find WX links). As with its other features (Charts, Manuals, Checklist and NET) the EFBXP provides a platform that has an open-ended architecture so as to allow each user (or group of users) to customize it by adding their own data. Why do I get a Windows error: "EFBXP.exe has encountered a problem and needs to close" or an Application Error saying "Class not registered"? The "EOleSysError" with the message "Class not registered" is an Adobe installation problem. The solution is to uninstall Adobe Reader and then install the latest version from the Adobe site. If you have just installed or updated the Adobe Reader software you may need to reboot your PC so that the Adobe Reader ActiveX plug-in is fully loaded by the Windows registry. You may also need to set Firewall/Anti-Virus software permissions for the EFBXP before attempting to run it. Please see this link for help – FSWidgets EFB – Adobe Reader Plugin I attempt to get WX/NET but it crashes EFBXP, why? If you are getting an error message on it may be that the Norton AV/Firewall (or similar) is preventing the application from accessing the internet. Permission must be set for the EFBXP.exe to have internet access to use this feature. Is the EFBXP able to be run on a second networked PC? Yes, we have built network capability into the EFBXP. You will also need to install the FSWidgets Network Pack on the host machine, see the FSWidgets Downloads page. ______________________________________________ Note: Any questions not specifically addressed in this manual may be directed to the developers via [email protected] or the FSWidgets Forum

FSWidgets - EFB for X-Plane 30
EFBXP Operators Manual – Revised 2/25/2014 Copyright © 2011 FSWidgets
Version History Note: When installing updates you may need to re-set internet access and other permissions on your Anti-Virus/Firewall due to the changed EFBXP.exe file. Version 1.4 – January 9, 2013
Updated – 64 bit Support. This release adds support for X-Plane 10.20 or later in 64 bit mode. It also supports the 32 bit edition of X-Plane shipped in 10.20 (X-Plane-32bit.exe), and of course continues to support previous versions of X-Plane 9 and 10.
Version 1.3 – March 25, 2011
Updated - GMap Version 2.0 support. The new release of GMap 2.0 is required now for GMap functionality to be loaded into the GMap page within EFBXP. Please download the new version of GMap and add the new FSWidgetsGMap.exe file to the EFBXP folder, overwriting the old file.
Updated – Previous Page button Logic. This button used to toggle between the last visited page and the current, even if the previous page was just an introductory menu. Based on feedback it has been decided to change the logic and only include “active” pages in the “Previous Page” list. By “active” we mean pages that actually display active information, like the Map, WX, NET, Charts, Checklist or Manuals page (i.e. not a menu page like the Charts page). This way it is possible to load the Map, then return the main menu and load the WX, then toggle directly between the Map/WX with the Previous Page button. Returning to the Main menu clears the former “Previous Page” in readiness for a new page to be selected. Please note that the VECTOR/GMAP toggle button on lower panel on the Map page is part of this system so toggling between VECTOR/GMAP with the blue button adds those two pages to the “Previous Page” system.
Bug Fix - NET Page. Issue occurred when loading a new NET link and then expanding the screen by using the Mini Zoom or Maxi Zoom buttons. On exiting the zoomed state the NET link menu was hidden by the expanded internal web browser and this has now been fixed.
Bug Fix - WX Page. Issue occurred when trying to save a new WX link, the check for a valid JPG/PNG file was returning a false indication and preventing the saving of the link, now fixed.
Updated - GMap Reload. The GMap page now allows it to be refreshed (i.e. completely reload the map from the server) by pressing the F5 key.
Added – Menu Links. Direct links to the EFBXP.ini and EFBXP_NET.ini* (*Network installation only) are now included in the Programs menu (Windows Start button).
Version 1.2 – September 22, 2009 Added - GMap module support. Download our freeware, stand-alone GMap for X-Plane application and add the FSWidgetsGMap.exe file to the main EFBXP installation folder. EFBXP will detect and load the GMap file. On displaying the MAP page inside EFBXP there are now two moving map options to select from: VECTOR and GMAP. You can also toggle from one to the other using the VECTOR/GMAP button (see panel along bottom of both moving map screens). Added - GMap-style memory optimization. The new release of GMap has a built-in memory optimization feature and this is now also included in EFBXP (even if used without GMap). To avoid needless duplication for those running EFBXP with GMap (most users) finer control of the memory optimization can be gained by using the FSWidgetsGMap.ini file, regardless of whether the FSWidgetsGMap.exe file is present or not. Again, see the GMap Chart Supplement PDF file (in the GMap ZIP download) for details on how to fine-tune the memory trim feature. Addressed - Video Refresh Issue. On some systems, the EFBXP window would not paint itself or float on the X-Plane window. A new window class has been implemented which should address this issue.

FSWidgets - EFB for X-Plane 31
EFBXP Operators Manual – Revised 2/25/2014 Copyright © 2011 FSWidgets
Added – Vector Map Disconnect. You can now disconnect the VECTOR map which allows you to click and drag the map to pan around (similar to what GMap does). This can be useful when loading flight plans, charts or simply for viewing areas outside of the current zoom level. Added – Vector/GMap Mouse Wheel Zoom Control. The zoom in/out function in Vector and GMap view (not in standalone GMap) are now also adjustable via the mouse-wheel. Added – PNG file format support for WX Links. Because it is a 24-bit/RGB image format, Portable Network Graphics (PNG) files lend themselves well for resizing and return good results (the WX image viewing area is 490x400 pixels and images are resized to fit this window). There are many PNG weather and radar links on the Net and so we have added support for this file format in addition to the current JPG files. A small list of sample PNG links for Canada/US is included in the Sample_PNG_WX_Links.txt file (see inside the EFBXP ZIP file). If you are installing for the very first time, these links will be added automatically to the default EFBXP.ini file. If you have an existing EFBXP.ini file the installer will not overwrite it, so you will need to add the links manually. For those who may be wondering, GIF files (which are 8-bit/256-color) were tested but did not give good results. You can of course still view them via the NET page. Added – Optional Prefetch File Deletion. Some of the FSWidgets beta testers reported significant increases in loading times when the EFBXP*.pf files in the C:\Windows\Prefetch folder from the previous session are deleted on shutdown. FSWidgets neither recommends nor discourages anyone from using this option as there are many conflicting opinions about it. Because this is a user-discretion type function, it will only be available via a manual EFBXP.ini file entry if you want the files deleted automatically in case of long EFBXP startup times (should be 15-30 sec). [Settings] DeletePrefetchFiles=1 Windows routinely clears out this cache (max 128 files) but in any case only *.pf file that begin with EFBXP* in the C:\Windows\Prefetch folder will be deleted, no other files will be touched! Added – Support for Systems with 120 DPI (Large Fonts).
Version 1.1 – August 18, 2006 Added - NOS/GEO calibrated chart support. By request, the EFBXP Moving Map now supports NOS/GEO calibrated charts which are available from AeroPlanner.com (Sim Pack). A small sample chart of the Marianas (GUAM) is included in the installation. Please note: This proprietary chart format requires the NOS/GEO plug-in (filename: ngx.ocx) to be registered in Windows by the EFBXP installer. If the installation does not accomplish this for any reason (e.g. being blocked by anti-virus software) it can be done manually using the RegOCX.exe utility installed in the X-Plane\EFBXP folder. The installation and loading of NOS/GEO charts is identical to the method outlined for BMP/XML charts (See Page 14). Addressed – EFBXP Refresh Issue. On some systems moving the EFBXP around may have resulted in some elements inside the inner screen not updating after the unit was dragged to a new location. Now on releasing the mouse after dragging a full refresh is being forced, this should clear up the issue in most cases. Fixed – Chart Page IDENT Refresh Issue. Save Chart Folder Button not refreshing the IDENT List on the Charts Page. When the Charts folder was changed and also the Save Chart Folder button was clicked on the SETTINGS-GENERAL page, on returning to the Charts loading page the Charts IDENT list went blank and was not updating.
Version 1.0 – June 23, 2006 Initial Release of X-Plane Version

FSWidgets - EFB for X-Plane 32
EFBXP Operators Manual – Revised 2/25/2014 Copyright © 2011 FSWidgets
FSWidgets License Agreement Copyright © 2013 FSWidgets.com - All rights reserved THE PROGRAM is protected by U.S. and International copyright laws, treaties and conventions and other Australian laws. The Program is licensed, and not sold, and this Agreement confers no title or ownership to the Program or any copy thereof. 1. Limited Use License. Author grants you the non-exclusive, non-transferable, limited right and license to use this shareware solely for your personal use on a single computer. 2. Ownership. All intellectual property rights in and to the Program (including but not limited to video, audio and other content incorporated therein) and title to any and all copies thereof are owned by author or its licensors, and you receive no right or interest therein other than the limited license in paragraph 1 hereof. YOU SHALL NOT:
Copy the Program except a single backup copy for your personal use.
Sell, rent, lease, license, distribute or otherwise transfer or make available to any other person the Program, in whole or in part, or use the Program or any part thereof in any commercial context, including but not limited in a service bureau, "cyber cafe", computer gaming center or any other commercial location in which multiple users may access the Program.
Reverse engineer, derive source code, modify, decompile, disassemble, or create derivative works of the Program, in whole or in part.
Remove, disable or circumvent any proprietary notices or labels contained on or within the Program.
Export or re-export the Program or any copy or adaptation in violation of any applicable export restrictions or other laws or regulations.
LIMITATION ON DAMAGES. IN NO EVENT WILL AUTHOR BE LIABLE FOR SPECIAL, INCIDENTAL OR CONSEQUENTIAL DAMAGES RESULTING FROM POSSESSION, USE OR MALFUNCTION OF THE PROGRAM, INCLUDING DAMAGES TO PROPERTY, LOSS OF GOODWILL, COMPUTER FAILURE OR MALFUNCTION AND, TO THE EXTENT PERMITTED BY LAW, DAMAGES FOR PERSONAL INJURIES, EVEN IF FSWIDGETS HAS BEEN ADVISED OF THE POSSIBILITY OF SUCH DAMAGES. FSWIDGETS LIABILITY SHALL NOT EXCEED THE ACTUAL PRICE PAID FOR THE LICENSE TO USE THIS PROGRAM. SOME STATES/COUNTRIES DO NOT ALLOW LIMITATIONS ON HOW LONG AN IMPLIED WARRANTY LASTS AND/OR THE EXCLUSION OR LIMITATION OF INCIDENTAL OR CONSEQUENTIAL DAMAGES, SO THE ABOVE LIMITATIONS AND/OR EXCLUSION OR LIMITATION OF LIABILITY MAY NOT APPLY TO YOU. THIS WARRANTY GIVES YOU SPECIFIC LEGAL RIGHTS, AND YOU MAY HAVE OTHER RIGHTS WHICH VARY FROM JURISDICTION TO JURISDICTION. TERMINATION. Without prejudice to any other rights of author, this Agreement will terminate automatically if you fail to comply with its terms and conditions. In such event, you must destroy all copies of the Program and all of its component parts. INJUNCTION. Because the author would be irreparably damaged if the terms of this Agreement were not specifically enforced, you agree that the author shall be entitled, without bond, other security or proof of damages, to appropriate equitable remedies with respect to breaches of this Agreement, in addition to such other remedies as author may otherwise have under applicable laws. INDEMNITY. You agree to indemnify, defend and hold author, its partners, affiliates, contractors, officers, directors, employees and agents harmless from all damages, losses and expenses arising directly or indirectly from your acts and omissions to act in using the Program pursuant to the terms of this Agreement. MISCELLANEOUS. This Agreement represents the complete agreement concerning this license between the parties and supersedes all prior agreements and representations between them. It may be amended only by a writing executed by both parties. If any provision of this Agreement is held to be unenforceable for any reason, such provision shall be reformed only to the extent necessary to make it enforceable and the remaining provisions of this Agreement shall not be affected. This Agreement shall be governed by and construed in accordance with the laws of Australia and you consent to the exclusive jurisdiction of the courts of Australia.