foundations for flute - · pdf file1 purpose of this book this book is the first in a series...
TRANSCRIPT
FoundationsforFlute
Ryan LeeWakefield
1Purpose ofthis Book
This book is the first in a series of method books for flute. It explains all the fundamental parts of music and the flute. This book can even be used before renting or buying a flute.
The other books in this series are used at the same time. Each book focuses on one aspect of music or the flute and compliments each other.
This series can also be used as a supplement for elementary band programs. A great thing about music is its universality. It doesn’t matter if you’re from America, Russia, England, or anywhere else, music uses the same principles and techniques.
Have fun learning to play the Flute!!!
2Table ofContents
How To Put The Flute Together ................... 3
Timetable For Learning The Flute................ 5
Musical Terms ............................................... 6
Flute Tone Production ................................. 9
Tonguing (How to start notes) .................. 13
Fingering Chart .......................................... 14
Technique and Posture ............................. 19Technique and Posture ............................. 19
Reading Music Notation ........................... 20
Where To Next ........................................... 29
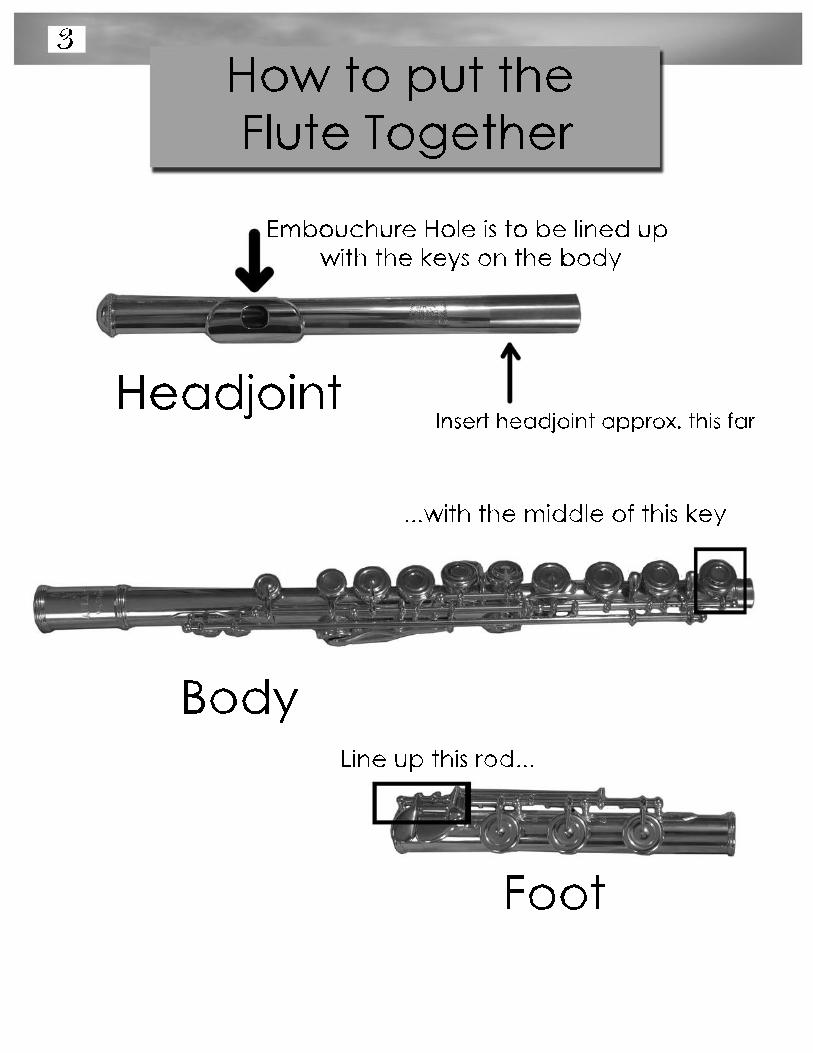
Insert headjoint approx. this far
Embouchure Hole is to be lined up with the keys on the body
Line up this rod...
...with the middle of this key
Headjoint
Body
Foot
3How to put the Flute Together
4
1. After opening the case on your lap, grab the Body and the Headjoint first.
2. Insert the Headjoint approximately to the arrow point and look down the flute to make sure the embouchure hole is lined up with the keys on the Body. Use a twisting motion to slide each part together.
3. Insert the Foot fully into the end of the Body. Line up 3. Insert the Foot fully into the end of the Body. Line up the rod with the middle of the last key on the Body.
*Be careful not to squeeze any part of the flute. Bending a rod or key can cause irreversible damage to a flute. If the parts of the flute do not slide together easily, wipe the tapered end of each part with a silver polishing cloth. This should be enough to clean the tapered ends.
*Never drop the flute at all costs. The main cause of *Never drop the flute at all costs. The main cause of dropping the flute is lying it on your lap and having in roll off. Always keep a hand on the flute or buy a flute stand to keep the flute on while not playing.
How to put the Flute Together
5
Some aspects of learning the flute will take more time than others and require different types of effort.
One such aspect is balancing the flute. There are three One such aspect is balancing the flute. There are three points of contact with the flute that are always present. They are the embouchure, the knuckle of the left index finger, and the right thumb. Sometimes the right pinky is used to balance the flute as well. Learning to balance the flute will feel like a yoga pose. Like yoga, don’t hold the pose for very long at first. You will build strength to hold it longer.longer.
Items such as notes, fingerings, key and time signatures, and other parts of music theory can be learned through memorization (flash cards) and at your own pace. There are many different things like these to learn in music, so take your time and learn them when they become relevant.
Learning to play in time and with correct rhythm will require a different kind of focus all together. The best way to learn is through listening and imitation. Chances are you already have a good sense of rhythm and all you need to do is pair that sense with the related musical notation.
Learning music will require different types of intelligence Learning music will require different types of intelligence such as memorization, logic, physical tasks, and most important, listening.
As with all learning, have patience.
Timetable for Learningthe Flute
6Musical Terms and Definitions
Here’s a reference of basic terms and concepts that will help you learn music.
Timbre- the quality of sound that refers to an instrument (sound of the flute, trumpet etc.) or the brightness/darkness/ warmth/shrillness of a sound, defined by the amplitude of each overtone of the fundamental tone; tone color
Overtones- a set of tones sounding above the Overtones- a set of tones sounding above the fundamental tone at specific ratios; the strength/amplitude of each overtone defines the timbre of the sound
Fundamental Tone- the strong, prime pitch of a sound
Pitch- the perceived highness or lowness of a sound
Tone- a single musical sound defined by pitch and Tone- a single musical sound defined by pitch and duration; a note
Articulation- the use of techniques to modify the attack/decay, connection, duration, dynamic, timbre, or pitch of individual notes creating interest, variety, and style
Phrasing- the ebb and flow of energy through a musical Phrasing- the ebb and flow of energy through a musical statement; techniques of articulation and dynamics direct the energy of the musical statement
7Dynamics- the softness (quietness) or loudness of a sound
Key- the series of tones forming any given major or minor tonality; tones which have harmonic relationships that are transposable to a higher or lower tonic note without changing those relationships. All other tones have a particular relation to the tonic note
Tonic- first note of a keyTonic- first note of a key
Interval- the distance between two tones in the musical alphabet
Melody- the distinct, memorable line in a piece of music, often sounds as the loudest part in a piece
Harmony- the relations of intervals sounding either Harmony- the relations of intervals sounding either simultanteously (vertical), in cadence (horizontal), or in combination. Also, the parts of music that sound under the melody; an accompanying line
Key Signature- pattern of sharps or flats that define a key in notation
Notation- written music
Musical Alphabet- A B C D E F G repeated higher and lower in Musical Alphabet- A B C D E F G repeated higher and lower in reverse order with half step sharp/flat notes in between; the series of keys on a piano/keyboard
8
Rhythm- the flow of notes through time, which have durations relative to a reference point and rate, often grouped together in units
Tempo- the rate of the beat, defined by a rate of beats per minute (bpm) as in 80 bpm, a word (Andante, Presto, ect) or by a conductor or band member (”1, 2, 1 2 3 4”)
Meter- the grouping of beats into a single unit, often Meter- the grouping of beats into a single unit, often characterized by strong and weak beats
Beat- the pulse of a piece of music; heartbeat, with even duration
Measure/Bar- one unit of the meter
Time Feel- the overall rhythmic sensation of a piece of music Time Feel- the overall rhythmic sensation of a piece of music usually described by vernacular terms (lively, morose, tight, funky, rocking, swinging, etc)
Groove- the danceable, head bopping aspect of a song defined by tempo and meter, often sounding as a pattern
Rubato- a time feel without a groove that can speed up or slow down as the musical phrasing dictates
9
Breath support is the first area of tone production on any woodwind instrument. Breath support means taking a deep, full breath each time you need one. You should breath from your stomach as opposed to your chest. You have a much larger capacity for air in your stomach than your chest and your abdominal, oblique, and lower back muscles will be able to force out air with more strength than the wheezing effect of your chest.strength than the wheezing effect of your chest.
To check if you are breathing from your stomach, lie flat on the floor or a bed and place a book on your stomach. When you breathe in, makes sure the book rises.
Breath Support
Sound is the most important aspect of the flute. In fact, the sound of any woodwind instrument is the reason why it exists at all. Developing a good sound is the first goal towards playing your instrument. These are the main aspects of flute tone production.
Flute ToneProduction
10
The larynx is the part of your throat you use to speak and sing. To find your larynx, yawn. In general for flute playing, the laynx should be kept in a “low singing” position. The low singing position is different for everyone, it’s just the lowest note you can sing without your throat closing. The larynx comes into play with intonation and tone color. Miming different vowel sounds with different pitches (not actually singing) with achieve a variety of pitches (not actually singing) with achieve a variety of effects.
Larynx
The embouchure is the muscles surrounding your lips and refers to the way in which your lips approach and adjust the flow of air into the embouchure hole in the headjoint of the flute. To form a flute embouchure, keep your lips in a neutral position (neither smiling or frowning) and create a small oval shaped opening in the middle of your lips. Once this is formed, bring the flute to your embouchure and cover about 1/3 of the embouchure embouchure and cover about 1/3 of the embouchure with your bottom lip, making sure not to squash your bottom lip into the lip of the headjoint.
Embouchure
Flute ToneProduction
11
The oral cavity involves your cheeks and tongue. In general, your cheeks should not be puffed out when playing the flute. They should be relaxed but firm. Your cheek muscles will come into play with your embouchure. Your tongue is used for articulation and the start of notes. It also comes into play with intonation and timbre. Experiment with high and low tongue positions using the “EE” sound in the word heel and the “OO” using the “EE” sound in the word heel and the “OO” sound in the word pool. For the most part, keep the tongue in a low position, as the tongue can cause unwanted turbulence in the sound of the flute.
TonguingTonguing is the process of using your tongue to start notes on the flute. To tongue, place your tongue on the ridge of your mouth just behind your top teeth. Then, build up air pressure behind your tongue and release your tongue to start the note. Different notes and dynamic levels will require different amounts of air pressure.
Oral Cavity
Flute ToneProduction
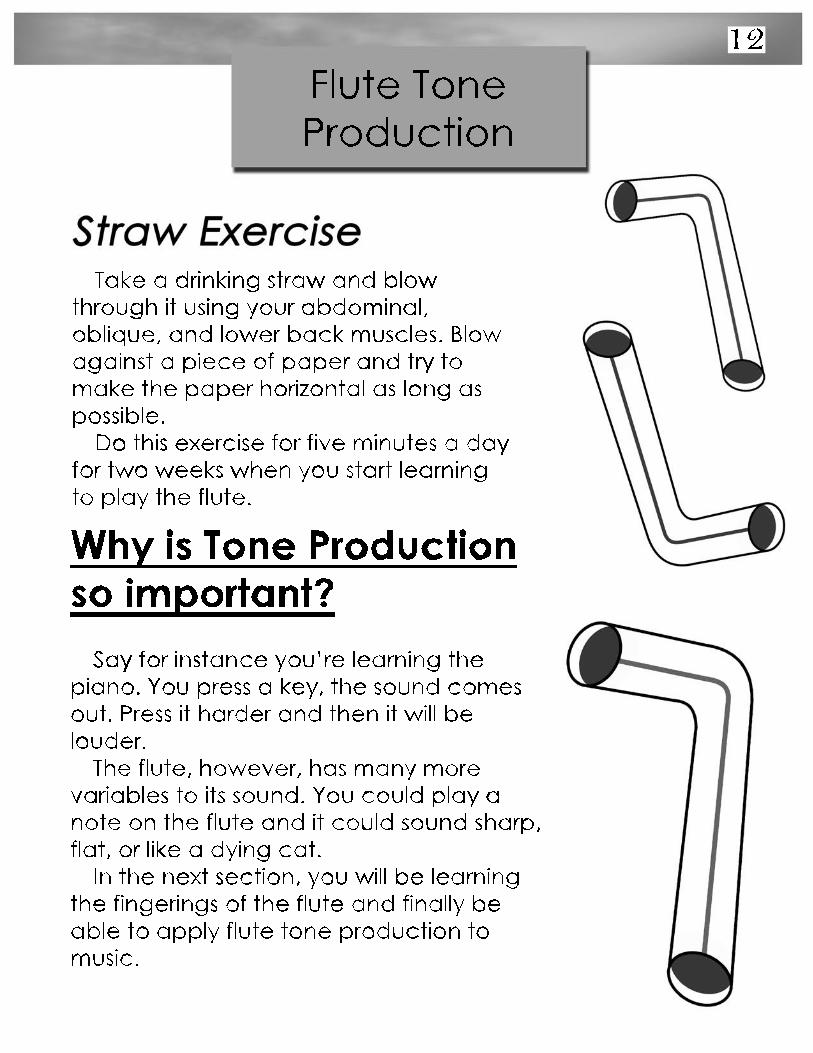
Take a drinking straw and blow through it using your abdominal, oblique, and lower back muscles. Blow against a piece of paper and try to make the paper horizontal as long as possible. Do this exercise for five minutes a day for two weeks when you start learning to play the flute.
Say for instance you’re learning the piano. You press a key, the sound comes out. Press it harder and then it will be louder. The flute, however, has many more variables to its sound. You could play a note on the flute and it could sound sharp, flat, or like a dying cat. In the next section, you will be learning the fingerings of the flute and finally be able to apply flute tone production to music.
12Flute ToneProduction
13
Here are some items to keep in mind when learning the flute.
1. Keep your fingers on the keys. Only lift them off just enough so the keys can fully extend.
2. Don’t slam and squeeze the keys. Only use necessary force to depress each key.
3. Sit or stand upright with both feet flat on the floor.
4. 4. Keep the flute parallel to the ground. If you hold the foot of the flute in front of the headjoint, this will ease any strain on your right arm.
5. Find the smallest movements for switching between each fingering. In order to play fast and in rhythm, all unnecessary movement must be removed from your technique.
Technique& Posture
14
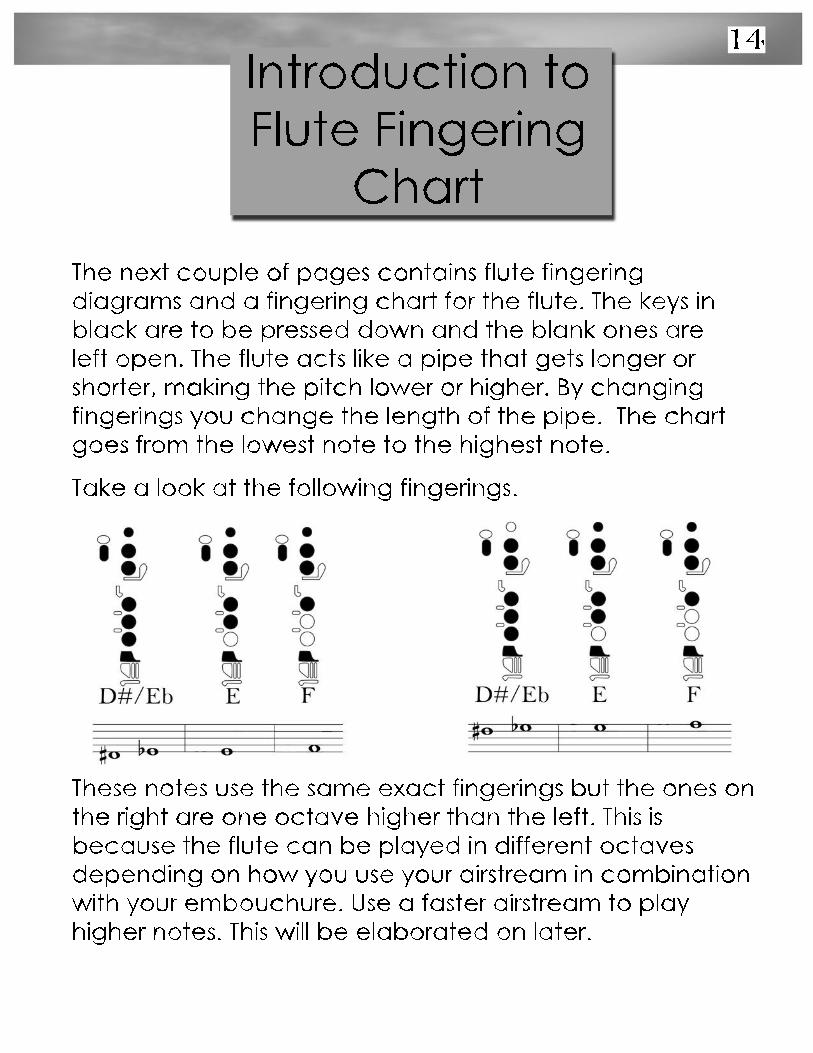
The next couple of pages contains flute fingering diagrams and a fingering chart for the flute. The keys in black are to be pressed down and the blank ones are left open. The flute acts like a pipe that gets longer or shorter, making the pitch lower or higher. By changing fingerings you change the length of the pipe. The chart goes from the lowest note to the highest note.
Take a look at the following fingerings.
These notes use the same exact fingerings but the ones on the right are one octave higher than the left. This is because the flute can be played in different octaves depending on how you use your airstream in combination with your embouchure. Use a faster airstream to play higher notes. This will be elaborated on later.
Introduction to Flute Fingering
Chart
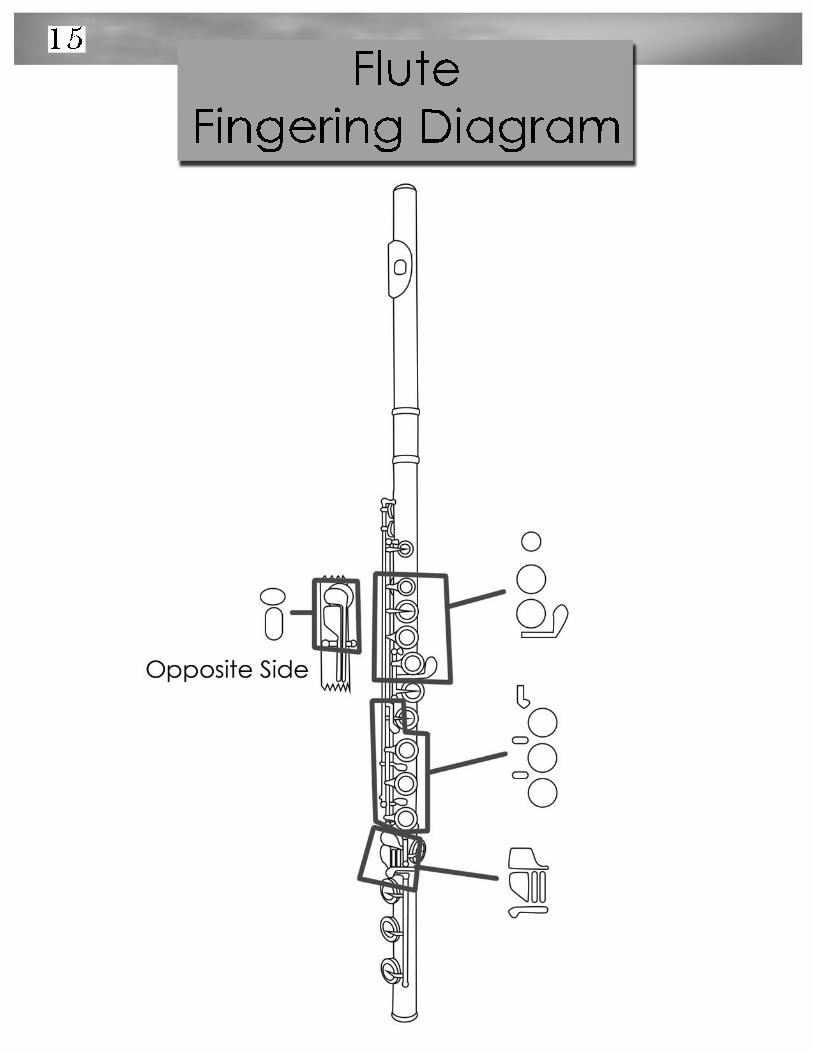
15Flute
Fingering Diagram
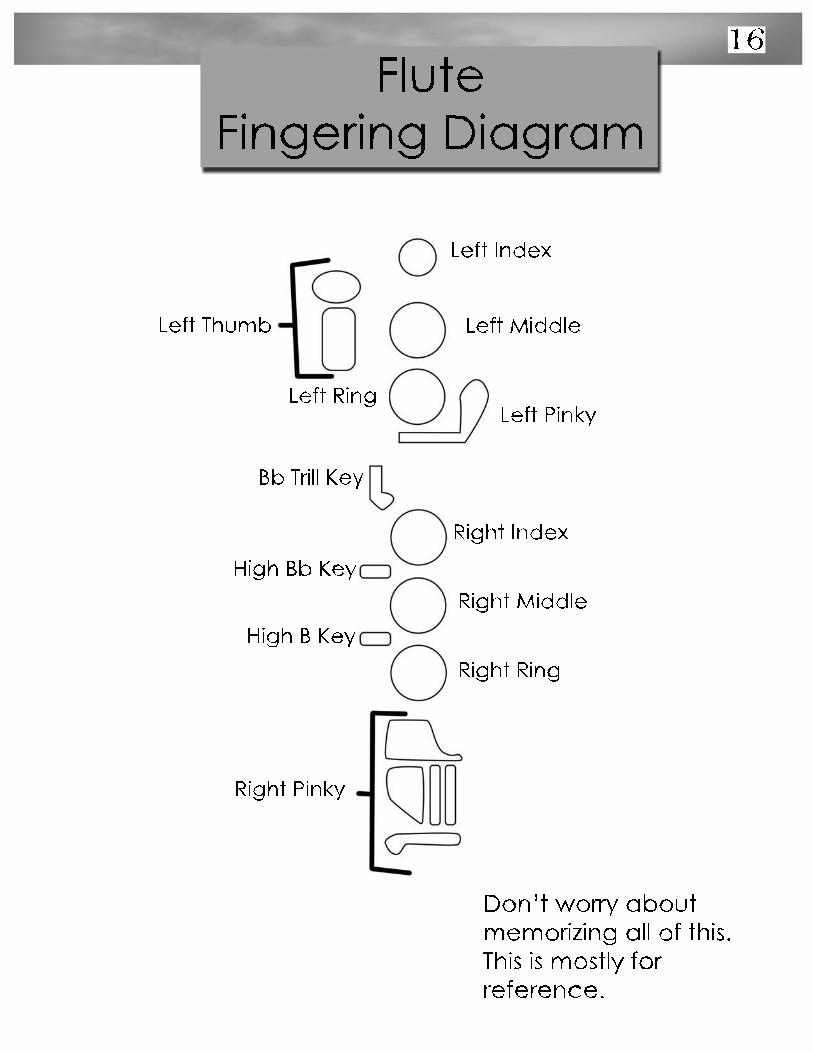
16
Right Index
Right Middle
Right Ring
Left Index
Left Middle
Left RingLeft Pinky
Right Pinky
High B Key
Bb Trill Key
High Bb Key
Left Thumb
Don’t worry about memorizing all of this. This is mostly for reference.
FluteFingering Diagram
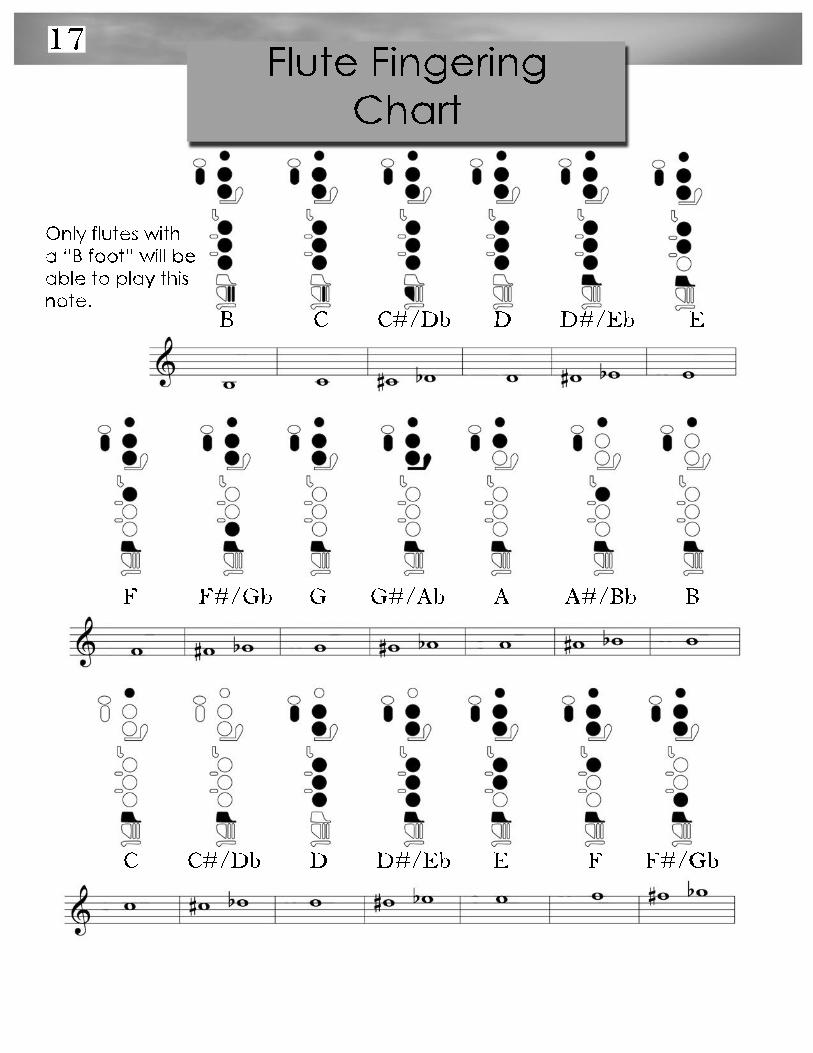
17
C C#/Db D D#/Eb E F F#/Gb
B C C#/Db D D#/Eb E
F F#/Gb G G#/Ab A A#/Bb B
Only flutes with a “B foot” will be able to play this note.
Flute FingeringChart
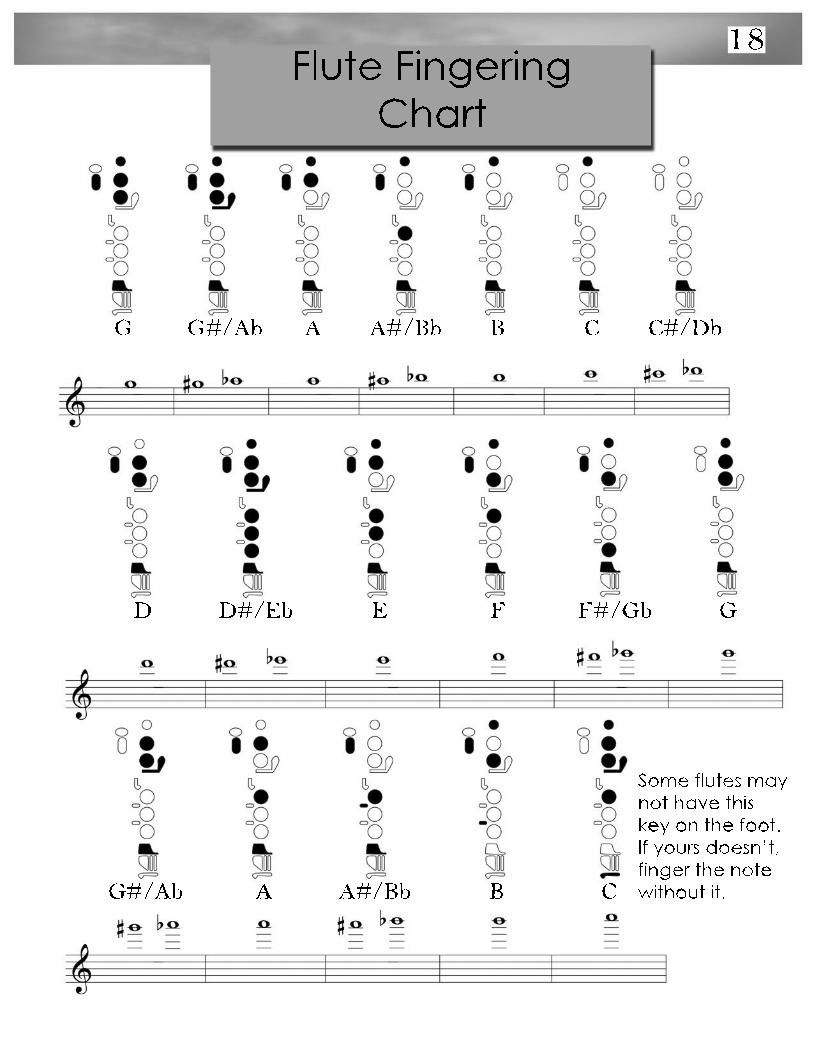
18Flute Fingering
Chart
G G#/Ab A A#/Bb B C C#/Db
D D#/Eb E F F#/Gb G
G#/Ab A A#/Bb B C
Some flutes maynot have thiskey on the foot.If yours doesn’t,finger the note without it.
19
Due to the fact that there is no resistance or back pressure when playing the flute, it can feel like it’s either all or nothing when it comes to producing a sound on the flute. Also the lack of resistance creates the feeling of being “light-headed,” which can be detrimental to practice (also be careful; sit while practicing until you no longer feel light-headed). Here’s a checklist that can alleviate most problems you will encounter with the flute.problems you will encounter with the flute.
1. Check your fingering. Unclosed keys will make the flute impossible to play in some cases.
2. Use enough breath support. Check with the straw and paper exercise.
3. Make sure not to cover too much of the embouchure hole with your bottom lip.
4. Is the opening in your embouchure too big? Blowing through a drinking straw with give a good reference for size.
5. Did you drop or damage your flute recently? Even if it was in its case? Even little bumps can knock keys out of alignment. If so, take your flute to an instrument repair shop for repairs (also don’t drop your flute).
Tone ProductionTips
20Reading MusicNotation
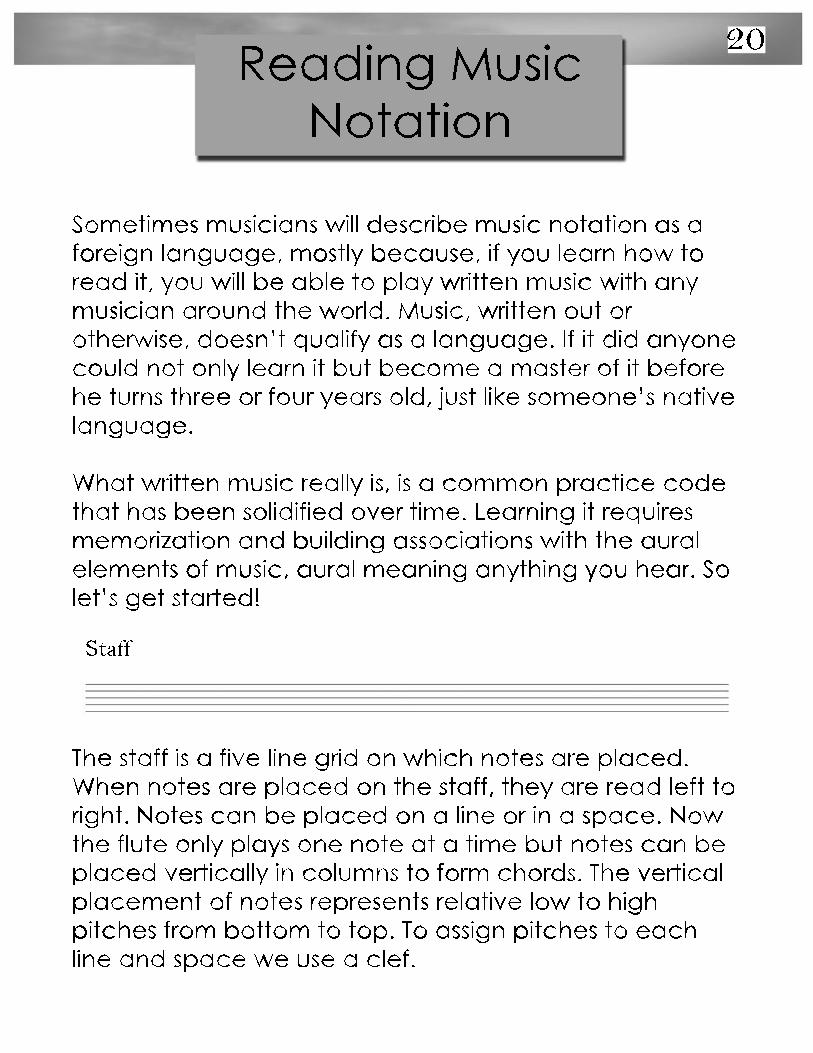
Sometimes musicians will describe music notation as a foreign language, mostly because, if you learn how to read it, you will be able to play written music with any musician around the world. Music, written out or otherwise, doesn’t qualify as a language. If it did anyone could not only learn it but become a master of it before he turns three or four years old, just like someone’s native language. language.
What written music really is, is a common practice code that has been solidified over time. Learning it requires memorization and building associations with the aural elements of music, aural meaning anything you hear. So let’s get started!
The staff is a five line grid on which notes are placed. When notes are placed on the staff, they are read left to right. Notes can be placed on a line or in a space. Now the flute only plays one note at a time but notes can be placed vertically in columns to form chords. The vertical placement of notes represents relative low to high pitches from bottom to top. To assign pitches to each line and space we use a clef.line and space we use a clef.
Staff
21
Clef
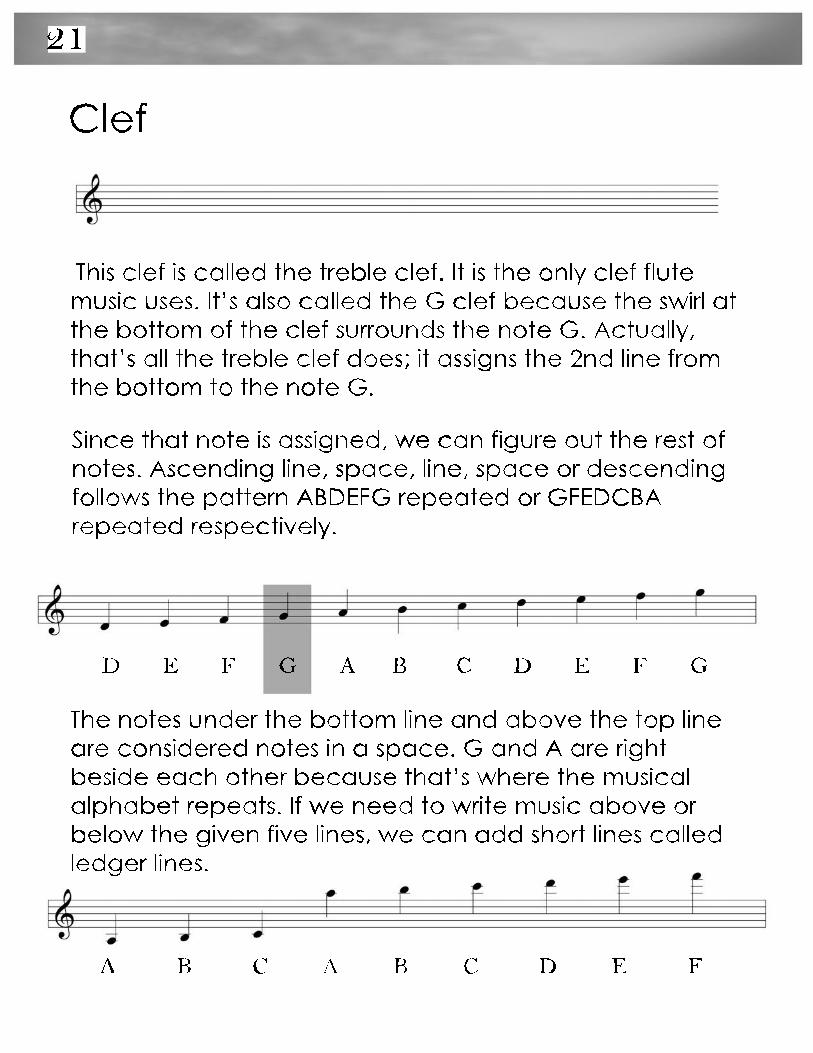
The notes under the bottom line and above the top line are considered notes in a space. G and A are right beside each other because that’s where the musical alphabet repeats. If we need to write music above or below the given five lines, we can add short lines called ledger lines.
A B C A B C D E F
D E F G A B C D E F G
This clef is called the treble clef. It is the only clef flute music uses. It’s also called the G clef because the swirl at the bottom of the clef surrounds the note G. Actually, that’s all the treble clef does; it assigns the 2nd line from the bottom to the note G.
Since that note is assigned, we can figure out the rest of notes. Ascending line, space, line, space or descending follows the pattern ABDEFG repeated or GFEDCBA repeated respectively.
flute
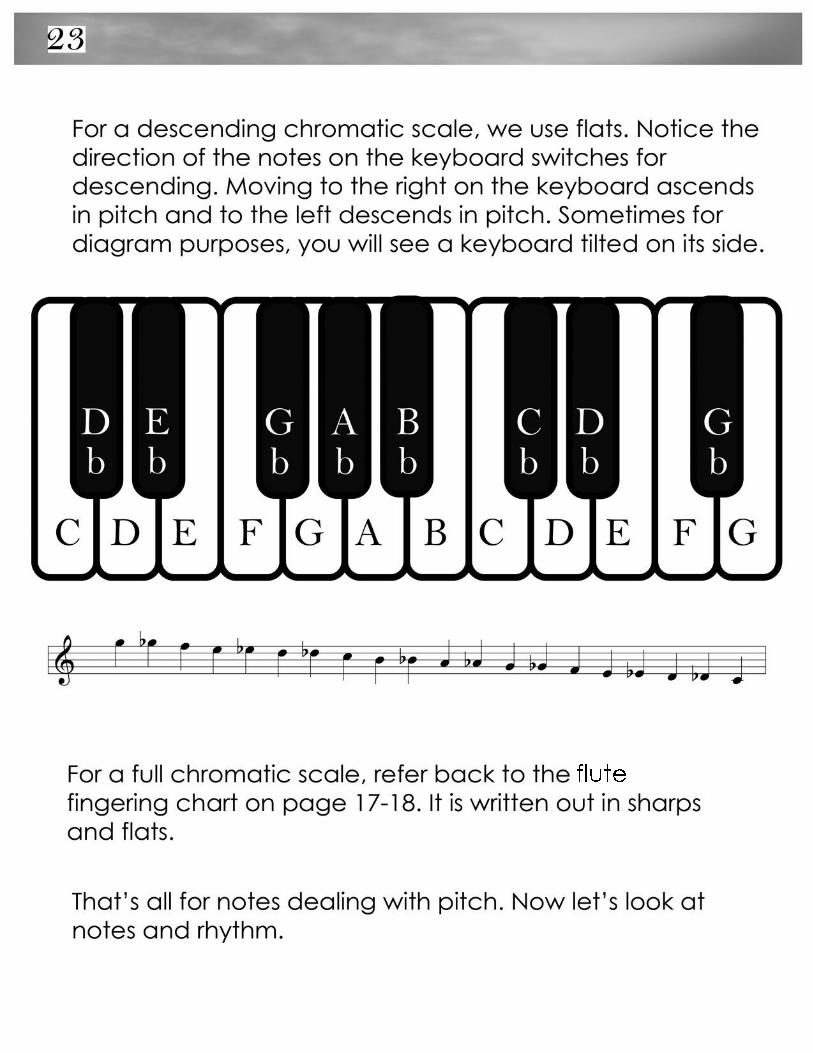
flute
24
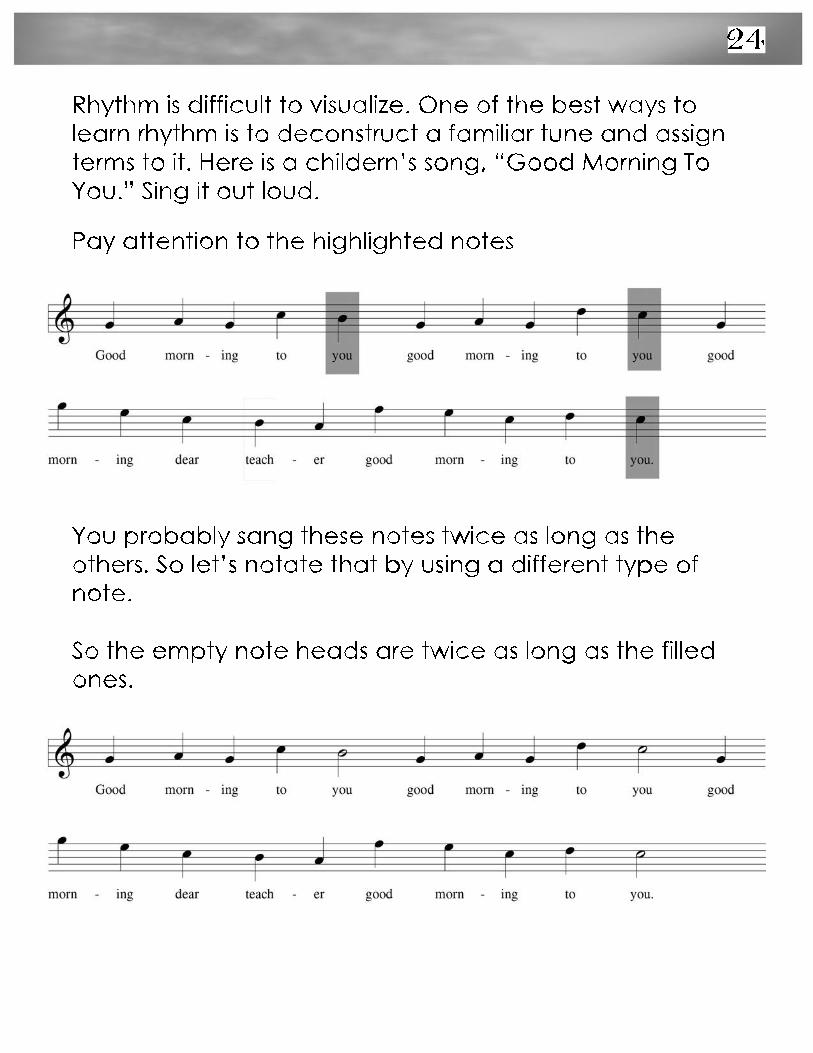
Rhythm is difficult to visualize. One of the best ways to learn rhythm is to deconstruct a familiar tune and assign terms to it. Here is a childern’s song, “Good Morning To You.” Sing it out loud.
You probably sang these notes twice as long as the others. So let’s notate that by using a different type of note.
So the empty note heads are twice as long as the filled ones.
Pay attention to the highlighted notes
25
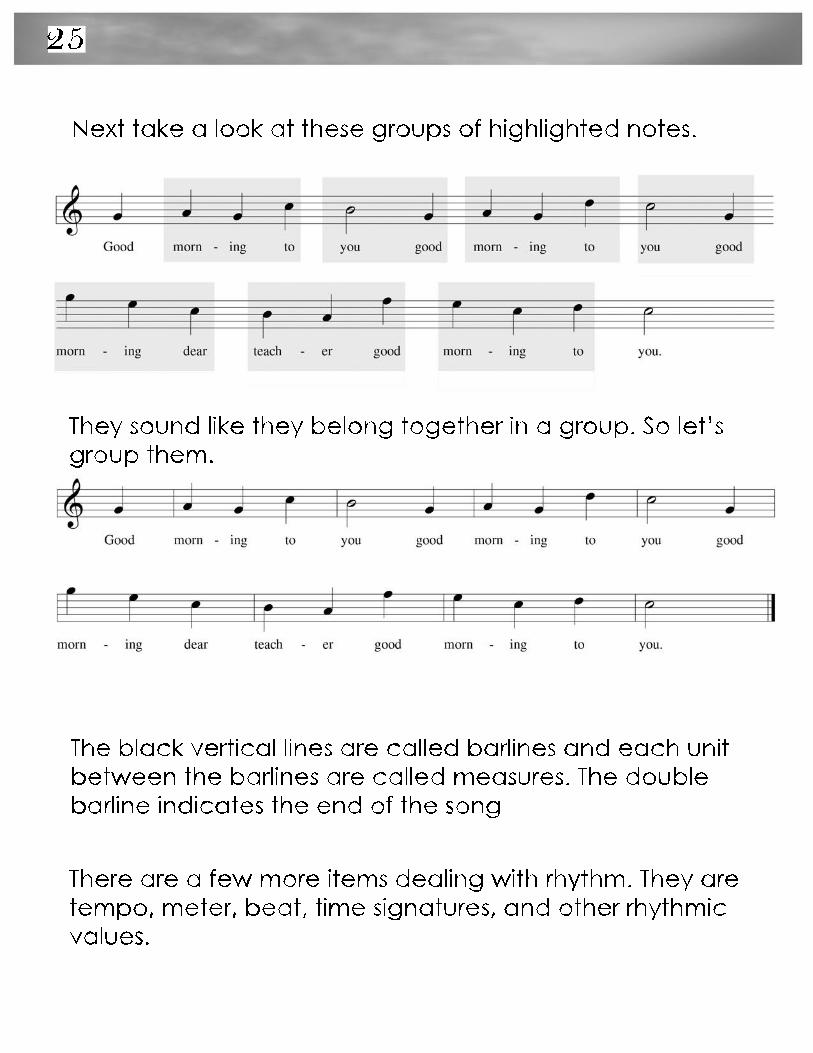
They sound like they belong together in a group. So let’s group them.
The black vertical lines are called barlines and each unit between the barlines are called measures. The double barline indicates the end of the song
There are a few more items dealing with rhythm. They are tempo, meter, beat, time signatures, and other rhythmic values.
Next take a look at these groups of highlighted notes.
26
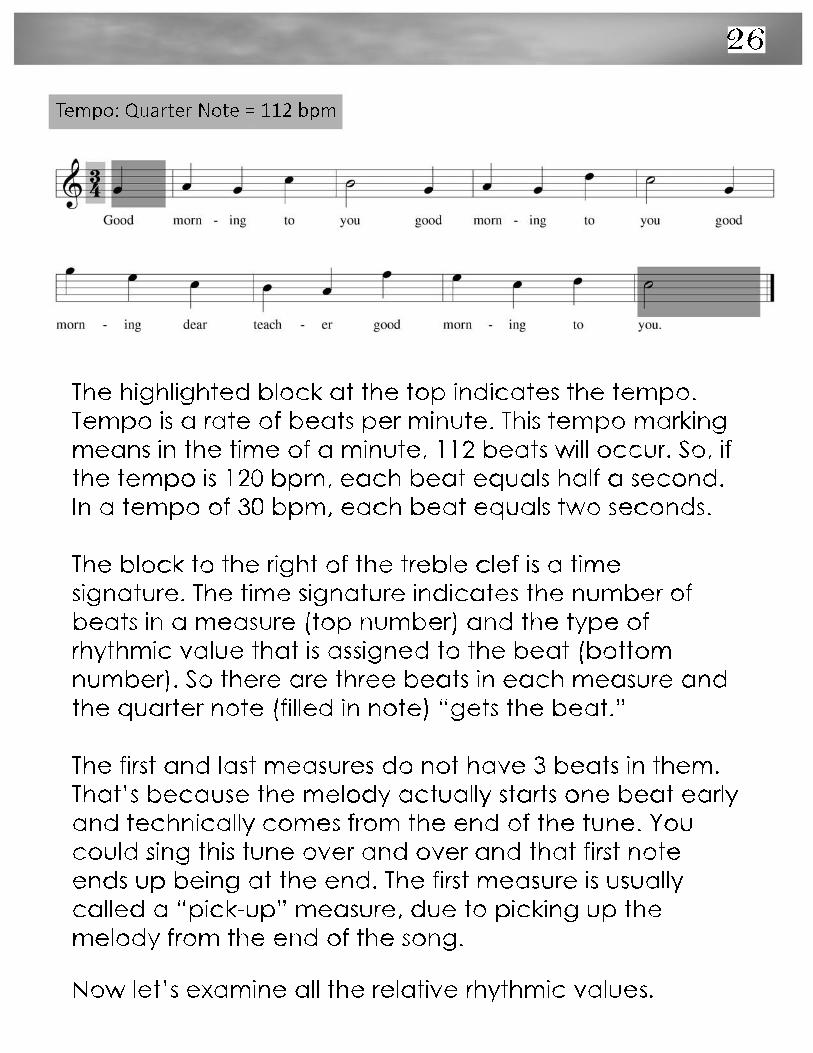
The highlighted block at the top indicates the tempo. Tempo is a rate of beats per minute. This tempo marking means in the time of a minute, 112 beats will occur. So, if the tempo is 120 bpm, each beat equals half a second. In a tempo of 30 bpm, each beat equals two seconds.
The block to the right of the treble clef is a time The block to the right of the treble clef is a time signature. The time signature indicates the number of beats in a measure (top number) and the type of rhythmic value that is assigned to the beat (bottom number). So there are three beats in each measure and the quarter note (filled in note) “gets the beat.”
The first and last measures do not have 3 beats in them. The first and last measures do not have 3 beats in them. That’s because the melody actually starts one beat early and technically comes from the end of the tune. You could sing this tune over and over and that first note ends up being at the end. The first measure is usually called a “pick-up” measure, due to picking up the melody from the end of the song.
Now let’s examine all the relative rhythmic values.
Tempo: Quarter Note = 112 bpm
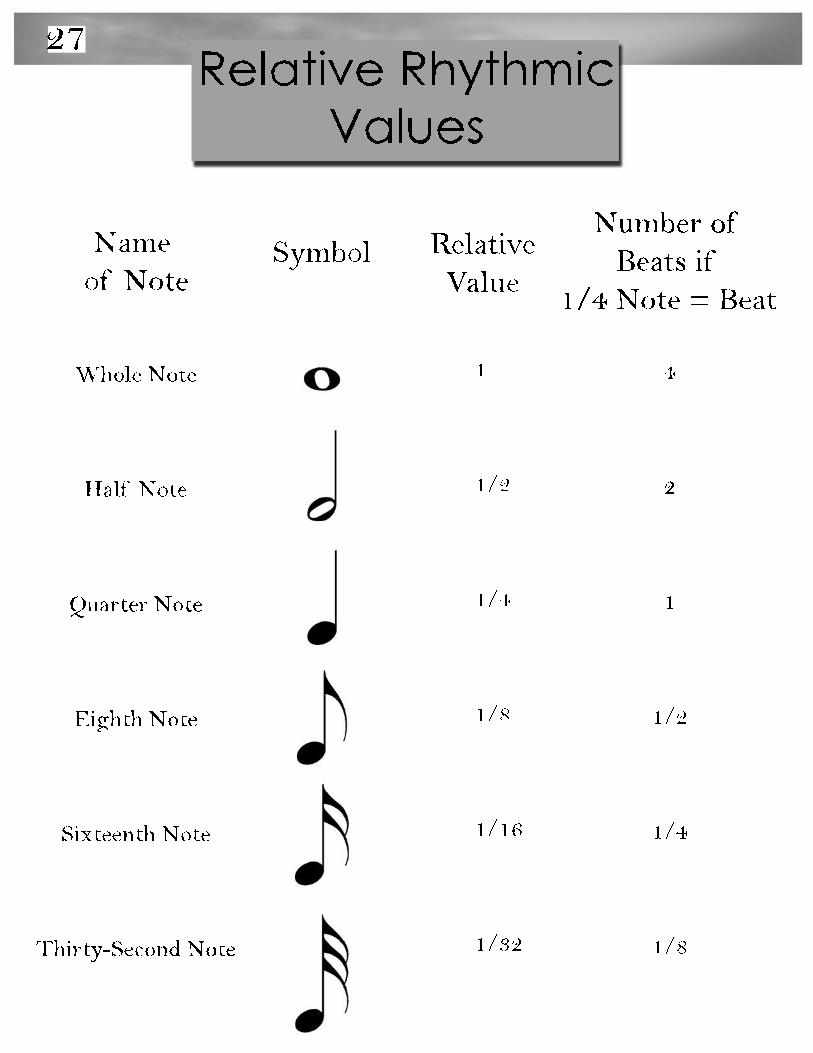
27Relative Rhythmic
Values
4
2
1
1/2
1/4
1/8
Number ofBeats if
1/4 Note = Beat
1
1/2
1/4
1/8
1/16
1/32
RelativeValue
Whole Note
Half Note
Quarter Note
Eighth Note
Sixteenth Note
Thirty-Second Note
Name of Note
Symbol
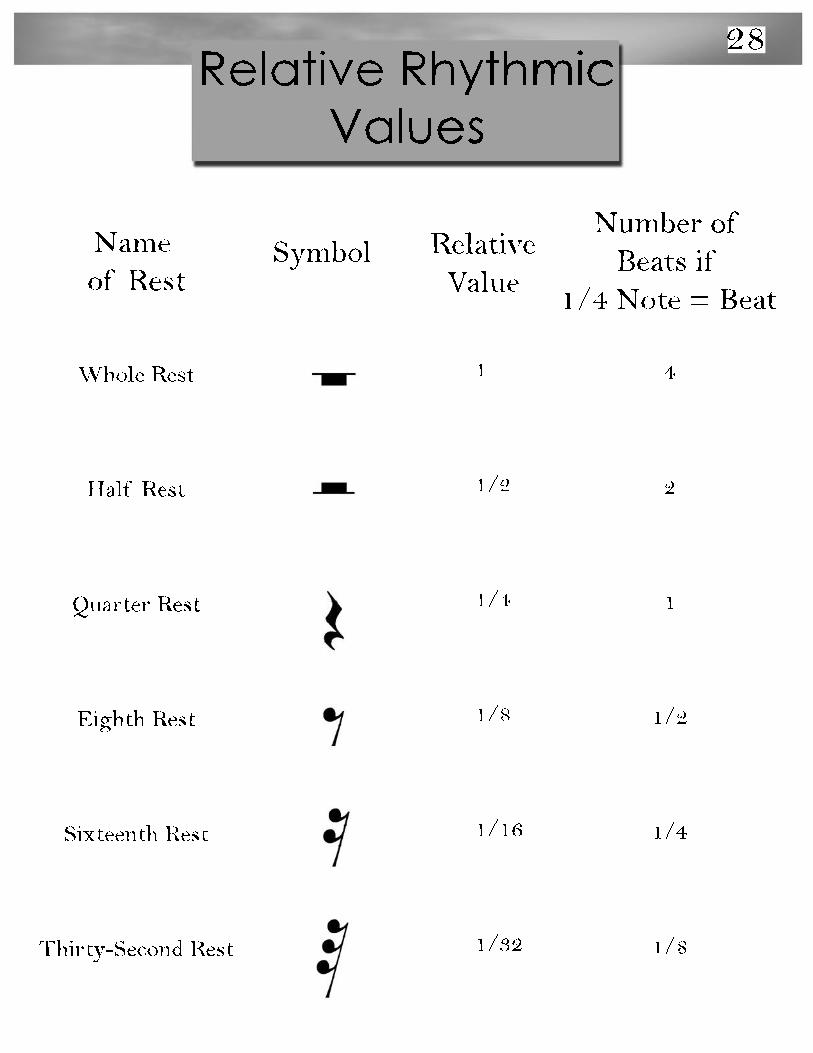
28Relative Rhythmic
Values
4
2
1
1/2
1/4
1/8
Number ofBeats if
1/4 Note = Beat
1
1/2
1/4
1/8
1/16
1/32
RelativeValue
Whole Rest
Half Rest
Quarter Rest
Eighth Rest
Sixteenth Rest
Thirty-Second Rest
Name of Rest
Symbol
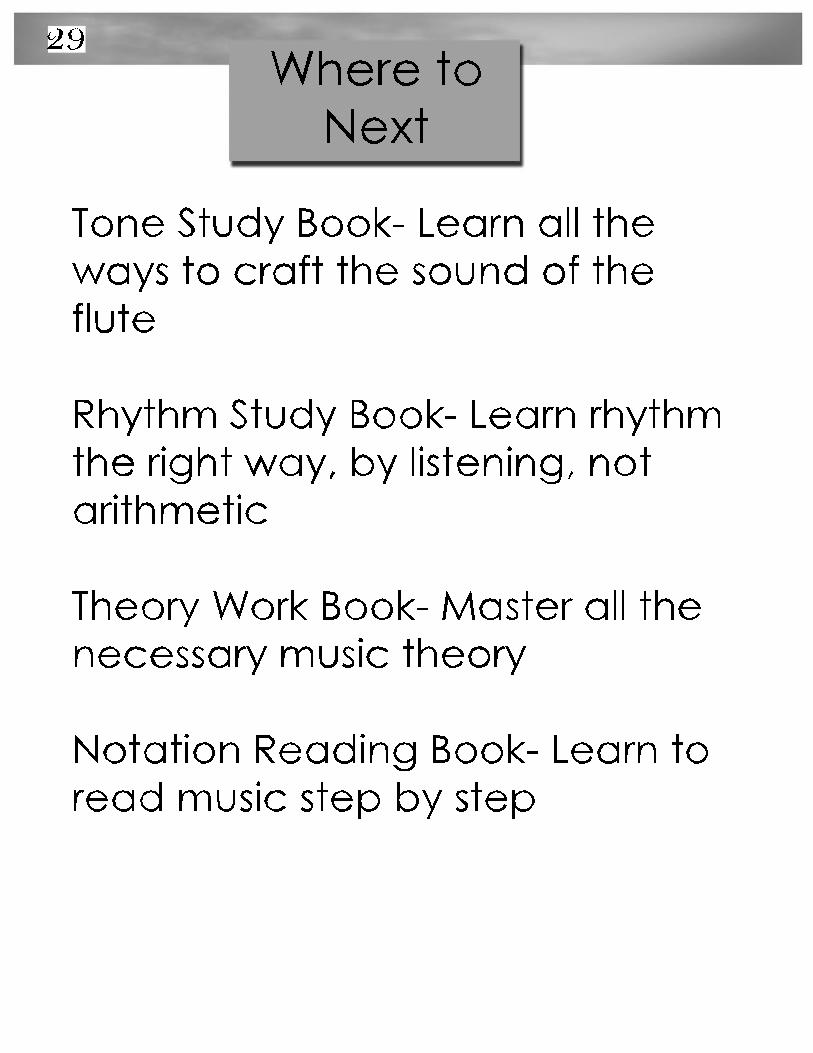
29Where toNext
Tone Study Book- Learn all the ways to craft the sound of the flute
Rhythm Study Book- Learn rhythm the right way, by listening, not arithmetic
Theory Work Book- Master all the Theory Work Book- Master all the necessary music theory
Notation Reading Book- Learn to read music step by step
30
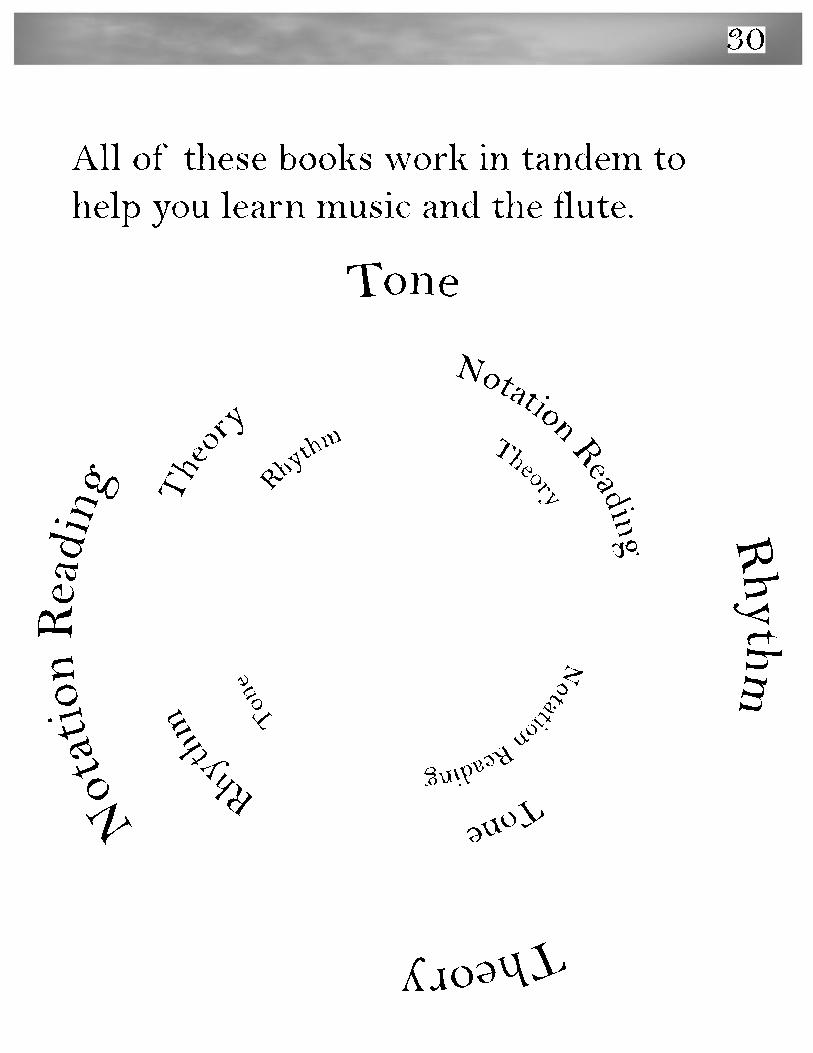
All of these books work in tandem to help you learn music and the flute.
Tone Rhythm
Theory
Notation Reading
Tone Rhy
thm Theor
y Notation Reading Tone R
hythm Theory N
otation Reading