forticlient endpoint security - fortinet docs...
TRANSCRIPT
FortiClient Endpoint Security™
Version 4.0 MR2Administration Guide
FortiClient Endpoint Security Administration GuideVersion 4.0 MR2 Rev. 1
20 January 2011
04-420-1116637-20101207
© Copyright 2010 Fortinet, Inc. All rights reserved. No part of this publication including text, examples, diagrams or illustrations may be reproduced, transmitted, or translated in any form or by any means, electronic, mechanical, manual, optical or otherwise, for any purpose, without prior written permission of Fortinet, Inc.
Trademarks
Dynamic Threat Prevention System (DTPS), APSecure, FortiASIC, FortiBIOS, FortiBridge, FortiClient, FortiGate®, FortiGate Unified Threat Management System, FortiGuard®, FortiGuard-Antispam, FortiGuard-Antivirus, FortiGuard-Intrusion, FortiGuard-Web, FortiLog, FortiAnalyzer, FortiManager, Fortinet®, FortiOS, FortiPartner, FortiProtect, FortiReporter, FortiResponse, FortiShield, FortiVoIP, and FortiWiFi are trademarks of Fortinet, Inc. in the United States and/or other countries. The names of actual companies and products mentioned herein may be the trademarks of their respective owners.
Windows is a registered trademark of Microsoft Corporation in the United States and other countries.
Regulatory compliance
FCC Class A Part 15 CSA/CUS
CAUTION: Risk of Explosion if Battery is replaced by an Incorrect Type. Dispose of Used Batteries According to the Instructions.
F0h
ContentsIntroduction .............................................................................................. 1What’s new in this release ............................................................................................. 1
About FortiClient Endpoint Security ............................................................................. 1
Fortinet Security Framework ......................................................................................... 3
FortiClient Editions ......................................................................................................... 4
System requirements...................................................................................................... 4
Supported Operating Systems.................................................................................... 5
Supported FortiGate and FortiManager versions ....................................................... 5
Language Support ...................................................................................................... 5
Additional FortiGuard Services ..................................................................................... 5
About this Guide ............................................................................................................. 6
Documentation ................................................................................................................ 6
Fortinet Tools and Documentation CD ....................................................................... 6
Fortinet Knowledge Center ........................................................................................ 6
Contact Fortinet technical documentation .................................................................. 7
Customer service and technical support...................................................................... 7
Installation ................................................................................................ 9Overview .......................................................................................................................... 9
FortiClient software packages ....................................................................................... 9
Windows executable (.exe) installer ........................................................................... 9
MSI installer ................................................................................................................ 9
Installation notes....................................................................................................... 10
Standard FortiClient Installation.................................................................................. 12
Single-user installation.............................................................................................. 12
Multiple-user installation ........................................................................................... 12
How to stop FortiClient start-up services................................................................... 12
FortiClient Licensing ............................................................................. 13Overview ........................................................................................................................ 13
Standard licensing ........................................................................................................ 14
Premium licensing ........................................................................................................ 14
Enterprise licensing...................................................................................................... 14
Configuring enterprise licenses ................................................................................ 15
Creating enterprise client license keys ..................................................................... 15
ortiClient Endpoint Security Version 4.0 MR2 Administration Guide4-420-1116637-20101207 ittp://docs.fortinet.com/ • Feedback

Contents
Custom Installer Packages ................................................................... 17Overview ........................................................................................................................ 17
Creating a customized installer using FCRepackager .............................................. 17
Creating the MST file with no command line parameters ......................................... 18
Creating the sample installation................................................................................ 18
Performing additional customizations ....................................................................... 19
Creating the custom MSI installation file................................................................... 20
Customizing the FortiClient application for enterprise licensing ............................... 23
Deploying the customized FortiClient application ..................................................... 23
Transferring customizations to later versions of FortiClient...................................... 23
Customizing the installer using an MSI editor ........................................................... 23
Creating a FortiClient custom installation ................................................................. 24
Suppressing Features............................................................................................... 25
Sample command lines ............................................................................................ 25
Specifying install log file............................................................................................ 25
Specifying multiple transforms on the command line ............................................... 26
Deploying the Customized Installation ....................................................................... 26
Endpoint NAC (FortiGate) distribution ...................................................................... 26
Active Directory installation....................................................................................... 26
Shared folder installation .......................................................................................... 26
Managing FortiClient with FortiManager .................................................................... 27
Communication between FortiClient and FortiManager ........................................... 27
Firewall behavior on FortiClient managed by FortiManager ..................................... 27
Customizing the FortiClient installation package for FortiManager central management 28
FortiClient partitioning and multiple FortiManager setup .......................................... 28
Configuring FortiClient installations to request registration ...................................... 29
Enabling Remote Management with FortiManager .................................................. 29
Advanced Scenarios..................................................................................................... 31
Installing FortiClient as part of a cloned disk image ................................................. 31
Installing FortiClient on cloned computers................................................................ 32
Installing FortiClient on Citrix servers ....................................................................... 32
Configuring AntiLeak for FortiClient.......................................................................... 32
Creating customized FortiClient installers ................................................................. 33
Corporate Security Policies .................................................................. 35Overview ........................................................................................................................ 35
User view of security policy ...................................................................................... 35
Configuring a corporate security policy ..................................................................... 36
Endpoint Network Access Control ....................................................... 37Overview ........................................................................................................................ 37
Enforcing use of FortiClient software ......................................................................... 37
FortiClient Endpoint Security Version 4.0 MR2 Administration Guideii 04-420-1116637-20101207
http://docs.fortinet.com/ • Feedback
Contents
F0h
Configuring FortiGuard Services ................................................................................ 38
Setting the FortiClient version..................................................................................... 38
Uploading the FortiClient installer to your FortiGate unit .......................................... 40
Enabling Endpoint Control........................................................................................... 40
Creating Endpoint Control profiles............................................................................ 40
Creating an Application Detection List...................................................................... 41
Applying an Endpoint Control profile to a firewall policy ........................................... 44
Monitoring Endpoints ................................................................................................ 45
Creating FortiClient VPNs ..................................................................... 47Overview ........................................................................................................................ 47
Configuring VPN connections using FortiClient........................................................ 47
Configuring VPN connections on FortiGate units ..................................................... 47
FortiClient SSL VPN client ........................................................................................... 48
Configuring VPN connections using FortiManager................................................... 50
Configuring VPN connections using custom installations....................................... 50
Configuring the FortiGate gateway as a policy server .............................................. 50
About split tunneling .................................................................................................... 50
Per-User Web Filtering .......................................................................... 53Overview ........................................................................................................................ 53
Web filtering on Windows networks.......................................................................... 53
Web filtering for remote users................................................................................... 53
Configuring web filtering.............................................................................................. 53
Managing FortiClient computers............................................................................... 54
Defining web filter profiles......................................................................................... 54
Configuring LDAP settings........................................................................................ 55
Assigning web filter profiles ...................................................................................... 55
FortiClient VPN Client............................................................................ 57Overview ........................................................................................................................ 57
Using the FortiClient VPN Editor ................................................................................. 58
Importing VPN tunnel settings .................................................................................. 59
Configuring VPN tunnel settings............................................................................... 59
Configuring certificates for FortiClient VPN .............................................................. 61
Exporting configurations to the FortiClient VPN installer ........................................ 61
Using the FortiClient API....................................................................... 63Overview ........................................................................................................................ 63
ortiClient Endpoint Security Version 4.0 MR2 Administration Guide4-420-1116637-20101207 iiittp://docs.fortinet.com/ • Feedback
Contents
Controlling a VPN.......................................................................................................... 63
Linking to the COM library ........................................................................................ 63
Retrieving a list of VPN connection names............................................................... 64
Opening the VPN tunnel ........................................................................................... 64
Responding to XAuth requests ................................................................................. 64
Monitoring the connection......................................................................................... 65
Setting and monitoring a security policy.................................................................... 65
Setting a security policy ............................................................................................ 66
Reading a security policy.......................................................................................... 66
Monitoring policy compliance.................................................................................... 66
Making the FortiClient application comply with the policy......................................... 67
API reference ................................................................................................................. 67
Appendix A: Installer Public Properties............................................... 69
Appendix B: External License Validation ............................................ 75Implementing the External Validation Service using Apache Tomcat..................... 75
Obtaining the WSDL file ........................................................................................... 75
Setting up the Web Server........................................................................................ 75
Connecting to FortiManager Web Services................................................................ 76
Obtaining the WSDL file ........................................................................................... 76
sayHello function ...................................................................................................... 76
validateKey function.................................................................................................. 76
enterprise_license_alert function .............................................................................. 78
Index ...................................................................................... 79
FortiClient Endpoint Security Version 4.0 MR2 Administration Guideiv 04-420-1116637-20101207
http://docs.fortinet.com/ • Feedback
F0h
IntroductionThis chapter introduces you to FortiClient Endpoint Security software and the following topics:
• About FortiClient Endpoint Security
• Documentation
• Customer service and technical support
What’s new in this release
The following features are new in this release:
• The extended antivirus database is now available in the Standard edition client. No configuration changes are needed. The extended antivirus database is automatically downloaded when the client first connects to the FortiGuard servers. Once the extended antivirus database has been downloaded, future updates include only those that have changed. The only difference between the Standard and Premium editions is the update frequency which is daily and hourly (if configured), respectively, for the antivirus functionality.
• Due to the addition of the extended antivirus database to the Standard edition, the option to enable or disable the extended antivirus database has been removed.
• FortiGuard anti-spam services are available in the Standard edition.
• Enhancements to the Web Filtering includes:
• Easier to use configuration.
• Schedule web filter profiles so that web access can be determined for time of day and day of week.
• Block additional types of web content.
• Improvements have been made to decrease the number of Firewall pop-up messages asking to allow access to the network.
• Resume download feature allows you to pause software and antivirus signature updates and resume at a later time.
About FortiClient Endpoint Security
Computer desktop and laptop devices have empowered today’s business users with the capability to access enterprise applications and mission critical data both in the office and on the road. While expanding productivity, remote access to the secure network perimeter increases security risk. Unfortunately, all devices are exposed to blended threats such as viruses, trojans, worms, spyware, key loggers, botnets, spam and Internet attack. While utilizing network security architectures that isolate segments from one another can mitigate infection or breach, computers within the same subnet can still potentially infect one another.
ortiClient Endpoint Security Version 4.0 MR2 Administration Guide4-420-1116637-20101207 1ttp://docs.fortinet.com/ • Feedback
About FortiClient Endpoint Security Introduction
Users may inadvertently circumvent policy by bringing in portable storage devices, failing to keep antivirus signatures up-to-date, or even disabling personal firewall protection. Users accessing inappropriate and dangerous web content jeopardize device integrity, negatively impact productivity and create security and legal exposure. While point product security technology, such as antivirus agents, are available to protect devices from certain threats, such methods fall short from comprehensively protecting against blended threats and do not enforce content access guidelines.
FortiClient offers the full range of Fortinet threat protection to computers, even when being used on insecure public networks. This comprehensive, modular protection suite secures desktops against viruses, trojans, worms and more. The FortiClient product is a client-based software solution designed to be used in connection with our FortiGate appliances to provide security features like Endpoint Control and WAN Optimization for enterprise computers. The feature set includes VPN (IPSec and SSL), antivirus/antispyware, personal firewall, Web filtering, and antispam – each with separate modular installs to completely avoid any potential conflicts with other security software. Powered by FortiGuard security services, FortiClient has access to constantly-updated protection on a real-time basis against current and emerging threats.
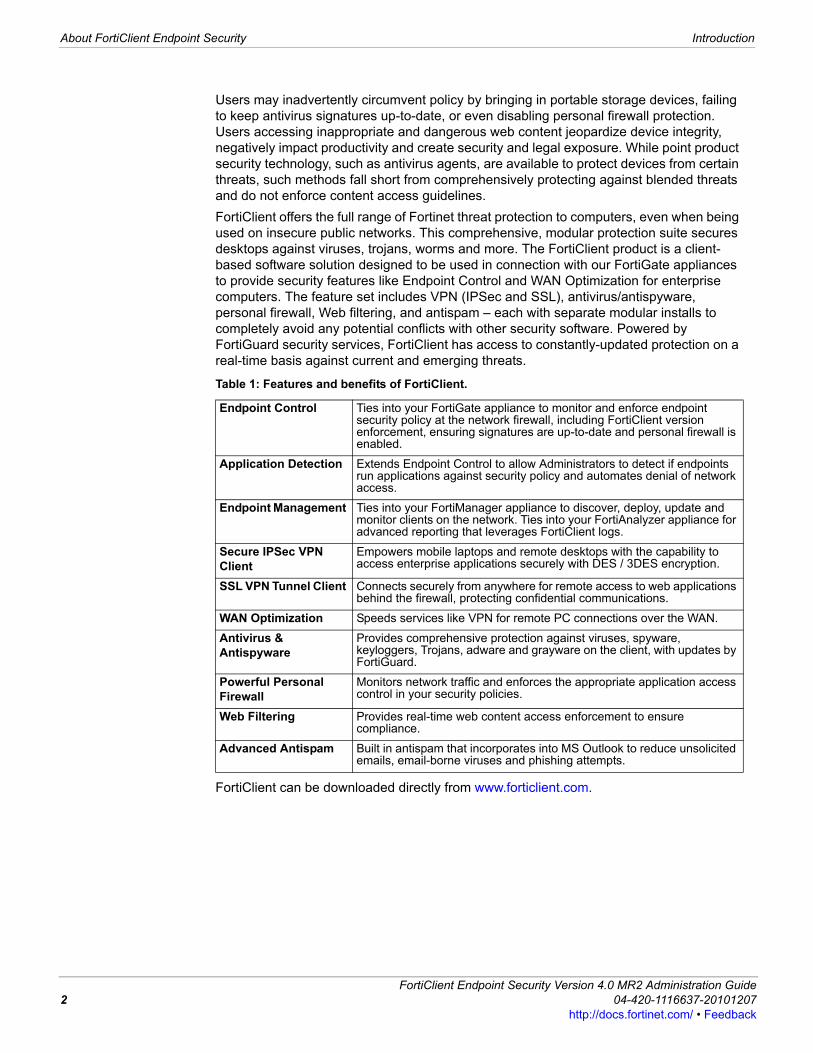
FortiClient can be downloaded directly from www.forticlient.com.
Table 1: Features and benefits of FortiClient.
Endpoint Control Ties into your FortiGate appliance to monitor and enforce endpoint security policy at the network firewall, including FortiClient version enforcement, ensuring signatures are up-to-date and personal firewall is enabled.
Application Detection Extends Endpoint Control to allow Administrators to detect if endpoints run applications against security policy and automates denial of network access.
Endpoint Management Ties into your FortiManager appliance to discover, deploy, update and monitor clients on the network. Ties into your FortiAnalyzer appliance for advanced reporting that leverages FortiClient logs.
Secure IPSec VPN Client
Empowers mobile laptops and remote desktops with the capability to access enterprise applications securely with DES / 3DES encryption.
SSL VPN Tunnel Client Connects securely from anywhere for remote access to web applications behind the firewall, protecting confidential communications.
WAN Optimization Speeds services like VPN for remote PC connections over the WAN.
Antivirus & Antispyware
Provides comprehensive protection against viruses, spyware, keyloggers, Trojans, adware and grayware on the client, with updates by FortiGuard.
Powerful Personal Firewall
Monitors network traffic and enforces the appropriate application access control in your security policies.
Web Filtering Provides real-time web content access enforcement to ensure compliance.
Advanced Antispam Built in antispam that incorporates into MS Outlook to reduce unsolicited emails, email-borne viruses and phishing attempts.
FortiClient Endpoint Security Version 4.0 MR2 Administration Guide2 04-420-1116637-20101207
http://docs.fortinet.com/ • Feedback
Introduction Fortinet Security Framework
F0h
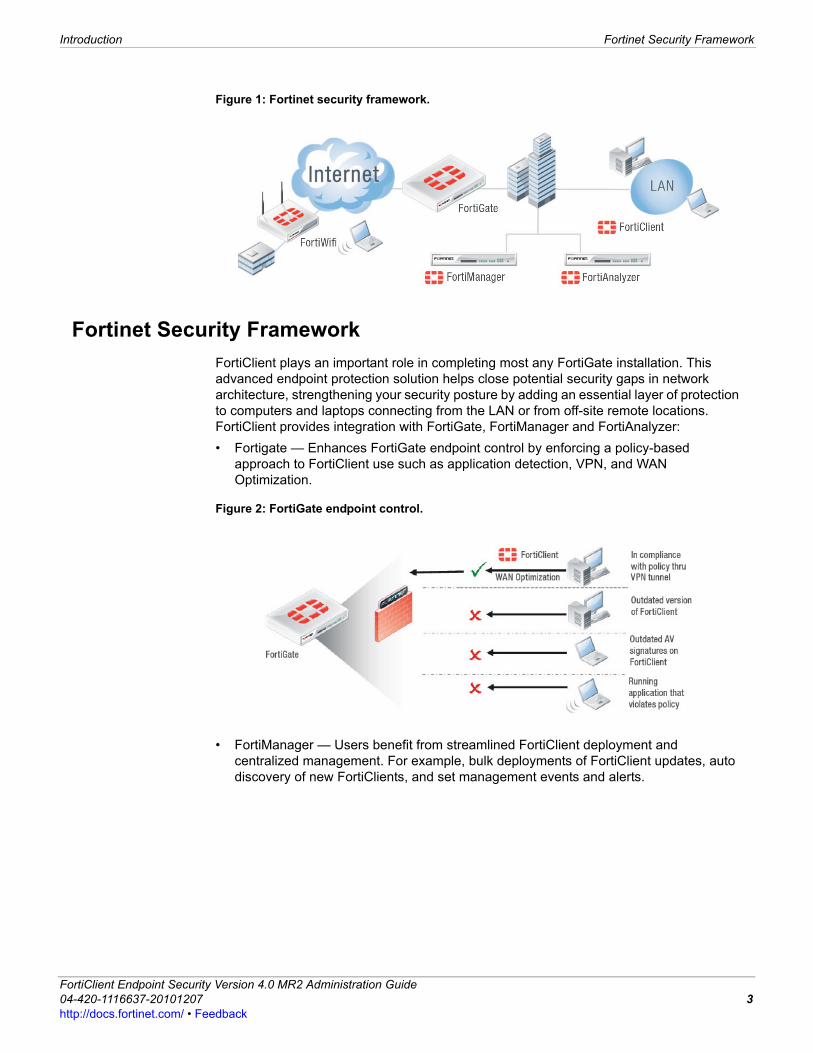
Figure 1: Fortinet security framework.
Fortinet Security Framework
FortiClient plays an important role in completing most any FortiGate installation. This advanced endpoint protection solution helps close potential security gaps in network architecture, strengthening your security posture by adding an essential layer of protection to computers and laptops connecting from the LAN or from off-site remote locations. FortiClient provides integration with FortiGate, FortiManager and FortiAnalyzer:
• Fortigate — Enhances FortiGate endpoint control by enforcing a policy-based approach to FortiClient use such as application detection, VPN, and WAN Optimization.
Figure 2: FortiGate endpoint control.
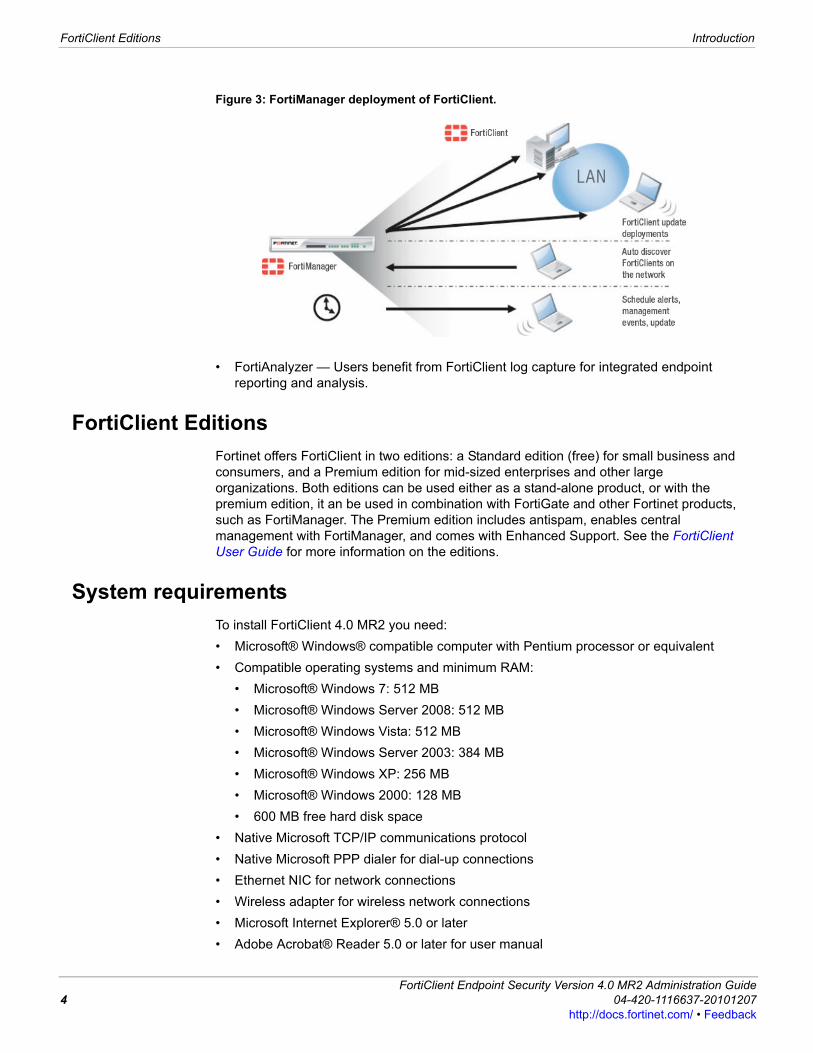
• FortiManager — Users benefit from streamlined FortiClient deployment and centralized management. For example, bulk deployments of FortiClient updates, auto discovery of new FortiClients, and set management events and alerts.
ortiClient Endpoint Security Version 4.0 MR2 Administration Guide4-420-1116637-20101207 3ttp://docs.fortinet.com/ • Feedback
FortiClient Editions Introduction
Figure 3: FortiManager deployment of FortiClient.
• FortiAnalyzer — Users benefit from FortiClient log capture for integrated endpoint reporting and analysis.
FortiClient Editions
Fortinet offers FortiClient in two editions: a Standard edition (free) for small business and consumers, and a Premium edition for mid-sized enterprises and other large organizations. Both editions can be used either as a stand-alone product, or with the premium edition, it an be used in combination with FortiGate and other Fortinet products, such as FortiManager. The Premium edition includes antispam, enables central management with FortiManager, and comes with Enhanced Support. See the FortiClient User Guide for more information on the editions.
System requirements
To install FortiClient 4.0 MR2 you need:
• Microsoft® Windows® compatible computer with Pentium processor or equivalent
• Compatible operating systems and minimum RAM:
• Microsoft® Windows 7: 512 MB
• Microsoft® Windows Server 2008: 512 MB
• Microsoft® Windows Vista: 512 MB
• Microsoft® Windows Server 2003: 384 MB
• Microsoft® Windows XP: 256 MB
• Microsoft® Windows 2000: 128 MB
• 600 MB free hard disk space
• Native Microsoft TCP/IP communications protocol
• Native Microsoft PPP dialer for dial-up connections
• Ethernet NIC for network connections
• Wireless adapter for wireless network connections
• Microsoft Internet Explorer® 5.0 or later
• Adobe Acrobat® Reader 5.0 or later for user manual
FortiClient Endpoint Security Version 4.0 MR2 Administration Guide4 04-420-1116637-20101207
http://docs.fortinet.com/ • Feedback
Introduction Additional FortiGuard Services
F0h
• MSI installer 3.0 or later
Supported Operating Systems
FortiClient supports the following operating systems:
• Microsoft® Windows 7 (both 32-bit and 64-bit)
• Microsoft® Windows Server 2008 including SP2 (both 32-bit and 64-bit)
• Microsoft® Windows Vista including SP1 and SP2 (both 32-bit and 64-bit)
• Microsoft® Windows Server 2003 including SP1 and SP2 (both 32-bit and 64-bit)
• Microsoft® XP including SP2 and SP3 (both 32-bit and 64-bit)
• Microsoft® Windows 2000 Professional
Supported FortiGate and FortiManager versions
The officially supported versions for FortiGate is 4.0 MR2 and for FortiManager is 4.0 MR2.
Language Support
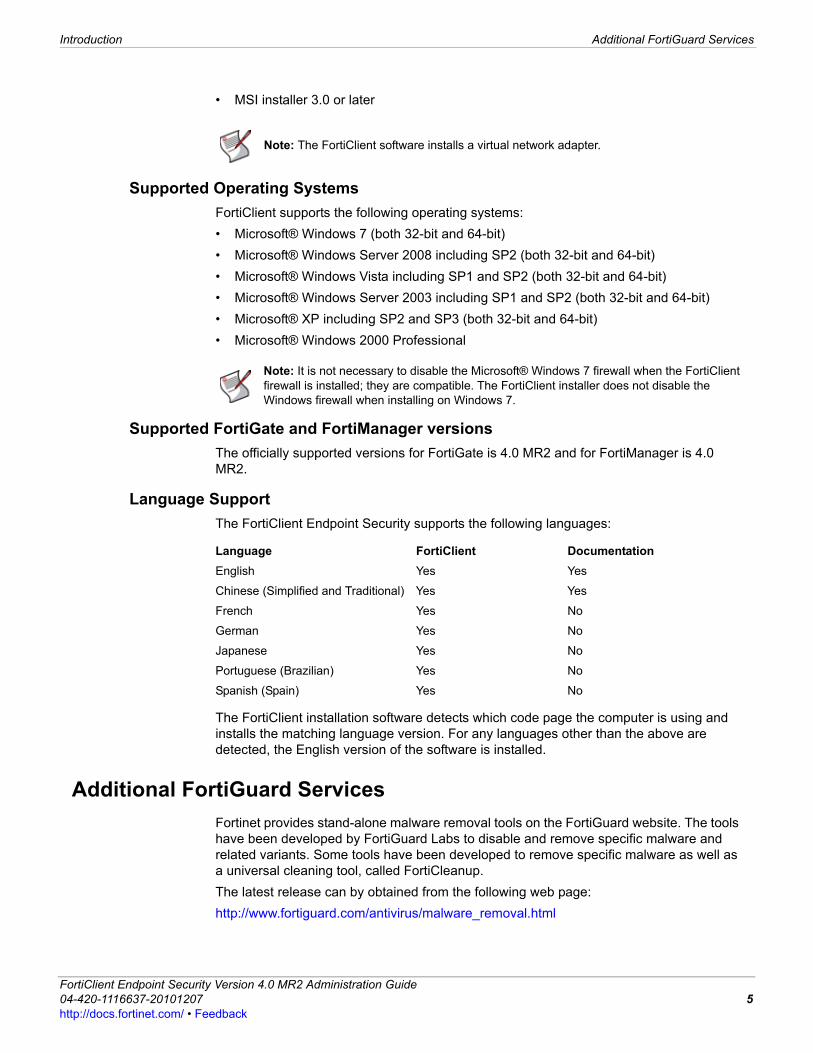
The FortiClient Endpoint Security supports the following languages:
The FortiClient installation software detects which code page the computer is using and installs the matching language version. For any languages other than the above are detected, the English version of the software is installed.
Additional FortiGuard Services
Fortinet provides stand-alone malware removal tools on the FortiGuard website. The tools have been developed by FortiGuard Labs to disable and remove specific malware and related variants. Some tools have been developed to remove specific malware as well as a universal cleaning tool, called FortiCleanup.
The latest release can by obtained from the following web page:
http://www.fortiguard.com/antivirus/malware_removal.html
Note: The FortiClient software installs a virtual network adapter.
Note: It is not necessary to disable the Microsoft® Windows 7 firewall when the FortiClient firewall is installed; they are compatible. The FortiClient installer does not disable the Windows firewall when installing on Windows 7.
Language FortiClient Documentation
English Yes Yes
Chinese (Simplified and Traditional) Yes Yes
French Yes No
German Yes No
Japanese Yes No
Portuguese (Brazilian) Yes No
Spanish (Spain) Yes No
ortiClient Endpoint Security Version 4.0 MR2 Administration Guide4-420-1116637-20101207 5ttp://docs.fortinet.com/ • Feedback
About this Guide Introduction
About this Guide
This Administration Guide contains the following chapters:
• Installation describes several types of FortiClient installation beyond the simple end-user installations described in the FortiClient Endpoint Security User Guide.
• Custom Installer Packages describes how to create a customized installation package to deploy to users in an organization. The customized installation can include enabling centralized management by a FortiManager server.
• Corporate Security Policies describes how you can require users to comply with a security policy to use VPN tunnels. The policy can require users to enable firewall, real-time antivirus protection, web filtering or antispam.
• FortiClient Licensing describes how to manage enterprise licensing of FortiClient computer, using either a volume license or a re-distributable license.
• Enforcing use of FortiClient describes how to enforce use of FortiClient Endpoint Security using a FortiGate unit that can check hosts for the presence FortiClient Endpoint Security.
• Creating FortiClient VPNs describes how to configure VPNs on FortiGate units to work with the VPN client feature of FortiClient Endpoint Security.
• FortiClient VPN Client describes how to configure FortiClient VPN, a light VPN client that you can distribute to users who do not have FortiClient Endpoint Security.
• Using the FortiClient API describes the COM-based FortiClient API.
• Per-User Web Filtering describes how to deploy the FortiClient application to perform web filtering customized for each user on a Microsoft Windows network. For larger deployments, a FortiManager system is used to manage web filter profiles.
Documentation
This manual, the FortiClient Endpoint Security Administration Guide, provides information about deploying the FortiClient application in your organization.
The FortiClient Endpoint Security User Guide and the FortiClient online help provide information and procedures for using and configuring the FortiClient software.
Information about FortiGate Antivirus Firewalls is available from the FortiGate online help and the FortiGate Administration Guide.
Fortinet Tools and Documentation CD
All Fortinet documentation is available on the Fortinet Tools and Documentation CD shipped with your Fortinet product. (You do not receive this CD if you download the FortiClient application.) The documents on this CD are current at shipping time. For up-to-date versions of Fortinet documentation visit the Fortinet Technical Documentation web site at http://docs.forticare.com.
Fortinet Knowledge Center
Additional Fortinet technical documentation is available from the Fortinet Knowledge Center. The knowledge center contains troubleshooting and how-to articles, FAQs, technical notes, a glossary, and more. Visit the Fortinet Knowledge Center at http://kb.fortinet.com.
FortiClient Endpoint Security Version 4.0 MR2 Administration Guide6 04-420-1116637-20101207
http://docs.fortinet.com/ • Feedback

Introduction Customer service and technical support
F0h
Contact Fortinet technical documentation
You can send information about errors or omissions in this document or any Fortinet technical documentation to [email protected].
Customer service and technical support
Fortinet Technical Support provides services designed to make sure that your Fortinet systems install quickly, configure easily, and operate reliably in your network.
Please visit the Fortinet Technical Support web Site at http://support.fortinet.com to learn about the technical support services that Fortinet provides.
ortiClient Endpoint Security Version 4.0 MR2 Administration Guide4-420-1116637-20101207 7ttp://docs.fortinet.com/ • Feedback
Customer service and technical support Introduction
FortiClient Endpoint Security Version 4.0 MR2 Administration Guide8 04-420-1116637-20101207
http://docs.fortinet.com/ • Feedback
F0h
InstallationThis chapter describes how to install FortiClient.
This chapter contains the following sections:
• Overview
• FortiClient software packages
• Standard FortiClient Installation
Overview
You can install FortiClient directly from the Fortinet Web site or from a custom location, such as your network.
FortiClient software packages
Fortinet provides different installation packages for FortiClient software. The two main types of default installation packages for FortiClient software are:
• a Windows executable (.exe) file
• a .zip file (compressed archive) containing a Microsoft Installer (MSI) package, language transform files and the FCRepackager tool
The 64-bit versions of these files have “_x64” in the name. If you are running 64-bit Windows, you must use a 64-bit installation package.
Windows executable (.exe) installer
The Windows executable (.exe) installer provides easy installation on a single computer by the end user. Any existing FortiClient installation on the computer is upgraded. The FortiClient Endpoint Security User Guide provides information about using these installers.
To install the FortiClient software - Windows executable installer
1 Double-click the FortiClient installer program file.
2 Follow the instructions on the screen, selecting Next to proceed through the installation options.
When the installation has completed, the FortiClient Configuration Wizard begins, unless you are upgrading an existing installation.
MSI installer
The MSI installer in the .zip file package is customizable for a larger roll-out to many computers in an organization. This customization procedures in this chapter use the .zip file package exclusively. You can deploy the customized MSI installer to your users and they can install it following the simple instructions in the FortiClient Endpoint Security User Guide. You can preconfigure all application settings, including the configuration for centralized management by a FortiManager system. For more information, see “Custom Installer Packages” on page 17.
ortiClient Endpoint Security Version 4.0 MR2 Administration Guide4-420-1116637-20101207 9ttp://docs.fortinet.com/ • Feedback
FortiClient software packages Installation
You can upgrade an existing FortiClient installation by installing a newer version of the software. To upgrade using an MSI installer, you can double-click the MSI file or use the following commend line:
msiexec /i FortiClient.msi
To install the FortiClient software - MSI installer
1 Extract the files from the FortiClient Setup .zip archive into a folder.
2 To perform a new installation or upgrade an existing installation, double-click the FortiClient.msi file.
3 Follow the instructions on the screen, selecting Next to proceed through the installation options.
When the installation has completed, the FortiClient Configuration Wizard begins, unless you are upgrading an existing installation.
Installation notes
Upgrading FortiClient
Previous versions of FortiClient, when uninstalled, can leave their intermediate drivers installed in the network stack. If these are present when you install FortiClient, it can cause the installation to fail. If this happens, the exe version of the installer will prompt you and you if you want to run a clean up tool. The tool “ReinstallNic.exe” removes the intermediate drivers and, if required, repair your network stack. ReinstallNic.exe is located in the FortiClientTools.zip folder.
For FortiClient version 1.0 and 1.2 installations, it is recommended that you uninstall the software before installing version 4.0 MR2 to ensure a clean install.
Installing software updates
Make sure that other applications, such as Windows®, are not installing updates while you install the FortiClient application. If an update has been run and it requested a reboot, be sure to reboot your computer before installing the FortiClient application.
FortiClient Proxy
FortiClient uses a local proxy. If you have other local proxy software installed it may cause conflicts which may result in loss of network connections. To resolve this issue, you must either disable/uninstall the other proxy.
Servers In the FortClient 4.0 release, antivirus protection that integrates with Microsoft Exchange is available for evaluation. Install the FortiClient application from the command line with the WITHEXCHANGE=1 option. (If you use the .exe installer, the command line option is /v”WITHEXCHANGE=1”.) FortiClient Endpoint Security automatically detects Microsoft Exchange installations and enables the Exchange Server Options under Antivirus > Server Protection. Fortinet recommends that you enable the options that exclude Exchange filesystem folders and associated files from virus scanning. A preset list of files to exclude is then added to the antivirus and real-time protection settings.
FortiClient Endpoint Security automatically detects SQL Server installations and enables the SQL Server Options under Antivirus > Server Protection. Fortinet recommends that you enable the options that exclude SQL Server file system folders and associated files from virus scanning. A preset list of files to exclude is then added to the antivirus and real-time protection settings.
FortiClient Endpoint Security Version 4.0 MR2 Administration Guide10 04-420-1116637-20101207
http://docs.fortinet.com/ • Feedback
Installation FortiClient software packages
F0h
For all server software, verify that server software product folders and files are excluded from The core signature database is comprised of viruses that currently active. This option will take less time to scan your computer because of the smaller database. The core signature database does not require a license and is updated frequently. scanning as their vendors recommend. Do not enable real-time protection or initiate virus scanning until you have done this. Go to both Antivirus > Settings and Antivirus > Realtime Protection to edit the exclusion lists.
Installing from a drive created with subst
Installing from an MSI package does not work if the MSI file is located on a drive created with the subst command. You can do any of the following:
• specify the real path to the file
• move the MSI file to a location where this is not an issue
• use the .exe installer instead, if possible
Antivirus performance optimization
FortiClient optimization performs a pre-scan of files in the Microsoft® Windows, //Windows/System32 files and select program files folders. The pre-scan is optimized to speed up the pre-scan process so that a list of critical files are scanned first. Critical files are those that are loaded during the boot and logon process. The pre-scan process creates a digital signature database of files that are digitally signed by trusted vendors. The digital signature database supersedes a hard-coded database that is used in previous versions.
The database is used by the antivirus feature to reduce the number of files that are required to be scanned. The firewall feature also uses this list as a “known good list” so that the end user is not asked if they want applications such as iexplore.exe and explorer.exe to access network resources.
After the scan completes the digital signature database is updated automatically with new signatures by components in the antivirus and firewall features. The optimization cannot be stopped until key critical files have been scanned. This takes approximately 10 seconds.
Once installed, optimization cannot be scheduled; it is unnecessary due to the optimization process. The optimization database is updated whenever antivirus or firewall encounters a file that has not been scanned before. As soon as that file has been processed and the optimization database updated, subsequent encounters with that file are processed significantly faster.
The installer pre-scan can be completely disabled by setting the MSI public property OPTIMIZE=0. This setting does not stop the post-installation automatic database updates by the antivirus and firewall features.
Note: If FortiClient is directly installed on SQL or Exchange server, the AntiVirus > Server Protection window is disabled. To enable antivirus server protection, use the msi package with the public property WITHEXCHANGE=1. For example: msiexec /i forticlient.msi WITHEXCHANGE=1
Note: While Windows Server is supported, Fortinet does not recommend installing FortiClient onto Domain Controllers.
ortiClient Endpoint Security Version 4.0 MR2 Administration Guide4-420-1116637-20101207 11ttp://docs.fortinet.com/ • Feedback
Standard FortiClient Installation Installation
Standard FortiClient Installation
Single-user installation
User can install the standard FortiClient application through such methods such as downloading it from the FortiClient Web site or using a CD. For more information on installing FortiClient, see the FortiClient User Guide or QuickStart Guide.
Multiple-user installation
You can use the FortiGate’s Web Config to manage the version of FortiClient (endpoint control) running on multiple computers. See “Enforcing use of FortiClient software” on page 37 for more information.
How to stop FortiClient start-up services
You can stop FortiClient from auto-starting when your computer starts up.
To stop FortiClient start-up services
1 Shutdown FortiClient by right-clicking on the icon in the system tray and selecting Shutdown FortiClient.
2 Go to Start > Run and type msconfig
The System Configuration window opens.
3 In the Services tab, clear the FortiClient Service Scheduler check box and click Apply.
4 In a Command Prompt window, type net stop fortishield
5 Go to Start > Run and type services
The Services window opens.
6 Right-click the FortiClient Service Scheduler and select Properties.
7 In the General tab, in the Startup type field, select Manual.
8 Restart your computer. FortiClient will not load on start-up.
FortiClient Endpoint Security Version 4.0 MR2 Administration Guide12 04-420-1116637-20101207
http://docs.fortinet.com/ • Feedback
F0h
FortiClient LicensingSome features of FortiClient require a license in order to use the feature. This chapter describes how to license FortiClient for different environments.
This chapter contains the following sections:
• Overview
• Premium licensing
• Enterprise licensing
Overview
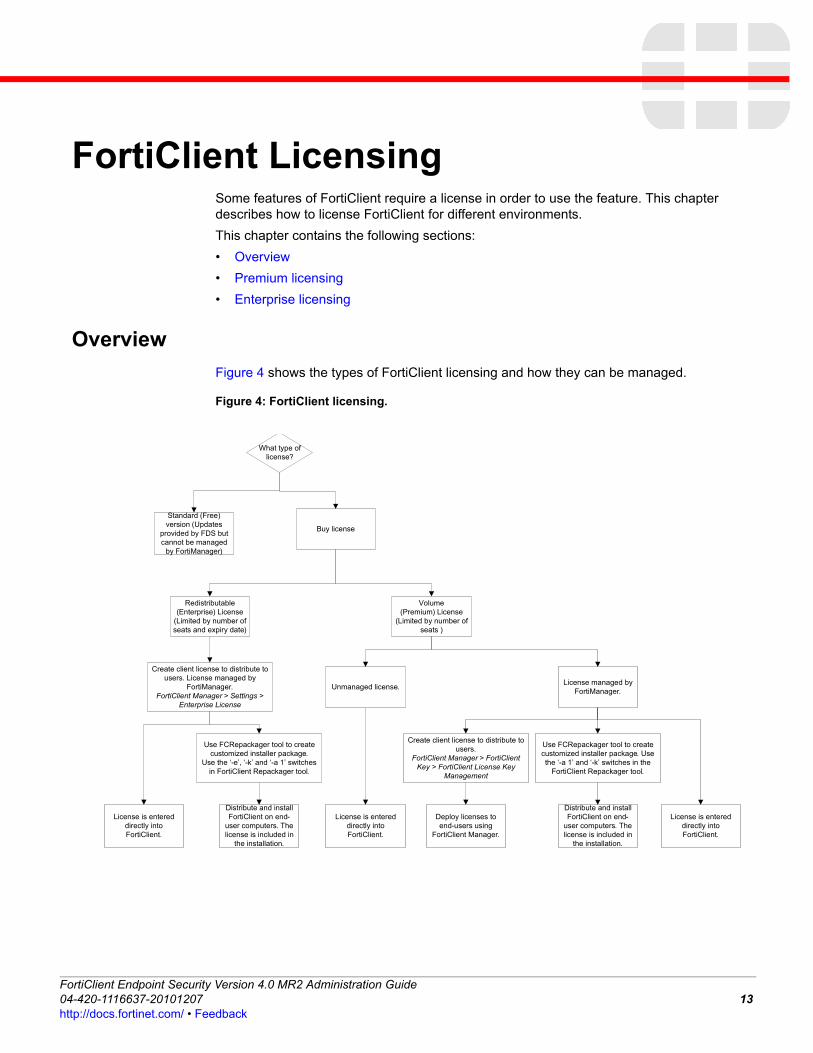
Figure 4 shows the types of FortiClient licensing and how they can be managed.
Figure 4: FortiClient licensing.
Buy license
License is entered directly into FortiClient.
Use FCRepackager tool to create customized installer package.
Use the ‘-e’, ‘-k’ and ‘-a 1’ switches in FortiClient Repackager tool.
Distribute and install FortiClient on end-
user computers. The license is included in
the installation.
Unmanaged license.
Volume(Premium) License
(Limited by number of seats )
Redistributable (Enterprise) License
(Limited by number of seats and expiry date)
Create client license to distribute to users.
FortiClient Manager > FortiClient Key > FortiClient License Key
Management
What type of license?
Standard (Free) version (Updates
provided by FDS but cannot be managed
by FortiManager)
Create client license to distribute to users. License managed by
FortiManager.FortiClient Manager > Settings >
Enterprise License
Deploy licenses to end-users using
FortiClient Manager.
License managed by FortiManager.
Use FCRepackager tool to create customized installer package. Use the ‘-a 1’ and ‘-k’ switches in the
FortiClient Repackager tool.
Distribute and install FortiClient on end-
user computers. The license is included in
the installation.
License is entered directly into FortiClient.
License is entered directly into FortiClient.
ortiClient Endpoint Security Version 4.0 MR2 Administration Guide4-420-1116637-20101207 13ttp://docs.fortinet.com/ • Feedback
Standard licensing FortiClient Licensing
Standard licensing
The Standard (Free) version cannot be managed by FortiClient manager. In order to manage FortiClient, a license is required. Some FortiClient features are limited in this version. See the FortiClient User Guide for limitation details.
Premium licensing
There are several ways to apply Premium (Volume) licensing:
• Provide the license key to your users to enter directly into the FortiClient application. The license will by managed by FDS, not by FortiManager.
• Create a customized FortiClient installer that includes the license key. Distribute the customized FortiClient installer to your users. Use the “-a”, and “-k” switches in the FCRepackager tool. For more information, see “Creating a customized installer using FCRepackager” on page 17.
• If you manage FortiClient computer with a FortiManager unit, you can deploy the licenses. See “To deploy Premium (Volume) license with FortiManager”. The license is applied to all of your managed FortiClient computers that already do not have a Premium license. The volume license has a seat limit which the FortiManager unit enforces.
To deploy Premium (Volume) license with FortiManager
1 Using FortiClient Manager, organize the managed FortiClient computer into client groups where all members use the same license key.
For more information, see “Working with FortiClient groups” in the FortiClient chapter of the FortiManager Administration Guide.
2 In the FortiClient Manager, go to Manage > FortiClient Key and select Add to add a license key to the FortiManager database.
3 In the License Key field, enter the license key.
4 Optionally, enter a description.
5 In the Available Group(s) list, select the client groups that use this license key and then select the green right arrow button to move the selected groups to the Assigned Group(s) list.
6 Click OK.
7 In the FortiClient License Key Management list, select the Deploy to group icon for the license key that you added. Click OK to confirm your request to deploy.
Enterprise licensing
With Enterprise (Redistributable) licensing, you obtain a re-distributable license from FortiCare and subdivide that license into smaller “seat’ licenses for your users. You can set the expiry date and seat count for each client license. The expiry date of your client licenses cannot be later than that of the enterprise license. The total seat count limit of your client licenses can exceed the seat count limit of the enterprise license, but the total number of managed clients cannot. FortiClient redistributable licensing can be validated by FortiClient Manager or by a company’s own licensing validation system. For more information on internal validation, see “Appendix B: External License Validation” on page 75.
FortiClient Endpoint Security Version 4.0 MR2 Administration Guide14 04-420-1116637-20101207
http://docs.fortinet.com/ • Feedback
FortiClient Licensing Enterprise licensing
F0h
The Redistributable license key can also be given to users and input into FortiClient manually.
To use enterprise licensing, you need to:
• Obtain an Enterprise License from FortiCare and register it on your FortiManager unit. For more information, see “Configuring enterprise licenses” on page 15.
• Create at least one enterprise client license for your FortiClient computer. For more information, see “Creating enterprise client license keys” on page 15.
• Create a custom FortiClient installer that enables enterprise licensing. You can include the client license key in the installer or provide the client license key to users to apply after installation. The FortiClient application must be specifically customized for use with re-distributable licensing. You can use the FCRepackager tool to create a customized installer package that includes the redistributable license. Use the “-a”, “-e” and “-k” switches. For more information, see “Creating customized FortiClient installers” on page 33.
• Deploy the customized FortiClient installer to your users.
Configuring enterprise licenses
You need to register your enterprise license on your FortiManager unit.
To configure the enterprise license
1 In the FortiClient Manager, go to Settings > Enterprise License.
2 In the License Mode section, select Enterprise License.
3 In the Enterprise License Key field, enter the license key purchased from FortiCare.
4 Select Download to register the license. Information about the license displays below the Enterprise License Key field.
5 In the Validation Type section, select Internal Validation.
6 Click Apply.
Creating enterprise client license keys
After you register your enterprise license (see “Configuring enterprise licenses” on page 15), you can create enterprise client licenses for your FortiClient computer. For each client license, you can set the seat limit. The total number of seats licensed through enterprise client licenses cannot exceed the number of seats that the enterprise license permits.
To create enterprise client license keys
1 Go to Setting > Enterprise License.
You must have an enterprise license registered on the FortiManager unit. For more information, see “Configuring enterprise licenses” on page 15.
2 Click the Enterprise Client License Management link.
The list of enterprise client licenses is displayed.
3 Click Add.
The New Client License window opens, with an enterprise client license key value in place.
4 In the Name field, enter a name to identify the license.
5 In the Seats Permitted field, enter a number seats that is no larger than the maximum shown at the right.
ortiClient Endpoint Security Version 4.0 MR2 Administration Guide4-420-1116637-20101207 15ttp://docs.fortinet.com/ • Feedback
Enterprise licensing FortiClient Licensing
6 In the Expiry Date field, enter a date that is no later than that of the enterprise license.
7 Optionally, enter a description.
8 Click OK.
FortiClient Endpoint Security Version 4.0 MR2 Administration Guide16 04-420-1116637-20101207
http://docs.fortinet.com/ • Feedback
F0h
Custom Installer PackagesThis chapter describes how to create a custom MSI package for FortiClient Endpoint Security that you can deploy to your users. The customized installation can include the necessary configuration for central management by a FortiManager system.
This chapter contains the following sections:
• Overview
• Creating a customized installer using FCRepackager
• Customizing the installer using an MSI editor
• Deploying the Customized Installation
• Managing FortiClient with FortiManager
• Advanced Scenarios
Overview
This chapter describes two methods of producing a custom MSI installer: using FCRepackager and using the MSI editor. The FCRepackager tool is included in the FortiClientTools.zip file and is the recommended method to use.
With both types of customized installation, you can:
• set which features are installed
• include the FortiClient license key
• enable or disable the installation wizard
• enable or disable update scheduling
• set update schedule randomly on install
• enable or disable upgrade of existing installation
• enable management by a FortiManager system and set the FortiClient Manager lockdown password
You can simply give your users the customized package to install. It works the same way as the standard installer provided by Fortinet. There are several other ways to distribute the customized installer, including a network installer image, Windows Active Directory server or the FortiClient host check feature on some FortiGate units. These are described in the “Installation” chapter.
Creating a customized installer using FCRepackager
FCRepackager is designed to speed up the creation of customized FortiClient installation packages. This tool will create a Microsoft Transform (MST) file from the current FortiClient installation settings. The current settings can be packed into an MST file by running the FCRepackager with no command line parameters.
Tip: Please read the FCRepackager_Readme.txt file that is included in the FortiClientTools.zip package prior to using the FCRepackager tool.
ortiClient Endpoint Security Version 4.0 MR2 Administration Guide4-420-1116637-20101207 17ttp://docs.fortinet.com/ • Feedback
Creating a customized installer using FCRepackager Custom Installer Packages
Optionally, you write the current installation settings into a FortiClient.msi file, so that end-users do not need to use the command line to incorporate MST files. To create a custom msi file, see “Creating the custom MSI installation file” on page 20.
Using the FCRepackager tool, you can create a custom installation package in a few steps:
1 Configure FortiClient. FortiClient must be installed and configured with the settings that you want installed on the end-user computers.
2 Create a custom installation package using either FCRepackager or an MSI editor. The FCRepackager application is easier to use.
3 Install the customized FortiClient application on your users’ computers. With the proper administrative permissions, users can even do this themselves.
Creating the MST file with no command line parameters
In order to create an mst file, you need to use the FCRepackager tool. The FCRepackager tool can be extracted from the FortiClientTools.zip file. The FortiClientTools.zip file can be downloaded from the Fortinet Support Web site.
You also need to have FortiClient installed and configured with your desired settings to create the custom mst file.
For more information and examples for creating a customized mst file using switches and switch parameters, see the FCRepackager_Readme.txt file that comes in the FortiClientTools.zip file.
To create the mst file with no command line parameters
1 Download the FortiClientTools.zip file from the Fortinet Support Web site and extract the files into a folder.
2 Ensure FortiClient is installed and configured with the desired settings. The mst file is created based on your current FortiClient settings.
3 Run the FCRepackager application. The FortiClient.mst file is automatically created in the same directory.
Creating the sample installation
You must create a sample installation on a computer running one of the supported operating systems. See “System requirements” on page 4. The computer should not already have the FortiClient application installed.
The ADMINMODE=1 option used in the following procedure enables you to make registry changes to your sample installation, which some customizations require. Also, this option permits modification of files in the FortiClient program directory, which normally only the FortiClient application can access. You should not use the ADMINMODE=1 option when you install of the FortiClient application onto your users’ computers.
To perform the sample installation of the FortiClient software
1 Expand the FortiClient Endpoint Security installer .zip package into a new folder.
2 From the folder where you expanded the .zip package, install the FortiClient application use the following command line:
• if FortiClient applications will not be centrally managed
FortiClient Endpoint Security Version 4.0 MR2 Administration Guide18 04-420-1116637-20101207
http://docs.fortinet.com/ • Feedback
Custom Installer Packages Creating a customized installer using FCRepackager
F0h
msiexec /i FortiClient.msi ADMINMODE=1
The FortiClient application wizard starts. Follow the wizard to install the features you require. Reboot the computer if the installer requests it. When the computer restarts, the FortiClient installation wizard continues.
3 Continue configuring the application. The wizard Advanced Setup option covers security zones, proxy settings, update settings and AV scan settings. These can also be configured later.
4 Configure the sample installation as you want the FortiClient application to be configured on your user’s computers.
5 Optionally, perform additional customizations as described in “Performing additional customizations” on page 19.
See the FortiClient Endpoint Security User Guide for information about configuring each of the FortiClient features.
Performing additional customizations
You can edit the registry to make additional customizations to your FortiClient installation.
Hiding the FortiTray
1 Using regedit or regedt32, edit the following key:
HKEY_LOCAL_MACHINE\Software\Fortinet\FortiClient\FA_FORTITRAY
2 Set the key value to 0.
Permitting fallback to public FDS servers
Managed FortiClient computer receive push updates for antivirus definitions. Mobile users might not always be able to connect to the FortiManager unit. Optionally, you can configure FortiClient to use the default public FDS servers when necessary.
To permit fallback use of public FDS servers
1 Using regedit or regedt32, create the following DWORD value:
HKEY_LOCAL_MACHINE\Software\Fortinet\FortiClient\FA_UPDATE\FallbackToDefault
2 Set the value to 1.
Disabling saving of VPN XAUTH passwords
This customization prevents users from saving their XAUTH passwords.
To disable saving of XAUTH passwords
1 Using regedit or regedt32, edit the following key:
HKEY_LOCAL_MACHINE\Software\Fortinet\FortiClient\FA_IKE\
2 Add the value DontRememberPassword as a DWORD under the key.
3 Set the value of DontRememberPassword to 1.
Disabling web filter rating of IP addresses
The FortiClient web filter requests ratings from the FortiGuard web filtering service for both the URL and the IP address. Optionally, you can disable the rating of IP addresses so that web sites are rated only by URL.
ortiClient Endpoint Security Version 4.0 MR2 Administration Guide4-420-1116637-20101207 19ttp://docs.fortinet.com/ • Feedback
Creating a customized installer using FCRepackager Custom Installer Packages
To disable rating of IP addresses
1 Using regedit or regedt32, edit the following key:
HKEY_LOCAL_MACHINE\Software\Fortinet\FortiClient\FA_WEBFILTER\
2 Add the value DontRateIP as a DWORD under the key.
3 Set the value of DontRateIP to 1.
Blocking all connections that have no firewall rule
By default, if there is no firewall rule for a particular network connection, the FortiClient application asks the user whether to allow the connection. For an enterprise deployment, you might prefer to block all connections except those that have a specific firewall rule to permit them.
To block all connections by default
1 Using regedit or regedt32, edit the following key:
HKEY_LOCAL_MACHINE\Software\Fortinet\FortiClient\FA_FCM\firewallbehavior
2 Set the key value to 0.
Creating the custom MSI installation file
With the sample application configured as you want for your users, you can create a custom MSI installer file for your customized FortiClient application.
1 Determine the command line options you need for your customized FortiClient installer from the following table.
Tip: Please read the FCRepackager_Readme.txt file that is included in the FortiClientTools.zip package prior to using the FCRepackager tool.
FortiClient Endpoint Security Version 4.0 MR2 Administration Guide20 04-420-1116637-20101207
http://docs.fortinet.com/ • Feedback
Custom Installer Packages Creating a customized installer using FCRepackager
F0h
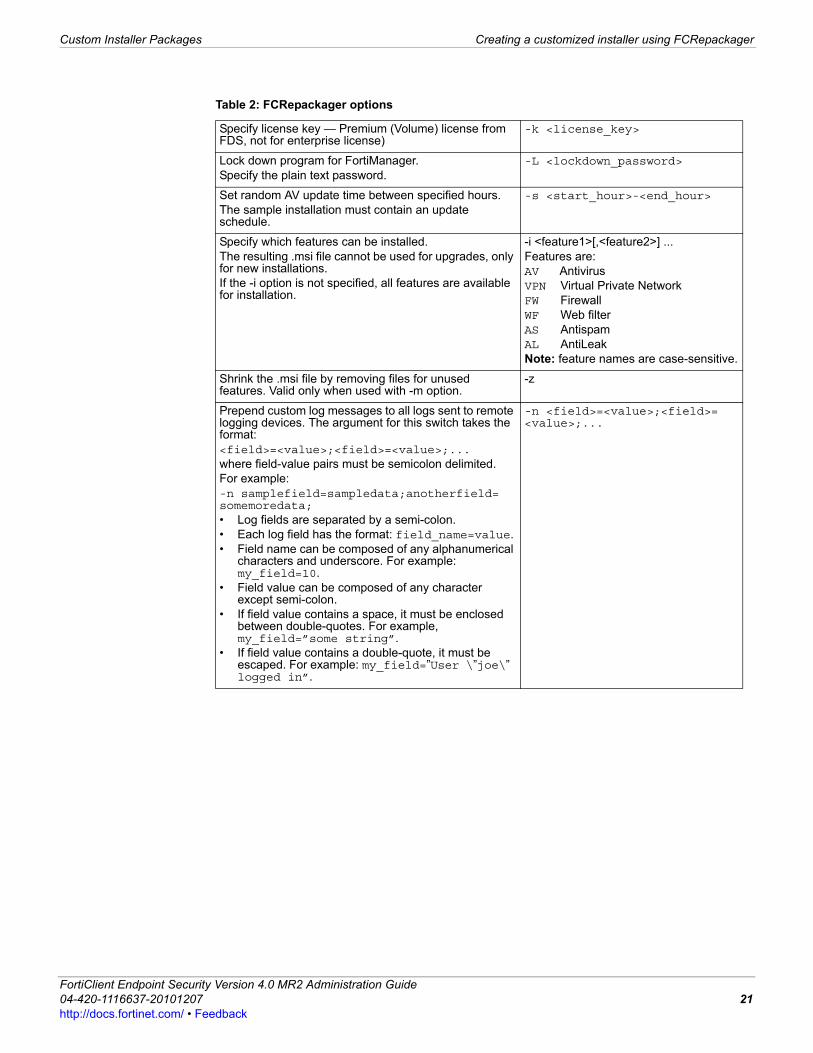
Table 2: FCRepackager options
Specify license key — Premium (Volume) license from FDS, not for enterprise license)
-k <license_key>
Lock down program for FortiManager.Specify the plain text password.
-L <lockdown_password>
Set random AV update time between specified hours. The sample installation must contain an update schedule.
-s <start_hour>-<end_hour>
Specify which features can be installed. The resulting .msi file cannot be used for upgrades, only for new installations.If the -i option is not specified, all features are available for installation.
-i <feature1>[,<feature2>] ...Features are:AV AntivirusVPN Virtual Private NetworkFW FirewallWF Web filterAS AntispamAL AntiLeakNote: feature names are case-sensitive.
Shrink the .msi file by removing files for unused features. Valid only when used with -m option.
-z
Prepend custom log messages to all logs sent to remote logging devices. The argument for this switch takes the format: <field>=<value>;<field>=<value>;...where field-value pairs must be semicolon delimited.For example:-n samplefield=sampledata;anotherfield=somemoredata;• Log fields are separated by a semi-colon.• Each log field has the format: field_name=value.• Field name can be composed of any alphanumerical
characters and underscore. For example: my_field=10.
• Field value can be composed of any character except semi-colon.
• If field value contains a space, it must be enclosed between double-quotes. For example, my_field=”some string”.
• If field value contains a double-quote, it must be escaped. For example: my_field=”User \”joe\” logged in”.
-n <field>=<value>;<field>=<value>;...
ortiClient Endpoint Security Version 4.0 MR2 Administration Guide4-420-1116637-20101207 21ttp://docs.fortinet.com/ • Feedback
Creating a customized installer using FCRepackager Custom Installer Packages
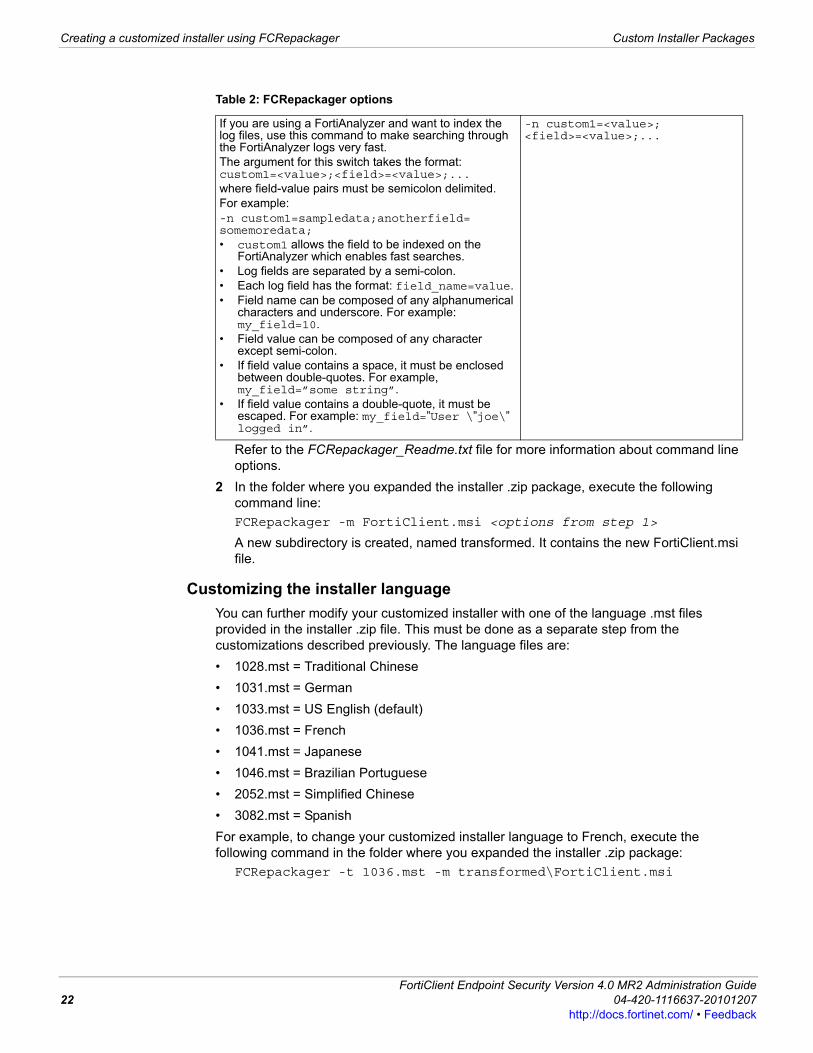
Refer to the FCRepackager_Readme.txt file for more information about command line options.
2 In the folder where you expanded the installer .zip package, execute the following command line:
FCRepackager -m FortiClient.msi <options from step 1>
A new subdirectory is created, named transformed. It contains the new FortiClient.msi file.
Customizing the installer language
You can further modify your customized installer with one of the language .mst files provided in the installer .zip file. This must be done as a separate step from the customizations described previously. The language files are:
• 1028.mst = Traditional Chinese
• 1031.mst = German
• 1033.mst = US English (default)
• 1036.mst = French
• 1041.mst = Japanese
• 1046.mst = Brazilian Portuguese
• 2052.mst = Simplified Chinese
• 3082.mst = Spanish
For example, to change your customized installer language to French, execute the following command in the folder where you expanded the installer .zip package:
FCRepackager -t 1036.mst -m transformed\FortiClient.msi
If you are using a FortiAnalyzer and want to index the log files, use this command to make searching through the FortiAnalyzer logs very fast. The argument for this switch takes the format: custom1=<value>;<field>=<value>;...where field-value pairs must be semicolon delimited.For example:-n custom1=sampledata;anotherfield=somemoredata;• custom1 allows the field to be indexed on the
FortiAnalyzer which enables fast searches.• Log fields are separated by a semi-colon.• Each log field has the format: field_name=value.• Field name can be composed of any alphanumerical
characters and underscore. For example: my_field=10.
• Field value can be composed of any character except semi-colon.
• If field value contains a space, it must be enclosed between double-quotes. For example, my_field=”some string”.
• If field value contains a double-quote, it must be escaped. For example: my_field=”User \”joe\” logged in”.
-n custom1=<value>;<field>=<value>;...
Table 2: FCRepackager options
FortiClient Endpoint Security Version 4.0 MR2 Administration Guide22 04-420-1116637-20101207
http://docs.fortinet.com/ • Feedback
Custom Installer Packages Customizing the installer using an MSI editor
F0h
Customizing the FortiClient application for enterprise licensing
If you use enterprise licensing for your FortiClient computer, your FortiClient installer needs specific additional customization. For more information, see “Enterprise licensing” on page 14.
Deploying the customized FortiClient application
You can distribute your new FortiClient.msi file to users. Users simply double-click the file to begin installation. On a Windows Advanced Server network, you can install the application on end users’ computers remotely. See “Active Directory installation” on page 26.
VPN certificates can be added to the customized installer.Use the FortiClientVPNEditor file located in the FortiClientVPNTools .zip file. It can be used to embed VPN tunnels into the FortiClient MSI file. See “Using the FortiClient VPN Editor” on page 58 for more information.
Transferring customizations to later versions of FortiClient
When a newer version of FortiClient Endpoint Security is released, your existing users can simply run the FortiClient installer and upgrade while keeping the customized settings. For new users, you will need to create a customized version of the new installer.
To customize the newer FortiClient installer, you do not need to repeat all of the customization steps described previously in this section. When you create your first customized FortiClient installer, you can also save your customizations to a transform (.mst) file. Simply run FCRepackager.exe again with no parameters. The output is a file named FortiClient.mst.
To modify the new FortiClient .msi installer with your saved customizations, use the following command:
FCRepackager -t FortiClient.mst -m FortiClient.msi
If the files are not in the current directory, you need to specify the path to them.
Customizing the installer using an MSI editor
Use an MSI editor to create a custom FortiClient installation package. For example, you can use the MSI property LICENSE to include your license key. You can create and set this property in the property table, or you can specify it on the command line using the following command:
msiexec /i FortiClient.msi LICENSE=1234567890abc
Note that the installation will not abort if you specify an invalid license key. For a complete list of installer public properties that can be specified when installing FortiClient, see “Appendix A: Installer Public Properties” for more information. The installer public properties can also be embedded into the MSI by using an MSI editing tool to make changes to the MSI’s property table.
Caution: If you are using FortiClient version 4.0 or lower, the .mst files from those versions are incompatible with FortiClient v4.0 MR1 and above. Therefore, you cannot use the FCRepackager -t FortiClient.mst -m FortiClient.msi command.
Note: An MSI installation package can upgrade an existing installation only if it has the same name as the original installation package. If necessary, rename the upgrade installation package to match the file name of the previous customized FortiClient installation package you provided to your users.
ortiClient Endpoint Security Version 4.0 MR2 Administration Guide4-420-1116637-20101207 23ttp://docs.fortinet.com/ • Feedback
Customizing the installer using an MSI editor Custom Installer Packages
It is recommended that you use this method only if you are familiar with the MSI editor and you only want to customize a few specific items. Do not edit the MSI file directly. Create a transform file that contains the configuration changes you require. The transform file is applied to the original MSI file at run time by the msiexec.exe executable file. Creating a transform file takes a bit more time than editing the MSI file directly, however it will save you time in the long run as you can apply the same transform file to future FortiClient releases.
If possible, avoid modifying any other components. FortiClient sub-features do not support “Advertised” installations.
The following rules MUST be followed or corruption to the MSI file:
• never delete a feature you do not need. If you do not need a feature, set the install level to 0.
• never delete a component you do not need.
• never move a component from one feature to another.
• never modify the installation UI or installation execution order.
• never rename ANY existing component or feature.
• never change the component code of ANY existing component.
• never change the PRODUCTCODE.
• never change the UPGRADECODE.
• never add new features to the root of the feature tree. If you really need to add a feature, add it as a sub-feature of an existing FortiClient feature. However, before you add a feature, question why you are adding a feature and what you are trying to accomplish.
Creating a FortiClient custom installation
Use an MSI editor and the original FortiClient MSI installation file for the following procedure. These instructions assume you know how to:
• use an MSI editor
• use the command line msiexec commands
• roll out an MSI based installation to your network.
To create and test a custom FortiClient installation
1 Make a copy of the FortiClient.msi file and rename the copy (i.e. “target.msi”).
2 Open “target.msi” with an MSI editor and add your modifications to it.
3 Save the changes you made to the “target.msi” file and close the file.
Caution: You must follow the editing rules described in this section. Ignoring these rules may result in a custom installation that cannot be upgraded or patched by future releases of FortiClient.
Note: You do not need to edit the MSI to disable the wizard. When you perform a silent or reduced UI installation, the MSI automatically disables the FortiClient Wizard from executing after rebooting the computer.
FortiClient Endpoint Security Version 4.0 MR2 Administration Guide24 04-420-1116637-20101207
http://docs.fortinet.com/ • Feedback
Custom Installer Packages Customizing the installer using an MSI editor
F0h
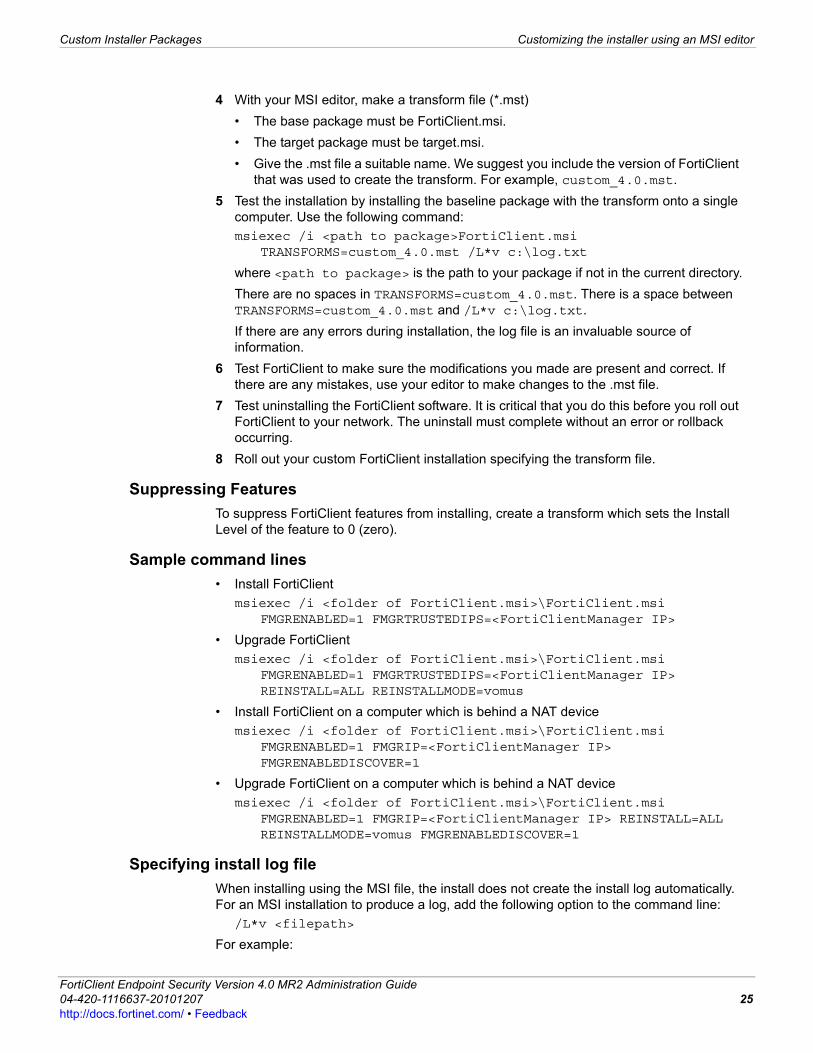
4 With your MSI editor, make a transform file (*.mst)
• The base package must be FortiClient.msi.
• The target package must be target.msi.
• Give the .mst file a suitable name. We suggest you include the version of FortiClient that was used to create the transform. For example, custom_4.0.mst.
5 Test the installation by installing the baseline package with the transform onto a single computer. Use the following command:
msiexec /i <path to package>FortiClient.msi TRANSFORMS=custom_4.0.mst /L*v c:\log.txt
where <path to package> is the path to your package if not in the current directory.
There are no spaces in TRANSFORMS=custom_4.0.mst. There is a space between TRANSFORMS=custom_4.0.mst and /L*v c:\log.txt.
If there are any errors during installation, the log file is an invaluable source of information.
6 Test FortiClient to make sure the modifications you made are present and correct. If there are any mistakes, use your editor to make changes to the .mst file.
7 Test uninstalling the FortiClient software. It is critical that you do this before you roll out FortiClient to your network. The uninstall must complete without an error or rollback occurring.
8 Roll out your custom FortiClient installation specifying the transform file.
Suppressing Features
To suppress FortiClient features from installing, create a transform which sets the Install Level of the feature to 0 (zero).
Sample command lines
• Install FortiClient
msiexec /i <folder of FortiClient.msi>\FortiClient.msi FMGRENABLED=1 FMGRTRUSTEDIPS=<FortiClientManager IP>
• Upgrade FortiClient
msiexec /i <folder of FortiClient.msi>\FortiClient.msi FMGRENABLED=1 FMGRTRUSTEDIPS=<FortiClientManager IP> REINSTALL=ALL REINSTALLMODE=vomus
• Install FortiClient on a computer which is behind a NAT device
msiexec /i <folder of FortiClient.msi>\FortiClient.msi FMGRENABLED=1 FMGRIP=<FortiClientManager IP> FMGRENABLEDISCOVER=1
• Upgrade FortiClient on a computer which is behind a NAT device
msiexec /i <folder of FortiClient.msi>\FortiClient.msi FMGRENABLED=1 FMGRIP=<FortiClientManager IP> REINSTALL=ALL REINSTALLMODE=vomus FMGRENABLEDISCOVER=1
Specifying install log file
When installing using the MSI file, the install does not create the install log automatically. For an MSI installation to produce a log, add the following option to the command line:
/L*v <filepath>
For example:
ortiClient Endpoint Security Version 4.0 MR2 Administration Guide4-420-1116637-20101207 25ttp://docs.fortinet.com/ • Feedback
Deploying the Customized Installation Custom Installer Packages
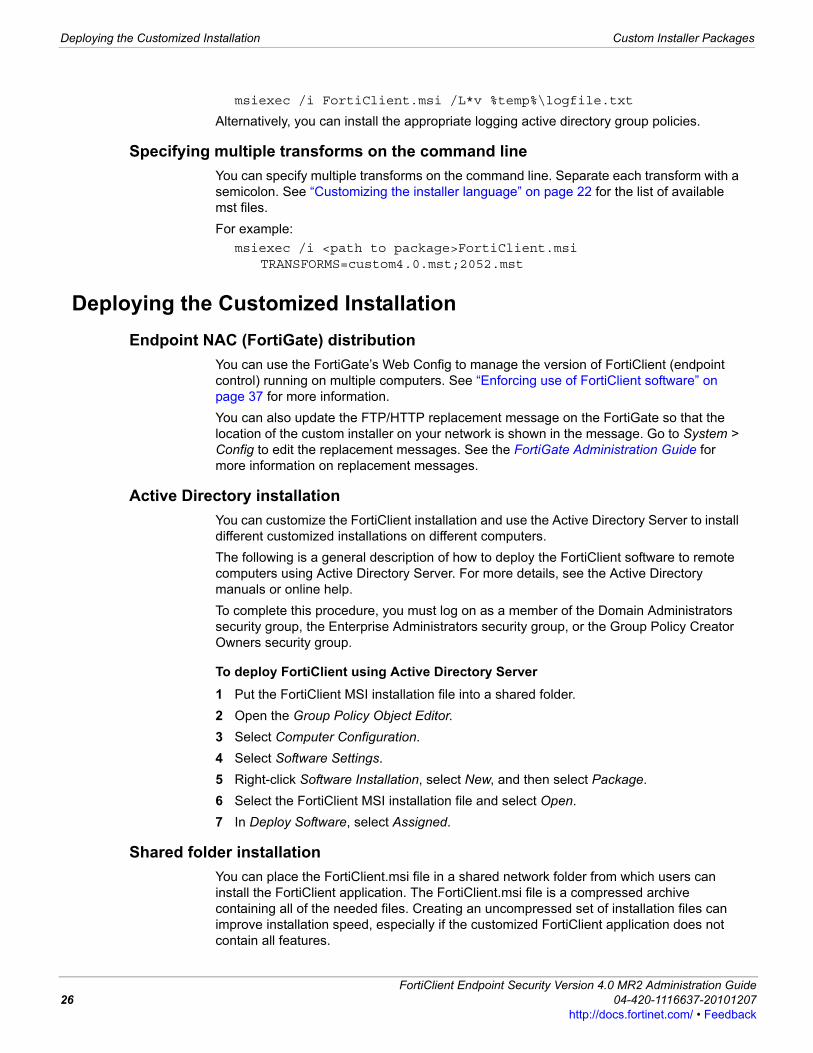
msiexec /i FortiClient.msi /L*v %temp%\logfile.txt
Alternatively, you can install the appropriate logging active directory group policies.
Specifying multiple transforms on the command line
You can specify multiple transforms on the command line. Separate each transform with a semicolon. See “Customizing the installer language” on page 22 for the list of available mst files.
For example:
msiexec /i <path to package>FortiClient.msi TRANSFORMS=custom4.0.mst;2052.mst
Deploying the Customized Installation
Endpoint NAC (FortiGate) distribution
You can use the FortiGate’s Web Config to manage the version of FortiClient (endpoint control) running on multiple computers. See “Enforcing use of FortiClient software” on page 37 for more information.
You can also update the FTP/HTTP replacement message on the FortiGate so that the location of the custom installer on your network is shown in the message. Go to System > Config to edit the replacement messages. See the FortiGate Administration Guide for more information on replacement messages.
Active Directory installation
You can customize the FortiClient installation and use the Active Directory Server to install different customized installations on different computers.
The following is a general description of how to deploy the FortiClient software to remote computers using Active Directory Server. For more details, see the Active Directory manuals or online help.
To complete this procedure, you must log on as a member of the Domain Administrators security group, the Enterprise Administrators security group, or the Group Policy Creator Owners security group.
To deploy FortiClient using Active Directory Server
1 Put the FortiClient MSI installation file into a shared folder.
2 Open the Group Policy Object Editor.
3 Select Computer Configuration.
4 Select Software Settings.
5 Right-click Software Installation, select New, and then select Package.
6 Select the FortiClient MSI installation file and select Open.
7 In Deploy Software, select Assigned.
Shared folder installation
You can place the FortiClient.msi file in a shared network folder from which users can install the FortiClient application. The FortiClient.msi file is a compressed archive containing all of the needed files. Creating an uncompressed set of installation files can improve installation speed, especially if the customized FortiClient application does not contain all features.
FortiClient Endpoint Security Version 4.0 MR2 Administration Guide26 04-420-1116637-20101207
http://docs.fortinet.com/ • Feedback

Custom Installer Packages Managing FortiClient with FortiManager
F0h
To create a network installer
1 Create or choose a shared network folder for the installation.
2 From the folder that contains the FortiClient.msi file, execute the following command:
msiexec /qb /a FortiClient.msi TARGETDIR=<location>
where <location> is the path to the shared network folder where you want to place the uncompressed installation files, for example c:\fc_installer\.
The shared network folder contains a FortiClient.msi file that is smaller than the original because the other files have been decompressed into a set of subfolders. To install the customized FortiClient application on their own computer, users simply execute the FortiClient.msi file.
Managing FortiClient with FortiManager
You can install the FortiClient Endpoint Security application from a .zip or .exe package and configure it for central management. The installed FortiClient application can either accept management from a FortiManager unit at a specific IP address, or discover FortiManager units on its network.
For information about centrally managing FortiClient PCs with FortiManager, see the FortiClient Manager chapter of the FortiManager Administration Guide.
Communication between FortiClient and FortiManager
FortiClient Manager uses TCP port 6020 and UDP port 6023 to accept client connections. If there are firewalls/routers/switches between FortiClient Manager and FortiClient, these two ports must have matching policies to accept incoming traffic from the client side. Without exposing these two ports, clients will fail to log on to FortiClient Manager.
If the firewalls protecting the clients have policies for outgoing traffic, they must allow UDP traffic from source port 6022 to the FortiManager device port 6023. Also, TCP traffic from the client to FortiManager device port 6020 must be allowed.
The TCP traffic between FortiClient and FortiManager is SSL encrypted. The UDP traffic is not strongly encrypted, as it is used only for conveying notifications and keep-alive messages.
When a client starts up, it first tries to send a registration message to FortiManager. If it succeeds, it will try to log on to that FortiManager. After successfully logging on, the FortiClient sends keep-alive UDP traffic every 60 seconds to indicate that it is active and to check that the FortiManager unit is available.
Whenever FortiManager has information for FortiClient PCs, such as antivirus updates, policy installation, etc, it sends notification messages to the IP and port used by last keep-alive UDP packet from that client. Both FortiClient and FortiClient Manager are fully NAT-aware. They can communicate even if there are NAT devices between them. Usually, notification messages are delivered to the client instantly. If the NAT session is closed by one or more NAT device(s), FortiManager will try to send the notification messages the next time it receives a keep-alive packet from the client.
Firewall behavior on FortiClient managed by FortiManager
For a loosely managed network, administrators may not want all clients to block network access attempts without matching firewall rules. They can set the firewall behavior to 1, so the client firewall will behave as normal. Administrators can setup deny policies for certain high risk applications, such as P2P clients (eDonkey, BitTorrent, etc).
ortiClient Endpoint Security Version 4.0 MR2 Administration Guide4-420-1116637-20101207 27ttp://docs.fortinet.com/ • Feedback
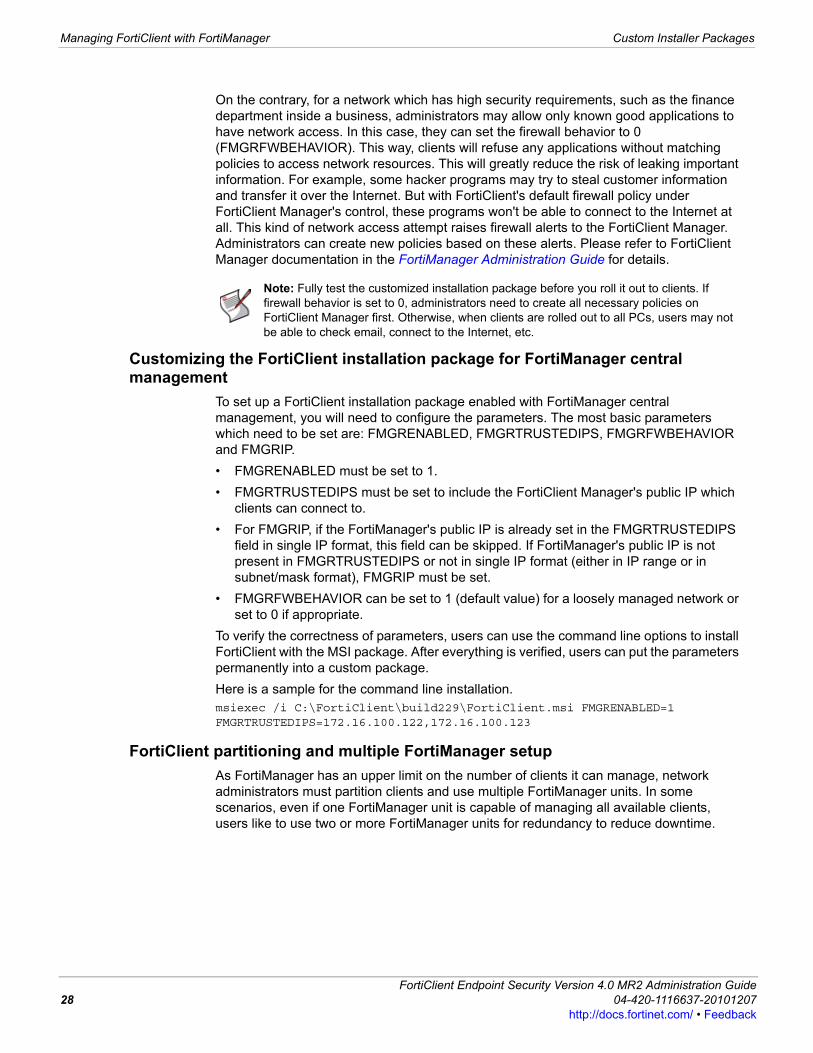
Managing FortiClient with FortiManager Custom Installer Packages
On the contrary, for a network which has high security requirements, such as the finance department inside a business, administrators may allow only known good applications to have network access. In this case, they can set the firewall behavior to 0 (FMGRFWBEHAVIOR). This way, clients will refuse any applications without matching policies to access network resources. This will greatly reduce the risk of leaking important information. For example, some hacker programs may try to steal customer information and transfer it over the Internet. But with FortiClient's default firewall policy under FortiClient Manager's control, these programs won't be able to connect to the Internet at all. This kind of network access attempt raises firewall alerts to the FortiClient Manager. Administrators can create new policies based on these alerts. Please refer to FortiClient Manager documentation in the FortiManager Administration Guide for details.
Customizing the FortiClient installation package for FortiManager central management
To set up a FortiClient installation package enabled with FortiManager central management, you will need to configure the parameters. The most basic parameters which need to be set are: FMGRENABLED, FMGRTRUSTEDIPS, FMGRFWBEHAVIOR and FMGRIP.
• FMGRENABLED must be set to 1.
• FMGRTRUSTEDIPS must be set to include the FortiClient Manager's public IP which clients can connect to.
• For FMGRIP, if the FortiManager's public IP is already set in the FMGRTRUSTEDIPS field in single IP format, this field can be skipped. If FortiManager's public IP is not present in FMGRTRUSTEDIPS or not in single IP format (either in IP range or in subnet/mask format), FMGRIP must be set.
• FMGRFWBEHAVIOR can be set to 1 (default value) for a loosely managed network or set to 0 if appropriate.
To verify the correctness of parameters, users can use the command line options to install FortiClient with the MSI package. After everything is verified, users can put the parameters permanently into a custom package.
Here is a sample for the command line installation.msiexec /i C:\FortiClient\build229\FortiClient.msi FMGRENABLED=1FMGRTRUSTEDIPS=172.16.100.122,172.16.100.123
FortiClient partitioning and multiple FortiManager setup
As FortiManager has an upper limit on the number of clients it can manage, network administrators must partition clients and use multiple FortiManager units. In some scenarios, even if one FortiManager unit is capable of managing all available clients, users like to use two or more FortiManager units for redundancy to reduce downtime.
Note: Fully test the customized installation package before you roll it out to clients. If firewall behavior is set to 0, administrators need to create all necessary policies on FortiClient Manager first. Otherwise, when clients are rolled out to all PCs, users may not be able to check email, connect to the Internet, etc.
FortiClient Endpoint Security Version 4.0 MR2 Administration Guide28 04-420-1116637-20101207
http://docs.fortinet.com/ • Feedback
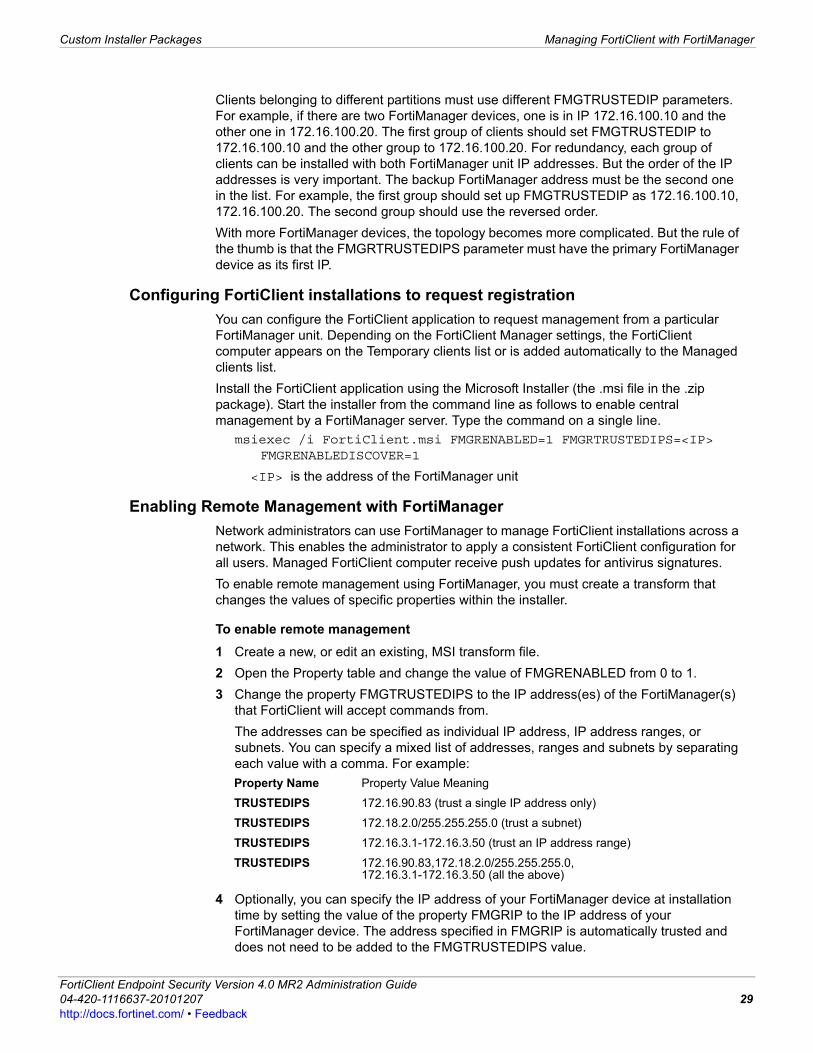
Custom Installer Packages Managing FortiClient with FortiManager
F0h
Clients belonging to different partitions must use different FMGTRUSTEDIP parameters. For example, if there are two FortiManager devices, one is in IP 172.16.100.10 and the other one in 172.16.100.20. The first group of clients should set FMGTRUSTEDIP to 172.16.100.10 and the other group to 172.16.100.20. For redundancy, each group of clients can be installed with both FortiManager unit IP addresses. But the order of the IP addresses is very important. The backup FortiManager address must be the second one in the list. For example, the first group should set up FMGTRUSTEDIP as 172.16.100.10, 172.16.100.20. The second group should use the reversed order.
With more FortiManager devices, the topology becomes more complicated. But the rule of the thumb is that the FMGRTRUSTEDIPS parameter must have the primary FortiManager device as its first IP.
Configuring FortiClient installations to request registration
You can configure the FortiClient application to request management from a particular FortiManager unit. Depending on the FortiClient Manager settings, the FortiClient computer appears on the Temporary clients list or is added automatically to the Managed clients list.
Install the FortiClient application using the Microsoft Installer (the .msi file in the .zip package). Start the installer from the command line as follows to enable central management by a FortiManager server. Type the command on a single line.
msiexec /i FortiClient.msi FMGRENABLED=1 FMGRTRUSTEDIPS=<IP> FMGRENABLEDISCOVER=1
<IP> is the address of the FortiManager unit
Enabling Remote Management with FortiManager
Network administrators can use FortiManager to manage FortiClient installations across a network. This enables the administrator to apply a consistent FortiClient configuration for all users. Managed FortiClient computer receive push updates for antivirus signatures.
To enable remote management using FortiManager, you must create a transform that changes the values of specific properties within the installer.
To enable remote management
1 Create a new, or edit an existing, MSI transform file.
2 Open the Property table and change the value of FMGRENABLED from 0 to 1.
3 Change the property FMGTRUSTEDIPS to the IP address(es) of the FortiManager(s) that FortiClient will accept commands from.
The addresses can be specified as individual IP address, IP address ranges, or subnets. You can specify a mixed list of addresses, ranges and subnets by separating each value with a comma. For example:
4 Optionally, you can specify the IP address of your FortiManager device at installation time by setting the value of the property FMGRIP to the IP address of your FortiManager device. The address specified in FMGRIP is automatically trusted and does not need to be added to the FMGTRUSTEDIPS value.
Property Name Property Value Meaning
TRUSTEDIPS 172.16.90.83 (trust a single IP address only)
TRUSTEDIPS 172.18.2.0/255.255.255.0 (trust a subnet)
TRUSTEDIPS 172.16.3.1-172.16.3.50 (trust an IP address range)
TRUSTEDIPS 172.16.90.83,172.18.2.0/255.255.255.0,172.16.3.1-172.16.3.50 (all the above)
ortiClient Endpoint Security Version 4.0 MR2 Administration Guide4-420-1116637-20101207 29ttp://docs.fortinet.com/ • Feedback
Managing FortiClient with FortiManager Custom Installer Packages
Configuring central management by specified FortiManager units
Using installer command line options, you can specify the IP address of one or more FortiManager units that will control the FortiClient configuration.
The command-line options are as follows:
If there are multiple FortiManager units that could manage this FortiClient PC, add the following option.
FMGRTRUSTEDIPS=<FM_IP1>,<FM_IP2>,...
<FM_IP1>,<FM_IP2>, and so on can be individual IP addresses, IP address ranges or subnets. You can omit the FMGRIP option if the primary FortiManager unit IP address is included as a single IP address in the FMGTRUSTEDIPS option.
For a complete list of installer public properties that can be specified when installing FortiClient, see “Appendix A: Installer Public Properties” for more information.
Example command lines for the .exe package
For a FortiClient PC centrally managed by a FortiManager unit on IP address 172.16.100.5, the installation command line is:
FortiClientSetup /v”FMGRENABLED=1 FMGRIP=172.16.100.5”
For a FortiClient PC centrally managed by either a primary FortiManager unit on IP address 172.16.100.5 or a secondary FortiManager unit on 172.16.100.6, the installation command line is:
FortiClientSetup /v”FMGRENABLED=1 FMGRIP=172.16.100.5 FMGRTRUSTEDIPS=172.16.100.5,172.16.100.6”
Note: You must enter the entire command on a single line.
Example command lines for the .zip package
Expand the .zip package into a folder before you execute these commands.
For a FortiClient PC centrally managed by a FortiManager unit on IP address 172.16.100.5, the installation command line is:
msiexec /i FortiClient.msi FMGRENABLED=1 FMGRIP=172.16.100.5
For a FortiClient PC centrally managed by either a primary FortiManager unit on IP address 172.16.100.5 or a secondary FortiManager unit on 172.16.100.6, the installation command line is:
msiexec /i FortiClient.msi FMGRENABLED=1 FMGRIP=172.16.100.5 FMGRTRUSTEDIPS=172.16.100.5,172.16.100.6
Note: You must enter the entire command on a single line.
Configuring central management by discovered FortiManager units
Using installer command line options, you can enable discovery of FortiManager units and specify by IP address the FortiManager units from which the FortiClient application accepts central management.
The command-line options are as follows:
FMGRENABLED=1 This enables FortiManager central management.
FMGRIP=<FM_IP_Primary> This specifies the primary (or only) FortiManager unit.
FMGRENABLED=1 This enables FortiManager central management.
FortiClient Endpoint Security Version 4.0 MR2 Administration Guide30 04-420-1116637-20101207
http://docs.fortinet.com/ • Feedback
Custom Installer Packages Advanced Scenarios
F0h
For a complete list of installer public properties that can be specified when installing FortiClient, see “Appendix A: Installer Public Properties” for more information.
Example command lines for the .exe package
For a FortiClient PC that accepts central management by any FortiManager unit on subnet 172.16.100.0/24, the installation command line is:
FortiClientSetup /v”FMGRENABLED=1 FMGRENABLEDISCOVER=1 FMGRTRUSTEDIPS=172.16.100.0/255.255.255.0”
Note: You must enter the entire command on a single line.
Example command lines for the .zip package
Expand the .zip package into a folder before you execute these commands.
For a FortiClient PC that accepts central management by any FortiManager unit on subnet 172.16.100.0/24, the installation command line is:
msiexec /i FortiClient.msi FMGRENABLED=1 FMGRENABLEDISCOVER=1 FMGRTRUSTEDIPS=172.16.100.0/255.255.255.0
Note: You must enter the entire command on a single line.
Changing the default firewall action
By default, the FortiClient firewall allows unknown applications to access the network, or asks the user, depending on the selected firewall profile. (An unknown application is one that is not on the firewall applications list.) To make the FortiClient firewall always block unknown applications, add the DEFAULTAPPLICATION=1 command line option when you run the FortiClient installer.
Advanced Scenarios
Installing FortiClient as part of a cloned disk image
If you configure computer using a cloned hard disk image, you need to remove the unique identifier from the FortiClient application. You will encounter problems with FortiManager Server if you deploy multiple FortiClient applications with the same identifier.
This section describes how to include a custom FortiClient installation in a cloned hard disk image but remove its unique identifier. On each computer configured with the cloned hard disk image, the FortiClient application will generate its own unique identifier the first time the computer is started.
To include a FortiClient installation in a hard disk image
1 Using an MSI FortiClient installer, install and configure the FortiClient application to suit your requirements.
You can use a standard or a customized installation package.
2 Right-click the FortiClient icon in the system tray and select Shutdown FortiClient.
3 From the folder where you expanded the FortiClientTools.zip file, run RemoveFCTID.exe. The RemoveFCTID tool requires administrative rights.
FMGRENABLEDISCOVER=1 This enables the FortiClient application to request central management.
FMGRTRUSTEDIPS=<FM_IP1>,<FM_IP2>,...
Specify individual IP addresses, IP address ranges or subnets from which the FortiClient application accepts central management.
ortiClient Endpoint Security Version 4.0 MR2 Administration Guide4-420-1116637-20101207 31ttp://docs.fortinet.com/ • Feedback
Advanced Scenarios Custom Installer Packages
4 Shut down the computer.
5 Create the hard disk image and deploy it as needed.
Installing FortiClient on cloned computers
If you intend to make an image of the hard drive for deployment to other computers, you need to shut down FortiClient and use the RemoveFCTID tool to remove the FortiClient identifier. For more information, see “Installing FortiClient as part of a cloned disk image” on page 31.
Installing FortiClient on Citrix servers
You can install FortiClient Endpoint Security on Citrix Presentation Server 4.5 in a Windows Server 2003 or Windows Server 2008 Beta 3 environment.
You can use a standard or a customized installation package, but you must select the Custom installation option and make sure that you do not install the VPN feature. Citrix uses the Windows IPsec service, which the FortiClient VPN would disable.
After installing the FortiClient application, restart the Citrix server. This resolves the problem that the FortiClient installation can cause the Citrix console to lose communication with the server.
To implement per-user web filtering, you need to define web filter profiles for your users. For more information, see the FortiClient Endpoint Security User Guide.
Configuring AntiLeak for FortiClient
The AntiLeak data loss prevention (DLP) feature prevents accidental leakage of sensitive information through email messages. When you send an email message using Microsoft Outlook (2000 or later), FortiClient searches the attachments for the words or patterns in your sensitive words list. If any of the words or patterns are found, FortiClient logs the message and can also block sending of the message.
AntiLeak can examine the following file types:
• text (.txt)
• Microsoft Word (.doc)
• Microsoft Excel (.xls)
• Microsoft PowerPoint (.ppt)
• Adobe Portable Document Format (.pdf)
To use AntiLeak in FortiClient, you will have to create a custom installer package with AntiLeak enabled.
Note: Do not make the RemoveFCTID tool part of a logon script.
Note: Do not reboot the Windows operating system on the computer before you create the hard disk image. The FortiClient identifier is created before you log on.
Caution: Anti-Leak is available to those users upgrading from FortiClient 3.0 who were previously using this feature. For a more comprehensive anti-leak solution, see data leak prevention (DLP) in the FortiGate Administration Guide. Anti-Leak is not available for users installing FortiClient 4.0 MR2 as a fresh install.
FortiClient Endpoint Security Version 4.0 MR2 Administration Guide32 04-420-1116637-20101207
http://docs.fortinet.com/ • Feedback
Custom Installer Packages Creating customized FortiClient installers
F0h
To configure AntiLeak settings
1 Open the MSI in an MSI editor.
2 Navigate to the Feature table.
3 Find the record where the Feature field is Feature_AntiLeak.
4 In that record, change the Display field to 1.
5 Change the InstallLevel field to 1.
6 Save and close the MSI.
Creating customized FortiClient installers
To support enterprise licensing, you must make specific customizations of the installer. At a minimum, use the “-a”, “-e” and “-k” switches in the FCRepackager tool.
1 Create a model FortiClient installation on a computer.
If you want to make other customizations in the FortiClient installer, you should make them first, following the procedures in the Customization chapter. See “Creating a customized installer using FCRepackager” on page 17. Then, install the result of those customizations as your model installation.
Customize licensing by using the FCRepackager tool with the following command line options:
• -f <FortiManager_IP>, where <FortiManager_IP> is the IP address or fully qualified domain name of the FortiManager unit that will license the FortiClient computer,
• -a <license_model>, where <license_model> is 1 for enterprise client license with FortiManager validation or 2 for enterprise client license with external validation,
• -k <license key>, where <license key> is the number generated by FortiClient Manager. It embeds the license into the installer. If you do not embed the license then the user has to manually enter the license directly into FortiClient,
• -e <client license key>, where <client license key> is the enterprise client license key created on the FortiManager unit. You can omit this command line option if you prefer to distribute the license key in some other way,
• -m <installer_file>, where <installer_file> is the FortiClient .msi installer file you used to create the model installation.
For example, to customize the FortiClient installer at c:\FortiClient to receive licensing and validation from the FortiManager unit at 172.20.120.161, with client license key 116c2d1ae25f071cc53a013db36040836e, the command is (all on one line):
FCRepackager.exe -f 172.20.120.161 -a 1 -e 116c2d1ae25f071cc53a013db36040836e -m c:\FortiClient\forticlient.msi
The customized installer is created in a subdirectory called “transformed”, c:\FortiClient\transformed, for example.
Distributing customized FortiClient installers
You can distribute the customized FortiClient installer in various ways, such as:
• Put the installer on a file share. Users simply double-click the file to begin installation.
ortiClient Endpoint Security Version 4.0 MR2 Administration Guide4-420-1116637-20101207 33ttp://docs.fortinet.com/ • Feedback
Creating customized FortiClient installers Custom Installer Packages
• On a Windows Advanced Server network, install the application on end users’ computers remotely. For more information, see “Active Directory installation” on page 26.
FortiClient Endpoint Security Version 4.0 MR2 Administration Guide34 04-420-1116637-20101207
http://docs.fortinet.com/ • Feedback
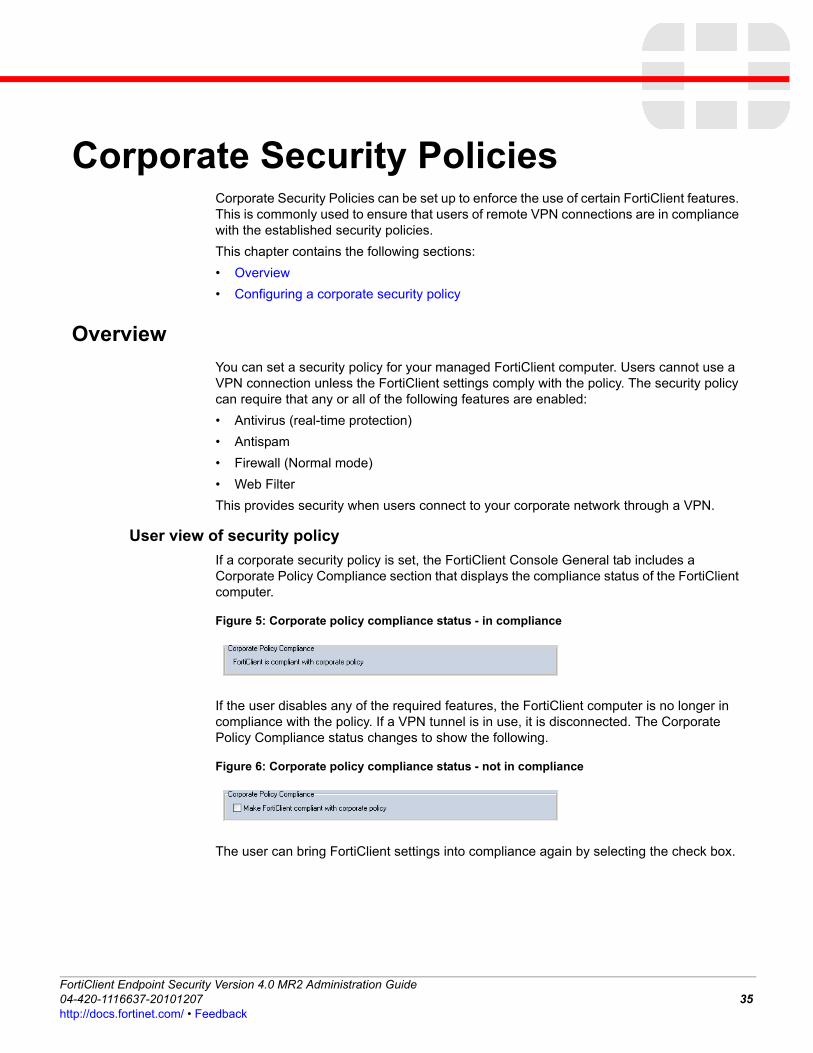
F0h
Corporate Security PoliciesCorporate Security Policies can be set up to enforce the use of certain FortiClient features. This is commonly used to ensure that users of remote VPN connections are in compliance with the established security policies.
This chapter contains the following sections:
• Overview
• Configuring a corporate security policy
Overview
You can set a security policy for your managed FortiClient computer. Users cannot use a VPN connection unless the FortiClient settings comply with the policy. The security policy can require that any or all of the following features are enabled:
• Antivirus (real-time protection)
• Antispam
• Firewall (Normal mode)
• Web Filter
This provides security when users connect to your corporate network through a VPN.
User view of security policy
If a corporate security policy is set, the FortiClient Console General tab includes a Corporate Policy Compliance section that displays the compliance status of the FortiClient computer.
Figure 5: Corporate policy compliance status - in compliance
If the user disables any of the required features, the FortiClient computer is no longer in compliance with the policy. If a VPN tunnel is in use, it is disconnected. The Corporate Policy Compliance status changes to show the following.
Figure 6: Corporate policy compliance status - not in compliance
The user can bring FortiClient settings into compliance again by selecting the check box.
ortiClient Endpoint Security Version 4.0 MR2 Administration Guide4-420-1116637-20101207 35ttp://docs.fortinet.com/ • Feedback
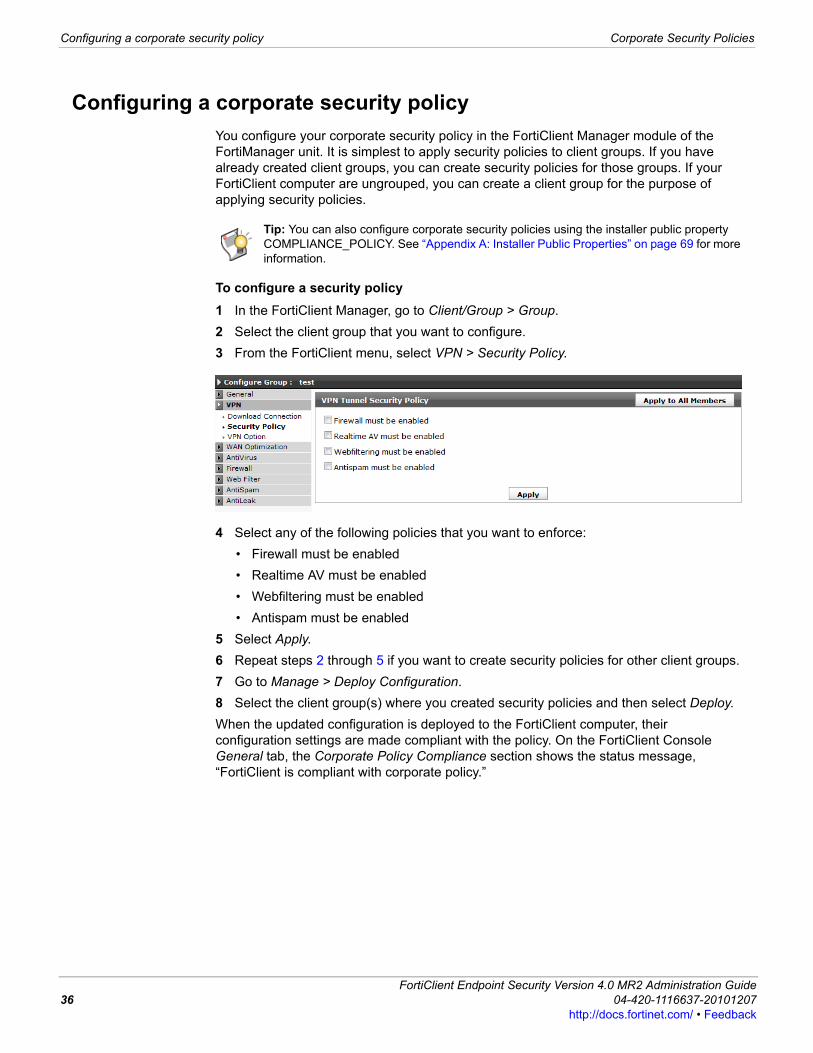
Configuring a corporate security policy Corporate Security Policies
Configuring a corporate security policy
You configure your corporate security policy in the FortiClient Manager module of the FortiManager unit. It is simplest to apply security policies to client groups. If you have already created client groups, you can create security policies for those groups. If your FortiClient computer are ungrouped, you can create a client group for the purpose of applying security policies.
To configure a security policy
1 In the FortiClient Manager, go to Client/Group > Group.
2 Select the client group that you want to configure.
3 From the FortiClient menu, select VPN > Security Policy.
4 Select any of the following policies that you want to enforce:
• Firewall must be enabled
• Realtime AV must be enabled
• Webfiltering must be enabled
• Antispam must be enabled
5 Select Apply.
6 Repeat steps 2 through 5 if you want to create security policies for other client groups.
7 Go to Manage > Deploy Configuration.
8 Select the client group(s) where you created security policies and then select Deploy.
When the updated configuration is deployed to the FortiClient computer, their configuration settings are made compliant with the policy. On the FortiClient Console General tab, the Corporate Policy Compliance section shows the status message, “FortiClient is compliant with corporate policy.”
Tip: You can also configure corporate security policies using the installer public property COMPLIANCE_POLICY. See “Appendix A: Installer Public Properties” on page 69 for more information.
FortiClient Endpoint Security Version 4.0 MR2 Administration Guide36 04-420-1116637-20101207
http://docs.fortinet.com/ • Feedback
F0h
Endpoint Network Access ControlThis chapter describes how to enforce the use of FortiClient by using a FortiGate unit’s Endpoint NAC feature.
This chapter contains the following sections:
• Overview
• Enforcing use of FortiClient software
• Configuring FortiGuard Services
• Setting the FortiClient version
• Enabling Endpoint Control
Overview
FortiGate units prevent viruses and other threats on the Internet from passing through the firewall to your private network. However, a computer, especially a portable computer, might become infected from media or unprotected connection to another network. This infection could spread on your internal network. FortiClient Endpoint Control protects the computer on which it is installed.
Endpoint NAC (Network Access Control) enforces the use of FortiClient endpoint security in your network. The compliance check ensures that the endpoint is running the most recent version of the FortiClient software, checks that the antivirus signatures are up-to-date, and are not using any blocked applications (application detection).
You enable endpoint control in a FortiGate firewall policy. When traffic attempts to pass through the firewall policy, the FortiGate unit runs compliance checks on the originating host on the source interface. Non-compliant endpoints are blocked. If web browsing, they receive a message telling them that they are non-compliant, or they are redirected to a web portal where they can download the FortiClient application installer.
Enforcing use of FortiClient software
Endpoint control requires that all hosts using the firewall policy have FortiClient Endpoint Security software installed. Make sure that all hosts affected by this policy are able to install this software. Currently, FortiClient Endpoint Security is available for Microsoft Windows 2000 and later only.
To set up endpoint control on your FortiGate unit, you need to
• Enable FortiGuard. This is required if you will use FortiGuard Services to update FortiClient software or antivirus signatures. You do not need to enter account information. See “Configuring FortiGuard Services” on page 38.
• Set the minimum required version of FortiClient and configure the source of FortiClient installer downloads for non-compliant endpoints. See “Setting the FortiClient version” on page 38.
• Enable endpoint control in the appropriate FortiGate firewall policies. See “Enabling Endpoint Control” on page 40.
ortiClient Endpoint Security Version 4.0 MR2 Administration Guide4-420-1116637-20101207 37ttp://docs.fortinet.com/ • Feedback
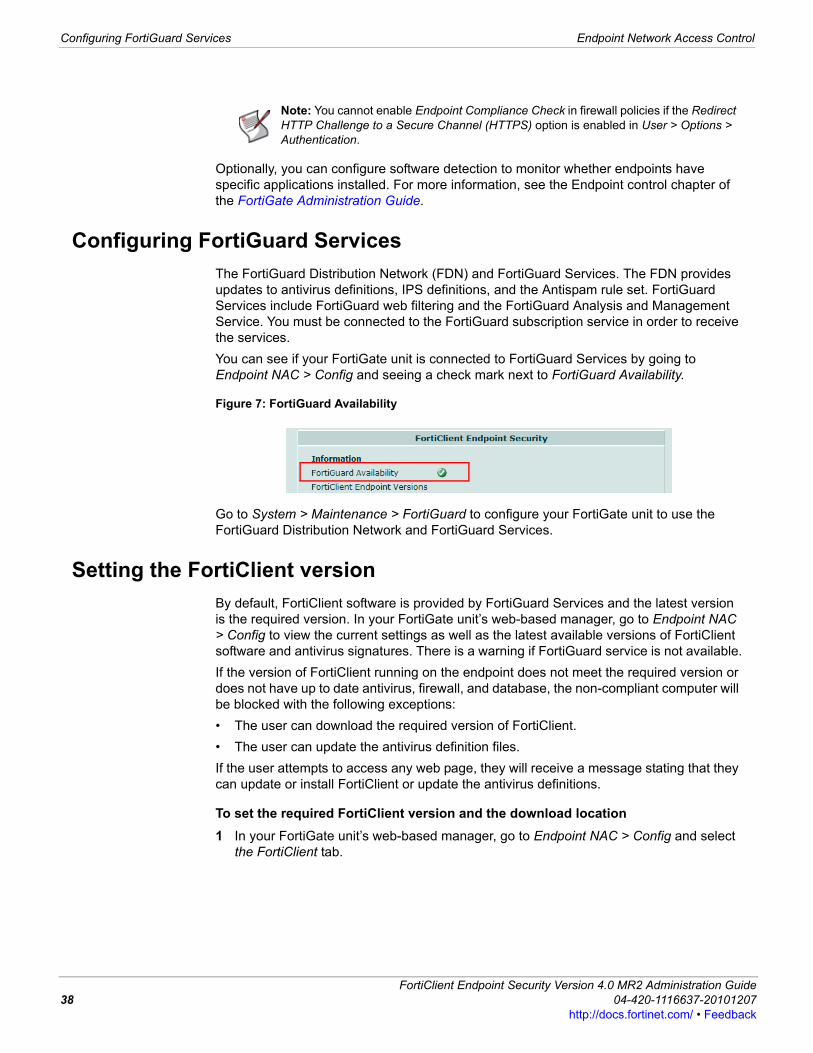
Configuring FortiGuard Services Endpoint Network Access Control
Optionally, you can configure software detection to monitor whether endpoints have specific applications installed. For more information, see the Endpoint control chapter of the FortiGate Administration Guide.
Configuring FortiGuard Services
The FortiGuard Distribution Network (FDN) and FortiGuard Services. The FDN provides updates to antivirus definitions, IPS definitions, and the Antispam rule set. FortiGuard Services include FortiGuard web filtering and the FortiGuard Analysis and Management Service. You must be connected to the FortiGuard subscription service in order to receive the services.
You can see if your FortiGate unit is connected to FortiGuard Services by going to Endpoint NAC > Config and seeing a check mark next to FortiGuard Availability.
Figure 7: FortiGuard Availability
Go to System > Maintenance > FortiGuard to configure your FortiGate unit to use the FortiGuard Distribution Network and FortiGuard Services.
Setting the FortiClient version
By default, FortiClient software is provided by FortiGuard Services and the latest version is the required version. In your FortiGate unit’s web-based manager, go to Endpoint NAC > Config to view the current settings as well as the latest available versions of FortiClient software and antivirus signatures. There is a warning if FortiGuard service is not available.
If the version of FortiClient running on the endpoint does not meet the required version or does not have up to date antivirus, firewall, and database, the non-compliant computer will be blocked with the following exceptions:
• The user can download the required version of FortiClient.
• The user can update the antivirus definition files.
If the user attempts to access any web page, they will receive a message stating that they can update or install FortiClient or update the antivirus definitions.
To set the required FortiClient version and the download location
1 In your FortiGate unit’s web-based manager, go to Endpoint NAC > Config and select the FortiClient tab.
Note: You cannot enable Endpoint Compliance Check in firewall policies if the Redirect HTTP Challenge to a Secure Channel (HTTPS) option is enabled in User > Options > Authentication.
FortiClient Endpoint Security Version 4.0 MR2 Administration Guide38 04-420-1116637-20101207
http://docs.fortinet.com/ • Feedback
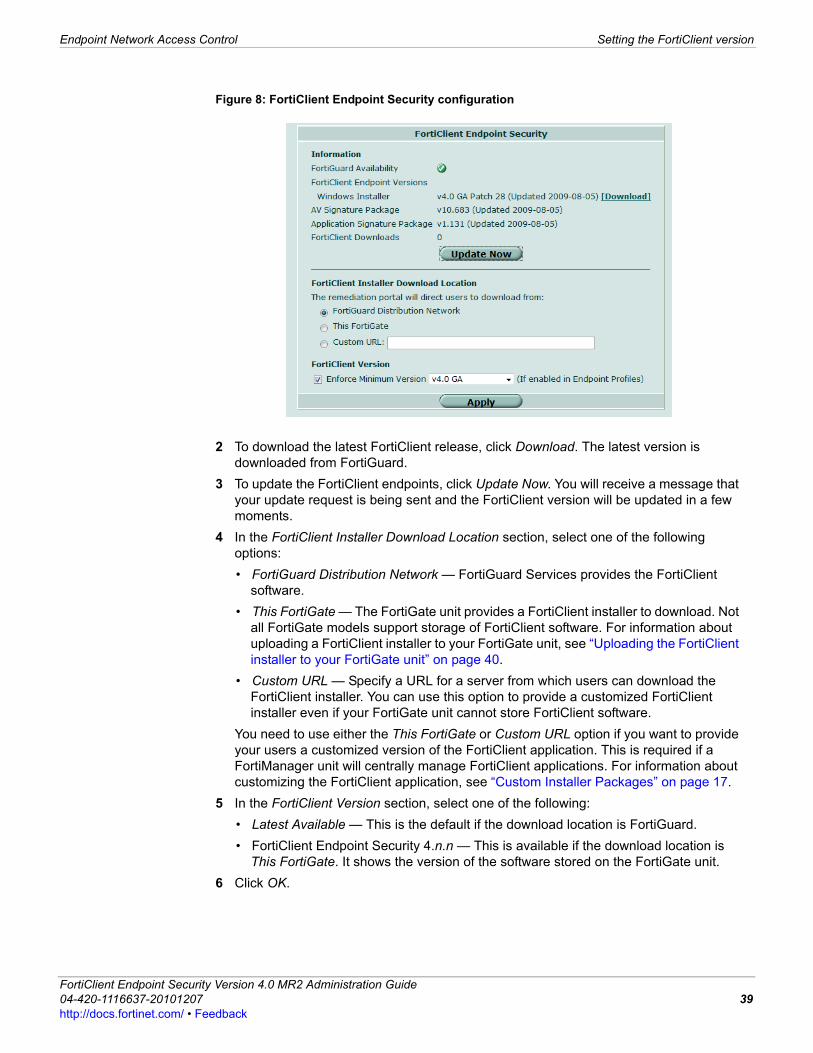
Endpoint Network Access Control Setting the FortiClient version
F0h
Figure 8: FortiClient Endpoint Security configuration
2 To download the latest FortiClient release, click Download. The latest version is downloaded from FortiGuard.
3 To update the FortiClient endpoints, click Update Now. You will receive a message that your update request is being sent and the FortiClient version will be updated in a few moments.
4 In the FortiClient Installer Download Location section, select one of the following options:
• FortiGuard Distribution Network — FortiGuard Services provides the FortiClient software.
• This FortiGate — The FortiGate unit provides a FortiClient installer to download. Not all FortiGate models support storage of FortiClient software. For information about uploading a FortiClient installer to your FortiGate unit, see “Uploading the FortiClient installer to your FortiGate unit” on page 40.
• Custom URL — Specify a URL for a server from which users can download the FortiClient installer. You can use this option to provide a customized FortiClient installer even if your FortiGate unit cannot store FortiClient software.
You need to use either the This FortiGate or Custom URL option if you want to provide your users a customized version of the FortiClient application. This is required if a FortiManager unit will centrally manage FortiClient applications. For information about customizing the FortiClient application, see “Custom Installer Packages” on page 17.
5 In the FortiClient Version section, select one of the following:
• Latest Available — This is the default if the download location is FortiGuard.
• FortiClient Endpoint Security 4.n.n — This is available if the download location is This FortiGate. It shows the version of the software stored on the FortiGate unit.
6 Click OK.
ortiClient Endpoint Security Version 4.0 MR2 Administration Guide4-420-1116637-20101207 39ttp://docs.fortinet.com/ • Feedback
Enabling Endpoint Control Endpoint Network Access Control
Uploading the FortiClient installer to your FortiGate unit
If you selected This FortiGate as the FortiClient Installer Download Location, you need to upload the FortiClient installer to the FortiGate unit.
The FortiClient installer file name must begin with “FortiClientSetup_”, followed by the version number, “4.0.2”, for example. You can upload either a .msi or .exe package.
To upload the FortiClient installer to the FortiGate unit
1 Place your installer file on a TFTP server that the FortiGate unit can access.
2 Connect to the FortiGate unit’s command line interface (CLI).
You can connect to the CLI through the FortiGate console, using SSH or Telnet (if enabled), or by using the CLI Console window that is part of the web-based manager.
3 Enter the following CLI command
execute restore forticlient tftp <filename> <server_ip>
where <filename> is, for example, FortiClientSetup_4.0.2.msiand <server_ip> is the IP address of the TFTP server.
The TFTP server uploads the file to the FortiGate unit.
For more information about using the CLI, refer to the FortiGate CLI Reference.
4 You can see the currently stored version of FortiClient software in the System Information section of the FortiGate unit dashboard. To view the dashboard, go to System > Status.
Enabling Endpoint Control
In order for a FortiGate unit to monitor applications, enforce antivirus and firewall use, and ensure antivirus definitions are up to date on FortiClient, do the following:
• Create an Endpoint Control profile
• Create an application detection list
• Apply an Endpoint Control profile to a firewall policy
After these steps are completed, you can then monitor the endpoints.
Creating Endpoint Control profiles
Create endpoint control profiles so that you can apply them to firewall policies. This allows the FortiGate unit to monitor which applications are running and installed through FortiClient and enable the enforcement of FortiClient features such as antivirus and firewall.
FortiClient Endpoint Security Version 4.0 MR2 Administration Guide40 04-420-1116637-20101207
http://docs.fortinet.com/ • Feedback
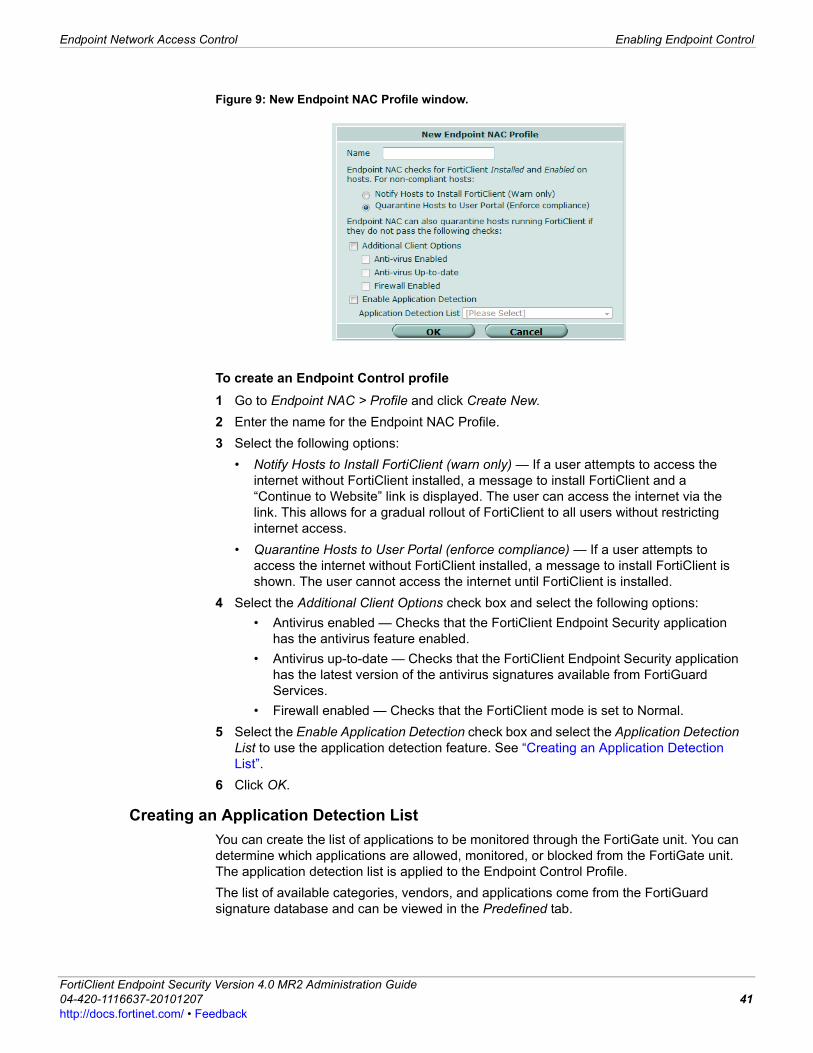
Endpoint Network Access Control Enabling Endpoint Control
F0h
Figure 9: New Endpoint NAC Profile window.
To create an Endpoint Control profile
1 Go to Endpoint NAC > Profile and click Create New.
2 Enter the name for the Endpoint NAC Profile.
3 Select the following options:
• Notify Hosts to Install FortiClient (warn only) — If a user attempts to access the internet without FortiClient installed, a message to install FortiClient and a “Continue to Website” link is displayed. The user can access the internet via the link. This allows for a gradual rollout of FortiClient to all users without restricting internet access.
• Quarantine Hosts to User Portal (enforce compliance) — If a user attempts to access the internet without FortiClient installed, a message to install FortiClient is shown. The user cannot access the internet until FortiClient is installed.
4 Select the Additional Client Options check box and select the following options:
• Antivirus enabled — Checks that the FortiClient Endpoint Security application has the antivirus feature enabled.
• Antivirus up-to-date — Checks that the FortiClient Endpoint Security application has the latest version of the antivirus signatures available from FortiGuard Services.
• Firewall enabled — Checks that the FortiClient mode is set to Normal.
5 Select the Enable Application Detection check box and select the Application Detection List to use the application detection feature. See “Creating an Application Detection List”.
6 Click OK.
Creating an Application Detection List
You can create the list of applications to be monitored through the FortiGate unit. You can determine which applications are allowed, monitored, or blocked from the FortiGate unit. The application detection list is applied to the Endpoint Control Profile.
The list of available categories, vendors, and applications come from the FortiGuard signature database and can be viewed in the Predefined tab.
ortiClient Endpoint Security Version 4.0 MR2 Administration Guide4-420-1116637-20101207 41ttp://docs.fortinet.com/ • Feedback
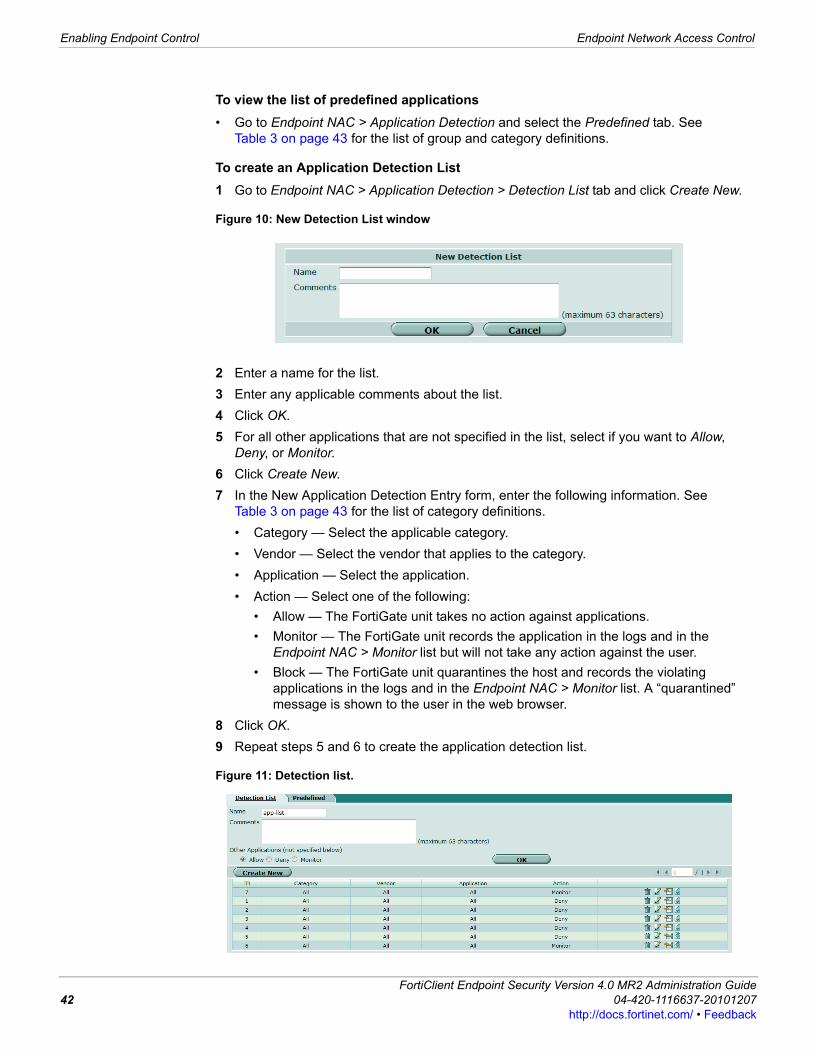
Enabling Endpoint Control Endpoint Network Access Control
To view the list of predefined applications
• Go to Endpoint NAC > Application Detection and select the Predefined tab. See Table 3 on page 43 for the list of group and category definitions.
To create an Application Detection List
1 Go to Endpoint NAC > Application Detection > Detection List tab and click Create New.
Figure 10: New Detection List window
2 Enter a name for the list.
3 Enter any applicable comments about the list.
4 Click OK.
5 For all other applications that are not specified in the list, select if you want to Allow, Deny, or Monitor.
6 Click Create New.
7 In the New Application Detection Entry form, enter the following information. See Table 3 on page 43 for the list of category definitions.
• Category — Select the applicable category.
• Vendor — Select the vendor that applies to the category.
• Application — Select the application.
• Action — Select one of the following:
• Allow — The FortiGate unit takes no action against applications.
• Monitor — The FortiGate unit records the application in the logs and in the Endpoint NAC > Monitor list but will not take any action against the user.
• Block — The FortiGate unit quarantines the host and records the violating applications in the logs and in the Endpoint NAC > Monitor list. A “quarantined” message is shown to the user in the web browser.
8 Click OK.
9 Repeat steps 5 and 6 to create the application detection list.
Figure 11: Detection list.
FortiClient Endpoint Security Version 4.0 MR2 Administration Guide42 04-420-1116637-20101207
http://docs.fortinet.com/ • Feedback

Endpoint Network Access Control Enabling Endpoint Control
F0h
Table 3: Application groups and category definitions.
Category Description
SecurityAnti-Malware Software
Software that detects, filters, and eliminates malicious content.
Authentication and Authorization
Software that restricts access to and use of the computer and its contents to authorized users and authorized uses.
Encryption, PKI Software that enables the encryption and decryption of data for security purposes.
Firewalls Software that protects the desktop from unauthorized remote access.
Hacking Software used to attack or evade access controls and privacy measures on other computers.
Potentially Unwanted Software
Technologies that alter the operation of the user's hardware, software, or network in ways that diminish control over the user experience, privacy, or the collection and distribution of personal information.
Proxy Avoidance
Applications that enable or facilitate the avoidance or bypassing of proxy server features.
Remote Access Software that enables authorized access to and use of a desktop computer or private network from a remote location.
System Audit Software used to monitor and log activity on a computer network, including both legitimate use and attempts to access or use network assets in unauthorized fashion, and to assess the status and security of the network.
Multimedia Media Players Software that enables the creation and playback of audio or video files.
CommunicationGroupware Software that enables the sharing of files and applications across work
groups, networks, or enterprises and provides communication and shared workspace for groups.
Internet Browsers
Software that interprets content and presents it on the desktop screen; excludes browsers dedicated to a single or limited sources.
Email Software that enables the receiving, display, composing, and sending of email from the desktop. Includes the client side of network applications (e.g. Microsoft Outlook) and bulk email software, but not email applications built into web browsers.
Instant Messaging
Software that enables the sending and receiving of synchronous, real-time messages on the desktop. (Also known as chat-room software.)
P2P File Sharing
Software that enables file search and sharing across a network without dependence on a central server.
Telephony, Conferencing, Fax
Software that enables telephonic transmission of voice and other data, including software for BBS, IP telephony, and dial-up internet access.
Critical FunctionsNever Block Executables needed to enable the desktop machine to perform its basic
functions prior to the use of added applications.
EntertainmentAdult Software that includes depictions of nudity or sexual activity or other
elements that might be objectionable to non-consenting users.
Gambling Software that enables online wagering or pay-for-play activity.
Games Software that enables the playing of games, whether solo or jointly with other players.
ortiClient Endpoint Security Version 4.0 MR2 Administration Guide4-420-1116637-20101207 43ttp://docs.fortinet.com/ • Feedback

Enabling Endpoint Control Endpoint Network Access Control
Applying an Endpoint Control profile to a firewall policy
Once you have created an Endpoint profile, you can apply it to the firewall policy.
If FortiClient has a valid license, it periodically sends the list of application IDs to the FortiGate unit. When the FortiGate unit receives an updated list, it compares the list of applications against the Endpoint Profile that is assigned for that user and take the following actions for each application:
• Allow — The FortiGate unit takes no action against applications.
Screen Savers Software that creates a display on the desktop screen when no keystrokes or mouse movements have occurred for some specified time.
MiscellaneousJava Files Binary files containing code to be executed by a Java interpreter (i.e.
files with .class or .jar extensions).
Other Executables not otherwise categorized.
Scripts Files containing non-malicious code to be executed by a scripting host (i.e. as with .bat, .pl, .vbs extensions).
Temporary Internet Files
JavaScript files, which load onto the desktop chiefly in association with HTML files.
ProductivityManagement Software
Including CRM, ERP, SCM, etc.
Database Software that enables the creation and utilization of structured sets of information, the structure being provided by the definition of fields or data objects, and the utilization consisting of analysis, synthesis, and comparison across large quantities of such data.
Document Viewers
Software other than that incorporated into document creation tools (e.g. word processors) or other than web browsers that enable the creation and viewing of documents and diagrams.
Graphics Software packages that enable sophisticated graphics creation and manipulation to engineering or studio standards. Includes CAD, cartographic, rendering, and animation tools.
Generic Productivity Software
Software that provides a body of reference information and means for accessing and displaying it. This also includes general desktop tools such as calendars, clocks, and calculators.
Microsoft Office Word processor, Spreadsheet, presentation, contacts, etc.
Proprietary Software developed within the firm for its own use and not as a product or component of a product.
Software Development
Tools used to create, debug, test, compile, and prepare for installation and use new software programs.
Web and Desktop Publishing
Software that enables format conversion, manipulation, and integration of text and image files for the purpose of publication on paper or on the Web.
SystemInstallers Executables that install applications.
System Utilities Other enabling tools not otherwise classified.
Operating Systems
The fundamental programs that enable the computer to recognize and accept input, to enable and organize the operation of devices and application programs, to manage stored information, and to direct output in designated modes.
Table 3: Application groups and category definitions.
FortiClient Endpoint Security Version 4.0 MR2 Administration Guide44 04-420-1116637-20101207
http://docs.fortinet.com/ • Feedback
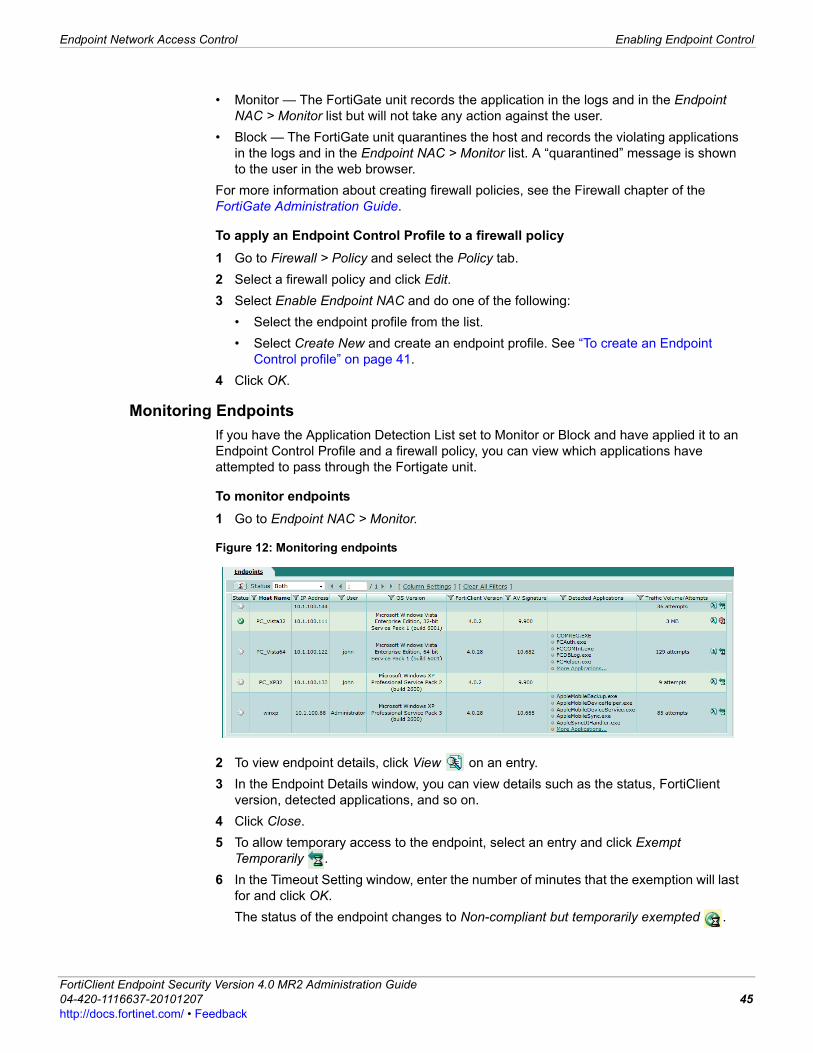
Endpoint Network Access Control Enabling Endpoint Control
F0h
• Monitor — The FortiGate unit records the application in the logs and in the Endpoint NAC > Monitor list but will not take any action against the user.
• Block — The FortiGate unit quarantines the host and records the violating applications in the logs and in the Endpoint NAC > Monitor list. A “quarantined” message is shown to the user in the web browser.
For more information about creating firewall policies, see the Firewall chapter of the FortiGate Administration Guide.
To apply an Endpoint Control Profile to a firewall policy
1 Go to Firewall > Policy and select the Policy tab.
2 Select a firewall policy and click Edit.
3 Select Enable Endpoint NAC and do one of the following:
• Select the endpoint profile from the list.
• Select Create New and create an endpoint profile. See “To create an Endpoint Control profile” on page 41.
4 Click OK.
Monitoring Endpoints
If you have the Application Detection List set to Monitor or Block and have applied it to an Endpoint Control Profile and a firewall policy, you can view which applications have attempted to pass through the Fortigate unit.
To monitor endpoints
1 Go to Endpoint NAC > Monitor.
Figure 12: Monitoring endpoints
2 To view endpoint details, click View on an entry.
3 In the Endpoint Details window, you can view details such as the status, FortiClient version, detected applications, and so on.
4 Click Close.
5 To allow temporary access to the endpoint, select an entry and click Exempt Temporarily .
6 In the Timeout Setting window, enter the number of minutes that the exemption will last for and click OK.
The status of the endpoint changes to Non-compliant but temporarily exempted .
ortiClient Endpoint Security Version 4.0 MR2 Administration Guide4-420-1116637-20101207 45ttp://docs.fortinet.com/ • Feedback
Enabling Endpoint Control Endpoint Network Access Control
7 If an endpoint has been given an exemption, you can block the endpoint prior to the exemption timeout by clicking Block Endpoint .
FortiClient Endpoint Security Version 4.0 MR2 Administration Guide46 04-420-1116637-20101207
http://docs.fortinet.com/ • Feedback

F0h
Creating FortiClient VPNsThis chapter describes how create policy-based, route-based, and SSL VPNs using FortiClient, FortiGate, or FortiClient Manager.
This chapter contains the following sections:
• Configuring VPN connections using FortiClient
• Configuring VPN connections on FortiGate units
• Configuring VPN connections using FortiManager
• Configuring VPN connections using custom installations
• Configuring the FortiGate gateway as a policy server
Overview
There are several ways to create VPN connections for remote users:
• FortiClient
• FortiGate
• FortiManager
• Custom installation
Configuring VPN connections using FortiClient
FortiClient Endpoint Security can establish a VPN tunnel between your computer and a FortiGate unit or other VPN gateway. You can set up a VPN using one of the following types in VPN > Connections:
• Automatic IPsec
• Manual IPsec
• SSL VPN
See the FortiClient Endpoint Security Guide for more information on how to configure VPNs in FortiClient.
Configuring VPN connections on FortiGate units
There are several ways to configure FortiGate units to accept VPN connections from FortiClient users.
• A policy-based VPN.
• A route-based VPN.
• SSL VPN. For more information on SSL VPNs, see the FortiGate SSL VPNs handbook.
For information on how to set up VPN connections using a FortiGate unit, see the FortiGate Administration Guide.
ortiClient Endpoint Security Version 4.0 MR2 Administration Guide4-420-1116637-20101207 47ttp://docs.fortinet.com/ • Feedback

FortiClient SSL VPN client Creating FortiClient VPNs
FortiClient SSL VPN client
The FortiClient SSL VPN stand-alone tunnel client can be installed during FortiClient installation. Once the SSL VPN client is installed, you can use either FortiClient or the SSL VPN stand-alone client to create VPN connections. For more information on using FortiClient to create SSL VPN connections, see the FortiClient User Guide.
For more information on SSL VPNs, see the FortiGate SSL VPNs handbook.
Figure 13: Selecting the FortiClient SSL VPN check box during FortiClient installation.
To use the SSL VPN standalone tunnel client
1 Go to Start > All Programs > FortiClient > FortiClient SSL VPN.
Figure 14: FortiClient SSL VPN client.
2 Enter the following information. Use the Connect and Disconnect buttons to control the tunnel connection.
Connection Name If you have pre-configured the connection settings, select the connection from the list and then select Connect. Otherwise, enter the settings in the fields below. To pre-configure connection settings, see “To configure tunnel client settings” on page 49.
Server Address Enter the IP address or FQDN of the FortiGate unit that hosts the SSL VPN.
Username Enter your user name.
Password Enter the password associated with your user account.
FortiClient Endpoint Security Version 4.0 MR2 Administration Guide48 04-420-1116637-20101207
http://docs.fortinet.com/ • Feedback
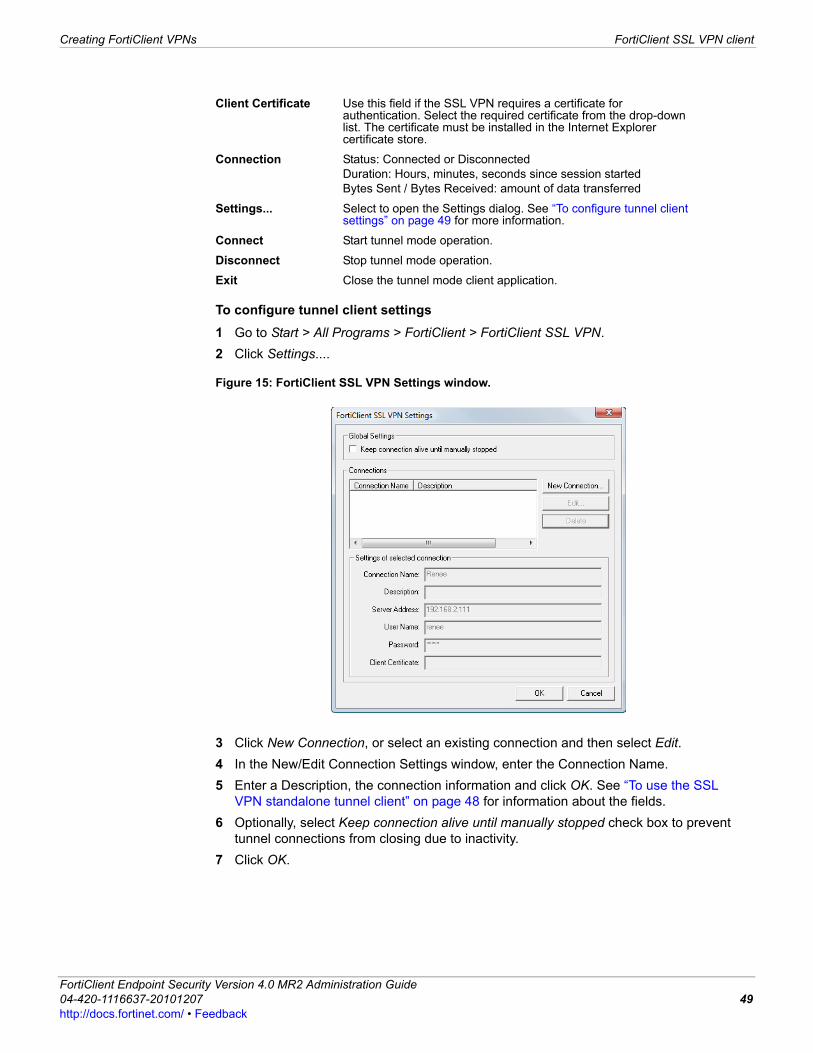
Creating FortiClient VPNs FortiClient SSL VPN client
F0h
To configure tunnel client settings
1 Go to Start > All Programs > FortiClient > FortiClient SSL VPN.
2 Click Settings....
Figure 15: FortiClient SSL VPN Settings window.
3 Click New Connection, or select an existing connection and then select Edit.
4 In the New/Edit Connection Settings window, enter the Connection Name.
5 Enter a Description, the connection information and click OK. See “To use the SSL VPN standalone tunnel client” on page 48 for information about the fields.
6 Optionally, select Keep connection alive until manually stopped check box to prevent tunnel connections from closing due to inactivity.
7 Click OK.
Client Certificate Use this field if the SSL VPN requires a certificate for authentication. Select the required certificate from the drop-down list. The certificate must be installed in the Internet Explorer certificate store.
Connection Status: Connected or DisconnectedDuration: Hours, minutes, seconds since session startedBytes Sent / Bytes Received: amount of data transferred
Settings... Select to open the Settings dialog. See “To configure tunnel client settings” on page 49 for more information.
Connect Start tunnel mode operation.
Disconnect Stop tunnel mode operation.
Exit Close the tunnel mode client application.
ortiClient Endpoint Security Version 4.0 MR2 Administration Guide4-420-1116637-20101207 49ttp://docs.fortinet.com/ • Feedback
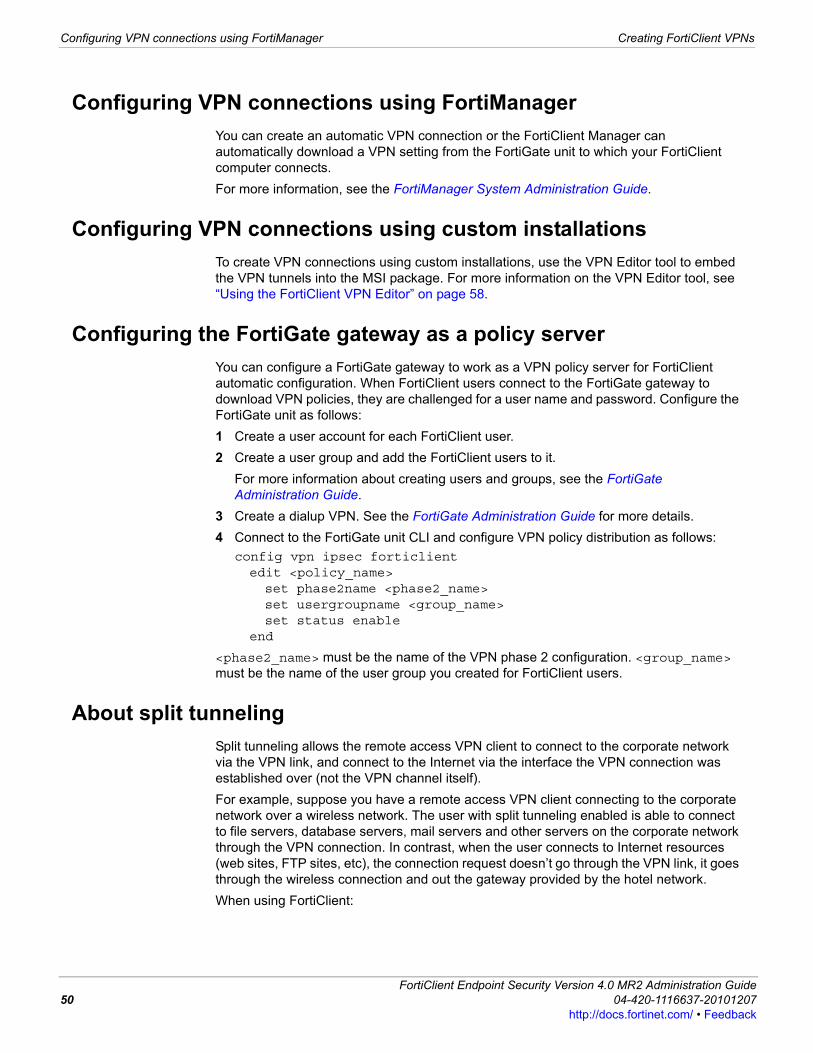
Configuring VPN connections using FortiManager Creating FortiClient VPNs
Configuring VPN connections using FortiManager
You can create an automatic VPN connection or the FortiClient Manager can automatically download a VPN setting from the FortiGate unit to which your FortiClient computer connects.
For more information, see the FortiManager System Administration Guide.
Configuring VPN connections using custom installations
To create VPN connections using custom installations, use the VPN Editor tool to embed the VPN tunnels into the MSI package. For more information on the VPN Editor tool, see “Using the FortiClient VPN Editor” on page 58.
Configuring the FortiGate gateway as a policy server
You can configure a FortiGate gateway to work as a VPN policy server for FortiClient automatic configuration. When FortiClient users connect to the FortiGate gateway to download VPN policies, they are challenged for a user name and password. Configure the FortiGate unit as follows:
1 Create a user account for each FortiClient user.
2 Create a user group and add the FortiClient users to it.
For more information about creating users and groups, see the FortiGate Administration Guide.
3 Create a dialup VPN. See the FortiGate Administration Guide for more details.
4 Connect to the FortiGate unit CLI and configure VPN policy distribution as follows:
config vpn ipsec forticlientedit <policy_name>set phase2name <phase2_name>set usergroupname <group_name>set status enable
end
<phase2_name> must be the name of the VPN phase 2 configuration. <group_name> must be the name of the user group you created for FortiClient users.
About split tunneling
Split tunneling allows the remote access VPN client to connect to the corporate network via the VPN link, and connect to the Internet via the interface the VPN connection was established over (not the VPN channel itself).
For example, suppose you have a remote access VPN client connecting to the corporate network over a wireless network. The user with split tunneling enabled is able to connect to file servers, database servers, mail servers and other servers on the corporate network through the VPN connection. In contrast, when the user connects to Internet resources (web sites, FTP sites, etc), the connection request doesn’t go through the VPN link, it goes through the wireless connection and out the gateway provided by the hotel network.
When using FortiClient:
FortiClient Endpoint Security Version 4.0 MR2 Administration Guide50 04-420-1116637-20101207
http://docs.fortinet.com/ • Feedback
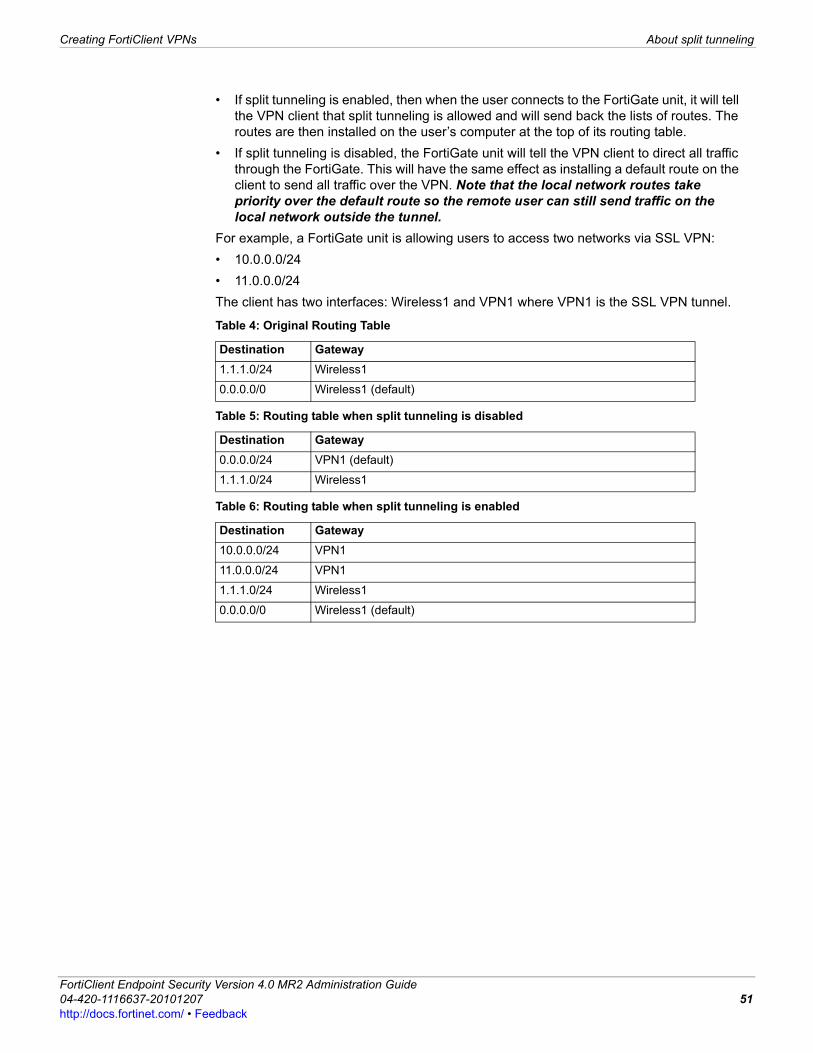
Creating FortiClient VPNs About split tunneling
F0h
• If split tunneling is enabled, then when the user connects to the FortiGate unit, it will tell the VPN client that split tunneling is allowed and will send back the lists of routes. The routes are then installed on the user’s computer at the top of its routing table.
• If split tunneling is disabled, the FortiGate unit will tell the VPN client to direct all traffic through the FortiGate. This will have the same effect as installing a default route on the client to send all traffic over the VPN. Note that the local network routes take priority over the default route so the remote user can still send traffic on the local network outside the tunnel.
For example, a FortiGate unit is allowing users to access two networks via SSL VPN:
• 10.0.0.0/24
• 11.0.0.0/24
The client has two interfaces: Wireless1 and VPN1 where VPN1 is the SSL VPN tunnel.
Table 4: Original Routing Table
Destination Gateway
1.1.1.0/24 Wireless1
0.0.0.0/0 Wireless1 (default)
Table 5: Routing table when split tunneling is disabled
Destination Gateway
0.0.0.0/24 VPN1 (default)
1.1.1.0/24 Wireless1
Table 6: Routing table when split tunneling is enabled
Destination Gateway
10.0.0.0/24 VPN1
11.0.0.0/24 VPN1
1.1.1.0/24 Wireless1
0.0.0.0/0 Wireless1 (default)
ortiClient Endpoint Security Version 4.0 MR2 Administration Guide4-420-1116637-20101207 51ttp://docs.fortinet.com/ • Feedback

About split tunneling Creating FortiClient VPNs
FortiClient Endpoint Security Version 4.0 MR2 Administration Guide52 04-420-1116637-20101207
http://docs.fortinet.com/ • Feedback
F0h
Per-User Web FilteringThis chapter describes how to deploy the FortiClient application to perform web filtering customized for each user on a Microsoft Windows network. For larger deployments, a FortiManager system simplifies management of user web filter profiles.
This chapter contains the following sections:
• Overview
• Configuring web filtering
Overview
FortiClient Endpoint Security web filtering controls access to web sites based on FortiGuard Service web site rating categories and black/white URL lists. The web filter profile selects which FortiGuard categories the user is permitted to access. Additionally, URLs in the black list are always blocked and URLs in the white list are always permitted.
You select a web filter profile for each user or user group. Users with no assigned profile are assigned to a global profile. You can create as many profiles as you need, one per user if necessary.
You can define web filter profiles and users locally in the FortiClient application. This is most suitable for a computer with a limited number of users, or if you decide to assign occasional users to a default web filter profile. For information about configuring FortiClient web filtering, see the Web Filter chapter of the FortiClient Endpoint Security User Guide.
If you have many FortiClient installations, you can manage their configurations with a FortiManager unit. This eliminates the need to configure all of the profiles and users on every FortiClient application you install.
Web filtering on Windows networks
On a Microsoft Windows network, any user can log on at any computer. If you want to perform web filtering configurable to the group or user level, you can use a FortiManager unit to provide web filter profile information to each FortiClient application as needed.
Web filtering for remote users
You can install FortiClient on a Windows Terminal Server or a Citrix Presentation Server to provide web filtering for remote users on a Windows network. The user’s computer does not need to have the FortiClient application installed. See “Installing FortiClient on Citrix servers” on page 32.
Configuring web filtering
To manage FortiClient web-filtering with a FortiManager unit, you need to:
• add each FortiClient computer as a managed client
• define the web filter profiles you will assign to users
• configure LDAP settings to obtain Windows group/user information
ortiClient Endpoint Security Version 4.0 MR2 Administration Guide4-420-1116637-20101207 53ttp://docs.fortinet.com/ • Feedback
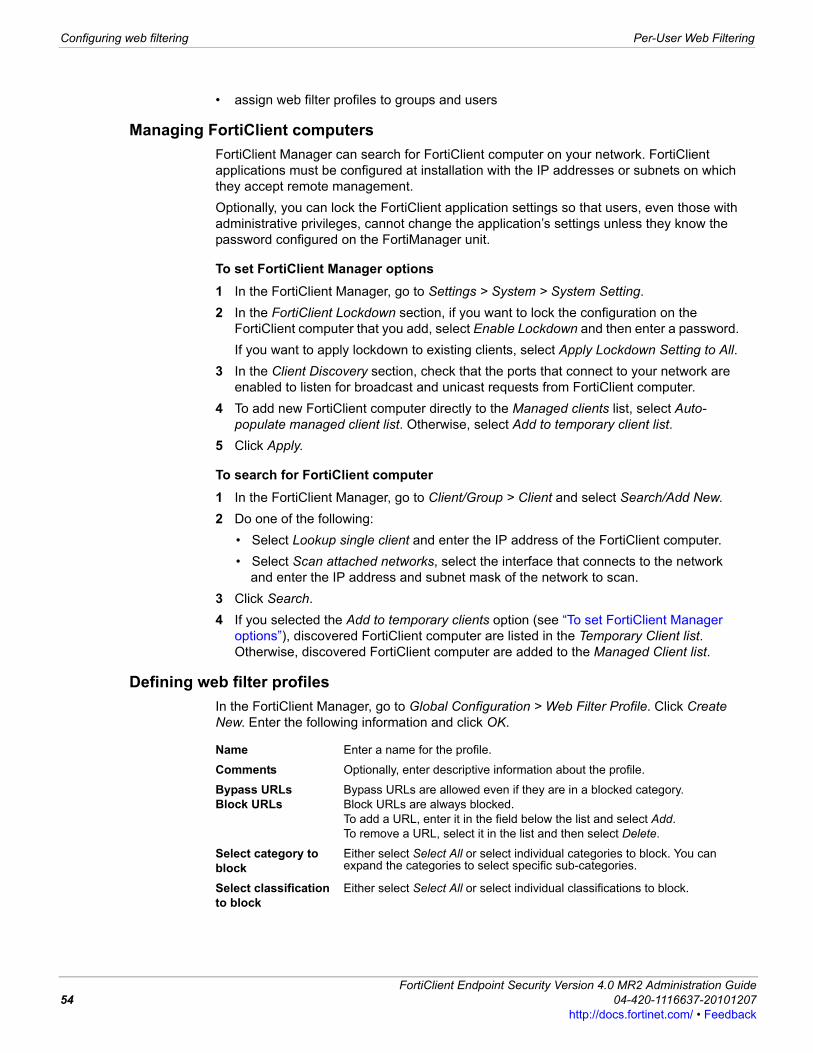
Configuring web filtering Per-User Web Filtering
• assign web filter profiles to groups and users
Managing FortiClient computers
FortiClient Manager can search for FortiClient computer on your network. FortiClient applications must be configured at installation with the IP addresses or subnets on which they accept remote management.
Optionally, you can lock the FortiClient application settings so that users, even those with administrative privileges, cannot change the application’s settings unless they know the password configured on the FortiManager unit.
To set FortiClient Manager options
1 In the FortiClient Manager, go to Settings > System > System Setting.
2 In the FortiClient Lockdown section, if you want to lock the configuration on the FortiClient computer that you add, select Enable Lockdown and then enter a password.
If you want to apply lockdown to existing clients, select Apply Lockdown Setting to All.
3 In the Client Discovery section, check that the ports that connect to your network are enabled to listen for broadcast and unicast requests from FortiClient computer.
4 To add new FortiClient computer directly to the Managed clients list, select Auto-populate managed client list. Otherwise, select Add to temporary client list.
5 Click Apply.
To search for FortiClient computer
1 In the FortiClient Manager, go to Client/Group > Client and select Search/Add New.
2 Do one of the following:
• Select Lookup single client and enter the IP address of the FortiClient computer.
• Select Scan attached networks, select the interface that connects to the network and enter the IP address and subnet mask of the network to scan.
3 Click Search.
4 If you selected the Add to temporary clients option (see “To set FortiClient Manager options”), discovered FortiClient computer are listed in the Temporary Client list. Otherwise, discovered FortiClient computer are added to the Managed Client list.
Defining web filter profiles
In the FortiClient Manager, go to Global Configuration > Web Filter Profile. Click Create New. Enter the following information and click OK.
Name Enter a name for the profile.
Comments Optionally, enter descriptive information about the profile.
Bypass URLsBlock URLs
Bypass URLs are allowed even if they are in a blocked category.Block URLs are always blocked.To add a URL, enter it in the field below the list and select Add.To remove a URL, select it in the list and then select Delete.
Select category to block
Either select Select All or select individual categories to block. You can expand the categories to select specific sub-categories.
Select classification to block
Either select Select All or select individual classifications to block.
FortiClient Endpoint Security Version 4.0 MR2 Administration Guide54 04-420-1116637-20101207
http://docs.fortinet.com/ • Feedback
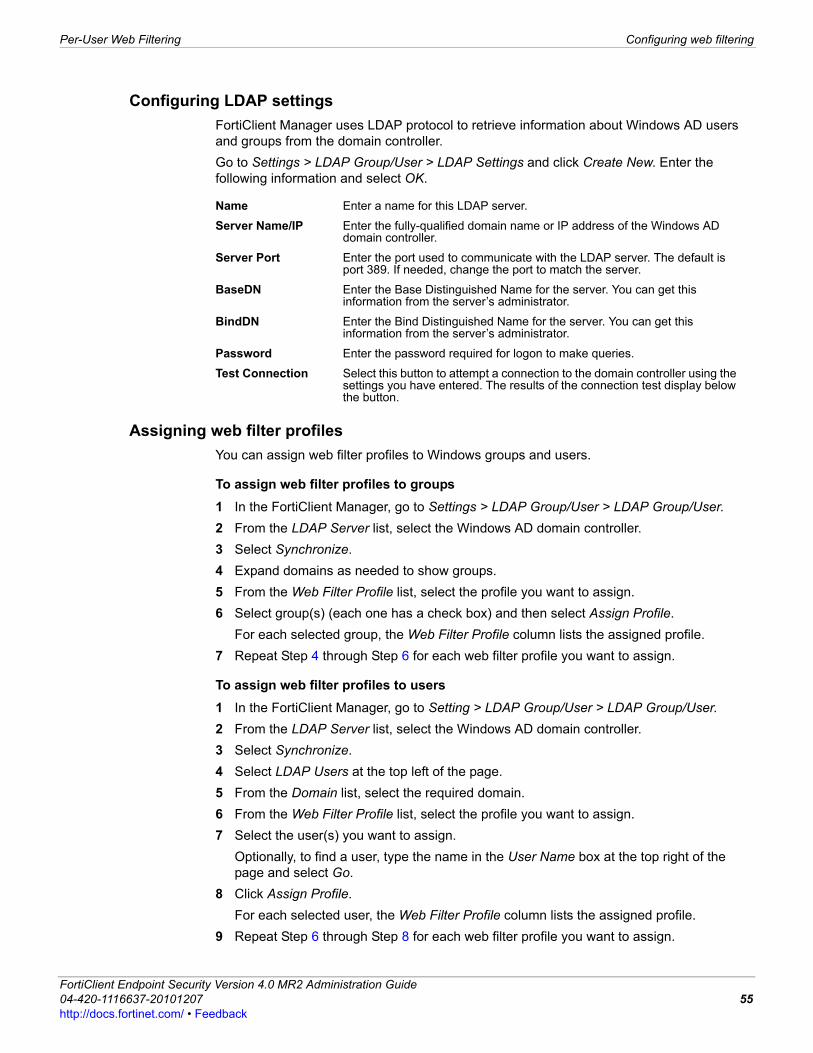
Per-User Web Filtering Configuring web filtering
F0h
Configuring LDAP settings
FortiClient Manager uses LDAP protocol to retrieve information about Windows AD users and groups from the domain controller.
Go to Settings > LDAP Group/User > LDAP Settings and click Create New. Enter the following information and select OK.
Assigning web filter profiles
You can assign web filter profiles to Windows groups and users.
To assign web filter profiles to groups
1 In the FortiClient Manager, go to Settings > LDAP Group/User > LDAP Group/User.
2 From the LDAP Server list, select the Windows AD domain controller.
3 Select Synchronize.
4 Expand domains as needed to show groups.
5 From the Web Filter Profile list, select the profile you want to assign.
6 Select group(s) (each one has a check box) and then select Assign Profile.
For each selected group, the Web Filter Profile column lists the assigned profile.
7 Repeat Step 4 through Step 6 for each web filter profile you want to assign.
To assign web filter profiles to users
1 In the FortiClient Manager, go to Setting > LDAP Group/User > LDAP Group/User.
2 From the LDAP Server list, select the Windows AD domain controller.
3 Select Synchronize.
4 Select LDAP Users at the top left of the page.
5 From the Domain list, select the required domain.
6 From the Web Filter Profile list, select the profile you want to assign.
7 Select the user(s) you want to assign.
Optionally, to find a user, type the name in the User Name box at the top right of the page and select Go.
8 Click Assign Profile.
For each selected user, the Web Filter Profile column lists the assigned profile.
9 Repeat Step 6 through Step 8 for each web filter profile you want to assign.
Name Enter a name for this LDAP server.
Server Name/IP Enter the fully-qualified domain name or IP address of the Windows AD domain controller.
Server Port Enter the port used to communicate with the LDAP server. The default is port 389. If needed, change the port to match the server.
BaseDN Enter the Base Distinguished Name for the server. You can get this information from the server’s administrator.
BindDN Enter the Bind Distinguished Name for the server. You can get this information from the server’s administrator.
Password Enter the password required for logon to make queries.
Test Connection Select this button to attempt a connection to the domain controller using the settings you have entered. The results of the connection test display below the button.
ortiClient Endpoint Security Version 4.0 MR2 Administration Guide4-420-1116637-20101207 55ttp://docs.fortinet.com/ • Feedback

Configuring web filtering Per-User Web Filtering
FortiClient Endpoint Security Version 4.0 MR2 Administration Guide56 04-420-1116637-20101207
http://docs.fortinet.com/ • Feedback
F0h
FortiClient VPN ClientFortiClient VPN is a light-weight, stand-alone VPN client interface designed to provision IPSec dial-up clients. Users cannot install the FortiClient VPN application if they have FortiClient Endpoint Security installed as FortiClient Endpoint Security is an upgrade to FortiClient VPN.
FortiClient VPN provides a connection to the corporate VPN for employees working from home or traveling. You pre-configure the VPN settings before providing the installer file to your users. The user needs only to start the application and select the Connect button.
The FortiClient VPN Editor can be installed on a computer that has FortiClient Endpoint Security installed. The editor automatically imports your VPN settings.
The following topics are included in this section:
• Overview
• Using the FortiClient VPN Editor
• Exporting configurations to the FortiClient VPN installer
Overview
Fortinet customers can obtain the FortiClient VPN msi file and the VPN Editor from the Fortinet Support web site at http://support.fortinet.com.
• The FortiClient VPN installer file for 32-bit and 64-bit systems (FortiClientVPN_4.x.x.xxxx.zip or FortiClientVPN_4.x.x.xxxx_x64.zip).
• The FortiClient VPN tools folder (FortiClientVPNTools_4.x.x.xxxx.zip) containing the configuration tool, FortiClientVPNEditor.
Users cannot install the FortiClient VPN application if they have FortiClient Endpoint Security installed. FortiClient Endpoint Security is an upgrade to FortiClient VPN.
The FortiClient VPN Editor can be installed on a computer that has FortiClient Endpoint Security installed. The editor automatically imports your VPN settings.
ortiClient Endpoint Security Version 4.0 MR2 Administration Guide4-420-1116637-20101207 57ttp://docs.fortinet.com/ • Feedback

Using the FortiClient VPN Editor FortiClient VPN Client
Figure 16: Overview of how to set up the FortiClient VPN client.
Using the FortiClient VPN Editor
The FortiClient VPN Editor can configure or import configurations for VPN tunnels, certificates and revocation lists and then save them to one of the FortiClient VPN installer files or to a configuration file.
To start the FortiClient VPN editor
1 Expand the FortiClient VPN package into a folder.
2 Go to the tools subfolder.
3 Double-click FortiClientVPNEditor.exe.
To provide VPN tunnel definitions to your users, you will need to import or configure the VPN settings in the FortiClient VPN editor.
Download FortiClientVPN 4.x.xx.xxxx.zip or FortiClientVPN 4.x.xx.xxx_64.zip
and FortiClientVPNTools 4.x.xx.xxx.zip
Use VPNEditor in FortiClientVPNTools to define the VPN tunnels.
Export tunnels from VPNEditor into the VPN msi installer.
Create a custom msi installer and distribute to end user.
End user installs FortiClient VPN using msi installer. The tunnels are
automatically installed.
End user starts FortiClient VPN and connects to the network through a
FortiGate unit. There is no configuration required.
FortiClient Endpoint Security Version 4.0 MR2 Administration Guide58 04-420-1116637-20101207
http://docs.fortinet.com/ • Feedback
FortiClient VPN Client Using the FortiClient VPN Editor
F0h
Importing VPN tunnel settings
If the computer you use to run the FortiClient VPN editor also has the FortiClient application installed on it, the FortiClient tunnel configurations are available in the FortiClient VPN editor. This is convenient if your FortiClient application has the same tunnel configuration that you want to provide to your users.
You can also import tunnel definitions into the FortiClient VPN editor from .vpl or .vpz export files, or from customized FortiClient installer files (.msi).
To import VPN tunnel settings
1 In the FortiClient VPN editor, select the Tunnels tab.
2 Select Import.
3 In the Open window, select one of the following file types:
• a VPN policy package (.vpz)
• a VPN policy files (.vpl)
• a customized FortiClient installer file (.msi)
4 Select Open.
The imported tunnels are listed.
Configuring VPN tunnel settings
If you do not have a source from which to import VPN settings, you can configure a VPN tunnel just as you would in the FortiClient application. Both automatic configuration and manual configuration are supported. Automatic configuration is compatible with a FortiGate remote gateway configured as a VPN policy server. For more information, see the FortiClient Endpoint Security User Guide.
To configure a VPN tunnel - automatic configuration
1 In the FortiClient VPN editor, select the Tunnels tab.
2 Select New.
3 In the New Connection window, enter a connection name.
4 For Configuration, select Automatic.
5 For Policy Server, enter the IP address or FQDN of the FortiGate gateway.
6 Select OK.
To configure a VPN tunnel - basic configuration
1 In the FortiClient VPN editor, select the Tunnels tab.
2 Select New.
3 Enter the following information:
Note: The .vpz export file contains both the tunnel settings and any certificates the tunnel requires. If possible, import a .vpz file instead of a .vpl file for tunnels that use certificates.
Connection Name Enter a descriptive name for the connection.
Configuration Select Manual
Remote Gateway Enter the IP address or the fully qualified domain name (FQDN) of the remote gateway.
ortiClient Endpoint Security Version 4.0 MR2 Administration Guide4-420-1116637-20101207 59ttp://docs.fortinet.com/ • Feedback
Using the FortiClient VPN Editor FortiClient VPN Client
4 Select Advanced if you need to:
• modify IKE or IPSec settings (see “Configuring IKE and IPSec policies” in the FortiClient Endpoint Security User Guide)
• configure the FortiClient VPN to use a virtual IP address
• add the IP addresses of additional networks behind the remote gateway
• configure Internet browsing over IPSec
• configure extended authentication (XAUTH)
The Advanced Settings window opens. This is the starting point for the rest of the procedures in this section.
To configure the virtual IP address
In the Advanced Settings window, do the following:
1 Select Acquire virtual IP address and then select Config.
2 In the Virtual IP Acquisition window, do one of the following:
• Select Dynamic Host Configuration Protocol (DHCP) over IPSec.
• Select Manually Set and enter the IP address, Subnet Mask, DNS Server and WINS Server addresses as required.
3 Select OK.
To add additional remote networks to a connection
In the Advanced Settings window, do the following:
1 In the Remote Network section, select Add.
2 In the Network Editor window, enter the IP Address and Subnet mask of the remote network and then select OK.
3 Repeat Steps 1 and 2 for each additional network that you want to add.
You can specify up to 16 remote networks.
4 Select OK.
To enable Internet browsing over IPSec
In the Advanced Settings window, do the following:
1 In the Remote Network section, select Add.
2 Enter 0.0.0.0./0.0.0.0 and select OK.
3 Select OK.
Remote Network Enter the IP address and netmask of the network behind the FortiGate unit.
Authentication Method Select Pre-shared Key or X509 Certificate.
Pre-shared Key Enter the pre-shared key. This is available if Authentication Method is Pre-shared Key.
X509 Certificate Select the X509 Certificate. The certificate must already be configured. This field is available if Authentication Method is X509 Certificate.
FortiClient Endpoint Security Version 4.0 MR2 Administration Guide60 04-420-1116637-20101207
http://docs.fortinet.com/ • Feedback
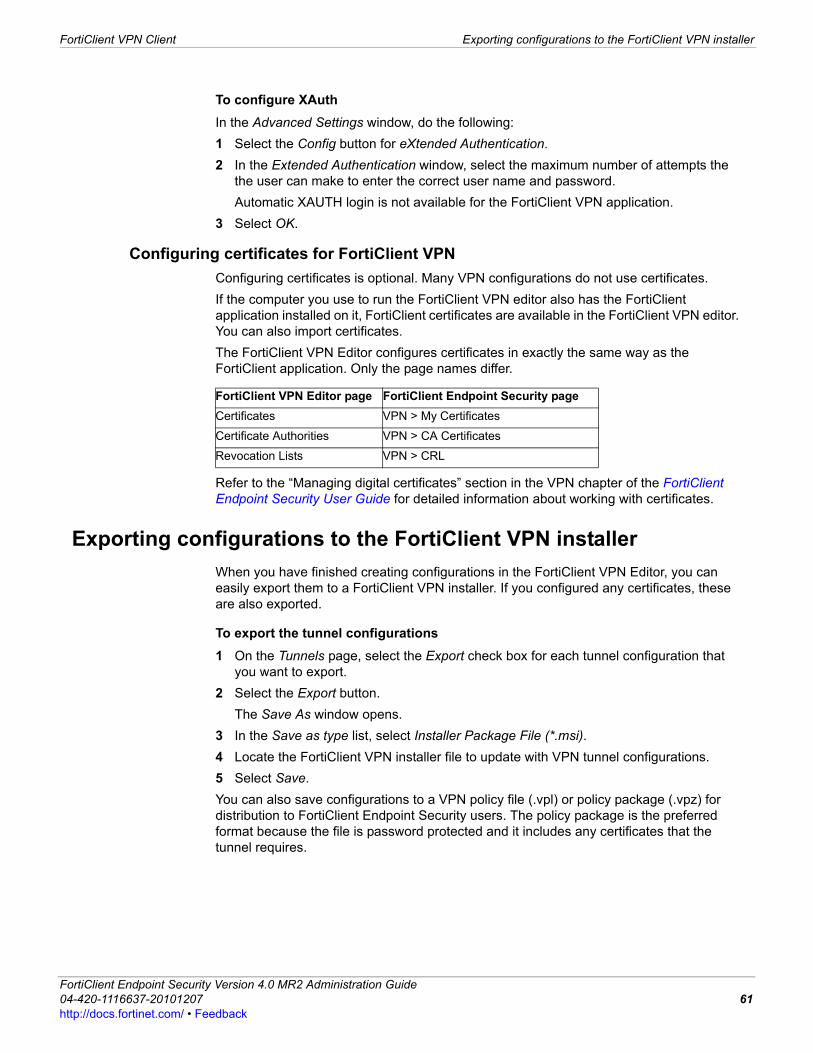
FortiClient VPN Client Exporting configurations to the FortiClient VPN installer
F0h
To configure XAuth
In the Advanced Settings window, do the following:
1 Select the Config button for eXtended Authentication.
2 In the Extended Authentication window, select the maximum number of attempts the the user can make to enter the correct user name and password.
Automatic XAUTH login is not available for the FortiClient VPN application.
3 Select OK.
Configuring certificates for FortiClient VPN
Configuring certificates is optional. Many VPN configurations do not use certificates.
If the computer you use to run the FortiClient VPN editor also has the FortiClient application installed on it, FortiClient certificates are available in the FortiClient VPN editor. You can also import certificates.
The FortiClient VPN Editor configures certificates in exactly the same way as the FortiClient application. Only the page names differ.
Refer to the “Managing digital certificates” section in the VPN chapter of the FortiClient Endpoint Security User Guide for detailed information about working with certificates.
Exporting configurations to the FortiClient VPN installer
When you have finished creating configurations in the FortiClient VPN Editor, you can easily export them to a FortiClient VPN installer. If you configured any certificates, these are also exported.
To export the tunnel configurations
1 On the Tunnels page, select the Export check box for each tunnel configuration that you want to export.
2 Select the Export button.
The Save As window opens.
3 In the Save as type list, select Installer Package File (*.msi).
4 Locate the FortiClient VPN installer file to update with VPN tunnel configurations.
5 Select Save.
You can also save configurations to a VPN policy file (.vpl) or policy package (.vpz) for distribution to FortiClient Endpoint Security users. The policy package is the preferred format because the file is password protected and it includes any certificates that the tunnel requires.
FortiClient VPN Editor page FortiClient Endpoint Security page
Certificates VPN > My Certificates
Certificate Authorities VPN > CA Certificates
Revocation Lists VPN > CRL
ortiClient Endpoint Security Version 4.0 MR2 Administration Guide4-420-1116637-20101207 61ttp://docs.fortinet.com/ • Feedback
Exporting configurations to the FortiClient VPN installer FortiClient VPN Client
FortiClient Endpoint Security Version 4.0 MR2 Administration Guide62 04-420-1116637-20101207
http://docs.fortinet.com/ • Feedback

F0h
Using the FortiClient APIYou can operate FortiClient VPNs using the COM-based FortiClient API.
This chapter contains the following sections:
• Overview
• Controlling a VPN
• Setting and monitoring a security policy
• API reference
Overview
The FortiClient COM library provides functionality to:
• Retrieve a list of the VPN tunnels configured in the FortiClient application.
• Start and stop any of the configured VPN tunnels.
• Send XAuth credentials.
• Set the security policy for the FortiClient VPN.
• Retrieve status information:
• configured tunnel list
• active tunnel name
• connected or not
• idle or not
• remaining key life
• current security policy
• Respond to FortiClient-related events:
• VPN connect
• VPN disconnect
• VPN is idle
• no longer in compliance with security policy
• XAuth authentication requested
Controlling a VPN
This section uses example code snippets in Visual Basic to show how to operate a VPN tunnel programmatically.
Linking to the COM library
The COM library for FortiClient is fccomintdll.dll, located in the FortiClient installation directory, by default c:\Program Files\Fortinet\FortiClient. Using your development environment, create a reference to this library.
Begin FCCOMINTDLLLibCtl.VPN VPN1
ortiClient Endpoint Security Version 4.0 MR2 Administration Guide4-420-1116637-20101207 63ttp://docs.fortinet.com/ • Feedback
Controlling a VPN Using the FortiClient API
This creates VPN1 as the FortiClient object.
Depending on your development environment, you might also need a type library file. You can find the file FCCOMIntDLL.tlb in the FortiClient .zip installation package.
Retrieving a list of VPN connection names
If needed, you can obtain a list of the VPN connections configured in the FortiClient application. The GetTunnelList function returns an array of the names.
tunnelList = VPN1.GetTunnelList
Typically, an application might put the tunnel names into a list from which the user chooses the required tunnel name. In this example, the list control List1 is populated with the tunnel names:
List1.ClearFor i = LBound(tunnelList) To UBound(tunnelList)List1.AddItem (tunnelList(i))
Next
Opening the VPN tunnel
Use the Connect method to establish the tunnel. The only parameter is the tunnel name, as configured in the FortiClient application. In this example, the tunnel name is “Office”:
VPN1.Connect “Office”
Responding to XAuth requests
If the VPN peer requires you to supply XAuth credentials, you can easily provide for this by writing code that responds to the On XAuthRequest event. In this example, a small window opens in which the user enters the user name and password.
Private Sub VPN1_OnXAuthRequest(ByVal bstrTunnelName As String)Dialog.Show 1
outUserName = ""outPassword = ""outSavePassword = False
If Not Dialog.Cancelled ThenoutUserName = Dialog.UserNameoutPassword = Dialog.PasswordoutSavePassword = Dialog.SavePasswordEnd If
VPN1.SendXAuthResponse bstrTunnelName, outUserName, outPassword, outSavePassword
End Sub
FortiClient Endpoint Security Version 4.0 MR2 Administration Guide64 04-420-1116637-20101207
http://docs.fortinet.com/ • Feedback
Using the FortiClient API Setting and monitoring a security policy
F0h
Monitoring the connection
There are both function-based and event-based ways to monitor the VPN connection.
Events
The FortiClient API includes event calls for which you write appropriate code. Using events, you can provide live status information for users. This example shows how an application could respond to the OnConnect and OnDisconnect events by updating a user interface display. A check box, ConnectCheck, is selected when the VPN connects and cleared when the VPN disconnects.
Private Sub VPN1_OnConnect(ByVal bstrTunnelName As String)ConnectCheck.Value = 1textName = bstrTunnelNameEnd Sub
Private Sub VPN1_OnDisconnect(ByVal bstrTunnelName As String)ConnectCheck.Value = 0textName = bstrTunnelNameEnd Sub
There is also an OnIdle event.
Functions
At any time, you can programmatically determine which VPN connection is active using the GetActiveTunnel function, like this:
TunnelName = VPN1.GetActiveTunnel
The returned string is empty if no VPN tunnel is up.
The boolean function IsConnected returns True if the named connection is up, like this:
If IsConnected("Office") ThenRem perform functions requiring Office VPN....
End If
There is also an IsIdle function.
Setting and monitoring a security policy
The FortiClient application can enforce a security policy. Users cannot use a VPN connection unless the FortiClient settings comply with the policy. The security policy can require that any or all of the following features are enabled:
• Antivirus (real-time protection)
• Antispam
• Firewall (Normal mode)
• Web Filter
This is usually applied in an enterprise environment to provide security when users connect to the corporate network through a VPN. A FortiManager unit can deploy the security policy to FortiClient computer.
The FortiClient API can also create a security policy. This section uses example code snippets in Visual Basic to show how to set and monitor a corporate security policy programmatically.
ortiClient Endpoint Security Version 4.0 MR2 Administration Guide4-420-1116637-20101207 65ttp://docs.fortinet.com/ • Feedback
Setting and monitoring a security policy Using the FortiClient API
Setting a security policy
The SetPolicy method passes four boolean values, one for each feature: antivirus, antispam, firewall, and web filter. If the value is True, the policy requires that the feature is enabled. It is quite easy to create a check box for each of the boolean values and call SetPolicy in response to the user selecting a “Set Policy” button.
In this example, check boxes are named for the features (AVcheck for the antivirus check box, for example) and the “Set Policy” button is named SetSecPolicy.
Private Sub SetSecPolicy_Click()VPN1.SetPolicy AVcheck.Value, AScheck.Value, FWcheck.Value,
WFcheck.Value
The FortiClient application receives the policy but does not change any settings. The FortiClient General tab and system tray menu show the option “Make compliant with corporate policy”.
If you want to programmatically make the FortiClient settings comply with the policy you set, you must use the MakeSystemPolicyCompliant method.
Reading a security policy
You can retrieve the security policy from the FortiClient application with the GetPolicy method. This returns four boolean values, one for each feature: antivirus, antispam, firewall, and web filter. If the value is True, the policy requires that the feature is enabled. If all four values are False, there is no security policy.
This example uses the returned boolean values to set check boxes named for the features (AVcheck for the antivirus check box, for example).
VPN1.GetPolicy a, b, c, dAVcheck.Value = Int(a)If b ThenAScheck.Value = 1
ElseAScheck.Value = 0
End IfIf c ThenFWcheck.Value = 1
ElseFWcheck.Value = 0
End IfIf d ThenWFcheck.Value = 1
ElseWFcheck.Value = 0
End If
The check boxes show the state of each feature in the policy. You could then make changes to the policy and set them using the SetPolicy method, as shown in “Setting a security policy” on page 66.
Monitoring policy compliance
The FortiClient API includes event calls for which you write appropriate code. Using events, you can provide live status information for users. The OnOutOfCompliance event returns four boolean values, one for each feature. A value of True indicates that the feature is not in compliance with the policy.
FortiClient Endpoint Security Version 4.0 MR2 Administration Guide66 04-420-1116637-20101207
http://docs.fortinet.com/ • Feedback

Using the FortiClient API API reference
F0h
This example shows how an application could respond to the OnOutOfCompliance event. A window opens that lists the out-of-compliance features.
Private Sub VPN1_OnOutOfCompliance(ByVal bAV As Boolean, ByVal bAS As Boolean, ByVal bFW As Boolean, ByVal bWF As Boolean)
OOCDialog.Show 1OOCDialog.Text = ""If bAV Then OOCDialog.Text = OOCDialog.Text + "Antivirus\n"
End IfIf bAS Then OOCDialog.Text = OOCDialog.Text + "Antispam\n"
End IfIf bFW ThenOOCDialog.Text = OOCDialog.Text + "Firewall\n"
End IfIf bWF ThenOOCDialog.Text = OOCDialog.Text + "Web Filter"
End IfEnd Sub
Making the FortiClient application comply with the policy
The FortiClient API includes a method that enables the features required by the security policy, bringing the application back into compliance. In this example, there is a “Make Compliant” button.
Private Sub MakeCompliantBtn_Click()VPN1.MakeSystemPolicyCompliant
End Sub
API reference
Table 7: Methods
Connect(bstrTunnelName As String) Open the named VPN tunnel. This connection must already be configured in your FortiClient application.
Disconnect(bstrTunnelName As String) Close the named VPN tunnel.
GetPolicy(pbAV As Boolean, pbAS As Boolean, pbFW As Boolean, pbWF As Boolean)
Retrieve security policy settings forAntivirusAntiSpamFirewallWeb FilterTrue means feature must be enabled.
GetRemainingKeyLife(bstrTunnelName As String, pSecs As Long, pKBytes As Long)
Retrieve the remaining key life for the named connection. Whether keylife time (pSecs) or data (pKBytes) are significant depends on the detailed settings in the FortiClient application.
MakeSystemPolicyCompliant() Apply the security policy defined by SetPolicy.
ortiClient Endpoint Security Version 4.0 MR2 Administration Guide4-420-1116637-20101207 67ttp://docs.fortinet.com/ • Feedback
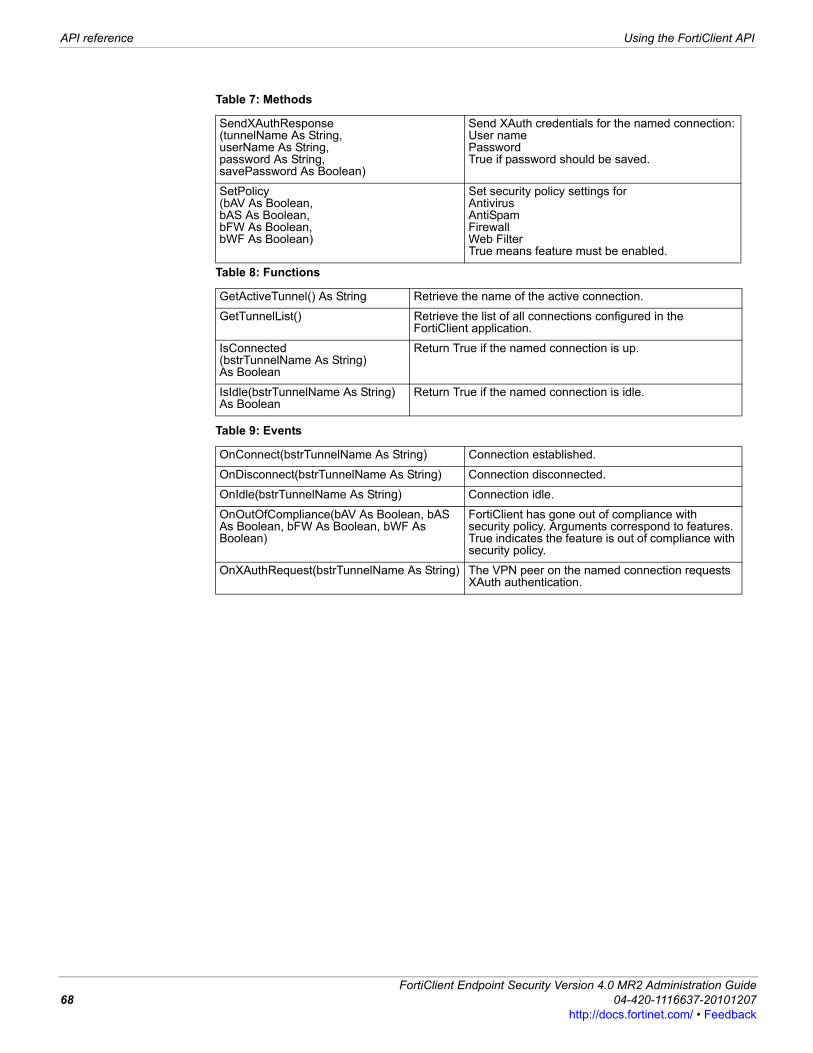
API reference Using the FortiClient API
SendXAuthResponse(tunnelName As String, userName As String, password As String, savePassword As Boolean)
Send XAuth credentials for the named connection:User namePasswordTrue if password should be saved.
SetPolicy(bAV As Boolean, bAS As Boolean, bFW As Boolean, bWF As Boolean)
Set security policy settings forAntivirusAntiSpamFirewallWeb FilterTrue means feature must be enabled.
Table 8: Functions
GetActiveTunnel() As String Retrieve the name of the active connection.
GetTunnelList() Retrieve the list of all connections configured in the FortiClient application.
IsConnected(bstrTunnelName As String) As Boolean
Return True if the named connection is up.
IsIdle(bstrTunnelName As String) As Boolean
Return True if the named connection is idle.
Table 9: Events
OnConnect(bstrTunnelName As String) Connection established.
OnDisconnect(bstrTunnelName As String) Connection disconnected.
OnIdle(bstrTunnelName As String) Connection idle.
OnOutOfCompliance(bAV As Boolean, bAS As Boolean, bFW As Boolean, bWF As Boolean)
FortiClient has gone out of compliance with security policy. Arguments correspond to features. True indicates the feature is out of compliance with security policy.
OnXAuthRequest(bstrTunnelName As String) The VPN peer on the named connection requests XAuth authentication.
Table 7: Methods
FortiClient Endpoint Security Version 4.0 MR2 Administration Guide68 04-420-1116637-20101207
http://docs.fortinet.com/ • Feedback
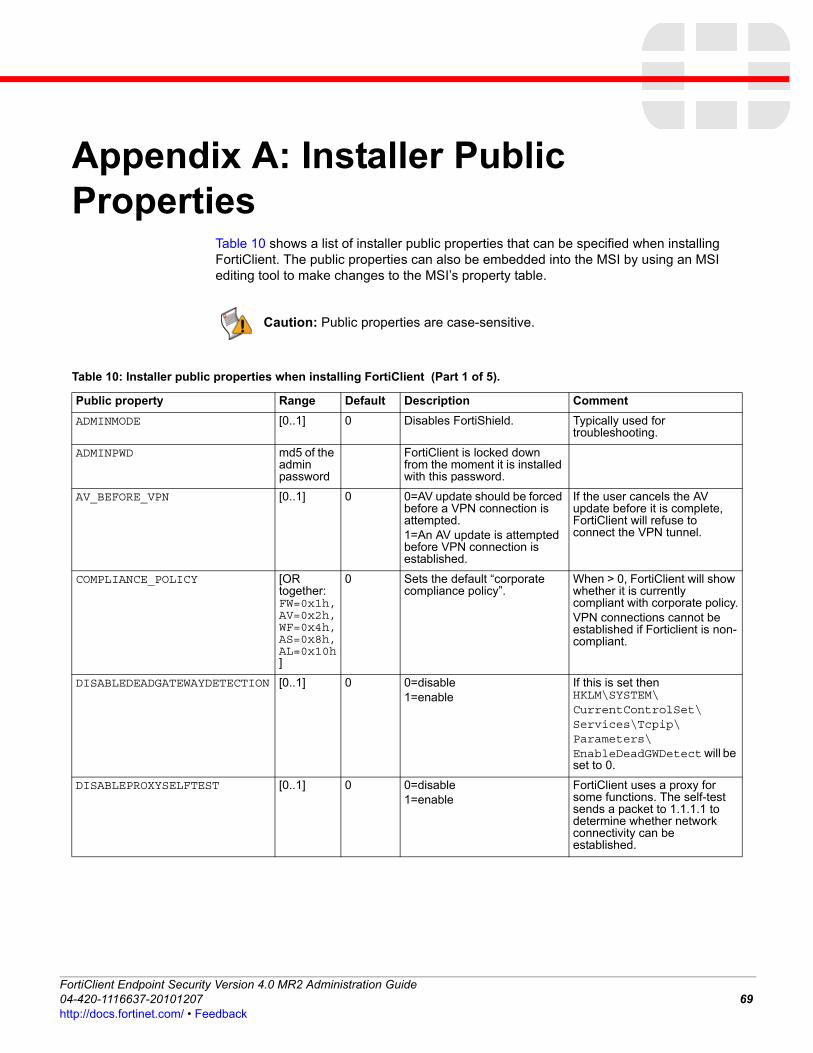
F0h
Appendix A: Installer Public Properties
Table 10 shows a list of installer public properties that can be specified when installing FortiClient. The public properties can also be embedded into the MSI by using an MSI editing tool to make changes to the MSI’s property table.
Caution: Public properties are case-sensitive.
Table 10: Installer public properties when installing FortiClient (Part 1 of 5).
Public property Range Default Description Comment
ADMINMODE [0..1] 0 Disables FortiShield. Typically used for troubleshooting.
ADMINPWD md5 of the admin password
FortiClient is locked down from the moment it is installed with this password.
AV_BEFORE_VPN [0..1] 0 0=AV update should be forced before a VPN connection is attempted.1=An AV update is attempted before VPN connection is established.
If the user cancels the AV update before it is complete, FortiClient will refuse to connect the VPN tunnel.
COMPLIANCE_POLICY [OR together: FW=0x1h, AV=0x2h, WF=0x4h, AS=0x8h, AL=0x10h]
0 Sets the default “corporate compliance policy”.
When > 0, FortiClient will show whether it is currently compliant with corporate policy.VPN connections cannot be established if Forticlient is non-compliant.
DISABLEDEADGATEWAYDETECTION [0..1] 0 0=disable1=enable
If this is set then HKLM\SYSTEM\CurrentControlSet\Services\Tcpip\Parameters\EnableDeadGWDetect will be set to 0.
DISABLEPROXYSELFTEST [0..1] 0 0=disable1=enable
FortiClient uses a proxy for some functions. The self-test sends a packet to 1.1.1.1 to determine whether network connectivity can be established.
ortiClient Endpoint Security Version 4.0 MR2 Administration Guide4-420-1116637-20101207 69ttp://docs.fortinet.com/ • Feedback
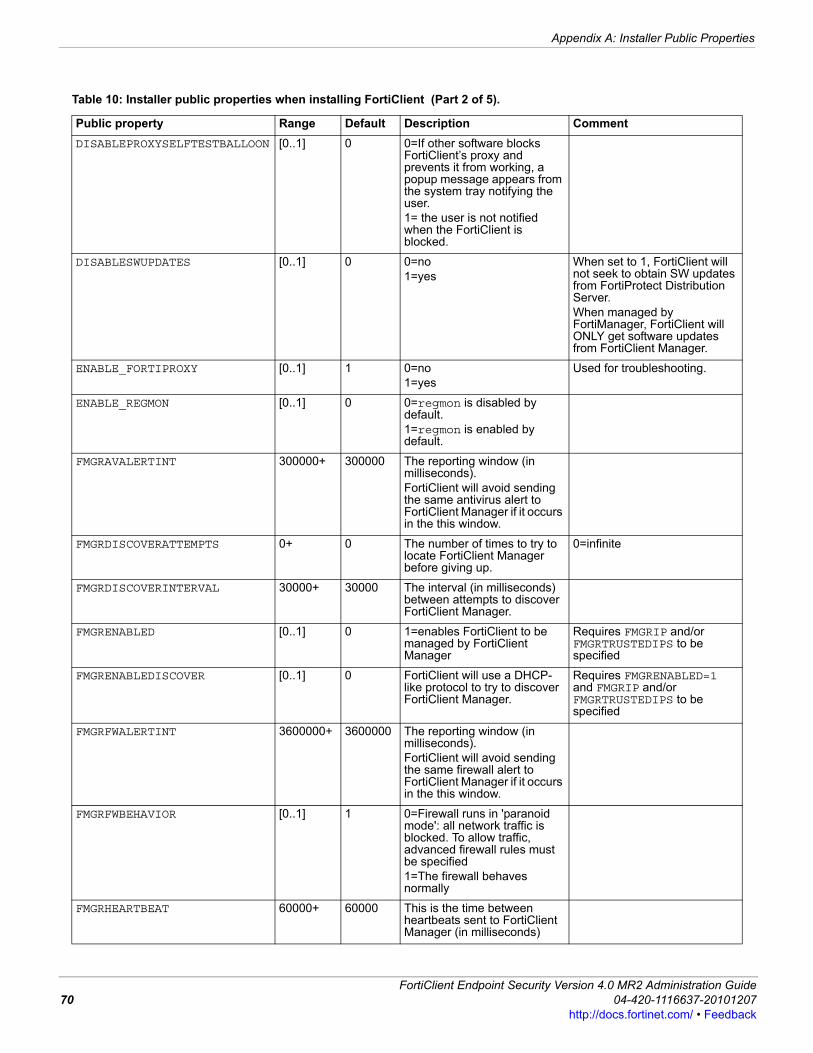
Appendix A: Installer Public Properties
DISABLEPROXYSELFTESTBALLOON [0..1] 0 0=If other software blocks FortiClient’s proxy and prevents it from working, a popup message appears from the system tray notifying the user.1= the user is not notified when the FortiClient is blocked.
DISABLESWUPDATES [0..1] 0 0=no1=yes
When set to 1, FortiClient will not seek to obtain SW updates from FortiProtect Distribution Server.When managed by FortiManager, FortiClient will ONLY get software updates from FortiClient Manager.
ENABLE_FORTIPROXY [0..1] 1 0=no1=yes
Used for troubleshooting.
ENABLE_REGMON [0..1] 0 0=regmon is disabled by default.1=regmon is enabled by default.
FMGRAVALERTINT 300000+ 300000 The reporting window (in milliseconds).FortiClient will avoid sending the same antivirus alert to FortiClient Manager if it occurs in the this window.
FMGRDISCOVERATTEMPTS 0+ 0 The number of times to try to locate FortiClient Manager before giving up.
0=infinite
FMGRDISCOVERINTERVAL 30000+ 30000 The interval (in milliseconds) between attempts to discover FortiClient Manager.
FMGRENABLED [0..1] 0 1=enables FortiClient to be managed by FortiClient Manager
Requires FMGRIP and/or FMGRTRUSTEDIPS to be specified
FMGRENABLEDISCOVER [0..1] 0 FortiClient will use a DHCP-like protocol to try to discover FortiClient Manager.
Requires FMGRENABLED=1 and FMGRIP and/or FMGRTRUSTEDIPS to be specified
FMGRFWALERTINT 3600000+ 3600000 The reporting window (in milliseconds).FortiClient will avoid sending the same firewall alert to FortiClient Manager if it occurs in the this window.
FMGRFWBEHAVIOR [0..1] 1 0=Firewall runs in 'paranoid mode': all network traffic is blocked. To allow traffic, advanced firewall rules must be specified1=The firewall behaves normally
FMGRHEARTBEAT 60000+ 60000 This is the time between heartbeats sent to FortiClient Manager (in milliseconds)
Table 10: Installer public properties when installing FortiClient (Part 2 of 5).
Public property Range Default Description Comment
FortiClient Endpoint Security Version 4.0 MR2 Administration Guide70 04-420-1116637-20101207
http://docs.fortinet.com/ • Feedback
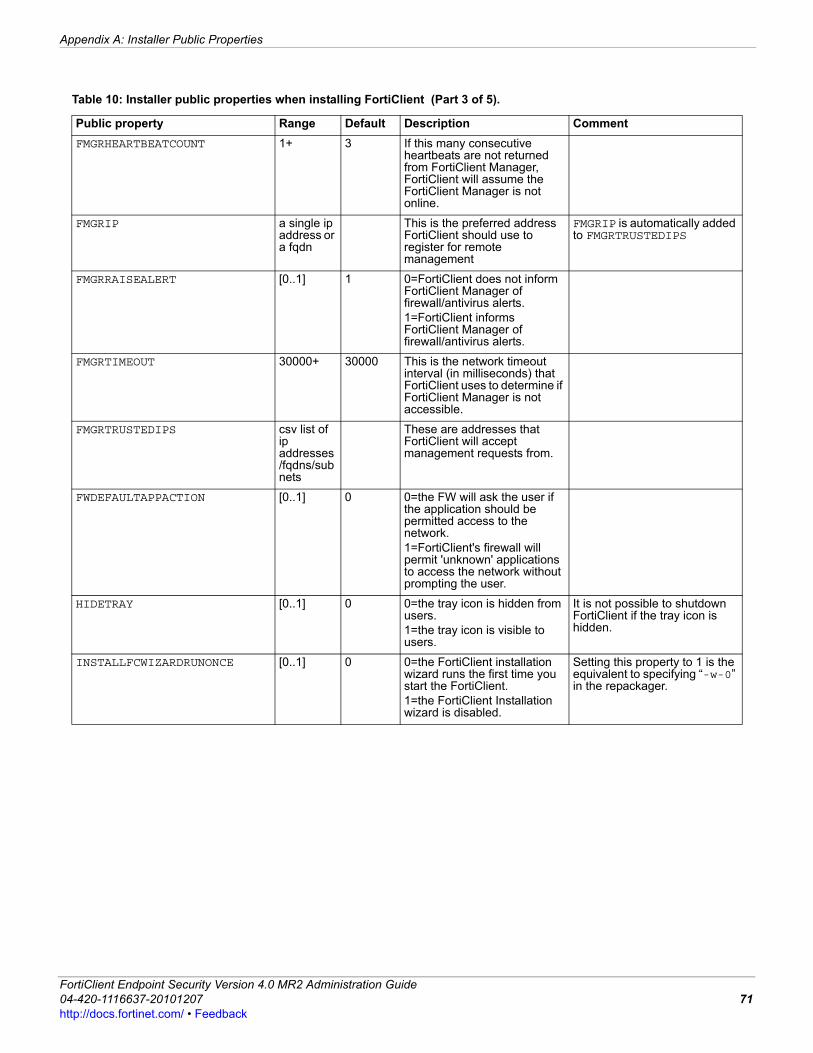
Appendix A: Installer Public Properties
F0h
FMGRHEARTBEATCOUNT 1+ 3 If this many consecutive heartbeats are not returned from FortiClient Manager, FortiClient will assume the FortiClient Manager is not online.
FMGRIP a single ip address or a fqdn
This is the preferred address FortiClient should use to register for remote management
FMGRIP is automatically added to FMGRTRUSTEDIPS
FMGRRAISEALERT [0..1] 1 0=FortiClient does not inform FortiClient Manager of firewall/antivirus alerts.1=FortiClient informs FortiClient Manager of firewall/antivirus alerts.
FMGRTIMEOUT 30000+ 30000 This is the network timeout interval (in milliseconds) that FortiClient uses to determine if FortiClient Manager is not accessible.
FMGRTRUSTEDIPS csv list of ip addresses/fqdns/subnets
These are addresses that FortiClient will accept management requests from.
FWDEFAULTAPPACTION [0..1] 0 0=the FW will ask the user if the application should be permitted access to the network.1=FortiClient's firewall will permit 'unknown' applications to access the network without prompting the user.
HIDETRAY [0..1] 0 0=the tray icon is hidden from users. 1=the tray icon is visible to users.
It is not possible to shutdown FortiClient if the tray icon is hidden.
INSTALLFCWIZARDRUNONCE [0..1] 0 0=the FortiClient installation wizard runs the first time you start the FortiClient.1=the FortiClient Installation wizard is disabled.
Setting this property to 1 is the equivalent to specifying “-w-0” in the repackager.
Table 10: Installer public properties when installing FortiClient (Part 3 of 5).
Public property Range Default Description Comment
ortiClient Endpoint Security Version 4.0 MR2 Administration Guide4-420-1116637-20101207 71ttp://docs.fortinet.com/ • Feedback
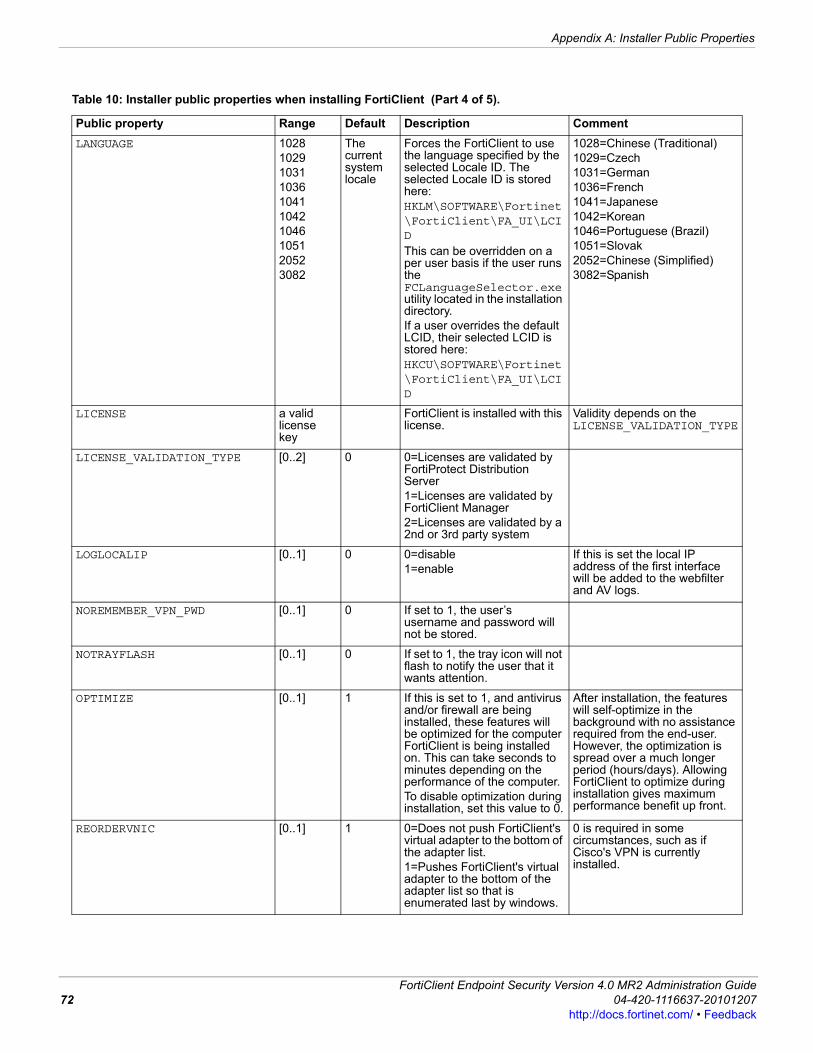
Appendix A: Installer Public Properties
LANGUAGE 1028102910311036104110421046105120523082
The current system locale
Forces the FortiClient to use the language specified by the selected Locale ID. The selected Locale ID is stored here:HKLM\SOFTWARE\Fortinet\FortiClient\FA_UI\LCID
This can be overridden on a per user basis if the user runs the FCLanguageSelector.exe utility located in the installation directory. If a user overrides the default LCID, their selected LCID is stored here:HKCU\SOFTWARE\Fortinet\FortiClient\FA_UI\LCID
1028=Chinese (Traditional)1029=Czech1031=German1036=French1041=Japanese1042=Korean1046=Portuguese (Brazil)1051=Slovak2052=Chinese (Simplified)3082=Spanish
LICENSE a valid license key
FortiClient is installed with this license.
Validity depends on the LICENSE_VALIDATION_TYPE
LICENSE_VALIDATION_TYPE [0..2] 0 0=Licenses are validated by FortiProtect Distribution Server1=Licenses are validated by FortiClient Manager2=Licenses are validated by a 2nd or 3rd party system
LOGLOCALIP [0..1] 0 0=disable1=enable
If this is set the local IP address of the first interface will be added to the webfilter and AV logs.
NOREMEMBER_VPN_PWD [0..1] 0 If set to 1, the user’s username and password will not be stored.
NOTRAYFLASH [0..1] 0 If set to 1, the tray icon will not flash to notify the user that it wants attention.
OPTIMIZE [0..1] 1 If this is set to 1, and antivirus and/or firewall are being installed, these features will be optimized for the computer FortiClient is being installed on. This can take seconds to minutes depending on the performance of the computer.To disable optimization during installation, set this value to 0.
After installation, the features will self-optimize in the background with no assistance required from the end-user. However, the optimization is spread over a much longer period (hours/days). Allowing FortiClient to optimize during installation gives maximum performance benefit up front.
REORDERVNIC [0..1] 1 0=Does not push FortiClient's virtual adapter to the bottom of the adapter list.1=Pushes FortiClient's virtual adapter to the bottom of the adapter list so that is enumerated last by windows.
0 is required in some circumstances, such as if Cisco's VPN is currently installed.
Table 10: Installer public properties when installing FortiClient (Part 4 of 5).
Public property Range Default Description Comment
FortiClient Endpoint Security Version 4.0 MR2 Administration Guide72 04-420-1116637-20101207
http://docs.fortinet.com/ • Feedback
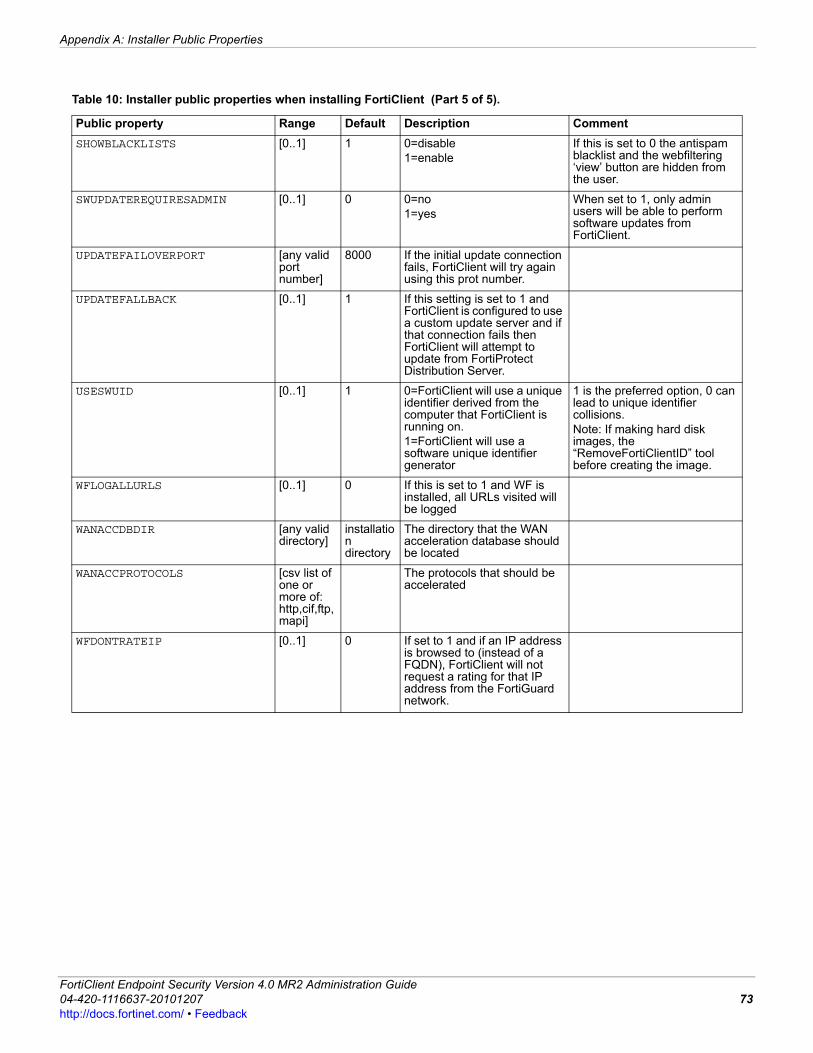
Appendix A: Installer Public Properties
F0h
SHOWBLACKLISTS [0..1] 1 0=disable1=enable
If this is set to 0 the antispam blacklist and the webfiltering ‘view’ button are hidden from the user.
SWUPDATEREQUIRESADMIN [0..1] 0 0=no1=yes
When set to 1, only admin users will be able to perform software updates from FortiClient.
UPDATEFAILOVERPORT [any valid port number]
8000 If the initial update connection fails, FortiClient will try again using this prot number.
UPDATEFALLBACK [0..1] 1 If this setting is set to 1 and FortiClient is configured to use a custom update server and if that connection fails then FortiClient will attempt to update from FortiProtect Distribution Server.
USESWUID [0..1] 1 0=FortiClient will use a unique identifier derived from the computer that FortiClient is running on.1=FortiClient will use a software unique identifier generator
1 is the preferred option, 0 can lead to unique identifier collisions.Note: If making hard disk images, the “RemoveFortiClientID” tool before creating the image.
WFLOGALLURLS [0..1] 0 If this is set to 1 and WF is installed, all URLs visited will be logged
WANACCDBDIR [any valid directory]
installation directory
The directory that the WAN acceleration database should be located
WANACCPROTOCOLS [csv list of one or more of: http,cif,ftp,mapi]
The protocols that should be accelerated
WFDONTRATEIP [0..1] 0 If set to 1 and if an IP address is browsed to (instead of a FQDN), FortiClient will not request a rating for that IP address from the FortiGuard network.
Table 10: Installer public properties when installing FortiClient (Part 5 of 5).
Public property Range Default Description Comment
ortiClient Endpoint Security Version 4.0 MR2 Administration Guide4-420-1116637-20101207 73ttp://docs.fortinet.com/ • Feedback

Appendix A: Installer Public Properties
FortiClient Endpoint Security Version 4.0 MR2 Administration Guide74 04-420-1116637-20101207
http://docs.fortinet.com/ • Feedback
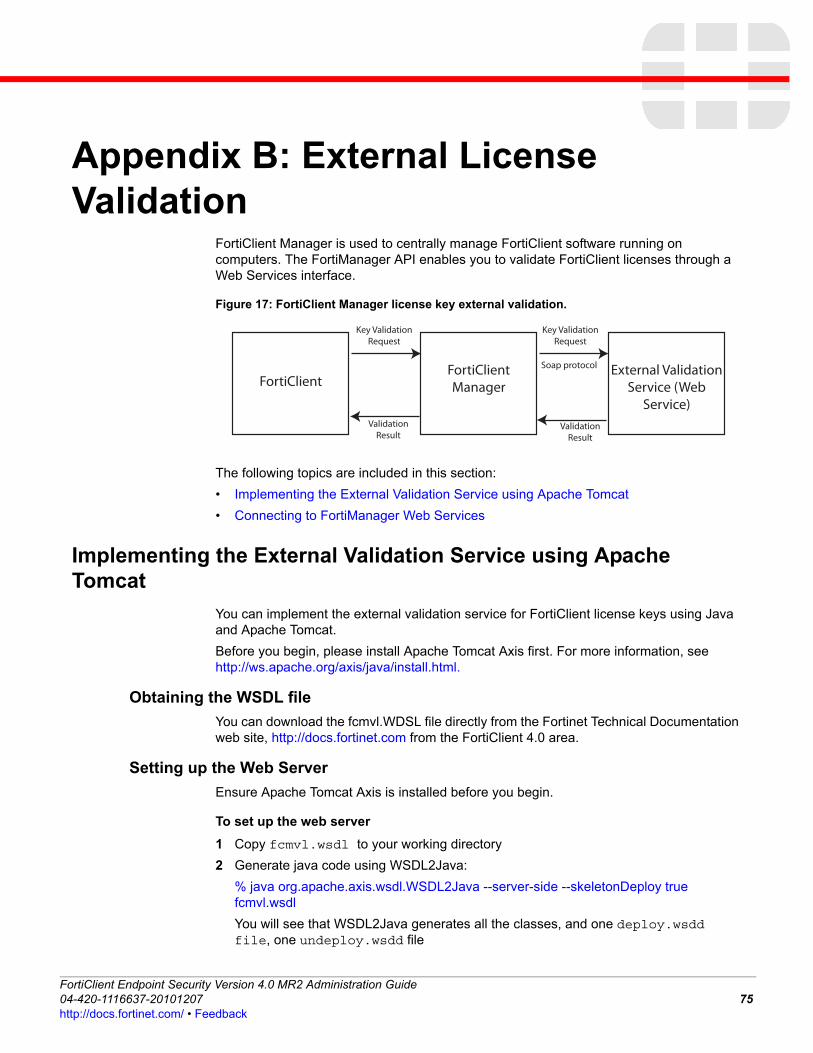
F0h
Appendix B: External License Validation
FortiClient Manager is used to centrally manage FortiClient software running on computers. The FortiManager API enables you to validate FortiClient licenses through a Web Services interface.
Figure 17: FortiClient Manager license key external validation.
The following topics are included in this section:
• Implementing the External Validation Service using Apache Tomcat
• Connecting to FortiManager Web Services
Implementing the External Validation Service using Apache Tomcat
You can implement the external validation service for FortiClient license keys using Java and Apache Tomcat.
Before you begin, please install Apache Tomcat Axis first. For more information, see http://ws.apache.org/axis/java/install.html.
Obtaining the WSDL file
You can download the fcmvl.WDSL file directly from the Fortinet Technical Documentation web site, http://docs.fortinet.com from the FortiClient 4.0 area.
Setting up the Web Server
Ensure Apache Tomcat Axis is installed before you begin.
To set up the web server
1 Copy fcmvl.wsdl to your working directory
2 Generate java code using WSDL2Java:
% java org.apache.axis.wsdl.WSDL2Java --server-side --skeletonDeploy true fcmvl.wsdl
You will see that WSDL2Java generates all the classes, and one deploy.wsdd file, one undeploy.wsdd file
FortiClientFortiClient Manager
External Validation Service (Web
Service)
Key Validation Request
Key Validation Request
Soap protocol
Validation Result
Validation Result
ortiClient Endpoint Security Version 4.0 MR2 Administration Guide4-420-1116637-20101207 75ttp://docs.fortinet.com/ • Feedback
Connecting to FortiManager Web Services Appendix B: External License Validation
3 Write your code in an implementation template class. This template class is already generated by WSDL2Java, called ServiceSoapImpl.java
4 Compile your webapp using javac.
5 Deploy your webapp:
% java org.apache.axis.client.AdminClient deploy.wsdd
Reference: http://ws.apache.org/axis/java/user-guide.html#WSDL2JavaBuildingStubsSkeletonsAndDataTypesFromWSD
Connecting to FortiManager Web Services
To implement the external validation service, you need to implement a web service providing the "External Validation Service”. FortiClient Manager will connect to this service via soap protocol to validate FortiClient licence keys.
The validation web service should include the following three functions:
• sayHello
• validateKey
• enterprise_license_alert
Obtaining the WSDL file
You can download the volumelicense.WDSL file directly from the Fortinet Technical Documentation web site, http://docs.fortinet.com from the FortiClient 4.0 area.
sayHello function
FortiClient Manager calls this function prior to validating the FortiClient license in order to test if the validation service is available and to exchange version information.
Parameter:
String interface_version
Return Values:
int ret_code
int interface_version
Parameter description:
Validation service interface is versioned. The current version is 1.
[Interface_version] is the highest version FortiClient Manager supports.
The validation service you write can ignore this.
Return value description:
If the validation service is ready, [ret_code] should be given 0.
If due to some reason, the validation service cannot provide service, [ret_code] should be set to 1.
[interface_version] should be set to 1, because current interface version is 1.
validateKey function
FortiClient Manager calls this function to validate the license key that it was sent by a FortiClient.
FortiClient Endpoint Security Version 4.0 MR2 Administration Guide76 04-420-1116637-20101207
http://docs.fortinet.com/ • Feedback
Appendix B: External License Validation Connecting to FortiManager Web Services
F0h
Parameters:
String val_key,
String fct_ip,
String fct_hostname,
String fct_os,
String fct_version,
String fct_status,
String fct_domain,
String fct_wingroup,
String fct_uid,
String other_param1,
String other_param2,
String other_param3
Return Values:
int ret_code
0: validate successfully
Other: error code
String err_desc
If ret_code is not zero, err_desc contains the error description.
String group_name
Put the FCT into the group called <group_name>.
String expired_date
Parameter description:
The validation service should use these parameters to decide if the key that was entered is valid.
[val_key] is the key input by user and requires validation by your service.
[fct_ip] is the IP address of computer FortiClient running is on.
[fct_hostname] is computer’s host name.
[fct_os] is the operation system.
[fct_version] is FortiClient version.
[fct_status] is the status of this FortiClient in FortiClient Manager:
• 0: This FortiClient has already been managed by FortiClient Manager.
• 4: This FortiClient is new to FortiClient Manager or it is in unlicensed group.
• -- (This FortiClient has been validated before but did not pass the validation).
[fct_domain] is computer's domain.
[fct_wingroup] is computer's windows group.
[fct_uid] is FortiClient's uid.
[other_param1] is reserved for future expansion.
[other_param2] is reserved for future expansion.
[other_param3] is reserved for future expansion.
ortiClient Endpoint Security Version 4.0 MR2 Administration Guide4-420-1116637-20101207 77ttp://docs.fortinet.com/ • Feedback
Connecting to FortiManager Web Services Appendix B: External License Validation
Return value description:
If the FortiClient passes the validation test, [ret_code] should be set to 0, otherwise it should be an error code. FortiClient Manager doesn't interpret this error code, but will relay it to FortiClient which will add it to it's local logs. (filter the logs by "FortiManager" to see it)
If [ret_code] is set to 0, FortiClient Manager will put this FortiClient into the managed group. Any other value of [ret_code] will result in FortiClient Manager regards this FortiClient as unlicensed and put it into the unlicensed group.
[err_desc] is the error description to describe why the FortiClient is unlicensed, and may be seen in the FortiClient's logs.
If you want the FortiClient to join a specific group upon successful licensing, the validation service should return the name of the group in [group_name]. This group must be static group and must be predefined in FortiClient Manager.
[expired_date] is the expiry date of this FortiClient's license. FortiClient Manager will send this date to FortiClient and FortiClient displays it in the GUI.
enterprise_license_alert function
If the enterprise license has expired or the maximum number of seats have been reached, this method will be invoked to notify your validation service of the event.
Parameters:
int type
0: seats are used up
1: seats will be used up soon.
2: license is expired
3: license will expire soon.
int seat_count
String expire_date
int seat_used_count
Return Values:
No return value.
Parameter description:
[type] is the type of the alert. There are four types of alerts:
• 0: seats are used up
• 1: seats will be used up soon.
• 2: license is expired
• 3: license will be expired soon.
[seat_count] is the total seat count of the enterprise license.
[expire_date] is the expiry date of this enterprise license.
[seat_used_count] is the seat count which has been used.
Return value description:
no return value.
FortiClient Endpoint Security Version 4.0 MR2 Administration Guide78 04-420-1116637-20101207
http://docs.fortinet.com/ • Feedback
F0h
IndexSymbols.exe, 9.msi, 9
AADMINMODE, 69ADMINPWD, 69antileak, 32antivirus
optimization, 11API, 63
controlling VPN, 63monitoring connections, 65monitoring security policies, 66policy compliance, 67reading security policies, 66security policies, 65, 66VPN connection names, 64VPN tunnel, 64XAuth requests, 64
application detection list, 45creating, 41
application groups, 43AV update schedule randomizing, 21AV_BEFORE_VPN, 69
BBLED, 28block access unless firewall rule permits
installation option, 20
Ccategory definitions, 43Citrix servers
installing, 32cloned disk image
including FortiClient, 31cloned PC hardware
install with USESWUID option, 32code page, 5COM library, 63comments on Fortinet technical documentation, 7COMPLIANCE_POLICY, 69corporate security policy
FortiClient, setting, 36viewing, 35
creatingapplication detection list, 41custom installer packages, 17endpoint control profiles, 40
custom installer packages, 17
customer service, 7customization of FortiClient installer
changing installer language, 22creating, 24deploying, 23Endpoint NAC distribution, 26for enterprise licensing, 33licensing, 23log file, 25sample command lines, 25specifying multiple transforms on the command line, 26supressing features, 25transferrring to later versions, 23using FCRepackager, 17using MSI editor, 23
Ddisable XAUTH password saving
installation option, 19DISABLEPROXYSELFTEST, 69DISABLEPROXYSELFTESTBALLOON, 69DISABLESWUPDATES, 70disabling web filter rating by IP addresses
installation option, 19documentation, 6
EENABLE_FORTIPROXY, 70ENABLE_REGMON, 70enabling
endpoint control, 40endpoint control
enabling, 40endpoint control profile
apply to firewall policy, 44endpoint control profiles
creating, 40Endpoint NAC distribution
deploying customized installation, 26endpoints
monitoring, 45Enterprise license, 14
FFCRepackager
using to create customized installer, 17FCRepackager tool, 18FCRepackager_Readme.txt, 18FDS servers, fallback to public servers, 19firewall
changing default firewall action, 31
ortiClient Endpoint Security Version 4.0 MR2 Administration Guide4-420-1116637-20101207 79ttp://docs.fortinet.com/ • Feedback
Index
firewall policyapplying endpoint control profile, 44
FMGRAVALERTINT, 70FMGRDISCOVERATTEMPTS, 70FMGRDISCOVERINTERVAL, 70FMGRENABLED, 70FMGRENABLEDISCOVER, 70FMGRFWALERTINT, 70FMGRFWBEHAVIOR, 28, 70FMGRHEARTBEAT, 70FMGRHEARTBEATCOUNT, 70FMGRIP, 28, 71FMGRRAISEALERT, 71FMGRTIMEOUT, 71FMGRTRUSTEDIPS, 28, 71FMGTRUSTEDIP, 29FortiClient
custom installation, 17enforcing use, 37installing, standard installation, 12software packages, 9stop start-up services, 12VPN, 47
FortiClient COM library, 63FortiClient packages
uploading to FortiGate unit, 40FortiClient partitioning, 28FortiClient PCs
adding to FortiManager database, 54FortiClient proxy, 10FortiClient version
setting, 38FortiClientTools.zip, 18FortiGate
VPN connections, 47FortiGate models
supported by FortiClient, 5FortiGuard Distribution Network (FDN), 38FortiGuard Services, 38FortiManager
configuring central management, 30configuring for FortiClient web filtering, 53configuring web filter profiles, 54custom installation package for, 28firewall behavior, 27FortiClient communication, 27FortiClient Manager options, 54remote management, 27VPN, 50
Fortinet customer service, 7Fortinet Knowledge Center, 6FortiOS versions
supported by FortiClient, 5FortiTray
installation option to hide, 19FWDEFAULTAPPACTION, 71
Hhide FortiTray
installation option, 19
HIDETRAY, 71
Iinstallation options
block access unless firewall rule permits, 20disable web filter rating by IP address, 19disable XAUTH password saving, 19hide FortiTray, 19permit fallback to public FDS, 19
INSTALLFCWIZARDRUNONCE, 71installing, 9
.exe, 9
.msi, 9as part of a cloned disk image, 31Citrix servers, 32custom installer packages, 17distributing customized installers, 33FortiClient, 9multiple-user, 12on cloned PC hardware, 32setting to request FortiManager registration, 29shared folder installation, 26single-user, 12using Active Directory server, 26
introduction, 1
LLANGUAGE, 71language support, 5LDAP
for Windows user and group information, 55LICENSE, 72license
creating a client license key, 15enterprise license, applying, 14enterprise license, registering, 15
license keyspecifying in FCRepackager customization, 21
LICENSE_VALIDATION_TYPE, 72lockdown
enabling in FCRepackager customization, 21
Mmonitoring
endpoints, 45MSI installation file
creating, 20shrinking, 21
mst file, 18
NNOREMEMBER_VPN_PWD, 72NOTRAYFLASH, 72
Ooptimization
antivirus, 11OPTIMIZE, 11, 72
FortiClient Endpoint Security Version 4.0 MR2 Administration Guide80 04-420-1116637-20101207
http://docs.fortinet.com/ • Feedback
Index
F0h
Pper-user web filtering
assigning profiles, 55configuring FortiManager for, 53overview, 53remote users, 53Windows network, 53
policy serverconfiguring FortiGate unit as, 50
Premium license, 14proxy
FortiClient, 10public installer properties, 69
Rremote management
enabling in MSI customization, 29FortiManager, 27
RemoveFCTID.exe, 31removing identifier, 31REORDERVNIC, 72rtiManager, 28
Ssample installation
for customization, 18see also Redistributablesee also Volume licenseservers, 10software updates, 10standard edition, 14Standard license, 14standard license, 14stop
start-up services, 12subst command, 11SWUPDATEREQUIRESADMIN, 72system requirements, 4
TTCP port 6020, 27
technical support, 7
UUDP port 6023, 27UPDATEFAILOVERPORT, 72UPDATEFALLBACK, 72upgrading, 10USESWUID, 73USESWUID installation option, 32
Vviewing
corporate security policy, 35Volume license, 14VPN
custom installation, 50FortiClient, 47FortiGate, 47FortiManager, 50
VPN Editor, 50VPN XAUTH passwords
installation option to disable saving, 19
WWANACCDBDIR, 73WANACCPROTOCOLS, 73web filter
disabling rating of IP addresses, 19web filter profiles
assigning to groups and users, 55defining in FortiClient Manager, 54
web filteringassigning profiles, 55configuring FortiManager for, 53on Citrix server, 53on Windows Terminal server, 53overview, 53remote users, 53Windows network, 53
WFDONTRATEIP, 73WFLOGALLURLS, 73
ortiClient Endpoint Security Version 4.0 MR2 Administration Guide4-420-1116637-20101207 81ttp://docs.fortinet.com/ • Feedback

Index
FortiClient Endpoint Security Version 4.0 MR2 Administration Guide82 04-420-1116637-20101207
http://docs.fortinet.com/ • Feedback

www.fortinet.com

www.fortinet.com