focus 40 blue user's guide - freedom scientific word navigation quick keys..... 33 text...
TRANSCRIPT

440663-001 Rev A
Focus 40 Blue
Refreshable Braille Display User’s Guide
Freedom Scientific Inc.

PUBLISHED BY Freedom Scientific Inc. 11800 31st Court North St. Petersburg, Florida 33716-1805 USA http://www.FreedomScientific.com
Information in this document is subject to change without notice. No part of this publication may be reproduced or transmitted in any form or by any means electronic or mechanical, for any purpose, without the express written permission of Freedom Scientific.
Copyright © 2014 Freedom Scientific. All Rights Reserved.
JAWS is a registered trademark of Freedom Scientific in the United States and other countries. Microsoft and Windows are registered trademarks of Microsoft Corporation in the U.S. and/or other countries.
Contains transmitter module FCC ID: ED9LMX9838
Contains transmitter module IC:1520A-LMX9838
USA-Federal Communications Commission (FCC) Notice
This equipment has been tested and found to comply with the limits for a Class B digital device, pursuant to Part 15 of the FCC Rules. These limits are designed to provide reasonable protection against harmful interference in a residential installation. This equipment generates, uses, and can radiate radio frequency energy and, if not installed and used in accordance with the instructions, may cause harmful interference to radio communications. However, there is no guarantee that interference will not occur in a particular installation. If this equipment does cause harmful interference to radio or television reception, which can be determined by turning the equipment off and on, the user is encouraged to try to correct the interference by one or more of the following measures:
Reorient or relocate the receiving antenna.
Increase the separation between the equipment and receiver.

Connect the equipment into an outlet on a circuit different from that to which the receiver is connected.
Consult the dealer or an experienced radio /TV technician for help.
This device complies with part 15 of the FCC Rules. Operation is subject to the following two conditions: (1) This device may not cause harmful interference, and (2) this device must accept any interference received, including interference that may cause undesired operation.
Any changes or modifications not expressly approved by the party responsible for compliance could void the user’s authority to operate the equipment.
Caution: Exposure to Radio Frequency Radiation.
This device must not be co-located or operating in conjunction with any other antenna or transmitter.
Canada – Industry Canada (IC) Notice
This Class B digital apparatus complies with Canadian ICES-003.
Cet appareil numérique de la classe B est conforme à la norme NMB-003 du Canada.
This device complies with RSS 210 of Industry Canada. Operation is subject to the following two conditions:
(1) this device may not cause interference, and
(2) this device must accept any interference, including interference that may cause undesired operation of this device.
L ‘ utilisation de ce dispositif est autorisée seulement aux conditions suivantes :
(1) il ne doit pas produire d’interference et
(2) l’ utilisateur du dispositif doit étre pr?t ? accepter toute interference radioélectrique reçu, m?me si celle-ci est susceptible de compromettre le fonctionnement du dispositif.

Caution: Exposure to Radio Frequency Radiation.
The installer of this radio equipment must ensure that the antenna is located or pointed such that it does not emit RF field in excess of Health Canada limits for the general population; consult Safety Code 6, obtainable from Health Canada’s website www.hc-sc.gc.ca.
Attention: Exposition à des radiations de fréquences radio.
Cet appareil émettant des ondes radio, l'installateur doit s'assurer que l'antenne est positionnée ou orientée de telle sorte que l'appareil émette des champs RF ne dépassant pas les limites recommandées par Santé Canada pour le grand public; consultez Code de sécurité 6, disponible à Santé Canada ou sur leur site web www.hc-sc.gc.ca.
Attention
This unit has been shipped with cables that allow compliance with FCC Regulations. If replacement cables are needed in the future, contact Freedom Scientific to obtain the appropriately shielded cable.
Safety, Maintenance, and Cleaning Procedures
Do not attempt to repair Focus Blue or open its case. This product contains no user serviceable parts. Any unauthorized attempt to service or replace internal components will void the product warranty.
Keep Focus Blue away from wet areas, rain, and other sources of liquids. Do not submerge Focus Blue.
Always operate Focus Blue in a place where the temperature is between 5° and 35° C (40° and 95° F).
Do not store in places subject to temperature extremes such as a parked car.
Use only the power adapter that came with Focus Blue to charge its internal battery pack. Other adapters may damage the unit.
Procédures de sécurité, d’entretien et de nettoyage
Focus Blue ne contient aucune pièce susceptible d'être réparée par l'utilisateur. Toute tentative d'entretien ou de réparation non autorisée de l'appareil par ouverture de sa coque fait perdre à l'utilisateur ses éventuels droits à la garantie.
NE PAS exposer Focus Blue ou l’utiliser à proximité de liquides, sous la pluie ou dans une atmosphère humide. Ne pas le plonger dans un liquide.
Cet appareil doit être utilisé uniquement dans des environnements où la température est comprise entre 5 ° et 35 ° C (40 ° et 95 ° F).
Ne pas l’exposer à des températures extrêmes comme par exemple une voiture garée.
Utilisez uniquement l'adaptateur secteur fourni avec Focus Blue pour charger sa batterie interne. D'autres adaptateurs peuvent endommager l'appareil.
Important Notice
This device has no user-serviceable components. Any unauthorized attempt to service or replace internal components by opening the case will void the product warranty.
Table of Contents
Features ...................................................................................................... 1
What’s in the Box? .................................................................................... 2
Physical Layout ......................................................................................... 3
Side View ................................................................................................ 3
Top View ................................................................................................. 3
Front View ............................................................................................... 4
Controls ................................................................................................... 5
NAV Rockers and Mode Buttons ........................................................ 5
Panning Buttons ................................................................................. 5
Rocker Bars ........................................................................................ 6
Selector Buttons ................................................................................. 6
Cursor Router Buttons ........................................................................ 6
Table of Multi-Control Functions ........................................................ 6
Power Button .......................................................................................... 8
Internal Battery .......................................................................................... 9
Connecting the Focus ............................................................................. 10
Adding JAWS Support to the Focus Display ........................................ 11
Configuring the USB Connection .......................................................... 11
Configuring the Bluetooth Connection .................................................. 12
Toggling Between the USB and Bluetooth Connection ........................ 16
BrailleIn .................................................................................................... 17
Typing with Contracted Braille .............................................................. 17
Braille Study Mode .................................................................................. 19
Configuring the Focus Display ............................................................... 20
Placement of Status Cells ..................................................................... 20
Variable Braille Dot Firmness ............................................................... 20
Locking the Perkins-style Keyboard ...................................................... 21
The Display Menu .................................................................................... 22
Bluetooth ID .......................................................................................... 22
Key Repeat ........................................................................................... 22
Display Sleep Delay .............................................................................. 23
Focus Keyboard Commands Overview ................................................. 24
Modifier Keys ........................................................................................ 24
Function Keys ................................................................................... 25
Special Keys ......................................................................................... 26
Navigation Commands .......................................................................... 29
Microsoft Word Navigation Quick Keys ................................................. 33
Text Selection Commands .................................................................... 34
Selecting with the Cursor Router Buttons ........................................ 36
Braille Commands ................................................................................. 36
Windows Commands ............................................................................ 37
Selection Commands ............................................................................ 38
JAWS Commands ................................................................................. 40
Cursor Functions ................................................................................... 41
Utility Functions ..................................................................................... 43
Environmental Considerations ............................................................... 44
Storage ................................................................................................. 44
Operating .............................................................................................. 44
Diagnostics Mode .................................................................................... 45
Entering and Exiting Diagnostics Mode ................................................ 45
Routing Button Test .............................................................................. 45
Display Test/Clean ................................................................................ 45
Key and Controls Test .......................................................................... 46
Battery Info Mode .................................................................................. 47
Troubleshooting ...................................................................................... 48

1
Features
The Focus 40 Blue refreshable braille display provides a compact, tactile interface to your computer. Used together with screen access software such as JAWS® for Windows, the Focus 40 Blue can enhance your computing experience.
The Focus 40 Blue includes the following features:
40 refreshable braille cells
A cursor router button above each braille cell
8-key Perkins-style braille keyboard, with the addition of two SHIFT keys
Two panning buttons, two rocker bars, and two selector buttons
A NAV Rocker and a mode button at each end of the display for quick navigation of files, lists, and menus
VariBraille adjustable braille dot firmness
Status cells configurable to either end of the display
USB connection to computer
Bluetooth® wireless connectivity
Support for select cell phones and other mobile devices via third party applications
2
What’s in the Box?
The Focus package includes the following items. If you find that you are missing any of the components listed below, please call Customer Service at (800) 444-4443.
Focus 40 Blue braille display
AC adapter
USB Cable, 6-foot
Carrying Case
Manual in Print and braille
Companion CD
Warranty registration cards
Product support insert
3
Physical Layout
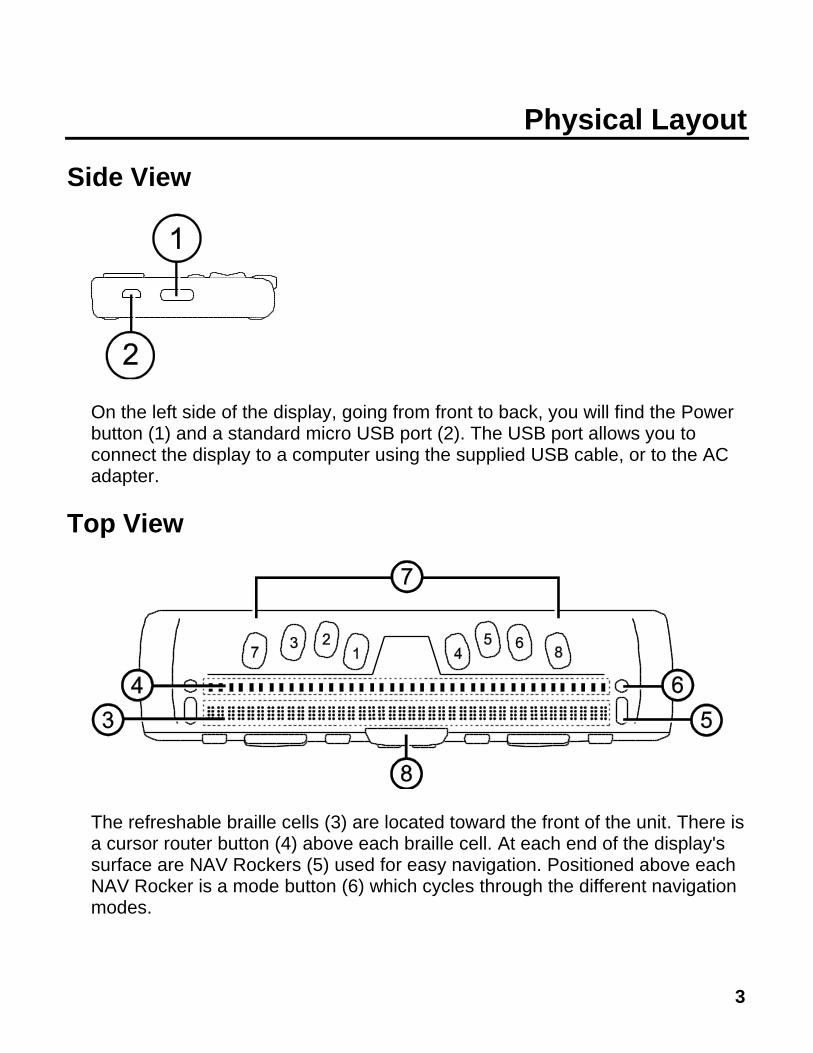
Side View
On the left side of the display, going from front to back, you will find the Power button (1) and a standard micro USB port (2). The USB port allows you to connect the display to a computer using the supplied USB cable, or to the AC adapter.
Top View
The refreshable braille cells (3) are located toward the front of the unit. There is a cursor router button (4) above each braille cell. At each end of the display's surface are NAV Rockers (5) used for easy navigation. Positioned above each NAV Rocker is a mode button (6) which cycles through the different navigation modes.
4
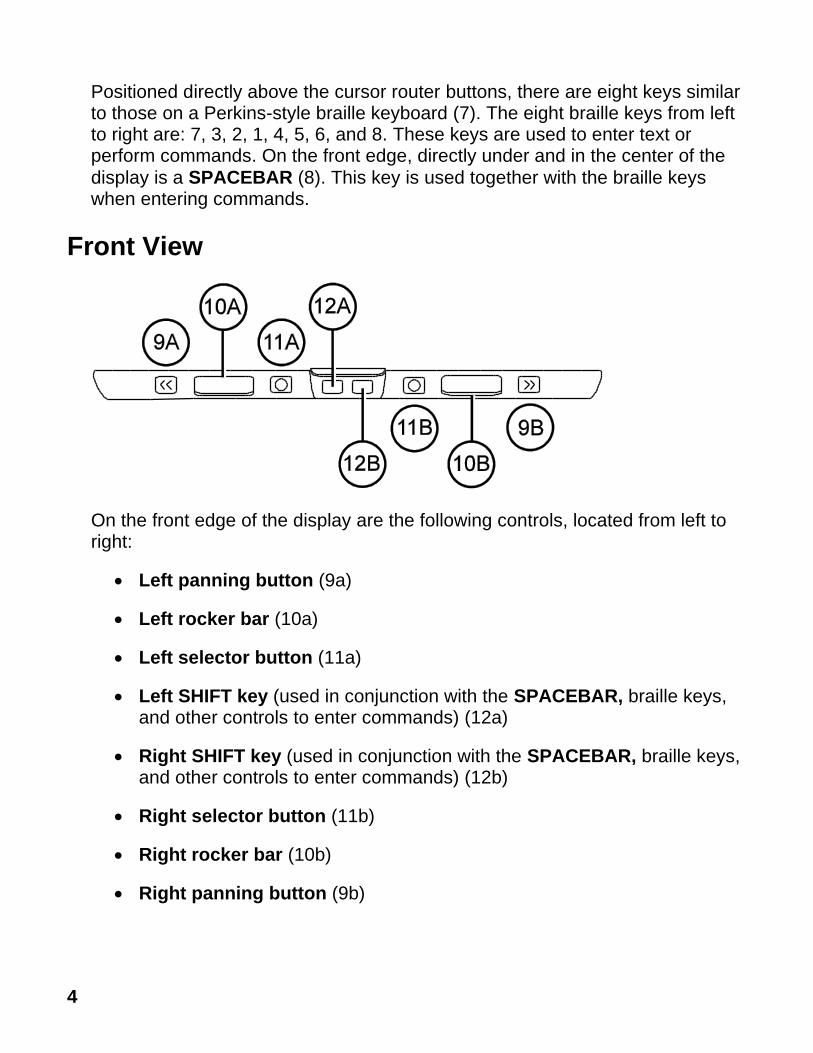
Positioned directly above the cursor router buttons, there are eight keys similar to those on a Perkins-style braille keyboard (7). The eight braille keys from left to right are: 7, 3, 2, 1, 4, 5, 6, and 8. These keys are used to enter text or perform commands. On the front edge, directly under and in the center of the
display is a SPACEBAR (8). This key is used together with the braille keys when entering commands.
Front View
On the front edge of the display are the following controls, located from left to right:
Left panning button (9a)
Left rocker bar (10a)
Left selector button (11a)
Left SHIFT key (used in conjunction with the SPACEBAR, braille keys, and other controls to enter commands) (12a)
Right SHIFT key (used in conjunction with the SPACEBAR, braille keys, and other controls to enter commands) (12b)
Right selector button (11b)
Right rocker bar (10b)
Right panning button (9b)
5
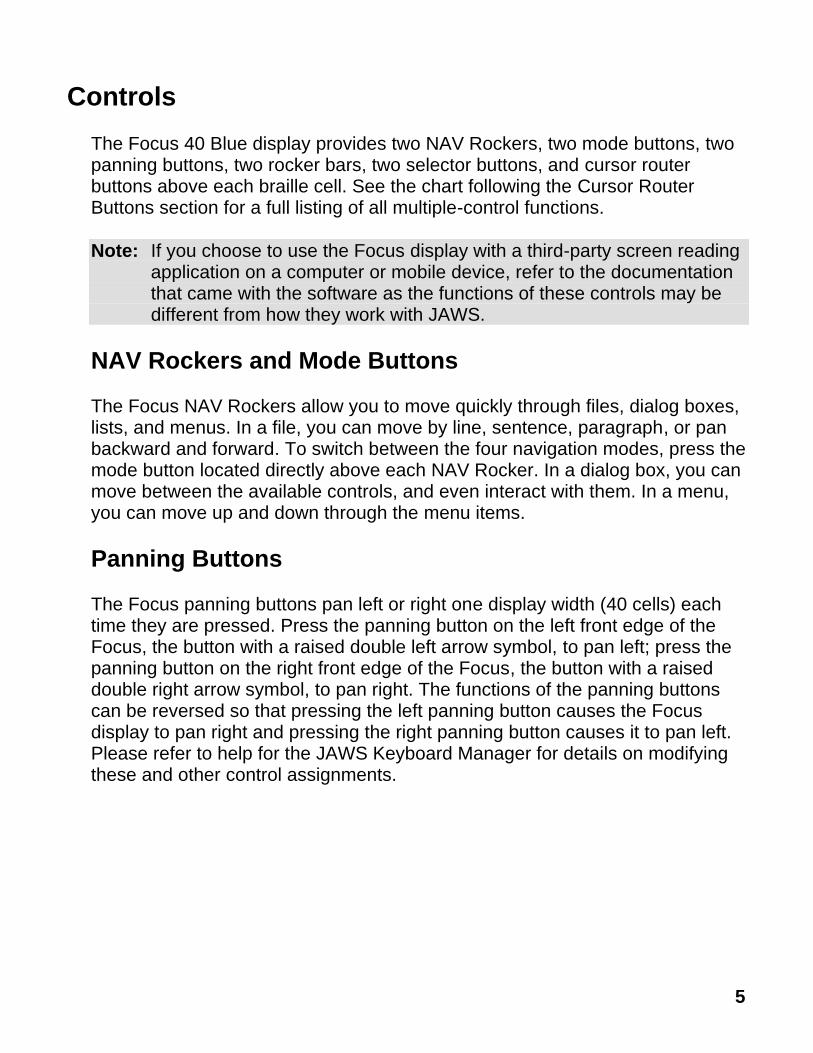
Controls
The Focus 40 Blue display provides two NAV Rockers, two mode buttons, two panning buttons, two rocker bars, two selector buttons, and cursor router buttons above each braille cell. See the chart following the Cursor Router Buttons section for a full listing of all multiple-control functions.
Note: If you choose to use the Focus display with a third-party screen reading application on a computer or mobile device, refer to the documentation that came with the software as the functions of these controls may be different from how they work with JAWS.
NAV Rockers and Mode Buttons
The Focus NAV Rockers allow you to move quickly through files, dialog boxes, lists, and menus. In a file, you can move by line, sentence, paragraph, or pan backward and forward. To switch between the four navigation modes, press the mode button located directly above each NAV Rocker. In a dialog box, you can move between the available controls, and even interact with them. In a menu, you can move up and down through the menu items.
Panning Buttons
The Focus panning buttons pan left or right one display width (40 cells) each time they are pressed. Press the panning button on the left front edge of the Focus, the button with a raised double left arrow symbol, to pan left; press the panning button on the right front edge of the Focus, the button with a raised double right arrow symbol, to pan right. The functions of the panning buttons can be reversed so that pressing the left panning button causes the Focus display to pan right and pressing the right panning button causes it to pan left. Please refer to help for the JAWS Keyboard Manager for details on modifying these and other control assignments.
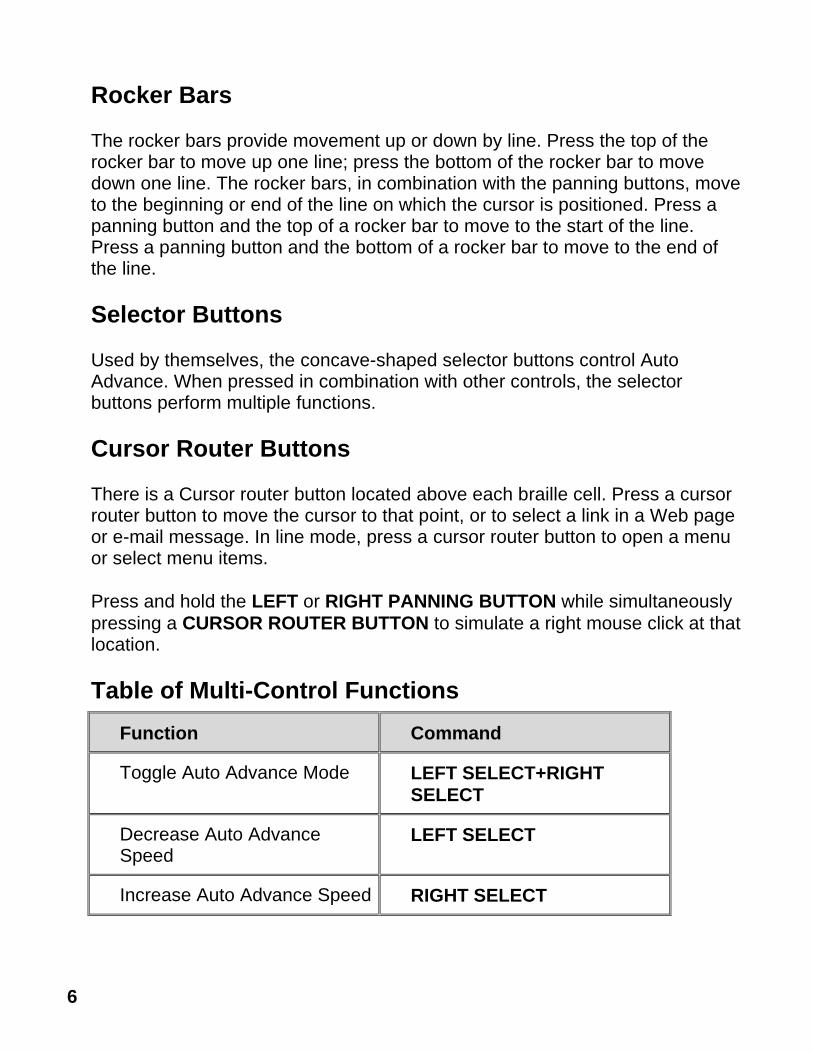
6
Rocker Bars
The rocker bars provide movement up or down by line. Press the top of the rocker bar to move up one line; press the bottom of the rocker bar to move down one line. The rocker bars, in combination with the panning buttons, move to the beginning or end of the line on which the cursor is positioned. Press a panning button and the top of a rocker bar to move to the start of the line. Press a panning button and the bottom of a rocker bar to move to the end of the line.
Selector Buttons
Used by themselves, the concave-shaped selector buttons control Auto Advance. When pressed in combination with other controls, the selector buttons perform multiple functions.
Cursor Router Buttons
There is a Cursor router button located above each braille cell. Press a cursor router button to move the cursor to that point, or to select a link in a Web page or e-mail message. In line mode, press a cursor router button to open a menu or select menu items.
Press and hold the LEFT or RIGHT PANNING BUTTON while simultaneously
pressing a CURSOR ROUTER BUTTON to simulate a right mouse click at that location.
Table of Multi-Control Functions
Function Command
Toggle Auto Advance Mode LEFT SELECT+RIGHT
SELECT
Decrease Auto Advance Speed
LEFT SELECT
Increase Auto Advance Speed RIGHT SELECT

7
Function Command
Right Mouse Click PANNING
BUTTON+CURSOR ROUTER
BUTTON
Control + Left Mouse Click ROUTER BUTTON CHORD
Page Down LEFT or RIGHT
SELECT+ROCKER DOWN
Page Up LEFT or RIGHT
SELECT+ROCKER UP
Top of File LEFT PANNING
BUTTON+SELECT BUTTON
Bottom of File RIGHT PANNING
BUTTON+SELECT BUTTON
End PANNING
BUTTON+ROCKER BAR
DOWN
Home PANNING
BUTTON+ROCKER BAR UP
Next Line ROCKER BAR DOWN
Prior Line ROCKER BAR UP
Pan Left LEFT PANNING BUTTON
Pan Right RIGHT PANNING BUTTON
Select Text LEFT SHIFT+CURSOR
ROUTER BUTTON
8
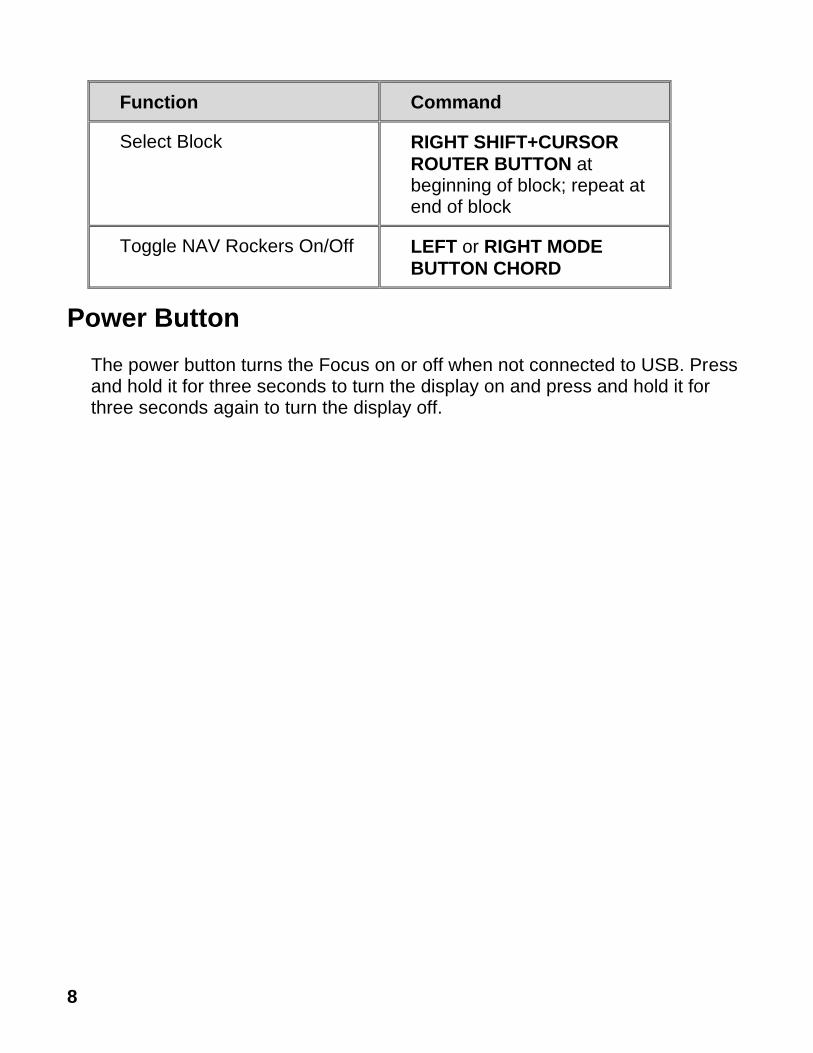
Function Command
Select Block RIGHT SHIFT+CURSOR
ROUTER BUTTON at beginning of block; repeat at end of block
Toggle NAV Rockers On/Off LEFT or RIGHT MODE
BUTTON CHORD
Power Button
The power button turns the Focus on or off when not connected to USB. Press and hold it for three seconds to turn the display on and press and hold it for three seconds again to turn the display off.
9
Internal Battery
The Focus 40 Blue contains an internal battery for Bluetooth operation. While using the Focus over a Bluetooth connection, you will get approximately 20 hours for typical usage. To check the battery status while the display is in use, press the power button to display the percentage of battery charge used. Press a cursor router or any other control to return to normal operation.
When the battery is at 20 percent, 10 percent, and 5 percent respectively, a low battery warning is displayed indicating it is time to plug in the AC adapter. You can dismiss this message by pressing a cursor router button. In addition, once the battery drops below 10 percent, dots seven and eight in the last five cells will show each percentage drop. For example, when the battery is at one
percent, DOT 8 in cell 40 will be raised.
Use the AC adapter supplied with your unit to charge the battery. The unit takes three hours to charge using the supplied AC adapter even when the Bluetooth connection is active. Charging time will be less if the battery is not completely discharged before the display is plugged in. The Focus will also charge while connected to a computer using the USB cable, however, charging time will take longer than with the supplied AC adapter. As the Focus charges, the battery charging indicator, a circle of dots, is displayed to the right of the percentage until the unit reaches 100 percent. You can continue using the Focus while it is charging.
Caution: No user serviceable parts. Risk of High Voltage shock.
10
Connecting the Focus
You can connect the Focus braille display to your computer using either the USB port or Bluetooth. If you connect using USB, the display is powered from the computer through the USB connection cable. This also charges the internal battery.
As soon as you connect the USB cable to the computer, the Focus immediately turns on. When the USB cable is removed, the Focus turns off. Pressing the power button while connected to USB causes the focus to display the model, firmware version, battery status, and the connection type, USB, in the last three cells. Pressing a cursor router button returns the display to normal operation.
Bluetooth is a short-range wireless communications technology. Devices with Bluetooth capabilities can communicate with each other over a distance of about 10 meters (30 feet) without requiring a physical connection. Using the Focus wirelessly over Bluetooth means you do not have any cables to worry about and you can relax on your couch and use the Focus as both a braille display and keyboard to access your computer from across the room.
In order to use Bluetooth, you must establish a partnership with a Bluetooth enabled computer. The majority of modern notebook computers and mobile phones as well as some models of desktop computers offer built-in Bluetooth support. However, not all computers offer this. If your computer does not have built-in Bluetooth, you will need to purchase an external USB Bluetooth adapter and install the appropriate drivers on your system to enable this functionality. Refer to the documentation that came with your Bluetooth hardware to ensure Bluetooth is properly configured on your computer.
11
Adding JAWS Support to the Focus Display
If you are using the Focus Blue with JAWS 10 or earlier, you will need to first install the driver included on the Companion CD that came with your display before connecting it to your computer.
Note: Disconnect the Focus display from your computer when performing the following steps. Having the display connected during this process results in improper installation and failure of the display to operate properly.
1. Insert the Focus Blue Companion CD. When the Freedom Scientific Focus Setup dialog box opens, choose Install Windows driver. You will hear a series of clicks as the driver is installed.
2. When the installation completes, choose the OK button to restart your computer.
JAWS 11 and later automatically installs the files necessary to use the Focus Blue during the JAWS installation. Make sure JAWS 11 or later is installed and running before attempting to establish a USB or Bluetooth connection with the Focus 40 Blue.
Note: If you choose to use the Focus display with a third-party screen reading application, you must install the driver from the Companion CD. However, once installed, refer to the documentation that came with the software for information on configuring and using the Focus with the particular application as certain commands may be different.
Configuring the USB Connection
To configure the Focus Blue braille display to operate with JAWS over USB, do the following:
1. Establish a USB connection between the Focus and computer using the supplied USB cable.
2. Windows will detect the display and install the appropriate drivers.
12
Note: Windows XP will display a Found New Hardware Wizard, prompting you to locate the driver. Choose the option to automatically install the software then select Finish to complete the installation.
3. Once Windows has confirmed that the hardware was successfully installed, close and then restart JAWS. JAWS automatically detects and begins using your Focus 40 Blue braille display.
Configuring the Bluetooth Connection
In order to use the Focus Blue with JAWS wirelessly over Bluetooth, you must first configure a Bluetooth partnership between the Focus and computer.
To set up a Bluetooth partnership between the Focus display and computer using Windows 7 or Vista, do the following:
1. Make sure that Bluetooth is enabled on the computer running JAWS. If you are using an external USB Bluetooth adapter, insert it and ensure it is detected properly.
2. Power on the focus. The firmware version and battery status information is displayed.
3. On the computer, go to the Control Panel and type "bluetooth" into the Search edit box.
4. Press TAB to move to Add Bluetooth Device and press ENTER. The computer will begin searching for Bluetooth devices. This may take several seconds. You are placed in the list of devices when the search is complete.
5. Use the ARROW keys to select your Focus display from the list, for example, Focus 40 BT, and then choose Next. If the Focus display was not found, make sure it is turned on then select the Retry button.
6. Select the Pairing Code button, type 0000 into the edit field, and then choose Next.
7. After a few seconds, you will receive a message informing you that the Bluetooth device was successfully connected. Choose the Close button.
13
If you are using JAWS 12 or earlier, you will need to find the outgoing port number assigned to the Focus as this is the port JAWS will use to communicate with the display. To view COM port information, select Change Bluetooth settings to open the Bluetooth Settings dialog box, then navigate to the COM Ports page. JAWS 13 and later automatically detects the appropriate COM port.
To set up a Bluetooth partnership between the Focus display and computer using Windows XP, do the following:
1. Make sure that Bluetooth is enabled on the computer running JAWS. If you are using an external USB Bluetooth adapter, insert it and ensure it is detected properly.
2. Power on the focus. The firmware version and battery status information is displayed.
3. On the computer, go to the Control Panel and select Bluetooth Devices.
4. When the Bluetooth Devices dialog box opens, press TAB to move to
the Add button and press ENTER.
5. Use the SPACEBAR to check the My device is set up and ready to be found check box then choose Next to begin searching for Bluetooth devices. This may take several seconds. You are placed in the list of devices when the search is complete.
6. Use the ARROW keys to select your Focus display from the list, for example, Focus 40 BT, and then choose Next. If the Focus display was not found, make sure it is turned on then select the Search Again button.
7. Select the Use the passkey found in the documentation radio button,
press TAB to Move to the Passkey edit field, type 0000, and choose Next.
14
8. After a few seconds, you will receive a message informing you that the Bluetooth device was successfully connected and the outgoing and incoming COM port assignments are displayed. If you are using JAWS 12 or earlier, make a note of the outgoing port number as this is the port JAWS will use to communicate with the Focus.
9. Choose Finish to close the wizard, and then OK to close the Bluetooth Devices dialog box and save your settings.
Note: Your settings will not be saved if you do not exit both the wizard and Bluetooth Devices dialog box as described in step 9.
You must now configure JAWS to use the Bluetooth connection. Note that it is not necessary to first establish a USB connection before using Bluetooth. If you have not yet set up a USB connection with the Focus display, do the following:
1. Press INSERT+J to open the JAWS window.
2. Press ALT+O to open the Options menu and select Braille to open the Braille Basic Settings dialog box.
3. Press TAB to move to the Add Braille Display button and press
ENTER.
4. In the list of braille displays, choose Focus and press the SPACEBAR to select it, and then choose Next.
5. If you are using JAWS 13 or later, in the Select the output port edit combo box, choose Bluetooth. Otherwise, select the port that corresponds to the outgoing COM port number that was displayed after you finished pairing the Focus.
6. Choose next and make sure that the Focus is selected as the primary display.
7. Select Finish and you are instructed to restart JAWS in order for these changes to take affect. Select OK to close this message and once more to close the Braille Basic Settings dialog box.
15
8. Quit and restart JAWS and your Focus Blue is now communicating with JAWS over Bluetooth. If you are using JAWS 13 or later, JAWS automatically detects the correct Bluetooth serial port.
If you are currently using the Focus display over USB and you want to switch the connection to use Bluetooth, do the following:
1. Press INSERT+J to open the JAWS window.
2. Press ALT+O to open the Options menu and select Braille to open the Braille Basic Settings dialog box.
3. In the Default Braille Display combo box, make sure Focus is selected then choose Modify Settings.
4. If you are using JAWS 13 or later, in the Select the output port edit combo box, choose Bluetooth. Otherwise, select the port that corresponds to the outgoing COM port number that was displayed after you finished pairing the Focus.
5. Select OK and you are instructed to restart JAWS in order for these changes to take affect. Select OK to close this message and once more to close the Braille Basic Settings dialog box.
6. Quit and restart JAWS and your Focus Blue is now communicating with JAWS over Bluetooth. If you are using JAWS 13 or later, JAWS automatically detects the correct Bluetooth serial port.
Once JAWS is configured to communicate with the Focus Blue over Bluetooth, you can switch back and forth between USB and Bluetooth and JAWS will automatically detect the connection without the need to change any settings. For example, if you connect the USB cable and restart JAWS, the display will work with JAWS over USB. If you disconnect the USB cable, then power on the Focus Blue and restart JAWS, the display will work with JAWS over Bluetooth.
To check the battery status, press the power button to display the percentage of battery power remaining. The letters “BT” are also displayed in cells 38 and 39 to indicate the Bluetooth connection is active. Press a cursor router button to return to normal operation.
16
Toggling Between the USB and Bluetooth Connection
If you are using the Focus display over a USB connection and you need to access a Bluetooth device you have previously paired with the Focus, you can use the Power 123 feature to quickly toggle the active connection between USB and Bluetooth. For example, if the Focus is connected over USB to your primary computer running JAWS and you receive a text message on your smartphone that you want to read and respond to using the braille display, you can switch to Bluetooth to access the smartphone and then back to USB to resume braille access to your computer.
To switch the active connection to use Bluetooth, press the power button to
display the status information and then press DOTS 1-2-3 from the Perkins-style keyboard on the Focus display. If the Focus has been paired and the device is on, the Focus will immediately begin displaying information from the
Bluetooth device. Press the power button and then press DOTS 1-2-3 again to switch back to the USB connection.
Note: When initially pairing the Focus Blue with another Bluetooth device, ensure the display is powered on and not connected to USB. Once paired, you can connect the USB cable and then use this feature to toggle the active connection.
Note: Android and iOS devices must first be locked before the display is switched from USB to Bluetooth connectivity. Once the display is switched to Bluetooth, unlock your mobile device so that it will find the display and begin using it as usual. Once the connection is established, you can switch back and forth using the Power 123 command without having to first lock and unlock the device.
17
BrailleIn
The BrailleIn™ feature allows you to use the Perkins-style braille keyboard on your Focus display to control your computer using both Windows and application specific commands. In addition, you can also enter both contracted and uncontracted braille input from your braille display’s keyboard. The advantage is that you no longer have to switch between your computer’s keyboard and your display’s keyboard, or enter a special typing mode in order to use contracted braille to run your computer or programs. For a list of keystrokes, refer to the Focus Keyboard Commands Overview section of this manual.
Typing with Contracted Braille
With BrailleIn, as you type in contracted braille using the Perkins-style keyboard, your input is immediately translated back as normal text in the current e-mail, document, or form. If an application or specific edit box does not support contracted braille, JAWS announces “Computer Braille” when tutor messages are enabled.
Contracted braille input is off by default. To turn it on, do the following:
1. Press INSERT+F2, and select Settings Center.
2. In the Search edit box, type "Contracted Braille Translation" without the quotes.
3. Press DOWN ARROW to move to Contracted Braille Translation in the filtered search results in the tree view.
4. Next, press SPACEBAR to cycle through the different settings in the Contracted Braille Translation combo box.
Available settings are Off, Output Only, and Input and Output. When set to Off, you cannot read or type in contracted braille using your braille display. When set to Output Only, you can read contracted braille on your braille display, but you can only type in computer braille using the Perkins-style keyboard on your braille display. When set to Input and Output, you can both read and type in contracted braille using your braille display. The default setting is Off.

18
Note: Contracted Braille Translation can also be turned on or off using the
Translation Options (INSERT+V) in those applications where it is available.
19
Braille Study Mode
Braille Study Mode is a training tool for teaching and learning braille. When Braille Study Mode is on, JAWS will announce the current braille character in a display cell when you press the Cursor Router button immediately above that cell. When you press the particular Cursor Router button in conjunction with the left or right selector button, JAWS will announce and spell the braille word. To enable Braille Study Mode, do the following:
1. Make sure that the Focus display is connected to your computer using either a USB or Bluetooth connection.
2. Do one of the following:
Press CTRL+INSERT+B to open the Adjust Braille Options dialog box (JAWS 12 or earlier), or
Press INSERT+V to open Quick Settings (JAWS 13 or later) or the Adjust JAWS Options dialog box (JAWS 12 or earlier).
3. Begin typing the word “study” until Study Mode appears, and then
press SPACEBAR to toggle Study Mode on. If using Quick Settings in
JAWS 13, first press TAB to move to the list of search results, and
then press SPACEBAR. Braille Study Mode remains on until toggled off or until JAWS is restarted.
In addition, the following commands are available even when Braille Study Mode is disabled:
Press MODE+CURSOR ROUTER to make JAWS announce the braille character in the display cell, or
Press CURSOR ROUTER+SELECTOR to make JAWS announce and spell the braille word.
This is useful when you need a quick reminder, but you do not want to go through the process of turning on Braille Study Mode as previously described.
Note: JAWS returns to normal operation after announcing the braille character or word.
20
Configuring the Focus Display
The Focus braille display provides features that you can customize to suit your needs. You can adjust the location of the status cells and vary the firmness of the braille dots.
These settings are all adjusted using Settings Center (JAWS 12 or later). In Settings Center, choose Braille, then Advanced. For more information on using Settings Center, refer to the JAWS help for Settings Center. If you are using JAWS 11 or earlier, these settings are adjusted through the JAWS Configuration Manager.
Placement of Status Cells
You can specify if the informational Status Cells are to be located on the left or right end of the display, or choose to not display them at all. The status cells are located at the left end of the display by default.
Variable Braille Dot Firmness
Specify the firmness of the braille dots on the Focus display. There are five levels of firmness. Adjust the display to the level of firmness most suited to the sensitivity of your fingers.
21
Locking the Perkins-style Keyboard
When using your Focus Blue in front of your computer’s QWERTY keyboard, you can lock the Perkins-style keys on the top of the display to prevent accidentally pressing them and entering unwanted text or commands.
To lock the Focus Blue keyboard, press the Power button to display the status information and then simultaneously press a Cursor Router and the left Mode button. To indicate that the keyboard is locked, DOTS 2-3-4-6-7-8 and DOTS 1-3-5-6-7-8 will be displayed in two cells toward the right end of the display, just before the connection status. Press any other control to return to normal
operation. Once locked, pressing DOTS 1 through 8 or the SPACEBAR will no longer send keystrokes through to the computer.
To unlock the keyboard so you can once again enter text or perform commands from the Focus Blue, press the Power button to display the status information and then simultaneously press a Cursor Router and the right Mode button. Press any other control to return to normal operation and you can once again enter text using the Focus Blue keyboard.
22
The Display Menu
Pressing DOTS 1-4-7-8 CHORD while the Focus status information is displayed activates a menu where you can change the Focus display’s Bluetooth ID, change the key repeat interval for the NAV Rockers, and adjust the length of time the display will wait after a control is pressed before going to sleep.
When the menu first opens, you are on the Bluetooth ID. To move through the available settings, press DOTS 4-5 CHORD or DOTS 1-2 CHORD. To move through the available options for a setting, use the Rocker Bars. To exit the
menu and save any changes you have made, press DOT 8. Press Z CHORD
(DOTS 1-3-5-6 CHORD) to exit the menu without saving any changes. Both of these commands will also return the display to normal operation.
The available menu options are described in the following sections.
Bluetooth ID
This option displays the Bluetooth ID used by the Focus 40 Blue to identify itself when pairing the display with a computer or mobile phone. The default Bluetooth ID for the Focus 40 is Focus 40 BT. You can also change the ID to Focus 40 BT plus the 8-digit Bluetooth MAC address. Using the Bluetooth MAC address makes your Focus more unique as it is different for each Focus display. This is useful if you will be pairing the Focus with a computer in an environment where there are other Focus Blue displays with Bluetooth enabled and you want to make sure you pair the correct one.
Key Repeat
This option controls how fast the NAV Rockers repeat when held down for a length of time, such as when you want to scroll quickly through the items in a list. The four settings are off, slow, medium, and fast. Off is indicated by a full braille cell at the far left of the display in cell one. Two full braille cells indicate slow, three full braille cells indicate medium, and four full cells indicate fast. By default, two full cells are shown, which means the key repeat is set to slow.

23
Display Sleep Delay
This menu option lets you specify how long the Focus display waits after a control is pressed before it goes to sleep. You can choose to have the display go to sleep after 5, 15, 30, or 45 minutes of inactivity. The number 5 is indicated by dots 2-6, 15 by dot 2 and dots 2-6, 30 by dots 2-5 and dots 3-5-6, and 45 by dots 2-5-6 and dots 2-6.
24
Focus Keyboard Commands Overview
This section describes the keyboard command assignments for JAWS and the Focus braille display. The commands are separated into modifier Keys, function keys, special keys, navigation commands, Microsoft Word navigation quick keys, text selection commands, Braille commands, Windows commands, selection commands, JAWS commands, cursor functions, and utility functions. Focus commands are consistently based on JAWS and Windows commands. If you are familiar with JAWS and Windows keyboard commands, Focus commands are very easy to learn. If you become familiar with Focus commands, JAWS and Windows keyboard commands are also easy to learn.
The keystrokes listed here are for JAWS 12 and later. To view Focus keystrokes for earlier versions of JAWS, visit the Freedom Scientific Braille Displays documentation page at http://www.freedomscientific.com/documentation/displays.asp.
Note: Some of these commands duplicate functions of the panning buttons, rocker bars, and selector buttons, detailed earlier in this manual.
Modifier Keys
Use the modifier keys to simulate key combinations (keystrokes) that include
CTRL, ALT, WINDOWS Key, SHIFT, or the JAWS Key (INSERT). To use these modifiers when typing a keystroke, do the following:
1. Hold down DOT 8 CHORD and then press the corresponding modifier keys in the keystroke. Modifier keystrokes are listed in the following table.
2. After you create the modifier portion of the keystroke, release the keys and press the remaining part of the keystroke. For example, to perform
the keystroke CTRL+SHIFT+V, you press DOTS 3-7-8 CHORD,
release the keys, and then press V (DOTS 1-2-3-6).
25
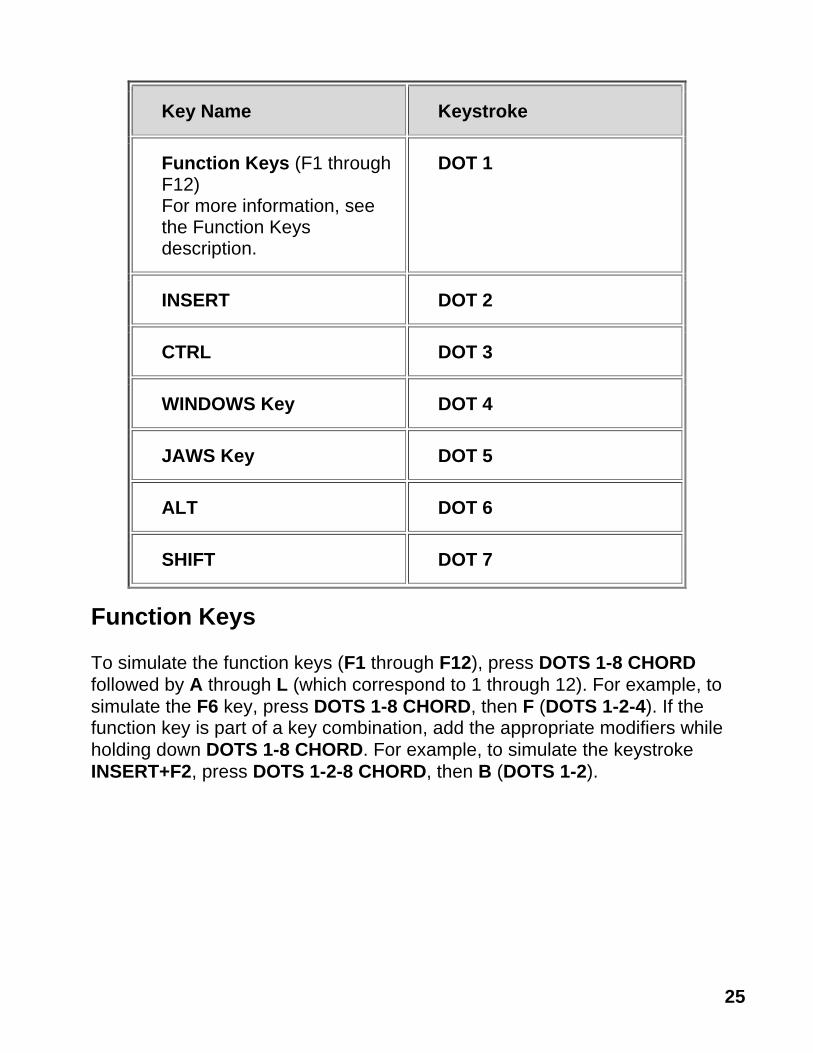
Key Name Keystroke
Function Keys (F1 through F12) For more information, see the Function Keys description.
DOT 1
INSERT DOT 2
CTRL DOT 3
WINDOWS Key DOT 4
JAWS Key DOT 5
ALT DOT 6
SHIFT DOT 7
Function Keys
To simulate the function keys (F1 through F12), press DOTS 1-8 CHORD
followed by A through L (which correspond to 1 through 12). For example, to
simulate the F6 key, press DOTS 1-8 CHORD, then F (DOTS 1-2-4). If the function key is part of a key combination, add the appropriate modifiers while
holding down DOTS 1-8 CHORD. For example, to simulate the keystroke
INSERT+F2, press DOTS 1-2-8 CHORD, then B (DOTS 1-2).
26
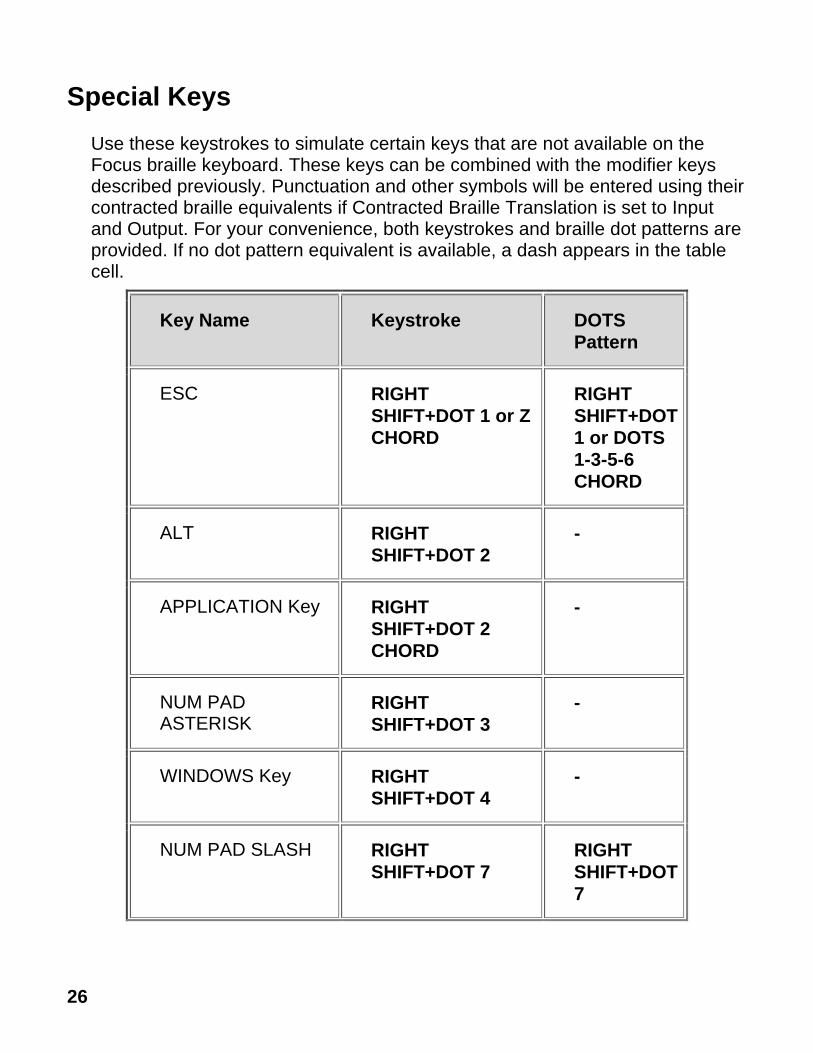
Special Keys
Use these keystrokes to simulate certain keys that are not available on the Focus braille keyboard. These keys can be combined with the modifier keys described previously. Punctuation and other symbols will be entered using their contracted braille equivalents if Contracted Braille Translation is set to Input and Output. For your convenience, both keystrokes and braille dot patterns are provided. If no dot pattern equivalent is available, a dash appears in the table cell.
Key Name Keystroke DOTS
Pattern
ESC RIGHT
SHIFT+DOT 1 or Z
CHORD
RIGHT
SHIFT+DOT
1 or DOTS
1-3-5-6
CHORD
ALT RIGHT
SHIFT+DOT 2
-
APPLICATION Key RIGHT
SHIFT+DOT 2
CHORD
-
NUM PAD ASTERISK
RIGHT
SHIFT+DOT 3
-
WINDOWS Key RIGHT
SHIFT+DOT 4
-
NUM PAD SLASH RIGHT
SHIFT+DOT 7
RIGHT
SHIFT+DOT
7
27
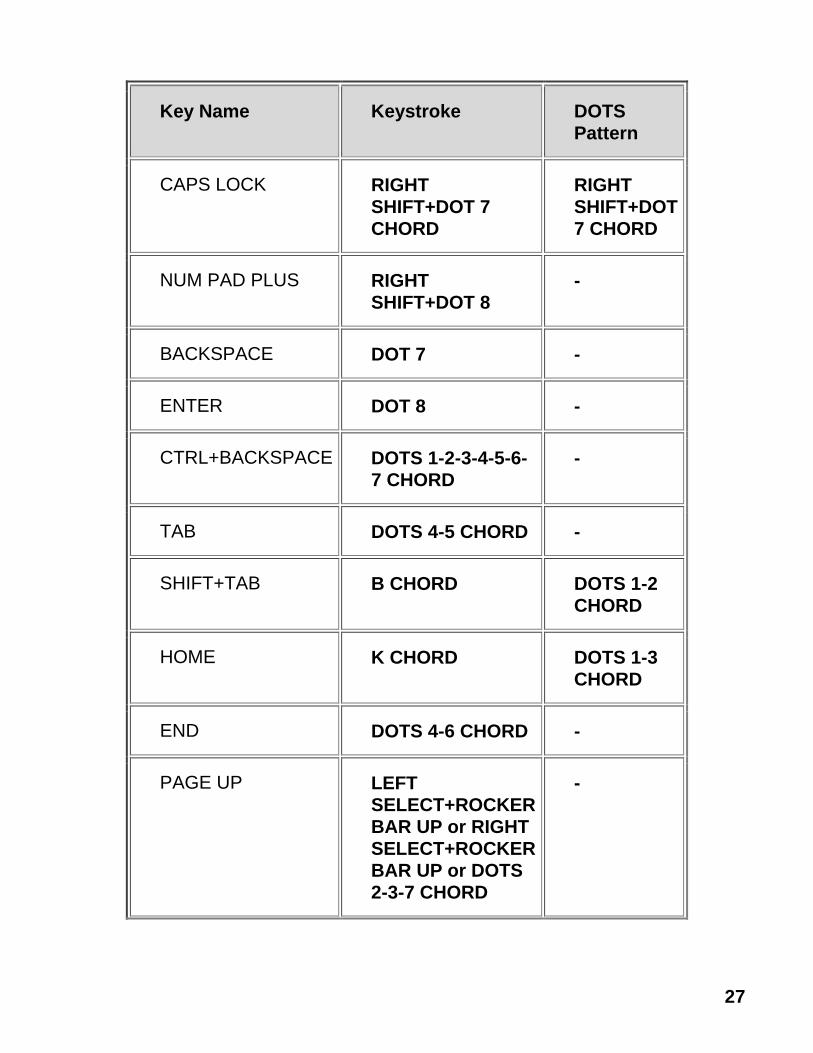
Key Name Keystroke DOTS
Pattern
CAPS LOCK RIGHT
SHIFT+DOT 7
CHORD
RIGHT
SHIFT+DOT
7 CHORD
NUM PAD PLUS RIGHT
SHIFT+DOT 8
-
BACKSPACE DOT 7 -
ENTER DOT 8 -
CTRL+BACKSPACE DOTS 1-2-3-4-5-6-
7 CHORD
-
TAB DOTS 4-5 CHORD -
SHIFT+TAB B CHORD DOTS 1-2
CHORD
HOME K CHORD DOTS 1-3
CHORD
END DOTS 4-6 CHORD -
PAGE UP LEFT
SELECT+ROCKER
BAR UP or RIGHT
SELECT+ROCKER
BAR UP or DOTS
2-3-7 CHORD
-
28
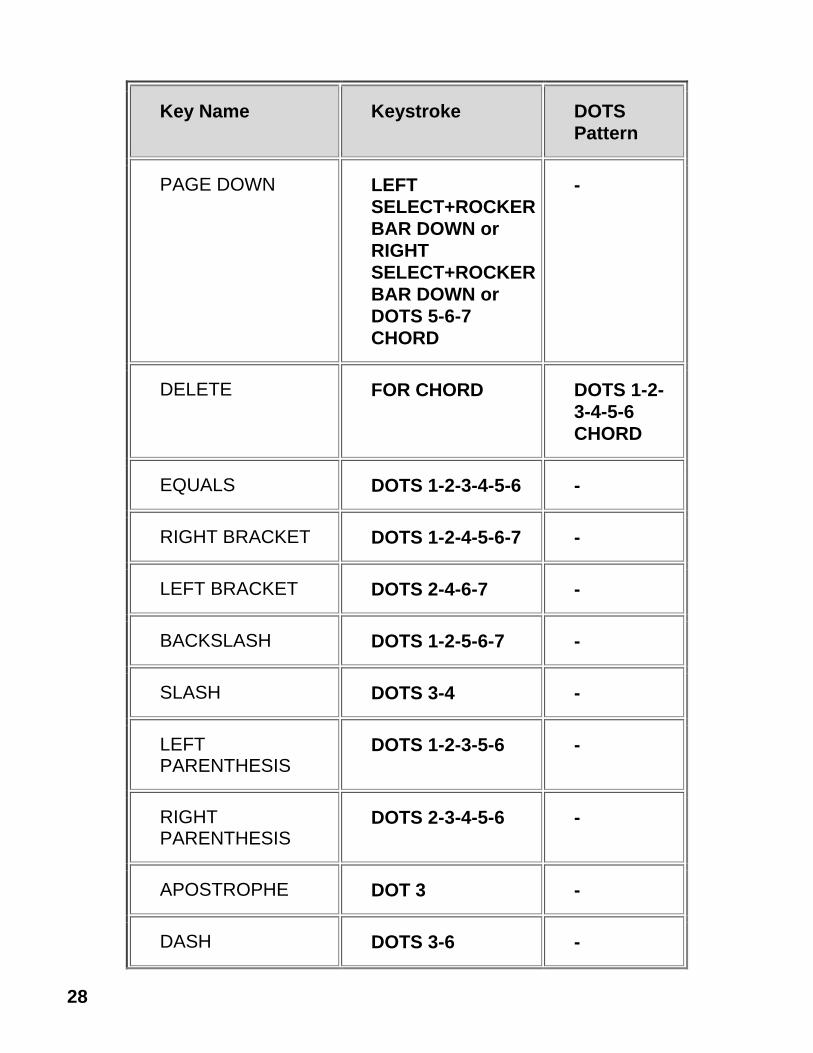
Key Name Keystroke DOTS
Pattern
PAGE DOWN LEFT
SELECT+ROCKER
BAR DOWN or
RIGHT
SELECT+ROCKER
BAR DOWN or
DOTS 5-6-7
CHORD
-
DELETE FOR CHORD DOTS 1-2-
3-4-5-6
CHORD
EQUALS DOTS 1-2-3-4-5-6 -
RIGHT BRACKET DOTS 1-2-4-5-6-7 -
LEFT BRACKET DOTS 2-4-6-7 -
BACKSLASH DOTS 1-2-5-6-7 -
SLASH DOTS 3-4 -
LEFT PARENTHESIS
DOTS 1-2-3-5-6 -
RIGHT PARENTHESIS
DOTS 2-3-4-5-6 -
APOSTROPHE DOT 3 -
DASH DOTS 3-6 -

29
Key Name Keystroke DOTS
Pattern
GRÀVE DOT 4 -
PERIOD DOTS 4-6 -
QUESTION MARK DOTS 1-4-5-6 -
EXCLAMATION MARK
DOTS 2-3-4-6 -
SEMICOLON DOTS 5-6 -
COMMA DOT 6 -
Navigation Commands
Use these keystrokes to perform various JAWS navigation commands. Both keystrokes and braille dot patterns are provided in the table. If no dot pattern equivalent is available, a dash appears in the table cell.
Description Keystroke DOTS Pattern
Say Prior Character
DOT 3 CHORD -
Say Next Character
DOT 6 CHORD -
Say Character DOTS 3-6 CHORD -
Say Prior Word DOT 2 CHORD -
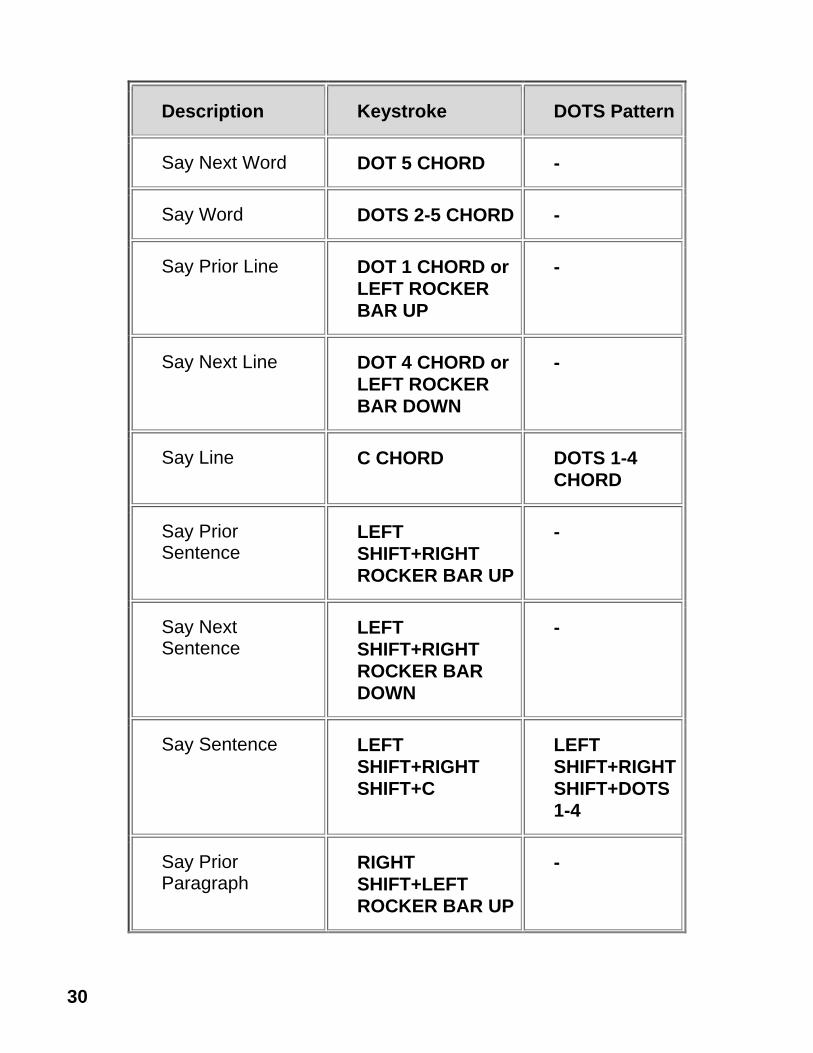
30
Description Keystroke DOTS Pattern
Say Next Word DOT 5 CHORD -
Say Word DOTS 2-5 CHORD -
Say Prior Line DOT 1 CHORD or
LEFT ROCKER
BAR UP
-
Say Next Line DOT 4 CHORD or
LEFT ROCKER
BAR DOWN
-
Say Line C CHORD DOTS 1-4
CHORD
Say Prior Sentence
LEFT
SHIFT+RIGHT
ROCKER BAR UP
-
Say Next Sentence
LEFT
SHIFT+RIGHT
ROCKER BAR
DOWN
-
Say Sentence LEFT
SHIFT+RIGHT
SHIFT+C
LEFT
SHIFT+RIGHT
SHIFT+DOTS
1-4
Say Prior Paragraph
RIGHT
SHIFT+LEFT
ROCKER BAR UP
-
31
Description Keystroke DOTS Pattern
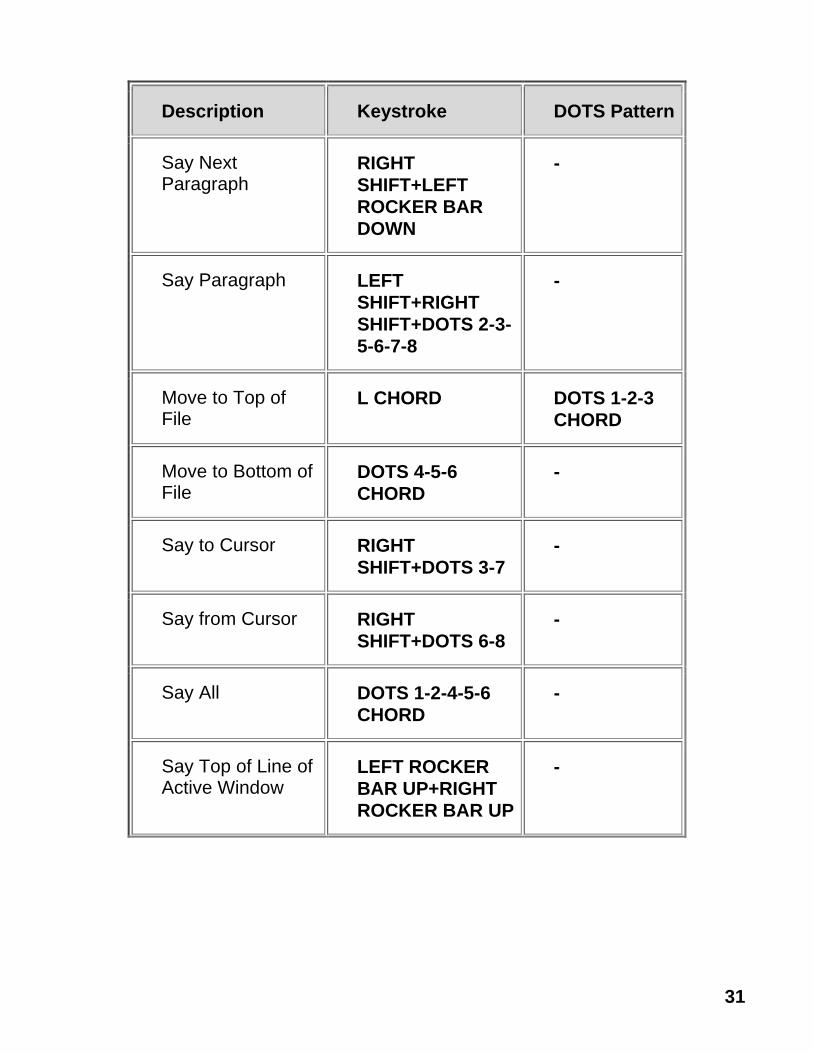
Say Next Paragraph
RIGHT
SHIFT+LEFT
ROCKER BAR
DOWN
-
Say Paragraph LEFT
SHIFT+RIGHT
SHIFT+DOTS 2-3-
5-6-7-8
-
Move to Top of File
L CHORD DOTS 1-2-3
CHORD
Move to Bottom of File
DOTS 4-5-6
CHORD
-
Say to Cursor RIGHT
SHIFT+DOTS 3-7
-
Say from Cursor RIGHT
SHIFT+DOTS 6-8
-
Say All DOTS 1-2-4-5-6
CHORD
-
Say Top of Line of Active Window
LEFT ROCKER
BAR UP+RIGHT
ROCKER BAR UP
-
32
Description Keystroke DOTS Pattern
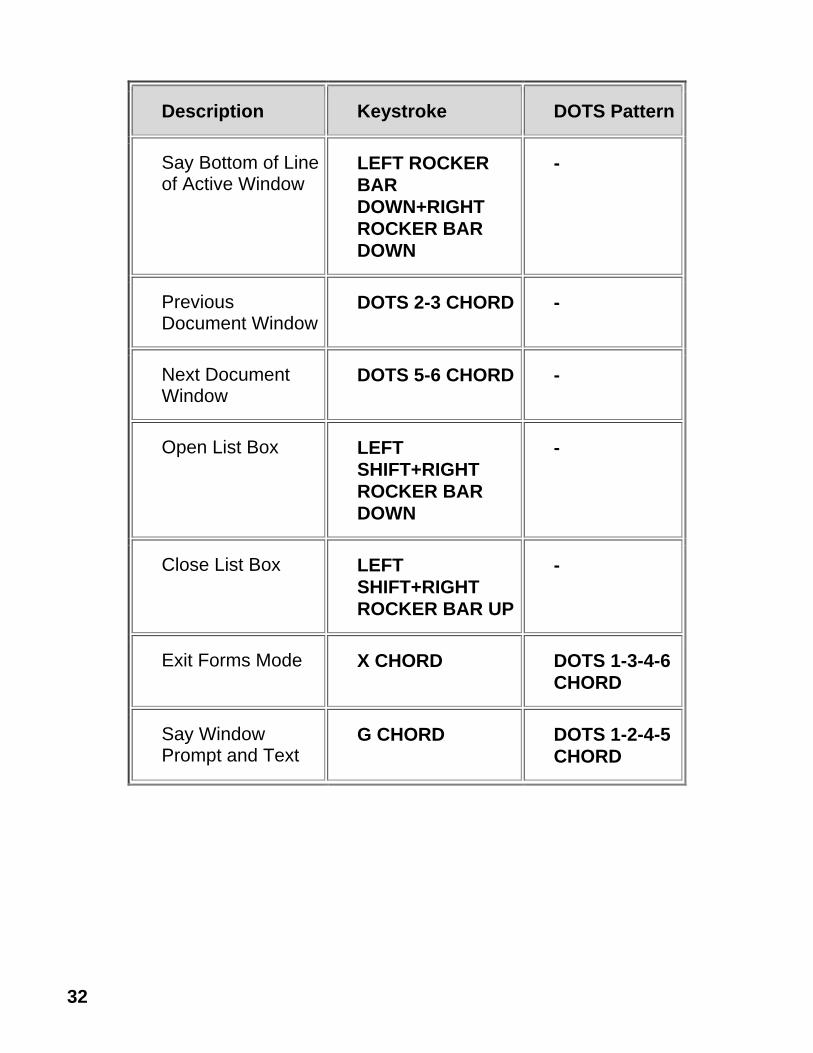
Say Bottom of Line of Active Window
LEFT ROCKER
BAR
DOWN+RIGHT
ROCKER BAR
DOWN
-
Previous Document Window
DOTS 2-3 CHORD -
Next Document Window
DOTS 5-6 CHORD -
Open List Box LEFT
SHIFT+RIGHT
ROCKER BAR
DOWN
-
Close List Box LEFT
SHIFT+RIGHT
ROCKER BAR UP
-
Exit Forms Mode X CHORD DOTS 1-3-4-6
CHORD
Say Window Prompt and Text
G CHORD DOTS 1-2-4-5
CHORD
33
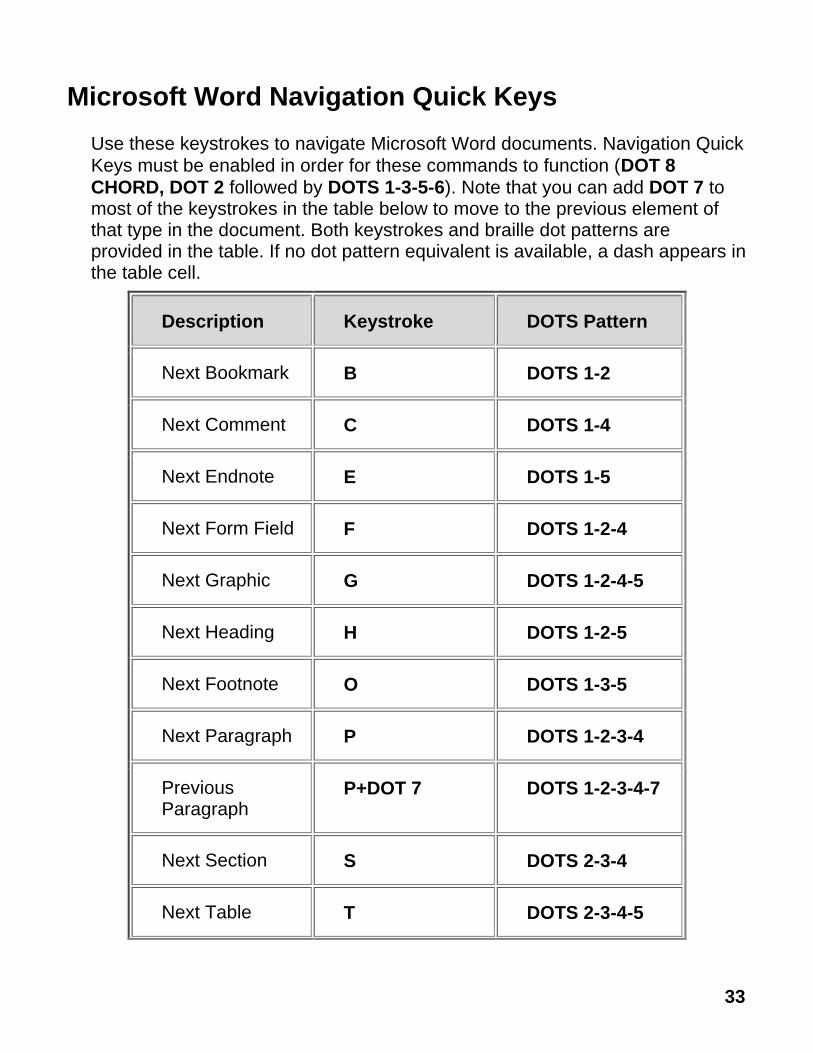
Microsoft Word Navigation Quick Keys
Use these keystrokes to navigate Microsoft Word documents. Navigation Quick
Keys must be enabled in order for these commands to function (DOT 8
CHORD, DOT 2 followed by DOTS 1-3-5-6). Note that you can add DOT 7 to most of the keystrokes in the table below to move to the previous element of that type in the document. Both keystrokes and braille dot patterns are provided in the table. If no dot pattern equivalent is available, a dash appears in the table cell.
Description Keystroke DOTS Pattern
Next Bookmark B DOTS 1-2
Next Comment C DOTS 1-4
Next Endnote E DOTS 1-5
Next Form Field F DOTS 1-2-4
Next Graphic G DOTS 1-2-4-5
Next Heading H DOTS 1-2-5
Next Footnote O DOTS 1-3-5
Next Paragraph P DOTS 1-2-3-4
Previous Paragraph
P+DOT 7 DOTS 1-2-3-4-7
Next Section S DOTS 2-3-4
Next Table T DOTS 2-3-4-5
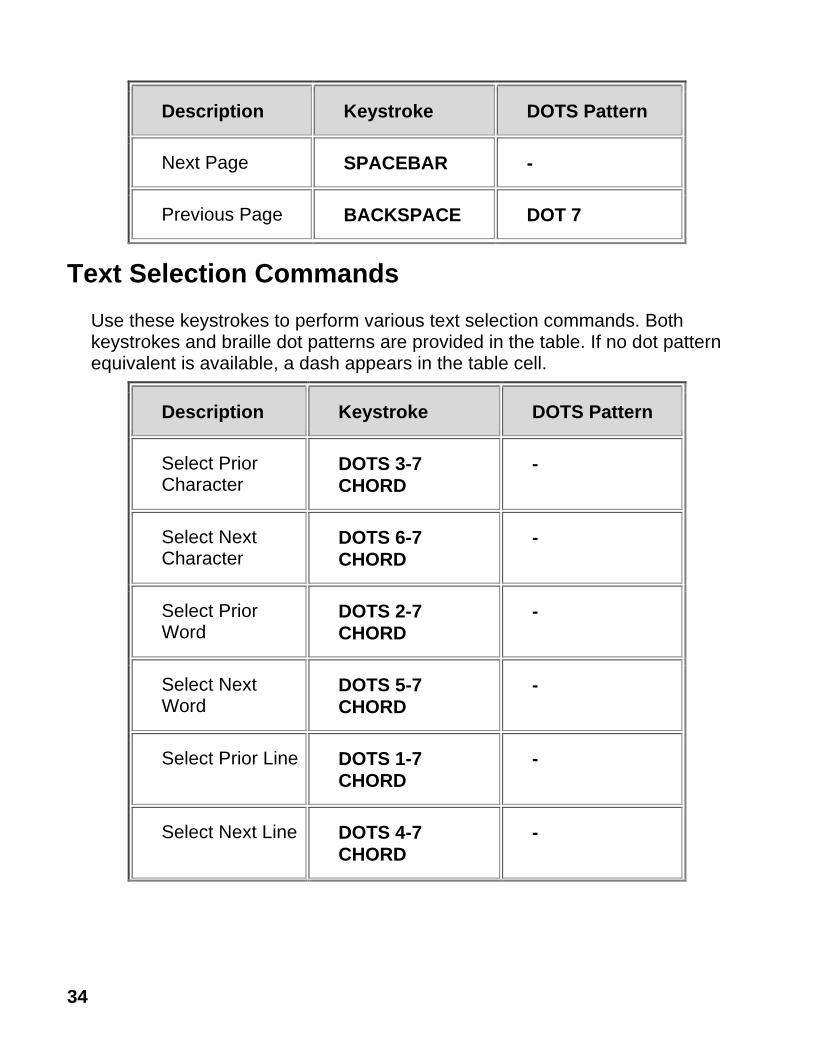
34
Description Keystroke DOTS Pattern
Next Page SPACEBAR -
Previous Page BACKSPACE DOT 7
Text Selection Commands
Use these keystrokes to perform various text selection commands. Both keystrokes and braille dot patterns are provided in the table. If no dot pattern equivalent is available, a dash appears in the table cell.
Description Keystroke DOTS Pattern
Select Prior Character
DOTS 3-7
CHORD
-
Select Next Character
DOTS 6-7
CHORD
-
Select Prior Word
DOTS 2-7
CHORD
-
Select Next Word
DOTS 5-7
CHORD
-
Select Prior Line DOTS 1-7
CHORD
-
Select Next Line DOTS 4-7
CHORD
-
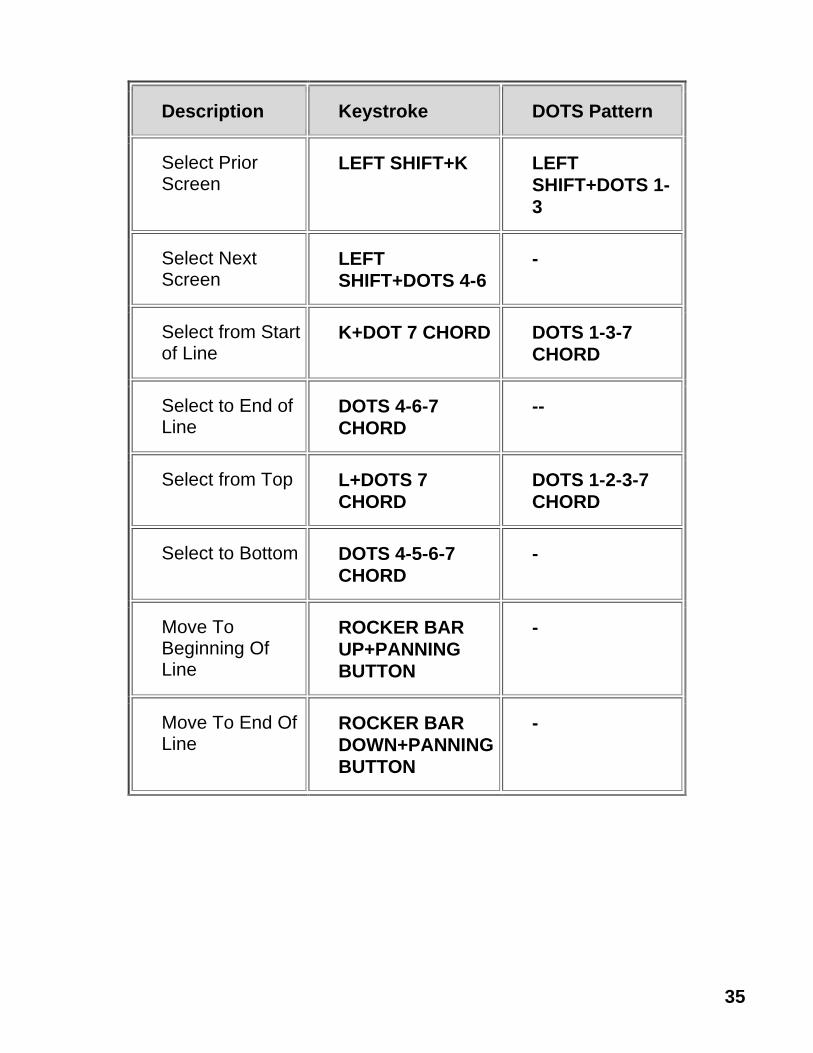
35
Description Keystroke DOTS Pattern
Select Prior Screen
LEFT SHIFT+K LEFT
SHIFT+DOTS 1-
3
Select Next Screen
LEFT
SHIFT+DOTS 4-6
-
Select from Start of Line
K+DOT 7 CHORD DOTS 1-3-7
CHORD
Select to End of Line
DOTS 4-6-7
CHORD
--
Select from Top L+DOTS 7
CHORD
DOTS 1-2-3-7
CHORD
Select to Bottom DOTS 4-5-6-7
CHORD
-
Move To Beginning Of Line
ROCKER BAR
UP+PANNING
BUTTON
-
Move To End Of Line
ROCKER BAR
DOWN+PANNING
BUTTON
-
36
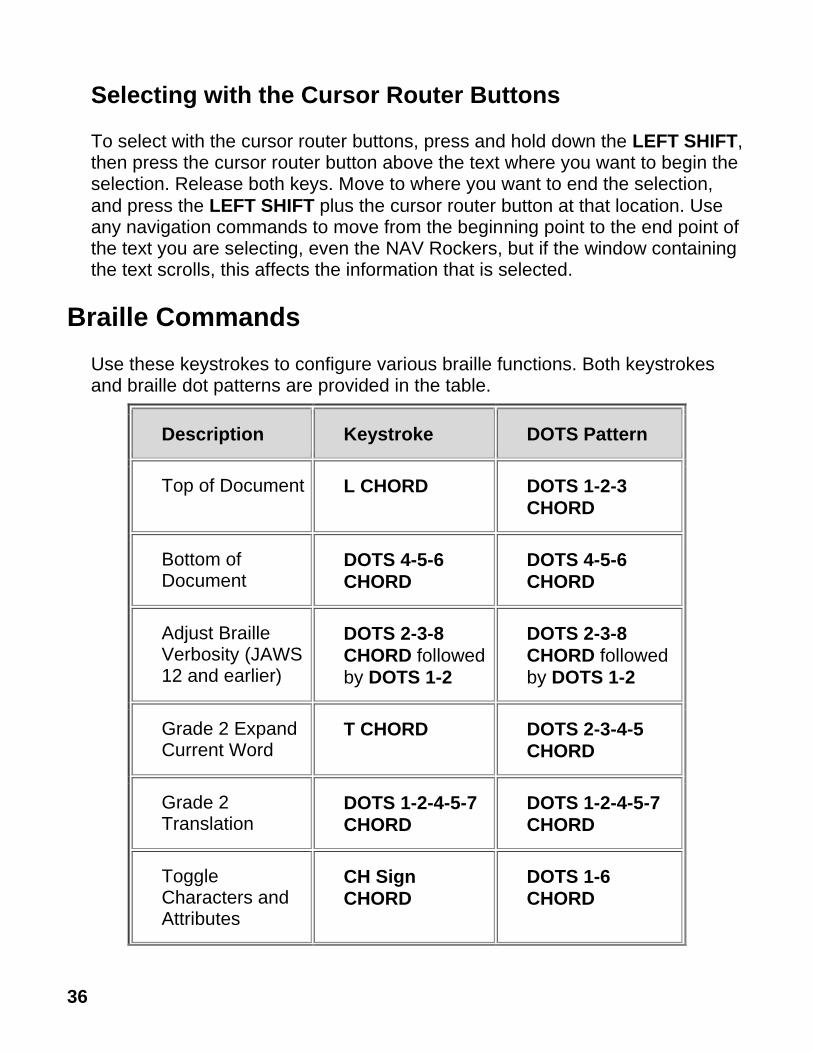
Selecting with the Cursor Router Buttons
To select with the cursor router buttons, press and hold down the LEFT SHIFT, then press the cursor router button above the text where you want to begin the selection. Release both keys. Move to where you want to end the selection,
and press the LEFT SHIFT plus the cursor router button at that location. Use any navigation commands to move from the beginning point to the end point of the text you are selecting, even the NAV Rockers, but if the window containing the text scrolls, this affects the information that is selected.
Braille Commands
Use these keystrokes to configure various braille functions. Both keystrokes and braille dot patterns are provided in the table.
Description Keystroke DOTS Pattern
Top of Document L CHORD DOTS 1-2-3
CHORD
Bottom of Document
DOTS 4-5-6
CHORD
DOTS 4-5-6
CHORD
Adjust Braille Verbosity (JAWS 12 and earlier)
DOTS 2-3-8
CHORD followed
by DOTS 1-2
DOTS 2-3-8
CHORD followed
by DOTS 1-2
Grade 2 Expand Current Word
T CHORD DOTS 2-3-4-5
CHORD
Grade 2 Translation
DOTS 1-2-4-5-7
CHORD
DOTS 1-2-4-5-7
CHORD
Toggle Characters and Attributes
CH Sign
CHORD
DOTS 1-6
CHORD

37
Description Keystroke DOTS Pattern
Cycle Among Braille Display Modes
M CHORD DOTS 1-3-4
CHORD
Toggle 8/6 DOTS Braille
8 CHORD DOTS 2-3-6
CHORD
Change Cursor Shape
SH Sign CHORD DOTS 1-4-6
CHORD
Restrict Braille Cursor
R CHORD DOTS 1-2-3-5
CHORD
Repeat Last Flash Message
F CHORD DOTS 1-2-4
CHORD
Windows Commands
Use these keystrokes for basic editing functions in Windows.
Description Braille Sign DOTS Pattern
ALT+TAB LEFT
SHIFT+DOTS 4-
5
LEFT
SHIFT+DOTS 4-5
Paste from Clipboard
LEFT SHIFT+V LEFT
SHIFT+DOTS 1-
2-3-6
Copy to Clipboard
LEFT SHIFT+C LEFT
SHIFT+DOTS 1-4
38
Description Braille Sign DOTS Pattern
Cut to Clipboard LEFT SHIFT+X LEFT
SHIFT+DOTS 1-
3-4-6
Undo LEFT SHIFT+Z LEFT
SHIFT+DOTS 1-
3-5-6
Delete LEFT SHIFT+D LEFT
SHIFT+DOTS 1-
4-5
Selection Commands
Use these keystrokes to select characters, lines, and other page elements.
Description Braille Sign DOTS Pattern
Select Next Character
LEFT
SHIFT+DOT 6
LEFT
SHIFT+DOT 6
Select Prior Character
LEFT
SHIFT+DOT 3
LEFT
SHIFT+DOT 3
Select Next Line LEFT
SHIFT+DOT 4
LEFT
SHIFT+DOT 4
Select Prior Line LEFT
SHIFT+DOT 1
LEFT
SHIFT+DOT 1
Select to End of Line
LEFT
SHIFT+DOT 5
LEFT
SHIFT+DOT 5
39
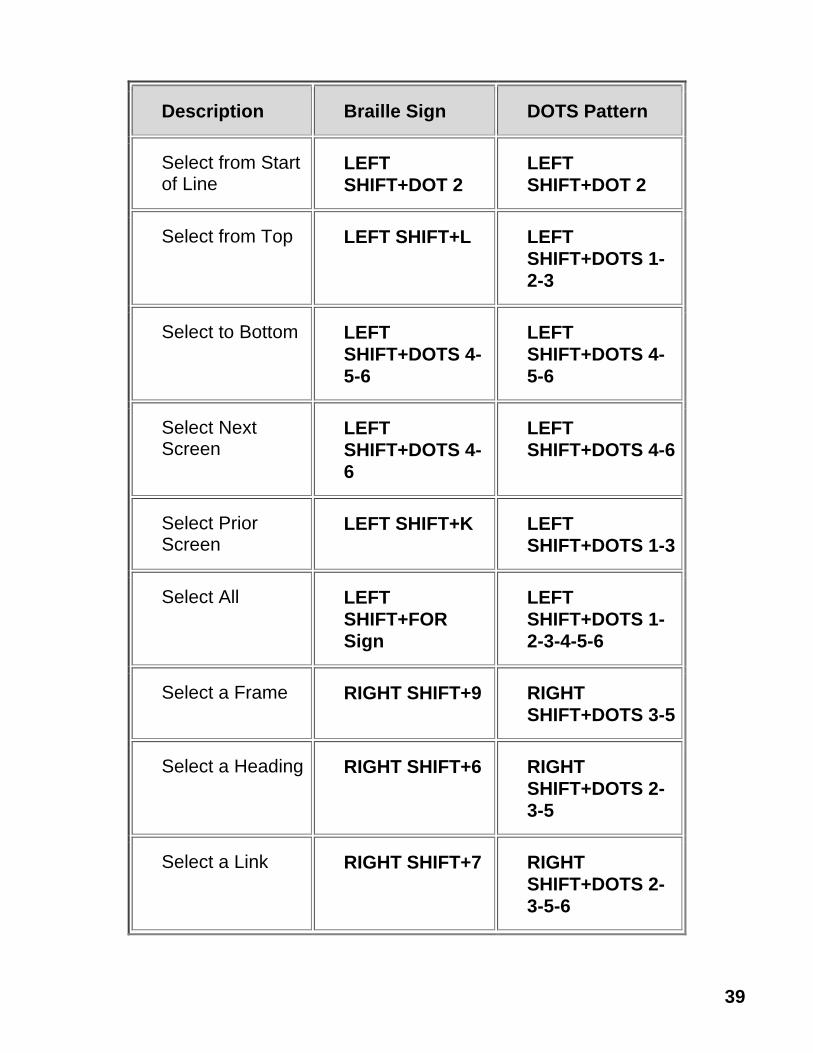
Description Braille Sign DOTS Pattern
Select from Start of Line
LEFT
SHIFT+DOT 2
LEFT
SHIFT+DOT 2
Select from Top LEFT SHIFT+L LEFT
SHIFT+DOTS 1-
2-3
Select to Bottom LEFT
SHIFT+DOTS 4-
5-6
LEFT
SHIFT+DOTS 4-
5-6
Select Next Screen
LEFT
SHIFT+DOTS 4-
6
LEFT
SHIFT+DOTS 4-6
Select Prior Screen
LEFT SHIFT+K LEFT
SHIFT+DOTS 1-3
Select All LEFT
SHIFT+FOR
Sign
LEFT
SHIFT+DOTS 1-
2-3-4-5-6
Select a Frame RIGHT SHIFT+9 RIGHT
SHIFT+DOTS 3-5
Select a Heading RIGHT SHIFT+6 RIGHT
SHIFT+DOTS 2-
3-5
Select a Link RIGHT SHIFT+7 RIGHT
SHIFT+DOTS 2-
3-5-6
40
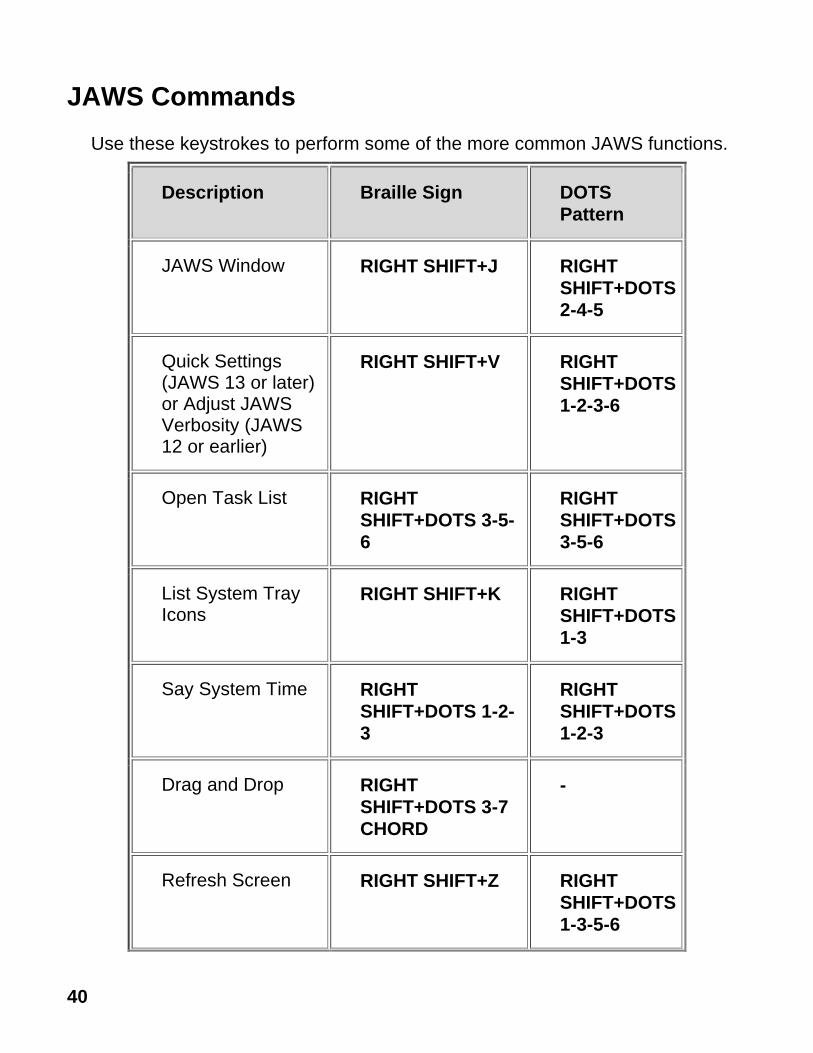
JAWS Commands
Use these keystrokes to perform some of the more common JAWS functions.
Description Braille Sign DOTS
Pattern
JAWS Window RIGHT SHIFT+J RIGHT
SHIFT+DOTS
2-4-5
Quick Settings (JAWS 13 or later) or Adjust JAWS Verbosity (JAWS 12 or earlier)
RIGHT SHIFT+V RIGHT
SHIFT+DOTS
1-2-3-6
Open Task List RIGHT
SHIFT+DOTS 3-5-
6
RIGHT
SHIFT+DOTS
3-5-6
List System Tray Icons
RIGHT SHIFT+K RIGHT
SHIFT+DOTS
1-3
Say System Time RIGHT
SHIFT+DOTS 1-2-
3
RIGHT
SHIFT+DOTS
1-2-3
Drag and Drop RIGHT
SHIFT+DOTS 3-7
CHORD
-
Refresh Screen RIGHT SHIFT+Z RIGHT
SHIFT+DOTS
1-3-5-6
41
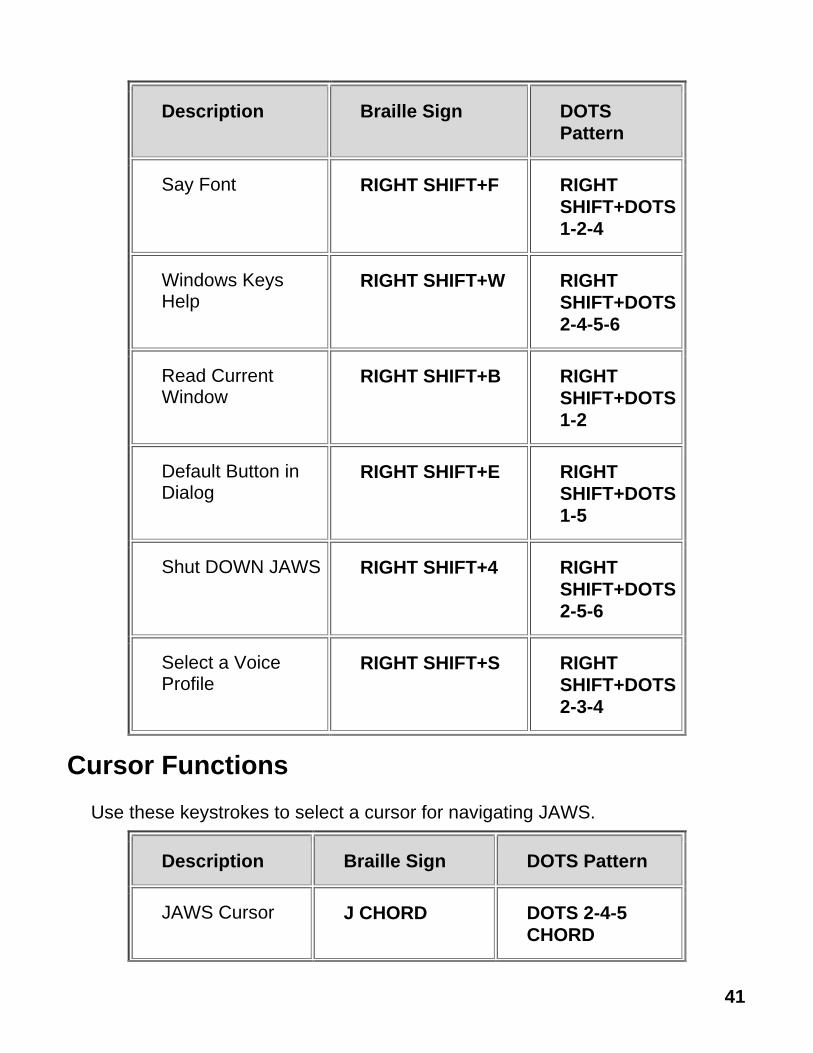
Description Braille Sign DOTS
Pattern
Say Font RIGHT SHIFT+F RIGHT
SHIFT+DOTS
1-2-4
Windows Keys Help
RIGHT SHIFT+W RIGHT
SHIFT+DOTS
2-4-5-6
Read Current Window
RIGHT SHIFT+B RIGHT
SHIFT+DOTS
1-2
Default Button in Dialog
RIGHT SHIFT+E RIGHT
SHIFT+DOTS
1-5
Shut DOWN JAWS RIGHT SHIFT+4 RIGHT
SHIFT+DOTS
2-5-6
Select a Voice Profile
RIGHT SHIFT+S RIGHT
SHIFT+DOTS
2-3-4
Cursor Functions
Use these keystrokes to select a cursor for navigating JAWS.
Description Braille Sign DOTS Pattern
JAWS Cursor J CHORD DOTS 2-4-5
CHORD
42
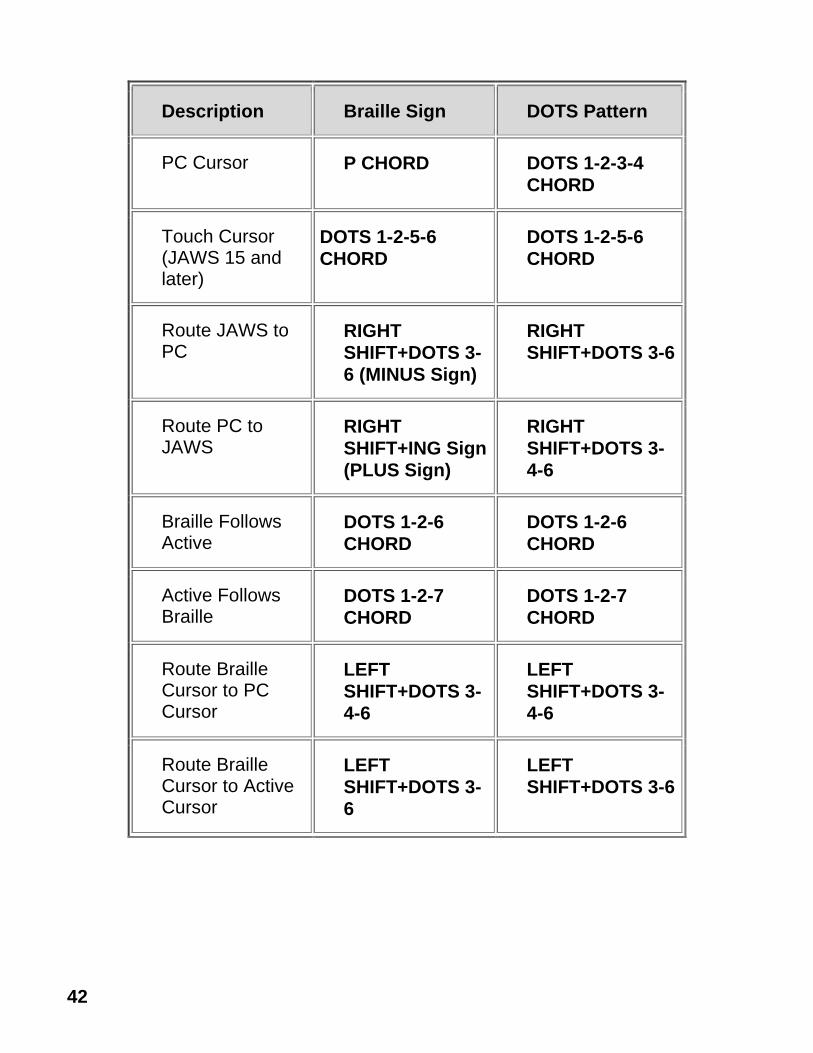
Description Braille Sign DOTS Pattern
PC Cursor P CHORD DOTS 1-2-3-4
CHORD
Touch Cursor (JAWS 15 and later)
DOTS 1-2-5-6
CHORD
DOTS 1-2-5-6
CHORD
Route JAWS to PC
RIGHT
SHIFT+DOTS 3-
6 (MINUS Sign)
RIGHT
SHIFT+DOTS 3-6
Route PC to JAWS
RIGHT
SHIFT+ING Sign
(PLUS Sign)
RIGHT
SHIFT+DOTS 3-
4-6
Braille Follows Active
DOTS 1-2-6
CHORD
DOTS 1-2-6
CHORD
Active Follows Braille
DOTS 1-2-7
CHORD
DOTS 1-2-7
CHORD
Route Braille Cursor to PC Cursor
LEFT
SHIFT+DOTS 3-
4-6
LEFT
SHIFT+DOTS 3-
4-6
Route Braille Cursor to Active Cursor
LEFT
SHIFT+DOTS 3-
6
LEFT
SHIFT+DOTS 3-6
43
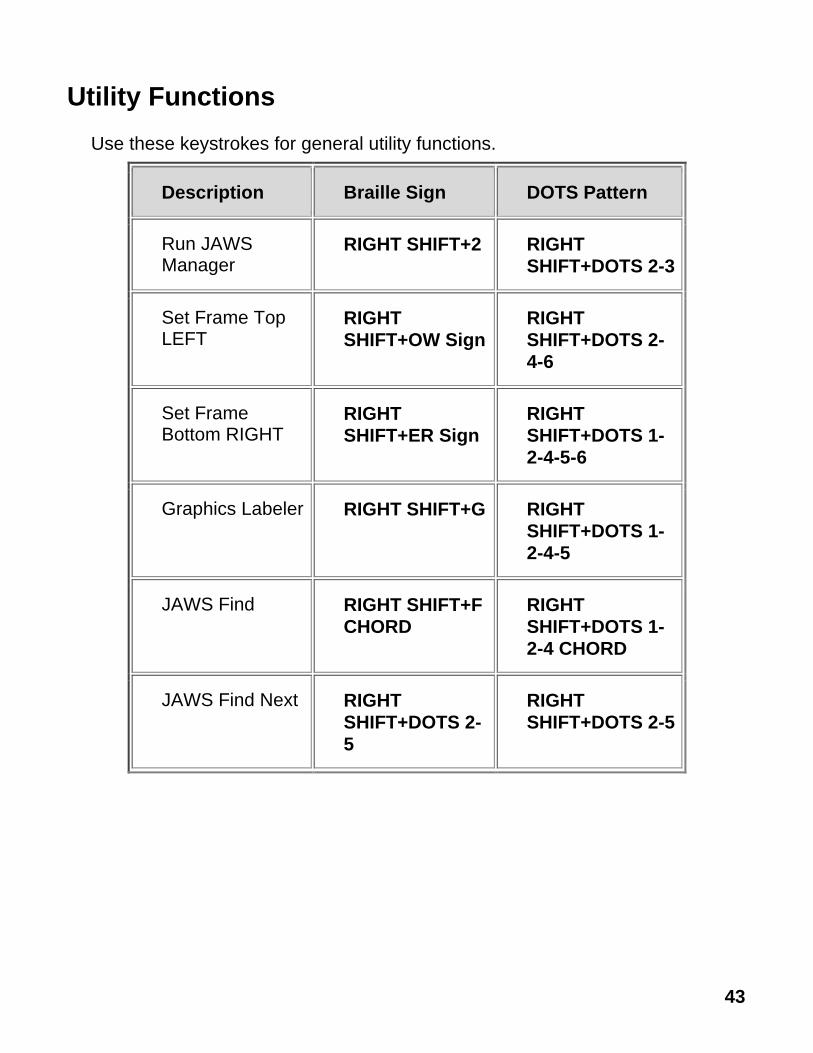
Utility Functions
Use these keystrokes for general utility functions.
Description Braille Sign DOTS Pattern
Run JAWS Manager
RIGHT SHIFT+2 RIGHT
SHIFT+DOTS 2-3
Set Frame Top LEFT
RIGHT
SHIFT+OW Sign
RIGHT
SHIFT+DOTS 2-
4-6
Set Frame Bottom RIGHT
RIGHT
SHIFT+ER Sign
RIGHT
SHIFT+DOTS 1-
2-4-5-6
Graphics Labeler RIGHT SHIFT+G RIGHT
SHIFT+DOTS 1-
2-4-5
JAWS Find RIGHT SHIFT+F
CHORD
RIGHT
SHIFT+DOTS 1-
2-4 CHORD
JAWS Find Next RIGHT
SHIFT+DOTS 2-
5
RIGHT
SHIFT+DOTS 2-5
44
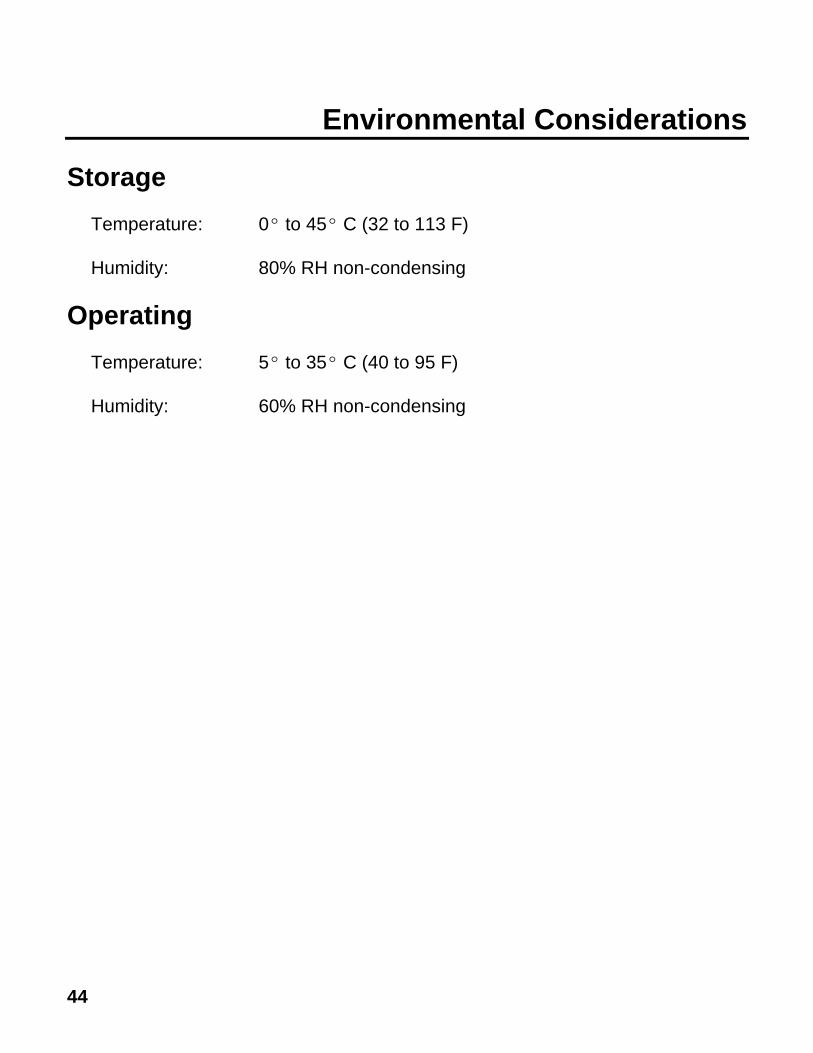
Environmental Considerations
Storage
Temperature: 0º to 45º C (32 to 113 F)
Humidity: 80% RH non-condensing
Operating
Temperature: 5º to 35º C (40 to 95 F)
Humidity: 60% RH non-condensing
45
Diagnostics Mode
The Focus braille display has built-in diagnostic tests for the cursor router buttons, braille display, NAV Rockers, mode buttons, braille keys, panning buttons, rocker bars, and selector buttons.
Before entering Diagnostics Mode, disconnect the Focus from your computer and make sure it is powered off.
Entering and Exiting Diagnostics Mode
Simultaneously, press the first two cursor router buttons farthest to the left (above cells one and two) while pressing the power button. The text, "press cr key/nav/panel keys," is displayed to indicate that Diagnostics Mode has been entered.
Press the power button again by itself to exit Diagnostics Mode.
Routing Button Test
The routing button test ensures that each of the cursor router buttons on the braille display work properly. Press any cursor router button to activate all dots in the cell below the button.
Display Test/Clean
It is necessary to disconnect the Focus Blue from your computer and make sure it is powered off before beginning this test. The display test is used to ensure that each pin on the braille display can be activated. The display test also allows you to clean the braille display. Press the power button while pressing the rightmost cursor router buttons (above the last two cells) simultaneously. This action causes all cells to be activated for cleaning. Use a soft cloth moistened with isopropyl alcohol. Do not use any other substance to clean the cells.
While the Focus is in this mode, pressing down on either the right or left NAV Rocker deactivates all of the cells. Pressing up on either the left or right NAV Rocker reactivates all cells.

46
Pressing the left or right mode button causes the cells to toggle up and down. To stop this action, press the mode button again.
Key and Controls Test
The key and controls test ensures that each of the keys and controls operate properly. You can begin the key test after entering Diagnostics Mode by pressing any of the keys or controls listed in the table below. The braille display reflects each key that is pressed. Refer to the following table for the exact dot position for each of the keys. Press each of the keys and controls and verify that the appropriate response is displayed.
Keys Displays
DOT 1 1
DOT 2 2
DOT 3 3
DOT 4 4
DOT 5 5
DOT 6 6
DOT 7 7
DOT 8 8
LEFT SHIFT kls
RIGHT SHIFT krs
SPACEBAR ksp
LEFT PANNING BUTTON pl
RIGHT PANNING BUTTON Pr
LEFT SELECTOR BUTTON sl
RIGHT SELECTOR BUTTON sr
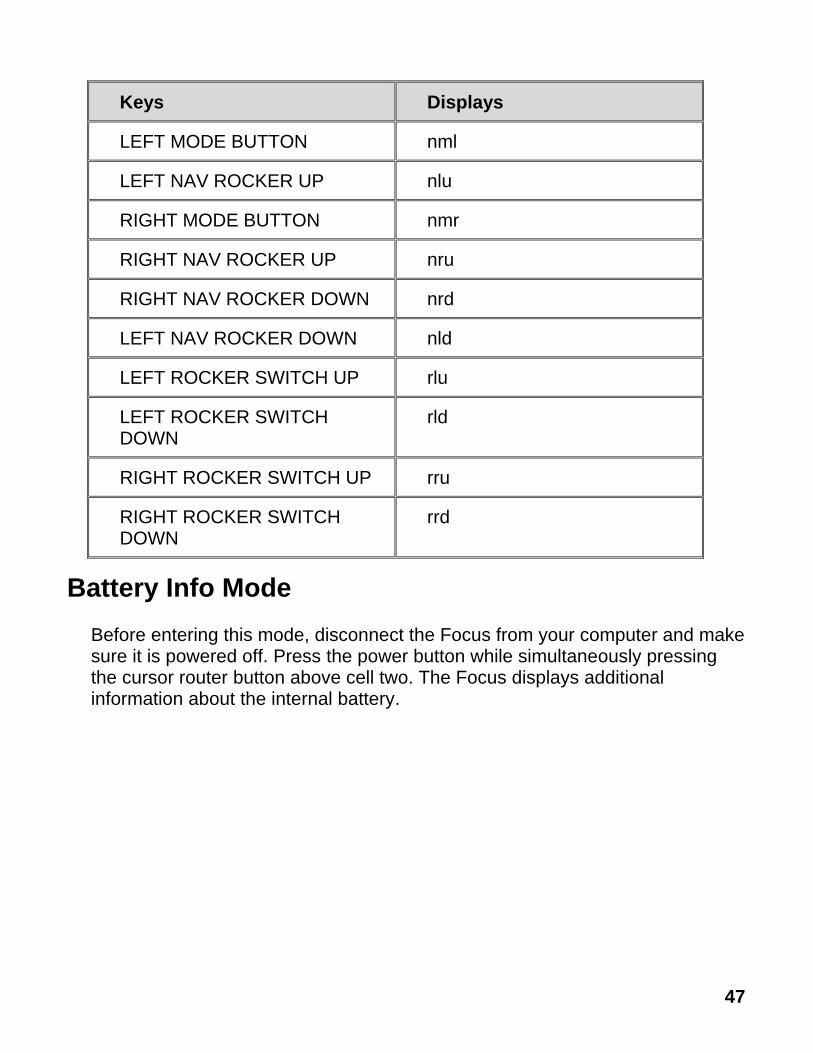
47
Keys Displays
LEFT MODE BUTTON nml
LEFT NAV ROCKER UP nlu
RIGHT MODE BUTTON nmr
RIGHT NAV ROCKER UP nru
RIGHT NAV ROCKER DOWN nrd
LEFT NAV ROCKER DOWN nld
LEFT ROCKER SWITCH UP rlu
LEFT ROCKER SWITCH DOWN
rld
RIGHT ROCKER SWITCH UP rru
RIGHT ROCKER SWITCH DOWN
rrd
Battery Info Mode
Before entering this mode, disconnect the Focus from your computer and make sure it is powered off. Press the power button while simultaneously pressing the cursor router button above cell two. The Focus displays additional information about the internal battery.
48
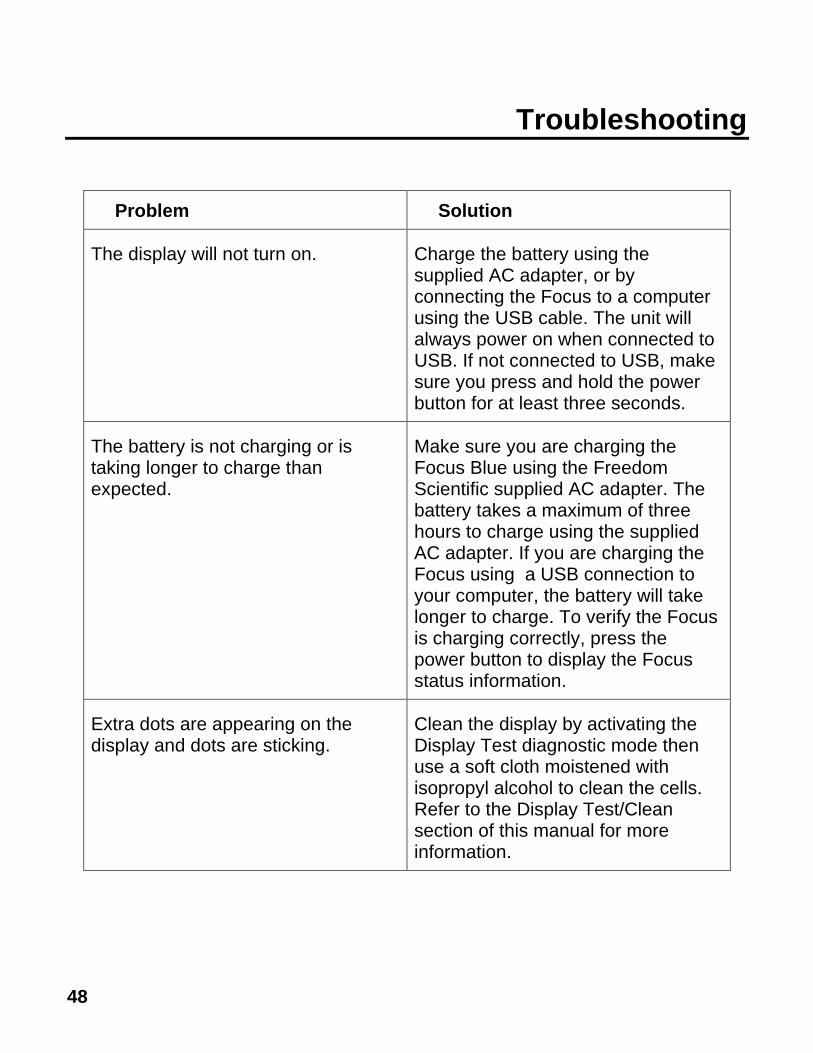
Troubleshooting
Problem Solution
The display will not turn on. Charge the battery using the supplied AC adapter, or by connecting the Focus to a computer using the USB cable. The unit will always power on when connected to USB. If not connected to USB, make sure you press and hold the power button for at least three seconds.
The battery is not charging or is taking longer to charge than expected.
Make sure you are charging the Focus Blue using the Freedom Scientific supplied AC adapter. The battery takes a maximum of three hours to charge using the supplied AC adapter. If you are charging the Focus using a USB connection to your computer, the battery will take longer to charge. To verify the Focus is charging correctly, press the power button to display the Focus status information.
Extra dots are appearing on the display and dots are sticking.
Clean the display by activating the Display Test diagnostic mode then use a soft cloth moistened with isopropyl alcohol to clean the cells. Refer to the Display Test/Clean section of this manual for more information.
49
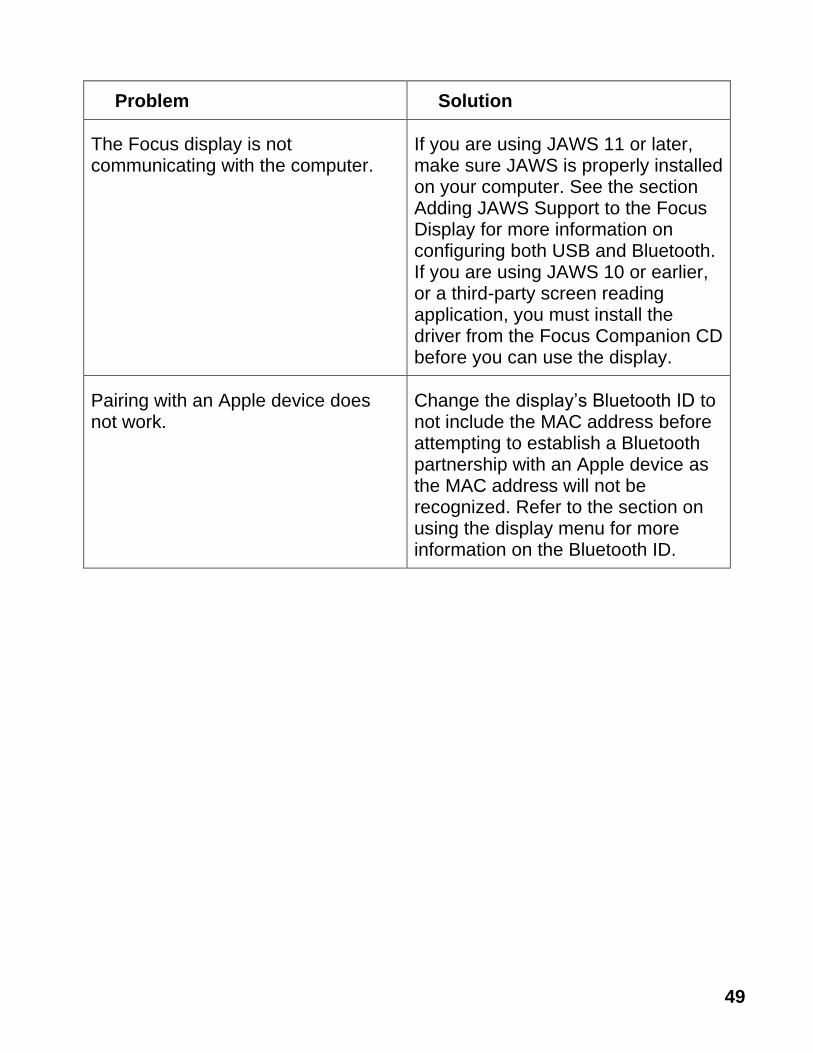
Problem Solution
The Focus display is not communicating with the computer.
If you are using JAWS 11 or later, make sure JAWS is properly installed on your computer. See the section Adding JAWS Support to the Focus Display for more information on configuring both USB and Bluetooth. If you are using JAWS 10 or earlier, or a third-party screen reading application, you must install the driver from the Focus Companion CD before you can use the display.
Pairing with an Apple device does not work.
Change the display’s Bluetooth ID to not include the MAC address before attempting to establish a Bluetooth partnership with an Apple device as the MAC address will not be recognized. Refer to the section on using the display menu for more information on the Bluetooth ID.