first robotics castle crashers tutorial · 1 first robotics castle crashers tutorial python &...
TRANSCRIPT
1
FIRST Robotics
Castle Crashers Tutorial
Python & PixelPAD
Introduction to App Dev with PixelPAD

1
Table of Contents
Getting Started ............................................................................................................................................. 4
What is PixelPAD? ........................................................................................................................... 4
Scripts ............................................................................................................................................................... 6
Scripts.................................................................................................................................................. 6
The Game Script ............................................................................................................................. 7
Default Object Properties ......................................................................................................................... 8
Sprite, sprite_height and sprite_width ................................................................................. 8
X, Y and Z Coordinates ................................................................................................................ 8
DOT Notation and Self ............................................................................................................................... 9
Dot Notation ...................................................................................................................................... 9
The “Self” Property......................................................................................................................... 9
Collisions ........................................................................................................................................................ 10
What are collisions? .................................................................................................................... 10
The collision_check function .................................................................................................... 10
Bounding Boxes .............................................................................................................................................11
Bounding Boxes ...............................................................................................................................11
Destroying Objects .....................................................................................................................................12
Destroying Objects .......................................................................................................................12
The Start and Loop.................................................................................................................................... 13
The Start and the Loop Tabs ................................................................................................... 13
The Game Loop ............................................................................................................................. 13
Loops ............................................................................................................................................................... 14
How Do We Use the Game Loop? ......................................................................................... 14
Conditionals .................................................................................................................................................. 15
Conditionals .................................................................................................................................... 15
Indentation in Python ............................................................................................................................... 16
Indentation ...................................................................................................................................... 16
Key Press .........................................................................................................................................................17
Comparisons ................................................................................................................................................ 18
Comparisons ................................................................................................................................... 18
Adding Boundaries Example .................................................................................................... 19
Comments ......................................................................................................................................................21

2
Explaining Code with Comments ...........................................................................................21
How to Write a Comment ..........................................................................................................21
Types of Bad Comments .......................................................................................................... 22
Misleading Comments .................................................................................................. 22
Obvious Comments ....................................................................................................... 23
Vague Comments .......................................................................................................... 23
Frames Per Second .................................................................................................................................. 25
Frames .............................................................................................................................................. 25
Timers ............................................................................................................................................... 26
Timers............................................................................................................................................................. 27
Random & Import ...................................................................................................................................... 28
Random Numbers ........................................................................................................................ 28
Random Positions......................................................................................................................... 28
Random Function ......................................................................................................................... 29
Probability ....................................................................................................................................... 29
Modules ............................................................................................................................................ 30
Rooms & Persistence ................................................................................................................................. 31
Rooms ................................................................................................................................................ 31
Persistent Objects ........................................................................................................................ 31
Errors .............................................................................................................................................................. 32
Types of Errors ............................................................................................................................. 32
Compile-time Errors ..................................................................................................... 32
Runtime Errors ................................................................................................................. 32
Debugging .................................................................................................................................................... 33
Debugging ...................................................................................................................................... 33
The Debug Loop ........................................................................................................................... 33
Logging In ..................................................................................................................................................... 34
Logging onto PixelPAD ............................................................................................................... 34
Game Guide Preface ................................................................................................................................ 35
Preface - Read me ....................................................................................................................... 35
Example Project ......................................................................................................................................... 36
Creating Objects ....................................................................................................................................... 37
Start of App Guide ...................................................................................................................... 37
Game Script................................................................................................................................................. 38
Create Your Scene .................................................................................................................................... 39
Creating the Scene .................................................................................................................................. 40

3
Teachers Edition Answers ........................................................................................................ 40
obj_FIRST_ball Start ................................................................................................................................. 41
FIRST Ball Movement................................................................................................................................ 42
FIRST Ball Explosion .................................................................................................................................. 43
FIRST Ball on Ground ............................................................................................................................... 44
Game Guide ................................................................................................................................................. 45
Animations .................................................................................................................................................... 49
obj_explosion .............................................................................................................................................. 50
Coding Player 2 ........................................................................................................................................... 51
Challenge Puzzles...................................................................................................................................... 54

4
Getting Started
What is PixelPAD?
PixelPAD is an online platform we will be using to create our own apps or games!
The PixelPAD IDE is composed of 4 areas:
ASSETS: Your assets are where you can add and access your object scripts and
sprites. Scripts are step-by-step instructions that are unique to the object. For
example, the instructions for how your player moves will be different from the way
your asteroid moves! Sprites is another word for image, and these images give your
objects an appearance!
CODE: In this section, you will write instructions for your game. To write your code,
click within the black box and on the line you want to type on. To make a new line,
click the end of the previous line and then press “Enter” on your keyboard.

5
Getting Started
STAGE: The stage is where your game will show up after you write your code and
click Play (or Stop and then Play). Don’t forget to click save after you make changes
to your code!
CONSOLE: Your console is where you will see messages when there are errors in
your code, and also where you can have messages from your game show up such as
the score, or instructions on how to play your game.
6
Scripts
Scripts
Two of the asset types we just covered, rooms and objects, are script assets. Script
assets (or scripts) are assets that have code inside them. Sprites are not considered
scripts, because they do not contain any code.
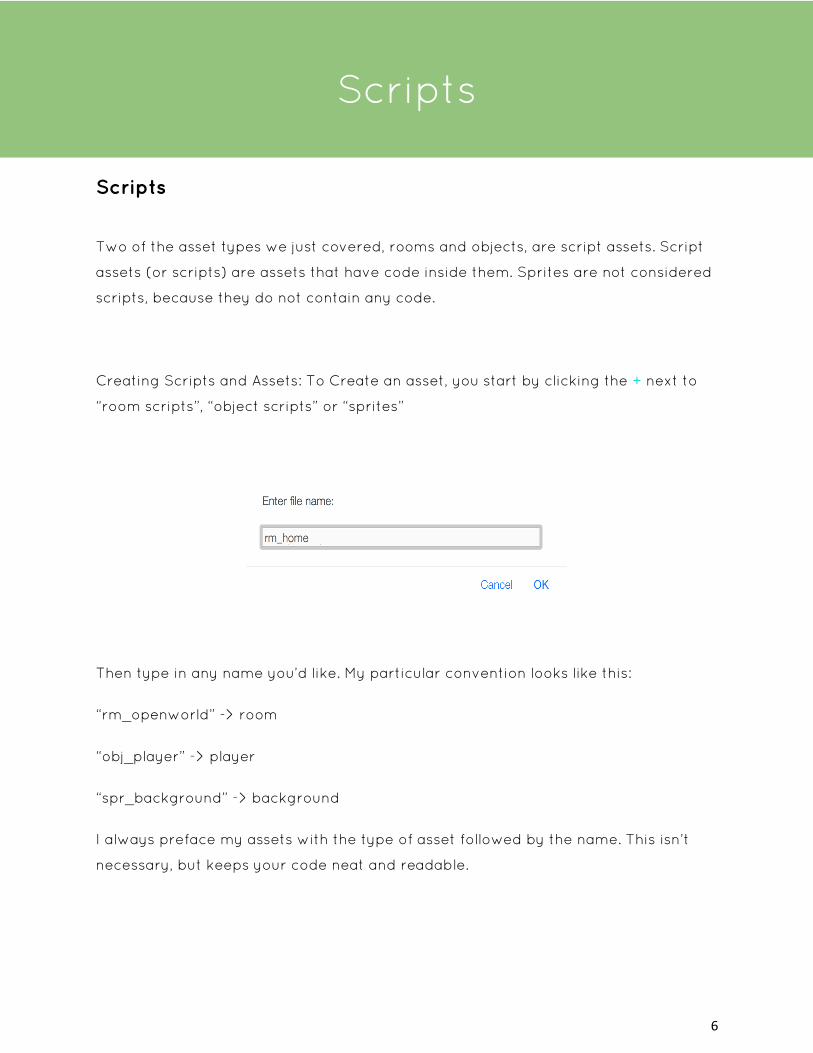
Creating Scripts and Assets: To Create an asset, you start by clicking the + next to
“room scripts”, “object scripts” or “sprites”
Then type in any name you’d like. My particular convention looks like this:
“rm_openworld” -> room
“obj_player” -> player
“spr_background” -> background
I always preface my assets with the type of asset followed by the name. This isn’t
necessary, but keeps your code neat and readable.

7
Scripts
The Game Script
There is one script asset that always exists in every project: the game script. The
purpose of the game script is to load all of the other assets in our project. The game
script represents our entire game, so it doesn't count as a room or as an object.

8
Default Object Properties
Sprite, sprite_height and sprite_width
Every object or object script inherits default properties when created in PixelPAD.
The First of these few properties you should learn about are:
.sprite, .sprite_height and .sprite_width.
.sprite is image of the object. The value of .sprite is an image object which we will get to later.
.sprite_height takes a float between 0 and 1 and stretches the sprite of the object lengthwise
.sprite_width takes a float between 0 and 1 and stretches the sprite of the object widthwise
X, Y and Z Coordinates
The position of an object is where the object is. In programming, we usually describe
an object's position using a pair of numbers: its X coordinate and its Y coordinate.
An object's X coordinate tells us where the object is horizontally (left and right), and
its Y coordinate tells us where the object is vertically (up and down).
[0,0] is the middle of the screen
.x takes the value of the x position of the object. The higher .x is, the farther to the right it is.
.y takes the value of the y position of the object. The higher .y is, the higher up the object is.
.z takes the value of the z position of the object. The higher .z is, the close to you the
object is.

9
DOT Notation and Self
Dot Notation
Dot notation is like an apostrophe s (‘s). Like “Timmy’s ball” or “Jimmy’s shoes”.
The ‘s tells you who you’re talking about. In code instead of using apostrophes we
use dots to talk about ownership.
So when we say player1.x we’re really saying “player1’s x”
Examples of Dot Notation:
obj_player.x -> referse to obj_player’s x value
obj_player.sprite_width -> referes to obj_player’s image width (percentage)
The “Self” Property
Self refers to whichever object you are currently in. So if you’re typing code inside the obj_FIRST_ball script, saying “self” refers to obj_FIRST_ball itself. Examples of Self #Code inside “obj_FIRST_ball” self.x = 50 self.y = 30 self.sprite_width = 0.5 self.sprite_height = 0.5 The code would make obj_FIRST_ball move to the right by 50px, up by 30px and reduce its image size in half.

10
Collisions
What are collisions?
Think of collision as checking whenever two objects touch. In Mario, whenever he
collides with a coin, it runs the code to add to score.
In PixelPAD, it’s when the “bounding boxes” of sprites touch. This includes the
transparent areas of the sprite as well!
We will use collisions in our game to determine when our ship is hit by obstacles,
when we've collected a power-up or health refill, and when we've managed to shoot
down an asteroid.
The collision_check function
When we want to check for a collision between two objects, we use an if statement
combined with a special function called collision_check.
Here is an example of a collision_check function:
● We start with an ordinary if statement.
● For our condition, we specify collision_check.
● We then write a pair of parentheses (()).
● Next, we write self. This specifies that we want to check for collisions against
the current object.
● Finally, we write "obj_asteroid". This specifies the kind of object we want to
check for collisions with. In this case, we are checking for collisions with
obj_asteroid objects.
11
Bounding Boxes
Bounding Boxes
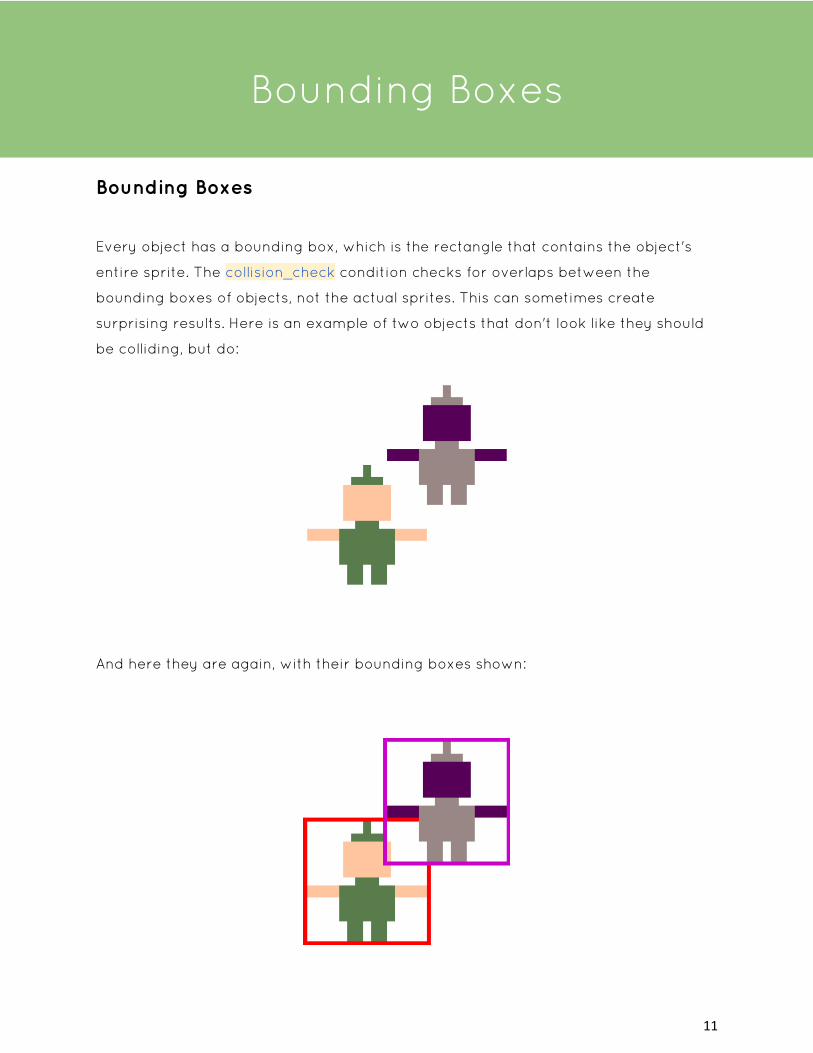
Every object has a bounding box, which is the rectangle that contains the object's
entire sprite. The collision_check condition checks for overlaps between the
bounding boxes of objects, not the actual sprites. This can sometimes create
surprising results. Here is an example of two objects that don't look like they should
be colliding, but do:
And here they are again, with their bounding boxes shown:

12
Destroying Objects
Destroying Objects
When two objects collide, we generally would like to destroy at least one of them.
Destroying an object removes it from the game. When an object is destroyed, it no
longer exists, and trying to use it could make your game behave strangely or crash.
Destroying an object is very simple. Here is an example of destroying the player
object:

13
The Start and Loop
The Start and the Loop Tabs
Say you decide to go for a run. You put on your runners and then you run. Running
the loop because it is repeats (one foot in front of the other), and putting runners on
is the start because it only happens in the beginning.
Similarly, in PixelPAD the “start” describes an instruction that only happens once,
such as the starting position of the robot. Whereas the “loop” could describe its
animation.
The Game Loop
Loops exist in our day-to-day life. For example, you wake up, get ready, go to school,
come back home, go to sleep and repeat these things every day! So looping is the
act of repeating. In programming, loops describe instructions that repeat instead of
having to code each instruction again and again!.
Loops can happen every day, or they can repeat a specific number of times. For
example, a programmer can code a robot to jump 100 times, or code the robot to
keeping jumping forever!
Video games are built around a game loop. Specifically for PixelPAD, our game loop
runs the code 60 times every second!

14
Loops
The loop starts when we click the Play button, and stops when we click the Stop
button. It goes around and around for as long as the game is playing, updating each
of our objects a little bit at a time.
How Do We Use the Game Loop?
When we write code for our objects, we can choose to place it in one of two
sections: the Start Section or the Loop Section. Code placed in the Start Section is
executed as soon as we create the object using object_new. Code placed in the
Loop Section, however, is added to the game loop, which means it will be executed
over and over until the game stops.

15
Conditionals
Conditionals
So far, whenever we've written any code, all we've done is give the computer a list
of commands to do one after the other. Using conditions, we can tell the computer
to make a decision between doing one thing or another.
If Statements
The way we write conditions in our code is by using if statements. Here is an
example of a simple if statement:
● Start with the word if.
● Next, we write our condition. The condition of an if statement is a true or false
question that we ask the computer to answer for us. In the above example, our
condition is key_is_pressed("left"), which is asking, "Is the left arrow key being
pressed?"
● After the condition, we write a full colon (:), and then make a new line.
● Next, we indent our code, which means we start typing it a little bit further to the
right than we normally would.
● Finally, we write the body of the if statement. If the condition of the if statement
turns out to be true, then the computer will run whatever code we put inside the
body. In the above example, the body is x = 300.

16
Indentation in Python
Indentation
Indentation is when code is shifted to the right by adding at least two spaces to the
left of the code. Indentation is important for two reasons:
● Code that is indented is considered to be part of the body of the if statement
by the computer. As soon as we stop indenting the code, we are no longer
inside of the if statement.
● Indentation helps us visually see the structure of our program based on the
shape of the our code. This helps us navigate our code and find bugs more
easily.
For example:
We can see clearly that the statements only run if the condition is met. E.g. the
player presses the SPACE button.
It is very important that all of the code in the same body be indented using the same
number of spaces on every line.

17
Key Press
Keyboard Input
One kind of condition we can use is a keyboard check. Keyboard checks can be used
to determine whether a keyboard key is being pressed or not. We can use keyboard
checks to make things happen when the player presses or releases a keyboard key.
Keyboard checks are done using the key_is_pressed function. Here is an example of
using the key_is_pressed function:
if key_is_pressed("w"):
print("You are pressing the W key!")
The code inside the quotation marks is the name of a keyboard key. Most keys are
named the same as the letter or word on their keyboard key. A few keys have
specific names:
● The space bar's name is space.
● The arrow keys are named left, right, up, and down.
● If you have a return key, it is named enter.

18
Comparisons
Comparisons
If we have code like: x > 300, this is a specific kind of condition called a comparison.
Comparisons are true/false questions we can ask the computer about pairs of
numbers. There are six main kinds of comparisons, each with its own operator
(special symbol). This table shows an example of each kind of comparison:
Example Question Example Code
Is x smaller than y? x < y
Is x bigger than y? x > y
Is x smaller than or equal to y? x <= y
Is x bigger than or equal to y? x >= y
Is x equal to y? x == y
Is x not equal to y? x != y
There are other kinds of conditions, but comparisons are the kind that we will be
using most often.

19
Comparisons
Adding Boundaries Example
We can add boundaries to our game using if statements and comparisons.

20
Comparisons
The Left Boundary
In our player script's Loop Section, add this new code at the bottom:
if x < -300:
x = -300
The Right Boundary
Next, add this code:
if x > 300:
x = 300
The Top Boundary
Next, add this code:
if y > 220:
y = 220
The Bottom Boundary
Finally, add this code:
if y < -220:
y = -220
21
Comments
Explaining Code with Comments
Computer code is complicated. That's why, a long time ago, some very smart
programmers invented code comments.
Comments are like little notes that you can leave for yourself in your programs. The
computer completely ignores comments in your code. You can write whatever you
want inside of a comment.
How to Write a Comment
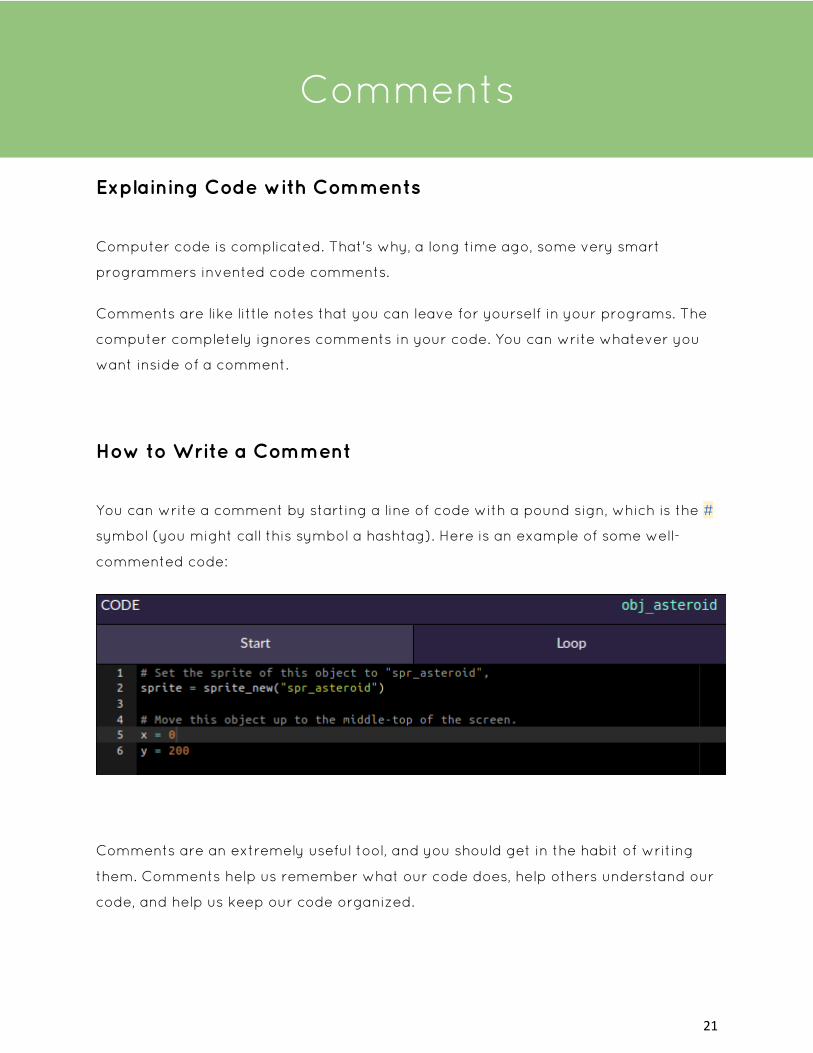
You can write a comment by starting a line of code with a pound sign, which is the #
symbol (you might call this symbol a hashtag). Here is an example of some well-
commented code:
Comments are an extremely useful tool, and you should get in the habit of writing
them. Comments help us remember what our code does, help others understand our
code, and help us keep our code organized.

22
Comments
Types of Bad Comments
Misleading Comments
It's important to remember that comments are notes. The computer doesn't read
our comments when it's deciding what to do next. Because of this, comments can
sometimes be inaccurate. We should always read the code, even if it is commented,
to make sure it does what we think it is doing.
Here is an example of a misleading comment:
The comment says that this code makes the player move upwards, but when we
read the code, it actually makes them move downwards. If we just read the
comment without checking it against the code, we would have no idea why our
game wasn't working properly.

23
Comments
Obvious Comments
Another type of bad comment is an obvious comment. Obvious comments don't add
any meaningful information to your code; they usually just re-state what the code is
saying in plain English. Here is an example of an obvious comment:
Obvious comments clutter up our code and can slowly turn into misleading
comments if we're not careful. If a comment doesn't add anything meaningful to our
code, it's best to just delete it.
Vague Comments
Vague comments are comments that don't actually explain anything. Vague
comments are usually written without very much thought, or because the author of
the comment was told to comment their code. Here is an example of a vague
comment:

24
Comments
The comment at the top of this code just says "weapons." It doesn't say what the
code does, or how it works. Some of this code doesn't even have anything obvious to
do with weapons. Similar to obvious comments, vague comments clutter up our
code and can slowly become misleading as we work on our project. It is better to
just delete any vague comments you find in your code.

25
Frames Per Second
Frames
When you watch a movie, it looks like you're seeing one single, moving picture on
the screen. This is a trick: a movie is a long series of slightly different pictures, and
those pictures are being shown to you so fast that you can't tell they're individual
images. Each of those single pictures is called a frame. Here is an example of a
movie with 9 frames:
Notice how each of the three objects is in a slightly different place every frame: the
green rectangle moves up, the blue star moves down, and the red circle moves to
the right. We can barely notice a difference between two consecutive frames, but
the objects have moved quite a bit when you compare the first and last frames!

26
Frames Per Second
Games use frames, too. Every time the code in an object's Loop Section runs, the
game is drawing a new frame based on where our objects are and what sprites we
have attached to those objects.
Every frame in our game lasts exactly the same amount of time: 1/60th of a second.
That means that there are 60 frames in a second.
Timers
A timer is a number that counts time. For example, if we were watching a clock, and
counted up by one every time the clock's second hand moved, we would be timing
seconds.

27
Timers
Since each frame in our games lasts the same amount of time, we can build a timer
that counts frames by counting up by one whenever our game's Loop Section is run.
Why are timers useful? Timers let us schedule things. For example, if we wanted an
asteroid to appear at the top of the screen every second, we could use a timer that
counted to 60 (since each frame lasts 1/60th of a second).

28
Random & Import
Random Numbers
Most video games use some kind of randomness to change what happens in the
game each time we play, to stop the game from getting boring. We can add
randomness to our games using random numbers.
Random Positions
For example, whenever we create an asteroid, we've been using code like this:
asteroid = object_new("obj_asteroid") asteroid.x = 0 asteroid.y = 200
This code makes asteroids appear at the top of our screen, right in the middle. When
we play the game, every asteroid will appear in exactly the same place. We can
change this by asking for random numbers when we set the asteroid's position:
asteroid = object_new("obj_asteroid") asteroid.x = random.randint(-200, 200) asteroid.y = 200

29
Random & Import
Random Function
random.randint is a special command which asks for a random number. The
numbers between the parentheses are the smallest and largest values you want to
get. For example, if we were writing a dice-rolling game, we could use
random.randint(1, 6) to perform a dice roll.
Probability
Random numbers can be used to affect the probability that something will happen in
your program.
For example, in the code below we’re only creating an asteroid only half the time we
used to by adding the random.randint(1,2) == 1 conditional.

30
Random & Import
if asteroid_frames >= asteroid_timer: asteroid_frames = 0 if asteroid_count < asteroid_max: if random.randint(1, 2) == 1: new_asteroid = object_new("obj_asteroid")
This code randomly chooses between the numbers 1 and 2. If it chooses 1, it creates
an asteroid. If it chooses 2, it does not create an asteroid. Because the random
number will be 1 half of the time, and 2 the other half of the time, this code will end
up creating an asteroid half of the time as well.
Modules
When we want to use random numbers, we have to write another special command
at the very beginning of our program. This is the command:
import random
This is called importing a module. Since we don't always need to use random
numbers, the random.randint command is normally turned off. Importing the random
module turns the random.randint command on, so we can use it.

31
Rooms & Persistence
Rooms
Rooms are the big sections of our game. At the very beginning of this course, we set
up a room for our game to happen in. Now that we've finished building most of our
game, it's time to add a few new rooms.
Recall that when we want to change rooms, we use the room_set command. This
command does two things:
1. It automatically destroys every object that was part of the previous room
2. It runs the Start Section of the new room, which should create all the objects
that are part of the new room
Because each room controls all of the objects that are part of that room, each room
can be used to create an independent section of our game.
Persistent Objects
When an object is created inside the game script, it is automatically made into a
persistent object. Persistent objects do not belong to any room, and are never
automatically destroyed by the room_set command. Persistent objects can be useful,
but we have to be extremely careful to clean them up with the destroy command
when we don't need them any more.
Since persistent objects are part of the game script, they can be accessed in a
special way: a persistent object called foo can be accessed from anywhere by
writing game.foo.

32
Errors
Types of Errors
Compile-time Errors
Sometimes, we make mistakes when we write code. We mean to type x, but
accidentally type y. We accidentally write If instead of if. These are called
programmer errors.
A compile-time error is an error that results from the programmer writing code
incorrectly. Another way of thinking about it is any error that produces an error
message.
Compile-time errors are generally easy to find and fix, because they tend to produce
detailed error messages with line numbers and file names.
Runtime Errors
On the other hand, sometimes we've written our code in the correct way, but it
doesn't do what we expect it to do. For example, we could expect an object to move
in one direction, but it ends up moving in the opposite direction. These are called
runtime errors, and are much harder to debug.
Runtime errors occur when code is written without mistakes, but does not behave
correctly.
The easiest way to find and fix runtime errors is to use the debug loop. Many
problems are caused by incorrect assumptions, so make sure to always reread your
code thoroughly to make sure it is doing what you think it is doing.

33
Debugging
Debugging
Debugging is when we find and fix problems in our programs. Debugging is very
important, because it's very easy to make mistakes when we write code. Even the
very best programmers need to debug their code every day.
The Debug Loop
When we're fixing our programs, we can always just change code at random until
our program behaves the way we want it to. If we're persistent, we can fix problems
this way, but it's not a very fast (or easy!) way to work.
A better way to debug is to use the debug loop. The debug loop is a simple process
that we repeat until our program works properly. This is what it looks like:
1. First, we Run our code. Running our code will let us observe it, which will show
us whether there are any errors or other problems. If everything is working
properly, we can stop debugging.
2. Next, we Read our code. Using what we learned from running our code, we
look for specific commands that might be causing problems. Sometimes, an
error message will tell us exactly where to look by giving us a line number and
file name (for example, error in obj_player on line 4 means that the 4th line of
code in the obj_player object is wrong). When we don't have an error
message, we have to look for the problem ourselves.
3. Lastly, we Change our code a tiny little bit. Once we think we've found the
source of a bug, we can change our code to either make it give us more
information (this is called tracing), or we can try to fix the problem. It is
important to change only a small amount of code in this step, because
whenever we change our code, we risk adding new bugs to our program.

34
Logging In
Logging onto PixelPAD
We will access PixelPAD using an internet browser such as Google Chrome, Firefox,
or Safari. This way you can play and create your game from any computer! Go onto
https://www.pixelpad.io
1. Click Login/Sign Up
2. Your username and password will be provided for you! If you don’t have a
username, please speak to one of your facilitators!
3. Click on the Game Tutorial you’d like to work on and choose Asset Pack 1. This
will download the necessary assets directly to your game to get you started.

35
Game Guide Preface
Preface - Read me
This tutorial tries its best to present all code in order. That is, code given to the user later in this tutorial should be placed after code already written into their program. For example if we say:
a) In obj_player1's start tab write:
self.sprite_width = 0.5
self.sprite_height = 0.5
Then later on say:
b) In obj_player1 start tab write:
if self.name != "":
print("hello " + self.name)
You can confidently place b)'s code after a)
Be cautious however, as from time to time we may ask the user to insert code within existing conditionals. In cases like this, read and understand the code carefully and place it in the most logical place.
There may also be times we ask the user to write their own code with the knowledge they've learned gained from the previous lessons. This code is necessary to ensure a fully functioning app.

36
Example Project
This is what your game will look like after you finish this tutorial:
You can try out an example project here:
https://pixelpad.io/play/hhx6nfpdsfl/

37
Creating Objects
Start of App Guide
First we need to create the objects we're going to use in our game. If you forget how to add objects and/or assets into PixelPAD you can always refer to the introductory lessons in an earlier chapter.
Add the following objects into the game:
• obj_bg • obj_player_blue • obj_player_red • obj_castle • obj_FIRST_ball • obj_girder • obj_powerbar • obj_explosion
We will be referring to these assets throughout the tutorial.

38
Game Script
Game Script - Start tab # Enter the start code for your game here. bg = object_new("obj_bg") bg.sprite = sprite_new("spr_bg") bg.sprite_height = 0.5 bg.sprite_width = 0.5
Create a new object called “bg” (short for background) Give bg the sprite spr_bg Change the background to half its height and half its width
p1 = object_new("obj_player_blue") p1.sprite = sprite_new("spr_player_blue") p1.sprite_height = 0.5 p1.sprite_width = 0.5 p1.x = -100
This code does very similar things to what we did with the background, creating a new object p1 (short for player 1), adding its sprite and changing its size. The new thing here is we changed the starting X position of p1 to -100
Game Script - Start tab p1.castle = object_new("obj_castle") p1.castle.sprite = sprite_new("spr_castle") p1.castle.x = -300 p1.castle.y = -52 p1.castle.sprite_width = 0.5 p1.castle.sprite_height = 0.5
I know what you may be asking: is there a default object property called “castle”? Nope! This is a new variable that we made up. This variable now stores the object “obj_castle” To access the object obj_castle, we need to use the dot notation twice!

39
Create Your Scene
Now is your turn! Try to recreate the scene in the image on the next page using what we've learned so far. See if you can add the girders to land on, p2, and the FIRST Robotics ball.

40
Creating the Scene
Teachers Edition Answers
Game Script - Start tab
p2 = object_new("obj_player_red") p2.sprite = sprite_new("spr_player_red") p2.sprite_height = 0.6 p2.sprite_width = 0.6 p2.x = 100 p2.castle = object_new("obj_castle") p2.castle.sprite = sprite_new("spr_castle") p2.castle.x = 300 p2.castle.y = -52 p2.castle.sprite_width = 0.5 p2.castle.sprite_height = 0.5 girder1 = object_new("obj_girder") girder1.sprite = sprite_new("spr_girder") girder1.y = -240 girder1.sprite_height = 0.5 girder1.sprite_width = 0.5 girder2 = object_new("obj_girder") girder2.sprite = sprite_new("spr_girder") girder2.y = -240 girder2.x = 288 girder2.sprite_height = 0.5 girder2.sprite_width = 0.5 girder3 = object_new("obj_girder") girder3.sprite = sprite_new("spr_girder") girder3.y = -240 girder3.x = -288 girder3.sprite_height = 0.5 girder3.sprite_width = 0.5 FIRST_ball = object_new("obj_FIRST_ball") FIRST_ball.sprite = sprite_new("spr_first_ball")

41
obj_FIRST_ball Start
obj_FIRST_ball – Start tab xspeed = 0 yspeed = 0 In the start tab of obj_FIRST_ball, we have to setup some new variables. These are NOT default variables, but new ones we've made up. By itself, xspeed and yspeed are just variables we made up that store a float. They could've been called "data1" and "data2" if we wanted, but that would've been confusing. We will use xspeed and yspeed as vectors, that is a velocity variable with an associated direction. xspeed being the horizontal vector yspeed being the vertical vector

42
FIRST Ball Movement
obj_FIRST_ball – Loop tab # Enter the loop code for obj_FIRST_ball here. self.x += xspeed self.y += yspeed
Remember self.x and self.y? Here we're saying, add whatever xspeed is to self.x every frame. Earlier we set xspeed to 0, so that means we're going to add 0 to self.x every frame until we change the value of x. Can you guess what will happen if we compile our game right now? If you guessed "nothing" you're absolutely right!
obj_FIRST_ball – Loop tab cblock = collision_check(self, "obj_girder") cCastle = collision_check(self, "obj_castle") Next we need to add collision checks. The first line checks if (self) i.e. the obj_FIRST_ball is colliding with any girders. Since this is happening in the loop, this will happen every frame. We're creating a new variable called "cblock" that will store the value of whatever collision_check returns. If obj_FIRST_ball is colliding with a girder, cBlock will store the girder it's colliding with. If it's not colliding with anything it will store NULL We do this twice, checking for collisions with the girder AND the castle.

43
FIRST Ball Explosion
obj_FIRST_ball – Loop tab if cCastle: if abs(xspeed) > 15: explosion = object_new("obj_explosion") explosion.x = self.x explosion.y = self.y new_ball = object_new("obj_FIRST_ball") new_ball.sprite = sprite_new("spr_first_ball") destroy(self) else: xspeed = 0 This code may look complicated but it’s actually just a bunch of stuff we've learned before put together. The first if cCastle statement asks "is cCastle a value other than null?" If its null it means our earlier collision check returned no value. But if it's a value, we can assume the obj_FIRST_ball has hit a castle! Now we check if xspeed > 15 because we only want the ball to explode if its going fairly fast. We must take the "absolute" value of xspeed, or else player 2, who is catapulting the ball to the left (-15) will never be able to hit the castle! Once both these conditions are met, we will create an explosion object and a new ball because we just blew up our old one. At the very bottom here, we added else: xspeed = 0 This else is connected with the if statement: if abs(xspeed) > 15: ... else: xspeed = 0 In plain English, if the ball thrown as the castle is greater than 15 do ... or ELSE make it stop moving.

44
FIRST Ball on Ground
obj_FIRST_ball – Loop tab if cblock: if yspeed < 0: self.y = cblock.y + 47 yspeed = 0 xspeed = 0 if yspeed > 0: yspeed = 0 else: yspeed -= 0.5 This last if statement checks if cblock is value other than NULL. If we check the start tab, we'll see that cblock stores the value of the girder the obj_FIRST_ball is colliding with. Next check is if we're travelling downwards. If we are, then completely stop moving with xspeed = 0 and yspeed = 0. So what does it mean by: self.y = cblock.y + 47 When we go down really fast, the ball may only be touching the girder when the ball is already inside the girder. This ensures that the ball is moved back above the girder. Lastly, if we're not colliding with any blocks we set subtract yspeed by 0.5. This means we will be travelling faster and faster downwards, simulating gravity.

45
Game Guide
obj_player_blue – Start tab yspeed = 0 onground = False power = 0 powerbar = "" Here we are setting up some default values for variables our player will use. These will be referred to in the loop tab of this player’s script. If you forget to do this part, you'll get some unexpected errors..!
obj_player_blue – Loop Tab # Enter the loop code for obj_player_blue here. self.y += yspeed cblock = collision_check(self, "obj_girder") cFIRST = collision_check(self, "obj_FIRST_ball") if cblock and yspeed < 0: self.y = cblock.y + 45 onground = True else: yspeed -= 0.5 onground = False Similar to what we did before, we will move the player vertically at yspeed and store any collisions with girders. We'll need to know when the player is contacting the FIRST ball so we'll need to check for this as well; storing the FIRST ball in the variable "cFIRST" This is asking if the player is moving downwards and is colliding with a girder we should stop moving down and set a variable called "onground" to True. The variable "onground" is what we call a "flag" or in technical terms, a boolean variable. Boolean variables only take 2 values, 1 or 0 aka True or False.

46
Game Guide
obj_player_blue – Loop Tab if key_is_pressed("a"): self.x -= 4 if key_is_pressed("d"): self.x += 4 if key_was_pressed("w") and onground: yspeed = 10 A new function: key_is_pressed("") checks if a key is currently being pressed. This function checks every frame in the loop. If you only want it to check once, then you should use key_was_pressed("") This last if statement is used to pick up the FIRST ball.

47
Game Guide
obj_player_blue – Loop Tab
if key_is_pressed("space") and cFIRST: cFIRST.x = self.x cFIRST.y = self.y + 16 cFIRST.yspeed = 0 power +=0.5 if power > 100: power = 1 else: if cFIRST and power > 0: cFIRST.xspeed = power / 4 cFIRST.yspeed = power / 10 power = 0 If I'm colliding with the ball AND I press space, pick up the ball. That is, set the FIRST ball's x value to the same as the player's x value and set the FIRST ball's y value to the same as the player's y value.
We added 16 to make the ball go over the player's head instead of directly in the middle.
If we have the ball picked up, we also want to add "power" as we're holding the ball.
ELSE - if i'm not holding the ball I need to know if I recently let go of the ball or was I never holding it in the first place.
If I recently let go of the ball, my power should be > 0. So if power >0 set the xspeed and yspeed of the ball relative to the power.
Then reset the power back down to 0.
Something to note about why I divided by 4 and 10. I wanted the ball to travel more horizontally than vertically, so I made the power less effective on the yspeed than the xspeed

48
Game Guide
obj_player_blue – Loop Tab #create the powerbar if power > 0: if powerbar == "": powerbar = object_new("obj_powerbar") powerbar.sprite_width = 0.5 powerbar.sprite_height = 0.5 powerbar_sheet = sprite_new("spr_powerbar", 1, 5) powerbar_0 = animation_new(powerbar_sheet, 0, 0,0) powerbar_1 = animation_new(powerbar_sheet, 0, 1,1) powerbar_2 = animation_new(powerbar_sheet, 0, 2,2) powerbar_3 = animation_new(powerbar_sheet, 0, 3,3) powerbar_4 = animation_new(powerbar_sheet, 0, 4,4) if power > 0: animation_set(powerbar, powerbar_0) if power > 20: animation_set(powerbar, powerbar_1) if power > 40: animation_set(powerbar, powerbar_2) if power > 60: animation_set(powerbar, powerbar_3) if power > 80: animation_set(powerbar, powerbar_4) powerbar.x = self.x - 40 powerbar.y = self.y + 15 else: if powerbar != "": destroy(powerbar) powerbar = "" This part of the code adds a little charm to your game. It shows how much power is accumulating as you're carrying the FIRST ball. The only part that should be new to you here is the animation, so let's talk about the 3 functions that make animation work, sprite_new, animation_new and animation_set.

49
Animations
obj_player_blue – Loop Tab
sprite_new needs 3 arguments, the location of the sprite and the number of columns and rows this sprite has.
Considering the sprite sheet for the powerbar looks like this:
The number of rows is 1 and number of columns is 5.
animation_new takes 4 arguments, the sprite sheet, speed of animation, frame start and frame end.
Here we named our sprite_sheet "power_sheet"
We set animation speed to 0 because it's not changing frames and we set the start and end frames to the frame we want.
Lastly animation_set sets the animation. Animation set takes 2 arguments, the object you want to set the animation for, and the animation you want to set it to.
In this case, we only want to change the animation at certain power values.

50
obj_explosion
obj_explosion – Start tab self_destruct_timer = 30 explosion_sheet = sprite_new("spr_explosion", 4, 4) explosion_anim = animation_new(explosion_sheet, 30, 0,15) animation_set(self, explosion_anim) Here we create a new variable called self_destruct_timer to 30. We set it to 30 because that's about the time it takes for the explosion animation to start and end. If you chose a different sprite sheet for the explosion, this number may differ. Experiment yourself to find the perfect timing.
obj_explosion – Loop Tab self_destruct_timer -=1 if self_destruct_timer < 0: destroy(self) This should be self-explanatory by now, but let's explain it again for good measure. Every frame the self_destruct_timer counts down by 1. Once it counts down to 0 we destroy the explosion.

51
Coding Player 2
Try to add the p2 code on your own! It's very similar to p1, except there are some minute changes that need to be made to the variables.
obj_player_red – Start Tab yspeed = 0 onground = False power = 0 powerbar = ""
obj_player_red – Loop Tab # Enter the loop code for obj_player_red here. self.y += yspeed cblock = collision_check(self, "obj_girder") cFIRST = collision_check(self, "obj_FIRST_ball") if cblock and yspeed < 0: self.y = cblock.y + 45 onground = True else: yspeed -= 0.5 onground = False if key_is_pressed("left"): self.x -= 4 if key_is_pressed("right"): self.x += 4 if key_was_pressed("up") and onground: yspeed = 10

52
Coding Player 2
obj_player_red – Loop Tab if key_is_pressed("enter") and cFIRST: cFIRST.x = self.x cFIRST.y = self.y + 16 cFIRST.yspeed = 0 power +=0.5 if power > 100: power = 1 else: if cFIRST and power > 0: cFIRST.xspeed = -power / 4 cFIRST.yspeed = power / 10 power = 0

53
Coding Player 2
obj_player_red – Loop Tab #create the powerbar if power > 0: if powerbar == "": powerbar = object_new("obj_powerbar") powerbar.sprite_width = 0.5 powerbar.sprite_height = 0.5 powerbar_sheet = sprite_new("spr_powerbar", 1, 5) powerbar_0 = animation_new(powerbar_sheet, 0, 0,0) powerbar_1 = animation_new(powerbar_sheet, 0, 1,1) powerbar_2 = animation_new(powerbar_sheet, 0, 2,2) powerbar_3 = animation_new(powerbar_sheet, 0, 3,3) powerbar_4 = animation_new(powerbar_sheet, 0, 4,4) if power > 0: animation_set(powerbar, powerbar_0) if power > 20: animation_set(powerbar, powerbar_1) if power > 40: animation_set(powerbar, powerbar_2) if power > 60: animation_set(powerbar, powerbar_3) if power > 80: animation_set(powerbar, powerbar_4) powerbar.x = self.x + 40 powerbar.y = self.y + 15 else: if powerbar != "": destroy(powerbar) powerbar = ""

54
Challenge Puzzles
• Can you figure out how to add 3 additional FIRST balls in the game?
• Can you figure out how to make the explosion animation twice its size?
• Can you figure out how to add powerups to the game that spawn every minute or so and gives higher jumps and faster speed?
• Can you figure out how to add health to the castles and add win and lose conditions?
• What's the difference between sprite_new, animation_new, and animation_set?
• What does collision_check() return?
• xspeed and yspeed are used frequently in this tutorial. Are these properties inherent in the objects in PixelPAD?