field necropsy of cattle and diagnostic sample...
TRANSCRIPT
Field Necropsy of Cattle andDiagnostic Sample Submission
Dee Griffin, DVM, MS
KEYWORDS
� Bovine � Necropsy � Diagnostic � Sharpening knives � Shipping specimens� Data collection
KEY POINTS
� Field necropsies can provide a wealth of information that can help guide productionmanagement decisions.
� The outlined procedures emphasize not detaching organs from the carcass unlessnecessary, thereby making carcass removal by rendering companies more efficientand minimizing clean-up on the production unit premise.
� An observation and history collection system using form templates and photographsimproves efficiency of recording necropsy results.
� One key to necropsy efficiency, speed, and enjoyment is having sharp knives. The firstpart of the article includes tips for sharpening knives.
FIELD NECROPSY AND DIAGNOSTIC SAMPLE SUBMISSION
This section includes:
� A brief overview of knife-sharpening skills and sharpening tools� A step-by-step field necropsy technique for ruminants� Review of simplified observations collection� Techniques for handling laboratory samples including proper packaging andshipping of samples to diagnostic facilities
The principal purpose of field necropsies is to gain information that may be used toevaluate production or influence production management decisions. Many productionmanagement issues relate to making a complete and thorough assessment of organsystems, including their associated lymph nodes.Safety is paramount, so always have protective clothing, gloves, and boots that
allow for disinfection. Remind all bystanders and observers of the importance of beingcareful to minimize their personal contamination. Have water, soap, disinfectant, andcleaning brushes readily available.
The author has no disclosures as part of the complete article.Great Plains Veterinary Educational Center, Highway 18 Spur, PO Box 148, Clay Center, NE68933-0148, USAE-mail address: [email protected]
Vet Clin Food Anim 28 (2012) 391–405http://dx.doi.org/10.1016/j.cvfa.2012.07.006 vetfood.theclinics.com0749-0720/12/$ – see front matter � 2012 Elsevier Inc. All rights reserved.
Griffin392
KNIFE-SHARPENING SKILLS
A quick alternative to using a knife-sharpening abrasive is to use a “V” carbide bladeknife sharpener. These put a very coarse, crudely shaped, yet usable edge on a knifeblade.
Sharpening Abrasives
Although 3-sided oil stones work well, these are generally expensive and do not travelwell when needed for field necropsies. Solid abrasives such as diamond-coated steelslabs are more durable than stone abrasives. They are easily cleaned and come in anassortment of grits. Most knives can be sharpened nicely with any abrasive that is finerthan 300 grit (medium or fine).Angle consistency, or the angle at which the blade is held as the abrasive is stroked,
is by far the most important key to developing a sharp cutting edge. There are severaldiamond-coated sharpening abrasives designed to maintain a consistent sharpeningangle. Most feature a clamp to hold the knife blade, and the abrasive is connected toa rod that slides through angle slots above and below the knife’s cutting edge.A consistent edge can be maintained on a flat abrasive if the back of the knife blade
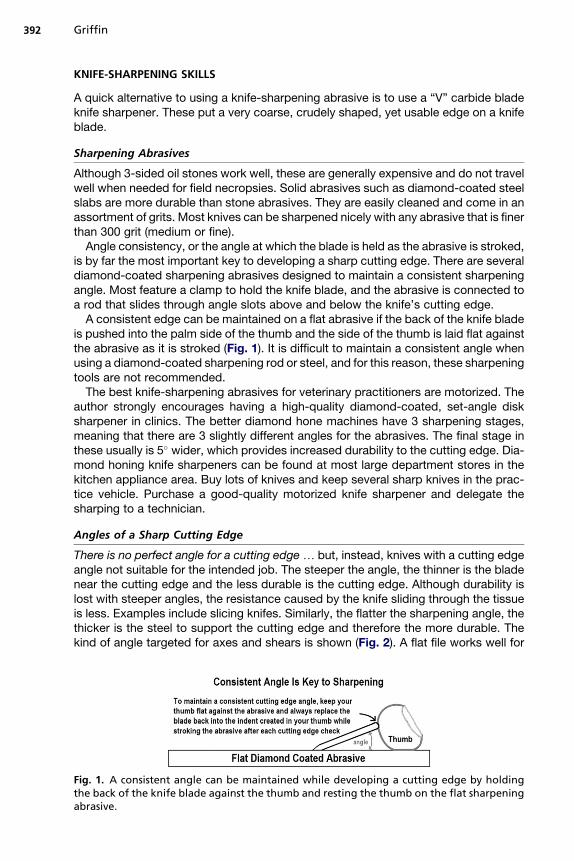
is pushed into the palm side of the thumb and the side of the thumb is laid flat againstthe abrasive as it is stroked (Fig. 1). It is difficult to maintain a consistent angle whenusing a diamond-coated sharpening rod or steel, and for this reason, these sharpeningtools are not recommended.The best knife-sharpening abrasives for veterinary practitioners are motorized. The
author strongly encourages having a high-quality diamond-coated, set-angle disksharpener in clinics. The better diamond hone machines have 3 sharpening stages,meaning that there are 3 slightly different angles for the abrasives. The final stage inthese usually is 5� wider, which provides increased durability to the cutting edge. Dia-mond honing knife sharpeners can be found at most large department stores in thekitchen appliance area. Buy lots of knives and keep several sharp knives in the prac-tice vehicle. Purchase a good-quality motorized knife sharpener and delegate thesharping to a technician.
Angles of a Sharp Cutting Edge
There is no perfect angle for a cutting edge . but, instead, knives with a cutting edgeangle not suitable for the intended job. The steeper the angle, the thinner is the bladenear the cutting edge and the less durable is the cutting edge. Although durability islost with steeper angles, the resistance caused by the knife sliding through the tissueis less. Examples include slicing knifes. Similarly, the flatter the sharpening angle, thethicker is the steel to support the cutting edge and therefore the more durable. Thekind of angle targeted for axes and shears is shown (Fig. 2). A flat file works well for
Fig. 1. A consistent angle can be maintained while developing a cutting edge by holdingthe back of the knife blade against the thumb and resting the thumb on the flat sharpeningabrasive.
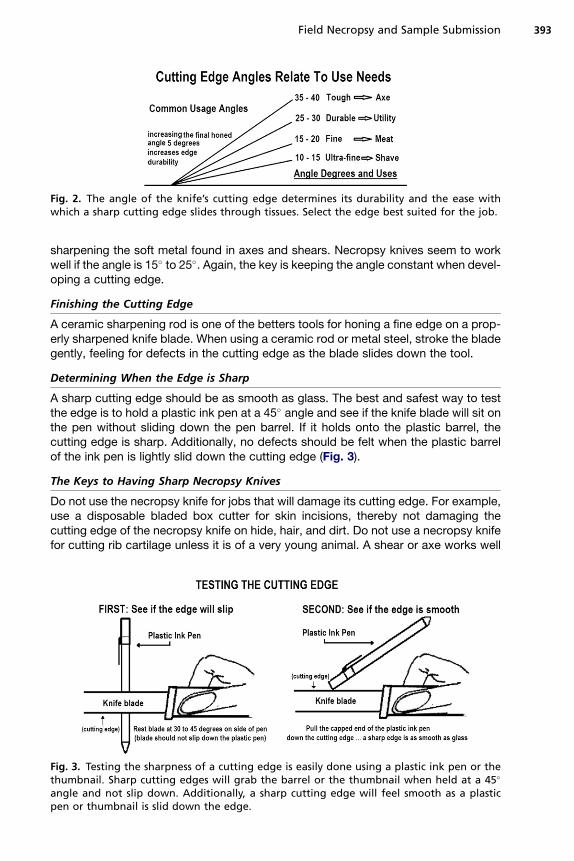
Fig. 2. The angle of the knife’s cutting edge determines its durability and the ease withwhich a sharp cutting edge slides through tissues. Select the edge best suited for the job.
Field Necropsy and Sample Submission 393
sharpening the soft metal found in axes and shears. Necropsy knives seem to workwell if the angle is 15� to 25�. Again, the key is keeping the angle constant when devel-oping a cutting edge.
Finishing the Cutting Edge
A ceramic sharpening rod is one of the betters tools for honing a fine edge on a prop-erly sharpened knife blade. When using a ceramic rod or metal steel, stroke the bladegently, feeling for defects in the cutting edge as the blade slides down the tool.
Determining When the Edge is Sharp
A sharp cutting edge should be as smooth as glass. The best and safest way to testthe edge is to hold a plastic ink pen at a 45� angle and see if the knife blade will sit onthe pen without sliding down the pen barrel. If it holds onto the plastic barrel, thecutting edge is sharp. Additionally, no defects should be felt when the plastic barrelof the ink pen is lightly slid down the cutting edge (Fig. 3).
The Keys to Having Sharp Necropsy Knives
Do not use the necropsy knife for jobs that will damage its cutting edge. For example,use a disposable bladed box cutter for skin incisions, thereby not damaging thecutting edge of the necropsy knife on hide, hair, and dirt. Do not use a necropsy knifefor cutting rib cartilage unless it is of a very young animal. A shear or axe works well
Fig. 3. Testing the sharpness of a cutting edge is easily done using a plastic ink pen or thethumbnail. Sharp cutting edges will grab the barrel or the thumbnail when held at a 45�
angle and not slip down. Additionally, a sharp cutting edge will feel smooth as a plasticpen or thumbnail is slid down the edge.
Griffin394
and saves the cutting edge of the knife. Use a ceramic rod to repeatedly touch up thecutting edge during the necropsy.
FIELD NECROPSY PROCEDURE WITH MINIMAL LOOSE PARTSImportant Note
Animals that will be rendered must not contain chemical residues that could be harm-ful to other animals that would consume rendered products.1
Start with the Ruminant on its Left Side
Think about what is observed. Collect histopathologic and culture specimens whileworking. Histopathologic specimens should not be thicker than 5 to 7 mm. Try toconnect observations into a unifying diagnosis or production managementobservation.The procedure outlined is designed to make it easier for animals to be picked up by
rendering trucks and to minimize hide damage, thereby improving the hide value torenderers. Detaching any organs that are not required for examination is not beingconsiderate of the people working for the rendering company and is more likely tocreate a mess at the farm, ranch, or feedlot on which the necropsy examination isbeing performed.
Review Anatomy and Gross Pathology
Knowledge of the structure and function of the organ tissues being examined can bekey to linking observations to a meaningful diagnosis.2,3 Be slow to jump to diagnosticconclusion based on the first observations. The “lift a leg and look” or “peek-a-boo”necropsies generally leave important production management observation undiscov-ered and minimize the value of the observations that could have contributed to betteranimal care and management.
Accessing the Brain
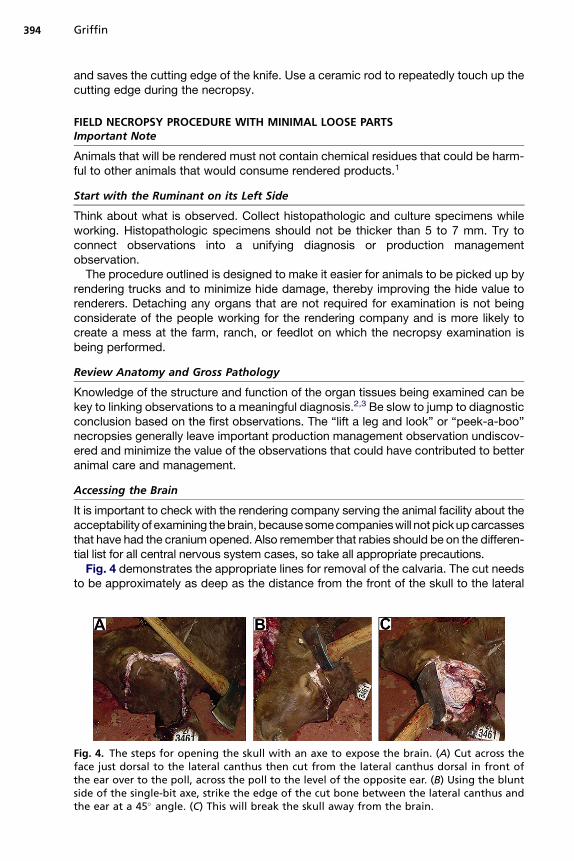
It is important to check with the rendering company serving the animal facility about theacceptability of examining thebrain,becausesomecompanieswill not pickupcarcassesthat have had the cranium opened. Also remember that rabies should be on the differen-tial list for all central nervous system cases, so take all appropriate precautions.Fig. 4 demonstrates the appropriate lines for removal of the calvaria. The cut needs
to be approximately as deep as the distance from the front of the skull to the lateral
Fig. 4. The steps for opening the skull with an axe to expose the brain. (A) Cut across theface just dorsal to the lateral canthus then cut from the lateral canthus dorsal in front ofthe ear over to the poll, across the poll to the level of the opposite ear. (B) Using the bluntside of the single-bit axe, strike the edge of the cut bone between the lateral canthus andthe ear at a 45� angle. (C) This will break the skull away from the brain.
Field Necropsy and Sample Submission 395
canthus. Make sure the axe cuts are completely through the cranium. Using the bluntor hammer side of the single-bit axe, strike the cut edge of the cranium along thefrontal crest at a 45� angle (see Fig. 4).To remove the brain, cut the dura mater across the cerebral falx, the tough medial
division of the dura. Extend this cut to allow the fingers to slide beneath the cerebrum.Using the necropsy knife, cut between the cerebrum and the cerebellum at the level ofthe pons and lift the cerebrum out of the cranium. Next, split the dura mater coveringthe cerebellum dorsally. Slide the tip of the necropsy knife behind the cerebellum intothe spinal canal and cut across the spinal cord distal to the obex. Lift out the cere-bellum and spinal cord, containing the obex.
Opening the Hide and Reflecting the Legs
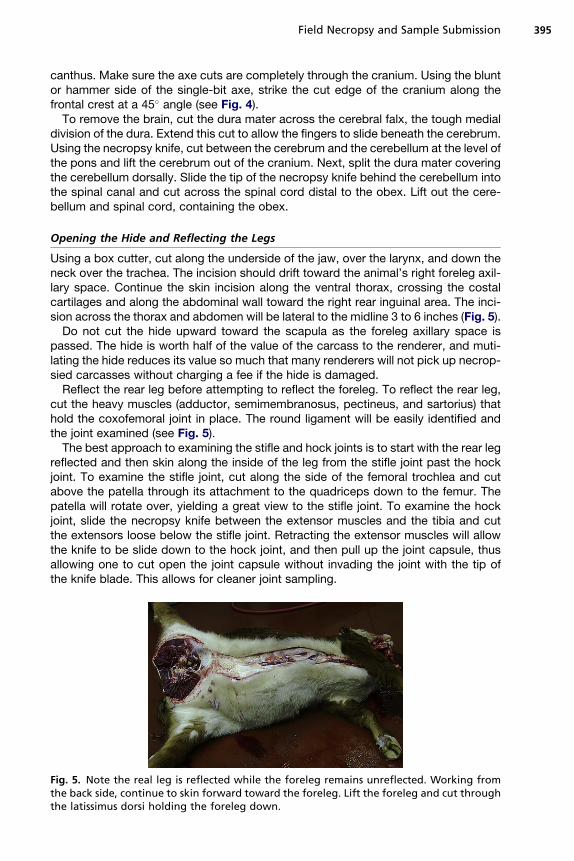
Using a box cutter, cut along the underside of the jaw, over the larynx, and down theneck over the trachea. The incision should drift toward the animal’s right foreleg axil-lary space. Continue the skin incision along the ventral thorax, crossing the costalcartilages and along the abdominal wall toward the right rear inguinal area. The inci-sion across the thorax and abdomen will be lateral to the midline 3 to 6 inches (Fig. 5).Do not cut the hide upward toward the scapula as the foreleg axillary space is
passed. The hide is worth half of the value of the carcass to the renderer, and muti-lating the hide reduces its value so much that many renderers will not pick up necrop-sied carcasses without charging a fee if the hide is damaged.Reflect the rear leg before attempting to reflect the foreleg. To reflect the rear leg,
cut the heavy muscles (adductor, semimembranosus, pectineus, and sartorius) thathold the coxofemoral joint in place. The round ligament will be easily identified andthe joint examined (see Fig. 5).The best approach to examining the stifle and hock joints is to start with the rear leg
reflected and then skin along the inside of the leg from the stifle joint past the hockjoint. To examine the stifle joint, cut along the side of the femoral trochlea and cutabove the patella through its attachment to the quadriceps down to the femur. Thepatella will rotate over, yielding a great view to the stifle joint. To examine the hockjoint, slide the necropsy knife between the extensor muscles and the tibia and cutthe extensors loose below the stifle joint. Retracting the extensor muscles will allowthe knife to be slide down to the hock joint, and then pull up the joint capsule, thusallowing one to cut open the joint capsule without invading the joint with the tip ofthe knife blade. This allows for cleaner joint sampling.
Fig. 5. Note the real leg is reflected while the foreleg remains unreflected. Working fromthe back side, continue to skin forward toward the foreleg. Lift the foreleg and cut throughthe latissimus dorsi holding the foreleg down.
Griffin396
Working from the back side, continue to skin the carcass toward the fore leg. Whenskinned to the level of the transverse processes and proximal rib attachments, the lat-issimus dorsi holding the foreleg downwill be easily cut. Move to the sternal side of theanimal and lift the foreleg, cutting the pectoral muscles. The foreleg should lay overwith only minor fascia dissection.
Examining the Oral Cavity and Neck Structures
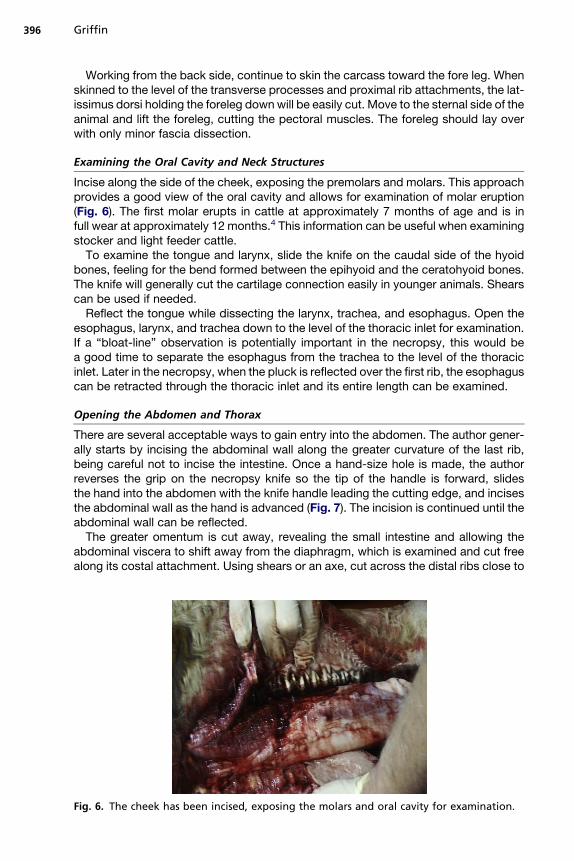
Incise along the side of the cheek, exposing the premolars and molars. This approachprovides a good view of the oral cavity and allows for examination of molar eruption(Fig. 6). The first molar erupts in cattle at approximately 7 months of age and is infull wear at approximately 12 months.4 This information can be useful when examiningstocker and light feeder cattle.To examine the tongue and larynx, slide the knife on the caudal side of the hyoid
bones, feeling for the bend formed between the epihyoid and the ceratohyoid bones.The knife will generally cut the cartilage connection easily in younger animals. Shearscan be used if needed.Reflect the tongue while dissecting the larynx, trachea, and esophagus. Open the
esophagus, larynx, and trachea down to the level of the thoracic inlet for examination.If a “bloat-line” observation is potentially important in the necropsy, this would bea good time to separate the esophagus from the trachea to the level of the thoracicinlet. Later in the necropsy, when the pluck is reflected over the first rib, the esophaguscan be retracted through the thoracic inlet and its entire length can be examined.
Opening the Abdomen and Thorax
There are several acceptable ways to gain entry into the abdomen. The author gener-ally starts by incising the abdominal wall along the greater curvature of the last rib,being careful not to incise the intestine. Once a hand-size hole is made, the authorreverses the grip on the necropsy knife so the tip of the handle is forward, slidesthe hand into the abdomen with the knife handle leading the cutting edge, and incisesthe abdominal wall as the hand is advanced (Fig. 7). The incision is continued until theabdominal wall can be reflected.The greater omentum is cut away, revealing the small intestine and allowing the
abdominal viscera to shift away from the diaphragm, which is examined and cut freealong its costal attachment. Using shears or an axe, cut across the distal ribs close to
Fig. 6. The cheek has been incised, exposing the molars and oral cavity for examination.

Fig. 7. Opening the abdomen by working with the hand inside and the knife blade pointingoutside will help prevent puncturing loops of intestine.
Field Necropsy and Sample Submission 397
the costochondral junctions. The ribs may be separated and manually reflected bybreaking the costovertebral joint, or one can cut across the proximal ribs close to thecostovertebral joints and reflect the entire plate of ribs forward off the top of the thoracicorgans (Figs. 8 and 9). Leave the first rib intact. This will hold the thoracic organs in thecarcass as it is winched onto the rendering truck. It is always a good idea to be consid-erate of both production personnel and those who work for the renderer.
Examining the Thoracic Cavity
First examine the pericardial sac and fluid. Detach the lung by cutting between thethoracic vertebra and aorta. Then dissect the dorsal lung free from the anteriorthoracic to the diaphragm (Fig. 10). Next, free the caudal right lung lobe from the dia-phragm by cutting the aorta, esophagus, and mediastinal reflections (right and left)between the pericardial sac and diaphragm. Continue detaching the pluck by cuttingattachments between the pericardial sac and ventral thoracic. Reflect the lungs andheart forward over the first rib (Fig. 11).Palpate the lung for abnormalities. Examine the tracheobronchial lymph nodes and
airways. Examine the thoracic esophagus. The esophagus can be pulled through thethoracic inlet if a potential bloat line is of interest.The heart’s pericardium, myocardium, and endocardium are evaluated as the organ
is opened. Start the examination with the right heart. Make an incision in the rightventricle just below the vena cava and extend the incision through the semilunar
Fig. 8. Cut across the ribs close to the costovertebral junctions.
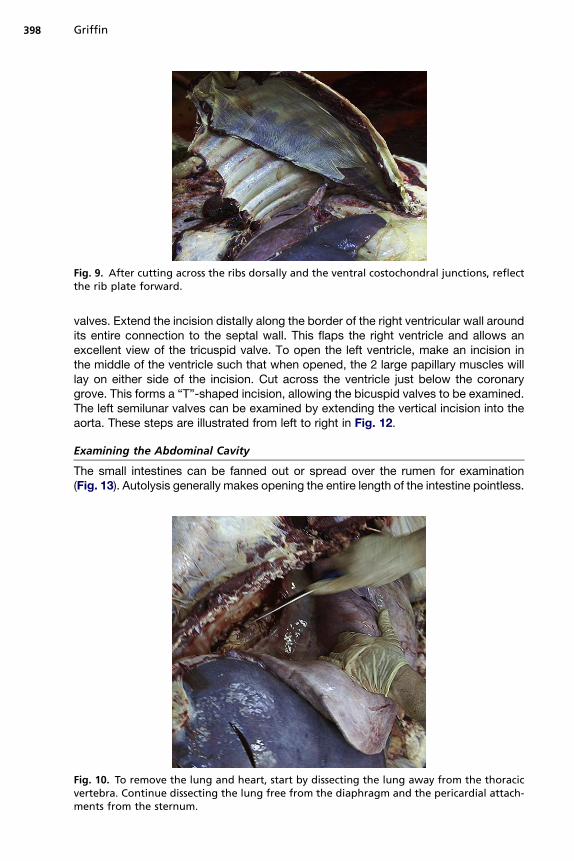
Fig. 9. After cutting across the ribs dorsally and the ventral costochondral junctions, reflectthe rib plate forward.
Griffin398
valves. Extend the incision distally along the border of the right ventricular wall aroundits entire connection to the septal wall. This flaps the right ventricle and allows anexcellent view of the tricuspid valve. To open the left ventricle, make an incision inthe middle of the ventricle such that when opened, the 2 large papillary muscles willlay on either side of the incision. Cut across the ventricle just below the coronarygrove. This forms a “T”-shaped incision, allowing the bicuspid valves to be examined.The left semilunar valves can be examined by extending the vertical incision into theaorta. These steps are illustrated from left to right in Fig. 12.
Examining the Abdominal Cavity
The small intestines can be fanned out or spread over the rumen for examination(Fig. 13). Autolysis generally makes opening the entire length of the intestine pointless.
Fig. 10. To remove the lung and heart, start by dissecting the lung away from the thoracicvertebra. Continue dissecting the lung free from the diaphragm and the pericardial attach-ments from the sternum.
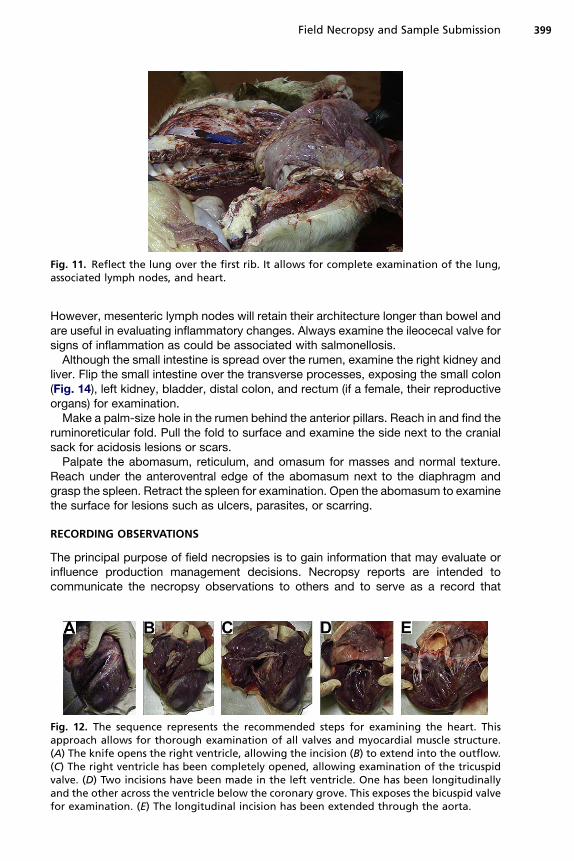
Fig. 11. Reflect the lung over the first rib. It allows for complete examination of the lung,associated lymph nodes, and heart.
Field Necropsy and Sample Submission 399
However, mesenteric lymph nodes will retain their architecture longer than bowel andare useful in evaluating inflammatory changes. Always examine the ileocecal valve forsigns of inflammation as could be associated with salmonellosis.Although the small intestine is spread over the rumen, examine the right kidney and
liver. Flip the small intestine over the transverse processes, exposing the small colon(Fig. 14), left kidney, bladder, distal colon, and rectum (if a female, their reproductiveorgans) for examination.Make a palm-size hole in the rumen behind the anterior pillars. Reach in and find the
ruminoreticular fold. Pull the fold to surface and examine the side next to the cranialsack for acidosis lesions or scars.Palpate the abomasum, reticulum, and omasum for masses and normal texture.
Reach under the anteroventral edge of the abomasum next to the diaphragm andgrasp the spleen. Retract the spleen for examination. Open the abomasum to examinethe surface for lesions such as ulcers, parasites, or scarring.
RECORDING OBSERVATIONS
The principal purpose of field necropsies is to gain information that may evaluate orinfluence production management decisions. Necropsy reports are intended tocommunicate the necropsy observations to others and to serve as a record that
Fig. 12. The sequence represents the recommended steps for examining the heart. Thisapproach allows for thorough examination of all valves and myocardial muscle structure.(A) The knife opens the right ventricle, allowing the incision (B) to extend into the outflow.(C) The right ventricle has been completely opened, allowing examination of the tricuspidvalve. (D) Two incisions have been made in the left ventricle. One has been longitudinallyand the other across the ventricle below the coronary grove. This exposes the bicuspid valvefor examination. (E) The longitudinal incision has been extended through the aorta.
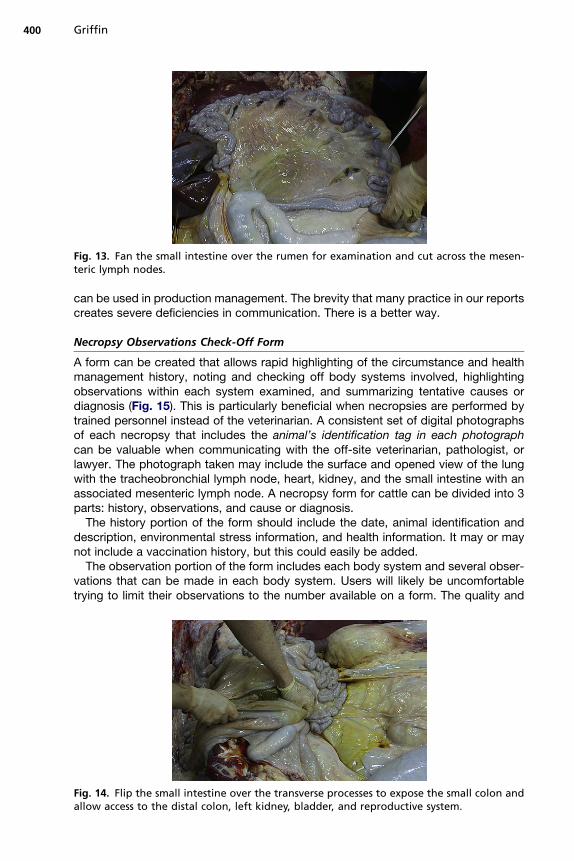
Fig. 13. Fan the small intestine over the rumen for examination and cut across the mesen-teric lymph nodes.
Griffin400
can be used in production management. The brevity that many practice in our reportscreates severe deficiencies in communication. There is a better way.
Necropsy Observations Check-Off Form
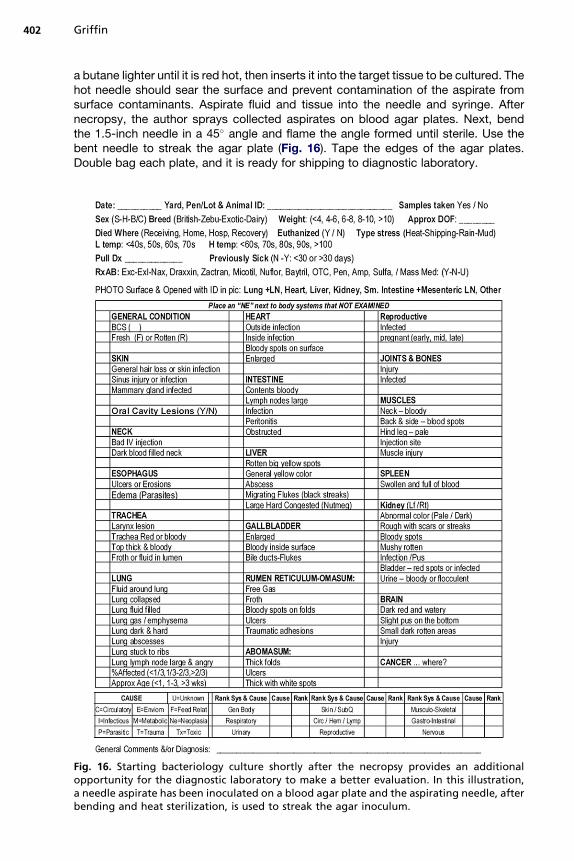
A form can be created that allows rapid highlighting of the circumstance and healthmanagement history, noting and checking off body systems involved, highlightingobservations within each system examined, and summarizing tentative causes ordiagnosis (Fig. 15). This is particularly beneficial when necropsies are performed bytrained personnel instead of the veterinarian. A consistent set of digital photographsof each necropsy that includes the animal’s identification tag in each photographcan be valuable when communicating with the off-site veterinarian, pathologist, orlawyer. The photograph taken may include the surface and opened view of the lungwith the tracheobronchial lymph node, heart, kidney, and the small intestine with anassociated mesenteric lymph node. A necropsy form for cattle can be divided into 3parts: history, observations, and cause or diagnosis.The history portion of the form should include the date, animal identification and
description, environmental stress information, and health information. It may or maynot include a vaccination history, but this could easily be added.The observation portion of the form includes each body system and several obser-
vations that can be made in each body system. Users will likely be uncomfortabletrying to limit their observations to the number available on a form. The quality and
Fig. 14. Flip the small intestine over the transverse processes to expose the small colon andallow access to the distal colon, left kidney, bladder, and reproductive system.
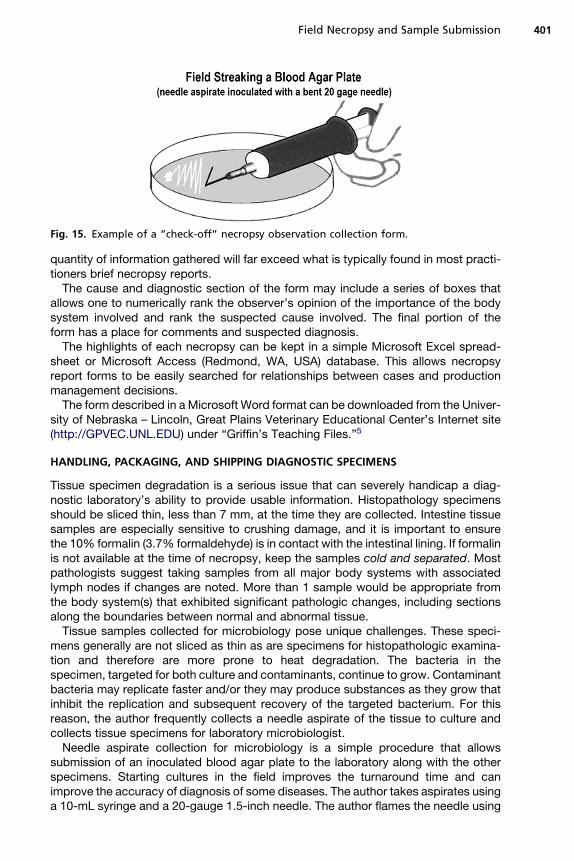
Fig. 15. Example of a “check-off” necropsy observation collection form.
Field Necropsy and Sample Submission 401
quantity of information gathered will far exceed what is typically found in most practi-tioners brief necropsy reports.The cause and diagnostic section of the form may include a series of boxes that
allows one to numerically rank the observer’s opinion of the importance of the bodysystem involved and rank the suspected cause involved. The final portion of theform has a place for comments and suspected diagnosis.The highlights of each necropsy can be kept in a simple Microsoft Excel spread-
sheet or Microsoft Access (Redmond, WA, USA) database. This allows necropsyreport forms to be easily searched for relationships between cases and productionmanagement decisions.The form described in a Microsoft Word format can be downloaded from the Univer-
sity of Nebraska – Lincoln, Great Plains Veterinary Educational Center’s Internet site(http://GPVEC.UNL.EDU) under “Griffin’s Teaching Files.”5
HANDLING, PACKAGING, AND SHIPPING DIAGNOSTIC SPECIMENS
Tissue specimen degradation is a serious issue that can severely handicap a diag-nostic laboratory’s ability to provide usable information. Histopathology specimensshould be sliced thin, less than 7 mm, at the time they are collected. Intestine tissuesamples are especially sensitive to crushing damage, and it is important to ensurethe 10% formalin (3.7% formaldehyde) is in contact with the intestinal lining. If formalinis not available at the time of necropsy, keep the samples cold and separated. Mostpathologists suggest taking samples from all major body systems with associatedlymph nodes if changes are noted. More than 1 sample would be appropriate fromthe body system(s) that exhibited significant pathologic changes, including sectionsalong the boundaries between normal and abnormal tissue.Tissue samples collected for microbiology pose unique challenges. These speci-
mens generally are not sliced as thin as are specimens for histopathologic examina-tion and therefore are more prone to heat degradation. The bacteria in thespecimen, targeted for both culture and contaminants, continue to grow. Contaminantbacteria may replicate faster and/or they may produce substances as they grow thatinhibit the replication and subsequent recovery of the targeted bacterium. For thisreason, the author frequently collects a needle aspirate of the tissue to culture andcollects tissue specimens for laboratory microbiologist.Needle aspirate collection for microbiology is a simple procedure that allows
submission of an inoculated blood agar plate to the laboratory along with the otherspecimens. Starting cultures in the field improves the turnaround time and canimprove the accuracy of diagnosis of some diseases. The author takes aspirates usinga 10-mL syringe and a 20-gauge 1.5-inch needle. The author flames the needle using
Griffin402
a butane lighter until it is red hot, then inserts it into the target tissue to be cultured. Thehot needle should sear the surface and prevent contamination of the aspirate fromsurface contaminants. Aspirate fluid and tissue into the needle and syringe. Afternecropsy, the author sprays collected aspirates on blood agar plates. Next, bendthe 1.5-inch needle in a 45� angle and flame the angle formed until sterile. Use thebent needle to streak the agar plate (Fig. 16). Tape the edges of the agar plates.Double bag each plate, and it is ready for shipping to diagnostic laboratory.
Fig. 16. Starting bacteriology culture shortly after the necropsy provides an additionalopportunity for the diagnostic laboratory to make a better evaluation. In this illustration,a needle aspirate has been inoculated on a blood agar plate and the aspirating needle, afterbending and heat sterilization, is used to streak the agar inoculum.
Field Necropsy and Sample Submission 403
Important packaging and shipping definitions6–8
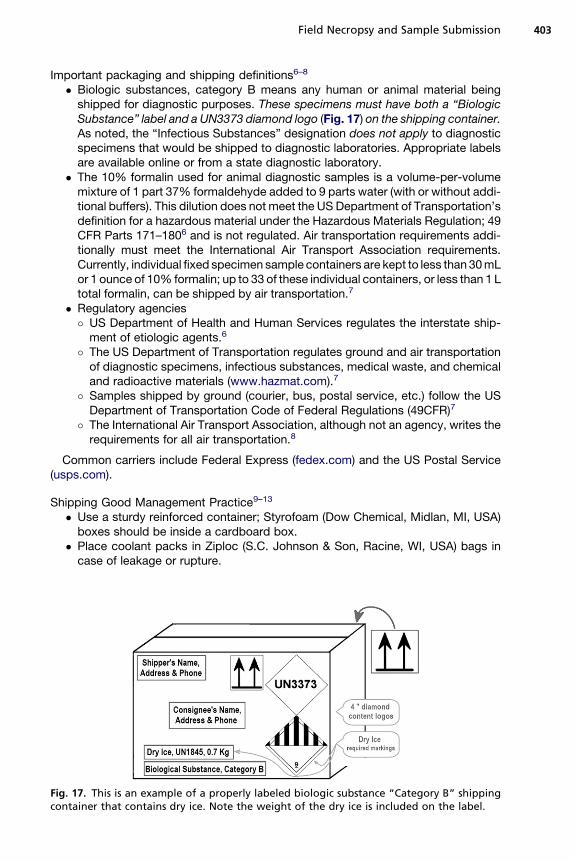
� Biologic substances, category B means any human or animal material beingshipped for diagnostic purposes. These specimens must have both a “BiologicSubstance” label and a UN3373 diamond logo (Fig. 17) on the shipping container.As noted, the “Infectious Substances” designation does not apply to diagnosticspecimens that would be shipped to diagnostic laboratories. Appropriate labelsare available online or from a state diagnostic laboratory.
� The 10% formalin used for animal diagnostic samples is a volume-per-volumemixture of 1 part 37% formaldehyde added to 9 parts water (with or without addi-tional buffers). This dilution does not meet the US Department of Transportation’sdefinition for a hazardous material under the Hazardous Materials Regulation; 49CFR Parts 171–1806 and is not regulated. Air transportation requirements addi-tionally must meet the International Air Transport Association requirements.Currently, individual fixed specimen sample containers are kept to less than 30mLor 1 ounce of 10% formalin; up to 33 of these individual containers, or less than 1 Ltotal formalin, can be shipped by air transportation.7
� Regulatory agencies� US Department of Health and Human Services regulates the interstate ship-ment of etiologic agents.6
� The US Department of Transportation regulates ground and air transportationof diagnostic specimens, infectious substances, medical waste, and chemicaland radioactive materials (www.hazmat.com).7
� Samples shipped by ground (courier, bus, postal service, etc.) follow the USDepartment of Transportation Code of Federal Regulations (49CFR)7
� The International Air Transport Association, although not an agency, writes therequirements for all air transportation.8
Common carriers include Federal Express (fedex.com) and the US Postal Service(usps.com).
Shipping Good Management Practice9–13
� Use a sturdy reinforced container; Styrofoam (Dow Chemical, Midlan, MI, USA)boxes should be inside a cardboard box.
� Place coolant packs in Ziploc (S.C. Johnson & Son, Racine, WI, USA) bags incase of leakage or rupture.
Fig. 17. This is an example of a properly labeled biologic substance “Category B” shippingcontainer that contains dry ice. Note the weight of the dry ice is included on the label.
Griffin404
� Avoid overfilling liquid containers, don’t exceedone-half of the container capacity.� Whirl-Pak (Uline, Pleasant Prairie, WI, USA) bags are superior to Ziploc bags;twist-tie the metal strip after closing.
� Tape all rubber-stoppered tubes.� Double check for potential leakage of all containers.� Place all specimens inside a large plastic bag that contains sufficient absorbent(cat litter or paper towels) for all the fluid in the containers to be shipped shouldthey be damaged during shipment.
� Avoid breakable specimen containers. if used, pad anddouble bag the container.� Place paperwork in waterproof bag; Ziploc bags work best.� If there are shipment questions, contact the carrier and/or laboratory.
Packaging Diagnostic Specimens (Biologic Substances, Category B)
Diagnostic specimens must be triple packed as follows:� Primary container should be a screw cap tube, taped red top blood tube, orWhirl-Pak bag wrapped with the tie ends twisted together. Ziploc bags are notsuitable for liquid primary containers.9–12
� Secondary container must be water-tight and have sufficient absorbent, such aspaper towels, should the primary container leak or rupture.
� Outer package (third layer of the specimen shipment container) should be at leastas durable as sturdy cardboard. Although Styrofoam is an excellent container; itshould never be used as a shipping container without residing in a sturdy card-board box. Styrofoam coolers are not acceptable as the exclusive outercontainer because of the potential for rupture if dropped or impacted in a trans-portation accident.
� USPS limits less than 1 L (1 L) liquid per primary container with total of less than4 L or less than 4 kg solid per shipment. USPS requires a biohazard logo. Somecarriers limit shipment to less than 0.5 L or less than 0.5 kg solids.
� Shipper’s and consignee’s contact information, including 24-hour telephonenumber, should be on the label (Fig. 17).
� Both a “Biologic Substance” label and a UN3373 diamond logo (see Fig. 16)should be on the outer shipping container.
BOTTOM LINE
Diagnostic specimens must be packaged in triple packaging consisting of9–12: (1) apri-mary container, such as a screw-cap tube or plastic bag; (2) a secondary containerthat must be watertight and contain sufficient absorbent to capture any leakage; (3)outer packaging that is of sturdy cardboard (do not use Styrofoam coolers as the outercontainer); and (4) a properly labeled shipping container (see Fig. 17).Assume that specimens will travel in part by air, so meet International Air Transport
Association shipping requirements (eg, 1 L of 10% formalin per properly packagedsample container, or 30 mL per sample container if it includes formaldehydeof >10% concentration). Shipping with dry ice has a few additional requirements(see Fig. 17).12 The outer shipping container must be marked with “Carbon Dioxide,Solid or Dry Ice” and the UN Identification Number “UN1845” and a Class 9 label.
REFERENCES
1. Federal Food,Drug, andCosmeticAct (FD&CAct), Section402(a)(1) or (2),CPGSec.675.400 Rendered Animal Feed Ingredients, Revised: 11/13/98. FDA, Washington,DC.
Field Necropsy and Sample Submission 405
2. JubbKV, KennedyPC, Palmer N. 3rd edition. Pathology of domestic animals, vol. 3.San Diego (CA): Academic Press; 1985. p. 175–92.
3. Dyce KM, Sack WO, Wensing CJ. Textbook of veterinary anatomy. 3rd edition.Philadelphia: Saunders; 2002. p. 627–760.
4. CropseyLM.Technical aspectsof determiningover-age inbeef cattle. Proceedingsof the American Association of Bovine Practitioners. Auburn, AL; 1974. p. 67–71.
5. Griffin DD. NecropsyDataBase_Classify&Photo2010Form_DGriffin.doc Griffin’sTeaching Files. University of Nebraska – Lincoln, Great Plains Veterinary Educa-tional Center’s Internet site. Available at: http://gpvec.unl.edu/files/listsub.asp?path=/griffin/Necropsy.
6. Interstate shipment of etiologic agents. Code of Federal Regulations Title 42 Part72, Interstate shipment of etiologic agents (PublicHealth).U.S.Government,Wash-ington, DC: 65 FR 49908, August 16, 2000.
7. Hazardousmaterials regulations. Code of Federal Regulations Title 49 SubchapterC: hazardous materials regulations, Part 171, 172, 173, 175. Department of Trans-portation;Washington, DC: 76 FR 3345, Jan. 19, 2011. 73 FR 20772, April 16, 2008;FR 78634, Dec. 29, 2006.
8. Dangerous Goods Regulations. International Air Transport Association. IATAUSA, 1201 F Street, N.W. Suite 650 Washington, DC 2012.
9. Safe operating procedures: shipping infectious substances. Lincoln (NE): Univer-sity of Nebraska-Lincoln Department of Environmental Health and Safety; 2011.
10. Safe operating procedures: packaging and shipping hazardous materials /dangerous goods. Lincoln (NE): University of Nebraska-Lincoln Department ofEnvironmental Health and Safety; 2010.
11. Safe operating procedures: shipping infectious substances with or without dryice. Lincoln (NE): University of Nebraska-Lincoln Department of EnvironmentalHealth and Safety; 2011.
12. Safe operating procedures: shipping items with dry ice that are not otherwisedangerous goods. Lincoln (NE): University of Nebraska-Lincoln Department ofEnvironmental Health and Safety; 2011.
13. Griffin DD, Shuck K. Packaging and shipping diagnostic samples. Clay Center(NE): University of Nebraska – Lincoln, Great Plains Veterinary EducationalCenter; 2011.