fft salesforce training guide for project reinvest guide for project reinvest (1...fft salesforce...
TRANSCRIPT

Revised on: 12/07/2017
1
FFT Salesforce Training Guide for Project Reinvest
Summary: This is a step by step guide of how you will use FFT Salesforce to track client outcomes for the Project Reinvest grant. The purpose of this document is to help walk you through how to input the required financial counseling data. If you are unsure of how to do something in this guide, please make a note and submit your feedback to [email protected] or bring your questions to support hours- (every Monday at 1pm CST) call in information can be found on our website: http://www.foc-network.org/upcoming-webinars.html .
Salesforce Login information: Website: https://lisc.force.com/partners/login | Click on Login in the upper right corner Tier 1A
INTAKE:
1. First begin by searching for your client in the database to avoid creating duplicates.
2. Once you have verified your client is not in the database, proceed to add your client by clicking on the “Intake” tab (make sure to select Financial Opportunity Center as the Program for enrollment). Click on NEXT.
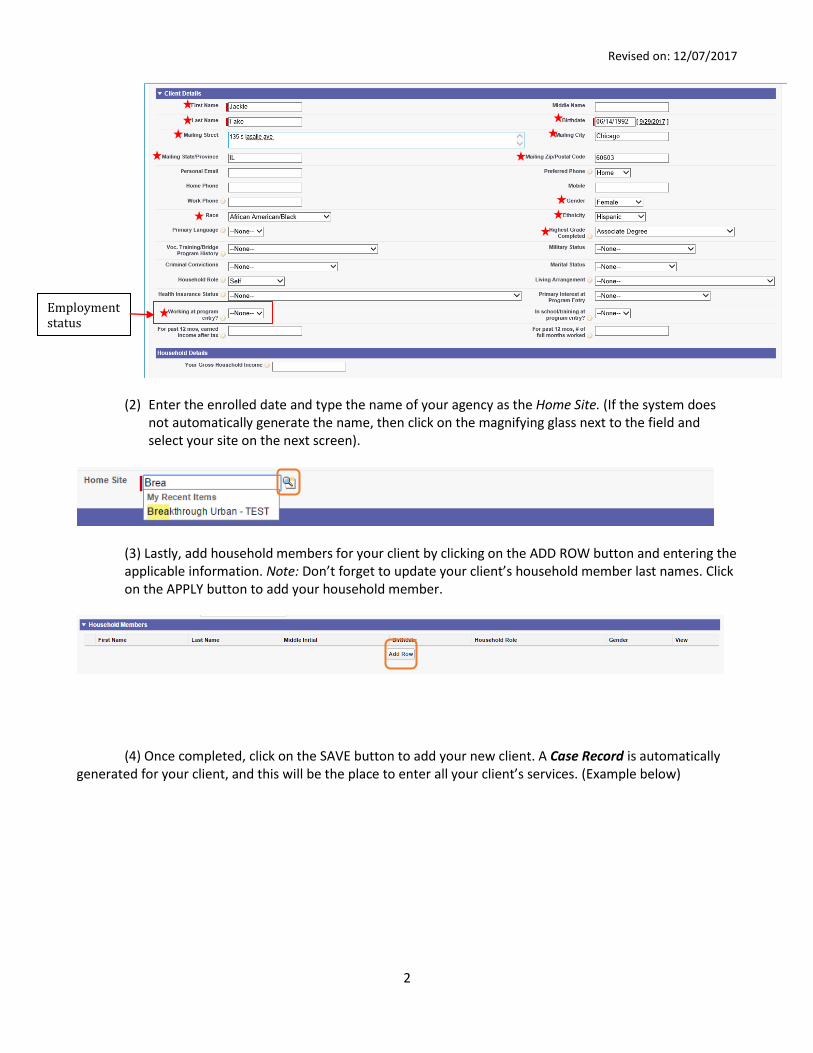
3. You will be directed to the Intake form. (1) Complete your client’s demographics fields and select the options to indicate your client’s current
employment status. All Required!
Revised on: 12/07/2017
2
(2) Enter the enrolled date and type the name of your agency as the Home Site. (If the system does not automatically generate the name, then click on the magnifying glass next to the field and select your site on the next screen).
(3) Lastly, add household members for your client by clicking on the ADD ROW button and entering the applicable information. Note: Don’t forget to update your client’s household member last names. Click on the APPLY button to add your household member.
(4) Once completed, click on the SAVE button to add your new client. A Case Record is automatically generated for your client, and this will be the place to enter all your client’s services. (Example below)
Employment status
Revised on: 12/07/2017
3
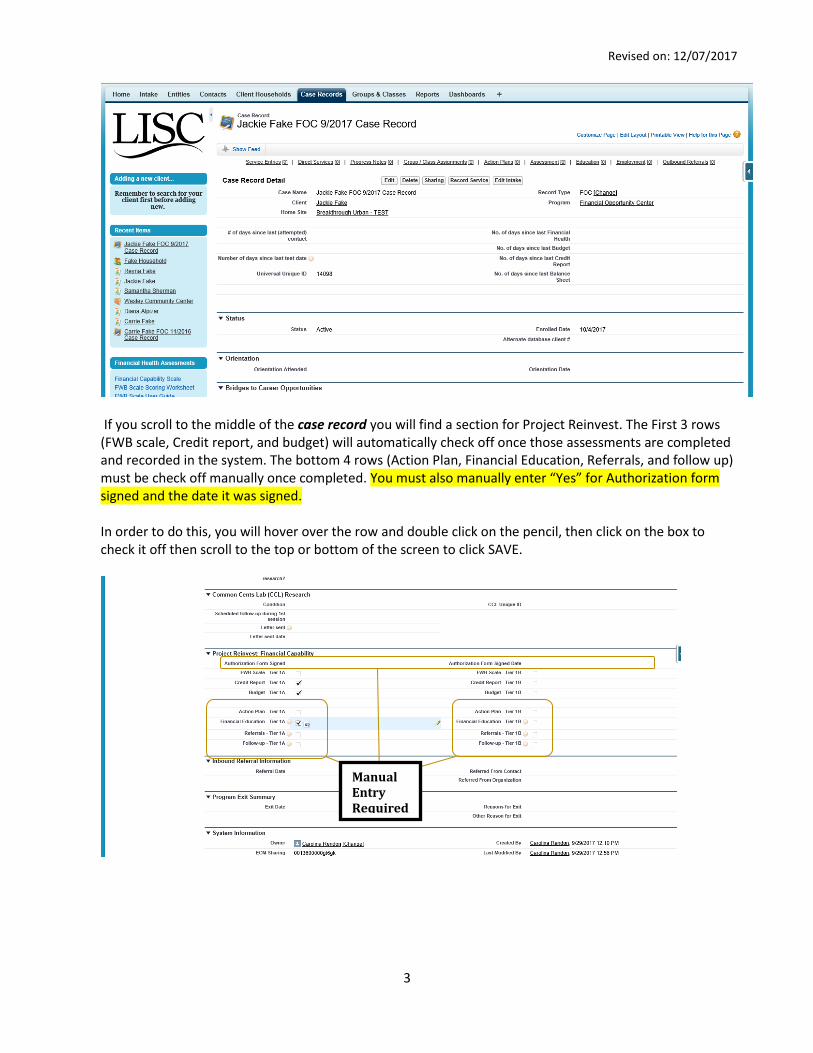
If you scroll to the middle of the case record you will find a section for Project Reinvest. The First 3 rows (FWB scale, Credit report, and budget) will automatically check off once those assessments are completed and recorded in the system. The bottom 4 rows (Action Plan, Financial Education, Referrals, and follow up) must be check off manually once completed. You must also manually enter “Yes” for Authorization form signed and the date it was signed. In order to do this, you will hover over the row and double click on the pencil, then click on the box to check it off then scroll to the top or bottom of the screen to click SAVE.
Manual Entry Required
Revised on: 12/07/2017
4
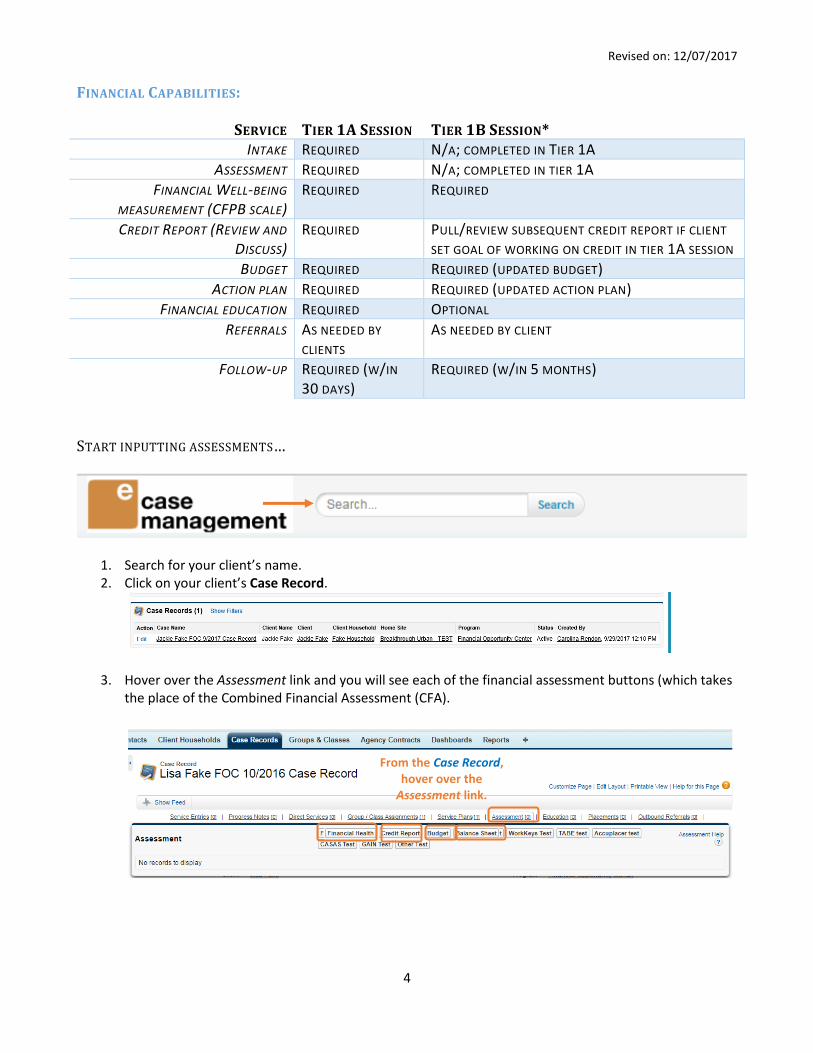
FINANCIAL CAPABILITIES:
SERVICE TIER 1A SESSION TIER 1B SESSION* INTAKE REQUIRED N/A; COMPLETED IN TIER 1A
ASSESSMENT REQUIRED N/A; COMPLETED IN TIER 1A
FINANCIAL WELL-BEING
MEASUREMENT (CFPB SCALE) REQUIRED REQUIRED
CREDIT REPORT (REVIEW AND
DISCUSS) REQUIRED PULL/REVIEW SUBSEQUENT CREDIT REPORT IF CLIENT
SET GOAL OF WORKING ON CREDIT IN TIER 1A SESSION
BUDGET REQUIRED REQUIRED (UPDATED BUDGET)
ACTION PLAN REQUIRED REQUIRED (UPDATED ACTION PLAN)
FINANCIAL EDUCATION REQUIRED OPTIONAL
REFERRALS AS NEEDED BY
CLIENTS AS NEEDED BY CLIENT
FOLLOW-UP REQUIRED (W/IN
30 DAYS) REQUIRED (W/IN 5 MONTHS)
START INPUTTING ASSESSMENTS…
1. Search for your client’s name. 2. Click on your client’s Case Record.
3. Hover over the Assessment link and you will see each of the financial assessment buttons (which takes the place of the Combined Financial Assessment (CFA).
From the Case Record, hover over the
Assessment link.
Revised on: 12/07/2017
5
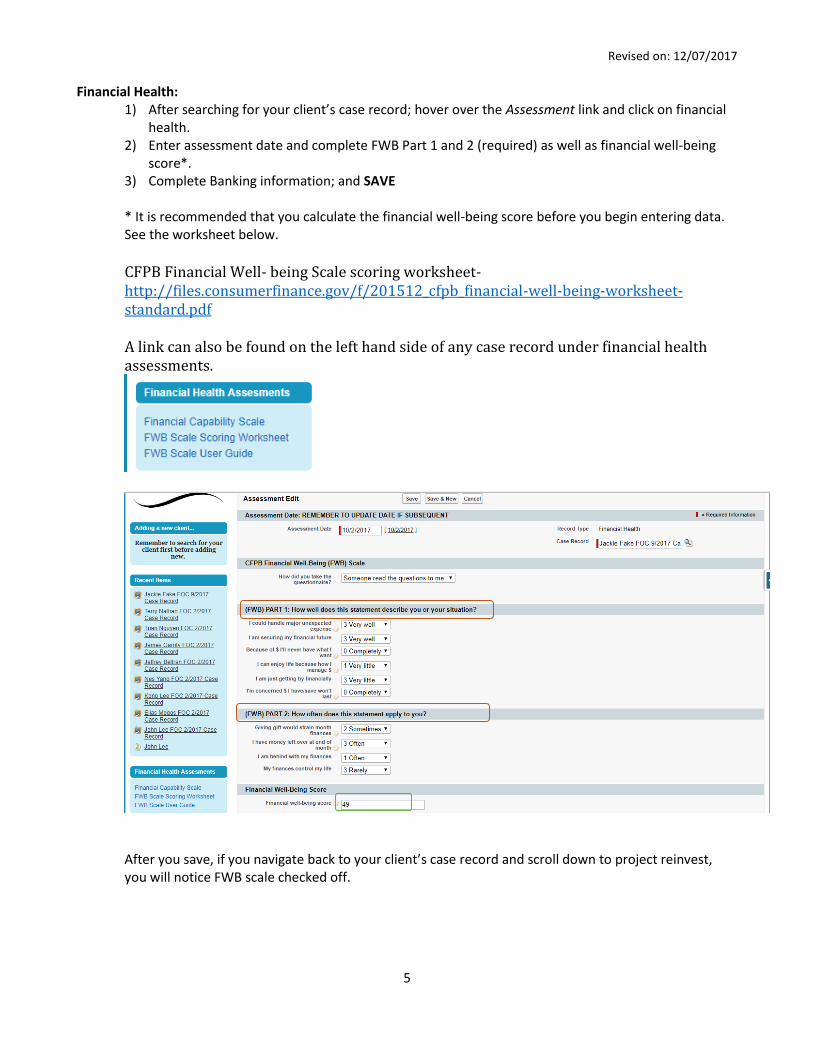
Financial Health: 1) After searching for your client’s case record; hover over the Assessment link and click on financial
health. 2) Enter assessment date and complete FWB Part 1 and 2 (required) as well as financial well-being
score*. 3) Complete Banking information; and SAVE
* It is recommended that you calculate the financial well-being score before you begin entering data. See the worksheet below.
CFPB Financial Well- being Scale scoring worksheet- http://files.consumerfinance.gov/f/201512_cfpb_financial-well-being-worksheet-standard.pdf A link can also be found on the left hand side of any case record under financial health assessments.
After you save, if you navigate back to your client’s case record and scroll down to project reinvest, you will notice FWB scale checked off.
Revised on: 12/07/2017
6
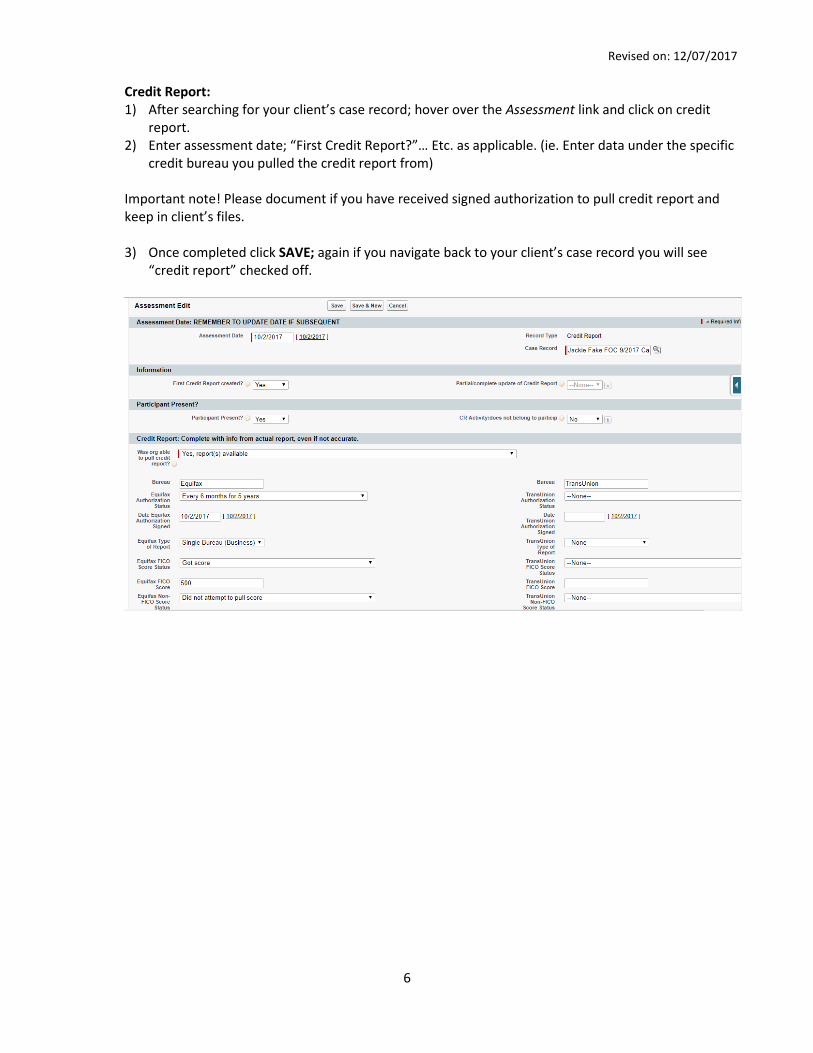
Credit Report: 1) After searching for your client’s case record; hover over the Assessment link and click on credit
report. 2) Enter assessment date; “First Credit Report?”… Etc. as applicable. (ie. Enter data under the specific
credit bureau you pulled the credit report from) Important note! Please document if you have received signed authorization to pull credit report and keep in client’s files. 3) Once completed click SAVE; again if you navigate back to your client’s case record you will see
“credit report” checked off.

Revised on: 12/07/2017
7
Budget:
1) After searching for your client’s case record; hover over the Assessment link and click on Budget. 2) Enter assessment date and all field applicable to your client’s budget. 3) When you click save you will be sent to the below screen where you can find your client’s Total
monthly net income. 4) Once completed click SAVE; again if you navigate back to your client’s case record you will see
“Budget” checked off.

Revised on: 12/07/2017
8
Action Plan: 1) Search for your client’s Case Record. Hover over the Action Plans link and click on the New Action
Plan button.
2) Enter the Start Date, and write in a Vision Narrative (this used to be the Big Vision). Click on the
QUICK SAVE button. 3) Click on the ECM Goals tab. Click on the New ECM Goal button*. Choose a Client Goal and at least
one Goal Action.
4) Fill in the Target Completion Date. Click on the SAVE button. *You may create as many ECM Goals
as you wish. 5) After you click save you must navigate back to your client’s case record and Manually Check off
“Action Plan”. (Instructions on page 3)
From the Case Record, hover over the Action
Plan link.
Revised on: 12/07/2017
9
Financial Education:
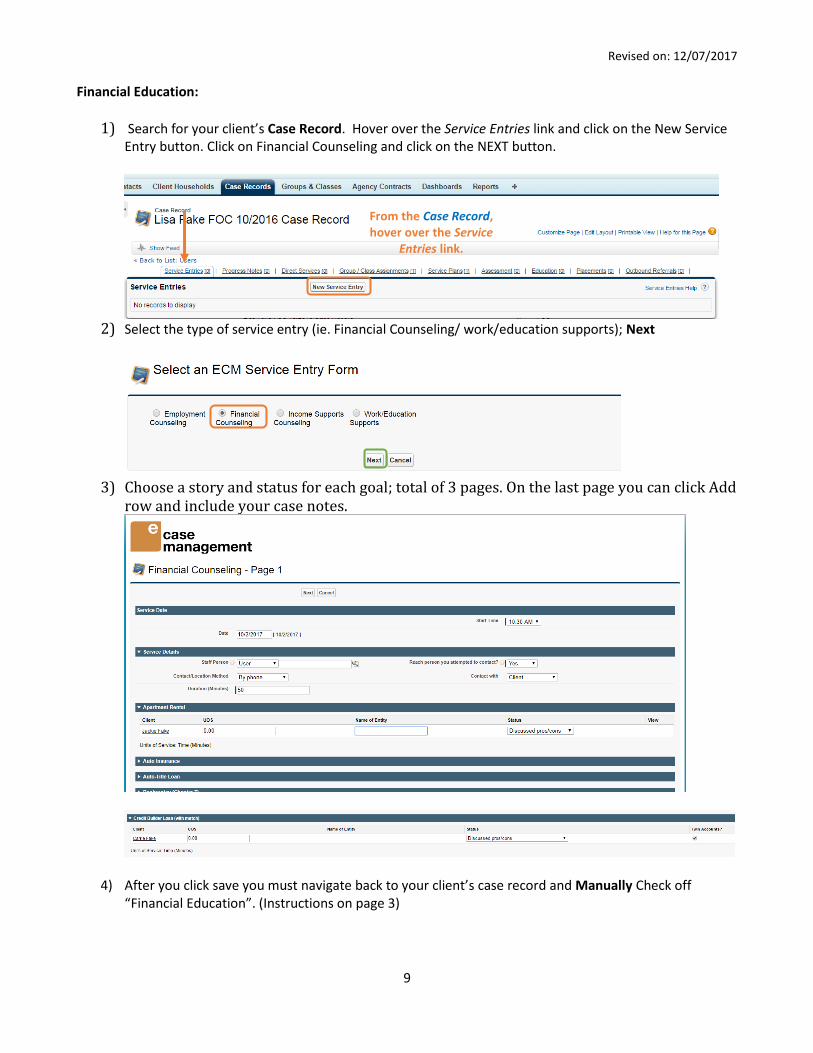
1) Search for your client’s Case Record. Hover over the Service Entries link and click on the New Service Entry button. Click on Financial Counseling and click on the NEXT button.
2) Select the type of service entry (ie. Financial Counseling/ work/education supports); Next
3) Choose a story and status for each goal; total of 3 pages. On the last page you can click Add
row and include your case notes.
4) After you click save you must navigate back to your client’s case record and Manually Check off “Financial Education”. (Instructions on page 3)
From the Case Record, hover over the Service
Entries link.
Revised on: 12/07/2017
10
Referrals: Referrals are as needed by client.
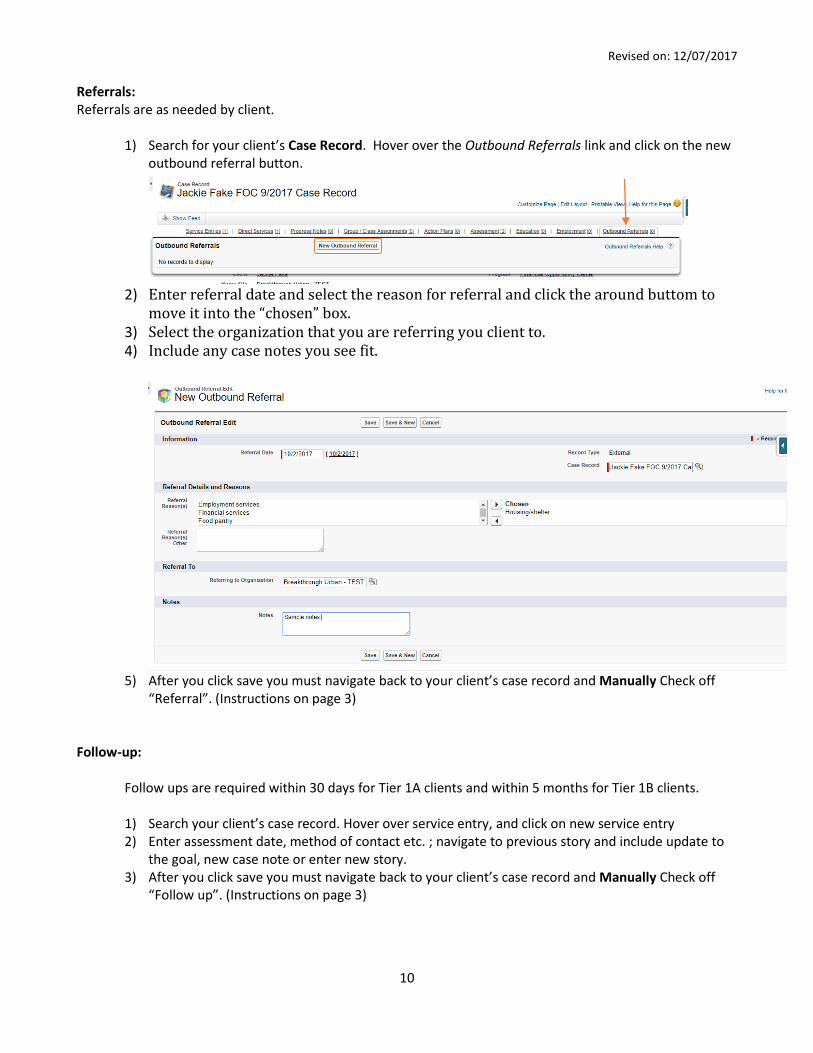
1) Search for your client’s Case Record. Hover over the Outbound Referrals link and click on the new outbound referral button.
2) Enter referral date and select the reason for referral and click the around buttom to
move it into the “chosen” box. 3) Select the organization that you are referring you client to. 4) Include any case notes you see fit.
5) After you click save you must navigate back to your client’s case record and Manually Check off
“Referral”. (Instructions on page 3)
Follow-up:
Follow ups are required within 30 days for Tier 1A clients and within 5 months for Tier 1B clients. 1) Search your client’s case record. Hover over service entry, and click on new service entry 2) Enter assessment date, method of contact etc. ; navigate to previous story and include update to
the goal, new case note or enter new story. 3) After you click save you must navigate back to your client’s case record and Manually Check off
“Follow up”. (Instructions on page 3)
Revised on: 12/07/2017
11
Revised on: 12/07/2017
12
Tier 1B
FINANCIAL CAPABILITIES:
SERVICE TIER 1A SESSION TIER 1B SESSION* INTAKE REQUIRED N/A; COMPLETED IN TIER 1A
ASSESSMENT REQUIRED N/A; COMPLETED IN TIER 1A
FINANCIAL WELL-BEING
MEASUREMENT (CFPB SCALE) REQUIRED REQUIRED
CREDIT REPORT (REVIEW AND
DISCUSS) REQUIRED PULL/REVIEW SUBSEQUENT CREDIT REPORT IF CLIENT
SET GOAL OF WORKING ON CREDIT IN TIER 1A SESSION
BUDGET REQUIRED REQUIRED (UPDATED BUDGET)
ACTION PLAN REQUIRED REQUIRED (UPDATED ACTION PLAN)
FINANCIAL EDUCATION REQUIRED OPTIONAL
REFERRALS AS NEEDED BY
CLIENTS AS NEEDED BY CLIENT
FOLLOW-UP REQUIRED (W/IN
30 DAYS) REQUIRED (W/IN 5 MONTHS)
Above you will see the requirements for Tier 1B as compared to Tier 1A. Note that a client cannot start a tier 1B session without first completing tier 1A but Tier 1B may start at the time of your tier 1A follow-up. Notice that Intake and Assessment has already been completed in Tier 1A. For tier 1B you are then required to provide and updated FWB scale, updated budget, updated action plan and follow up within 5 months. Financial education is optional and Credit report/ referrals are as needed by client. Financial Well- Being (update required):
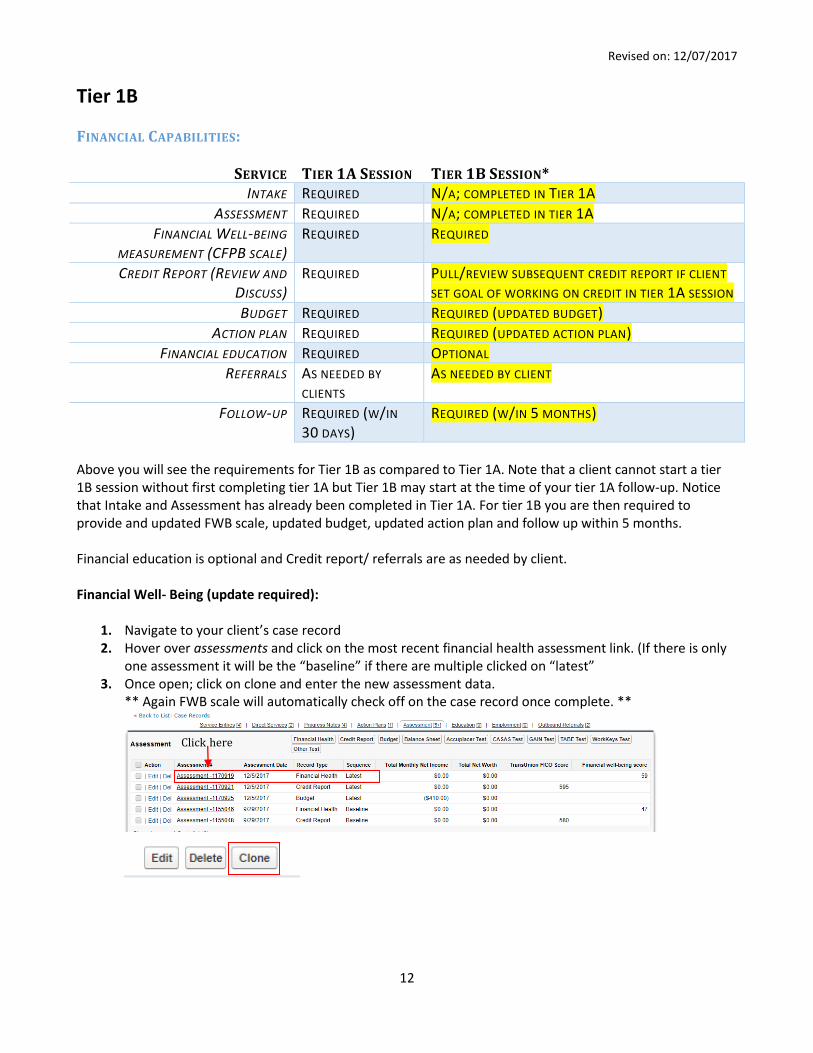
1. Navigate to your client’s case record 2. Hover over assessments and click on the most recent financial health assessment link. (If there is only
one assessment it will be the “baseline” if there are multiple clicked on “latest” 3. Once open; click on clone and enter the new assessment data.
** Again FWB scale will automatically check off on the case record once complete. **
Click here

Revised on: 12/07/2017
13
Credit Report (As needed by Client): Credit report pulls will only be required if your clients goal from tier 1a was to work on their credit.
1. Navigate to your client’s case record 2. Hover over assessments and click on the most recent credit report assessment link. (If there is only one
assessment it will be the “baseline” if there are multiple clicked on “latest” 3. Once open; click on clone and enter the new assessment data. ** Credit report will automatically check off on the case record once complete. **
Budget (update required):
1. Navigate to your client’s case record 2. Hover over assessments and click on the most recent budget assessment link. (If there is only one
assessment it will be the “baseline” if there are multiple clicked on “latest” 3. Once open; click on clone and enter the new assessment data. ** The budget will automatically check off on the case record once complete. **
Action Plan (update required):
1. Navigate to your client’s case record 2. Hover over Action Plans and click on the action plan that was created in tier 1A. 3. Once open; Click on ECM goal and choose a goal to edit/update. Make sure not to delete any previous
case note but instead add to it by including a date. If goal has been met include completion date. QUICK SAVE once complete.
** The action plan will NOT automatically check off on the case record; See instructions on page 3. **
Revised on: 12/07/2017
14
Financial Education (Optional)
1. Navigate to your client’s case record. 2. Hover over Services Entries and click new service entry 3. Click on Financial Counseling 4. Then you can either update a previous goal story and/or create a new story ; SAVE *** Navigate back to client’s case record and manually check off referral (instructions on page 3)***
Referrals
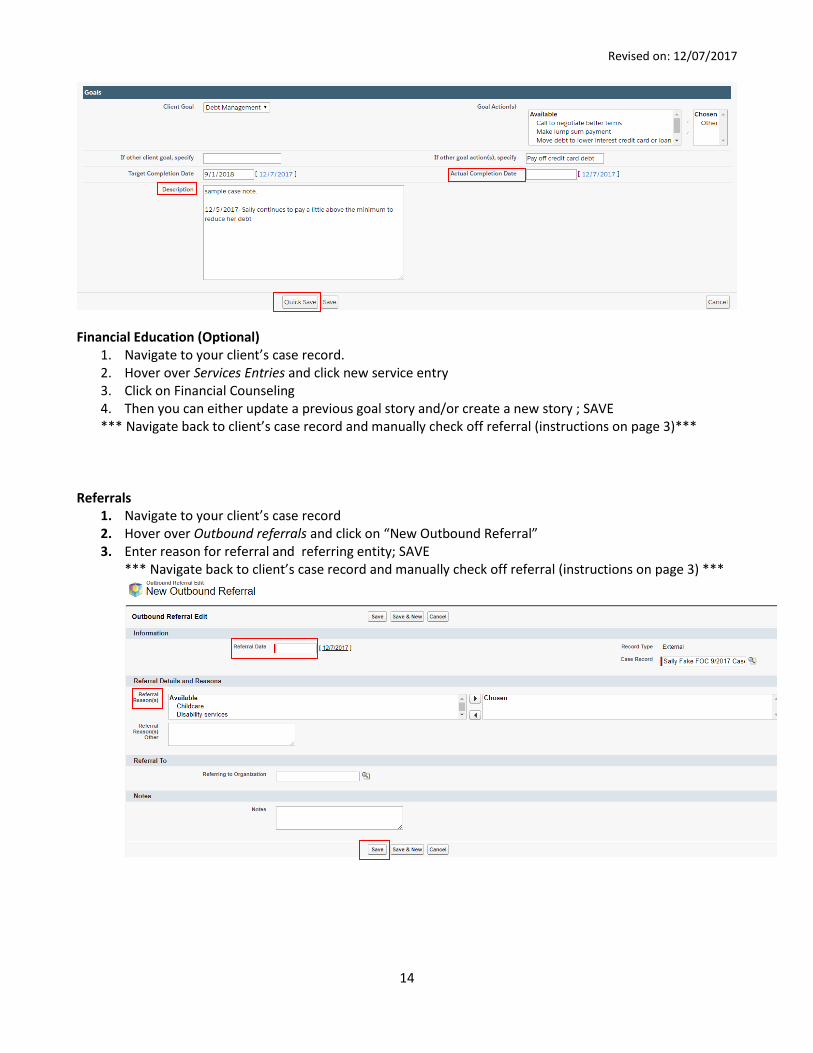
1. Navigate to your client’s case record 2. Hover over Outbound referrals and click on “New Outbound Referral” 3. Enter reason for referral and referring entity; SAVE
*** Navigate back to client’s case record and manually check off referral (instructions on page 3) ***
Revised on: 12/07/2017
15
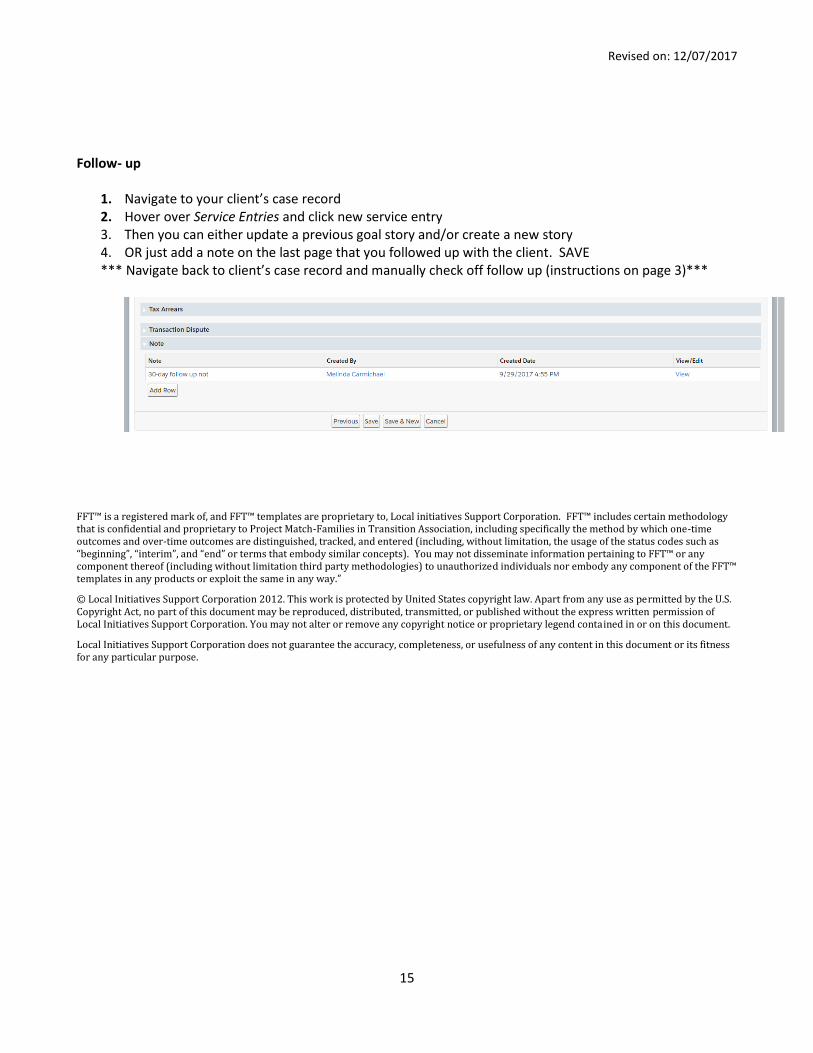
Follow- up
1. Navigate to your client’s case record 2. Hover over Service Entries and click new service entry 3. Then you can either update a previous goal story and/or create a new story 4. OR just add a note on the last page that you followed up with the client. SAVE *** Navigate back to client’s case record and manually check off follow up (instructions on page 3)***
FFT™ is a registered mark of, and FFT™ templates are proprietary to, Local initiatives Support Corporation. FFT™ includes certain methodology that is confidential and proprietary to Project Match-Families in Transition Association, including specifically the method by which one-time outcomes and over-time outcomes are distinguished, tracked, and entered (including, without limitation, the usage of the status codes such as “beginning”, “interim”, and “end” or terms that embody similar concepts). You may not disseminate information pertaining to FFT™ or any component thereof (including without limitation third party methodologies) to unauthorized individuals nor embody any component of the FFT™ templates in any products or exploit the same in any way.”
© Local Initiatives Support Corporation 2012. This work is protected by United States copyright law. Apart from any use as permitted by the U.S. Copyright Act, no part of this document may be reproduced, distributed, transmitted, or published without the express written permission of Local Initiatives Support Corporation. You may not alter or remove any copyright notice or proprietary legend contained in or on this document.
Local Initiatives Support Corporation does not guarantee the accuracy, completeness, or usefulness of any content in this document or its fitness for any particular purpose.