fermilab sharepoint 2010cd-docdb.fnal.gov/0046/004683/013/fermilab sharepoint 2010 end-us… ·...
TRANSCRIPT
Fermilab SharePoint Training Page 0
FERMI NATIONAL ACCELERATOR LABORATORY
Fermilab SharePoint 2010 Contributor Training Manual
Fang Wang, Kimberly Myles
1/3/2012
Version 6.0
This training manual provides information and hands-on examples for how to use the Fermilab instance of SharePoint for those with Contribute- level permissions. Contribute-level permissions allow users to add, edit and delete items in already established lists and document libraries.
Fermilab SharePoint Training Page 1
i. Useful Online Resources .................................................................................................................. 3
a. Fermilab Resources: ..................................................................................................................... 3
b. Online resources from Microsoft:................................................................................................. 3
ii. References ....................................................................................................................................... 3
iii. Additional training opportunities ..................................................................................................... 4
a. SharePoint computer-based training for Employees ..................................................................... 4
b. Learning Tree ............................................................................................................................... 4
Introduction ............................................................................................................................................ 5
1) Authentication ................................................................................................................................ 6
1.1 Login to SharePoint .................................................................................................................. 6
2) Working with a Fermilab team site .................................................................................................. 7
2.1 Team site features ................................................................................................................... 7
3) Site Navigation................................................................................................................................. 9
3.1 Page Up button ........................................................................................................................ 9
3.2 Search ...................................................................................................................................... 9
4) The Ribbon .................................................................................................................................... 10
5) Working with your My Site ............................................................................................................ 11
5.1 Accessing your My Site ........................................................................................................... 11
5.1 What’s New ........................................................................................................................... 11
5.3 Newsfeed ............................................................................................................................... 13
5.4 My Content ............................................................................................................................ 14
5.5 My Profile .............................................................................................................................. 15
5.6 Adding Tags to content in SharePoint ..................................................................................... 17
5.7 My Links ................................................................................................................................. 19
6) Working with Document Libraries .................................................................................................. 20
6.1 Upload a file to a Document Library ....................................................................................... 20
6.2 Upload multiple files to a Document Library ........................................................................... 21
7) Working with documents ............................................................................................................... 22
7.1 Using the Edit menu ............................................................................................................... 22
7.2 Editing a document’s properties ............................................................................................. 22
7.3 Checking documents in and out ............................................................................................. 23
7.4 Recover deleted documents ................................................................................................... 23
Fermilab SharePoint Training Page 2
7.5 Versioning .............................................................................................................................. 24
7.6 Sending a link to a document by e-mail .................................................................................. 25
7.7 Create alerts .......................................................................................................................... 26
7.8 Manage alerts ........................................................................................................................ 27
8) Working with Lists ......................................................................................................................... 28
8.1 Use the Ribbon to manage Lists.............................................................................................. 28
8.2 Create a column ..................................................................................................................... 29
8.3 Adding calendar items ............................................................................................................ 30
Fermilab SharePoint Training Page 3
i. Useful Online Resources
a. Fermilab Resources:
Fermilab integration environment: https://intranet-int.fnal.gov/
Fermilab SharePoint Help Site:
https://sharepoint.fnal.gov/help/Pages/HelpHome.aspx
Fermilab SharePoint Help Blog:
https://sharepoint.fnal.gov/help/HelpBlog/default.aspx
Latest version of this End-user manual: http://cd-docdb.fnal.gov/cgi-
bin/ShowDocument?docid=4683
b. Online resources from Microsoft:
Microsoft SharePoint 2010 For End Users:
http://sharepoint.microsoft.com/en-us/product/benefits/End-
User/Pages/default.aspx
Microsoft “That’s why I use SharePoint” site:
http://sharepoint.microsoft.com/iusesharepoint/landing.aspx
Microsoft SharePoint 2010 Quick Reference Cards:
http://office.microsoft.com/en-us/sharepoint-server-help/quick-reference-card-
RZ101806469.aspx?section=11&mode=print
ii. References
1. Microsoft SharePoint 2010 Plain & Simple, by Jonathan Lightfoot and Chris
Beckett.
2. SharePoint 2010 How-To, by Ishai Sagi.
3. Microsoft SharePoint 2010 for Dummies, by Vanessa L. Williams.
4. The SharePoint Shepherd’s Guide for End Users, by Robert L. Bogue.
5. Beginning SharePoint 2010: Building Business Solutions with SharePoint, by
Amanda Perran, Shane Perran, Jennifer Mason, and Laura Rogers.
This training manual is also built based upon the “SharePoint 2010 End User
Information” quick guide developed by Alicia Simmons.
Fermilab SharePoint Training Page 4
iii. Additional training opportunities
a. SharePoint computer-based training for Employees
Fermilab employees can request online, computer-based SharePoint training
through the Fermilab Service Desk:
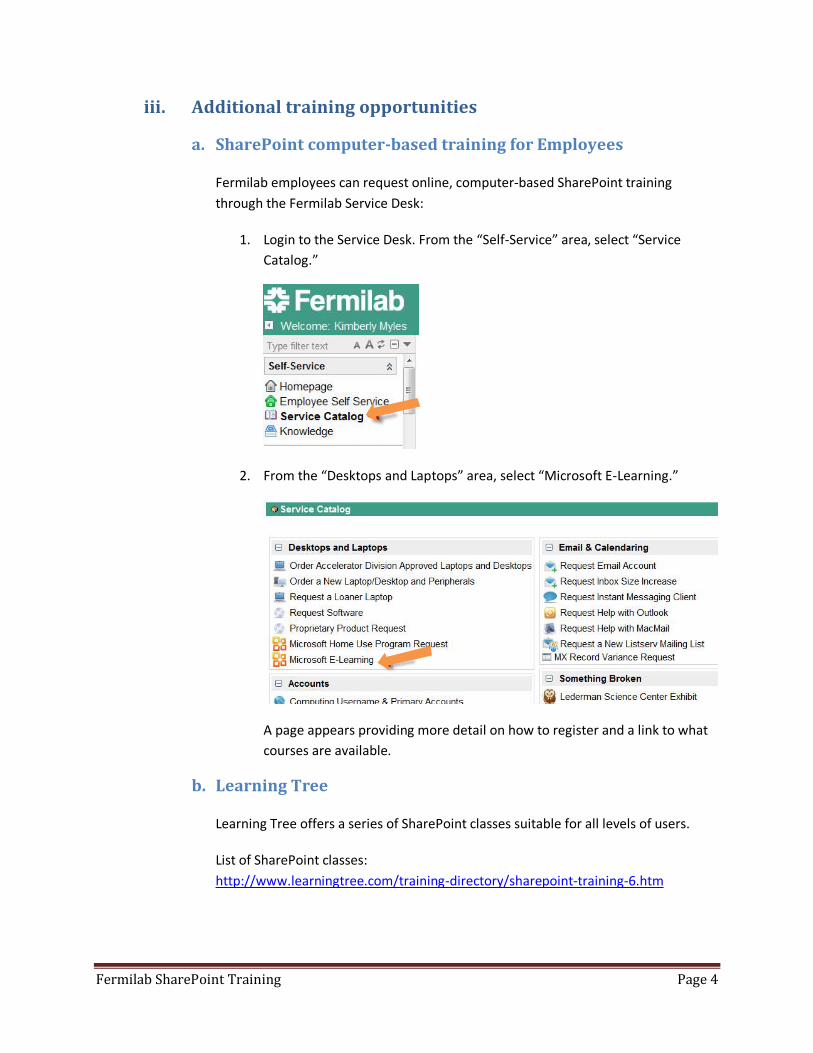
1. Login to the Service Desk. From the “Self-Service” area, select “Service
Catalog.”
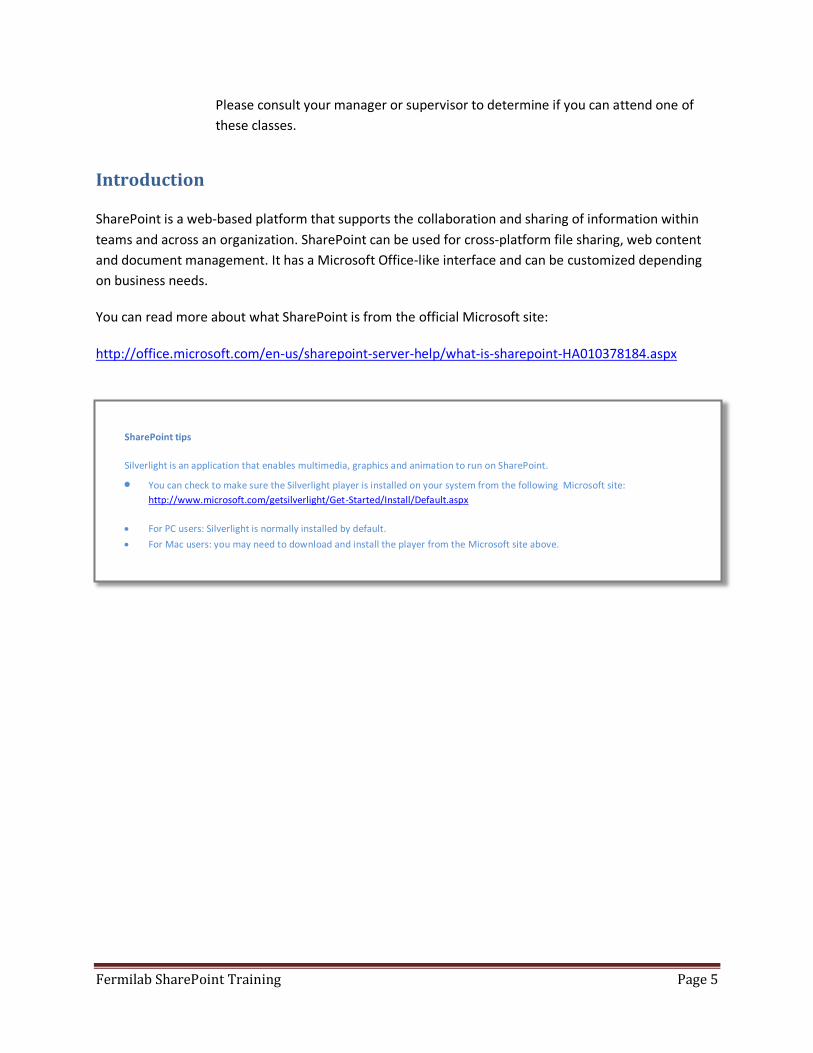
2. From the “Desktops and Laptops” area, select “Microsoft E-Learning.”
A page appears providing more detail on how to register and a link to what
courses are available.
b. Learning Tree
Learning Tree offers a series of SharePoint classes suitable for all levels of users.
List of SharePoint classes:
http://www.learningtree.com/training-directory/sharepoint-training-6.htm
Fermilab SharePoint Training Page 5
Please consult your manager or supervisor to determine if you can attend one of
these classes.
Introduction
SharePoint is a web-based platform that supports the collaboration and sharing of information within
teams and across an organization. SharePoint can be used for cross-platform file sharing, web content
and document management. It has a Microsoft Office-like interface and can be customized depending
on business needs.
You can read more about what SharePoint is from the official Microsoft site:
http://office.microsoft.com/en-us/sharepoint-server-help/what-is-sharepoint-HA010378184.aspx
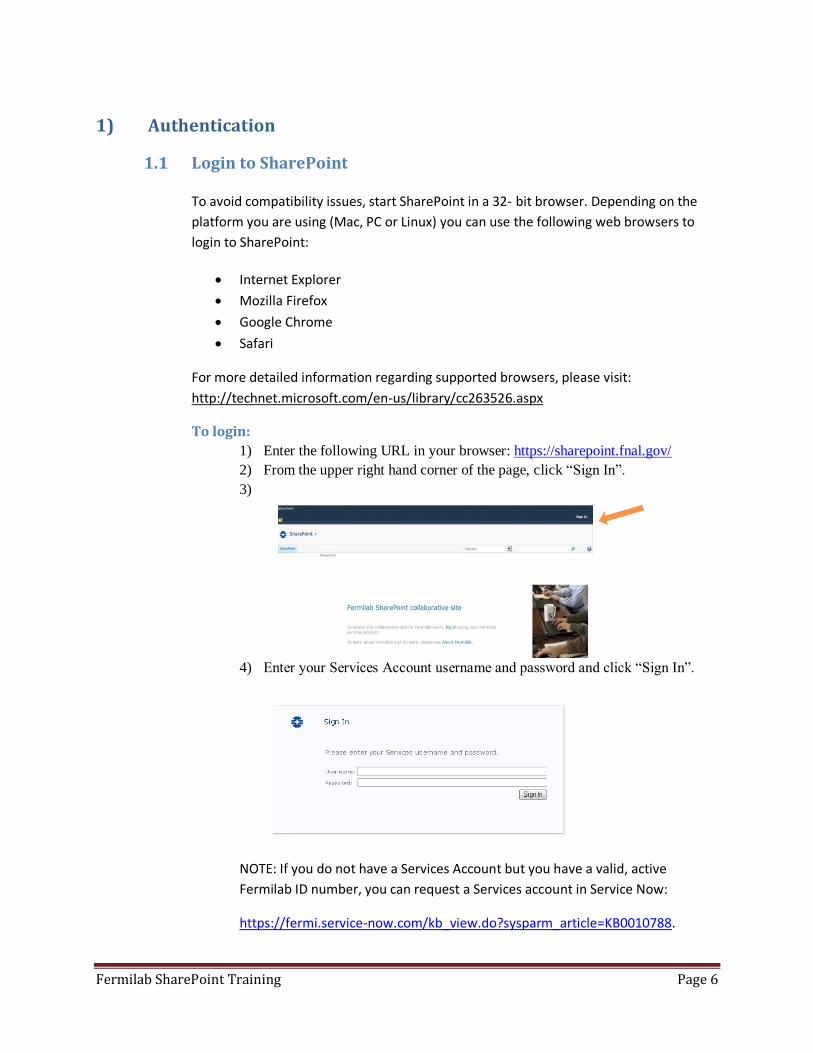
SharePoint tips
Silverlight is an application that enables multimedia, graphics and animation to run on SharePoint.
You can check to make sure the Silverlight player is installed on your system from the following Microsoft site: http://www.microsoft.com/getsilverlight/Get-Started/Install/Default.aspx
For PC users: Silverlight is normally installed by default.
For Mac users: you may need to download and install the player from the Microsoft site above.
Fermilab SharePoint Training Page 6
1) Authentication
1.1 Login to SharePoint
To avoid compatibility issues, start SharePoint in a 32- bit browser. Depending on the
platform you are using (Mac, PC or Linux) you can use the following web browsers to
login to SharePoint:
Internet Explorer
Mozilla Firefox
Google Chrome
Safari
For more detailed information regarding supported browsers, please visit:
http://technet.microsoft.com/en-us/library/cc263526.aspx
To login:
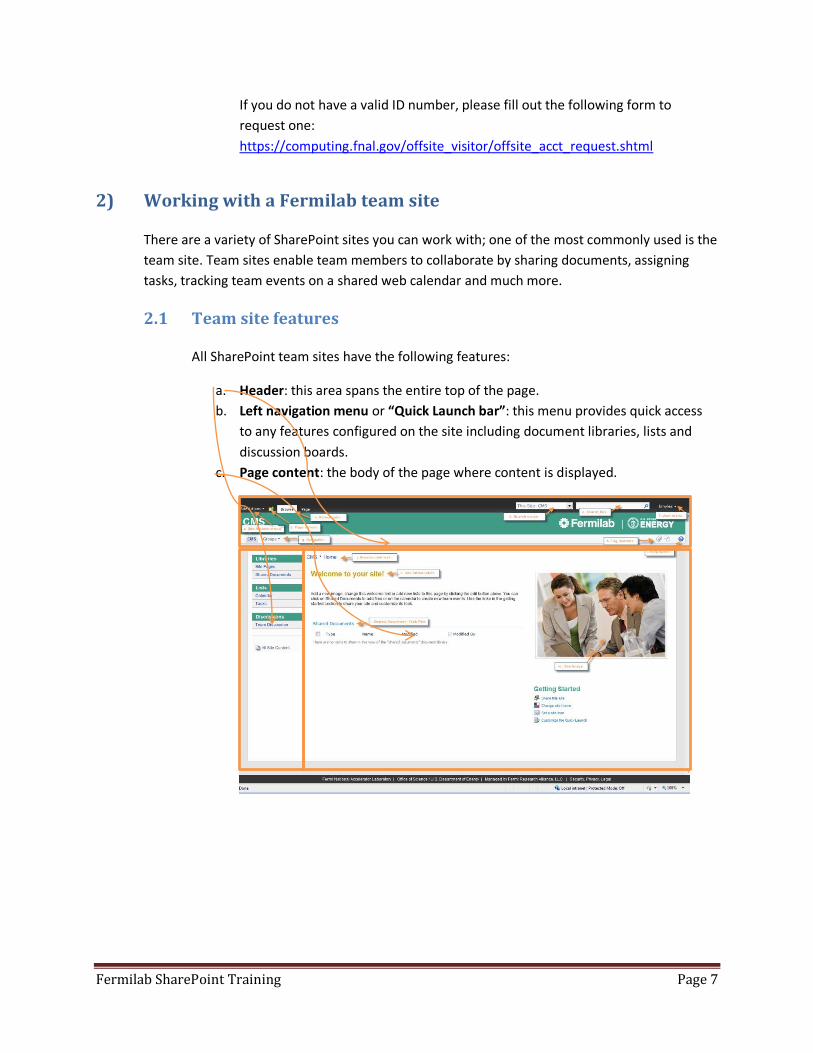
1) Enter the following URL in your browser: https://sharepoint.fnal.gov/
2) From the upper right hand corner of the page, click “Sign In”.
3)
4) Enter your Services Account username and password and click “Sign In”.
NOTE: If you do not have a Services Account but you have a valid, active
Fermilab ID number, you can request a Services account in Service Now:
https://fermi.service-now.com/kb_view.do?sysparm_article=KB0010788.
Fermilab SharePoint Training Page 7
If you do not have a valid ID number, please fill out the following form to
request one:
https://computing.fnal.gov/offsite_visitor/offsite_acct_request.shtml
2) Working with a Fermilab team site
There are a variety of SharePoint sites you can work with; one of the most commonly used is the
team site. Team sites enable team members to collaborate by sharing documents, assigning
tasks, tracking team events on a shared web calendar and much more.
2.1 Team site features
All SharePoint team sites have the following features:
a. Header: this area spans the entire top of the page.
b. Left navigation menu or “Quick Launch bar”: this menu provides quick access
to any features configured on the site including document libraries, lists and
discussion boards.
c. Page content: the body of the page where content is displayed.
Fermilab SharePoint Training Page 8
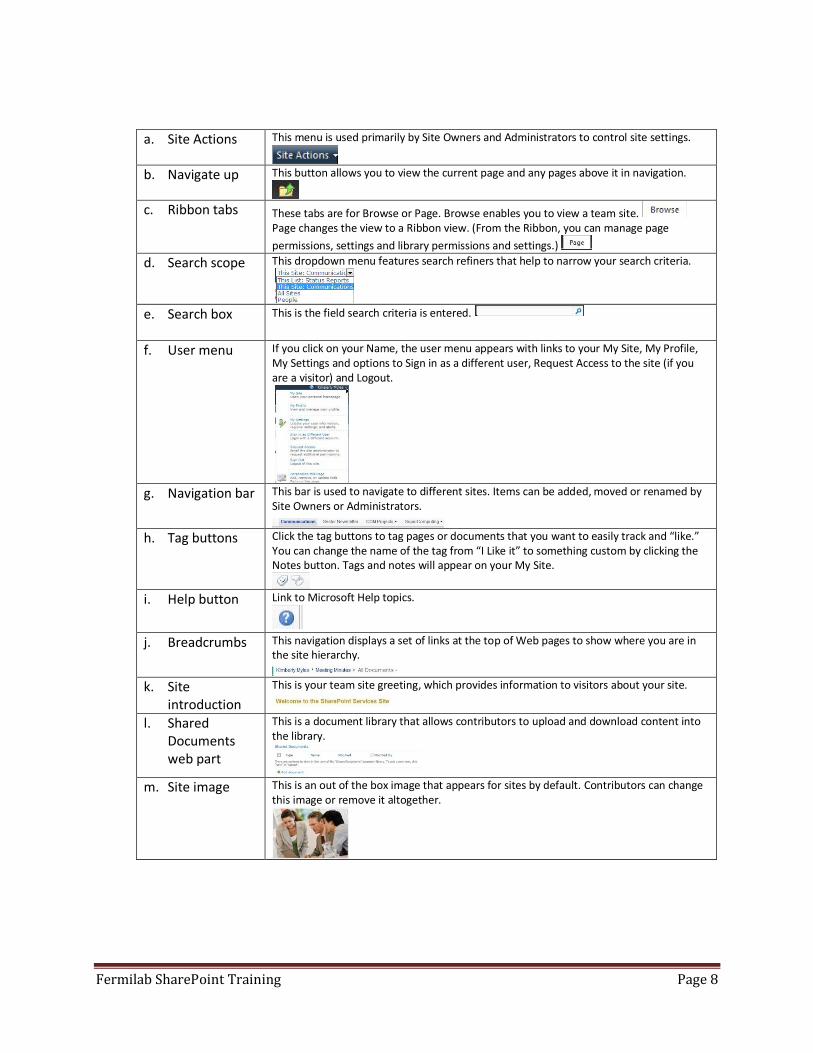
a. Site Actions This menu is used primarily by Site Owners and Administrators to control site settings.
b. Navigate up This button allows you to view the current page and any pages above it in navigation.
c. Ribbon tabs These tabs are for Browse or Page. Browse enables you to view a team site.
Page changes the view to a Ribbon view. (From the Ribbon, you can manage page
permissions, settings and library permissions and settings.)
d. Search scope
This dropdown menu features search refiners that help to narrow your search criteria.
e. Search box
This is the field search criteria is entered.
f. User menu
If you click on your Name, the user menu appears with links to your My Site, My Profile, My Settings and options to Sign in as a different user, Request Access to the site (if you are a visitor) and Logout.
g. Navigation bar This bar is used to navigate to different sites. Items can be added, moved or renamed by
Site Owners or Administrators.
h. Tag buttons Click the tag buttons to tag pages or documents that you want to easily track and “like.”
You can change the name of the tag from “I Like it” to something custom by clicking the Notes button. Tags and notes will appear on your My Site.
i. Help button Link to Microsoft Help topics.
j. Breadcrumbs This navigation displays a set of links at the top of Web pages to show where you are in the site hierarchy.
k. Site
introduction
This is your team site greeting, which provides information to visitors about your site.
l. Shared Documents web part
This is a document library that allows contributors to upload and download content into the library.
m. Site image
This is an out of the box image that appears for sites by default. Contributors can change this image or remove it altogether.
Fermilab SharePoint Training Page 9
3) Site Navigation
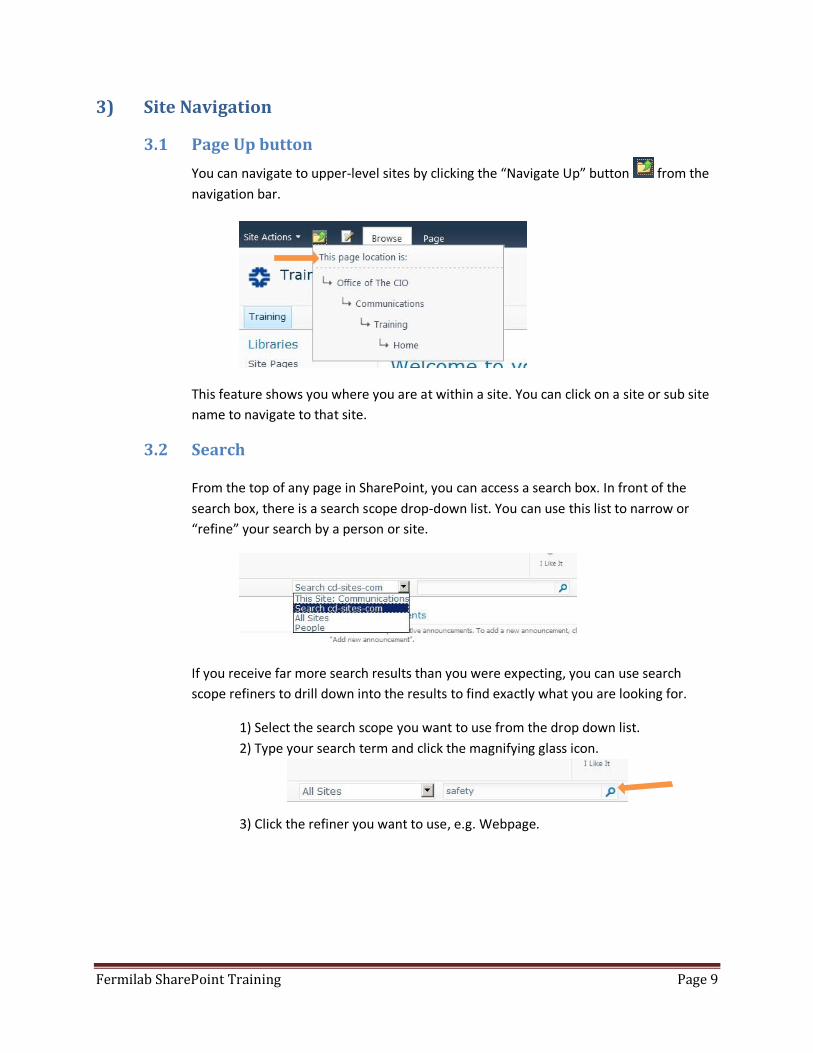
3.1 Page Up button
You can navigate to upper-level sites by clicking the “Navigate Up” button from the
navigation bar.
This feature shows you where you are at within a site. You can click on a site or sub site
name to navigate to that site.
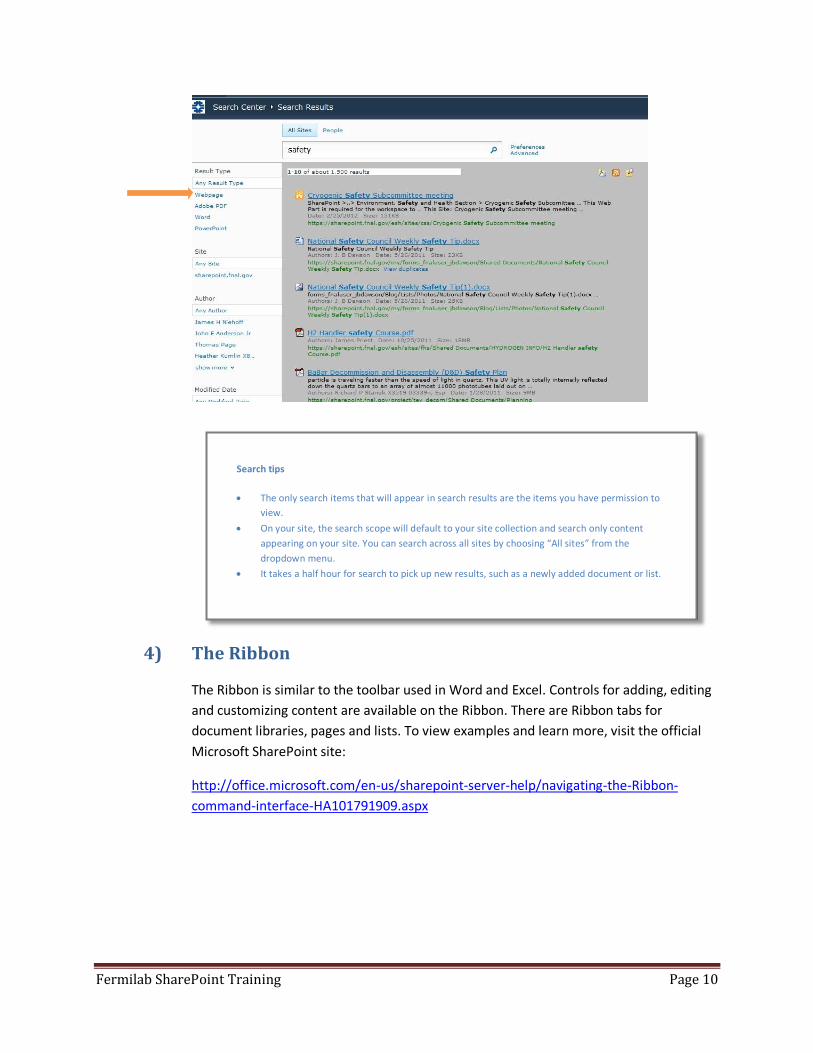
3.2 Search
From the top of any page in SharePoint, you can access a search box. In front of the
search box, there is a search scope drop-down list. You can use this list to narrow or
“refine” your search by a person or site.
If you receive far more search results than you were expecting, you can use search
scope refiners to drill down into the results to find exactly what you are looking for.
1) Select the search scope you want to use from the drop down list.
2) Type your search term and click the magnifying glass icon.
3) Click the refiner you want to use, e.g. Webpage.
Fermilab SharePoint Training Page 10
4) The Ribbon
The Ribbon is similar to the toolbar used in Word and Excel. Controls for adding, editing
and customizing content are available on the Ribbon. There are Ribbon tabs for
document libraries, pages and lists. To view examples and learn more, visit the official
Microsoft SharePoint site:
http://office.microsoft.com/en-us/sharepoint-server-help/navigating-the-Ribbon-
command-interface-HA101791909.aspx
Search tips
The only search items that will appear in search results are the items you have permission to
view.
On your site, the search scope will default to your site collection and search only content
appearing on your site. You can search across all sites by choosing “All sites” from the
dropdown menu.
It takes a half hour for search to pick up new results, such as a newly added document or list.
Fermilab SharePoint Training Page 11
5) Working with your My Site
A My Site is a personal web site that is available for any authenticated user with a Services
Account and Password.
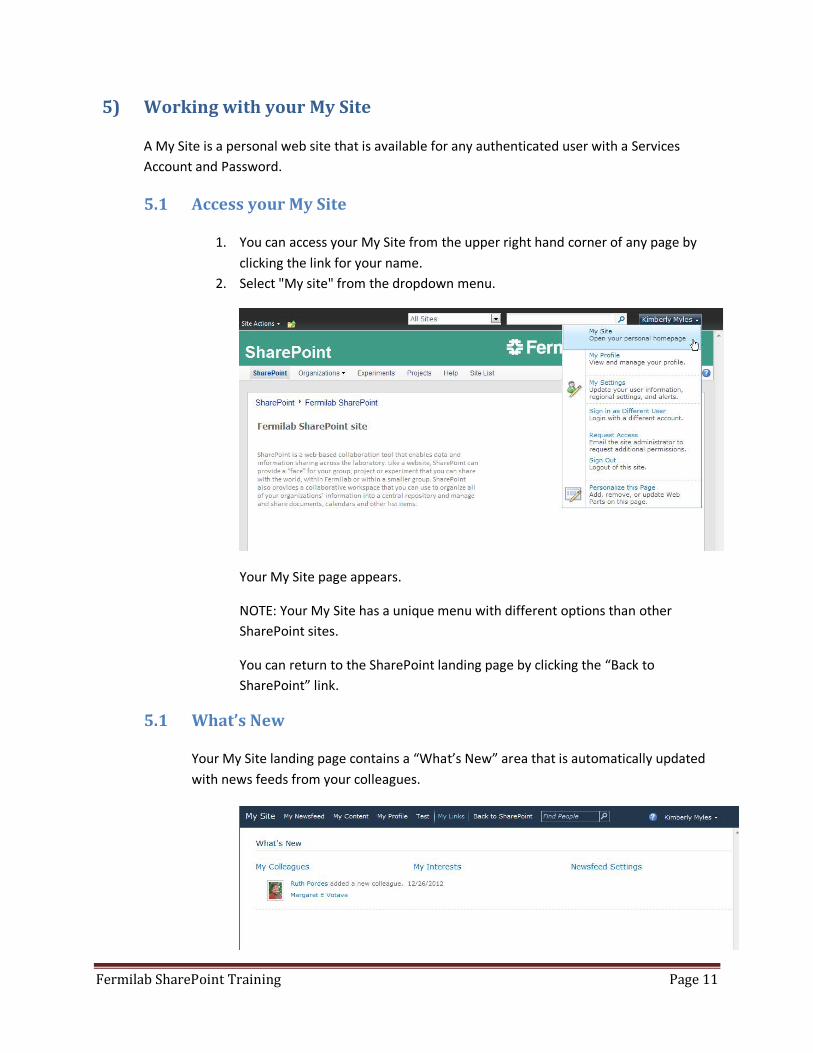
5.1 Access your My Site
1. You can access your My Site from the upper right hand corner of any page by
clicking the link for your name.
2. Select "My site" from the dropdown menu.
Your My Site page appears.
NOTE: Your My Site has a unique menu with different options than other
SharePoint sites.
You can return to the SharePoint landing page by clicking the “Back to
SharePoint” link.
5.1 What’s New
Your My Site landing page contains a “What’s New” area that is automatically updated
with news feeds from your colleagues.
Fermilab SharePoint Training Page 12
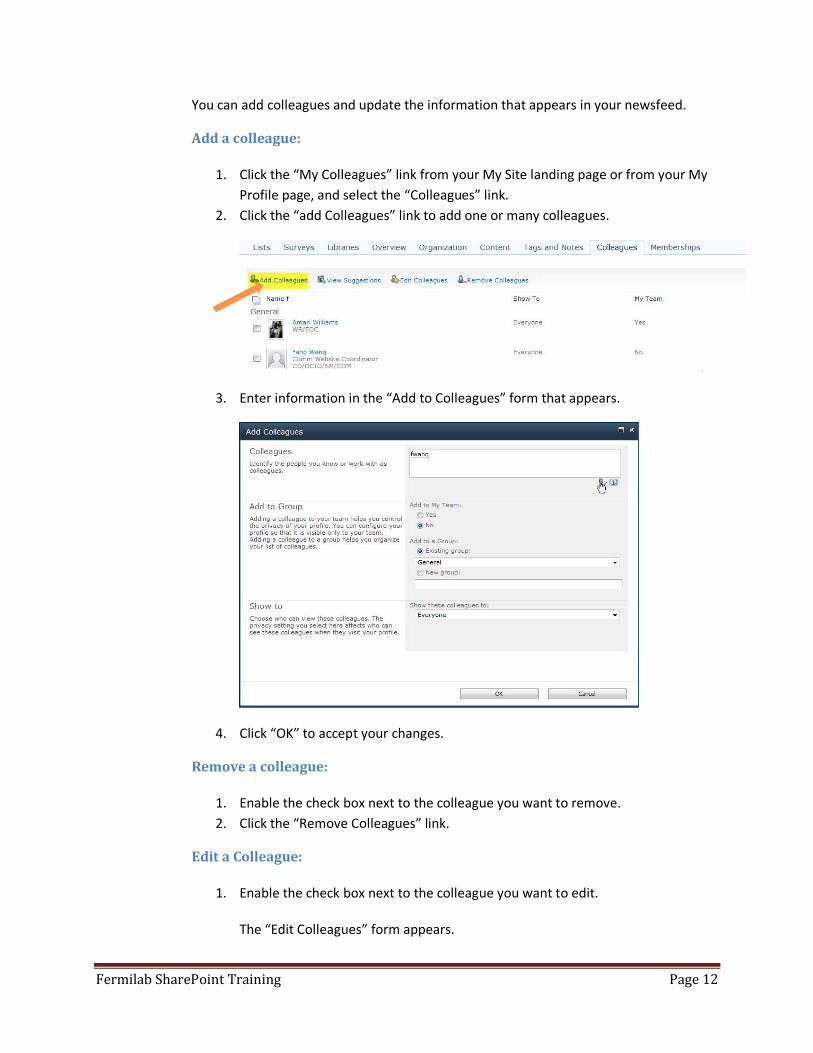
You can add colleagues and update the information that appears in your newsfeed.
Add a colleague:
1. Click the “My Colleagues” link from your My Site landing page or from your My
Profile page, and select the “Colleagues” link.
2. Click the “add Colleagues” link to add one or many colleagues.
3. Enter information in the “Add to Colleagues” form that appears.
4. Click “OK” to accept your changes.
Remove a colleague:
1. Enable the check box next to the colleague you want to remove.
2. Click the “Remove Colleagues” link.
Edit a Colleague:
1. Enable the check box next to the colleague you want to edit.
The “Edit Colleagues” form appears.
Fermilab SharePoint Training Page 13
2. Make updates and click “OK” to accept your changes.
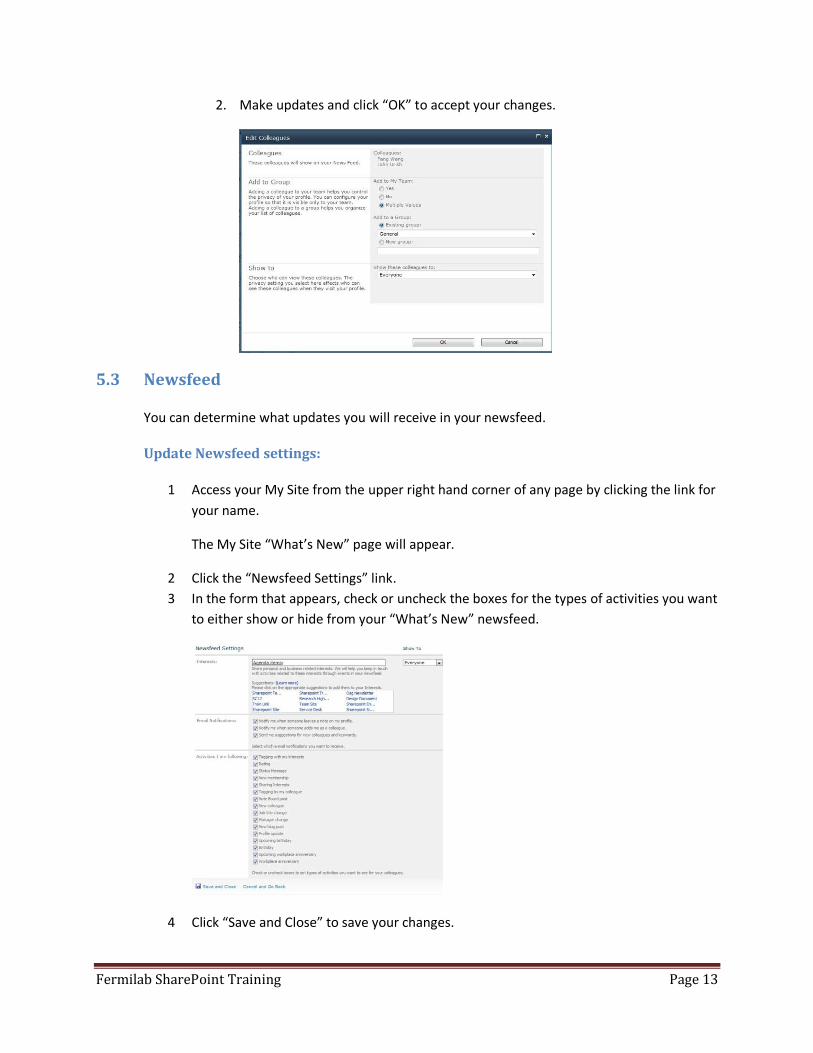
5.3 Newsfeed
You can determine what updates you will receive in your newsfeed.
Update Newsfeed settings:
1 Access your My Site from the upper right hand corner of any page by clicking the link for
your name.
The My Site “What’s New” page will appear.
2 Click the “Newsfeed Settings” link.
3 In the form that appears, check or uncheck the boxes for the types of activities you want
to either show or hide from your “What’s New” newsfeed.
4 Click “Save and Close” to save your changes.
Fermilab SharePoint Training Page 14
5.4 My Content
The My Content link points to your personal SharePoint team site.
Note: If you click this link for the first time, it may take several minutes for your new team site to
be set up.
Anyone with a Services Account and password can create a My Site team site. You can update
your My Site as you would any SharePoint team site. You can also create a sub-site of your main
team site to use as a production sandbox to test basic SharePoint features covered in training.
NOTE: For more complex testing, please test in the integration environment: https://intranet-
int.fnal.gov/Pages/Default.aspx
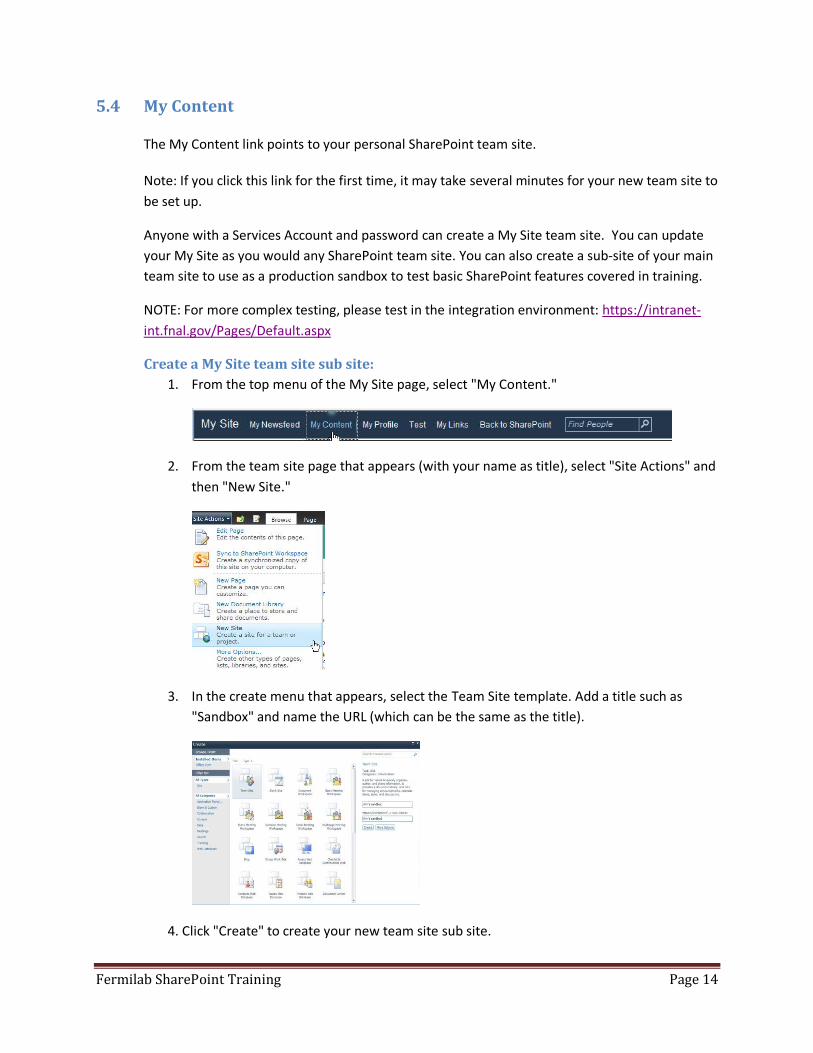
Create a My Site team site sub site:
1. From the top menu of the My Site page, select "My Content."
2. From the team site page that appears (with your name as title), select "Site Actions" and
then "New Site."
3. In the create menu that appears, select the Team Site template. Add a title such as
"Sandbox" and name the URL (which can be the same as the title).
4. Click "Create" to create your new team site sub site.
Fermilab SharePoint Training Page 15
Note: A link to your new sub site will appear automatically on the top menu of your team
site.
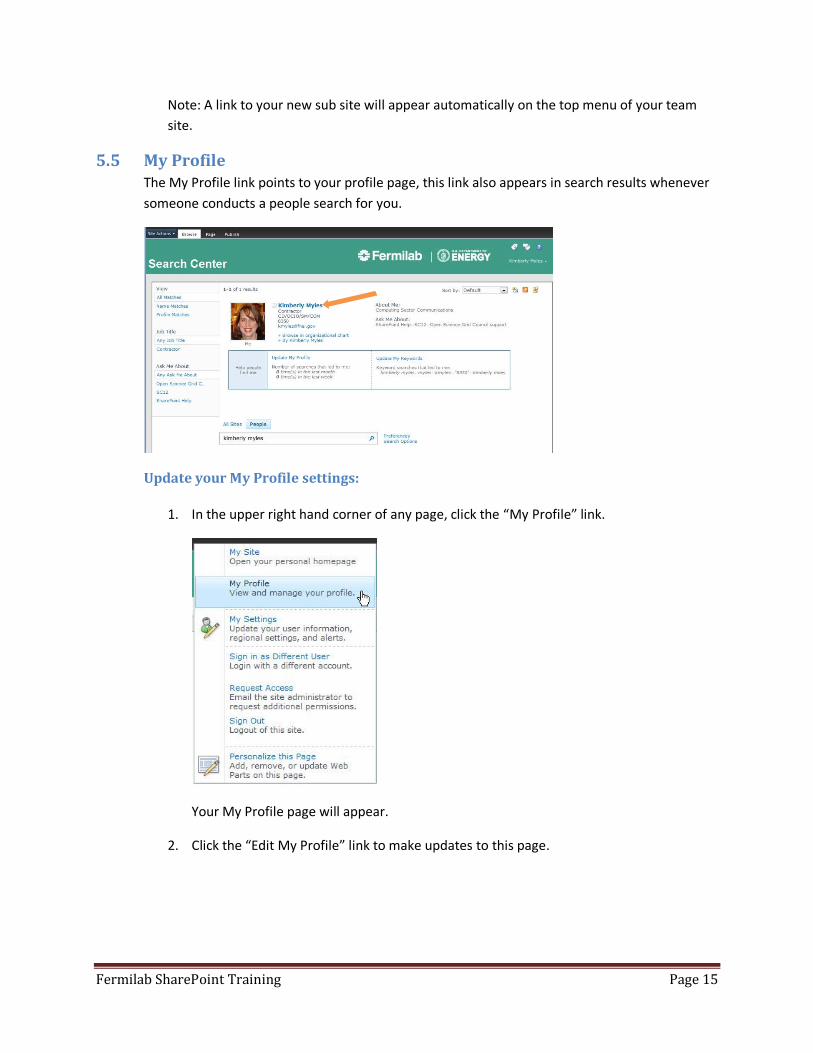
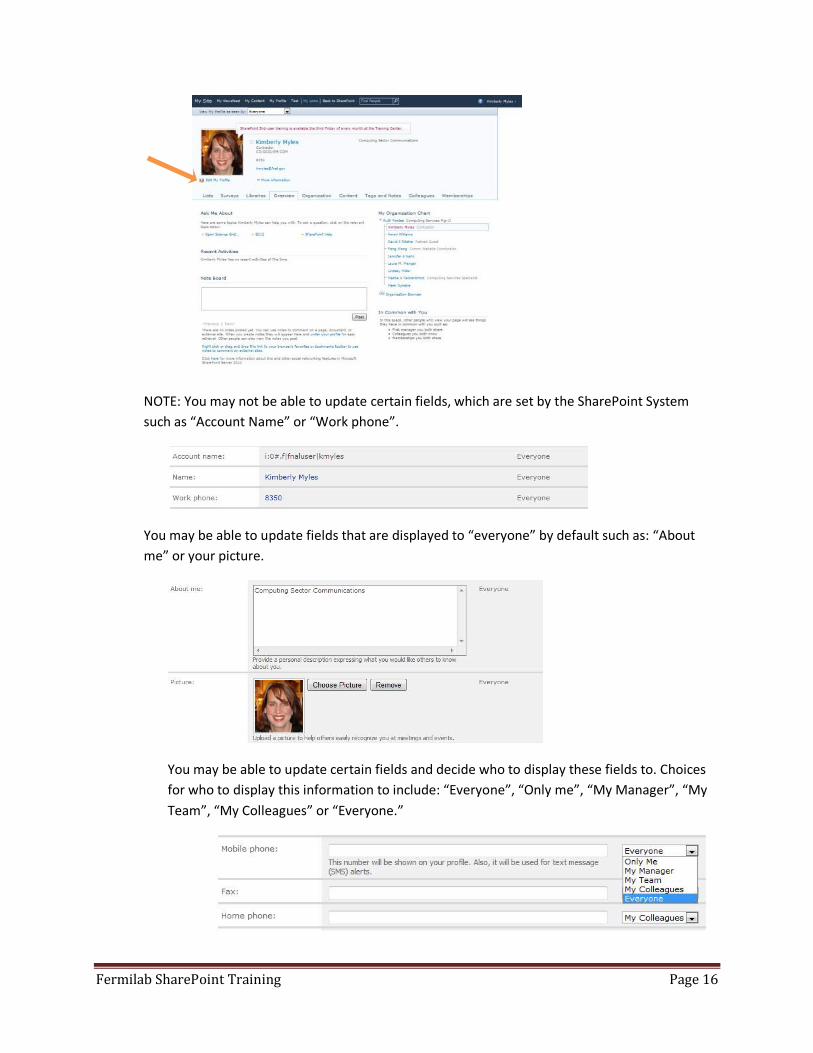
5.5 My Profile The My Profile link points to your profile page, this link also appears in search results whenever
someone conducts a people search for you.
Update your My Profile settings:
1. In the upper right hand corner of any page, click the “My Profile” link.
Your My Profile page will appear.
2. Click the “Edit My Profile” link to make updates to this page.
Fermilab SharePoint Training Page 16
NOTE: You may not be able to update certain fields, which are set by the SharePoint System
such as “Account Name” or “Work phone”.
You may be able to update fields that are displayed to “everyone” by default such as: “About
me” or your picture.
You may be able to update certain fields and decide who to display these fields to. Choices
for who to display this information to include: “Everyone”, “Only me”, “My Manager”, “My
Team”, “My Colleagues” or “Everyone.”
Fermilab SharePoint Training Page 17
My Profile Tabs:
On your My Profile page, there are a series of tabs that provide quick access to import
information such as an organization chart, things you’ve tagged or noted, or a list of the sites
you are a member of.
A summary of these tabs follows:
Tab Description Overview Displays your My Profile page.
Organization Displays an organization chart with your line management and colleagues
Content Displays content you have on your personal team site and on any group sites in SharePoint.
Tags and Notes Shows all of the tags and notes you have made throughout SharePoint.
Colleagues Shows colleagues you have selected. (You can maintain this list by adding or removing colleagues or making edits to colleague information.)
Memberships Shows all of the SharePoint sites that you have permission to access.
5.6 Adding Tags to content in SharePoint
You can use tags to flag documents and pages that you want to easily reference or that you
think others might find interesting.
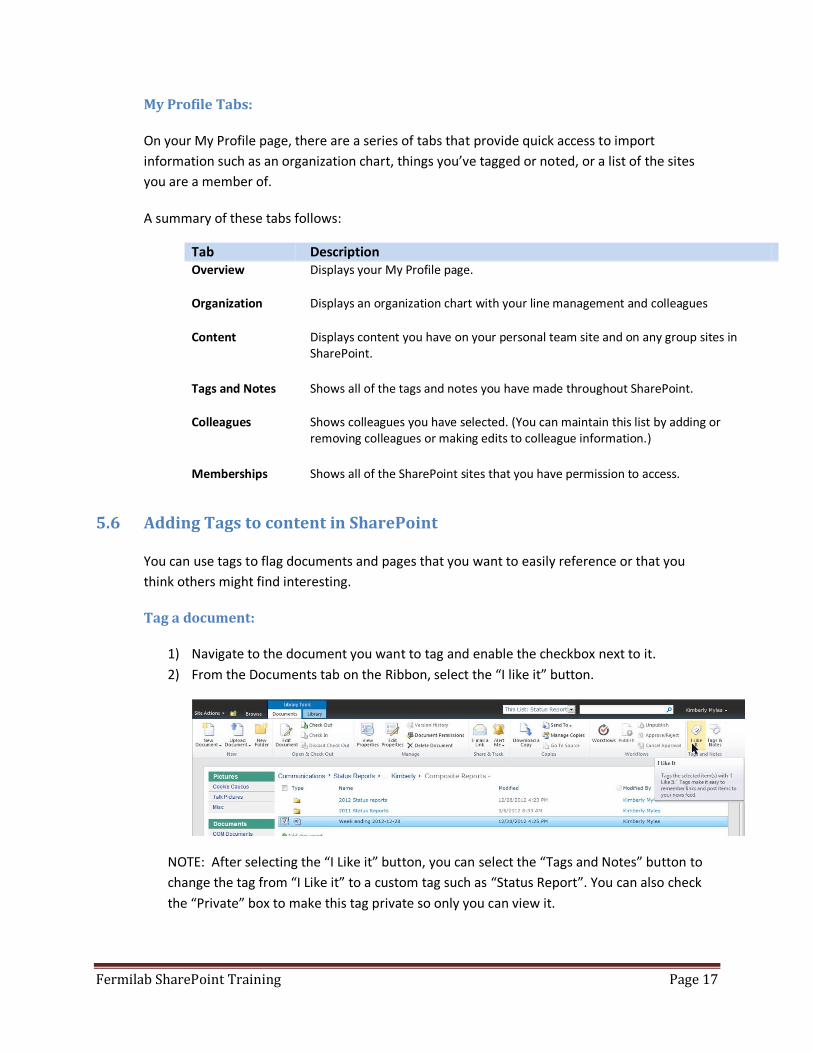
Tag a document:
1) Navigate to the document you want to tag and enable the checkbox next to it.
2) From the Documents tab on the Ribbon, select the “I like it” button.
NOTE: After selecting the “I Like it” button, you can select the “Tags and Notes” button to
change the tag from “I Like it” to a custom tag such as “Status Report”. You can also check
the “Private” box to make this tag private so only you can view it.
Fermilab SharePoint Training Page 18
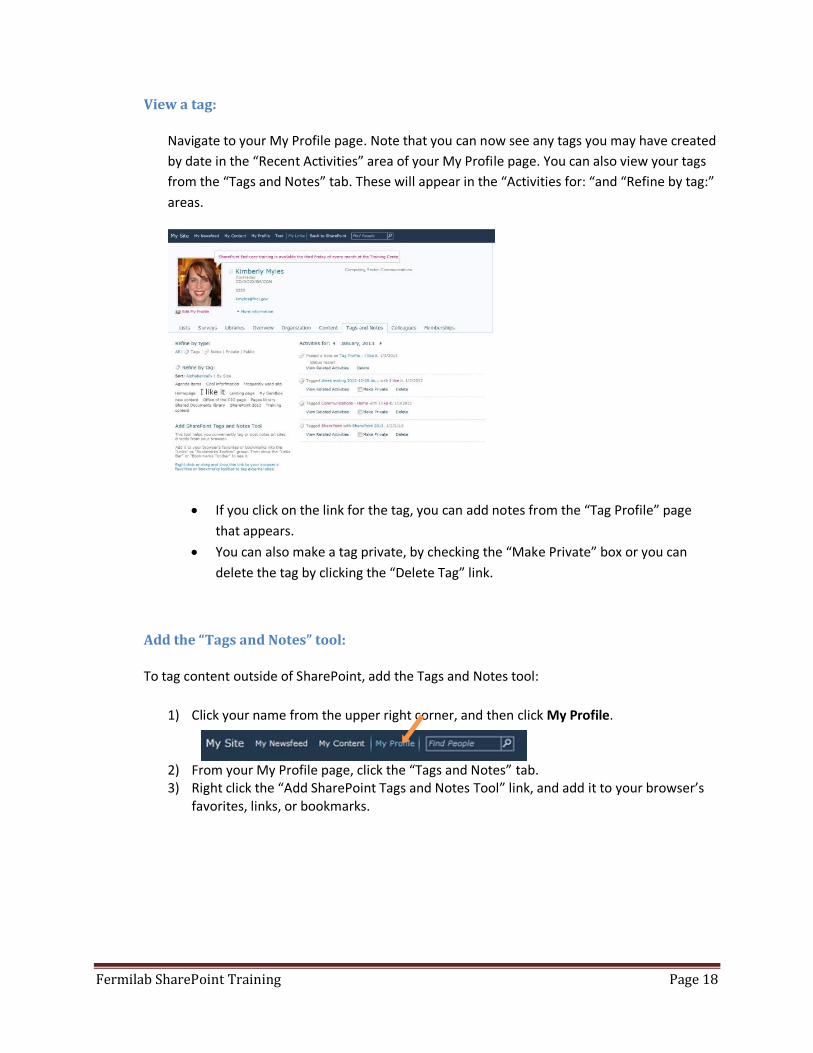
View a tag:
Navigate to your My Profile page. Note that you can now see any tags you may have created
by date in the “Recent Activities” area of your My Profile page. You can also view your tags
from the “Tags and Notes” tab. These will appear in the “Activities for: “and “Refine by tag:”
areas.
If you click on the link for the tag, you can add notes from the “Tag Profile” page
that appears.
You can also make a tag private, by checking the “Make Private” box or you can
delete the tag by clicking the “Delete Tag” link.
Add the “Tags and Notes” tool:
To tag content outside of SharePoint, add the Tags and Notes tool:
1) Click your name from the upper right corner, and then click My Profile.
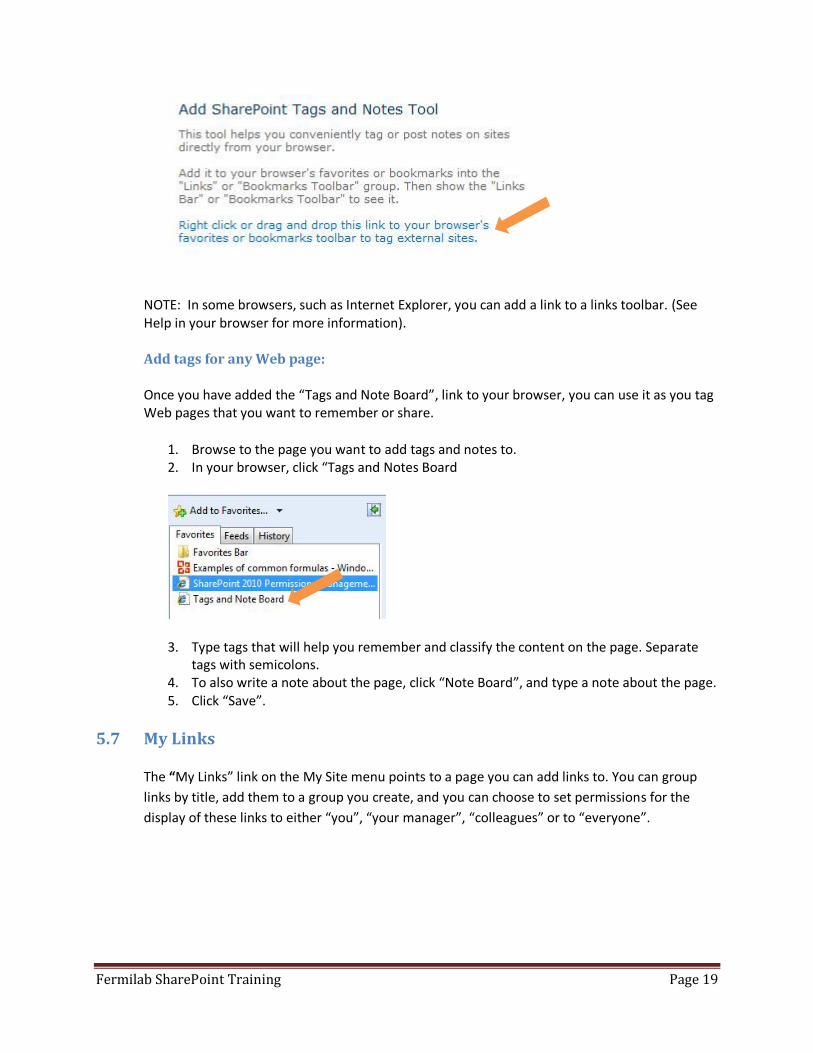
2) From your My Profile page, click the “Tags and Notes” tab. 3) Right click the “Add SharePoint Tags and Notes Tool” link, and add it to your browser’s
favorites, links, or bookmarks.
Fermilab SharePoint Training Page 19
NOTE: In some browsers, such as Internet Explorer, you can add a link to a links toolbar. (See Help in your browser for more information).
Add tags for any Web page:
Once you have added the “Tags and Note Board”, link to your browser, you can use it as you tag Web pages that you want to remember or share.
1. Browse to the page you want to add tags and notes to. 2. In your browser, click “Tags and Notes Board
3. Type tags that will help you remember and classify the content on the page. Separate tags with semicolons.
4. To also write a note about the page, click “Note Board”, and type a note about the page. 5. Click “Save”.
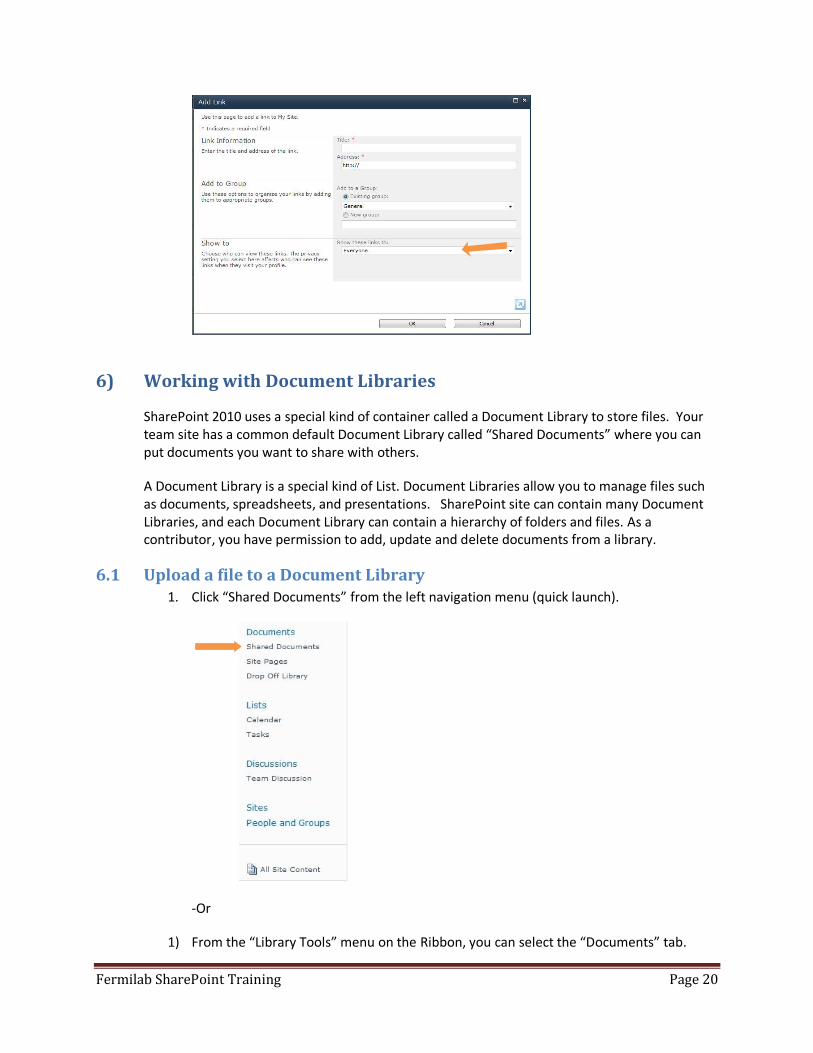
5.7 My Links
The “My Links” link on the My Site menu points to a page you can add links to. You can group
links by title, add them to a group you create, and you can choose to set permissions for the
display of these links to either “you”, “your manager”, “colleagues” or to “everyone”.
Fermilab SharePoint Training Page 20
6) Working with Document Libraries
SharePoint 2010 uses a special kind of container called a Document Library to store files. Your team site has a common default Document Library called “Shared Documents” where you can put documents you want to share with others.
A Document Library is a special kind of List. Document Libraries allow you to manage files such as documents, spreadsheets, and presentations. SharePoint site can contain many Document Libraries, and each Document Library can contain a hierarchy of folders and files. As a contributor, you have permission to add, update and delete documents from a library.
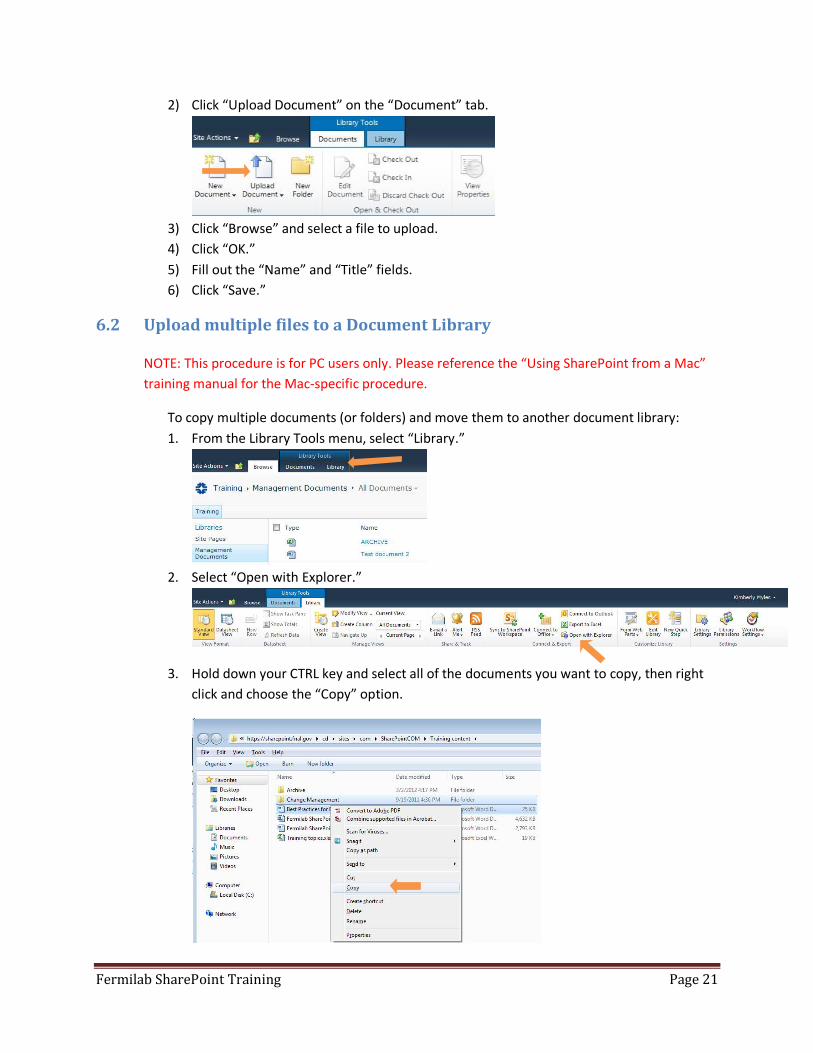
6.1 Upload a file to a Document Library 1. Click “Shared Documents” from the left navigation menu (quick launch).
-Or
1) From the “Library Tools” menu on the Ribbon, you can select the “Documents” tab.
Fermilab SharePoint Training Page 21
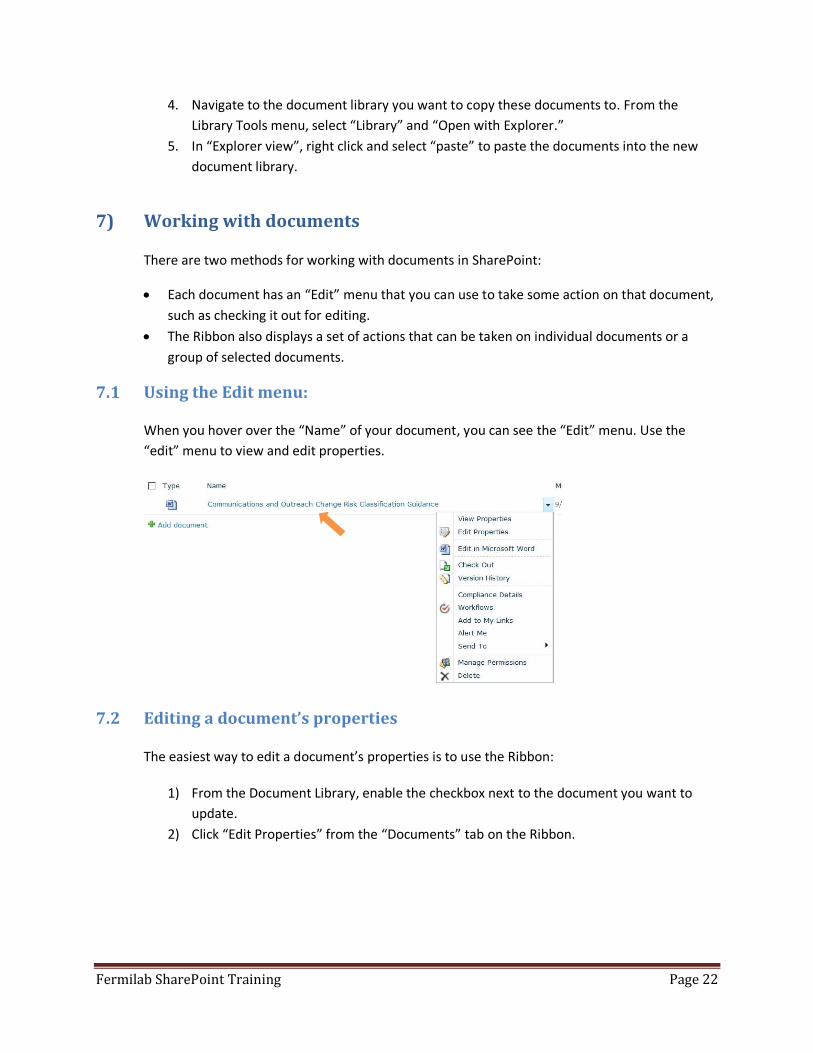
2) Click “Upload Document” on the “Document” tab.
3) Click “Browse” and select a file to upload.
4) Click “OK.”
5) Fill out the “Name” and “Title” fields.
6) Click “Save.”
6.2 Upload multiple files to a Document Library
NOTE: This procedure is for PC users only. Please reference the “Using SharePoint from a Mac”
training manual for the Mac-specific procedure.
To copy multiple documents (or folders) and move them to another document library:
1. From the Library Tools menu, select “Library.”
2. Select “Open with Explorer.”
3. Hold down your CTRL key and select all of the documents you want to copy, then right
click and choose the “Copy” option.
Fermilab SharePoint Training Page 22
4. Navigate to the document library you want to copy these documents to. From the
Library Tools menu, select “Library” and “Open with Explorer.”
5. In “Explorer view”, right click and select “paste” to paste the documents into the new
document library.
7) Working with documents
There are two methods for working with documents in SharePoint:
Each document has an “Edit” menu that you can use to take some action on that document,
such as checking it out for editing.
The Ribbon also displays a set of actions that can be taken on individual documents or a
group of selected documents.
7.1 Using the Edit menu:
When you hover over the “Name” of your document, you can see the “Edit” menu. Use the
“edit” menu to view and edit properties.
7.2 Editing a document’s properties
The easiest way to edit a document’s properties is to use the Ribbon:
1) From the Document Library, enable the checkbox next to the document you want to
update.
2) Click “Edit Properties” from the “Documents” tab on the Ribbon.
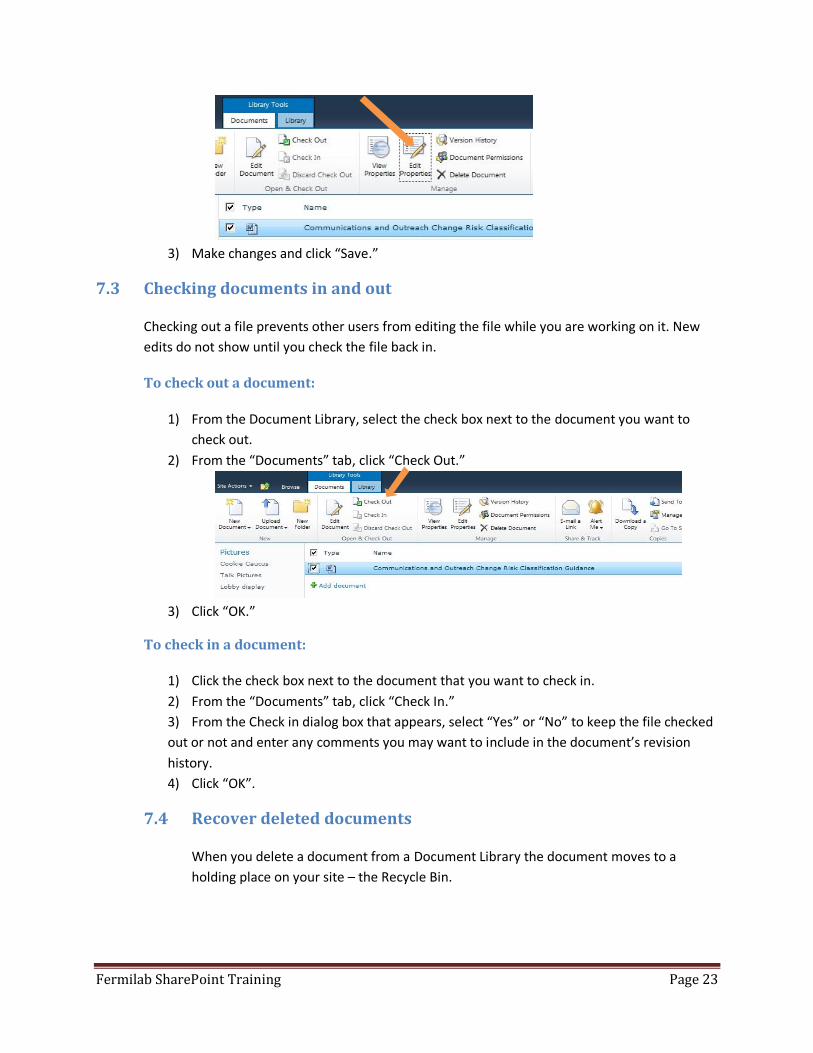
Fermilab SharePoint Training Page 23
3) Make changes and click “Save.”
7.3 Checking documents in and out
Checking out a file prevents other users from editing the file while you are working on it. New
edits do not show until you check the file back in.
To check out a document:
1) From the Document Library, select the check box next to the document you want to
check out.
2) From the “Documents” tab, click “Check Out.”
3) Click “OK.”
To check in a document:
1) Click the check box next to the document that you want to check in.
2) From the “Documents” tab, click “Check In.”
3) From the Check in dialog box that appears, select “Yes” or “No” to keep the file checked
out or not and enter any comments you may want to include in the document’s revision
history.
4) Click “OK”.
7.4 Recover deleted documents
When you delete a document from a Document Library the document moves to a
holding place on your site – the Recycle Bin.
Fermilab SharePoint Training Page 24
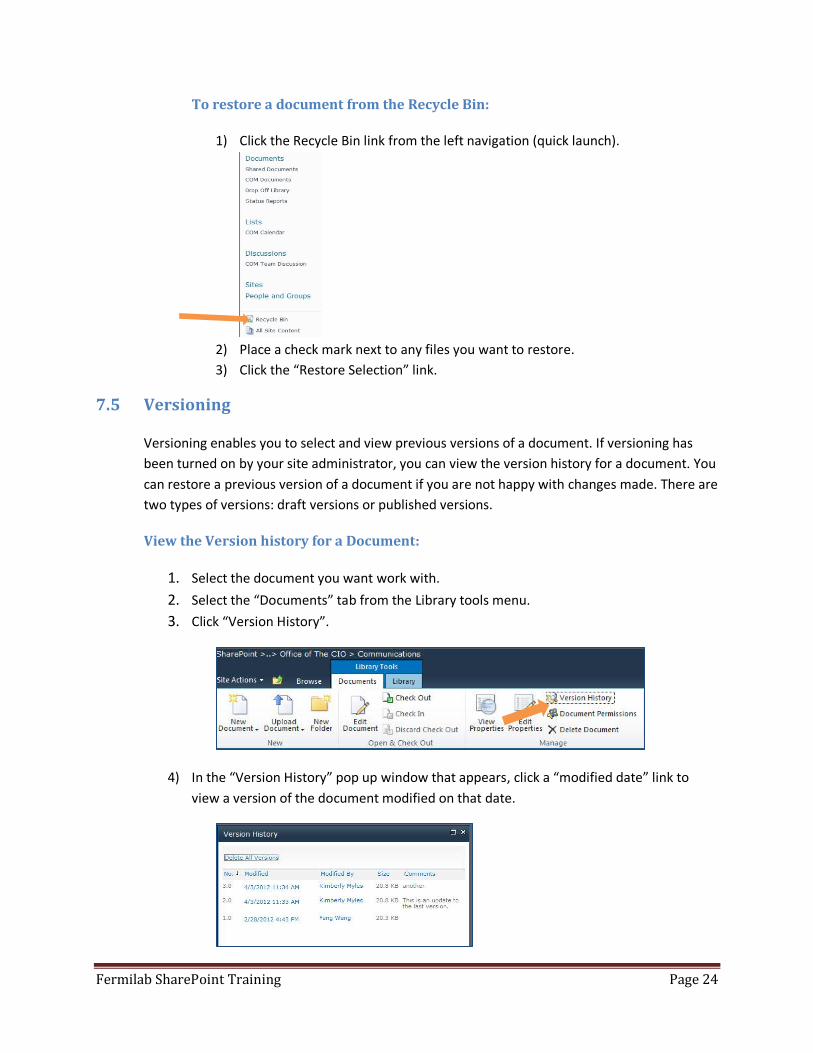
To restore a document from the Recycle Bin:
1) Click the Recycle Bin link from the left navigation (quick launch).
2) Place a check mark next to any files you want to restore.
3) Click the “Restore Selection” link.
7.5 Versioning
Versioning enables you to select and view previous versions of a document. If versioning has
been turned on by your site administrator, you can view the version history for a document. You
can restore a previous version of a document if you are not happy with changes made. There are
two types of versions: draft versions or published versions.
View the Version history for a Document:
1. Select the document you want work with.
2. Select the “Documents” tab from the Library tools menu.
3. Click “Version History”.
4) In the “Version History” pop up window that appears, click a “modified date” link to
view a version of the document modified on that date.
Fermilab SharePoint Training Page 25
Restore an earlier version of a Document:
1) From the “Version History” pop up window, select the version you want to restore by
clicking on the date from the “Modified” column.
2) From the menu that appears, click “Restore” to restore that version.
3) When prompted to confirm that you want to replace the current version of the file with
the previous version, click “OK”.
7.6 Sending a link to a document by e-mail
To share your documents with others, they need to know where to find the document. You can
do this by sending them a direct link to the document itself.
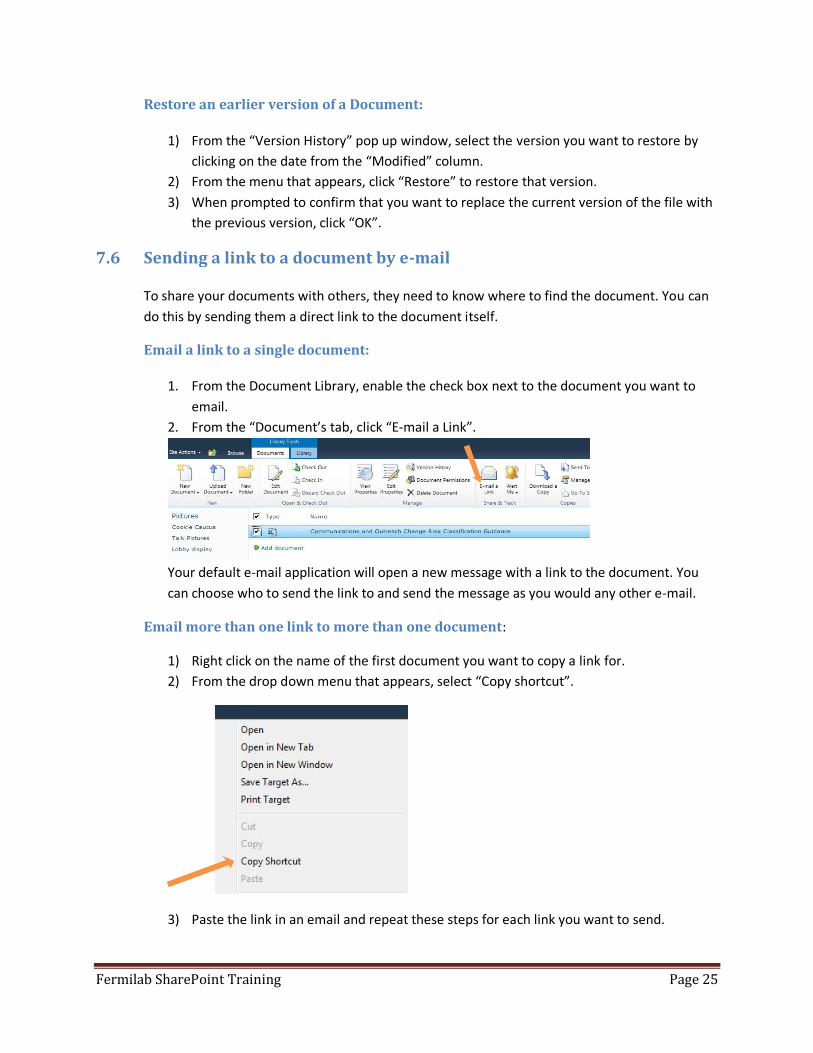
Email a link to a single document:
1. From the Document Library, enable the check box next to the document you want to
email.
2. From the “Document’s tab, click “E-mail a Link”.
Your default e-mail application will open a new message with a link to the document. You
can choose who to send the link to and send the message as you would any other e-mail.
Email more than one link to more than one document:
1) Right click on the name of the first document you want to copy a link for.
2) From the drop down menu that appears, select “Copy shortcut”.
3) Paste the link in an email and repeat these steps for each link you want to send.
Fermilab SharePoint Training Page 26
7.7 Create alerts
Alerts are a great way to keep track of the changes your teammates make to
documents.
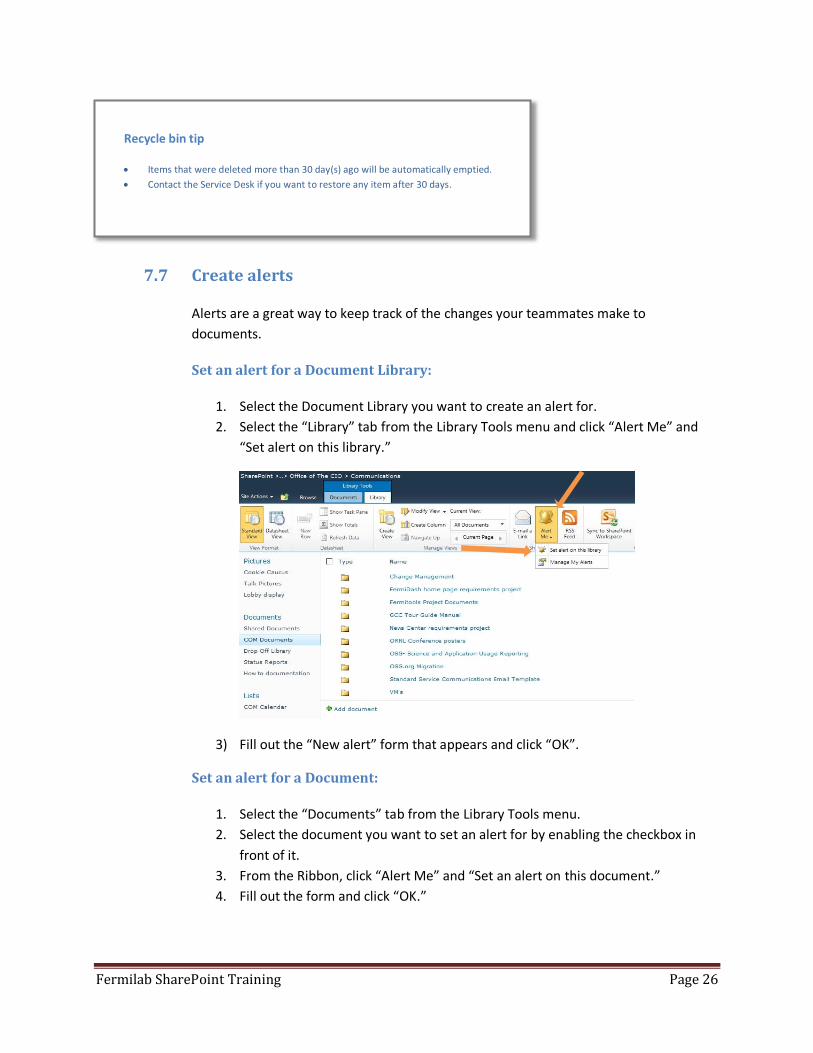
Set an alert for a Document Library:
1. Select the Document Library you want to create an alert for.
2. Select the “Library” tab from the Library Tools menu and click “Alert Me” and
“Set alert on this library.”
3) Fill out the “New alert” form that appears and click “OK”.
Set an alert for a Document:
1. Select the “Documents” tab from the Library Tools menu.
2. Select the document you want to set an alert for by enabling the checkbox in
front of it.
3. From the Ribbon, click “Alert Me” and “Set an alert on this document.”
4. Fill out the form and click “OK.”
Recycle bin tip
Items that were deleted more than 30 day(s) ago will be automatically emptied.
Contact the Service Desk if you want to restore any item after 30 days.
Fermilab SharePoint Training Page 27
Set an alert for a Page:
1. Navigate to the page you want to set an alert for.
2. Click the “Page” tab.
3. From the Ribbon, click “Alert Me” and “Set an alert on this page.”
4. Fill out the form and click “OK.”
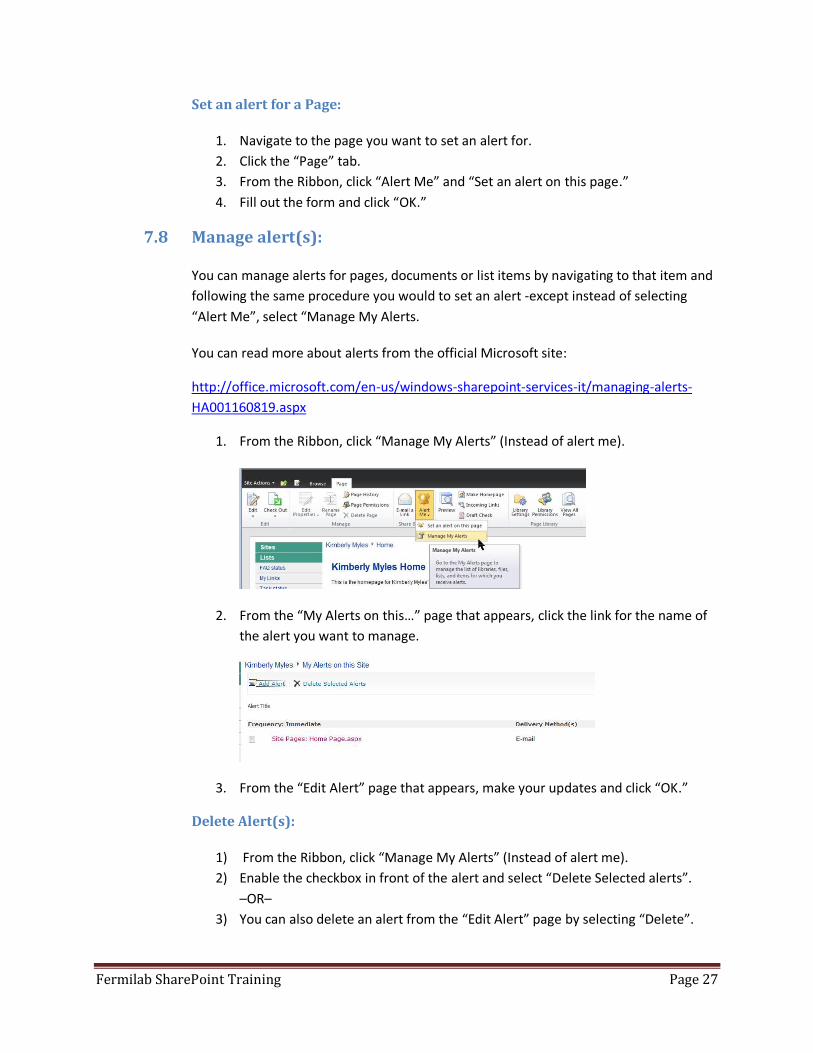
7.8 Manage alert(s):
You can manage alerts for pages, documents or list items by navigating to that item and
following the same procedure you would to set an alert -except instead of selecting
“Alert Me”, select “Manage My Alerts.
You can read more about alerts from the official Microsoft site:
http://office.microsoft.com/en-us/windows-sharepoint-services-it/managing-alerts-
HA001160819.aspx
1. From the Ribbon, click “Manage My Alerts” (Instead of alert me).
2. From the “My Alerts on this…” page that appears, click the link for the name of
the alert you want to manage.
3. From the “Edit Alert” page that appears, make your updates and click “OK.”
Delete Alert(s):
1) From the Ribbon, click “Manage My Alerts” (Instead of alert me).
2) Enable the checkbox in front of the alert and select “Delete Selected alerts”.
–OR–
3) You can also delete an alert from the “Edit Alert” page by selecting “Delete”.
Fermilab SharePoint Training Page 28
8) Working with Lists
SharePoint 2010 provides many kinds of Lists that you can use to track information. A List is
similar to an Excel spreadsheet or a table in a database.
In a List, data is gathered in rows, and each row is known as a List Item. A List can have multiple
columns. A List Item is a row with data in those columns.
For example, a List of Fermilab contacts may have the following columns:
First Name
Last name
Fermilab ID
Organization
Phone
SharePoint provides three basic kinds of Lists:
1. Communication Lists are used to track announcements, contacts, and discussion
boards.
2. Tracking Lists are used to track information such as links, calendars, tasks, issues and
surveys.
3. Custom Lists provide a starting template that you can build on to create a List with the
exact columns you need.
8.1 Use the Ribbon to manage Lists
All SharePoint Lists display the Ribbon at the top of the List. You can use the Ribbon to
access the common tasks used for working with Lists.
The menu commands you see in the Ribbon depend on the kind of List you are viewing.
The Ribbon usually displays List commands in one of two tabs:
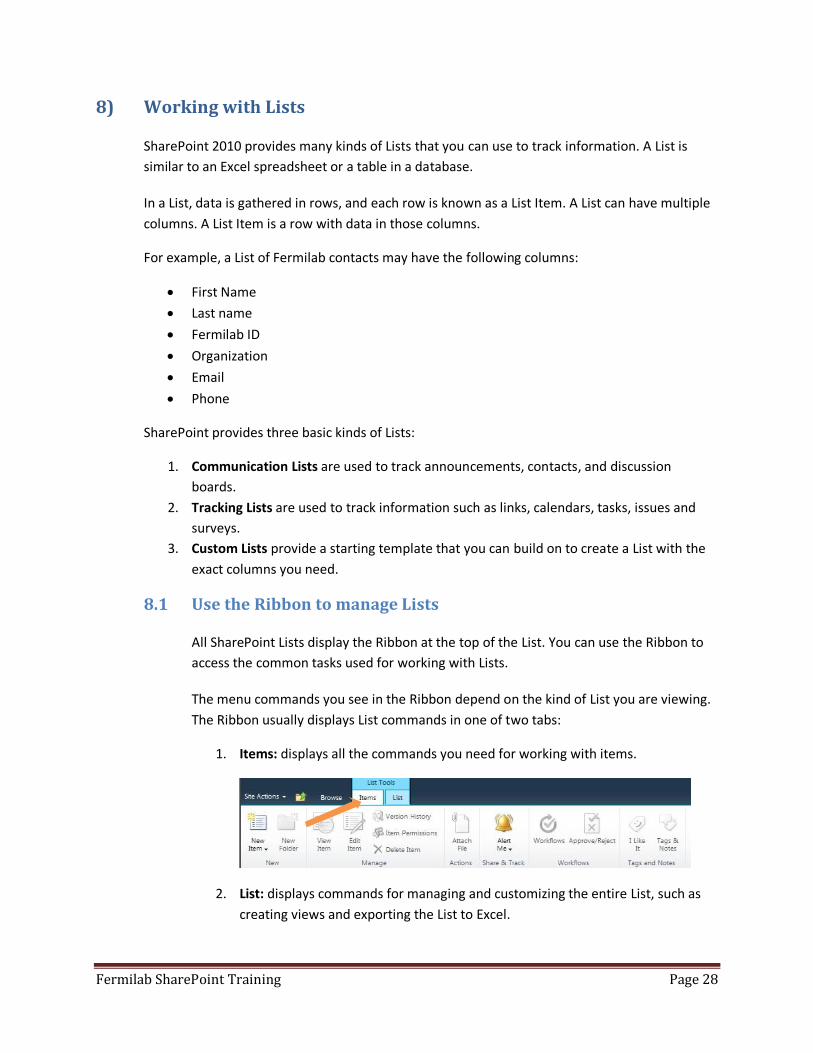
1. Items: displays all the commands you need for working with items.
2. List: displays commands for managing and customizing the entire List, such as
creating views and exporting the List to Excel.
Fermilab SharePoint Training Page 29
8.2 Create a column
As a contributor, you can create a column to capture more data in a list.
1) Select the List you want to work with.
2) Click the “List” tab from the Ribbon.
3) Click “Create Column”.
4) Enter a name for the column.
5) Select the type of information you want to store in the column.
6) Click “OK”.
8.3 Manage a List
Add a single list item:
1. Navigate to the list you want to work with.
2. Click “Add new item.”
3. From the form that appears, make updates and click “Save.”.
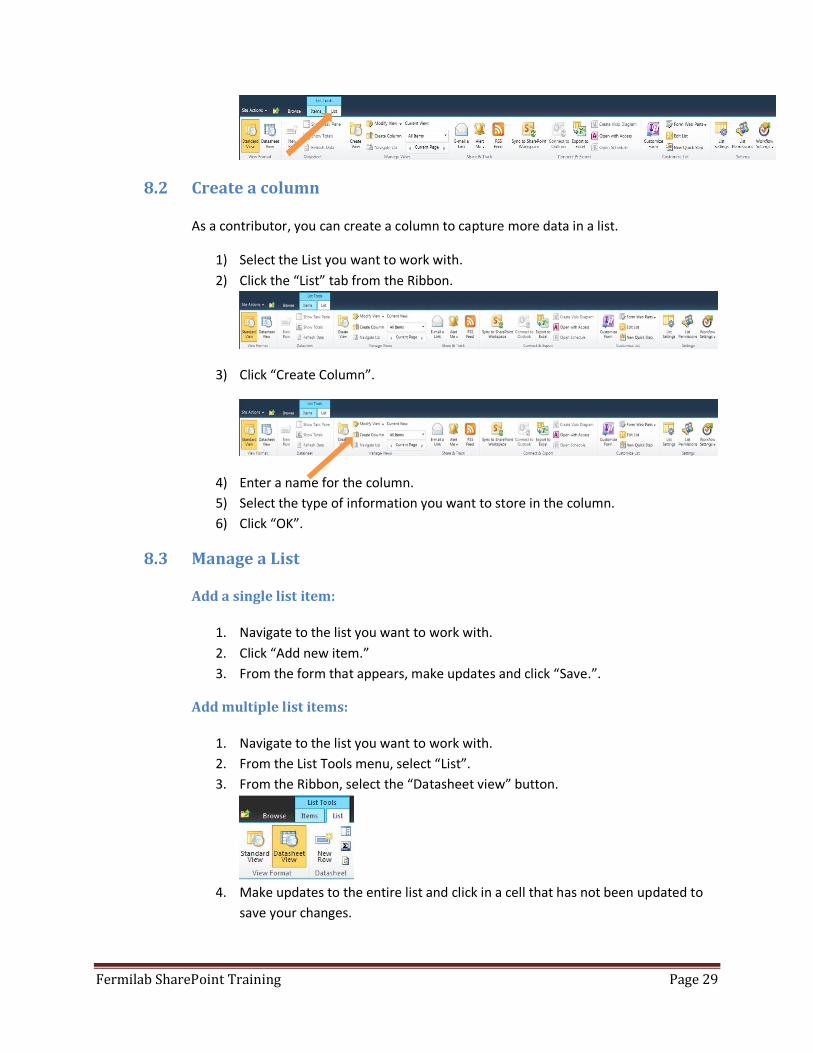
Add multiple list items:
1. Navigate to the list you want to work with.
2. From the List Tools menu, select “List”.
3. From the Ribbon, select the “Datasheet view” button.
4. Make updates to the entire list and click in a cell that has not been updated to
save your changes.
Fermilab SharePoint Training Page 30
5. From the Ribbon, select the “Standard View” button to get out of Datasheet
view.
8.3 Add calendar items
A default calendar is provided to track events. Contributors can add, update or delete
events and set an alert so that a reminder is sent for an event.
Add an Event:
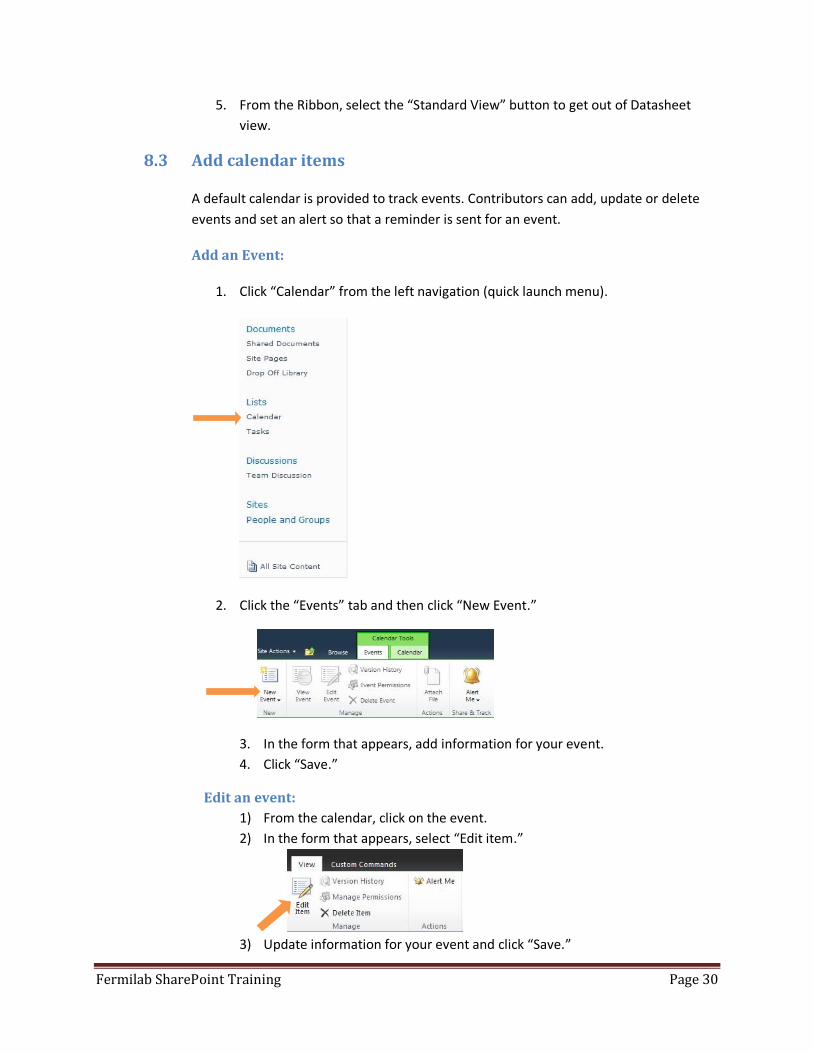
1. Click “Calendar” from the left navigation (quick launch menu).
2. Click the “Events” tab and then click “New Event.”
3. In the form that appears, add information for your event.
4. Click “Save.”
Edit an event:
1) From the calendar, click on the event.
2) In the form that appears, select “Edit item.”
3) Update information for your event and click “Save.”
Fermilab SharePoint Training Page 31
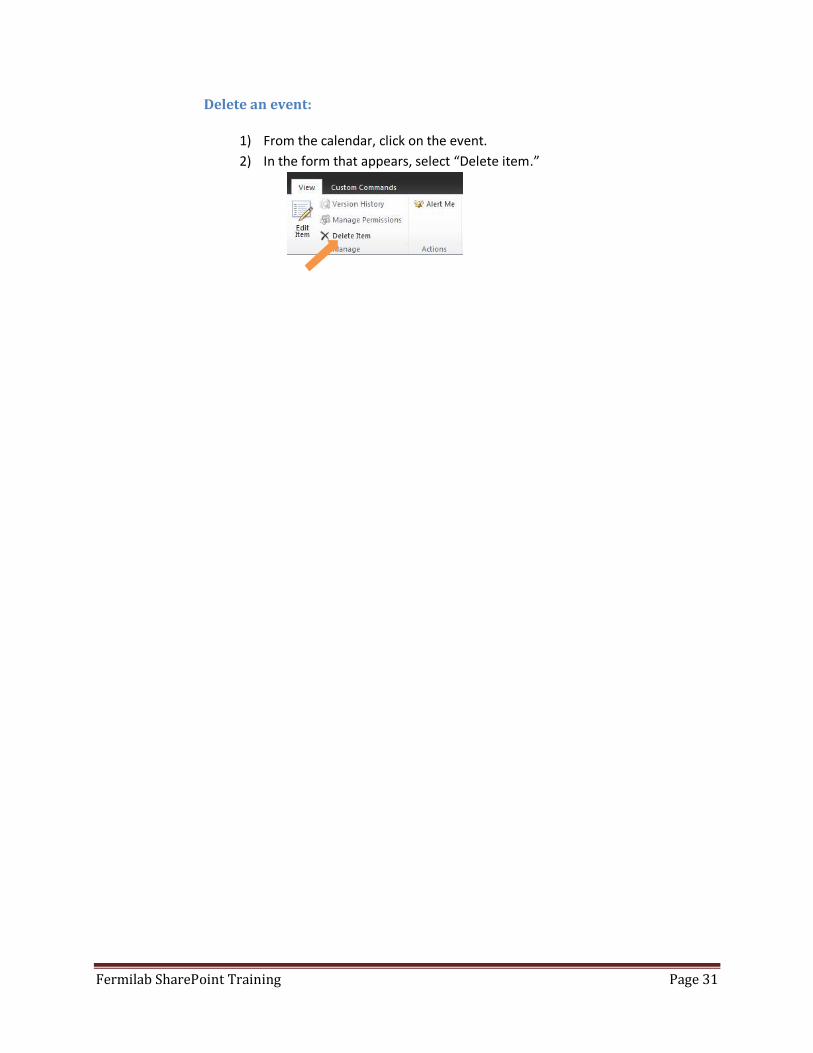
Delete an event:
1) From the calendar, click on the event.
2) In the form that appears, select “Delete item.”